• Home
  • Recipe Index
    • Desserts
    • Dinner
    • Appetizer
    • Drinks
  • About
  • Contact
  • Privacy Policy
menu icon
go to homepage
  • Home
  • Recipe Index
    • Desserts
    • Dinner
    • Appetizer
    • Drinks
  • About
  • Contact
  • Privacy Policy

search icon
Homepage link
  • Home
  • Recipe Index
    • Desserts
    • Dinner
    • Appetizer
    • Drinks
  • About
  • Contact
  • Privacy Policy

×
Taling

Taling

Chef Taling is the creator and culinary voice behind Taling’s Recipes, an online hub where she turns her lifelong love of food into step-by-step dishes home cooks can trust.

Her journey began in her grandmother’s kitchen, soaking up the aromas of spices and the joy of shared meals an experience that sparked a passion for exploring global flavors and recreating them for friends, family, and now a worldwide audience.

  • - 1 ½ cups all-purpose flour This is the base of your loaf. It gives structure. - 1 teaspoon baking powder This helps the loaf rise. It makes it light. - ½ teaspoon baking soda This works with the yogurt to create fluffiness. - ¼ teaspoon salt Salt enhances flavors. It balances the sweetness. - ⅓ cup unsalted butter, softened Butter adds richness and moisture to the loaf. - 1 cup granulated sugar Sugar sweetens the loaf and helps it brown. - 2 large eggs Eggs provide structure and moisture. They bind everything. - 1 teaspoon vanilla extract Vanilla adds depth to the flavor. It complements the lemon. - ½ cup plain yogurt (or sour cream) Yogurt keeps the loaf moist and adds tang. - Zest of 1 large lemon Lemon zest gives a bright, fresh flavor. It boosts the lemon taste. - 2 tablespoons fresh lemon juice The juice adds a tartness that lifts the flavors. - 1 ½ cups fresh blueberries (or frozen, if unavailable) Blueberries add sweetness and tartness. They make the loaf fruity. Each ingredient plays a role in making your loaf tasty and moist. The flour and eggs give structure. Butter and yogurt add moisture. Baking powder and soda help it rise. The blueberries and lemon bring freshness. You can swap yogurt for sour cream. If you need gluten-free, try a gluten-free flour blend. You can also use coconut oil instead of butter for a dairy-free version. Choose blueberries that are firm, plump, and deep blue. Avoid any with wrinkles or mold. For lemons, pick ones that feel heavy and have a smooth skin. The zest from fresh lemons is key to flavor. Proper preparation is key to a great loaf. Start by preheating your oven to 350°F (175°C). This temperature gives the loaf a nice rise. Next, you need to prepare your pan. Greasing and flouring a 9x5-inch loaf pan helps the loaf release easily. You can also use parchment paper for easy removal. Just cut it to fit the bottom and sides of the pan. Start by mixing the butter and sugar. Use a large bowl and beat them together until light and fluffy. This takes about 3-4 minutes. It is important because it adds air to the batter. Next, add the eggs one at a time. Mix well after each egg. This helps to bind the ingredients together. After that, stir in the vanilla extract, lemon zest, and lemon juice. These add flavor and brightness to your loaf. Now comes the fun part—adding the blueberries! Gently fold them into the batter. Use a spatula and be careful not to break them. If you break the berries, they can burst and make the batter watery. To avoid this, handle them gently and mix just until incorporated. This way, you keep those lovely whole blueberries intact in your loaf. Importance of Oven Temperature Oven temperature is key to a great loaf. Always preheat your oven to 350°F (175°C). This helps the loaf rise evenly. If your oven runs hot or cold, it can change the baking time. Use an oven thermometer for accuracy. How to Know When the Loaf is Done To check if the loaf is done, insert a toothpick into the center. If it comes out clean, your loaf is ready. If it has wet batter on it, bake for a few more minutes. Keep an eye on the time, but trust your toothpick. Role of Yogurt/Sour Cream in the Recipe Yogurt or sour cream adds moisture to your loaf. They also make the texture soft and fluffy. This helps balance the tartness of lemon with the sweetness of blueberries. If you want, you can use buttermilk as a substitute. Achieving the Desired Balance of Flavors Balancing flavors is crucial. The bright lemon zest and juice bring a fresh taste. The blueberries add sweetness and color. Taste your batter before baking, but remember, it will taste different when baked. Adjust the lemon or sugar if you want a stronger flavor. Decorating and Garnishing Your Loaf A beautiful loaf looks inviting. After it cools, dust the top with powdered sugar. Add fresh blueberries and lemon slices for color. You can also drizzle a simple lemon glaze on top for a sweet touch. Serving Suggestions for Special Occasions Serve your loaf on a nice plate for gatherings. Pair it with tea or coffee for a cozy feel. For brunch, slice it up and display it with fruit or whipped cream. This will make your blueberry lemon loaf a star at any event! {{image_2}} You can mix in other berries for fun twists. Strawberries, raspberries, or blackberries work well. Each berry adds a different flavor. You can also try seasonal fruits. Peaches and cherries taste great in summer. Apples and pears give a cozy touch in fall. Add spices or nuts to boost flavor. Consider cinnamon or nutmeg for warmth. Chopped walnuts or almonds add crunch. You can also swap lemon zest. Try orange or lime for a new taste. Each zest brings its own unique aroma. To make this loaf gluten-free, use a 1:1 gluten-free flour blend. This keeps the texture light. For a vegan option, substitute eggs with flax eggs. Mix one tablespoon of flaxseed meal with two and a half tablespoons of water. Let it sit until it thickens. Use plant-based yogurt instead of regular yogurt for a creamy texture. To keep your loaf fresh, wrap it tightly in plastic wrap. This traps moisture and keeps it soft. You can also place it in an airtight container. Make sure it cools completely before wrapping. This prevents sogginess. Store it at room temperature for up to 3 days. If you want it to last longer, consider freezing. To freeze your loaf, let it cool completely. Then, wrap it in plastic wrap and foil. This double layer protects it from frost. You can freeze it for up to 3 months. When you want to eat it, remove it from the freezer. Thaw it in the fridge overnight. If you need it fast, leave it on the counter for a few hours. For reheating, the best method is to use an oven. Preheat it to 350°F (175°C). Place the loaf in the oven for about 10-15 minutes. This warms it up and keeps the texture nice. Avoid using a microwave, as it can make the loaf soggy. Enjoy your slice warm, with a little butter if you like! How can I tell if my loaf is done baking? You can check if your loaf is done by inserting a toothpick into the center. If it comes out clean, your loaf is ready. This usually takes about 50 to 60 minutes in the oven. Can I use frozen blueberries instead of fresh? Yes, you can use frozen blueberries. They work well in this recipe. Just fold them in gently to avoid breaking them. What can I substitute for yogurt in this recipe? You can use sour cream as a substitute for yogurt. It will give your loaf a similar texture and flavor. Can I change the sugar content? Yes, you can reduce the sugar for a less sweet loaf. Start by cutting the sugar in half. You can always add a bit back if you want more sweetness. What happens if I skip the lemon zest or juice? If you skip the lemon zest or juice, your loaf will lose some of its bright flavor. Lemon adds a fresh taste that balances the sweetness of the blueberries. Why did my loaf sink in the middle? A loaf can sink if it has too much liquid or if it was underbaked. Make sure to measure ingredients carefully and check for doneness with a toothpick. How can I make sure the loaf rises properly? Make sure your baking powder and baking soda are fresh. Also, do not overmix the batter. Mix until just combined for the best rise. This blog post covers key steps to bake a delicious blueberry lemon loaf. We explored the right ingredients, helpful techniques, and storage tips. Remember, fresh blueberries and lemons make a big difference. Proper mixing and folding techniques yield great results. Consider variations to suit your taste, like adding different fruits or making it vegan. With the right care, your loaf will impress. Keep these tips in mind for future baking. Enjoy your tasty creations!
    Blueberry Lemon Loaf Bakery Style Easy and Delicious Recipe
  • - 4 large russet potatoes - 1/4 cup grated Parmesan cheese - 2 tablespoons olive oil - 1 teaspoon garlic powder - 1 teaspoon onion powder - 1/2 teaspoon smoked paprika - 1/2 teaspoon dried oregano - Salt and pepper to taste - Fresh parsley, chopped When I make Parmesan potato wedges, I want them crispy and flavorful. Start with fresh russet potatoes. They have the right starchiness for great texture. Wash and scrub them well. No dirt should remain. I slice each potato into about eight wedges. Aim for even sizes to cook them uniformly. Next, I use olive oil to coat the wedges. This helps the seasoning stick and promotes crispiness. I mix grated Parmesan cheese with garlic powder, onion powder, smoked paprika, dried oregano, salt, and pepper. This blend gives the wedges a tasty kick. I toss the potato wedges in the seasoning well. Each wedge should get a nice coating. Before cooking, I preheat my air fryer to 400°F (200°C). This step is key for crispiness. I arrange the wedges in a single layer. Avoid overcrowding. It ensures that each wedge cooks evenly. Cooking takes about 15-20 minutes. I shake the basket halfway through. The wedges will turn golden brown and crispy. For a fresh touch, I sprinkle chopped parsley on top before serving. It adds a pop of color and brightness. - Wash and scrub the potatoes. - Slice into wedges (about 8 wedges per potato). Start by giving your russet potatoes a good wash. This removes dirt and makes them clean. After that, slice each potato into about eight wedges. Aim for even sizes to help them cook well. - Toss potato wedges with olive oil. - Combine Parmesan and spices in a bowl. Next, put your potato wedges in a large bowl. Drizzle olive oil over them and toss until each wedge is coated. In a separate bowl, mix the grated Parmesan cheese with garlic powder, onion powder, smoked paprika, oregano, salt, and pepper. This blend gives the wedges a tasty kick. - Preheat the air fryer to 400°F (200°C). - Arrange wedges in a single layer. - Cook for 15-20 minutes, shaking halfway. Now, preheat your air fryer to 400°F (200°C). Once it’s ready, place the potato wedges in the fryer basket in a single layer. This helps them cook evenly and get crispy. Cook for 15-20 minutes, but remember to shake the basket halfway through. This step ensures all sides get that golden-brown color you want. To get those perfect crispy wedges, start with the right coating. Use enough olive oil so each wedge glistens. This helps the seasonings stick. Mix your Parmesan and spices well before adding to the wedges. Even coverage is key. Preheating the air fryer is also important. Set it to 400°F (200°C) before adding your wedges. This step ensures they cook evenly and get that nice crunch. These potato wedges shine when served with tasty dips. Creamy ranch and garlic aioli are my favorites. They add flavor and richness. For a fun touch, serve the wedges on a wooden platter. A white dish also makes the golden color pop. Garnish with fresh parsley before serving. It adds color and a fresh taste. You can customize the flavors of your wedges easily. Love heat? Add a pinch of cayenne pepper. Prefer something milder? Skip the smoked paprika. If you want a cheese alternative, try cheddar or nutritional yeast. Both can give a great flavor boost while keeping it dairy-free. {{image_2}} You can switch it up by using sweet potatoes. They add a natural sweetness and a vibrant color. Sweet potato wedges get crispy, too, and taste great with Parmesan. Another option is to try Yukon Gold potatoes. They are creamy and have a buttery taste. You can even mix different types of potatoes for more fun and flavor. To make your wedges unique, add herbs and spices. Fresh rosemary gives a nice touch. You can also sprinkle some chili powder for a bit of heat. If you want to change the cheese, try cheddar. It melts well and has a rich flavor. Nutritional yeast is a great choice for a vegan option. It adds a cheesy taste without dairy. If you don't have an air fryer, no worries! You can bake these wedges in the oven. Preheat your oven to 425°F (220°C) and spread the wedges on a baking sheet. Bake for 25-30 minutes, flipping halfway through. For a classic crispy taste, you can deep fry the wedges. Heat oil in a pot and fry them until golden. This method gives a crunchy texture, but it adds more oil. Choose what works best for you! To keep your Parmesan potato wedges fresh, store them in an airtight container. Place a piece of parchment paper in between the layers to absorb moisture. This helps keep them crispy. You can keep them in the fridge for up to three days. If you want to store them longer, freezing is a great option. Let the wedges cool completely. Then, spread them in a single layer on a baking sheet. Freeze until solid, then transfer to a freezer bag. This way, they can last for up to three months. To re-crisp your wedges, use the air fryer. Preheat the air fryer to 400°F (200°C). Place the wedges in a single layer and heat for about 5 to 7 minutes. This method keeps them crispy and delicious. You can also use the microwave, but that may make them soft. If you choose the oven, preheat it to 400°F (200°C) and heat the wedges for about 10 minutes. This helps maintain some crunch. When stored correctly, your Parmesan potato wedges can stay fresh for up to three days in the fridge. Check for signs of spoilage, like an off smell or a mushy texture. If they look or smell bad, it’s best to toss them. Keeping an eye on freshness ensures you get the best taste every time you enjoy them. To achieve crispy potato wedges, follow these tips: - Cut the potatoes evenly into wedges for uniform cooking. - Coat them well with olive oil; this helps with crispiness. - Use a mix of Parmesan and spices to enhance the crunch. - Preheat your air fryer before cooking; this gives a better texture. - Cook in a single layer; overcrowding can make them soggy. Yes, you can use different cheeses. Here are some options: - Cheddar gives a sharp flavor. - Gouda adds a creamy, smoky taste. - Nutritional yeast is great for a vegan option. Each cheese alters the flavor, so choose based on your taste. Cooking potato wedges in an air fryer takes about 15-20 minutes. - Preheat your air fryer to 400°F (200°C). - Cook the wedges for 15-20 minutes, shaking halfway. - They should be golden brown and crispy when done. Soaking potatoes before cooking is not required but has benefits. - Soaking helps remove extra starch, leading to crispier wedges. - If you're short on time, you can skip this step. - Direct frying works, but soaking can enhance the final texture. This post shared how to make crispy and tasty potato wedges in an air fryer. We covered the key ingredients, step-by-step cooking methods, and tips to customize flavors. Remember, you can adjust seasonings and try different potatoes to suit your taste. Storing and reheating leftovers was also discussed for easy enjoyment later. Now, you have the tools to create great wedges anytime. Enjoy your cooking and discovering new flavors!
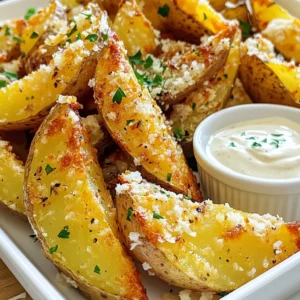
    Parmesan Potato Wedges Air Fryer Easy Crispy Snack
  • To make pumpkin cream cheese danish, you need a few key items. Here’s the list: - 1 sheet of puff pastry, thawed - 8 oz cream cheese, softened - 1/2 cup pumpkin puree (canned or fresh) - 1/4 cup granulated sugar - 1 teaspoon vanilla extract - 1 teaspoon pumpkin pie spice - 1 egg, beaten (for egg wash) - 1 tablespoon confectioners' sugar (for dusting) These simple ingredients come together to create a rich and creamy filling. The puff pastry adds a flaky and buttery texture, making each bite a delight. You will need a few basic tools to make these danishes. Gather these items: - Baking sheet - Parchment paper - Rolling pin - Medium mixing bowl - Measuring cups and spoons - Pastry brush - Knife or pizza cutter Having these tools ready will make your process smooth and easy. Feel free to customize your danish with some optional ingredients. Here are some tasty ideas: - Chopped nuts, like walnuts or pecans, for crunch - Chocolate chips for a sweet twist - Cream cheese frosting for a richer topping - A pinch of salt to enhance the flavors These little changes can make your danish even more special. Mix and match to find your favorite! First, preheat your oven to 400°F (200°C). This step is key for a nice bake. Line a baking sheet with parchment paper to prevent sticking. Next, roll out the thawed puff pastry on a floured surface. Aim for about 1/8-inch thick. Cut the pastry into rectangles, about 4x6 inches. In a medium bowl, mix the softened cream cheese and pumpkin puree. Add 1/4 cup of granulated sugar, 1 teaspoon of vanilla extract, and 1 teaspoon of pumpkin pie spice. Stir until the mixture is smooth. It should smell amazing! Place a generous spoonful of the pumpkin cream cheese mixture in the center of each pastry rectangle. Fold the edges over the filling. Pinch to seal and make a small pocket. You can also fold the pastry into a triangle shape. Brush the tops with the beaten egg for a golden finish. Now, bake in your preheated oven for 15 to 18 minutes. Look for a puffed and golden brown color. Once done, let the danishes cool slightly. Dust them with confectioners' sugar before serving to add a sweet touch. Use fresh cream cheese for a smooth mixture. It helps the filling taste rich and creamy. Ensure your puff pastry is well-thawed for easy rolling. If you want a flaky texture, avoid overworking the dough. Serve these danishes warm for the best flavor. They make a fantastic breakfast or snack! To get the best puff pastry, start with a good quality sheet. Thaw it in the fridge to keep it cold. Roll it out gently on a floured surface. Aim for about 1/8-inch thick. This thickness helps it puff nicely. Cut the pastry into rectangles, about 4x6 inches. This size holds the filling well without spilling. Make sure your oven is at 400°F (200°C) before baking. Preheating helps the pastry rise quickly. When you bake, space the danishes apart on the baking sheet. This allows hot air to circulate. Watch for a golden brown color. This means they are done! The cream cheese mixture is key to this treat. Start with softened cream cheese. It mixes better and becomes smooth. Add pumpkin puree, granulated sugar, vanilla extract, and pumpkin pie spice. Mix until combined and creamy. Don't skip the pumpkin pie spice! It adds warmth and flavor. Taste the mixture before filling the pastry. Adjust sweetness if needed. If you want a richer flavor, add a bit more vanilla. This will enhance the overall taste. Enjoy your danishes warm or at room temperature. They taste great on their own. For extra flair, serve with a drizzle of caramel sauce. This adds sweetness and richness. Pair them with a hot drink like coffee or tea. The flavors complement each other perfectly. For a fun twist, try adding chopped nuts on top before baking. They add crunch and flavor. Dust the cooled danishes with confectioners' sugar for a sweet finish. {{image_2}} You can change the flavor of your Pumpkin Cream Cheese Danish easily. Try adding nuts like pecans or walnuts for a crunchy texture. Chopped chocolate or chocolate chips can add a rich flavor. You might also swap pumpkin pie spice for cinnamon or nutmeg for a different taste. Each option brings a new twist to this fall treat. If you need gluten-free options, use gluten-free puff pastry. Many stores sell this option now. You can also make a dairy-free version. Just swap the cream cheese for a dairy-free cream cheese. Pumpkin puree is naturally dairy-free, so you are already on the right track! While puff pastry is delicious, you can try other types too. Use crescent roll dough for a softer texture. A flaky pie crust can also work well for a different taste. Each type of pastry changes the danish but keeps it just as tasty. Experiment and find your favorite! After you enjoy your Pumpkin Cream Cheese Danish, store any leftovers in the fridge. Place them in an airtight container. This keeps them fresh for up to three days. If you don’t have a container, wrap them tightly in plastic wrap. Make sure they are cool before wrapping to avoid sogginess. You can freeze these danishes if you want to save some for later. First, let them cool completely. Then, wrap each danish in plastic wrap. Place them in a freezer-safe bag or container. They can last in the freezer for up to three months. When you’re ready to eat one, just take it out and let it thaw in the fridge overnight. To reheat your Pumpkin Cream Cheese Danish, preheat your oven to 350°F (175°C). Place the danish on a baking sheet. Heat for about 10 minutes or until warm. This will help keep the pastry crisp. You can also use a microwave, but the pastry might get soft. If using a microwave, heat for 20-30 seconds at a time, checking often. Enjoy your warm danish as a tasty treat! Yes, you can use homemade pumpkin puree. Just make sure it is smooth and thick. If it is too watery, it may affect the filling's texture. To make homemade pumpkin puree, cook a pumpkin, scoop out the flesh, and blend until smooth. These danishes last for about 2-3 days at room temperature. Keep them in an airtight container to keep them fresh. You can also store them in the fridge for up to a week. Just make sure to reheat them before serving for the best taste. Absolutely! You can make the pumpkin cream cheese filling a day ahead. Store it in an airtight container in the fridge. When you're ready to bake, just fill your pastry and follow the rest of the steps. This saves time and makes baking easier! This blog post covered how to make a delicious Pumpkin Cream Cheese Danish. We explored essential ingredients and useful tools. I shared step-by-step instructions for preparation and baking. You'll find tips for perfect puff pastry and serving ideas. We also covered fun flavor variations and dietary options. Remember, proper storage keeps your danishes fresh. Use this guide to bake, enjoy, and share your treats with others. Baking should be fun, so try new flavors and enjoy the process!
    Pumpkin Cream Cheese Danish Irresistible Fall Treat
  • - 1 cup unsalted butter (2 sticks) - 1 ½ cups granulated sugar - 1 cup packed brown sugar - 4 large eggs - 1 teaspoon vanilla extract - 1 ¼ cups all-purpose flour - ½ cup unsweetened cocoa powder - 1 teaspoon baking powder - ½ teaspoon salt To make Turtle Brownies with Caramel Pecan, you need rich, flavorful ingredients. The butter gives the brownies a soft texture. Both granulated and brown sugars add sweetness and depth. Eggs are vital for binding everything together. Vanilla extract brings a lovely aroma. The dry ingredients include flour for structure, cocoa powder for chocolate flavor, baking powder for lift, and salt to enhance taste. - 1 cup semi-sweet chocolate chips - 1 cup pecans, chopped (plus extra for topping) - 1 cup caramel sauce (store-bought or homemade) These toppings make your brownies shine. Semi-sweet chocolate chips add gooeyness. Chopped pecans give a nice crunch and nutty flavor. Caramel sauce is the star, providing that sweet, sticky goodness. You can use store-bought caramel or try making your own. Both options work great! - Extra chopped pecans for topping - Additional caramel drizzle For an extra touch, you can add more chopped pecans on top. A drizzle of caramel makes them look fancy and taste even better. These garnishes turn a simple dessert into a showstopper. Everyone will love how they look and taste! Preheat your oven to 350°F (175°C). Grease a 9x13 inch pan with butter. Line it with parchment paper, leaving some paper hanging over the sides. This makes it easy to lift the brownies out later. In a medium saucepan, melt the butter over low heat. Stir the granulated sugar and brown sugar into the melted butter until smooth. This mixture should feel creamy and rich. Let the butter-sugar mix cool for a bit. Now, whisk in four eggs, one at a time. Make sure each egg mixes in well before adding the next. Then, mix in one teaspoon of vanilla extract. In a separate bowl, combine 1 ¼ cups of flour, ½ cup of cocoa powder, 1 teaspoon of baking powder, and ½ teaspoon of salt. Sift these dry ingredients together to remove lumps. Gradually fold the dry mix into the wet mixture using a spatula. Stop mixing when you see no more dry flour. Gently fold in 1 cup of semi-sweet chocolate chips and 1 cup of chopped pecans. Save a few pecans for later to sprinkle on top. Pour half of the brownie batter into your prepared pan. Use a spatula to spread it evenly. Drizzle half of the caramel sauce over this batter layer. Now, add the rest of the brownie batter on top of the caramel. Spread it out evenly. Drizzle the remaining caramel sauce on top and sprinkle with the reserved pecans. Bake your brownies in the preheated oven for 25-30 minutes. To check if they're done, insert a toothpick into the center. It should come out with a few moist crumbs, but not wet batter. Once baked, take the brownies out of the oven. Let them cool in the pan for 15 minutes. Use the parchment paper to lift them out. Place them on a wire rack to cool completely. After cooling, cut the brownies into squares. You can drizzle more caramel on top if you like. Enjoy your Turtle Brownies with Caramel Pecan! - Measure your ingredients carefully. This step ensures the best brownie texture. - Use a kitchen scale for precise measurements. Even slight changes can affect outcomes. - Mix your batter just until combined. Overmixing can lead to tough brownies. - Check your oven temperature. An oven thermometer helps ensure accurate baking. - Store-bought caramel is quick and easy. Homemade caramel offers richer flavor but takes time. - To drizzle caramel, use a squeeze bottle for control. This helps you create pretty patterns. - Warm the caramel slightly for easier drizzling. It flows better when slightly heated. - Toasting pecans boosts their flavor. Spread them on a baking sheet and bake until fragrant. - Use fresh pecans for the best taste. Look for pecans that are plump and have no dark spots. {{image_2}} You can change the flavor of your turtle brownies to fit your taste. Try using different types of chocolate. Milk chocolate adds a sweet touch, while dark chocolate gives a rich flavor. White chocolate can add a creamy twist. Adding other nuts is also fun. Walnuts or almonds work great in place of pecans. You can even mix in some shredded coconut for a tropical vibe. Get creative with toppings, like mini marshmallows or a sprinkle of sea salt. Each choice brings a new twist to this classic treat. If you want a gluten-free version, switch out the all-purpose flour for gluten-free flour. Many brands work well and keep the brownie texture nice. Just be sure to check the package for the best results. You can also make other small changes for different diets. For a dairy-free version, try using coconut oil instead of butter. You can also use flax eggs instead of regular eggs for a vegan option. These swaps help everyone enjoy this treat. To make mini brownie bites, use a mini muffin tin instead of a large pan. Spoon the brownie batter into each cup, filling them about two-thirds full. This size is perfect for parties or snacks. Adjust the baking time to about 15-20 minutes. Keep an eye on them, as they bake faster. Check for doneness by inserting a toothpick in the center. If it comes out clean or with a few crumbs, they are ready! These mini bites make sharing easy and fun. To keep your turtle brownies fresh, store them at room temperature. Use an airtight container to keep air out. Place a piece of parchment paper between layers if stacking. This helps avoid sticking. Best practices for maintaining freshness: - Make sure the brownies are completely cool before storing. - Keep them in a cool, dry place away from sunlight. - If you want extra moisture, place a slice of bread in the container. The brownies will absorb the moisture from the bread. Freezing brownies is a great way to keep them for longer. Cut the cooled brownies into squares. Wrap each square tightly in plastic wrap. After that, place them in a freezer bag. Be sure to remove as much air as possible. Thawing and reheating instructions: - To thaw, take the brownies out of the freezer and place them in the fridge overnight. - For a quick warm-up, microwave a square for about 10-15 seconds. This makes them soft and gooey again. Turtle brownies can last up to one week at room temperature. In the fridge, they can last for two weeks. If frozen, they can stay fresh for up to three months. Signs that brownies have gone bad: - Look for any mold or strange smells. - If the brownies feel hard and dry, they may not taste good anymore. - A change in color can also be a sign that they are past their prime. Can I substitute butter with oil? Yes, you can use oil instead of butter. Use a light oil like canola or vegetable oil. Use about ¾ cup of oil for each cup of butter. This will keep the brownies moist. What can I use instead of eggs for a vegan option? For a vegan option, try using flax eggs. Mix 1 tablespoon of ground flaxseed with 2.5 tablespoons of water. Let it sit for a few minutes until it thickens. You can also use unsweetened applesauce—¼ cup per egg. How do I make homemade caramel sauce? To make homemade caramel sauce, start with 1 cup of sugar. Heat it in a pan over medium heat. Stir until it melts and turns golden brown. Remove from heat, then slowly whisk in ½ cup of heavy cream. Add a pinch of salt for extra flavor. Can I use salted caramel for this recipe? Yes, salted caramel works well in these brownies. It adds a nice contrast to the sweet chocolate and pecans. Just be careful not to add too much salt elsewhere in the recipe. What can I use instead of pecans? If you need a substitute for pecans, walnuts are a great choice. You can also use sunflower seeds or pumpkin seeds for a nut-free option. They add crunch without the nuts. Are there nut-free variations available? Yes, you can make nut-free turtle brownies. Simply leave out the pecans and use seeds instead. You can also add extra chocolate chips or colorful sprinkles for fun. We covered all you need to make delicious turtle brownies. You start with unsalted butter, sugar, and eggs, then mix in dry ingredients and chocolate. Don't forget to layer in caramel and pecans! Use my tips for baking, caramel, and nut options to perfect your brownies. Experiment with flavors, and remember, the right storage keeps them fresh. Enjoy your delicious treats, and share them with friends and family!
    Turtle Brownies with Caramel Pecan Delightful Treat
  • To make Biscoff cookie butter truffles, you need some simple yet delicious ingredients. Each one plays a key role in creating that rich and delightful flavor. Here’s what you’ll need: - 1 cup Biscoff cookie crumbs - 1/2 cup creamy Biscoff cookie butter - 1/4 cup cream cheese, softened - 1 teaspoon vanilla extract - 1/2 cup white chocolate chips - 1 tablespoon coconut oil - Extra cookie crumbs for coating Each ingredient brings something special to the mix. The Biscoff cookie crumbs form the base, giving a nice crunch. The creamy Biscoff cookie butter adds that smooth, sweet taste we all love. Cream cheese helps bind everything together, making it rich and creamy. Vanilla extract adds a warm note. White chocolate chips and coconut oil create a sweet coating that makes the truffles shine. Lastly, extra cookie crumbs coat the outside, adding texture and flavor. Gather all these ingredients before you start. This way, you’ll have everything at your fingertips. It makes the process smooth and fun! Start by gathering your ingredients. In a big mixing bowl, combine: - 1 cup Biscoff cookie crumbs - 1/2 cup creamy Biscoff cookie butter - 1/4 cup cream cheese, softened - 1 teaspoon vanilla extract Mix everything well until smooth. You want a dough-like consistency. If the mix feels too soft, add a bit more cookie crumbs. Once well mixed, cover the bowl and refrigerate for about 30 minutes. This helps the mixture firm up. A firmer mix makes it easier to shape the truffles. After chilling, it’s time to shape the truffles. Scoop out small portions, about 1 inch wide. Roll these portions into balls using your hands. Place each ball on a parchment-lined baking sheet. Now, let’s prepare the coating. In a microwave-safe bowl, combine: - 1/2 cup white chocolate chips - 1 tablespoon coconut oil Heat the mix in 30-second intervals, stirring in between. Keep heating until the chocolate melts smoothly. Next, dip each truffle into the melted white chocolate. Let any excess chocolate drip off. Roll the truffles in extra cookie crumbs for a nice finish. Return the truffles to the baking sheet and chill them again for about 30 minutes. This sets the chocolate coating. Enjoy the delicious Biscoff flavor! Chilling the mixture is key for great truffles. After mixing the ingredients, refrigerate for 30 minutes. This makes the dough easier to shape. For rolling uniform balls, use a small cookie scoop. Aim for one-inch portions. This helps keep all your truffles the same size. To get a smooth coating, melt the white chocolate with coconut oil. Stir frequently as you heat. This prevents the chocolate from burning. When you dip each truffle, let the excess chocolate drip off. For alternative coatings, try crushed nuts or colorful sprinkles. Both add fun textures. These truffles shine on a nice platter. Pair them with coffee or tea for a cozy treat. For a special touch, sprinkle extra cookie crumbs on top. You can also place them in cute candy bags for gifts. Enjoy the delight of Biscoff flavor with friends! {{image_2}} You can easily change the taste of your Biscoff cookie butter truffles. Adding crushed nuts gives a nice crunch. Walnuts or pecans work well. You can also try different flavors. For example, consider adding a dash of cinnamon or a hint of sea salt for extra depth. Using dark or milk chocolate can change the vibe too. Dark chocolate adds richness, while milk chocolate brings sweetness. Choose your coating based on your taste. Mixing flavors keeps things fun and fresh! If you need vegan options, you can swap cream cheese with vegan cream cheese. Use dairy-free chocolate for coating as well. This way, everyone can enjoy these treats. For those needing gluten-free choices, make sure to use gluten-free cookie crumbs. Many brands offer gluten-free Biscoff cookies. This will keep the recipe safe for all diets. You can adapt the truffles for different occasions. For parties, make smaller truffles. They are bite-sized and easy to share. If you want to make them special for gifts, use pretty boxes. To keep them fresh, store in an airtight container in the fridge. They last up to a week. You can also freeze them. Just wrap each truffle in plastic wrap. When you're ready, let them thaw in the fridge. Enjoy your tasty treats any time! To keep your Biscoff cookie butter truffles fresh, store them in the fridge. Place them in an airtight container. This method keeps them moist and flavorful. They will stay good for about one week. If you want to save some for later, freezing works great. First, place the truffles in a single layer on a baking sheet. Freeze them for about one hour until they are firm. Then transfer the truffles to a freezer-safe bag. Be sure to remove as much air as you can. They can last up to three months in the freezer. To thaw, simply take them out of the freezer and let them sit at room temperature for about 30 minutes. This way, they will regain their creamy goodness. Enjoy your truffles even after a long time! Yes, you can use crunchy Biscoff cookie butter. The main difference is texture. Crunchy cookie butter will add a fun, crispy bite. It also changes the truffles' smoothness. If you enjoy a bit of crunch, go for it! Truffles are ready when they feel firm to the touch. You can gently press on one. If it holds its shape, it's set. The chilling time is key. Aim for about 30 minutes in the fridge. This helps them stay solid when you bite in. Absolutely! You can use different cookies for the crumbs. Try graham crackers, Oreos, or even chocolate wafers. Each cookie gives a unique flavor. Just make sure to crush them finely, so they mix well. This lets you get creative with your truffles! In this post, I covered how to make delicious Biscoff truffles. We explored the key ingredients, from cookie crumbs to white chocolate. I provided clear steps to ensure you achieve the best texture and flavor. Remember to chill your mixture for easier shaping and rolling. Don’t forget to taste and experiment with different coatings or flavors. Enjoy your treats and feel free to share these tips with friends for any occasion! You’ll impress everyone with your homemade creations.
    Biscoff Cookie Butter Truffles No Bake Delight
  • - 2 medium zucchini, spiralized into noodles - 2 boneless, skinless chicken breasts, sliced thin - 4 cloves garlic, minced - 1 tablespoon olive oil - 1 tablespoon butter - 1 teaspoon Italian seasoning - Salt and pepper to taste - 1/4 teaspoon red pepper flakes (optional, for heat) - Fresh parsley, chopped (for garnish) - Grated Parmesan cheese (for serving) This dish shines with fresh ingredients. The zucchini noodles bring a lightness that pairs well with the chicken. Chicken breast adds protein and keeps the meal filling. The garlic infuses the dish with a rich flavor. For the seasonings, I love using olive oil and butter. They create a lovely base for cooking. Italian seasoning ties everything together, giving a burst of flavor. If you like some heat, add the red pepper flakes. They give a nice kick without overwhelming the dish. Remember to have some fresh parsley handy for garnish. It adds a pop of color and freshness. Grated Parmesan cheese is a must for serving. It melts slightly on the warm noodles and enhances the overall taste. These simple ingredients create a wonderful meal that feels special yet easy to make. {{ingredient_image_1}} Spiralizing Technique To make zucchini noodles, use a spiralizer. This tool turns zucchini into long, thin strands. Start with washed zucchini. Cut off the ends, then twist the zucchini on the spiralizer. It’s quick and easy! Alternative methods if no spiralizer is available If you don't have a spiralizer, you can use a vegetable peeler. Just peel long strips from the zucchini. You can also use a box grater. Grate the zucchini for thin noodles. Both methods work well! Searing Techniques for Perfect Chicken For juicy chicken, use a large skillet. Heat olive oil and butter over medium heat. Once hot, add the sliced chicken. Let it cook without stirring for a few minutes. This helps it brown nicely. Season with salt, pepper, and Italian seasoning. Cook for about 5-6 minutes. Importance of Timing when Adding Garlic Timing is key when adding garlic. Add it to the skillet after the chicken is golden. Cook the garlic for 1-2 minutes until it smells great. This way, it won’t burn and turn bitter. Integrating Zucchini Noodles with Chicken After cooking the chicken and garlic, lower the heat. Add the zucchini noodles to the skillet. Toss them gently with the chicken and garlic. This helps mix the flavors well. Tips for Achieving the Right Texture Cook the zucchini noodles for only 2-3 minutes. You want them tender but not mushy. If they cook too long, they can get watery. Keep an eye on them for best results! Achieving the Right Seasoning Balance To get the best flavor, use salt and pepper wisely. Start with a pinch of salt and pepper when cooking your chicken. Taste as you go. Add more if needed. The Italian seasoning brings a nice herbal note, so don’t skip it. If you like heat, add red pepper flakes. Just a little can make a big difference. Cooking Time for Al Dente Zucchini Zucchini noodles cook fast. You want them tender but not mushy. Cook for just 2-3 minutes after adding them to the skillet. Stir gently to mix with the chicken and garlic. Check for doneness by tasting a strand. It should be slightly firm. This keeps your dish light and fresh. Recommended Plating Techniques For a lovely presentation, use a shallow bowl. Start with a base of zucchini noodles. Then, layer the chicken on top. Drizzle a bit of olive oil for shine. Finish it off with fresh parsley and a generous sprinkle of Parmesan cheese. This makes your dish pop on the table. Pairing with Side Dishes or Wines Garlic Chicken Zucchini Noodles pair well with a light salad. A simple green salad with lemon dressing works great. For a drink, try a crisp white wine, like Sauvignon Blanc. It complements the garlic and chicken flavors perfectly. Enjoy your meal with these simple pairings to elevate your dining experience. Pro Tips Choose Firm Zucchini: Look for firm zucchini without soft spots to ensure your noodles hold their shape during cooking. Don't Overcook the Zucchini: Cook the zucchini noodles just until tender to maintain a bit of crunch and prevent them from becoming mushy. Season in Layers: Season the chicken, then the garlic, and finally the zucchini for a well-rounded flavor throughout the dish. Experiment with Proteins: Try substituting chicken with shrimp or tofu for a different protein option that pairs well with the garlic and zucchini. {{image_2}} You can switch up the protein in this dish for a new twist. - Using Shrimp or Tofu: Shrimp cooks quickly and adds a nice flavor. Just sauté it until it's pink, then follow the same steps for chicken. Tofu is a great plant-based option. Use firm tofu and cube it. Sauté until golden before adding the garlic. - Substitute for Chicken: If you don’t have chicken, try turkey or pork. Both work well. Just slice them thin and cook until done. This keeps the dish light and tasty. Changing the flavors can make this meal exciting. - Adding Different Herbs: Fresh herbs like basil or cilantro can change the taste. Add them at the end for a burst of flavor. You can also use dried herbs if you don’t have fresh ones. - Incorporating Vegetables: You can add bell peppers, spinach, or cherry tomatoes. Just sauté them with the chicken and garlic. This not only adds color but also boosts nutrients. Mixing in different veggies keeps each meal fresh and fun. After making garlic chicken zucchini noodles, store any leftovers in the fridge. Use an airtight container. This keeps the dish fresh and tasty for up to three days. If you want to freeze the meal, use freezer-safe bags or containers. Make sure to remove as much air as possible. This helps prevent freezer burn. You can freeze the dish for up to three months. However, zucchini noodles may become watery upon thawing. To reheat, use a skillet on low heat. This helps keep the noodles from getting mushy. Stir gently to heat evenly. You can also use a microwave, but be careful. Heat in short bursts to avoid overcooking. For serving leftovers, try adding fresh herbs or a sprinkle of cheese. This can brighten the flavors and add a fresh touch. You could also serve with a side salad for a complete meal. You can make zucchini noodles using a few simple tools. A knife works well. Cut the zucchini lengthwise into thin strips. This method takes a bit more time, but you get nice, flat noodles. A vegetable peeler is another option. Just peel thin strips from the zucchini. Keep peeling until you reach the seeds in the center. Both methods give you tasty noodles to use in your dish. Yes, you can use cooked chicken for this recipe. It saves time and reduces cooking. Just cut the cooked chicken into bite-sized pieces. Add it to the skillet after cooking the garlic. Heat it through for a few minutes. This way, you still get great flavor from the garlic and other ingredients. To keep zucchini noodles from getting soggy, do not cook them too long. Add them at the end of cooking time. Stir them gently for about 2-3 minutes. This makes them tender but not mushy. Also, use a large skillet. A wider pan helps moisture escape better. If you want, you can sprinkle a bit of salt on the noodles before cooking. Let them sit for a few minutes to draw out excess water. In this blog post, we explored making garlic chicken zucchini noodles from start to finish. We covered key ingredients like zucchini, chicken, and garlic. We detailed step-by-step cooking methods to ensure your dish is tasty. Plus, we shared tips for perfect texture and seasoning balance. As you try this dish, remember the variations possible with different proteins and flavors. Whether it's shrimp or tofu, the choices make this recipe flexible and fun. Enjoy your cooking journey and savor every bite!
    Garlic Chicken Zucchini Noodles Savory One-Pan Meal
  • - 2 boneless, skinless chicken breasts - 1/2 cup buffalo sauce - 1 teaspoon olive oil - 1 cup cooked brown rice or cauliflower rice - 1 cup broccoli florets - 1/2 cup carrots, shredded - 1/2 cup celery, diced - 1/4 cup blue cheese crumbles - 2 tablespoons Greek yogurt - 1 tablespoon fresh parsley - Salt and pepper to taste Buffalo Chicken Bowls shine thanks to their simple yet bold flavors. You need just a few items to create this flavorful meal. The chicken serves as the star, soaking up that tangy buffalo sauce. I love using two boneless, skinless chicken breasts for this dish. They are easy to cook and shred. The buffalo sauce brings the heat, so choose your favorite brand or make your own. A teaspoon of olive oil helps the chicken brown nicely in the pan. For the base, I often use a cup of cooked brown rice, but cauliflower rice is a great low-carb swap. It adds a nice texture while keeping it light. The veggies add color and nutrition. I like to use broccoli, shredded carrots, and diced celery. They add crunch and freshness. Finally, the toppings make the dish pop. Blue cheese crumbles add a rich flavor. If you prefer something lighter, Greek yogurt works well too. A sprinkle of fresh parsley on top gives it a beautiful finish. Don’t forget to season with salt and pepper to taste; it ties everything together. With these ingredients, you can whip up a delicious meal in no time! {{ingredient_image_1}} First, we need to cook the chicken. Take two boneless, skinless chicken breasts and season them with salt and pepper. Heat a skillet on medium heat and add one teaspoon of olive oil. When the pan is hot, place the chicken in it. Sear each side for about 5-7 minutes until golden brown. Once the chicken is cooked through, pour in half a cup of buffalo sauce. Cover the skillet with a lid and let it simmer for five minutes. This step lets the chicken soak up all that spicy flavor. After simmering, it’s time to shred the chicken. Carefully remove it from the skillet using tongs. Use two forks to shred the chicken into bite-sized pieces. Return the shredded chicken to the skillet and stir it well in the buffalo sauce. Keep it warm on low heat while you prepare the base. While the chicken simmers, let’s prepare the base. Cook one cup of brown rice or cauliflower rice in a pot according to package instructions. At the same time, steam one cup of broccoli florets and half a cup of shredded carrots. You can do this in a steamer basket or microwave. Now, it’s time to assemble your bowls. Start with a layer of rice at the bottom. Then, add the steamed broccoli, shredded carrots, and the buffalo chicken mixture on top. For the finishing touch, sprinkle a quarter cup of blue cheese crumbles over everything. Add a dollop of two tablespoons of Greek yogurt for creaminess. Finally, top it off with a tablespoon of fresh chopped parsley. Enjoy your colorful and tasty Buffalo Chicken Bowls! To keep chicken juicy, use medium heat and don’t overcook it. Sear the chicken for about 5-7 minutes on each side until golden. After that, pour buffalo sauce over the chicken and cover the skillet. Let it simmer for 5 minutes. This helps the chicken soak up all the flavors. You can adjust the spice level of the buffalo sauce easily. If you like it mild, mix in some Greek yogurt or sour cream. For a spicier kick, add more buffalo sauce or a splash of hot sauce. Taste as you go, so it fits your spice preference. Using clear glassware makes your buffalo chicken bowls look great. You can see all the colorful layers of rice, veggies, and chicken. It’s like a work of art! For added flair, drizzle a little buffalo sauce on top before serving. This not only enhances the look but also adds more flavor. A sprinkle of fresh parsley on top gives a nice touch too. Pro Tips Adjust the Heat: If you prefer a milder flavor, mix the buffalo sauce with a little honey or barbecue sauce to balance the heat. Cook Chicken Evenly: For perfectly cooked chicken, make sure to pound the breasts to an even thickness before cooking. Meal Prep Friendly: This dish is great for meal prep! Store components separately and assemble when ready to eat for fresh flavors. Customization is Key: Feel free to add other veggies like bell peppers or swap out the blue cheese for feta or a dairy-free alternative! {{image_2}} You can make a low-carb version of Buffalo Chicken Bowls. Simply swap out the brown rice for cauliflower rice. Cauliflower rice has a light texture and absorbs flavors well. It cuts down on carbs while keeping the dish tasty. To prepare, just pulse cauliflower florets in a food processor until they resemble rice. Sauté them briefly in a pan until tender and serve as the base for your bowl. Want a vegan twist? Replace the chicken with tofu or chickpeas. Tofu provides a nice protein source and absorbs flavors well. Cut it into cubes and sauté until golden. If you prefer chickpeas, use canned ones. Just rinse and heat them before adding to the bowl. For toppings, use a dairy-free alternative for blue cheese. You can use cashew cheese or a store-bought vegan option. For creaminess, swap Greek yogurt with a dairy-free yogurt or avocado. Don’t be afraid to mix it up! Experiment with different sauces. Barbecue sauce can give a sweet and smoky flavor. You can also try teriyaki or sriracha for a different kick. Adding more veggies can enhance the flavor and nutrition. Try bell peppers, spinach, or corn. Fresh herbs like cilantro or green onions can add a nice touch as well. Get creative and find the combination you love! To store your Buffalo Chicken Bowls, first let them cool. Place leftovers in airtight containers. This keeps them fresh and safe to eat later. Use containers that are BPA-free. Glass or plastic containers work well. Be sure to label each container with the date. This way, you can keep track of when you made them. Try to eat leftovers within three to four days for the best taste. When reheating, avoid using a microwave if possible. Instead, use a skillet on low heat. Add a splash of water or broth to keep the chicken moist. Stir often to make sure everything heats evenly. If you use a microwave, cover the bowl with a wet paper towel. This helps trap steam and keeps the food from drying out. Always check that the chicken is heated all the way through. You can make buffalo sauce at home. Simply mix hot sauce with butter. This creates a rich and spicy sauce. If you want a milder option, consider using barbecue sauce. You can mix it with a little hot sauce for a gentle kick. Another choice is to use sriracha or a sweet chili sauce, which has a nice balance of heat and sweetness. Yes! You can prep Buffalo Chicken Bowls in advance. Cook the chicken and shred it. Store it in the fridge for up to three days. You can also prepare the rice and veggies ahead of time. Keep them separate to maintain freshness. When ready to eat, just reheat the chicken and assemble your bowls. This makes weeknight meals quick and easy. To add more heat, use extra buffalo sauce. You can also sprinkle in some red pepper flakes. If you want a real kick, try adding diced jalapeños. For a smoky flavor, chipotle sauce works well too. Just remember to taste as you go to find your perfect spice level. This blog post covered how to make delicious Buffalo Chicken Bowls. You learned about the main ingredients, step-by-step cooking, helpful tips, and fun variations. Whether you want a low-carb meal or a vegan option, there are many ways to customize this dish. In conclusion, enjoy trying out different flavors and ingredients. With these easy steps, anyone can make a tasty meal. Don’t forget to store leftovers for later and think of ways to spice it up!
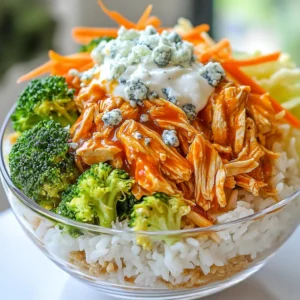
    Buffalo Chicken Bowls Flavorful and Easy Weeknight Meal
  • To make the best Maple Pecan Granola Clusters, gather these simple ingredients: - 2 cups rolled oats - 1 cup chopped pecans - 1/2 cup almond slivers - 1/4 cup sunflower seeds - 1/4 cup pumpkin seeds - 1/2 cup maple syrup - 1/4 cup melted coconut oil - 1 teaspoon vanilla extract - 1 teaspoon cinnamon - 1/2 teaspoon salt - Optional: 1/2 cup dried cranberries or raisins These ingredients create a tasty mix of flavors and textures. The oats serve as a hearty base, while the nuts add crunch. Maple syrup gives a sweet touch, and coconut oil helps everything stick together. Adding dried fruit makes it even better. This granola is not just for breakfast; you can snack on it anytime! - Preheat your oven to 350°F (175°C). Line a large baking sheet with parchment paper. - In a large mixing bowl, combine 2 cups of rolled oats, 1 cup of chopped pecans, 1/2 cup of almond slivers, 1/4 cup of sunflower seeds, and 1/4 cup of pumpkin seeds. Mix well. - In a separate bowl, whisk together 1/2 cup of maple syrup, 1/4 cup of melted coconut oil, 1 teaspoon of vanilla extract, 1 teaspoon of cinnamon, and 1/2 teaspoon of salt until smooth. - Pour the wet mixture over the dry ingredients and stir until everything is evenly coated. - Spread the granola mixture onto the prepared baking sheet in an even layer. Press it down firmly to help form clusters. - Bake in the preheated oven for 20-25 minutes, or until golden brown. Stir halfway through to ensure even baking. - Once baked, remove from the oven and let it cool completely on the baking sheet. As it cools, it will harden and form clusters. To get those lovely clusters, press the granola down firmly before baking. This helps the pieces stick together. You want to create a solid base. Pressing makes all the difference in your final result. Watch the baking time closely. I bake my granola for 20 to 25 minutes. Stir halfway through to ensure even cooking. If you see brown edges, pull it out. You want golden brown, not burnt. Granola clusters shine when paired with yogurt and fruits. Try serving them with creamy yogurt and fresh berries. This mix adds flavor and fun textures to your breakfast. For a beautiful display, place the granola in clear glass jars. The colors of the nuts and oats look great. Plus, it makes a nice snack ready to grab. Enjoy them by the handful anytime! {{image_2}} You can change the nuts and seeds in your granola. Try using walnuts or hazelnuts. Each nut gives a different flavor. Sunflower and pumpkin seeds add crunch too. You can mix and match for fun! Adding flavored extracts or spices can change the taste. Try almond extract for a sweet touch. You could also add nutmeg for warmth. Just a little can make a big difference! If you want to make the granola gluten-free, use certified gluten-free oats. They taste just as good, and you won’t lose flavor. For vegan modifications, swap the honey or maple syrup with agave nectar. Instead of coconut oil, use a plant-based oil like canola. This keeps your granola tasty and plant-based! To keep your Maple Pecan Granola Clusters fresh, use airtight containers. Glass jars work well. You can also use plastic containers that seal tightly. Store them in a cool, dry place. Avoid areas with heat or humidity, like near the stove. These granola clusters stay fresh for about two weeks. If you want to keep them longer, consider freezing. To freeze, place them in a freezer-safe bag. Remove as much air as possible before sealing. They can last up to three months in the freezer. When ready to eat, let them thaw at room temperature. Enjoy their crunch whenever you want! To make granola clusters stick well, you need to press the mixture down firmly on the baking sheet. This helps it form solid clumps while baking. The warm mixture also needs enough binding agents, like maple syrup and coconut oil. These ingredients help everything stick together as it cools. Yes, you can use other sweeteners. Honey or agave syrup works well. However, keep in mind that these sweeteners may change the flavor and texture slightly. Maple syrup gives a unique taste that many enjoy. Choose what suits your taste best! Yes, Maple Pecan Granola Clusters can be healthy. They contain whole grains, nuts, and seeds. These ingredients offer fiber, healthy fats, and protein. Be mindful of portion sizes, as they can be high in calories. The natural sweetener is a better choice compared to refined sugars. You can find premade granola clusters at most grocery stores. Look in the cereal or snack aisle. Many brands offer various flavors and options. Health food stores and online shops also carry them. Check the labels for ingredients and nutritional info to find the best fit for you. In this post, we explored making Maple Pecan Granola Clusters. We covered the easy ingredients, step-by-step instructions, and helpful tips. These clusters are simple to customize and can fit various diets. Storing them well keeps your snack fresh and tasty. Enjoy them with yogurt or on their own. You now have all you need to make a delicious treat that everyone will love. Get creative and make this recipe your own!
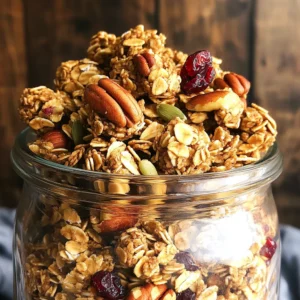
    Maple Pecan Granola Clusters Delightful Breakfast Treat
  • To create this rich and gooey chocolate lava cake, gather the following ingredients: - 1 cup all-purpose flour - 1 cup granulated sugar - 1/2 cup unsweetened cocoa powder - 2 teaspoons baking powder - 1/2 teaspoon salt - 1/2 cup milk - 1/3 cup vegetable oil - 2 teaspoons vanilla extract - 1 cup semi-sweet chocolate chips - 1 cup hot water - Optional: powdered sugar for dusting or vanilla ice cream for serving You can swap some ingredients if needed: - For a gluten-free option, use a gluten-free flour blend instead of all-purpose flour. - Substitute almond milk or oat milk for regular milk. - Use coconut oil in place of vegetable oil for a different flavor. - Dark chocolate chips can replace semi-sweet chips for a richer taste. Using the best ingredients makes a difference. Here’s how to choose wisely: - Flour: Go for unbleached all-purpose flour. It gives better flavor and texture. - Cocoa Powder: Choose high-quality, unsweetened cocoa powder. It enhances the chocolate flavor. - Sugar: Use granulated sugar for sweetness. Avoid brown sugar, as it changes the cake's texture. - Chocolate Chips: Select a brand you love. Good chocolate chips melt well and taste great. - Dairy: Fresh milk makes the batter smoother and richer. Check expiration dates before buying. Start by greasing the inside of your slow cooker. Use butter or non-stick spray. This step helps to prevent sticking. A well-prepared slow cooker makes serving easier. In a mixing bowl, add the following dry ingredients: - 1 cup all-purpose flour - 1 cup granulated sugar - 1/2 cup unsweetened cocoa powder - 2 teaspoons baking powder - 1/2 teaspoon salt Whisk these dry ingredients until they are well combined. Next, take another bowl for the wet ingredients. Combine: - 1/2 cup milk - 1/3 cup vegetable oil - 2 teaspoons vanilla extract Stir these wet ingredients until smooth. Then, pour the wet mix into the dry mix. Gently stir until combined, but do not overmix. Fold in 1 cup of semi-sweet chocolate chips. Now, pour the cake batter into your greased slow cooker. Spread it evenly across the bottom. Carefully pour 1 cup of hot water over the batter. Do not stir! This hot water creates the lava effect. Cover the slow cooker with the lid. Cook on low for 2 to 2.5 hours. The edges will set, while the center stays gooey. To check for doneness, insert a toothpick into the edge of the cake. It should come out clean. The center will remain melted. Once cooked, turn off the slow cooker. Let the cake sit for 10 minutes before serving. Scoop portions into bowls, ensuring you get some of that melted chocolate. Enjoy your tasty treat! To get that warm, gooey center, follow these steps: - Use a slow cooker set on low. - Cook for 2 to 2.5 hours. - Test with a toothpick. It should come out clean from the edge. - The center should remain soft and oozy. This lava cake needs time to form its magic. Be patient and trust the process. Here are some mistakes that can ruin your cake: - Overmixing the batter: Mix just until combined. - Skipping the hot water: This step is key for the lava effect. - Not greasing the slow cooker: Greasing prevents sticking. - Opening the lid too soon: Each peek adds cooking time. Avoiding these errors helps you create a perfect dessert. Having the right tools makes cooking easier. Here’s what you need: - A slow cooker (4 to 6 quarts works well). - Mixing bowls for wet and dry ingredients. - A whisk for blending. - A spatula for folding in chocolate chips. - A toothpick for testing doneness. These tools help you make this treat with ease and fun! {{image_2}} You can easily change the flavor of your slow cooker chocolate lava cake. Adding nuts, like walnuts or pecans, gives a nice crunch. Chopped fruit, such as raspberries or cherries, adds a fresh twist. You can also use different types of chocolate chips. Try dark chocolate or even white chocolate for a fun mix. If you need gluten-free options, use a gluten-free flour blend instead of all-purpose flour. This swap works well and keeps the cake tasty. For a dairy-free version, replace the milk with almond milk or coconut milk. Just make sure to check the labels for any added sugars. Serving your lava cake can be a fun experience. A dusting of powdered sugar on top makes it look fancy. For an extra treat, add a scoop of vanilla ice cream. The cold ice cream pairs perfectly with the warm gooey cake. You can also top it with fresh berries or a drizzle of chocolate sauce. To store leftovers, let the cake cool down first. Then, cut it into pieces. Place each piece in an airtight container. Keep it in the fridge for up to three days. This keeps the cake fresh and moist. You can also cover the slow cooker with its lid if you have not served it all. When you are ready to enjoy the cake again, you can reheat it easily. Use a microwave for quick warming. Place a piece of cake on a microwave-safe plate. Heat it for about 20 to 30 seconds. Check if it is warm enough. If needed, heat for an extra 10 seconds. You can also reheat it in the slow cooker. Just cover it and warm it on low for about 30 minutes. You can freeze the chocolate lava cake too. After it cools, cut it into pieces. Wrap each piece tightly in plastic wrap. Then, place them in a freezer-safe bag. Label the bag with the date. You can freeze it for up to three months. When you want to eat it, move the cake to the fridge to thaw overnight. Heat it up as needed for a warm, gooey treat. You should cook the cake for 2 to 2.5 hours on low. The edges should set, while the middle stays gooey. Check it with a toothpick. If it comes out clean from the edge, it's ready. The center should remain soft and melted for that lava effect. Yes, you can bake this cake in an oven. Preheat it to 350°F (175°C). Pour the batter into a greased baking dish. Bake for about 30 to 35 minutes. Watch for the edges to firm up while the center stays soft. You won’t get the same slow-cooked texture, but it will still be delicious. You can serve this cake with a dusting of powdered sugar. A scoop of vanilla ice cream adds a creamy touch. Fresh berries also bring a nice contrast. Whipped cream is another option for a rich flavor. Try any of these to enhance your dessert experience! You learned about making a Slow Cooker Chocolate Lava Cake, including key ingredients and their substitutes. I shared tips for picking quality items and gave clear steps for cooking. You discovered tricks for that perfect gooeyness and avoided common mistakes. We explored tasty variations, storage tips, and answered FAQs to enhance your experience. Try your own lava cake to impress friends and family. It’s fun, delicious, and easy to make! Enjoy your cooking adventure!
    Slow Cooker Chocolate Lava Cake Irresistible Dessert
  • - 1.5 lbs baby potatoes, halved - 3 tablespoons olive oil - 4 cloves garlic, minced - 1 teaspoon dried oregano - 1 teaspoon smoked paprika - Salt and pepper to taste - ½ cup grated Parmesan cheese - 2 tablespoons fresh parsley, chopped (for garnish) These ingredients create a tasty and crispy dish. I love using baby potatoes for this recipe. They cook evenly and have a nice texture. Olive oil gives the potatoes a rich flavor. Next, minced garlic adds a strong aroma and taste. Dried oregano brings in a herby note that complements the garlic well. Smoked paprika adds a bit of warmth and depth. Salt and pepper enhance all the flavors. Grated Parmesan cheese makes everything extra cheesy and delicious. Finally, fresh parsley adds a pop of color and freshness as a garnish. Gather all these ingredients before you start cooking. It makes the process easier and more fun! Preheating your air fryer is key. Set it to 400°F (200°C) and let it warm up for about 5 minutes. This step helps the potatoes cook evenly. If you skip this, your potatoes may not get that nice, crispy texture we all love. Start by halving 1.5 pounds of baby potatoes. Place them in a large bowl. Add 3 tablespoons of olive oil, 4 minced garlic cloves, 1 teaspoon dried oregano, 1 teaspoon smoked paprika, and salt and pepper to taste. Mix everything well until the potatoes are coated. Now, sprinkle in ½ cup of grated Parmesan cheese. Toss again to make sure every piece is nicely covered in cheese. Place the seasoned potatoes in the air fryer basket. Spread them out in a single layer. This allows hot air to circulate, cooking them evenly. Air fry for 15 to 20 minutes. Shake the basket halfway through. This helps them cook on all sides. You want them golden brown and crispy on the outside. Once done, transfer them to a bowl and garnish with 2 tablespoons of chopped fresh parsley for a fresh touch. To get that perfect crunch, cook your potatoes for 15-20 minutes. Check them halfway through and shake the basket. This helps them cook evenly. If you like them extra crispy, add a few more minutes. You can also try different cooking times for softer or firmer potatoes. To boost the taste, consider adding other spices. Paprika gives a smoky flavor, while garlic powder adds depth. You can also try fresh herbs like rosemary or thyme. Fresh herbs have a bright flavor, while dried herbs offer a more subtle taste. Mix and match to find your favorite blend! For a beautiful presentation, use a rustic bowl or a wooden platter. Top with extra Parmesan cheese and parsley for color. Serve with a dipping sauce, like ranch or yogurt. This adds a creamy contrast to the crispy potatoes. Pair them with grilled chicken or a fresh salad for a complete meal. {{image_2}} You can switch up the potatoes for different flavors. Try red or yellow potatoes. These add a nice texture and taste. You can also mix in other seasonings. Rosemary or thyme works great for herbal notes. Feel free to experiment and find your favorite combo! Want to add some heat? You can easily make your potatoes spicy. Try adding chili flakes or a dash of hot sauce. This option gives a fun kick to every bite. Adjust the amount to match your spice level. Enjoy the extra zing! If you prefer a vegan dish, you can skip the cheese. Use a dairy-free cheese substitute for a similar taste. You can also use avocado oil instead of olive oil. This way, you keep the rich flavor without using any dairy. Enjoy the same great taste while sticking to your diet! To keep your Air Fryer Garlic Parmesan Potatoes fresh, follow these tips: - Cool them down: Let the potatoes cool to room temperature. - Use an airtight container: Store them in a container with a tight lid. - Refrigerate: Keep them in the fridge within two hours of cooking. - Freshness: Eat leftovers within 3 days for the best taste. You can reheat your potatoes in different ways. Here are some options: - Air Fryer: This method is best. Set it to 350°F (175°C) for about 5-7 minutes. - Oven: Preheat your oven to 375°F (190°C). Bake for 10-15 minutes. - Crispiness tips: Add a little olive oil before reheating to keep them crunchy. - Check often: Stir or shake the potatoes halfway through to heat evenly. Cooking Air Fryer Garlic Parmesan Potatoes takes about 30 minutes total. Here’s the breakdown: - Prep time: 10 minutes - Cooking time: 15-20 minutes Preheat your air fryer at 400°F (200°C) for about 5 minutes. Then, mix your ingredients and air fry. Yes, you can make these potatoes ahead of time. Here’s how to store and reheat them: - Storage: Let the potatoes cool. Place them in an airtight container. They stay fresh in the fridge for 3-4 days. - Reheating: Use the air fryer to maintain crispiness. Heat them at 350°F (175°C) for about 5-7 minutes. To get crispy potatoes, follow these tips: - Cut evenly: Halve the baby potatoes so they cook uniformly. - Toss well: Make sure to coat them evenly with olive oil and seasonings. - Single layer: Place potatoes in a single layer in the air fryer basket. This helps hot air circulate. - Shake halfway: Shake the basket halfway through cooking to ensure all sides get crispy. These steps will help you achieve the perfect crispy texture every time. Now you know how to make Air Fryer Garlic Parmesan Potatoes. We covered the ingredients, step-by-step instructions, and tips for perfect crispiness. Remember, preheating your air fryer is key to great results. You can try variations with different spices or potatoes to mix things up. Proper storage and reheating methods keep leftovers fresh. Enjoy impressing family and friends with this simple and tasty dish. Happy cooking!
    Air Fryer Garlic Parmesan Potatoes Tasty and Crispy Dish
  • - 1 ½ cups graham cracker crumbs - ½ cup unsalted butter, melted The crust gives the bars their nice, crunchy base. I prefer using graham cracker crumbs. They add a sweet flavor. Melted unsalted butter keeps it together. Mix them well and press into your pan. Set it aside while you make the filling. - 2 cups cream cheese, softened - 1 cup powdered sugar - 1 cup heavy whipping cream - 1 teaspoon vanilla extract - Zest of 1 lemon - ¼ cup fresh lemon juice For the filling, cream cheese is key. It makes the cheesecake rich and smooth. I mix it with powdered sugar for sweetness. Heavy whipping cream adds fluffiness; it makes the filling light. Vanilla extract gives a nice flavor. Fresh lemon juice and zest bring brightness to the dish. They balance the sweetness well. - 1 cup fresh raspberries - Additional lemon slices Fresh raspberries add a pop of color and flavor. They are tart and sweet. I like to arrange extra raspberries and lemon slices on top. This makes the bars look even prettier. It also adds more flavor with each bite. - In a medium bowl, combine 1 ½ cups of graham cracker crumbs and ½ cup of melted butter. - Mix until well blended. - Press the mixture evenly into the bottom of a greased 8x8 inch baking pan. - Place the pan in the refrigerator. This helps the crust firm up while you make the filling. - In a large bowl, beat 2 cups of softened cream cheese and 1 cup of powdered sugar. - Mix until the mixture is smooth and creamy, about 2-3 minutes. - Stir in the zest of 1 lemon and ¼ cup of fresh lemon juice. - Make sure everything is well mixed together. - In a separate bowl, beat 1 cup of heavy whipping cream. - Add 1 teaspoon of vanilla extract and whip until stiff peaks form. - Gently fold the whipped cream into the cream cheese mixture. - Be careful not to deflate the whipped cream too much. - Take 1 cup of fresh raspberries and gently fold them into the filling. - Be cautious not to break them apart too much, as you want nice pieces. - Pour the creamy filling over the crust. - Spread it evenly with a spatula to smooth the top. - Cover the pan with plastic wrap. - Refrigerate for 4-6 hours until the cheesecake bars are firm. - Once set, remove the cheesecake from the pan using the edges of the plastic wrap. - Slice into bars for easy serving. - Garnish each bar with additional fresh raspberries and lemon slices for a bright touch. To get the right texture for the crust, mix the graham cracker crumbs with melted butter well. It should feel like wet sand. Press the mixture firmly into the bottom of your pan. This helps the crust hold together. If you want a twist, try using crushed cookies like Oreos instead of graham crackers. This change adds a fun flavor. For added flavor, mix in a teaspoon of lemon extract or a splash of almond extract. You can also use other fruits, like blueberries or strawberries, for a fun twist. To make the filling lighter, beat the heavy cream until it forms stiff peaks. Then, gently fold it into the cream cheese mixture. This trick makes the bars fluffy and airy. Chill the cheesecake bars for at least 4 to 6 hours. This time helps the mixture firm up nicely. For best results, cover the pan tightly with plastic wrap while chilling. This prevents air from getting in and keeps the cheesecake fresh. If you need to store it longer, place the bars in an airtight container after they chill. {{image_2}} You can switch up the fruit in these bars. Try strawberries or blueberries instead of raspberries. They add a nice twist to the flavor. You can also mix in chocolate or white chocolate for a richer taste. Just chop the chocolate into small pieces and fold it in gently. This makes each bite a sweet surprise! If you need a gluten-free option, use gluten-free graham crackers for the crust. They work well and keep the flavor intact. For a vegan version, substitute cream cheese with a vegan cream cheese. You can use coconut cream instead of heavy whipping cream. These swaps make the dessert fit different diets without losing taste. These cheesecake bars shine with sauces or toppings. A drizzle of chocolate sauce or a berry coulis adds flair. Fresh mint leaves also make a great garnish. These bars are perfect for parties, picnics, or celebrations. They impress guests and are easy to serve. To keep your No Bake Lemon Raspberry Cheesecake Bars fresh, use an airtight container. A glass or plastic container works well. Make sure the lid fits tightly. This keeps the bars moist and tasty. To prevent freezer burn, wrap the cheesecake bars tightly in plastic wrap before placing them in the container. This extra layer helps protect them from air. These cheesecake bars last about 5 days in the fridge. Store them in the fridge for the best taste. If you want to keep them longer, you can freeze them. To freeze, cut the bars into slices first. Then, wrap each slice in plastic wrap and place them in a freezer-safe bag. They can last up to 2 months in the freezer. You do not need to thaw the cheesecake bars before serving. They taste great chilled. If you prefer them slightly softer, let them sit at room temperature for about 10-15 minutes. To maintain the creamy texture, avoid reheating them in the microwave or oven. Enjoy the fresh taste straight from the fridge! These bars need to chill for about 4 to 6 hours. This time allows the filling to firm up well. I recommend making them the night before. This way, they are ready for your next gathering. Yes, you can use granulated sugar or coconut sugar. However, these will change the texture a bit. Granulated sugar does not dissolve as easily, so you might notice a grainy feel. If you prefer a smooth texture, stick with powdered sugar. To cut clean slices, use a sharp knife. Dip the knife in hot water and wipe it dry before cutting. This method helps keep each slice neat. Make sure to cut straight down without sawing back and forth. Yes, you can freeze these cheesecake bars! Wrap them tightly in plastic wrap and foil. They can last up to three months in the freezer. When you're ready to enjoy, thaw them in the fridge for a few hours. This keeps the texture nice and creamy. In this blog post, we explored how to make delicious No Bake Lemon Raspberry Cheesecake Bars. We covered essential ingredients, step-by-step instructions, and tips to ensure success. I shared variations to suit different tastes and dietary needs. Finally, we discussed storage and answered common questions. Enjoying these cheesecake bars is simple and fun. You can impress your friends and family with this tasty treat. Remember, baking should be enjoyable. So roll up your sleeves and get started!
    No Bake Lemon Raspberry Cheesecake Bars Delightful Treat
  • To make a tasty Creamy Cajun Shrimp Pasta, you will need the following: - 8 oz fettuccine pasta - 1 lb large shrimp, peeled and deveined - 2 tablespoons Cajun seasoning - 2 tablespoons olive oil - 3 cloves garlic, minced - 1 cup heavy cream - 1 cup cherry tomatoes, halved - 1/2 cup grated Parmesan cheese - 1 cup spinach leaves - Salt and pepper to taste These ingredients work together to create a rich and flavorful dish. You will need a few tools to make this dish: - Large pot for boiling pasta - Large skillet for cooking shrimp and sauce - Mixing bowl for seasoning shrimp - Wooden spoon for stirring - Strainer for draining pasta Having these tools ready will help you cook smoothly. For extra flavor and a nice look, consider these garnishes: - Fresh parsley, chopped - Extra grated Parmesan cheese These add a fresh touch and enhance the dish's taste. Start by boiling a large pot of salted water. Make sure it's a rolling boil. Add 8 ounces of fettuccine pasta. Cook it according to the package directions until it is al dente. This usually takes around 8 to 10 minutes. Before draining, save half a cup of the pasta water. Drain the pasta and set it aside. This water helps adjust the sauce later. Next, take 1 pound of large shrimp that are peeled and deveined. In a bowl, toss the shrimp with 1 tablespoon of Cajun seasoning. Make sure every shrimp is coated well. Heat 2 tablespoons of olive oil in a large skillet over medium heat. Once hot, add the shrimp. Cook them for 2 to 3 minutes on each side. They should turn pink and be cooked through. Remove the shrimp from the skillet and set them aside. In the same skillet, add 3 cloves of minced garlic. Sauté the garlic for about 30 seconds. You want it to be fragrant but not burnt. Now, pour in 1 cup of heavy cream. Stir to mix it well, scraping any bits stuck to the pan. Let it simmer gently. This will add great flavor to your sauce. Lower the heat and add the rest of the Cajun seasoning. Toss in 1 cup of halved cherry tomatoes and 1/2 cup of grated Parmesan cheese. Stir these in, along with 1 cup of spinach leaves. Keep stirring until the spinach wilts and the sauce thickens a bit, which takes about 3 to 5 minutes. Finally, add the cooked fettuccine and shrimp back to the skillet. Toss everything together well. If the sauce seems too thick, add a splash of the reserved pasta water. Season with salt and pepper to taste. To serve, plate the pasta in wide bowls. Garnish with fresh chopped parsley for color. You can also sprinkle more grated Parmesan on top. This adds a nice touch to your dish. Enjoy your creamy Cajun shrimp pasta! To get the best flavor in your creamy Cajun shrimp pasta, use fresh ingredients. Fresh shrimp gives a sweet taste that frozen shrimp can lack. Choose high-quality Cajun seasoning to get that bold kick. Don’t rush the cooking; let the garlic cook until fragrant for max flavor. For perfect shrimp, avoid overcooking. Shrimp cooks quickly, just 2-3 minutes per side in hot oil. Look for a bright pink color to know they’re done. If you overcook them, they can turn tough and rubbery. Keep them warm while you finish the sauce for the best texture. Adjusting spice levels is easy. If you like it mild, use less Cajun seasoning. You can add other ingredients like bell peppers to balance the heat. For a spicy kick, add more seasoning or a dash of hot sauce. Taste as you go to find your perfect heat level. {{image_2}} You can change the shrimp for other proteins. Chicken works well if you slice it thin. Cook it until it's golden brown, just like the shrimp. You can also use scallops. They cook fast and taste great. For a plant-based option, try tofu. Just press it first to remove water, then sauté until it's crisp. You can boost flavor by adding more veggies. Bell peppers add color and crunch. Mushrooms give a nice earthiness. Broccoli is another good choice for a healthy bite. Add these veggies when you make the sauce. This lets them cook down and blend well. To make this dish dairy-free, swap heavy cream for coconut cream or almond milk. They give a creamy texture without dairy. For a gluten-free option, use gluten-free pasta. There are many kinds made from rice or corn. Just make sure to cook it according to package instructions for the best results. Store any leftover creamy Cajun shrimp pasta in an airtight container. Let it cool down first. Place it in the fridge for up to three days. If you want to keep it longer, consider freezing it. To reheat the pasta, use a microwave or a skillet. If using a microwave, place the pasta in a bowl. Add a splash of water to keep it moist. Heat for one to two minutes, stirring halfway through. If using a skillet, heat it on medium-low. Add a little olive oil or cream to help it warm up without drying out. You can freeze this dish for later meals. Make sure to use a freezer-safe container. It can last up to three months in the freezer. When ready to eat, thaw it in the fridge overnight. Then, reheat it as described above. Cajun seasoning is a mix of spices. It often includes paprika, garlic powder, onion powder, and cayenne pepper. You might also find oregano and thyme in some blends. Each brand has its unique twist. This spice blend gives dishes a bold and zesty taste. You can easily make your own by mixing these spices at home. Yes, you can use frozen shrimp. Just make sure to thaw them first. Place the shrimp in cold water for about 15-20 minutes. Once they are thawed, peel and devein them if needed. Using frozen shrimp can save time and still give you great flavor. To thicken the pasta sauce, you can cook it a bit longer. This helps reduce the liquid. You can also add more grated Parmesan cheese. It will melt and make the sauce creamy. Another trick is to stir in a bit of cornstarch mixed with water. This will help thicken the sauce quickly. Yes, you can prep this dish ahead of time. You can cook the pasta and shrimp separately. Store them in the fridge until you are ready to serve. When you want to eat, just heat them up and add the sauce. Be careful not to overcook the shrimp when reheating. Enjoy your meal! This blog post covered how to make creamy Cajun shrimp pasta. We explored the main ingredients, tools, and tasty garnishes. Then, I shared step-by-step instructions for cooking the dish. You learned tips for flavor and texture, plus ideas for variations. Lastly, I provided storage options and addressed common questions. With these insights, you can impress at dinner. Dive in and enjoy your cooking journey!
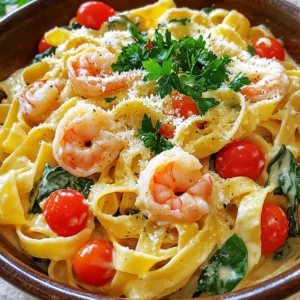
    Creamy Cajun Shrimp Pasta Flavorful and Easy Recipe
  • To make Carrot Cake Overnight Oats, you will need: - 1 cup rolled oats - 1 cup unsweetened almond milk (or milk of choice) - 1 medium carrot, grated - 1 tablespoon chia seeds - 1 tablespoon maple syrup (or honey) - ½ teaspoon ground cinnamon - ¼ teaspoon nutmeg - ¼ cup crushed pineapple, drained - ¼ cup raisins or currants - 2 tablespoons chopped walnuts (optional) - Pinch of salt - 1 teaspoon vanilla extract These simple ingredients blend to create a delicious dish. Each one adds flavor and texture. You can add these for extra flavor and nutrition: - 2 tablespoons shredded coconut - 1 tablespoon flax seeds - Fresh fruit like bananas or berries - A scoop of protein powder Feel free to mix and match! These add-ins boost taste and nutrition. - Rolled oats: Great source of fiber. They keep you full longer. - Almond milk: Low in calories and dairy-free. It's a good alternative for many. - Carrots: Packed with vitamins and good for your eyes. - Chia seeds: High in omega-3s. They help keep your heart healthy. - Maple syrup: Natural sweetener with antioxidants. - Ground cinnamon: May help lower blood sugar levels. - Nutmeg: Adds flavor and has anti-inflammatory properties. - Pineapple: Contains bromelain, good for digestion. - Raisins or currants: Add natural sweetness and iron. - Walnuts: Source of healthy fats and protein. - Salt: Enhances flavors in the dish. - Vanilla extract: Adds a warm, sweet flavor. Each ingredient plays a role in making this dish tasty and healthy. You get a blend of flavors along with important nutrients! First, gather your ingredients. You need rolled oats, almond milk, a grated carrot, chia seeds, and maple syrup. Add ground cinnamon, nutmeg, crushed pineapple, raisins, walnuts, salt, and vanilla extract. In a mixing bowl, combine the rolled oats and almond milk. Then, stir in the grated carrot and chia seeds. Pour in the maple syrup, ground cinnamon, nutmeg, and a pinch of salt. Mix well until everything is combined. Next, fold in the crushed pineapple and raisins or currants. If you like, add chopped walnuts for some crunch. Finally, stir in the vanilla extract. This mixture will be the base of your overnight oats. Once your oat mixture is ready, transfer it to a mason jar or an airtight container. Make sure it is sealed tightly to keep the freshness in. Place the jar in the refrigerator overnight. This process allows the oats to soak up the liquid and flavors. Letting it sit overnight helps soften the oats. In the morning, you will have a creamy and tasty mix waiting for you. When you are ready to enjoy your oats, give them a good stir. If you want a thinner mixture, add a splash of almond milk. For toppings, try adding more grated carrot or a sprinkle of cinnamon. You can also add extra walnuts for crunch. If you like, drizzle a bit more maple syrup on top for added sweetness. Enjoy this tasty breakfast! To get the best texture in your carrot cake overnight oats, use rolled oats. They soak up liquid well without getting mushy. Mix them with almond milk, grated carrot, and chia seeds. Chia seeds help thicken the oats, giving them a nice creamy feel. Let them sit overnight in the fridge. This allows the oats to soften and the flavors to blend. If you want a thinner texture, add a splash of milk in the morning. Adjusting the sweetness is simple. Start with one tablespoon of maple syrup or honey. This gives a mild sweetness that feels just right. If you like it sweeter, add more syrup a little at a time. You can also use the crushed pineapple for extra sweetness. Taste before you serve. This way, you can customize the oats to fit your preference. Making these oats ahead of time is easy. You can prep a few jars at once for busy mornings. Just follow the steps and divide the mixture into mason jars. Store them in the fridge for up to five days. This makes breakfast quick and hassle-free. If you want to switch things up, you can change the toppings daily. This keeps your meal prep fresh and exciting! {{image_2}} You can easily make this dish vegan and gluten-free. To do this, use almond milk or oat milk. Both are great choices and keep the oats creamy. Make sure your oats are certified gluten-free. This helps avoid any cross-contamination. You can also skip the honey and stick with maple syrup for sweetness. If you want to change the sweetener, try agave nectar or coconut sugar. Both options add unique flavors. Agave nectar is lighter and less thick. Coconut sugar gives a rich, caramel taste. You can adjust the amount based on your taste buds. Start with a small amount and add more if needed. Spices can really change the taste. You could add ginger for a kick or cloves for warmth. Adding fruits can also change things up. Try diced apples for crunch or banana for creaminess. You can even mix in a bit of cocoa for a chocolate twist. The options are endless, and you can make this dish your own. To keep your carrot cake overnight oats fresh, store them in an airtight container. Glass jars work well. Make sure the lid seals tightly. Place the jar in the fridge. This keeps the oats soft and the flavors rich. If you want to save your oats for later, freezing is a great option. First, let the oats cool completely. Then, scoop them into freezer-safe containers. Leave some space at the top for expansion. When ready to eat, thaw them in the fridge overnight. You can also microwave them for a quick meal. In the refrigerator, your carrot cake overnight oats last for about 3 to 5 days. You’ll notice the oats may thicken as they sit. If they get too thick, just stir in a little milk before serving. If you freeze them, they can last for up to 3 months. Just remember to check for any signs of freezer burn before eating. You can store overnight oats in the fridge for up to five days. This means you can make a batch and enjoy them all week. Just remember to keep them in an airtight container to stay fresh. Yes, you can use quick oats! They will soak up the liquid faster. This might change the texture, making them creamier. If you like a smoother feel, go for quick oats. If you prefer a chewier bite, stick with rolled oats. There are many ways to make this recipe your own! Here are some fun ideas: - Add more spices like ginger or cloves for extra flavor. - Swap in different fruits like apples or bananas. - Use different nuts like pecans or almonds for a new crunch. - Try different types of milk, like coconut or oat milk for a twist. - Use sweeteners like agave syrup or stevia if you want less sugar. Feel free to mix and match these options to suit your taste! This article covered everything you need to make delicious carrot cake overnight oats. We explored each ingredient and its benefits. I shared step-by-step instructions for easy prep. You got tips for perfect texture and sweetness. Plus, we discussed variations like vegan options and different flavors. Remember, customize your oats to your taste. Enjoy the ease and health benefits of this dish. Now, go ahead and make your own tasty overnight oats!
    Carrot Cake Overnight Oats Simple and Tasty Dish
  • - Sweet potatoes: You need 2 large sweet potatoes. They provide a sweet base for the nachos. - Olive oil and seasonings: Use 1 tablespoon of olive oil, 1 teaspoon of smoked paprika, and 1 teaspoon of garlic powder. These add flavor and help the sweet potatoes crisp up. - Toppings and garnishes: Gather 1 cup of black beans, 1 cup of corn, and 1 cup of cherry tomatoes. You will also need 1 avocado, 1 cup of shredded cheese, 1/4 cup of green onions, 1/4 cup of fresh cilantro, and 1/2 cup of Greek yogurt or sour cream for serving. Don't forget the optional jalapeño slices for heat. These ingredients create a hearty dish that is both tasty and nutritious. Sweet potatoes offer fiber and vitamins. Black beans add protein, while the toppings bring freshness and color. The cheese melts beautifully, making every bite delicious. Enjoy the mix of flavors and textures in this fun dish! Slicing and seasoning Start with two large sweet potatoes. Slice them into thin rounds. You want them about 1/4 inch thick. This helps them bake evenly and get crispy. In a mixing bowl, add the sweet potato slices. Drizzle with one tablespoon of olive oil. Sprinkle in one teaspoon of smoked paprika and one teaspoon of garlic powder. Add salt and pepper to taste. Toss until the slices are well coated. Arranging for baking Now, lay the sweet potato rounds on a large baking sheet. Make sure to arrange them in a single layer. This allows hot air to circulate around each piece. If they overlap, they won’t crisp up well. Initial bake to crisp Preheat your oven to 425°F (220°C). Bake the sweet potatoes for 20-25 minutes. Flip them halfway through the time. You want them to turn golden brown and crispy around the edges. Once they are done, take them out and reduce the oven temperature to 350°F (175°C). Layering the toppings On a large oven-safe platter, layer half of the baked sweet potato rounds. Then, top with half of the black beans, corn, cherry tomatoes, and shredded cheese. Repeat this with the remaining ingredients. The layers build flavor and texture. Melting the cheese Now, bake the loaded sweet potato nachos for another 10-15 minutes. Keep an eye on them until the cheese melts and bubbles. This is where the magic happens. Adding fresh toppings After baking, carefully remove the nachos from the oven. Let them cool for a minute. Top with diced avocado, green onions, and cilantro. If you like some heat, add jalapeño slices on top. Serve warm with a dollop of Greek yogurt or sour cream on the side. Enjoy your delicious and nutritious creation! Achieving optimal crispiness To get crispy sweet potato nachos, slice the sweet potatoes thin. Aim for 1/4 inch thick rounds. A thin slice helps them cook evenly. Toss them with olive oil, smoked paprika, garlic powder, salt, and pepper. This mix adds flavor and helps with crispiness. Bake them at 425°F for 20-25 minutes. Flip them halfway to ensure even browning. Balancing flavors To balance flavors, mix savory and fresh toppings. Use black beans for protein and corn for sweetness. Fresh cherry tomatoes add color and tang. Diced avocado brings creaminess that contrasts well with the crispy sweet potatoes. Top it with green onions and cilantro for a fresh burst. If you love spice, add jalapeño slices for an extra kick. Additional toppings options Get creative with toppings! You can add sautéed bell peppers or onions for extra flavor. Try using different cheeses like pepper jack for heat or mozzarella for a mild taste. Add a layer of refried beans for richness or some cooked ground turkey for more protein. The options are endless! Spice level adjustments Want more heat? Add more jalapeños or a drizzle of hot sauce. For a milder version, skip the jalapeños. You can also try adding chili powder or cayenne pepper to the sweet potatoes before baking. Adjust the spice to fit your taste. Always remember, you can start small and add more as you go! {{image_2}} You can make loaded sweet potato nachos even healthier with some easy swaps. Use vegan cheese instead of regular cheese. You can find many tasty options at stores. Replace Greek yogurt with a plant-based yogurt. You can also add more veggies like bell peppers or zucchini. This makes the dish colorful and nutritious. Sweet potatoes are naturally gluten-free, so you’re already on the right track! Just make sure any toppings you choose, like cheese or beans, are also gluten-free. Look for brands that clearly mark their products. You can use corn chips if you want a crunchy texture instead of the sweet potatoes. Let your taste buds explore with unique toppings! Try adding roasted chickpeas for extra crunch. Pineapple or mango can add a sweet twist. You might also enjoy adding spicy salsa or guacamole for flavor. Each topping can change the whole dish! Take inspiration from global cuisines. For a Mexican twist, add jalapeños and fresh cilantro. Go Mediterranean by using feta cheese and olives. If you like Asian flavors, top with sesame seeds and green onions. Each variation can bring a new experience to your plate! After enjoying your loaded sweet potato nachos, you may have some left. Store them in an airtight container. This keeps them fresh for up to three days in the fridge. Make sure to let them cool down first. If they stay warm, they can become soggy. For reheating, preheat your oven to 350°F (175°C). Place the nachos on a baking sheet. Heat them for about 10 minutes. This will help regain that crispy texture. You can also use a microwave, but the nachos may not stay crispy. If you want to save nachos for later, freezing is a great option. Start by letting them cool completely. Place them in freezer-safe bags or containers. Remove as much air as possible to avoid freezer burn. They can last up to three months in the freezer. To thaw, move the nachos from the freezer to the fridge overnight. When you're ready to eat, reheat them in the oven at 350°F (175°C) for about 15 minutes. This method keeps the flavors intact and the texture delightful. How to make sweet potato nachos crispy? To make sweet potato nachos crispy, slice the sweet potatoes thin. Toss them with olive oil, smoked paprika, garlic powder, salt, and pepper. Spread them evenly on a baking sheet. Bake at 425°F for 20-25 minutes, flipping halfway. This helps them turn golden and crisp. Can I use different cheese? Yes, you can use different cheeses. Try mozzarella, feta, or pepper jack. Each cheese will add a unique taste. Mix and match to find your favorite combination. Just make sure it melts well. Are sweet potato nachos healthy? Yes, sweet potato nachos are healthy. Sweet potatoes offer fiber, vitamins, and minerals. They provide energy without too many calories. Topping them with black beans and veggies adds extra nutrients. It’s a great dish if you want something tasty and good for you. What are good side dishes to serve with nachos? Good side dishes include fresh salads, guacamole, or salsa. You can also serve a yogurt dip or a light soup. These sides balance the flavors and add freshness to your meal. Enjoying nachos with a variety of sides makes it more fun! Loaded sweet potato nachos are easy to make and taste great. We covered the best ingredients, step-by-step baking, and how to top them for a delicious finish. Remember, you can customize your nachos with different toppings and spices to fit your taste. Storage tips help keep them fresh for later. Sweet potato nachos can be healthy, too. Enjoy experimenting with flavors and creating your perfect plate. You now know how to make these tasty nachos that everyone will love. Give them a try!
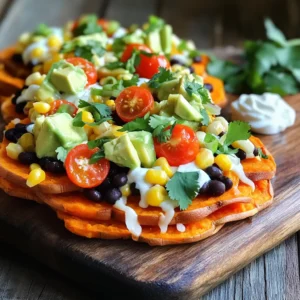
    Loaded Sweet Potato Nachos Tasty and Nutritious Dish
  • - 4 large portobello mushrooms, stems removed - 1 cup cherry tomatoes, halved - 1 cup fresh mozzarella balls, halved - 1/4 cup fresh basil leaves, chopped - 2 tablespoons balsamic glaze - 2 tablespoons olive oil - 2 cloves garlic, minced When I make Caprese stuffed portobello mushrooms, I love the bright flavors. The portobello mushrooms form a strong base. They hold the filling well and add a nice meaty taste. Next, I use sweet cherry tomatoes. When they bake, they burst with juice. I also add fresh mozzarella balls, which melt perfectly. The creamy cheese ties everything together. Fresh basil is key for this dish. It adds a pop of green and a lovely aroma. Balsamic glaze gives a sweet and tangy kick. Olive oil brings richness, while garlic adds depth. Together, these ingredients create a flavorful delight. - Salt and pepper - Fresh basil leaves for garnish Seasoning is also important. I add salt and pepper to boost the taste. For the finishing touch, I use fresh basil leaves as a garnish. This makes the dish look pretty and adds more flavor. You can also think about adding other herbs or spices if you wish. First, clean the portobello mushrooms. Use a damp cloth. Wipe off any dirt. Make sure to remove the stems from each mushroom. This step helps the mushrooms hold the filling well. Next, preheat your oven to 375°F (190°C). This temperature will help the mushrooms cook evenly. Now, it’s time to make the filling. In a bowl, combine the halved cherry tomatoes, mozzarella balls, and chopped basil. This mix gives the dish a fresh taste. Add two cloves of minced garlic for flavor. Pour in two tablespoons of balsamic glaze and two tablespoons of olive oil. Season with salt and pepper. Mix everything gently to ensure all ingredients blend well. Now, let’s stuff the mushrooms. Spoon the tomato and mozzarella mixture into each portobello cap. Fill them generously to the top. Drizzle a little extra olive oil over the stuffed mushrooms. This adds more flavor while baking. Place the baking tray in the oven. Bake for about 20 minutes. The mushrooms should be tender, and the cheese should melt and bubble. Once done, remove them from the oven. Let them cool slightly. Garnish with fresh basil leaves before serving. Enjoy your delicious Caprese stuffed portobello mushrooms! Choosing the right mushrooms Pick large portobello mushrooms. They hold the filling well. Look for firm caps with no spots. This ensures a great texture. Fresh mushrooms taste better and are healthy. Optimal baking techniques Preheat your oven to 375°F (190°C). This helps mushrooms cook evenly. Line your baking tray with parchment paper. This makes cleaning easy. Place mushrooms gill side up. This keeps the filling in. Bake for about 20 minutes. The mushrooms should be tender, and cheese should melt. Serving on a platter Arrange the stuffed mushrooms on a nice platter. It makes the dish look fancy. Use a large plate that fits all mushrooms. This way, guests can see the colors and textures. Drizzling balsamic glaze for decoration Use balsamic glaze for a lovely finish. Drizzle it over the mushrooms just before serving. This adds flavor and looks great. Sprinkle extra fresh basil around the dish. It brings a pop of color and freshness. Enjoy your meal! {{image_2}} If you want to switch things up, try different cheeses. Instead of fresh mozzarella, use burrata for a creamier texture. You can also use feta or goat cheese if you like bolder flavors. Adding vegetables can enhance the dish. Try bell peppers, zucchini, or spinach for extra color and nutrients. Fresh herbs like parsley or oregano can also bring new layers of flavor. For a vegan version, swap out the mozzarella for vegan cheese or creamy cashew cheese. You can also skip the cheese entirely and use more veggies. If you need a gluten-free option, stick with the mushrooms as your base. Ensure any balsamic glaze you use is gluten-free. You can also serve these with a side salad to keep your meal light and fresh. To keep your Caprese stuffed portobello mushrooms fresh, follow these tips: - Store in an airtight container. This helps keep moisture in and flavors intact. - Place in the fridge. They can last up to three days. - For longer storage, freeze the mushrooms. Wrap them tightly in plastic wrap. - Use a freezer-safe bag or container. This prevents freezer burn. To enjoy your leftovers, you can reheat them easily: - Use the oven. Preheat it to 350°F (175°C). Place mushrooms on a baking tray. - Heat for 10 to 15 minutes. This keeps the mushrooms tender and the cheese melty. - You can also use a microwave. Place on a microwave-safe plate. Heat for 1 to 2 minutes. - Check the center to ensure it's warm. Enjoy your mushrooms again! Can I make these mushrooms ahead of time? Yes, you can prepare the filling ahead. Store it in the fridge for up to a day. Just stuff the mushrooms just before baking. This keeps them fresh and tasty. What can I serve with stuffed portobello mushrooms? These stuffed mushrooms pair well with a green salad. You can also serve them with crusty bread or garlic bread. A light pasta dish or grilled veggies work great too. How do I know when the mushrooms are done baking? The mushrooms are done when they are soft and tender. The cheese should be melted and bubbly. If the mushrooms look golden brown and smell amazing, they are ready to enjoy! Caprese stuffed Portobello mushrooms are simple and tasty. You learned the best ingredients, like fresh mozzarella and basil. I shared step-by-step instructions to prepare, assemble, and bake. We also explored tips for perfect cooking and serving. For those who want to experiment, you have options for substitutions and dietary needs. Store and reheat leftovers to enjoy later. Now, go ahead and make these stuffed mushrooms. They are sure to impress anyone who tries them!
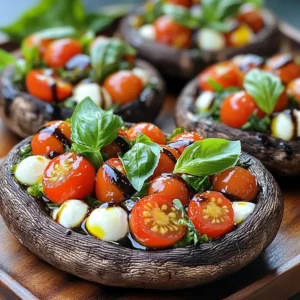
    Caprese Stuffed Portobello Mushrooms Flavorful Delight
  • To make these banana bread protein muffins, you need simple and healthy ingredients. Here's the list: - 3 ripe bananas, mashed - 1 cup rolled oats - 1/2 cup protein powder (vanilla or unflavored) - 1/4 cup almond milk (or any milk of choice) - 1/4 cup honey or maple syrup - 2 large eggs - 1 teaspoon baking powder - 1/2 teaspoon baking soda - 1 teaspoon cinnamon - Pinch of salt - 1/2 cup walnuts or pecans, chopped (optional) - 1/2 cup dark chocolate chips (optional) Each ingredient plays an important role in the muffins. Ripe bananas add natural sweetness and moisture. Rolled oats provide a chewy texture and fiber. The protein powder boosts nutrition, making these muffins a great snack. Almond milk keeps the batter light and adds flavor. Sweeteners like honey or maple syrup enhance taste without refined sugar. Eggs help bind everything together and add protein. Baking powder and soda ensure the muffins rise. Cinnamon gives a warm flavor, while salt balances the sweetness. You can also add walnuts or pecans for a crunchy bite or dark chocolate chips for a sweet surprise. These options let you customize your muffins to suit your taste. Start by preheating your oven to 350°F (175°C). This heat is perfect for baking. Next, get your muffin tin ready. You can use paper liners for easy cleanup or spray the tin with cooking spray. This helps the muffins come out easily after baking. In a large mixing bowl, take three ripe bananas and mash them well. The riper they are, the sweeter your muffins will be. Add in one cup of almond milk, 1/4 cup of honey or maple syrup, and two large eggs. Mix everything together until it is smooth. You want to blend the flavors and make a nice batter base. In another bowl, combine one cup of rolled oats, 1/2 cup of protein powder, one teaspoon of baking powder, 1/2 teaspoon of baking soda, one teaspoon of cinnamon, and a pinch of salt. Stir these dry ingredients together. This step helps evenly distribute the baking powder and soda. Now, slowly add the dry mixture to the wet mixture. Stir gently until just combined. Be careful not to overmix; this keeps the muffins light. If you want to add texture, fold in 1/2 cup of chopped walnuts or pecans and 1/2 cup of dark chocolate chips if you like a sweeter touch. Take your batter and divide it evenly into the muffin tin. Fill each cup about 2/3 full. This gives the muffins room to rise without overflowing. Place the muffin tin in your preheated oven. Bake for about 15-20 minutes. To check if they are done, insert a toothpick in the center. If it comes out clean, they are ready. After baking, let the muffins cool in the tin for about 5 minutes. Then, transfer them to a wire rack to cool completely. To get the best muffin texture, focus on mixing. When you mix the wet and dry ingredients, do it gently. Overmixing will make them tough. You want the batter to be lumpy but combined. Also, make sure your bananas are very ripe. Ripe bananas add moisture and sweetness. This helps keep your muffins soft and fluffy. You can make swaps in this recipe to suit your taste. If you don’t have protein powder, you can use almond flour or coconut flour. For the milk, any milk will work, like oat milk or cow's milk. If you want a sweeter option, swap honey for agave syrup. For nuts, try pecans or sunflower seeds. You can also leave out the chocolate chips if you prefer a more classic muffin. To keep your muffins fresh, store them in an airtight container. They stay good for up to three days at room temperature. If you want them to last longer, freeze them. Wrap each muffin in plastic wrap, then place them in a freezer bag. They will keep well for up to three months. When you’re ready to eat, just thaw them at room temperature or heat them in the microwave. {{image_2}} You can swap the protein powder for different options. Try whey, pea, or soy protein. Each one changes the taste and texture a bit. You can even use Greek yogurt as a protein source. Just adjust the liquid in the recipe. This way, you can keep it fun and fit your needs. Adding different spices or extracts can make these muffins your own. For a warm kick, try adding nutmeg or ginger. You can even mix in some cocoa powder for a chocolate twist. Vanilla or almond extract can boost the flavor too. Just a teaspoon of either will change the game. If you want to lower sugar, use mashed dates or applesauce. These natural sweeteners pack flavor while cutting calories. You can also use stevia or monk fruit for a low-calorie option. Honey and maple syrup are great, but they add sugar. Choose what fits your diet best. Each muffin offers a great mix of nutrients. You get about 150 calories per muffin. They pack around 7 grams of protein. The carbs come in at about 22 grams. Each muffin has around 5 grams of fat. The mix of oats and bananas makes them filling and tasty. - Bananas: Rich in potassium, they help with heart health and digestion. - Rolled oats: Full of fiber, they keep you full and help with digestion. - Protein powder: Provides essential amino acids for muscle growth. - Almond milk: Low in calories and a good source of vitamin E. - Honey or maple syrup: Natural sweeteners that offer antioxidants. - Eggs: Packed with protein and healthy fats. - Walnuts or pecans: Offer omega-3 fatty acids for brain health. - Dark chocolate chips: They add flavor and antioxidants. To make these muffins a complete meal, try serving them with Greek yogurt. A dollop of yogurt adds protein and creaminess. You can also enjoy them with fresh fruit for added vitamins. Pairing muffins with a glass of milk gives extra calcium, too. These combinations make a great snack or breakfast choice. Yes, you can use frozen bananas. Just thaw them first. Frozen bananas work well. They add moisture and sweetness. Mash them up like fresh ones. Using them may actually make your muffins softer. Store your muffins in an airtight container. Keep them at room temperature for up to three days. For longer storage, place them in the fridge. You can also freeze them for up to three months. Just wrap each muffin tightly before freezing. Thaw them in the fridge or microwave when ready to eat. Yes, you can! Replace eggs with flax eggs. Mix one tablespoon of flaxseed meal with three tablespoons of water. Let it sit for five minutes until it thickens. Substitute almond milk with any plant-based milk. Use maple syrup instead of honey for sweetness. You can adjust the sweetness easily. Use less honey or maple syrup if you prefer less sugar. Add more if you like it sweeter. Consider using mashed dates or applesauce as alternatives. These options can add natural sweetness without extra sugar. Dense muffins may be due to overmixing the batter. Mix just until everything is combined. Too much mixing can stir in too much air. Another reason could be using too much flour. Always measure your ingredients carefully. Make sure to spoon flour into the measuring cup instead of scooping. You learned how to make banana bread protein muffins with simple ingredients. We covered prep, mixing, and baking steps. Remember, you can adjust flavors and ingredients to fit your taste. The right storage keeps them fresh longer. Each muffin packs nutrients and energy. Enjoy customizing them for your needs. With these tips, you’ll bake like a pro and impress everyone. Healthy eating can be enjoyable. Dive in and have fun with these muffins!
    Banana Bread Protein Muffins Delightful and Healthy Snack
  • - 1 lb ground chicken - 1 tablespoon olive oil - 1 red bell pepper, diced - 1 carrot, grated - 3 green onions, chopped - 1 cup water chestnuts, diced - 1/4 cup sweet chili sauce - 2 tablespoons soy sauce - 1 tablespoon rice vinegar - 1 tablespoon sesame oil - Salt and pepper to taste - 1 head of butter or romaine lettuce, leaves separated To make Sweet Chili Chicken Lettuce Cups, you need simple, fresh ingredients. The ground chicken gives protein and rich flavor. Red bell pepper adds color and crunch. Grated carrot brings sweetness and texture. Green onions give a mild spice, while water chestnuts add a delightful crunch. The sauce is key. Sweet chili sauce brings a sweet and spicy kick. Soy sauce adds depth. Rice vinegar gives a tangy note. Sesame oil ties everything together with its nutty flavor. Using fresh lettuce, like butter or romaine, makes the perfect cup. It holds the filling well and adds crispness. These ingredients come together to create a dish that is both tasty and fun to eat. First, heat the olive oil in a large skillet over medium-high heat. The oil should shimmer but not smoke. Next, add the ground chicken to the skillet. Cook it for about 5 to 7 minutes. Break it apart with a wooden spoon. It should turn a nice brown color. This step gives the chicken a rich flavor. Now, it’s time to add some color and crunch. Stir in the diced red bell pepper, grated carrot, chopped green onions, and diced water chestnuts. Sauté this mixture for about 3 to 4 minutes. You want the vegetables to be tender but still crisp. This mix adds freshness to your dish. In a small bowl, whisk together the sweet chili sauce, soy sauce, rice vinegar, and sesame oil. This sauce will bring everything together. Pour the sauce mixture over the chicken and vegetables in the skillet. Mix well to coat everything evenly. Cook for an additional 2 to 3 minutes. This allows the flavors to meld beautifully. Remove the skillet from heat and let it cool slightly. Now, it’s time to build your cups! Spoon the chicken mixture into the lettuce leaves. You can use butter or romaine lettuce. For a great look, arrange the filled cups on a serving platter. Garnish with extra chopped green onions or sesame seeds. Serve with more sweet chili sauce on the side for dipping. Enjoy your fresh and flavorful creation! To ensure even browning of your ground chicken, break it apart as it cooks. Use a wooden spoon to crumble the meat. Spread it in the skillet so it cooks evenly. Keep the heat at medium-high for the best results. For sautéing the veggies, add them after the chicken is browned. Start with the bell pepper and carrot first. These will soften in about three to four minutes. Add the green onions and water chestnuts last for a nice crunch. Consider adding a pinch of garlic powder or ginger for extra flavor. A bit of chopped cilantro can also brighten the dish. For a spicy kick, mix in red pepper flakes or sriracha. Garnish your lettuce cups with chopped green onions or sesame seeds. This adds a lovely touch and enhances the look of the dish. You can also serve extra sweet chili sauce on the side for dipping. One common mistake is overcooking the vegetables. They should stay vibrant and crisp. Keep an eye on them while sautéing. Another mistake is skipping the seasoning step. Always taste the mixture before serving. A sprinkle of salt and pepper can make a big difference in flavor. {{image_2}} You can easily change the protein in this dish. Ground turkey works well for a lighter option. It has a similar taste and texture to chicken. You can also use ground beef if you want a richer flavor. For those who prefer plant-based meals, consider using lentils or chickpeas. They add protein and fiber. Making your own sweet chili sauce is fun and simple. You can mix sugar, rice vinegar, and chili flakes for a fresh taste. If you like more heat, add extra chili paste or sriracha. This lets you control the spice level. You can make it sweeter by adding more sugar or honey. These lettuce cups pair nicely with many side dishes. Try serving them with steamed rice or a simple salad. For a twist, you can turn the cups into a wrap. Just use tortillas instead of lettuce. You can chop up the lettuce and mix it into a salad. This gives you a fresh take on the dish. To keep your Sweet Chili Chicken Lettuce Cups fresh, follow these steps. First, allow the chicken mixture to cool completely. This helps prevent condensation in storage. Use airtight containers to store the chicken filling. Divide it into portions if you plan to eat it later. For the lettuce, wrap the leaves in a damp paper towel. Place them in a plastic bag, sealing it loosely. This keeps the leaves crisp and fresh. You can reheat the chicken mixture easily. The microwave works well. Place the chicken in a microwave-safe dish. Cover it to keep moisture in. Heat for about 1-2 minutes or until hot. If you prefer, use the stovetop. Heat a skillet over medium heat. Add a splash of water to keep it moist. Stir until heated through. Remember to keep the lettuce separate. Reheat just the chicken, and serve it fresh in the lettuce cups. You can freeze the chicken mixture for later. Place it in an airtight container or freezer bag. Remove as much air as possible to avoid freezer burn. Label the bag with the date. It can last up to three months. When ready to eat, thaw it in the fridge overnight. Reheat it on the stovetop or microwave as described above. This method lets you enjoy these tasty cups any time! Yes, you can use various lettuces for your cups. Butter lettuce works well because it is soft and wraps easily. Romaine is another great choice; it has a nice crunch. You can also try iceberg lettuce for an extra crisp bite. Each type adds a unique texture, so feel free to experiment! These cups pair nicely with several side dishes. Consider serving them with a light cucumber salad for freshness. Rice or quinoa can make a good side too. For drinks, iced tea or sparkling water enhances the meal without overpowering the flavors. You can store these lettuce cups in the fridge for up to three days. Keep the filling and lettuce separate to maintain freshness. When you are ready to eat, just assemble them again. This way, the lettuce stays crisp, and the filling remains flavorful. Yes, you can make Sweet Chili Chicken Lettuce Cups gluten-free. Use gluten-free soy sauce instead of regular soy sauce. Always check labels to ensure all ingredients meet your dietary needs. This way, everyone can enjoy this tasty dish without worry! In this blog post, we explored how to make delicious Sweet Chili Chicken Lettuce Cups. We covered the key ingredients, step-by-step cooking methods, and tips for the best results. You learned about sauces, serving ideas, and storage tips to keep leftovers fresh. Creating these cups is easy and fun. Feel free to experiment with different proteins and sauces. Enjoy this tasty meal with your family. You’ll impress everyone with your cooking skills and fresh flavors.
    Sweet Chili Chicken Lettuce Cups Flavorful and Fresh
  • - 1 cup all-purpose flour - 1 cup granulated sugar - 1/2 cup unsweetened cocoa powder - 1 tsp baking powder - 1/2 tsp baking soda - 1/4 tsp salt - 2 large eggs - 1/2 cup vegetable oil - 1/2 cup buttermilk (or 1/2 cup milk + 1/2 tsp vinegar) - 1 tsp vanilla extract - 1/2 cup creamy peanut butter - 1/2 cup mini chocolate chips (optional) - 1/2 cup unsalted butter, softened - 1/2 cup creamy peanut butter - 2 cups powdered sugar - 3-4 tbsp milk - 1/2 tsp vanilla extract - Mini chocolate chips for topping - Mini chocolate chips for cupcakes and topping These ingredients create a sweet treat that is hard to resist. The blend of chocolate and peanut butter makes them rich and satisfying. Using fresh ingredients is key for the best flavor. Enjoy the smooth frosting and fluffy cupcakes that come together so well. The mini chocolate chips add a fun touch, but they are not a must. You can choose to skip them if you prefer plain cupcakes. 1. Preheat your oven to 350°F (175°C). Line a muffin tin with cupcake liners. 2. In a large bowl, mix together: - 1 cup all-purpose flour - 1 cup granulated sugar - 1/2 cup unsweetened cocoa powder - 1 tsp baking powder - 1/2 tsp baking soda - 1/4 tsp salt Stir until well blended. 3. In another bowl, beat 2 large eggs. Add: - 1/2 cup vegetable oil - 1/2 cup buttermilk - 1 tsp vanilla extract Mix until smooth. 4. Pour the wet mix into the dry mix. Stir until just combined. Don't overmix! 5. Fold in 1/2 cup creamy peanut butter. If using, add 1/2 cup mini chocolate chips. Stir gently. 6. Fill each cupcake liner about 2/3 full with batter. 7. Bake for 18-20 minutes. Check for doneness with a toothpick. It should come out clean. 8. While the cupcakes cool, prepare the frosting. Beat together: - 1/2 cup unsalted butter, softened - 1/2 cup creamy peanut butter Until fluffy. 9. Gradually mix in 2 cups powdered sugar. Add 3-4 tbsp milk as needed. Stir in 1/2 tsp vanilla extract. 10. Once the cupcakes are cool, frost them with the peanut butter mix. Top with mini chocolate chips for a fun finish. - Avoiding overmixing: Mix the batter until just combined. Overmixing makes cupcakes dense. Use a spatula to fold in the peanut butter gently. - Checking for doneness: Insert a toothpick into the center. If it comes out clean, your cupcakes are done. Keep an eye on the time, around 18-20 minutes works well. - Achieving the perfect texture: Beat the butter and peanut butter well. It should be fluffy and creamy. Add powdered sugar slowly to avoid a sugar cloud. - Decorating ideas with mini chocolate chips: After frosting, sprinkle mini chocolate chips on top. This adds a nice crunch and makes them look fancy. - Mismeasuring ingredients: Accurate measurements are key. Use a kitchen scale for precision, especially for flour and sugar. - Not letting cupcakes cool before frosting: Cool cupcakes completely before frosting. This prevents the frosting from melting and keeps your design intact. {{image_2}} To make these cupcakes vegan, you can swap the eggs with flaxseed meal. Mix 1 tablespoon of flaxseed meal with 2.5 tablespoons of water. Let it sit for five minutes to thicken. For the buttermilk, use almond milk with a splash of vinegar. This change keeps the cupcakes moist yet dairy-free. If you need gluten-free cupcakes, substitute all-purpose flour with almond or oat flour. Both options keep the cupcakes soft and tasty. You can also use a gluten-free blend that includes xanthan gum. This helps provide the right texture and allows them to rise well. Get creative with flavors! You can add a pinch of cinnamon or nutmeg for warmth. Vanilla or almond extract can also enhance the taste. For a fun twist, try adding a few tablespoons of coffee. It deepens the chocolate flavor and adds a unique touch to the cupcakes. You can store chocolate peanut butter cupcakes at room temperature. Keep them in an airtight container. This helps keep them moist. If your kitchen is warm, use the fridge. Cold air can dry them out. Always let them cool before storing. This prevents condensation and sogginess. Freezing is a great option if you want to save some. To freeze cupcakes, wrap each one tightly in plastic wrap. Place them in a freezer bag or container. For frosting, store it in a separate airtight container. To thaw, move them to the fridge overnight. You can also leave them out for a few hours. These cupcakes last about 3 to 4 days at room temperature. In the fridge, they can last up to a week. Check for signs of spoilage. If they smell off or look dry, it’s best to toss them. Freshness is key to enjoying their rich flavor! Yes, you can make these cupcakes ahead of time. Here are some tips: - Bake the cupcakes and let them cool completely. - Store them in an airtight container at room temperature for up to two days. - You can also freeze the cupcakes for up to three months. Just wrap them well. - Frost them just before serving for the best taste. To check if your cupcakes are done, use the toothpick test. Insert a toothpick into the center of a cupcake. If it comes out clean or with a few crumbs, they are ready. - Be careful not to overbake, as this can make them dry. - Start checking around 18 minutes for best results. Yes, you can use crunchy peanut butter. It will change the texture a bit. - The cupcakes will have a delightful crunch. - The flavor will still be rich and tasty, but with added texture. - Be aware that the frosting will also have some crunch if you use it. You learned how to make delicious chocolate peanut butter cupcakes. We covered important ingredients and detailed steps for baking and frosting. I also shared tips to avoid common mistakes and variations for special diets. These cupcakes are fun and easy to make. Enjoy baking and experimenting. You can impress anyone with these treats! Happy baking!
    Chocolate Peanut Butter Cupcakes Irresistible Delight
  • - 1 pound smoked sausage, sliced into 1-inch pieces - 2 medium sweet potatoes, peeled and cubed - 1 red bell pepper, chopped - 1 yellow bell pepper, chopped - 1 red onion, chopped For this dish, I use smoked sausage for its rich taste. Sweet potatoes add a nice sweetness. The peppers and onion bring color and crunch. - 3 tablespoons balsamic glaze - 2 tablespoons olive oil - 1 teaspoon garlic powder - 1 teaspoon dried thyme - 1/2 teaspoon smoked paprika - Salt and pepper to taste The balsamic glaze adds depth. Olive oil helps everything roast well. Garlic powder, thyme, and paprika bring out the flavors. Salt and pepper balance the dish. - Fresh parsley, chopped (for garnish) Fresh parsley adds a burst of color. It gives a fresh taste and makes the dish look pretty. Always sprinkle it on just before serving. - Preheating the oven Start by preheating your oven to 425°F (220°C). This step helps cook the dish evenly. - Preparing the ingredients Next, peel and cube the sweet potatoes. Chop the red and yellow bell peppers and the red onion. Slice the smoked sausage into 1-inch pieces. - Combining ingredients In a large mixing bowl, add the sausage, sweet potatoes, bell peppers, and onion. - Adding seasonings Drizzle olive oil and balsamic glaze over the mixture. Sprinkle in garlic powder, thyme, smoked paprika, salt, and pepper. Toss everything well. You want each piece coated nicely with flavor. - Spreading on the baking sheet Spread the mixture onto a large baking sheet lined with parchment paper. Make sure to give space between the pieces for even cooking. - Cooking times and techniques Bake in the oven for 25-30 minutes. Stir halfway through to ensure even cooking. The sweet potatoes should become tender, and the sausage should brown nicely. To make sweet potatoes soft and tasty, cook them until tender. This takes about 25 to 30 minutes. Check them by poking with a fork. If it goes in easily, they are ready. Cutting sweet potatoes into uniform cubes helps them cook evenly. Aim for 1-inch pieces. This size allows them to roast well and absorb flavors. You can use many types of sausage for this dish. Smoked sausage adds great flavor, but you can choose chicken or turkey sausage for a lighter option. For dietary needs, try plant-based sausages. They work well and keep the meal tasty. Just check the package for cooking times. Want to boost flavor? Add herbs like rosemary or oregano. A pinch of red pepper flakes can add heat. For marinating, let the sausage and veggies sit in balsamic glaze for 30 minutes before cooking. This helps flavors blend better. Enjoy your meal with a flavor kick! {{image_2}} You can add many other veggies to this dish. Consider using broccoli, zucchini, or carrots. These veggies cook well and add great taste and color. Seasonal swaps work well too. In fall, try adding Brussels sprouts or butternut squash. In summer, fresh corn or green beans shine. If you prefer chicken, use boneless thighs or breasts. Cut them into bite-sized pieces just like the sausage. Tofu is another great choice for a vegetarian dish. Firm tofu holds up well during cooking. For a vegan option, skip the sausage and tofu, and focus on the veggies and balsamic glaze. You can change the glaze for a new taste. Try a honey mustard or teriyaki sauce for a different vibe. If you like some heat, add red pepper flakes or sliced jalapeños. These twists make the dish exciting and cater to your taste buds. To store leftovers, let the dish cool down first. Place it in an airtight container. This keeps it fresh and tasty. You can store it in the fridge for up to three days. For the best taste, eat it within two days. If you want to freeze it, use a freezer-safe container. Portion it out into smaller servings. Make sure to leave some space at the top for expansion. You can freeze it for up to three months. When ready to eat, thaw it in the fridge overnight. Reheat in the oven or microwave until hot. You can prepare this dish in advance. Pre-chop the sweet potatoes and veggies. Store them in the fridge to save time. Portion the sausage into bags so they are ready to use. This makes cooking easy on busy days. Yes, you can use raw sausage. Just remember to cook it longer. Raw sausage needs more time to reach a safe temperature. Cook it for about 30-35 minutes. Check that it is no longer pink inside. This change may also change the flavor. Smoked sausage has a rich taste that raw sausage does not. This dish pairs well with several sides. Here are some ideas: - A fresh green salad adds a nice crunch. - Quinoa or rice can soak up the flavors. - Roasted broccoli or green beans make a great veggie side. - Garlic bread is tasty for a hearty meal. The total cooking time is about 45 minutes. This includes 15 minutes of prep and 25-30 minutes of baking. Make sure to stir halfway to ensure even cooking. The sweet potatoes should be tender and the sausage browned when done. Yes, this dish can be made gluten-free. All the main ingredients are gluten-free. Just ensure your balsamic glaze is also gluten-free. Some brands may add gluten-based thickeners. Check the label to be safe. This blog post detailed a tasty dish made with smoked sausage, sweet potatoes, and veggies. I shared steps for mixing, baking, and perfecting the dish. You can adjust flavors and ingredients to fit your style. Remember to store leftovers properly to enjoy them later. By making simple changes, like using different proteins or glazes, you can keep the meal exciting. Experiment and have fun! With these tips, you'll create a dish that everyone loves.
    Sheet-Pan Balsamic Sausage & Sweet Potatoes Delight
  • - 4 bone-in chicken thighs, skin on - 2 tablespoons olive oil - 1 tablespoon fresh lemon juice - 1 teaspoon lemon zest - 2 cloves garlic, minced - 1 teaspoon dried oregano - 1 teaspoon dried thyme - Salt and pepper to taste - 1 cup cherry tomatoes, halved - 1 cup baby spinach - Fresh parsley, chopped (for garnish) Bone-in chicken thighs give great flavor. The skin helps keep the meat juicy. Olive oil and lemon juice add bright notes. Fresh herbs like oregano and thyme bring depth. Garlic adds a lovely aroma. Cherry tomatoes and spinach add color and nutrition. You can try other herbs for extra flavor. Consider using rosemary or parsley. Fresh herbs work well, but dried herbs are fine too. Always pick high-quality ingredients. Fresh chicken and organic vegetables taste best. Look for vibrant colors and firm textures. If you want to switch the chicken, try bone-in pork chops. They cook well and taste great. For a veggie option, use mushrooms or eggplant. They soak up flavors nicely and keep things interesting. Always feel free to mix and match ingredients based on what you have. {{ingredient_image_1}} Start by grabbing a small bowl. In this bowl, whisk together these ingredients: - 2 tablespoons olive oil - 1 tablespoon fresh lemon juice - 1 teaspoon lemon zest - 2 cloves garlic, minced - 1 teaspoon dried oregano - 1 teaspoon dried thyme - Salt and pepper to taste Make sure to mix well. This ensures all flavors blend. Use a whisk for the best results. You want a smooth marinade. To coat the chicken evenly, pour the marinade over the chicken thighs. Move the chicken around in the bowl. This helps the flavor stick to every part. Now it's time for the skillet. Arrange the chicken thighs in a large oven-safe skillet. Place them skin-side up. Next, add the halved cherry tomatoes around the chicken. This adds flavor and color. Preheat your oven to 400°F (200°C). Roast the chicken for 30-35 minutes. The chicken is done when it reaches an internal temperature of 165°F (75°C). Check the skin; it should be crispy. If it’s not crispy enough, you can broil it for a few minutes at the end. During the last 5 minutes of cooking, add 1 cup of baby spinach on top of the chicken. The spinach will wilt nicely, adding a fresh touch. Once done, take the skillet out of the oven. Let the chicken rest for a few minutes. Resting helps the juices stay in the meat. Before serving, sprinkle fresh parsley on top. This adds a bright look and fresh flavor. Enjoy your One-Pan Lemon Herb Chicken Thighs! To get crispy skin on your chicken thighs, start with dry skin. Pat the thighs with a paper towel to remove moisture. This step helps the skin crisp up nicely. Next, use a good amount of olive oil in your marinade. The oil helps create a golden crust. When you roast the chicken, place it skin-side up. This allows the heat to crisp the skin perfectly. To check for doneness, use a meat thermometer. Insert it into the thickest part of the thigh. The chicken should reach 165°F (75°C) for safe eating. If you don’t have a thermometer, you can cut into the thigh. The juices should run clear, not pink. Feel free to experiment with different herbs to change the flavor. Instead of oregano and thyme, try rosemary or basil. Fresh herbs give a nice pop of flavor. You can also mix in a splash of white wine or chicken broth for added depth. Marinades can add layers of taste. Let the chicken sit in the marinade for at least 30 minutes. For more flavor, marinate it overnight in the fridge. This allows the herbs to infuse into the meat. For one-pan meals, an oven-safe skillet is a must. A cast-iron skillet works great for heat retention. It helps cook the chicken evenly and keep it juicy. If you don’t have cast iron, a good stainless steel skillet will also work. Make sure your skillet is large enough to hold the chicken thighs. You want enough space for the cherry tomatoes and spinach to cook well. Using the right tools makes cooking easier and results in better meals. Pro Tips Marinade Time is Key: For even more flavor, let the chicken marinate in the refrigerator for at least 30 minutes or up to overnight before cooking. Skin-On for Crispy Texture: Keeping the skin on the chicken thighs will help achieve a crispy texture while keeping the meat juicy. Add a Kick: If you like a bit of heat, consider adding crushed red pepper flakes to the marinade for an extra spicy kick. Fresh Herbs Matter: Using fresh herbs instead of dried can elevate the dish; feel free to substitute with fresh oregano or thyme for a brighter flavor. {{image_2}} You can make this dish even more tasty. Try adding Mediterranean flavors. Use olives, artichokes, or feta cheese. These add a nice twist. If you want heat, add red pepper flakes. They give a spicy kick without overpowering the dish. If you need a gluten-free meal, this recipe works well. All the ingredients are gluten-free. To make it low-carb or keto-friendly, skip the cherry tomatoes. You can add more spinach instead. This keeps the meal light and healthy while still being delicious. You can prepare this dish ahead of time. Marinate the chicken thighs in the fridge. This makes weeknight meals easy. If you want to save it for later, freeze the cooked chicken. It stays tasty for up to three months. Just thaw it in the fridge before reheating. To keep your One-Pan Lemon Herb Chicken Thighs fresh, follow these steps: - Refrigeration: Place leftovers in an airtight container. This keeps moisture in and air out. They stay good for up to 3 days. - Freezing: If you want to save them longer, freeze the chicken. Wrap each piece in plastic wrap, then place in a freezer bag. This helps prevent freezer burn. You can freeze them for up to 3 months. When reheating your chicken, aim to keep it juicy and flavorful: - Oven Method: Preheat your oven to 350°F (175°C). Place the chicken on a baking sheet. Heat for 15-20 minutes. This helps keep the skin crispy. - Microwave Method: If you're short on time, use the microwave. Place chicken on a microwave-safe plate. Heat in 30-second intervals until warm. Be careful not to overcook. Knowing how long your food lasts is key: - Storage Duration: In the fridge, your chicken lasts about 3 days. If frozen, it can last up to 3 months. - Spoilage Signs: Look for changes in color or smell. If the chicken feels slimy or has a sour odor, it's best to toss it. Always trust your senses! Yes, you can use boneless chicken thighs. They will cook faster than bone-in ones. Adjust your cooking time to about 20-25 minutes. Check for a golden brown color and juicy texture. Boneless thighs still soak up the lemon and herb flavors well. To check if chicken is done, use a meat thermometer. Insert it into the thickest part of the thigh. The internal temperature should be 165°F (75°C). If you do not have a thermometer, cut into the chicken. The meat should be opaque and the juices should run clear. This dish pairs well with several sides. Here are some great options: - Garlic mashed potatoes - Quinoa or rice - A fresh green salad - Roasted vegetables These sides balance the bright flavors of the chicken. Yes, you can prepare the chicken in advance. Marinate it and store it in the fridge up to 24 hours. This enhances the flavor. Cook the chicken just before serving for the best texture. Leftovers can last in the fridge for three to four days. This blog post covered how to make delicious one-pan lemon herb chicken thighs. We explored main ingredients like bone-in chicken and fresh herbs. I shared step-by-step instructions for preparing, cooking, and finishing your dish. You learned tips for perfecting the chicken and ways to customize flavors. Remember, experimenting with herbs and adjusting for dietary needs can enhance your meal. Follow my storage tips for fresh leftovers. Enjoy this simple recipe to make weeknight dinners easy and tasty!
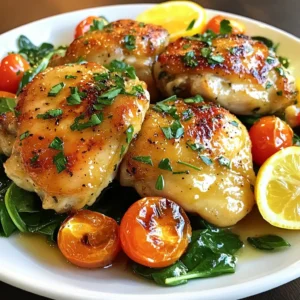
    One-Pan Lemon Herb Chicken Thighs Savory Delight
  • To make delicious pumpkin cheesecake bars, you need these key ingredients: - 1 ½ cups graham cracker crumbs - ½ cup unsalted butter, melted - 2 tablespoons sugar - 16 oz cream cheese, softened - 1 cup pumpkin puree - 1 cup sugar - 3 large eggs - 1 teaspoon vanilla extract - 1 teaspoon ground cinnamon - ½ teaspoon ground nutmeg - ¼ teaspoon ground ginger - ¼ teaspoon salt - Optional toppings: whipped cream, chopped pecans or walnuts These ingredients create a rich, creamy filling and a sweet, crunchy crust. The graham cracker crumbs give a nice texture. The melted butter helps the crust hold together. Sugar adds sweetness to both the crust and filling. Cream cheese makes the bars creamy and smooth. Pumpkin puree gives the bars their signature flavor and color. The eggs help bind everything together. Spices like cinnamon, nutmeg, and ginger bring warmth and depth to each bite. The salt balances the sweetness perfectly. For a special touch, you can add whipped cream or nuts on top when serving. Each ingredient plays a role in making these bars a tasty treat. Set your oven to 350°F (175°C) for the best baking. This temperature helps the bars cook evenly. In a bowl, mix together 1 ½ cups of graham cracker crumbs, ½ cup of melted unsalted butter, and 2 tablespoons of sugar. Stir well until the crumbs are coated. Press this mixture firmly into the bottom of a 9x13 inch baking dish. Bake the crust for 10 minutes. Remove it and let it cool before adding the filling. In a large bowl, beat 16 oz of softened cream cheese with a hand mixer until smooth. Then, add 1 cup of pumpkin puree, 1 cup of sugar, and 3 large eggs. Mix in 1 teaspoon of vanilla extract, 1 teaspoon of ground cinnamon, ½ teaspoon of ground nutmeg, ¼ teaspoon of ground ginger, and ¼ teaspoon of salt. Beat until the mixture is creamy and free of lumps. Pour the cheesecake filling over the cooled crust. Use a spatula to spread it evenly. Bake in the preheated oven for 30 to 35 minutes. Check for doneness by ensuring the edges are set and the center has a slight jiggle. Let the bars cool at room temperature for 1 hour after baking. Then, transfer them to the fridge. Chill for at least 3 hours or overnight. This step helps the bars set properly. Once chilled, lift the cheesecake out of the pan by holding the parchment paper overhang. Cut into bars using a sharp knife. Serve chilled, adding whipped cream and chopped pecans or walnuts on top if you like. To avoid lumps in your filling, use softened cream cheese. Cold cream cheese does not blend well. Beat it alone first until it's creamy. Then, add the pumpkin puree and sugar. Mix until smooth. Always mix on low speed to keep air out. This helps keep your bars dense and rich. For even baking, check your oven temperature with a thermometer. Sometimes, ovens can be off. Use a glass or metal pan, as both work well. Place your pan in the middle of the oven, away from the walls. This helps prevent cracks. If you see cracks, do not worry! They will be covered by toppings. When serving, lift the bars using the parchment paper. Cut them into squares for easy serving. A dollop of whipped cream adds a nice touch. For crunch, sprinkle chopped pecans or walnuts on top. These add flavor and texture. You can also serve them with a drizzle of caramel sauce for a sweet twist. {{image_2}} You can switch up the crust to add fun flavors. Instead of graham crackers, try using Oreo cookies for a chocolatey twist. Just crush them into fine crumbs and mix with melted butter. You can also use almond flour for a nutty flavor. This crust is great for gluten-free diets. Adding spices can make your pumpkin cheesecake bars even better. Try mixing in some extra cinnamon or a pinch of cloves for warmth. You can also add chocolate chips to the filling for a sweet surprise. Dark chocolate pairs nicely with pumpkin, too. If you need a gluten-free version, use almond flour or gluten-free cookies for the crust. For a dairy-free option, swap cream cheese with a vegan cream cheese alternative. You can also use coconut cream for a rich texture. Adjust the sugar to taste, and you’re good to go! To keep your pumpkin cheesecake bars fresh, store them in the refrigerator. Use an airtight container to prevent drying out. You can also cover the bars with plastic wrap. If needed, you can freeze them. Wrap each bar tightly in plastic wrap, then place them in a freezer bag. This keeps them safe from freezer burn. These pumpkin cheesecake bars can last in the fridge for about 5 to 7 days. If you freeze them, they can stay fresh for up to 3 months. Just remember to label the bags with the date. This helps you keep track of how long they have been stored. You can serve these bars chilled straight from the fridge. If you prefer them warm, heat them gently. Place a bar on a microwave-safe plate and heat for about 10 to 15 seconds. This warms them without cooking them further. Enjoy them with a dollop of whipped cream or a sprinkle of nuts for extra flavor! Yes, you can use homemade pumpkin puree. Fresh pumpkin gives a bright flavor. It can also be smoother than canned. To make it, roast a pumpkin, scoop out the flesh, and blend until smooth. Canned pumpkin is convenient and has a consistent flavor. Both options work well in these bars. Look for a few signs of doneness. The edges should be set and look firm. The center should have a slight jiggle. If it’s too wobbly, it needs more time. A toothpick inserted should come out mostly clean. Allowing it to cool will help it set more. Yes, you can make these bars ahead of time. They store well in the fridge. After baking, let them cool completely. Cover them in plastic wrap or foil. They can last for up to a week in the fridge. This makes them perfect for gatherings. You can use alternatives like Greek yogurt or ricotta cheese. Cream cheese gives a rich taste, but these options add a different texture. Silken tofu can also work for a dairy-free choice. Each option changes the flavor slightly, so choose what you prefer. This blog post covered making delicious pumpkin cheesecake bars. We discussed the ingredients, step-by-step instructions, and tips for perfecting your dessert. You learned about variations, storage, and common questions. Remember, you can mix flavors and make it your own. Try different crusts and toppings to suit your taste. You can impress friends and family with this tasty treat. Enjoy baking and savoring every bite of your pumpkin cheesecake bars!
    Pumpkin Cheesecake Bars Rich and Creamy Dessert Treat
  • - 1 pound boneless, skinless chicken breasts, diced - 8 ounces fettuccine pasta - 4 cups chicken broth - 1 cup heavy cream - 1 cup grated Parmesan cheese The chicken is the star here. I use boneless, skinless chicken breasts for ease. Dicing them helps them cook quickly and evenly. Fettuccine pasta works great in this dish, soaking up the sauce well. Chicken broth adds depth to the flavor. Heavy cream gives the dish its rich, creamy texture. Lastly, grated Parmesan cheese adds that classic cheesy flavor that we all love. - 2 tablespoons olive oil - 4 cloves garlic, minced - 1 teaspoon Italian seasoning - Salt and pepper, to taste - 1 cup frozen peas - Fresh parsley, chopped (for garnish) Olive oil helps to brown the chicken and gives flavor. Garlic adds a wonderful aroma and taste. Italian seasoning brings together those warm, herby notes. Don’t forget salt and pepper; they make everything taste better! I like to add peas for a pop of color and sweetness. Finally, fresh parsley not only brightens the dish but adds freshness as a garnish. 1. Start by heating 2 tablespoons of olive oil in a large pot over medium heat. This oil adds flavor and helps cook the chicken evenly. 2. Next, add 1 pound of diced chicken to the pot. Season the chicken with salt, pepper, and 1 teaspoon of Italian seasoning. Cook it for about 5 to 7 minutes. You want the chicken to brown and cook fully. 1. After browning the chicken, add 4 cloves of minced garlic to the pot. Sauté it for 1 to 2 minutes until it smells great. This step adds a rich flavor to your dish. 2. Now, pour in 4 cups of chicken broth and bring it to a boil. Once boiling, stir in 8 ounces of fettuccine pasta. Lower the heat to a simmer. Cook the pasta for 10 to 12 minutes, stirring occasionally. You want the pasta to be al dente and most of the liquid absorbed. 1. Once the pasta is cooked, lower the heat. Stir in 1 cup of heavy cream and 1 cup of grated Parmesan cheese. Mix until the sauce is smooth and creamy. 2. Fold in 1 cup of frozen peas and cook for an additional 2 to 3 minutes. This adds a pop of color and sweetness. Taste your dish and adjust the seasoning if needed. 3. Remove the pot from heat and let it rest for a couple of minutes. This helps thicken the sauce. Enjoy your creamy one-pot chicken Alfredo pasta! To make your dish creamy, heavy cream plays a big part. It adds richness and smoothness. Use about one cup for a perfect balance. Parmesan cheese is also key. It brings flavor and helps thicken the sauce. Grate it fresh for the best taste. Mix it in right after the cream, so it melts evenly. When cooking pasta, always use a large pot. This gives it room to move. Stir the pasta often to keep it from sticking. Cook it until it is al dente, which means it has a slight bite. Taste your dish as you go. Adjust salt and pepper to match your liking. You can always add more, but it's hard to take it out. Garnish your dish with fresh parsley. It adds color and a fresh taste. Just chop it finely and sprinkle it on top. For serving, use shallow bowls to show off the creamy pasta. You can pair it with a side salad or garlic bread for a complete meal. {{image_2}} You can easily add veggies to your one-pot chicken Alfredo. Spinach is a great choice. It wilts down nicely and adds color. Just toss in a couple of handfuls toward the end of cooking. Broccoli is another option. It adds crunch and a fresh taste. Steam or blanch it first, then mix it in right before serving. If you want to switch up the protein, shrimp works perfectly. Use peeled shrimp and add it with the garlic. Cook until pink, which takes just a few minutes. Tofu is another great option, especially for a meatless meal. Press it first, then cube it. Sauté it with the chicken for a tasty twist. For a richer flavor, try making your own Alfredo sauce. Use butter, cream, and cheese, and season it to your taste. You can also enhance the flavor of store-bought sauce. Add spices like nutmeg or crushed red pepper. This will give your dish a unique kick. Experiment with herbs like basil or oregano for a fresh twist. To keep your leftovers fresh, use airtight containers. Glass or plastic containers work great. Store the pasta in the fridge for up to three days. After that, the cream may break down. The best way to reheat this dish is on the stove. Use low heat and add a splash of chicken broth. This helps keep the cream smooth. Stir it often to make sure it heats evenly. You can also use a microwave, but stir halfway through to avoid hot spots. You can freeze this meal if you have extra. Portion it into freezer-safe bags or containers. Make sure to leave some space for expansion. It’s best used within three months. When you are ready to eat, thaw it in the fridge overnight. Reheat on the stove, adding a bit of broth for creaminess. To make one-pot chicken Alfredo pasta, start with these key ingredients: - 1 pound boneless, skinless chicken breasts, diced - 2 tablespoons olive oil - 4 cloves garlic, minced - 1 teaspoon Italian seasoning - Salt and pepper, to taste - 8 ounces fettuccine pasta - 4 cups chicken broth - 1 cup heavy cream - 1 cup grated Parmesan cheese - 1 cup frozen peas - Fresh parsley, chopped (for garnish) For ingredient substitutions, you can use chicken thighs instead of breasts for more flavor. If you want a lighter dish, swap heavy cream for half-and-half. Here’s a simple overview of the steps: 1. Heat olive oil in a pot. 2. Cook the chicken until golden. 3. Add garlic and sauté. 4. Pour in chicken broth, then add pasta. 5. Cook until pasta is tender. 6. Stir in cream and cheese. 7. Add peas and heat through. 8. Garnish and serve. Yes, you can use other pasta types like penne or rotini. They will work well with the sauce. Just keep in mind that cooking times may change. Thinner pasta cooks faster while thicker types may take longer. Always check for doneness before serving. For side dishes, consider a fresh salad or garlic bread. A light Caesar salad pairs nicely with the creamy pasta. You could also serve steamed broccoli to add some color and nutrition. Pairing ideas include a glass of white wine or sparkling water with lemon. These drinks balance the richness of the Alfredo sauce and keep the meal refreshing. This recipe for one-pot chicken Alfredo pasta combines simple steps and rich flavors. You start with chicken, fettuccine, and a creamy sauce, seasoning it just right. Then, I shared tips on cooking, presentation, and even variations with veggies or proteins. You can store leftovers easily and reheat them without losing taste. Remember, cooking should be fun and easy. With this dish, you can impress anyone at your dinner table. Enjoy making it your own!
    One-Pot Chicken Alfredo Pasta Quick and Creamy Meal
  • To make white chocolate pumpkin fudge, you need just a few main ingredients. These create its rich and creamy texture. Here’s what you will need: - 1 cup canned pumpkin puree - 2 cups white chocolate chips - 1 teaspoon vanilla extract - 1/2 teaspoon ground cinnamon - 1/4 teaspoon ground nutmeg - 1/4 teaspoon ground ginger - 1/4 teaspoon salt - 1 can (14 ounces) sweetened condensed milk Each ingredient plays a role in flavor and consistency. The pumpkin puree adds moisture and a lovely fall flavor. The white chocolate chips give the fudge its sweet and creamy base. The spices enhance the taste, making each bite a delight. You can add a few optional ingredients too. These can make your fudge even more fun and tasty. Consider using: - 1/2 cup chopped pecans Chopped pecans add a nice crunch. They also give a nutty flavor that pairs well with the fudge. Feel free to get creative and try other nuts or fruits! To make your fudge look pretty, consider adding toppings. These can also boost the flavor. Here are some ideas: - A sprinkle of cinnamon - Whole pecans on top These simple toppings add charm and enhance the fall vibe. Plus, they make your fudge stand out when you serve it! First, grab an 8x8-inch baking dish. Line it with parchment paper. Leave some paper hanging over the sides. This helps you lift out the fudge later. Make sure the paper covers the bottom and sides well. Next, take a medium saucepan and place it on low heat. Add 2 cups of white chocolate chips and one can of sweetened condensed milk. Stir them together. Keep stirring until the chocolate melts and everything is smooth. This step is key to a creamy fudge. Once the mixture is smooth, remove the pan from heat. Now, add 1 cup of canned pumpkin puree. Also, mix in 1 teaspoon of vanilla extract, 1/2 teaspoon of ground cinnamon, 1/4 teaspoon of ground nutmeg, 1/4 teaspoon of ground ginger, and a pinch of salt. Stir until all ingredients blend well. This will give your fudge that warm, fall flavor. Pour the mixture into your prepared baking dish. Use a spatula to spread it evenly. Then, cover the dish and place it in the fridge. Chill for at least 4 hours. Once firm, lift the fudge out using the parchment paper. Cut it into squares. Now your fudge is ready to enjoy! To get the right texture for your fudge, heat is key. Use low heat when melting the white chocolate chips and sweetened condensed milk. Stir until smooth. If your fudge feels too soft, add more chocolate chips to thicken it. This helps create a firmer fudge that holds its shape. For a richer taste, consider adding a pinch of sea salt. It enhances the sweet flavors. You can also add a splash of maple syrup for extra depth. Try using flavored extracts like almond or orange for a fun twist. Each small change can make a big impact on your fudge's flavor. Make your fudge look as good as it tastes! Use a nice platter to serve it. A sprinkle of cinnamon on top adds color and warmth. You can also place whole pecans on the fudge for decoration. Cut the fudge into neat squares to impress your guests. Each piece should look inviting and delicious. {{image_2}} You can mix things up with flavors in white chocolate pumpkin fudge. Try adding a splash of maple syrup for a sweet twist. You can also use flavored extracts, like almond or hazelnut. Adding a bit of orange zest gives a nice citrus touch. If you love spices, increase the nutmeg or even add cloves for warmth. Each change can create a new taste adventure. If you want to cut back on sugar, there are options. You can use honey or agave syrup in place of sweetened condensed milk. Coconut cream works well too, if you want a rich taste. Just remember, using a different sweetener might change the fudge's texture. Always check the amounts, as some sweeteners are sweeter than others. Making this fudge vegan is easy! Use dairy-free white chocolate chips instead of regular ones. Replace sweetened condensed milk with a non-dairy version, like coconut or almond milk. Make sure to check the labels for any hidden dairy. This way, everyone can enjoy this tasty treat! To keep your white chocolate pumpkin fudge fresh, store it in an airtight container. Line the container with parchment paper to prevent sticking. If you have leftovers, you can layer the fudge with parchment in between each layer. This helps keep it nice and neat. Your fudge can last up to two weeks in the fridge. For longer storage, you can freeze it. Cut the fudge into squares before freezing. Wrap each piece in plastic wrap, then place them in a freezer bag. This way, it can stay fresh for up to three months in the freezer. When you're ready to enjoy your fudge, let it thaw in the fridge overnight. If you want to warm it up, place it in the microwave for 10-15 seconds. This will make it soft and creamy again. Serve it chilled or slightly warm, and enjoy the delightful flavors! Yes, you can use dark chocolate. It will change the taste. The fudge will become richer and less sweet. If you want a deeper flavor, dark chocolate works well. Make sure to chill the fudge long enough. Four hours is good, but overnight is better. You can also add more chocolate chips. This will help make the fudge thicker and firmer. You can try coconut cream or a mix of milk and sugar. Both options will give a similar sweetness. Just keep in mind that the texture may change slightly. Yes, this fudge is gluten-free! All the ingredients are safe for those who avoid gluten. Just make sure your chocolate chips are also gluten-free. This post covers the key elements of making White Chocolate Pumpkin Fudge. We explored the main ingredients, optional add-ins, and tasty toppings. I shared the step-by-step guide for the fudge, from preparation to cutting. We discussed tips for great consistency and flavor, plus variations for dietary needs. Lastly, I provided smart storage options for your fudge. I hope you feel ready to try this vanilla twist on a fall favorite! Enjoy your baking journey!
    White Chocolate Pumpkin Fudge Irresistible Fall Treat
  • To make this dish, gather these main ingredients: - 1 lb large shrimp, peeled and deveined - 2 tablespoons honey - 4 cloves garlic, minced - 1 tablespoon soy sauce - 1 tablespoon fresh ginger, grated - 1 bell pepper (red or yellow), sliced - 1 cup broccoli florets - 1 carrot, thinly sliced These ingredients bring a sweet and savory flavor. The shrimp add protein, while the veggies give crunch and color. You will need two cooking oils for the best taste: - 2 tablespoons olive oil - 1 tablespoon sesame oil The olive oil helps cook the shrimp and veggies. Sesame oil adds a nutty flavor that shines through. To finish your dish, consider these garnishes: - Sesame seeds - Chopped green onions These garnishes add texture and a pop of color. They make your Honey Garlic Shrimp Stir Fry look and taste even better. To make the honey garlic sauce, grab a small bowl. In this bowl, whisk together 2 tablespoons of honey, 4 minced garlic cloves, 1 tablespoon of soy sauce, and 1 tablespoon of grated ginger. This mix brings a sweet and savory taste to your dish. Set the sauce aside for later. Next, heat a large skillet or wok over medium-high heat. Add 2 tablespoons of olive oil and 1 tablespoon of sesame oil. Once the oil is hot, toss in 1 pound of peeled and deveined shrimp. Season the shrimp with a pinch of salt and pepper. Cook them for about 2-3 minutes. Watch as they turn pink. This means they are almost done. When they look good, take them out of the skillet and set them aside. In the same skillet, add the sliced bell pepper, 1 cup of broccoli florets, and 1 thinly sliced carrot. Stir-fry these veggies for about 4-5 minutes. You want them to be bright and still a little crunchy. This keeps their flavor fresh and vibrant. Now it's time to bring it all together. Return the cooked shrimp to the skillet with the veggies. Pour your honey garlic sauce over everything. Stir well to coat all the ingredients evenly. Cook for another 2-3 minutes. This heats the sauce and makes sure the shrimp are fully cooked. Once everything looks great, you are ready to serve. Enjoy this dish over jasmine rice or quinoa. For a lovely touch, garnish with sesame seeds and green onions. To cook shrimp well, start with fresh or thawed shrimp. Always peel and devein them for a clean taste. Pat them dry with a paper towel. This helps the shrimp sear better. Heat your skillet until it's hot before adding oil. This keeps shrimp from sticking. Cook shrimp in batches if your skillet is small. This ensures even cooking and a nice sear. To amp up the flavor, use high-quality honey. It adds a rich sweetness. Fresh ginger and garlic are key. They bring a bright taste to the dish. You can also add a splash of lime juice. It adds a nice zing. If you like a kick, try adding red pepper flakes. They give your stir fry an exciting heat. Do not overcook shrimp. They turn rubbery and tough if cooked too long. Keep an eye on the color. Shrimp should turn pink and opaque. Avoid crowding the skillet. This leads to steaming instead of stir-frying. Finally, do not skip the garnishes. Sesame seeds and green onions make your dish look great. They also add texture and flavor. {{image_2}} You can change the veggies in this dish to suit your taste. Try adding snap peas for a crisp bite. You can also use mushrooms for an earthy flavor. Bok choy works well too, adding a nice crunch. Carrots can be swapped for zucchini, which cooks fast. Just remember to cut your veggies in similar sizes for even cooking. While the honey garlic sauce is tasty, feel free to mix it up. Teriyaki sauce adds a sweet and tangy twist. A spicy chili garlic sauce can bring heat. If you love citrus, try mixing in some fresh orange juice. Each sauce gives the shrimp its own unique flair. Not in the mood for shrimp? You can easily swap it for chicken or tofu. Chicken thighs add rich flavor. Just slice it thin so it cooks fast. Tofu gives a nice vegetarian option. Make sure to press it to remove extra water. This way, it gets nice and crispy when cooked. To store your honey garlic shrimp stir fry, keep it in an airtight container. Make sure it cools down first. Place it in the fridge for up to three days. This helps keep the flavors fresh. When you reheat the stir fry, use a skillet or a microwave. If using a skillet, heat it on medium. Add a splash of water or oil to help steam the dish. If using the microwave, cover the container loosely. Heat in short bursts to avoid overcooking. You can freeze honey garlic shrimp stir fry for up to three months. Use a freezer-safe container or bag. Make sure to remove as much air as possible. To thaw, place it in the fridge overnight. Then, reheat it in a skillet or microwave. Enjoy the flavors just as you did fresh! Yes, you can prepare the honey garlic sauce ahead. Store it in the fridge for up to three days. You can also chop the veggies in advance. However, I suggest cooking the shrimp fresh. This keeps the shrimp tender and juicy. You can stir-fry everything when you’re ready to eat. Yes, you can use frozen shrimp. Just remember to thaw them first. Place the shrimp in cold water for about 20 minutes. Once thawed, drain and pat them dry. This step helps your shrimp cook evenly. Frozen shrimp can still taste great when cooked properly. I recommend serving this dish over jasmine rice or quinoa. Both options soak up the honey garlic sauce well. You can also add a side of steamed vegetables for more color and nutrition. If you like, serve it with spring rolls or a simple salad. These sides make the meal even more satisfying. This article covered how to make an easy honey garlic shrimp stir fry. We discussed the main ingredients, cooking oils, and garnishes. I shared step-by-step instructions for sauce prep, cooking shrimp, and stir-frying veggies. You learned tips for flavor and how to avoid common mistakes. I also mentioned variations and storage tips for leftovers. Remember, this dish is flexible and fun. Enjoy your cooking and make it your own!
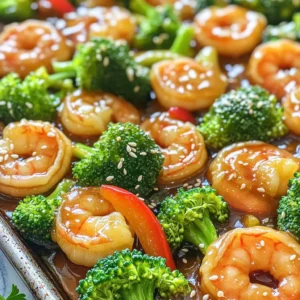
    Honey Garlic Shrimp Stir Fry Quick and Flavorful Meal
  • - 4 medium-sized russet potatoes - 3 tablespoons olive oil - 4 cloves garlic, minced - 1 tablespoon dried thyme - 1 tablespoon dried rosemary - 1 teaspoon paprika - Salt and pepper to taste - Fresh parsley, chopped (for garnish) Gathering the right ingredients is key to making these tasty potato wedges. Start with four medium-sized russet potatoes. They give a nice balance of starch and flavor. Use three tablespoons of olive oil to coat the wedges. The oil helps achieve that crispy texture you'll love. Next, you'll need four cloves of minced garlic. Garlic adds a punchy flavor that pairs well with herbs. For the herb mix, grab one tablespoon each of dried thyme and dried rosemary. These herbs bring a warm, earthy taste to the dish. Don't forget one teaspoon of paprika for color and a hint of smokiness. Finally, season with salt and pepper to taste. These simple spices elevate all the flavors. To finish, use fresh parsley for garnish. It adds a pop of color and freshness right before serving. By gathering these ingredients, you set the stage for a delicious meal that everyone will enjoy. Start by washing and scrubbing the russet potatoes. This step removes dirt and ensures a clean surface. Next, cut each potato in half lengthwise. Then, slice each half into three wedges. You will have six wedges per potato. Aim for even sizes to help them cook uniformly. In a large bowl, combine three tablespoons of olive oil, four minced garlic cloves, one tablespoon of dried thyme, one tablespoon of dried rosemary, one teaspoon of paprika, and salt and pepper to taste. Stir well until the mix is smooth and all the herbs are evenly spread. This mixture will give your wedges great flavor. Now, add the potato wedges to the seasoning bowl. Toss them gently but thoroughly. Make sure every wedge is coated in the garlic herb mix. This step is crucial for flavor, so take your time. Each bite should burst with taste. Preheat your air fryer to 400°F (200°C) for about five minutes. This helps the potatoes start cooking right away. Place the coated wedges in the fryer basket in a single layer. Avoid overcrowding, as this can lead to uneven cooking. Cook them in batches if needed. Air fry the wedges for 15-20 minutes. Remember to shake the basket halfway through cooking. This ensures they brown evenly and become crispy. Once cooked, remove the wedges from the air fryer. Let them cool for a minute before serving. To make them look great, garnish with freshly chopped parsley. This adds a nice pop of color and freshness. Serve them with your favorite dipping sauce, like garlic aioli or sriracha mayo. Enjoy your crispy delight! To make those potato wedges crispy, set your air fryer to 400°F. This high heat helps to give them a nice crunch. Cook for about 15-20 minutes. You can check for doneness by looking for a golden color. If they’re not golden enough, cook them a few more minutes. Remember, air fryers can vary, so keep an eye on them! Shaking the basket is key for even cooking. Halfway through cooking, take out the basket and shake it gently. This movement helps to turn the wedges around, so all sides cook evenly. You can also use a spatula to flip them if you prefer. Doing this ensures every wedge gets that perfect crisp. For dipping, I love serving these potato wedges with garlic aioli or sriracha mayo. The creamy aioli pairs well with the garlic flavor. If you want some heat, the sriracha mayo adds a nice kick! You can also try ketchup or ranch for a classic touch. Serve them on a rustic board for a fun presentation. {{image_2}} You can change the flavors of your potato wedges easily. Try fresh herbs like basil, cilantro, or dill. Each herb adds a new twist. You can also use spices like cumin or chili powder for a kick. Consider adding cheese, like parmesan, for a richer taste. Mixing flavors keeps this dish exciting. If you need to swap out ingredients, it’s simple. You can use canola or avocado oil instead of olive oil. For herbs, fresh versions work great if you have them. If you don’t have thyme or rosemary, try oregano or Italian seasoning. These swaps still give you tasty wedges. No air fryer? No problem! You can bake these potato wedges in the oven. Preheat your oven to 425°F (220°C). Spread the wedges on a baking sheet lined with parchment paper. Bake for 25-30 minutes, flipping halfway through. If you want to fry them, heat oil in a pan. Fry until golden brown. Both methods yield delicious results! To store leftover potato wedges, first let them cool completely. Place them in an airtight container. If you have a lot, use a larger container for better air flow. Keep them in the fridge for up to three days. This helps keep them fresh and tasty. For the best taste, reheat your potato wedges in the air fryer. Set it to 350°F. Reheat for about 5-7 minutes. This keeps them crispy. You can also use an oven, preheating it to 375°F. Bake for 10-15 minutes. Both methods work well to restore crispiness. If you want to freeze your potato wedges, follow these steps: 1. Cool Completely: Let the wedges cool completely after cooking. 2. Flash Freeze: Spread them in a single layer on a baking sheet. Freeze for about 1 hour. 3. Store in Bags: Once frozen, transfer the wedges to a freezer bag. Remove as much air as possible. 4. Label and Date: Write the date on the bag. Store in the freezer for up to 3 months. To reheat, first thaw in the fridge overnight. Then, follow the reheating instructions above for the best results. Enjoy your crispy garlic herb potato wedges even later! To make your potato wedges crispy, start with dry potatoes. After washing, pat them dry with a towel. Cut them into even wedges for uniform cooking. When seasoning, use enough olive oil to coat but not drown the potatoes. Preheat your air fryer to 400°F (200°C) before adding the wedges. Air fry in a single layer and avoid overcrowding. Shake the basket halfway through for even crisping. Yes, you can use sweet potatoes. They add a different flavor and a hint of sweetness. Sweet potatoes cook faster than russet potatoes. Keep an eye on them while air frying. Adjust your cooking time to about 12-15 minutes. You may also want to reduce the oil slightly since sweet potatoes are moister. Some great dipping sauces include garlic aioli, ranch, or sriracha mayo. These sauces match the herbs and garlic in the wedges. You can also try spicy ketchup or a yogurt-based sauce for a refreshing twist. Mix and match to find your favorite pairings! To add heat, include cayenne pepper or crushed red pepper flakes in your seasoning mix. Start with a small amount and taste as you go. You can also use a spicy oil like chili oil for extra flavor. Another option is to serve with a hot sauce on the side for an added kick. You learned how to make delicious garlic herb potato wedges using simple ingredients. From washing the potatoes to frying them, each step is easy. You can customize the recipe with different herbs or cooking methods. Remember to store leftovers properly to keep them tasty. With these tips and tricks, you'll always have crispy, flavorful wedges. Enjoy these as a snack or side dish, and don't forget the dips! Try these tasty wedges at your next meal, and impress your family and friends.
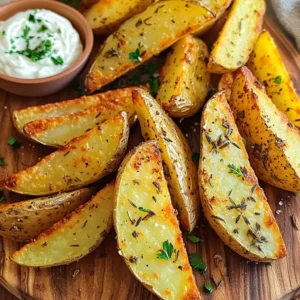
    Air Fryer Garlic Herb Potato Wedges Crispy Delight
  • - 1 cup all-purpose flour - 1/2 cup unsweetened cocoa powder - 1/2 cup granulated sugar - 1/4 teaspoon salt - 1/2 cup unsalted butter, melted - 1 cup pecans, roughly chopped - 1 cup brown sugar, packed - 1/2 cup corn syrup - 3 large eggs - 1 teaspoon vanilla extract - 1/4 teaspoon cinnamon Each ingredient has a specific amount. Here’s the breakdown: - Flour: 1 cup - Cocoa powder: 1/2 cup - Granulated sugar: 1/2 cup - Salt: 1/4 teaspoon - Unsalted butter: 1/2 cup, melted - Pecans: 1 cup, roughly chopped - Brown sugar: 1 cup, packed - Corn syrup: 1/2 cup - Eggs: 3 large - Vanilla extract: 1 teaspoon - Cinnamon: 1/4 teaspoon You can change some ingredients if needed: - Use whole wheat flour for a nutty flavor. - Swap cocoa powder with carob powder for a caffeine-free option. - Replace granulated sugar with coconut sugar for a healthier choice. - Try maple syrup instead of corn syrup for a unique taste. - Use egg substitutes like flaxseed meal or applesauce for vegan bars. - Chopped walnuts can replace pecans if you prefer a different nut. These choices let you enjoy the bars in your way. Set your oven to 350°F (175°C). This step is key for even baking. Grab an 8x8 inch square baking dish. Grease the dish with some butter. Then, line it with parchment paper. Leave some paper hanging over the edges. This will help you lift the bars out later. In a mixing bowl, add 1 cup of all-purpose flour. Then, add 1/2 cup of cocoa powder, 1/2 cup of granulated sugar, and 1/4 teaspoon of salt. Use a whisk or spoon to mix these dry ingredients well. Now, pour in 1/2 cup of melted unsalted butter. Mix again until the dough forms. It should be slightly sticky. Press this dough firmly into the bottom of your prepared baking dish. Make sure it's even everywhere. While the crust bakes, get a new bowl. Whisk together 1 cup of packed brown sugar and 1/2 cup of corn syrup. Next, crack in 3 large eggs. Add 1 teaspoon of vanilla extract and 1/4 teaspoon of cinnamon. Mix until it’s smooth and well blended. Now, add 1 cup of roughly chopped pecans to the filling. Stir them in so they spread evenly. Once the crust is done, take it out of the oven. Let it cool for a few minutes. Pour your pecan filling over the warm crust. Spread it out evenly with a spatula. Now, put the dish back in the oven. Bake for another 25-30 minutes. You want the filling to be set and bubbling slightly at the edges. After baking, let the bars cool completely in the pan. Use the parchment paper to lift them out. Slice into squares and enjoy! One mistake is overmixing the crust. This can make it tough. Mix until just combined. Another common error is not letting the crust cool slightly. If you pour the filling on a hot crust, it can become soggy. Always let it cool for a few minutes. Also, do not skip the parchment paper. It helps you lift the bars out easily. For the best texture, use fresh pecans. Stale nuts can ruin the taste and crunch. Make sure the filling is smooth before adding the pecans. If you want a firmer filling, bake it a few extra minutes. Check for bubbling edges as a sign that it’s ready. Cool the bars completely before cutting. This helps them set and hold their shape. Presentation can make a big difference. Serve the bars on a rustic platter. Drizzle extra caramel sauce on top for a sweet touch. Sprinkle sea salt for a nice contrast. Garnish with whole pecans to make it look pretty. You can also serve them with whipped cream or vanilla ice cream. These toppings add a fun twist to your dessert! {{image_2}} You can add chocolate chips for a twist. Mix in one cup of semi-sweet chocolate chips with the pecans. This will add a rich, sweet flavor to your bars. The melting chocolate pairs well with the caramel and pecans. I love this variation for chocolate lovers. It makes each bite even more delightful. If you want a gluten-free version, swap out the flour. Use one cup of almond flour instead. This change keeps the bars tasty and gives them a nutty flavor. Make sure the cocoa powder is gluten-free too. Your guests won’t even know it's gluten-free! You can change the flavors based on the season. In fall, add a half teaspoon of pumpkin spice to the filling. In spring, mix in some lemon zest for a fresh taste. During the holidays, a touch of nutmeg will make them festive. These small changes can really brighten the bars and keep them exciting year-round. To keep your Caramel Pecan Pie Bars fresh, store them in an airtight container. Use parchment paper between layers to prevent sticking. This will help maintain their flavor and texture. Ensure the bars are completely cool before placing them in the container. Storing them while warm can create moisture, making them soggy. Keep the container in a cool place away from direct sunlight. You can freeze these bars for longer storage. Cut them into squares and wrap each piece tightly in plastic wrap. Then, place them in a freezer-safe bag or container. When you're ready to enjoy them, remove the bars from the freezer. Thaw them in the fridge overnight for best results. If you need them sooner, you can thaw them at room temperature for about two hours. When stored correctly at room temperature, Caramel Pecan Pie Bars last up to one week. In the fridge, they stay fresh for about two weeks. If frozen, they can last for up to three months. Just remember to check for any signs of spoilage before eating. Always trust your senses; if something seems off, it’s better to be safe and toss it out. Caramel Pecan Pie Bars last about one week when stored properly. Keep them in an airtight container. If you leave them out, they may get stale quickly. Refrigeration helps them last longer, but the texture may change. Yes, you can make these bars ahead of time. They actually taste better after a day in the fridge. Baking them a day early allows the flavors to meld well. Just make sure to store them in an airtight container. To cut these bars neatly, wait until they cool completely. Use a sharp knife for clean cuts. You can also warm the knife slightly to help it glide through the sticky filling. After cutting, serve them on a platter for a nice presentation. Caramel pecan pie bars are simple to make and full of flavor. We discussed the main ingredients, how to prepare them, and tips for great results. Remember to avoid common mistakes to get the best texture. Feel free to try different variations, like adding chocolate chips or going gluten-free. Store your bars properly for lasting freshness. Enjoy your delicious treat and impress your friends with your baking skills.
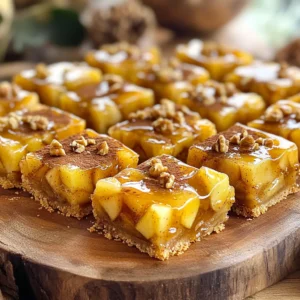
    Caramel Pecan Pie Bars Irresistible Sweet Treats
  • To make the perfect Pumpkin Pie Overnight Oats, gather these main ingredients: - 1 cup rolled oats - 1 can (15 oz) pumpkin puree - 1 cup almond milk (or any milk of choice) - 1/2 cup Greek yogurt (plain or vanilla) - 2 tablespoons maple syrup (adjust to taste) - 1 teaspoon vanilla extract - 1 teaspoon pumpkin pie spice - 1/4 teaspoon salt These ingredients blend together to create a creamy and comforting breakfast. While the oats are tasty on their own, consider adding these toppings for extra flavor: - Chopped pecans - Whipped cream (coconut-based for non-dairy) - A sprinkle of cinnamon These toppings can make your oats look and taste even better. You can easily swap ingredients to fit your needs. Here are some ideas: - Use any milk you like, such as oat or soy. - Swap Greek yogurt for dairy-free yogurt if needed. - Use honey or agave syrup in place of maple syrup. These changes keep the dish delicious while matching your diet. To start, gather all your ingredients. You need: - 1 cup rolled oats - 1 can (15 oz) pumpkin puree - 1 cup almond milk (or any milk of choice) - 1/2 cup Greek yogurt (plain or vanilla) - 2 tablespoons maple syrup (adjust to taste) - 1 teaspoon vanilla extract - 1 teaspoon pumpkin pie spice - 1/4 teaspoon salt In a medium bowl, mix the rolled oats, pumpkin puree, almond milk, Greek yogurt, maple syrup, vanilla extract, pumpkin pie spice, and salt together. Stir until everything blends well. You want the oats to be coated nicely. Once mixed, divide the mixture into two jars or containers. Press down lightly to remove any air bubbles. This helps the oats soak better. Close the jars tightly and put them in the fridge. Let them chill overnight or for at least four hours. This soaking makes the oats soft and creamy. In the morning, take your jars out. Stir the oats well before eating. If you want them creamier, add a splash of almond milk. Top your oats with chopped pecans, a dollop of whipped cream, and a sprinkle of cinnamon for extra flavor. Enjoy your tasty breakfast delight! To make great overnight oats, start with high-quality rolled oats. They soak up liquid well and keep their texture. Use a medium bowl for mixing. Combine all your ingredients well. If you want creamier oats, add more almond milk in the morning. Press the mixture into jars to avoid air bubbles. This helps keep them fresh. Let them soak overnight for the best flavor. Want to add more flavor? Try adjusting the maple syrup to your taste. You can add a bit more pumpkin pie spice for a stronger taste. A pinch of nutmeg also adds warmth. For a twist, mix in some chocolate chips or dried fruit. These extra touches make each bite special. These overnight oats last up to four days in the fridge. Use airtight jars or containers to keep them fresh. If you notice them getting dry, add a splash of almond milk when serving. You can prepare several jars at once. This makes breakfast easy all week long! {{image_2}} You can easily make this recipe dairy-free. Replace Greek yogurt with coconut yogurt. Use almond milk or any other plant-based milk. This keeps the creamy texture without dairy. You still get the great taste of pumpkin pie. While pumpkin pie spice is classic, you can mix it up. Try adding a pinch of nutmeg or ginger for more warmth. You can also use cinnamon alone for a simple taste. Experimenting with spices lets you find your favorite blend. Adjust the sweetness to your liking. If you want it sweeter, add more maple syrup. You can also use honey or agave syrup. For less sweetness, cut back on the syrup or use a sugar substitute. Finding the right balance makes your oats perfect for your taste. Pumpkin is a superfood. It is low in calories but high in nutrients. One cup of pumpkin puree gives you vitamin A, which is good for your eyes. It also has fiber, which helps keep you full. Fiber improves digestion too. Pumpkin is rich in antioxidants, which may help your body fight off diseases. This makes pumpkin a smart choice for a healthy breakfast. Pumpkin Pie Overnight Oats are filling yet light. Each serving has about 300 calories. Here’s a quick look at the macronutrients: - Carbohydrates: 50 grams - Protein: 10 grams - Fat: 8 grams This balance of nutrients helps you feel energized and satisfied throughout the morning. These oats can fit different diets. They are great for those who are vegetarian or looking for a healthy breakfast. You can easily make them dairy-free with almond milk and a non-dairy yogurt. Adjust the maple syrup to fit your sweetness preference. Always check for allergies to ingredients like nuts or dairy before you make them. Yes, you can easily make this dish vegan. Use almond milk or any plant-based milk. Instead of Greek yogurt, use a vegan yogurt. This keeps the creamy texture while making it dairy-free. Maple syrup is already vegan, so you’re all set there! Overnight oats stay fresh for up to five days. Store them in airtight jars in the fridge. Just remember to mix them well before eating. If they seem dry, add a splash of milk. You can use instant oats, but the texture will change. Instant oats absorb liquid faster and may become mushy. If you prefer a creamy texture, stick with rolled oats. They provide a nice chewiness that makes these oats delightful. In this article, we explored all about making pumpkin pie overnight oats. You learned key ingredients, preparation steps, and various tips. We covered how to customize your dish with toppings and substitutions. Finally, we examined the health benefits of pumpkin and answered common questions. Incorporating these easy techniques can make your breakfasts fun and nutritious. Try experimenting with flavors to find your favorite mix. Enjoy creating your own tasty twist on this classic dish!
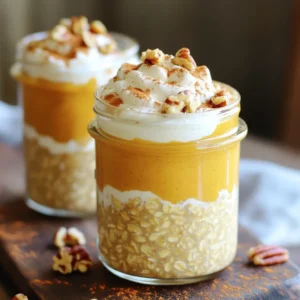
    Pumpkin Pie Overnight Oats Tasty Breakfast Delight
  • To make a delicious Pumpkin Cream Cheese Danish, you'll need a few simple ingredients. Each one plays a key role in creating that rich, warm flavor. Here’s what you need: - 1 sheet of puff pastry (thawed) - 4 oz cream cheese, softened - 1/2 cup pumpkin puree - 1/4 cup granulated sugar - 1 teaspoon vanilla extract - 1 teaspoon pumpkin pie spice - 1 egg (for egg wash) - 1 tablespoon milk (for egg wash) - Powdered sugar for dusting (optional) These ingredients work together to create a sweet and creamy filling. The puff pastry gives a nice crunch. The cream cheese adds a rich texture, while the pumpkin puree provides that classic fall flavor. The sugar balances the taste, and the spices bring warmth to each bite. You will love how easy and fun it is to make this treat with these ingredients! First, set your oven to 400°F (200°C). This heat helps the pastry puff up nicely. While it heats, you can prepare your baking sheet. Line it with parchment paper. This step keeps your Danish from sticking. Next, take your puff pastry out. Make sure it is thawed. On a lightly floured surface, roll the pastry into a rectangle. Aim for about 1/8 inch thick. Cut the pastry into four equal squares. Each square will hold your tasty filling. Now, grab a mixing bowl. Add 4 oz of softened cream cheese. Then, mix in 1/2 cup of pumpkin puree. Add 1/4 cup of granulated sugar, 1 teaspoon of vanilla extract, and 1 teaspoon of pumpkin pie spice. Stir until smooth. This filling is the star of your Danish. Place a spoonful of the pumpkin cream cheese filling in the center of each square. Fold the corners of each square toward the middle. This creates a pocket for the filling. Pinch the edges to seal them well. Make sure no filling can escape. In a small bowl, whisk together 1 egg and 1 tablespoon of milk. This is your egg wash. Brush the tops of each Danish with the wash. This gives your pastries a nice, glossy finish when baked. Place the Danish in your preheated oven. Bake for 15-20 minutes. Keep an eye on them. They should turn golden brown and puffed up. Once done, take them out and let them cool slightly. If you want, dust them with powdered sugar before serving. Enjoy your tasty treat! To thaw puff pastry, place it in the fridge overnight. If you need it fast, leave it at room temp for 30 minutes. Avoid microwave thawing, as it can ruin the texture. Always keep it covered to prevent drying out. Start with room temperature cream cheese. This helps it blend easily with the pumpkin puree. Use a hand mixer or a whisk for a smooth mix. Make sure there are no lumps for the best flavor and texture. When sealing your Danish, make sure to pinch the edges firmly. This keeps the filling from leaking. Use a fork to crimp the edges if you like. It also adds a nice touch to the look of your pastry. For even baking, space out your Danish on the baking sheet. This allows hot air to flow around them. Rotate the baking sheet halfway through cooking. This helps all sides bake evenly for a perfect golden finish. {{image_2}} You can change the cream cheese filling for a new taste. Try using mascarpone for a richer flavor. Ricotta is another option that gives a light texture. For a fun twist, add some lemon zest to brighten the filling. You can even mix in chocolate chips for a sweet surprise. Each of these options will offer a unique flavor and texture to your Danish. The pumpkin filling can be more than just pumpkin puree. You can stir in some chopped nuts for crunch. Pecans or walnuts work well and add a nice texture. Try adding a splash of maple syrup for extra sweetness. A pinch of cinnamon can enhance the pumpkin flavor. You can also add a dash of nutmeg for warmth. These small changes can make your Danish even more tasty. For those needing gluten-free options, there are several choices. Look for gluten-free puff pastry in stores. Many brands now offer a great taste and texture. You can also make your own using almond flour and tapioca starch. This option takes more time but can be fun. Just follow a good gluten-free recipe to ensure your pastry puffs up nicely. Enjoy your delicious Danish while sticking to your dietary needs! Store your leftover Danish in an airtight container. They stay fresh for up to two days at room temperature. If you want to keep them longer, place them in the fridge. They will last about a week in the fridge. Just remember to let them cool completely before sealing them up. You can freeze these Danish for later use. To freeze, wrap each Danish tightly in plastic wrap. Then, place them in a freezer-safe bag or container. They will keep well for up to three months in the freezer. When you want to enjoy them, just thaw them in the fridge overnight. To reheat the Danish, preheat your oven to 350°F (175°C). Place them on a baking sheet and bake for about 10 minutes. This will help keep them crispy. You can also microwave them for about 20-30 seconds if you’re in a hurry, but they may lose some crunch. Enjoy your tasty treat warm! Yes, you can use different pastries. You might try croissant dough or phyllo dough. Each will give a unique taste. Puff pastry works best for its flaky texture. If you want a lighter treat, croissant dough is great. Phyllo dough adds a crisp layer. You can prepare the filling a day before. Store it in the fridge in a sealed container. You can also cut and shape the pastry. Keep the shaped Danish in the fridge until you are ready to bake. Just brush with egg wash before baking. If you lack pumpkin puree, you can use sweet potato puree or butternut squash puree. Both give a sweet and smooth taste. You can also mash cooked carrots for a different flavor. Make sure any substitute is smooth for best results. Check for a golden-brown color on top. The pastry should be puffed and firm. You can also poke one with a toothpick. If it comes out clean, they're done. Bake for 15-20 minutes, but watch closely for burning. Yes, this recipe is vegetarian-friendly. It uses cream cheese and pumpkin, both of which are plant-based. If you want to avoid animal products, look for vegan cream cheese. This swap keeps the flavor and texture you enjoy. This blog post covered the key ingredients and steps to make a delicious pumpkin cream cheese Danish. You learned how to prepare puff pastry and create a tasty filling. We also explored tips for baking and storing your leftovers. Remember, variations can add fun to your baking. Whether you’re an expert or a beginner, this recipe is easy to follow. Dive in and enjoy the warm flavors of fall with this delightful treat. Happy baking!
    Pumpkin Cream Cheese Danish Tasty and Simple Treat
  • - Apples: Use Granny Smith or Honeycrisp. They add a nice tartness. - Dry ingredients: Combine 1 cup of all-purpose flour, 1/2 cup sugar, 1 teaspoon baking powder, 1/2 teaspoon salt, and 1 teaspoon ground cinnamon. These create a great base. - Wet ingredients: Mix in 1/2 cup milk, 1 large egg, and 1 teaspoon vanilla extract. They bring moisture and flavor. - Additional ingredients: Use oil for frying. You will also need 1/2 cup powdered sugar for a sweet glaze. These ingredients come together to make a tasty treat. The apples give a fresh taste, while the spices add warmth. The sugar coating makes them irresistible. 1. Combining dry ingredients in a medium bowl Grab a medium bowl. Add 1 cup of flour, 1/2 cup of sugar, 1 teaspoon of baking powder, 1/2 teaspoon of salt, and 1 teaspoon of ground cinnamon. Mix them well with a whisk. 2. Whisking wet ingredients in a separate bowl In another bowl, pour in 1/2 cup of milk. Crack in 1 large egg and add 1 teaspoon of vanilla extract. Whisk until everything is well combined. 3. Mixing together wet and dry ingredients Now, pour the wet mix into the dry mix. Stir gently until just combined. You don’t want to overmix. Fold in the diced apples, making sure they’re evenly spread in the batter. 1. Heating oil in a frying pan Heat about 2 inches of oil in a deep skillet or frying pan. Use medium heat until the oil reaches around 350°F (175°C). 2. Dropping batter into hot oil Using a spoon or small scoop, drop the batter by tablespoonfuls into the hot oil. Make sure not to overcrowd the pan. 3. Frying time and process for achieving golden brown fritters Fry each fritter for about 2-3 minutes on each side. You want them golden brown. Keep an eye on them to ensure they don’t burn. 1. Draining excess oil from fritters Once golden brown, use a slotted spoon to remove the fritters from the oil. Place them on a plate lined with paper towels to drain off any excess oil. 2. Coating warm fritters in cinnamon sugar While the fritters are still warm, mix extra sugar and ground cinnamon in a shallow dish. Roll each fritter in this cinnamon sugar to coat them evenly. To make the best fritters, you need the right batter. Start by mixing the dry ingredients well. This helps the baking powder work its magic. When you add the wet mix, stir gently. You want a thick but smooth batter. If it's too runny, your fritters won’t hold their shape. Frying needs some care. Do not overcrowd the pan. If you add too many, the oil cools down. This leads to soggy fritters. Fry only a few at a time. Each fritter needs space to cook evenly. For golden-brown fritters, keep an eye on the color. Flip them when they turn golden. Each side needs about 2-3 minutes. Use a slotted spoon to remove them. Let them drain on paper towels. This keeps them crisp. Serving fritters is fun! Place them warm on a rustic board. Dust them with extra cinnamon sugar for a nice look. You can also add a small bowl of caramel sauce. This gives a sweet dip that everyone loves. For garnishing, think about fresh fruit or extra cinnamon. A sprinkle of powdered sugar adds a nice touch too. Make your plate look tempting. The more inviting your fritters, the more people will want to try them! {{image_2}} You can make your cinnamon sugar apple fritters even better with a few simple tweaks. Try adding spices like nutmeg or cardamom. These spices add warmth and depth to your fritters. Just a pinch can change the whole taste! You can also add nuts or raisins to the batter. Chopped walnuts or pecans give a nice crunch. They blend well with the soft apples. Adding raisins can bring a sweet chewiness. This makes every bite exciting. If you need a gluten-free option, use almond or coconut flour. These flours work well and keep the fritters tasty. You might need to adjust the liquid a bit, so keep an eye on the batter’s thickness. For a dairy-free choice, replace milk with almond or oat milk. These milks are easy to find and add a subtle flavor. They work perfectly in this recipe without losing the yummy taste. To store leftover fritters, let them cool first. Place them in an airtight container. If you want to keep them at room temperature, they will last about one day. For longer storage, move them to the fridge. In the fridge, they can stay fresh for up to three days. Just remember to separate layers with parchment paper. This keeps the fritters from sticking together. To reheat fritters, use an oven for the best results. Preheat your oven to 350°F (175°C). Place the fritters on a baking sheet lined with parchment paper. Bake for about five to seven minutes. This will make them warm and crispy again. You can also use an air fryer for a quicker method. Set it to 350°F (175°C) and heat for about three minutes. Avoid using a microwave, as it can make them soggy. Enjoy your fritters fresh and crispy! Can I make the batter ahead of time? Yes, you can prepare the batter in advance. Just store it in the fridge. Use it within 24 hours for the best taste and texture. What type of oil is best for frying? I recommend using vegetable oil or canola oil. Both oils have high smoke points, which makes them ideal for frying. Avoid oils with strong flavors, like olive oil. How do I know when the oil is hot enough? To check if the oil is ready, drop a small amount of batter into it. If it sizzles and rises to the top, the oil is hot enough. You can also use a thermometer to reach about 350°F (175°C). Are these fritters freezable? How to freeze them properly? Yes, you can freeze these fritters. Let them cool completely, then place them in a single layer on a baking sheet. Freeze until firm, then transfer to a freezer bag. They will last for about two months. To reheat, bake them in the oven at 350°F (175°C) until warm and crispy. You now have everything needed to make and enjoy delicious fritters. We covered key ingredients, like apples and dry components, along with simple steps for frying. Helpful tips will ensure your fritters turn out just right. Don’t forget the fun variations to explore flavors and textures. Lastly, I shared how to store and reheat any leftovers. Get started, and enjoy each crispy bite. You'll love making these fritters again and again!
    Cinnamon Sugar Apple Fritters Irresistible Snack Idea
  • - 1 cup dried green or brown lentils, rinsed - 1 large onion, finely chopped - 2 cloves garlic, minced - 1 medium carrot, diced - 1 bell pepper (red or green), diced - 1 can (15 oz) tomato sauce - 1 tablespoon tomato paste - 2 tablespoons brown sugar - 2 tablespoons apple cider vinegar - 1 tablespoon Worcestershire sauce (check for vegetarian) - 1 teaspoon chili powder - 1 teaspoon smoked paprika - Salt and pepper to taste - Whole wheat burger buns - Sliced pickles - Avocado - Coleslaw You can swap lentils for canned ones to save time. Just rinse and drain. If you want more color, use a mix of bell peppers. For a tangy kick, try adding a splash of hot sauce. If you don't have Worcestershire sauce, use soy sauce for a different flavor. You can also use honey instead of brown sugar for sweetness. If you need a gluten-free option, serve the lentil mix in lettuce wraps or gluten-free buns. Start by rinsing 1 cup of dried lentils under cold water. This step removes any dirt or debris. Next, chop 1 large onion finely. Mince 2 cloves of garlic. Dice 1 medium carrot and 1 bell pepper. You can use red or green bell pepper based on your taste. Once all the veggies are ready, it’s time to combine them with the lentils. In a large slow cooker, add the chopped onion, garlic, carrot, and bell pepper. Then, mix in the rinsed lentils. Pour in 1 can (15 oz) of tomato sauce and add 1 tablespoon of tomato paste. Next, add 2 tablespoons of brown sugar and 2 tablespoons of apple cider vinegar. For flavor, include 1 tablespoon of Worcestershire sauce, 1 teaspoon of chili powder, and 1 teaspoon of smoked paprika. Season with salt and pepper to taste. Stir the mixture well to combine all the ingredients. Cover the slow cooker. Set it to low and cook for 6-8 hours. If you are short on time, you can set it to high for 3-4 hours. Check occasionally, if you can, to stir the mixture. Once the lentils are tender and the mix is thick, taste it. Adjust seasoning if needed. If it seems too thick, add a splash of vegetable broth or water. To serve, spoon the lentil mix onto whole wheat burger buns. You can add optional toppings like sliced pickles or creamy avocado. Coleslaw also makes a great topping. These add flavor and crunch. Enjoy your healthy and hearty meal! To boost flavor in your Slow Cooker Lentil Sloppy Joes, try these tips: - Use fresh herbs like parsley or cilantro. They add a bright taste to your dish. - Add a dash of hot sauce for heat. This gives a nice kick to the mix. - Experiment with spices. Ground cumin or coriander can deepen the flavor. - A splash of liquid smoke can give a smoky taste. Just a little will go a long way. Getting the right texture is key. Here are some pointers: - Rinse your lentils well before cooking. This removes dirt and helps them cook evenly. - Cook on low heat for a longer time. This allows lentils to soften and absorb flavors. - If your mix is too thick, add vegetable broth or water. Mix it in slowly until you reach your desired consistency. - Stir occasionally if you can. This helps everything cook evenly. Avoid these common errors to make the best Sloppy Joes: - Don't skip cleaning the lentils. Dirty lentils can ruin the dish. - Avoid overcooking. Lentils can turn mushy if left too long. - Remember to taste as you go. Adjust seasoning to fit your taste. - Don’t forget the toppings. They add flavor and texture, making the meal more enjoyable. {{image_2}} You can use various lentil types for your Sloppy Joes. Green and brown lentils work great. They hold their shape well during cooking. You can also try red lentils. They cook faster and get softer. This gives a different texture to your dish. Adding extra ingredients can make your meal even better. Try adding some diced mushrooms for a meaty taste. Chopped spinach or kale can boost nutrition. You can also mix in some corn or diced tomatoes. These add sweetness and color. For a richer flavor, add a splash of soy sauce or liquid smoke. If you like spice, add crushed red pepper flakes to the mix. You can also use hot sauce or jalapeños. For a sweeter taste, increase the brown sugar. Honey or maple syrup can work well too. Adjust these amounts to suit your taste. Enjoy the fun of creating your own special Sloppy Joes! To keep your lentil sloppy joes fresh, let them cool first. Then, transfer the mixture to an airtight container. Store it in the fridge for up to 5 days. Make sure to label the container with the date. This way, you will know when to eat it. You can freeze lentil sloppy joes too! Pour the cooled lentil mix into freezer-safe bags. Remove as much air as possible before sealing. Label the bags with the date. These will last in the freezer for about 3 months. When you want to enjoy them, just thaw in the fridge overnight. To reheat, you have a few options. You can use the microwave or stovetop. If using the microwave, heat in short bursts, stirring in between. If using the stovetop, cook over medium heat until warm. You can add a splash of water or broth if it looks too thick. This keeps the mix moist and tasty. Enjoy your meal again! Yes, you can use canned lentils. They save time and are easy to use. If you choose this option, skip the soaking step. Rinse the canned lentils before adding them to the slow cooker. Use about two cans for this recipe. The cooking time will be shorter, so check for doneness after about 1-2 hours on low heat. To make this dish gluten-free, choose gluten-free burger buns. Check the label of the Worcestershire sauce, as some brands use gluten. You can also use tamari sauce as a substitute. This way, you keep all the great flavors without the gluten. Sloppy Joes pair well with many sides. Try serving them with a fresh salad or baked sweet potato fries. Coleslaw adds a nice crunch and balances the flavors. You could also serve them with chips or pickles for a fun touch. Enjoy experimenting with what you love! This blog post detailed how to make a great lentil dish. We covered essential ingredients, step-by-step instructions, and tips to enhance your meal. You learned about variations and how to store leftovers properly. Remember, the key is to adjust flavors to your taste and avoid common mistakes. Experiment with different lentils for unique dishes. Enjoy your cooking journey!
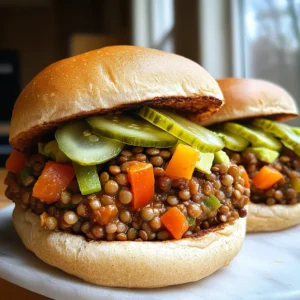
    Slow Cooker Lentil Sloppy Joes Tasty Family Dinner
  • - 1 medium butternut squash, peeled and diced - 2 tablespoons olive oil - 2 cloves garlic, minced - 1 cup vegetable broth - 1/2 cup heavy cream - 1/4 teaspoon nutmeg - 1/2 teaspoon salt - 1/4 teaspoon black pepper - 1 cup freshly grated Parmesan cheese - 12 ounces fettuccine pasta - Fresh parsley, chopped (for garnish) The butternut squash is key for a rich flavor. Choose one that feels heavy for its size. The skin should be smooth and firm. Olive oil adds a nice depth to the dish. Use fresh garlic for a brighter taste. Heavy cream gives the sauce its creaminess. If you want a lighter option, consider half-and-half. Nutmeg adds warmth but use it sparingly. Freshly grated Parmesan really makes a difference, so skip the pre-shredded kind. Fettuccine pairs perfectly with the sauce, but you can swap it for any pasta you like. Garnish with parsley for a fresh touch. This dish serves four. Each serving has about: - Calories: 450 - Protein: 15g - Fat: 25g - Carbohydrates: 45g - Fiber: 3g The butternut squash provides vitamins A and C, plus fiber. The heavy cream and cheese add calcium and protein. Enjoy this dish as a wholesome meal that is both filling and nutritious! First, preheat your oven to 400°F (200°C). While the oven heats, peel and dice one medium butternut squash. It should be in bite-sized pieces. Next, drizzle one tablespoon of olive oil over the squash and add a pinch of salt. Toss it well to coat. Spread the squash on a baking sheet in a single layer. Roast for 25 to 30 minutes. Look for tender and slightly caramelized pieces when done. While the squash roasts, bring a large pot of salted water to a boil. Add 12 ounces of fettuccine pasta. Cook it according to the package instructions until it is al dente. Remember to reserve one cup of pasta water before draining the pasta. Once drained, set it aside. In a medium saucepan, heat one tablespoon of olive oil over medium heat. Add two minced cloves of garlic and sauté for about one minute. When the garlic is fragrant, add the roasted butternut squash and one cup of vegetable broth. Bring this mixture to a gentle simmer and cook for five minutes. Now, use an immersion blender to blend the mixture until it is smooth and creamy. If you do not have one, carefully transfer it to a regular blender and blend it. Return the blended sauce to the saucepan. Stir in half a cup of heavy cream, a quarter teaspoon of nutmeg, half a teaspoon of salt, and a quarter teaspoon of black pepper. Add one cup of freshly grated Parmesan cheese. Cook this over low heat for about three to four minutes, stirring often. If the sauce is too thick, add reserved pasta water gradually until you get your desired consistency. Finally, add the drained fettuccine to the sauce and toss it until the pasta is well-coated. Serve hot, garnished with chopped fresh parsley and extra Parmesan if you like. When picking butternut squash, look for a firm one. It should feel heavy for its size. The skin should be a deep tan color. Avoid any squash with soft spots or blemishes. A good squash will have a smooth surface. The stem should be dry. This means it was picked at the right time. To boost creaminess, you can add more heavy cream. You can also stir in extra cheese. A bit of cream cheese or mascarpone can work wonders too. If you want a lighter touch, use ricotta for a smooth finish. Blending the roasted squash well helps create a creamy texture. Use an immersion blender for a quick and easy method. If it gets too thick, add some reserved pasta water slowly. Serve your Butternut Squash Alfredo with fresh parsley on top. This adds color and flavor. You can sprinkle more Parmesan cheese for a rich taste. Pair it with a side salad for a fresh crunch. A slice of crusty bread works well too. It’s perfect for soaking up the sauce. Enjoy this dish warm for the best flavor. {{image_2}} To make a vegan version, swap the heavy cream and Parmesan cheese. Use coconut cream for a rich texture. Nutritional yeast adds a cheesy flavor without dairy. Blend the roasted butternut squash with vegetable broth and coconut cream. Mix it into your cooked pasta for a creamy dish. For a gluten-free meal, choose gluten-free pasta. Many brands offer great alternatives made from rice or chickpeas. Follow the same recipe steps, and enjoy a tasty dish without gluten. This option keeps the flavor while catering to dietary needs. You can add proteins like grilled chicken or shrimp for a heartier meal. Cook them separately and mix them in with the pasta. If you want more veggies, try spinach or peas. These additions will boost nutrients and add color to your plate. To store leftovers, let the dish cool down at room temperature. Place it in an airtight container. This helps keep the flavors fresh. You can store Butternut Squash Alfredo in the fridge for up to three days. Make sure to cover it well to avoid drying out. When you’re ready to enjoy the leftovers, reheat them gently. You can use a pan over low heat. Add a splash of water or broth to help loosen the sauce. Stir it often until heated through. If using a microwave, heat in short bursts, stirring in between. This keeps the pasta from getting too dry. If you want to freeze Butternut Squash Alfredo, it’s best to do this before adding the fettuccine. Allow the sauce to cool, then pour it into a freezer-safe container. Label it with the date. It can last in the freezer for about three months. When you’re ready to eat, thaw it overnight in the fridge. Reheat and add freshly cooked fettuccine just before serving. Enjoy your creamy dish any time! Yes, you can use any pasta you like. Penne, rigatoni, or even gluten-free pasta works well. Just make sure to cook it according to package instructions. Your sauce will still be creamy and flavorful! Butternut Squash Alfredo can last up to four days in the fridge. Store it in an airtight container for best results. Just reheat it gently on the stove or in the microwave. Absolutely! You can use half-and-half or whole milk instead. For a dairy-free option, try coconut milk or cashew cream. These swaps will change the flavor a bit, but they will still taste great. Butternut squash is packed with nutrients. It is high in vitamins A and C, which boost your immune system. It also contains fiber, which is good for digestion. Plus, it is low in calories, making it a healthy choice for meals. In this blog post, we explored the tasty world of Butternut Squash Alfredo. We covered all the important ingredients and provided clear steps to make it. Tips helped you choose the best squash and suggested ways to make it creamier. You learned about tasty variations and how to store your leftovers. Butternut Squash Alfredo is a versatile dish that can fit many diets. Try it out in different ways and enjoy its rich flavors!
    Butternut Squash Alfredo Creamy and Flavorful Dish
  • - 20 large cremini or button mushrooms, cleaned and stems removed - 1 cup fresh breadcrumbs - ½ cup grated Parmesan cheese - ¼ cup cream cheese, softened - 1 clove garlic, minced - 2 tablespoons fresh parsley, chopped - 1 tablespoon olive oil - ½ teaspoon dried oregano - Salt and pepper to taste Using fresh ingredients makes a big difference. Choose firm, unblemished mushrooms. Look for good quality Parmesan cheese for a rich taste. Fresh parsley adds bright flavor and color. Don't skip the garlic; it gives depth to the filling. If you need a gluten-free option, use gluten-free breadcrumbs. For a dairy-free version, try nutritional yeast instead of Parmesan. You can also swap cream cheese with a vegan cream cheese for a plant-based filling. Start by washing the mushrooms. Use a damp cloth to clean them. Remove the stems gently. You want the caps intact for stuffing. Set the cleaned mushrooms aside. This ensures they will hold the filling well. In a bowl, mix the fresh breadcrumbs and grated Parmesan cheese. Add the softened cream cheese and minced garlic. Toss in the chopped parsley, olive oil, and dried oregano. Season with salt and pepper. Mix everything until it's thick and well blended. This filling should be creamy and tasty. Preheat your air fryer to 350°F (175°C). Take each mushroom cap and fill it with the mixture. Press the filling down gently. Make sure they are full but not overflowing. Place the stuffed mushrooms in the air fryer basket. Arrange them in a single layer. Air fry the mushrooms for 10-12 minutes. Check for a golden brown top. Once done, let them cool for a minute before serving. Enjoy the tasty bites! To get the best texture, use fresh breadcrumbs. They soak up moisture and stay soft. The cream cheese adds a nice creaminess. Mix it well to make a smooth filling. Stuff the mushroom caps generously. This helps them hold their shape. Air fry them until golden brown. This gives you a crisp top. Use fresh herbs like parsley to boost flavor. They add brightness and freshness. A touch of garlic gives it a savory kick. Don’t skip the Parmesan cheese; it adds a salty, nutty taste. You can also add a pinch of red pepper flakes for some heat. Just a little can make a big difference. Make sure to preheat your air fryer to 350°F. This helps the mushrooms cook evenly. Arrange the stuffed mushrooms in a single layer. Avoid crowding them in the basket. This allows hot air to circulate around each mushroom. Cook them for about 10-12 minutes. Check for a golden color on top to know they are done. {{image_2}} You can easily make these stuffed mushrooms vegetarian. Just use a few simple swaps. Replace the cream cheese with a vegan cream cheese. Use nutritional yeast instead of Parmesan for that cheesy flavor. You can also add chopped spinach for extra nutrition. These changes keep your dish tasty and plant-based. Feel free to get creative with cheese! Try mixing in mozzarella or feta for a different taste. You could even add goat cheese for a tangy flavor. Just remember, different cheeses will change the texture. So, adjust your cooking time if needed. Experimenting with cheeses can make each batch unique and delicious. If you love heat, add some spice! Mix in chopped jalapeños or red pepper flakes. You could even add a dash of hot sauce to the filling. This will give your mushrooms a nice kick. For a smoky flavor, consider adding smoked paprika. These spicy twists will make your stuffed mushrooms stand out at any gathering. To store leftover stuffed mushrooms, let them cool first. Place them in an airtight container. You can keep them in the fridge for up to three days. Make sure they are sealed well to keep moisture out. This helps keep them fresh and tasty. When you’re ready to enjoy your mushrooms again, reheating is easy. Preheat your air fryer to 350°F (175°C). Place the mushrooms in the basket, spaced apart for air flow. Heat them for about five minutes. This will make them warm and crispy again. You can also freeze stuffed mushrooms for later. After they cool, arrange them on a baking sheet. Freeze them for one to two hours until they are solid. Then, transfer them to a freezer-safe bag. You can keep them frozen for up to three months. To cook, no need to thaw. Just air fry them at 350°F (175°C) for about 15-18 minutes. Enjoy your meal prep! Yes, you can use other mushrooms. Portobello and shiitake mushrooms work well too. Each type will give a unique taste and texture. Just ensure they are large enough to hold the filling. You should cook stuffed mushrooms for about 10 to 12 minutes. Set your air fryer to 350°F (175°C). Check for a golden brown color on top. This means they are ready to eat! Serve stuffed mushrooms warm on a nice platter. You can garnish them with extra chopped parsley for color. Pair them with toothpicks for easy eating. They make a great appetizer for parties or a tasty snack! In this blog post, we covered how to make stuffed mushrooms. We explored the best ingredients and their quality, plus tasty alternatives. You learned step-by-step instructions for prepping, filling, and air frying your mushrooms. I shared tips for texture and flavor too. Variations include vegetarian options and spicy twists. Lastly, I discussed storage tips to keep leftovers fresh. Now you have all the tools to make delicious stuffed mushrooms. Enjoy experimenting and impressing your friends with your cooking skills!
    Air Fryer Parmesan Stuffed Mushrooms Savory Delight
  • - 1 lb boneless, skinless chicken thighs, sliced into thin strips - 1 cup broccoli florets - 1 bell pepper, sliced - 1 cup snap peas For a tasty stir-fry, chicken thighs work best. They stay juicy and tender. You can slice them into thin strips for quick cooking. Fresh vegetables add color and crunch. Broccoli, bell peppers, and snap peas offer great flavor and nutrients. - 3 tablespoons soy sauce - 1 tablespoon rice vinegar - 1 tablespoon honey - 2 cloves garlic, minced - 1 tablespoon fresh ginger, grated A good marinade makes a big difference. Soy sauce adds saltiness. Rice vinegar gives a tangy kick. Honey balances the flavors with sweetness. Garlic and ginger add depth. Let the chicken marinate for about 15 minutes to soak up these flavors. - 2 tablespoons sesame oil - Salt and pepper to taste Sesame oil has a rich, nutty flavor. It enhances the dish and adds aroma. Use it to stir-fry the chicken and veggies. Salt and pepper are key for seasoning. Adjust to your taste as you cook. - 2 teaspoons sesame seeds - 3 green onions, chopped Garnishes elevate the dish. Sprinkle sesame seeds on top for crunch. Chopped green onions add freshness and color. They make your meal look and taste even better. Serve these garnishes right before enjoying your stir-fry. To start, I mix the marinade ingredients. In a bowl, combine 3 tablespoons of soy sauce, 1 tablespoon of rice vinegar, and 1 tablespoon of honey. This blend adds a sweet and tangy flavor. Next, I slice 1 pound of boneless, skinless chicken thighs into thin strips. Then, I stir the chicken into the marinade, ensuring each piece gets a good coating. I let the chicken marinate for about 15 minutes. This short time allows the chicken to absorb all the lovely flavors. I heat 1 tablespoon of sesame oil in a large skillet over medium-high heat. Once the oil is hot, I add the marinated chicken strips. I stir-fry them for 5 to 7 minutes. I cook until the chicken is golden brown and cooked through. Once done, I remove the chicken from the pan and set it aside. This keeps the chicken juicy and flavorful. In the same skillet, I add another tablespoon of sesame oil. I toss in 2 cloves of minced garlic and 1 tablespoon of grated ginger. I let them cook for about 30 seconds until fragrant. Next, I add 1 cup of broccoli florets, 1 sliced bell pepper, and 1 cup of snap peas. I stir-fry these veggies for about 4 to 5 minutes. This keeps them tender but still crisp, giving a nice texture to the dish. Now, I return the cooked chicken to the skillet. I pour in the leftover marinade from the chicken. I stir everything together for an additional 2 to 3 minutes. This step lets all the flavors meld beautifully. Finally, I toss in 3 chopped green onions and 2 teaspoons of sesame seeds. I mix well and season with salt and pepper to taste. The dish is now ready to serve. A good marinade makes all the difference. It adds depth and taste to the chicken. To make the marinade, mix soy sauce, rice vinegar, and honey. Let the chicken soak in this blend for about 15 minutes. This short time helps the chicken absorb the flavors. Choosing the right cooking oil is also key. I recommend using sesame oil. It adds a rich, nutty taste to the dish. Use it to stir-fry the chicken and vegetables. This oil can handle high heat well, making it perfect for stir-frying. Stir-frying requires high heat. This method cooks food quickly and seals in flavors. Start with a hot skillet or wok. Add the chicken strips and cook until golden brown. This should take about 5 to 7 minutes. To keep your veggies from getting soggy, stir-fry them quickly. Add them in the right order. Start with the broccoli, then the bell pepper, and finally the snap peas. This way, each veggie stays crisp and colorful. How you serve your stir-fry matters. I like to use bowls or plates for a nice look. A sprinkle of sesame seeds on top adds a bit of flair. You can also add a lime wedge on the side. It gives a fresh twist that brightens the dish. For a complete meal, serve the stir-fry over jasmine rice. The rice soaks up the sauce, making every bite delicious. {{image_2}} You can switch chicken for other proteins. Try shrimp, beef, or tofu. Each option brings a unique taste. If you choose shrimp, cook it just until pink. For beef, thinly slice it to help it cook fast. Tofu is a great choice for a vegetarian dish. Use firm tofu and fry it until golden. Feel free to mix in seasonal vegetables. Zucchini, carrots, or snap peas work well. You can enhance flavors with garlic or ginger. Try adding bok choy or mushrooms for a fun twist. The key is to keep the veggies crisp. Watch cooking time closely to avoid mushy bites. Sauce is where you can get creative. Swap soy sauce for tamari for gluten-free. You can add hoisin sauce for more sweetness or chili paste for spice. Adjust the honey for your taste. If you love heat, add a dash of sriracha. Taste your sauce before you pour it in. To keep your Sesame Ginger Chicken Stir Fry fresh, store it in airtight containers. Divide the leftovers into smaller portions. This way, you can grab just what you need. Place the containers in the fridge. Enjoy your meal within three to four days for the best taste. When you're ready to eat, reheat the stir fry on the stove. Use medium heat to warm the dish. Stir it often to heat evenly. You can also use the microwave. Heat in short bursts, stirring in between. This helps keep the chicken juicy and the veggies crisp. If you want to save leftovers for later, freezing is a great option. Let the stir fry cool completely. Place it in a freezer-safe container or bag. Try to remove as much air as possible to prevent freezer burn. The dish can last up to three months in the freezer. When you're ready to eat, thaw it overnight in the fridge. Reheat it on the stove for best results. Yes, you can use chicken breast. Chicken thighs are juicier, but breasts work well too. Just slice them thinly for even cooking. Adjust cooking time, as chicken breasts may cook faster. Keep an eye on them to avoid dryness. To change the spice level, add chili flakes or fresh chili peppers. Start small and taste as you go. If you prefer milder flavors, skip the chili. You can also add sweetness to balance the heat using honey or sugar. This dish pairs well with jasmine rice or brown rice. You can also serve it with noodles for a fun twist. For a healthy side, try a simple cucumber salad. Fresh herbs like cilantro add a nice touch too. Store leftovers in an airtight container. They stay fresh for about 3-4 days. When reheating, heat gently to keep the chicken tender. You can also freeze the stir fry for up to 2 months for longer storage. This article covered how to make a tasty Sesame Ginger Chicken Stir Fry. We discussed key ingredients like chicken, vegetables, and marinades. You learned step-by-step instructions for marinating and cooking. Tips helped ensure the best flavor and presentation. We also explored variations for different proteins and sauces. Lastly, I shared storage tips for leftovers. In summary, this dish is simple, flavorful, and adaptable. Enjoy your cooking and experimenting!
    Sesame Ginger Chicken Stir Fry Flavorful Weeknight Meal
  • - 14 oz firm tofu, pressed and cubed - 1 cup broccoli florets - 1 red bell pepper, sliced - 2 carrots, julienned - 1 cup cooked quinoa or rice (for serving) - 3 tablespoons soy sauce (low sodium) - 2 tablespoons hoisin sauce - 1 tablespoon rice vinegar - 1 tablespoon sesame oil - 2 cloves garlic, minced - 1 teaspoon ginger, minced - 1 green onion, chopped (for garnish) - Sesame seeds (for garnish) - Salt and pepper to taste The main ingredients in my General Tso's Tofu Bowls bring life and color to the dish. Firm tofu provides a hearty base, while broccoli, bell pepper, and carrots add crunch and nutrition. You can serve this dish over cooked quinoa or rice, giving it a nice, filling touch. For the sauce, I mix soy sauce, hoisin sauce, and rice vinegar. These flavors come together with garlic and ginger, creating a rich taste. The sesame oil adds a nutty finish that elevates the dish. I finish each bowl with green onion and sesame seeds. These ingredients not only look great but also add a bit of flavor. A sprinkle of salt and pepper rounds everything out. Each ingredient plays a role in making this dish both tasty and satisfying. First, you need to press the tofu. This helps remove water and makes it crispy. Press it for at least 15 minutes. After pressing, cut the tofu into small cubes. Season the cubes with salt and cornstarch. Toss them gently to coat. Next, heat some vegetable oil in a large skillet over medium-high heat. Once hot, carefully add the tofu cubes. Fry them for about 8-10 minutes. You want them golden brown and crispy. When done, place the tofu on a plate lined with paper towels. This helps absorb any extra oil. In the same skillet, it’s time to add the veggies. Toss in the broccoli florets, sliced red bell pepper, and julienned carrots. Stir-fry these for about 3-4 minutes. You want them tender but still bright and crunchy. Let’s make the sauce! In a small bowl, mix 3 tablespoons of soy sauce, 2 tablespoons of hoisin sauce, 1 tablespoon of rice vinegar, and 1 tablespoon of sesame oil. Add 2 cloves of minced garlic and 1 teaspoon of minced ginger. Stir well until everything is combined. Now, add the crispy tofu back to the skillet with the veggies. Pour the sauce mixture over the tofu and vegetables. Stir well to coat everything. Cook for an additional 2-3 minutes. This helps heat the dish and thicken the sauce a bit. To serve, divide cooked quinoa or rice among bowls. Top each bowl with the tofu and vegetable mixture. For a nice touch, garnish with chopped green onions and a sprinkle of sesame seeds. Enjoy your General Tso's Tofu Bowls! To make crispy tofu, follow these steps: - Press tofu for at least 15 minutes. This removes excess moisture. - Cut tofu into bite-sized cubes. This helps them cook evenly. - Season the cubes with salt and coat them in cornstarch. This gives a nice crunch. For pressing, use a tofu press or a heavy pan. Place the tofu between paper towels and set the weight on top. This method works well to remove moisture quickly. You can swap vegetables based on what you have. Try: - Snap peas instead of broccoli. - Zucchini or mushrooms for bell peppers. - Sweet potatoes or green beans for carrots. Seasonal vegetables add freshness. Use asparagus in spring or squash in fall for great flavor. Pair your bowls with sides like: - Steamed edamame for protein. - A crispy salad for crunch. - Green tea or ginger ale for drinks. To enhance your dish, drizzle extra sesame oil on top. A sprinkle of chili flakes adds heat. Arrange the tofu and veggies nicely for a colorful plate. {{image_2}} You can make General Tso's Tofu Bowls even better with vegan twists. Try adding more plant-based proteins. Chickpeas or lentils can boost the protein. These options add a different texture and taste. You can also replace sauces. Instead of soy sauce, use tamari for a gluten-free option. Coconut aminos is another great substitute. It has a sweet, mild taste. This change can suit different dietary needs. Making this dish gluten-free is easy. For soy sauce, pick a gluten-free brand. Tamari works well and tastes similar. You can also look for gluten-free hoisin sauce. This way, you keep the flavor without gluten. Other ingredients can also be swapped. Use gluten-free cornstarch for thickening. Ensure all packaged items are gluten-free. This keeps your meal safe for those with gluten sensitivities. Adjusting the spice level is simple. Want it sweeter? Add a touch more hoisin sauce. If you like heat, add chili flakes or sriracha. You can mix these into the sauce for a kick. To add flavor depth, try adding more garlic or ginger. These ingredients bring warmth and aroma. You can also experiment with different peppers for a unique taste. Each choice can change the dish's flavor profile. To store leftovers, let the dish cool down first. Place it in an airtight container. You can keep it in the fridge for up to three days. This keeps the flavors fresh and safe to eat. You can freeze the tofu and sauce separately. Wrap the tofu in plastic wrap, then place it in a freezer bag. For the sauce, pour it into a container and seal it tight. When you want to eat it, thaw overnight in the fridge. Reheat the tofu on a skillet over medium heat for a crispy texture. For meal prep, chop all veggies ahead of time. Store them in separate containers to keep them fresh. You can also cook the quinoa or rice in advance. This way, you just need to heat everything up when you're ready to eat. Having the ingredients prepped makes meal time quick and easy. To make General Tso's tofu gluten-free, use gluten-free soy sauce. Look for brands that are labeled gluten-free. You can also find gluten-free hoisin sauce. Check the labels to ensure they do not contain wheat. This simple swap makes the dish safe for those with gluten sensitivities. Yes, you can use different vegetables in this dish. Feel free to swap broccoli with snap peas or bok choy. You can also replace bell peppers with zucchini or mushrooms. Just remember to keep the cooking times in mind. Aim for vibrant colors and textures. Serve General Tso's tofu with cooked quinoa or rice. These are great bases for the dish. You can also add a side of steamed green beans or a fresh salad. For drinks, try serving it with green tea or a light lager. These pair well with the flavors. To make General Tso's sauce, mix together soy sauce, hoisin sauce, rice vinegar, and sesame oil. Add minced garlic and ginger for extra flavor. Adjust the sweetness by adding a bit of sugar or honey. Stir until combined, and it’s ready to use! General Tso's tofu is a healthy option. Tofu is a great source of protein and is low in calories. The vegetables add vitamins and minerals. Using quinoa instead of rice boosts fiber too. Overall, this dish offers a balanced meal with plenty of nutrients. In this blog post, we explored how to make a delicious General Tso's tofu dish. You learned about the key ingredients, such as tofu, fresh veggies, and sauces. I shared step-by-step instructions to perfectly prepare and serve your meal. Lastly, we discussed tips for variations, storage, and answered common questions. By following these steps, you can create a tasty, healthy meal at home. Enjoy this flavorful dish and feel proud of your cooking skills!
    General Tsos Tofu Bowls Flavorful Plant-Based Dish
  • - 4 boneless, skinless chicken breasts - 2 large red bell peppers - 1 small onion, diced - 3 cloves garlic, minced - 1 teaspoon smoked paprika - 1 teaspoon dried oregano - 1/2 teaspoon red pepper flakes (adjust to taste) - 1/4 cup chicken broth - 3 tablespoons olive oil - Salt and pepper to taste - Fresh basil leaves for garnish When I make Roasted Red Pepper Chicken, I start with chicken breasts. I prefer boneless and skinless. They cook evenly and stay moist. Next are the red bell peppers. I use two large ones. Roasting them adds a sweet and smoky flavor. Don't forget the onion. I use a small one, diced. It gives the dish a nice base. Garlic is a must too. I use three cloves, minced. Garlic brings a punch of flavor. For spices, I use smoked paprika and dried oregano. Each adds depth. I also add red pepper flakes. You can adjust the amount for your heat level. I use chicken broth to keep the dish juicy. Olive oil helps cook the chicken and adds richness. Lastly, I season with salt and pepper. Fresh basil leaves will be my garnish. They add color and freshness to the final dish. {{ingredient_image_1}} To start, preheat your oven to 425°F (220°C). This heat helps to char the peppers well. Place the whole red bell peppers on a baking sheet. Roast them for 25-30 minutes. You want the skins to be nice and blackened. Once done, take them out and put them in a bowl. Cover the bowl with plastic wrap. This steam helps the skins peel off easily. After 10 minutes, peel the skins and slice the peppers into strips. Next, heat 2 tablespoons of olive oil in a large skillet over medium-high heat. While the oil heats, season the chicken breasts with salt, pepper, smoked paprika, and oregano. This seasoning adds a lot of flavor. When the oil is hot, add the chicken breasts. Sear them for 5-6 minutes on each side until they are browned. Once done, remove the chicken from the skillet and set it aside. Now, let’s add flavor! In the same skillet, add the diced onion and minced garlic. Sauté for 2-3 minutes until they soften and smell great. Then, if you like heat, add the red pepper flakes. Cook for another minute to let those flavors build. Pour in the chicken broth. Then, add the roasted red pepper strips to the skillet. Stir everything to combine well. Carefully place the seared chicken breasts back into the skillet. Make sure they get coated in the sauce for even flavor. Transfer the skillet to the oven, or use a greased baking dish if needed. Bake for 15-20 minutes. Check the chicken’s doneness by using a meat thermometer. It should read 165°F (75°C) to ensure it is safe to eat. Once cooked, take the dish out of the oven. Let it rest for a few minutes. This helps the juices settle. For a nice touch, garnish with fresh basil leaves. It adds color and a fresh taste. Enjoy this tasty dish! To get the best flavor, roast your red peppers well. Here are some tips: - Use fresh peppers: Choose firm, bright red peppers. They taste the best. - High heat is key: Set your oven to 425°F (220°C). This helps char the skin. - Keep them whole: Roast the peppers whole for even cooking. - Watch the time: Roast them for about 25-30 minutes. Look for charred skins. Peeling peppers can be tricky. Here’s an easy way: - Steam them: After roasting, place the peppers in a bowl and cover it with plastic wrap. - Let them sit: Wait about 10 minutes. The steam helps loosen the skin. - Remove the skin: Once cooled, the skin should peel off easily. To boost the flavor of the chicken, consider these marinating options: - Simple marinade: Use olive oil, lemon juice, and herbs. Let it marinate for at least 30 minutes. - Add garlic: Include minced garlic in the marinade for depth. For herbs and spices, I suggest: - Smoked paprika: This adds a nice smoky flavor. - Dried oregano: It pairs perfectly with the red peppers. - Fresh herbs: Add fresh basil before serving for extra zest. To cater to different heat preferences, consider these tips: - Red pepper flakes: Start with 1/2 teaspoon. Adjust based on your taste. - Spice it up: For more heat, add cayenne pepper or hot sauce. If you want milder flavors, try these options: - Sweet bell peppers: Substitute some red peppers with yellow or orange ones. - Creamy additions: Stir in a little cream or yogurt to tone down spice. These tips will help you create the perfect Roasted Red Pepper Chicken that suits your taste! Pro Tips Tip 1: Choose the Right Peppers: Opt for ripe, glossy red bell peppers for the best sweetness and flavor. Avoid any with soft spots or blemishes. Tip 2: Marinate the Chicken: For extra flavor, marinate the chicken breasts in olive oil, smoked paprika, and oregano for at least 30 minutes before cooking. Tip 3: Use a Meat Thermometer: To ensure perfectly cooked chicken, use a meat thermometer to check that the internal temperature reaches 165°F (75°C). Tip 4: Customize the Heat: Adjust the amount of red pepper flakes based on your spice preference. Start with a little and add more if you like it spicy! {{image_2}} You can switch out chicken for turkey or tofu. Turkey works well because it has a similar taste. Tofu soaks up flavors nicely, making it a great choice for this dish. Just make sure to press the tofu to remove extra water. This helps it absorb the sauce better. Adding veggies can boost the dish's flavor. Consider using spinach or zucchini. Chop them into bite-sized pieces. Toss them in during the sauté stage for a colorful mix. You can also add mushrooms for a hearty texture. These extras can add depth and nutrition. You can cook this dish in multiple ways. A slow cooker is great for busy days. Just cook on low for 6-8 hours. An Instant Pot cooks it fast, taking only about 15 minutes under pressure. Grilling is another fun option. It gives the chicken a smoky flavor. Just make sure to marinate the chicken first for the best results. To keep your Roasted Red Pepper Chicken fresh, use airtight containers. Glass or plastic containers work well. Store the chicken in the fridge for up to four days. Make sure it cools down before sealing. When reheating, keep the chicken tender by using the oven or stovetop. Heat it at a low temperature. Add a splash of chicken broth to prevent dryness. Cover the dish to trap moisture. This keeps the chicken juicy and flavorful. You can freeze Roasted Red Pepper Chicken for up to three months. Use freezer-safe containers or bags. Make sure to remove as much air as possible. For thawing, place it in the fridge overnight. This helps the chicken stay moist and tasty when you reheat it. Yes, you can use jarred roasted red peppers. They save time and effort. Jarred peppers have a softer texture. They are also less smoky than fresh roasted ones. If you choose jarred, rinse them well. This helps remove excess oil and salt. Use about one cup of jarred peppers in place of fresh. This dish pairs well with many sides. Here are some tasty options: - Steamed rice - Quinoa - Roasted vegetables - Garlic bread - A fresh salad These sides complement the chicken's rich flavor. They add texture and balance to your meal. To make this dish gluten-free, check a few ingredients: - Ensure your chicken broth is labeled gluten-free. - Use gluten-free seasoning blends if needed. - Avoid any sauces or condiments that may contain gluten. This way, you can enjoy the dish without worry. Yes, you can prepare this dish ahead of time. Cook the chicken and sauce, then store them separately. Keep them in airtight containers. You can refrigerate for up to three days. For best taste, reheat gently on the stove. This prevents the chicken from drying out. This blog post covered how to make roasted red pepper chicken from start to finish. We explored the key ingredients like chicken breasts and roasted red peppers, along with step-by-step cooking instructions. I shared tips for roasting and seasoning to boost flavor and variations for different diets. Remember, cooking is about creativity and experimentation. You can easily adapt this dish to fit your taste. Enjoy cooking, and don't hesitate to try new flavors!
    Roasted Red Pepper Chicken Flavorful Comfort Dish
  • - 1 package of pizza dough (store-bought or homemade) - 3 tablespoons unsalted butter, melted - 2 cloves garlic, minced - 1 teaspoon dried oregano - 1 teaspoon garlic powder - 1 cup shredded mozzarella cheese - 1/4 cup grated Parmesan cheese - Fresh parsley, chopped (for garnish) - Salt and pepper to taste The first step in making your air fryer cheesy garlic breadsticks is gathering all the right ingredients. You can use store-bought pizza dough to save time. If you want, you can also make your own dough from scratch. Melt the unsalted butter in a small bowl. This will help your garlic and spices stick to the dough. Minced garlic gives that strong flavor we love. Dried oregano and garlic powder add extra taste. For the cheesy part, you will need shredded mozzarella and grated Parmesan. These cheeses melt well and give a delicious flavor. Fresh parsley adds a nice touch for garnish. Finally, don't forget salt and pepper to bring out the flavors. - Additional herbs for flavor enhancement - Marinara sauce for dipping If you want to spice things up, add some herbs like basil or thyme. They will make your breadsticks even more tasty. Marinara sauce is a great choice for dipping. It pairs well with the cheesy garlic flavor. With these ingredients, you're all set to make a tasty treat that everyone will love! - Preheat your air fryer to 375°F (190°C). - Roll out the pizza dough on a clean surface. Aim for about 1/2 inch thick. - Cut the dough into 1-inch wide strips. - In a small bowl, mix the melted butter with minced garlic. - Add dried oregano, garlic powder, salt, and pepper. - Stir everything well until combined. - Brush the garlic butter mixture over the dough strips. Make sure to coat both sides well. - Place the strips in a single layer in the air fryer basket. Do not let them overlap. Cook in batches if needed. - Air fry for 5-7 minutes until the breadsticks turn golden brown. - After the timer goes off, open the air fryer. Sprinkle mozzarella and Parmesan cheese over the breadsticks. - Close the air fryer and cook for another 2-3 minutes. Wait until the cheese is bubbly and melted. - Carefully take out the breadsticks and sprinkle with fresh parsley to garnish. To get the best breadsticks, cook them in batches. This helps them cook evenly. If your air fryer is crowded, the breadsticks may not crisp up well. For a great texture, you might need to adjust the cooking time. If you want them extra crispy, add a minute or two. Just keep an eye on them so they don't burn. To take your breadsticks to the next level, try adding more seasonings. You can use red pepper flakes for heat or Italian seasoning for extra flavor. Fresh herbs like basil or thyme can add a nice touch too. Mix these into the garlic butter before brushing it on the dough. The result will be even tastier breadsticks. Serving your cheesy garlic breadsticks is fun and easy. Arrange them warm on a wooden board. This gives a nice rustic look. Pair them with a small bowl of marinara sauce for dipping. Not only does it taste great, but it also looks nice on the table. For a finishing touch, sprinkle chopped parsley on top. It adds color and freshness. {{image_2}} You can change the cheese to fit your taste. Try using cheddar for a sharper flavor. Gouda adds a nice smoky touch. You can also use a blend of cheeses, like feta or provolone. Each cheese brings its unique taste. Mix and match to find your favorite. You can make your breadsticks even better with toppings. Add sliced tomatoes for freshness. Chopped jalapeños give a nice kick. You can also try olives or roasted red peppers. Just sprinkle them on before the cheese melts. This adds flavor and color to your dish. If you need gluten-free options, look for gluten-free pizza dough. Many stores sell it now. For a vegan version, use vegan cheese. There are great brands that melt well. You can also make your own cheese from nuts. This way, everyone can enjoy the breadsticks! To keep your cheesy garlic breadsticks fresh, use the right containers. I recommend using an airtight container. This will help keep them soft and prevent them from drying out. You can also wrap them tightly in plastic wrap before placing them in a container. If you want, use aluminum foil as another option. Just make sure it seals well. You have two great options for reheating: the oven or the air fryer. - Air Fryer Method: Preheat your air fryer to 350°F (175°C). Place the breadsticks in a single layer and heat for about 3-5 minutes. This will keep them crispy. - Oven Method: Preheat your oven to 375°F (190°C). Lay the breadsticks on a baking sheet and cover them with foil. Heat for 10-12 minutes. This method warms them without drying them out. Both methods work well, but the air fryer gives a nice crunch. If you want to save some breadsticks for later, freezing is easy. Start by letting the breadsticks cool completely. Then, place them in a single layer on a baking sheet. Freeze them for about 2 hours. Once frozen, transfer them to a freezer bag. Make sure to press out any air before sealing. To thaw, leave them in the fridge overnight. You can reheat them in the oven or air fryer as mentioned. This way, you’ll have tasty breadsticks ready whenever you want! Yes, you can prepare these breadsticks a day in advance. To do this, follow the steps until you brush on the garlic butter. After that, cover the breadsticks tightly with plastic wrap and place them in the fridge. When you are ready to cook, just air fry them straight from the fridge. You may need to add a minute or two to the cooking time. Garlic breadsticks pair well with many dishes. Here are some great options: - Marinara sauce for dipping - A fresh garden salad - Creamy Alfredo sauce - Spicy pizza sauce - Soup, like tomato or minestrone These options make your meal more tasty and fun! Making pizza dough from scratch is easy! Here’s a simple recipe: - Ingredients: - 2 cups all-purpose flour - 1 packet active dry yeast (2 1/4 teaspoons) - 3/4 cup warm water (around 110°F) - 1 teaspoon salt - 1 teaspoon sugar - 1 tablespoon olive oil - Instructions: 1. In a bowl, mix warm water, sugar, and yeast. Let it sit for 5 minutes until foamy. 2. In a large bowl, mix flour and salt. 3. Add the yeast mixture and oil to the flour. Stir until a dough forms. 4. Knead the dough on a floured surface for about 5 minutes. 5. Let it rise in a warm spot for 1 hour or until it doubles in size. Now you have fresh dough ready for your cheesy garlic breadsticks! Making garlic breadsticks is simple and fun, as this guide showed. You learned about the right ingredients, step-by-step cooking, and how to add your own twist. Remember, cooking is all about trying new things. Feel free to experiment with flavors and styles. Enjoy these tasty breadsticks with your favorite dips. They are sure to impress friends and family. When you take the time to make them, you create great memories. Happy cooking!
    Air Fryer Cheesy Garlic Breadsticks Simple and Tasty
  • - 2 cups all-purpose flour - 1 teaspoon baking powder - 1/2 teaspoon baking soda - 1/4 teaspoon salt - 1 teaspoon ground cinnamon For the base, we start with the dry ingredients. All-purpose flour gives the bars their structure. Baking powder and baking soda help them rise. Salt enhances the flavors and balances sweetness. Cinnamon adds warmth and spice, making each bite comforting and delicious. - 1/2 cup unsalted butter, softened - 1 cup brown sugar, packed - 1/2 cup granulated sugar - 2 large eggs - 2 teaspoons vanilla extract Next, we move to the wet ingredients. Softened butter creates a rich base. Brown sugar adds moisture and deep flavor, while granulated sugar sweetens without overpowering. Eggs bind everything together, and vanilla adds a lovely aroma. These ingredients blend to create a smooth batter. - 1 1/2 cups peeled and diced apples (about 2 medium apples) - 1/2 cup chopped walnuts (optional) - 1 cup powdered sugar (for glaze) - 2 tablespoons maple syrup Finally, we have the stars of our recipe. Diced apples bring freshness and texture. Walnuts add a crunchy touch, but they are optional. For the glaze, powdered sugar mixes with maple syrup to create a sweet topping. This glaze ties everything together, making the bars shine. First, preheat your oven to 350°F (175°C). This gets your oven ready for baking. Next, grease a 9x13-inch baking pan. Use butter or cooking spray. Then, line the pan with parchment paper. Leave some paper hanging over the edges. This makes it easy to lift out the bars later. In a medium bowl, whisk together the dry ingredients. Combine 2 cups of all-purpose flour, 1 teaspoon of baking powder, 1/2 teaspoon of baking soda, 1/4 teaspoon of salt, and 1 teaspoon of ground cinnamon. Make sure the mix is even. This blend gives your bars great flavor and helps them rise. In a large bowl, cream 1/2 cup of softened unsalted butter with 1 cup of packed brown sugar and 1/2 cup of granulated sugar. Mix until light and fluffy. This takes about 3 to 4 minutes. The air you whip in gives the bars a nice texture. Now, add 2 large eggs, one at a time. Mix well after each egg. Then, stir in 2 teaspoons of vanilla extract. After that, gradually add your dry mix to the wet ingredients. Blend until just combined. Do not over-mix; this keeps your bars tender. Finally, fold in 1 1/2 cups of peeled and diced apples and 1/2 cup of chopped walnuts, if you like. Pour the batter into your prepared baking pan. Spread it out evenly. Bake for 25 to 30 minutes. To check if they are done, insert a toothpick into the center. If it comes out clean, the bars are ready. While the bars bake, whisk together 1 cup of powdered sugar and 2 tablespoons of maple syrup in a small bowl. Mix until smooth. This glaze adds a sweet touch to your apple bars. When the bars cool, drizzle the glaze over them for that perfect finish. To get the best texture, avoid over-mixing the batter. When you mix too much, the bars can turn out tough. Mix until just combined. This keeps the bars soft and chewy. The creaming step is key. Cream the butter and sugars together until light and fluffy. This step adds air and helps the bars rise nicely. For a lovely presentation, arrange the bars on a platter. Sprinkle some cinnamon or chopped walnuts on top. You can also add a small bowl of extra maple syrup for drizzling. Pair these bars with a warm cup of tea or coffee. A scoop of vanilla ice cream makes a great side too. You can add fun flavors to the batter. Try mixing in spices like nutmeg or ginger for a warm taste. Walnuts add a nice crunch, but you can also use pecans or almonds. If you want more fruit, toss in some raisins or dried cranberries. These little additions make the bars even more delicious. {{image_2}} The best apples for baking include Granny Smith, Honeycrisp, and Fuji. Granny Smith apples give a nice tart flavor. Honeycrisp apples are sweet and juicy. Fuji apples provide a great crunch. Using a mix of these apples can enhance the taste. Always choose firm apples. Soft apples can make your bars mushy. If you want to switch up the glaze, consider using cream cheese frosting. Mix cream cheese, butter, and powdered sugar for a rich taste. You can also use a simple lemon glaze. Just mix lemon juice and powdered sugar. This gives a bright flavor. Try a caramel sauce if you want something sweet and sticky. Each glaze adds its own twist to the bars. Walnuts add a nice crunch, but you can use other nuts too. Pecans, almonds, or hazelnuts work well. If you love chocolate, mix in chocolate chips. Dried fruits like raisins or cranberries also add great flavor. These options let you create your own unique apple bars. Feel free to experiment and find your favorite mix. Store your maple glazed apple bars at room temperature for up to three days. Keep them in an airtight container to keep them moist. If your kitchen is warm, refrigerate them to prevent spoilage. But, note that refrigeration can make them a bit dense. To freeze the bars, let them cool completely first. Wrap each bar in plastic wrap. Then, place them in a freezer bag or container. They can stay fresh in the freezer for up to three months. When you want to eat one, thaw it overnight in the fridge. Reheat it in the microwave for about 20 seconds for a warm treat. These delicious bars stay fresh for about three days at room temperature. In the fridge, they last about a week. If you freeze them, they can hold their flavor and texture for three months. Enjoy them while they are fresh for the best taste! Yes, you can use other sweeteners. Brown sugar gives a rich flavor. You might try coconut sugar for a similar taste. Honey or maple syrup can work too, but adjust the liquid in the recipe. Just keep in mind that each sweetener changes the final taste and texture. The best apples are firm and sweet. I recommend Honeycrisp, Granny Smith, or Fuji apples. Honeycrisp adds sweetness and crunch. Granny Smith gives a nice tartness. Fuji is juicy and sweet. Mixing two types can add depth to the flavor. Yes, you can! Use a gluten-free all-purpose flour blend. Look for one with xanthan gum for better texture. Almond flour or oat flour can also work. Just remember that baking time might change slightly. Check the bars after 25 minutes. Insert a toothpick into the center. If it comes out clean, they are done. The edges should look golden brown. If it’s still wet, bake a few more minutes, then check again. In this post, we covered the key ingredients and steps to make delicious apple bars. We discussed dry and wet ingredients, baking tips, and ways to enhance flavor. You learned about different apple varieties and glaze options. Enjoy experimenting with the recipe and making it your own. Baking is fun and rewarding. Share your tasty results with friends and family!
    Maple Glazed Apple Bars Irresistible Flavor Delight
  • - 1 lb boneless chicken thighs, cut into bite-sized pieces - 1/2 cup cornstarch - 1/2 cup all-purpose flour - 2 large eggs, beaten - 1/2 cup vegetable oil (for frying) The chicken thighs bring a juicy and rich flavor. I prefer thighs over breasts for this recipe. They stay tender and absorb the sauce beautifully. The cornstarch and flour coating gives the chicken a crispy crunch. - 2 tablespoons soy sauce - 2 tablespoons rice vinegar - 1 tablespoon hoisin sauce - 2 tablespoons sugar - 1 tablespoon sesame oil - 3 cloves garlic, minced - 1 inch piece ginger, grated - 2-3 dried red chilies (adjust for heat preference) The sauce makes this dish sing! Soy sauce gives it saltiness. Rice vinegar adds a nice tang. Hoisin sauce brings sweetness and depth. Garlic and ginger add warmth and richness. The dried red chilies allow you to control the heat, making it just right for you. - 3 green onions, sliced (for garnish) - Optional toppings like sesame seeds Garnishes are key to a great presentation. Green onions add a fresh crunch on top. Sesame seeds are another great option for a bit of texture. They also look lovely on the plate. To start, combine cornstarch and flour in a bowl. This mix gives the chicken a crunchy crust. Take your chicken pieces, dip them in the beaten eggs, and then coat them well in the flour mix. Make sure each piece is covered. This coating is key for crispiness. If you skip this step, the chicken may turn out soggy. Next, heat vegetable oil in a skillet over medium-high heat. The oil needs to be hot enough for frying. If it’s too cool, the chicken will absorb too much oil. Once hot, add the chicken in batches. Fry each batch for about 5 to 7 minutes. Look for a golden brown color on the outside. Remove the chicken and place it on a paper towel to drain excess oil. Now, let’s prepare the sauce. In a small bowl, whisk together soy sauce, rice vinegar, hoisin sauce, sugar, sesame oil, garlic, and ginger. Mix until smooth. In the same skillet, discard most of the oil, leaving just about a tablespoon. Add dried red chilies and sauté for 30 seconds to unlock their flavor. Pour in your sauce mix and bring it to a gentle simmer. Finally, add the fried chicken back into the skillet. Toss everything together to coat the chicken evenly. Let it simmer for another 2 to 3 minutes. This step allows the sauce to thicken and cling to the chicken nicely. To get that perfect crunch, double-coat your chicken. First, dip it in beaten egg. Then, roll it in a mix of cornstarch and flour. The two layers help create a crispy shell. For frying, heat your oil to about 350°F. This temperature cooks the chicken well and keeps it golden and crunchy. Fry in batches to avoid crowding. This keeps the oil hot and helps the chicken fry evenly. To make your dish pop, adjust the heat using red chilies. Start with two dried chilies and taste as you go. You can always add more if you like it spicier. Adding extra garlic and ginger boosts the flavor too. Try using four cloves of garlic instead of three. Grated ginger adds warmth and depth. Both ingredients bring a fresh zing that enhances your dish. Serving General Tso’s Chicken is all about the visuals. Plate it over a mound of fluffy steamed rice. Drizzle some extra sauce on top for added flavor. Garnish with sliced green onions to add a fresh, vibrant touch. You can also sprinkle sesame seeds for extra crunch. The colors and textures make your dish look just as good as it tastes! {{image_2}} You can make this dish lighter by using chicken breast. Chicken breast has less fat than thighs. It still tastes great when cooked right. Another healthy swap is baking instead of frying. Preheat your oven to 400°F. Coat the chicken like usual, then bake on a lined sheet. Bake for about 20 minutes, or until crispy. Want to add color and nutrition? Try adding vegetables! Bell peppers and broccoli work well. They add crunch and flavor. Toss them in when you cook the sauce for a few minutes. You can also play with the sauce. Swap hoisin sauce for teriyaki or sweet chili sauce. Each sauce brings a unique twist to the dish. For gluten-free options, use gluten-free soy sauce. This keeps the flavor but makes it safe for gluten-sensitive folks. If you want a vegetarian or vegan version, try using tofu or tempeh. Cut it into cubes, coat it, and follow the same frying steps. Use a vegan sauce by swapping regular soy sauce for a plant-based version. Store leftovers in an airtight container. This keeps them fresh and tasty. Make sure the chicken cools before sealing. When reheating, use a skillet over medium heat. This helps restore the crispiness. You can also microwave, but it may make the chicken soggy. For best results, add a splash of water to steam it slightly. To freeze General Tso’s Chicken, let it cool completely first. Place the chicken in a freezer-safe bag. Remove as much air as possible to prevent freezer burn. It’s best to freeze it without sauce. When ready to eat, thaw it overnight in the fridge. Reheat in a skillet for the best texture. You can also microwave it on low power. In the fridge, General Tso’s Chicken lasts about 3 to 4 days. Always check for signs of spoilage. Look for a strange smell or color changes. If the chicken feels slimy, it’s best to discard it. Keeping track of dates helps you enjoy your meal safely. This General Tso’s Chicken stands out for a few key reasons. First, I use fresh chicken thighs, which give a juicier bite. Takeout often uses lower-quality meats that can be dry. The coating, made of cornstarch and flour, adds a great crunch that takeout lacks. I fry the chicken until it’s golden brown, ensuring crispiness that is hard to beat. The sauce blends soy sauce, rice vinegar, hoisin sauce, and fresh garlic and ginger. This mix adds layers of flavor that you simply won’t find in many takeout versions. Plus, I control the heat with dried red chilies, so you can adjust it to your taste. Finally, the use of sesame oil brings a nutty depth, making each bite more delightful. Absolutely! Meal prepping this dish is a great idea. You can cut the chicken and coat it in the flour mixture a day ahead. Store it in the fridge, and it will be ready to fry when you need it. You can also make the sauce in advance. Just mix all the sauce ingredients, and keep it in a jar in the fridge. When it’s time to eat, fry the chicken, heat the sauce, and combine them. This way, you have a quick meal ready to go. If you prefer less heat, you can easily adjust the spice level. Start by using fewer dried red chilies. Just one or two can give nice flavor without too much heat. Another option is to remove the seeds from the chilies. The seeds hold most of the spice, so skipping them can really tone it down. You can also add a touch more sugar to balance the heat. Lastly, serve it with rice, which helps to cool down the dish. Enjoy your meal at your preferred spice level! You now have a complete guide to making General Tso’s Chicken. From selecting the best ingredients to achieving perfect crispiness, each step adds to its flavor. Don't forget to experiment with variations to suit your taste. Proper storage ensures your leftovers last longer and taste great. With these tips, you can make a delicious dish that beats takeout. Enjoy your cooking adventure and savor every bite of your homemade meal!
    General Tso’s Chicken Better Than Takeout Delight
  • - 12 oz cheese tortellini (fresh or frozen) - 1 cup sun-dried tomatoes (packed in oil, drained and roughly chopped) - 3 cups vegetable broth - 1 cup heavy cream - 1 cup fresh spinach leaves For this dish, cheese tortellini serves as the base. You can use fresh or frozen tortellini. Sun-dried tomatoes add a rich, tangy flavor. They come packed in oil, which helps to enhance the taste of the sauce. Vegetable broth gives the meal depth and warmth. Heavy cream makes the dish creamy and rich. Fresh spinach adds color and nutrients, making it a balanced meal. - 2 cloves garlic, minced - 1 teaspoon Italian seasoning - Salt and pepper to taste - ¼ cup grated Parmesan cheese (plus extra for serving) - 2 tablespoons olive oil Garlic brings a savory aroma to the dish. Italian seasoning adds classic flavor, enhancing the overall taste. Salt and pepper balance the flavors. Grated Parmesan cheese gives a salty finish. Olive oil not only cooks the garlic but also adds richness. These simple seasonings make the tortellini shine. Use fresh, high-quality ingredients for the best results. First, take a large pot and heat 2 tablespoons of olive oil over medium heat. Add 2 cloves of minced garlic to the pot. Sauté the garlic for 1-2 minutes. You want it fragrant, not burnt. Next, add 1 cup of sun-dried tomatoes that are packed in oil. Cook them for about 2 minutes, stirring often. This step builds a great flavor base for the dish. After the sun-dried tomatoes are ready, pour in 3 cups of vegetable broth. Bring this mixture to a simmer. Once it starts bubbling, add 12 oz of cheese tortellini. Sprinkle in 1 teaspoon of Italian seasoning. Stir gently to mix everything well. Cook for 5-7 minutes or until the tortellini is al dente. Keep stirring occasionally to prevent sticking. Now, lower the heat and slowly stir in 1 cup of heavy cream. This makes the dish rich and creamy. Add 1 cup of fresh spinach leaves next. Cook for another 2-3 minutes until the spinach wilts. Lastly, stir in ¼ cup of grated Parmesan cheese. Season with salt and pepper to taste. Let it sit for a couple of minutes to thicken slightly before serving. How to achieve al dente tortellini To cook tortellini perfectly, follow the package instructions closely. Usually, it takes about 5-7 minutes. Taste a piece to check for doneness. It should be firm yet tender. If you cook it too long, it becomes mushy. Stir gently while it cooks to keep it from sticking. Timing for adding spinach Add the spinach at the end of cooking. After stirring in the cream, let it cook for 2-3 minutes. This allows the spinach to wilt nicely while keeping its bright color. If you add it too early, it can lose flavor and texture. Suggestions for garlic preparation Use fresh garlic for the best taste. Mince it finely to release its oils. Sauté it in olive oil until fragrant but not burnt. This step builds a strong flavor base for your dish. You can also try roasting the garlic for a sweeter taste. Alternative spices to elevate the dish Try adding a pinch of red pepper flakes for heat. Fresh herbs like basil or parsley can add freshness. You can also experiment with a dash of lemon juice for brightness. These small changes can make your meal more exciting. {{image_2}} You can switch up the veggies in this dish. Try using kale or mushrooms instead of spinach. Both add a nice twist to the flavor. Kale gives a hearty bite, while mushrooms add umami. If you're in the mood for a different pasta, you can choose any shape you like. Bowtie or penne work well too. Just make sure to adjust the cooking time based on the pasta you select. To make this meal gluten-free, use gluten-free tortellini. Many brands offer tasty options. You can also swap the heavy cream for coconut milk or a nut-based cream for a dairy-free version. If you want a vegetarian dish, stick with the cheese tortellini. For a vegan option, use vegan tortellini and skip the cheese on top. You can still enjoy all the rich flavors! To keep your leftover Sun-Dried Tomato Tortellini tasty, store it in the fridge. Use an airtight container to avoid drying out. This meal stays fresh for about 3 to 4 days in the fridge. If you want to save it longer, freeze it. Place it in a freezer-safe container. It can last for up to 3 months in the freezer. When it's time to eat your leftovers, reheat them gently. The best way is to use a pot on low heat. Stir often to keep the texture nice. You can also use the microwave. Heat it in short bursts, stirring in between. This helps avoid overcooking. For a fun twist, serve it with a fresh salad or garlic bread. This adds crunch and flavor to your meal! If you don’t have sun-dried tomatoes, try roasted red peppers. They add a sweet and smoky flavor. You can also use fresh tomatoes. Just chop them finely and cook them longer to get a similar taste. For a tangy twist, consider using olives. They bring a nice salty punch to your dish. Yes, you can prepare parts of this meal ahead. Cook the tortellini and store it in the fridge. Keep the sun-dried tomato mix separate until you are ready to serve. This will keep the flavors fresh. When you want to eat, combine everything in a pot. Heat it gently and stir in the cream and spinach. To change the serving size, you can easily scale the ingredients. For more servings, just double everything. If you need fewer, halve the amounts. Use a measuring cup for accuracy. This way, you keep the flavors balanced. Always keep an eye on the cooking time, as it may change slightly based on the amount you make. This recipe highlights cheese tortellini's rich flavors with fresh spinach and sun-dried tomatoes. We explored easy steps to prepare the dish, from sautéing garlic to adding cream and seasoning. I shared tips for perfect cooking and variations that suit different diets. You can enjoy leftovers and keep them fresh. Remember, cooking is all about experimenting and adapting. With this dish, have fun and make it your own. Each bite can bring comfort and joy to your meals. Enjoy your cooking journey and share your creations!
    Sun-Dried Tomato Tortellini One Pot Easy Dinner Meal
  • To make caramel apple monkey bread, you need a few key ingredients. Here’s the list: - 3 cans (16.5 oz each) refrigerated biscuit dough - 3 apples (peeled, cored, and diced) - 1 cup caramel sauce (store-bought or homemade) - 1/2 cup brown sugar - 1 teaspoon ground cinnamon - 1/2 cup butter (melted) - 1/2 cup chopped walnuts or pecans (optional) - Whipped cream (optional, for serving) Each ingredient plays a role in creating the rich, sweet flavor of this dish. The biscuit dough serves as a soft base. The apples add freshness and texture. Caramel sauce brings sweetness and gooeyness. Brown sugar and cinnamon create warmth and spice. Butter adds richness, and nuts give a nice crunch. If you want to switch things up, you can skip the nuts or use a different type of apple. Granny Smith apples work well for a tart flavor, while Honeycrisp apples add sweetness. Make sure to gather everything before you start cooking. This will help you stay organized and make the process smooth. Enjoy preparing this delightful treat! - Preheat your oven to 350°F (175°C) and grease a bundt pan well. - In a bowl, mix the brown sugar and cinnamon. Set it aside for later. - Open the biscuit dough and cut each biscuit into fourths. Roll each piece into a ball. - In another bowl, mix the diced apples with half of the caramel sauce. Stir well. - Layer half of the biscuit balls in the bundt pan. Then add half of the apple mixture. - Sprinkle any remaining cinnamon-sugar over the apples for extra flavor. - Add the rest of the biscuit balls on top of the apples. Then, layer the remaining apples. - Pour the melted butter evenly over the layers. Drizzle the rest of the caramel sauce on top. - If using nuts, sprinkle them over the top now. - Bake in your preheated oven for about 30 to 35 minutes. Look for a golden brown color. - Once done, take it out and let it cool for about 10 minutes. Then invert it onto a platter. - Drizzle any remaining caramel sauce over the monkey bread. Serve warm, adding whipped cream if you like it. To ensure even cooking through your caramel apple monkey bread, keep a few things in mind. First, cut the biscuit dough into even pieces. This helps them cook at the same rate. Layer the dough balls and apples carefully. Avoid packing them too tightly in the bundt pan. This allows heat to circulate well. When choosing the best apples for baking, look for firm varieties. Granny Smith apples are tart and hold their shape well. Honeycrisp apples add a sweet touch and great texture. Avoid soft apples, as they may turn mushy in the oven. Get creative when serving caramel apple monkey bread! You can pull it apart and serve it warm on a platter. For a fun twist, drizzle extra caramel sauce on top before serving. Add a scoop of whipped cream or a sprinkle of cinnamon for extra flavor. Pair the monkey bread with warm apple cider for a cozy treat. A scoop of vanilla ice cream also makes a delightful addition. To store leftovers, wrap the monkey bread tightly in plastic wrap. You can also place it in an airtight container. Keep it in the fridge for up to three days. This helps keep it fresh and tasty. For reheating, place slices in the microwave for 15 to 20 seconds. This warms it up and keeps it soft. If you prefer a crispier texture, reheat in the oven at 350°F for about 10 minutes. {{image_2}} You can make your caramel apple monkey bread even better! Try adding spices like nutmeg or ginger. A splash of vanilla or almond extract adds a lovely touch. You can also swap out the nuts. Try almonds or pecans instead of walnuts. Adding dried fruits, like cranberries or raisins, gives a nice twist. If you're looking for lighter options, use low-fat biscuit dough. You can also replace the butter with unsweetened applesauce. This keeps the flavor but cuts some calories. For gluten-free needs, there are great gluten-free biscuit mixes. These make it easy to enjoy this treat without worry. Seasonal fruits can change the game! In fall, add pears or even pumpkin. For summer, peaches or cherries work great. You can also top it with a sprinkle of crushed candy canes during the holidays. Another idea is to drizzle chocolate sauce instead of caramel for a fun change! You can store your monkey bread in two ways: refrigeration or at room temperature. If you plan to eat it within two days, keeping it at room temperature works well. Just make sure to wrap it tightly in plastic wrap. For longer storage, refrigeration is best. It stays fresh in the fridge for about five days. If you want to save some for later, freezing is a great option. Cut the monkey bread into portions that suit your needs. Wrap each piece well in plastic wrap and then in aluminum foil. This helps keep it fresh. When you're ready to enjoy it, thaw it overnight in the fridge. Reheat it in the oven at 350°F (175°C) for about 10-15 minutes until warm. Use airtight containers for the best results. Glass or plastic containers with tight lids work great. Make sure to avoid containers that trap moisture. This helps prevent spoilage and keeps your monkey bread tasty. If you notice any extra moisture, add a paper towel inside the container. This will help absorb it and keep your treat fresh longer. Can I use homemade biscuit dough instead? Yes, you can use homemade biscuit dough. Just ensure it is well chilled. This will help it rise and stay fluffy during baking. Homemade dough can add a personal touch to the recipe. How do I know when monkey bread is done baking? You will know it's done when the top is golden brown. A toothpick inserted in the center should come out clean. The dough should feel firm, not gooey. Can I make this recipe ahead of time? Yes, you can prep the monkey bread a day before. Layer the ingredients in the bundt pan and cover it. Just bake it the next day when you are ready. What can I substitute for caramel sauce? You can use butterscotch sauce or chocolate sauce. Maple syrup can work, too, but it will change the flavor slightly. Alternatives for nuts in the recipe If you prefer no nuts, leave them out. You can also use seeds, like pumpkin seeds. They will add a nice crunch without being overpowering. How should I serve caramel apple monkey bread? Serve it warm, right from the oven. Drizzle extra caramel sauce on top for a sweet touch. A dollop of whipped cream can add a nice creaminess. Can I serve it cold or should it be warm? It is best served warm. The gooey caramel and soft bread taste great when fresh. Serving it cold will change the texture. Caramel apple monkey bread is fun and easy to make. We covered the key ingredients, baking steps, and serving tips. Remember, you can customize flavors to make it your own. Try using different fruits or nuts. Perfect for any occasion, this treat always brings joy. Store it properly to keep it fresh. I hope you enjoy making and sharing this delicious recipe. You will impress family and friends with your skills. Happy baking!
    Caramel Apple Monkey Bread Delightful and Easy Recipe
  • - Chicken and Vegetables - 1 lb chicken breast, sliced into thin strips - 1 cup bell peppers, sliced (red and yellow for color) - 1 cup snap peas - Sauces and Seasonings - 2 tablespoons honey - 2 tablespoons soy sauce - 1 tablespoon sesame oil - 1 tablespoon ginger, minced - 2 cloves garlic, minced - Garnishing Elements - 2 tablespoons sesame seeds - 3 green onions, chopped for garnish - Cooked jasmine rice or noodles for serving Gather these fresh ingredients before you start cooking. The chicken gives protein and fills you up. Bell peppers add color and crunch. Snap peas bring a sweet bite. The honey and soy sauce blend well for a tasty sauce. Ginger and garlic add warmth and depth. Sesame seeds and green onions finish the dish with flair. Enjoy your cooking! {{ingredient_image_1}} To make the stir-fry sauce, grab a small bowl. Mix together 2 tablespoons of honey, 2 tablespoons of soy sauce, and 1 tablespoon of sesame oil. This mix adds a sweet and salty flavor to the dish. Set the sauce aside while you cook the chicken. Heat a large skillet or wok over medium-high heat. Add 1 tablespoon of sesame oil. Once the oil is hot, add the sliced chicken strips in a single layer. Cook the chicken for about 4-5 minutes, stirring occasionally. Look for a golden brown color. Make sure the chicken is cooked through. Next, add 1 tablespoon of minced ginger and 2 cloves of minced garlic. Stir and cook for another 1-2 minutes. You want to smell that lovely aroma. Now it's time for the vegetables! Toss in 1 cup of sliced bell peppers and 1 cup of snap peas. Stir-fry everything for about 3-4 minutes. The veggies should look bright and feel slightly tender. Pour the honey soy sauce over the chicken and veggies. Stir well to coat everything evenly. Let it cook for another minute. Finally, sprinkle 2 tablespoons of sesame seeds on top. Give everything a good toss one last time. Serve this hot over cooked jasmine rice or noodles. Don’t forget to garnish with chopped green onions for that extra touch! To make your chicken tender, choose fresh chicken breast. Slice it thinly. This helps it cook fast. Cook on high heat to keep it juicy. Don’t overcrowd the pan. This lets the chicken brown well. Let it rest for a minute after cooking. This keeps the juices inside. For more flavor, add minced ginger and garlic early. This brings out their taste. Use fresh bell peppers for crunch and color. A mix of red and yellow looks great. Adding sesame seeds at the end gives a nutty flavor. You can also try adding a splash of lime juice. This adds a bright taste to the dish. Serving your stir-fry well makes it more fun. Use a large plate or bowl. Start with a base of jasmine rice or noodles. Pile the chicken and veggies on top. Sprinkle green onions and sesame seeds on top. This adds color and texture. You can also serve with lemon wedges on the side. It makes the dish look fresh and inviting. Pro Tips Marinate for Extra Flavor: For enhanced flavor, marinate the chicken in the honey soy sauce mixture for at least 30 minutes before cooking. This allows the chicken to absorb the flavors more deeply. High Heat is Key: Stir-frying requires high heat to achieve that signature sear on the chicken and vegetables. Ensure your skillet or wok is very hot before adding the ingredients. Fresh Ingredients Matter: Use fresh ginger and garlic for the best flavor. If possible, grate the ginger instead of mincing for a more intense flavor profile. Colorful Veggies: Mix and match colorful vegetables to make the dish visually appealing and nutritious. Consider adding broccoli or carrots for added crunch and color. {{image_2}} You can easily make this dish vegetarian. Swap out the chicken for tofu. Firm tofu works best. Cut it into small cubes. Press it to remove extra water. Stir-fry until golden brown. Then, follow the same steps for the sauce and veggies. If you have food allergies, you can change some ingredients. Use tamari instead of soy sauce for gluten-free cooking. Maple syrup can replace honey for a vegan option. For low-sodium diets, pick low-sodium soy sauce. These swaps keep the dish tasty while fitting your needs. Feel free to load this stir-fry with more veggies. Broccoli, carrots, or zucchini add great flavors and textures. You can also add more protein. Shrimp or beef strips work well. Simply adjust cooking times. Make it your own by mixing in your favorite ingredients. After you enjoy your Honey Sesame Chicken Stir-Fry, store any leftovers in an airtight container. Keep it in the fridge for up to three days. Make sure it cools down before you put it away. This helps keep it fresh and tasty. When you want to enjoy your leftovers, reheat them on the stove. Use medium heat to warm it up. Stir it often to heat evenly. You can also use a microwave. Just cover the bowl with a microwave-safe lid. Heat for one to two minutes. Check that it's hot all the way through. If you want to save it for later, you can freeze the stir-fry. Place it in a freezer-safe container. It can stay good for up to three months. When you're ready to eat, thaw it in the fridge overnight. Then reheat it as mentioned above. Enjoy your meal anytime! You can prepare the sauce a day in advance. Just mix honey, soy sauce, and sesame oil. Store it in the fridge. Slice the chicken and veggies ahead too. Keep them in separate containers. When you're ready to cook, just heat the pan and add everything. This saves time on busy days. Yes, you can! This recipe works well with shrimp, beef, or tofu. If using shrimp, cook it until pink and firm. For beef, slice it thinly for quick cooking. Tofu should be pressed and cubed before cooking. Each protein adds its own twist and flavor. Serve it over jasmine rice or noodles. You can also add a side of steamed broccoli or a simple salad. These sides balance the dish and make it hearty. Feel free to add more veggies for extra crunch and color. Enjoy your meal! This blog post covered how to make a tasty Honey Sesame Chicken Stir-Fry. We went over the ingredients, step-by-step cooking instructions, and helpful tips. You learned about vegetarian options and how to store leftovers. Lastly, we answered common questions for more clarity. Now, you have the tools to create your own stir-fry with ease. Enjoy experimenting with flavors and ingredients. Cooking can be fun and rewarding!
    Honey Sesame Chicken Stir-Fry in 20 Minutes Delight
  • - 1 lb large shrimp, peeled and deveined - 2 cups broccoli florets - 1 red bell pepper, sliced - 4 cloves garlic, minced - 1/4 cup honey - 3 tablespoons soy sauce (or tamari for gluten-free) - 2 tablespoons olive oil - 1 tablespoon sesame oil - 1 teaspoon grated fresh ginger - 1/2 teaspoon crushed red pepper flakes (optional) - Salt and pepper to taste - Sesame seeds for garnish - Fresh parsley or cilantro for garnish For this dish, measuring correctly is key. Use: - 1 pound of shrimp. This gives four servings. - 2 cups of broccoli florets. Fresh is best for crunch. - 1 red bell pepper. Slice it thin for even cooking. - 4 cloves of garlic, minced finely. This adds great flavor. For fresh produce, look for bright colors. The broccoli should be firm. Choose a red bell pepper that feels heavy for its size. Avoid any with soft spots or blemishes. Fresh ingredients make all the difference in taste! 1. Preheating the oven: Set your oven to 400°F (200°C). This step helps cook everything evenly. A hot oven ensures that your shrimp and broccoli roast perfectly. 2. Making the marinade: In a mixing bowl, whisk together: - 4 cloves garlic, minced - 1/4 cup honey - 3 tablespoons soy sauce - 2 tablespoons olive oil - 1 tablespoon sesame oil - 1 teaspoon grated fresh ginger - 1/2 teaspoon crushed red pepper flakes (if you like a bit of heat) Save about 2 tablespoons of this marinade in another bowl. You will use it later as a finishing glaze. 1. Marinating the shrimp: Add 1 lb of large, peeled shrimp to the bowl with the marinade. Toss the shrimp well to coat them evenly. Let them sit for at least 10 minutes. This time allows the shrimp to soak up all the tasty flavors. 2. Arranging vegetables and shrimp on the sheet pan: On a sheet pan, place 2 cups of broccoli florets and sliced red bell pepper. Drizzle with olive oil and sprinkle with salt and pepper. Toss the veggies to coat them well. Spread the marinated shrimp evenly over the vegetables. This helps everything cook together nicely. 3. Baking and broiling times: Place the sheet pan in the preheated oven. Bake for 12-15 minutes. The shrimp should turn pink and opaque, and the broccoli should be tender-crisp. After baking, drizzle the reserved marinade over the shrimp and veggies. Switch your oven to broil for an extra 2-3 minutes. This step caramelizes the glaze, adding more flavor to your dish. To achieve perfect shrimp texture, start with fresh or thawed shrimp. Avoid overcooking, as shrimp can become tough. Cook them until they turn pink, about 12-15 minutes in the oven. Marinating for at least 10 minutes helps them soak up flavor without losing their texture. For tender-crisp broccoli, cut the florets into even pieces. This ensures they cook evenly. Toss them with olive oil, salt, and pepper before baking. Bake until they are bright green and just tender. Broiling them at the end gives a nice finish. Want to jazz up your dish? Add spices like paprika or garlic powder for depth. Try fresh herbs like thyme or basil for a twist. You could also mix in some lime juice for a zesty kick. To adjust sweetness, add more honey for a sweeter taste. If you prefer less sweetness, use less honey or add vinegar for balance. For spice, increase the crushed red pepper flakes or add sriracha to the marinade. Always taste as you go! {{image_2}} You can easily change some veggies in this dish. Snap peas and carrots work well. They add crunch and color. You can also use bell peppers of any color for a fun twist. If you need a gluten-free option, use tamari instead of soy sauce. It has a similar taste but is safe for those avoiding gluten. Coconut aminos can be another great swap. It’s sweeter and less salty. Want to cut carbs? You can swap the shrimp for chicken or tofu. These options fit well into low-carb or ketogenic diets. Just be sure to adjust cooking times for chicken. Tofu cooks faster than shrimp. For a vegan version, replace shrimp with chickpeas or mushrooms. Both soak up the honey garlic flavor well. Use maple syrup instead of honey for sweetness. This keeps it plant-based and delicious. To store leftovers, let the dish cool first. Place the shrimp and broccoli in an airtight container. You can keep it in the fridge for up to three days. Use glass or plastic containers that seal well. This keeps the flavors fresh and prevents spills. To reheat, the best method is using the oven. Preheat the oven to 350°F (175°C). Place the leftovers on a baking sheet. Heat for about 10-15 minutes until warm. This helps keep the shrimp juicy and broccoli crisp. You can also transform leftovers into a new meal. Try adding the shrimp and broccoli to a salad or mix them into fried rice. Both options give you a fun twist on the original dish! How long should I marinate shrimp? You should marinate the shrimp for at least 10 minutes. This time lets the shrimp soak up the flavors. If you have more time, you can marinate them for up to 30 minutes. Just don’t go too long, or the shrimp might become too soft. Can I use frozen shrimp instead of fresh? Yes, you can use frozen shrimp. Just make sure to thaw them first. Run them under cold water for about 10 minutes. Pat them dry before marinating. This helps the marinade stick better. What sides pair well with Honey Garlic Shrimp & Broccoli? This dish goes well with rice or quinoa. You can also serve it with a fresh salad. For a hearty meal, add some bread or noodles. The flavors mix well and make a complete meal. What's the best way to adjust this recipe for larger servings? To adjust for larger servings, simply double the ingredients. Use two sheet pans if needed. Make sure the shrimp and veggies are in a single layer for even cooking. Keep an eye on the cooking time, as it may vary. How can I make this a low-sodium dish? To make this dish low-sodium, use low-sodium soy sauce or tamari. You can also cut the amount of soy sauce in half. Add more honey or ginger to boost the flavor without the salt. This blog post covered all key steps to make a delicious Honey Garlic Shrimp and Broccoli. You learned about the main ingredients, preparation process, and cooking methods. We also shared helpful tips for perfect texture and flavor. Plus, you discovered variations and storage information for leftovers. Cooking should be fun and easy. With these tips, you can create a dish your family will love. Enjoy experimenting and make it your own!
    Honey Garlic Shrimp & Broccoli Sheet Pan Delight

Posts pagination

← Newer 1 2 3 4 … 66 Older →

Footer

↑ back to top

More information

  • Drinks
  • Appetizer
  • Dinner
  • Desserts
  • About
  • Contact
  • Privacy Policy

Our Policies

  • Privacy Policy
  • GDPR Policy
  • Terms Of Use
  • Copyright Policy
  • Cookie Policy
  • Disclaimer

Copyright © 2025 cheftaling