• Home
  • Recipe Index
    • Desserts
    • Dinner
    • Appetizer
    • Drinks
  • About
  • Contact
  • Privacy Policy
menu icon
go to homepage
  • Home
  • Recipe Index
    • Desserts
    • Dinner
    • Appetizer
    • Drinks
  • About
  • Contact
  • Privacy Policy

search icon
Homepage link
  • Home
  • Recipe Index
    • Desserts
    • Dinner
    • Appetizer
    • Drinks
  • About
  • Contact
  • Privacy Policy

×
Natalie

Natalie

Natalie is a passionate food storyteller and recipe developer at Taling’s Recipes, where she brings her love of seasonal ingredients and approachable cooking to life.

Her culinary path started in farmers’ markets, where she discovered the beauty of cooking with what’s fresh and local. Over time, she honed her skills in home kitchens and community gatherings, creating comforting meals that balance flavor with simplicity. Today, Natalie shares her recipes with a global audience, inspiring home cooks to embrace creativity, confidence, and joy in everyday meals.

  • To make maple glazed carrot fries, you will need: - 4 large carrots, peeled and cut into fries - 2 tablespoons olive oil - 3 tablespoons pure maple syrup - 1 teaspoon ground cinnamon - 1/2 teaspoon salt - 1/4 teaspoon black pepper - 1/4 teaspoon cayenne pepper (optional for a kick) - Fresh parsley or cilantro for garnish These simple ingredients create a sweet and savory treat. The carrots shine when paired with maple syrup and spices. To get perfect fries, measure your ingredients carefully. Here are some tips: - Use dry measuring cups for solid ingredients. - Use liquid measuring cups for oils and syrups. - Level off dry ingredients with a knife. - For sticky ingredients like maple syrup, spray your measuring cup with a little oil for easy pouring. Being precise helps you achieve the best taste and texture. If you don't have all the ingredients, here are some easy swaps: - Swap olive oil for avocado oil or canola oil. - Use honey or agave syrup instead of maple syrup for a different flavor. - If you lack ground cinnamon, try nutmeg for a warm spice. - Leave out the cayenne pepper if you prefer no spice. These substitutes still keep the flavor profile delicious! {{ingredient_image_1}} Start with four large carrots. Peel them first, then cut them into fry shapes. Aim for a size that’s easy to hold. This helps them cook evenly. In a big bowl, mix the olive oil, maple syrup, cinnamon, salt, black pepper, and cayenne (if you want some heat). Add the carrot fries and toss well. Make sure every fry gets coated. This glaze adds a sweet and spicy kick. Preheat your oven to 425°F (220°C). Line a baking sheet with parchment paper for easy cleanup. Spread the carrot fries in a single layer. Give them space to get crispy. Bake for 20-25 minutes. Flip them halfway through for even browning. They should be golden and caramelized when done. Let them cool for a few minutes. Top with fresh parsley or cilantro for a nice touch. To get your carrot fries crispy, space them out on the baking sheet. If they touch, they steam instead of crisp. Bake at 425°F for 20-25 minutes. Flip them halfway through for even cooking. Keep an eye on them toward the end. You want them golden brown. Want a flavor boost? Try adding garlic powder or smoked paprika. These spices pair well with maple syrup. For a spicy kick, add cayenne pepper. Fresh herbs like rosemary or thyme also add great taste. Feel free to mix and match based on what you like. Serve your carrot fries in a fun way! Use a colorful bowl or a wooden platter. Garnish them with fresh parsley or cilantro for a pop of color. Pair them with a dipping sauce like ranch or yogurt. Your guests will love the look and taste! Pro Tips Choose the Right Carrots: Use fresh, firm carrots for the best texture and flavor. Organic carrots often have a sweeter taste. Adjust the Sweetness: Depending on your preference, you can increase or decrease the amount of maple syrup in the recipe for a more intense or subtle sweetness. Crispier Fries: For extra crispy carrot fries, soak the cut carrots in cold water for 30 minutes before baking. This helps to remove excess starch. Flavor Variations: Experiment with additional spices like paprika or garlic powder to create different flavor profiles for your carrot fries. {{image_2}} You can add a kick to your carrot fries. Mix in cayenne pepper for heat. Just a touch will do. You can also add some chili powder for more spice. The sweet maple syrup balances the heat well. This combo makes a fun twist on the recipe. Your taste buds will love it! Feel free to get creative with spices. Try adding garlic powder for depth. You can also use smoked paprika for a smoky flavor. Italian herbs like oregano or thyme work great too. Each spice adds a new layer to the dish. Mix and match to find your favorite blend! You can cook these fries in an air fryer. Just coat the fries as you would for the oven. Place them in the fryer basket in a single layer. Cook at 400°F (204°C) for about 15 minutes. Shake the basket halfway through for even cooking. Air frying gives you a crispier texture without much oil. It’s a quick and easy option! After you enjoy your maple glazed carrot fries, cool them down to room temperature. Place them in an airtight container. Store them in the fridge for up to three days. This keeps them fresh and delicious for later meals. To reheat, preheat your oven to 350°F (175°C). Spread the carrot fries on a baking sheet. Heat them for about 10-15 minutes. This helps restore their crispiness. You can also use a microwave, but they may lose crunch. If you want to freeze carrot fries, make sure they are fully cooled. Place them in a single layer on a baking sheet first. Freeze them for about an hour until firm. Then, transfer them to a freezer bag. They can stay frozen for up to three months. When ready, bake them straight from the freezer. Enjoy the sweet and spicy flavor anytime! Yes, you can use baby carrots. They will cook faster, so check them often. Cut them in half lengthwise for better results. You want them to be crispy and caramelized, just like the large ones. To reduce sweetness, use less maple syrup. You can try two tablespoons instead of three. Adding more spices, like cinnamon or black pepper, helps balance the flavor too. This way, your fries will still taste great without being too sweet. Yes, these carrot fries are vegan. They contain no animal products. The maple syrup and olive oil both come from plants, making them perfect for a vegan diet. Enjoy these fries as a tasty, meat-free treat! In this post, we discussed how to make delicious maple glazed carrot fries. We covered the needed ingredients, helpful measuring tips, and easy substitutes. I shared simple steps for preparing, mixing, and baking. You learned tips for crispiness and flavor. We explored fun variations and how to store your fries correctly. Carrot fries can be a tasty and healthy snack or side dish. Enjoy experimenting with different flavors and methods. Happy cooking!
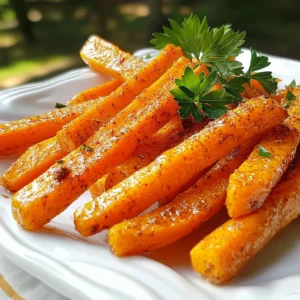
    Maple Glazed Carrot Fries Flavorful and Easy Recipe
  • To make this creamy garden vegetable soup, gather these ingredients: - 1 tablespoon olive oil - 1 medium onion, chopped - 2 cloves garlic, minced - 2 medium carrots, diced - 1 medium zucchini, diced - 1 bell pepper, chopped (any color) - 1 cup green beans, trimmed and cut into 1-inch pieces - 4 cups vegetable broth - 1 cup whole milk or a plant-based alternative - 1 cup heavy cream - 1 teaspoon dried thyme - 1 teaspoon dried basil - Salt and pepper to taste - 1 cup fresh spinach, chopped - Chopped parsley for garnish If you want a dairy-free soup, use these options: - Substitute whole milk with almond milk, oat milk, or coconut milk. - Replace heavy cream with coconut cream or a thick cashew cream. These choices keep the soup creamy without dairy. Fresh herbs add bright flavor, while dried herbs offer convenience. Here’s how they compare: - Fresh Herbs: Use them for a vibrant taste. You can add them at the end of cooking. - Dried Herbs: They work well for longer cooking times. Add them early to allow their flavors to bloom. For this soup, I suggest using dried thyme and basil during cooking, but feel free to toss in some fresh herbs before serving. This way, you get the best of both worlds! {{ingredient_image_1}} Start by gathering your fresh veggies. Use a sharp knife to chop the onion. Mince the garlic with care. Dice the carrots and zucchini into small pieces. Chop the bell pepper into cubes. Trim the green beans and cut them into one-inch pieces. Fresh spinach adds color and taste, so chop that too. This mix of vegetables gives the soup great flavor and nutrition. In a large pot, heat one tablespoon of olive oil over medium heat. Once hot, add the chopped onion and minced garlic. Sauté them until the onion turns clear, which takes about five minutes. Now, stir in the diced carrots, zucchini, bell pepper, and green beans. Cook these for five to seven more minutes. Stir occasionally, so they don’t burn. When they soften, it’s time to add four cups of vegetable broth. Bring it to a boil, then reduce the heat. Let it simmer for about 15 minutes until the veggies are tender. After the vegetables soften, it’s blending time. Use an immersion blender to puree the soup until it’s smooth. If you don’t have one, carefully pour the soup into a stand blender in small batches. Blend until creamy. This step makes the soup rich and velvety. Once blended, pour the soup back into the pot if using a stand blender. Now stir in one cup of whole milk and one cup of heavy cream. Mix well to combine. Add one teaspoon of dried thyme and one teaspoon of dried basil for flavor. Season with salt and pepper to your taste. Let it simmer on low heat for five minutes to warm it through. Just before serving, stir in the fresh chopped spinach, so it wilts slightly. Ladle the soup into bowls, sprinkle with chopped parsley, and serve hot. Enjoy your creamy garden vegetable soup! To get a smooth and creamy soup, use an immersion blender. This tool helps blend the soup right in the pot. If you don’t have one, carefully pour the soup into a stand blender. Blend in small batches to avoid spills. Blend until the soup is silky. Adding whole milk and heavy cream boosts the creaminess. Stir these in after blending. This gives the soup a rich feel. Store leftover soup in an airtight container. It lasts about three to four days in the fridge. For longer storage, freeze the soup. Use freezer-safe bags or containers. Leave some space for the soup to expand as it freezes. When reheating, do it slowly over low heat. Stir often to keep it from sticking to the pot. If the soup thickens too much, add a splash of broth or milk. Here are some tools that make this recipe easier: - Large pot for cooking the soup - Immersion blender for a smooth texture - Chopping knife and cutting board for veggies - Measuring cups and spoons for accuracy - Ladle for serving the soup Using these tools will help you create a tasty and creamy garden vegetable soup. Pro Tips Use Fresh Herbs: Fresh herbs can elevate the flavor of your soup. Consider adding fresh thyme or basil at the end for a burst of freshness. Adjust Creaminess: If you prefer a lighter soup, you can reduce the amount of heavy cream or substitute with more vegetable broth or a plant-based alternative. Incorporate Seasonal Veggies: Feel free to swap in seasonal vegetables to make the soup more vibrant and tailored to what you have on hand. Blend to Preference: If you like some texture, only partially blend the soup, leaving some chunks of vegetables for added bite. {{image_2}} To make your creamy garden vegetable soup heartier, consider adding protein. You can stir in cooked chicken, turkey, or shrimp. For a vegetarian option, add chickpeas or white beans. These proteins boost the soup's nutrition and flavor. They also make it a full meal. Cook the protein separately and add it just before serving. This keeps the texture nice. Using seasonal vegetables makes your soup fresh and vibrant. In spring, add asparagus or peas for sweetness. Summer brings tomatoes and corn, which add a juicy flavor. Fall vegetables like squash or pumpkins offer warmth. Winter vegetables like kale or root veggies like parsnips give depth. Adjust your ingredients based on what is fresh and available in your area. This keeps your soup exciting and full of flavor. You can change the flavor of your soup with simple tweaks. For a spicy kick, add red pepper flakes or a dash of hot sauce. For an earthy taste, try adding smoked paprika. If you want an Asian twist, add ginger and a splash of soy sauce. You can also play with fresh herbs. Basil or cilantro can brighten up the soup. Each change gives your soup a new personality. One serving of creamy garden vegetable soup contains about 350 calories. This total includes calories from olive oil, vegetables, milk, and cream. The soup is hearty yet light, making it a great option for lunch or dinner. This soup is vegetarian-friendly. You can easily make it gluten-free by using gluten-free vegetable broth. For those avoiding dairy, you can swap whole milk and heavy cream for plant-based alternatives like almond or coconut milk. These changes keep the soup creamy and delicious. - Vegetables: Packed with vitamins and minerals, the carrots, zucchini, and spinach boost your health. - Olive Oil: This healthy fat is good for your heart. - Garlic: It has antioxidant properties and can help boost your immune system. - Thyme and Basil: These herbs add flavor and offer anti-inflammatory benefits. Each ingredient plays a role in making this soup not just tasty but also nutritious. Enjoying this soup can be a step toward healthier eating habits. To make creamy garden vegetable soup vegan, swap the dairy. Use a plant-based milk instead of whole milk. Coconut or almond milk works well. Replace heavy cream with a vegan cream or more plant milk. This keeps the soup rich and creamy while avoiding animal products. Yes, you can freeze this soup. Let it cool completely first. Pour it into freezer-safe containers. Leave some space at the top for expansion. It can stay in the freezer for up to three months. When ready to eat, thaw it in the fridge overnight. Reheat it on the stove over low heat. This soup pairs well with many sides. Try serving it with crusty bread or a fresh salad. Grilled cheese sandwiches are also a great choice. For a light touch, add some fresh herbs or a sprinkle of cheese on top. These additions make your meal even more delightful. This blog post shared a complete guide to making creamy garden vegetable soup. We covered ingredient lists, cooking steps, and helpful tips for perfecting your dish. I also shared ways to customize the soup to your taste and nutritional needs. Remember, cooking is about creativity and enjoyment. Experiment and make this recipe your own. Enjoy the warmth and flavors of your homemade soup!
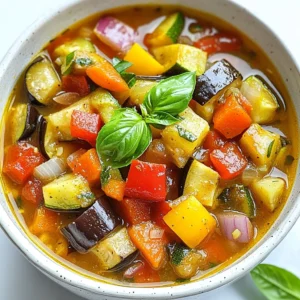
    Creamy Garden Vegetable Soup Delightful and Easy Recipe
  • To make Crème Brûlée French Toast, gather these ingredients: - 1 loaf of brioche bread, sliced thick (about 8 slices) - 4 large eggs - 1 cup whole milk - 1/2 cup heavy cream - 1/2 cup granulated sugar - 1 tablespoon vanilla extract - 1 teaspoon ground cinnamon - Pinch of salt - 1/4 cup brown sugar (for topping) - Fresh berries (for garnish) - Whipped cream (optional, for serving) Each ingredient plays a special role in this recipe. - Brioche Bread: This soft bread adds sweetness and richness. Its thick slices soak up the egg mixture well. - Eggs: They bind the mixture and give the toast a custardy texture. Always use large eggs for best results. - Whole Milk and Heavy Cream: These create a creamy base. Whole milk adds richness, while heavy cream boosts flavor. - Granulated Sugar: This sweetens the egg mixture. It helps to create a balanced flavor. - Vanilla Extract: This adds a warm, sweet aroma. It enhances the overall taste. - Ground Cinnamon: It gives a hint of spice. Cinnamon makes the dish cozy and inviting. - Brown Sugar: This forms a crunchy topping. It caramelizes beautifully, adding a nice contrast to the soft bread. If you can't find some ingredients, here are some substitutes: - Brioche Bread: You can use challah or any thick-sliced bread. They work well too. - Heavy Cream: Use half-and-half for a lighter option. It still adds creaminess. - Whole Milk: Almond milk or oat milk can work if you prefer dairy-free. - Granulated Sugar: You can swap it with coconut sugar or honey for a different sweetness. - Brown Sugar: If you don’t have brown sugar, use granulated sugar with a touch of molasses. {{ingredient_image_1}} To start, gather your ingredients. You will need 4 large eggs, 1 cup of whole milk, 1/2 cup of heavy cream, 1/2 cup of granulated sugar, 1 tablespoon of vanilla extract, 1 teaspoon of ground cinnamon, and a pinch of salt. 1. In a large mixing bowl, whisk together the eggs, milk, heavy cream, granulated sugar, vanilla, cinnamon, and salt. Mix until it is smooth and creamy. This mixture is the heart of your French toast. 2. Let the mixture sit for a few minutes. This gives the flavors time to blend well together. Now, it’s time to assemble your French toast. 1. Take a loaf of brioche bread and slice it thickly, about 8 slices. Arrange the slices in a greased baking dish. You can slightly overlap them if needed. 2. Pour your egg mixture over the brioche slices. Make sure each slice is well soaked. This step is key for that rich, custardy texture. 3. Cover the dish with plastic wrap and refrigerate. Let it sit for at least 2 hours or overnight. The longer it sits, the better it tastes. After the soaking time, you’re ready to bake. 1. Preheat your oven to 350°F (175°C). This ensures even cooking. 2. Remove the plastic wrap and sprinkle 1/4 cup of brown sugar evenly over the soaked bread. This will create that lovely caramel top. 3. Bake in the oven for 30-35 minutes. Look for a golden top and a set center. 4. For a special touch, use a kitchen torch to caramelize the brown sugar. Aim for a bubbly, golden finish for that perfect crème brûlée effect. 5. Let it cool for a few minutes before slicing. This helps the toast hold its shape. Enjoy your delicious Crème Brûlée French Toast warm, topped with fresh berries and whipped cream if you like! To get the best texture, use thick slices of brioche bread. This bread soaks up the egg mixture well. I recommend letting it sit in the fridge for at least two hours. Overnight soaking yields even better results. This allows the bread to absorb all the flavors. One common mistake is not soaking the bread long enough. If you skip this step, the toast may turn out dry. Also, avoid using too much heat while baking. Baking at 350°F ensures even cooking without burning the top. Remember, caramelizing the sugar with too much heat can lead to burnt sugar. Serve your Crème Brûlée French Toast warm. Top it with fresh berries for a burst of flavor. A dollop of whipped cream adds a nice touch, too. You can sprinkle some extra cinnamon on top for added warmth. Consider pairing it with maple syrup for sweetness or a drizzle of honey for a unique twist. Pro Tips Use Day-Old Brioche: For the best texture, use day-old brioche bread. It will absorb the custard mixture better without becoming too soggy. Customize Your Flavors: Feel free to experiment with different extracts like almond or orange for a unique twist on the classic flavor. Check for Doneness: To ensure your French toast is perfectly set, gently shake the baking dish. If the center jiggles too much, it needs more time in the oven. Serving Suggestions: Serve with a drizzle of maple syrup or a dusting of powdered sugar for an extra touch of sweetness. {{image_2}} You can add fun flavors to your Crème Brûlée French Toast. Chocolate is a great choice. You can use chocolate chips or a drizzle of chocolate sauce. Fresh fruit is another tasty addition. Strawberries, blueberries, and bananas work well. You can also mix fruit into the egg mix. It adds a fresh taste and color. Want to try something different? Add a splash of orange or almond extract for a unique twist. You can make this dish fit your needs. For a gluten-free option, use gluten-free bread. Many brands offer great gluten-free choices. If you want a dairy-free version, substitute almond milk or oat milk for whole milk. Use coconut cream instead of heavy cream. This keeps the creaminess while making it dairy-free. Just adjust the sugar if you use sweetened milk. Serving your Crème Brûlée French Toast can be fun! You can stack the slices high for a tall, impressive look. Add whipped cream on top for a treat. Fresh berries add color and flavor. For a fancy touch, sprinkle powdered sugar over the top. You could also serve it with maple syrup or a fruit compote on the side. This makes breakfast feel special. After you enjoy your Crème Brûlée French Toast, you might have some left. To store leftovers, let them cool completely first. Place the slices in an airtight container. Keep them in the fridge for up to three days. This way, they stay fresh and tasty. When you're ready to eat the leftovers, reheating is simple. Preheat your oven to 350°F (175°C). Place the French toast on a baking sheet. Cover it with foil to keep it moist. Heat for about 10-15 minutes. You can also use the microwave if you’re in a hurry. Just warm it for 30-60 seconds, but the oven gives better results. If you want to save some for later, freezing works well too. Wrap each slice in plastic wrap tightly. Then, place them in a freezer bag. They can last up to two months in the freezer. When you're ready to eat, thaw them in the fridge overnight. After that, reheat as mentioned earlier. Crème Brûlée French Toast is a sweet breakfast dish. It combines the creamy texture of crème brûlée with the classic French toast. You soak thick slices of brioche bread in a rich mixture of eggs, milk, and heavy cream. After soaking, you bake it until it is golden. Then, you top it with brown sugar and caramelize it for a crunchy finish. This dish is both decadent and comforting, perfect for special mornings. You can easily prepare this dish ahead of time. After you mix the egg mixture, pour it over the brioche slices. Cover the baking dish with plastic wrap and place it in the fridge. Let it soak for at least 2 hours or overnight for best results. This way, it’s ready to bake when you are. Just preheat your oven and bake it in the morning. You’ll enjoy a warm, tasty breakfast without stress. Yes, you can use different types of bread for this recipe. While brioche gives a rich flavor, you can try challah or French bread. These types also soak up the egg mixture well. Just make sure the bread is thickly sliced. Thin slices may not hold up during baking. Experiment with what you have on hand for a fun twist on this dish! We explored the key ingredients and step-by-step instructions for Crème Brûlée French Toast. I shared tips for perfect texture and common mistakes to avoid. You learned about different variations and storage options to keep your dish fresh. In conclusion, with a few simple steps and tweaks, you can make this dish shine. Experiment with flavors and enjoy every bite. Happy cooking!
    Crème Brûlée French Toast Delicious Morning Treat
  • To make Air Fryer Buffalo Cauliflower Bites, you will need: - 1 medium head of cauliflower, cut into bite-sized florets - 1 cup all-purpose flour - 1 teaspoon garlic powder - 1 teaspoon onion powder - 1 teaspoon smoked paprika - 1/2 teaspoon cayenne pepper (adjust for spice level) - 1/2 teaspoon salt - 3/4 cup water - 1/2 cup buffalo sauce - 2 tablespoons olive oil - Fresh parsley, chopped (for garnish) Using fresh cauliflower makes a big difference. Look for firm florets with no brown spots. For the batter, mix your dry spices well. This helps the flavors blend. If you like more heat, add more cayenne pepper. The olive oil gives the bites a nice crunch when air frying. Don't skip the parsley; it adds a fresh look and taste. If you have a gluten allergy, try using gluten-free flour instead. You can swap buffalo sauce for barbecue sauce if you prefer a sweeter flavor. For a vegan option, replace the flour with chickpea flour. This change keeps the bites crispy and tasty. If you're allergic to cauliflower, try using broccoli instead. The cooking time will stay the same, so you'll still enjoy a flavorful snack. {{ingredient_image_1}} Start by rinsing the cauliflower head. Cut it into bite-sized florets. Try to make them similar in size. This helps them cook evenly. You want each piece to be tender yet crispy. In a mixing bowl, combine the flour, garlic powder, onion powder, smoked paprika, cayenne pepper, and salt. These spices pack a flavor punch! Gradually add 3/4 cup of water. Whisk until you have a smooth batter. It should be thick enough to coat the cauliflower well. Preheat your air fryer to 400°F (200°C) for about 5 minutes. While it heats, dip each cauliflower floret into the batter. Allow any excess batter to drip off. Place them in a single layer in the air fryer basket. Lightly spray the basket with olive oil first. Air fry for 12-15 minutes. Shake the basket halfway through cooking. This ensures they cook evenly. Once golden and crispy, take them out. Next, toss the fried cauliflower in buffalo sauce. Make sure each piece is well coated. To get that extra crispiness, return them to the air fryer for another 3-5 minutes. Now your bites are ready to serve! To get that perfect crunch, coat the cauliflower well. The batter should cover every floret. Use cold water for the batter. Cold water helps create a crispy crust. Make sure to shake off extra batter. This helps to keep the bites from becoming soggy. Air fry in a single layer. This ensures even cooking and crispiness. Set your air fryer to 400°F (200°C) for the best results. Cook the cauliflower for 12-15 minutes. Shake the basket halfway through. This lets hot air reach all sides. If you want extra crispiness, add 3-5 more minutes after tossing in the buffalo sauce. Keep an eye on them to avoid burning. Serve these bites hot for the best taste. Add a side of ranch or blue cheese for dipping. Fresh parsley adds color and flavor. You can also serve them with celery sticks. This adds a nice crunch and freshness. Enjoy them as a snack or appetizer at your next game day gathering. Pro Tips Tip Title 1: For extra flavor, consider adding a splash of hot sauce to the batter before coating the cauliflower. Tip Title 2: If you want a healthier option, use whole wheat flour or a gluten-free flour blend. Tip Title 3: For a crunchier texture, let the coated cauliflower sit for a few minutes before air frying. Tip Title 4: Experiment with different sauces; ranch or blue cheese dressing make great dips for these spicy bites! {{image_2}} You can change the flavor of your buffalo cauliflower bites by trying different sauces. Instead of buffalo sauce, use barbecue sauce for a sweet twist. Or, try teriyaki sauce for a savory taste. You can also mix sauces together. This way, you can find your favorite flavor! Want to boost the nutrition? Add more veggies to your bites. Try adding broccoli florets or bell pepper slices. You can even toss in some carrots. Just make sure they are cut small, like the cauliflower. This adds color and vitamins to your snack! If you need a gluten-free option, swap out the all-purpose flour. Use gluten-free flour blends instead. They work well for the batter. Make sure to check that your buffalo sauce is gluten-free too. This way, everyone can enjoy these tasty bites without worry! After enjoying your air fryer buffalo cauliflower bites, let them cool. Place them in an airtight container. Store the container in the fridge. They will stay fresh for up to three days. Make sure they are not warm when you store them. This helps to avoid sogginess. To reheat your cauliflower bites, use the air fryer again. Preheat it to 350°F (175°C). Arrange the bites in a single layer. Heat for about 5-7 minutes. This keeps them crispy. If you like them extra saucy, you can toss them in more buffalo sauce before reheating. If you want to save some bites for later, freezing works well. First, let the bites cool completely. Arrange them on a baking sheet in a single layer. Freeze them for about an hour. Once frozen, transfer them to a freezer bag. They can last up to three months. When ready to eat, you can cook them directly from frozen. Just add a few extra minutes to the air frying time. Air Fryer Buffalo Cauliflower Bites can last up to four days in the fridge. Store them in an airtight container. Make sure they cool down before you put them away. This keeps them fresh and tasty for later. Yes, you can make these bites in the oven. Preheat your oven to 425°F (220°C). Line a baking sheet with parchment paper. Place the coated cauliflower florets on the sheet. Bake for about 25-30 minutes, flipping halfway through. This method gives you a great crunch too. You can serve these bites with a variety of dips. Ranch or blue cheese dressing works well. Fresh veggies like carrots and celery add a nice crunch. You can even make a fun platter with chips or pita bread for sharing. In this post, we explored making delicious Air Fryer Buffalo Cauliflower Bites. We discussed the best ingredients, cooking steps, and tips for a crispy texture. I shared variations, storage info, and common questions to help you succeed. You can enjoy these bites in many ways. They are fun, easy, and a great snack. Try this recipe to impress your friends and family with tasty flavors. Your kitchen adventures are just beginning! Enjoy your culinary journey!
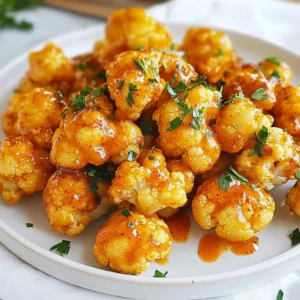
    Air Fryer Buffalo Cauliflower Bites Flavorful Snack Treat
  • To make Poisoned Apple Cider, you need these key items: - 4 cups apple cider - 1 small pumpkin, peeled and cubed - 2 cups dark red cranberries (fresh or frozen) - 1 teaspoon cinnamon - 1 teaspoon nutmeg - 1 teaspoon allspice These ingredients work together to create a warm, cozy drink. The apple cider forms the base. The pumpkin adds creaminess. Cranberries give a tart taste. Spices like cinnamon and nutmeg add warmth. Allspice adds depth, making this drink special. You can use these optional items to enhance the flavor: - 1 tablespoon brown sugar (optional) - 1 tablespoon vanilla extract Adding brown sugar can sweeten the cider a bit. Vanilla extract adds a nice aroma. These ingredients can make your cider taste even better. Feel free to adjust them based on your taste. Presentation is key for this spooky drink! For a fun touch, use: - 1/2 cup blackberries for garnish - Sprigs of rosemary for garnish Blackberries add a pop of color. Rosemary looks like little witchy sprigs. These garnishes make your cider look festive and inviting. Serve in spooky mugs for an extra thrill! {{ingredient_image_1}} To start, gather your ingredients. You need: - 4 cups apple cider - 1 small pumpkin, peeled and cubed - 2 cups dark red cranberries (fresh or frozen) - 1 teaspoon cinnamon - 1 teaspoon nutmeg - 1 teaspoon allspice - 1 tablespoon brown sugar (optional) - 1 tablespoon vanilla extract In a large pot, combine the apple cider, cubed pumpkin, and cranberries. The pumpkin adds a nice texture. The cranberries bring a tart balance. Next, add the cinnamon, nutmeg, allspice, and brown sugar if you choose. Stir well to mix everything together. Now, heat the pot over medium heat. Watch closely until it starts to simmer. This usually takes about 5 to 10 minutes. Once it simmers, reduce the heat to low and cover the pot. Let it simmer for about 30 minutes. This step is key. It lets the flavors meld together beautifully. You’ll notice a lovely aroma filling your kitchen. After 30 minutes, you need to blend the mixture. Use an immersion blender to puree it until smooth. If you don’t have one, transfer it to a regular blender. Do this in small batches to avoid spills. Once blended, return the smooth mixture to the pot. Stir in the vanilla extract for an extra layer of flavor. Heat it for another 10 minutes to warm it through. Now your poisoned apple cider is ready to serve! To make the best poisoned apple cider, balance is key. The tartness of cranberries goes well with sweet apple cider. Use fresh or frozen cranberries. The pumpkin adds creaminess and a rich taste. Spices like cinnamon, nutmeg, and allspice bring warmth. If you want more sweetness, add brown sugar. This helps round out the flavors. Don’t forget the vanilla extract! It enhances the overall taste and aroma. Using the right equipment helps achieve the best cider. A large pot is essential for cooking the mixture. An immersion blender makes it easy to puree the cider smoothly. If you don’t have one, a regular blender works too. Just be careful when transferring hot liquid. Prepare heat-resistant mugs for serving. They keep your drink warm and look great too. Make your cider look as good as it tastes! Serve it in spooky mugs. For extra flair, add blackberries on top. They look like little dark gems. A sprig of rosemary adds a creepy touch. For a foggy effect, place dry ice in a separate container. This gives the cider a bubbling potion look. Your guests will love the spooky vibe! Pro Tips Choose Fresh Ingredients: Opt for fresh cranberries and seasonal pumpkins to enhance the flavor and quality of your cider. Adjust Sweetness: Taste the mixture before serving and adjust the sweetness by adding more brown sugar if desired, depending on your taste preference. Garnish Creatively: Use additional spooky garnishes like gummy worms or spooky-shaped ice cubes to make your presentation even more festive. Make Ahead: This cider can be made a day in advance. Just reheat gently before serving, allowing the flavors to deepen even more. {{image_2}} You can change the flavor of your poisoned apple cider by swapping or adding ingredients. Try using pear cider instead of apple cider for a different taste. You can also add a splash of orange juice for a zesty twist. Want some spice? Toss in a few cloves or a slice of fresh ginger. These simple swaps can make your drink unique and fun. You can enjoy poisoned apple cider in two ways. For a non-alcoholic drink, just follow the recipe as is. It’s perfect for kids and anyone who wants a tasty treat. If you want a kick, try adding rum or bourbon. Just mix in about a cup when you heat the cider. This gives it a warm, cozy feel for adults. You can make your cider special for any holiday. For Halloween, keep the spooky theme with creepy garnishes like gummy worms or spooky mugs. During Thanksgiving, focus on flavors like maple syrup or caramel. For Christmas, add some peppermint extract or even some cranberries on top for a festive look. These variations keep your poisoned apple cider fun and fresh all year round! Store your poisoned apple cider in a clean glass jar or airtight container. Make sure it cools to room temperature first. Label the container with the date. This helps you remember when you made it. Keep it in the fridge to stay fresh. Avoid metal containers as they can change the flavor. When stored properly, your poisoned apple cider can last up to five days in the fridge. After that, it may spoil. Always check for any off smells or changes in color. If it looks or smells bad, throw it out. Safety first! When reheating, do it on low heat. This helps keep the flavors intact. Stir often to avoid hot spots. Heat until it is warm but not boiling. If you have leftovers, never reheat more than once. Enjoy your spooky drink safely! If apple cider is poisoned, you may feel sick. Common symptoms include nausea, vomiting, and stomach pain. You might also have headaches or dizziness. In serious cases, you could feel confused or have trouble breathing. If you notice any of these signs after drinking cider, seek help fast. To check if apple cider is safe, start with your senses. Look for strange colors or floating bits. Smell it; if it smells off, do not drink it. Taste a small amount. If it tastes sour or strange, it might be bad. Always buy cider from a trusted source to stay safe. If you think the cider is poisoned, stop drinking it right away. Call poison control or seek medical help. Tell them what you drank and when. Keep the cider container for testing if needed. Do not wait for symptoms to appear; act quickly! Yes, there have been news stories about poisoned apple cider. Some cases involved people getting sick after drinking unregulated cider from local farms. These cases remind us to be careful when enjoying seasonal drinks. Always check where your cider comes from to ensure it is safe. In this blog post, we covered the core ingredients for a tasty apple cider. You learned step-by-step how to prepare and simmer it to boost flavor. We also discussed tips for the best taste and fun ways to serve it. Variations let you create seasonal drinks too. Lastly, we tackled storage tips and answered common questions about cider safety. Enjoy your delicious apple cider, and remember, safety first!
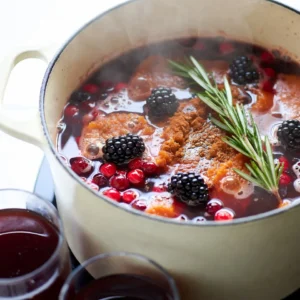
    Poisoned Apple Cider Shocking Safety Tips Revealed
  • - 3 ripe bananas, mashed - 1 cup Greek yogurt (plain, unsweetened) - 2 large eggs - 1/2 cup honey or maple syrup - 1/4 cup melted coconut oil (or vegetable oil) - 1 teaspoon vanilla extract - 1 teaspoon baking soda - 1/2 teaspoon baking powder - 1/2 teaspoon salt - 1 teaspoon ground cinnamon - 1 1/2 cups all-purpose flour - 1/2 cup chopped walnuts or pecans - 1/2 cup dark chocolate chips The key to this Greek yogurt banana bread lies in the balance of flavors and textures. The ripe bananas give it sweetness and moisture. The Greek yogurt adds creaminess and a slight tang, making your bread rich and soft. This recipe uses two eggs for binding and structure. Honey or maple syrup serves as a natural sweetener, which you can adjust to fit your taste. Coconut oil brings a lovely richness, but you can swap it with vegetable oil if you prefer. For the dry mix, baking soda and baking powder make the bread rise. Salt enhances all the flavors, while cinnamon adds warmth. Finally, all-purpose flour gives the bread its structure. Feel free to customize your banana bread! Adding walnuts or dark chocolate chips can transform the flavor and texture. You can mix and match to create your perfect loaf. {{ingredient_image_1}} - Preheat your oven to 350°F (175°C). - Grease or line a 9x5-inch loaf pan. - In a large bowl, combine the mashed bananas, Greek yogurt, eggs, honey (or maple syrup), melted coconut oil, and vanilla extract. - Whisk everything until smooth and well-combined. - In another bowl, whisk together the baking soda, baking powder, salt, ground cinnamon, and all-purpose flour. - Gradually fold the dry ingredients into the wet mixture. Mix until just combined. - If you like, fold in walnuts or dark chocolate chips. - Pour the batter into the prepared loaf pan and smooth the top. - Bake for 50-60 minutes. Check doneness with a toothpick; it should come out clean. - Don't over-mix the batter. This keeps your bread light and fluffy. - Let the ingredients come to room temperature before mixing. Cold ingredients can make the bread dense. - Experiment with adding vanilla extract or spices to boost flavor. A little can go a long way! - Add a pinch of nutmeg for additional warmth. It gives a nice touch to the overall taste. - Cool in the pan for 10 minutes before transferring to a wire rack. This helps it set properly. - Serve warm or at room temperature. Enjoy it plain or with a dollop of Greek yogurt for extra creaminess. Pro Tips Use Overripe Bananas: The riper the bananas, the sweeter and more flavorful your banana bread will be. Look for bananas with brown spots for optimal sweetness. Don’t Overmix the Batter: Mix the wet and dry ingredients until just combined to ensure a tender loaf. Overmixing can lead to a dense texture. Add Flavor Variations: Consider adding nuts, chocolate chips, or spices like nutmeg for extra flavor. Make it your own by experimenting with different mix-ins! Cool Properly: Let the banana bread cool in the pan for a few minutes before transferring it to a wire rack. This helps maintain its structure and prevents sogginess. {{image_2}} You can make simple swaps to boost the health factor of your Greek yogurt banana bread. - Replace honey with agave syrup for a lower glycemic option. - Use whole wheat flour instead of all-purpose flour. Whole wheat flour adds fiber and nutrients. Get creative with flavors to make your banana bread unique. - Add dried fruit like raisins or cranberries for extra sweetness. - Incorporate zests like lemon or orange for a fresh twist. The zests bring brightness to the dish. You can modify the recipe to fit different diets. - Make it vegan by swapping eggs with flaxseed meal mixed with water. - Use maple syrup instead of honey for a plant-based sweetener. These changes keep the bread moist and tasty. Let the bread cool completely before storing. This helps keep the texture nice. Once cool, store it in an airtight container at room temperature. The bread stays fresh for up to 3 days. For long-term storage, freeze slices of banana bread. Wrap each slice in plastic wrap, then in foil. This helps keep the bread from getting freezer burn. You can freeze it for up to 3 months. When ready to eat, thaw it in the refrigerator or at room temperature. To enjoy your banana bread warm, you can microwave it for a few seconds. Alternatively, toast slices for a warm treat. Both methods bring back that fresh-baked taste. Enjoy! Yes, you can use frozen bananas. Just thaw them first. Drain any extra liquid after thawing. This way, your banana bread stays moist and tasty. If you don’t have Greek yogurt, plain yogurt works well. You can also use applesauce for a lighter option. Both will keep your bread moist and delicious. You can replace eggs easily. Mix flaxseed meal with water as a substitute. A commercial egg replacer also works. Both options keep your banana bread fluffy. To check if your banana bread is ready, insert a toothpick into the center. If it comes out clean or with a few moist crumbs, your bread is done. This simple test ensures perfect baking every time. In this post, I covered how to make delicious banana bread, detailing its main and dry ingredients, and offering step-by-step instructions. I also shared tips for baking and storing, plus variations and FAQs. With this guide, you can easily bake banana bread at home. Try different flavors and modifications to suit your taste. Enjoy the process, and share your tasty results with friends and family!
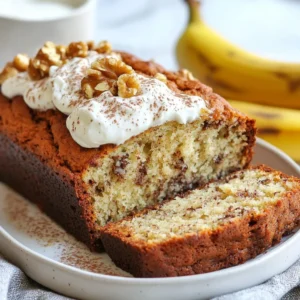
    Greek Yogurt Banana Bread Simple and Tasty Recipe
  • - 2 cups orange juice (freshly squeezed) - 1 cup sparkling water - 1 teaspoon ground cinnamon - 1 tablespoon honey or maple syrup - 1 orange (for garnish) - 2 cinnamon sticks (for garnish) - Ice cubes - Mint leaves (optional garnish) To make the Cinnamon Orange Cozy Mocktail, you need fresh orange juice. I suggest squeezing the oranges yourself for the best taste. You'll also need sparkling water to add some fizz. Ground cinnamon gives it that warm flavor we love. For sweetness, you can use honey or maple syrup. Taste it after mixing to see if you like it sweeter. Don't forget the garnishes! Slices of orange and cinnamon sticks make it look nice. Mint leaves add a fresh touch but are optional. Gather all these ingredients, and you’re ready to make a cozy drink that brightens your day! {{ingredient_image_1}} - First, grab a large pitcher. - Combine 2 cups of orange juice with 1 cup of sparkling water. - Add 1 teaspoon of ground cinnamon and 1 tablespoon of honey or maple syrup. - Stir the mix well until the honey or syrup dissolves completely. - This step helps the cinnamon blend in nicely. - Now, fill your serving glasses with ice cubes. - Carefully pour the orange mixture over the ice-filled glasses. - Make each drink special by garnishing with orange slices and a cinnamon stick. - If you want, add a few mint leaves for a fresh touch. - Serve your cozy mocktail right away and enjoy! To customize the sweetness of your Cinnamon Orange Cozy Mocktail, start with the honey or maple syrup. You can add one tablespoon, then taste it. If it needs more sweetness, add a little more. Remember, you can always add more sweetener, but you can't take it out. So, taste test before serving to get it just right. Garnishing makes your drink look nice. Use fresh orange slices to enhance the color. Adding a cinnamon stick brings warmth to the drink and makes it smell great. If you want a fresh touch, add mint leaves. They not only look good but also add a cool flavor. Arrange everything nicely in the glass to make your mocktail pop! Pro Tips Use Fresh Ingredients: Freshly squeezed orange juice enhances the flavor significantly compared to store-bought juice. Adjust Sweetness: Taste the mixture before serving and adjust the honey or maple syrup to your preferred sweetness level. Chill the Glasses: For an extra refreshing experience, chill your serving glasses in the freezer for 15 minutes before pouring the mocktail. Experiment with Garnishes: Feel free to add other garnishes like star anise or pomegranate seeds for a unique twist. {{image_2}} You can change the taste of your cozy mocktail by adding more spices. Try adding nutmeg for a warm, sweet note. Cloves can also add a unique flavor. Just a pinch of these spices can transform your drink. For sweetness, you have options. Use agave syrup, coconut sugar, or even stevia. Each sweetener adds its own twist. Adjust based on your taste. Always taste as you go to find the right balance. Seasonal fruits can make your mocktail even more special. In fall, add sliced apples or pears for a crisp touch. In summer, mix in fresh berries like strawberries or blueberries. They not only taste great but also look beautiful. You can also use seasonal spices. In winter, try ginger or allspice. They add warmth and depth to your drink. For spring, fresh herbs like basil can brighten the flavor. Experiment to find your favorite seasonal mix! To keep your Cinnamon Orange Cozy Mocktail fresh, store it in the fridge. Use an airtight container. A glass jar or a pitcher works great. If you have extra garnishes, store them separately. This prevents them from getting soggy. This mocktail is best served cold. If you want to refresh it, add ice. You can also mix in more sparkling water. For the best taste, drink it within two days. After that, the flavors may fade. Always check if it smells or tastes off before drinking. Can I make this mocktail ahead of time? Yes, you can. Make the drink mix ahead of time. Store it in the fridge. Just add ice and garnish when you serve. What are the health benefits of cinnamon and orange? Cinnamon helps with blood sugar control. It also has antioxidants. Oranges are high in vitamin C. They boost your immune system and keep your skin healthy. Is this recipe vegan-friendly? Yes, this recipe is vegan. Use maple syrup instead of honey for a vegan option. What snacks pair well with this mocktail? This mocktail goes great with light snacks. Try cheese and crackers, fruit platters, or veggie sticks. These snacks balance the sweetness of the drink. Can it be served at parties or gatherings? Absolutely! This mocktail is perfect for parties. It is easy to make and looks beautiful. Guests will love its fresh taste and cozy vibe. This blog post guides you through making a fresh cinnamon orange mocktail. We covered the simple ingredients and easy steps, plus tips for sweetness and garnish. You learned about flavor variations and how to store leftovers. Enjoy mixing this drink at home. It’s fun and healthy, perfect for any occasion. Try different spices and fruits to make it your own. You're ready to impress your friends with a tasty and eye-catching mocktail!
    Cinnamon Orange Cozy Mocktail Refreshing Drink Recipe
  • To make this tasty dip, gather the following items: - 2 medium apples (use Granny Smith for tartness) - 1 cup caramel sauce (store-bought or homemade) - 1/2 teaspoon ground cinnamon - 1/2 teaspoon nutmeg - 1 package (8 oz) cream cheese (softened) - 1/2 cup powdered sugar - 1 teaspoon vanilla extract - 1 cup whipped topping (like Cool Whip) - Optional: Graham crackers, apple slices, or vanilla wafers for dipping You can swap out some ingredients based on what you have: - Apples: Try Honeycrisp or Fuji for a sweeter taste. - Cream cheese: Use Greek yogurt for a lighter dip. - Caramel sauce: Make it from scratch with sugar, butter, and cream. - Whipped topping: Whip heavy cream instead for a fresh option. Here are some quick conversions: - 1 cup = 8 ounces - 1/2 cup = 4 ounces - 1 teaspoon = 5 milliliters - 1 tablespoon = 15 milliliters These conversions help you adjust the recipe as needed. {{ingredient_image_1}} Start by softening the cream cheese. You can leave it out for about 30 minutes. In a medium bowl, mix the cream cheese, powdered sugar, and vanilla extract. Use a hand mixer to beat them together until smooth. This mix will be the base of our dip. Next, fold in the whipped topping gently. This makes the dip light and fluffy. Make sure it is well combined but don’t overmix. Grab a serving dish or bowl. Spread the cream cheese mixture at the bottom. Smooth the top with a spatula. Now, take the caramel sauce and pour it over the cream cheese layer. Let it drizzle down the sides for a nice look. In another bowl, mix the diced apples with ground cinnamon and nutmeg. Toss them until each piece is coated. Spread the spiced apples evenly over the caramel layer. If you want, drizzle some extra caramel on top for decoration. Serve the dip right away for the best taste. I love to pair it with graham crackers, apple slices, or vanilla wafers. These options give a nice crunch and balance the dip's creaminess. You can also arrange the dippers around the dip for a fun display. Enjoy your delicious Caramel Apple Pie Dip with friends or family! To make your Caramel Apple Pie Dip burst with flavor, use fresh apples. I prefer Granny Smith for their tartness. The sharp taste balances well with the sweet caramel. Mix in ground cinnamon and nutmeg for that warm, cozy feel of fall. These spices enhance the apple taste and add depth. Always use high-quality caramel sauce. If you want to make it homemade, that’s even better! It adds a personal touch that guests will love. When serving, choose a clear dish to show off the layers. Start with the cream cheese layer at the bottom. Then, pour on the caramel sauce. Lastly, top with the spiced apples. Drizzle extra caramel on top for a touch of shine. To make it even more inviting, serve with a variety of dippers. Place graham crackers, apple slices, and vanilla wafers around the dip. This adds color and texture to your presentation. One mistake is not softening the cream cheese enough. This can lead to lumps in your dip. Always let it sit out for about 30 minutes before mixing. Another error is overmixing the whipped topping. You want a light and airy texture, not dense. Also, don’t skip the spices; they make a big difference in flavor. Finally, serve the dip right after making it. If it sits too long, the apples may brown and the dip may lose its freshness. Pro Tips Choose the Right Apples: Use tart apples like Granny Smith for a nice contrast against the sweetness of the caramel and cream cheese. Make It Ahead: Prepare the cream cheese mixture and spiced apples ahead of time and assemble just before serving for a fresh taste. Customize Your Dippers: Experiment with different dippers like pretzels or fresh fruit for a fun twist on the classic flavors. Warm the Caramel: If using store-bought caramel sauce, warm it slightly to make it easier to drizzle over the dip. {{image_2}} You can make this dip even better with fun flavors. Try adding chocolate chips for a sweet twist. Just sprinkle them on top of the apples. You can also mix in some peanut butter for a nutty flavor. Start with a few spoonfuls and taste as you go. These changes can make your dip unique and tasty. If you want a lighter dip, use yogurt instead of cream cheese. Greek yogurt works well for a creamy texture. You can also swap the whipped topping for a lighter version. This keeps the taste but cuts down on calories. Choose low-sugar caramel sauce for a healthier option too. Fall brings great flavors, so add pumpkin spice for a seasonal touch. Just mix in a teaspoon to your apple mix. You can also use chopped pecans or walnuts for crunch. This adds to the cozy feel of the dip. These changes make it perfect for holiday gatherings. To store leftovers, put the dip in an airtight container. You can cover it tightly with plastic wrap. Keep it in the fridge. It should last for about three days. Make sure to keep it cold, so it stays fresh. If you notice any changes in smell or color, it’s best to throw it away. I do not recommend freezing this dip. The cream cheese and whipped topping can change texture when frozen. If you freeze it, the dip may become watery and separate when thawed. To enjoy the best flavor and texture, stick to refrigeration. You don’t need to reheat this dip. It tastes great cold and is meant to be served chilled. However, if you prefer it warm, gently heat it in the microwave for a few seconds. Stir it well to ensure even warming. Enjoy it right away for the best experience! Yes, you can use different types of apples. I like Granny Smith for their tartness. Other good choices are Fuji, Honeycrisp, or Gala. Each type adds a unique flavor. Sweet apples balance well with the caramel. Tart apples add a nice zing. Mix and match for fun flavor. You can keep the dip in the fridge for about three days. Store it in an airtight container. This helps keep it fresh and tasty. After a day or two, the apples may soften. They still taste good but change in texture. If you notice any browning, that's normal. You can serve the dip with many items. Graham crackers add crunch and sweetness. Apple slices are perfect for dipping. They pair well with the dip's flavors. Vanilla wafers also make a great choice. You can even use pretzels for a salty twist. Get creative with your dippers! In this blog post, we covered how to make a delicious Caramel Apple Pie Dip. You learned about key ingredients, substitutions, and how to prepare the dip step by step. We also shared tips for flavor and common mistakes to avoid. Explore variations like healthier options or fun seasonal twists to keep things fresh. Lastly, you have storage tips to enjoy your dip later. With these ideas, you can make a dip that everyone will love, whether it's a party snack or a cozy treat at home.
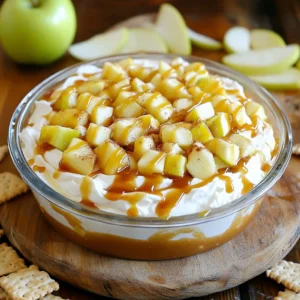
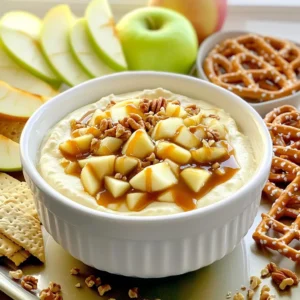
    Caramel Apple Pie Dip Irresistible Flavor for Fall
  • For this tasty roasted veggie soup, gather these fresh vegetables: - 1 red bell pepper, chopped - 1 yellow bell pepper, chopped - 1 zucchini, diced - 1 small eggplant, diced - 2 carrots, sliced - 1 red onion, quartered - 4 cloves garlic, whole These vegetables bring color and flavor to your soup. Roasting them makes them sweet and soft. To enhance the taste, use these spices: - 2 tablespoons olive oil - 1 teaspoon dried thyme - 1 teaspoon smoked paprika - Salt and pepper to taste These spices add depth and warmth. The olive oil helps the veggies brown nicely. For the soup base and finish, you need: - 6 cups vegetable broth - Fresh basil for garnish The broth gives your soup a rich flavor. Fresh basil adds a bright touch at the end. {{ingredient_image_1}} Start by washing all your veggies well. Chop the red and yellow bell peppers into small pieces. Dice the zucchini and eggplant into bite-sized cubes. Slice the carrots thinly for even cooking. Quarter the red onion and keep the garlic cloves whole. Preheat your oven to 400°F (200°C). Line a baking sheet with parchment paper for easy cleanup. Spread all your chopped veggies on the sheet. Drizzle olive oil over them. Then, sprinkle with thyme, smoked paprika, salt, and pepper. Toss everything to coat the veggies evenly. Roast in the oven for 25 to 30 minutes. Stir them halfway through cooking until they turn tender and a bit caramelized. Once your veggies are roasted, take them out of the oven. Add them to a large pot. Pour in the vegetable broth and bring it to a boil over medium heat. Once boiling, reduce the heat and let it simmer for 10 minutes. This lets the flavors blend well. Use an immersion blender to puree the soup until it's smooth. If you use a regular blender, blend in batches. Taste the soup and add more salt and pepper if needed. Serve hot and garnish with fresh basil. To boost the taste, try adding a splash of lemon juice. It brightens up the soup. You can also toss in some fresh herbs like thyme or parsley. They add freshness. For a spicy kick, add red pepper flakes or cayenne. This will warm you up! You really need just a few tools. A sharp knife helps with chopping veggies. A large baking sheet is great for roasting. An immersion blender makes pureeing easy. If you don't have one, a regular blender works too. Just be careful with hot soup! Serve the soup hot with crusty bread. It makes a great meal. You can also add a dollop of yogurt or sour cream on top. This adds creaminess. For a fun twist, sprinkle some croutons for crunch. Enjoy this cozy bowl with family or friends! Pro Tips Use Seasonal Vegetables: Choosing seasonal veggies not only enhances the flavor of your soup but also ensures that you're using the freshest ingredients available. Blend for Texture: For a creamier soup, blend thoroughly. If you prefer a chunkier texture, blend only half of the mixture and leave the rest as is. Experiment with Spices: Feel free to add your favorite spices or herbs, such as cumin or oregano, to personalize the flavor profile of your soup. Garnish Creatively: Besides fresh basil, consider garnishing with a drizzle of olive oil, a sprinkle of feta cheese, or toasted seeds for added flavor and texture. {{image_2}} You can make your roasted veggie soup more filling by adding protein. Great choices include cooked beans, lentils, or diced chicken. For a vegetarian option, try adding chickpeas or tofu. These proteins give your soup flavor and texture. If you use canned beans, rinse them well before adding. This keeps your soup clean and fresh. Feel free to switch up the vegetables in your soup. Try adding butternut squash, sweet potatoes, or broccoli. Each veggie brings a unique taste and color. You can also use seasonal vegetables to keep it fresh. Just remember to chop them evenly for even cooking. The more variety, the more fun your soup will be! While vegetable broth is great, you can try different broths for added depth. Chicken broth adds a rich flavor if you eat meat. For a twist, use miso broth for a savory taste. You can even make your own broth from veggie scraps. This way, you control the flavor and ingredients while being eco-friendly. Enjoy experimenting with these ideas! After enjoying your roasted veggie soup, let it cool. Place it in an airtight container. Store it in the fridge. It will stay fresh for up to four days. If you want to keep it longer, consider freezing it. To freeze the soup, let it cool completely. Use freezer-safe containers or bags. Leave some space at the top, as the soup will expand. Label the containers with the date. It can last up to three months in the freezer. When ready to eat, thaw the soup in the fridge overnight. You can also use the microwave or stovetop. If using the stovetop, heat it on medium. Stir often until it warms through. Add a bit of water or broth if it seems thick. Enjoy your delicious soup! Yes, you can use frozen vegetables. They are a great option when fresh veggies are not available. Just remember to let them thaw before roasting. This helps them cook evenly. You might need to roast them a bit longer since they have more moisture. To make this soup creamier, add a splash of cream or coconut milk. You can also blend in some cooked potatoes or cashews for a nice, smooth texture. Another option is to stir in some Greek yogurt right before serving. This adds creaminess and a tangy flavor. Many herbs work well with roasted veggie soup. Try adding fresh parsley or dill for a bright taste. Oregano or rosemary also adds depth to the flavor. Experiment with different herbs to find your favorite mix. They can really enhance your soup’s taste. In this blog post, we explored fresh vegetables, spices, and broth for a tasty soup. I walked you through preparation, roasting, and cooking steps. Tips on flavor, equipment, and serving ideas will help you succeed. We discussed variations, storage methods, and answered common questions, like using frozen veggies or making the soup creamier. Remember, cooking soup should be fun and creative. Use the tips and make it your own! Enjoy every bowl you create.
    Roasted Veggie Soup Delicious and Nourishing Recipe
  • - 1 pound ground beef (or turkey) - 1 onion, diced - 3 cloves garlic, minced - 1 bell pepper, chopped - 2 cups rotini pasta - 1 can (15 oz) black beans, drained and rinsed - 1 can (15 oz) diced tomatoes with green chilies - 2 cups chicken broth - 1 tablespoon taco seasoning - 1 cup corn (frozen or fresh) - 1 cup shredded cheese (cheddar or Mexican blend) - Salt and pepper to taste - Fresh cilantro, for garnish - Optional toppings: sour cream, sliced jalapeños, diced avocado One Pot Taco Pasta shines with its simple yet vibrant ingredients. You start with ground beef or turkey. This choice adds a hearty base. Next, you bring in onion and garlic. They give a strong, savory smell as they cook. I love to add a bell pepper for color and crunch. Rotini pasta is perfect here. It grabs all that tasty sauce. Then, you need black beans and diced tomatoes. The beans add protein and fiber. The tomatoes bring a nice tang. Chicken broth gives depth and helps cook the pasta well. Taco seasoning is key for flavor. It blends all the spices you need in one scoop. Corn adds sweetness and texture. Finally, shredded cheese melts in, creating creaminess. I also love fresh cilantro for a finishing touch. You can add sour cream or jalapeños for more flavor. This dish offers fun and easy ways to make it your own! {{ingredient_image_1}} - Browning the meat: Start by heating a large pot over medium heat. Add 1 pound of ground beef or turkey. Cook until the meat is brown. This takes about 5 to 7 minutes. Drain any extra fat from the pot. - Sautéing vegetables: Next, add 1 diced onion, 3 cloves of minced garlic, and 1 chopped bell pepper to the pot. Stir and cook for about 3 to 4 minutes. You want the veggies to be soft and fragrant. - Adding beans, tomatoes, and broth: Now it’s time to mix in flavor. Add 1 can of black beans (drained and rinsed), 1 can of diced tomatoes with green chilies, and 2 cups of chicken broth. Stir everything well. - Incorporating taco seasoning: Sprinkle in 1 tablespoon of taco seasoning. Mix thoroughly again. This will give the dish its tasty taco flavor. - Bringing to a boil: Raise the heat to bring the mixture to a boil. Once boiling, add 2 cups of rotini pasta. - Simmering and stirring: Reduce the heat to low. Cover the pot and let it simmer for 10 to 12 minutes. Stir occasionally to keep the pasta from sticking. The pasta should be tender and have soaked up most of the liquid. - Adding corn and cheese: Stir in 1 cup of corn, either frozen or fresh. Then add half of the shredded cheese (1 cup of cheddar or Mexican blend). Mix until the cheese melts and combines. - Melting the cheese: Remove the pot from the heat. Sprinkle the rest of the cheese on top. Cover the pot for a few minutes. This helps the cheese melt perfectly. Fluff the pasta with a fork before serving. Don’t forget to garnish with fresh cilantro for color and taste. Enjoy your delicious One Pot Taco Pasta! When making One Pot Taco Pasta, you can choose between ground turkey and ground beef. Ground turkey is leaner and lower in fat. It adds a mild flavor that works well with spices. Ground beef gives a richer taste and is juicier. Both options are great; it just depends on your preference. If you want a vegetarian dish, try using black beans or lentils. These options are high in protein and add a nice texture. You can also use veggie crumbles for a meat-like feel. To boost flavor, you can adjust the taco seasoning. Try adding more or less based on your taste. If you want extra zing, consider adding lime juice or hot sauce. Fresh herbs can also take your dish to the next level. Chopped cilantro works well as a garnish. You can also mix in fresh parsley or green onions for added flavor. Get the pasta cook time just right by checking it often. Start checking a few minutes before the time is up. This keeps the pasta from getting too soft. To avoid sticky pasta, stir it gently while it cooks. This helps prevent clumping. If you find it sticky, add a splash of chicken broth to loosen it up. Pro Tips Use Leftovers: This recipe is perfect for using up leftover ingredients. Feel free to add vegetables or beans that you have on hand to customize your dish. Spice it Up: If you prefer a spicier taco pasta, add some diced jalapeños or a few dashes of hot sauce to the mix during cooking. Cheese Variations: Experiment with different types of cheese for added flavor. Pepper jack or a sprinkle of feta can give your pasta a unique twist. Meal Prep Friendly: This dish stores well in the fridge. Make a big batch and enjoy it for lunch or dinner throughout the week. {{image_2}} You can easily change up the ingredients in One Pot Taco Pasta. - Alternative pasta shapes: Try penne, fusilli, or even elbow macaroni for a fun twist. - Using different beans: If you want, swap black beans for pinto or kidney beans. Each type brings its own taste and texture. Adjust the spice level to fit your taste. - Making it milder or spicier: If you like mild flavors, use less taco seasoning. For more heat, add extra seasoning. - Adding heat with jalapeños: Chopped jalapeños add a kick. Mix them in with the onions for a great flavor boost. You can make your meal look great and taste even better. - Pairing with sides like salad or bread: A fresh salad or warm bread pairs well with this dish. They add balance to the meal. - Creative plating ideas: Serve in bowls and top with cheese, cilantro, or avocado. It makes the dish pop and taste amazing! To store your One Pot Taco Pasta, let it cool first. Use airtight containers. Divide it into smaller portions for easy access. This helps keep it fresh. I suggest using glass or BPA-free plastic containers. They are durable and safe. Store it in the fridge for up to three days. To freeze One Pot Taco Pasta, let it cool completely. Place it in freezer-safe bags or containers. Remove as much air as possible. Label the bags with the date. It can last for up to three months in the freezer. When ready to eat, thaw it in the fridge overnight. Reheat it on the stove or in the microwave. Add a bit of water or broth to keep it moist. For food safety, always check for signs of spoilage. Look for changes in color or smell. If it smells off or looks moldy, toss it. Properly stored, it can last in the fridge for three days and three months in the freezer. Always trust your senses! Yes, you can make One Pot Taco Pasta ahead of time. This dish stores well in the fridge. To prep, cook the pasta as directed. Let it cool before storing in an airtight container. It will stay fresh for up to three days. When ready to eat, reheat in a pot on low heat. Add a splash of broth to keep it moist. Yes, you can easily make this dish vegetarian. Swap the ground beef or turkey for a plant-based meat substitute. Lentils or mushrooms also work well. Use vegetable broth instead of chicken broth for flavor. You can add extra beans or veggies to boost the meal. Leftovers can be fun to repurpose. You can turn them into a taco salad. Just add fresh greens, diced tomatoes, and avocado. Another option is to make stuffed peppers. Fill halved bell peppers with the pasta and bake until heated through. You could also add it to scrambled eggs for a tasty breakfast. You've learned how to make delicious One Pot Taco Pasta. We covered the key ingredients, step-by-step cooking instructions, and some helpful tips. You can customize the dish to fit your taste by swapping ingredients or adjusting spice levels. It’s perfect for meal prep and easy to store or freeze. Enjoy trying this recipe; it's simple and tasty. I hope you now feel ready to create your own flavorful One Pot Taco Pasta at home! Your kitchen adventure awaits.
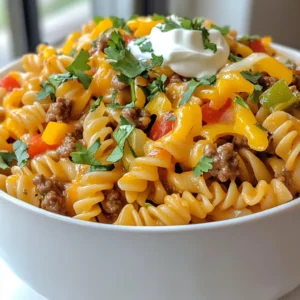
    One Pot Taco Pasta Simple and Flavorful Meal
  • - Fresh raspberries - Raspberry syrup - Club soda - Coconut cream - Lime juice - Fresh mint leaves - Ice cubes Gathering the right ingredients is key. Start with fresh raspberries. They should be bright and firm. Next, get raspberry syrup. This adds sweetness and flavor. Use club soda for a fizzy lift. You will also need coconut cream. This makes your drink creamy and rich. Don't forget lime juice. It adds a nice zing that balances the sweetness. Fresh mint leaves give your drink a fresh touch. Finally, grab some ice cubes. They cool everything down. With these ingredients, you're ready to create a refreshing Raspberry Dream Dirty Soda. Each part plays a role in making this drink a summer favorite! Start by blending 1 cup of fresh raspberries with 1/2 cup of raspberry syrup. Blend until smooth. If you prefer no seeds, strain the mixture through a fine mesh sieve. This step gives you a smooth, bright raspberry puree. Next, take the raspberry puree and pour it into a large pitcher. Add 2 cups of club soda to the puree. Stir gently to mix. Then, squeeze in 1 tablespoon of lime juice. The lime adds a zesty kick to the drink. In a separate bowl, whip 1/2 cup of coconut cream. Use a hand mixer or whisk until it reaches a smooth and fluffy texture. This cream will top your drink and provide a nice contrast to the tart raspberry. Now, grab your glasses and fill them with ice cubes. Pour the raspberry soda mixture over the ice. Make sure each glass gets a nice amount. Finally, top each drink with a generous dollop of whipped coconut cream. For a final touch, garnish with fresh mint leaves. Enjoy your refreshing Raspberry Dream Dirty Soda! To make a great raspberry puree, choose ripe raspberries. Look for berries that are deep red and firm. Avoid any that are mushy or have dark spots. Ripe berries will give you the best flavor. To avoid seed chunks, blend the raspberries with raspberry syrup until smooth. Then, strain the mixture through a fine mesh sieve. This step helps you get a silky texture. Push the puree through with a spatula for best results. You can add more flavor to your drink easily. Consider mixing in a splash of vanilla or a hint of ginger. Both will give your drink a nice twist. Adjust the sweetness based on your taste. If you like it sweeter, add more raspberry syrup. If you prefer less sugar, use fresh lime juice to balance the sweetness. Serving your drink can be fun and creative. Use clear glasses to show off the vibrant colors. You can also layer the coconut cream on top for a beautiful look. For garnishing, add fresh mint leaves on top. They add a pop of color and a fresh scent. You might also consider adding a slice of lime on the rim of the glass for an extra touch. {{image_2}} You can switch up the fruits in your Raspberry Dream Dirty Soda. Try using other berries like strawberries or blueberries. These fruits add a fun twist and color to your drink. If you want a tropical vibe, use pineapple or mango. They give a refreshing taste that pairs well with the soda. If you want a non-dairy option, almond milk or oat cream works well. These alternatives keep your drink creamy without coconut. For a coconut-free choice, you can use soy or cashew cream. These will still add richness and flavor to your soda. You can make a fun cocktail version of this soda. Try adding light or dark rum for a kick. The rum blends nicely with the raspberry and lime flavors. Mix it well in a shaker for a smooth drink. A Raspberry Dream Dirty Soda with rum can be a great choice for summer parties. After making the raspberry puree, store it in the fridge. Use an airtight container for best results. The puree stays fresh for up to three days. If you want to keep it longer, freeze it. Pour the puree into ice cube trays. Once frozen, transfer the cubes to a bag. This method makes it easy to use later. Do not store the assembled drink in the fridge. The club soda will lose its fizz. Instead, prepare the drink just before serving. You can mix the raspberry soda and coconut cream separately. Keep them cool until you are ready to serve. This way, your drink will stay refreshing and bubbly. Fresh raspberries last about one week in the fridge. Watch for soft spots or mold as signs of spoilage. Raspberry syrup can last up to a month when stored in a cool, dark place. For club soda, check the expiration date on the can. Proper storage helps keep your ingredients fresh and tasty. Raspberry Dream Dirty Soda is a fun and fizzy drink. It blends fresh raspberries, raspberry syrup, and club soda. This drink also has a creamy touch from coconut cream. It is refreshing and perfect for hot days. Many people love it for its bright flavor. The drink became popular in recent years, often seen at summer parties and events. It has roots in the "dirty soda" trend that started in Utah. Yes, you can prepare parts of this drink ahead. You can make the raspberry puree and store it in the fridge for up to three days. Keep it in an airtight container. Mix the raspberry puree with the club soda right before serving for the best fizz. Do not whip the coconut cream until you are ready to serve. Whipped cream does not store well. If you want alternatives to raspberry syrup, consider these options: - Strawberry syrup for a different berry flavor. - Agave syrup for a natural sweetness. - Honey can also work, but it has a strong taste. You can also use fruit juice, like pomegranate or cherry, for a fruity twist. Adjust the sweetness to your liking. Raspberry Dream Dirty Soda has some healthy parts. Fresh raspberries are full of vitamins and fiber. The drink does contain added sugar from the syrup. If you want a healthier option, try these tips: - Use less raspberry syrup or a sugar-free version. - Replace coconut cream with lighter options like almond milk. - Add more fresh fruits for extra nutrients. In this blog post, we covered how to make a refreshing Raspberry Dream Dirty Soda. We explored the key ingredients and went step-by-step through blending raspberry puree, mixing, and adding the coconut cream. Tips on flavor and presentation help you enhance your drink. We also looked at fun variations and storage tips. Try these methods to impress your guests or enjoy a treat at home. This drink is simple, enjoyable, and perfect for any occasion.
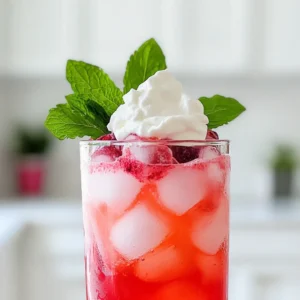
    Raspberry Dream Dirty Soda Refreshing Summer Treat
  • For this delicious crockpot high protein chicken, gather these ingredients: - 2 lbs boneless, skinless chicken breasts - 1 cup low-sodium chicken broth - 1 cup black beans, rinsed and drained - 1 cup quinoa, rinsed - 1 red bell pepper, diced - 1 cup corn (fresh, frozen, or canned) - 1 onion, finely chopped - 3 cloves garlic, minced - 2 teaspoons cumin - 1 teaspoon smoked paprika - 1 teaspoon chili powder - Salt and pepper to taste - Fresh cilantro for garnish Each ingredient adds nutrition to this meal. - Chicken breasts are lean and high in protein. They help build muscle. - Chicken broth adds flavor and keeps the chicken moist. It has low sodium to support heart health. - Black beans offer fiber and protein, which help digestion and keep you full. - Quinoa is a whole grain with protein and all nine essential amino acids. It promotes energy. - Red bell pepper is rich in vitamins A and C, boosting the immune system. - Corn provides fiber and minerals, good for digestion and energy. - Onion contains antioxidants, which protect cells from damage. - Garlic supports heart health and adds great flavor. - Cumin and smoked paprika enhance taste while providing antioxidants. - Chili powder adds a kick and boosts metabolism. - Salt and pepper enhance flavors, but use them wisely for health. - Cilantro adds freshness and vitamins to your dish. You can swap some ingredients if needed. - For chicken, use turkey breasts or tofu for a plant-based option. - Use vegetable broth instead of chicken broth for a vegetarian version. - Swap black beans for kidney beans or lentils for variety. - Quinoa can be replaced with brown rice or farro. - Any color bell pepper works, or you can skip it if you prefer. - Frozen corn works well if fresh is not available. - Shallots can replace onion if you like a milder taste. - Fresh herbs like parsley can replace cilantro for a different flavor. Feel free to mix and match based on what you have! Each choice still makes a tasty, high protein meal. To start, gather your ingredients. You will need: - 2 lbs boneless, skinless chicken breasts - 1 cup low-sodium chicken broth - 1 cup black beans, rinsed and drained - 1 cup quinoa, rinsed - 1 red bell pepper, diced - 1 cup corn (fresh, frozen, or canned) - 1 onion, finely chopped - 3 cloves garlic, minced - 2 teaspoons cumin - 1 teaspoon smoked paprika - 1 teaspoon chili powder - Salt and pepper to taste - Fresh cilantro for garnish First, place the chicken breasts in the bottom of your crockpot. This helps the chicken cook evenly. Next, pour the chicken broth over the chicken. This keeps it moist. In a bowl, mix the black beans, quinoa, diced red bell pepper, corn, chopped onion, minced garlic, cumin, smoked paprika, chili powder, salt, and pepper. This mix adds flavor and texture. Carefully spoon this mixture over the chicken in the crockpot. Spread it evenly. Cover the crockpot with its lid. Cook on low for 6-7 hours or on high for 3-4 hours. The chicken will be done when it easily shreds with a fork. Once the chicken is cooked, take two forks and shred it in the pot. This makes it easy to mix with the other ingredients. Stir everything together. Taste your dish and adjust the seasoning if needed. For serving, dish it out into deep bowls and garnish with fresh cilantro. You can also add lime wedges on the side for a fresh kick. Enjoy your hearty, high-protein meal! To get the best shredded chicken, you need to start with good chicken. I use boneless, skinless chicken breasts. They cook well and shred easily. Place the chicken in the crockpot first. Pour chicken broth on top to keep it moist. Cook it on low for 6-7 hours. If you're in a rush, use the high setting for 3-4 hours. After cooking, use two forks to shred the chicken. Mix it well with the other ingredients in the pot. This way, it absorbs all the great flavors. You can add even more flavor to your dish. Consider adding fresh herbs like cilantro or parsley. You can also squeeze lime juice for a zesty kick. If you like heat, try adding diced jalapeños or a splash of hot sauce. Another great idea is to mix in a tablespoon of your favorite salsa. Experiment with spices, like oregano or cayenne pepper, to make it your own. These small changes can make a big difference. Meal prep can save you lots of time. Cook a big batch of this chicken on the weekend. Divide it into meal-sized portions. Store them in airtight containers. You can keep them in the fridge for up to four days. If you want to store it longer, freeze it. Just thaw it overnight in the fridge before reheating. This way, you always have a healthy meal ready to go. {{image_2}} You can easily change the protein in this dish. If you want more protein, add extra chicken. You can also use turkey breasts for a leaner option. If you want to lower the meat, try adding more beans or quinoa. They both pack great protein too! This way, you keep the dish healthy and filling. For a vegetarian option, replace the chicken with extra firm tofu. You should press the tofu first to remove excess water. This helps it soak up flavors. For a vegan option, you can use chickpeas or lentils. Both add protein and make this dish hearty. Just add them in the same way as the chicken. You can change the flavors to suit your taste. Want a spicy kick? Add jalapeños or cayenne pepper. For a sweeter touch, try adding diced mango or pineapple. If you like herbs, add fresh basil or oregano. Each choice gives you a new flavor experience! Adjusting these aspects can make your meal fun and exciting. Store your leftover Crockpot High Protein Chicken in an airtight container. Let it cool to room temperature first. Place it in the fridge within two hours of cooking. It will stay fresh for three to four days. Label your container with the date to keep track of its freshness. Freezing is a great option if you want to save some for later. Use freezer-safe containers or bags. Make sure to portion the chicken. This way, you can thaw only what you need. It can last up to three months in the freezer. To prevent freezer burn, remove as much air as possible. When you're ready to enjoy leftovers, reheat them carefully. You can use the microwave or stovetop. If using the microwave, heat in short bursts and stir in between. If on the stovetop, add a splash of broth to keep it moist. Heat until it reaches a safe temperature of 165°F. Enjoy it hot, just like when you first made it! It takes about 6-7 hours on low or 3-4 hours on high. Cooking time may vary based on your crockpot. Always check the chicken to make sure it is cooked through. The internal temperature should reach 165°F for safe eating. Using a meat thermometer helps ensure perfect cooking every time. Yes, you can use frozen chicken breasts. However, it’s best to cook them on high for about 4-5 hours. This way, the chicken cooks evenly and stays moist. If you use frozen chicken, avoid adding too much liquid. The ice will melt and could make the dish watery. High protein chicken dishes go well with many sides. Here are some great options: - Brown rice or quinoa for extra protein - Steamed vegetables like broccoli or green beans - A fresh salad with mixed greens - Sweet potatoes for a sweet touch - Cornbread for a comforting side These sides not only taste good but also add nutrition to your meal. We explored the key ingredients and their benefits in your chicken dish. I shared easy steps for cooking and serving tender, shredded chicken. We also discussed helpful tips to make your meal prep smoother. You can vary flavors or adjust protein as needed. Finally, I covered how to store and reheat your leftovers safely. Enjoy your cooking journey and make meals that your family will love!
    Crockpot High Protein Chicken Delicious and Easy Recipe
  • To make Chicken Alfredo Flatbread, gather these items: - 2 large flatbreads or naan - 1 cup cooked chicken breast, shredded - 1 cup Alfredo sauce - 1 cup shredded mozzarella cheese - ½ cup grated Parmesan cheese - ½ teaspoon garlic powder - ½ teaspoon Italian seasoning - Salt and pepper to taste - Fresh parsley, chopped (for garnish) You can swap flatbreads for pita or tortillas. They will still taste great. For the chicken, use rotisserie chicken for quick prep. If you want less fat, use low-fat Alfredo sauce. You can also use vegan cheese if you're avoiding dairy. For seasoning, fresh garlic can replace garlic powder. To make this dish, you need a few tools: - Baking sheet - Parchment paper - Mixing bowl - Spoon for mixing - Knife for slicing - Oven for baking These tools help you create a tasty Chicken Alfredo Flatbread with ease. Start by preheating your oven to 400°F (200°C). This helps the flatbreads get crispy. Line a baking sheet with parchment paper. This makes cleanup easy later on. Place the flatbreads or naan on the sheet. Make sure they are spread out well. In a medium bowl, combine the shredded chicken and Alfredo sauce. Add garlic powder, Italian seasoning, salt, and pepper. Mix this well until the chicken is coated nicely. This step is key for flavor. The sauce makes the chicken creamy and rich. Now, spread the chicken mixture evenly over each flatbread. Don’t be shy; use it all! Next, sprinkle the shredded mozzarella and grated Parmesan on top. This will create a cheesy crust. Bake your flatbreads in the oven for about 12-15 minutes. Look for the cheese to melt and bubble. You want the edges golden brown. Once done, take them out and let them cool for a minute. Slice and serve! Garnish with chopped parsley for a fresh touch. To get that gooey, melty cheese, use fresh mozzarella. Fresh cheese melts better than old cheese. Mix mozzarella with Parmesan for extra flavor. Use the right amount; too much can make it greasy. Bake until it bubbles and turns golden brown. This takes about 12 to 15 minutes at 400°F. Soggy flatbread can ruin your meal. To avoid this, bake your flatbread first for 3-5 minutes. This helps it stay crispy. Spread your chicken mixture on hot flatbreads. Use less sauce or drain excess liquid from the chicken. This keeps your flatbread crunchy and delicious. Chicken Alfredo Flatbread pairs well with many sides. Try a fresh salad for a light touch. Garlic bread is another tasty choice. You can also serve it with marinara sauce for dipping. A nice glass of white wine matches well, too. Enjoy your meal with family and friends! {{image_2}} To make a vegetarian version, skip the chicken. Use cooked mushrooms or spinach instead. You can also add bell peppers or artichokes. Just mix these veggies with the Alfredo sauce. This will keep the creamy taste while adding fresh flavors. Want some heat? Add red pepper flakes to the Alfredo sauce. You can also use spicy chicken. Mix in some jalapeños or sriracha for a real kick. This adds a nice contrast to the creamy sauce and makes the dish exciting. You can switch the Alfredo sauce for pesto or marinara. This gives a fresh twist to the flatbread. Try a garlic or cheese sauce for a rich flavor. Each sauce brings its own unique taste, keeping your meals fun and varied. To keep your Chicken Alfredo Flatbread fresh, store it in an airtight container. It can last in the fridge for about 3 to 4 days. Make sure it cools down before you seal it. This helps prevent sogginess and keeps the flavors intact. If you want to save some for later, freezing is a great option. Wrap each flatbread tightly in plastic wrap, then place them in a freezer bag. This keeps out air and freezer burn. You can freeze them for up to 2 months. When you’re ready to eat, just thaw in the fridge overnight. Reheating is simple! Preheat your oven to 350°F (175°C). Place the flatbread on a baking sheet. Heat for about 10 to 15 minutes or until warm. You can also use a microwave, but this may make the flatbread soggy. For the best taste, I recommend the oven method. Enjoy every bite! Yes, you can use store-bought Alfredo sauce. It saves time and still tastes great. Look for a brand with simple ingredients. This makes it easy to enjoy Chicken Alfredo Flatbread without stress. If you want more flavor, try adding garlic or herbs to the sauce. You can add many tasty items to boost flavor. Here are some ideas: - Spinach: Fresh or cooked spinach adds color and nutrition. - Mushrooms: Sautéed mushrooms give an earthy taste. - Sun-dried tomatoes: These offer a sweet and tangy kick. - Buffalo sauce: For a spicy twist, drizzle some buffalo sauce on top. - Extra herbs: Fresh basil or oregano can brighten the dish. Feel free to mix and match these to suit your taste! Chicken Alfredo Flatbread lasts for about 3-4 days in the fridge. Store it in an airtight container to keep it fresh. If you want it to last longer, you can freeze it. Just wrap the flatbreads well in plastic wrap and foil. They can stay good for up to 2 months in the freezer. You learned how to make Chicken Alfredo Flatbread from start to finish. We covered the right ingredients, step-by-step methods, and handy tips. You can experiment with fun variations and store any extras well. Remember, cooking is all about trying new things and having fun. Enjoy your dish, share it with friends, and get creative. Trust me; you’ll love every bite!
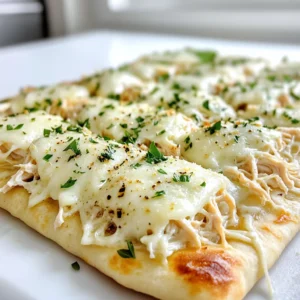
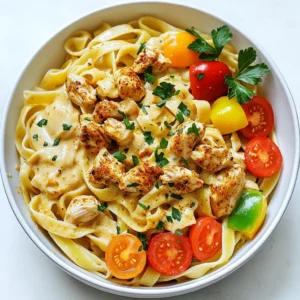
    Chicken Alfredo Flatbread Quick and Tasty Recipe
  • To make One Pan Creamy Orzo, gather these main ingredients: - 1 cup orzo pasta - 3 cups vegetable broth - 1 cup heavy cream - 1 cup cherry tomatoes, halved - 1 zucchini, diced - 1 cup spinach, roughly chopped - 1 small onion, diced - 2 cloves garlic, minced - 1 teaspoon dried oregano - 1 teaspoon dried basil - Salt and pepper to taste - 1/2 cup grated Parmesan cheese - Fresh basil leaves, for garnish These ingredients blend well to create a comforting dish. Want to make your orzo even better? Here are some optional ingredients: - Red pepper flakes for heat - Lemon zest for brightness - Mushrooms for earthiness - Peas for sweetness - Artichoke hearts for a unique twist These additions can enhance flavor and make your dish special. Need to swap some ingredients? Here are a few ideas: - Use almond milk instead of heavy cream for a lighter version. - Swap orzo for quinoa or rice for a gluten-free meal. - Use vegetable broth to make it vegan. - Replace Parmesan with nutritional yeast for a dairy-free option. These substitutions can help you enjoy this dish no matter your dietary needs. Start by gathering all your ingredients. You will need orzo pasta, vegetable broth, heavy cream, cherry tomatoes, zucchini, spinach, onion, garlic, dried oregano, dried basil, salt, pepper, and Parmesan cheese. This makes your cooking smooth and quick. Dice the onion, garlic, and zucchini into small pieces. Halve the cherry tomatoes. Roughly chop the spinach. Heat a large skillet over medium heat. Add a drizzle of olive oil. Once it is hot, add the diced onion. Sauté for about 3-4 minutes, until it turns translucent. Next, add the minced garlic and cook for 1 more minute. This will make your kitchen smell amazing! Stir in the cherry tomatoes and zucchini. Cook them for about 5 minutes until the tomatoes soften. Now, add the orzo pasta to the skillet. Stir well to mix everything. Pour in the vegetable broth and bring it to a simmer. Cover the skillet and reduce the heat to low. Cook for about 10 minutes, stirring occasionally. The orzo should be al dente when done. Once cooked, gently stir in the heavy cream, oregano, basil, salt, and pepper. Let it simmer for 3 more minutes until creamy. Fold in the chopped spinach and grated Parmesan cheese. Mix until the spinach wilts and everything blends well. Taste the dish and adjust the seasoning if needed. Remove the skillet from heat and let it sit for a few minutes. This helps the flavors settle. Serve the creamy orzo in shallow bowls. Garnish with fresh basil leaves and a sprinkle of Parmesan cheese for a lovely finish. Enjoy your delicious meal! To get that rich, creamy feel in your orzo, follow these tips: - Use heavy cream. It adds a smooth texture that makes a big difference. - Stir gently after adding cream. This helps keep everything mixed without breaking it apart. - Let it sit before serving. This helps the orzo absorb flavors and become creamy. Here are some common pitfalls to watch out for: - Not stirring enough. This can cause the orzo to stick and clump. - Adding too much broth at once. Use the right amount to avoid watery orzo. - Overcooking the orzo. Check it often; you want it al dente, not mushy. You can boost the flavor with these easy ideas: - Add fresh herbs like parsley or cilantro for a fresh taste. - Squeeze some lemon juice for brightness and acidity. - Toss in some red pepper flakes for a spicy kick. These tips will help you create a creamy, flavorful orzo that everyone will love. Enjoy experimenting! {{image_2}} You can easily make One Pan Creamy Orzo vegetarian. Just skip the heavy cream and use a plant-based cream. Swap the Parmesan cheese for a vegan cheese option. You can also add more veggies, like bell peppers or mushrooms. These changes keep the dish rich and tasty. If you want more protein in your meal, add grilled chicken, shrimp, or sausage. Cook the protein separately and mix it in with the orzo at the end. This makes a filling dish that satisfies everyone at the table. You can also use canned chickpeas for a plant-based protein boost. Using seasonal ingredients can elevate your orzo. In spring, add asparagus or peas. In summer, fresh corn or bell peppers work great. In fall, try butternut squash or kale. Using what’s fresh not only enhances flavor but also keeps your dish vibrant and healthy. Store leftover One Pan Creamy Orzo in an airtight container. Let it cool first. Place it in the fridge for up to three days. If you want to keep it longer, consider freezing. When you reheat, add a splash of vegetable broth or cream. This will help keep the orzo creamy. Warm it slowly over low heat in a pan. Stir often to avoid sticking. To freeze, let the dish cool completely. Then, spoon it into freezer-safe bags or containers. Squeeze out extra air to prevent freezer burn. It can last up to three months in the freezer. When ready, thaw it overnight in the fridge before reheating. One Pan Creamy Orzo lasts about 3 to 5 days in the fridge. Store it in an airtight container. Make sure it cools down first. This helps keep it fresh and safe to eat. Yes, you can make One Pan Creamy Orzo in advance. Cook it fully, then store it in the fridge. This dish is great for meal prep. Just reheat it when you are ready to eat. You can serve One Pan Creamy Orzo with many sides. Try a fresh salad for crunch. Garlic bread pairs well, too. Roasted veggies add color and flavor. You can also add grilled chicken or shrimp for protein. These options make the meal more filling and fun! One Pan Creamy Orzo is easy to make and full of flavor. We covered the key ingredients, simple steps, and tips to get the best texture. You can adapt the dish to fit your dietary needs or try new variations. Store leftovers properly to enjoy later, and reheating is simple. Remember, this recipe can fit any meal. So grab your pan and start cooking for a creamy delight tonight!
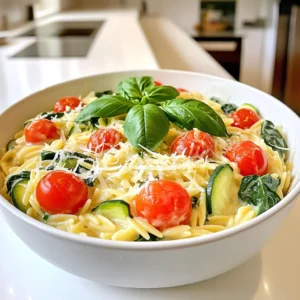
    One Pan Creamy Orzo Delightful and Easy Recipe
  • - Ground beef: This is the star of the dish. It adds rich flavor and protein. Choose lean ground beef to keep it healthier. You can also use turkey or chicken if you prefer lighter meat. - Russet potatoes: Fresh russet potatoes give the best texture. They hold up well during baking and become soft inside. Slice them thinly for even cooking. - Optional ingredients: You can add 1 cup of breadcrumbs for a crunchy top. Mixing them with melted butter makes them golden and tasty. Feel free to skip this if you want a simpler dish. - Seasonings: This recipe uses Worcestershire sauce, salt, black pepper, and paprika. Worcestershire adds depth, while paprika gives a slight kick. Adjust the salt and pepper to fit your taste. - Cheese: I use shredded cheddar cheese for its sharp flavor. You could try mozzarella for a milder taste or pepper jack for some heat. Mix different cheeses for a unique flavor. - Sour cream and milk: These add creaminess to the casserole. The sour cream gives it a tangy taste, while milk makes it smooth. The combo creates a lovely sauce that coats the layers well. 1. First, preheat your oven to 350°F (175°C). This temperature cooks the casserole evenly. 2. Grease a 9x13 inch baking dish with cooking spray or butter. This helps prevent sticking. 3. In a large skillet, cook 1 pound of ground beef over medium heat until it is browned. Make sure to drain any excess fat after cooking. 4. Add 1 chopped medium onion and 2 minced garlic cloves to the skillet with the beef. Cook until the onion is soft, about 5 minutes. This adds great flavor. 5. Mix in 1 tablespoon of Worcestershire sauce, 1 teaspoon of salt, 1/2 teaspoon of black pepper, and 1 teaspoon of paprika. Stir well and then remove the skillet from heat. Set it aside. 1. Start by layering half of the sliced potatoes in the greased baking dish. This is about 4 large russet potatoes, thinly sliced. 2. Pour half of the sour cream and milk mixture over the potatoes. This adds creaminess and helps bind the layers. 3. Next, add half of the beef mixture on top of the sour cream. This ensures every bite has flavor. 4. Sprinkle half of the shredded cheddar cheese (1 cup) over the beef. Cheese makes everything better! 5. Repeat the layers with the remaining potatoes, sour cream mixture, beef, and the rest of the cheddar cheese. 6. If you want a crunchy topping, mix 1 cup of breadcrumbs with 2 tablespoons of melted butter and sprinkle it on top. This is optional but adds great texture. 1. Cover your casserole with aluminum foil. This keeps moisture in while baking. 2. Bake for 45 minutes. This allows the flavors to meld and the potatoes to cook. 3. After 45 minutes, remove the foil. Bake for an additional 15 minutes. This step helps the cheese become bubbly and golden. 4. Check if the potatoes are cooked through. They should be tender when pierced with a fork. 5. Let the casserole cool for 5–10 minutes before serving. This resting time helps with serving. To make sure your potatoes are tender, slice them thinly. Thin slices cook faster and soak up flavors well. Layer them evenly in the dish. This helps them cook uniformly. Prevent excess moisture by cooking the ground beef until browned. Drain fat well to keep it from making the casserole soggy. You can also cover the dish with foil while baking. This traps steam, but do remove it later for a nice, golden top. For garnish, sprinkle fresh parsley on top. It adds color and a fresh taste. Add a dollop of sour cream to each serving for extra creaminess. This also makes the dish look inviting. When serving, pair the casserole with a simple side salad or steamed vegetables. These will add freshness and balance the richness of the casserole. {{image_2}} You can easily switch up the meats in this casserole. Ground turkey or chicken works great. They add a lighter taste with fewer calories. If you want something spicy, try ground chorizo. It gives a fun twist! Cheese is another fun area to explore. While cheddar is classic, mozzarella melts beautifully. Pepper jack adds a nice kick. You can even use a mix of different cheeses for more flavor. If you need a gluten-free dish, skip the breadcrumbs. Instead, you can use crushed gluten-free crackers or oats. Both add a nice crunch without the gluten. Want a vegetarian version? Swap the ground beef for plant-based meat. There are many tasty options today. Some brands even make crumbles that taste like beef. This way, everyone can enjoy the casserole! To keep your Cheesy Hamburger Potato Casserole fresh, follow these tips: - Refrigerate: Cool the casserole to room temperature. Cover it tightly with plastic wrap or foil. It stays good for about 3-4 days in the fridge. - Freeze: For long-term storage, freeze leftovers. Use an airtight container or heavy-duty freezer bags. This way, it can last up to 3 months. For optimal storage, glass or plastic containers work well. Make sure they have tight lids to keep air out. Label your containers with dates to track freshness. Reheating your casserole can be easy and rewarding. Here are some methods: - Oven: Preheat your oven to 350°F (175°C). Place the casserole in an oven-safe dish. Cover it with foil to keep it moist. Heat for about 20-25 minutes or until warm. - Microwave: For a quick option, use the microwave. Place a portion in a microwave-safe dish. Cover it loosely to avoid splatters. Heat in short bursts of 1-2 minutes, checking often. To maintain texture and moisture, avoid overheating. If the casserole seems dry, add a splash of milk before reheating. This keeps it creamy and delicious. How long does Cheesy Hamburger Potato Casserole last in the fridge? This casserole can last about 3 to 4 days in the fridge. Make sure to store it in an airtight container. This keeps it fresh and tasty for your next meal. Can I prepare this casserole ahead of time? Yes, you can prep this casserole a day before. Assemble it, cover it, and store it in the fridge. Just remember to bake it when you're ready. It saves time on busy days! What can I serve with Cheesy Hamburger Potato Casserole? This dish pairs well with a simple green salad. You can also serve it with garlic bread for a tasty side. Both options add freshness and balance to the meal. Is it possible to make this recipe lighter? Absolutely! Use lean ground beef or ground turkey. You can also swap full-fat sour cream for Greek yogurt. These changes cut calories while keeping the flavor rich. How do I know when the casserole is done baking? Look for bubbly cheese and tender potatoes. The top should be golden brown if you added breadcrumbs. A knife should slide easily through the layers when it’s cooked. In this article, we explored the delicious Cheesy Hamburger Potato Casserole. We covered the key ingredients, such as fresh russet potatoes and ground beef. We shared simple steps for preparation and baking, along with tips for perfecting flavor and texture. You can swap ingredients to suit your taste or dietary needs. Lastly, we discussed how to store and reheat leftovers. This dish is versatile, easy to make, and perfect for any meal. Enjoy making this casserole for family and friends!
    Cheesy Hamburger Potato Casserole Easy Comfort Recipe
  • To make Cajun Chicken Tortellini, you need: - 2 cups cheese tortellini (fresh or frozen) - 1 lb boneless, skinless chicken breasts, cut into bite-sized pieces - 2 tablespoons Cajun seasoning - 1 tablespoon olive oil - 1 small onion, finely chopped - 2 cloves garlic, minced - 1 red bell pepper, diced - 1 cup heavy cream - 1 cup cherry tomatoes, halved - 1/2 cup grated Parmesan cheese - Salt and black pepper, to taste - Fresh parsley, chopped (for garnish) You can add extra flavors or textures with these options: - Sliced green onions for a fresh crunch - A squeeze of lemon juice for brightness - Crushed red pepper flakes for more heat - Additional cheese, like mozzarella or cheddar, for extra creaminess Each serving of Cajun Chicken Tortellini provides: - Calories: 550 - Protein: 30g - Carbohydrates: 45g - Total Fat: 30g - Saturated Fat: 17g - Fiber: 3g - Sugar: 4g - Sodium: 800mg This dish is rich and filling, perfect for a hearty meal. Adjust portions based on your needs. {{ingredient_image_1}} To start, bring a large pot of salted water to a boil. This step is key for flavorful tortellini. Once the water boils, add 2 cups of cheese tortellini. Cook according to the package instructions, usually about 3-5 minutes. You want the tortellini to be al dente, which means firm to the bite. After cooking, drain the tortellini and set it aside. Next, take 1 pound of boneless, skinless chicken breasts and cut them into bite-sized pieces. In a bowl, toss the chicken with 2 tablespoons of Cajun seasoning to coat it well. This gives the chicken a nice kick. Heat 1 tablespoon of olive oil in a large skillet over medium-high heat. Add the seasoned chicken and cook for about 5-7 minutes. You want the chicken to be golden brown and cooked through. Once done, remove it from the skillet and set it aside. In the same skillet, add 1 small finely chopped onion. Sauté it for 2-3 minutes until it becomes translucent. Then, add 2 minced garlic cloves and 1 diced red bell pepper. Cook these for another 3-4 minutes until they soften. Now, pour in 1 cup of heavy cream and bring it to a gentle simmer. This will make your sauce rich and creamy. Stir in 1 cup of halved cherry tomatoes and let it cook for about 5 minutes. This helps the flavors blend well. After the sauce has simmered, add the cooked chicken and tortellini back into the skillet. Toss everything gently to coat in the sauce. Finally, stir in 1/2 cup of grated Parmesan cheese. Season with salt and black pepper to taste. Once everything is mixed well and heated through, it’s ready to serve. Enjoy this tasty Cajun Chicken Tortellini! When cooking tortellini, follow a few simple steps to get it just right. First, always use a large pot with plenty of salted water. This helps the tortellini cook evenly. Bring the water to a rolling boil before adding the tortellini. This ensures they cook quickly and don’t stick together. Cook the tortellini until they are al dente. This means they should be firm but not hard. If you overcook them, they will become mushy. After cooking, drain them well and toss them with a bit of olive oil to keep them from sticking. This simple trick makes a big difference! For perfectly cooked chicken, start by cutting it into small, even pieces. This helps it cook evenly. Toss the chicken with Cajun seasoning for great flavor. Let it sit for a few minutes to absorb the spices. When cooking, use a hot skillet with olive oil. Add the chicken in a single layer. Avoid crowding the pan, or the chicken will steam instead of brown. Cook until golden brown, about 5-7 minutes. Use a meat thermometer to check for doneness; it should reach 165°F. To enhance the flavor of your sauce, start with sautéing onions and garlic. This step adds depth to the dish. Cook them until they are soft and fragrant. Next, add diced red bell pepper for sweetness and color. When you pour in the heavy cream, make sure to stir well. This creates a rich and creamy base. Add halved cherry tomatoes for a burst of freshness and acidity. Let the sauce simmer for a few minutes to blend the flavors. Lastly, a sprinkle of Parmesan cheese adds a nice touch. Adjust salt and black pepper to taste for the perfect finish. Pro Tips Use Fresh Ingredients: Fresh tortellini and vegetables will enhance the overall flavor and texture of your dish. Adjust the Spice Level: Feel free to increase or decrease the amount of Cajun seasoning based on your heat preference. Experiment with Proteins: Substitute chicken with shrimp or sausage for a different protein twist that complements the Cajun flavors. Let it Rest: Allow the dish to sit for a few minutes before serving to let the flavors develop and meld together. {{image_2}} If you want a meat-free meal, try using veggies instead of chicken. You can swap out the chicken for a mix of mushrooms, zucchini, and spinach. Use the same Cajun seasoning to keep that bold flavor. Cook the veggies until tender, then add them to the sauce. This way, you still get a creamy, tasty dish. If you love heat, kick up the spice level! You can add chopped jalapeños or a dash of hot sauce to the chicken. Mix in some red pepper flakes when you sauté the veggies. This will give your dish that extra zing. Adjust the spice to your taste, but be careful; it can get hot! Don’t feel limited to just heavy cream. You can try coconut milk for a lighter option. It adds a nice sweetness too. For a tangy twist, use a mix of cream cheese and chicken broth. This will create a thicker sauce. You can also toss in different veggies, like broccoli or snap peas, for added crunch. To store your Cajun Chicken Tortellini, let it cool down first. Then, place it in an airtight container. Make sure to cover it tightly. You can keep it in the fridge for up to three days. This way, it stays fresh and tasty. When you want to eat leftovers, reheat them gently. Place the tortellini in a skillet over medium heat. Add a splash of milk or cream to keep it creamy. Stir often to heat evenly. You can also use the microwave. Heat in short bursts, stirring in between, until warm. If you want to save some for later, freezing is a great option. First, let the dish cool completely. Then, place it in a freezer-safe container or bag. Remove as much air as possible to prevent freezer burn. You can freeze it for up to three months. To enjoy it later, thaw it overnight in the fridge before reheating. Yes, you can use frozen tortellini. Just boil them in salted water. Cook them as per the package instructions. They will taste great in this dish. The cooking time may be a bit longer than fresh tortellini. Make sure to check if they float. That means they are done! If you want to replace heavy cream, use half-and-half or whole milk. For a lighter option, try Greek yogurt. You can mix yogurt with a little milk for a creamy texture. Coconut milk is also a tasty choice! It adds a sweet flavor to the dish. To add more heat, toss in extra Cajun seasoning. You could also add diced jalapeños or crushed red pepper flakes. If you love hot sauce, drizzle some over the top. Adjust the spice level to your taste. Enjoy the heat! Cajun Chicken Tortellini is a fun and tasty dish to make. You learned the key ingredients, step-by-step instructions, and helpful tips. We also explored variations and storage methods. This meal is simple to customize and enjoy any night. With the right cooking methods, you will create a flavorful dish every time. Dive into your own Cajun Chicken Tortellini adventure, and impress everyone at your table!
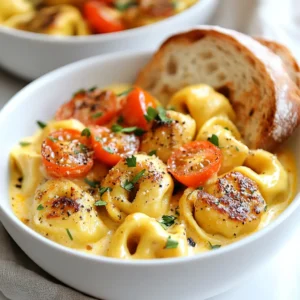
    Cajun Chicken Tortellini Flavorful and Easy Recipe
  • For these tasty tacos, you need fresh shrimp. Here's what you'll gather: - 1 lb large shrimp, peeled and deveined - 8 small corn tortillas The shrimp should be firm and pink. Look for shrimp that smell like the ocean. Corn tortillas are soft and tasty. They add a nice touch to the dish. The marinade gives the shrimp a sweet and garlicky flavor. Gather these items: - 3 tablespoons honey - 3 cloves garlic, minced - 2 tablespoons olive oil - 1 teaspoon smoked paprika - 1 teaspoon cumin - Salt and pepper to taste Mix honey and garlic for a sweet kick. Olive oil helps everything stick. Smoked paprika adds a hint of smokiness, while cumin gives warmth. Don't forget the salt and pepper to make it pop. Fresh toppings make the tacos bright and crunchy. Here’s what you'll need: - 1 cup red cabbage, shredded - 1 avocado, sliced - 1/4 cup fresh cilantro, chopped - Lime wedges, for serving Shredded red cabbage adds crunch and color. Sliced avocado brings creaminess. Chopped cilantro gives a fresh taste. Serve lime wedges on the side for a zesty squeeze. To start, gather your ingredients. You need honey, garlic, olive oil, smoked paprika, cumin, salt, pepper, and shrimp. In a large bowl, mix the honey, minced garlic, olive oil, smoked paprika, cumin, salt, and pepper. Stir well until all the flavors blend together. Next, add the shrimp to the bowl. Toss the shrimp in the marinade until they are fully coated. This step is key. You want the shrimp to soak up all that delicious flavor. Set the bowl aside for a moment while you prepare to bake. Now, preheat your oven to 400°F (200°C). This temperature is perfect for cooking shrimp quickly while keeping them tender. Line a sheet pan with parchment paper for easy cleanup. Spread the marinated shrimp in a single layer on the sheet pan. Make sure they have space between them. This helps them cook evenly. Bake the shrimp for 8 to 10 minutes. Keep an eye on them. They are ready when they turn pink and opaque. Once done, take them out of the oven and let them cool for a few minutes. This helps them firm up a bit, making them easier to handle. While the shrimp cool, warm your corn tortillas. You can do this in a skillet over medium heat for about 30 seconds on each side. Warm tortillas are soft and easy to fold. Now it’s time to build your tacos. Take a tortilla and place a few shrimp in the center. Top it with shredded red cabbage, sliced avocado, and chopped cilantro for that fresh touch. Don’t forget the lime wedges! Serve them on the side for a zesty finish. Squeeze lime over the tacos just before eating for extra flavor. Enjoy your Savory Sheet Pan Honey Garlic Shrimp Tacos! To cook shrimp just right, look for a few signs. First, the shrimp should turn pink and opaque. This means they are ready to eat. Overcooking makes shrimp tough and chewy. Keep an eye on the time. Bake for 8 to 10 minutes at 400°F. If you want extra flavor, marinate the shrimp longer, up to 30 minutes. This helps the honey and garlic soak in. Warming tortillas is easy and makes a big difference. Use a skillet over medium heat. Cook each tortilla for about 30 seconds on each side. This warms them up and makes them soft. You can also wrap a stack of tortillas in a damp paper towel. Microwave them for about 30 seconds. Both methods make the tortillas pliable, perfect for filling. Tacos are not just about the shrimp. Add fun toppings to make them special. Shredded red cabbage gives a nice crunch. Sliced avocado adds creaminess. Chopped cilantro brings fresh flavor. Squeeze lime on top for a zesty kick. You can also try adding diced tomatoes or jalapeños for more spice. Make your tacos your own! {{image_2}} If you want to switch up your tacos, try different proteins. Chicken works well with the same honey garlic marinade. Just use about 1 lb of boneless chicken breast or thighs. Cook them the same way as the shrimp. You can also use firm tofu for a vegetarian option. It absorbs flavors nicely and adds great texture. For a vegetarian twist, load your tacos with roasted veggies. Bell peppers, zucchini, and sweet potatoes are great choices. Cut them into small pieces and toss them in the same marinade. Bake them on the sheet pan until they are tender. You can also use black beans or chickpeas for added protein. They pair well with the crunchy cabbage and creamy avocado. Feel free to play with flavors! Swap honey for maple syrup for a different sweetness. Add lime juice to the marinade for a zesty kick. You can also use spicy seasonings like cayenne pepper or chili powder if you like heat. Experiment with fresh herbs too. Try adding basil or mint for a fresh taste. Each twist makes the tacos unique and fun! Store leftover shrimp in an airtight container. This keeps them fresh longer. Place the shrimp in the fridge. They will last about 2-3 days. If you want to keep them longer, freeze them. Use a freezer bag to avoid freezer burn. Make sure to remove as much air as possible. Frozen shrimp can last up to 3 months. To reheat shrimp, use a skillet. Heat it over medium heat. Add a bit of oil to the pan. Then, add the shrimp. Cook them until they are warm, about 3-4 minutes. You can also use the microwave. Place shrimp in a bowl, cover, and heat for 30 seconds. Be careful not to overcook them. For tacos, warm them on a skillet for a bit. This keeps them soft and tasty. For fresh ingredients, store them properly. Keep red cabbage in the fridge in a bag. This helps it stay crunchy. Store avocado at room temperature until ripe. Once ripe, place it in the fridge. Use fresh cilantro within a week for the best flavor. Keep it in a damp paper towel and put it in a bag. This keeps it fresh and full of taste. Yes, you can prep these tacos ahead. Mix the marinade and coat the shrimp. Store them in the fridge for up to 24 hours. When you are ready, bake the shrimp as usual. This keeps the flavors fresh and saves time. If you lack shrimp, try chicken or fish. Use about the same weight and cut them into smaller pieces. For a vegetarian option, consider mushrooms or firm tofu. These will soak up the marinade well and provide a tasty meal. Yes, you can use corn tortillas, which are naturally gluten-free. They work great for these tacos. Check labels to ensure they are made in a gluten-free facility. This way, you can enjoy tasty tacos without worry. In this post, I covered how to make delicious shrimp tacos. I shared key ingredients, spices, and fresh toppings. You learned step-by-step how to prepare, bake, and assemble your tacos. I also included tips for perfect shrimp and warming tortillas. We explored fun variations and storage tips for any leftovers. Shrimp tacos can be a hit for any meal. With these tips, you will impress your guests! Enjoy making and sharing these tasty tacos!
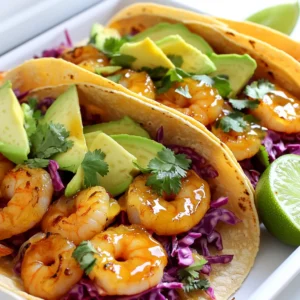
    Savory Sheet Pan Honey Garlic Shrimp Tacos Recipe
  • To make these tasty bites, you need just a few key ingredients: - 1 cup almond flour - 1 cup canned pumpkin puree - 1/4 cup maple syrup - 1/4 cup nut butter (almond or peanut) - 1 teaspoon vanilla extract - 1 teaspoon pumpkin pie spice - 1/4 teaspoon salt These ingredients come together to create a rich, creamy dough. The almond flour gives a nice texture, while pumpkin puree adds moisture and flavor. Maple syrup sweetens the mix without being too heavy. The nut butter binds it all together, and the spices bring out that cozy fall taste. You can easily take these bites to the next level. Consider adding: - 1/2 cup chocolate chips - 1/2 cup chopped nuts Chocolate chips add a sweet surprise, while nuts give a nice crunch. You can mix and match. If you want a fun twist, try adding dried fruit or coconut flakes. If you need to swap an ingredient, it's quite simple. Here are a few ideas: - Almond flour: You can use oat flour or any nut flour. - Maple syrup: Honey or agave syrup works too. - Nut butter: Sunflower seed butter is a great choice for nut-free options. These changes keep the taste good while catering to your needs. Don't be afraid to experiment! To start, grab a large mixing bowl. Add 1 cup of almond flour. Next, scoop in 1 cup of canned pumpkin puree. Pour in 1/4 cup of maple syrup. Then, add 1/4 cup of nut butter. You can use almond or peanut butter here. Don't forget to include 1 teaspoon of vanilla extract. Sprinkle in 1 teaspoon of pumpkin pie spice and 1/4 teaspoon of salt. Mix all these ingredients well. A nice dough should form. If you want, fold in 1/2 cup of chocolate chips or chopped nuts. This adds a tasty twist. Now for the fun part! Use your hands to scoop out small portions of the dough. Aim for about 1 inch in diameter. This size is perfect for bites. Roll the dough into balls. Make sure they are smooth and round. Place the cookie dough bites on a parchment-lined baking sheet. Space them out evenly. This helps them keep their shape. Chilling is key for these bites. After rolling, place the baking sheet in the fridge. Let them chill for at least 30 minutes. This step helps the bites firm up. They will be easier to eat and hold their shape. After chilling, they are ready to enjoy. If you have leftovers, store them in an airtight container in the fridge. To get the right dough, mix your ingredients well. You want a thick and smooth texture. If it feels too sticky, add a bit more almond flour. If it seems too dry, a splash of maple syrup helps. Always trust your hands; they give the best feel for dough. Spices can make your bites pop! Try adding a bit of cinnamon for warmth. Nutmeg is a great choice for extra depth. A pinch of cloves can also add a festive twist. Just remember, start small. You can always add more spice, but you can't take it out! To impress guests, use mini cupcake liners for serving. They make your bites look fancy. Sprinkle some pumpkin pie spice on top for flair. You can also drizzle a little melted chocolate over them. This adds sweetness and makes them extra special. Enjoy these bites chilled for the best flavor! {{image_2}} To make these bites vegan, swap the maple syrup for agave nectar. You can also use sunflower seed butter instead of nut butter. This keeps the bites creamy and delicious while being nut-free. The other ingredients stay the same. You still get that yummy pumpkin flavor without any animal products. If you need a gluten-free version, almond flour works great. You can also try coconut flour. Just remember, coconut flour absorbs more liquid. Start with less, then add more if needed. Always check the labels on your ingredients to ensure they are gluten-free. You can change up the flavor by adding extracts. Try almond or maple extract for a twist. Just a few drops can make a big difference. If you love spice, add more pumpkin pie spice or a pinch of cinnamon. This adds warmth and depth to the bites. Feel free to get creative and mix flavors to find your favorite combo! To keep your pumpkin cookie dough bites fresh, store them in an airtight container. This will help keep moisture out and preserve flavor. You can place parchment paper between layers to avoid sticking. Make sure to keep the bites in the fridge. They stay best at a cool temperature. If you want to save some bites for later, freezing is a great option. Start by placing the bites in a single layer on a baking sheet. Freeze them for about an hour until they are firm. Once frozen, transfer them to a freezer-safe bag or container. Label the bag with the date. You can freeze them for up to three months. When stored properly, these bites last about one week in the fridge. If you freeze them, they can last up to three months. Just remember, the longer they sit, the more their taste may change. Always check for any signs of spoilage before eating. Yes, you can use fresh pumpkin. First, cook and puree it until smooth. Make sure to drain any excess water. Canned pumpkin is easier and saves time. Both options work well in this recipe. To make these bites healthier, try these tips: - Use less maple syrup or substitute with a low-calorie sweetener. - Add chia seeds or flaxseeds for added fiber. - Swap almond flour for oat flour to increase whole grains. These changes keep the taste while boosting nutrition. You can use sun butter or soy nut butter if you need a nut-free option. Both provide a similar creamy texture. You can also try tahini for a different flavor. Just keep the consistency in mind. Yes, these bites are perfect for kids. They are easy to make and fun to eat. Plus, they contain healthy ingredients. Just watch out for any nut allergies when serving. Each bite has a good mix of nutrients. They are rich in protein from the nut butter and healthy fats from the almond flour. A rough estimate gives you around: - Calories: 100 - Protein: 3g - Carbs: 10g - Fat: 5g This varies based on your specific ingredients. You learned how to make tasty No Bake Pumpkin Cookie Dough Bites. We discussed essential ingredients and fun ways to customize your recipe. You now know how to mix, shape, and chill your bites for the best results. With tips on dough consistency and flavor boosts, you can impress your friends. Remember, these bites are easy to store and freeze for later. Enjoy your creation, and have fun making it your own!
    No Bake Pumpkin Cookie Dough Bites Delightfully Easy
  • - 1.5 lbs boneless, skinless chicken breasts - 1 cup brown rice, rinsed - 1 can (15 oz) black beans, drained and rinsed - 1 can (14.5 oz) diced tomatoes with green chilies - 1 cup corn (fresh or frozen) - 1 small onion, diced - 2 cloves garlic, minced - 2 teaspoons chili powder - 1 teaspoon cumin - 1 teaspoon smoked paprika - Salt and pepper to taste - 1 cup chicken broth - 1 lime, juiced - Fresh cilantro, chopped (for garnish) - Avocado slices (for topping) - Sour cream (for topping) - Shredded cheese (for topping) For the best flavor, I suggest using brands like: - Chicken: Perdue or Tyson are both reliable for quality chicken. - Canned Goods: Goya for black beans and diced tomatoes, as they have great taste and quality. - Rice: Uncle Ben’s brown rice cooks well and has a nice texture. - Spices: McCormick provides fresh spices that enhance flavor. If you need to make swaps, consider these options: - Rice: Quinoa works well instead of brown rice for a gluten-free option. - Beans: Use pinto beans if you prefer a different flavor. - Corn: Canned corn can replace fresh corn if needed. - Lime: Lemon juice can be a good substitute for lime if you don’t have it. Using these ingredients will give you a tasty and easy meal. You can mix and match based on your pantry items or personal taste. Enjoy crafting your delicious Slow Cooker Chicken Burrito Bowls! {{ingredient_image_1}} First, gather your ingredients. You need chicken, rice, beans, tomatoes, corn, onion, garlic, and spices. Start by placing 1.5 lbs of boneless, skinless chicken breasts at the bottom of your slow cooker. Next, in a bowl, mix 1 cup of rinsed brown rice, 1 can of drained black beans, 1 can of diced tomatoes with green chilies, and 1 cup of corn. Add 1 small diced onion, 2 minced cloves of garlic, 2 teaspoons of chili powder, 1 teaspoon of cumin, and 1 teaspoon of smoked paprika. Don't forget to season with salt and pepper. Stir well to combine. Now, spread the rice and bean mixture over the chicken in the slow cooker. Pour in 1 cup of chicken broth, making sure the rice and beans are covered with liquid. Cover the slow cooker and set it to cook on low for 6-8 hours or on high for 3-4 hours. Check that the chicken is fully cooked and tender before moving on to the next step. About 30 minutes before serving, use two forks to shred the chicken while it’s still in the cooker. Mix everything well to combine the flavors. Squeeze the juice of 1 lime into the mixture and stir again to enhance the taste. This simple step brings brightness to the dish. Enjoy your flavorful and easy slow cooker chicken burrito bowls! To cook rice well in a slow cooker, rinse it first. Rinsing removes extra starch. This helps the rice cook evenly. Use a ratio of 1 cup of rice to 2 cups of liquid. For our dish, use chicken broth for great taste. Mix the rice in with the other ingredients. It will absorb all the flavors as it cooks. You can adjust the spices to fit your taste. If you like heat, add more chili powder or even some diced jalapeños. For a smoky flavor, try more smoked paprika. Remember to taste as you go. This way, you can find the right mix for your palate. Adding a pinch of salt enhances all the flavors too. To get tender chicken, start with quality meat. Boneless, skinless chicken breasts work best. Place them at the bottom of the cooker. This way, they soak up the juices. Cook on low for 6-8 hours for the best results. If you’re short on time, the high setting works too but may not be as tender. Shredding the chicken halfway through cooking helps it mix well with the rice and beans. Pro Tips Use Fresh Ingredients: Fresh cilantro and ripe avocados will enhance the flavors and freshness of your burrito bowls, making them even more delicious. Adjust Spice Levels: If you prefer a spicier dish, consider adding jalapeños or increasing the amount of chili powder to suit your taste. Meal Prep Friendly: This recipe is perfect for meal prepping! Store individual portions in airtight containers for quick and easy lunches throughout the week. Customize Your Toppings: Feel free to get creative with toppings! Add diced tomatoes, sliced olives, or even a sprinkle of hot sauce for an extra kick. {{image_2}} You can easily make this dish vegetarian. Simply swap the chicken for extra beans or lentils. Use the same spices for flavor. Add more veggies like bell peppers and zucchini. This change keeps the dish hearty and satisfying. If you love heat, add diced jalapeños or serrano peppers. Stir them into the rice and bean mix. You can also use spicy diced tomatoes instead of regular ones. This will give your burrito bowl a nice kick. Adjust the spices to match your taste. For a Southwest twist, try adding black olives or diced avocado. You can also mix in some corn salsa for extra flavor. Top your bowl with fresh pico de gallo or a drizzle of chipotle sauce. These add-ins will enhance the vibrant flavors and textures. After enjoying your Slow Cooker Chicken Burrito Bowls, store any leftovers in an airtight container. Make sure to let the dish cool down first. This helps keep the flavors fresh and prevents sogginess. Keep the leftovers in the fridge for up to 3 days. To avoid mixing textures, store toppings like avocado and sour cream separately. When you're ready to enjoy your leftovers, reheat them in the microwave. Place the burrito bowl mixture in a microwave-safe dish. Cover it with a damp paper towel to keep the moisture in. Heat for 1-2 minutes, stirring halfway through. Check if it's hot enough before serving. You can also reheat it on the stove. Just warm it over low heat, stirring often. If you've made a big batch, you can freeze the burrito bowls for later. Portion the mixture into freezer-safe containers. Leave some space at the top, as the food will expand when frozen. They can stay good for up to 3 months. To thaw, move the container to the fridge overnight. Reheat it using the steps above, and enjoy a quick meal anytime! Yes, you can use frozen chicken. Just add an extra hour to the cooking time. You want it to be fully cooked and tender. It will still absorb all the great flavors from the spices and other ingredients. Make sure to check that the chicken reaches 165°F for safety. To make this recipe gluten-free, use gluten-free brown rice. Also, check that your chicken broth is gluten-free. Most canned beans and tomatoes are safe, but always read the labels. This way, you can enjoy the burrito bowl without any worries! Burrito bowls are great on their own but pairing them adds fun! You can serve tortilla chips on the side for crunch. A fresh salad with lime dressing works well too. Think about adding sliced jalapeños or a side of guacamole for some heat and flavor. Enjoy your meal! In this post, I covered the key ingredients for tasty burrito bowls, from brands to substitutions. You learned step-by-step cooking methods, tips for perfect rice, and ways to add spice. I also shared variations, including vegetarian options and storage tips. To sum up, you now have all the tools to create delicious burrito bowls your way. Enjoy your cooking and share your tasty results!
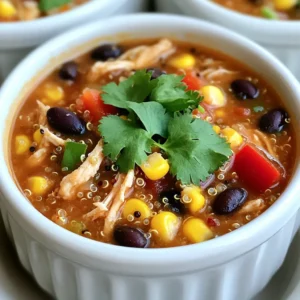
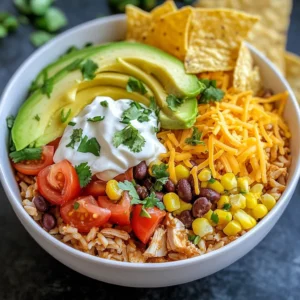
    Slow Cooker Chicken Burrito Bowls Flavorful and Easy
  • - 2 ripe pears, thinly sliced - 4 cups mixed greens (arugula, spinach, and kale) - 1/4 cup dried cranberries - 1/4 cup pomegranate seeds Fresh produce makes this salad vibrant and tasty. Ripe pears add sweetness. Mixed greens provide a crunchy base. Dried cranberries give a hint of tartness. Pomegranate seeds add a pop of color and flavor. - 1/2 cup goat cheese, crumbled - 1/3 cup walnuts, toasted and chopped Goat cheese brings creaminess to the salad. Its tangy flavor contrasts well with the sweet pears. Toasted walnuts add a nutty crunch. They also boost the salad's nutrition and flavor. - 3 tablespoons olive oil - 1 tablespoon apple cider vinegar - 1 teaspoon Dijon mustard - Salt and pepper to taste A simple dressing ties the salad together. Olive oil adds richness. Apple cider vinegar brings brightness. Dijon mustard adds a slight kick. Salt and pepper enhance all the flavors. This combination creates a balanced and fresh dressing. To start, I toast the walnuts. Place them in a dry skillet over medium heat. Stir them often for 5 to 7 minutes. You will know they are done when they smell good and turn golden. This step brings out their flavor. Next, I slice the pears. I use two ripe pears for this salad. I cut them into thin slices. This makes them easy to mix and ensures they stay pretty. Now, I mix the greens. I use 4 cups of mixed greens. My favorite mix includes arugula, spinach, and kale. I toss these together in a large bowl. This mix adds color and crunch to the salad. Now, I make the dressing. In a small bowl, I whisk together 3 tablespoons of olive oil, 1 tablespoon of apple cider vinegar, and 1 teaspoon of Dijon mustard. I add salt and pepper to taste. This mixture brings a tangy flavor to the salad. I taste the dressing after whisking. If needed, I adjust the seasoning. Just a pinch more salt or pepper can make a big difference. It's time to assemble the salad. In the large bowl with mixed greens, I add the sliced pears, toasted walnuts, 1/4 cup of dried cranberries, and 1/4 cup of pomegranate seeds. I combine all these elements gently. Next, I drizzle the dressing over the salad. I toss everything together, but I am careful. I don’t want to mash the pears; they need to stay fresh and beautiful. Finally, I sprinkle 1/2 cup of crumbled goat cheese on top. This adds a creamy texture and rich flavor. I serve the salad right away for the best taste. Enjoy your fresh, tasty delight! - Choosing ripe pears: Look for pears that feel slightly soft when you press them. They should smell sweet. Avoid pears that are too hard or have dark spots. Ripe pears add a nice sweetness to your salad. - Toasting walnuts for maximum flavor: Toast walnuts in a dry skillet over medium heat. Stir them often for about 5 to 7 minutes. They should turn golden and smell nutty. Toasting brings out their rich flavor, making your salad even more delicious. - Rustic serving ideas: Serve the salad in a large wooden bowl. This gives it a cozy, autumn feel. The natural wood complements the colors of the salad well. - Garnishing tips with pomegranate seeds: Sprinkle extra pomegranate seeds on top before serving. They add bright color and a pop of flavor. You can also add whole walnuts for a nice touch. - Pairing with proteins: This salad goes well with grilled chicken or shrimp. You can also add sliced steak for a heartier meal. The protein balances the lightness of the salad. - Ideal occasions for serving: Serve this salad at fall gatherings, holiday dinners, or casual lunches. It’s fresh and festive, making it perfect for any autumn occasion. {{image_2}} You can easily change up the nuts in your salad. Instead of walnuts, try pecans or almonds. Both add nice crunch and flavor. If you want a different cheese, feta or blue cheese works well too. Each brings its own taste. Feta adds a salty kick, while blue cheese gives a bold flavor. This salad shines with fall veggies. Roasted squash adds sweetness and warmth. You can also add other fruits like apples or figs. Apples give a crisp bite, while figs add a chewy texture. These swaps can make your salad unique every time. Homemade vinaigrettes can elevate your salad. Mix olive oil and vinegar to create a fresh base. Adding herbs like basil or thyme can boost flavor. You can also try spices like cumin or paprika for extra zing. Experimenting with dressings makes each salad special. To keep your Pear & Goat Cheese Autumn Salad fresh, store it in an airtight container. This helps prevent the greens from wilting. Aim to eat leftovers within two days for the best taste. Always check for freshness before eating. You can prep ingredients like pears, nuts, and cheese separately. This keeps everything fresh and crisp. Mix the greens and toppings together before serving. Assemble the salad just before you eat. This helps maintain the best flavors and textures. You cannot freeze the salad once it is mixed. Freezing will change the texture of the greens. However, you can freeze nuts and cheese. For nuts, place them in a sealed bag and remove air before freezing. To thaw, leave them at room temperature. For cheese, let it sit in the fridge overnight to soften. To make this salad quickly, follow these steps: 1. First, toast the walnuts in a dry skillet on medium heat. Stir them for about 5-7 minutes until they smell good and turn golden. 2. Next, in a small bowl, combine olive oil, apple cider vinegar, Dijon mustard, salt, and pepper. Whisk until mixed well. 3. In a large bowl, mix the greens, sliced pears, toasted walnuts, dried cranberries, and pomegranate seeds. 4. Drizzle the dressing over this mix and toss gently. Don’t mash the pears while tossing. 5. Finally, add crumbled goat cheese on top and serve right away for the best taste. For the best results, use a mix of greens. I recommend: - Arugula for a peppery taste. - Spinach for a mild flavor. - Kale for a hearty crunch. These greens add great texture and flavor to your salad. Yes, you can make this salad vegan with a few changes: - Replace goat cheese with vegan cheese or avocado. - Use maple syrup instead of honey in the dressing if you want added sweetness. - Ensure the Dijon mustard does not contain honey. These swaps keep the salad tasty and plant-based. This salad lasts about 1-2 days in the fridge. To keep it fresh: - Store the salad without dressing until serving. - Keep the dressing in a separate container. This way, the greens stay crisp and delicious! This salad combines fresh produce, creamy cheese, and crunchy nuts, making it delightful. I covered how to prepare the ingredients, make dressings, and assemble the dish. Important tips help enhance flavor and present beautifully. You can also explore variations and storage options to fit your needs. In giving this salad a try, you can enjoy a tasty, healthy meal any time. Now, gather your ingredients and dig into this vibrant dish!
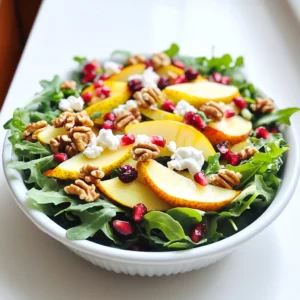
    Pear & Goat Cheese Autumn Salad Tasty and Fresh Delight
  • To make Slow Cooker Chicken Alfredo Pasta, you need some simple ingredients. Here’s the full list: - 1 pound boneless, skinless chicken breasts - 8 ounces fettuccine pasta - 2 cups heavy cream - 1 cup grated Parmesan cheese - 1 cup chicken broth - 4 cloves garlic, minced - 1 teaspoon Italian seasoning - Salt and pepper to taste - 2 tablespoons butter - Fresh parsley, chopped (for garnish) These ingredients come together to create a rich and creamy dish. The chicken breasts are the main star, while the fettuccine adds great texture. Heavy cream and Parmesan cheese give it that comforting, creamy flavor we all love. Garlic adds a nice kick, and Italian seasoning brings in warmth. Salt and pepper help to balance all the tastes. Don't forget the butter for richness and the parsley for a fresh touch! First, I season the chicken. I use salt, pepper, and Italian seasoning to add flavor. I place the boneless, skinless chicken breasts in the slow cooker. Next, I add the liquid ingredients. I pour in the chicken broth and heavy cream. Then, I add minced garlic and butter. I gently stir everything to mix well. Now, it's time to cook. I cover the slow cooker tightly. If I set it on low, it cooks for 6-7 hours. On high, it cooks for 3-4 hours. Covering the slow cooker is key. It keeps the heat in and helps the chicken cook evenly. About 30 minutes before serving, I make the pasta. I bring a large pot of salted water to a boil and add the fettuccine. I cook it according to the package instructions until it is al dente, then drain and set aside. Once the chicken is done, I remove it from the slow cooker. Using two forks, I shred the chicken into bite-sized pieces. I return the shredded chicken back to the slow cooker. Finally, I stir in the cooked fettuccine and grated Parmesan cheese. I mix everything well and let it cook for an additional 10-15 minutes. This warms everything through and blends the flavors perfectly. To make your Slow Cooker Chicken Alfredo Pasta extra tasty, use seasonings like: - Italian seasoning - Salt and pepper - Garlic powder You can also add ingredients to boost flavor. Consider: - Fresh spinach for a nutrient boost - Sun-dried tomatoes for a tangy kick - Mushrooms for earthy notes For this recipe, a good slow cooker is key. I recommend using: - 6-quart slow cooker for larger meals - Programmable slow cooker for ease of use You will need some basic utensils, such as: - Measuring cups for accuracy - A sharp knife for prepping - A large spoon for stirring Plating your dish well makes it more appealing. Here are some ideas: - Serve in shallow bowls for a cozy look - Sprinkle extra Parmesan on top for richness - Add a pinch of chopped parsley for color A drizzle of olive oil can enhance the dish's visual appeal. Small touches can make your meal look gourmet! {{image_2}} You can switch up the chicken for shrimp or sausage. Shrimp cooks quickly and adds a nice touch. Just toss it in the slow cooker for the last hour of cooking. For sausage, use Italian sausage. Slice it up and add it at the start. Both options bring great flavors to your meal. If you want a vegetarian twist, try using mushrooms or tofu in place of chicken. For mushrooms, use a mix of cremini and shiitake. They add a hearty texture and umami flavor. If you choose tofu, use firm tofu. Press it to remove excess moisture, then cube it. Add it to the slow cooker with the other ingredients for a creamy dish. While fettuccine is classic, you can use other pasta shapes too. Penne works well and holds sauce nicely. Bowtie pasta is fun and adds a playful look. Even whole wheat or gluten-free pasta can be used. Just adjust the cooking time based on the type of pasta you choose. This way, you can keep it interesting every time you make it! To keep your leftovers fresh, let them cool first. Place the chicken Alfredo pasta in an airtight container. This will help prevent moisture loss and keep flavors intact. Store it in the fridge for up to three days. Make sure to label the container with the date. This way, you know when to finish it. You can freeze this dish for later. First, let it cool completely. Then, transfer the pasta to a freezer-safe container. Seal it tightly to avoid freezer burn. This dish can last up to three months in the freezer. When you're ready to eat, thaw it in the fridge overnight. Reheat it on the stove over low heat. Add a splash of cream or broth to revive the sauce. In the fridge, your chicken Alfredo pasta lasts about three days. If you freeze it, you can keep it for three months. Always check for any signs of spoilage before eating. If it smells off or looks strange, it’s best to throw it away. Enjoy your tasty meal without worry! Cooking this dish takes about 6 to 7 hours on low. If you set it to high, it will take 3 to 4 hours. The chicken needs to reach a safe temperature to be tender. Always check that your chicken is fully cooked before serving. Yes, you can prep this meal ahead of time. You can season the chicken and add the liquids into the slow cooker the night before. Just cover it and store it in the fridge. In the morning, you can plug it in and let it cook while you go about your day. This dish pairs well with simple side salads or garlic bread. A fresh green salad with vinaigrette will balance the creaminess. You can also enjoy a glass of white wine or sparkling water with lemon. These drinks will enhance the flavors of the pasta. This blog post covered how to make Slow Cooker Chicken Alfredo Pasta. We looked at the key ingredients, step-by-step instructions, and tips to boost flavor. I shared storage methods and variations for your tastes. Now you can create a delicious meal with ease. Enjoy experimenting with different proteins and pasta shapes. Follow these steps for great results every time. You’re now ready to impress friends and family with your cooking skills!
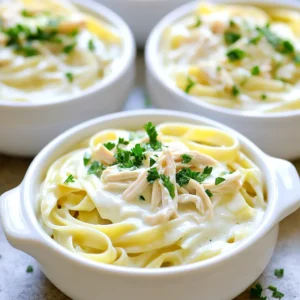
    Slow Cooker Chicken Alfredo Pasta Easy and Tasty Meal
  • - 8 oz linguine pasta - 1 lb large shrimp, peeled and deveined - 4 tablespoons unsalted butter - 4 cloves garlic, minced The base of this dish is simple yet packed with flavor. Linguine pasta gives a nice texture. Shrimp adds a sweet seafood taste. Butter and garlic create a rich, savory sauce. - 1/4 teaspoon red pepper flakes (adjust to taste) - 1 lemon (juice and zest) - 1/4 cup fresh parsley, chopped - Grated Parmesan cheese (for serving, optional) The optional ingredients can elevate your dish. Red pepper flakes add heat. Lemon brightens the flavors. Fresh parsley brings a pop of color and freshness. Parmesan cheese gives a creamy touch when served. - Salt and pepper - Reserved pasta water Salt and pepper enhance the dish's overall taste. Reserved pasta water helps adjust the sauce's thickness. It also adds flavor, making every bite enjoyable. To start, you need to cook the linguine pasta. Boil water in a large pot. Add 8 ounces of linguine and cook as directed on the package. This usually takes about 8 to 10 minutes. You want it to be al dente, which means firm to the bite. After cooking, save 1/2 cup of the pasta water before draining the rest. This water is rich in starch and helps bind the sauce later. Don’t skip this step; it makes a big difference in the dish! While your pasta cooks, it’s time to prepare the shrimp. In a large skillet, heat 2 tablespoons of butter over medium heat. Once melted, add 4 cloves of minced garlic. Cook this for about 30 seconds until it smells great. Next, add 1 pound of peeled and deveined shrimp. Sprinkle some salt, pepper, and 1/4 teaspoon of red pepper flakes for a little kick. Cook the shrimp for 2 to 3 minutes on each side. They will turn pink and opaque when ready. Once done, take the shrimp out and set them aside. Now, let's make the garlic butter sauce. In the same skillet, add the remaining 2 tablespoons of butter. Squeeze in the juice of 1 lemon and add the zest. Stir together and let it simmer for about a minute. Return the shrimp to the skillet and add the drained linguine. Toss everything well, adding the reserved pasta water bit by bit. This helps create the perfect sauce. Finally, stir in 1/4 cup of chopped fresh parsley for color and taste. Adjust seasoning if needed. Serve right away in shallow bowls. Top with extra parsley and grated Parmesan cheese if you like! Achieving Perfectly Cooked Shrimp To cook shrimp well, heat oil in a skillet. Add shrimp in a single layer. Cook until pink for about 2-3 minutes on each side. Don’t crowd the pan. This helps them cook evenly. If they curl too tightly, they may be overcooked. How to Enhance the Garlic Flavor For a stronger garlic taste, use fresh garlic. Mince it finely for better flavor release. Add garlic at the start of cooking for a rich base. If you like more heat, add red pepper flakes when cooking the garlic. This brings out a nice kick. Best Ways to Plate Garlic Butter Shrimp Linguine Serve your dish in shallow bowls. Twirl the linguine for a nice presentation. Top with cooked shrimp and a sprinkle of parsley. Finish with grated Parmesan for a creamy touch. This adds color and taste. Recommended Wine Pairing Pair this dish with a crisp white wine. A Sauvignon Blanc or Pinot Grigio works best. The wine cuts through the butter and enhances the shrimp flavor. How to Prepare in Under 30 Minutes To keep it quick, prep all your ingredients first. Cook the linguine while you prepare the sauce. This makes the dish come together fast. If you multitask, you can easily finish in 20 minutes. Multitasking While Cooking While the pasta cooks, focus on the shrimp. Heat the skillet and start with the garlic. This way, you save time and keep everything fresh. Always keep an eye on the stove to avoid burning. {{image_2}} Alternative Pastas You can use other pastas if you want a change. Try fettuccine, spaghetti, or whole wheat pasta. Each type gives a different texture. Remember to cook them the same way as linguine. Different Protein Options If shrimp isn’t your thing, try chicken or scallops. Both cook quickly and soak up flavor well. Just adjust cooking times to keep them tender. Adding Vegetables Want more color and nutrients? Add fresh spinach or cherry tomatoes. They cook fast and add a nice pop. Toss them in just before serving for a fresh crunch. Spices and Herbs Variations For more spice, add more red pepper flakes or some paprika. Fresh herbs like basil or thyme can also make a big difference. Experiment and find your favorite mix. Gluten-Free Options If you need a gluten-free dish, use gluten-free pasta. Many great options are available. Just check the package for cooking instructions. Vegan Alternatives To make this dish vegan, swap shrimp for chickpeas or tofu. Use vegan butter in place of regular butter. You can also skip the Parmesan or use a vegan cheese. To keep your Garlic Butter Shrimp Linguine fresh, store it right. First, let it cool completely. Then, place it in an airtight container. This helps keep moisture in and air out. For best taste, eat leftovers within three days. Use glass or BPA-free plastic containers. Glass containers work well when reheating. They do not absorb flavors. Choose a size that fits your serving needs. Smaller containers are great for lunch portions. To reheat, add a small splash of water or broth to the pan. This helps keep the dish moist. Heat it over medium heat for about five minutes. Stir often to ensure even heating. Be careful not to overheat the shrimp. They can become tough if cooked too long. Heat just until warm. If using a microwave, heat in short bursts. Stir in between bursts for even heating. Freezing Garlic Butter Shrimp Linguine is not the best idea. The shrimp may lose texture and flavor. However, if you must freeze, do so without the shrimp. To thaw, place the container in the fridge overnight. This keeps the dish safe. Reheat in a pan with a bit of water or broth. Stir gently until heated through. Enjoy your meal just like fresh! It takes about 20 minutes to make Garlic Butter Shrimp Linguine. This includes 10 minutes of prep time and 10 minutes of cooking time. You can enjoy a tasty meal fast! Yes, you can use frozen shrimp. Make sure to thaw them first. To thaw, place the shrimp in a bowl of cold water for about 15-20 minutes. Once thawed, pat them dry before cooking. This helps the shrimp cook evenly and stay juicy. If you don’t have linguine, you can use other types of pasta. Good choices include spaghetti, fettuccine, or even penne. Each type will change the dish's look and feel, but all will taste great with the garlic butter sauce! This blog post shared the essentials for making Garlic Butter Shrimp Linguine. You learned about key ingredients like shrimp, butter, and pasta. I provided step-by-step cooking instructions and handy tips to make this dish shine. Remember, variations and smart storage keep your meal fresh and fun. Whether you're an expert cook or a beginner, this dish is easy to master. Enjoy your delicious meal and impress others with your skills!
    Garlic Butter Shrimp Linguine Flavorful Yet Simple Dish
  • The main ingredients for this dish create a colorful and tasty meal. You need: - 4 Italian chicken sausages (or your choice of sausage) - 2 cups baby potatoes, halved - 1 red bell pepper, diced - 1 yellow bell pepper, diced - 1 zucchini, sliced - 1 red onion, cut into wedges - 3 cloves garlic, minced These ingredients blend well and cook evenly, giving you great flavors and textures. You can customize this dish to fit your taste. Consider adding: - Broccoli florets - Carrots, sliced - Asparagus, cut into pieces - Cherry tomatoes These veggies add color and make your meal even more nutritious. You can mix and match based on what you have at home. Seasoning enhances the flavors of the dish. Use: - 2 tablespoons olive oil - 1 teaspoon dried oregano - 1 teaspoon smoked paprika - Salt and pepper to taste For a fresh finish, sprinkle chopped parsley on top after cooking. This adds a pop of color and a hint of flavor. Enjoy your meal straight from the sheet pan for a fun, rustic dining experience! First, you need to preheat your oven to 400°F (200°C). This step is key for getting your meal crispy and golden. While the oven heats, grab a large sheet pan. Make sure it is clean and ready to use. This will help your veggies and sausage cook evenly. In a big bowl, add the halved baby potatoes, diced red and yellow bell peppers, sliced zucchini, and red onion wedges. Next, toss in the minced garlic. Drizzle 2 tablespoons of olive oil over the veggies. This adds rich flavor and helps them roast well. Now, sprinkle in 1 teaspoon of dried oregano, 1 teaspoon of smoked paprika, and some salt and pepper. Mix everything together until the veggies are well coated. This blend of spices brings out the best flavors in each ingredient. Spread the seasoned veggies evenly on your sheet pan. Make sure they are not crowded. Nestle the Italian chicken sausages among the veggies. This allows the flavors to mix while cooking. Put the sheet pan in your preheated oven. Roast for about 25-30 minutes. Check to see if the sausages are browned and cooked through. The veggies should be tender and caramelized. Flip the veggies halfway through to ensure they cook evenly. Once done, take the sheet pan out of the oven. Sprinkle fresh parsley on top for a pop of color and taste. Serve hot from the pan for a fun touch or move everything to a serving dish for a nicer look. Enjoy your meal! When picking sausages, look for fresh ones. Check the expiry date. I prefer chicken sausages for this recipe. They are lean and flavorful. You can also use pork or turkey sausages. Always choose high-quality meat. Look for natural casings. This makes them juicy and gives a nice snap when you bite in. If you can, ask the butcher for advice. They can help you find the best options. To get great roasted veggies, cut them into even pieces. This helps them cook evenly. I like to add a mix of colors. Red and yellow bell peppers, zucchini, and red onion make a lovely dish. Toss them well with olive oil and seasoning. This ensures each piece is coated. Don’t crowd the pan; give them space. This helps them caramelize. Flip the veggies halfway through cooking for the best results. Ovens can vary, so check your food as it cooks. If your oven runs hot, start checking the dish early. At 400°F, it should take about 25-30 minutes. Look for browned sausages and tender veggies. If your oven is cooler, it might take longer. You can use a meat thermometer to check the sausages. They should reach 165°F. This way, you ensure your meal is safe and tasty! {{image_2}} You can mix and match veggies for this dish. Try using broccoli or carrots for a different taste. Cauliflower adds a nice crunch. Sweet potatoes can bring a hint of sweetness. Asparagus or green beans can also work well. The key is to choose what you love. While Italian chicken sausages are great, feel free to experiment. Try spicy sausage for extra heat. Pork sausage adds rich flavor. Turkey sausage is a leaner option. You can even use plant-based sausage for a veggie twist. Each type changes the dish's flavor. To make this dish gluten-free, ensure your sausage is certified gluten-free. You can swap potatoes for cauliflower or turnips for a low-carb option. Zucchini noodles can also replace traditional pasta. These swaps keep the meal light and healthy without losing taste. To store your sausage and veggie sheet pan dinner, let it cool first. Then, place the leftovers in an airtight container. Make sure to divide it into smaller portions for easy access. You can keep it in the fridge for up to three days. This way, you can enjoy it again without fuss. When you’re ready to eat the leftovers, reheating is simple. Preheat your oven to 350°F (175°C). Spread the leftovers on a baking sheet. Heat them for about 15-20 minutes. This method helps keep the sausages juicy and the veggies crisp. You can also use the microwave, but the oven gives better results. If you want to save the dish for later, freezing works well. After cooling, place the meal in a freezer-safe container. Make sure to label it with the date. You can freeze it for up to three months. To enjoy, thaw it overnight in the fridge, then reheat as mentioned above. This makes meal prep easy and fun! Yes, you can use frozen vegetables for this dish. Frozen veggies save time and are still tasty. Just remember to adjust the cooking time. They may need a few extra minutes to cook through. Check them often to avoid mushiness. The internal temperature for sausages should reach 165°F (74°C). Use a meat thermometer to check. This ensures they are safe to eat. Cook them until they are no longer pink inside. This keeps the meal both safe and delicious. To make it a one-pan meal, add a few more items. You can include chickpeas or quinoa for protein. Leafy greens like spinach or kale can add nutrients. Just make sure to chop them small for even cooking. Mix these extras in with the other veggies before roasting. This way, you get a complete meal in one pan. In this article, I shared how to craft a tasty roasted sausage and veggie dish. I covered key ingredients, step-by-step cooking methods, and helpful tips for perfect results. I also explored variations to keep meals exciting and storage tips for leftovers. Remember, the best meals come from simple steps and fresh choices. Stay creative. Enjoy your cooking journey!
    Sausage & Veggie Sheet Pan Dinner Simple and Tasty
  • For this tasty soup, you need: - 2 cups vegetable broth - 1 can (14 oz) diced tomatoes, with juices - 1 medium onion, diced - 2 cloves garlic, minced - 2 medium carrots, chopped - 2 celery stalks, chopped - 1 zucchini, diced - 1 cup green beans, chopped - 1 cup kidney beans, drained and rinsed - 1 teaspoon dried oregano - 1 teaspoon dried basil - Salt and pepper to taste - 1 cup small pasta (like ditalini or elbow macaroni) - 1 cup fresh spinach, roughly chopped - 2 tablespoons olive oil - Grated Parmesan cheese (optional, for serving) When making minestrone, fresh ingredients often taste better. Fresh veggies add crunch and bright flavors. However, canned items can save time. Use canned tomatoes for easy prep. Just be sure to pick those packed in juice, not syrup. It gives the soup a richer taste. You can add fun toppings to your soup. Grated Parmesan cheese brings a salty kick. A drizzle of olive oil adds richness. For a bit of spice, try red pepper flakes. Fresh herbs, like basil or parsley, also brighten the dish. If you want to make it heartier, add cooked sausage or chicken. Enjoy mixing and matching toppings to suit your taste! To start, gather all your ingredients. This makes cooking easier. First, pour 2 cups of vegetable broth into the slow cooker. Next, add the can of diced tomatoes with the juices. Then, toss in the diced onion, minced garlic, chopped carrots, and celery. These veggies give the soup great flavor. After that, add the diced zucchini, chopped green beans, and kidney beans. Don’t forget to sprinkle in dried oregano, dried basil, salt, and pepper. Drizzle 2 tablespoons of olive oil on top, and mix everything well. You can cook this soup on low or high heat. If you choose low heat, cook it for 6 to 8 hours. This slow method brings out more flavor. If you are short on time, use high heat. This will take about 3 to 4 hours. Both ways will taste delicious! About 30 minutes before you serve the soup, it’s time to add the pasta. Stir in 1 cup of small pasta like ditalini or elbow macaroni. If the soup seems too thick, add more broth. This helps the pasta cook well without sticking. When the pasta is tender, stir in the fresh spinach. Let it wilt for about 5 minutes. This adds color and nutrition to your soup. To make your minestrone extra tasty, use fresh herbs. Add basil and oregano right before serving. This keeps their bright taste. You can also try using homemade vegetable broth. It adds depth and flavor. A splash of lemon juice can brighten the soup, too. One mistake is not seasoning well. Always taste and adjust salt and pepper. Another issue is overcooking the vegetables. Add softer veggies like spinach at the end. This keeps them vibrant and fresh. Lastly, don’t forget to monitor the pasta. It can get mushy if cooked too long. You can change the vegetables based on what you have. Use squash, peas, or corn for variety. If you want more protein, add some lentils or chickpeas. To make it heartier, toss in cooked sausage or chicken. Lastly, try different pasta shapes for a fun twist. {{image_2}} You can change the veggies based on the season. In spring, try adding peas or asparagus. In summer, use bell peppers or corn for a fresh twist. Fall is perfect for squash or pumpkin. In winter, root vegetables like parsnips or turnips add great flavor. This soup is flexible, making it fun to explore new tastes. If you want to make your minestrone more filling, try adding lentils or chickpeas. These options are rich in protein and keep it vegetarian. You can also use vegetable stock instead of chicken broth for a more robust taste. Fresh herbs like basil or parsley can brighten the dish. Just sprinkle them in right before serving. To make this recipe gluten-free, swap out the pasta for gluten-free pasta or zucchini noodles. This keeps the meal light and tasty. If you are going low-carb, you can skip the pasta altogether. Adding more veggies, like cauliflower or mushrooms, gives you that hearty feel without the carbs. This way, you can enjoy a warm bowl of soup that suits your diet. To store leftover minestrone soup, let it cool first. Then, pour the soup into airtight containers. Make sure to leave some space at the top. This lets the soup expand as it freezes. Label the containers with the date. Place them in the fridge for up to four days. When you are ready to eat, reheat the soup on the stove. Pour the soup into a pot. Heat over medium heat, stirring often. If the soup seems thick, add a splash of broth or water. You can also use the microwave. Place the soup in a microwave-safe bowl. Heat it in short bursts, stirring in between. This helps it heat evenly. You can freeze minestrone soup for longer storage. Place it in freezer-safe containers. Make sure to leave space at the top for expansion. The soup can last up to three months in the freezer. When you want to eat it, thaw the soup in the fridge overnight. Then, reheat it as mentioned before. This keeps the flavors fresh and tasty! Yes, you can skip the pasta if you want. The soup still tastes great. You might want to add more beans or veggies for texture. Try using quinoa or rice for a different twist. These options still fit well in the soup. To thicken your minestrone, you have a few choices. First, you can mash some of the beans in the soup. This adds body and creaminess. Another way is to add a little more vegetable broth and let it cook longer. You could also stir in a cornstarch slurry. Mix one tablespoon of cornstarch with two tablespoons of water. Pour it in, and let it cook until thickened. Serve the soup in deep bowls for a cozy feel. I love adding grated Parmesan cheese on top. This adds a rich, salty flavor. Drizzle a bit of olive oil for extra taste. Pair the soup with crusty bread for dipping. It's a warm, filling meal that everyone enjoys. Yes, you can add meat if you like. Cooked chicken, sausage, or ground beef work well. Just add the meat when you add the vegetables. This will give the soup a heartier taste. If you add meat, make sure to adjust the seasoning to keep the flavor balanced. You can make a tasty minestrone in your slow cooker with ease. Remember to choose fresh or canned ingredients wisely for great flavor. Cooking times can change based on low or high heat, so keep an eye on it. Don't forget to customize and store your soup for later. By following these steps and tips, you’ll have a warm, hearty dish ready to enjoy at any time. Enjoy your cooking journey!
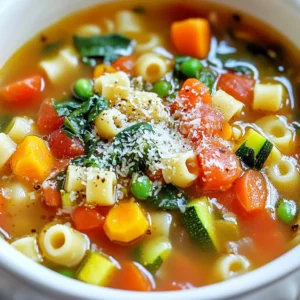
    Slow Cooker Vegetable Minestrone Hearty and Simple Recipe
  • - 12 oz pasta (penne or fettuccine work great) - 1 cup fresh spinach, chopped - 1 cup canned artichoke hearts, drained and chopped For this creamy spinach artichoke pasta, the type of pasta matters. I love using penne or fettuccine. Both hold the sauce well. Penne gives a nice bite, while fettuccine offers a silky texture. Fresh spinach adds a bright color and taste. It wilts down nicely, letting you enjoy its flavor. Artichoke hearts bring a unique tang and a bit of texture. Make sure to chop them well for even mixing. - 1 cup cream cheese, softened - 1 cup grated Parmesan cheese Cream cheese is key for that rich creaminess in this dish. It melts beautifully and adds a smooth texture. I recommend softening it first, so it blends easier. Parmesan cheese gives the pasta a salty, nutty flavor. Use fresh grated Parmesan if you can. It makes a big difference in taste. - 2 cloves garlic, minced - 1 teaspoon onion powder - 1 teaspoon garlic powder - Salt and pepper to taste Garlic is a must for this recipe. It adds depth and a lovely aroma. I use both fresh minced garlic and garlic powder for extra flavor. Onion powder enhances the taste without overpowering it. Season with salt and pepper to your liking. This keeps everything balanced and tasty. To start, fill a large pot with water. Add a pinch of salt and bring it to a boil. Once the water is boiling, add 12 ounces of your pasta. Penne or fettuccine works well here. Cook the pasta according to the package directions until it is al dente. This means it should be firm to the bite but not hard. This usually takes about 8 to 10 minutes. After cooking, drain the pasta in a colander and set it aside. Next, we move to the spinach and sauce. In the same pot, pour in 2 tablespoons of olive oil. Heat it on medium. Add 2 cloves of minced garlic and sauté them for about 1 minute. You want the garlic to be fragrant but not browned. Now, toss in 1 cup of chopped fresh spinach. Stir it for 2 to 3 minutes until it wilts down. Once the spinach is ready, add 1 cup of chopped canned artichoke hearts. Mix them in well. Lower the heat and add 1 cup of softened cream cheese and 1 cup of vegetable broth. Also, sprinkle in 1 teaspoon of onion powder and 1 teaspoon of garlic powder. Stir this mixture continuously until the cream cheese melts and becomes creamy. Now it’s time to bring everything together. Add the drained pasta into the pot with your creamy sauce. Toss everything together well to coat the pasta evenly. If the sauce seems too thick, add a splash more of vegetable broth. This will help reach your desired texture. Finally, stir in 1 cup of grated Parmesan cheese. Mix it well until the cheese melts into the sauce. Season with salt and pepper to taste. Your creamy spinach artichoke pasta is now ready to serve! To make your creamy spinach artichoke pasta even richer, try different cheese options. You can use a mix of cream cheese and ricotta for a light texture. Goat cheese adds a tangy flavor, while mozzarella brings a stretchy quality. Adjusting the sauce consistency is also key. If your sauce feels too thick, slowly add more vegetable broth. Stir as you go until you reach the perfect creaminess. For a lovely finish, garnish your pasta with fresh basil and grated Parmesan. This adds color and enhances flavor. Serve your dish with a side of crusty bread or a fresh salad. Both pair well and add a nice crunch to your meal. You can even drizzle some olive oil on top for extra richness. When cooking your pasta, do not overcook it. Aim for al dente, which means it should have a slight bite. This keeps the pasta from becoming mushy when mixed with the sauce. Another mistake is not seasoning well. Taste your dish as you cook and adjust salt and pepper. This will bring out all the flavors in your creamy spinach artichoke pasta. {{image_2}} You can add protein to your creamy spinach artichoke pasta for a heartier meal. Chicken or shrimp work well. For chicken, use cooked, shredded pieces. Toss them into the sauce when you mix in the pasta. If you prefer shrimp, sauté them in olive oil until pink. Then, add them to the dish just before serving. This adds flavor and makes the meal more filling. If you want a vegetarian boost, consider adding extra vegetables. Bell peppers or zucchini are great choices. Slice the bell peppers and chop the zucchini. Sauté them with the garlic and spinach. This adds color and nutrients, making your dish even better. You can mix and match your favorite veggies to create your perfect blend. Need a gluten-free option? No problem! You can swap regular pasta for gluten-free pasta. Options like brown rice pasta or chickpea pasta are excellent choices. Make sure to check the cooking times, as they can differ. This way, everyone can enjoy this creamy dish without worry. To keep your creamy spinach artichoke pasta fresh, store it in an airtight container. This helps to prevent air and moisture from getting in. Make sure to let the pasta cool completely before sealing it. This way, it stays tasty and safe to eat for up to three days. When you want to enjoy leftovers, reheating is key to keeping the creaminess. The best method is to use the stovetop. Add a splash of vegetable broth to the pasta in a pan. Heat over low to medium heat, stirring gently. This helps the sauce to stay smooth and creamy. You can also use a microwave, but add broth and cover it loosely. Heat in short intervals, stirring each time. Freezing this pasta is easy but requires some care. First, cool the pasta completely. Place it in a freezer-safe container or bag. Remove as much air as possible to prevent freezer burn. It can last for up to three months in the freezer. To thaw, move it to the fridge overnight. Reheat gently on the stove, adding broth to restore the creamy texture. This way, your meal stays delicious! Yes, you can use frozen spinach. The flavor will change slightly. Frozen spinach is often more watery. This can make the pasta a bit soupy. To fix this, thaw and drain the spinach well before use. This way, you keep the pasta creamy without extra water. This dish can last for about 3 to 4 days in the fridge. Store it in an airtight container to keep it fresh. When you reheat, make sure it is hot all the way through. If you notice any odd smells or colors, throw it out. Food safety is very important. Yes, you can make this dish vegan. Use a vegan cream cheese and nutritional yeast instead of Parmesan. You can also use vegetable broth that is labeled vegan. This way, you keep the creamy texture while making it dairy-free. Enjoy your meal without the dairy! This blog covers the key ingredients and steps to make a tasty dish. We explored pasta, fresh spinach, creamy cheeses, and spices. I shared tips for perfect texture and flavor. You learned about variations, handling proteins, and vegetarian options. Storage tips ensure your dish stays fresh. Remember, simple adjustments can elevate your meal. Happy cooking!
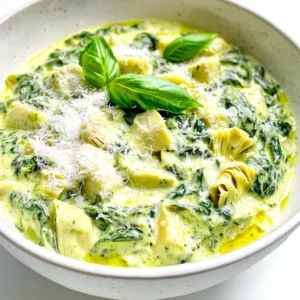
    Creamy Spinach Artichoke Pasta Flavorful Weeknight Meal
  • To create the pumpkin cream cheese roll, you'll need these key ingredients: - 3/4 cup all-purpose flour - 1/2 teaspoon baking powder - 1 teaspoon baking soda - 1 teaspoon ground cinnamon - 1/2 teaspoon ground nutmeg - 1/4 teaspoon ground ginger - 1/4 teaspoon salt - 1 cup granulated sugar - 3 large eggs - 1 cup canned pumpkin puree - 1 teaspoon vanilla extract - 8 oz cream cheese, softened - 1/4 cup unsalted butter, softened - 2 cups powdered sugar - 1 teaspoon vanilla extract (for the frosting) You can add your twist to this recipe with these optional ingredients: - Chopped nuts like walnuts or pecans for crunch - Chocolate chips for a sweet surprise - A splash of maple syrup for added flavor - Cream cheese with herbs for a savory twist If you run out of an ingredient, here are some swaps: - Use whole wheat flour instead of all-purpose flour for a healthier option. - Replace granulated sugar with coconut sugar for a lower glycemic index. - If you have no cream cheese, Greek yogurt can work in a pinch. - Swap eggs with flaxseed meal mixed with water for a vegan option. These ingredients help you make a great pumpkin cream cheese roll. Each option brings its taste and flair to this delightful dessert. First, set your oven to 375°F (190°C). Grab a 15x10-inch jelly roll pan. Line it with parchment paper. Lightly grease the paper with non-stick spray. This helps the cake release easily. In a medium bowl, whisk together flour, baking powder, baking soda, cinnamon, nutmeg, ginger, and salt. Mix well and set the bowl aside. This mix gives the cake its warm fall flavor. In a large bowl, beat the sugar and eggs until light and fluffy. This takes about 3-4 minutes. Next, add the pumpkin puree and 1 teaspoon of vanilla. Mix until everything combines well. Gradually fold in the dry ingredients. Be gentle; don't overmix. Pour the batter into your prepared pan. Spread it evenly with a spatula. Bake for 15 minutes. Check if it's done by lightly pressing the cake. It should spring back. While the cake bakes, prepare the filling. In a medium bowl, beat the softened cream cheese and butter until smooth. Slowly add powdered sugar and 1 teaspoon of vanilla. Mix until creamy and well combined. Once the cake is done, carefully flip it onto a clean kitchen towel dusted with powdered sugar. Remove the parchment paper. Start at one end and gently roll the cake with the towel. Let it cool completely in this rolled shape. After cooling, unroll the cake carefully. Spread the cream cheese filling evenly over the cake. Roll the cake back up without the towel. Keep the seam side down. Wrap it in plastic wrap and chill for at least one hour. When ready, slice the roll into pieces. Dust with more powdered sugar if you like. Serve it on a pretty platter with a sprinkle of cinnamon or fresh mint leaves for a nice touch. Enjoy this delightful fall treat! To keep your pumpkin cream cheese roll from cracking, follow these steps: - Use Parchment Paper: Line your pan with parchment paper. This helps the cake slide out easily. - Cool on a Towel: After baking, flip the cake onto a clean, powdered sugar-dusted towel. This helps keep it moist. - Roll While Warm: Roll the cake while it’s still warm. This makes it flexible and less likely to crack. If cracks do happen, don’t worry! You can hide them with frosting later. The texture of your roll is key for a great dessert. Here’s how to get it right: - Mix Gently: When adding dry ingredients, fold them in slowly. Overmixing makes the cake tough. - Check for Doneness: Bake until the cake springs back. If it’s too soft, it won’t hold its shape. - Cool Completely: Allow the cake to cool fully before adding the cream cheese filling. This prevents melting and sogginess in the filling. These steps ensure your roll is soft and fluffy, just like it should be. Getting your ingredients ready helps your baking go smoothly: - Room Temperature Ingredients: Use eggs and cream cheese at room temperature. This helps them blend better. - Measure Accurately: Use a kitchen scale or measuring cups for precise amounts. Baking is a science. - Sift Dry Ingredients: Sifting the flour and spices removes lumps. It also adds air, which helps the cake rise. Following these tips will help you create a delightful pumpkin cream cheese roll that impresses everyone. {{image_2}} You can make a gluten-free version of this dessert. Replace all-purpose flour with a gluten-free blend. Make sure the blend has a good mix of starches and flours. Use 3/4 cup of this mix in place of regular flour. The texture may differ slightly, but it will still taste amazing. To create a vegan pumpkin cream cheese roll, substitute eggs with flaxseed meal. Mix 1 tablespoon of flaxseed meal with 3 tablespoons of water for each egg. Let it sit until it thickens. For the cream cheese filling, use a vegan cream cheese alternative mixed with coconut butter. This gives a rich flavor without dairy. You can add fun flavors to your pumpkin cream cheese roll. For a chocolate twist, stir in 1/4 cup of cocoa powder into the batter. This makes a chocolate-pumpkin delight. If you prefer spices, try adding allspice or cardamom. Just a pinch can change the whole vibe of the roll. These variations keep your dessert exciting and unique! Store leftover pumpkin cream cheese roll in the fridge. Wrap it tightly in plastic wrap. This keeps it fresh and moist. You can also place it in an airtight container. It will last for about 3 to 5 days in the fridge. Make sure to slice it before serving. This way, it’s easy to grab a piece whenever you want a tasty treat. You can freeze the pumpkin cream cheese roll for longer storage. To do this, wrap it tightly in plastic wrap. Then, place it in a freezer bag or container. This helps to prevent freezer burn. The roll will stay fresh in the freezer for up to 2 months. When you're ready to enjoy it, just take it out and let it thaw in the fridge overnight. To reheat the pumpkin cream cheese roll, you have a couple of options. For a quick method, slice it and place it in the microwave for about 10-15 seconds. This warms it up nicely without drying it out. If you prefer, you can reheat slices in an oven. Preheat the oven to 350°F (175°C) and place the slices on a baking sheet. Heat for about 5-10 minutes. Enjoy it warm for a cozy fall dessert! Yes, you can use fresh pumpkin. You need to cook and puree it first. Start with about 1 1/4 pounds of fresh pumpkin. Cut it in half, remove the seeds, and roast it until soft. Once cooked, scoop out the flesh and blend until smooth. This gives a fresh taste to your roll. To prevent the roll from breaking, be gentle when rolling it. Use a clean kitchen towel dusted with powdered sugar. After baking, flip the cake onto the towel, remove the parchment, and roll it up while it’s still warm. Allow it to cool in this shape. This helps keep the cake soft and flexible. You can serve it with whipped cream or a scoop of vanilla ice cream. A sprinkle of cinnamon adds warmth and flavor. Some like to pair it with coffee or chai tea. Fresh mint leaves can also add a nice touch and color. The pumpkin cream cheese roll lasts about 3 to 5 days in the fridge. Make sure to wrap it well in plastic wrap. This keeps it fresh and moist. If you want it to last longer, consider freezing it. You learned how to make a great pumpkin cream cheese roll. We covered essential ingredients and tips for the best texture. You can explore variations, like gluten-free or vegan options. Storing leftovers and reheating are easy with the right steps. Remember, practice makes perfect in baking. Embrace your creativity, and enjoy your tasty results. Now, gather your ingredients and start baking!
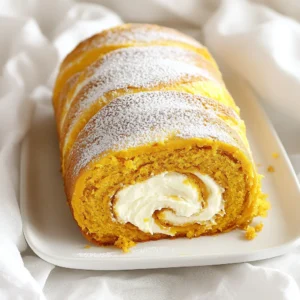
    Pumpkin Cream Cheese Roll Delightful Fall Dessert Recipe
  • To make Pumpkin Spice Whipped Coffee, gather these ingredients: - 2 tablespoons instant coffee - 2 tablespoons sugar - 2 tablespoons hot water - 1/4 cup milk (dairy or non-dairy) - 1/4 teaspoon pumpkin spice (plus extra for garnish) - 1 tablespoon pumpkin puree - Whipped cream (optional, for topping) Having the right ingredients makes your coffee special. I love how these simple items blend to create a delightful drink. You can add fun toppings to your whipped coffee. Some great options include: - Whipped cream - Extra pumpkin spice - Chocolate shavings - Caramel drizzle Toppings add flavor and make your drink look fancy. I recommend using whipped cream and a sprinkle of pumpkin spice for a festive touch. If you want to switch things up, here are some easy swaps: - Use brown sugar instead of white sugar for a richer flavor. - Coconut milk or almond milk work well if you’re avoiding dairy. - Try cinnamon instead of pumpkin spice for a different taste. These substitutions let you customize the drink to your taste. Enjoy experimenting with flavors! To make pumpkin spice whipped coffee, gather your ingredients first. This simple recipe takes just ten minutes. You'll enjoy a delightful coffee treat with warm pumpkin flavors. 1. In a medium bowl, combine: - 2 tablespoons instant coffee - 2 tablespoons sugar - 2 tablespoons hot water Mix these together well. 2. Use an electric mixer or a whisk. Beat the mixture on high speed. This should take about 2-4 minutes. You want it light and fluffy, like whipped cream. 3. In a separate container, heat: - 1/4 cup milk (dairy or non-dairy) Heat until steaming but not boiling. If using non-dairy milk, ensure it’s frothy. 4. Stir in: - 1/4 teaspoon pumpkin spice - 1 tablespoon pumpkin puree Mix these into the heated milk until fully combined. 5. In a glass, pour in the pumpkin mixture first. Next, add the whipped coffee on top. 6. You can gently fold the whipped coffee into the pumpkin milk for a marbled look. Or, leave it layered for a pretty presentation. 7. If you'd like, top with whipped cream. Sprinkle a pinch of pumpkin spice for an extra festive touch. Enjoy your pumpkin spice whipped coffee warm. It makes a perfect fall treat. Pair it with a slice of pumpkin bread or a cozy blanket. Share it with friends for a delightful coffee break! To make your whipped coffee fluffy, use instant coffee. Mix it with sugar and hot water. Beat the mix on high speed for about 2-4 minutes. You want it to look light and airy. If you don’t have an electric mixer, a whisk works too, but it takes longer. Aim for stiff peaks, like whipped cream. To boost the taste, use fresh pumpkin spice. Add a touch more if you like spice. Pumpkin puree also helps bring out the pumpkin flavor. If you want it sweeter, add extra sugar to taste. Heating the milk until it's steaming helps mix the spices well, making each sip flavorful. Don’t skip the instant coffee. Regular coffee won’t whip up like instant. Avoid using cold milk, as it won’t blend well. If you overbeat the coffee mix, it can become grainy. Also, don’t forget to garnish. A sprinkle of pumpkin spice on top makes it look pretty and adds flavor. {{image_2}} You can change the flavor of your Pumpkin Spice Whipped Coffee by adding new ingredients. Here are some fun ideas: - Vanilla Extract: A splash of vanilla adds warmth. - Cocoa Powder: Mix in cocoa for a chocolate twist. - Caramel Sauce: Drizzle caramel for extra sweetness and richness. - Nutmeg or Cinnamon: These spices can deepen the fall flavor. Each add-in creates a unique drink. Feel free to experiment! You can adjust the sweetness to fit your taste. The basic recipe calls for two tablespoons of sugar. Here are some tips: - Less Sweet: Start with one tablespoon of sugar. - More Sweet: Add up to three tablespoons if you like it sweeter. - Natural Sweeteners: Try honey, maple syrup, or agave for a different flavor. Taste as you mix. Make it just right for you! You can make this drink dairy-free and vegan easily. Here are some options: - Milk Choices: Use almond milk, oat milk, or coconut milk instead of dairy milk. - Whipped Topping: Look for dairy-free whipped cream at the store. - Sugar Substitutes: Use coconut sugar or maple syrup if preferred. These swaps will keep the drink delicious and suitable for all diets. Enjoy your tasty Pumpkin Spice Whipped Coffee! To store any leftovers, place them in a sealed container. You can keep it in the fridge for up to two days. If you want to enjoy it later, make sure to store the whipped coffee and pumpkin milk separately. This helps keep each part fresh. When you're ready to enjoy your coffee again, heat the pumpkin milk gently. Use a microwave or a small pot on low heat. Stir it well to mix any settled pumpkin spice. Avoid boiling the milk, as it can change the taste. For the best taste, drink your Pumpkin Spice Whipped Coffee fresh. If you have leftovers, consume them within two days. Make sure to seal the container tightly. This keeps out air and other smells, helping preserve its yummy flavor. Yes, you can use brewed coffee instead. Just make a strong cup. Use about 1/2 cup of brewed coffee in place of the instant coffee. It may not whip up as fluffy, but it will still taste great. You can prepare the whipped coffee and pumpkin milk separately. Store them in airtight containers in the fridge. When you're ready to enjoy, combine them and serve cold or heat the milk. This way, you save time on busy mornings. The best milk depends on your taste. Dairy milk gives a rich flavor. Almond milk or oat milk works well too for a lighter taste. Choose what fits your diet and enjoy it! This blog post outlined the key ingredients and steps for making Pumpkin Spice Whipped Coffee. You learned about optional toppings, ingredient swaps, and how to perfect the whipped texture. There are tips to enhance flavor and avoid common mistakes. You can customize flavors and ensure the drink fits your diet. Lastly, I shared how to store leftovers and answer common questions. With this knowledge, you can enjoy a sweet, creamy treat. Get creative and make it your own!
    Pumpkin Spice Whipped Coffee Delightful Fall Treat
  • - 1 lb large shrimp, peeled and deveined - 1 bunch asparagus, trimmed and cut into 2-inch pieces - 4 tablespoons olive oil, divided - Zest and juice of 2 lemons - 3 cloves garlic, minced - 1 tablespoon fresh parsley, chopped - 1 teaspoon dried oregano - 1 teaspoon red pepper flakes (optional for spice) - Salt and pepper to taste When cooking this dish, you want fresh and high-quality ingredients. The large shrimp are the star here, and they should be firm and vibrant. Asparagus adds a crisp texture and a bright color. Olive oil brings richness and helps blend the flavors. The flavor elements are key. Lemon zest and juice give a bright punch. Garlic adds depth, and parsley brings freshness. For seasoning, dried oregano offers an earthy note, while red pepper flakes can add a kick. Using salt and pepper enhances all the flavors. Don't skip these basics. They are important! Gather these ingredients before starting. It makes cooking smoother and more enjoyable. Happy cooking! To start, grab a bowl. In this bowl, whisk together 2 tablespoons of olive oil, lemon zest, lemon juice, minced garlic, parsley, oregano, red pepper flakes, salt, and pepper. You want to blend everything well for full flavor. To marinate the shrimp, place them in the bowl. Toss the shrimp gently to coat them in the marinade. Let them sit for about 10 minutes. This step allows the shrimp to soak up all the tasty flavors. Next, let's focus on the asparagus. First, trim the ends and cut the stalks into 2-inch pieces. This size helps them cook evenly. Now, arrange the asparagus on the lined baking sheet. Drizzle with the remaining 2 tablespoons of olive oil. Season with salt and pepper. Toss them to make sure they are coated well. Spread them out in a single layer to ensure even cooking. Once the shrimp marinated and the asparagus is ready, it’s time to layer them. Spread the marinated shrimp on top of the asparagus in a single layer. This way, the shrimp cooks perfectly while the asparagus gets nice and tender. Now, place the baking sheet in the preheated oven at 400°F (200°C). Bake for 12-15 minutes. Look for the shrimp to become opaque and the asparagus to be tender yet crisp. Once done, take it out and let it cool for a couple of minutes. Enjoy your meal warm! - Avoiding overcooking: Shrimp cooks quickly. Bake for 12-15 minutes only. When they turn opaque, they are ready. Overcooked shrimp can be tough. Watch them closely while baking. - Choosing the right shrimp: Look for large or extra-large shrimp. Fresh shrimp tastes best. If using frozen shrimp, thaw them fully. This helps them cook evenly. - Tips for crisp-tender asparagus: Trim the ends of asparagus. Cut them into 2-inch pieces. Toss them in olive oil and season well. Bake them with shrimp. This method keeps them crisp yet tender. - Best practices for seasoning: Use salt and pepper to season the asparagus. You can add garlic powder for more flavor. Try a squeeze of lemon juice before serving. - Garnishing suggestions: Fresh parsley adds a pop of color. Lemon wedges look nice on the side. They also add extra flavor when squeezed over the dish. - Serving options: Serve directly from the baking sheet for a casual look. Or, plate the shrimp and asparagus for a fancy dinner. Pair with rice or a fresh salad for a complete meal. {{image_2}} You can easily swap the shrimp for chicken or tofu. For chicken, use boneless, skinless breast or thighs. Cut the chicken into bite-sized pieces. For tofu, choose firm or extra-firm tofu, and cut it into cubes. When using chicken, bake for about 20-25 minutes. This extra time helps the chicken cook through. For tofu, 12-15 minutes works well. Just like shrimp, it should be golden and slightly crispy. Feel free to add other veggies to the mix. Broccoli, bell peppers, or zucchini are great choices. They add color and flavor. You can also change up the asparagus for seasonal veggies. In spring, use fresh peas. In fall, try Brussels sprouts or sweet potatoes. Mix and match as you like. This dish is all about what you enjoy. You can take the flavor up a notch. Try adding fresh herbs like basil or cilantro. They bring a new twist to the dish. You can also use flavored oils like garlic-infused olive oil for extra taste. Experiment with marinades too. A splash of soy sauce or a dash of hot sauce can change the whole vibe. Don’t be afraid to get creative! To keep your Lemon Herb Shrimp with Asparagus fresh, use an airtight container. This will help keep the flavors locked in. Place the shrimp and asparagus in the fridge within two hours of cooking. This prevents bacteria growth. The dish will stay good for up to three days in the fridge. Always label your container with the date to track freshness. When reheating, you want to keep the shrimp tender and the asparagus crisp. The best method is to use a skillet on low heat. Add a splash of olive oil to prevent sticking. Heat for about five minutes, stirring gently. You can also use a microwave, but be careful not to overheat. Heat in short bursts of 30 seconds to keep the texture nice. You can freeze this dish, but it’s best to freeze only the shrimp. Cooked asparagus may get mushy when thawed. To freeze shrimp, place it in a freezer-safe bag. Remove all air to avoid freezer burn. For thawing, place the shrimp in the fridge overnight. This keeps it safe and tasty. If you need it fast, you can use the microwave. Just defrost on low power. Yes, you can prep this dish ahead of time. Marinate the shrimp and store it in the fridge for up to 24 hours. Cut the asparagus and season it as well. Keep both in separate containers until you are ready to cook. This way, you save time during your meal prep. The shrimp is done when it turns opaque and pink. This usually takes about 12 to 15 minutes in the oven. You can cut one open to check. It should no longer be translucent inside. Be careful not to overcook, as shrimp can become rubbery. This dish pairs well with rice, quinoa, or couscous. A fresh salad adds a nice crunch too. You can also serve it with crusty bread to soak up the flavors. A glass of white wine can enhance your meal further. Yes, you can use avocado oil or melted butter. Both will add great flavor. Coconut oil works too but will add a different taste. Choose what best matches your palate and dietary needs. This dish is healthy and packed with protein. For one serving, you get about 300 calories. It has around 25 grams of protein and healthy fats from the olive oil. The shrimp and asparagus add vitamins and minerals, making it a balanced meal. This blog post covered a simple yet flavorful dish featuring shrimp and asparagus. We discussed the key ingredients, the steps to prepare and cook them, and tips for success. You can switch proteins or veggies for variety, too. Storing leftovers is easy, and I provided reheating tips to keep the meal tasty. Remember, cooking should be fun, so feel free to add your twist! Enjoy your cooking adventure with lemon herb shrimp and asparagus!
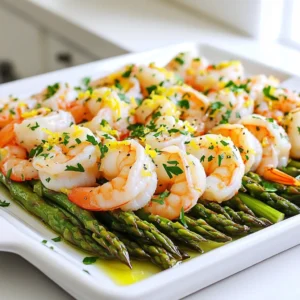
    Lemon Herb Shrimp with Asparagus Sheet Pan Delight
  • - 2 medium sweet potatoes, peeled and cubed - 4 cups fresh arugula - 1 red bell pepper, diced - 1/2 cup red onion, thinly sliced - 1/4 cup feta cheese, crumbled - 1/4 cup walnuts, roughly chopped - 2 tablespoons olive oil - 1 teaspoon ground cumin - 1 teaspoon smoked paprika - 1 tablespoon balsamic vinegar - Salt and pepper to taste This salad starts with sweet potatoes. They bring a warm, sweet flavor. I use two medium ones. Make sure to peel and cube them. Next comes fresh arugula, which adds a nice peppery taste. Four cups of arugula make a great base. Add color with a red bell pepper. Dice one red bell pepper to mix in. For crunch and flavor, use half a cup of red onion. Slice it thin for a milder taste. Feta cheese makes the salad creamy. Crumble a quarter cup and sprinkle it on top. Walnuts add texture and a nutty flavor. Roughly chop a quarter cup of walnuts to mix in. For the dressing, olive oil is key. Use two tablespoons to coat the sweet potatoes. Ground cumin and smoked paprika give warmth and depth. One teaspoon of each will do. Finish with a tablespoon of balsamic vinegar. It adds a tangy touch. Don't forget salt and pepper. They enhance all the flavors! 1. Preheating the oven First, set your oven to 425°F (220°C). This high heat helps the sweet potatoes get nice and caramelized. 2. Tossing sweet potatoes with seasoning In a large bowl, take 2 medium sweet potatoes, peeled and cubed. Add 2 tablespoons of olive oil. Sprinkle in 1 teaspoon of ground cumin, 1 teaspoon of smoked paprika, and a pinch of salt and pepper. Mix well until all sweet potato pieces are coated. 3. Roasting sweet potatoes Spread the seasoned sweet potatoes on a baking sheet lined with parchment paper. Roast them in the oven for 25 to 30 minutes. Stir halfway through to ensure even cooking. They should be tender and lightly caramelized when done. 1. Preparing the salad base While the sweet potatoes roast, grab a large salad bowl. Add 4 cups of fresh arugula, 1 diced red bell pepper, and 1/2 cup of thinly sliced red onion. Toss these together to mix well. 2. Combining roasted sweet potatoes Once the sweet potatoes cool for a few minutes, add them to your salad bowl. Gently toss the salad to combine the warm sweet potatoes with the fresh greens and veggies. 1. Adding dressing and toppings Drizzle 1 tablespoon of balsamic vinegar over the salad. Toss everything again to coat. Top your salad with 1/4 cup of crumbled feta cheese and 1/4 cup of roughly chopped walnuts. 2. Serving suggestions Serve your salad right away for a warm dish. You can also let it sit for a few minutes. This helps the flavors meld together, making each bite even more delightful. Enjoy! To get the best caramelization, cut the sweet potatoes into even cubes. This helps them cook uniformly. Toss the cubes well in olive oil, cumin, smoked paprika, salt, and pepper. These spices add a warm, rich flavor. Roast them at 425°F for 25 to 30 minutes. Stir halfway through to ensure even browning. You want them tender with a golden color. For a dynamic flavor boost, consider adding garlic powder or a sprinkle of cayenne pepper for heat. Serve this salad fresh for the best taste. Mix the arugula, red bell pepper, and red onion in a large bowl. Once the sweet potatoes cool a bit, add them to the salad. Drizzle balsamic vinegar over the top and toss gently. This salad pairs nicely with grilled chicken or fish. It is also great with a slice of crusty bread. Feel free to customize your salad! You can add roasted chickpeas for extra protein. If you're not a fan of feta, try goat cheese or leave it out. For nuts, you can use almonds or pecans. If you need a vegan option, skip the cheese and use a vegan dressing. This salad is also gluten-free, making it a great choice for many diets. {{image_2}} You can change up the greens in this salad. If you want a peppery kick, use kale. You can also try spinach for a milder taste. Both add great nutrients. Seasonal vegetables bring life to your salad. In winter, add roasted Brussels sprouts or beets. In summer, fresh corn or cherry tomatoes work well. Adjusting these ingredients keeps the dish fresh and exciting. Changing the cheese can enhance the flavor. Try goat cheese for a tangy bite. Or use sharp cheddar for a richer taste. Each cheese gives a new twist to the salad. You can also swap nuts. Almonds add a crunch, while pecans give a sweet flavor. Each nut will create a unique texture and taste. This is a fun way to customize your salad. You can make your own dressing or buy one. A homemade balsamic vinaigrette with garlic and mustard can add depth. Store-bought dressings are quick and easy, too. Just check the label for quality. Other dressing ideas include tahini or a yogurt-based dressing. Both can add creaminess and flavor. Experiment to find what you like best. To keep your roasted sweet potato salad fresh, use airtight containers. These help lock in moisture and prevent spills. Store the salad in the fridge right away. It’s best to separate the roasted sweet potatoes from the arugula. This way, the greens stay crisp. When it’s time to eat leftovers, you can reheat the sweet potatoes. Place them on a plate and microwave for 30 seconds. Stir and heat for another 30 seconds if needed. You can also serve the salad cold. It tastes great both ways! Your salad will stay fresh for about three days in the fridge. Check for any changes in smell or color. If it seems off, it’s best to toss it out. Always trust your senses when checking for spoilage. Yes, you can. If you want to swap sweet potatoes, try using regular potatoes or butternut squash. Each has its own flavor. Keep in mind, cooking times may change. Regular potatoes usually take a bit longer to cook. Aim for a golden brown color for the best taste. Absolutely! This salad is gluten-free. All the ingredients are safe for a gluten-free diet. Always check labels if you use packaged ingredients. You can make this salad vegan easily. Simply replace feta cheese with a vegan cheese option. Look for brands that offer dairy-free feta. You can also skip the cheese if you prefer. The salad still tastes great without it. This blog post covered a tasty roasted sweet potato salad. You learned about the key ingredients, like sweet potatoes and arugula. I shared step-by-step instructions to roast sweet potatoes and build a salad. You also found tips for perfecting flavors and ideas for customizing your dish. In closing, enjoy experimenting with flavors and ingredients. This salad is easy and fun to make, and it offers many ways to suit your taste.
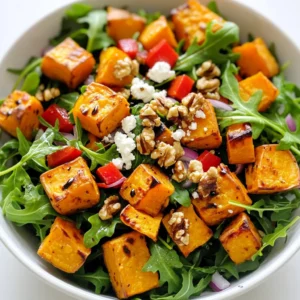
    Roasted Sweet Potato Salad with Arugula Delightful Meal
  • - 2 cans (16 oz each) refrigerated biscuit dough - 1 cup apple butter - 1/2 cup brown sugar, packed - 3 teaspoons ground cinnamon - 1/4 cup granulated sugar - 1/2 cup unsalted butter, melted - 1 cup chopped apples (preferably Granny Smith) - 1/2 cup chopped walnuts or pecans (optional) - 1 pinch of salt When I create Apple Butter Monkey Bread, I love using fresh ingredients. The first key ingredient is the biscuit dough. I use two cans of refrigerated dough to save time. This dough provides the base for the sweet and sticky goodness. Next, I grab a cup of apple butter. The apple butter adds depth and a rich flavor. It turns the dough into an irresistible treat. Brown sugar adds sweetness. I use half a cup packed to give that caramel-like flavor. Cinnamon plays a big role in this recipe. I add three teaspoons for warmth and spice. Granulated sugar, about a quarter cup, mixes with the brown sugar and cinnamon for a sweet coating. Melted unsalted butter is essential. I use half a cup to help the sugar and cinnamon stick to the dough. Then, I chop one cup of Granny Smith apples for a tart contrast. If you like nuts, I recommend adding half a cup of walnuts or pecans. They add crunch and extra flavor. Finally, I include a pinch of salt to balance everything. These ingredients come together to create a delightful dish. Each bite is full of flavor and texture. You will find that this monkey bread is not only tasty but also fun to share. - Preheat your oven to 350°F (175°C). - Grease a bundt pan with non-stick spray or butter. Start by getting your oven ready. Preheating it ensures even baking. A hot oven helps the dough rise nicely. Greasing the bundt pan prevents sticking. You want your monkey bread to come out whole and beautiful. - Mix brown sugar, granulated sugar, and cinnamon in a bowl. - Cut the biscuit dough into quarters. In a small bowl, mix the brown sugar, granulated sugar, and cinnamon. Set this aside. This mix brings sweetness and warmth to your bread. Next, take the biscuit dough. Cut each biscuit into quarters. This makes it easier to coat and layer. - Mix apple butter with melted butter. - Toss the biscuit pieces with the apple butter mixture. - Add chopped apples and nuts, if using. Now, in another bowl, mix the melted butter with the apple butter. This blend is the magic sauce. Drizzle this mixture over your biscuit pieces. Toss them gently until they are well-coated. If you like, add in your chopped apples and nuts. This adds texture and flavor. - Sprinkle half of the sugar-cinnamon mixture. - Layer the biscuit mix in the bundt pan. - Bake for 30-35 minutes, or until golden. Take half of your sugar-cinnamon mix and sprinkle it over the coated biscuit pieces. Toss again to coat. Now it’s time to layer. Place the biscuit mix in the greased bundt pan. Sprinkle any remaining sugar mixture between layers. Bake for 30-35 minutes. Check for doneness by looking for a golden brown top. To make your Apple Butter Monkey Bread shine, start with the right apples. I recommend using Granny Smith apples. They add a lovely tartness that balances the sweetness of the apple butter. If you want it sweeter, you can adjust the sugar levels. Add a bit more brown sugar or granulated sugar to your mix. Just remember, too much sugar can make it overly sweet. To check if your monkey bread is done, use a toothpick. Insert it in the center. If it comes out clean, your bread is ready. For a golden top, keep an eye on your oven. You want it to be a nice brown color, not too dark. If it starts to brown too quickly, cover it with foil. This will help it bake evenly. This treat is best served warm. The gooey apple butter pulls apart easily when it's hot. You can also serve it cold, but the flavors shine when warm. For drinks, try pairing it with hot cider or coffee. You can also add toppings like whipped cream or a drizzle of caramel for extra fun! {{image_2}} You can easily customize your Apple Butter Monkey Bread. Adding spices like nutmeg or cloves brings warmth and depth. These spices enhance the apple flavor and make it cozy. You can also switch up your butters. Try using maple butter for a sweet twist. It adds a rich, earthy taste that pairs well with apple butter. Think about drizzling your monkey bread with caramel or icing. These toppings add a sticky sweetness that makes each bite special. You can also add seasonal fruits like pears or cranberries. These fruits can bring a fresh burst of flavor and color to your dish. Their tartness balances the sweetness of the bread. If you need gluten-free options, substitute the biscuit dough with gluten-free dough. There are many brands available that taste great. For those wanting a vegan version, use plant-based butter and almond milk instead of regular butter. You can still enjoy the same gooey goodness while keeping it plant-based. To keep your Apple Butter Monkey Bread fresh, store it in the fridge. Place the cooled bread in an airtight container. You can also wrap it tightly in plastic wrap. This method helps lock in moisture and flavor. Aim to eat it within three days for the best taste. To reheat, place the bread in the oven at 350°F (175°C). Cover it with foil to keep it moist. Heat for about 10-15 minutes. You can also use the microwave. Heat it in short bursts, about 20 seconds at a time. Check often to avoid drying it out. You can freeze Apple Butter Monkey Bread if you want to save some for later. First, let it cool completely. Then, wrap it well in plastic wrap and foil. This helps prevent freezer burn. It can last for about three months in the freezer. To thaw, move it to the fridge overnight. If you’re in a hurry, let it sit at room temperature for a couple of hours. Once thawed, reheat it as mentioned before. Enjoy this sweet treat any time! Monkey bread is a fun and tasty pull-apart bread. It uses biscuit dough, coated in sweet layers. You bake it in a bundt pan, which gives it a lovely shape. Each piece is soft, gooey, and filled with flavor. You can also add spices and fruits for extra taste. Yes, you can prep this monkey bread ahead. Cut the biscuit dough into pieces. Mix with apple butter and spices, then place in the bundt pan. Cover it and put it in the fridge. Bake it fresh when you're ready to serve. This way, you save time on busy days. Using homemade apple butter is great! It tastes fresh and rich. You can control the sweetness and spices. Store-bought apple butter is fine, but homemade often has more flavor. If you have the time, making your own is worth it. No, adding nuts is not a must. You can skip them if you have nut allergies. You can also use seeds, like sunflower or pumpkin. They add a nice crunch without nuts. Enjoy this sweet treat just the way you like it! In this article, I shared a delicious recipe for apple butter monkey bread. We explored the key ingredients and detailed steps to prepare it perfectly. I also offered tips for flavor and baking, along with suggestions for variations and storage. This dish is a fun treat for all ages. Whether you share it warm or cold, its flavors will delight everyone. Enjoy making this recipe and feel free to get creative with it!
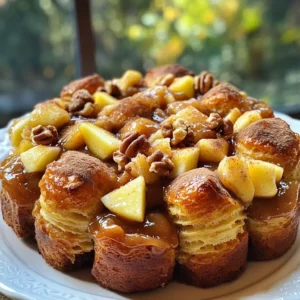
    Apple Butter Monkey Bread Irresistible Sweet Treat
  • - 1 lb boneless chicken breast, cubed - 2 cups cooked jasmine rice (preferably cold) - 3 tablespoons honey - 4 tablespoons soy sauce - 3 cloves garlic, minced - 1 cup mixed vegetables (peas, carrots, corn) - 2 green onions, sliced - 2 eggs, beaten - 2 tablespoons sesame oil - Salt and pepper to taste The main ingredients in this dish bring together simple yet flavorful elements. The chicken serves as the protein, giving the meal a hearty base. I always prefer using boneless chicken breast, as it cooks quickly and stays tender. The jasmine rice is key; its fragrance adds depth to the dish. Using cold rice is important. It helps the grains stay separate and not clump together. Honey and soy sauce create a rich, sweet, and savory glaze that coats the chicken and rice beautifully. Together, they balance the dish perfectly. For additional ingredients, garlic adds a punch of flavor. The mixed vegetables not only add color but also boost the nutrition. I like to use frozen peas, carrots, and corn because they are easy and always ready to go. In terms of seasoning, green onions add a fresh crunch. Eggs bring richness and texture. Sesame oil rounds out the flavors with its nutty aroma. Finally, don’t forget salt and pepper to enhance all the tastes. With these ingredients, you can create a tasty and satisfying meal that is quick to prepare, making it perfect for busy weeknights. {{ingredient_image_1}} Start by cutting your chicken breast into cubes. In a bowl, mix the chicken with soy sauce, honey, and minced garlic. Make sure all the chicken pieces are well-coated. Let it marinate for at least 15 minutes. This step adds flavor and keeps the chicken juicy. Heat a large skillet over medium-high heat. Add one tablespoon of sesame oil. Once hot, add the marinated chicken to the skillet. Sauté the chicken until it turns golden brown and is fully cooked, about 5-7 minutes. Remove the chicken from the skillet and set it aside. This process seals in the flavors and gives the chicken a nice texture. In the same skillet, add another tablespoon of sesame oil. Toss in your mixed vegetables. Stir-fry them for about 2-3 minutes until they start to soften. This keeps the veggies colorful and crisp. Push the vegetables to one side of the skillet. Pour the beaten eggs onto the empty side. Scramble the eggs until cooked, then mix them with the vegetables. This adds richness to the dish. Now, add the cold cooked jasmine rice to the skillet. Stir everything together well. Drizzle in the remaining soy sauce and toss the mixture until the rice is evenly coated. This step ensures every grain of rice tastes delicious. Return the cooked chicken to the skillet. Mix everything well, cooking for an additional 2-3 minutes until it’s all heated through. Season your fried rice with salt and pepper to taste. Toss in the sliced green onions right before serving. This brightens up the dish and adds a fresh crunch. Serve the fried rice in a large bowl, and consider garnishing it with extra green onions and a drizzle of honey for a nice finish. Enjoy your easy weeknight meal! Using cold jasmine rice is key. Cold rice helps keep the grains separate. It prevents clumping and gives a nice texture. Freshly cooked rice can become mushy. For best results, cook your rice a day before. Let it cool and store it in the fridge. This method makes your fried rice more enjoyable. Marinating the chicken is important. Mix cubed chicken with soy sauce, honey, and garlic. Let it sit for at least 15 minutes. This gives the chicken great flavor. Use high heat when cooking the chicken. Sauté it until it turns golden brown. This step adds a nice crunch and keeps the meat juicy. You can boost the taste with extra seasonings. Try adding sesame seeds or a splash of rice vinegar. You might also use chili flakes for some heat. Adding these small touches makes a big difference. They can create a dish that is uniquely yours. Don’t forget to taste as you cook! Adjust flavors to fit your liking. Pro Tips Marinate for Maximum Flavor: Allowing the chicken to marinate for at least 15 minutes enhances the flavor significantly, making each bite more delicious. Use Cold Rice: Using cold, day-old jasmine rice prevents the grains from becoming mushy and helps achieve the perfect fried rice texture. High Heat is Key: Stir-frying on high heat ensures that the chicken and vegetables cook quickly, retaining their texture and flavor. Garnish for Visual Appeal: Garnish your dish with extra green onions and a drizzle of honey to make it visually appealing and appetizing. {{image_2}} You can switch the chicken for shrimp or tofu. Shrimp cooks quickly and adds a nice taste. Just sauté it until it turns pink. For tofu, use firm or extra-firm. Cut it into cubes and fry until golden. Both options give your dish a new twist. You can also try a mix of proteins for extra fun. Feel free to use seasonal or frozen vegetables. Fresh veggies give great flavor, while frozen ones are quick and easy. Try bell peppers, broccoli, or snap peas. Toss in whatever you have on hand. This makes your fried rice colorful and full of nutrients. Using a mix keeps it exciting every time you cook. To add extra zing, try spices or sauces. A dash of chili flakes adds heat. You can also use oyster sauce or hoisin sauce for depth. Want a bit of tang? A splash of rice vinegar or lime juice works great. Experiment and find what you love. Making it your own is the best part of cooking! To store leftovers, let the fried rice cool first. Place it in an airtight container. This will keep it fresh in the fridge. You can store it for up to three days. Make sure to label the container with the date. When you want to eat it again, check for any signs of spoilage. If you want to keep it longer, freezing is a great choice. Use a freezer-safe container or a heavy-duty freezer bag. Remove as much air as you can before sealing. Fried rice can last in the freezer for up to three months. When you are ready to eat, thaw it overnight in the fridge before reheating. The best way to reheat fried rice is in a skillet. Heat a bit of oil in the pan over medium heat. Add the rice and stir it often. This helps to heat it evenly. You can add a splash of water to create steam. This method keeps the rice moist and tasty. You can also use a microwave, but stir it halfway through for even heating. Yes, you can use leftover rice. Day-old rice works best for fried rice. It is drier and less sticky, which makes it easier to fry. Freshly cooked rice may clump together. Using leftover rice helps create a better texture. If you need a substitute for honey, try maple syrup or agave nectar. Both add sweetness and flavor. You can also use brown sugar mixed with a little water. This will give a similar taste and texture. Yes, this dish is great for kids. To make it more appealing, cut the chicken into smaller pieces. You can also let them help with mixing ingredients. Adding their favorite veggies can make it fun. Sweet flavors like honey will keep them interested. This blog post showed you how to make tasty chicken fried rice. We covered ingredients like chicken, jasmine rice, and a mix of veggies. You learned the step-by-step process, from marinating the chicken to serving the dish. I shared tips for perfecting your fried rice and variations to try. Remember, use day-old rice for best results. Store leftovers properly, and feel free to make it kid-friendly. Now, it's time for you to cook and enjoy this simple, flavorful meal!
    Honey Garlic Chicken Fried Rice Easy Weeknight Meal
  • To make caramel apple Rice Krispie treats, you will need: - 4 cups Rice Krispies cereal - 1 cup mini marshmallows - 3 tablespoons unsalted butter - 1 cup caramel sauce (store-bought or homemade) - 1 large apple, peeled and diced (preferably Granny Smith for tartness) - 1/2 teaspoon cinnamon - 1/2 cup chopped walnuts or pecans (optional) - 1/4 cup chocolate chips (optional, for drizzling on top) You can swap the Rice Krispies with any puffed rice cereal. If you want a nut-free option, skip the walnuts or pecans. You can use any apple you like, but Granny Smith gives the best tart flavor. For a healthier version, use natural caramel sauce made with dates. If you don’t have chocolate chips, melted peanut butter can add a tasty drizzle too. Using high-quality ingredients makes a big difference in taste. Fresh apples have a crisp bite and sweet flavor that enhances the treats. Good caramel sauce, whether homemade or store-bought, adds rich, buttery notes. Always choose unsalted butter to control the saltiness. The best mini marshmallows melt well, giving you a smooth texture. Quality nuts add crunch and depth, while dark chocolate can elevate the overall flavor. Remember, great ingredients lead to great snacks! 1. Start by melting the butter in a large saucepan over low heat. This step is key for a smooth mix. 2. Once the butter melts, add the mini marshmallows. Stir them until they are completely melted and smooth. 3. Remove the pan from heat. Mix in the caramel sauce well until it blends with the marshmallows. 4. Add the Rice Krispies cereal to this mixture. Gently fold it in using a spatula until every piece is coated. 5. Dice the apple and stir it into the mixture along with cinnamon and nuts if you choose to add them. 6. Lightly grease a 9x13-inch baking dish. Pour the mixture in and press it down to create a flat layer. 7. If you like, melt chocolate chips in the microwave. Drizzle this over the pressed treats for extra sweetness. 8. Allow the treats to cool for about 30 minutes at room temperature. This helps them set properly. 9. After cooling, cut them into squares or rectangles for serving. To get the best texture, work quickly when mixing. Marshmallows can cool and harden fast. Make sure to fold gently when adding the Rice Krispies. This keeps them crunchy. If you press too hard, the treats can become too dense. If your treats are too sticky, you may not have used enough butter. This can lead to a messy result. If they are too hard, you might have overcooked the marshmallows. Keep an eye on them while melting. If they don’t set, let them cool longer and try again. To keep your Caramel Apple Rice Krispie Treats fresh, wrap them tightly in plastic wrap. Place them in an airtight container. This will prevent them from getting hard or stale. Store them at room temperature for up to three days. If you want to keep them longer, freeze them. Just make sure to separate layers with parchment paper. These treats shine at parties or as after-school snacks. You can cut them into fun shapes using cookie cutters. Pair them with a scoop of vanilla ice cream for a sweet treat. They also go well with hot apple cider or a warm cup of tea. Kids love them, and adults do too! Want to add a twist? Try adding dried fruit like cranberries or raisins. You can also mix in some shredded coconut for a tropical flair. If you love chocolate, stir in some chocolate chips or drizzle melted chocolate on top. Each of these options gives your treats a new flavor and texture. {{image_2}} You can give your Caramel Apple Rice Krispie Treats a twist with fun flavors. Adding chocolate chips is an easy way to make these treats richer. Just melt some chocolate and drizzle it on top. You can also mix in nuts like walnuts or pecans for extra crunch. This adds flavor and texture, making each bite exciting. If you want a lighter version, try using less butter. You can substitute the butter with coconut oil. This change keeps the taste while reducing fat. Use homemade caramel sauce with less sugar for a healthier option. You can also add more apples. This adds fiber and makes the treat feel fresh and light. You can change these treats to fit the season. In fall, use pumpkin spice instead of cinnamon for a cozy vibe. During the holidays, add crushed peppermint for a festive twist. You can also use dried cranberries or raisins to add color and flavor. These small changes keep your treats fun and exciting all year long! To keep your Caramel Apple Rice Krispie Treats fresh, store them in an airtight container. This keeps air out and moisture in, helping them stay soft. You can layer the treats with parchment paper. This prevents sticking and makes it easy to grab a piece later. Avoid storing them in the fridge. The cold air can make them hard. These treats usually last about a week at room temperature. If you want to keep them longer, freeze them. Wrap each piece in plastic wrap, then place in a freezer bag. They can last up to three months in the freezer. When you want to eat them, just thaw at room temperature for a few hours. If your treats do get a bit hard, you can soften them. Place a piece of wax paper over them and microwave for 10-15 seconds. This helps them regain some of their chewy texture. Just be careful not to overheat, or they could melt. Enjoy your tasty snacks! Yes, you can make these treats ahead of time. Just store them in an airtight container. They stay fresh for about three days at room temperature. For longer storage, put them in the fridge. Just remember, they may get a bit harder. If you want them soft again, let them sit at room temperature for a while before serving. I recommend using Granny Smith apples for this recipe. They are tart and crunchy. Their flavor balances the sweetness of the caramel and marshmallows. If you like sweeter apples, you can try Honeycrisp or Fuji. Just keep in mind that the taste will be sweeter overall. To keep the treats soft, follow a few simple tips. First, do not overcook the marshmallows. Melt them just until smooth. Second, mix in the Rice Krispies gently. If you press too hard, they will get dense. Lastly, store them properly in an airtight container. This keeps moisture in and helps maintain their softness. This blog covered important aspects of making Rice Krispie treats. We explored the best ingredients, tips for great texture, and common troubles. I shared ways to store leftovers and suggested fun variations to try. Remember, ingredient quality truly matters for flavor. Use this guide to enjoy tasty treats that you can make and share with ease. Happy cooking, and may every bite bring you joy!
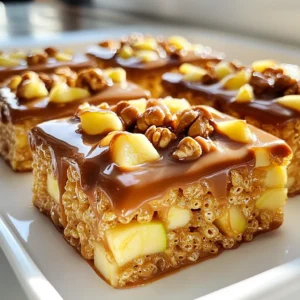
    Caramel Apple Rice Krispie Treats Delightful Snack
  • - 2 medium sweet potatoes, peeled and diced - 1 can (400ml) coconut milk - 1 tablespoon coconut oil Sweet potatoes are the star here. They add a natural sweetness and creaminess. Coconut milk brings richness and a tropical touch. Coconut oil enhances the flavor and helps with cooking. - 1 onion, finely chopped - 3 garlic cloves, minced - 1 tablespoon ginger, grated - 1 red bell pepper, sliced Onion, garlic, and ginger create a flavorful base. Their aroma fills the kitchen and makes your mouth water. Red bell pepper adds color and crunch. Together, these ingredients make the dish vibrant and tasty. - 1 tablespoon curry powder - 1 teaspoon turmeric - 1 teaspoon cumin - Salt and pepper to taste Spices are key to good curry. Curry powder gives depth and warmth. Turmeric adds a golden hue and health benefits. Cumin adds a nutty flavor that rounds out the dish. Don't forget salt and pepper to bring everything together. First, let's prepare the sweet potatoes and vegetables. Take 2 medium sweet potatoes, peel them, and dice them into small cubes. This helps them cook evenly. Next, finely chop 1 onion, slice 1 red bell pepper, and mince 3 garlic cloves. Grate 1 tablespoon of fresh ginger. These ingredients will add great flavor to the dish. Now, measure out your spices. You will need 1 tablespoon of curry powder, 1 teaspoon of turmeric, and 1 teaspoon of cumin. Having these ready makes cooking easier. Don’t forget to have salt and pepper nearby to season at the end. Heat 1 tablespoon of coconut oil in a large pot over medium heat. Once the oil is hot, add the chopped onion. Sauté it for about 5 minutes until it turns translucent. This step releases the onion's sweet flavor. Then, add the minced garlic and grated ginger. Stir for about 1 minute until you smell the lovely aroma. Now, sprinkle in the curry powder, turmeric, and cumin. Cook the spices for another minute. This toasting step boosts their flavor. Next, add the diced sweet potatoes and sliced red bell pepper. Mix them well to coat with the spices. Pour in 1 can of coconut milk and 1 cup of vegetable broth. Stir everything together and bring it to a gentle simmer. Cover the pot and let it cook for 15 to 20 minutes. Stir occasionally to prevent sticking. You want the sweet potatoes to be tender but not mushy. Once cooked, season with salt and pepper to taste. If you want more flavor, you can add extra curry powder. Serve the curry hot, garnished with fresh cilantro and lime wedges on the side. The lime adds a nice zesty touch to the dish. Enjoy the vibrant flavors and creamy texture! To make your sweet potato coconut curry even better, toast your spices. Heat them in the pot before adding liquids. This step wakes up the spices and boosts flavor. You can also adjust seasoning to fit your taste. If you like it spicy, add more curry powder. If you want it milder, hold back on the spices. Always taste as you go. If you want a creamier curry, add more coconut milk. This makes it rich and smooth. You can also blend the curry for a velvety texture. Use an immersion blender for easy mixing. Check the tenderness of sweet potatoes with a fork. They should be soft but not mushy. This ensures a great bite in your curry. Keep the curry's consistency right by stirring it. If it gets too thick, add a splash of vegetable broth. This keeps it delicious and easy to serve. {{image_2}} You can easily boost the protein in your sweet potato coconut curry. Here are two great options: - Chickpeas: Canned chickpeas are perfect. Just rinse and add them to the pot. They soak up flavor and add texture. - Tofu: Firm tofu works well. Cut it into cubes and brown it before adding to the curry. This gives it a nice crunch. Adding these proteins makes the dish heartier and more filling. Mixing in different veggies can change the flavor and color. Here are a couple of tasty choices: - Spinach: Fresh spinach wilts down quickly. Stir it in during the last few minutes of cooking for added nutrients. - Carrots: Diced carrots bring sweetness and crunch. Add them with the sweet potatoes so they cook through. These veggies make your curry more colorful and nutritious. You can also play with the style of your curry. Here are two fun ideas: - Red curry paste instead of powder: Use red curry paste for a richer taste. Just replace the curry powder with the same amount of paste. - Thai-inspired version: Add some lime juice, fish sauce, and basil for a Thai twist. This will give your curry a zesty kick. These variations let you explore different flavors while keeping the dish simple and delicious. Your sweet potato coconut curry will last in the fridge for about 3 to 4 days. Store it in an airtight container to keep it fresh. Glass or plastic containers work well. Make sure to let it cool before sealing. If you want to freeze the curry, it’s best to do it right after cooking. Let it cool, then pour it into a freezer-safe bag. Remove as much air as possible before sealing. When you’re ready to eat, thaw the curry in the fridge overnight. Reheat it in a pot over low heat, stirring often. You may need to add a splash of vegetable broth or coconut milk for creaminess. You can use leftover curry in many ways. Try it in wraps with fresh greens for a quick lunch. It also makes a great side dish with rice or quinoa. Want to turn it into a soup? Just add more vegetable broth and blend it smooth. You’ll enjoy a tasty, comforting soup that’s perfect for any day! Yes, you can use other potatoes. Yukon Gold or white potatoes work well. They add a creamy texture. However, sweet potatoes bring a unique sweetness and color to the dish. If you swap them, note that cooking times may change. Absolutely! This recipe is vegan-friendly. It uses coconut milk, which is plant-based. The vegetables and spices are also vegan. You can enjoy this dish without any animal products. It’s perfect for anyone seeking a hearty vegan meal. To add heat, include fresh chilies or red pepper flakes. You can also increase the curry powder amount. Another option is to use a spicy curry paste instead. Start with small amounts, and taste as you go. Adjust it to your spice level. Serve this curry with rice or quinoa. They soak up the sauce nicely. You can also pair it with naan or flatbread for dipping. Fresh lime wedges and cilantro add zing and brightness. Enjoy this dish with a simple salad for extra crunch. This blog post covered making a delicious sweet potato coconut curry. We explored key ingredients, like sweet potatoes, coconut milk, and spices. I shared step-by-step instructions, tips to enhance flavor, and ways to customize the dish. In the end, you can enjoy this healthy curry in various styles and variations. Rely on my tips for better taste and storage options. You now have everything you need to create a fantastic meal that’s full of flavor. Enjoy your cooking!
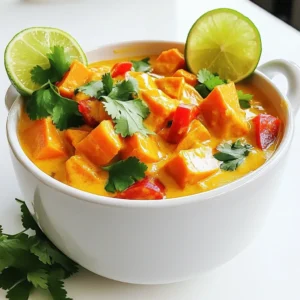
    Sweet Potato Coconut Curry Flavorful and Easy Dish
  • For this spicy peanut veggie noodles recipe, you will need: - 8 oz rice noodles - 1 cup bell peppers (red and yellow), sliced - 1 cup snap peas, trimmed - 1 medium carrot, julienned - 1 cup broccoli florets - 2 green onions, chopped - 1/4 cup cilantro, chopped - 1/3 cup creamy peanut butter - 3 tablespoons soy sauce - 2 tablespoons lime juice - 1 tablespoon sriracha (adjust to taste) - 1 tablespoon sesame oil - 2 cloves garlic, minced - 1 teaspoon fresh ginger, grated - Salt and pepper to taste - Crushed peanuts for garnish You can enhance the dish with these extra ingredients: - Chopped scallions for more flavor - Sesame seeds for a crunchy topping - More veggies like zucchini or mushrooms Each serving of spicy peanut veggie noodles contains: - Calories: 400 - Protein: 12g - Carbs: 60g - Fat: 16g - Fiber: 4g This dish offers a good mix of veggies and protein. Plus, it's tasty and filling! First, cook the rice noodles. Follow the package instructions closely. Usually, this takes about 4 to 6 minutes. Drain the noodles and set them aside. Toss them with some sesame oil. This prevents sticking and adds flavor. Next, let’s prepare the veggies. Slice one cup of red and yellow bell peppers. Trim one cup of snap peas. Julien the medium carrot. Cut it into thin strips. Break one cup of broccoli into small florets. Chop two green onions and a quarter cup of cilantro. Set all these vegetables aside for later. Now, we will make the sauce. In a medium bowl, add one-third cup of creamy peanut butter. Pour in three tablespoons of soy sauce and two tablespoons of lime juice. Add one tablespoon of sriracha for heat. If you like it spicier, add more sriracha. Finally, add two minced garlic cloves and one teaspoon of grated ginger. Whisk everything together until it is smooth. It’s time to combine everything. Heat some sesame oil in a large skillet or wok over medium-high heat. Add the minced garlic and ginger. Sauté for about 30 seconds until fragrant. Then, toss in the bell peppers, snap peas, carrots, and broccoli. Stir-fry for about 5 to 7 minutes. The veggies should be tender yet crisp. Now, add the cooked rice noodles to the skillet. Pour the spicy peanut sauce over the noodles. Gently toss everything together until coated. Finally, mix in the chopped green onions and cilantro. Add salt and pepper to taste. Serve the noodles warm, garnished with crushed peanuts and more cilantro if you want. Enjoy your meal! To cook the rice noodles well, follow the package instructions carefully. Use plenty of water. Bring it to a boil before adding the noodles. Stir them gently to prevent sticking. Cook until they are firm but tender. Drain them and rinse with cold water to stop cooking. Toss with a bit of sesame oil to keep them from clumping together. If you like heat, add more sriracha. Start with one tablespoon, then taste the sauce. Mix well before adding more. You can also add red pepper flakes for extra kick. If it gets too spicy, balance it with more peanut butter or lime juice. For a richer taste, try adding sesame seeds or crushed peanuts. They add crunch and extra flavor. You can also mix in proteins like tofu or chicken for heartiness. Fresh herbs like basil or mint can brighten the dish. Experiment with your favorite vegetables for variety. {{image_2}} You can boost your Spicy Peanut Veggie Noodles with protein. Tofu works great for a plant-based option. Use firm or extra-firm tofu. Press it to remove water, then cut it into cubes. Sauté the tofu until golden and crispy before adding it to the noodles. If you prefer meat, chicken is an excellent choice. Cook bite-sized pieces of chicken in the skillet until they’re fully cooked. Then, mix them in with the noodles and veggies. To make this dish gluten-free, swap the soy sauce for tamari. Tamari is a gluten-free soy sauce that gives great flavor. You can also use gluten-free rice noodles or quinoa noodles. Both options will work well and keep the dish tasty. Just make sure to check the package for cooking times, as they may differ. Making this dish vegan is simple. The recipe is nearly vegan already! Just ensure you choose vegan soy sauce and peanut butter. Most brands are vegan, but it’s always good to check. If you want to add more veggies, consider mushrooms or zucchini for extra flavor. These additions will keep the dish fresh and vibrant. After you enjoy your Spicy Peanut Veggie Noodles, you may have some left. Store the leftovers in an airtight container. Keep them in the fridge. They will stay fresh for about 3 to 4 days. Make sure to cool the noodles to room temperature before sealing them. This helps prevent sogginess. Reheating is easy! You can use a microwave or a stove. If using a microwave, place the noodles in a bowl. Add a splash of water to keep them moist. Heat in short bursts, stirring in between. On the stove, heat a skillet over low heat. Add the noodles and a bit of water. Stir until warmed through. This way, they stay tasty and do not dry out. You can freeze Spicy Peanut Veggie Noodles too! Place them in a freezer-safe container. Make sure to leave space for expansion. They can last up to 2 months in the freezer. When ready to eat, thaw them overnight in the fridge. Reheat them as mentioned above. Freezing keeps the flavors intact, so enjoy them later! To make Spicy Peanut Veggie Noodles vegan, simply substitute soy sauce with a vegan brand. Check the label for any animal products. Use rice noodles as they are usually vegan. The creamy peanut butter is often vegan, but double-check the ingredients. You can also add more veggies or tofu for protein. If you can't find rice noodles, try using whole wheat noodles or soba noodles. Both options work well with the spicy peanut sauce. You can also use zucchini noodles for a low-carb choice. Just remember to cook them lightly to keep them fresh and crunchy. Yes! You can prep the veggies and sauce a day in advance. Store the veggies in the fridge in an airtight container. Keep the peanut sauce separate to maintain the flavor. When ready to eat, just cook the noodles and combine everything. This saves time on busy days. Spicy Peanut Veggie Noodles pair well with a simple green salad. A cucumber salad with rice vinegar adds a nice crunch. You can also serve spring rolls for a fresh bite. Any of these sides will enhance your meal and add variety. In this post, you learned how to make tasty Spicy Peanut Veggie Noodles. We covered the key ingredients, step-by-step cooking, and helpful tips. You can adjust spice levels and add proteins like tofu or chicken. Storing leftovers is easy, and reheating is simple. For more flavor, try different veggies. Now it’s your turn to create your dish! Enjoy the fun of making and sharing this meal with friends.
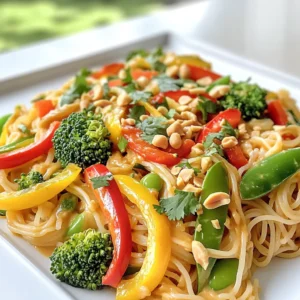
    Spicy Peanut Veggie Noodles Flavorful and Easy Recipe
  • To make a delicious slow cooker maple glazed ham, gather these simple ingredients: - 1 fully cooked boneless ham (3-4 pounds) - 1 cup pure maple syrup - 1/2 cup brown sugar - 1/4 cup Dijon mustard - 1 tablespoon apple cider vinegar - 1 teaspoon ground cinnamon - 1/2 teaspoon ground ginger - 1/4 teaspoon ground cloves These items work together to create a sweet and savory glaze that makes the ham shine. For those who want to add a bit more flair, consider these optional ingredients: - 1/2 cup chopped pecans or walnuts for garnish Adding nuts gives the dish a nice crunch. It also enhances the flavor and looks great on the table. Choosing the right ham is key for great taste. Here are some tips to help you pick the best one: - Look for a boneless ham: This makes slicing easier. - Choose a fully cooked ham: This saves time and ensures safety. - Check for marbling: A ham with good marbling will be juicy and flavorful. - Consider the size: A 3-4 pound ham serves 8-10 people well. By following these tips, you’ll set your meal up for success. Enjoy making your slow cooker maple glazed ham! To start, grab a medium bowl. In it, whisk together these ingredients: - 1 cup pure maple syrup - 1/2 cup brown sugar - 1/4 cup Dijon mustard - 1 tablespoon apple cider vinegar - 1 teaspoon ground cinnamon - 1/2 teaspoon ground ginger - 1/4 teaspoon ground cloves Make sure everything blends well. The glaze should be smooth and sweet. This mix gives the ham a great flavor. Next, take your boneless ham, weighing about 3 to 4 pounds. Place it cut-side down in the slow cooker. Carefully pour the maple glaze over the ham. Cover it tightly. Set the slow cooker to low and cook for 6 to 8 hours. Every hour, use a spoon to ladle the glaze over the ham. This step keeps the meat juicy and full of flavor. The ham is done when it's heated through and fork-tender. Once the ham is ready, remove it from the slow cooker. Let it rest for about 15 minutes. This step helps the juices settle. After resting, slice the ham into pieces. For a nice touch, sprinkle chopped pecans or walnuts on top. This adds a crunchy texture. Serve it warm with your favorite sides. Enjoy this sweet and savory meal! To get the best flavor from your ham, use high-quality ingredients. Start with pure maple syrup. It gives a rich taste that blends great with the spices. Mix the glaze well before pouring it on your ham. Ensure every part of the ham gets coated. This helps the flavors seep into the meat. Cooking on low heat is key too. It keeps the ham moist and tender. Remember to spoon the glaze over the ham every hour. This keeps it juicy and full of flavor. You can make the glaze even better. Try adding fresh herbs like rosemary or thyme. These herbs add depth to the sweet glaze. A splash of orange juice also brightens the flavor. If you like heat, add a pinch of cayenne pepper. This gives a nice kick to the sweet taste. For a nutty twist, sprinkle chopped pecans or walnuts on top. They add crunch and flavor. Sometimes, things don’t go as planned. If your ham seems dry, it may need more glaze. Make sure to spoon the glaze often. If the glaze is too thin, thicken it. You can do this by cooking it on the stove for a bit. If the glaze burns, reduce the heat or add more liquid. Always keep an eye on it. With these tips, you can fix common problems and enjoy a great meal. {{image_2}} You can change the flavor of your ham by using different glazes. For a citrus twist, try using orange juice and zest instead of maple syrup. Mix this with brown sugar and mustard for a bright taste. You can also make a spicy glaze. Use honey, soy sauce, and a pinch of cayenne for a kick. If you want a savory glaze, mix balsamic vinegar and honey. This will give your ham a rich and tangy flavor. While a slow cooker is great, there are other ways to make maple glazed ham. You can bake it in the oven. Preheat your oven to 325°F. Place the ham in a roasting pan and cover it with foil. Bake for about 15 minutes per pound. Basting every 30 minutes will keep it moist. Another option is to grill your ham. This adds a nice smoky flavor. Just wrap it in foil and place it on indirect heat until it's heated through. If you need a gluten-free option, check the labels on your ingredients. Most maple syrup and mustard are gluten-free. You can also lower the sugar content. Use a sugar substitute, or cut back on the brown sugar. For a healthier choice, you can add more spices like cinnamon and ginger for flavor without the extra sugar. This keeps your maple glazed ham tasty and good for you. To store leftover ham, let it cool down first. Once cooled, cut the ham into slices. Place the slices in an airtight container. You can also wrap the ham tightly in plastic wrap or aluminum foil. Be sure to store it in the fridge. Leftover ham will stay fresh for up to five days. Reheating ham is easy and quick. You can use the oven or the microwave. For the oven, preheat it to 325°F. Place the ham in a baking dish and cover it with foil. Heat for about 15-20 minutes or until warm. For the microwave, place slices on a microwave-safe plate. Heat them for 1-2 minutes, checking often to avoid drying out. If you have extra ham, freezing is a great option. Slice the ham and wrap each slice in plastic wrap. Then, place the wrapped slices in a freezer bag. Make sure to remove as much air as possible. Label the bag with the date. You can freeze the ham for up to three months. When ready to eat, thaw in the fridge overnight before reheating. You should cook a ham in a slow cooker for about 6 to 8 hours. The ham should be on low heat. This slow cooking makes it tender and juicy. If you use a smaller ham, check it a bit earlier. If it’s larger, you may need more time. The key is to ensure it is heated through. Yes, you can use other sweeteners if you like. Honey, agave syrup, or brown sugar can work well. Each sweetener will give a unique taste. Just keep the same amount as the maple syrup. This way, the glaze stays balanced and tasty. Maple glazed ham goes great with many side dishes. Here are some ideas: - Roasted vegetables - Creamy mashed potatoes - Green bean casserole - Sweet potato casserole - Coleslaw These dishes add color and flavor to your meal. They complement the sweet glaze of the ham. To know if the ham is fully cooked, check its internal temperature. Use a meat thermometer. The ham should reach 140°F (60°C) for safety. If you don’t have a thermometer, look for a warm, tender texture. The meat should come apart easily when you slice it. This blog post covered everything you need for a tasty slow cooker maple glazed ham. We discussed main and optional ingredients, picking the right ham, and making a delicious glaze. You learned about cooking and serving tips to enhance the flavor, plus variations for dietary needs. Lastly, we shared important storage info and answers to common questions. Now, you can create a delicious ham meal with ease. Enjoy every bite and share it with those you love!
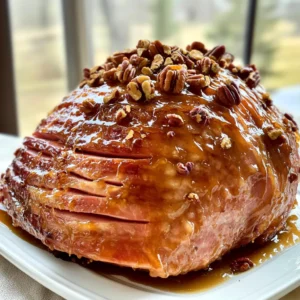
    Slow Cooker Maple Glazed Ham Simple and Tasty Meal
  • To make Crockpot Chicken Piccata, you need: - 4 boneless, skinless chicken breasts - 1 cup chicken broth - 1/4 cup lemon juice (freshly squeezed) - 2 tablespoons capers, drained - 2 cloves garlic, minced - 1 tablespoon olive oil - Salt and pepper to taste - 1 teaspoon dried oregano - 1/2 teaspoon red pepper flakes (optional) - Fresh parsley, chopped (for garnish) - Cooked rice or pasta (for serving) Getting the right measurements is key. Use a liquid measuring cup for liquids. For dry ingredients, like oregano or salt, use a set of measuring spoons. Level off each spoon with a knife for the best results. This helps keep the flavors balanced. If you want a stronger lemon taste, add a bit more juice. For less salt, reduce it to your taste. You can make swaps if you need. If you don’t have chicken broth, use vegetable broth. For lemon juice, lime juice works too. If you want less salt, try low-sodium broth. Instead of capers, you can use green olives for a different flavor. If you don’t like spice, skip the red pepper flakes. Each swap can change the dish but still keep it tasty! {{ingredient_image_1}} To start, gather your ingredients. In a bowl, mix: - 1 cup chicken broth - 1/4 cup fresh lemon juice - 2 cloves minced garlic - 1 tablespoon olive oil - 1 teaspoon dried oregano - 1/2 teaspoon red pepper flakes (optional) - Salt and pepper to taste Stir these together well. This sauce will bring bright flavor to your dish. Next, take your four boneless, skinless chicken breasts. Place them at the bottom of the crockpot. Pour your prepared sauce over the chicken. Make sure it covers all the pieces. Now, sprinkle 2 tablespoons of drained capers on top. This adds a nice salty bite. Cover the crockpot with its lid. Set it to low for 6-8 hours or high for 3-4 hours. Cooking on low gives a tender chicken. Check for doneness. The chicken should be fully cooked and easy to shred. When ready, adjust seasonings if needed and serve over rice or pasta. Garnish with fresh parsley for a pop of color. Enjoy your meal! To get tender chicken, choose boneless, skinless breasts. These cook well in a crockpot. Make sure to use enough liquid. The broth and lemon juice keep the chicken moist. Cook on low for 6-8 hours for the best texture. If you’re in a hurry, you can use high heat for 3-4 hours, but low is best. Check that the chicken reaches 165°F for safety. To boost the taste, use fresh lemon juice. It gives a bright flavor that dried lemon can't match. Adding capers brings a salty, briny kick. If you like heat, stir in red pepper flakes. Fresh parsley not only looks nice, but it adds a fresh taste too. You might try adding a splash of white wine to the sauce for depth. Avoid overcooking the chicken; it can become dry. Always check the cooking time based on your crockpot's heat settings. Don’t skip the salt and pepper, as they are key for flavor. If you forget to add capers early, don’t worry! Just sprinkle them on top right before serving. Lastly, adjust seasoning after cooking; it’s easier to add than to take away. Pro Tips Choose Quality Chicken: Opt for organic or free-range chicken breasts for the best flavor and texture. Fresh Ingredients Matter: Use freshly squeezed lemon juice and fresh garlic for a brighter and more vibrant sauce. Let It Rest: After cooking, allow the chicken to rest for a few minutes before shredding or serving to retain its juices. Customize Your Heat: Adjust the amount of red pepper flakes according to your spice preference for a personalized kick. {{image_2}} You can switch out chicken for turkey in this recipe. Turkey breasts cook well and soak up all the tasty sauce. Just cut them to the same size as the chicken. If you want a plant-based option, try tofu. Use extra-firm tofu for the best texture. Press it to remove water, then cube it before cooking. To make a vegetarian Chicken Piccata, consider using mushrooms. They have a meaty texture and absorb flavors well. Slice portobello or cremini mushrooms and cook them like the chicken. You can also use cauliflower or eggplant. Both options add a unique taste and texture to your dish. If you need to avoid gluten, use gluten-free pasta or rice. For a low-sodium option, choose low-sodium chicken broth. If you can't have dairy, skip any cheese toppings. Instead, use fresh herbs like basil or thyme for flavor. Always adapt the recipe to fit your needs. To store leftovers, let the chicken cool first. Place the chicken and sauce in an airtight container. Store it in the fridge for up to three days. Make sure to keep it sealed. This helps keep the flavors fresh. When reheating, I suggest using the stove. Pour the chicken and sauce into a pan. Heat it over low to medium heat. Stir gently until hot. This method helps keep the chicken moist and tasty. You can also use the microwave. Just cover it and heat in short bursts. Stir in between to heat evenly. To freeze, let the chicken cool completely. Place it in a freezer-safe container. Seal it tightly to avoid freezer burn. You can freeze it for up to three months. When ready to eat, thaw in the fridge overnight. Reheat gently for the best taste. Yes, you can make Crockpot Chicken Piccata ahead of time. Simply prepare the dish, then store it in the fridge. Allow it to cool first. When you're ready to serve, heat it gently on the stove or in the crockpot. This dish tastes even better the next day, as the flavors blend well. Just be sure to adjust the seasoning if needed before serving. Crockpot Chicken Piccata pairs well with many sides. Here are some great options: - Cooked rice - Pasta - Steamed broccoli - Garlic bread - Roasted vegetables - Mashed potatoes These sides soak up the tasty sauce and add more flavor to your meal. You can pick one or mix a few! To make Crockpot Chicken Piccata gluten-free, follow these simple steps: - Use gluten-free chicken broth. - Serve with rice instead of pasta. - Double-check other ingredients for hidden gluten. Most ingredients on the list are naturally gluten-free. So, with a few swaps, you can enjoy this dish without worry! In this post, we covered how to make Crockpot Chicken Piccata. We started with the right ingredients and their measurements. I shared step-by-step guides to prepare the sauce and layer the dish. I also gave tips for the best texture and flavor. Don’t forget about variations to suit your tastes or needs. Storing leftovers correctly will keep this dish tasty. Use the FAQs to answer common questions. Now you're ready to enjoy a delicious meal!
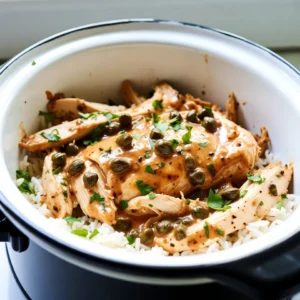
    Crockpot Chicken Piccata Easy and Flavorful Recipe
  • - 4 boneless, skinless chicken breasts - 2 cups fresh spinach, chopped - 1 cup cream cheese, softened - 1 cup shredded mozzarella cheese - 1/2 cup grated Parmesan cheese - 2 cloves garlic, minced - 1 tablespoon olive oil - 1 teaspoon Italian seasoning - Salt and pepper to taste - 1/2 teaspoon red pepper flakes (optional) - 1 tablespoon fresh basil, chopped (for garnish) This dish starts with the main star: chicken breasts. You want them boneless and skinless for easy stuffing. Next, we need some cheese. The cream cheese gives a rich base, while mozzarella adds that gooey stretch we all love. Parmesan brings a nice sharpness to the flavor. Don't forget the veggies! Fresh spinach is a must here. It adds color, nutrition, and a lovely taste. Garlic brings warmth and depth. It pairs well with the spinach and cheese mixture. For seasoning, Italian seasoning gives a perfect blend of herbs. Salt and pepper are key for basic flavor. If you like a bit of heat, add red pepper flakes. They are optional but can elevate the dish. Finally, fresh basil makes for a beautiful garnish. It also adds a burst of fresh flavor right before serving. This mix of ingredients combines to create a filling that is creamy, cheesy, and simply delicious. Each bite is a delight! {{ingredient_image_1}} 1. First, preheat your oven to 375°F (190°C). This helps cook the chicken evenly. 2. Next, heat one tablespoon of olive oil in a skillet over medium heat. 3. Add two minced garlic cloves and sauté for one minute. You want it to smell nice. 4. Now, toss in two cups of chopped fresh spinach. Cook until it wilts, about two to three minutes. 5. Once done, remove the skillet from heat and let it cool for a bit. 1. In a large mixing bowl, add one cup of softened cream cheese. 2. Then, add one cup of shredded mozzarella cheese and half a cup of grated Parmesan cheese. 3. Combine the sautéed spinach and garlic with the cheeses. 4. Mix in one teaspoon of Italian seasoning, salt, pepper, and red pepper flakes if you like some heat. 5. Stir everything well until combined. This filling will be creamy and tasty. 1. Take four boneless, skinless chicken breasts. Carefully slice a pocket into each one. 2. Be careful not to cut all the way through. You want to hold the filling inside. 3. Season the outside of the chicken with salt and pepper. 4. Now, stuff each chicken breast with the spinach cheese mixture. 5. If needed, use toothpicks to secure the opening. This keeps the filling from spilling out. 1. Place the stuffed chicken breasts in a greased baking dish. 2. If you have leftover cheese, sprinkle it on top of the chicken. 3. Bake in the oven for 25 to 30 minutes. 4. Check that the chicken reaches an internal temperature of 165°F (75°C). 5. After baking, let the chicken rest for five minutes. Garnish with fresh basil before serving. Enjoy your meal! To keep your chicken juicy and tender, choose thin chicken breasts. This helps them cook evenly and stay moist. You can also flatten the chicken with a meat mallet. This will help it cook faster. When you stuff the chicken, secure it well. You can use toothpicks to hold the filling inside. Make sure to seal the opening tightly. This keeps the cheesy goodness where it belongs. To boost flavor, try adding more spices. A pinch of garlic powder or paprika can give it a nice kick. Fresh herbs like oregano or thyme can also brighten the dish. For cheese substitutions, you have options. Cream cheese can be swapped with ricotta for a creamier texture. If you want a sharper taste, try using feta cheese instead. This adds a new twist to your stuffed chicken. Pro Tips Use Fresh Spinach: Fresh spinach provides a vibrant flavor and texture; avoid frozen spinach for the best results. Seal the Chicken: Use toothpicks to secure the pockets after stuffing to prevent the cheese mixture from leaking during baking. Check Internal Temperature: Ensure the chicken reaches an internal temperature of 165°F (75°C) for safe consumption. Let it Rest: Allow the chicken to rest for a few minutes after baking to keep it juicy and flavorful. {{image_2}} You can change up the cheese in this recipe. Try using gouda or feta. They add a nice twist. You can also swap the spinach for other greens. Kale or Swiss chard work well too. Want to add some crunch? Consider bacon or ham! Cook them first, then mix them into the cheese filling. This adds a savory touch to your stuffed chicken. For gluten-free needs, you can enjoy this dish without worry. All the ingredients are naturally gluten-free. Just check your cheese labels to be safe. If you want a dairy-free option, use vegan cream cheese and dairy-free cheese. This way, everyone can enjoy the meal. Looking for low-carb choices? You can skip the starchy fillers. Focus only on the chicken and cheese mixture. It will still taste great and fit into a low-carb diet! To keep your Cheesy Spinach Stuffed Chicken fresh, follow these steps. First, let the chicken cool down to room temperature. This takes about 30 minutes. Once cool, wrap the chicken tightly in plastic wrap or foil. You can also place it in an airtight container. Store it in the fridge for up to three days. If you want to keep it longer, freeze it. To freeze, wrap each piece in plastic, then place them in a freezer-safe bag. This way, they stay fresh for up to three months. When you’re ready to enjoy leftovers, reheating is simple. The best way is to use an oven. Preheat your oven to 350°F (175°C). Place the chicken in an oven-safe dish. Cover it with foil to keep moisture in. Heat for about 20 to 25 minutes. The chicken should be hot all the way through. You can also use a microwave if you're short on time. Place the chicken on a microwave-safe plate. Heat in 1-minute intervals until warm. Just make sure the chicken reaches 165°F (75°C) before eating. Yes, you can make Cheesy Spinach Stuffed Chicken ahead of time. Prepare the chicken and stuffing, then stuff the chicken breasts. Cover and refrigerate them for up to 24 hours. When you’re ready to eat, just bake them as the recipe directs. This saves time on busy nights. This dish pairs well with many sides. Here are some great options: - Steamed broccoli - Garlic mashed potatoes - A fresh green salad - Roasted vegetables These sides add color and balance to your meal. They also bring out the flavors of the stuffed chicken. Check the internal temperature of the chicken. It should reach 165°F (75°C) for safe eating. You can use a meat thermometer for this. Insert it into the thickest part of the chicken. If the juices run clear and the chicken is no longer pink, it is done. Rest the chicken for 5 minutes before serving. This helps keep it juicy. In this blog post, we explored how to make Cheesy Spinach Stuffed Chicken. We covered all the ingredients and shared step-by-step instructions for great results. I gave tips for juicy chicken and flavor boosts you can try. We also discussed variations for different diets and storage tips to keep leftovers fresh. Enjoy making this dish your own! The options are endless, and the results are delicious. You’ll impress family and friends with your cooking skills.
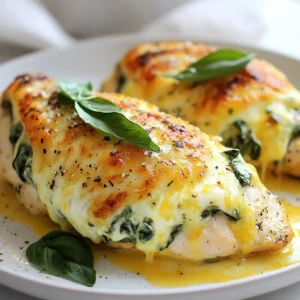
    Cheesy Spinach Stuffed Chicken Flavorful and Simple Meal
  • - 8 oz cream cheese, softened - 1 cup powdered sugar - 1 teaspoon vanilla extract - 1 cup whipped cream - 1 medium apple, diced (preferably Granny Smith) - ½ cup caramel sauce (store-bought or homemade) - ¼ cup chopped nuts (such as pecans or walnuts, optional) - Sliced apples, graham crackers, or pretzels for dipping I love using Granny Smith apples for this dip. Their tartness balances the sweet caramel and rich cream cheese. Other great options include Honeycrisp and Fuji apples. These apples add a nice crunch and juicy flavor. You can customize this dip further! Try adding chocolate chips for extra sweetness. A sprinkle of cinnamon gives a warm spice note. If you want more texture, mix in some crushed graham crackers. These add a nice crunch and depth to the dip. To begin, gather your ingredients. You need 8 oz of softened cream cheese, 1 cup of powdered sugar, and 1 teaspoon of vanilla extract. In a large bowl, use a hand mixer to beat the cream cheese until it is smooth. This step is key for a creamy dip. Next, slowly add the powdered sugar and vanilla. Mix until everything is well combined. Now, it’s time to make this dip fluffy. Gently fold in 1 cup of whipped cream. This adds lightness to our dip. After that, carefully add 1 medium diced apple. I prefer Granny Smith for its tartness. If you like, you can also mix in ¼ cup of chopped nuts for a crunchy twist. Now for the fun part! In a serving dish, spread the cheesecake mixture evenly. Drizzle ½ cup of caramel sauce all over the top. The golden caramel makes it look amazing! If you added nuts, sprinkle them on top. Serve this dip right away with sliced apples, graham crackers, or pretzels. Each bite is a sweet treat! To make your dip creamy, start with soft cream cheese. I let mine sit out for about 30 minutes. Then, beat it with a hand mixer until it is smooth. Add powdered sugar slowly. This helps it blend well. Mix in vanilla extract for extra flavor. Next, you want to fold in whipped cream gently. This keeps the dip light and fluffy. If you mix too hard, it can lose that nice texture. When dicing apples, choose a firm apple like Granny Smith. This type stays crisp and tangy. Wash the apple first, then cut it into quarters. Remove the core and seeds. Slice each quarter into thin pieces. Then, chop those slices into small cubes. Aim for even sizes so they mix well. This way, every bite has a bit of apple. Toss the diced apples in a little lemon juice to keep them fresh and bright. For serving, choose a nice dish to show off your dip. Spread the cheesecake mixture evenly in the dish. Drizzle caramel sauce over the top. You can create a fun design with the sauce. If you like, sprinkle chopped nuts on top for crunch. Use colorful sliced apples, graham crackers, or pretzels for dipping. Arrange them nicely around the dip. This makes it look inviting and fun. Enjoy your treat with friends or family! {{image_2}} You can easily change the flavor of this dip. Want a chocolate twist? Add some cocoa powder to the cream cheese mix. You can also drizzle chocolate syrup on top for extra sweetness. If you like spices, try adding cinnamon or nutmeg. These spices make the dip warm and cozy, perfect for fall. If you want a lighter dip, there are ways to cut back on sugar. Use a sugar substitute for the powdered sugar. You could also swap the whipped cream for Greek yogurt. This gives you the creaminess without all the calories. This way, you enjoy taste without feeling guilty. Feel free to play with the nuts in this recipe. Pecans and walnuts are great, but almonds or hazelnuts work well too. You can also skip the nuts if you have nut allergies. Instead, sprinkle some granola on top for a nice crunch. This gives you options and lets everyone enjoy the dip! To keep your caramel apple cheesecake dip fresh, store it in an airtight container. This helps keep the dip creamy and delicious. Make sure to cover the surface with plastic wrap before sealing the lid. This extra step prevents air from getting in and helps maintain the flavor. You can keep this dip in the fridge for up to three days. After that, the apples may start to brown, and the dip may lose its creaminess. Always check for any off smells or changes in texture before eating leftovers. Freezing caramel apple cheesecake dip is not recommended. The cream cheese and whipped cream can change in texture when thawed. If you need to store it longer, consider freezing the dip without the apples. When you’re ready to enjoy it, thaw in the fridge overnight and fold in fresh apple pieces before serving. Yes, you can make this dip ahead of time. I suggest mixing everything but the caramel sauce. Store the dip in the fridge for up to two days. Just before serving, drizzle the caramel on top. This keeps the dip fresh and creamy. Making homemade caramel sauce is easy! Here’s a quick method: - Ingredients: - 1 cup sugar - 6 tablespoons butter - 1/2 cup heavy cream - Steps: 1. In a pot, heat sugar over medium heat. Stir until it melts and turns golden brown. 2. Add the butter and mix until it melts. 3. Slowly pour in the cream, stirring constantly. 4. Remove from heat and let it cool. This sauce adds a rich, sweet taste to your dip. You have many options for dipping! Here are some great choices: - Graham crackers - Pretzels - Vanilla wafers - Sliced strawberries - Biscotti These options offer a fun twist to enjoy your creamy dip. This blog post covered how to create a delicious caramel apple cheesecake dip. You learned about the key ingredients and recommended apple types. I shared tips for the best texture and how to serve it well. We explored flavor variations and healthy swaps for your needs. Remember, you can store leftovers safely and even freeze the dip. Enjoy customizing this treat to suit your taste. With these ideas and tips, you can impress everyone at your next gathering. Happy dipping!
    Caramel Apple Cheesecake Dip Irresistibly Creamy Treat
  • - 4 salmon fillets (6 oz each) - 3 tablespoons pure maple syrup - 2 tablespoons soy sauce (or tamari for gluten-free) - 1 tablespoon Dijon mustard - 2 tablespoons olive oil - 2 cups broccoli florets - 1 cup baby carrots - 1 red bell pepper, sliced into strips - 1 teaspoon garlic powder - Salt and pepper to taste - Fresh parsley, chopped (for garnish) Each serving packs a healthy punch. You get about 350 calories, with 22 grams of protein. The dish also provides healthy fats and fiber. It is rich in vitamins A and C from the veggies. This meal is balanced and satisfying. When buying salmon, look for bright, shiny skin. The flesh should be firm and have a nice pink color. Avoid any fish with a strong fishy smell. For veggies, choose bright colors and firm textures. Fresh broccoli should be dark green and crisp. Select carrots that are smooth, with no soft spots. Fresh bell peppers should feel heavy for their size and have smooth skin. First, gather your ingredients. You will need: - 4 salmon fillets (6 oz each) - 3 tablespoons pure maple syrup - 2 tablespoons soy sauce - 1 tablespoon Dijon mustard - 2 tablespoons olive oil - 2 cups broccoli florets - 1 cup baby carrots - 1 red bell pepper - 1 teaspoon garlic powder - Salt and pepper - Fresh parsley Next, preheat your oven to 400°F (200°C). Line a large baking sheet with parchment paper. This helps with cleanup. In a small bowl, whisk together the maple syrup, soy sauce, Dijon mustard, and olive oil. This mix will be your glaze. Set it aside for later. Place the salmon fillets on one side of the baking sheet. Season them with salt, pepper, and garlic powder. Pour half of the maple glaze over the salmon. Make sure each piece is coated well. On the other side, arrange the broccoli, baby carrots, and red bell pepper strips. Drizzle olive oil on the veggies and season them with salt and pepper. Toss the veggies to coat them evenly. Now, put the baking sheet in the oven. Roast for about 15-18 minutes. The salmon should flake easily with a fork when done. The veggies will be tender-crisp. In the last 5 minutes, brush the remaining glaze over the salmon. This adds a nice flavor boost. You will need 10 minutes to prep the dish. The total cooking time is about 20 minutes. So, the whole meal takes around 30 minutes from start to finish. Once done, let the salmon rest for a couple of minutes before serving. Garnish with fresh parsley for a bright touch. Enjoy this easy and tasty dish! To make a great maple glaze, start with pure maple syrup. Mix it with soy sauce and Dijon mustard. The soy sauce adds salt and depth. The mustard gives a nice tang. Whisk these together with olive oil until smooth. Brush half of this glaze on the salmon before cooking. Save the rest for the last few minutes. This step adds an extra layer of flavor. For roasted veggies, cut them into similar sizes. This helps them cook evenly. Broccoli florets, baby carrots, and bell peppers work great. Toss them in olive oil, salt, and pepper. Spread them out on the baking sheet. This allows hot air to circulate around each piece. Roast for about 15-18 minutes. They should be tender but still crisp. When serving, arrange the salmon and veggies on a large platter. The colors should pop! Drizzle any remaining glaze over the top. This adds shine and flavor. Sprinkle with fresh parsley for a bright touch. A beautiful presentation makes the meal feel special. Enjoy your dish with pride! {{image_2}} You can mix and match veggies to suit your taste. Here are some great options: - Zucchini, sliced - Asparagus, trimmed - Cauliflower florets - Brussels sprouts, halved - Sweet potatoes, diced These vegetables roast well and absorb the maple glaze nicely. Experiment and find your favorite combo! This recipe is easy to make gluten-free. Just swap soy sauce for tamari. Tamari is a great choice, as it tastes similar. Always check labels to ensure no gluten sneaks in. You can change the marinade for fun flavors. Try these ideas: - Add fresh ginger for spice. - Use orange juice for a citrus twist. - Mix in sriracha for heat, if you love spice. These changes keep the dish exciting. Feel free to get creative! To store leftover salmon and veggies, let them cool first. Place them in an airtight container. Make sure to cover the salmon well. This helps keep it fresh. You can store it in the fridge for up to three days. To reheat, preheat your oven to 350°F (175°C). Place the salmon and veggies on a baking sheet. Cover them loosely with foil. This keeps moisture in. Heat for about 10-15 minutes, or until warm. You can also use a microwave, but the oven keeps the texture better. The shelf life of cooked salmon and veggies is about three days in the fridge. For longer storage, freeze them. Wrap each piece of salmon and veggies in plastic wrap. Then, place them in a freezer bag. They can last up to three months in the freezer. To thaw, move them to the fridge overnight before reheating. Cooking salmon in a sheet pan takes about 15 to 18 minutes. At 400°F (200°C), the salmon cooks fast. It flakes easily when done. Check the thickest part for doneness. If it’s opaque and flakes with a fork, it’s ready. Yes, you can prepare some parts ahead. Season the salmon and chop the veggies. Store them in the fridge until ready to bake. This saves time on busy nights. Just add the glaze right before cooking for fresh flavor. Sheet-pan salmon goes well with many sides. Here are some great options: - Quinoa - Brown rice - Mashed potatoes - Garlic bread - A light salad These sides add variety and balance. Choose what you love most! You can grill the salmon if you prefer! Preheat your grill to medium heat. Brush the glaze on the salmon. Grill for about 6 to 8 minutes per side. Watch closely so it doesn’t burn. Grilling adds a tasty smokiness too! This blog post covered everything you need for a delicious sheet-pan maple glazed salmon meal. We discussed key ingredients, simple cooking steps, and tips for perfecting your dish. I shared storage tips and answered common questions to help you succeed. With these insights, you can confidently prepare a tasty, healthy meal that impresses. Enjoy cooking and making this recipe your own!
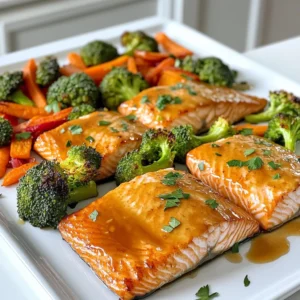
    Sheet-Pan Maple Glazed Salmon with Veggies Delight
  • To make this dish, gather these key items: - 2 boneless, skinless chicken breasts, diced - 2 tablespoons Cajun seasoning - 2 tablespoons olive oil - 1 medium onion, chopped - 3 cloves garlic, minced - 1 bell pepper (any color), diced - 1 cup cherry tomatoes, halved - 4 cups chicken broth - 8 ounces fettuccine or penne pasta - 1 cup heavy cream - 1 cup grated Parmesan cheese - Salt and pepper to taste - Fresh parsley, chopped (for garnish) Each ingredient plays a role. The chicken brings protein, while Cajun seasoning adds spice. Olive oil helps cook the chicken and veggies. Onions, garlic, and bell peppers provide flavor. Cherry tomatoes add sweetness, and the broth creates a base. The pasta soaks up the sauce, making every bite tasty. Cream and Parmesan make the dish rich and creamy. You can add these items for extra taste: - 1 teaspoon smoked paprika - 1 tablespoon lemon juice - 1/2 cup spinach or kale Smoked paprika gives a deeper flavor. Lemon juice adds brightness to the dish. Spinach or kale boosts nutrition and color. Feel free to mix and match these options to suit your taste. If you run out of something or want to try new flavors, consider these swaps: - Use shrimp or sausage instead of chicken for a different protein. - Swap heavy cream with coconut milk for a lighter option. - Choose vegetable broth for a vegetarian version. These substitutions keep the dish delicious while allowing for creativity. Don't be afraid to experiment! To start, take your chicken breasts and dice them into small pieces. Next, sprinkle the Cajun seasoning over the chicken. Make sure every piece is covered well. Heat the olive oil in a large pot over medium heat. Once hot, add the seasoned chicken. Cook it for about 5 to 7 minutes. You want it browned and cooked all the way through. Once done, remove the chicken from the pot and set it aside. Now, it’s time for the veggies! In the same pot, add the chopped onion, minced garlic, and diced bell pepper. Sauté these for about 3 to 4 minutes. You want them soft and fragrant. After that, toss in the halved cherry tomatoes. Let them cook for another 2 minutes until they start to break down. Once your veggies are ready, it’s pasta time! Pour in the chicken broth and bring it to a boil. When it starts to bubble, add the fettuccine or penne pasta. Stir occasionally as it cooks. Follow the package instructions for the right cooking time until the pasta is al dente. This usually takes around 8 to 10 minutes. Once cooked, lower the heat and add the chicken back into the pot. Now for the best part—the sauce! Stir in the heavy cream and grated Parmesan cheese. Mix everything together until the cheese melts and the sauce looks creamy. If it’s too thick, you can add a bit more chicken broth to get just the right consistency. Taste and season with salt and pepper as needed. After mixing, let the dish sit off the heat for a couple of minutes. This lets it thicken up just a bit. Before serving, sprinkle some fresh parsley on top for a pop of color. To get that perfect creamy sauce, start with heavy cream. It adds richness. Stir the cream in slowly after cooking your chicken and veggies. Mix in the Parmesan cheese next. This cheese melts well and adds flavor. If the sauce is too thick, add more chicken broth. This helps you reach the right consistency. You can use many types of pasta for this dish. Fettuccine works great, but penne is also good. Other options include spaghetti or even gluten-free pasta. Just keep an eye on the cooking time. Different pasta shapes may need extra or less time to cook. Follow the package instructions for best results. Adjust the spice level to fit your taste. If you like it mild, use less Cajun seasoning. For a kick, add more! You can also mix in some red pepper flakes for heat. Fresh herbs like basil or cilantro can boost flavor too. A squeeze of lemon juice can brighten up the dish. {{image_2}} You can make this dish vegetarian by swapping chicken for plant-based options. Use diced mushrooms or firm tofu for protein. Both options soak up the Cajun flavor well. You can also use chickpeas for a great crunch and added protein. Keep the Cajun seasoning to give it that kick. Use vegetable broth instead of chicken broth to keep it rich. Seafood can add a nice twist to this dish. Shrimp works great with this creamy sauce. Just add it to the pot after the veggies are softened. Cook the shrimp until they turn pink, about 3-4 minutes. Scallops or crab meat also pair well. Just be careful not to overcook them. They can become tough if you cook them for too long. You can boost nutrition by adding more veggies. Spinach or kale adds color and health benefits. Add them at the end, just before you mix in the cream. This way, they stay bright and fresh. You can also add zucchini or broccoli for crunch. Just chop them small so they cook quickly. Try to make it colorful; it makes the dish more fun! To keep your creamy Cajun chicken pasta fresh, store it in an airtight container. Let the pasta cool to room temperature before sealing. Place the container in the fridge. This way, the flavors stay strong. You can enjoy your leftovers for up to three days. Just remember to label the container with the date. When it's time to eat your leftovers, reheat them gently. Use a microwave-safe dish or a skillet on low heat. Add a splash of chicken broth or cream to keep it creamy. Stir often to heat evenly. This will help prevent the pasta from drying out. Heat until warm but not boiling. If you want to save some for later, freezing works great! First, let the pasta cool down completely. Then, portion it into freezer-safe bags or containers. Remove as much air as possible. This helps prevent freezer burn. You can freeze it for up to three months. When you're ready to enjoy, thaw in the fridge overnight and reheat as mentioned above. Yes, you can make this recipe gluten-free. Use gluten-free pasta instead of regular pasta. Many brands offer gluten-free options that work well in this dish. Just make sure to check the cooking time, as it may differ from traditional pasta. If you want a lighter option, use half-and-half or whole milk. You can also use coconut milk for a dairy-free version. For a thicker sauce, blend silken tofu with a bit of broth. This keeps the creaminess while being healthier. Leftovers can last for about 3-4 days in the fridge. Store them in an airtight container to keep them fresh. When you are ready to eat, just reheat on the stove or in the microwave. Make sure to stir well to heat evenly. In this post, I covered the key ingredients, steps, and tips for making creamy Cajun chicken pasta. You learned how to prep chicken and veggies, cook pasta in one pot, and create a rich sauce. Remember, you can adjust spice levels and try variations with seafood or extra veggies. Store any leftovers properly and use the reheating tips for the best flavor. Enjoy your meal, and feel free to get creative with new twists!
    Creamy Cajun Chicken Pasta One Pot Delightful Meal
  • - 4 boneless, skinless chicken breasts - 2 cups sliced mushrooms (cremini or button) - 1 medium onion, diced - 3 cloves garlic, minced - 1 cup chicken broth - 1 cup heavy cream - 2 tablespoons olive oil - 1 teaspoon dried thyme - 1 teaspoon dried rosemary - Salt and pepper to taste - Fresh parsley, chopped - Additional herbs When making creamy mushroom chicken, you need fresh and simple ingredients. The chicken breasts serve as the main protein. I love using cremini or button mushrooms for their deep flavor. Diced onion adds sweetness, while minced garlic gives it a nice kick. For the sauce, chicken broth adds moisture and flavor. Heavy cream makes it rich and creamy. Olive oil is perfect for searing the chicken. Seasonings like thyme and rosemary enhance the taste, while salt and pepper balance everything out. To finish, you can garnish your dish with fresh parsley or other herbs. This adds color and freshness to your meal. Using high-quality ingredients makes a big difference in flavor. - Searing the chicken Start by heating olive oil in a large skillet over medium heat. Once hot, add the chicken breasts. Sear them for 2 to 3 minutes on each side until they become golden brown. This step locks in flavor and moisture. After searing, remove the chicken from the skillet and set it aside. - Sautéing the vegetables In the same skillet, add the diced onion. Sauté it for about 3 to 4 minutes until it turns translucent. Then, add the minced garlic and sliced mushrooms. Cook these for around 5 minutes, stirring often. The mushrooms should be tender and the moisture should be released. This mix will add depth to your dish. - Combining ingredients in the slow cooker In your slow cooker, combine the sautéed onion, garlic, and mushrooms. Add in the chicken broth, dried thyme, and dried rosemary. Season with salt and pepper to taste. Stir the mixture well to blend the flavors. Nestle the seared chicken breasts into this mixture. - Cooking times for low and high settings Cover the slow cooker. Cook the dish on low for 4 to 6 hours or on high for 2 to 3 hours. The chicken should be cooked through and tender by the end of the cooking time. - Adding heavy cream About 30 minutes before serving, stir in the heavy cream. This addition will make the sauce rich and creamy. Let it warm through, and taste it. Adjust the seasoning if needed. - Shredding chicken if desired Once the chicken is done, remove it from the slow cooker. If you like, shred the chicken using two forks. Then, stir everything together in the slow cooker. This step will help the flavors meld beautifully. Enjoy your creamy mushroom chicken! To make your creamy mushroom chicken shine, use these seasonings: - 1 teaspoon dried thyme - 1 teaspoon dried rosemary - Salt and pepper to taste You can also try adding a splash of white wine or a squeeze of lemon for extra zing. For a twist, swap the chicken for turkey or use other mushrooms like shiitake or portobello. To avoid dry chicken, sear it until golden but do not overcook. This step adds flavor and keeps the meat juicy. If your chicken breasts are very thick, cook them longer on low heat. Check for doneness with a meat thermometer; it should reach 165°F (75°C). For the best meal, serve your creamy mushroom chicken over rice or mashed potatoes. This helps soak up the delicious sauce. You can also add steamed broccoli or green beans for a colorful plate. For a nice touch, garnish with fresh parsley to add brightness to your dish. {{image_2}} You can change the types of mushrooms in this dish. Try portobello or shiitake mushrooms for a richer taste. You can also use a mix of mushrooms for added depth. If you want to swap the chicken, use turkey or even tofu. This provides options for different diets and preferences. To make this dish gluten-free, use a gluten-free chicken broth. Always check labels to ensure no hidden gluten. If you want a low-calorie option, substitute heavy cream with Greek yogurt or a lower-fat cream. You can also reduce the amount of olive oil used. Add vegetables like spinach or carrots for extra nutrients. You can mix in broccoli or bell peppers to brighten the dish. For a twist, consider using different sauces. A splash of soy sauce or balsamic vinegar can add a unique flavor. Experimenting with these choices can make each meal special. - Refrigeration tips: After your meal, let the creamy mushroom chicken cool. Place it in an airtight container. Store it in the fridge. It stays fresh for about 3-4 days. - Freezing options: If you want to save it longer, freeze the leftovers. Use a freezer-safe container. It can last up to 2-3 months in the freezer. Just remember to label it with the date! - Best methods for reheating: The best way to reheat is in the microwave. Use a microwave-safe dish. You can also reheat it on the stove over low heat. Stir often to warm it evenly. - Maintaining texture and flavor: To keep it creamy, add a splash of chicken broth or cream while reheating. This helps maintain its rich flavor and smooth texture. - How long the dish lasts in the fridge: In the fridge, creamy mushroom chicken lasts about 3-4 days. After that, it may spoil. - Signs of spoilage: Check for off smells, changes in color, or mold. If you see any of these signs, it’s best to throw it away. Always prioritize safety! Cooking Creamy Mushroom Chicken takes 4-6 hours on low or 2-3 hours on high. The chicken needs to be tender and cooked through. - Low setting: 4-6 hours - High setting: 2-3 hours This slow cooking allows the flavors to blend well, making the dish rich and tasty. Yes, you can use frozen chicken in this recipe. Just adjust the cooking time. If you use frozen chicken, cook it on high for 4-5 hours instead of the usual times. - Ensure the chicken is in a single layer for even cooking. - Add extra time to ensure it cooks through safely. Using frozen chicken makes preparation easier, especially on busy days. Creamy Mushroom Chicken pairs well with various sides. Here are some great options: - Rice: White rice or brown rice absorbs the sauce well. - Mashed potatoes: They provide a creamy base for the chicken. - Steamed vegetables: Broccoli, green beans, or carrots add color and nutrients. - Pasta: Egg noodles or fettuccine work nicely to soak up the sauce. These sides balance the dish and make it a full meal. This blog post covered how to make delicious Creamy Mushroom Chicken in a slow cooker. You learned about the key ingredients, like chicken, mushrooms, and seasoning. We walked through the preparation and cooking steps, along with useful tips to enhance flavor. You also discovered variations to try and how to store leftovers safely. As you explore this dish, remember that creativity can lead to great meals. Happy cooking!
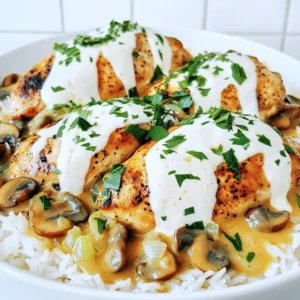
    Creamy Mushroom Chicken Slow Cooker Delightful Meal
  • - 8 oz lo mein noodles or spaghetti - 2 tablespoons sesame oil - 1 tablespoon olive oil - 1 cup sliced bell peppers (red and yellow) - 1 cup sugar snap peas, trimmed - 1 cup carrots, julienned - 3 green onions, sliced - 2 cloves garlic, minced - 1 tablespoon ginger, grated To make a tasty lo mein, start with the noodles. You can use lo mein noodles or spaghetti if you cannot find them. Cook them according to the package instructions. Drain and toss them with sesame oil. This step helps to prevent sticking. Next, gather your colorful veggies. I love using bell peppers, sugar snap peas, and carrots. They add great color and crunch. Aromatics are key to flavor. Mince the garlic and grate the ginger. These two ingredients will fill your kitchen with a delightful smell. They also add a warm, spicy note to your dish. - 3 tablespoons soy sauce - 1 tablespoon oyster sauce (optional) - 1 tablespoon honey or maple syrup - Salt and pepper to taste - Sesame seeds for garnish - Fresh cilantro for garnish Now, let’s boost the flavors. Mix soy sauce and oyster sauce in a small bowl. The oyster sauce is optional, but it adds depth. For a hint of sweetness, add honey or maple syrup. A sprinkle of salt and pepper is important too. Finally, we want to make it look pretty. Use sesame seeds and fresh cilantro for garnish. They give your dish a lovely finish and a pop of flavor. To cook lo mein noodles, boil water in a large pot. Once the water boils, add the noodles. Cook them according to the package instructions. This usually takes around 5-7 minutes. Stir the noodles gently to prevent sticking. Drain the noodles and toss them with a little sesame oil. This oil helps keep them from clumping together. Heat a large skillet or wok over medium-high heat. Add 1 tablespoon of olive oil. Once the oil is hot, add 2 cloves of minced garlic and 1 tablespoon of grated ginger. Sauté for about 30 seconds, stirring often. The aroma will fill your kitchen! Next, add 1 cup of sliced bell peppers, 1 cup of sugar snap peas, and 1 cup of julienned carrots. Stir-fry these vegetables for 3-4 minutes. You want them to be tender but still crisp. Now, toss in the cooked lo mein noodles and 3 tablespoons of soy sauce. If you want extra flavor, add 1 tablespoon of oyster sauce. Mix in 1 tablespoon of honey or maple syrup for a touch of sweetness. Stir everything together, ensuring the noodles and veggies get coated in the sauce. Cook for another 2-3 minutes, stirring constantly. This allows all the flavors to blend nicely. To achieve the perfect texture, make sure not to overcook the noodles. They should be tender but not mushy. For a beautiful presentation, serve your lo mein in large bowls. Garnish with sesame seeds and fresh cilantro. A lime wedge on the side adds a nice zesty touch. Enjoy your meal! - Best practices for stir-frying vegetables: Heat your pan before adding oil. This helps the veggies cook quickly and stay crisp. Cut your vegetables into similar sizes. This ensures even cooking. Stir constantly to avoid burning. - How to enhance flavors without overpowering: Start with less sauce, then taste as you go. Add more if needed. Fresh herbs like cilantro boost flavor without adding heaviness. A splash of lime can also brighten the dish. - Substituting with pantry staples: If you don’t have lo mein noodles, spaghetti works well. Use any fresh or frozen vegetables you have. Carrots, peas, or broccoli are great choices. - Variations for dietary restrictions: For gluten-free options, use rice noodles or gluten-free soy sauce. You can also swap honey with agave syrup for a vegan option. - Optimal cook times for stir-frying: Cook the vegetables for 3-4 minutes. You want them tender yet crunchy. Stir-fry the noodles with the sauce for 2-3 minutes. This helps the flavors mix well. - Adjusting sauce flavors to personal preference: If you like it sweeter, add more honey. For a saltier taste, increase the soy sauce. Feel free to mix flavors until you find your favorite balance. {{image_2}} You can add protein to your lo mein for a heartier meal. Chicken, shrimp, or tofu work well. If you choose chicken or shrimp, cut them into small pieces. Tofu can be cubed and pressed to remove extra water. I suggest marinating proteins to boost flavor. For chicken, use soy sauce and ginger. For shrimp, a splash of lemon juice works wonders. For tofu, try a mix of soy sauce and sesame oil. Let them soak for at least 15 minutes before cooking. This step makes a big difference! You can change the flavor of your lo mein with different sauces. For a spicy kick, add chili paste or Sriracha. If you like sweet, try more honey or maple syrup. You can also use teriyaki sauce for a savory taste. Don't forget to add more vegetables for variety! Broccoli, mushrooms, or baby corn can create new textures. Toss in some bok choy for crunch. Mixing these ingredients adds layers of flavor to your dish. If you want a vegetarian dish, swapping meat is easy. Use tofu or tempeh as a protein source. For a vegan option, skip oyster sauce or find a plant-based one. To keep flavors strong, use vegetable broth instead of water. You can also add more spices like five-spice powder. This gives your dish depth without animal products. Ensure your sauces are vegan-friendly, and you will have a tasty meal. To store leftover Lo Mein, use airtight containers. Glass or plastic containers work well. Always cool the dish before sealing. This step helps keep it fresh. - Place the noodles and veggies in a single layer. - Avoid storing in metal containers, as they can affect flavor. - Add a sprinkle of sesame oil to keep noodles moist. To maintain freshness, eat leftovers within three days. Keep them in the fridge. If you notice any off smells, it’s best to discard them. You can reheat Lo Mein in a few ways. The microwave is quick and easy. Place the noodles in a bowl and cover them with a damp paper towel. Heat for one to two minutes. Stir halfway to ensure even heating. For stovetop reheating, use a skillet. Add a splash of water or broth to prevent sticking. Heat on medium until warm, stirring often. This method helps keep the noodles from becoming mushy. Freezing Lo Mein is a great option for long-term storage. To freeze, let the dish cool completely. Place it in a freezer-safe container or bag. Remove as much air as possible to prevent freezer burn. - Label the container with the date. - Use within three months for best taste. Before freezing, consider the texture. Fresh veggies may not hold up well. You can blanch them first or add them fresh when reheating. This way, they stay crisp and tasty. Yes, you can use other noodles. Spaghetti works well if lo mein noodles are hard to find. Rice noodles or udon are also great choices. They all bring a unique taste and texture. To make your lo mein gluten-free, pick gluten-free noodles. Rice noodles are a tasty option. Use tamari instead of soy sauce. This swap keeps the flavor without gluten. Serve this lo mein with spring rolls or dumplings. A simple cucumber salad adds crunch. You could also pair it with a hot and sour soup for a complete meal. Add red pepper flakes or chili paste for heat. You can also toss in sliced jalapeños while cooking. For a unique twist, try a splash of sriracha in the sauce. This blog post covers how to make Better Than Takeout Lo Mein. We explored key ingredients and flavor boosters. You learned the steps to cook noodles, stir-fry veggies, and perfect your dish. We shared valuable tips for timing, techniques, and ingredient swaps. Variations let you customize with proteins or spicy sauces. Lastly, we covered storage and reheating methods. With these insights, you can enjoy delicious lo mein at home anytime. Now, you have the tools to create your own tasty meals!
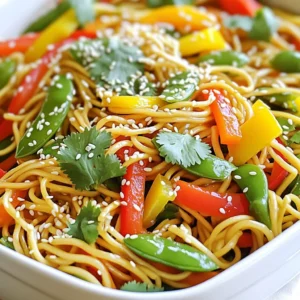
    Better Than Takeout Lo Mein Flavorful and Quick Meal

Posts pagination

1 2 3 … 9 Older →

Footer

↑ back to top

More information

  • Drinks
  • Appetizer
  • Dinner
  • Desserts
  • About
  • Contact
  • Privacy Policy

Our Policies

  • Privacy Policy
  • GDPR Policy
  • Terms Of Use
  • Copyright Policy
  • Cookie Policy
  • Disclaimer

Copyright © 2025 cheftaling