Chef Taling

  • Home
  • Recipe Index
    • Desserts
    • Dinner
    • Appetizer
    • Drinks
  • About
  • Contact
  • Privacy Policy
menu icon
go to homepage
  • Home
  • Recipe Index
    • Desserts
    • Dinner
    • Appetizer
    • Drinks
  • About
  • Contact
  • Privacy Policy

search icon
Homepage link
  • Home
  • Recipe Index
    • Desserts
    • Dinner
    • Appetizer
    • Drinks
  • About
  • Contact
  • Privacy Policy

×

Recipe Index

by Category

  • Dinner
  • Desserts
  • Drinks
  • Appetizer

Top 10 Recipes

  • - 1 package (16 oz) potato gnocchi - 1 tablespoon olive oil - 3 cloves garlic, minced - 1 can (14 oz) diced tomatoes (with juices) - 1 cup vegetable broth - 1 cup heavy cream - 1 teaspoon dried oregano - ½ teaspoon red pepper flakes (optional) - Salt and black pepper to taste - 1 cup fresh basil leaves, chopped - ½ cup grated Parmesan cheese These ingredients create a rich and creamy dish. The gnocchi acts as a perfect base. The tomatoes add a sweet and tangy flavor. Garlic brings warmth and depth. Cream gives it that luscious texture. - ½ teaspoon smoked paprika - Fresh herbs like thyme or parsley - Additional vegetables (spinach or mushrooms) These extras can enhance the dish. Smoked paprika adds a nice smokiness. Fresh herbs give more brightness. Adding veggies boosts nutrition and flavor. - Large pot or high-sided skillet - Wooden spoon or spatula - Measuring cups and spoons - Knife and cutting board Using the right tools makes cooking easier. A large pot helps mix everything well. A wooden spoon is great for stirring without scratching your pot. These tools help you create this dish smoothly. First, gather your ingredients. You will need: - 1 package (16 oz) potato gnocchi - 1 tablespoon olive oil - 3 cloves garlic, minced - 1 can (14 oz) diced tomatoes (with juices) - 1 cup vegetable broth - 1 cup heavy cream - 1 teaspoon dried oregano - ½ teaspoon red pepper flakes (optional for heat) - Salt and black pepper to taste - 1 cup fresh basil leaves, chopped - ½ cup grated Parmesan cheese (plus more for serving) Next, chop the fresh basil and mince the garlic. This will add great flavor. 1. Heat the olive oil in a large pot over medium heat. 2. Add the minced garlic and sauté. Watch it closely; you only need about 30 seconds. 3. Pour in the diced tomatoes, juices included. Stir and let them soften for 2-3 minutes. 4. Add the vegetable broth and heavy cream. Stir well and bring to a gentle simmer. 5. Mix in the oregano, red pepper flakes, salt, and black pepper. Let it simmer for 5 minutes. 6. Now, add the gnocchi. Stir gently to cover them in the sauce. Cover the pot and cook for 3-5 minutes. The gnocchi will float when done. 7. Stir in the chopped basil and Parmesan cheese. Keep stirring until the cheese melts and the sauce is creamy. 8. Finally, remove it from the heat. Give it a gentle stir before serving. - Keep an eye on the garlic. It can burn quickly, so stir it often. - When simmering, don’t rush. Let the flavors mix well. - If the gnocchi isn’t floating after 5 minutes, give it a couple more minutes. - Adjust the seasoning to your taste before serving. This dish is quick, easy, and perfect for a cozy meal. Enjoy the creamy goodness! To get that silky feel in your dish, use heavy cream. It adds rich texture. You can also blend in some of the pasta cooking water. This will help the sauce cling to the gnocchi. If you want it creamier, add more cream. Just remember, balance is key. You can boost the taste in many ways. Use fresh garlic instead of garlic powder. Fresh herbs like basil add great flavor. Add a squeeze of lemon juice for brightness. If you like heat, use more red pepper flakes. Experiment with different spices too, like paprika or thyme. Don’t rush the sautéing of garlic. It should be fragrant but not brown. If you overcook the gnocchi, they can become mushy. Keep an eye on them as they cook. Also, avoid skipping the salt. It brings out all the flavors in your dish. Finally, don’t forget to taste as you go. This will ensure your dish is just right. {{image_2}} You can easily make this dish vegetarian or vegan. For a vegetarian twist, use vegetable broth. Replace the heavy cream with coconut milk or cashew cream to keep it creamy and rich. For a vegan option, skip the Parmesan cheese or use a plant-based cheese. Fresh basil and garlic still add amazing flavor. Want to add protein? Chicken works great! Simply cook diced chicken in the pot before adding the garlic. You can also use Italian sausage for a spicy kick. Cook it until browned, then add garlic and follow the recipe. If you prefer seafood, shrimp can be a tasty addition. Just toss it in with the gnocchi and cook until pink. For a gluten-free version, choose gluten-free gnocchi. These are widely available in stores. The rest of the ingredients are naturally gluten-free. Just ensure your broth and any added cheese are also gluten-free. This way, everyone can enjoy this creamy dish without worry. To keep leftovers fresh, place them in an airtight container. Let the dish cool first. Store it in the fridge for up to three days. If you want to enjoy it later, use these tips. You can freeze One-Pot Creamy Tomato Basil Gnocchi. Use a freezer-safe container for best results. Make sure to leave some space at the top for expansion. It will last for about three months. Label the container with the date to track freshness. To reheat, thaw the gnocchi in the fridge overnight first. Heat it in a pot over medium heat. Add a splash of vegetable broth or cream to keep it creamy. Stir gently until it's warm throughout. You can also use a microwave. Heat it in 30-second bursts, stirring in between. Enjoy your delicious meal again! Yes, you can use store-bought gnocchi. It saves time and tastes great. Look for fresh or frozen options. Both work well in this recipe. You can find them in the pasta aisle or the freezer section at your grocery store. Fresh gnocchi cooks faster, so check the package for cooking times. To make this dish dairy-free, swap heavy cream for coconut milk or a dairy-free cream. Use nutritional yeast instead of Parmesan cheese for a cheesy flavor. You can also add a bit of lemon juice for tang. This keeps the dish creamy and rich, without dairy. This dish pairs well with a simple salad. A green salad with mixed greens and vinaigrette works nicely. You can also serve garlic bread for a crunchy side. For a heartier meal, add grilled chicken or shrimp. These options balance the creamy flavors of the gnocchi. This blog post covered everything you need to create a delicious one-pot creamy tomato basil gnocchi. We looked at the main and optional ingredients, discussed useful kitchen tools, and followed step-by-step instructions for making this dish. Tips helped you avoid common mistakes and added extra flavor. You saw different variations and learned how to store leftovers properly. With this knowledge, you can cook with confidence. Now, enjoy crafting your meals and impressing your friends and family!
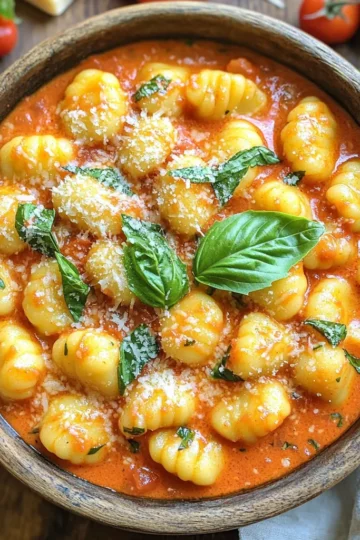
    One-Pot Creamy Tomato Basil Gnocchi Delight Recipe
  • - 1 ½ cups all-purpose flour - 1 teaspoon baking powder - ½ teaspoon baking soda - ½ teaspoon salt - 1 teaspoon ground cinnamon - ½ teaspoon ground nutmeg - ½ teaspoon ground ginger - 2 large eggs - 1 cup canned pumpkin puree - ½ cup brown sugar, packed - ½ cup granulated sugar - ½ cup vegetable oil - 1 teaspoon vanilla extract - 1 cup semi-sweet chocolate chips - ½ cup chopped walnuts (optional) For this recipe, it's key to measure carefully. Use a dry measuring cup for the flour. Spoon the flour into the cup and level it off. This helps avoid too much flour. If you don't have ground ginger, try using allspice or leave it out. You can swap the granulated sugar for coconut sugar for a richer flavor. If you need a nut-free version, skip the walnuts. Choose high-quality canned pumpkin puree. Look for brands that list pumpkin as the only ingredient. Fresh spices give a stronger flavor than old ones. For chocolate chips, semi-sweet is best, but dark chocolate also works well. If you can, use organic eggs and sugar for a cleaner taste. Quality ingredients make a big difference in flavor and texture. Start by heating your oven to 350°F (175°C). While it warms up, grab a 9x5 inch loaf pan. Grease it well with cooking spray or butter. This helps the loaf come out easily after baking. In a medium bowl, combine the all-purpose flour, baking powder, baking soda, salt, cinnamon, nutmeg, and ginger. Whisk these together until they blend well. This mix gives the loaf its great flavor and texture. In a large mixing bowl, crack the two eggs. Beat them lightly. Then, add the pumpkin puree, brown sugar, granulated sugar, vegetable oil, and vanilla extract. Mix these ingredients until they are smooth and well combined. This step is key for a moist loaf. Now, it's time to add the dry mix to your wet ingredients. Do this slowly and stir gently. You want to combine them without overmixing. Next, fold in the semi-sweet chocolate chips and, if you like, the chopped walnuts. Stir until they are evenly spread throughout the batter. Pour the batter into your prepared loaf pan. Use a spatula to smooth the top. Bake it in the oven for 55-65 minutes. To check if it's ready, insert a toothpick into the center. If it comes out clean, your loaf is done. Remove it from the oven and let it cool in the pan for about 10 minutes. Then, transfer it to a wire rack to cool completely. Enjoy your delicious creation! To make your pumpkin chocolate chip loaf perfect, avoid common baking mistakes. First, measure your flour correctly. Too much flour can make the cake dry. Use the spoon and level method for best results. Next, do not overmix your batter. Stir until just combined for a soft loaf. Finally, check your oven's temperature. An oven that is too hot can burn the edges. For a moist loaf, use canned pumpkin puree, not fresh pumpkin. Canned pumpkin gives a smooth texture. Adding eggs helps bind the ingredients and adds moisture. Use room temperature eggs for better mixing. The right balance of sugars also helps. Brown sugar adds moisture, while granulated sugar gives a nice rise. To elevate flavor, add spices like allspice or cloves. They give warmth to the loaf. You can also mix in nuts for crunch. Use walnuts for a rich texture. If you want a twist, try using dark chocolate chips instead of semi-sweet. For a fun touch, add a swirl of cream cheese in the batter before baking. This adds creaminess and a tangy kick. {{image_2}} To make a gluten-free version, swap regular flour with gluten-free all-purpose flour. This flour is easy to find and works well in most recipes. Use a blend that contains xanthan gum for the best results. Your loaf will still be moist and delicious. For a dairy-free loaf, replace the eggs with flax eggs. Mix one tablespoon of flaxseed meal with three tablespoons of water for each egg. Let it sit for five minutes to thicken. Also, use a dairy-free milk like almond or coconut milk instead of any dairy milk. You can get creative with add-ins. Try adding dried cranberries, chopped pecans, or even a swirl of cream cheese for a tangy twist. For toppings, sprinkle some cinnamon sugar before baking for a crunchy crust. A drizzle of caramel sauce on top makes it even more special! To keep your pumpkin chocolate chip loaf fresh, wrap it tightly. Use plastic wrap or aluminum foil. You can also place it in an airtight container. Store it at room temperature for up to three days. If you want it to last longer, refrigerate it. Just remember, cold air can dry it out. Freezing is a great way to save your loaf. Slice it first for easy serving later. Wrap each slice in plastic wrap, then place them in a freezer bag. Squeeze out the air to prevent freezer burn. You can freeze the loaf for up to three months. Label the bag with the date for easy tracking. To enjoy your loaf again, thaw it overnight in the fridge. For a warm treat, preheat your oven to 350°F (175°C). Place the loaf or slices on a baking sheet. Heat for about 10-15 minutes until warm. You can also use a microwave. Heat for 20-30 seconds per slice, but check often. Enjoy your delicious, warm pumpkin chocolate chip loaf! Yes, you can use fresh pumpkin. First, cook and puree your pumpkin. Make sure it is smooth and not too watery. Canned pumpkin is thicker, so adjust your other liquids if needed. You can make this recipe healthier by using whole wheat flour instead of all-purpose flour. You can also reduce the sugar by using applesauce or honey. For added fiber, mix in some ground flaxseed. The best way to check if the loaf is done is with a toothpick. Insert it into the center of the loaf. If it comes out clean or with a few crumbs, your loaf is ready. Yes, you can make mini loaves! Just divide the batter into smaller pans. Bake for about 20-30 minutes. Keep an eye on them to avoid overbaking. The cake will last about 2-3 days at room temperature. Make sure to store it in an airtight container. This helps keep it moist and fresh. In this post, we explored everything about making a pumpkin chocolate chip loaf cake. We covered the right ingredients, step-by-step instructions, and helpful tips for baking. You learned about variations and the best ways to store your cake. Baking can be fun and tasty with the right know-how. Now, you can enjoy this delicious treat on any occasion! Happy baking!
    Pumpkin Chocolate Chip Loaf Cake Irresistible Recipe
  • To make Minute Garlic Parmesan Pasta Skillet, you need a few key ingredients. Here’s a simple list: - Main ingredients: - 8 oz spaghetti or your favorite pasta - 4 cloves garlic, minced - ¼ cup unsalted butter - Sauce components: - 1 cup heavy cream - 1 cup grated Parmesan cheese - Optional ingredients: - ½ teaspoon crushed red pepper flakes (for heat) - Zest of 1 lemon (for brightness) Using fresh garlic enhances the flavor. The butter adds richness, while heavy cream and Parmesan create a creamy sauce. If you like some spice, add red pepper flakes. The lemon zest gives a fresh touch that balances the dish. Gathering these ingredients ensures a quick and tasty meal. I love how easy it is to whip this up. This dish is perfect for busy days or a cozy night in. Enjoy the process of cooking and savor the flavors! First, fill a large pot with salted water. Bring it to a boil. Salt helps to flavor the pasta well. Add 8 oz of spaghetti or your favorite pasta. Cook it according to the package instructions until it is al dente. This usually takes about 8 to 10 minutes. When the pasta is done, save 1 cup of pasta water before draining. This water helps adjust the sauce later. Next, use the same pot to sauté the garlic. Melt ¼ cup of unsalted butter over medium heat. Add 4 cloves of minced garlic and optional ½ teaspoon of crushed red pepper flakes. Cook for about 1 to 2 minutes. You want the garlic to smell great, but be careful not to burn it. Burnt garlic can ruin the dish. Now for the sauce! Pour in 1 cup of heavy cream and bring it to a gentle simmer. Stir in 1 cup of grated Parmesan cheese. Mix well until the cheese melts. This will take about 2 to 3 minutes. The sauce should thicken slightly. A smooth sauce is key for a great pasta dish. Time to combine! Add the drained pasta back to the pot. Toss it well with the creamy garlic Parmesan sauce. If the sauce seems too thick, add some of the reserved pasta water. Do this a little at a time until you reach your desired sauce thickness. This step makes a big difference in how the dish turns out. Finally, season the pasta with salt and black pepper to taste. Add the zest of 1 lemon for a fresh kick. Lemon zest brightens up the flavors and makes the dish more exciting. Finish by removing the pot from heat. Garnish with fresh parsley before serving. Enjoy your meal! - Use a large pot for boiling pasta. It helps cook evenly. - A pasta pot with a built-in strainer saves time when draining. - Chop garlic and parsley ahead of time. This makes cooking faster. - Measure out all ingredients before starting. This keeps things organized. - Serve pasta in shallow bowls for a nice look. - Top with extra Parmesan and parsley. This adds color and flavor. - Add a lemon wedge on the side. It brightens the dish. - Pair with a simple green salad. A fresh salad balances the meal. - Try adding fresh basil or oregano for more taste. - Consider using thyme for a warm flavor twist. - A splash of white wine can elevate the sauce. - Pair with a crisp white wine like Sauvignon Blanc. It complements garlic well. {{image_2}} You can easily add protein to your Minute Garlic Parmesan Pasta Skillet. Here’s how: - Chicken: Cook diced chicken in the skillet before adding garlic. Cook for about 6-8 minutes until no longer pink. Then add garlic and follow the recipe. - Shrimp: Sauté shrimp for 3-4 minutes. Make sure they turn pink. Then add garlic and continue with the recipe. - Tofu: Use firm tofu. Cube it and sauté for 5-7 minutes until golden. Add garlic next and proceed with the recipe. Cooking times for proteins can vary. Always check that chicken is cooked through. It should reach an internal temperature of 165°F. Shrimp should be opaque, and tofu should be crispy on the outside. If you want a vegetarian dish, try these substitutes: - Pasta: Use any pasta shape you like. Whole wheat or gluten-free options work well too. - Cream: Swap heavy cream with coconut cream for a vegan touch. Or use cashew cream for a lighter feel. - Cheese: Nutritional yeast can replace Parmesan. It gives a cheesy flavor without dairy. These changes keep the dish tasty while meeting your dietary needs. Feel free to swap out ingredients for variety: - Pasta Types: Try penne, fusilli, or even zoodles (zucchini noodles) for a fun twist. - Seasonal Vegetables: Add veggies like spinach, cherry tomatoes, or bell peppers. Cook them with the garlic for extra flavor. These swaps keep the meal fresh and exciting, perfect for any season! To store leftover garlic parmesan pasta, place it in an airtight container. This keeps it fresh and tasty. You should refrigerate it within two hours of cooking. The pasta stays good for up to three days. When reheating, use a skillet over low heat. Add a splash of reserved pasta water or cream. This keeps the sauce creamy and prevents it from drying out. Stir gently until heated through. If you want to freeze the dish, let it cool first. Then, transfer it to freezer-safe containers. Leave some space at the top, as the pasta will expand. Label each container with the date. It can last up to three months in the freezer. To thaw, move it to the fridge overnight. For quick thawing, place it in cold water. When ready to eat, reheat in a skillet over medium heat. Add a bit of reserved pasta water to help it regain its creamy texture. Stir often until hot. This dish is quick to make. It takes about 20 minutes total. You spend 5 minutes prepping ingredients. Cooking the pasta takes around 10 minutes. Sautéing the garlic and making the sauce adds another 5 minutes. Yes, you can swap the cheese! Try using mozzarella for a stretchier texture. Feta adds a tangy kick. You could also use Pecorino Romano for a sharper flavor. Each cheese gives a unique twist to the dish! This pasta pairs well with many sides. A crisp garden salad complements it nicely. Garlic bread adds a tasty touch. Roasted vegetables can add color and flavor too. You could even serve it with grilled chicken for protein. Absolutely! You can make this dish in advance. Store it in airtight containers in the fridge. It stays fresh for up to 3 days. Just reheat it on the stove or in the microwave. To keep it creamy, add a splash of water or cream when reheating. This post covered the key ingredients and steps for making delicious garlic Parmesan pasta. You learned how to cook pasta, sauté garlic, and create a smooth sauce. We also discussed ways to customize the dish with proteins, veggies, and herbs. Remember, cooking is about experimenting and having fun. Use these tips to create your version. Enjoy the dish and share it with friends!
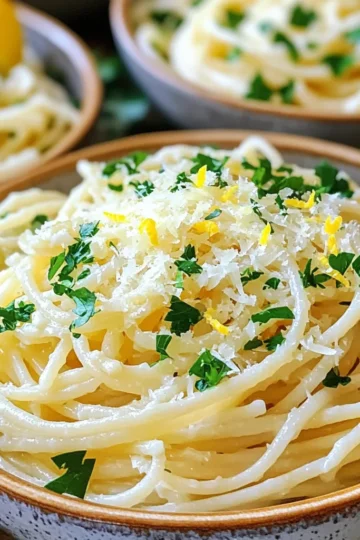
    Minute Garlic Parmesan Pasta Skillet Quick and Tasty Meal
  • To make Apple Cider Donut Trifle Cups, you'll need: - 4 apple cider donuts, crumbled - 2 cups vanilla pudding - 1 cup whipped cream - 1 cup diced apples (preferably sweet varieties) - 1 teaspoon cinnamon - 2 tablespoons brown sugar These ingredients blend to create a sweet, layered dessert that brings joy to any gathering. Enhance your trifle cups with these garnishes: - Caramel sauce for drizzling - Thin apple slices for decoration - Crushed nuts for added crunch These little touches make your trifle cups look and taste even better! You can switch some ingredients if needed: - Use chocolate pudding instead of vanilla for a richer flavor. - Swap apple cider donuts for cinnamon donuts or sponge cake. - Try different apples, like tart Granny Smith or sweet Fuji. These substitutions allow you to customize the trifle to your taste and what you have on hand. Start by dicing your apples into small pieces. I prefer sweet apples for their taste. In a small bowl, mix the diced apples with one teaspoon of cinnamon and two tablespoons of brown sugar. This blend adds a warm, sweet flavor. Let the apples sit for about 10 minutes. This allows the sugar to draw out the juice from the apples. You will see a nice syrup form at the bottom of the bowl. Grab your clear cups or dessert glasses. Begin with a layer of crumbled apple cider donuts. Use about half of the donuts for the bottom layer. Next, spoon a layer of vanilla pudding over the donuts. Smooth it out with the back of your spoon for a nice look. After that, add a layer of whipped cream. You can use a piping bag for a fancy touch, or just spoon it on. Now, take your cinnamon-sugar apple mixture and spoon it over the whipped cream. Repeat the layering process. Start again with donut crumbles, then pudding, followed by whipped cream, and finally the apple mixture. Finish with a big dollop of whipped cream on top. If you want to make it special, drizzle some caramel sauce over the top. A sprinkle of cinnamon adds a nice touch, too. Enjoy this treat chilled for the best flavor! Make your trifle cups look great. Use clear cups to show off the layers. This makes it fun to see the bright apples, cream, and donuts. For a fancy touch, add a thin apple slice on the rim. A sprinkle of crushed nuts adds crunch and color. Serve the cups chilled for the best taste. To boost flavor, try adding nutmeg or ginger to the apple mix. These spices add warmth that pairs well with the sweet donuts. Drizzle some caramel sauce on top for extra sweetness. You can also swap the vanilla pudding for a butterscotch or pumpkin flavor. These changes can make the trifle even more special. One mistake is not letting the apples sit long enough. They need to sit so they can soak up the cinnamon and sugar. This step brings out their natural sweetness. Avoid overfilling the cups. Each layer should be even and not too packed. This helps keep each bite balanced and tasty. Lastly, don't skip the chilling step. Chilling helps the flavors blend and makes each bite creamy and smooth. {{image_2}} You can change your trifle cups with the seasons. In fall, use spiced donuts. In winter, try peppermint donuts for a festive twist. In spring, swap for lemon donuts to brighten the dish. Summer? Fresh berry toppings can add a burst of color and flavor. Each season brings new tastes to enjoy. To make this treat gluten-free, use gluten-free apple cider donuts. Check the label to be sure. For a vegan option, swap the pudding for a plant-based version and use coconut cream instead of whipped cream. You can still enjoy all the layers without missing any flavors. Mixing flavors can elevate your trifle. Add nutmeg for warmth or ginger for a kick. Try using different fruits like pears or berries. You can even mix in some nuts for crunch. These small changes can create a new favorite dessert every time. Store your Apple Cider Donut Trifle Cups in the fridge. Use an airtight container. They will stay fresh for about 2 to 3 days. Keep the whipped cream from getting too soft. If you notice it losing its shape, enjoy them quickly. Freezing is not the best option for these trifle cups. The texture of the whipped cream and pudding can change. If you must freeze them, separate the layers first. You can freeze the crumbled donuts and apple mixture. Just thaw them before layering again. These trifle cups taste best when served cold. Enjoy them the same day you make them. The flavors blend nicely after a few hours in the fridge. They are perfect for parties or gatherings, especially in autumn. Yes, you can use store-bought apple cider donuts. They save time and still taste great. Just crumble them up as you would with homemade ones. The flavor will still shine through in your trifle cups. You can store the trifle cups in the fridge for up to two days. Keep them covered to avoid drying out. After two days, the donuts may get soggy. You can use chocolate pudding or butterscotch pudding instead of vanilla. Both will add a fun twist to your trifle. If you want a lighter option, try Greek yogurt mixed with honey. Yes, you can use gluten-free apple cider donuts for this recipe. Check the store for gluten-free brands. Ensure the pudding and any other ingredients are gluten-free too. Yes, you can make this trifle ahead of time. Assemble it a day in advance and store it in the fridge. Just add the whipped cream and caramel sauce right before serving for the best taste. This blog covered key ingredients and how to prepare them for your trifle. I shared tips for better presentation and ways to adapt the recipe for different diets. Remember to store your trifle properly for the best taste. Enjoy experimenting with flavors and substitutes to make it your own. With these steps in mind, you can create a great dessert that impresses everyone!
    Apple Cider Donut Trifle Cups Easy Seasonal Delight
  • To make Air Fryer Honey Garlic Brussels Sprouts, gather these key items: - 1 lb Brussels sprouts, trimmed and halved - 3 tablespoons honey - 2 tablespoons soy sauce - 2 cloves garlic, minced - 1 tablespoon olive oil - Salt and pepper to taste - 1 teaspoon sesame seeds (for garnish) If you want to amp up the taste, consider these options: - Red pepper flakes for a spicy kick You can swap some ingredients without losing flavor: - Use maple syrup instead of honey for a vegan option. - Tamari can replace soy sauce for a gluten-free version. - Coconut oil works well in place of olive oil. To make the honey garlic sauce, grab a large bowl. Add 3 tablespoons of honey. Next, pour in 2 tablespoons of soy sauce. Then, add 2 minced cloves of garlic. Follow this with 1 tablespoon of olive oil. Season with salt and pepper to taste. Mix everything well until it blends nicely. This sauce is sweet, salty, and packed with flavor. Now, it’s time to coat the Brussels sprouts. Take 1 pound of trimmed and halved Brussels sprouts. Add them to the bowl with the honey garlic sauce. Toss the sprouts gently until each one is fully coated. Make sure no sprout is left dry. This step is key for flavor and caramelization. Preheat your air fryer to 375°F (190°C). This step helps the sprouts cook evenly. Place the coated Brussels sprouts in the air fryer basket in a single layer. Don’t crowd the basket; it may take two batches. Air fry for 15-18 minutes. Shake the basket halfway through to ensure even cooking. The sprouts should turn crispy and caramelized when done. After cooking, transfer them to a serving dish. Drizzle any leftover sauce over the top. Sprinkle sesame seeds for a nice touch. If you like heat, add red pepper flakes for a spicy kick. Enjoy your crunchy delight! To get the best crunch, you must start with fresh sprouts. Look for bright green, firm Brussels sprouts. Trim and halve them evenly to ensure they cook well. The honey garlic sauce adds flavor, but too much moisture can make them soggy. Keep the sauce light. If you notice extra liquid, drain it before cooking. Preheat your air fryer to 375°F (190°C). This step helps the Brussels sprouts cook evenly. Place them in a single layer to let hot air circulate. If your air fryer is small, cook in batches. Shake the basket halfway through to help with even browning. Check for doneness after 15 minutes. They should be crispy and have a nice caramel color. These honey garlic Brussels sprouts shine on their own or as a side dish. They pair well with grilled chicken or fish. For a twist, add red pepper flakes for heat. You can also sprinkle some extra sesame seeds for a nice finish. Serve them warm in a decorative bowl with a drizzle of honey on top. This not only looks great but also adds more sweetness. {{image_2}} If you want some heat, try adding red pepper flakes. Just sprinkle them into the sauce. This spice brings a nice kick to your sweet dish. You can adjust the amount based on your taste. For a bolder flavor, consider adding some sriracha sauce to the mix too. It blends well with honey and garlic. You can swap honey for other sweeteners. Maple syrup is a great choice. It adds a rich flavor that pairs nicely with Brussels sprouts. Agave nectar is another option if you want a vegan twist. Each sweetener gives a different taste, so feel free to experiment. Brussels sprouts are not the only veggies you can use. Try adding broccoli or cauliflower for more color. Slice carrots or bell peppers for a sweet addition. Just remember to cut them to a similar size. This ensures even cooking in the air fryer. Mixing vegetables can create a fun and tasty medley. To store leftover Brussels sprouts, first let them cool. Place them in a container with a lid. You can keep them in the fridge for up to three days. Make sure they are sealed tightly to keep them fresh. When you are ready to eat the leftovers, you can reheat them in the air fryer. Set the air fryer to 350°F (175°C). Heat for about 5 to 7 minutes. This will help them regain some crunch. You can also use a microwave, but this may make them soggy. If you want to freeze Brussels sprouts, place them in a freezer-safe bag. Remove as much air as you can before sealing. They will stay good for about three months. When you're ready to cook them, thaw them in the fridge overnight before reheating in the air fryer. This will help keep their texture. Yes, you can use frozen Brussels sprouts. Just keep in mind that they may not get as crispy. I suggest thawing them first. Pat them dry with a towel. This helps remove excess moisture. Then, toss them in your honey garlic sauce and air fry as usual. You can tell the Brussels sprouts are done when they are crispy and golden brown. They should be tender inside. Check them at around 15 minutes. If they need more time, give them a few extra minutes. Shake the basket halfway through cooking for even crispiness. These Brussels sprouts pair well with many dishes. Try them with grilled chicken or salmon. They also go great with rice or quinoa. You can serve them as a side dish at dinner or even as an appetizer. The sweet and savory flavors make them a hit with everyone! This guide covered all you need to know about making honey garlic Brussels sprouts. You learned about essential ingredients, easy steps, and useful tips for cooking. We explored tasty variations and how to store leftovers, ensuring you can enjoy these sprouts later. Remember, air frying gives a crisp outside and tender inside. Use these ideas to make your dish unique. Experiment confidently, and enjoy your meals with great flavors and textures.
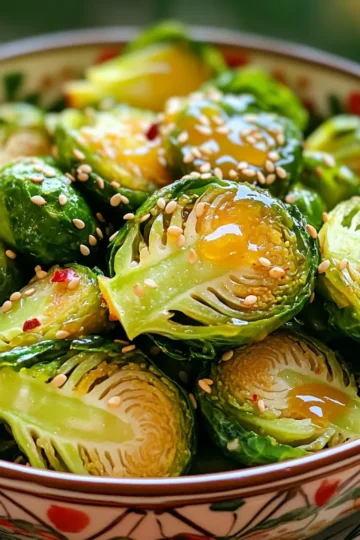
    Air Fryer Honey Garlic Brussels Sprouts Crunchy Delight
  • To make a delicious Cinnamon Streusel Coffee Cake, you will need: - 2 cups all-purpose flour - 1 cup granulated sugar - ½ cup unsalted butter, softened - 2 large eggs - 1 cup sour cream - 1 teaspoon vanilla extract - 1 teaspoon baking powder - ½ teaspoon baking soda - ½ teaspoon salt - 1 tablespoon ground cinnamon - ½ cup brown sugar, packed - ½ cup chopped walnuts or pecans (optional) - ¼ cup powdered sugar (for dusting) These ingredients come together to create a rich and moist cake with a crunchy topping. You can add extra flavor to your cake. Here are some ideas: - Chopped fruit: Try adding apples or pears for a fruity twist. - Chocolate chips: These add sweetness and richness. - More nuts: If you love nuts, add more walnuts or pecans. - Citrus zest: A bit of lemon or orange zest brightens up the flavor. Feel free to mix and match based on your taste! Choosing the best ingredients makes your cake taste great. Here are some tips: - Flour: Use fresh all-purpose flour. Check the date on the bag. - Butter: Choose high-quality unsalted butter for rich flavor. - Eggs: Fresh eggs make for a fluffier cake. Look for organic if possible. - Sour cream: A creamy, full-fat sour cream adds moisture. - Spices: Use fresh cinnamon for a strong and warm flavor. Good ingredients lead to a great outcome. Enjoy your baking! Start by preheating your oven to 350°F (175°C). This step ensures your cake bakes evenly. While the oven heats, grease and flour a 9x13-inch baking pan. This helps the cake come out easily after baking. It also prevents sticking. In a large mixing bowl, cream ½ cup of softened butter with 1 cup of granulated sugar. Mix until the mixture looks light and fluffy. This step adds air and helps your cake rise. Next, beat in 2 large eggs, one at a time. Make sure to mix well after each egg. Then, stir in 1 cup of sour cream and 1 teaspoon of vanilla extract. Mix until everything is combined. In a separate bowl, whisk together 2 cups of all-purpose flour, 1 teaspoon of baking powder, ½ teaspoon of baking soda, and ½ teaspoon of salt. Gradually add this dry mix to the wet mix. Stir gently until just combined. Be careful not to over-mix. This keeps the cake light. In a small bowl, mix together ½ cup of brown sugar and 1 tablespoon of ground cinnamon. If you like, add ½ cup of chopped walnuts or pecans for a nice crunch. Combine these ingredients well. Pour half of the batter into the prepared baking pan. Spread it evenly. Then, sprinkle half of the streusel mixture on top. Pour the remaining batter over this layer. Finally, finish with the last of the streusel mixture on top. Place the pan in the oven and bake for 30-35 minutes. Check if it’s done by inserting a toothpick into the center. If it comes out clean, your cake is ready. After baking, let the cake cool in the pan for about 10-15 minutes. Once cooled, dust the top with ¼ cup of powdered sugar. This adds a lovely touch and makes it look fancy. Now, you can cut it into squares. Enjoy your warm coffee cake! When making cinnamon streusel coffee cake, watch out for a few common errors. First, do not over-mix your batter. Mixing too much makes the cake dense. Second, make sure your oven is at the right temperature. An oven that is too hot can burn the cake, while one that is too cool will leave it soggy. Lastly, ensure you let the cake cool before dusting with powdered sugar. If you do this too soon, the sugar will melt and disappear. To get the perfect texture, use room-temperature ingredients. Cold butter or eggs can lead to uneven mixing. Also, make sure to measure your flour correctly. Too much flour can create a dry cake. Use the spoon and level method: spoon flour into your measuring cup and level it off with a knife. This will help you get the right amount. Lastly, bake until a toothpick comes out clean. This ensures your cake is moist and fluffy. Serve your coffee cake warm for the best taste. Pair it with a cup of coffee or tea for a lovely treat. You can also add fresh fruit, like berries or sliced bananas, on the side. If you want an extra touch, try adding a scoop of vanilla ice cream or whipped cream on top. This makes for a delightful dessert option! {{image_2}} You can easily skip the nuts in the cinnamon streusel. Just leave out the walnuts or pecans. This change makes the cake safe for those with nut allergies. It still tastes great! The streusel will be just as sweet and crunchy without them. You can switch things up for the seasons. Try adding pumpkin puree for a fall treat. Use one cup of pumpkin instead of sour cream. You can add pumpkin spice for extra flavor. For summer, add fresh apples. Chop them into small pieces and fold them into the batter. This adds a lovely fruity taste. If you want to change the topping, consider a cream cheese glaze. Mix cream cheese, powdered sugar, and a little milk. Drizzle it on top after the cake cools. For a lighter option, dust with extra powdered sugar or even cinnamon. Each choice gives your coffee cake a new twist! To keep your Cinnamon Streusel Coffee Cake fresh, store it in an airtight container. This will help it stay moist. You can also wrap it tightly in plastic wrap. Place it at room temperature for up to three days. If you want it to last longer, the fridge is a good option. Just know that it may dry out a bit. If you want to save some for later, freezing is a great choice. First, let the cake cool completely. Then, cut it into squares for easy serving. Wrap each square in plastic wrap. After that, place them in a freezer-safe bag. You can freeze the cake for up to three months. When you’re ready to eat, just pull out a piece. To enjoy your cake warm, reheating is simple. Preheat your oven to 350°F (175°C). Place the cake on a baking sheet. Cover it with foil to prevent it from drying out. Heat for about 10 to 15 minutes. You can also use the microwave. Heat for 15 to 20 seconds, but be careful not to make it tough. Enjoy your cake with a fresh cup of coffee! You can use plain yogurt as a sour cream substitute. It has a similar taste and texture. You can also use buttermilk or a mix of milk and vinegar. Each option keeps the cake moist and tasty. Yes, you can make this coffee cake vegan. Use plant-based butter and substitute eggs with flax eggs. Mix one tablespoon of ground flaxseed with three tablespoons of water to replace one egg. For sour cream, use unsweetened coconut yogurt or another dairy-free yogurt. Check the cake after 30 minutes. Insert a toothpick into the center. If it comes out clean or with a few crumbs, the cake is done. If wet batter sticks to the toothpick, bake for a few more minutes. Always let it cool before cutting. This blog post shared key steps to bake a great coffee cake. You learned about essential ingredients and fun add-ins to enhance flavor. We covered precise instructions, tips for perfect texture, and creative variations. Storing leftovers and reheating keep your cake fresh and tasty. Enjoying coffee cake brings family and friends together. With these tips, you can bake one that everyone will love. Happy baking!
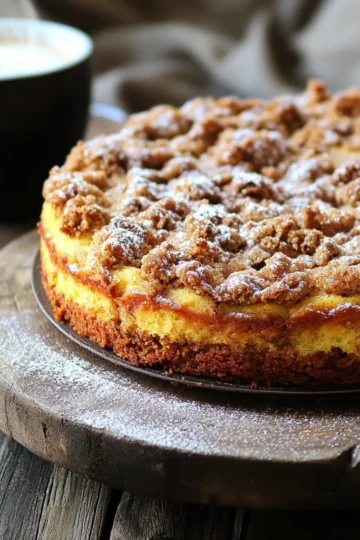
    Cinnamon Streusel Coffee Cake Simple and Delicious Treat
  • - Chicken and Marinade Components - 4 boneless, skinless chicken breasts - 1 cup fresh orange juice - ¼ cup fresh lime juice - 2 tablespoons chili powder - 1 teaspoon cumin - 1 teaspoon garlic powder - 1 teaspoon onion powder - 1 teaspoon smoked paprika - ½ teaspoon salt - ½ teaspoon pepper - 1 tablespoon olive oil - Vegetables and Toppings - 1 red onion, diced - 1 bell pepper, diced (any color) - 1 can (15 oz) black beans, drained and rinsed - Fresh cilantro, chopped (for garnish) - Sliced avocado (for topping) - Taco Assembly Items - 12 small corn or flour tortillas - Lime wedges (for serving) Gathering these ingredients is the first step to making your tacos. The chicken and marinade create a zesty base. Fresh juices and spices bring life to the dish. The vegetables add crunch and flavor. The toppings elevate your tacos. Tortillas hold everything together. This combination makes a tasty meal that everyone will enjoy. - Mixing Juices and Spices: Start by grabbing a bowl. In it, mix 1 cup of fresh orange juice with ¼ cup of fresh lime juice. Add 2 tablespoons of chili powder, 1 teaspoon of cumin, 1 teaspoon of garlic powder, 1 teaspoon of onion powder, and 1 teaspoon of smoked paprika. Finally, sprinkle in ½ teaspoon of salt and ½ teaspoon of pepper. Stir until it all blends well. - Ensuring Chicken Coating: Next, take 4 boneless, skinless chicken breasts and place them in your slow cooker. Drizzle 1 tablespoon of olive oil over the chicken. Then, pour the marinade you just mixed over the chicken. Make sure every piece is coated well. This step is key for great flavor. - Layering Ingredients: Now, scatter diced red onion and bell pepper over the chicken. This adds more flavor and color. The veggies will cook down and mix nicely with the chicken. - Cooking Time Options (Low and High): Cover the slow cooker with a lid. If you choose low heat, cook for 6-7 hours. For high heat, cook for 3-4 hours. The chicken should be tender and easy to shred when done. - Shredding the Chicken: When the cooking time is up, take two forks and shred the chicken right in the slow cooker. Mix it with the onions, peppers, and beans. This helps all the flavors come together. - Assembling the Tacos: Warm 12 small corn or flour tortillas in a skillet or microwave. Take each tortilla and fill it with the chili lime chicken mixture. Top with fresh chopped cilantro, sliced avocado, and a squeeze of lime juice. This adds a nice fresh taste to each bite. Enjoy! To keep the chicken moist, always use a good marinade. The mix of orange juice and lime juice works wonders. It adds flavor and keeps the chicken juicy. I suggest marinating the chicken for at least one hour. For the best taste, try to marinate it overnight. This allows the flavors to soak in deeply. Warming tortillas is key for great tacos. You can heat them in a dry skillet over medium heat. Just a minute on each side is perfect. You can also warm them in the microwave. Wrap them in a damp paper towel and heat for about 20-30 seconds. For the best tacos, choose corn or flour tortillas. Corn tortillas have a great taste and texture. Flour tortillas are soft and easy to fold. Both types work well, so pick what you like! Presentation can make your tacos shine. Serve them on a large platter. Add lime wedges around the tacos for color and flavor. A side of salsa or a fresh salad adds more excitement. You can also sprinkle some extra cilantro on top for a nice touch. {{image_2}} Alternative Proteins You can use different meats or even tofu. Try beef, turkey, or pork. For a vegetarian option, use chickpeas or lentils. Each swap adds its own twist to the flavor and texture. Seasonal Vegetables Options Feel free to mix in seasonal veggies. Zucchini, corn, or squash work well. These vegetables add crunch and extra nutrients to your tacos. You can also use spinach or kale for added greens. Spice Level Modifications If you want more heat, add jalapeños or a dash of cayenne. You could also use spicy chili powder. Adjust the spice to your liking. For milder flavors, skip the heat altogether. Different Marinade Ideas Experiment with different marinades. You can use mango juice instead of orange juice for sweetness. Try adding fresh herbs like cilantro or basil for extra layers of flavor. A splash of soy sauce can also give it a unique twist. Gluten-Free Alternatives Use corn tortillas instead of flour ones to keep it gluten-free. You can also serve the chicken over rice or in a salad for a gluten-free meal. Make sure to check labels on all ingredients. Vegan Options for the Recipe To make this dish vegan, swap the chicken for jackfruit or tofu. Use vegetable broth instead of juices for the marinade. These changes keep the bold flavors while making it plant-based. To store leftovers, place the chili lime chicken in an airtight container. This keeps the chicken fresh. Make sure to cool it to room temperature first. For best taste, use leftovers within 3 days. The shelf life of the prepared dish is about 3 days in the fridge. For freezing tacos, let them cool completely. Then, wrap each taco in plastic wrap. After that, place them in a freezer-safe bag. This helps keep them fresh for up to 3 months. When ready to eat, thaw tacos in the fridge overnight. Reheat in the oven at 350°F for about 15 minutes. You can prep the chicken and marinade in advance. Mix the marinade and coat the chicken. Store it in the fridge for up to 24 hours. This makes it easy to cook later. Use glass or BPA-free plastic containers for storage. They are best for keeping food fresh and safe. Yes, you can use frozen chicken. However, you must adjust the cooking time. When using frozen chicken, cook on high for about 5-6 hours. This ensures the chicken cooks through and remains tender. You can try many toppings! Here are some great options: - Fresh diced tomatoes - Shredded cheese like cheddar or cotija - Sour cream or Greek yogurt - Sliced jalapeños for a kick - Chopped green onions for added crunch To add more heat, you can: - Include diced jalapeños in the marinade. - Use spicy chili powder or cayenne pepper. - Serve with hot salsa or hot sauce on top. These changes will bring a nice kick to your tacos! Yes, you can use a regular pot. Just cook on low heat and cover it. Stir often to prevent sticking. The cooking time will be about 1.5 to 2 hours. Make sure the chicken cooks until it's tender enough to shred. These sides work great: - Mexican rice for a filling meal - Refried beans for a creamy touch - A fresh salad with lime dressing - Corn on the cob for sweetness These sides will complement your tacos perfectly! This blog post covered everything you need for delicious chili lime chicken tacos. We looked at the key ingredients and shared step-by-step cooking instructions. You learned tips to perfect the chicken and the best ways to serve tacos. Don't forget the variations that let you customize flavors and keep meals fresh. Finally, we shared smart storage ideas to enjoy leftovers or meal prep. Now, grab your ingredients and start cooking! You’re just a few steps away from tasty tacos. Enjoy your meal!
    Slow Cooker Chili Lime Chicken Tacos Flavorful Delight
  • - Chicken - 4 boneless, skinless chicken thighs - Vegetables - 2 cups broccoli florets - 1 red bell pepper, sliced - 1 yellow bell pepper, sliced - 1 medium red onion, sliced - Balsamic Glaze Components - ⅓ cup balsamic vinegar - 2 tablespoons honey - 2 tablespoons olive oil - 3 cloves garlic, minced - 1 teaspoon dried thyme - Salt and pepper to taste For this recipe, I make sure to use the right amounts. Here’s what you need: - Chicken: 4 thighs - Broccoli: 2 cups - Red bell pepper: 1 - Yellow bell pepper: 1 - Red onion: 1 medium - Balsamic vinegar: ⅓ cup - Honey: 2 tablespoons - Olive oil: 2 tablespoons - Garlic: 3 cloves - Thyme: 1 teaspoon - Salt and pepper: to taste - Fresh parsley for garnish (optional) Using fresh parsley adds a nice touch. It also makes the dish look pretty. With these ingredients, you’ll create a tasty meal that is both healthy and colorful! First, you need to preheat your oven to 425°F (220°C). This step is key for even cooking. While the oven heats up, grab a large sheet pan. Line it with parchment paper for easy cleanup. It also helps the food not stick. In a small bowl, whisk together the balsamic vinegar, honey, olive oil, minced garlic, dried thyme, salt, and pepper. This mixture creates a tasty glaze. Make sure to mix it well. The flavors blend together, giving your dish a rich taste. Now, place the chicken thighs on one side of the sheet pan. Pour half of the balsamic glaze over the chicken. Make sure each piece is coated well. On the other side, arrange the broccoli florets, sliced bell peppers, and red onion. Drizzle the rest of the glaze over the veggies. Toss them gently to coat evenly. Bake the pan in your preheated oven for 25-30 minutes. Check that the chicken reaches an internal temperature of 165°F (75°C). The vegetables should be tender and slightly caramelized. Once done, remove the pan from the oven. Let it sit for 5 minutes before serving. If you want, garnish with fresh parsley for a pop of color. Enjoy your meal! To ensure your chicken is juicy and safe to eat, check the internal temperature. Use a meat thermometer to confirm it reaches 165°F (75°C). Insert the thermometer into the thickest part of the thigh. If it reads 165°F, your chicken is done! Let it rest for a few minutes before serving. This helps keep the juices inside. To boost the flavor of your veggies, start with good seasoning. Use salt and pepper generously. A little olive oil helps too. Toss the vegetables in the balsamic glaze well. This adds sweetness and depth. For caramelization, roast them until they're soft and slightly brown. This brings out their natural sweetness and adds great texture. Meal prep can save you time during busy weeks. Chop your veggies a day ahead and store them in the fridge. You can also marinate the chicken in the balsamic glaze overnight. This gives the chicken more flavor and makes cooking easier. When it's time to cook, just toss everything on the sheet pan. Easy and quick! {{image_2}} You can change up the protein in this dish. Try using chicken breasts or turkey. For a meatless option, use firm tofu or chickpeas. Swap the veggies too. Instead of broccoli, try green beans or asparagus. You can also use zucchini or carrots. Mixing and matching makes this dish fun and new each time. This meal pairs well with many sides. Serve it over rice for a filling option. Quinoa adds a nutty taste and is healthy too. You can also enjoy it with crusty bread. The bread is perfect for soaking up the tasty glaze. Feel free to add a side salad for some crunch and freshness. Want to make it even tastier? Add spices like paprika or cumin. Fresh herbs like rosemary or basil can boost the flavor too. A squeeze of lemon juice brightens the dish. Try adding chili flakes for a spicy kick. These small changes can take your meal to the next level. To keep your sheet-pan balsamic glazed chicken and veggies fresh, store them in an airtight container. Place the chicken and veggies in the fridge within two hours of cooking. They will last up to three days. Label your container with the date. This way, you know when to eat them. When you're ready to enjoy leftovers, preheat your oven to 350°F (175°C). Place the chicken and veggies on a baking sheet. Cover them with foil to prevent drying. Heat for about 15-20 minutes or until warm. You can also reheat in the microwave if you’re short on time. Just heat for 1-2 minutes, checking often. If you want to save some for later, freezing is a great option! First, let the chicken and veggies cool completely. Then, place them in a freezer-safe bag or container. Remove as much air as possible before sealing. You can freeze them for up to three months. To reheat, thaw in the fridge overnight and then follow the reheating instructions. Bake the chicken for 25 to 30 minutes. The chicken is done when it reaches 165°F. Use a meat thermometer to check this. The veggies will cook nicely alongside the chicken. They will be tender and slightly caramelized. This cooking time makes it easy and quick. Yes, you can use frozen chicken and veggies. Just remember to adjust the cooking time. Frozen chicken may take longer to cook. Make sure it reaches the safe temperature of 165°F. For frozen veggies, they may need less time to cook. Keep an eye on them to avoid overcooking. You can serve this dish with many sides. Try rice for a filling option. Quinoa is also a great choice for a healthy twist. You can add a fresh salad for some crunch. Bread is nice for soaking up the glaze too. Choose what you like best to make your meal complete. This blog post covered the key ingredients, steps, and tips for making balsamic glazed chicken. We explored the main ingredients, including chicken and fresh veggies, and discussed how to prepare the dish. I shared useful cooking and flavor tips to help you succeed. In the end, this recipe is easy to adapt. You can switch ingredients and sides based on what you like. Enjoy your cooking and the delicious meal ahead!
    Sheet-Pan Balsamic Glazed Chicken and Veggies Delight
  • - 1 cup almond butter - ½ cup coconut oil, melted - ¼ cup cocoa powder - ¼ cup maple syrup or honey - 1 teaspoon pure vanilla extract - ¼ teaspoon sea salt - ½ cup dark chocolate chips - ¼ cup chopped almonds (optional topping) Gather these simple ingredients. Each one plays a key role in flavor and texture. Almond butter gives a creamy base. Coconut oil helps things bind together while adding richness. Cocoa powder provides that deep chocolate taste. Maple syrup or honey adds just the right sweetness. Vanilla extract boosts all the flavors. Sea salt balances the sweetness and enhances taste. Dark chocolate chips are the final layer of joy. If you like, sprinkle chopped almonds on top for crunch. This mix will help you create a treat that feels indulgent yet simple. - In a mixing bowl, combine: - 1 cup almond butter - ½ cup melted coconut oil - ¼ cup cocoa powder - ¼ cup maple syrup or honey - 1 teaspoon pure vanilla extract - ¼ teaspoon sea salt - Stir the mixture until it is smooth and well combined. This step is key for a rich flavor. - Line a muffin tin with paper liners to keep the cups from sticking. - Spoon about 2 tablespoons of the almond butter mixture into each liner. Fill them halfway. Use the back of a spoon to press down gently for even layers. - Place the muffin tin in the freezer for 15 to 20 minutes. This helps the almond butter layer set. - While that freezes, melt ½ cup dark chocolate chips in a microwave-safe bowl. Heat in 30-second bursts, stirring until smooth. - Remove the muffin tin from the freezer. Pour the melted chocolate over the almond butter layer in each cup. - If you want, sprinkle with ¼ cup chopped almonds for a nice crunch. - Return the muffin tin to the freezer for another 30 minutes to let the chocolate set. - After they are set, remove the cups from the freezer and peel away the paper liners. Enjoy! - Use natural almond butter for a healthier option. This choice enhances flavor and nutrition. - Allow the chocolate to cool slightly before pouring over the almond butter. This helps keep the layers distinct. - Replace maple syrup with agave nectar for a vegan option. This change keeps the sweetness while meeting dietary needs. - Use other nut butters like peanut butter for a different flavor. Each nut butter brings its own unique taste and texture. {{image_2}} You can easily mix up the flavors. Adding a pinch of sea salt on top gives a nice touch. Salt balances the sweetness and enhances the chocolate. Another fun idea is to add shredded coconut into the almond butter mix. This adds a chewy texture and a tropical twist to your cups. You can adjust the taste and feel by changing the cocoa powder amount. Adding more cocoa powder gives a richer, deeper chocolate flavor. To add crunch, try topping your cups with different nuts or seeds. Chopped walnuts or sunflower seeds work well. Mixing these in can make the treat even more delicious! You can keep these no-bake chocolate almond butter cups in the freezer. Use an airtight container for best results. They will stay fresh for up to 2 months. When you want to enjoy them, simply thaw before serving. If you’re in a hurry, you can eat them straight from the freezer. They taste great cold! These cups are best enjoyed at room temperature. Let them sit out for a few minutes before serving. Avoid putting them in the microwave. Reheating can change their texture, and we want them to stay smooth and creamy. Enjoy your tasty treat! Yes, you can use peanut butter or cashew butter. Both options work well. Each nut butter adds a unique flavor. This gives you room to create your favorite taste. These cups can be stored in the freezer for up to 2 months. Just keep them in an airtight container. They will stay fresh and tasty. You can enjoy them whenever you like. Yes, they are quite healthy. They contain good fats from the nut butter and coconut oil. The maple syrup or honey adds natural sweetness. This makes them a guilt-free treat that tastes great! These no-bake chocolate almond butter cups are easy and fun to make. You only need a few ingredients and simple steps to get delicious results. Remember, you can swap ingredients to match your taste. Store them in your freezer for a sweet treat anytime. Enjoy this guilt-free snack without worry. You’ll love how satisfying they are and how quick they come together. Happy cooking!
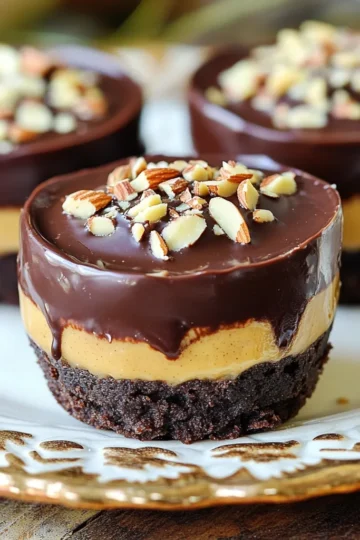
    No-Bake Chocolate Almond Butter Cups Delightfully Simple
  • For the Pumpkin Cream Cheese Whoopie Pies, you need the following items: - 1 ½ cups all-purpose flour - 1 teaspoon baking soda - ½ teaspoon baking powder - 1 teaspoon ground cinnamon - ½ teaspoon ground nutmeg - ¼ teaspoon ground ginger - ¼ teaspoon salt - ½ cup unsalted butter, softened - 1 cup packed brown sugar - ½ cup granulated sugar - 1 cup canned pumpkin puree - 1 large egg - 1 teaspoon vanilla extract - 8 oz cream cheese, softened - ½ cup powdered sugar - ¼ cup heavy cream - ½ teaspoon vanilla extract (for filling) These ingredients create a soft, spiced cake that pairs well with creamy filling. I love how the pumpkin gives a moist texture, while the spices add warmth. The cream cheese filling is rich and tangy, making every bite a delight. Using fresh spices can really boost flavor. Don't skip the cream cheese; it brings the whole treat together! - Preheat the oven to 350°F (175°C). - Line two baking sheets with parchment paper. - In a medium bowl, whisk together: - 1 ½ cups all-purpose flour - 1 teaspoon baking soda - ½ teaspoon baking powder - 1 teaspoon ground cinnamon - ½ teaspoon ground nutmeg - ¼ teaspoon ground ginger - ¼ teaspoon salt This mix gives your whoopie pies great flavor. Set the bowl aside for later. - In a large bowl, use an electric mixer to beat together: - ½ cup unsalted butter, softened - 1 cup packed brown sugar - ½ cup granulated sugar Mix until the mixture is light and fluffy. This takes about 3 to 5 minutes. - Next, add: - 1 cup canned pumpkin puree - 1 large egg - 1 teaspoon vanilla extract Beat everything together until it is well combined. - Gradually mix the dry ingredients into the wet ingredients. - Stir until just combined; do not overmix. This helps keep your whoopie pies soft. - Using a cookie scoop or tablespoon, drop heaping tablespoons of batter onto the prepared baking sheets. Space them about 2 inches apart. - Bake for about 12 to 15 minutes. Check with a toothpick; it should come out clean. - Let the cakes cool on the baking sheets for 5 minutes. Then, transfer them to wire racks to cool completely. - In a medium bowl, beat together: - 8 oz cream cheese, softened - ½ cup powdered sugar - ¼ cup heavy cream - ½ teaspoon vanilla extract Mix until the filling is smooth and creamy. - Once the pumpkin cakes have cooled, spread a generous dollop of cream cheese filling on the flat side of one cake. - Top with another cake to form a sandwich. Press gently to stick them together. Repeat this with all the cakes and filling. Enjoy your delicious whoopie pies! To make the best pumpkin whoopie pies, use room temperature ingredients. This helps them blend well. Cold butter or eggs can create lumps. Mix the batter gently. Overmixing can make the cakes tough, which you want to avoid. For the cream cheese filling, adjust the heavy cream. Add more for a thinner filling. Use less if you prefer a thicker texture. This way, you can get just the right spreadability for your whoopie pies. Make your whoopie pies look special. Dust them with powdered sugar before serving. This adds a nice touch and makes them look even more tempting. Plus, it enhances the sweet flavor. {{image_2}} You can change the cream cheese filling to fit your taste. Try using flavored cream cheeses like maple or vanilla. These will add a new twist to the whoopie pies. You can even use a mix of cream cheese and pumpkin spice for a fun surprise. Each variation brings a unique taste and keeps things fresh. Want to make your whoopie pies more exciting? Add chocolate chips or nuts to the batter. Chocolate chips give a sweet burst with each bite. Nuts add a nice crunch and depth of flavor. You can also sprinkle some chopped nuts on the filling for extra texture. This small change can make a big difference! If you need a gluten-free treat, you can easily adapt this recipe. Just swap the all-purpose flour for gluten-free flour. Make sure to choose a blend that works well for baking. Your whoopie pies will still be soft and tasty while fitting your dietary needs. Enjoy them without worry! You can store your whoopie pies in the refrigerator. They stay fresh for up to 3 days. Just place them in an airtight container. This keeps the pies soft and moist. If you want to save them longer, freeze your whoopie pies. They can last for up to 3 months in the freezer. Wrap each pie in plastic wrap and place them in a freezer bag. This way, you can enjoy them later. To avoid sticking, layer your whoopie pies with parchment paper. Place a piece of parchment between each pie. This simple trick helps keep them intact and ready to eat. Yes, you can use fresh pumpkin. To do this, roast a small pumpkin until soft. Let it cool, then scoop out the flesh. Blend the flesh until smooth to make a fresh pumpkin puree. This adds a lovely, bright flavor to your whoopie pies. To check if they are done, use the toothpick test. Insert a toothpick into the center of a pie. If it comes out clean, they are ready. If it has wet batter, bake them a bit longer. This ensures a moist yet firm texture. Yes, you can make these whoopie pies ahead of time. Bake and cool them completely first. Store them in an airtight container in the fridge for up to three days. You can also freeze them for up to three months. Just thaw before serving. These whoopie pies are best served chilled or at room temperature. For a pretty touch, dust them with powdered sugar. Arrange them on a nice plate for a fun presentation. Your guests will love the look and taste! You learned how to make delicious pumpkin whoopie pies. We covered all the important steps, from gathering ingredients to mixing and baking. The right texture and flavor matter, so remember to let your ingredients warm up. Experiment with fillings and toppings to make them unique. Store them well to keep them fresh. Enjoy these tasty treats with friends and family. You’ll impress everyone with your baking skills!
    Pumpkin Cream Cheese Whoopie Pies Delightful Treats

our favorite

Dessert Recipes

A little dessert is a cornerstone of a healthy diet.

browse all desserts
  • - 1 ½ cups graham cracker crumbs - ⅓ cup unsalted butter, melted - 2 tablespoons granulated sugar - 8 oz cream cheese, softened - ½ cup powdered sugar - 1 teaspoon vanilla extract - 1 cup heavy whipping cream - 2 cups fresh strawberries, hulled and sliced - 2 tablespoons lemon juice - 1 tablespoon granulated sugar (for strawberries) - Fresh mint leaves (for garnish) When measuring your ingredients, accuracy is key. Use a dry measuring cup for the graham cracker crumbs and sugar. For the butter, melt it and measure in a liquid measuring cup. Cream cheese should be softened, so let it sit out for 30 minutes. Use a kitchen scale for precise measurement if you have one. You can swap some ingredients if needed. Instead of graham crackers, use crushed cookies like Oreos for a different flavor. You can use coconut oil instead of unsalted butter for a dairy-free option. If you don't have powdered sugar, blend granulated sugar until fine. For a lighter version, try using low-fat cream cheese. Fresh strawberries are best, but frozen ones will work too; just thaw and drain excess liquid. To start, grab a medium mixing bowl. Add 1 ½ cups of graham cracker crumbs. Next, pour in ⅓ cup of melted unsalted butter and 2 tablespoons of granulated sugar. Mix it all together. You want the crumbs to feel like wet sand. This step is key; the crust holds everything in place. Now, press the crumb mixture firmly into the bottom of your jars or dessert cups. Make sure it’s even and compact. This will give your cheesecake a solid base. Set the jars aside. In a large mixing bowl, take 8 oz of softened cream cheese. Use an electric mixer to beat it until it’s smooth and creamy. This step ensures a rich filling. Add in ½ cup of powdered sugar and 1 teaspoon of vanilla extract. Mix until everything is smooth and well combined. In another bowl, whip 1 cup of heavy cream until soft peaks form. This whipped cream adds lightness to the filling. Gently fold the whipped cream into the cream cheese mixture. Be careful not to deflate the whipped cream. This keeps your filling fluffy. Now it’s time to assemble. Spoon the cream cheese mixture over the graham cracker crust in each jar. Fill them about ¾ full. This layer is where the magic happens. Next, take 2 cups of fresh strawberries that you’ve hulled and sliced. Mix them with 2 tablespoons of lemon juice and 1 tablespoon of sugar in a bowl. Let them sit for about 10 minutes. This allows the strawberries to become sweeter and juicier. Spoon the macerated strawberries on top of the cream cheese layer. Distribute them evenly across all jars. For a fancy touch, you can add a dollop of the remaining cream cheese mixture on top. Finish with a fresh mint leaf for color. Finally, refrigerate the jars for at least 2-4 hours. If possible, let them set overnight. This waiting time helps the cheesecake become firm and delicious. Enjoy your easy and tasty no-bake strawberry cheesecake jars! To achieve the best whipped cream, start with cold heavy cream. Cold cream whips up faster and better. Use a clean bowl and beaters. This helps the cream reach soft peaks quickly. Whip until it is fluffy but still holds its shape. Be careful not to over-whip, as it can turn buttery. Gently fold the whipped cream into the cream cheese mix. This keeps the texture light and airy. Fresh strawberries make this dessert shine. Choose ripe berries for the best taste. Remove the green tops and slice them thinly. Mix the slices with lemon juice and sugar. Let them sit for about ten minutes. This softens the berries and brings out their natural sweetness. The lemon juice adds brightness, enhancing the flavor of the strawberries. Presentation is key to making your jars appealing. Use clear jars to show off the lovely layers. Mason jars are a great choice, adding a rustic touch. You can also top the jars with a dollop of cream cheese mix. A fresh mint leaf adds a pop of color. Consider using striped paper straws for a fun look. Serve chilled for the best experience. {{image_2}} You can change the flavor of your cheesecake jars. Try adding chocolate for a rich twist. Melt some chocolate and mix it into the cream cheese. You can also use blueberry or raspberry instead of strawberries. Just swap the berries when you layer them on top. Each fruit brings its own taste and fun colors. Want a lighter version? Use low-fat cream cheese. It keeps the creaminess but cuts down on fat. You can also use Greek yogurt in place of some cream cheese. This adds protein and makes it healthier. For the crust, swap regular butter for coconut oil. It gives a nice flavor while keeping it light. If you need a gluten-free dessert, use gluten-free graham crackers. They work just like regular ones. You can also make a crust with ground nuts like almonds or pecans. Mix them with melted butter for a crunchy base. This adds flavor and texture while keeping your cheesecake jars safe for gluten-free diets. To store leftover cheesecake jars, cover them tightly with plastic wrap. You can also use a lid if your jars have one. This keeps the cheesecake fresh and prevents it from absorbing other smells in your fridge. Make sure to keep them in the main part of the fridge, not the door. The fridge door can be warmer and may not keep your dessert as fresh. Leftover cheesecake jars can stay fresh in the fridge for up to three days. After that, the crust may become soggy. If you can, enjoy your jars within this time for the best taste and texture. Always check for any signs of spoilage before eating. If something looks or smells off, it's best to toss it. You can freeze these cheesecake jars if you want to keep them longer. First, make sure the jars are airtight. If not, transfer the cheesecake to a freezer-safe container. These jars can last up to two months in the freezer. When you're ready to eat, thaw them in the fridge overnight. Avoid microwaving the jars, as this can change the texture. Yes, you can make these jars ahead of time. I often whip them up a day before I need them. This lets the flavors blend well. Just cover the jars and keep them in the fridge. They stay fresh and tasty for up to two days. This makes them great for parties or special meals. If you want a change, you can use cookies instead of graham crackers. Digestive biscuits work well. You can also use vanilla wafers or even crushed Oreos for a fun twist. Just make sure the texture is similar. This will keep your crust thick and tasty. These jars last about three to four days in the fridge. Keep them covered tightly to avoid drying out. If you notice the strawberries getting soft, it’s best to eat them sooner. Enjoy your cheesecake jars while they are fresh for the best taste! You now have all the tools to make delicious No Bake Strawberry Cheesecake Jars. We covered key ingredients, step-by-step instructions, and tips to enhance your recipe. Plus, we explored variations and storage methods to keep your jars fresh. Remember, making cheesecake jars is simple and fun. Enjoy experimenting with flavors and sharing your creations. Your friends will love this tasty treat! Dive in and make the jars your own. Happy baking!
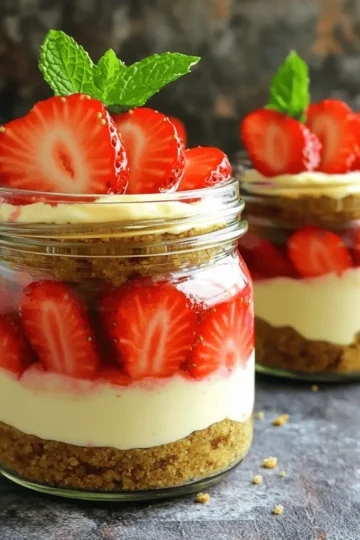
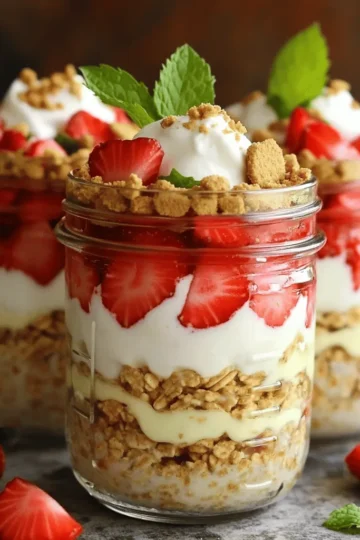
    No Bake Strawberry Cheesecake Jars Easy and Delicious
  • To make caramel pecan pie bars, you will need: - 1 cup all-purpose flour - ½ cup unsalted butter, softened - ¼ cup granulated sugar - ¼ teaspoon salt - ½ cup brown sugar, packed - ⅓ cup light corn syrup - 1 large egg - 1 teaspoon vanilla extract - 1 cup pecans, roughly chopped - ¼ teaspoon ground cinnamon Each ingredient plays a key role in your bars. If you run out of all-purpose flour, you can use a gluten-free flour blend. Unsalted butter is best for control over salt. You can swap brown sugar for coconut sugar for a lighter taste. Light corn syrup can be replaced with maple syrup if desired. Just keep in mind that the flavor may slightly change. Using fresh ingredients always makes a big difference. Fresh pecans give more flavor and crunch. Check your baking supplies for freshness, especially the baking powder. If you have old ingredients, it can affect the taste and texture of your bars. Always go for the freshest options you can find for the best results. Start by preheating your oven to 350°F (175°C). Grease an 8x8-inch baking pan or line it with parchment paper. This helps with easy removal later. In a medium bowl, mix 1 cup of all-purpose flour, ½ cup of softened unsalted butter, and ¼ cup of granulated sugar with ¼ teaspoon of salt. Blend until the mixture looks crumbly. Press this dough into the bottom of your prepared pan. Bake it for about 15 minutes, or until it turns lightly golden. While the crust bakes, prepare the filling. In a bowl, whisk together ½ cup of packed brown sugar, ⅓ cup of light corn syrup, 1 large egg, and 1 teaspoon of vanilla extract. Mix until smooth. Then, stir in 1 cup of roughly chopped pecans and ¼ teaspoon of ground cinnamon. Make sure the pecans are well coated. Once your crust is golden, take it out of the oven. Pour the pecan filling over the hot crust, spreading it evenly. Bake the entire dish for 25-30 minutes, or until the filling is set and slightly bubbly. Let the bars cool completely in the pan on a wire rack. Once cool, cut them into squares or bars. Enjoy your sweet, nutty treat! To get a great crust, start with soft butter. It helps mix in better. Aim for a crumbly dough that sticks together. Press it firmly in the pan. This keeps the crust from falling apart. Bake it just until golden. This step gives it a nice crunch. For the filling, whisk the sugars and corn syrup well. This helps blend the sweet flavors. Add the egg and vanilla for richness. Stir in the pecans last. Make sure they are well coated. The cinnamon adds a warm note. Let the filling bubble just a bit while baking. This means it’s ready. Serve the bars on a pretty plate. Drizzle some extra caramel sauce on top. It looks fancy and tastes great. Add whole pecans on the sides for fun. This makes each bar pop with color. Always cut the bars after they cool. This keeps them neat and easy to serve. {{image_2}} If you want to make these bars without nuts, it's easy! You can replace the pecans with seeds. Sunflower seeds or pumpkin seeds work well. They add crunch and flavor without nuts. Just use the same amount of seeds as you would pecans. You can also add some chocolate chips for extra sweetness. You can add a twist to the flavor of your caramel pecan pie bars. Try mixing in some chocolate chips for a rich taste. Dark chocolate pairs nicely with the caramel. You can also add a touch of sea salt on top before baking. This will balance the sweetness and enhance the flavor. For a hint of spice, add a pinch of nutmeg or ginger to the filling. To make these bars gluten-free, swap the all-purpose flour for a gluten-free blend. Many blends work well in baking. Just check that the blend has a good balance of starches and flours. You can also use almond flour for a nutty flavor. Adjust the amount of butter if needed, as almond flour can be more moist. Store any leftover caramel pecan pie bars in an airtight container. Keep them in the fridge for up to one week. This keeps them fresh and tasty. If you want to enjoy them longer, freezing is a great option. To freeze the bars, first let them cool completely. Cut them into squares or bars. Wrap each one in plastic wrap or foil. Then, place them in a freezer-safe bag. These can stay frozen for up to three months. When you are ready to eat, thaw them in the fridge overnight. To reheat, take the bars out of the fridge. Place them in a microwave-safe dish. Heat them for about 10 to 15 seconds. This warms them up without making them soggy. You can also warm them in the oven. Set it to 350°F (175°C) and heat for about 5 minutes. Enjoy your delicious treat! Yes, you can use different nuts. Walnuts or almonds work great too. They add a nice crunch. Just chop them roughly like the pecans. Adjust the baking time if needed, but the bars will still be delicious. The bars are done when the filling is set and slightly bubbly. You can check by gently shaking the pan. If the center jiggles, bake a little longer. A golden top also shows they are ready. Absolutely! These bars taste great when made a day ahead. Just cool them completely and store them in an airtight container. They will stay fresh for up to four days. You can enjoy them anytime. To cut the bars, use a sharp knife. First, let them cool completely. If you lined the pan with parchment, lift the bars out. This makes cutting easier. Clean the knife between cuts for neat squares. You can use honey or maple syrup as a substitute. Both options add a nice flavor. However, they may change the texture a bit. Use the same amount as the corn syrup in the recipe. You now have all the details to make delicious caramel pecan pie bars. We covered the best ingredients, how to prepare them, and even tips for getting the most from your bake. Remember, using fresh ingredients makes a big difference. Don’t forget to explore variations to suit your taste. Store any leftovers properly to enjoy later. With these steps, you can impress everyone with your sweet treat. Enjoy baking and sharing your caramel pecan pie bars with family and friends!
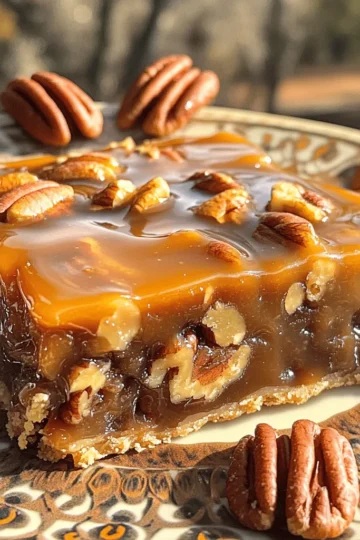
    Caramel Pecan Pie Bars Simple and Tasty Treat
  • To make bakery-style cinnamon swirl bread, you'll need these key items: - 3 ½ cups all-purpose flour - ½ cup granulated sugar - 1 packet (2 ¼ tsp) instant yeast - 1 teaspoon salt - 1 cup warm milk (about 110°F/43°C) - ¼ cup unsalted butter, melted - 2 large eggs - 1 tablespoon vanilla extract - ⅓ cup brown sugar - 2 teaspoon ground cinnamon These ingredients create a soft and fluffy bread that swirls with sweet cinnamon goodness. The warm milk helps the yeast grow, and the butter adds richness. You will also need a few baking essentials: - A large mixing bowl - A floured surface for kneading - A rolling pin - A greased 9x5-inch loaf pan - A sharp knife for slicing These tools help you shape and prepare the dough without any hassle. Having everything ready makes baking more fun and easy. For a special touch, consider these optional toppings: - 1 egg wash (1 egg beaten with 1 tablespoon water) for a golden crust - Powdered sugar for dusting after baking The egg wash gives your bread a shiny finish, while powdered sugar adds sweetness. You can choose one or both to make your bread look and taste amazing! First, grab a large mixing bowl. Pour in 1 cup of warm milk and ¼ cup of melted unsalted butter. Then, add ½ cup of granulated sugar. Sprinkle 1 packet of instant yeast over the top. Let this sit for about 5 minutes. You want to see some bubbles forming. This shows the yeast is active and ready to work. Next, it's time to add the eggs and 1 tablespoon of vanilla extract. Stir this mixture well until it combines smoothly. Gradually mix in 3 ½ cups of all-purpose flour and 1 teaspoon of salt. Keep stirring until the dough begins to come together. Now, turn the dough out onto a floured surface. Knead it for 8 to 10 minutes. You want it to feel smooth and elastic. If the dough is too sticky, add a little more flour. Next, place the dough in a greased bowl. Cover it with a kitchen towel and set it in a warm spot to rise for about 1 hour. It should double in size. Enjoy this time; your bread is on its way to becoming amazing! To get the right dough, start with warm milk. It helps the yeast wake up. Mix in melted butter and sugar until smooth. When you add flour, do this slowly. The dough should feel soft but not sticky. If it feels too wet, add more flour, just a tablespoon at a time. Knead it on a floured surface for 8-10 minutes. You want it smooth and elastic. This is key for soft bread. To get a nice cinnamon swirl, roll the dough into a big rectangle. Aim for about 18x12 inches. Spread melted butter on top, then sprinkle your cinnamon-sugar mix evenly. When you roll it up, do it tightly. This helps keep the swirl intact. After cutting the roll, twist the two halves with the cut sides facing up. This will show off that lovely swirl when it bakes. Bake your bread at 350°F (175°C). This temperature gives a nice golden color. Keep an eye on it after 25 minutes. It should look brown and sound hollow when tapped. If it needs more time, check every 2-3 minutes. Let it cool in the pan for 10 minutes before moving it to a wire rack. This helps keep it moist. Enjoy the smell as it cools! {{image_2}} You can make your cinnamon swirl bread even better. Try adding nuts or fruits. Walnuts or pecans give a nice crunch. You can also add raisins or chopped apples for sweetness. When you sprinkle the cinnamon-sugar mix, fold in the nuts or fruits. It adds a fun twist and more flavor. A glaze can make your bread shine. You can use a simple glaze made from powdered sugar and milk. Mix one cup of powdered sugar with two tablespoons of milk. Drizzle it on the bread after it cools. For a richer taste, mix in some vanilla extract. You can also brush the top with melted butter and sprinkle more cinnamon sugar. It gives a sweet touch. Spices can change the whole taste of your bread. Try nutmeg or cardamom for a warm flavor. Mix these spices with your brown sugar and cinnamon. This gives your bread a unique twist. Experiment to find your favorite mix. You might just create a new family favorite! To keep your cinnamon swirl bread fresh, wrap it tightly in plastic wrap. You can also use aluminum foil. Place it in an airtight container at room temperature. This helps keep the bread moist. Enjoy it within three days for the best taste. If you want to save some for later, freezing works well. Slice the bread before freezing. Wrap each slice in plastic wrap, then place them in a freezer-safe bag. This way, you can take out just what you need. The bread can last up to three months in the freezer. To reheat, take out a slice and place it in the toaster. You can also warm it in the oven at 350°F (175°C) for about 10 minutes. This gives it a nice crust. If you prefer it warm and soft, use the microwave for about 15 seconds. Enjoy your bread warm! Yes, you can use whole wheat flour. Just replace half of the all-purpose flour with whole wheat. This change adds fiber and nutrients. The bread may be denser, but it still tastes great. You might need to add a bit more liquid to keep the dough soft. If your dough doesn't rise, check the yeast. It needs to be fresh and active. Make sure your milk is warm, about 110°F. If the dough is cold, it won’t rise well. Also, ensure you are in a warm spot for rising. You can place it in an oven with the light on to help. To make this recipe vegan-friendly, swap the eggs with flax eggs. Mix 1 tablespoon of flaxseed meal with 2.5 tablespoons of water for each egg. Replace the butter with coconut oil or vegan butter. Use plant-based milk instead of regular milk. This keeps all the flavor while making it vegan. You learned about the key ingredients for baking and how to prepare dough. I shared tips to perfect your swirl and get the baking time just right. You can even explore tasty variations like adding nuts or fruits. Storing and reheating your baked goods is simple. With these steps and tricks, you can create delicious treats at home. Keep experimenting and enjoy the fun of baking!
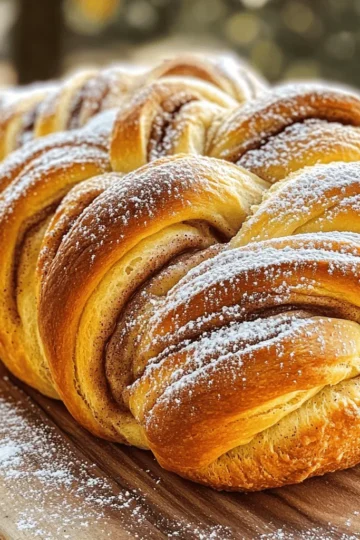
    Bakery Style Cinnamon Swirl Bread Easy and Delicious
  • To make this tasty ice cream, you will need: - 2 cups heavy whipping cream - 1 cup sweetened condensed milk - 1 teaspoon vanilla extract - 1 cup crushed chocolate sandwich cookies (like Oreos) - ½ cup mini chocolate chips (optional) These ingredients come together to create a smooth and creamy treat. The heavy whipping cream gives the ice cream its fluffy texture. The sweetened condensed milk adds sweetness and creaminess, while the vanilla extract enhances the flavor. The chocolate sandwich cookies deliver that classic cookies and cream taste. You can play with flavors by adding: - ½ cup chopped nuts (like pecans or walnuts) - ½ cup crushed candy bars (like Snickers or Reese's) - A swirl of chocolate or caramel sauce These additions can make your ice cream even more fun and unique. You can mix and match to find your favorite combo! When choosing cookies, I suggest these brands: - Oreo - Hydrox - Famous Amos These brands provide a great crunch and rich taste. They are perfect for blending into your ice cream. Using quality cookies will make your ice cream delightfully delicious! To start, grab a large mixing bowl. Pour in 2 cups of heavy whipping cream. Use an electric mixer to whip the cream. Set the speed to medium-high. Whip for about 3 to 4 minutes. You want to see stiff peaks form. This step gives your ice cream its light texture. Now, take a separate bowl. Add 1 cup of sweetened condensed milk. Pour in 1 teaspoon of vanilla extract. Mix these well until they blend smoothly. This mixture brings a sweet, rich flavor to your ice cream. Next, gently fold the whipped cream into the condensed milk mixture. Do this slowly to keep the lightness. Once they mix well, it's time for the fun part! Add 1 cup of crushed chocolate sandwich cookies. If you like, toss in ½ cup of mini chocolate chips. Fold everything in until the cookies are spread evenly. Now, pour your mix into a loaf pan or an airtight container. Smooth the top with a spatula for evenness. Cover it with plastic wrap or a lid. Place it in the freezer for at least 4 to 6 hours. This waiting time helps it freeze and firm up. After that, scoop it into bowls or cones and enjoy! To get the best whipped cream, start with cold cream. Cold cream whips better and faster. Use a clean bowl and beaters for the best results. I whip the heavy cream on medium-high speed. It takes about 3-4 minutes to get stiff peaks. Stiff peaks mean the cream holds its shape well. This step is key for a light and airy ice cream. Ice crystals can ruin your ice cream's smoothness. To avoid them, freeze the mixture quickly. Use a shallow container for faster freezing. Cover the ice cream tightly to keep air out. This helps keep the texture creamy. Stir the ice cream after two hours of freezing. This breaks up any crystals forming. Repeat if you want a super smooth finish. When serving, scoop the ice cream into bowls or cones. You can add more crushed cookies on top. Drizzle chocolate syrup for extra sweetness. A sprinkle of mini chocolate chips makes it fun. Serve this ice cream with fresh berries for a nice touch. Enjoy it on a hot day or after dinner. It's a treat everyone loves! {{image_2}} You can switch up the cookie type for fun. Try chocolate chip cookies for a twist. Vanilla wafers can also add a new flavor. If you want a crunch, use peanut butter cookies. Each cookie brings its own taste and texture, making the ice cream unique. Just remember, crush the cookies before adding them in! Adding flavors can make your ice cream even better. You might stir in some caramel or fudge for a sweet swirl. Try adding crushed peppermint candies for a holiday treat. You can also mix in fruit purees like strawberry or raspberry for a fruity kick. The options are endless, and you can be as creative as you want! If you need a dairy-free version, use coconut cream instead of heavy whipping cream. This gives a rich flavor and creamy texture. For sweetened condensed milk, look for dairy-free brands made from coconut or almond. You can still enjoy cookies and cream ice cream without dairy. Just follow the same steps, and you’ll have a tasty treat! To keep your No-Churn Cookies and Cream Ice Cream fresh, use an airtight container. This helps prevent freezer burn and keeps flavors intact. Make sure to smooth the top of the ice cream before sealing it. Cover the surface with plastic wrap, then put the lid on. This extra step gives you a better seal. No-Churn Cookies and Cream Ice Cream lasts about two to three weeks in the freezer. After that, it may lose some taste and texture. For the best experience, enjoy it within the first week. If you have leftovers, note when you made it for easy tracking. If your ice cream melts, you can refreeze it. Make sure to stir it well before refreezing. This helps mix the texture and flavors evenly. However, repeated thawing and freezing can affect the creaminess. Try to keep it frozen once it sets for the best result. Yes, you can whip the cream by hand. Use a whisk and a large bowl. It will take more time and effort, about 8-10 minutes. Keep whisking until you see stiff peaks. This makes the ice cream light and fluffy. You can use coconut cream or a dairy-free whipping cream. They work well and still give you a nice texture. Make sure to chill the cream before whipping. This helps it whip better and hold its shape. Yes, it's easy to make a vegan version. Use coconut cream instead of heavy cream. Swap sweetened condensed milk for a dairy-free version. You can find these at most stores. This way, everyone can enjoy the treat! If your ice cream is too soft, freeze it longer. Try placing it in the freezer for an extra hour or two. If you need it firmer, let it sit in the freezer overnight. This will help it set better. Making No-Churn Cookies and Cream Ice Cream is simple and fun. You learned about key ingredients, like whipped cream and condensed milk, and how to mix them right. Tips help you get the best texture and flavor every time. You can even switch up cookies or add swirls to make it your own. Remember to store it well, so it stays fresh longer. Now, you’re ready to impress friends and family with your tasty homemade treat! Enjoy every creamy bite.
    No-Churn Cookies And Cream Ice Cream Delight Recipe
  • - 1 cup rolled oats - 1 cup almond milk (or milk of choice) - ½ cup Greek yogurt (plain or vanilla) - ½ cup cream cheese, softened - 2 tablespoons maple syrup or honey - 1 teaspoon vanilla extract - ½ cup strawberries, diced - 2 tablespoons chia seeds - Crushed graham crackers - Fresh strawberries - Whipped cream To make Strawberry Cheesecake Overnight Oats, gather these simple ingredients. Start with rolled oats as the base. They give your dish that hearty texture. Next, choose almond milk or any milk you like. This adds creaminess. Greek yogurt brings a nice tang and packs in protein. Softened cream cheese gives it that cheesecake goodness. Sweeten with maple syrup or honey for just the right touch. Vanilla extract adds a warm flavor, making it feel special. Fresh strawberries bring sweetness and color. Finally, chia seeds not only add nutrition but also help thicken the mix. If you're feeling fancy, think about toppings. Crushed graham crackers add crunch. Fresh strawberries on top look great and taste amazing. A dollop of whipped cream can turn this into a treat. With these ingredients, you can create a delightful breakfast or snack that feels like dessert! To start, you need to mix the oats with the liquids and other ingredients. In a medium bowl, combine: - 1 cup rolled oats - 1 cup almond milk (or milk of choice) - ½ cup Greek yogurt (plain or vanilla) - ½ cup cream cheese, softened - 2 tablespoons maple syrup or honey - 1 teaspoon vanilla extract - 2 tablespoons chia seeds Stir these together until everything is well blended. This mix should feel creamy. Next, gently fold in the diced strawberries, ensuring they spread evenly throughout the mixture. Now, it’s time to divide the mixture into jars. Use two mason jars or airtight containers. Fill them evenly, leaving a bit of space at the top. Seal each jar tightly. Place them in the refrigerator to chill for at least four hours or overnight. This allows the oats to soak and soften. When you are ready to enjoy your oats, take them out of the fridge. Give each jar a good stir to combine the ingredients. You can adjust the sweetness by adding more maple syrup or honey if you like. If the oats are too thick for your taste, just add a splash of milk to reach your desired consistency. For a fun finish, top each serving with: - Crushed graham crackers - Fresh strawberry slices - A dollop of whipped cream Serve these in clear jars to show off the colorful layers. Enjoy every spoonful of this delicious treat! To keep your oats from becoming mushy, use rolled oats. They soak up just the right amount of liquid. Also, avoid adding too much liquid at once. Start with the recipe's measurements and adjust later. If you want a sweeter taste, add more maple syrup or honey to suit your liking. Taste before serving to get it just right. If you're looking for alternative sweeteners, try agave nectar or stevia. They can give a nice twist and lower the calorie count. For yogurt, Greek yogurt is thick and creamy, but you can also use regular yogurt. Vanilla yogurt adds extra flavor that pairs well with strawberries, making it a tasty choice. Serving your overnight oats in clear jars makes them look lovely. You can see the layers and the bright red strawberries. For a fun touch, sprinkle crushed graham crackers on top. Fresh strawberry slices and a dollop of whipped cream can make your dish pop even more. A mint leaf also adds a fresh look to your tasty treat. {{image_2}} You can easily change the fruit in your overnight oats. Try swapping strawberries for other berries like blueberries, raspberries, or blackberries. Each berry adds its own unique flavor and color. You can also add bananas or peaches. Sliced bananas bring a creamy texture, while peaches add a sweet, juicy burst. If you need dairy-free options, choose almond milk or coconut yogurt. These swaps keep the creaminess without dairy. For those watching sugar, use less maple syrup or honey. You can also try using stevia or monk fruit sweetener to keep the taste sweet but low in sugar. To mix things up, consider adding chocolate or nut butter. Chocolate chips give a rich taste, while almond or peanut butter adds protein and creaminess. You can also infuse your oats with spices like cinnamon or nutmeg. These spices add warmth and depth to your dish, making it even more exciting. Store your strawberry cheesecake overnight oats in airtight containers. This keeps them fresh and tasty. I recommend using mason jars for easy storage. They are clear, so you can see the beautiful layers. For the best flavor, eat them within three to five days. You can freeze your overnight oats if you want to save some for later. To freeze, simply place the jars in the freezer. Make sure to leave some space at the top. This allows room for the oats to expand. When you want to eat them, take the oats out and let them thaw in the fridge overnight. You can also use the microwave for quick thawing. If you prefer warm oats, you can reheat them. The best way is to use the microwave. Heat in short bursts, stirring in between. This helps avoid hot spots. If the texture is too thick after freezing, add a splash of milk. Stir it well to ensure a creamy finish. Enjoy your delicious strawberry cheesecake oats! Strawberry Cheesecake Overnight Oats last about 3 to 5 days in the fridge. After you make them, store them in airtight containers. They stay fresh and tasty during this time. Keep an eye on the strawberries. If they start to look mushy, it's best to toss the oats. Yes, you can prepare overnight oats for meal prep! This recipe is great for making in bulk. You can double or triple the recipe to have enough for the week. Store each serving in a jar. Just remember to add fresh toppings like strawberries or whipped cream before eating. This keeps them fresh and tasty. This recipe has many good nutrients. Each serving has about 320 calories. You get protein from Greek yogurt and cream cheese. The oats provide fiber, helping with digestion. Chia seeds add healthy fats and more fiber. Overall, these oats are filling and nutritious. Enjoy them as a healthy breakfast or snack! This blog post covered a delicious recipe for Strawberry Cheesecake Overnight Oats. You learned about key ingredients, like oats, yogurt, and strawberries. I provided easy steps to prepare, store, and serve your oats. You also discovered tips for flavor and texture. Remember, you can customize these oats to fit your taste. Keep it fun, fresh, and tasty! Enjoy your breakfast with confidence, knowing you can make it your way.
    Strawberry Cheesecake Overnight Oats Simple Delight
  • To make a delicious pumpkin roll cake, gather these main ingredients: - ¾ cup all-purpose flour - ½ teaspoon baking powder - ½ teaspoon baking soda - 1 teaspoon ground cinnamon - ½ teaspoon ground ginger - ¼ teaspoon ground nutmeg - ¼ teaspoon salt - 3 large eggs - 1 cup granulated sugar - 1 cup canned pumpkin puree - 1 teaspoon vanilla extract These ingredients work together to create a moist and flavorful cake. The spices bring warmth, while the pumpkin adds rich taste and color. For a lovely finish, consider these optional garnishes: - Chopped pecans or walnuts - Extra powdered sugar for dusting If you want a twist, you can add different fillings. Add chocolate chips or even a layer of caramel for a fun surprise. You can easily swap some ingredients if needed: - Use whole wheat flour instead of all-purpose flour for a healthier option. - Replace granulated sugar with coconut sugar for a lower glycemic index. - If you want a dairy-free filling, blend silken tofu with a bit of vanilla and sugar. These substitutions allow you to customize the cake to fit your taste and dietary needs. First, gather your ingredients. You need: - ¾ cup all-purpose flour - ½ teaspoon baking powder - ½ teaspoon baking soda - 1 teaspoon ground cinnamon - ½ teaspoon ground ginger - ¼ teaspoon ground nutmeg - ¼ teaspoon salt - 3 large eggs - 1 cup granulated sugar - 1 cup canned pumpkin puree - 1 teaspoon vanilla extract Start by preheating your oven to 350°F (175°C). Line a 15x10 inch jelly roll pan with parchment paper and grease it lightly. In a medium bowl, mix the flour, baking powder, baking soda, cinnamon, ginger, nutmeg, and salt. Whisk them well. In a large bowl, beat the eggs and granulated sugar until light and fluffy. This takes about 2-3 minutes. Add the pumpkin puree and vanilla extract, mixing until smooth. Next, add the dry mix to the wet mix. Stir gently until just combined. Pour the batter into the pan and spread it evenly with a spatula. Bake for 13-15 minutes. The cake is done when it springs back when touched. While the cake bakes, dust a clean kitchen towel with powdered sugar. When the cake is ready, remove it from the oven. Invert it onto the towel, then peel off the parchment paper. Starting from one short end, roll the cake with the towel into a log shape. It should be tight but not too tight. Let it cool completely in this rolled position. For the filling, beat the softened cream cheese, powdered sugar, lemon juice, and extra vanilla in a bowl. Mix until smooth and creamy. Once the cake is cool, unroll it carefully. Spread the cream cheese filling evenly on the cake. Then, roll the cake back up without the towel, starting from the short end. Wrap it in plastic wrap and chill it in the fridge for at least 2 hours. When it's time to serve, slice the pumpkin roll cake into rounds. You can garnish with chopped nuts if you like. Serve the slices on a decorative platter. Dust with more powdered sugar for an elegant touch. A sprig of mint adds freshness, too. Enjoy your delightful treat! To make a great pumpkin roll, start by baking your cake just right. It should spring back when you touch it lightly. This shows it is done. Use a clean kitchen towel dusted with powdered sugar. This helps prevent sticking. Once the cake bakes, you must act fast. Invert the cake onto the towel and peel off the parchment paper. Roll the cake tightly from one end. This helps it keep its shape. Let it cool rolled up. This step is key for a perfect roll. Baking can be tricky, but I have tips to help. First, measure your ingredients carefully. Too much flour can make the cake dry. Always whisk your dry ingredients well. This ensures they mix evenly. Don’t overmix when adding wet to dry. This can lead to a tough cake. If your cake cracks, don’t worry. You can hide it with filling. Just roll it up tight, and it will look great! Serving your pumpkin roll can be fun! Slice it into rounds for a nice look. Arrange the slices on a decorative platter. Dust them with powdered sugar for a sweet touch. If you want, add a sprig of mint for color. Chopped nuts on top add a nice crunch. For a festive feel, place it on a table with autumn decor. Your guests will love the look and taste! {{image_2}} You can spice up your pumpkin roll cake with extra flavors. Add more cinnamon or a pinch of cloves for warmth. You can also mix in some allspice for a deeper flavor. Each bite will burst with cozy fall vibes. For a twist, try a chocolate pumpkin roll. Simply add ¼ cup of cocoa powder to the dry mix. This gives a rich chocolate flavor. Pair it with dark chocolate in the filling for a sweet treat. It’s a fun way to enjoy two favorites in one. If you need gluten-free, use almond flour instead of all-purpose flour. Make sure to add a bit more baking powder. For dairy-free, swap the cream cheese with a nut-based cream. Coconut cream works well too! These easy swaps let everyone enjoy this cake. To keep your pumpkin roll cake fresh, refrigerate it in an airtight container. This helps it stay moist and tasty. You can also freeze it if you want to save some for later. Wrap the rolled cake in plastic wrap, then place it in a freezer bag. This protects it from freezer burn. When you’re ready to eat it, let it thaw in the fridge overnight. Reheating leftover slices is simple. You can use the microwave for quick heating. Place a slice on a plate, cover it with a damp paper towel, and heat for 10-15 seconds. This keeps it moist and soft. If you prefer, you can also use the oven. Preheat it to 350°F (175°C) and warm the slices for about 5-10 minutes. This will make the cake taste fresh again. Your pumpkin roll cake can last about 4-5 days in the fridge. Just make sure it’s wrapped well to keep it fresh. If you notice any changes in smell or texture, it’s best to toss it. Always trust your senses when it comes to food safety. Enjoy your delicious cake within the week for the best taste! Yes, you can make pumpkin roll cake ahead of time. I suggest baking the cake a day in advance. After it cools, wrap it tightly in plastic wrap. This keeps it fresh and moist. You can also prepare the filling a day before. Just store it in the fridge. When you are ready to serve, simply roll the cake, fill it, and chill it for a couple of hours. This method saves time and lets the flavors blend nicely. If you want to skip cream cheese, you have options. Mascarpone cheese works great as a substitute. It gives a rich and smooth texture. Greek yogurt is another choice. It adds a tangy flavor but is lighter. You can even use whipped cream mixed with a bit of sugar and vanilla. This option makes a light and airy filling. Experiment with flavors to find your favorite! If your pumpkin roll cake cracks, don’t worry! It happens sometimes. Here’s how to fix it. First, use the filling to cover the cracks. Spread it generously over the surface. This hides any flaws and adds flavor. If the crack is serious, you can slice the cake into smaller pieces. Arrange them on a plate and drizzle with chocolate or caramel sauce. This way, you can still serve it beautifully. Remember, it’s all about taste! In this post, we explored how to make a pumpkin roll cake. We covered main ingredients, optional garnishes, and easy substitutions. I shared step-by-step instructions for baking, rolling, and serving. We discussed tips for a perfect roll and how to avoid mistakes. You also learned about fun variations and storage methods. Now, it’s your turn to try this recipe. Enjoy the process and have fun in the kitchen!
    Pumpkin Roll Cake Delightful and Easy Recipe Guide

Latest Recipes

  • To make this dish, gather these key ingredients: - 1 tablespoon olive oil - 3 cloves garlic, minced - 1 can (14 oz) crushed tomatoes - 1 cup vegetable broth - 1 cup heavy cream - 1 tablespoon tomato paste - 1 teaspoon dried oregano - Salt and pepper to taste - 1 package (16 oz) potato gnocchi - 1 cup fresh basil leaves, torn - ½ cup grated Parmesan cheese These ingredients create a rich and creamy sauce that coats the gnocchi perfectly. You can enhance your dish with these optional items: - Extra basil for garnish - Additional Parmesan cheese for topping These add flavor and make your dish look even more appealing. If you need to swap ingredients, here are some ideas: - Use coconut cream instead of heavy cream for a dairy-free option. - Swap vegetable broth with chicken broth for extra flavor. - Try fresh tomatoes if you do not have crushed tomatoes. These substitutions will keep your dish tasty and fun while catering to your needs. To start, gather all your ingredients. You will need: - 1 tablespoon olive oil - 3 cloves garlic, minced - 1 can (14 oz) crushed tomatoes - 1 cup vegetable broth - 1 cup heavy cream - 1 tablespoon tomato paste - 1 teaspoon dried oregano - Salt and pepper to taste - 1 package (16 oz) potato gnocchi - 1 cup fresh basil leaves, torn - ½ cup grated Parmesan cheese - Optional: Extra basil and Parmesan for garnish Next, measure everything out. Having your ingredients ready makes cooking easier and faster. Heat the olive oil in a large pot over medium heat. Once hot, add the minced garlic. Sauté for about one minute until it smells good. Now, stir in the crushed tomatoes, vegetable broth, heavy cream, and tomato paste. Mix everything well. Season with oregano, salt, and pepper. Let this mixture gently simmer for a few minutes. Add the potato gnocchi to the pot. Stir to coat them in the creamy sauce. Cover the pot and cook for about 4-5 minutes. Stir occasionally to keep the gnocchi from sticking. They should be tender when done. After the gnocchi are cooked, reduce the heat to low. Add the torn basil leaves and grated Parmesan cheese. Stir until the cheese melts and the sauce is creamy. Once done, taste the dish. Adjust the seasoning if needed. Serve the creamy gnocchi in bowls. For a nice touch, garnish with extra torn basil leaves and a sprinkle of Parmesan on top. This makes the dish look great and adds more flavor. Enjoy your meal! One common mistake is overcooking the gnocchi. Gnocchi cooks quickly, usually in 4-5 minutes. If you cook it too long, it can become mushy. Another mistake is not seasoning well. Taste your sauce before serving. A pinch of salt or pepper can make a big difference. Lastly, be careful with the heat. Cooking on high can burn the garlic before the sauce is ready. To boost the flavor, add fresh herbs. You can use thyme or parsley along with basil. A splash of balsamic vinegar adds depth to the sauce. For heat lovers, sprinkle in red pepper flakes. You can also add a squeeze of lemon juice for brightness. Lastly, finish with a drizzle of high-quality olive oil before serving for a gourmet touch. For this recipe, you need a large pot. A heavy-bottomed pot is best for even heat. You will also need a wooden spoon for stirring. A sharp knife will help you chop the garlic and herbs. Use measuring cups for accurate amounts. If you have a lid for your pot, that’s great for simmering the sauce. A grater is handy for the Parmesan cheese, too. {{image_2}} You can easily make this dish vegetarian or vegan. For vegetarian, just keep the heavy cream and Parmesan. For a vegan version, swap heavy cream with coconut cream or cashew cream. Use nutritional yeast instead of Parmesan for a cheesy flavor. This way, you keep all the creaminess and taste without dairy. You can change flavors by swapping ingredients. Try adding sautéed mushrooms for an earthy taste. You can also use spinach or kale for more greens. For a spicy kick, toss in red pepper flakes. If you want a smoky flavor, add some smoked paprika. These swaps keep the dish exciting while still being simple. When serving creamy tomato basil gnocchi, pair it with a fresh salad. A simple arugula salad with lemon dressing works well. You can also serve garlic bread on the side to soak up the sauce. For a heartier meal, add roasted vegetables or a side of grilled chicken. These sides balance the rich flavors of the gnocchi. After enjoying your creamy tomato basil gnocchi, let it cool first. Then, place it in an airtight container. This helps keep it fresh. Store the container in the fridge for up to three days. Make sure to label it with the date for easy tracking. When you want to enjoy your leftovers, reheat them gently. You can use a pot on the stove or a microwave. If using the stove, add a splash of broth or cream. This keeps the dish creamy. Heat it slowly on low until warm. Stir often to avoid sticking. In the microwave, heat in short bursts. Stir in between until the gnocchi is hot. If you want to save some gnocchi for later, freezing works well. First, let the dish cool completely. Then, spoon it into freezer-safe bags. Flatten the bags to save space. Remove as much air as you can before sealing. You can freeze it for up to three months. When ready to eat, thaw it overnight in the fridge. Reheat as mentioned above. Enjoy a quick meal anytime! Yes, you can use fresh gnocchi. Fresh gnocchi cooks faster than packaged ones. Adjust your cooking time. Check it after about 2-3 minutes. Fresh gnocchi will float when done. This gives you a light and fluffy texture. Leftovers can last up to three days in the fridge. Store them in an airtight container. The sauce will thicken as it cools. You may need to add a splash of broth when reheating. This helps keep the gnocchi creamy. You can make the sauce ahead of time. Cook the sauce and store it separately. When ready, heat the sauce and add the gnocchi. This keeps the dish fresh and tasty. It saves time for busy days. This blog post covers all you need for creamy tomato basil gnocchi. We explored essential ingredients, cooking steps, and helpful tips. You learned about variations like vegetarian options and how to store leftovers. Remember, good gnocchi takes practice, so don't rush. Enjoy playing with flavors and finding what you love. With these steps, you can create a delightful dish anytime. Happy cooking!
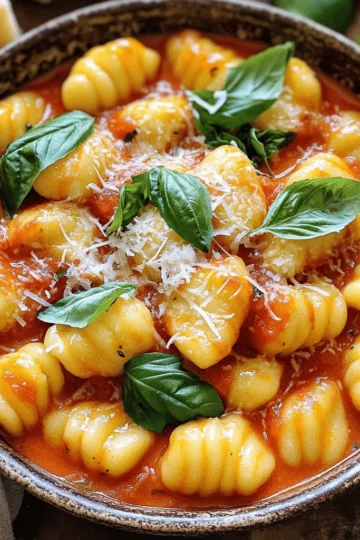
    Creamy One Pot Tomato Basil Gnocchi Quick Recipe
  • - 1.5 lbs boneless, skinless chicken thighs - 2 cups carrots, sliced - 1 cup celery, chopped - 1 small onion, diced - 4 cloves garlic, minced - 1 teaspoon dried thyme - 1 teaspoon dried rosemary - 1 bay leaf The main ingredients make this dish hearty and flavorful. Chicken thighs give a rich taste. They stay moist during cooking. The veggies add color and crunch. Carrots, celery, and onion work well together. Garlic gives a nice kick, too. Thyme and rosemary bring an earthy flavor. The bay leaf adds depth to the broth. - 4 cups low-sodium chicken broth - 2 cups biscuit dough (store-bought or homemade) - 2 cups frozen peas - Salt and pepper to taste - Fresh parsley for garnish The chicken broth is key for a tasty base. It keeps everything moist. You can use low-sodium broth to control salt. Biscuit dough forms the dumplings; they puff up nicely. Frozen peas add a pop of color and sweetness. Season with salt and pepper for balance. Fresh parsley makes a great garnish, too. It brightens up the dish and looks pretty! Start by layering the ingredients in the slow cooker. Place 1.5 lbs of boneless, skinless chicken thighs at the bottom. Pour in 4 cups of low-sodium chicken broth. Next, add 2 cups of sliced carrots, 1 cup of chopped celery, 1 small diced onion, and 4 cloves of minced garlic. This mix makes a tasty base. Now, we need to add flavor. Sprinkle 1 teaspoon of dried thyme and 1 teaspoon of dried rosemary over the top. Toss in 1 bay leaf. Season with salt and pepper to taste. These spices will give your dish a rich aroma. Cover the slow cooker. Cook on low for 6 hours or high for 3 hours. The chicken will be tender and easy to shred. After cooking, remove the chicken. Use two forks to shred it into bite-sized pieces. Discard the bay leaf, as we don’t want that in our meal. Return the shredded chicken to the cooker. Stir in 2 cups of frozen peas. This adds a sweet pop of color and flavor. Now, it's time for the dumplings. Take 2 cups of biscuit dough and break it into small pieces. You can use store-bought or homemade dough. Drop these pieces on top of the broth mixture in the slow cooker. Cover and cook on high for an additional hour. This step makes the dumplings fluffy and tender. Before serving, stir gently. This mixes the dumplings and chicken together. It’s ready to enjoy! How to ensure flavorful broth To make a rich broth, use low-sodium chicken broth. It adds depth without too much salt. Add garlic, onion, and herbs like thyme and rosemary for extra flavor. The longer you cook the broth, the more it develops. If you have time, let it simmer longer for deeper taste. Best practices for dumpling texture For fluffy dumplings, do not over-mix the dough. Just combine until moist. Drop spoonfuls gently onto the broth. Keep the lid closed while cooking to trap steam. This helps the dumplings rise and stay soft. Let them cook until they are light and fluffy. Using prepped ingredients To cut down on prep time, use pre-chopped veggies. Many stores offer fresh or frozen options. You can also buy ready-made biscuit dough for the dumplings. This saves time and effort, making the dish easier to prepare on busy days. Storing leftovers for future recipes If you have leftovers, store them in an airtight container. They can last in the fridge for 3-4 days. You can also freeze them for up to 3 months. Just make sure to separate the dumplings, as they can get soggy when thawed. {{image_2}} You can switch chicken thighs for chicken breast. Chicken breast is leaner and cooks well. Just keep in mind, it may dry out more easily. For veggies, you can try different options. Zucchini, bell peppers, or even green beans work well. They add color and flavor. Feel free to mix and match based on what you have at home. You can choose between homemade or store-bought biscuit dough. Homemade dough can taste fresher, but store-bought saves time. If you’re in a hurry, store-bought is a great choice. If you need gluten-free dumplings, look for gluten-free biscuit mixes. Many brands offer tasty options. Just follow the package directions for the best results. Enjoy your meal just the way you like it! After making slow cooker chicken dumplings, you may have leftovers. Store them safely to enjoy later. - Storing leftovers in the refrigerator: Let the chicken dumplings cool to room temperature. Place them in an airtight container. They stay fresh in the fridge for about 3-4 days. - Freezing chicken and dumplings: You can freeze leftovers too! Use freezer-safe containers or bags. Make sure to remove as much air as possible. They can last up to 3 months in the freezer. Just label the bags with the date. When you're ready to enjoy your chicken dumplings again, reheating correctly is key. - Best practices for reheating without losing texture: For the best taste, thaw frozen dumplings in the fridge overnight. Reheat them gently. This helps keep the dumplings fluffy and the chicken tender. - Microwave vs. stovetop methods: You can use either method. For the microwave, place the dumplings in a bowl. Cover with a damp paper towel. Heat in short bursts, checking often. For stovetop, use a pot with a splash of broth. Heat on low, stirring gently until warmed through. How long do leftovers of slow cooker chicken dumplings last? Leftovers can stay fresh in the fridge for about 3 to 4 days. Store them in an airtight container. To enjoy them later, reheat gently. Can I use frozen chicken for this recipe? Yes, you can use frozen chicken. Just add an extra hour to the cooking time. Make sure the chicken reaches a safe temperature of 165°F. What can I serve with chicken dumplings? You can serve chicken dumplings with crusty bread or a fresh salad. Both options add great texture and flavor. Try a simple green salad with a light vinaigrette. How to adjust the recipe for smaller servings? To make smaller servings, cut the recipe in half. Use 0.75 lbs of chicken and adjust the broth and veggies accordingly. This way, you still enjoy the full flavor without leftovers. This blog post shared the ingredients and steps for making slow cooker chicken dumplings. You learned about the main ingredients, cooking process, and essential tips. I emphasized the importance of using fresh ingredients and proper storage. In the end, slow cooker chicken dumplings are easy, filling, and a family favorite. Try different ingredients to suit your taste. Enjoy this comforting dish tonight!
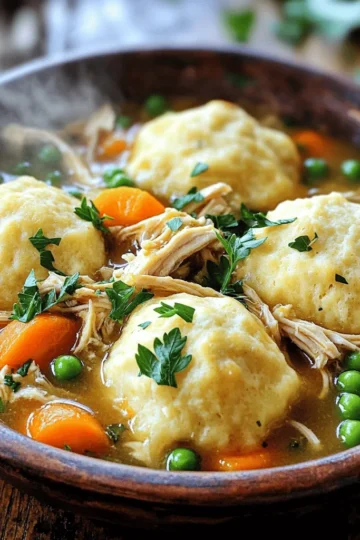
    Savory Slow Cooker Chicken Dumplings Simple Delight
  • - 1 cup orzo pasta - 2 cups vegetable broth - 1 cup canned crushed tomatoes - 1 cup heavy cream or coconut cream - 1 tablespoon olive oil These core items make up the heart of the dish. The orzo pasta absorbs flavors well. Vegetable broth adds depth and warmth. Crushed tomatoes bring a rich tomato taste. Heavy cream gives the dish its creamy texture, while coconut cream offers a dairy-free choice. - 2 cloves garlic, minced - 1 small onion, diced - 1 teaspoon Italian seasoning - Salt and pepper to taste Garlic and onion enhance the dish's aroma and taste. Italian seasoning adds an herbal kick, making it feel authentic. Don't forget to season with salt and pepper. It can elevate the overall flavor. - ½ cup grated Parmesan cheese or nutritional yeast - Fresh basil leaves for garnish Adding cheese creates a richer flavor. Nutritional yeast is a great vegan choice. Fresh basil leaves not only look nice but also add a burst of freshness. You can adjust these based on your taste and dietary needs. Start by heating 1 tablespoon of olive oil in a large pot over medium heat. Once hot, add the diced onion. Sauté it for about 3-4 minutes, until it turns translucent. This step builds a great flavor base. Next, add 2 cloves of minced garlic and sauté for just 1 minute. Be careful not to burn the garlic, as it can taste bitter. Now, pour in 2 cups of vegetable broth and 1 cup of canned crushed tomatoes. Stir the mixture well to combine. This will create a rich and flavorful liquid for your orzo. Bring your pot to a gentle boil. Once bubbling, add 1 cup of orzo pasta and 1 teaspoon of Italian seasoning. Reduce the heat to medium-low. Let it simmer for about 10-12 minutes. Stir occasionally to prevent the orzo from sticking. You want the orzo to be soft while the liquid absorbs. Once the orzo is cooked, stir in 1 cup of heavy cream or coconut cream. Add ½ cup of grated Parmesan cheese and mix well. The cheese will melt, making the sauce creamy. If the mixture is too thick, add a bit more broth or water to reach your desired consistency. This step ensures every bite is rich and flavorful. After mixing, let the dish sit for a couple of minutes off the heat. This helps it thicken just a bit more. Serve it hot, garnished with fresh basil leaves for extra flavor. To keep your cream from curdling, add it slowly. Stir it in when the pot is off the heat. This way, you heat it gently. If using coconut cream, follow the same steps. To ensure the orzo cooks just right, stir it often. This helps it cook evenly. Keep an eye on it; orzo cooks fast. Test it a minute early to avoid mushiness. For sides, a crisp green salad works wonders. Garlic bread also pairs well. It adds a nice crunch. For garnishes, fresh basil leaves are a must. They add flavor and color. You can also sprinkle extra Parmesan on top for richness. One big mistake is overcooking the orzo. This can turn it into mush. Be sure to check for doneness at about ten minutes. Another mistake is not seasoning enough. Taste your dish while cooking. Adjust with salt and pepper to get that perfect flavor. {{image_2}} For a dairy-free or vegan option, swap heavy cream with coconut cream. This gives you a rich flavor without dairy. You can use nutritional yeast instead of Parmesan cheese. It adds a cheesy taste while keeping it plant-based. If you need a gluten-free alternative, look for gluten-free orzo. Many brands offer this option, so you won’t miss out on texture. Always check the label to ensure it fits your needs. Feel free to get creative with your veggies! You can add spinach, bell peppers, or zucchini. These not only boost nutrition but also add color. Mixing in frozen peas or corn can also provide a nice sweetness. Herbs and spices are a great way to change the flavor. Try fresh parsley or thyme for a different twist. A pinch of smoked paprika can add a nice depth too. Want extra protein? You can easily add cooked chicken, shrimp, or beans. This makes the dish more filling and nutritious. Simply stir them in during the last few minutes of cooking. If you enjoy a little heat, sprinkle in some chili flakes or paprika. This will give the dish a nice kick. Just remember to add a little at a time and taste as you go. To keep your One-Pot Creamy Tomato Orzo fresh, follow these tips: - Refrigeration: Let the dish cool to room temperature. This prevents moisture buildup. - Storage Containers: Use airtight containers. Glass or BPA-free plastic works well. When reheating, you want to keep the creaminess. Here are some methods: - Stovetop Method: Place the orzo in a pan. Add a splash of broth or water. Heat on low, stirring often. - Microwave Method: Use a microwave-safe bowl. Add a little broth or water. Cover and heat in short bursts, stirring in between. Yes, you can freeze this dish! Here’s how: - Freezing: Let it cool completely. Transfer to freezer-safe containers. Leave space for expansion as it freezes. - Thawing: For best results, thaw it overnight in the fridge. Reheat on the stovetop, adding a splash of broth or water to restore creaminess. Yes, you can make this dish ahead of time. Here are some tips for prepping in advance: - Cook the orzo: You can cook the orzo and store it in the fridge. When ready, combine it with the sauce. - Prep ingredients: Chop the onion and garlic in advance. Store them in an airtight container. - Make the sauce: You can prepare the creamy tomato sauce and store it. Just reheat it before mixing with the orzo. - Store separately: Keep the orzo and sauce separate. This keeps the orzo from getting too soft. If you need alternatives for cream, here are some options: - Coconut cream: This gives a rich, creamy texture and is dairy-free. - Cashew cream: Soak cashews and blend them with water for a smooth texture. - Greek yogurt: This adds creaminess and a tangy flavor. - Silken tofu: Blend this until smooth for a dairy-free option. Orzo pasta can be a healthy choice. Here’s some nutritional information and its benefits: - Whole grain options: Look for whole grain orzo for added fiber. - Low in calories: It is lower in calories than many other pasta types. - Rich in carbohydrates: Orzo provides energy for your body. - Versatile: You can pair it with veggies and lean proteins for a balanced meal. In this post, we explored creating a creamy orzo dish. We covered essential ingredients, step-by-step cooking, and tips for the perfect sauce. You learned about storage and variations to suit different diets. Remember, keep the orzo cooked just right and season well. Enjoy garnishing with fresh basil for a burst of flavor. With these tips, you can make a delicious meal that fits your needs, whether you go dairy-free or gluten-free. Try it out, and enjoy your cooking adventure!
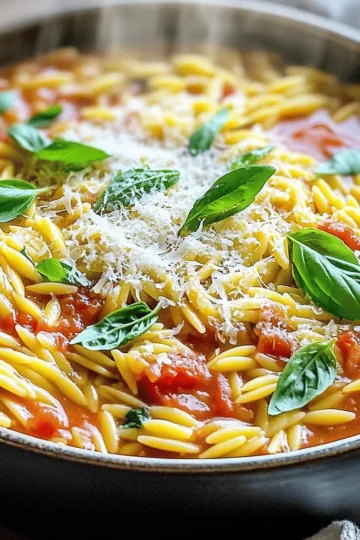
    One-Pot Creamy Tomato Orzo Quick and Easy Meal
  • To make mango salsa fish tacos, gather these fresh and tasty ingredients: - Fish Options: tilapia, cod, or halibut - Spices: chili powder, cumin, garlic powder - Fresh Produce: mango, red onion, jalapeño, cilantro, lime, avocado - Tortillas: corn tortillas - Seasoning: salt and pepper You will need one pound of firm white fish. This fish should be cut into one-inch pieces. I like to use tilapia because it cooks quickly and has a mild flavor. Cod and halibut are also great choices. For spices, you will need chili powder, cumin, and garlic powder. These spices add a warm, savory taste to the fish. Make sure to season the fish well with salt and pepper, too. Next, let’s talk about the fresh produce. A ripe mango brings sweetness to the salsa. You want it diced into small pieces. The red onion adds a nice crunch, while the jalapeño gives a little heat. Don’t forget the fresh cilantro for a burst of flavor. Lastly, a squeeze of lime juice brightens everything up. Avocado slices make the tacos creamy and rich. For the tortillas, I recommend using corn tortillas. They have a great texture and flavor. These will hold all your yummy fillings together. Gather these ingredients, and you are ready to make a delicious meal! Marinating the Fish with Spices To start, take your fish and cut it into 1-inch pieces. In a bowl, mix the fish with 2 tablespoons of olive oil. Add 1 teaspoon of chili powder, 1 teaspoon of cumin, and ½ teaspoon of garlic powder. Season with salt and pepper to taste. Toss everything together until each piece is coated well. Let the fish sit for about 10 minutes to soak up those great flavors. Cooking Techniques for Better Flavor Preheat a skillet over medium-high heat. Once hot, add the seasoned fish in a single layer. Cook for 3 to 4 minutes on each side. The fish should be golden and flake easily with a fork when done. Remove it from the heat and set it aside. This method keeps the fish juicy and full of flavor. Ingredients Mixing Guidelines For the mango salsa, take 1 ripe mango and dice it. Then, chop ½ a red onion and 1 small jalapeño after removing the seeds. In a bowl, combine the mango, onion, jalapeño, and ¼ cup of fresh cilantro. Squeeze in the juice of 1 lime for a zesty kick. Gently mix everything together and add a pinch of salt to taste. Tips for Achieving the Right Texture Mix the salsa carefully to keep the mango pieces intact. You want a nice balance of crunch from the onion and jalapeño, with the softness of the mango. Let the salsa sit for a few minutes to allow the flavors to blend. Warming Tortillas: Best Practices To warm the corn tortillas, you can use a dry skillet over medium heat. Cook each tortilla for about 30 seconds on each side until they are soft and warm. Alternatively, you can microwave them for about 15 seconds. This step makes the tortillas easier to fold. Layering Fish and Salsa Now, it’s time to build your tacos. Place a spoonful of the cooked fish on each warm tortilla. Top it with a generous amount of mango salsa. Add a few slices of avocado for creaminess. Enjoy these vibrant tacos right away for the best taste! To make sure your fish is perfect, look for a few signs. The fish should turn opaque and flake easily with a fork. This usually takes about 3-4 minutes per side on medium-high heat. If the fish looks dry or hard, you may have overcooked it. You can add more flavor to your fish tacos with a few extras. Try mixing in some lime zest for a fresh twist. You can also add diced bell peppers or corn to the salsa. A pinch of smoked paprika can give the fish a nice kick. Feel free to adjust spices to match your taste! These tacos pair well with simple sides. Serve with a fresh green salad or tortilla chips and salsa. For drinks, a light beer or a refreshing limeade works great. You can also try a chilled white wine to enhance the meal. Enjoy your delicious tacos with friends and family! {{image_2}} You can switch up the fish in these tacos. Chicken works great if you prefer poultry. Shrimp is another tasty choice. If you want a plant-based option, try tofu or tempeh. Just season them like the fish. Each protein brings its own flavor and texture. Adjust the cooking time based on what you choose. Mango salsa can be fun to change. You can add other fruits like pineapple or peaches for sweetness. Try adding bell peppers for a crunch. Even diced tomatoes can enhance the mix. Each fruit or veggie adds unique taste and texture. Feel free to experiment based on what you have. This keeps the salsa fresh and exciting. When it comes to tortillas, corn is classic. But flour tortillas can be softer and chewier. If you want to cut carbs, use lettuce wraps. You can also find low-carb tortillas at many stores. Each type offers a different experience. Choose what you enjoy most or what fits your diet. Store leftover fish tacos in an airtight container. Make sure to separate the fish from the tortillas and salsa. This keeps everything fresh. Place the fish in the fridge within two hours of cooking. It will stay good for up to three days. For mango salsa, use a clean, airtight container. Keep it in the fridge for up to four days. Always check for freshness before using. If you see any signs of spoilage, it’s best to toss it. If you want to keep it longer, you can freeze it. Just make sure to leave some space in the container since it can expand. When reheating, avoid using the microwave alone. It can make the fish tough. Instead, try these methods: - Skillet: Heat a small amount of oil in a pan. Add the fish and cook on medium heat until warmed through. - Oven: Place the fish on a baking sheet. Heat in a preheated oven at 350°F until hot, about 10 minutes. These methods help restore the fish's texture while keeping it moist. Enjoy your tasty fish tacos again! Yes, you can use frozen fish for these tacos. Just make sure to thaw it first. To thaw, place the fish in the fridge overnight. If you're short on time, you can also use the cold-water method. Submerge the sealed fish in cold water for about 30 minutes. After thawing, pat it dry with a paper towel. This helps the spices stick better when you cook it. Cook the fish just like fresh, aiming for 3-4 minutes on each side. The spice level of the mango salsa can vary. It mainly depends on the jalapeño you use. If you want it mild, remove all the seeds and membranes. For more heat, leave some of the seeds in. You can also add more jalapeño or a pinch of cayenne pepper to boost the spice. Taste the salsa as you mix it, and adjust to your liking. This way, you can find the perfect balance for your palate. Making this recipe gluten-free is simple. Use corn tortillas instead of flour tortillas, as they are naturally gluten-free. Check the labels on the spices to ensure they are gluten-free. Most spices are safe, but some blends may contain gluten. You can also replace any soy sauce with tamari, which is gluten-free. With these swaps, you can enjoy delicious fish tacos without worry. We covered how to make delicious fish tacos from scratch. You learned about the key ingredients and steps for marinating fish, making mango salsa, and assembling the tacos. I shared tips to perfect your cooking times and suggested ways to customize the dish. Remember, you can mix and match proteins and salsas to create your own twist. With proper storage and reheating, you can enjoy these tacos later. Dive into this meal as a fun family dish or a tasty treat for friends!
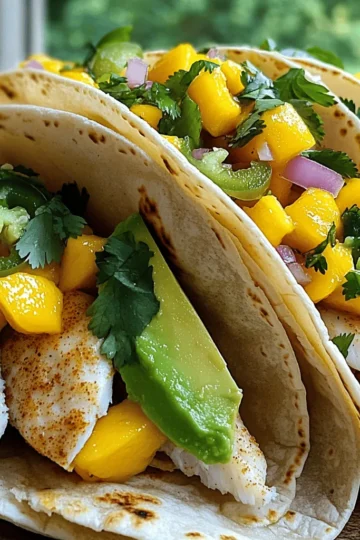
    Mango Salsa Fish Tacos Flavorful and Easy Recipe
  • - 2 ripe avocados - 1 cup cherry tomatoes, halved - 1 cup fresh mozzarella balls, drained - ¼ cup fresh basil leaves, chopped - 2 tablespoons balsamic glaze - 1 tablespoon olive oil - Salt and pepper to taste Using high-quality ingredients makes a big difference. Fresh avocados give a creamy texture. Ripe cherry tomatoes add sweetness. Choose mozzarella balls that are fresh and soft. Fresh basil leaves bring bright flavor. Balsamic glaze should be thick and rich. When you pick top ingredients, your dish shines. Caprese stuffed avocados are not just tasty; they are healthy too. Avocados are full of good fats. They help your heart and keep you full. Cherry tomatoes add vitamins C and K. Mozzarella brings protein and calcium. This dish is light but satisfying. Plus, it's a good source of fiber. Enjoying this treat is a smart choice for your meal. Start by cutting the avocados in half lengthwise. Use a sharp knife for this. Carefully remove the pit with a spoon or knife. Make sure to be gentle. Next, scoop out a bit of the avocado flesh. This creates space for your filling. Chop the scooped-out flesh into small pieces. Set these aside for later use. In a mixing bowl, combine one cup of halved cherry tomatoes. Add one cup of fresh mozzarella balls that you drained. Toss in the chopped basil leaves and the small pieces of avocado you set aside. Drizzle two tablespoons of olive oil over the mix. Sprinkle salt and pepper to taste. Gently mix everything together. This step is key to blending the flavors. Grab your avocado halves. Spoon the Caprese salad mixture into each half. Fill them generously, but don’t overstuff. Drizzle balsamic glaze over the top for added flavor. This will make the dish shine. You can serve right away, or chill for up to 15 minutes. Chilling helps the flavors meld together nicely. Place the stuffed avocados on a platter for a beautiful presentation. Garnish with extra basil leaves and a drizzle of balsamic glaze. Enjoy your tasty treat! To find the perfect avocado, look for a few key signs. First, check the skin. It should be dark and slightly bumpy. Gently squeeze the avocado; it should yield just a bit but not feel mushy. If it feels hard, it is not ripe yet. You can also check the stem. If it pops off easily and is green underneath, the avocado is ripe. Avoid any with large dark spots or dents, as these may indicate overripeness or spoilage. Caprese stuffed avocados are a great treat for many occasions. You can serve them as a light lunch, a savory snack, or a colorful appetizer. Pair them with crusty bread or tortilla chips for added crunch. These stuffed avocados also shine at parties. Just prepare the filling ahead of time and stuff them just before serving. This keeps them fresh and tasty. Presentation is key to making your dish stand out. Place the stuffed avocados on a bright platter to catch the eye. Garnish them with extra basil leaves for a pop of color. A light drizzle of balsamic glaze adds shine and elegance. For added flair, sprinkle some sea salt on top. This enhances the flavors while making your dish look gourmet. {{image_2}} You can switch the cheese for a unique taste. Try feta for a tangy kick. Goat cheese adds creaminess and flavor. If you want a stronger taste, use aged cheddar. Each cheese brings a different twist to your Caprese stuffed avocados. Want a filling dish? Add protein like grilled chicken or shrimp. Diced turkey or ham also work well. You can even mix in chickpeas for a plant-based option. This makes the meal more balanced and satisfying. Make the most of seasonal produce. In summer, use fresh peaches or mangoes for sweetness. In the fall, add roasted butternut squash for warmth. Winter calls for citrus like orange or grapefruit to brighten the dish. Each seasonal swap keeps the flavors fresh and exciting. To keep your Caprese stuffed avocados fresh, store them in an airtight container. This helps prevent browning. If possible, keep the avocado halves separate from the salad mix. You can also sprinkle lemon juice on the avocado flesh to slow down browning. Aim to eat leftovers within a day for the best taste. Stuffed avocados are best enjoyed fresh. However, they can last in the fridge for about 1 day. If you store them properly, you may get an extra 24 hours. After that, the taste and texture may decline. Always check for freshness before eating. Reheating stuffed avocados is not recommended. They taste best cold or at room temperature. If you need to eat them warm, try to just warm the filling gently. Avoid using a microwave, as it can make the avocado mushy. Instead, use a low oven for a short time. Caprese stuffed avocados are a great dish for your health. They offer healthy fats from avocados. The fresh mozzarella adds protein and calcium. Cherry tomatoes provide vitamins A and C. Basil gives you antioxidants. This dish is low in carbs and high in flavor. Eating this meal can help you feel full longer. Yes, you can prepare parts of this recipe ahead of time. You can mix the Caprese salad mixture a few hours in advance. Just keep it in the fridge until you're ready to serve. However, I recommend waiting to stuff the avocados until right before you eat. This keeps the avocados fresh and green. You can get creative with your stuffing! Adding grilled chicken can make it heartier. You could also use different cheeses, like feta or goat cheese. For a spicy kick, consider adding jalapeños. You might even include nuts for a crunchy texture. The options are endless, so feel free to experiment! In this blog post, we explored the ingredients for Caprese stuffed avocados and their quality. We also covered step-by-step instructions on how to prepare and assemble this dish. You learned tips for choosing ripe avocados and how to present your plates beautifully. Variations offered ways to customize the recipe, making it your own. In my final thoughts, this dish is not just tasty; it’s also flexible and fun. Enjoy creating it for yourself and your loved ones!
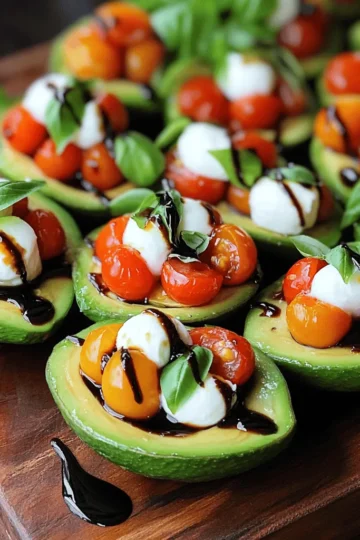
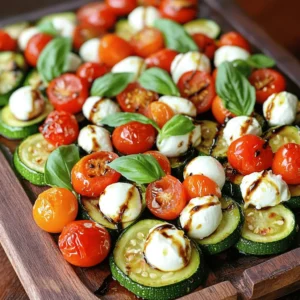
    Caprese Stuffed Avocados Flavorful and Healthy Treat
  • - 1 lb chicken tenders - 1 cup buttermilk or alternative - 1 cup all-purpose flour - 2 large eggs To start, you need fresh chicken tenders. They cook fast and stay juicy. Buttermilk or a lemon-milk mix adds flavor and moisture. All-purpose flour helps the coating stick. Beaten eggs create a binding layer. - 1 cup panko breadcrumbs - 3 tablespoons everything bagel seasoning - Salt and pepper to taste Panko breadcrumbs give a great crunch. Everything bagel seasoning adds a tasty twist. Use salt and pepper to enhance flavors. Together, these make the chicken tasty and fun. - Cooking spray - Air fryer - Bowls for breading station You need an air fryer for this recipe. It cooks the chicken evenly and quickly. Use cooking spray for crispiness. Set up three bowls for the breading: one for flour, one for eggs, and one for panko. This makes the process smooth and easy. Start by putting the chicken tenders in a bowl. Pour in the buttermilk. This mix helps make the chicken tender. Let it soak for at least 30 minutes. This time is key for adding flavor. Next, you need to preheat your air fryer. Set it to 400°F (200°C). This takes about 5 minutes. Preheating ensures even cooking. Now, let’s set up the breading station. You need three bowls: - First bowl: 1 cup of flour with salt and pepper. - Second bowl: 2 large beaten eggs. - Third bowl: 1 cup of panko mixed with 3 tablespoons of everything bagel seasoning. To bread the chicken, take a tender from the buttermilk. Let the extra drip off. First, dredge it in the flour. Then dip it in the beaten eggs. Finally, coat it with the panko mix, pressing gently to stick. Place the breaded chicken tenders in the air fryer basket. Lay them flat in a single layer. Lightly spray them with cooking spray to make them crispy. Cook at 400°F (200°C) for 10 to 12 minutes. Flip halfway through for even cooking. To check if the chicken is done, use an instant-read thermometer. The inside should reach 165°F (74°C). This ensures the chicken is safe to eat. To boost the taste of your chicken tenders, consider adding garlic powder or paprika. These spices add depth and a hint of warmth. You can also mix in some fresh herbs like thyme or parsley for a fresh touch. Marinating your chicken in buttermilk is key. Let it sit for at least 30 minutes. This makes the chicken tender and juicy. For great breading, use three separate bowls: flour, eggs, and panko. Make sure to coat each tender well. This helps the breadcrumbs stick better. Don't skip the cooking spray! A light spray adds extra crispiness and keeps the chicken from drying out. Serve your chicken tenders with dips like honey mustard or ranch for extra flavor. Pair them with crispy fries or a fresh salad for a complete meal. For a nice touch, arrange the tenders on a wooden board. Add a small bowl of sauce and some parsley on top for color. This makes your dish look appealing and tasty! {{image_2}} You can swap out all-purpose flour for whole grain flour. Whole grain flour adds fiber and nutrients. For a gluten-free option, use gluten-free flour. This keeps your meal tasty and safe for those with gluten issues. Instead of panko, you can use crushed pork rinds. Pork rinds add crunch and flavor without carbs. They work well in many recipes, giving a nice twist. You can change the seasoning to fit your taste. For a spicy kick, add cayenne pepper or chili powder. You can also use lemon zest for a fresh zing. Mix it up with garlic powder or onion powder for added depth. Dipping sauces can also be fun. Try honey mustard, ranch, or even a spicy sriracha mayo. Each dip can change the meal's whole vibe. If you want to bake instead of air fry, preheat your oven to 400°F (200°C). Place the chicken on a baking sheet lined with parchment paper. Bake for 15-20 minutes, flipping halfway through, until golden. You can also use a traditional fryer. Heat oil to 350°F (175°C) and fry the chicken for about 5-7 minutes. This gives a crispy texture but adds more oil to the dish. Choose the method that suits your style! To keep your chicken tenders fresh, store them in an airtight container. Place a layer of paper towels at the bottom to absorb moisture. You can keep the chicken tenders in the fridge for up to three days. After that, they may lose their flavor and texture. To reheat chicken tenders, use your air fryer. Set it to 350°F (175°C) for about 5 to 7 minutes. This method helps keep them crispy. You can also use an oven at the same temperature. Avoid using a microwave, as it makes chicken soggy. If you want to freeze the chicken tenders, do it before cooking. Place the breaded tenders in a single layer on a baking sheet. Once frozen solid, transfer them to a freezer bag. They can stay in the freezer for up to three months. When you're ready to eat, cook them straight from frozen. Cook for about 15 to 18 minutes at 400°F (200°C), flipping halfway through. Yes, you can use chicken breasts. Just cut them into strips. The cooking time may change. Cook the strips for about 12-15 minutes. Always check that the chicken reaches 165°F (74°C). This ensures safety and flavor. If you lack buttermilk, don’t worry! You can make a quick substitute. Mix 1 cup of milk with a squeeze of lemon juice or vinegar. Let it sit for a few minutes. This will mimic the tangy flavor of buttermilk. It depends on your air fryer size. Typically, you can fit 4-6 tenders in a single layer. Avoid overcrowding them. This helps them cook evenly and stay crispy. You can cook in batches if needed. Absolutely! Feel free to explore other seasonings. You can try garlic powder, paprika, or even taco seasoning. Mix and match for fun flavors. Just make sure to adjust the amount to your taste preference. You now have a complete guide for making delicious air fryer chicken tenders. From the main ingredients to storage tips, each step is laid out for you. Remember to marinate your chicken well for the best flavor. Experiment with coatings and seasonings to find what you love. Don’t forget, these tenders can be stored and reheated easily, so you can enjoy them anytime. Use what you learned to cook up the perfect meal. Get ready to impress with your tasty homemade chicken tenders!
    Air Fryer Everything Bagel Chicken Tenders Delight
  • - 1 package (16 oz) refrigerated cheese tortellini - 1 cup heavy cream - 1 cup fresh basil pesto - 1 cup cherry tomatoes, halved - 1 cup spinach, roughly chopped - ½ cup grated Parmesan cheese - 1 tablespoon olive oil - 2 cloves garlic, minced - Fresh basil leaves for garnish - Large skillet - Cooking utensils For this creamy pesto tortellini skillet, you need some key ingredients. The cheese tortellini is the star of this dish. It adds a nice, soft texture. Heavy cream makes the sauce rich and smooth. Fresh basil pesto gives it that vibrant flavor. Cherry tomatoes add sweetness and color. Spinach offers a touch of green and nutrition. If you want to boost the flavor, consider adding some grated Parmesan cheese. It melts well and adds depth. Olive oil is great for cooking the garlic and tomatoes. Minced garlic adds a lovely aroma. Lastly, fresh basil leaves make a nice garnish. For equipment, a large skillet works best. You need enough space for all the tasty ingredients. Also, gather your cooking utensils like spatulas and a measuring cup. With these essential items, you’ll be ready to make a delightful dinner. - Heat 1 tablespoon of olive oil in a large skillet over medium heat. - Add 2 minced garlic cloves to the hot oil. Sauté for about 1 minute until it smells good. - Now, add 1 cup of halved cherry tomatoes. Cook for 3 to 4 minutes. Stir often until they get soft. - Next, stir in 1 cup of roughly chopped spinach. Cook until the spinach wilts, which takes about 2 minutes. - Pour in 1 cup of heavy cream. Bring it to a gentle simmer. - Then, stir in 1 cup of fresh basil pesto. Mix it well to combine. - Add 1 package (16 oz) of cheese tortellini to the skillet. Cook it as the package says, usually 3 to 5 minutes. Watch for it to float. - Sprinkle in ½ cup of grated Parmesan cheese. Stir gently to mix and let it melt. - Finally, add salt and pepper to taste. Adjust to your liking before serving. To get the best sauce, aim for a creamy texture. Add the heavy cream slowly. Stir it gently as you combine it with the pesto. You want it smooth, not too thick. If it feels too thick, add a splash of water or broth. This keeps it light and rich. Cooking the tortellini right is key. Follow the package instructions closely. Usually, it takes about 3-5 minutes. Look for the tortellini to float to the top. This means they are done. You want them soft but still firm, not mushy. Drain them well before adding to the sauce. Pair your creamy pesto tortellini with a fresh salad. A simple green salad with vinaigrette works well. You can also serve it with crusty bread. This helps soak up the extra sauce. For garnishing, fresh basil leaves are a must. They add color and a fresh taste. You might sprinkle more grated Parmesan on top. This gives an extra flavor boost. To take the taste up a notch, add fresh herbs. Chopped parsley or thyme works great. You can also stir in some red pepper flakes for heat. Just a pinch can change the whole dish. If you want a twist, try different ingredients. Swap the heavy cream for coconut milk for a lighter option. Use sun-dried tomatoes instead of fresh for a deeper flavor. This lets you get creative while keeping it delicious. {{image_2}} You can easily make this dish vegetarian. Just skip the cheese tortellini with meat. Use cheese tortellini instead. To make it vegan, use vegan tortellini and coconut cream. You can also find dairy-free pesto to keep the flavor. For gluten-free options, choose gluten-free tortellini. Many stores offer this choice now. Feel free to swap out tortellini types. You can use spinach, mushroom, or even chicken tortellini for a twist. If you want a different sauce, try Alfredo or arrabbiata. You can mix it up and add your favorite flavors. Experimenting with sauces can lead to exciting new tastes. Add seasonal veggies for a fresh touch. In summer, use zucchini or bell peppers. In fall, try squash or kale. These veggies not only taste good but also look pretty. You can also adjust for holidays. Add cranberries for Thanksgiving or red and green peppers for Christmas. This can make your dish festive and fun. To store leftovers properly, let the dish cool first. Transfer it to an airtight container. Make sure to seal it tightly. Place it in the fridge within two hours. This keeps the flavors fresh. Consume the leftovers within 3 to 4 days for the best taste. Freezing is simple. First, let the dish cool completely. Portion it into freezer-safe containers. Leave some space at the top for expansion. Seal the containers well to avoid freezer burn. When ready to eat, thaw overnight in the fridge. Reheat in a skillet over low heat, adding a splash of cream if needed. In the fridge, creamy pesto tortellini lasts about 3 to 4 days. In the freezer, it can last up to 2 to 3 months. Always check for any off smells or changes in texture before eating. Yes, you can use frozen tortellini. Just cook it a bit longer. Follow the package instructions for the best results. Frozen tortellini usually takes about 5-8 minutes to cook. To add spice, include red pepper flakes. You can also mix in hot sauce or diced jalapeños. Start with a little and adjust to your taste. This way, you control the heat level. If the sauce is thick, add a splash of broth or water. Stir well to combine. You can also add more cream for a richer taste. Adjust until you reach your desired consistency. Yes, you can use half-and-half or whole milk. These options will make the dish lighter but still creamy. For a dairy-free choice, try coconut cream or a plant-based milk. Yes, this dish is great for meal prep. Cook it ahead and store in containers. Just reheat when ready to eat. It tastes great for up to three days in the fridge. This recipe for creamy pesto tortellini is simple and tasty. You learned about key ingredients and how to prepare them step by step. You can also explore various adaptations to fit your needs. Remember to check refrigeration and freezing tips for leftovers. This dish can please many taste buds, so try it for your next meal! Enjoy the process and have fun in the kitchen.
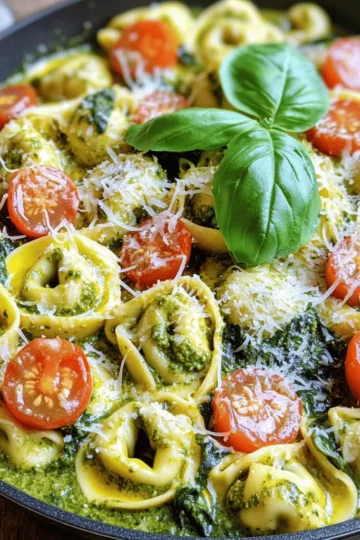
    Creamy Pesto Tortellini Skillet Delightful Dinner
  • - 200g egg noodles - 4 cloves of garlic, thinly sliced - 2 tablespoons chili flakes - 1 tablespoon soy sauce - 3 tablespoons vegetable oil - 1 tablespoon sesame oil - 1 teaspoon sugar - 1 tablespoon rice vinegar - 2 green onions, finely chopped - Fresh cilantro, for garnish - Salt, to taste Using fresh garlic is key for great flavor. It adds a sharp taste that dried garlic can't match. Choose egg noodles that are fresh or high-quality for the best texture. The right noodles stay chewy and absorb the sauce well. Use good quality oils, too. They enhance the dish's flavor and aroma, making each bite more enjoyable. This care in choosing ingredients makes a big difference in your Min Garlic Chili Oil Noodles. To start, you need to cook the egg noodles. Follow the package instructions carefully. Usually, this means boiling them in salted water for about 4-6 minutes. Once cooked, drain the noodles and set them aside. Remember to save a bit of the pasta water. This helps later to adjust the sauce. For perfect noodle texture, check them a minute before the time is up. They should be al dente, meaning they should still have a bit of bite. If you overcook them, the noodles will turn mushy. Next, it’s time to make the garlic chili oil. In a small saucepan, heat the vegetable oil over medium heat. Add the thinly sliced garlic. Cook it for about 2-3 minutes. You want the garlic to turn golden brown, but watch closely! If it burns, it will taste bitter. Once your garlic is golden, take the pan off the heat. Immediately stir in the chili flakes. This is where the magic happens. Let the mixture steep for 5 minutes. Soon, the oil will turn a vibrant red, full of flavor. Now, let’s combine all the flavors. In a large mixing bowl, add the cooked noodles. Pour in the soy sauce, sesame oil, sugar, rice vinegar, and a pinch of salt. Gently toss everything together. You want every noodle to be coated with the delicious sauces. For an even coating, use tongs or two forks. This helps to mix without breaking the noodles. If the noodles seem dry, add a splash of the reserved pasta water. It will help loosen up the sauce. Finally, it’s time to add the garlic chili oil. Pour it over the noodles while they are still warm. Toss everything again to mix well. Taste the noodles now. Adjust the salt and add more chili flakes if you like more heat. For serving, plate the Min Garlic Chili Oil Noodles in deep bowls. Top them with chopped green onions for crunch and flavor. A sprinkle of fresh cilantro adds a beautiful touch. If you want, drizzle a little extra chili oil on top for shine. Enjoy! You can easily change the spice in this dish. If you want more heat, add more chili flakes. Start with one extra tablespoon and taste as you go. For fresh chili peppers, slice them thin. Mix them into your garlic oil for a fresh kick. Red or green chili peppers work well here. To boost flavors, think about adding more ingredients. Peas or bell peppers can add color and taste. You can also toss in cooked chicken or tofu for protein. Top the dish with toasted sesame seeds. Chopped peanuts or cashews also add a nice crunch. One mistake is overcooking the garlic. It should be golden, not brown. Brown garlic tastes bitter and ruins the dish. Another mistake is skipping the reserved pasta water. This starchy water helps the sauce stick to the noodles. Use it to adjust the sauce's thickness as needed. {{image_2}} You can make this dish vegetarian easily. Start by swapping egg noodles for vegetable noodles or rice noodles. This keeps the flavors bold and fresh. For added protein, try adding mushrooms or tofu. Sauté sliced mushrooms in the garlic oil to enhance their flavor, or cube firm tofu and toss it in for a hearty bite. If you need a gluten-free dish, use gluten-free noodles. Many stores offer rice noodles or other gluten-free options. Check the labels carefully. You can also use tamari instead of soy sauce. Tamari is a great gluten-free alternative that packs similar flavor. Always read your ingredient labels to ensure they fit your needs. Don't be afraid to get creative with sauces! You can experiment with different oils, like chili oil or sesame oil. Each oil brings a unique flavor twist. Adding ginger or garlic powder can also enhance the taste. Try mixing in some soy sauce with hoisin for a sweet and savory kick. The world of flavors is vast, so have fun exploring! To keep your Min Garlic Chili Oil Noodles fresh, store them in airtight containers. This helps prevent air from drying out the noodles. Before sealing, make sure they are cool to avoid condensation. You can use glass or plastic containers, but glass is best for keeping flavors intact. When reheating, avoid the microwave if you can. Instead, use a skillet over low heat. Add a splash of water or extra oil to keep them moist. Stir frequently to heat evenly. If you use the microwave, cover the noodles with a damp paper towel. This keeps them from drying out while reheating. Yes, you can freeze Min Garlic Chili Oil Noodles! To freeze, place them in a freezer-safe bag or container. Make sure to remove as much air as possible. For best results, use them within three months. When ready to eat, thaw in the fridge overnight. Reheat gently in a skillet, adding a splash of water to revive flavors. Min Garlic Chili Oil Noodles are a simple yet tasty dish. They feature egg noodles dressed in a spicy garlic oil. This dish has roots in Chinese cuisine and is loved for its bold flavor. It combines heat from the chili flakes with the rich taste of garlic. Many enjoy it as a quick meal or a side dish. Its cultural significance lies in its ability to bring comfort and warmth to the table. To increase the heat, add more chili flakes. You can also use fresh chili peppers, like Thai bird chilies. Simply chop them and mix them into the oil. If you like it extra spicy, try adding a splash of hot sauce. Remember, start with a small amount and adjust to your taste. This way, you can find the right level of spice that suits you. Yes, you can use other noodles like rice noodles or udon. Each type will change the taste and texture a bit. Rice noodles will give a lighter feel, while udon noodles add a chewy bite. Make sure to adjust the cooking time based on the noodle type you choose. This way, you’ll still achieve that delicious garlic chili flavor. These noodles pair well with a variety of dishes. You can serve them with stir-fried vegetables or grilled chicken. A fresh cucumber salad also complements the heat nicely. For a complete meal, add some tofu or shrimp on the side. If you want something light, a bowl of miso soup works well too. Enjoy mixing and matching to create your perfect meal! In this article, we delved into the details of making Min Garlic Chili Oil Noodles. We covered the key ingredients, focusing on freshness and quality. You learned about step-by-step cooking methods, plus tips for adjusting spice and enhancing flavor. We also explored variations for different diets and provided storage tips. Finally, remember that cooking is about flavor and fun. Experiment with the ingredients and make this dish your own. Enjoy the process, and savor each bite!
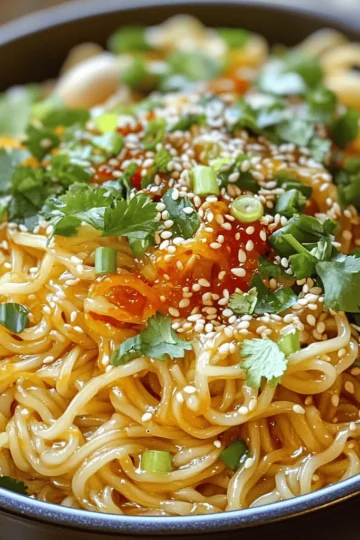
    Min Garlic Chili Oil Noodles Flavorful and Easy Recipe
  • - 4 medium sweet potatoes - 2 cups cooked shredded chicken - ½ cup buffalo sauce - ½ cup cream cheese, softened - ½ cup shredded cheddar cheese - ¼ cup green onions, chopped - ¼ cup ranch dressing (optional) - Salt and pepper to taste - Fresh parsley for garnish Each ingredient plays a key role in flavor. You can swap the chicken for turkey if you want. If you don’t have buffalo sauce, hot sauce works too. For a creamy kick, try using Greek yogurt in place of cream cheese. You can also use vegan cheese or a dairy-free cream for a vegan option. Garnishing your dish adds a nice touch. Use chopped green onions for crunch and color. A drizzle of ranch dressing brings an extra layer of flavor. Fresh parsley not only brightens the dish but also adds freshness. You can even sprinkle crushed red pepper for more heat. This combination of ingredients makes Buffalo Chicken Stuffed Sweet Potatoes a fun meal to share. They are colorful and packed with flavor, making them a hit for any gathering. Start by preheating your oven to 400°F (200°C). Wash the sweet potatoes well. Use a fork to poke several holes in each potato. This step is key, as it helps steam escape while they bake. Place the sweet potatoes on a baking sheet. Bake them for 45 to 60 minutes. They should feel soft and tender when pierced with a fork. While the sweet potatoes bake, it’s time to make the filling. In a bowl, mix 2 cups of cooked, shredded chicken with ½ cup of buffalo sauce. You can adjust the sauce to your taste. If you want more kick, add more sauce. Next, stir in ½ cup of softened cream cheese. Mix this well until it’s smooth. Don’t forget to season with salt and pepper to taste. Once the sweet potatoes have baked, let them cool for a few minutes. Cut each potato in half lengthwise. Scoop out a bit of the flesh to make space for the filling. Now, fill each half with the buffalo chicken mixture. Press it down gently to pack it in. Sprinkle ½ cup of shredded cheddar cheese on top. Return the stuffed potatoes to the oven for another 10 to 15 minutes. The cheese should be melted and bubbly when they are ready. Once done, remove them from the oven. Top with chopped green onions and, if you like, drizzle ranch dressing over the top. Garnish with fresh parsley for a nice touch. Enjoy your flavorful creation! When picking sweet potatoes, look for medium-sized ones. They should feel firm and have smooth skin. Bumps or soft spots mean they are old. I prefer orange-fleshed sweet potatoes for their sweetness. They balance well with the spicy chicken mix. To control the heat, start with less buffalo sauce. Add a little at a time until you find your sweet spot. If it's too spicy, mix in more cream cheese. This will cool down the heat and add creaminess. You can also try different buffalo sauce brands for varying levels of spice. For the best cheese melt, use freshly shredded cheddar. Pre-shredded cheese often has additives that prevent melting well. When you sprinkle it on the stuffed potatoes, make sure to cover them evenly. This helps the cheese melt uniformly. Bake until bubbly, but keep an eye on it to prevent burning. {{image_2}} You can swap the chicken for other proteins. Try shredded turkey or beef. You can also use canned tuna for a lighter option. Each protein adds a unique taste to the dish. Adjust the buffalo sauce to match the protein's flavor. More sauce can enhance the taste further. For a vegetarian option, use lentils or chickpeas. These beans pack protein and fiber. Mix them with buffalo sauce for flavor. If you want a vegan dish, replace cream cheese with a plant-based cream. Use vegan cheese instead of cheddar. These swaps keep the dish creamy and tasty. Boost the flavor with fun toppings. Add jalapeños for heat or bell peppers for crunch. You can also mix in some celery for freshness. If you like it creamy, add more ranch dressing on top. Fresh herbs like cilantro or chives can add a bright touch. Each choice makes the dish unique and fun. To store your Buffalo Chicken Stuffed Sweet Potatoes, first, let them cool. Then place them in an airtight container. Make sure to separate each potato with parchment paper. This helps to avoid sogginess. You can keep them in the fridge for up to three days. To reheat, preheat your oven to 350°F (175°C). Place the stuffed sweet potatoes on a baking sheet. Cover them with aluminum foil to keep them moist. Heat for about 20 minutes, or until warmed through. You can also use a microwave for quick reheating. Just place one potato on a plate and heat for about 2-3 minutes. If you want to freeze your stuffed sweet potatoes, do this before baking them. After filling the sweet potatoes, wrap each one tightly in plastic wrap. Then place them in a freezer-safe bag. They will last for up to three months. When ready to eat, thaw them in the fridge overnight. Bake them as instructed until heated through. Enjoy your meal prep! Yes, you can make these stuffed sweet potatoes ahead of time. Prepare the sweet potatoes and filling separately. Store them in the fridge for up to two days. When you want to eat, just assemble and bake. This saves time and makes meal prep easy. These stuffed sweet potatoes are great on their own. Still, you can add sides for balance. Consider serving a fresh salad or some crunchy veggies. A bowl of mixed greens or coleslaw works well. You could also serve extra ranch dressing for dipping. To adjust the heat, simply change the amount of buffalo sauce. For a spicier dish, add more sauce or choose a hotter variety. If you want it milder, use less sauce or mix in some cream cheese. You can also add a bit of honey to tame the spice. You now have all you need to make Buffalo Chicken Stuffed Sweet Potatoes. We covered the required ingredients, step-by-step instructions, and helpful tips. You learned about delicious variations, storage methods, and answers to common questions. Enjoy this tasty dish, whether you like it spicy or mild. You can mix it up with your favorite toppings, too. I hope you find joy in making and eating this meal!
    Buffalo Chicken Stuffed Sweet Potatoes Flavor Boost
  • To make roasted garlic Parmesan cauliflower steaks, you will need: - 1 large head of cauliflower - 4 cloves of garlic, minced - ¼ cup grated Parmesan cheese - 3 tablespoons olive oil - 1 teaspoon smoked paprika - ½ teaspoon salt - ½ teaspoon black pepper - Fresh parsley, chopped (for garnish) - Lemon wedges (for serving) If you don't have some ingredients, don't worry! Here are some easy swaps: - Cauliflower: You can use broccoli for a different taste. - Parmesan cheese: Try using nutritional yeast for a vegan option. - Olive oil: Avocado oil works well if you need a substitute. - Smoked paprika: Regular paprika or cayenne pepper can add some heat. Want to spice things up? Here are some fun add-ins: - Crushed red pepper flakes: Add a kick of spice. - Lemon zest: Brighten the dish with a fresh citrus flavor. - Balsamic glaze: Drizzle over the top for added sweetness. - Herbs: Fresh thyme or rosemary can bring a wonderful aroma. Feel free to mix and match ingredients to suit your taste! Start by preheating your oven to 425°F (220°C). This high heat helps to crisp the cauliflower. Next, grab a large head of cauliflower. Remove the leaves and trim the stem. Keep the core intact for easy slicing. Now, slice the cauliflower into 1-inch thick steaks. You will get about 2-3 steaks from one head. Save any leftover florets for soup or stir-fry. In a small bowl, mix together minced garlic, olive oil, smoked paprika, salt, and black pepper. Whisk until well combined. This mix adds flavor to the cauliflower. Brush both sides of each cauliflower steak with the garlic oil mixture. Make sure to coat them well for the best taste. Carefully place the cauliflower steaks on a baking sheet lined with parchment paper. This helps prevent sticking. Roast in the oven for 20 minutes. After 20 minutes, flip the steaks gently with a spatula. Now sprinkle grated Parmesan cheese over the flipped steaks. This cheese gets melty and crispy as it bakes. Return the baking sheet to the oven for an additional 10-15 minutes. Keep an eye on them. You want the cauliflower to be tender and the cheese to turn golden brown. When the cauliflower steaks are done, take them out of the oven. Let them cool for a couple of minutes. This small wait helps the flavors settle. Garnish with freshly chopped parsley for a pop of color. Serve with lemon wedges on the side. The lemon adds a bright touch that pairs well with the rich flavors. Enjoy this dish as a side or a main meal! To get the best roasted cauliflower, start with a fresh head. Look for firm, white florets. Cut the cauliflower into 1-inch steaks. This size helps them cook evenly. Preheat your oven to 425°F (220°C). A hot oven gives you a nice, crispy texture. Use parchment paper on your baking sheet. This makes cleanup easy and prevents sticking. Seasoning is key for great flavor. I mix garlic, olive oil, smoked paprika, salt, and pepper in a bowl. Brush this mix on both sides of the cauliflower steaks. Make sure each steak gets a good coat. This helps the flavors soak in while roasting. Adding Parmesan cheese during the last few minutes enhances the dish. It creates a golden, crispy layer on top. You’ll need a few simple tools for this recipe. A sharp knife helps cut the cauliflower. A baking sheet lined with parchment paper is a must. A small bowl for mixing the oil and spices makes it easy. Use a basting brush to coat the cauliflower steaks evenly. Finally, an oven mitt protects your hands when flipping and removing the steaks. {{image_2}} If you want to change the cheese, try these options. Use feta for a tangy kick. Goat cheese adds creaminess and flavor. Nutritional yeast is great for a dairy-free option. It gives a cheesy taste without using dairy. To make this dish vegan, skip the Parmesan. Brush the steaks with olive oil and garlic mix. Use nutritional yeast instead of cheese. It will give you a savory flavor. You can also add vegan cheese if you like. You can change the flavor to suit your taste. Add lemon zest for a fresh twist. Try using different spices like cumin or curry powder. A sprinkle of red pepper flakes adds heat. For a smoky touch, use smoked salt instead of regular salt. After enjoying your roasted garlic Parmesan cauliflower steaks, let them cool down. Place the leftovers in an airtight container. This helps keep them fresh and tasty. Store the container in the fridge. They will stay good for about three to four days. To enjoy your leftovers, reheat them in the oven. Preheat your oven to 350°F (175°C). Place the cauliflower steaks on a baking sheet. Heat for about 10 to 15 minutes. You want them warm and the cheese slightly melted again. You can also use a microwave, but the oven keeps them crispier. If you want to save some for later, freezing is an option. First, let the cauliflower steaks cool completely. Wrap each steak in plastic wrap or foil. Place them in a freezer-safe bag or container. They can last up to three months in the freezer. When you’re ready to eat, thaw them in the fridge overnight before reheating. Roasted garlic Parmesan cauliflower steaks last about 3 to 5 days in the fridge. Store them in an airtight container to keep them fresh. If you notice any changes in color or smell, it's best to toss them. Always trust your senses when it comes to food safety. Yes, you can prepare the cauliflower steaks ahead of time. Slice the cauliflower and store it in the fridge with the garlic oil mixture. Just brush the steaks with the oil right before roasting. You can also roast them a day before and reheat them later. This makes meal prep easy and fun. Roasted cauliflower steaks pair well with many dishes. Here are a few ideas: - Grilled chicken or fish for protein - A fresh salad for crunch and color - Quinoa or rice for a hearty side - Your favorite dipping sauce for extra flavor These options will make your meal colorful and delicious. Enjoy! This blog post covered the key ingredients, detailed steps, and helpful tips for roasting cauliflower. You learned about substitutions, add-ins, and variations to suit your taste. We also shared storage tips to keep leftovers fresh. Roasted cauliflower is a great dish for any meal. With these insights, you can make it perfect every time. Enjoy your cooking journey and explore new flavors confidently!
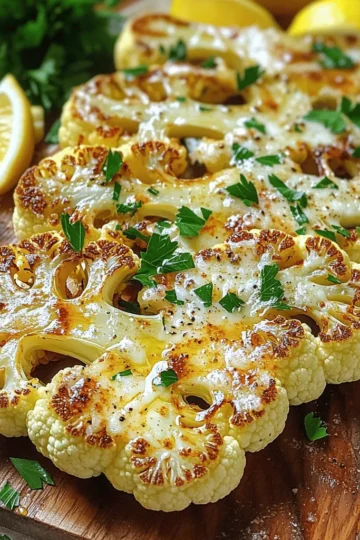
    Roasted Garlic Parmesan Cauliflower Steaks Delight
  • To make this loaded potato soup, gather these simple ingredients: - 4 large russet potatoes, peeled and diced - 1 medium onion, chopped - 3 garlic cloves, minced - 4 cups vegetable broth - 1 cup heavy cream (or coconut cream for a vegan option) - 1 cup shredded sharp cheddar cheese, plus more for topping - 1 cup cooked and crumbled turkey bacon or plant-based bacon (optional) - 1 teaspoon dried thyme - 1 teaspoon smoked paprika - Salt and pepper to taste - ½ cup sour cream or Greek yogurt for garnish - Chopped green onions for garnish You can easily swap ingredients based on your taste or needs. Here are some ideas: - Use sweet potatoes for a sweeter flavor. - Replace heavy cream with cashew cream for a nutty twist. - Try different cheese like gouda or pepper jack for extra flavor. - For a lighter option, skip the bacon or use a veggie alternative. Using fresh ingredients makes a big difference. Here are some tips: - Choose firm russet potatoes with no bruises or blemishes. - Fresh garlic gives a stronger flavor than pre-minced. - Look for high-quality vegetable broth for better taste. - Select sharp cheddar cheese for a bolder flavor profile. These choices will make your soup rich and delicious. Enjoy the cooking journey! Start by peeling the four large russet potatoes. Dice them into small cubes. This helps them cook evenly. Next, chop one medium onion and mince three garlic cloves. Add these to your work area. In your slow cooker, combine the diced potatoes, chopped onion, and minced garlic. Pour in four cups of vegetable broth. This adds flavor and moisture. Stir everything well to mix the ingredients. Now, sprinkle in one teaspoon of dried thyme and one teaspoon of smoked paprika. Add salt and pepper to taste. These spices boost the soup's flavor. Mix them thoroughly with the vegetables. Cover your slow cooker. Set it to cook on low for 6-7 hours or on high for 3-4 hours. The goal is to make the potatoes tender. Check the soup after the cooking time. The potatoes should be soft and easy to mash. Once done, use a potato masher or an immersion blender. Blend some of the potatoes but leave a few chunks for texture. This creates a creamy base while keeping some bite. After blending, stir in one cup of heavy cream. If you prefer a vegan option, use coconut cream instead. Next, mix in one cup of shredded sharp cheddar cheese. Stir until the cheese melts and blends well. If you want, add one cup of cooked and crumbled turkey bacon for extra flavor. Adjust the seasoning if needed with more salt and pepper. Serve the soup hot. Top each bowl with a dollop of sour cream or Greek yogurt. Add extra cheddar cheese and chopped green onions for garnish. Enjoy your creamy comfort dish! For the best creaminess, use heavy cream. It adds rich flavor and smoothness. If you prefer a lighter option, coconut cream works great too. Blend some potatoes with a masher or an immersion blender. This step helps create a thick and creamy base. Make sure to leave some chunks for texture. To boost the taste, use fresh herbs when possible. Dried thyme and smoked paprika give depth. You can add a splash of lemon juice for brightness. Adjust salt and pepper to your liking. For a smoky flavor, try adding a bit of liquid smoke. If you love cheese, toss in more sharp cheddar right before serving. A good slow cooker is key for this soup. I recommend one with a timer. An immersion blender makes blending easy and mess-free. You can also use a regular blender, but be careful with hot soup. A potato masher is handy if you prefer a chunkier texture. Don't forget a sturdy cutting board and a sharp knife for prepping your ingredients. {{image_2}} You can make this soup vegan easily. Swap out the heavy cream for coconut cream. It adds a nice richness. You can also skip the cheese or use a vegan cheese. For the broth, stick with vegetable broth. This keeps all the flavors intact while being plant-based. If you want more protein, add beans or lentils. They blend well and make the soup hearty. You can also use plant-based bacon for a smoky flavor. Another option is adding cooked chickpeas. They add texture and nutrition without overpowering the dish. You can change the flavor by adding spices. A pinch of cayenne pepper gives it heat. Fresh herbs like parsley or cilantro brighten the taste. For a smoky twist, try adding chipotle powder. You can also sprinkle in some lemon juice before serving for a fresh zest. Adjust these flavors to fit your taste! To store leftovers, let the soup cool down first. Use an airtight container. You can keep it in the fridge for about 3 to 5 days. Make sure to label the container with the date. This helps you know when to use it. Reheat the soup on the stove over medium heat. Stir it often to avoid sticking. If it seems too thick, add a splash of broth or cream. You can also use a microwave. Place the soup in a microwave-safe bowl. Heat it in short bursts, stirring between each. You can freeze this soup for later. Use freezer-safe containers or bags. Leave some space for the soup to expand as it freezes. It can last up to 3 months in the freezer. To thaw, place it in the fridge overnight. Reheat it on the stove or microwave afterward. You can store loaded potato soup in the fridge for about three to five days. Make sure to keep it in an airtight container. If you want to keep it longer, you can freeze it. The soup can last up to three months in the freezer. Just be sure to let it cool before you freeze it. Yes, you can use different potatoes for this soup. While russet potatoes are great, Yukon Gold or red potatoes work well too. Yukon Gold gives a creamier texture. Red potatoes add a nice color and flavor. Just keep in mind that cooking times may vary a bit. You can make this soup on the stove if you don’t have a slow cooker. Start by cooking the onions and garlic in a large pot. Then, add the diced potatoes and broth. Bring it to a boil, then lower the heat and let it simmer. Cook until the potatoes are soft, about 20 to 30 minutes. You can then mash some potatoes for texture and stir in the cream and cheese. To make loaded potato soup, you need the right ingredients and proper preparation. We covered substitutions, cooking steps, and how to achieve creamy textures. I shared tips for enhancing flavor and equipment suggestions for success. You can customize the soup to fit your diet, and storage tips ensure leftovers last longer. Remember, you can always adjust recipes to fit your taste. Enjoy the process and have fun cooking!
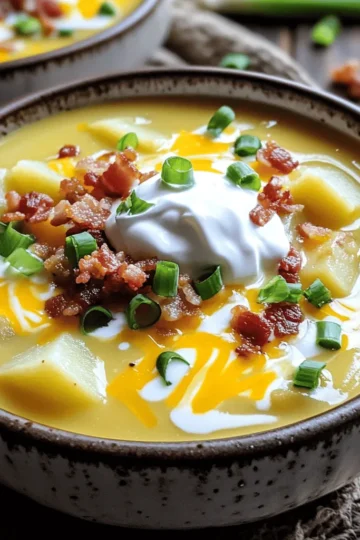
    Slow Cooker Loaded Potato Soup Creamy Comfort Dish
  • - 4 boneless, skinless chicken thighs - 2 cups fresh broccoli florets - 1 large lemon (zested and juiced) - 3 tablespoons olive oil - 2 teaspoons dried oregano - 1 teaspoon garlic powder - 1 teaspoon onion powder - Salt and pepper to taste - Fresh parsley, chopped (for garnish) - Parmesan cheese for topping - Additional vegetables like bell peppers or carrots I love how simple and fresh this dish is. The chicken thighs bring a nice, juicy flavor that pairs well with the bright lemon and herbs. The broccoli adds a nice crunch and healthy touch. Using olive oil in the marinade gives it richness. The lemon zest and juice brighten everything up. Oregano adds a warm, earthy flavor, while garlic powder and onion powder create a tasty base. You can switch things up by adding Parmesan cheese on top. It melts nicely and gives a nice salty kick. Feel free to toss in other veggies like bell peppers or carrots for more color and taste. This dish is all about making it your own! - Preheat your oven to 400°F (200°C). This helps cook the dish evenly. - Line a large sheet pan with parchment paper. This makes cleanup simple. - In a bowl, mix together the lemon zest, lemon juice, olive oil, oregano, garlic powder, onion powder, salt, and pepper. This will be your marinade. - Place the chicken thighs on one side of the sheet pan. Pour half of the marinade over them. Make sure each thigh is coated well. - On the other side of the sheet pan, add the broccoli florets. Drizzle the remaining marinade over them. Toss the broccoli to coat it fully. - Spread the chicken and broccoli out in a single layer. This helps them cook evenly. - Bake the dish in the preheated oven for 25-30 minutes. - The chicken is done when it reaches an internal temperature of 165°F (74°C). The broccoli should be tender and slightly crisp. - Once done, take the sheet pan out and let it rest for a few minutes. Garnish with fresh parsley before serving. Marinating the chicken is key for flavor. A good marinade makes your dish shine. Aim for at least 30 minutes. For a stronger taste, let it marinate longer. You can even marinate overnight for more depth. Adjust the salt and pepper to fit your taste. If you want it zestier, add more lemon juice. Remember, you control the flavor! To ensure the chicken is evenly coated, use your hands or a brush. This helps the flavors absorb well. Spread the chicken and broccoli out on the pan. This gives each piece room to cook. For broccoli, roast until it is bright green and tender. It should still have a slight crunch. Toss the florets in the marinade well for a full flavor. Pair this dish with a light salad or rice for a complete meal. Quinoa or couscous also works well. For a pretty presentation, serve it family-style on the sheet pan. You can garnish with extra lemon slices and parsley. This adds color and freshness. If you plate it, keep the chicken and broccoli together for a beautiful look. Enjoy! {{image_2}} If you want a change from chicken, try using tofu or shrimp. Tofu absorbs flavors well, making it a great choice for this dish. Shrimp cooks faster and adds a nice twist. For veggies, you can swap out broccoli for bell peppers, carrots, or green beans. Each vegetable brings a different taste and texture. You can mix and match to suit your preferences. To boost the flavor, you can add fresh herbs like thyme or rosemary. These herbs pair nicely with lemon. For a spicy kick, consider adding red pepper flakes or cayenne pepper. Adjust the amount based on your heat tolerance. You might also try adding a touch of honey or maple syrup for sweetness. This contrast can enhance the overall flavor profile. If you prefer stovetop cooking, heat a skillet over medium-high heat. Cook the marinated chicken until golden brown. Add the broccoli in the last few minutes to steam it. Grilling is another option. Marinate the chicken and grill it over medium heat. Toss the broccoli in a grill basket for even cooking. For a flavorful drizzle, make a lemon herb sauce. Combine olive oil, lemon juice, and fresh herbs in a bowl. Whisk until blended and drizzle over the dish before serving. To keep your Lemon Herb Chicken and Broccoli fresh, store leftovers in the fridge. Use an airtight container. This helps prevent moisture loss and keeps the chicken juicy. Make sure to eat the leftovers within three to four days. When reheating, keep the chicken and broccoli separate. Use a microwave for quick heating. Heat in short bursts. Check the chicken reaches at least 165°F for safety. For the broccoli, heat just until warm. This keeps it crisp and not soggy. Yes, you can freeze this dish! Let it cool before packing. Use freezer-safe bags or containers. Remove as much air as possible to avoid freezer burn. For defrosting, place it in the fridge overnight. You can also use the microwave for a quick thaw. What can I substitute for chicken thighs? You can use chicken drumsticks or chicken breasts. Drumsticks add a nice flavor. They are juicy and tender. Breasts are leaner and cook faster. Adjust your cooking time as needed. Can I use chicken breasts instead? Yes, chicken breasts work great too. They may dry out faster than thighs. To keep them moist, use a good marinade. Also, check the temperature early. Aim for 165°F to ensure they are safe to eat. How long can I marinate the chicken? You can marinate the chicken for 30 minutes to 2 hours. If you have more time, you can go overnight. The longer you marinate, the more flavor it gains. Just keep it in the fridge. Can I prepare this recipe ahead of time? Yes, you can prep it a day in advance. Marinate the chicken and chop the broccoli ahead of time. Store them in the fridge until you are ready to cook. Just remember to take them out before cooking to reach room temperature. Is this dish healthy? Nutritional highlights Yes, this dish is healthy. It has lean protein from chicken and fiber from broccoli. Olive oil adds good fats, while lemon gives vitamin C. This meal is low in carbs and full of flavor. Can this recipe fit into a special diet (e.g., keto, gluten-free)? Absolutely! This recipe is gluten-free. It is also low in carbs, fitting well into a keto diet. Just ensure to use low-carb vegetables if you add more. Enjoy it while staying on your diet! This blog post covered a tasty lemon herb chicken dish that is easy to make. I shared the main ingredients, step-by-step instructions, and tips for perfecting the meal. You can try different flavors or cooking methods to suit your taste. Storing leftovers is simple, and I provided methods for reheating and freezing. This dish is not only delightful but also healthy. Dive in and enjoy creating this flavorful meal that will impress everyone!
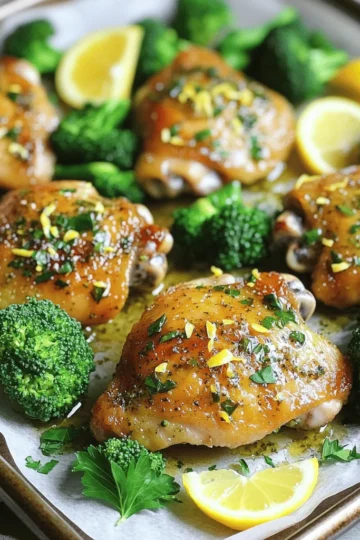
    Lemon Herb Chicken and Broccoli Sheet Pan Delight

Hi I’m Taling

I love sharing perfected dishes from my kitchen. I’m sure they’ll earn a spot in your heart. Let’s savor this journey together!.

More about me

Recent Desserts

  • - 1 cup unsalted butter - 2 cups granulated sugar - 1 teaspoon vanilla extract - 4 large eggs - 1 cup all-purpose flour - 1 cup cocoa powder - ½ teaspoon baking powder - ¼ teaspoon salt - 1 cup pecans, chopped - 1 cup corn syrup - 1 cup brown sugar, packed - 2 teaspoons vanilla extract (for the pecan topping) For best results, use unsalted butter. If you want a richer flavor, try using salted butter. Instead of granulated sugar, you can use coconut sugar for a healthier choice. If you want to reduce sugar, use a sugar substitute that measures like regular sugar. Choose fresh pecans for the best taste. Look for pecans that feel firm and smell nutty. Store your flour in a cool place to keep it fresh. Use fresh eggs; check the date on the carton. Always measure your ingredients accurately for the best results. - Preheat your oven to 350°F (175°C). Grease a 9x13 inch baking pan. - In a large bowl, whisk the melted butter, granulated sugar, and 1 teaspoon of vanilla extract until smooth. - Add the eggs, one at a time. Mix well after each egg. - In another bowl, sift together the all-purpose flour, cocoa powder, baking powder, and salt. - Gradually add this dry mixture to the wet ingredients. Stir until just combined. - In a separate bowl, mix the corn syrup, brown sugar, and 2 teaspoons of vanilla extract until well blended. - Pour this corn syrup mixture over the brownie batter in the pan. Spread it carefully to cover the top. Now you’re ready to bake these delightful pecan pie brownies. Enjoy the rich flavor they bring! - Checking for doneness: To check if your brownies are ready, insert a toothpick into the center. If it comes out with moist crumbs, they are done. Avoid wet batter, as it means they need more time. Start checking around 30 minutes to prevent overbaking. - Cooling and storing tips: After baking, let the brownies cool completely in the pan. This helps them set and makes slicing easier. Once cool, slice into squares. Store them in an airtight container at room temperature. They stay fresh for up to five days. - Serving ideas with sauces and toppings: Serve your pecan pie brownies warm for the best taste. Drizzle with caramel or chocolate sauce to add a sweet touch. A scoop of vanilla ice cream on the side makes it even better. - Garnishing with additional pecans: Sprinkle extra chopped pecans on top before serving. This adds crunch and looks great. You can also use a dusting of powdered sugar for a pretty finish. If your brownies come out too dry, it might mean you baked them too long. Always check for doneness early. If they are too gooey, they likely need more baking time. For a chewy texture, mix the batter less after adding the dry ingredients. This keeps the brownies soft. If you want a richer taste, consider adding more cocoa powder. {{image_2}} You can make nut-free pecan pie brownies by simply leaving out the pecans. Substitute the chopped pecans with sunflower seeds or pumpkin seeds. These seeds add a nice crunch without the nut allergy risk. They also bring a unique flavor to the brownies. You will still enjoy the rich chocolate taste, making them a great treat for everyone. For a twist, try adding chocolate chips to your pecan pie brownies. Mix in one cup of semi-sweet or dark chocolate chips into the batter. This addition boosts the chocolate flavor, making the brownies even richer. You can also sprinkle some on top before adding the pecan topping. This gives a lovely look and taste to your dessert. To make gluten-free pecan pie brownies, swap the all-purpose flour for a gluten-free blend. Look for a mix that works well in baking. Ensure it has a good balance of starches and flours. This way, your brownies will still rise and taste great. The texture may change slightly, but they will still be delicious and satisfying. Store your pecan pie brownies in an airtight container. This keeps them fresh and moist. Place parchment paper between layers to avoid sticking. Keep them at room temperature for up to four days. If you want them to last longer, refrigerate them. To freeze brownies, cut them into squares first. Wrap each piece in plastic wrap, then place them in a freezer bag. Seal the bag tightly, removing as much air as possible. These brownies can last in the freezer for up to three months. When you’re ready to enjoy, thaw them in the fridge overnight. For the best texture, reheat brownies in the oven. Preheat your oven to 350°F (175°C). Place the brownies in an oven-safe dish, cover with foil, and warm for about 10 minutes. This keeps them soft and chewy. You can also use the microwave. Heat for about 10-15 seconds. Enjoy your warm, delightful brownies! Yes, you can make pecan pie brownies ahead of time. Bake them and let them cool completely. Then, cover them tightly with plastic wrap or foil. Store them in the fridge for up to three days. This helps the flavors blend well. Pecan pie brownies last about four to five days at room temperature. If you keep them in the fridge, they can last up to a week. Just make sure to store them in an airtight container to keep them fresh. Yes, you can use different nuts in this recipe. Walnuts or almonds work well too. Just chop them up like pecans. This can add a new taste and texture to your brownies. Yes, you can make these brownies without eggs. Use a mix of ¼ cup applesauce or ¼ cup mashed bananas for each egg. This will help keep the brownies moist. You can also try using flaxseed meal mixed with water as a substitute. You can serve pecan pie brownies with whipped cream or vanilla ice cream. A drizzle of chocolate or caramel sauce adds a nice touch too. You can also top them with extra chopped pecans for a fun crunch. We explored the key ingredients for delicious pecan pie brownies and how to prepare them. You learned about tips for fresh ingredients, step-by-step baking instructions, and ways to store your brownies for lasting flavor. Remember, perfecting your brownies takes practice. Try different variations to find your favorite. Enjoy your tasty creations and impress your friends and family with these easy tips. Happy baking!
    Pecan Pie Brownies Delightful and Rich Dessert Treat
  • Here’s what you need to make Pumpkin Spice Oreo Truffles: - 1 package (15.25 oz) Pumpkin Spice Oreo cookies - 8 oz cream cheese, softened - 1 teaspoon vanilla extract - 1 cup white chocolate chips - 1 teaspoon pumpkin spice blend - 1 tablespoon coconut oil (optional for melting chocolate) - A pinch of sea salt - Extra crushed Oreo cookies for garnish (optional) Each ingredient plays a key role in flavor and texture. The Pumpkin Spice Oreo cookies bring that warm, seasonal taste. The cream cheese adds a rich creaminess that balances the sweetness. Vanilla extract enhances all the flavors, making every bite delightful. White chocolate chips give a smooth coating that complements the spiced filling. The pumpkin spice blend adds depth and warmth. Coconut oil makes the melted chocolate smoother, but it’s optional. A pinch of sea salt helps to enhance the sweetness. If you want a bit of crunch, crushed Oreo cookies make a tasty garnish. Gather these ingredients, and you’ll be ready to create a fall treat that everyone will love! Start by taking your Pumpkin Spice Oreo cookies. Place them in a food processor. Pulse them until they turn into fine crumbs. This step is key for the best texture. Next, take a large bowl and combine the crumbs with the softened cream cheese and vanilla extract. Mix it well until you have a dough-like consistency. This mixture should be smooth and easy to work with. Now it’s time to shape your truffles. Use your hands to roll the mixture into small balls, about one inch in size. Make sure they are evenly sized for a nice look. Once formed, place the balls on a baking sheet lined with parchment paper. Keep them spaced apart, so they don’t stick together. Next, refrigerate the truffles for about 30 minutes. This will help them firm up and makes coating easier. While they chill, it’s time to melt the white chocolate. In a microwave-safe bowl, combine the white chocolate chips, pumpkin spice, and coconut oil if you choose to use it. Heat it in the microwave in 30-second bursts, stirring in between. This helps prevent burning. Once melted and smooth, take out the chilled truffles. Dip each one into the melted chocolate, making sure they are fully coated. Use a fork to lift them out and let any extra chocolate drip off. Place them back on the parchment-lined baking sheet. While the chocolate is still wet, sprinkle a pinch of sea salt and some crushed Oreo cookies on top. This adds great flavor and a nice crunch. Finally, chill the truffles again for another 30 minutes to let the chocolate fully set. To soften cream cheese, take it out of the fridge. Let it sit at room temperature for about 30 minutes. You can also microwave it for about 10 seconds. Just make sure it doesn’t get too warm. When rolling truffles, keep your hands slightly damp. This helps the mixture not stick. Roll them gently into balls about one inch wide. Don’t worry if they aren’t perfect; they will still taste great! To melt white chocolate without burning, use a microwave-safe bowl. Heat the chocolate in 30-second bursts. Stir after each interval until smooth. Never rush this step; slow and steady wins. Adding a tablespoon of coconut oil to the chocolate helps it melt smoothly. The oil gives it a nice shine too. If you don’t have coconut oil, that’s okay. The truffles will still taste amazing! For extra flair, consider toppings like crushed nuts or sprinkles. These add a nice crunch and color. You can also use different types of chocolate for coating. Dark chocolate gives a rich taste, while milk chocolate adds sweetness. Using extra crushed Oreo cookies as a garnish is a fun way to tie in the flavor. Just sprinkle them on while the chocolate is still wet. This makes your truffles look beautiful and taste even better! {{image_2}} You can change up the flavor of your Pumpkin Spice Oreo truffles. Try using different Oreo cookies. For example, golden Oreos add a fun twist. They make the truffles taste light and sweet. You can also mix in a splash of orange zest. This adds a fresh, zesty flavor that brightens the truffles. It’s a simple way to make your treats unique and exciting. The coating can change the whole feel of your truffles. You can use dark chocolate instead of white chocolate. Dark chocolate gives a rich taste that pairs well with pumpkin spice. If you want something fun, try candy melts or chocolate bark. These options come in many colors and flavors. They can make your truffles stand out. Just melt them like you do with white chocolate for easy coating. You can make these truffles fit different diets. For gluten-free options, use gluten-free Oreo cookies. They work just as well and taste great. If you want vegan truffles, swap out cream cheese for a vegan cream cheese. You can also use nut butter or coconut cream. This way, everyone can enjoy these tasty treats. Making simple swaps helps you cater to many dietary needs without losing flavor. To keep your Pumpkin Spice Oreo Truffles fresh, store them in the fridge. Place them in an airtight container. This will help them stay moist and tasty. Make sure to separate layers with parchment paper to avoid sticking. If you want to keep them longer, freezing is a great option. Place the truffles in a single layer on a baking sheet. Once frozen, transfer them to a freezer-safe bag. They will stay good for up to three months in the freezer. To thaw, just take them out and let them sit at room temperature for about 30 minutes. In the fridge, these truffles can last about one week. After that, they may lose their taste or texture. Look for signs of spoilage. If you notice a strange smell or change in color, it's best to toss them out. Keeping an eye on your treats will ensure you enjoy them at their best! Yes, you can make these truffles ahead of time. They taste even better after resting. For the best results, prepare the truffles and chill them. Store them in an airtight container in the fridge. They can stay fresh for up to a week. You can also freeze them for up to a month. Just make sure to let them thaw in the fridge before serving. If you don't have cream cheese, try using mascarpone cheese. It offers a creamy texture and mild flavor. Another option is Greek yogurt. It will give a tangy taste and a bit less creaminess. Silken tofu is also a great vegan choice. Blend it until smooth for a similar texture. To balance the sweetness, try reducing the amount of white chocolate. You can also add a pinch of sea salt to enhance the flavors. If you want a less sweet truffle, mix in some unsweetened cocoa powder. This will give a nice depth without adding extra sugar. These Pumpkin Spice Oreo truffles are fun to make and delicious to eat. You can shape the cookie mixture into truffles, coat them in white chocolate, and add your favorite toppings. Don't forget the tips for texture and melting chocolate. You can also try different flavors, storage methods, and dietary options. Remember, these treats can be made ahead and adjusted to your taste. Enjoy creating your own sweet twist on this fall favorite!
    Pumpkin Spice Oreo Truffles Easy Fall Delight
  • To make these apple crumb muffins, you need: - 1 ½ cups all-purpose flour - 1 cup granulated sugar - ½ teaspoon baking soda - 1 teaspoon baking powder - ½ teaspoon salt - 1 teaspoon ground cinnamon - ½ cup unsalted butter, melted and cooled - 2 large eggs - 1 teaspoon vanilla extract - ½ cup milk - 2 cups apples, peeled, cored, and diced For the delicious crumb topping, gather these: - ½ cup brown sugar - ½ cup rolled oats - ½ cup all-purpose flour - 1 teaspoon ground cinnamon - ¼ cup cold unsalted butter, cubed Choosing the right apples makes a big difference. I prefer sweeter varieties like Fuji or Honeycrisp. These apples add flavor and sweetness to your muffins. Look for firm apples with bright colors. Avoid any that feel soft or have bruises. Fresh apples will give your muffins a better taste and texture. First, set your oven to 350°F (175°C). This temperature is perfect for baking muffins. While the oven heats, prepare your muffin tin. You can use paper liners or grease it with cooking spray. This step helps prevent the muffins from sticking. In a large bowl, combine the dry ingredients. Use 1 ½ cups of all-purpose flour, 1 cup of granulated sugar, ½ teaspoon of baking soda, 1 teaspoon of baking powder, ½ teaspoon of salt, and 1 teaspoon of ground cinnamon. Whisk these ingredients together until they blend well. This mixture gives the muffins structure and flavor. In another bowl, mix the wet ingredients. You need ½ cup of melted butter, 2 large eggs, 1 teaspoon of vanilla extract, and ½ cup of milk. Stir these until smooth. Next, pour the wet mix into the dry mix. Gently fold them together. Avoid over-mixing; this keeps the muffins light and fluffy. Finally, add 2 cups of diced apples to the batter. Fold them in until they are evenly mixed. For the crumb topping, take a small bowl. Combine ½ cup of brown sugar, ½ cup of rolled oats, ½ cup of all-purpose flour, and 1 teaspoon of cinnamon. Mix these well. Then, add ¼ cup of cold, cubed unsalted butter to the bowl. Use your fingers or a pastry cutter to mix until it looks like coarse crumbs. This topping adds a crunchy texture to your muffins. Now, fill each muffin cup about ¾ full with the batter. Sprinkle the crumb topping generously over each muffin. Place the tin in the preheated oven and bake for 18-22 minutes. To check if they are done, insert a toothpick into the center. If it comes out clean, your muffins are ready. Let them cool in the pan for 5 minutes, then move them to a wire rack. Enjoy the warm, delightful scent as they cool! To avoid common mistakes, measure your flour correctly. Too much flour makes muffins dry. Always spoon flour into your measuring cup and level it off. Mix the wet and dry ingredients gently. Over-mixing makes tough muffins. Finally, don’t skip the crumb topping. It adds flavor and crunch. For a perfect crumb texture, use cold butter for the topping. Cold butter creates those lovely crunchy bits. Mix the topping until it looks like coarse crumbs. If it feels too wet, add a bit more flour. Sprinkle the topping generously on each muffin before baking to ensure a nice crust. Serve these muffins warm for the best taste. A light sprinkle of powdered sugar makes them look fancy. Pair them with a slice of fresh apple and a cup of tea or coffee. They are great for breakfast or as a snack. You can also try adding a dollop of whipped cream on top for a treat! {{image_2}} You can add nuts or dried fruits to your apple crumb muffins. Walnuts or pecans add crunch. Dried cranberries or raisins can add sweetness. When you mix in these extras, use about ½ cup. This will keep the balance of flavors just right. Chop the nuts coarsely and fold them in with the diced apples. If using dried fruits, chop them smaller for even mixing. For a gluten-free version, swap the all-purpose flour. Use a gluten-free blend instead. Make sure it has a binding agent like xanthan gum. This helps give the muffins structure. You can also use almond flour or coconut flour, but adjust the liquid. These flours absorb more moisture. You might need to add an extra tablespoon of milk to keep the batter moist. You can enhance the flavor of your muffins easily. Adding spices like nutmeg or ginger can add warmth. A splash of almond or maple extract can give a nice twist. When mixing the batter, use ¼ teaspoon of nutmeg or ginger. For extracts, a teaspoon is perfect. This makes the muffins unique and more flavorful. To keep your apple crumb muffins fresh, store them in an airtight container. This helps lock in moisture and flavor. Place them at room temperature for up to three days. If you want to keep them longer, consider freezing. For long-term storage, freeze the muffins after they cool completely. Wrap each muffin in plastic wrap. Then place the wrapped muffins in a freezer-safe bag. They can last up to three months in the freezer. When ready to enjoy, just take out the number you need. To reheat the muffins, use your oven or microwave. For the oven, preheat to 350°F (175°C). Place the muffins on a baking sheet for about 10 minutes. For the microwave, heat each muffin for 15-20 seconds. Enjoy them warm for the best taste! To keep your muffins moist, use apples that are juicy. You can use sweeter varieties of apples. Adding a little extra butter also helps. Make sure not to over-mix the batter. Over-mixing can make them dry. Use fresh ingredients for the best results. Yes, you can use other fruits. Pears, berries, or peaches work great. Just ensure the fruit is ripe. Diced fruits will blend well into the batter. Adjust the sugar if your fruit is less sweet. Apple crumb muffins stay fresh for about three days at room temperature. Store them in an airtight container. If you want them to last longer, refrigerate them for up to a week. They can also be frozen for about three months. To warm leftover muffins, preheat your oven to 350°F. Place the muffins on a baking sheet. Heat them for about 5-7 minutes. You can also use a microwave for 15-20 seconds. Enjoy them warm for the best taste. You now know how to make delicious apple crumb muffins from scratch. We covered the key ingredients, clear steps, and helpful tips to avoid mistakes. I shared fun variations and explained how to store your muffins for later. Remember, fresh apples make a big difference in taste. With these insights, you can enjoy tasty muffins anytime. Dive into your baking adventure, and let every bite remind you of the effort you put into it. Enjoy your apple muffins!
    Apple Crumb Muffins Delightful Taste and Texture
  • To make these tasty pumpkin spice donut holes, gather the following: - 1 cup all-purpose flour - ½ cup pumpkin puree - ¼ cup granulated sugar - ¼ cup brown sugar, packed - ¼ cup milk - 1 large egg - 1 teaspoon baking powder - ½ teaspoon baking soda - 1 teaspoon pumpkin pie spice - ½ teaspoon vanilla extract - ¼ teaspoon salt - ¼ cup melted butter (for coating) - ½ cup granulated sugar (for coating) - 1 teaspoon cinnamon (for coating) You can swap some ingredients if needed: - All-purpose flour: Use whole wheat or gluten-free flour. - Pumpkin puree: Replace with applesauce for a lighter flavor. - Granulated sugar: Try coconut sugar or honey as alternatives. - Milk: Use almond milk or oat milk for dairy-free options. - Egg: A flaxseed meal mix (1 tablespoon flaxseed + 2.5 tablespoons water) works as a binder. Understanding what’s in your donut holes is key: - All-purpose flour: Provides carbs and some protein. - Pumpkin puree: Offers fiber, vitamins A and C, and antioxidants. - Granulated sugar: Adds sweetness but has no nutrients. - Brown sugar: Adds moisture and a hint of flavor. - Milk: Contributes calcium and protein. - Egg: Adds protein and helps bind the mix. - Baking powder and baking soda: These help the donut holes rise. - Pumpkin pie spice: Brings warm flavors like cinnamon and nutmeg. - Vanilla extract: Enhances overall flavor. - Salt: Balances sweetness and boosts flavor. - Melted butter: Adds richness and helps the sugar coating stick. - Cinnamon sugar: Provides a sweet and spicy finish. These ingredients come together to create a warm, cozy treat that celebrates fall. First, gather all your ingredients. This makes cooking easier and more fun. You will need flour, pumpkin puree, sugars, milk, an egg, baking powder, baking soda, pumpkin pie spice, vanilla, salt, melted butter, and more sugar with cinnamon for coating. Preheat your oven to 350°F (175°C). Grease a mini muffin tin with cooking spray or butter. Start by mixing dry ingredients in a bowl. Combine flour, baking powder, baking soda, pumpkin pie spice, and salt. Whisk them well. In another bowl, mix the wet ingredients. Add pumpkin puree, granulated sugar, brown sugar, milk, egg, and vanilla extract. Whisk until smooth. Gradually add dry ingredients to the wet mix. Stir until just combined. A few lumps are fine; don’t overmix. Next, fill each muffin cup ⅔ full with batter. Bake for 10 to 12 minutes. Check doneness with a toothpick. If it comes out clean, they are ready. Once baked, let the donut holes cool for about five minutes in the tin. Then, move them to a wire rack. While they cool, make the cinnamon sugar mix. Combine granulated sugar and cinnamon in a bowl. When the donut holes are warm, dip each one in melted butter. Roll them in the cinnamon sugar mixture to coat well. Enjoy your tasty Pumpkin Spice Donut Holes warm! To make the best pumpkin spice donut holes, follow these tips: - Use fresh pumpkin puree. Fresh puree gives a richer taste. - Don’t overmix the batter. Mix until just combined for light, fluffy donut holes. - Grease the tin well. This helps the donut holes come out easily. - Check the temperature. Make sure your oven is preheated to 350°F for even baking. - Use a toothpick test. Insert a toothpick to check if they are done. It should come out clean. Avoid these common mistakes to ensure success: - Too much flour. Measuring too much can make them dense. Always spoon flour into your measuring cup. - Skipping the cooling step. Letting them cool for a few minutes helps them firm up before coating. - Not coating while warm. Coating them right after baking helps the sugar stick better. - Baking too long. If they are overbaked, they will be dry. Watch them closely in the last minutes. Here are some ideas to boost the flavor: - Add nuts. Chopped pecans or walnuts can add a nice crunch and flavor. - Try different spices. A pinch of nutmeg or allspice can enhance the pumpkin spice flavor. - Glaze option. Drizzle a simple glaze made of powdered sugar and milk for extra sweetness. - Stuff them. Fill with cream cheese or chocolate for a surprise inside. {{image_2}} You can change the flavors of your donut holes easily. For a chocolate twist, add cocoa powder to the batter. Just use 2 tablespoons of cocoa powder to replace some flour. You can also mix in mini chocolate chips for a sweet surprise. If you want a fruity touch, add mashed bananas or applesauce. This will give your donut holes a moist texture. You can also try different spices. Swap pumpkin pie spice for cinnamon or nutmeg. Each spice adds a unique taste. To make these donut holes gluten-free, use a gluten-free flour blend. Just ensure it has a good mix of starches and proteins. You can also replace the egg with a flaxseed egg. Mix 1 tablespoon of ground flaxseed with 2.5 tablespoons of water. Let it sit for a few minutes until it thickens. For a vegan version, switch milk with almond or oat milk. Choose a plant-based butter for coating. This way, everyone can enjoy these tasty treats! Add seasonal flavors to your donut holes for more fun. Try mixing in chopped nuts like pecans or walnuts. You can also sprinkle in dried cranberries or raisins for a chewy bite. For garnishing, drizzle maple syrup or caramel on top. This makes them look fancy and taste even better. You can also dust them with powdered sugar for a sweet finish. These little changes will make your pumpkin spice donut holes stand out. To keep your pumpkin spice donut holes fresh, store them in an airtight container. This helps keep them moist and tasty. You can keep them at room temperature for up to two days. If you want them to last longer, store them in the fridge. Just remember, they might lose some of their fluffiness. When you’re ready to enjoy these donut holes again, reheating is easy. Preheat your oven to 350°F (175°C). Place the donut holes on a baking sheet. Heat them for about five to seven minutes. This method helps restore their warm, soft texture. You can also use a microwave. Just heat them for about 10-15 seconds at a time. Be careful not to overheat, or they might get tough. If you want to save some for later, freezing is a great option. Allow the donut holes to cool completely. Then, place them in a single layer on a baking sheet. Freeze them for about one hour. Once frozen, transfer them to a freezer bag. Seal it tightly and label it with the date. They can last up to three months in the freezer. When you're ready to eat, thaw them overnight in the fridge, then reheat as mentioned above. Enjoy your tasty treat anytime! Pumpkin spice donut holes are bite-sized treats made with pumpkin puree and warm spices. They have a soft, cake-like texture and are rolled in cinnamon sugar. These mini donuts capture the flavors of fall in every bite. Yes, you can make these donut holes ahead of time. Bake them and store them in an airtight container. They stay fresh for about two days at room temperature. For longer storage, freeze them for up to three months. You can tell your donut holes are done when a toothpick inserted comes out clean. They should also be golden brown on top. If they look slightly puffed and spring back when touched, they are ready. You can find pumpkin spice donut holes at many bakeries and coffee shops in the fall. Some grocery stores may also sell them in the bakery section. If you want a fresh batch, making them at home is always a great option! We explored the ingredients, baking steps, and variations for pumpkin spice donut holes. You learned how to create these tasty treats with helpful tips and storage tricks. Remember, ingredient swaps and flavor combinations can make your baking fun and unique. Use these insights to impress family and friends. Keep experimenting and enjoy every bite of your delightful donut holes. Happy baking!
    Pumpkin Spice Donut Holes Tasty Fall Treat Recipe

Recent Drinks

  • - 1 ripe banana - 2 tablespoons natural peanut butter - 1 cup unsweetened almond milk (or any milk of choice) - 1 scoop vanilla protein powder (plant-based or whey) - 1 tablespoon chia seeds - 1 teaspoon honey (optional for sweetness) - A pinch of cinnamon - Ice cubes (optional, for a thicker texture) Gather these simple items before you start. A ripe banana gives natural sweetness and creaminess. Use two tablespoons of natural peanut butter for a rich flavor. Almond milk is my go-to, but any milk you love works great. The protein powder adds a boost of nutrition. Choose vanilla to match the banana. Chia seeds are tiny but mighty. They add fiber and help keep you full. If you like it sweeter, add honey, but it’s not a must. A pinch of cinnamon brings warmth and depth to this drink. For a thicker texture, toss in some ice cubes. This smoothie is flexible, so feel free to mix and match based on your taste. Now, let's blend it all together! 1. Start by peeling the ripe banana. Break it into small chunks. 2. In a blender, combine the banana chunks, natural peanut butter, almond milk, protein powder, chia seeds, and a pinch of cinnamon. 3. If you like a colder and thicker smoothie, add some ice cubes. 1. Blend all the ingredients on high speed. Keep blending until you have a smooth and creamy mix. 2. Stop the blender and taste your smoothie. If you want it sweeter, add honey. Blend again for a few seconds to mix. 1. Pour the smoothie into a tall glass. Enjoy it right away for the best taste and creaminess. 2. For a fun twist, you can top it with extra chia seeds or banana slices. This makes it look pretty too! To get the perfect texture, use a ripe banana. A ripe banana makes the smoothie creamy. Add ice cubes if you want it thicker. If you prefer a smoother drink, blend longer. Scrape the sides of the blender to mix all the ingredients well. This ensures a silky-smooth result. If your smoothie tastes too bland, add honey or more banana. Start with a teaspoon of honey. Blend and taste again. You can always add more honey if needed. This way, you control the sweetness to match your taste. Remember, ripe bananas also add natural sweetness. Use a high-speed blender for the best results. A strong blender breaks down the ingredients quickly. If you have a less powerful blender, blend in stages. Start with the liquids first, then add the solids. This helps everything mix better. Make sure your blender is clean for the best flavor. {{image_2}} You can switch the peanut butter for other nut butters. Almond butter offers a nutty taste. Cashew butter is creamy and sweet. Sunflower seed butter is a great choice for allergies. Each nut butter brings its own flavor and health benefits. Experiment to find your favorite. You can add many fruits to the smoothie. Frozen berries add sweetness and color. Spinach or kale boosts nutrition without changing the taste. Try mango for a tropical twist. Each fruit adds vitamins and makes the smoothie fun. Mix and match to discover new flavors. Choosing the right protein powder is key. Plant-based powders are great for vegan diets. Whey protein is popular for muscle recovery. Look for flavors that match your taste, like chocolate or vanilla. The right powder can enhance the smoothie’s flavor and nutrition. Test different types to see what you prefer. Store any leftover smoothie in an airtight container. You want to keep it fresh. Place it in the fridge right after making it. It will stay good for about one day. When you are ready to drink it again, shake or stir well. This helps mix any settled ingredients. You can freeze your smoothie for later. Pour it into ice cube trays or freezer-safe bags. This way, you can grab a portion whenever you want. To use, thaw the smoothie overnight in the fridge. You can also blend it again for a fresh taste. In the fridge, your smoothie lasts about 24 hours. In the freezer, it can last up to three months. Just remember, the sooner you drink it, the better the taste and texture will be! Yes, this smoothie is gluten-free. All the ingredients listed are naturally free from gluten. The peanut butter, banana, almond milk, protein powder, chia seeds, and honey do not contain gluten. Always check labels if you use store-bought items to confirm they are gluten-free. Absolutely! To make this smoothie vegan, simply use plant-based protein powder. Ensure your peanut butter is also free from animal products. Replace honey with maple syrup or agave nectar for sweetness. All other ingredients are already vegan-friendly. This smoothie offers many health benefits. It provides protein from the peanut butter and protein powder, which helps build muscle. Bananas add potassium, good for heart health. Chia seeds are packed with fiber, aiding digestion. Almond milk is low in calories and rich in vitamins. Yes, you can use various milk types. Cow’s milk will add creaminess and protein. Soy milk is a great option for extra protein. Coconut milk gives a tropical flavor. Each milk option changes the taste and texture slightly, so choose what you enjoy best. This smoothie recipe combines simple ingredients for great taste and nutrition. You learned step-by-step how to prepare it and tips for perfect texture. Variations let you customize your drink to fit your taste. Remember to store leftovers properly for later enjoyment. Smoothies can be healthy and fun. Try new mixtures to find what you love best. Keep experimenting and enjoy your delicious creations!
    Peanut Butter Banana Protein Smoothie Easy Recipe
  • To make a delicious Turmeric Golden Milk Latte, gather these simple ingredients: - 2 cups almond milk (or your preferred milk) - 1 teaspoon ground turmeric - ½ teaspoon ground ginger - ¼ teaspoon cinnamon - 1 tablespoon honey or maple syrup (adjust to taste) - Pinch of black pepper - ½ teaspoon vanilla extract - Optional: a sprinkle of nutmeg for garnish - Almond Milk: This milk is low in calories and rich in vitamins. It helps with heart health. - Turmeric: This spice has curcumin, known for its anti-inflammatory properties. It may help improve brain function. - Ginger: Ginger can help with digestion and nausea. It adds a nice warmth to the drink. - Cinnamon: This spice is rich in antioxidants. It may help lower blood sugar and improve heart health. - Honey or Maple Syrup: Both sweeteners can boost energy. They also provide antioxidants. - Black Pepper: This spice enhances turmeric absorption. It makes the drink more effective. - Vanilla Extract: It adds flavor and can help reduce stress. - Nutmeg: This spice is optional, but it adds warmth and a nice aroma. - Milk Options: You can use oat milk, soy milk, or coconut milk for different flavors. - Sweeteners: If you prefer, try agave syrup or stevia as sugar-free options. - Spices: Experiment with cardamom or cloves for added flavor. - Nutmeg: You can skip it if you don't like nutmeg, or use a touch of cocoa powder instead. 1. Start by taking a small saucepan. 2. Add 2 cups of almond milk to the pan. 3. Measure and add 1 teaspoon of ground turmeric. 4. Next, add ½ teaspoon of ground ginger. 5. Sprinkle in ¼ teaspoon of cinnamon. 6. Sweeten your drink with 1 tablespoon of honey or maple syrup. 7. Don't forget a pinch of black pepper for better absorption of turmeric. 8. Lastly, add ½ teaspoon of vanilla extract. 9. Whisk all the ingredients well in the pan. 10. Place the saucepan on medium heat. 11. Gently warm the mixture while stirring often. 12. Keep an eye on it; do not let it boil. 13. After about 5-7 minutes, it should be hot enough. 14. Remove the pan from heat and let it cool slightly. 15. If you want a frothy drink, use a milk frother or whisk it quickly. 16. Pour the golden milk into your favorite mugs. 17. Optionally, sprinkle a bit of nutmeg on top for a nice touch. 18. Serve warm and enjoy this comforting drink! - Always use a whisk to blend the spices into the milk. - Whisking helps mix the turmeric and other spices evenly. - When heating, keep the heat low to avoid scalding the milk. - Stir often to prevent sticking at the bottom of the pan. - If you see steam but no bubbles, you are at the right temperature. - A milk frother works wonders for a smooth, frothy finish. - If you don’t have a frother, whisk vigorously by hand. - Frothing adds air, giving the latte a creamy feel. - The more you froth, the lighter and fluffier your drink will become. - For an extra touch, froth some almond milk separately and top your latte with it. You can mix spices to make your turmeric latte tastier. Try adding a pinch of nutmeg or a dash of cardamom. These spices add warmth to the drink. You can also use fresh ginger instead of ground ginger. This will give your latte a bright, zesty kick. Just remember, fresh ginger may need more time to steep. Many people rush the heating process. Always warm your milk slowly over medium heat. If you boil it, the spices can lose flavor. Another mistake is not blending the spices well. Make sure to whisk the mixture thoroughly. This helps avoid clumps of turmeric or ginger. Lastly, avoid skipping the black pepper. It helps your body absorb turmeric better. Sweetness is personal. Start with one tablespoon of honey or maple syrup. Taste your latte and add more if you like it sweeter. For creaminess, use full-fat coconut milk for a richer feel. Almond milk is lighter but still delicious. You can also mix almond and coconut milk for the best of both worlds. {{image_2}} You can easily make this latte vegan. Just use almond milk, coconut milk, or oat milk. These milks work great in this recipe. They keep the drink creamy and delicious. If you want a nut-free option, oat milk is the best choice. It blends well with turmeric and spices. To make an iced version, start with brewed turmeric milk. Follow the same steps but let it cool. Pour over ice instead of serving warm. This drink is refreshing on hot days. You can also add some ice cream for a treat! You can mix and match flavors for fun. Try adding matcha for a green twist. This adds a fresh taste and boosts energy. You can also use cocoa for a chocolatey version. The cocoa pairs well with turmeric and spices. For a special touch, add a dash of vanilla extract. This enhances the overall flavor and aroma. To store leftover turmeric golden milk, let it cool first. Then, pour it into an airtight container. Keep it in the fridge for up to three days. This way, you can enjoy the drink again without losing its flavor. When reheating your golden milk, do it gently. Pour it into a small saucepan. Heat it over low to medium heat. Stir it often to avoid burning. Never let it boil, as this can change the taste and texture. You can also use a microwave. Heat in short bursts, stirring in between. Turmeric golden milk lasts about three days in the fridge. Check for signs of spoilage. If it smells sour or has any mold, discard it. Always trust your senses. If it looks or smells off, it’s best to throw it away. Turmeric has many health benefits. It is known for its bright yellow color and active compound called curcumin. Curcumin may help reduce inflammation. It can also support joint health. Some studies suggest it may boost your mood. Turmeric might even help with digestion. Drinking turmeric may also support your immune system. Yes, you can use any milk you like. Almond milk is great, but coconut milk adds creaminess. Oat milk is a good choice for a thicker texture. If you prefer dairy, whole or skim milk works too. Just remember, different types of milk will change the flavor a bit. To make this recipe sugar-free, skip the honey or maple syrup. You can use a sugar substitute like stevia or monk fruit instead. These options will give you sweetness without the calories. Just adjust the amount to your taste. Yes, it is safe for most people to have turmeric daily. Using it in cooking or drinks is a great way to enjoy its benefits. However, if you have health issues or take certain medications, check with a doctor first. Moderation is key, as with any food. In this blog post, we explored the ingredients and health benefits of Turmeric Golden Milk. I shared step-by-step instructions for making it frothy and delicious. We also discovered tips, tricks, and variations to enhance your drink. Proper storage and reheating advice can help you enjoy leftovers. Remember, turmeric offers many health benefits, so enjoy this drink often. Use alternative ingredients if you prefer. With these ideas, you can create the perfect golden milk to suit your taste and health needs. Enjoy your journey to wellness!
    Turmeric Golden Milk Latte Simple and Creamy Recipe
  • - 1 ripe mango, peeled and diced - 1 cup fresh pineapple chunks - 1 banana, sliced - 1 cup coconut water (or regular water) - ½ cup plain Greek yogurt (or dairy-free alternative) - 1 tablespoon honey or agave syrup (optional) - A handful of fresh mint leaves (for garnish) - Ice cubes (optional) The key to a delicious mango pineapple smoothie lies in its fresh ingredients. You want ripe fruits for the best flavor. The mango should feel soft when you squeeze it gently. Pineapples should smell sweet and fruity. This smoothie combines sweet mango, tangy pineapple, and creamy banana. Coconut water adds hydration, while Greek yogurt gives it a nice creaminess. You can add honey for extra sweetness if you like. Mint leaves add a refreshing touch when you serve it. Each ingredient plays a role in making this smoothie flavorful and refreshing. Trust me, using fresh ingredients will make a big difference in taste! To make this smoothie, start by gathering your main ingredients. You need a ripe mango, fresh pineapple, and a banana. 1. In a blender, combine the diced mango, pineapple chunks, and banana slices. This mix brings a burst of tropical flavor. 2. Next, add one cup of coconut water to the blender. This not only hydrates but also adds a refreshing twist. 3. For creaminess, pour in half a cup of plain Greek yogurt. If you want it sweeter, drizzle in one tablespoon of honey or agave syrup. 4. Blend on high until the mixture is smooth and creamy. If you like your smoothie chilled, toss in a few ice cubes and blend again until they are fully mixed in. 5. After blending, taste your smoothie. If it needs to be sweeter or thicker, add more honey or coconut water as needed. Once your smoothie is ready, it’s time to serve it. I recommend using tall glasses to show off the vibrant color. For a fun touch, garnish each glass with a few fresh mint leaves on top. This not only looks nice but also adds a fresh aroma. Enjoy your delicious Mango Pineapple Smoothie! For the Full Recipe, please refer back to the ingredient list and instructions. To get your smoothie just right, focus on creaminess. Use ripe fruits like mango and banana. The Greek yogurt adds a nice, smooth texture. If you want a richer taste, try full-fat yogurt. For a lighter feel, use low-fat or dairy-free yogurt. Adjust the thickness by adding more liquid. Coconut water is great for this. If your smoothie is too thick, just pour in a bit more. Blend again until it’s just how you like it. If you want a thicker smoothie, add more banana or ice cubes. Boosting flavor can take your smoothie to the next level. Try adding spices like cinnamon or ginger. These spices not only add warmth but also great health benefits. A dash of cinnamon can make the smoothie taste cozy. A pinch of ginger gives it a nice kick. You can also use flavored yogurts for extra taste. Vanilla or coconut yogurt work well. If you want sweetness, think about honey or agave syrup. These can make your smoothie more enjoyable. For a fun twist, try adding a splash of vanilla extract. It will add a lovely aroma to your drink. For a full taste experience, explore the [Full Recipe]. {{image_2}} You can change the fruit in your smoothie to keep it fresh. Adding strawberries or blueberries gives a sweet twist. These berries add a nice color and taste. You can also try using other tropical fruits like papaya or kiwi. These fruits bring new flavors and nutrients to your drink. Each fruit will change the smoothie’s taste and make it unique. If you want a dairy-free smoothie, swap the Greek yogurt for a plant-based option. Almond, coconut, or soy yogurt works well. These alternatives keep your smoothie creamy without dairy. For sweeteners, you can use maple syrup or agave syrup for a vegan choice. These options add sweetness while keeping your drink plant-based. Enjoy the fruity goodness in many ways! Don't forget to check the Full Recipe for more ideas. You may have some smoothie left after making your Mango Pineapple Smoothie. To keep it fresh, use a glass jar or a BPA-free plastic container. Seal it tightly to prevent air from spoiling the flavor. Store it in the fridge for up to 24 hours. After that, it may lose some taste and texture. If you want to enjoy the smoothie later, freezing is a great option. Pour the smoothie into ice cube trays or freezer-safe bags. Leave some space in the bags for expansion. You can freeze it for up to three months. When you’re ready to drink it, take out what you need. Thaw it in the fridge overnight or blend it straight from the freezer for a slushy treat. Enjoy your refreshing Mango Pineapple Smoothie anytime! Yes, you can make this smoothie ahead of time. If you want to save it, store it in an airtight container. Keep it in the fridge for up to one day. The smoothie may separate, so stir it well before you drink it. If you don’t have coconut water, use regular water or fruit juice instead. Fruit juice can add a nice flavor. You can also try almond milk for a creamier touch. Just remember, the taste will change a bit based on what you use. To make the smoothie thicker, add more Greek yogurt or a banana. You can also use frozen fruit instead of fresh. Frozen fruit gives you a nice, thick texture. Just blend it well, and you’ll get a creamy drink. Yes, this smoothie is great for kids! It is packed with fruits and tastes sweet. You can adjust the sweetness by adding less honey. The bright colors and fresh flavors will appeal to children, making it a fun treat. You can find the Full Recipe for the Tropical Bliss Mango Pineapple Smoothie above in this article. This will guide you through every step to create your own refreshing drink. This blog post covers a simple and tasty smoothie recipe. You learned about the key ingredients and their nutritional benefits. I provided steps to prepare and serve the smoothie perfectly. Tips for texture and flavor help you make it your own. You can explore variations to suit your tastes or dietary needs. Don’t forget storage tips to keep leftovers fresh. Enjoy your smoothie making journey. It’s all about trying new things and having fun!
    Mango Pineapple Smoothie Refreshing and Flavorful Blend
  • - 2 packets of frozen açaí puree - 1 ripe banana - 1 cup of fresh pineapple chunks - 1 cup of coconut milk (or any non-dairy milk) - 1 tablespoon of honey or agave syrup (optional) For a vibrant tropical taste, the main ingredients are key. Açaí puree brings rich color and flavor. It is full of antioxidants. Bananas add creaminess and natural sweetness. Fresh pineapple gives a bright, juicy touch. Coconut milk offers a smooth base. You can use any non-dairy milk you prefer. Honey or agave syrup adds sweetness if needed. - Sliced kiwi - Coconut flakes - Granola - Chia seeds - Fresh berries (e.g., strawberries, blueberries) Toppings make your smoothie bowl pop! Sliced kiwi adds a zesty kick. Coconut flakes give it a tropical crunch. Granola provides texture and flavor. Chia seeds offer extra nutrients. Fresh berries, like strawberries and blueberries, add color and taste. You can mix and match these toppings for a fun look. For the full recipe, please refer to the section above. 1. Blend the ingredients Start by adding the frozen açaí puree, ripe banana, fresh pineapple chunks, and coconut milk into a blender. If you want it sweeter, you can add honey or agave syrup. Blend this mixture on high speed until it becomes creamy and smooth. 2. Adjust consistency with coconut milk If your smoothie is too thick, just add a bit more coconut milk. Blend again until you reach the texture you want. This step is key to making your smoothie bowl enjoyable. 3. Pour into a bowl Once blended, carefully pour the smoothie mixture into a bowl. Make sure to use a large enough bowl to hold all the goodness. 4. Add toppings creatively Now comes the fun part! Arrange your toppings, such as sliced kiwi, coconut flakes, granola, chia seeds, and fresh berries, over the smoothie. Try to create a colorful pattern. I love making a circular design to highlight all the vibrant colors. - Tips for presentation Use a shallow bowl to show off your beautiful toppings. You can also sprinkle some extra coconut flakes around the edge for a nice touch. A colorful presentation makes your smoothie bowl more fun to eat. - Recommended serving utensils Serve your smoothie bowl with a regular spoon. If you want to make it more special, use a wooden spoon or a cute, colorful one. Enjoy your tropical treat right away to keep it fresh and tasty. For the full recipe, refer to the earlier sections. To make a great smoothie bowl, start with ripe fruits. Ripe fruits taste better and add natural sweetness. Look for bananas that are yellow with some brown spots. When it comes to pineapples, choose ones that smell sweet. It ensures they are juicy and fresh. Blending is key to your smoothie bowl. You want a smooth and creamy texture. If your mix is too thick, add more coconut milk. Blend again until you reach the right consistency. A good blend makes your bowl enjoyable and easy to eat. A colorful topping arrangement makes your smoothie bowl pop. Use fresh berries, sliced kiwi, and coconut flakes. Lay them out in a pattern. A circular design looks appealing and fun. To elevate your smoothie bowl's look, use bowls with interesting shapes. Tall bowls or wide, shallow ones can change the game. Garnish with a sprinkle of chia seeds for a fancy touch. This not only looks great but adds a bit of crunch too. {{image_2}} You can change the non-dairy milk for this smoothie. Almond, soy, or oat milk work well. Each milk adds a different taste. Try using seasonal fruits too. Mango, papaya, or berries add a fresh twist. You can mix and match to find your favorite blend. Want more nutrients? Add spinach or kale to your smoothie. They blend well and boost health. You won’t even taste them! For extra energy, stir in nut butter or protein powder. Both will make your smoothie more filling. They add great flavor too! You can also experiment with different combinations to find the best taste for you. To store leftovers, place your smoothie bowl in the fridge. Use a tight container to keep it fresh. Glass or BPA-free plastic works well for storage. I prefer glass because it keeps flavors better. You can freeze smoothie bowls for later. Just pour the mixture into an airtight container. Leave some space at the top, as it will expand when frozen. To defrost, place it in the fridge overnight. If you’re in a rush, you can use the microwave. Just heat it in short bursts to avoid cooking. Enjoy your tropical treat later with ease! For the recipe, check out the Full Recipe. What is açaí and what are its benefits? Açaí is a small, dark purple berry from Brazil. It is full of antioxidants, which help fight free radicals in the body. Açaí is also rich in fiber, promoting good digestion. Plus, it has healthy fats that support heart health. You can enjoy its fruity taste in many dishes. Can I make this smoothie bowl ahead of time? Yes! You can prepare the smoothie mix and store it in the fridge for up to 24 hours. Just remember to keep the toppings separate. This way, your bowl stays fresh and tasty. How can I make this recipe vegan or gluten-free? To make it vegan, use agave syrup instead of honey. For gluten-free, ensure your granola and any other toppings are gluten-free. Most fruits and coconut milk are naturally gluten-free, so you’re all set! Can I substitute açaí with other fruits? Yes, you can! If you can’t find açaí, try using frozen berries like blueberries or strawberries. These fruits will add sweetness and a burst of color to your bowl. What to do if the smoothie is too thick? If your smoothie is too thick, just add a little more coconut milk. Blend again until you reach your desired creaminess. This will make it easier to pour and enjoy. How to fix a smoothie bowl that tastes too bland? If your smoothie bowl lacks flavor, try adding a splash of vanilla extract or a pinch of salt. You can also mix in a bit of honey or agave syrup for sweetness. Adjust the toppings to add more taste and texture. This article covers how to make a delicious açaí smoothie bowl. You learned about the key ingredients, easy steps for preparation, and creative topping ideas. I shared tips to improve taste and presentation, plus fun variations to try. Don’t forget storage techniques to keep your bowl fresh. With all this information, you can enjoy a tasty and nutritious treat anytime. Get creative with your favorites and make this recipe truly yours. Enjoy every bite!
    Tropical Acai Smoothie Bowl Energizing Healthy Treat

Footer

↑ back to top

More information

  • Drinks
  • Appetizer
  • Dinner
  • Desserts
  • About
  • Contact
  • Privacy Policy

Our Policies

  • Privacy Policy
  • GDPR Policy
  • Terms Of Use
  • Copyright Policy
  • Cookie Policy
  • Disclaimer

Copyright © 2025 cheftaling