Introduction
The world of desserts is a delightful one, filled with an array of flavors and textures that can transport us to a state of bliss. Among these, the concept of sweet and salty desserts has emerged as a beloved trend, captivating taste buds and hearts alike. The contrast of sweetness with a hint of salt creates a symphony of flavors that tantalizes the palate, making each bite an experience to savor. One dessert that exemplifies this perfect balance is the Salted Caramel Butter Bar—a rich, buttery treat that combines the lusciousness of caramel with the savory touch of sea salt.
Salted caramel has taken the culinary world by storm in recent years. Once a humble addition to various desserts, it has now become a star player, gracing everything from cakes and ice creams to brownies and cookies. The allure lies in its complexity; the sweetness of caramel is beautifully complemented by the slight bitterness of the salt, creating a depth of flavor that is both indulgent and satisfying. This sweet and salty combination tantalizes our taste buds, making it a crowd-pleaser for any occasion.
In this article, we will explore how to make Salted Caramel Butter Bars—a delectable dessert that embodies the essence of sweet and salty indulgence. With a rich, buttery base and a smooth, velvety salted caramel topping, these bars are perfect for sharing with friends and family or enjoying as a personal treat. Whether you’re hosting a gathering or simply craving something sweet, these butter bars are sure to impress. So, roll up your sleeves and get ready to dive into this delightful recipe that’s packed with flavor and texture.
The Allure of Salted Caramel
Salted caramel is a culinary marvel that has taken desserts to new heights. At its core, salted caramel is made by melting sugar until it transforms into a golden syrup, which is then combined with butter and cream, along with a sprinkle of sea salt. This seemingly simple mixture results in a flavor explosion that is both complex and comforting. The growing popularity of salted caramel can be attributed to its versatility—it’s a delightful addition to a variety of treats, enhancing their flavors and adding an unexpected twist.
What makes salted caramel so irresistible is the perfect balance of flavors. The sweetness from the caramel provides a rich, luxurious taste, while the addition of sea salt elevates it, cutting through the sweetness and adding a savory note that enhances the overall experience. This interplay between sweet and salty creates a dessert that is not only satisfying but also intriguing, encouraging us to take just one more bite.
Personal experiences with salted caramel desserts often evoke fond memories. Whether it’s the first time you tasted a salted caramel brownie or indulged in a decadent salted caramel ice cream, these moments are often associated with joy and warmth. The combination of flavors seems to resonate with many, making salted caramel a favorite among dessert lovers everywhere.
Ingredients Breakdown
To create the perfect Salted Caramel Butter Bars, it’s essential to use high-quality ingredients that contribute to the overall flavor and texture of the dessert. Here’s a detailed breakdown of the ingredients you’ll need for both the butter bar base and the salted caramel topping.
Ingredients for the Butter Bars:
– Unsalted Butter: The foundation of our butter bars, unsalted butter provides a rich and creamy flavor. Using unsalted butter allows for better control of the overall saltiness of the dessert.
– Granulated Sugar: This is the primary sweetener for the butter bars, contributing to their sweetness and texture.
– Brown Sugar: The inclusion of brown sugar adds a hint of molasses flavor and moisture to the bars, enhancing their richness.
– Eggs: Eggs serve as a binding agent, adding moisture and structure to the bars. They also help in achieving a soft and chewy texture.
– Vanilla Extract: A splash of vanilla extract elevates the flavor profile, adding warmth and depth to the bars.
– All-Purpose Flour: Flour provides the necessary structure to hold the bars together. It is key to achieving the perfect balance between tenderness and sturdiness.
– Baking Powder: This leavening agent ensures the bars rise slightly, giving them a light and airy texture.
Ingredients for the Salted Caramel Topping:
– Granulated Sugar: Just like in the butter bars, granulated sugar is used to create the caramel. It is essential to melt it down slowly to achieve that perfect golden hue.
– Unsalted Butter: Additional unsalted butter is added to the caramel to create a smooth, creamy consistency.
– Heavy Cream: The inclusion of heavy cream in the caramel mixture adds richness and a velvety texture, making the caramel luscious and indulgent.
– Sea Salt: A sprinkle of sea salt at the end enhances the flavor of the caramel, creating that signature sweet and salty contrast that makes this dessert so appealing.
The significance of brown sugar in caramelization cannot be overstated. It not only contributes to the rich flavor profile of the caramel but also helps achieve a beautiful, deep color. Heavy cream is another crucial component, as it helps to smooth out the caramel and prevent it from becoming too hard once it cools. Finally, the addition of sea salt enhances the caramel’s flavor, making every bite a delightful balance of sweet and salty.
Step-by-Step Instructions for Butter Bars
Now that we have a clear understanding of the ingredients needed for our Salted Caramel Butter Bars, it’s time to dive into the preparation process. Follow these step-by-step instructions to create the buttery base that will serve as the foundation for our indulgent dessert.
Preheat the Oven and Prepare the Baking Pan
Start by preheating your oven to 350°F (175°C). This ensures that the bars will bake evenly and achieve the perfect texture. While the oven is heating, prepare your baking pan. For this recipe, a 9×9-inch square baking pan works best. Line the bottom and sides of the pan with parchment paper, allowing some overhang on the edges. This will make it easier to remove the bars once they are baked and cooled.
Importance of Parchment Paper for Easy Removal
Using parchment paper is a crucial step in ensuring that your butter bars come out of the pan without sticking or breaking apart. The overhanging edges will act as handles, allowing you to lift the entire batch out of the pan with ease after baking. This not only helps in presentation but also ensures that each bar retains its shape.
Preparing the Butter Bar Base
In a large mixing bowl, combine the unsalted butter, granulated sugar, and brown sugar. Using an electric mixer, cream the butter and sugars together on medium speed until the mixture is light and fluffy. This process typically takes about 2-3 minutes. The incorporation of air during this step is essential for achieving a tender texture in the final product.
Techniques for Creaming Butter and Sugar Effectively
When creaming butter and sugar, it’s important to start with room temperature butter. Cold butter will not cream properly and can result in a denser texture. If you forget to take the butter out of the fridge beforehand, you can quickly soften it by cutting it into cubes and microwaving it for about 10 seconds at a time until it is just soft but not melted.
Once the butter and sugars are nicely creamed, add in the eggs one at a time, mixing well after each addition. Follow this with the vanilla extract, continuing to mix until everything is well combined.
Tips for Incorporating Eggs and Vanilla Extract Properly
When adding eggs to your mixture, ensure they are at room temperature as well. This helps them incorporate more easily into the batter. To achieve a well-mixed batter, it’s crucial to scrape down the sides of the bowl with a spatula periodically, ensuring that all ingredients are evenly combined.
Combining Dry Ingredients
In a separate bowl, whisk together the all-purpose flour and baking powder. Gradually add the dry ingredients to the wet mixture, stirring gently until just combined. Be careful not to overmix, as this can lead to tough butter bars. Overmixing develops the gluten in the flour, resulting in a denser texture. It’s important to stop mixing as soon as there are no visible streaks of flour.
With these steps complete, your butter bar base is now ready to be transferred into the prepared baking pan. Smooth the top with a spatula to create an even layer, ensuring that the bars will bake uniformly.
The next phase will involve creating the luscious salted caramel topping that will crown these decadent bars, but for now, focus on perfecting the buttery base that will serve as the foundation of your Salted Caramel Butter Bars. Stay tuned as we continue this delicious journey into the world of sweet and salty indulgence.

Sweet & Salty Indulgence: Salted Caramel Butter Bars
Importance of Sifting and Whisking for Even Distribution
When preparing the base for your Salted Caramel Butter Bars, the importance of sifting and whisking cannot be overstated. Sifting flour, powdered sugar, or any dry ingredients helps to aerate them, breaking up clumps and ensuring a smooth mixture. This process not only leads to a more tender bar but also promotes even distribution of ingredients throughout the batter.
In addition to sifting, whisking your ingredients together (especially the dry ingredients) ensures that they are thoroughly mixed and free from lumps. This is particularly crucial for baking, as uneven mixtures can lead to inconsistent textures and flavors. Take your time to sift and whisk properly, and enjoy the process; it’s a fundamental step in achieving the perfect salted caramel butter bars!
Avoiding Overmixing to Keep Bars Tender
While mixing is essential, it’s equally important to avoid overmixing your batter. Overmixing can develop gluten in the flour too much, resulting in a tougher texture rather than the tender, melt-in-your-mouth consistency we desire in these bars. Once you combine your wet and dry ingredients, mix just until incorporated. The batter should be combined and slightly lumpy, which is perfectly fine. This technique will ensure that your bars remain soft and buttery, allowing the salted caramel to shine through.
Baking the Base
Once your batter is ready, it’s time to bake the base. Preheat your oven to 350°F (175°C) and line a 9×9-inch baking pan with parchment paper, allowing some overhang for easy removal later.
Pour the batter into your prepared pan and spread it evenly using a spatula. Bake in the preheated oven for 20-25 minutes, or until the edges are lightly golden and the center is set.
Indicators of Doneness: Color and Toothpick Test
To ensure your salted caramel butter bars are perfectly baked, look for a light golden-brown color around the edges. The center should feel firm to the touch but may slightly jiggle—this is normal as it will continue to set while cooling.
For a foolproof test, insert a toothpick into the center of the bars. If it comes out clean or with a few moist crumbs (not wet batter), your bars are ready. Be cautious not to overbake, as this can lead to dry bars.
Crafting the Perfect Salted Caramel
Creating the salted caramel topping is a pivotal part of this recipe, and it’s where you can truly elevate your bars.
Detailed Instructions for Making the Salted Caramel Topping
Start by measuring out the ingredients: 1 cup of granulated sugar, 6 tablespoons of unsalted butter, and ½ cup of heavy cream. It’s essential to have everything ready before you begin, as caramel requires attention and quick action.
1. Melt the Sugar: In a medium saucepan over medium heat, add the sugar. Stir constantly with a wooden spoon or heat-resistant spatula, allowing the sugar to melt evenly. As it heats, the sugar will begin to clump before melting into a smooth, amber liquid.
2. Add Butter: Once the sugar is fully melted and has reached a deep amber color, carefully add the butter. The mixture will bubble up, so be cautious. Stir continuously until the butter is completely melted and incorporated.
3. Incorporate Cream: After the butter is mixed in, slowly drizzle in the heavy cream while stirring. This will also cause the mixture to bubble, so be prepared. Continue stirring until everything is well combined.
Importance of Stirring Constantly to Avoid Burning
Stirring constantly is crucial for preventing the sugar from burning. Caramel can go from perfectly cooked to burnt very quickly, so keep an eye on the color and the consistency. If you notice any dark spots forming, reduce the heat immediately and continue stirring until everything is smooth again.
Understanding the Boiling Process and Its Significance
During the boiling process, the sugar mixture reaches a specific temperature, typically around 350°F (175°C), which is essential for achieving the right caramel flavor and texture. This stage is where the sugar undergoes caramelization, resulting in its characteristic rich flavor.
Adding Sea Salt and Vanilla
Once your caramel is smooth and combined, remove it from heat and stir in 1 teaspoon of pure vanilla extract and ½ teaspoon of flaky sea salt. The sea salt is what gives this topping its signature flavor, balancing the sweetness of the caramel beautifully. Adjust the salt to your taste preference if necessary.
Tips for Achieving the Perfect Consistency and Flavor Balance in Caramel
To achieve the ideal consistency, aim for a pourable but thick caramel. If it’s too thick, you can add a splash of cream to loosen it. If it’s too thin, you can return it to the heat for a few minutes to thicken up. Taste your caramel before pouring it onto the bars; it should be a harmonious blend of sweet and salty.
Assembling the Salted Caramel Butter Bars
With the base baked and the caramel ready, it’s time to assemble your bars.
Step-by-Step Guide on Pouring and Spreading the Caramel
Carefully pour the warm salted caramel over the baked base, using a spatula to spread it evenly. Ensure that the caramel covers the entire surface for a uniform flavor in every bite. Allow the caramel to settle into the bars without swirling or mixing, as this can disrupt the layers.
Importance of Allowing the Caramel to Set Properly
Let the caramel cool at room temperature for about 30 minutes before transferring to the refrigerator. This step is crucial for the caramel to set properly without becoming too hard or sticky. Allowing it to chill for at least 2 hours will ensure it firms up nicely, making cutting easier.
Techniques for Cutting the Bars Once Set
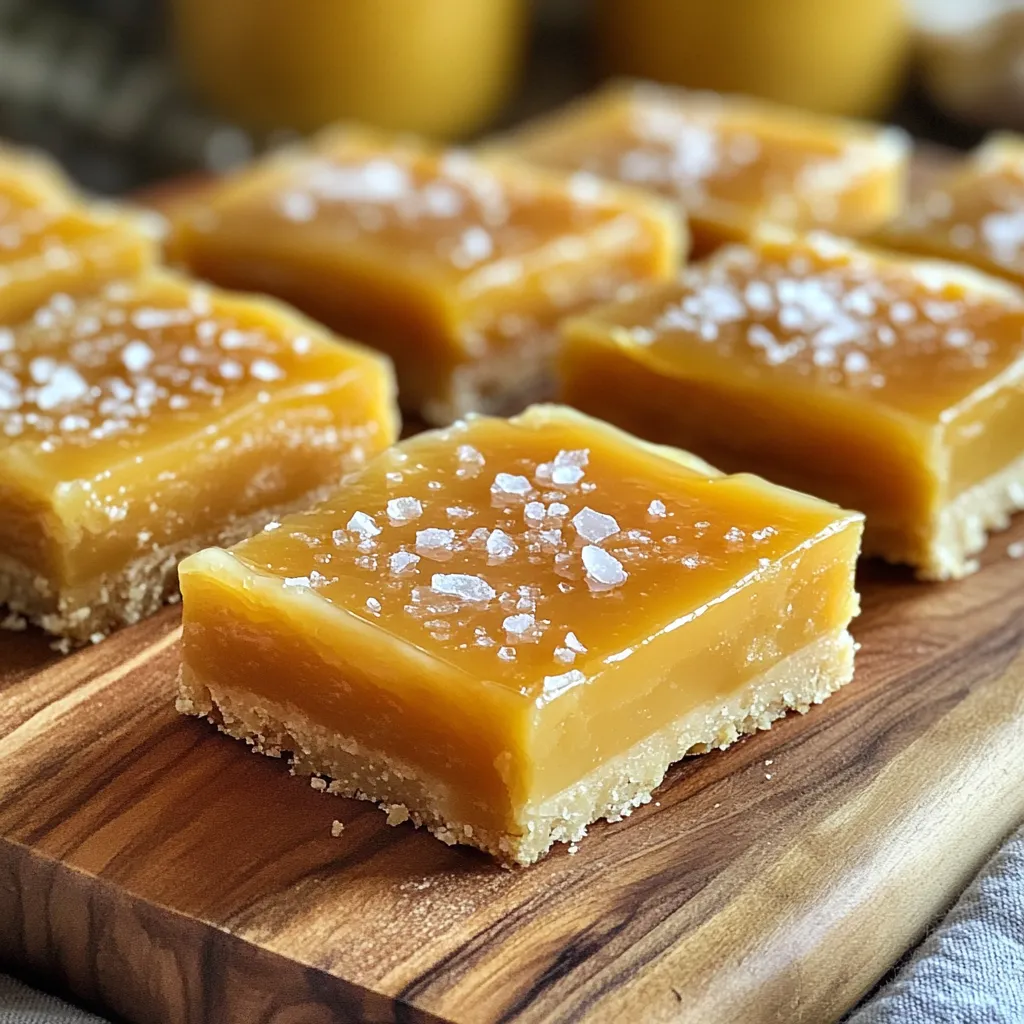
Once the caramel has set, lift the bars out of the pan using the overhanging parchment paper. Using a sharp knife, cut them into squares or rectangles. Wipe the knife with a damp cloth between cuts for clean edges, and if desired, sprinkle a little extra flaky sea salt on top for added flair.
Serving Suggestions and Pairings
These Salted Caramel Butter Bars are not only a delightful treat on their own but can be elevated further with some thoughtful presentation and pairing.
Ideas for Serving the Bars: Presentation Tips
For an elegant touch, serve the bars on a decorative platter alongside fresh fruit or a scoop of vanilla ice cream. Drizzle any leftover salted caramel sauce over the top for an extra indulgent experience. You can garnish with a sprig of mint or a dusting of cocoa powder for added visual appeal.
Suggestions for Beverages that Complement the Bars
Pair these bars with a variety of beverages to enhance the tasting experience. A rich, dark coffee or a creamy latte complements the sweetness of the caramel beautifully. For those preferring tea, a cup of Earl Grey or chai can provide a lovely contrast. If you’re in the mood for something more decadent, consider a glass of dessert wine or even a port to highlight the flavors of the caramel.
Discussion of Storage Options and Shelf Life
These salted caramel butter bars can be stored in an airtight container at room temperature for up to 5 days. If you want to extend their shelf life, refrigerate them for up to 2 weeks. Make sure to separate layers with parchment paper to prevent sticking. For longer storage, consider freezing the bars. Wrap them tightly in plastic wrap and store them in an airtight container. They will maintain quality for up to 3 months, making them a perfect make-ahead treat for gatherings.
Nutritional Information
When indulging in sweet treats, being aware of the nutritional content can be helpful.
Overview of the Nutritional Aspects of the Bars
Each salted caramel butter bar contains approximately 250 calories, with a balance of carbohydrates, fats, and proteins. While they are rich in flavor, it’s essential to enjoy them in moderation as part of a balanced diet.
Considerations for Dietary Restrictions
For those with dietary restrictions, there are a few modifications you can consider. If gluten is a concern, substitute regular flour with a 1:1 gluten-free flour blend. For a lower-sugar option, you could experiment with natural sweeteners like coconut sugar or erythritol, although this may alter the flavor and texture slightly.
Conclusion
The delightful combination of sweet and salty in these Salted Caramel Butter Bars is truly a treat for the senses. The buttery base paired with the rich, gooey salted caramel creates a flavor profile that is both comforting and indulgent.
We encourage you to try making this recipe in your own kitchen. The process of baking, from crafting the base to creating the perfect caramel, is rewarding and allows for creativity and personalization. As you bake, remember that sweet and salty treats have a special place in home baking, offering a wonderful way to indulge and share with loved ones. Embrace the joy of baking and enjoy every delicious bite!


