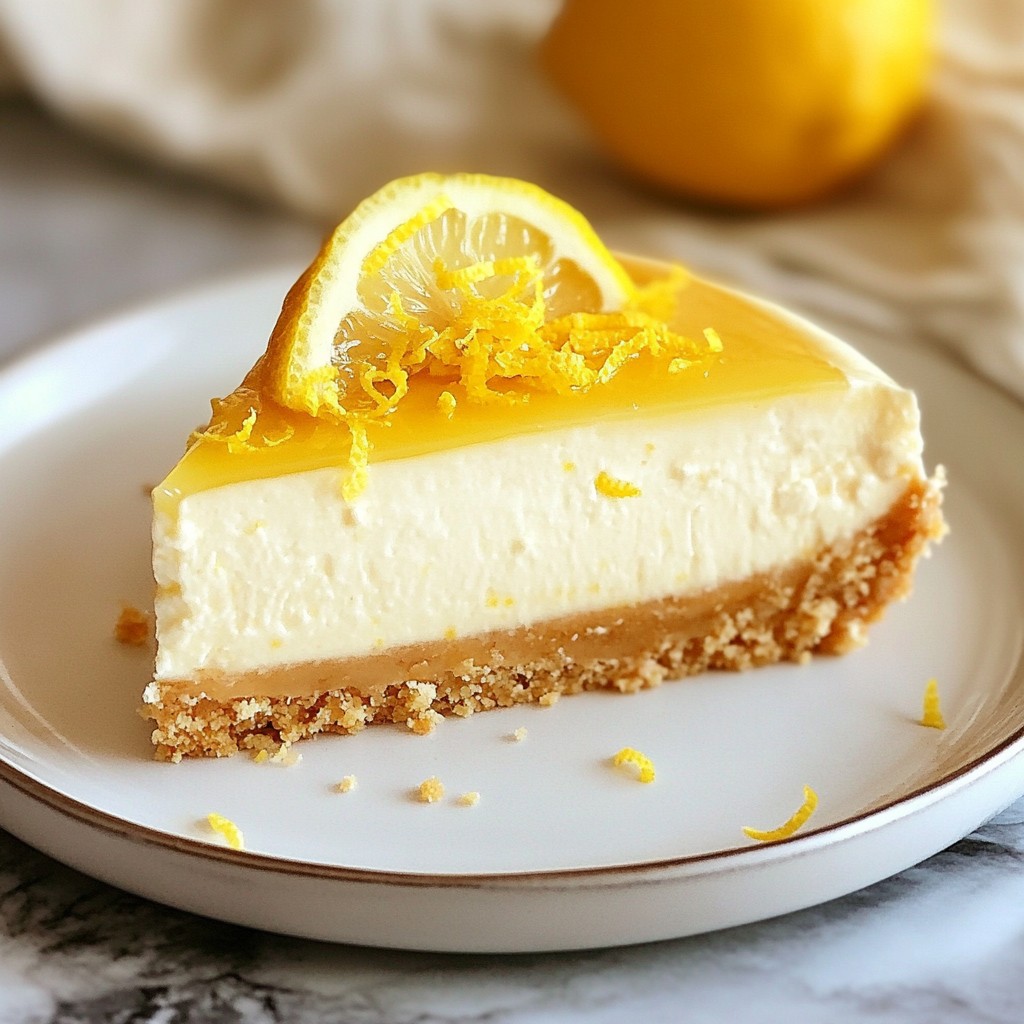
If you're craving a sweet and tangy dessert that won't derail your keto plan, you’ve found it! This Sugar-free Keto Lemon Cheesecake is not just a treat; it’s a creamy, dreamy delight that fits perfectly into a low-carb lifestyle. I’ll guide you through simple steps to make this cheesecake shine, along with handy tips to ensure it’s a hit every time. Let's whip up a dessert that pleases your palate and keeps you on track!
Why I Love This Recipe
- Delicious Flavor: This cheesecake combines the tanginess of fresh lemons with the creaminess of the cheese, resulting in a delightful dessert that satisfies your sweet tooth without the sugar.
- Keto-Friendly: Using almond flour and erythritol ensures that this dessert fits perfectly within a ketogenic diet, allowing you to indulge guilt-free.
- Easy to Make: With straightforward steps, this recipe is simple enough for anyone to follow, even if you're new to baking.
- Perfect for Any Occasion: This light and refreshing cheesecake is a great dessert for gatherings, holidays, or just a special treat for yourself.
Ingredients
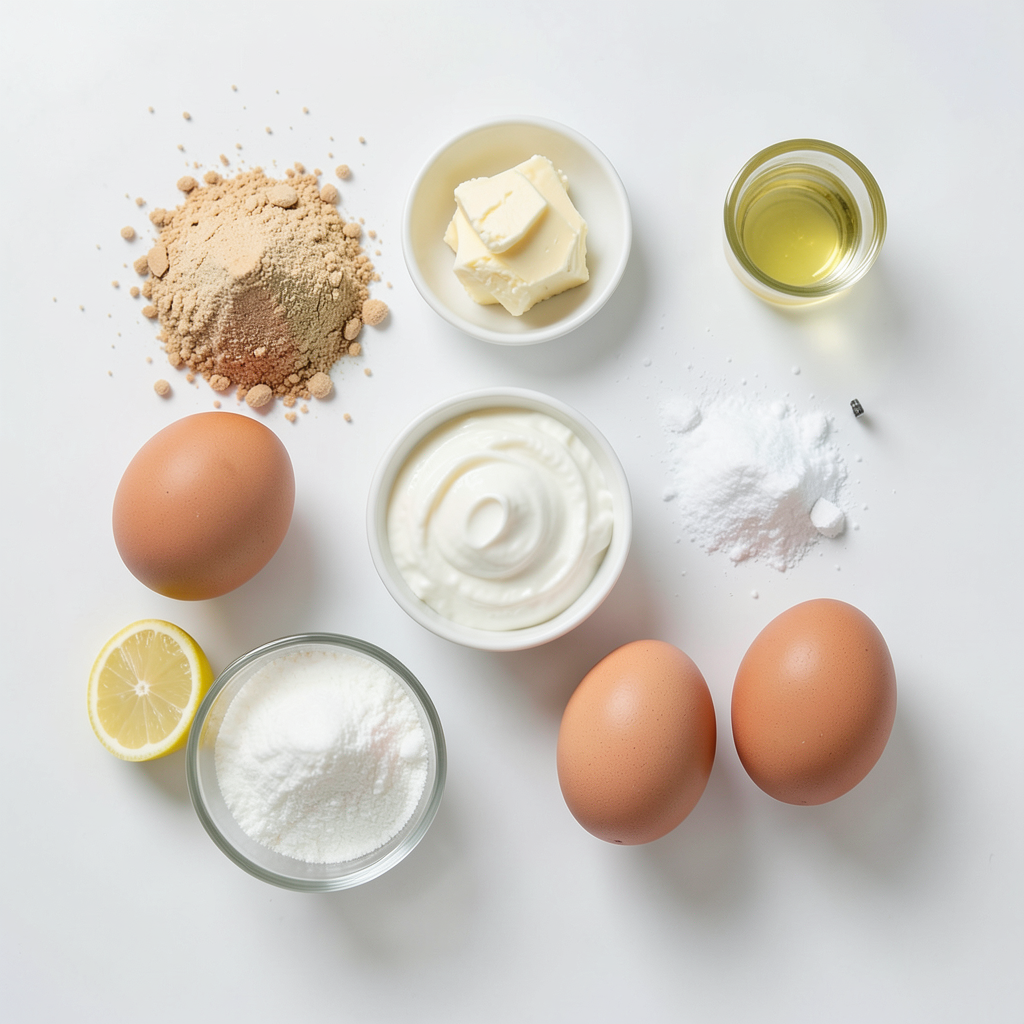
List of Ingredients
- 1 ½ cups almond flour
- ¼ cup granulated erythritol (or your preferred keto sweetener)
- ½ cup unsalted butter, melted
- 16 oz cream cheese, softened
- ½ cup sour cream
- ¾ cup granulated erythritol (divided, for sweetening)
- 2 large eggs
- Zest of 2 lemons
- ⅓ cup fresh lemon juice
- 1 tsp vanilla extract
- Pinch of salt
When making this sugar-free keto lemon cheesecake, you have some options. For sweeteners, erythritol works great, but you can use stevia or monk fruit. Each sweetener may change the taste a bit, so remember to adjust to your taste.
For the crust, almond flour is best. If you're allergic to nuts, try sunflower seed flour. It has a similar texture and keeps the recipe keto-friendly.
The cream cheese should be soft. This helps create a smooth filling. If you want a dairy-free option, use a cream cheese substitute made from nuts. It will change the flavor slightly but can still be delicious.
Using fresh lemons for zest and juice makes a big difference. The flavor is bright and tangy. Avoid bottled lemon juice if you can. It often has added sugars or preservatives.
With these ingredients, you can create a treat that feels indulgent while keeping it healthy and keto-friendly.
Step-by-Step Instructions
Preparation of the Crust
1. First, preheat your oven to 325°F (160°C). Grease a 9-inch springform pan with butter or non-stick spray.
2. In a mixing bowl, combine 1 ½ cups almond flour, ¼ cup erythritol, and ½ cup melted butter.
3. Stir this mixture until it looks like wet sand.
4. Press the almond flour mixture firmly into the bottom of the greased springform pan to form a crust.
5. Bake the crust in your preheated oven for 10 minutes. Once done, remove it and set aside to cool slightly.
Making the Cheesecake Filling
1. In a large mixing bowl, beat 16 oz softened cream cheese and ¾ cup erythritol until smooth and creamy.
2. Add in ½ cup sour cream, zest from 2 lemons, ⅓ cup fresh lemon juice, 1 tsp vanilla extract, and a pinch of salt.
3. Mix well until all the ingredients blend together perfectly.
4. Add 2 large eggs one at a time, mixing just until combined. Avoid overmixing to keep the texture light.
Baking and Cooling Process
1. Pour the cheesecake batter over the cooled crust in the springform pan. Smooth the top with a spatula.
2. Bake in the oven for 50-60 minutes. The edges should be set, and the center should jiggle a bit.
3. Turn off the oven and crack the door open. Let the cheesecake cool in the oven for about an hour to avoid cracks.
4. After cooling, transfer the cheesecake to the refrigerator. Chill it for at least 4 hours or overnight before serving.
Tips & Tricks
Perfecting Your Cheesecake Texture
To make a great cheesecake, mix your batter carefully. Start by beating the cream cheese until it is smooth. Then, slowly add in your sweetener. Avoid mixing too much after adding eggs. Just blend until you see no lumps. This helps keep your cheesecake creamy.
For a smooth batter, use softened cream cheese. Let it sit at room temperature before mixing. If it’s too cold, it won’t blend well. A smooth batter gives a better texture in the final bake.
Common Pitfalls to Avoid
Baking can be tricky. To prevent cracks in your cheesecake, follow these tips. First, don’t open the oven door while it bakes. Sudden temperature changes can cause cracks. Also, let your cheesecake cool slowly in the oven after baking. This helps it set without breaking.
Chilling time is key. After baking, let your cheesecake cool at room temperature for about an hour. Then, place it in the fridge for at least four hours, or even overnight. This helps the flavors blend and gives you that perfect slice.
Pro Tips
- Use Room Temperature Ingredients: Make sure your cream cheese and eggs are at room temperature to ensure a smooth batter and prevent lumps.
- Don’t Overbake: Keep an eye on the cheesecake as it bakes. It should have a slight jiggle in the center when done; overbaking can lead to cracks.
- Chill Overnight: For the best flavor and texture, allow your cheesecake to chill overnight in the refrigerator before serving.
Variations
Flavor Additions and Swaps
You can change the flavor of your cheesecake easily. Try using other citrus fruits. Lime or orange can give a fresh twist. They add bright flavors that mix well with cream cheese. You can also use different flavor extracts. Almond or coconut extracts can create a unique taste. Just swap them in place of vanilla. Start with a small amount, and adjust to your liking.
Dietary Modifications
Making this cheesecake fit your diet is simple. If you need a dairy-free option, swap cream cheese with a nut-based cheese. Look for brands made from cashews or almonds. Use coconut cream instead of sour cream for a rich texture.
If you want a nut-free crust, use sunflower seed flour. It bakes nicely and keeps the recipe keto-friendly. You can also use crushed pork rinds as a fun base. This will add crunch without the carbs. Enjoy exploring different options to suit your needs!
Storage Info
Best Storage Practices
- Refrigeration recommendations: Once your cheesecake cools, place it in the fridge. Wrap it tightly in plastic wrap or place it in an airtight container. This keeps it fresh for up to a week. The cool air helps the flavors deepen and meld.
- Freezing tips for leftovers: If you want to save some for later, you can freeze it. Cut the cheesecake into slices. Wrap each slice in plastic wrap, then place them in a freezer bag. It will stay good for about three months. When ready to eat, just take out a slice and let it thaw in the fridge for a few hours.
How to Serve After Storage
- Tips for thawing and serving: When you’re ready to serve, remove the cheesecake from the fridge. If it was frozen, let it thaw overnight in the fridge. This keeps the texture smooth and creamy.
- Presentation ideas for serving from the fridge: Once thawed, take the cheesecake out of the springform pan. You can garnish it with fresh lemon zest or a dollop of sugar-free whipped cream. This adds a nice touch and makes it look fancy. Slice and serve it on a pretty plate for a delightful treat!
FAQs
Can I use a different sweetener?
Yes, you can use other sweeteners. Keto-friendly options include stevia, monk fruit, or allulose. Each sweetener has a different level of sweetness. Adjust the amount based on your taste. Erythritol is popular due to its similar texture to sugar.
How long does the cheesecake last?
The cheesecake lasts about five days in the fridge. Store it in an airtight container to keep it fresh. You can also freeze it for up to two months. Just make sure to wrap it well. Thaw it overnight in the fridge before serving.
What can I serve with the cheesecake?
You can serve the cheesecake with toppings like fresh berries or sugar-free whipped cream. A drizzle of sugar-free lemon sauce adds a nice touch. You can also sprinkle lemon zest on top for extra flavor. These options enhance the cheesecake's taste and make it more fun!
This blog post guided you through making a great cheesecake. We covered the key ingredients, step-by-step instructions, and tips for texture and common mistakes. You discovered fun variations and storage ideas to keep your cheesecake fresh. Remember, baking is about practice. Don’t let a few cracks or swaps discourage you. Enjoy experimenting with flavors and share your tasty results! Happy baking!