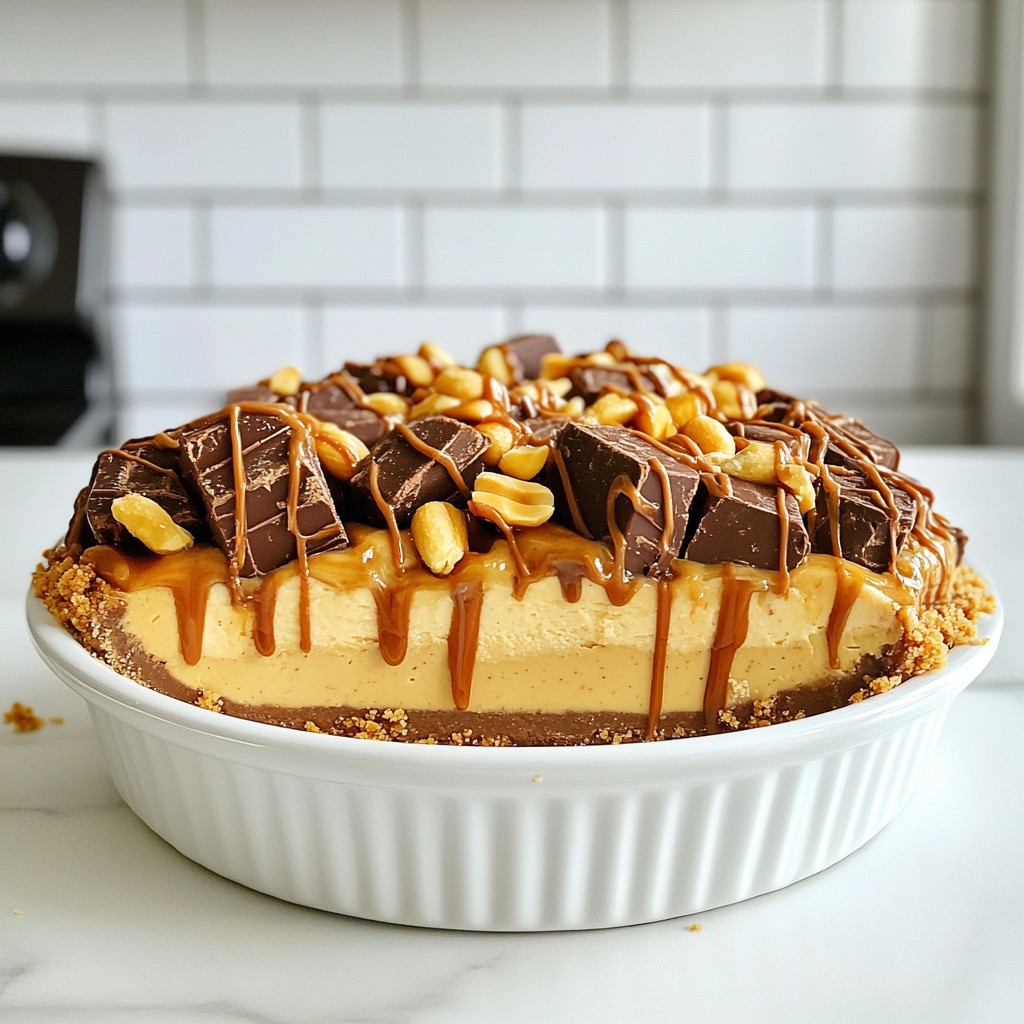
Craving a cool, creamy treat that’s sure to impress? Look no further! This Snickers Icebox Pie is a decadent no-bake dessert that brings the perfect blend of chocolate, caramel, and peanut butter to your table. In just a few easy steps, you’ll create a sweet masterpiece worthy of any occasion. Let’s dive into this simple yet indulgent recipe that will leave your taste buds wanting more!
Why I Love This Recipe
- Irresistible Flavor Combination: The rich chocolate, creamy peanut butter, and caramel create a decadent dessert that is simply irresistible.
- No-Bake Convenience: This icebox pie is perfect for warm weather, as it requires no baking and can be prepared in advance.
- Fun and Customizable: You can easily customize this pie by adding your favorite candy or nuts for an extra twist!
- Great for Gatherings: This dessert is a crowd-pleaser, making it perfect for parties, barbecues, or any special occasion.
Ingredients
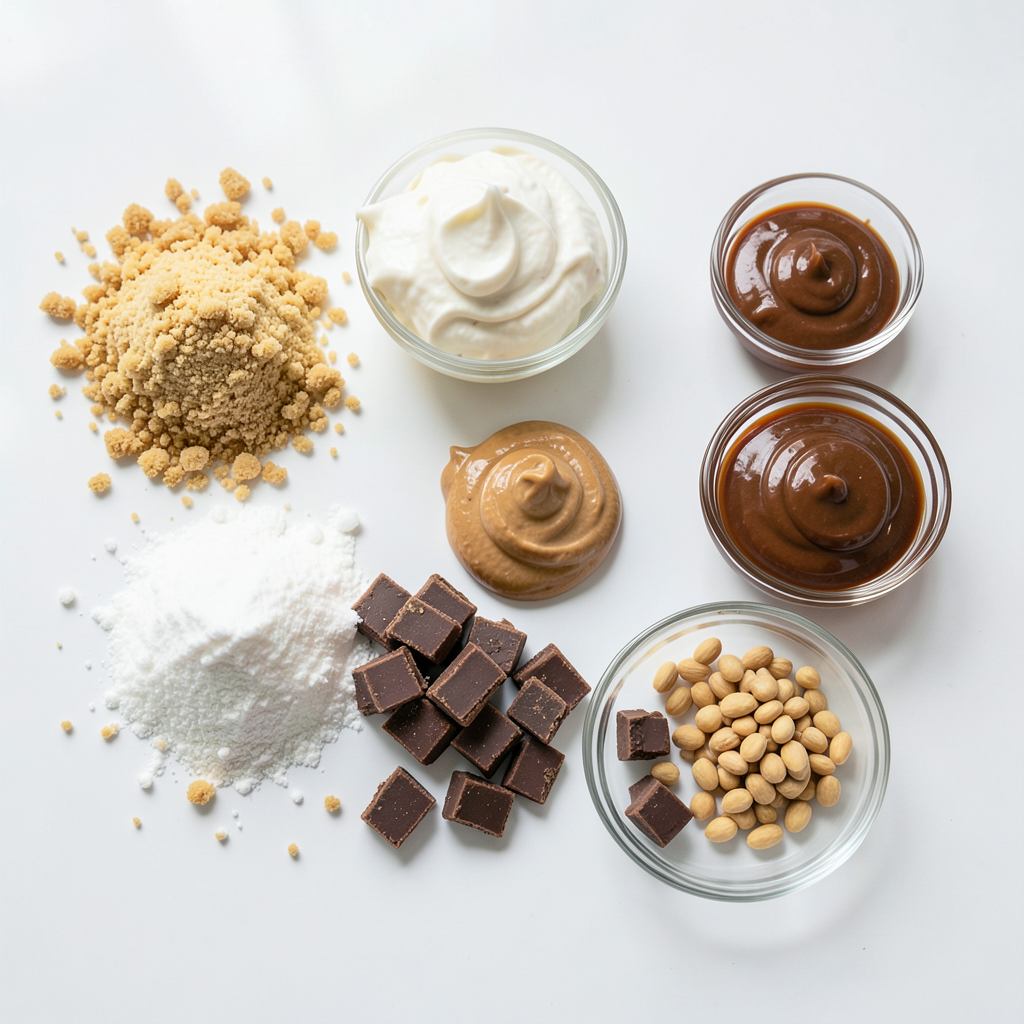
List of Ingredients
- 1 ½ cups graham cracker crumbs
- ½ cup unsalted butter, melted
- 2 cups whipped topping (thawed)
- 1 cup creamy peanut butter
- 1 cup powdered sugar
- 1 cup chopped Snickers bars (about 4-5 bars)
- ½ cup chocolate syrup
- ½ cup caramel sauce
- 1 cup chopped salted peanuts (for garnish)
To create Snickers Icebox Pie, gather these simple ingredients. Each one adds to the pie's rich and creamy taste. The graham cracker crumbs form a crunchy crust. Melted butter binds the crumbs together, making a solid base. The whipped topping adds a light, fluffy texture. Creamy peanut butter brings in that sought-after nutty flavor.
Powdered sugar sweetens the filling just right. Chopped Snickers bars add candy goodness, giving each bite a fun crunch. Chocolate syrup and caramel sauce drizzle on top provide a beautiful, tasty finish. Finally, the chopped salted peanuts add a delightful crunch once you serve the pie.
This dessert is easy to make and perfect for sharing. You can even mix and match the toppings to make it your own. Enjoy your sweet treat!
Step-by-Step Instructions
Preparing the Crust
1. Start by mixing 1 ½ cups of graham cracker crumbs and ½ cup of melted butter in a bowl. Make sure the crumbs soak up the butter well.
2. Next, take this mixture and press it evenly into the bottom of a 9-inch pie pan. Use your fingers or the bottom of a glass to make it flat.
3. Now, refrigerate the crust for about 15 minutes. This helps it set and hold its shape.
Making the Filling
1. In another bowl, combine 2 cups of thawed whipped topping, 1 cup of creamy peanut butter, and 1 cup of powdered sugar. Beat them together until smooth and creamy.
2. Then, fold in 1 cup of chopped Snickers bars. Make sure they are evenly mixed into the filling.
Assembling the Pie
1. Pour the peanut butter mixture into the chilled crust. Spread it out evenly to cover the whole crust.
2. Now, drizzle ½ cup of chocolate syrup and ½ cup of caramel sauce over the top. Create a fun marbled effect by swirling them together.
3. Finally, sprinkle the remaining chopped Snickers bars on top of the pie for extra sweetness and texture.
Freezing and Serving
1. Cover the pie with plastic wrap and freeze it for about 4 hours or until it is firm.
2. When ready to serve, take the pie out of the freezer. Let it sit for a few minutes at room temperature before slicing.
3. For a nice touch, garnish each slice with chopped salted peanuts. This adds a great crunch to your dessert.
Tips & Tricks
Ingredient Substitutions
- If you need a different crust, try using chocolate cookie crumbs. They add a rich flavor.
- Almond butter works great instead of peanut butter. It gives a nice twist and is a good option for nut allergies.
Perfecting the Texture
- For a creamy filling, mix the whipped topping and peanut butter until smooth. This helps the pie set well.
- When adding toppings, sprinkle them evenly. This makes each slice look great and taste balanced.
Presentation Ideas
- Serve the pie sliced into wedges. Drizzle extra chocolate and caramel sauce on each slice for a fancy touch.
- To make it look even better, garnish with chopped salted peanuts. They add a nice crunch and visual appeal.
Pro Tips
- Chill Your Mixing Bowls: Before making the filling, chill your mixing bowls and beaters in the freezer for about 10 minutes. This helps the whipped topping hold its shape better when combined with the peanut butter.
- Use Room Temperature Ingredients: Ensure your peanut butter is at room temperature for easier mixing. This will create a smoother filling and help it blend more seamlessly with the whipped topping.
- Customize Your Toppings: Feel free to mix and match toppings! Consider adding mini chocolate chips, crushed pretzels, or even a layer of fudge to elevate the dessert further.
- Let It Rest: After slicing, let the pie sit for a few minutes before serving. This allows the filling to soften slightly, making each slice easier to serve and enhancing the flavor.
Variations
Flavor Variations
You can switch up the flavors in your Snickers Icebox Pie. Try using different candy bars, like Reese's or Milky Way. Each adds its own fun twist. If you want a nut-free version, skip the peanuts and use sunbutter instead of peanut butter. This keeps the creamy texture while making it safe for those with nut allergies.
Dietary Adjustments
To make this pie gluten-free, use gluten-free graham cracker crumbs. Many brands offer these, so you won’t lose flavor. For a healthier option, swap out regular sugar with a natural sweetener like agave or honey. This can lighten the dessert while keeping it tasty.
Serving Suggestions
Pair your pie with a scoop of vanilla ice cream or a dollop of whipped cream. Both add a nice touch of creaminess. If you’re planning a dessert table, consider serving the pie with fresh fruit or chocolate-covered strawberries. These bright flavors balance the rich pie and make it even more appealing.
Storage Info
How to Store the Pie
To keep your Snickers Icebox Pie fresh, you have two main options: refrigerate or freeze it. If you plan to eat it soon, store it in the refrigerator. Just cover it with plastic wrap or a lid. This keeps it from drying out and protects the flavors.
If you want to save it for later, freezing is best. Wrap the pie tightly in plastic wrap, then in aluminum foil. This helps prevent freezer burn and keeps the pie tasty.
Shelf Life
In the refrigerator, the pie lasts about 3 to 5 days. Make sure to check for any off smells or changes in texture before you dig in. If you freeze the pie, it can last up to 2 months. To enjoy, move it to the fridge overnight to thaw.
Reheating Tips
You don’t need to reheat this pie, but thawing it is key. Move it from the freezer to the fridge for a slow thaw. This helps keep the pie's creamy texture. Avoid using a microwave, as it may make the pie soggy or change its texture. Enjoy your sweet treat!
FAQs
Can I Make Snickers Icebox Pie Ahead of Time?
Yes, you can make Snickers Icebox Pie ahead. It’s best to make it the day before serving. This allows the flavors to mix and the pie to set well. Just follow these tips:
- Prepare the pie as directed and freeze it.
- Cover the pie tightly with plastic wrap to avoid freezer burn.
- Thaw it in the fridge for a few hours before serving.
Can I Substitute the Peanuts?
Absolutely! If you have a nut allergy, there are great options. You can skip the peanuts altogether. Here are some substitutes:
- Sunflower seeds for a crunchy texture.
- Pumpkin seeds for a nut-free option.
- Crispy rice cereal for added crunch.
What’s the Best Way to Cut Frozen Pie?
Cutting a frozen pie can be tricky. Use these tools and techniques for clean slices:
- A sharp, warm knife works best. Dip it in hot water, then dry it before cutting.
- Clean the knife after each slice for neat edges.
- If the pie is too hard, let it sit for a few minutes at room temperature.
How Can I Customize My Snickers Icebox Pie?
You can make your Snickers Icebox Pie unique! Here are some fun ideas:
- Add different candy bars like Reese’s or Milky Way.
- Use crushed pretzels in the crust for a salty twist.
- Top with whipped cream and extra chocolate or caramel sauce for flair.
This Snickers Icebox Pie is a fun and tasty dessert. We talked about the ingredients, mixing, and assembling steps. Make it your own by trying different toppings or substitutions. It’s easy to store and stay fresh. You can freeze it for later. Enjoying this pie with friends or family adds to the fun. Trust me, it’s worth a try. Get creative and make it your special treat!