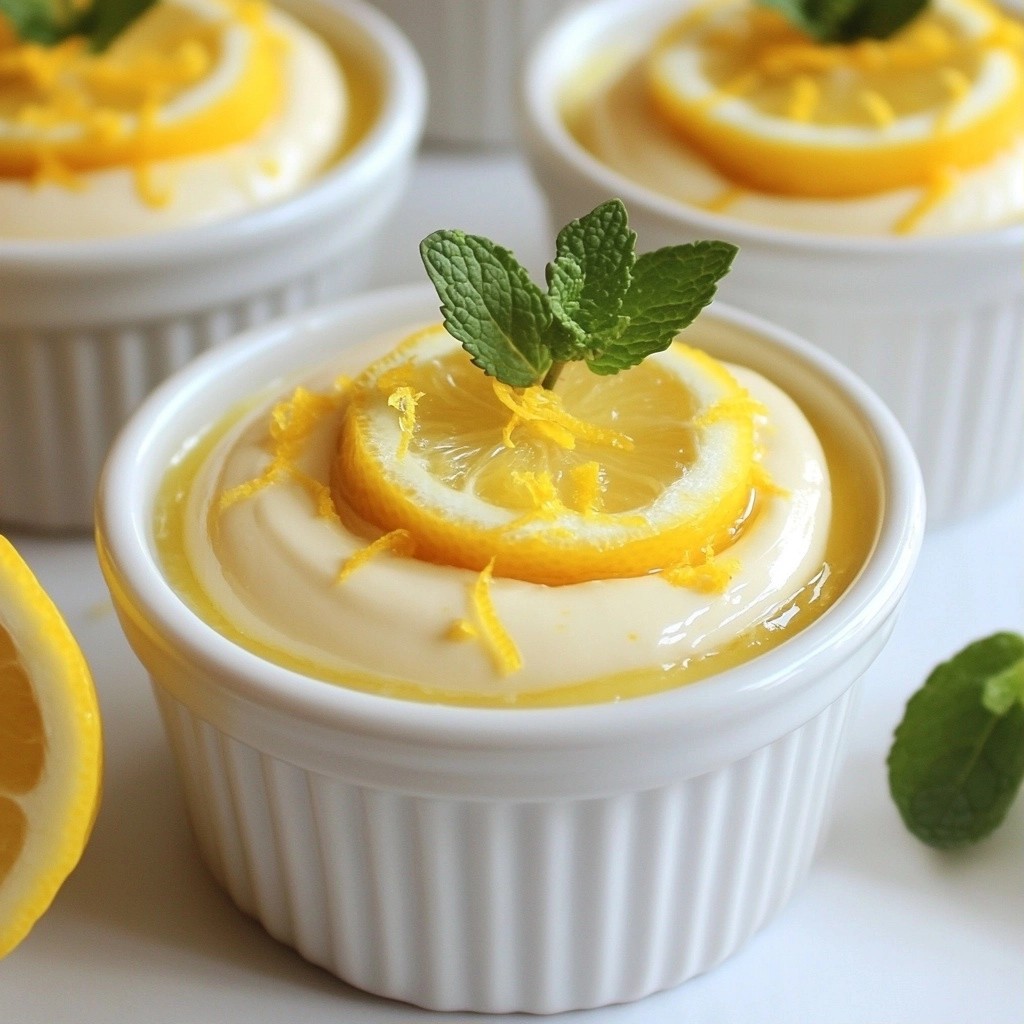
Looking for a light and refreshing dessert? You’ll love my Silky Sugar-Free Lemon Mousse Cups! This treat is rich, creamy, and bursting with lemon flavor, all without the sugar. I’ll share easy steps to whip up this delightful dessert, plus tips for variations and storage. Whether you’re following a low-sugar diet or just craving a tasty treat, this mousse will not disappoint! Let’s dive into the simple recipe!
Why I Love This Recipe
- Light and Fluffy: This mousse is incredibly light, making it a perfect dessert for any occasion without weighing you down.
- Refreshing Flavor: The fresh lemon juice and zest provide a bright, tangy flavor that invigorates the palate.
- Easy to Make: With just a few simple steps, you can whip up this elegant dessert in no time!
- Guilt-Free Treat: This sugar-free version allows you to indulge without the extra calories, perfect for those watching their sugar intake.
Ingredients
Key Ingredients Needed
- 1 cup heavy cream
- 1/4 cup powdered erythritol (or any preferred sugar substitute)
- Zest of 1 lemon
- 1/4 cup fresh lemon juice
- 1 teaspoon vanilla extract
- 1 tablespoon gelatin powder
- 3 tablespoons water
I love using heavy cream for this mousse. It gives a rich and creamy texture. The powdered erythritol adds sweetness without the sugar. You can find this in many stores. Fresh lemon zest and juice bring bright flavor. They enhance the mousse and make it lively. Gelatin powder helps the mousse set perfectly.
Optional Garnishes
- Fresh mint leaves
- Additional lemon zest
I like to add fresh mint leaves on top for a pop of color. It adds a refreshing taste too. A sprinkle of extra lemon zest looks nice and boosts flavor. These garnishes make your mousse cups look fancy and inviting!

Step-by-Step Instructions
Preparing the Gelatin Mixture
To start, we need to bloom the gelatin. Take a small bowl and sprinkle the gelatin powder over the water. Let it sit for about 5 minutes. This step helps the gelatin absorb water and swell.
Next, we dissolve the gelatin over low heat. Pour the bloomed gelatin into a small saucepan. Warm it gently until fully dissolved. Make sure to stir it well. Remove it from the heat and let it cool slightly.
Mixing the Mousse
Now, we move on to mixing the mousse. In a large mixing bowl, add the heavy cream, powdered erythritol, lemon zest, fresh lemon juice, and vanilla extract. Using an electric mixer, whip the cream mixture. Beat it until soft peaks form, but avoid over-whipping.
Once you have soft peaks, it's time to incorporate the gelatin. Slowly drizzle the warm gelatin mixture into the whipped cream. Gently fold it in with a spatula until it is fully mixed. This step gives our mousse its silky texture.
Setting and Serving
Now for the fun part! Spoon the mousse into serving cups or ramekins. You can use any cute cups you like. Place them in the refrigerator. They need at least 2 hours to set.
After the mousse is set, you can garnish it. Add fresh mint leaves on top for a nice touch. This adds a pop of color and flavor. Enjoy your delicious, silky sugar-free lemon mousse cups!
Tips & Tricks
Achieving the Perfect Texture
To make your mousse smooth, you must not over-whip the cream. Soft peaks are key. If you whip too long, the cream can turn grainy. You want it light and fluffy. Start with cold cream. Cold ingredients whip up better.
The temperature of your gelatin mixture is also important. If it is too hot, it can melt the cream. If it’s too cold, it will clump. Aim for a warm but not hot temperature when adding it to the whipped cream.
Flavor Enhancements
Adjust the lemon juice to fit your taste. If you like it tart, add more juice. For a milder flavor, cut back on the lemon. This way, you can make the mousse just how you like it.
When it comes to sweeteners, feel free to try different sugar substitutes. Each has its own flavor and sweetness level. Some may be sweeter than others. Start with less and taste as you go. This helps you find the perfect balance for your mousse.
Pro Tips
- Use Fresh Lemons: Fresh lemon juice and zest will yield the brightest flavor, enhancing the overall taste of your mousse.
- Perfect Whipping: Watch the cream closely while whipping; you want soft peaks, not stiff peaks, for a creamy texture.
- Chill the Ingredients: Chill your mixing bowl and beaters before whipping the cream to achieve a better volume and texture.
- Experiment with Flavors: Feel free to add other flavorings, such as a splash of vanilla bean paste or a hint of lavender, for a unique twist.
Variations
Flavor Variations
You can play with flavors in your mousse. Adding different citrus zest makes it fun. Try lime or orange zest for a new twist. Each brings a unique taste. You can also mix in extracts like almond or coconut. These add depth to your mousse. Just a drop or two will do. Remember to taste as you mix!
Dietary Adjustments
If you want a vegan option, swap gelatin with agar-agar. This plant-based thickener works well. It sets just like gelatin but is made from seaweed. You can also use coconut cream for a dairy-free mousse. It adds a rich, creamy texture. Use full-fat coconut cream for the best results. Your mousse will still be silky and delicious!
Storage Info
Best Practices for Storing Mousse
To keep your silky sugar-free lemon mousse fresh, store it in the fridge. Place the mousse cups in an airtight container or cover them tightly with plastic wrap. This helps to prevent any unwanted odors from other foods in the fridge.
If you want to freeze the mousse, it’s best to do this before adding any garnishes. Transfer the mousse into freezer-safe containers. Leave some space at the top since the mousse will expand when frozen. When you are ready to enjoy it, let it thaw in the fridge overnight.
Shelf Life
For optimal freshness, consume your mousse within 3 to 4 days. After this, the texture may change, and it might lose some flavor.
Watch for signs of spoilage, like an odd smell or change in color. If the mousse starts to separate or looks watery, it’s best to toss it. Always trust your senses; if it doesn’t smell or look right, don’t eat it!
FAQs
How to make sugar-free lemon mousse?
Making sugar-free lemon mousse is easy and fun. Here’s a quick overview:
1. Bloom the gelatin: Sprinkle gelatin over water and let it sit for 5 minutes.
2. Dissolve the gelatin: Heat the bloomed gelatin in a saucepan until it dissolves. Let it cool slightly.
3. Mix the mousse: In a bowl, combine heavy cream, powdered erythritol, lemon zest, lemon juice, and vanilla. Whip until soft peaks form.
4. Combine: Slowly add the warm gelatin to the whipped cream, folding gently.
5. Refrigerate: Spoon the mixture into cups and chill for at least 2 hours.
This process creates a light and airy mousse with a zesty flavor.
Can I use other sweeteners like stevia?
Yes, you can use other sweeteners like stevia. Here are some pros and cons:
- Pros:
- Stevia is natural and has zero calories.
- It works well in many recipes.
- Cons:
- Some brands may have a strong aftertaste.
- The sweetness level can vary, so adjust the amount.
Experiment with different sweeteners to find the one you love best!
How long does it take for the mousse to set?
Typically, the mousse takes about 2 hours to set in the fridge. Factors affecting the setting time include:
- Ingredient temperature: If ingredients are warm, it may take longer.
- Container size: Smaller cups will set faster than larger ones.
- Humidity levels: High humidity can slow down the setting.
Check if the mousse is firm before serving to ensure the best texture.
Can I make this mousse in advance?
Yes, you can make this mousse ahead of time! Here are some best practices:
- Prepare up to 2 days in advance: This mousse keeps well in the fridge.
- Cover tightly: Use plastic wrap or a lid to prevent odors from the fridge.
- Garnish before serving: Wait to add mint or zest until just before you serve.
Making it in advance saves you time and adds ease to your meal planning!
You now have a delicious recipe for sugar-free lemon mousse. Start with heavy cream, powdered erythritol, fresh lemon, and gelatin. Follow the easy steps to prepare and set the mousse, and add optional garnishes for a pop of color. Remember to adjust flavors and use suitable substitutes as needed. Store it correctly to maintain freshness. I encourage you to enjoy your creation and share it with others. You will impress everyone with this delightful treat!