Get ready to whip up a sweet treat that's both easy and delicious! In this post, I’ll share my Mint Oreo Icebox Cake recipe that everyone will love. With just a few ingredients and simple steps, you can create a delightful dessert that makes any occasion special. Plus, I’ll provide tips and variations to suit your taste. Let’s dive into this cool and creamy delight!
Why I Love This Recipe
- Easy to Make: This recipe requires minimal effort and uses simple ingredients, making it perfect for any home cook.
- Refreshing Flavor: The combination of mint and cream creates a delightful and refreshing dessert that’s perfect for warm days.
- Layered Delight: The layering of Oreos and whipped cream provides a beautiful presentation and a delicious texture in every bite.
- Make Ahead: This icebox cake can be prepared in advance, allowing you to save time on the day of your gathering or celebration.
Ingredients
Detailed Ingredient List
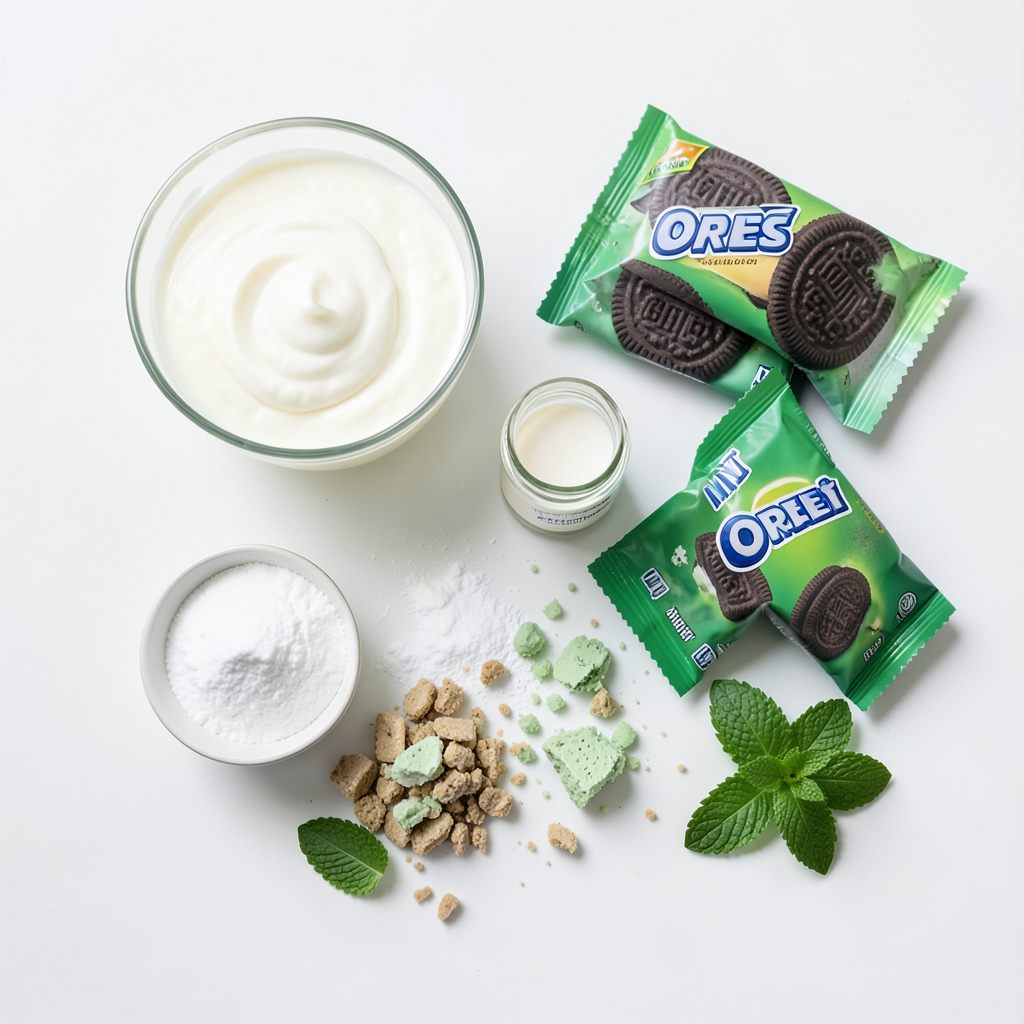
For this Mint Oreo Icebox Cake, you'll need the following:
- 2 cups heavy cream
- 1/2 cup powdered sugar
- 1 teaspoon vanilla extract
- 1 teaspoon peppermint extract
- 2 packs (15.25 oz each) Mint Oreos (or regular Oreos if preferred)
- 1/2 cup crushed Mint Oreos for topping
- Fresh mint leaves for garnish (optional)
Measurements for Accuracy
Using the right measurements is key. I recommend using a liquid measuring cup for the heavy cream. This ensures you get the right amount. For the powdered sugar, a dry measuring cup works best. Accurate measurements guarantee a creamy texture and balanced flavor.
Optional Garnishes
To make your cake look great, add fresh mint leaves on top. They add a nice touch and a burst of color. You can also sprinkle more crushed Mint Oreos for extra crunch on top. These small details make your dessert more appealing and fun to serve.
Step-by-Step Instructions
Preparing the Whipped Cream Mixture
To start, grab a large mixing bowl. Pour in 2 cups of heavy cream. Use a hand mixer or stand mixer to whip the cream. Whip it until soft peaks form. This takes about 2 to 3 minutes. Next, add in 1/2 cup of powdered sugar. Then, mix in 1 teaspoon of vanilla extract and 1 teaspoon of peppermint extract. Keep whisking until the mixture becomes thick and creamy. This will give your cake a sweet and minty flavor.
Layering the Cake
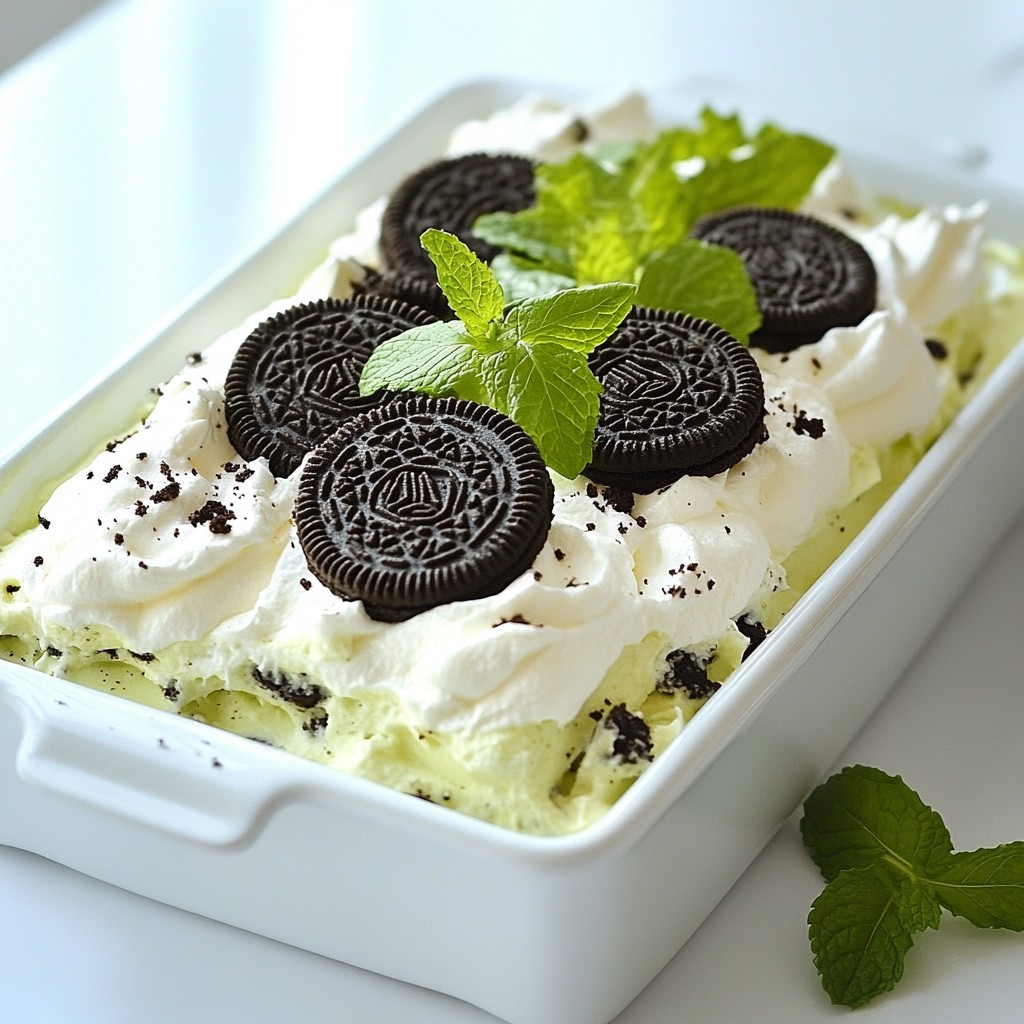
Now, take a 9x13 inch baking dish. Begin by laying a single layer of Mint Oreos at the bottom. Make sure the Oreos are closely packed. Once done, spread a generous layer of the whipped cream mixture over the Oreos. Cover them completely so you don’t see any cookies. Next, add another layer of Oreos on top of the whipped cream. Repeat the process, adding whipped cream after every layer of Oreos. Keep layering until you run out of the ingredients. End with a layer of whipped cream on top.
Refrigeration and Serving Tips
Once your layers are complete, sprinkle 1/2 cup of crushed Mint Oreos over the top. This adds a nice crunch. Cover the baking dish with plastic wrap. Place it in the fridge for at least 4 hours, or overnight if you can wait. This chilling time helps the flavors blend. Before serving, you can add fresh mint leaves for decoration. When ready, slice the cake into squares and enjoy this delicious treat chilled.
Tips & Tricks
Achieving the Perfect Whipped Cream
To make great whipped cream, start with cold heavy cream. Using a chilled bowl helps too. Whip the cream until soft peaks form. Then, add powdered sugar, vanilla extract, and peppermint extract. Mix until it thickens. Don't over-whip it. It should be fluffy, not grainy. Perfect whipped cream makes your cake taste wonderful.
Layering Techniques for Best Results
When layering, start with a single layer of Mint Oreos at the bottom. Spread a thick layer of whipped cream on top. Press down gently to ensure it sticks. Keep repeating this process until you use all your ingredients. End with whipped cream on top. This helps the flavors mix well. It also makes the cake look nice.
Common Mistakes to Avoid
A few mistakes can ruin your Mint Oreo Icebox Cake. First, don’t skip chilling the layers. Refrigerate the cake for at least four hours. This lets the cookies soften and flavors blend. Second, avoid using warm cream. Warm cream won’t whip well. Lastly, don’t rush the layering. Take your time to layer carefully. This brings out the best taste.
Pro Tips
- Chill Your Mixing Bowl: For an extra fluffy whipped cream, chill your mixing bowl and beaters in the refrigerator for 15-20 minutes before whipping the cream.
- Layering Technique: To avoid Oreos from floating, press down slightly on each layer of Oreos after adding the whipped cream to ensure they are well-saturated.
- Flavor Boost: For an intense mint flavor, consider adding a few drops of food-grade peppermint oil to the whipped cream mixture.
- Make Ahead: This cake can be made a day in advance; in fact, it tastes even better the longer it sits as the flavors meld together!
Variations
Alternative Flavor Ideas
You can switch up the flavors of this cake easily. Instead of mint, try chocolate. Use chocolate Oreos and add chocolate syrup to the whipped cream. For a fruity twist, use lemon Oreos. Add some lemon zest to the whipped cream. You can also create a peanut butter version. Use peanut butter Oreos and mix in creamy peanut butter with the whipped cream.
Different Oreo Flavors or Brands
Oreo offers many flavors. Try seasonal options like pumpkin spice or red velvet. You can even use gluten-free Oreos if you need them. If you want to experiment, look for local brands. Some have unique flavors that can enhance your cake.
Toppings and Serving Suggestions
Toppings can make your cake shine. Try using whipped cream on top. You can also sprinkle crushed Oreos or chocolate shavings. Fresh fruit like strawberries or raspberries adds color and taste. For a fun touch, drizzle chocolate or caramel sauce over the cake before serving. You can also add nuts for crunch. Enjoy customizing your Mint Oreo Icebox Cake!
Storage Info
How to Store the Cake
To keep your Mint Oreo Icebox Cake fresh, use a tight cover. Plastic wrap works well. You can also use an airtight container. Make sure to cover it well to prevent drying out. This helps keep the cake moist and tasty.
Shelf Life in the Refrigerator
In the fridge, the Mint Oreo Icebox Cake lasts about 4 to 5 days. The flavors improve as it sits. The cookies get softer, which adds to the cake's charm. Just remember to check for any signs of spoilage before serving.
Freezing the Icebox Cake
You can freeze the cake if you want to save some for later. First, cover it tightly in plastic wrap. Then, place it in a freezer-safe container. It can last up to 2 months in the freezer. When ready to eat, thaw it in the fridge overnight. Enjoy the minty delight again!
FAQs
Can I use regular Oreos instead of Mint Oreos?
Yes, you can use regular Oreos. The cake will taste different but still be great. Regular Oreos give a classic flavor. If you like mint, try adding more peppermint extract to the cream.
How long can the cake be stored?
You can store the cake for up to five days. Keep it in the fridge to keep it fresh. The flavors will blend and taste even better after a day. Just cover it well to protect it.
Can I make this cake in advance?
Yes, you can make this cake a day ahead. It needs time to chill in the fridge. This helps the cookies soften and the flavors mix. Making it in advance saves time on the day you serve it.
What are the best ways to serve this dessert?
Serve the cake cold for the best taste. You can slice it into squares for easy serving. Top each piece with crushed Mint Oreos for crunch. Add fresh mint leaves for a pop of color. Enjoy this fun, minty dessert with friends and family!
We covered all the key parts of making an icebox cake. You learned about the best ingredients, how to layer it right, and tips for perfect whipped cream. Remember to avoid common mistakes for the best results. Try different flavors and toppings to make it your own. Store the cake properly to enjoy it longer. This dessert is easy to make and great for gatherings. Enjoy every delicious bite!