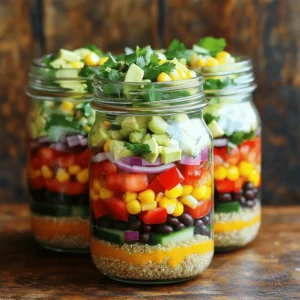
- Southwest Quinoa Salad Jars Fresh and Flavorful Mix
- BBQ Ranch Chickpea Tacos Flavorful and Quick Meal
- Cheesy Broccoli Rice Casserole Simple and Tasty Dish
- Fresh Peach Salsa Flavorful and Easy Summer Recipe
- Raspberry Almond Breakfast Cookies Simple Delight
- Teriyaki Salmon Rice Bowls Flavorful and Simple Dish
- One Pot Garlic Butter Pasta Easy and Tasty Meal
- Instant Pot Chicken and Rice Simple Comfort Meal
- Creamy Garlic Mashed Potatoes Rich and Flavorful Dish
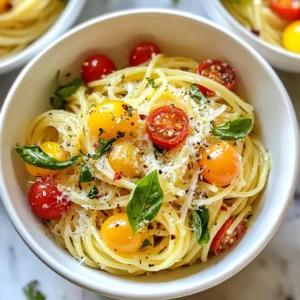
- Sun-Dried Tomato Pasta Rich and Flavorful Dish
- Caramel Apple Crisp Delightful and Easy Recipe
- Lemon Blueberry Scones Freshly Baked Delight
- Pistachio Rosewater Shortbread Delightful and Easy Recipe
- High-Protein Beef Pasta Tasty and Filling Recipe
- Lemon Blueberry Pound Cake Irresistible Flavor Boost
- No-Bake Peanut Butter Bars Simple and Irresistible Treat
- Strawberry Spinach Salad Fresh and Flavorful Option
- One-Pan Honey Garlic Tofu Quick and Easy Recipe
- Mexican Street Corn Salad Flavorful Summer Dish
- Avocado Chocolate Pudding Rich and Creamy Delight
- Crispy Baked Falafel Tasty and Healthy Snack Option
- Crispy Air Fryer Okra Simple and Flavorful Snack
- Zucchini Cornbread Muffins Flavorful and Easy Recipe
- Garlic Roasted Zucchini Slices Easy and Flavorful Dish
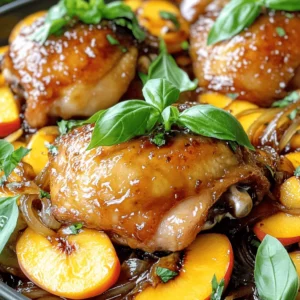
- One Pot Peach Chicken Simple Delightful Recipe
- No-Bake Chocolate Oat Bars Easy and Quick Recipe
- Crispy Baked Eggplant Parmesan Flavorful and Easy Meal
- Easy Chicken Enchilada Casserole Tasty Family Dish
- Spinach Mushroom Quiche Tasty and Easy Recipe
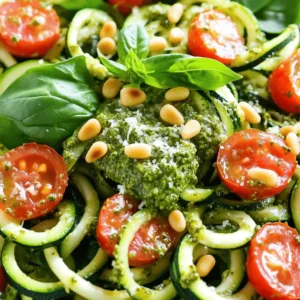
- Pesto Zoodle Salad Fresh and Flavorful Recipe
- Chocolate Dipped Strawberries Simple and Sweet Treat
- Lemon Garlic Shrimp Skewers Perfect for Grilling Night
- Easy Chicken Gyros Flavorful and Quick Recipe Guide
- Chicken Taco Lettuce Wraps Flavorful and Easy Meal
- Crispy Chickpea Snack for a Healthy Crunch
- Buffalo Chicken Wraps Savory and Simple Delight
- Air Fryer Chicken Tenders Crunchy and Juicy Treat
- Peach Cobbler Mug Cake Simple and Delicious Dessert
- Coconut Chicken and Rice Flavorful Home Comfort Meal
- 3-Ingredient Chorizo Sweet Potato Tacos Recipe
- Beef Enchilada Tortellini Savory and Simple Dinner
- Coconut Curry Lentil Soup Flavorful and Simple Recipe


![To make sun-dried tomato pasta, you need a few key items. First, choose your favorite pasta. I recommend spaghetti or fettuccine. Both work well with the sauce. Next, gather these key ingredients: - 8 oz spaghetti or your favorite pasta - 1 cup sun-dried tomatoes (in oil, drained and chopped) - 3 cloves garlic, minced - 1/2 cup fresh basil leaves, chopped - 1/4 cup grated Parmesan cheese (plus extra for serving) - 1/4 cup pine nuts, toasted - 1/4 cup olive oil - Salt and pepper to taste - 1 tsp crushed red pepper flakes (optional for heat) - Fresh basil leaves for garnish You can add delightful extras to your dish. Cheese options like Parmesan or Pecorino enhance the flavor. I suggest using Parmesan for a creamy touch. You may also include some optional ingredients like: - Crushed red pepper for heat - Pine nuts for a crunchy texture These extras can elevate your pasta experience. Feel free to mix and match based on your taste! For the full recipe, click [Full Recipe]. First, grab a large pot and fill it with water. Add a good amount of salt to the water. Salt makes the pasta taste better. Bring the water to a boil over high heat. Once it's boiling, add your pasta. I love spaghetti, but you can use any pasta you enjoy. Cook the pasta according to the package instructions. Most pasta takes about 8 to 12 minutes. You want it to be al dente, which means it should be firm but tender. Before you drain the pasta, save about 1/2 cup of that starchy pasta water. This water helps adjust your sauce later. After that, drain the pasta and set it aside. Now, it's time to make the sauce. Take a large skillet and heat it over medium heat. Pour in the olive oil and let it warm up. Once hot, add your minced garlic. Sauté it for about 30 seconds. Garlic is key here; it adds a great flavor. Be careful not to burn it! Next, add the chopped sun-dried tomatoes to the skillet. If you like a bit of heat, toss in some crushed red pepper flakes too. Stir it all together and cook for another 2-3 minutes. This helps the flavors mix well. Now, it’s time to bring it all together. Add your drained pasta to the skillet with the sauce. Toss everything well to mix. If the sauce seems too thick, add some of the reserved pasta water. Do this a little at a time until you get the sauce just right. Finally, take the skillet off the heat. Stir in the fresh basil, grated Parmesan, and toasted pine nuts. Season with salt and pepper to taste. Now, your sun-dried tomato pasta is ready to enjoy! For the full recipe, check the details above. To cook pasta al dente, boil a large pot of salted water. Add the pasta and stir it gently. Follow the package time, but check a minute early. The pasta should be firm but not hard. Drain it but keep some pasta water for later. This water adds flavor and helps the sauce stick. To infuse flavor, use high-quality olive oil. Heat it gently before adding garlic. Sauté until fragrant, but don’t let it burn. Then add sun-dried tomatoes and spices. This step brings out the rich taste. Toss in the pasta and use reserved water to make it creamy. Garnishes can take your dish to the next level. Fresh basil adds a pop of color and taste. Extra Parmesan cheese brings creaminess and umami. Toasted pine nuts add a nice crunch. If your pasta sticks together, here are some tips. Make sure to stir while it cooks. Drain it quickly but avoid rinsing, as this washes away flavor. When mixing with sauce, add a little reserved water to keep it loose and saucy. Enjoy your dish with a smile! {{image_2}} You can change the pasta shape to fit your mood. Spaghetti works great, but fettuccine or penne can add fun texture. Each shape holds the sauce a bit differently. You can also use gluten-free pasta if you need it. Whole grain pasta is a tasty option too. It adds fiber and a hearty taste. Let’s talk about adding proteins. You can toss in chicken, shrimp, or tofu. Cooked chicken gives a nice, filling bite. Shrimp adds a touch of the sea, while tofu keeps it plant-based. You can also mix in seasonal veggies. Think spinach in spring or roasted butternut squash in fall. Adding these ingredients makes the dish richer and more colorful. For a full list of ingredients and steps, check the Full Recipe. To keep your sun-dried tomato pasta fresh, store it in the fridge. Use an airtight container. Make sure to cool the pasta first before sealing it. This helps prevent moisture buildup. Your pasta should last for about 3 to 5 days in the fridge. If you want to save it longer, consider freezing it. Use a freezer-safe container or a heavy-duty freezer bag. Remove as much air as possible to avoid freezer burn. Frozen pasta can last for up to 3 months. Reheating sun-dried tomato pasta is easy and quick. You can use the microwave or stovetop. For the microwave, place the pasta in a safe bowl. Add a splash of water to keep it moist. Cover the bowl with a microwave-safe lid or plate. Heat in 30-second intervals, stirring in between until warm. If you prefer the stovetop, heat a non-stick skillet over medium heat. Add the pasta and a little olive oil or water. Stir often to prevent sticking. Heat until warm, about 5 to 7 minutes. This method helps keep the pasta flavorful. Enjoy your leftovers just like the first time with these easy tips! How to make sun-dried tomato pasta vegetarian? To make sun-dried tomato pasta vegetarian, focus on using plant-based ingredients. Start with the main components: pasta, sun-dried tomatoes, garlic, and fresh herbs. Use vegetable broth instead of chicken broth if your recipe calls for it. Also, choose a vegetarian cheese, like nutritional yeast or a plant-based cheese, for added flavor without meat. Can I use dried sun-dried tomatoes instead of oil-packed? Yes, you can use dried sun-dried tomatoes. However, you must soak them before use. Place the dried tomatoes in hot water for about 20-30 minutes. This softens them and allows them to blend better in your dish. After soaking, drain and chop them as needed for your recipe. What’s the best way to infuse flavor into the oil? To infuse flavor into the oil, heat it slowly with minced garlic. Add the garlic to cold oil in a skillet and then warm it up. This method avoids burning the garlic and lets the oil absorb its flavor. You can also add herbs like basil or oregano during this process for extra taste. How to modify for dietary restrictions? To modify the recipe for dietary restrictions, consider substitutes. For gluten-free options, use gluten-free pasta. If you're dairy-free, replace cheese with nutritional yeast or a vegan cheese. You can also adjust the oil or add more vegetables for flavor while keeping it healthy. Pairing with side dishes or salads Sun-dried tomato pasta pairs well with salads or roasted vegetables. A simple arugula salad with lemon vinaigrette adds a fresh touch. Roasted zucchini or asparagus can complement the pasta nicely and add color to your plate. Beverage recommendations for a complete meal For a complete meal, enjoy your pasta with a light white wine like Pinot Grigio. If you prefer non-alcoholic options, try sparkling water with a slice of lemon. Both choices balance the rich flavors of the sun-dried tomatoes and garlic. For the full recipe, check out the complete guide in the article. In this post, we explored making a delicious sun-dried tomato pasta dish. You learned about essential ingredients and how to cook pasta perfectly. We shared tips to enhance your meal and offered variations to suit your taste. Remember to store your leftovers well for great flavor later. Cooking can be fun and rewarding. With practice, your skills will grow, making every meal a delight. Enjoy creating and sharing your pasta dishes!](https://cheftaling.com/wp-content/uploads/2025/07/f994e83b-ef68-490c-bd95-45d6fa0e875c-300x300.webp)


![This Lemon Blueberry Pound Cake combines bright lemon flavor with sweet blueberries. It’s simple to make and perfect for any occasion. - Dry Ingredients - 1 ½ cups all-purpose flour - 1 teaspoon baking powder - ½ teaspoon baking soda - ¼ teaspoon salt - Wet Ingredients - ½ cup unsalted butter, softened - 1 cup granulated sugar - 2 large eggs - 1 tablespoon lemon zest - 2 tablespoons fresh lemon juice - 1 teaspoon vanilla extract - ½ cup sour cream - 1 cup fresh blueberries - Optional Toppings - Powdered sugar for dusting This blend of ingredients makes the cake rich and moist. The lemon zest and juice add a fresh pop that wakes up your taste buds. The blueberries bring sweetness and color. You can find the full recipe above. Enjoy each bite of this delightful treat! Prepping the Oven and Pan First, you need to preheat your oven to 350°F (175°C). This ensures even baking. Next, take a 9x5 inch loaf pan and grease it with butter. Dust it lightly with flour. This helps the cake not stick. Mixing Dry Ingredients In a medium bowl, whisk together 1 ½ cups of all-purpose flour, 1 teaspoon of baking powder, ½ teaspoon of baking soda, and ¼ teaspoon of salt. Mixing these dry ingredients first adds air and helps the cake rise. Creaming Butter and Sugar In a large mixing bowl, cream ½ cup of softened unsalted butter with 1 cup of granulated sugar. Use a mixer on medium speed for about 3-4 minutes. You want it light and fluffy for the best texture. Adding Eggs and Flavor Now, add 2 large eggs one at a time. Mix well after each egg. Then, stir in 1 tablespoon of lemon zest, 2 tablespoons of fresh lemon juice, and 1 teaspoon of vanilla extract. This adds a burst of flavor. Incorporating Dry Ingredients and Sour Cream Gradually add the dry mix to the wet mixture. Alternate adding ½ cup of sour cream. Start and end with the flour mix. Mix just until you see no dry flour. Overmixing can make the cake tough. Folding in Blueberries Now, gently fold in 1 cup of fresh blueberries. Be careful not to overmix, or the blueberries will break. You want whole berries for that juicy burst in every bite. Pouring and Smoothing Batter Pour the batter into your prepared loaf pan. Use a spatula to smooth the top. This helps it bake evenly. Baking Time and Techniques Bake in the oven for 55-60 minutes. Check for doneness by inserting a toothpick into the center. If it comes out clean, your cake is done. Cooling Instructions Once baked, let the cake cool in the pan for 10 minutes. Then, transfer it to a wire rack to cool completely. This helps keep the crust nice and crisp. To see the complete recipe, check the Full Recipe section above. Enjoy your baking! Achieving the Perfect Texture To get the right texture, cream the butter and sugar well. This step adds air, making your cake fluffy. Use room temperature ingredients for the best results. They mix better and create a smooth batter. Avoiding Overmixing Mix the batter just until combined. Overmixing can make your cake dense. When you fold in the blueberries, be gentle. This keeps them whole and juicy. Testing for Doneness Insert a toothpick into the center of your cake. If it comes out clean, it's ready. If not, give it a few more minutes. Keep an eye on the edges; they should be golden brown. Ingredient Measurement Tips Use the right tools for measuring. A kitchen scale can help with accuracy. For flour, spoon it into the cup, then level it off. This prevents adding too much flour. Temperature Considerations Make sure your oven is properly preheated. An oven thermometer can help. If your cake bakes too fast, it may burn on the outside but stay raw inside. Flour Types Stick to all-purpose flour for this recipe. Other flours can change the texture of your cake. They may absorb liquids differently, leading to unexpected results. For the full recipe, check out the Lemon Blueberry Bliss Pound Cake. {{image_2}} Adding Nuts or Seeds You can add nuts or seeds to boost flavor. Chopped walnuts or pecans add a nice crunch. Pumpkin seeds also give a unique twist. Just fold in about ½ cup of your choice while mixing the blueberries. Creating a Glaze A lemon glaze can take this cake to a new level. Mix powdered sugar with lemon juice for a sweet, tangy glaze. Drizzle it over the cooled cake for a beautiful finish. This adds extra sweetness and a bright flavor. Using Different Berries Feel free to swap blueberries for other berries. Raspberries or blackberries work well too. They add color and a slightly different taste. You can mix berries for a fun medley that will wow your guests. Gluten-Free Options To make this cake gluten-free, use a gluten-free flour blend. Look for blends that include xanthan gum for the best texture. You can use the same amount as all-purpose flour in the recipe. Vegan Alternatives For a vegan version, replace eggs with flax eggs. Mix 1 tablespoon of ground flaxseed with 3 tablespoons of water and let it sit until thick. Use plant-based butter and dairy-free yogurt to keep it moist. This way, you maintain flavor without dairy or eggs. Explore these variations to make your lemon blueberry pound cake even more special! Check out the Full Recipe for detailed instructions. To keep your Lemon Blueberry Pound Cake fresh, store it at room temperature. Wrap it in plastic wrap or foil. This will help keep moisture in. Place it in an airtight container for added protection. If you do not have an airtight container, a cake dome works well too. This cake stays fresh for about three days. If you want to keep your cake for longer, freezing is the best option. First, let the cake cool completely. Then, wrap it tightly in plastic wrap. After that, place the wrapped cake in a freezer bag. Be sure to remove as much air as you can. The cake can last up to three months in the freezer. When you are ready to enjoy it again, take the cake out of the freezer. Let it thaw in the fridge overnight. Once thawed, you can reheat it in the oven. Set the oven to 350°F (175°C). Bake it for about 10 to 15 minutes. This will warm it up nicely. You can also microwave a slice for about 20 seconds. For more details, check the [Full Recipe]. How can I make this recipe ahead of time? You can prepare the batter and store it in the fridge for a day. Just remember to bake it fresh when you need it. This keeps the cake moist and tasty. Can I substitute ingredients? Yes! You can swap sour cream with plain yogurt. If you want a lighter cake, use applesauce instead of butter. Make sure to keep the same amounts. What are the signs of a well-baked pound cake? A well-baked pound cake has a golden brown top. It should spring back when touched lightly. A toothpick inserted in the center should come out clean. What flavors pair well with lemon blueberry? Lemon blueberry pairs well with vanilla and almond flavors. You can also add hints of ginger or mint for a unique twist. How to serve and present the cake for gatherings? Serve slices on a pretty platter with fresh blueberries on top. A dusting of powdered sugar adds a nice touch. You can also drizzle a simple lemon glaze for more flavor. Can I use frozen blueberries? Yes, you can use frozen blueberries. Just toss them in flour before adding to the batter. This helps prevent them from sinking to the bottom of the cake. You now have a full guide to baking an amazing lemon blueberry pound cake. We covered the key ingredients, step-by-step instructions, and helpful tips to avoid mistakes. You can also experiment with flavors or dietary needs. Remember to store your cake properly for the best taste. Baking can be fun and rewarding. Enjoy sharing your tasty creation with friends and family. Happy baking!](https://cheftaling.com/wp-content/uploads/2025/07/7e8435ee-d83e-4642-bc9c-f6c38b488b06-300x300.webp)

![To make a delicious Strawberry Spinach Salad, you need fresh items. Here’s what you need: - 6 cups fresh spinach, washed and dried - 1 cup strawberries, hulled and sliced - 1/2 cup walnuts, toasted - 1/4 cup feta cheese, crumbled - 1 small red onion, thinly sliced These fresh ingredients give the salad great color and taste. The spinach adds a nice crunch. Strawberries bring a sweet touch, while walnuts add a nutty flavor. Feta cheese gives a creamy bite, and red onion adds a sharp taste. Now, let's look at pantry items you need for the dressing: - 1/4 cup balsamic vinegar - 2 tablespoons honey - 3 tablespoons olive oil - Salt and pepper to taste These pantry items help create a dressing that’s both sweet and tangy. Balsamic vinegar adds depth, and honey balances the acidity. Olive oil gives the dressing a smooth texture. Salt and pepper bring out all the flavors. This recipe serves four people. Each serving has a good mix of nutrients. Spinach is packed with vitamins and minerals. Strawberries are rich in antioxidants. Walnuts provide healthy fats. Feta cheese adds protein. This salad is not just tasty; it’s also healthy. It’s perfect for a light lunch or dinner side. You can check the [Full Recipe] for more details on preparation and serving tips. Enjoy! To make Strawberry Spinach Salad, start with fresh ingredients. You need 6 cups of spinach, 1 cup of strawberries, 1/2 cup of walnuts, and 1/4 cup of feta cheese. Also, gather 1 small red onion, 1/4 cup of balsamic vinegar, 2 tablespoons of honey, and 3 tablespoons of olive oil. Wash and dry the spinach well. Hull and slice the strawberries thinly. Toast the walnuts in a pan for extra flavor. Thinly slice the red onion for a crisp bite. In a large mixing bowl, combine the spinach, strawberries, walnuts, feta cheese, and red onion. Gently mix them together. Use your hands or a large spoon for this. Make sure everything is evenly distributed. The colors will be bright and inviting. This step is important because it helps blend the flavors. In a small bowl, whisk together the balsamic vinegar, honey, and olive oil. Mix until the dressing is well-blended and a bit thick. Drizzle this dressing over the salad ingredients. Gently toss everything to coat well. Add salt and pepper to taste. Allow the salad to sit for a few minutes. This lets the flavors mix together nicely. Serve it fresh for the best taste. You can find the Full Recipe for more details. When picking strawberries, look for bright red color. The best berries feel firm and plump. Avoid ones with soft spots or dark patches. The green leaves should be fresh and green, not wilted. If you can, smell them. Good strawberries have a sweet aroma. Local farmers' markets often have the freshest options. Always wash strawberries right before you plan to use them. If you have leftover salad, store it in an airtight container. Keep the dressing separate to prevent sogginess. The salad stays fresh for about one day in the fridge. Before eating, check for any wilted greens or soggy fruit. If it looks good, toss in some fresh spinach or new strawberries to brighten it up. To boost the flavor, add nuts or seeds for crunch. Try using sunflower seeds or slivered almonds for a twist. Fresh herbs like basil or mint can add a unique touch. To make it sweeter, drizzle more honey or add sliced apples. Experiment with different cheeses too, like goat cheese or blue cheese. Each change can create a new taste adventure. For more details, check out the Full Recipe. {{image_2}} Want to make your salad heartier? Add protein! Grilled chicken adds great flavor. Shrimp also works well and cooks quickly. For a vegetarian option, try chickpeas or black beans. Each adds a nice texture and boost of protein. You can also use tofu for a vegan twist. The dressing can change the whole vibe of your salad. Balsamic vinegar is classic, but you can try honey mustard. A creamy ranch dressing pairs nicely with strawberries too. If you want something light, use lemon juice and olive oil. Each dressing brings its own taste to the mix. Don’t limit yourself to strawberries! In summer, use peaches or nectarines. Apples or pears work well in fall. In winter, try pomegranate seeds for a pop of color. Each season offers unique fruits to explore. Swap fruits to keep the salad fresh and exciting. For the full recipe, check out the details above. To keep your salad fresh, store each ingredient separately. Place spinach in a dry bag. Keep strawberries in a container with air holes. This prevents them from getting mushy. Walnuts should stay in a cool, dark place. Use an airtight container for feta cheese. Make sure to keep it chilled. Once mixed, the salad tastes best right away. However, it can last in the fridge for 1 to 2 days. The spinach may wilt after that time. If you mixed it with the dressing, it might not last as long. The salad may lose its crunch after a day. Always check for freshness before eating. Freezing this salad is not a good idea. Fresh spinach and strawberries do not freeze well. They lose their texture and flavor when thawed. If you want to save some ingredients, freeze the walnuts. They will stay fresh for a few months. For the best taste, use fresh ingredients from the Full Recipe. Yes, you can prepare parts of the salad ahead of time. Wash and dry the spinach early. Slice the strawberries and store them in the fridge. Keep them separate from the dressing. Mixing it all together right before serving keeps it fresh. This way, the spinach stays crisp, and the strawberries remain juicy. This salad pairs well with many side dishes. Grilled chicken adds protein and flavor. You can also serve it with garlic bread for a nice touch. Rice or quinoa can add heartiness to your meal. For a lighter option, serve it with a bowl of soup. To make this salad vegan, skip the feta cheese. You can use vegan cheese or just leave it out. Replace honey with maple syrup for a sweet touch. This way, you keep the taste great while making it plant-based. Enjoy your fresh and bright salad! In this post, we explored how to make a delicious Strawberry Spinach Salad. We covered fresh ingredients, pantry staples, and serving size details. I provided step-by-step instructions for preparation, mixing, and dressing the salad. You learned tips for selecting strawberries and storing leftovers. We also discussed flavor variations and best storage practices. In closing, this salad is easy, tasty, and fun to make. Enjoy creating it with your unique twist!](https://cheftaling.com/wp-content/uploads/2025/07/3ca18859-8e29-461d-99d4-b0150b103ca8-300x300.webp)

![- 4 ears of fresh corn, husked - 1 cup cherry tomatoes, halved - 1/2 red onion, finely diced - 1/2 cup crumbled feta cheese - 1/4 cup fresh cilantro, chopped - 1 avocado, diced - 2 tablespoons mayonnaise - 1 tablespoon sour cream - 1 teaspoon chili powder - 1 lime, juiced - Salt and pepper, to taste Using fresh and quality ingredients makes this salad shine. Choosing the best corn: Look for corn with bright green husks. The kernels should be plump and milky. Sweet corn tastes the best, especially when grilled. Importance of ripe avocados and tomatoes: Ripe avocados feel slightly soft. They add creaminess to the salad. For tomatoes, choose firm ones with a rich color. Ripe cherry tomatoes bring sweetness and balance to the dish. Dairy-free options: Swap feta with a dairy-free cheese. You can also use tahini for creaminess. Gluten-free alternatives: This salad is naturally gluten-free. Just ensure that any added ingredients are also gluten-free. For the full recipe, click [Full Recipe]. - Prep time: 15 minutes - Cook time: 15 minutes - Total time: 30 minutes - Servings: 6 Grilling the corn: Start by preheating your grill to medium-high heat. This step is key for great flavor. Grill the corn for 10 to 12 minutes. Turn the corn occasionally so it chars evenly. You want those nice grill marks! Once cooked, let the corn cool a bit. Then, cut the kernels off the cob. Do this over a large bowl to catch all the juicy kernels. Combining ingredients for the salad: Now that your corn is ready, add the following to your bowl: - 1 cup cherry tomatoes, halved - 1/2 red onion, finely diced - 1/2 cup crumbled feta cheese - 1/4 cup fresh cilantro, chopped - 1 avocado, diced This mix adds color and crunch to your salad. Stir gently so you don’t mash the avocado. Making the dressing: In a small bowl, mix these ingredients: - 2 tablespoons mayonnaise - 1 tablespoon sour cream - 1 teaspoon chili powder - Juice from 1 lime - Salt and pepper to taste Whisk until smooth. This dressing adds creaminess and zest. Adjusting seasoning to taste: Pour the dressing over your salad mix. Gently toss everything together until well coated. Taste your salad. If you want more flavor, add extra salt, pepper, or lime juice. Let the salad sit for at least 10 minutes. This helps the flavors blend together beautifully. You can find the full recipe online if you need more detailed steps! To boost the flavor of your Mexican street corn salad, try adding extra spices. A pinch of smoked paprika can give it a warm, smoky taste. You can also sprinkle some cayenne for a spicy kick. You can incorporate different herbs for a fresh twist. Fresh mint or oregano can add unique notes. Just chop them finely and mix them in with the other ingredients. Present your salad in a large bowl or a colorful platter. Garnish it with extra cilantro and a sprinkle of chili powder for a vibrant look. Adding lime wedges on the side can give guests a zesty option. For protein pairings, grilled chicken or shrimp work well. They complement the salad's flavors. Consider serving it with tortilla chips for a crunchy side. If you want to prepare this dish in advance, do it a few hours before serving. This allows the flavors to blend well. Just keep the salad in the fridge until you're ready to serve. For storage, use an airtight container. This keeps the salad fresh for up to three days. Be sure to add the avocado right before serving. This keeps it from browning too soon. Check out the Full Recipe for more details! {{image_2}} For a vegetarian take on Mexican street corn salad, add tofu or chickpeas. Tofu brings protein and absorbs flavors well. Chickpeas add a nice crunch. For a vegan version, swap mayo with a plant-based option. Use cashew cream or silken tofu mixed with lime juice instead. For cheese, try nutritional yeast or a vegan cheese that melts well. You can change up the ingredients based on the season. In summer, add diced bell peppers for color and crunch. In fall, consider roasted butternut squash for a sweet twist. You can also play with cheese. Feta is classic, but goat cheese adds a creamy tang. Cotija cheese gives a more traditional taste, too. Want some heat? Add diced jalapeños or a splash of hot sauce. This brings a nice kick to the salad. For a sweeter touch, stir in corn salsa. Fresh corn adds sweetness, but salsa can enhance that flavor. You can even mix in diced mango or pineapple for a fruity twist. For the full recipe, check out the detailed instructions to make this delicious dish at home! To keep your Mexican street corn salad fresh, store it in the fridge. Use an airtight container to seal in the flavors. This method helps the salad stay crisp and cool. Aim to eat it within three days for the best taste and texture. If you notice any moisture, drain it before serving. This will help avoid a soggy salad. You can freeze this salad, but I don’t recommend it. Freezing changes the texture of the corn and other fresh ingredients. If you must freeze it, separate the dressing from the salad. Store the salad in a freezer-safe container without the dressing. When you’re ready to eat, thaw it in the fridge overnight. Mix in the dressing just before serving. Each ingredient in this salad has its own shelf life. Here’s a quick guide: - Corn: Fresh corn lasts 3-5 days in the fridge. - Tomatoes: Cherry tomatoes stay fresh for about a week. - Red onion: It keeps well for 1-2 weeks in the fridge. - Feta cheese: It can last up to a month if stored properly. - Cilantro: Fresh cilantro lasts about a week. - Avocado: Ripe avocados should be used within 1-2 days. Knowing how long each ingredient lasts helps you plan meals. This way, you can enjoy the full flavor of your Mexican street corn salad. Mexican Street Corn Salad, or Esquites, is a tasty dish inspired by street food in Mexico. It takes the classic flavors of elote, which is corn on the cob slathered with creamy toppings, and turns it into a salad. The main ingredients are sweet corn, fresh herbs, and tangy cheese. The dish is bright, fresh, and full of flavor. You can enjoy it warm or cold. It makes a great side dish for summer barbecues or a light lunch. Yes, you can! If you don’t have a grill or prefer not to use one, you can boil or roast the corn instead. To boil, simply place the husked corn in a pot of boiling water for about 5-7 minutes. To roast, preheat your oven to 400°F (200°C). Wrap the corn in foil and roast for 25-30 minutes. After cooking, cut the kernels off the cob and mix them into your salad. This method still gives great flavor. This salad pairs well with many dishes. You can serve it alongside grilled chicken, shrimp tacos, or steak. It also goes great with a nice piece of fish. For a vegetarian option, pair it with quesadillas or black bean burgers. The fresh flavors of the salad complement many meals, making it a versatile choice. If you like your salad mild, skip the chili powder. You can also use less lime juice for a milder taste. To make it spicy, add diced jalapeños or a dash of hot sauce. You can even sprinkle a little cayenne pepper into the dressing. Taste as you go, and adjust to find your perfect heat level. In this blog post, we explored a fresh Mexican Street Corn Salad. We covered key ingredients like corn, tomatoes, and avocado, emphasizing quality and freshness. I shared easy steps for preparation, along with tips to enhance flavor. You can customize the dish for dietary needs or personal taste. Remember to store it properly for lasting freshness. This salad is perfect for any meal or gathering. Enjoy your cooking and stay creative with variations. It’s all about making this dish your own!](https://cheftaling.com/wp-content/uploads/2025/07/3db01cf4-fe27-40de-bff6-3babc1b3159d-300x300.webp)


![To make tasty air fryer chicken tenders, you need: - 1 lb chicken breast, sliced into strips - 1 cup buttermilk - 1 cup all-purpose flour - 1 cup breadcrumbs (preferably panko for extra crispiness) These main ingredients give you the perfect base. The chicken makes the dish hearty. Buttermilk adds moisture. Flour and breadcrumbs create the crunchy coating. Next, let’s spice things up! You will need: - 1 teaspoon garlic powder - 1 teaspoon onion powder - 1 teaspoon paprika - 1/2 teaspoon cayenne pepper (optional for extra spice) - Salt and pepper to taste These seasonings bring flavor. Garlic and onion powder add depth. Paprika gives a nice color. Cayenne pepper can add a little kick if you like spice. Want to make your chicken tenders even better? Consider these add-ins: - Fresh herbs like parsley or thyme - Grated Parmesan cheese mixed with breadcrumbs - A splash of hot sauce in the buttermilk These options let you play with flavors. Fresh herbs add brightness. Cheese gives a rich taste. Hot sauce can make them fiery and fun! For the full recipe, check out the Crispy Air Fryer Chicken Tenders. You’ll love how easy it is to whip up this crunchy and juicy treat! Start by marinating the chicken. Take your chicken strips and place them in a large bowl. Pour in the buttermilk until the chicken is fully covered. Cover the bowl with plastic wrap and place it in the fridge. Let the chicken soak for at least 30 minutes to make it tender. If you can wait longer, leave it overnight. This step is key for juicy and flavorful chicken. Next, we need to set up our breading station. In one shallow bowl, mix the flour, garlic powder, onion powder, paprika, cayenne pepper, salt, and pepper. This mix gives a great flavor to the chicken. In another shallow bowl, add your breadcrumbs. I prefer panko for crunch, but any breadcrumbs work. This setup makes breading the chicken easy and fun. Now, it's time to preheat the air fryer. Set it to 400°F (200°C) and let it heat for about 5 minutes. Preheating helps the chicken cook evenly and become crispy. While the air fryer heats up, you can start coating the chicken strips. Follow the breading steps for a delicious finish. For the full recipe, check out the details above. After you coat the chicken, it's time to arrange them in the air fryer. Place the chicken tenders in a single layer. Make sure they do not touch each other. This allows hot air to flow around each piece, giving you that perfect crunch. If you crowd the basket, they may steam instead of fry. Set your air fryer to 400°F (200°C). Cook the chicken tenders for 10 to 12 minutes. This high heat helps create a crispy outside while keeping the inside juicy. You want them golden brown. Use a meat thermometer to check the internal temperature. It should reach 165°F (75°C) for safety. Halfway through cooking, flip the chicken tenders. This step is key for even crispiness. The air fryer cooks from all sides, but flipping helps achieve that perfect golden color. Use tongs for this step to prevent burns. After flipping, spray the top again with a bit of cooking spray for added crunch. {{image_2}} To make your chicken tenders crunchy, use panko breadcrumbs. They add extra texture. Coat each tender well with the flour mix. This step is key for a great crunch. Don't skip the buttermilk soak; it keeps the chicken juicy. Ensure your air fryer is preheated to 400°F. This helps the tenders crisp right away. To stop chicken tenders from sticking, spray the air fryer basket with cooking spray. A light coat goes a long way. Arrange the tenders in a single layer. Avoid overcrowding; it leads to uneven cooking. Flip the chicken halfway through cooking. This helps both sides crisp up nicely. Serve your chicken tenders hot for the best taste. Pair them with sauces like honey mustard or BBQ. Add some fresh veggies or a salad on the side for color. This makes your plate look great and adds healthy crunch. You can find the full recipe to start cooking today! You can easily change the flavor of your chicken tenders. For a spicy kick, add more cayenne pepper or some hot sauce to the buttermilk. This gives the chicken a nice heat. If you prefer mild flavors, skip the cayenne altogether. Instead, add herbs like thyme or rosemary for a fresh taste. You can also mix in some lemon zest for brightness. You can make these chicken tenders gluten-free. Use gluten-free flour instead of all-purpose flour. Also, choose gluten-free breadcrumbs. These swaps keep the crunchy texture while being safe for those with gluten sensitivities. Always check labels to ensure your ingredients are truly gluten-free. While an air fryer is great, you can also bake or pan-fry these tenders. To bake, preheat your oven to 425°F (220°C). Place the tenders on a baking sheet and spray them with cooking spray. Bake for about 15-20 minutes, flipping halfway. For pan-frying, heat oil in a skillet over medium heat. Cook the tenders for about 4-5 minutes on each side until golden brown. Each method gives you a tasty result, just with a different texture. For the complete recipe, check the [Full Recipe]. To check if your chicken tenders are cooked, use a meat thermometer. The inside should reach 165°F (75°C). The outside will be golden and crispy. You can also cut one open. The meat should be white and not pink. Juices should run clear. This ensures your chicken is safe and tasty. Yes, you can prepare these chicken tenders ahead of time. Marinate the chicken and coat it with the breading. Then, store them in the fridge for up to 24 hours. When you're ready, just air fry them. You can also freeze the breaded tenders. When frozen, they last for about three months. Cook them from frozen; just add a few extra minutes to the cooking time. Dipping sauces can make your chicken tenders even better. Some popular choices include: - Honey mustard - Ranch dressing - Barbecue sauce - Ketchup - Buffalo sauce Feel free to mix and match! You can even create your own sauces. Try mixing yogurt with herbs for a fresh dip. Get creative and find your favorite combo. For more ideas, check the Full Recipe. You learned how to make tasty air fryer chicken tenders. We discussed key ingredients, the right steps for cooking, and helpful tips for perfect crispiness. Remember to marinate your chicken and preheat your air fryer for the best results. Variations, like spicy or gluten-free options, let you get creative. Enjoy your chicken tenders with your favorite dipping sauces for a fun meal. Now, get cooking and impress your friends and family!](https://cheftaling.com/wp-content/uploads/2025/07/3bc9420c-3769-4bee-94d0-37a4303b25c6-300x300.webp)