• Home
  • Recipe Index
    • Desserts
    • Dinner
    • Appetizer
    • Drinks
  • About
  • Contact
  • Privacy Policy
menu icon
go to homepage
  • Home
  • Recipe Index
    • Desserts
    • Dinner
    • Appetizer
    • Drinks
  • About
  • Contact
  • Privacy Policy

search icon
Homepage link
  • Home
  • Recipe Index
    • Desserts
    • Dinner
    • Appetizer
    • Drinks
  • About
  • Contact
  • Privacy Policy

×
Taling

Taling

Chef Taling is the creator and culinary voice behind Taling’s Recipes, an online hub where she turns her lifelong love of food into step-by-step dishes home cooks can trust.

Her journey began in her grandmother’s kitchen, soaking up the aromas of spices and the joy of shared meals an experience that sparked a passion for exploring global flavors and recreating them for friends, family, and now a worldwide audience.

  • Mississippi Mud Potatoes are a delightful culinary creation that brings together the comforting essence of traditional baked potatoes with a playful twist that is both savory and slightly sweet. This dish is an exciting fusion of flavors, combining the familiar elements of classic comfort food with unexpected ingredients that elevate it to a new level. In many households, comfort food serves as a centerpiece for gatherings with family and friends, creating cherished memories around the dinner table. The warmth and satisfaction of a hearty meal can bring people together, and Mississippi Mud Potatoes are the perfect dish to share in these moments.
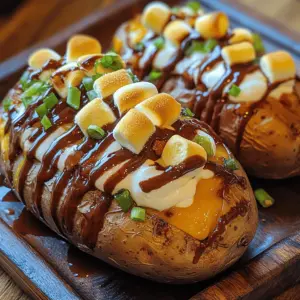
    Mississippi Mud Potatoes: A Unique Take on a Comfort Food Classic
  • - 2 boneless, skinless chicken breasts, sliced - 8 oz (about 225g) penne pasta - 2 tablespoons olive oil - 2 cloves garlic, minced - 1 cup sun-dried tomatoes, sliced - 2 cups fresh spinach - 1 cup heavy cream - 1 cup grated Parmesan cheese The heart of Tuscan chicken pasta lies in its main ingredients. First, the chicken gives protein and a juicy bite. Next, penne pasta holds the sauce well and adds texture. The olive oil brings richness, while garlic adds a nice kick. Sun-dried tomatoes provide a sweet and tangy flavor. Fresh spinach offers color and nutrients. Heavy cream makes the sauce creamy, and Parmesan cheese adds a savory finish. - Salt and pepper to taste - Fresh basil leaves, for garnish Seasoning is key to great flavor. A sprinkle of salt and pepper enhances every ingredient. Fresh basil leaves brighten the dish and add a fragrant touch. They make each bite feel fresh. This combination of simple yet vibrant flavors makes Tuscan chicken pasta a true delight for any weeknight dinner. {{ingredient_image_1}} To cook the pasta, start with a large pot of water. Add salt to the boiling water. This step adds flavor. Use 8 oz of penne pasta. Cook it until it is al dente. This usually takes about 10-12 minutes. Drain the pasta and set it aside for the next steps. For the chicken, use two boneless, skinless breasts. Slice them into thin pieces. Season the chicken with salt and pepper. Heat 2 tablespoons of olive oil in a large skillet over medium heat. Add the chicken slices. Cook them for about 5-7 minutes until they turn golden brown. Make sure they are cooked through. Remove the chicken from the skillet and set it aside. In the same skillet, add 2 cloves of minced garlic and 1 cup of sliced sun-dried tomatoes. Sauté these for about 2 minutes. You want the kitchen to smell great. This step builds flavor for your sauce. Next, pour in 1 cup of heavy cream. Stir well to mix it with the garlic and tomatoes. Let it simmer for 2-3 minutes. This makes the sauce slightly thick. Check the consistency. It should be creamy but not too thick. Now, add the cooked pasta back into the skillet. Include the sautéed chicken as well. Stir everything together. Add 2 cups of fresh spinach. Let it wilt for about 1-2 minutes. This adds freshness to your dish. To serve, spoon the pasta onto plates or into bowls. Garnish with fresh basil leaves for a pop of color and flavor. Enjoy your Tuscan Chicken Pasta! To keep the chicken juicy, use a skillet over medium heat. Heat 2 tablespoons of olive oil before adding the chicken. This helps to seal in the moisture. Cook the chicken for about 5-7 minutes, until golden brown. Make sure to check the internal temperature. It should reach 165°F (75°C). Overcooking dries out the chicken, so stay close. If it starts to brown too fast, lower the heat. Remove it from the skillet once it is done. For perfect pasta, cook the penne until it is al dente. This means it should still have a slight bite when you eat it. Follow the package instructions, but start checking a minute early. Drain the pasta and do not rinse it. This keeps the starch, which helps the sauce stick. I recommend using penne, but you can try fusilli or rigatoni too. These shapes hold the sauce well. Fresh herbs can make a big difference. I love adding basil for a fresh taste. You can also add thyme or oregano. These herbs pair well with the creamy sauce. For an extra kick, consider adding crushed red pepper flakes. They can bring a nice heat without overpowering the dish. Adjust the amounts based on your taste. Pro Tips Use Fresh Ingredients: Always opt for fresh spinach and high-quality sun-dried tomatoes to enhance the flavor of your dish. Customize Your Cheese: Feel free to mix different cheeses like mozzarella or goat cheese for a unique twist on the classic recipe. Adjust the Creaminess: If you prefer a lighter sauce, substitute half of the heavy cream with chicken broth or a splash of white wine. Perfect Pasta Cooking: Make sure to cook the pasta just until al dente, as it will continue to cook slightly when mixed with the sauce. {{image_2}} - Alternative proteins: You can use shrimp or tofu instead of chicken. Both options cook quickly and soak up the sauce's flavors well. If you prefer beef, thinly sliced steak works nicely too. - Dairy-free options: For a dairy-free version, swap the heavy cream for coconut milk. Use a vegan cheese blend in place of Parmesan. This keeps the dish creamy without dairy. - Vegetables to include: Add bell peppers or zucchini for extra color and crunch. Mushrooms also add a nice earthy flavor. Toss in some asparagus for a spring twist. - Flavorful mix-ins: Try adding capers or olives for a briny kick. Sunflower seeds or pine nuts add a great crunch. A splash of lemon juice brightens the dish and enhances the flavors. - Other Tuscan-inspired ingredients: Incorporate cannellini beans for added protein and fiber. You can also use fresh herbs like sage or rosemary for a more robust flavor. - Traditional pairings: Serve with crusty bread and a fresh salad. A simple arugula and lemon salad complements the dish well. Pair with a light red wine for a true Tuscan experience. To keep your Tuscan chicken pasta fresh, store it in an airtight container. Use glass or plastic containers that seal tightly. This helps prevent air from getting in and keeps the flavors intact. Always let the pasta cool to room temperature before sealing it. This avoids condensation, which can make the pasta soggy. - Best Practices: - Store in an airtight container - Cool before sealing - Keep in the fridge for up to 3 days You can freeze Tuscan chicken pasta for later. First, let the dish cool completely. Then, divide it into meal-sized portions and place them in freezer-safe bags. Squeeze out as much air as possible before sealing. This helps prevent freezer burn. - How to Freeze: - Cool completely before freezing - Use freezer-safe bags or containers - Portion for easy meals To thaw, place the frozen pasta in the fridge overnight. Reheat it on the stove over low heat or in the microwave. Add a splash of cream or water to keep it moist while reheating. - Thawing and Reheating Tips: - Thaw in the fridge overnight - Reheat in a skillet or microwave - Add liquid to maintain moisture Tuscan chicken pasta is a creamy and savory dish. It features tender chicken and fresh ingredients. You cook penne pasta and mix it with sun-dried tomatoes, spinach, and a rich sauce. The dish is topped with Parmesan cheese and fresh basil. This meal brings the flavors of Tuscany to your table. Yes, you can prepare this dish ahead of time. Cook the pasta and chicken, then store them separately. You can make the sauce and add it just before serving. This way, you keep the flavors fresh. Reheat everything on the stove for a quick meal. If you want to replace heavy cream, try these options: - Half-and-half for a lighter sauce - Coconut milk for a dairy-free choice - Greek yogurt for creaminess without the fat These swaps will change the taste slightly but still taste great. This dish is not spicy. It has mild flavors from garlic and sun-dried tomatoes. If you want some heat, add red pepper flakes. Start with a small amount and adjust to your taste. To make Tuscan chicken pasta healthier, you can: - Use whole wheat pasta for more fiber - Add more fresh vegetables like bell peppers or zucchini - Use less cheese or choose a lighter cheese option These changes will keep the dish tasty while cutting calories. This blog post covered how to make Tuscan chicken pasta. We explored main ingredients, cooking steps, and tips to enhance flavor. Remember to season your chicken well and cook the pasta al dente for the best texture. You can also try variations like adding vegetables or dairy-free options. Proper storage and reheating will keep your dish fresh. Tuscan chicken pasta is versatile and can fit many diets. Try it your way, and enjoy this savory meal with family and friends!
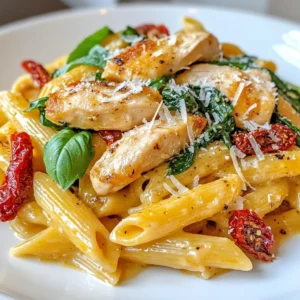
    Tuscan Chicken Pasta Flavorful Weeknight Dinner Delight
  • If you're a fan of classic comfort food, the Bacon-Lover's BLT Pasta Salad is a dish that beautifully merges the savory elements of a traditional BLT sandwich with the hearty satisfaction of pasta. This innovative recipe not only tantalizes your taste buds with its rich flavors but also offers a delightful textural experience that keeps you coming back for more. Ideal for gatherings, potlucks, or even a quick weeknight dinner, this pasta salad is a crowd-pleaser that brings together the best of both worlds—bacon and salad.
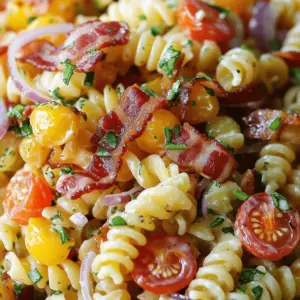
    Bacon-Lover's BLT Pasta Salad: A Flavorful Twist on a Classic
  • As the temperatures dip and the days grow shorter, there's nothing quite like a warm bowl of soup to bring comfort and nourishment. One of the most delightful options for such occasions is Cozy Sausage Tortellini Soup. This heartwarming dish is a perfect blend of rich flavors and satisfying textures, making it an ideal choice for family dinners, gatherings, or cozy nights in.
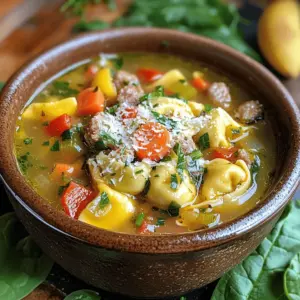
    Cozy Sausage Tortellini Soup: A Hearty Recipe for Every Season
  • Imagine waking up to the irresistible aroma of warm, toasted bread filled with the rich, creamy goodness of Nutella. Nutella Toast Pies are a delightful indulgence, perfect for breakfast, brunch, or even as a sweet snack at any time of day. This recipe combines the comforting essence of French toast with the beloved chocolate-hazelnut spread, creating a delicious meal that is sure to satisfy your cravings in just 20 minutes.
    Delicious Nutella Toast Pies: An Indulgent Treat for Any Time
  • The Keto diet has surged in popularity in recent years, captivating the attention of health enthusiasts and food lovers alike. This low-carbohydrate, high-fat diet focuses on reducing carbohydrate intake while increasing fat consumption, leading the body into a metabolic state known as ketosis. When in ketosis, the body becomes efficient at burning fat for energy, which can result in weight loss, improved energy levels, and better mental clarity. As more people turn to the Keto lifestyle, the search for delicious recipes that fit within these dietary guidelines intensifies.
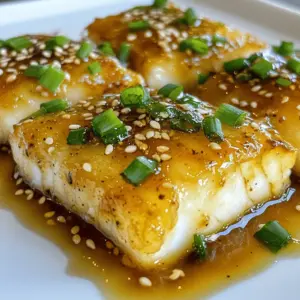
    Keto Asian-Inspired Chilean Seabass in Soy Ginger Sauce: A Culinary Delight
  • The Ultimate Patty Melt is not just a meal; it's an experience that brings comfort and satisfaction with every bite. This classic American dish features juicy beef patties, luscious Swiss cheese, and sweet caramelized onions, all sandwiched between slices of perfectly toasted rye or sourdough bread. What sets this recipe apart is the addition of a secret sauce that enhances the flavors and takes the patty melt to a whole new level of deliciousness. In this article, we will take you on a culinary journey, unveiling the origins of the Patty Melt, breaking down each component, and providing you with step-by-step instructions to create this mouthwatering dish at home.
    Ultimate Patty Melt with Secret Sauce
  • Burger enthusiasts, prepare yourself for a culinary experience that tantalizes your taste buds and elevates your burger game to new heights! The concept of "Crack Burgers" has emerged as a beloved trend among food lovers, and it’s not hard to see why. These burgers are not just a meal; they are an indulgent creation that combines juicy beef patties, sharp cheddar cheese, and a creamy, tangy sauce that coaxes you to take one bite after another—hence the name "Crack Burgers."
    Ultimate Crack Burgers Recipe
  • Bacon cheddar biscuits are the epitome of comfort food, merging the rich, savory taste of crispy bacon with the sharp, creamy flavor of cheddar cheese. These delightful pastries are not just your average biscuits; they are a culinary experience that evokes warmth and nostalgia, making them a favorite for many. Whether served as a breakfast treat, a hearty brunch item, or a savory side dish to complement dinner, bacon cheddar biscuits have earned their place in the hearts (and stomachs) of food lovers everywhere.
    Irresistibly Flaky Bacon Cheddar Biscuits: A Savory Delight for Any Occasion
  • - 4 boneless, skinless chicken breasts - 1 teaspoon garlic powder - 1 teaspoon onion powder - 1 teaspoon paprika - Salt and pepper to taste - 2 tablespoons olive oil - 1 medium onion, sliced - 2 cups mushrooms, sliced - 1 cup chicken broth - 1 cup heavy cream - 1 tablespoon Worcestershire sauce - 1 teaspoon dried thyme - ½ cup shredded cheddar cheese - ¼ cup chopped green onions for garnish You can add a few extras to boost the taste. Consider using: - Fresh herbs like parsley or basil for a fresh kick. - A dash of hot sauce for some heat. - Crumbled bacon for a smoky crunch. Using fresh ingredients makes a big difference. Fresh chicken tastes better and stays juicy. Fresh mushrooms add rich flavor and texture. Fresh herbs give a bright taste. Always choose the best you can find. It makes your dish shine! {{ingredient_image_1}} First, take your chicken breasts. Season them well. Use garlic powder, onion powder, paprika, salt, and pepper. Make sure each breast gets an even coat. This step adds great flavor to the chicken. Heat 2 tablespoons of olive oil in a large skillet. Set the heat to medium-high. When the oil is hot, add the seasoned chicken breasts. Cook them for 6 to 7 minutes on each side. You want them golden brown and cooked through. After cooking, take them out of the skillet and set them aside on a plate. In the same skillet, toss in your sliced onions and mushrooms. Sauté these for about 5 to 6 minutes. You want the onions to be translucent and the mushrooms lightly browned. This brings out their natural sweetness and adds depth to your dish. Now, it’s time for the sauce. Pour in 1 cup of chicken broth. Don’t forget to scrape up any brown bits from the bottom of the skillet. Those bits are full of flavor! Next, stir in 1 cup of heavy cream, 1 tablespoon of Worcestershire sauce, and 1 teaspoon of dried thyme. Bring this mixture to a gentle simmer. Cook for about 3 to 4 minutes until it thickens a bit. Return the cooked chicken breasts to the skillet. Nestle them right into the sauce. Then, sprinkle ½ cup of shredded cheddar cheese on top. Cover the skillet with a lid and let it simmer on low heat. This should take about 5 to 7 minutes. The chicken will reheat, and the cheese will melt beautifully. When serving, think about presentation. Place the smothered chicken on a bed of creamy mashed potatoes or rice. Spoon the delicious mushroom and onion sauce over the chicken. For a pop of color, garnish with chopped green onions. This makes your dish look as good as it tastes! To get the best chicken, start with good cuts. Use boneless, skinless chicken breasts. Season them well. I suggest garlic powder, onion powder, and paprika. This adds flavor right away. Cook the chicken until golden brown. Aim for about 6-7 minutes on each side. This helps lock in juices. If you cut into them too early, they may dry out. Let them rest before serving. This keeps the chicken tender and juicy. For the sauce, you want a creamy texture. Start by sautéing onions and mushrooms. This adds depth. After that, pour in chicken broth and heavy cream. Stir well to mix everything. You want to simmer this mixture. This helps it thicken in about 3-4 minutes. If it’s too thin, let it cook longer. Keep stirring to avoid burning. The sauce should coat the back of a spoon when it's ready. To boost the flavor, add Worcestershire sauce and dried thyme. These ingredients really bring out the taste. You can also use fresh herbs, which add a nice touch. Don’t skip the cheese! Cheddar melts beautifully, adding richness. Lastly, a sprinkle of chopped green onions before serving adds freshness. This makes the dish look pretty and taste great! Pro Tips Use Fresh Herbs: Fresh thyme can elevate the flavor profile of your dish significantly. If possible, opt for fresh herbs instead of dried for a more vibrant taste. Let Chicken Rest: After cooking, allow the chicken to rest for a few minutes before serving. This helps retain juices, making the chicken more tender and flavorful. Customize the Cheese: Experiment with different types of cheese like gouda or pepper jack for a unique twist. Each cheese brings its distinct flavor to the dish. Thicken the Sauce: If you prefer a thicker sauce, add a cornstarch slurry (1 tablespoon cornstarch mixed with 1 tablespoon cold water) to the simmering sauce for a perfect consistency. {{image_2}} You can spice up your smothered chicken easily. Add some heat with sliced jalapeños or a dash of hot sauce. This gives your dish a nice kick. You may also use cayenne pepper to taste. Mix it in with your seasonings for the chicken. Trust me, your taste buds will love this change! Another tasty option is to add spinach. Spinach adds color and nutrition. Simply stir in a few cups of fresh spinach when you make the sauce. Let it wilt before adding the chicken back in. This gives your dish a healthy twist. Plus, the flavors blend well with the creamy sauce. If you want a low-carb option, skip the heavy cream. Use unsweetened almond milk instead. You can also add cauliflower rice instead of traditional rice. This keeps the dish light but still tasty. Season the chicken as usual, and you won’t miss the carbs! Enjoy your meal without the guilt. Storing leftovers is simple. Place any leftover smothered chicken in an airtight container. Let it cool down first. You can keep it in the fridge for up to three days. Make sure to cover it well to prevent drying out. You want to keep that creamy sauce intact! Reheating smothered chicken is easy. You can use the microwave or the stove. If using a microwave, place the chicken on a microwave-safe plate. Cover it with a damp paper towel. Heat in short bursts, about one to two minutes, until warmed through. For stovetop reheating, use a skillet on low heat. Add a splash of chicken broth to keep it moist. Stir gently until hot. Freezing smothered chicken is a great option if you have too much. Start by letting it cool completely. Then, place it in a freezer-safe container. Make sure to leave some space for expansion. It can last in the freezer for up to three months. When ready to eat, thaw it in the fridge overnight. Reheat it as mentioned above. Enjoy your tasty meal later! Yes, you can use bone-in chicken. Just adjust the cooking time. Bone-in chicken takes longer to cook. Cook it until the internal temperature reaches 165°F. The flavor from the bones adds richness to the dish. You can serve Smothered Chicken with several sides. Creamy mashed potatoes pair well. Rice also works great to soak up the sauce. Steamed vegetables or a fresh salad add a nice crunch. Smothered Chicken lasts about 3 to 4 days in the fridge. Store it in an airtight container. Make sure it cools down before sealing it. Reheat gently on the stove or in the microwave. Yes, you can prepare Smothered Chicken ahead of time. Cook it fully and let it cool. Store it in the fridge. When you are ready to eat, reheat it gently on the stove. A good substitute for heavy cream is half-and-half. You can also use whole milk mixed with butter. This will give you a similar creaminess. Coconut cream is a fun dairy-free option too. We discussed essential ingredients and extra flavor ideas for your dish. Fresh ingredients make a big difference in taste. The step-by-step instructions help you cook the chicken right and create a creamy sauce. I shared tips for perfect texture and sauce consistency, plus variations for different tastes. Storing leftovers properly keeps your meal fresh for later. Remember, you can make this dish yours with the right tweaks. Enjoy creating your smothered chicken!
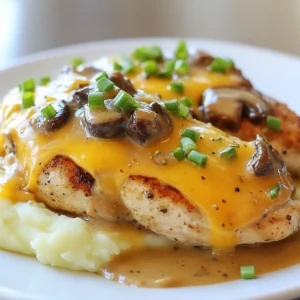
    Smothered Chicken Texas Roadhouse Style Easy Recipe
  • Are you ready to take your pizza game to the next level? Say hello to Deep Dish Pizza Cupcakes, a fun and innovative twist on the classic deep-dish pizza that everyone loves. These delightful mini pizzas are not only visually appealing but also pack a punch of flavor and texture that is sure to impress your friends and family. Perfect for gatherings, parties, or even a cozy family meal, these cupcakes bring the comforting essence of pizza into a portable and shareable form.
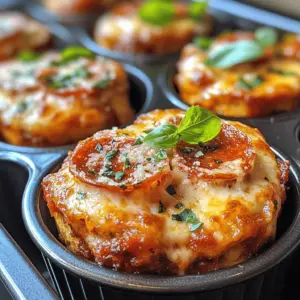
    Deep Dish Pizza Cupcakes Recipe
  • Stuffed bread has long been a beloved dish across various cuisines, celebrated for its ability to transform a simple loaf into an enticing centerpiece. From Italian focaccia to Middle Eastern manakish, the concept of filling bread with flavorful ingredients is a culinary tradition that transcends borders. One of the standout variations in this genre is the Spinach and Artichoke Stuffed Bread. This delightful dish combines the earthy taste of spinach with the tangy flavor of artichokes, all encased in a warm, crusty bread that makes it perfect for gatherings, parties, or even a cozy night in.
    Spinach and Artichoke Stuffed Bread Recipe
  • Welcome to the rich and flavorful world of Creamy Garlic Mushroom Pasta Delight! This delightful dish brings together the earthy, umami notes of mushrooms with the comforting creaminess of a well-crafted sauce, making it a favorite among pasta lovers. As one of the quintessential comfort foods, pasta dishes like this one not only satisfy hunger but also provide a canvas for a symphony of flavors and textures that can transport your taste buds to new heights.
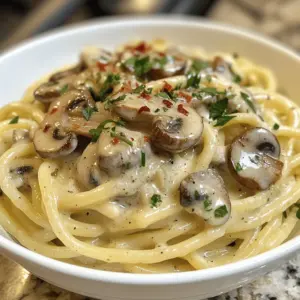
    Creamy Garlic Mushroom Pasta Delight: A Culinary Journey
  • Boursin cheese is a versatile and luxurious ingredient that has captured the hearts of chefs and home cooks alike. Originating in France in the 1950s, this creamy cheese is infused with a delightful mix of herbs and garlic, creating a flavor profile that is both bold and comforting. Its smooth texture allows it to spread easily, making it an ideal choice for stuffing, spreading, or even incorporating into sauces.
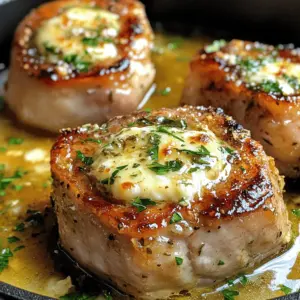
    Boursin Stuffed Pork Chops: A Flavorful Delight
  • - 1 cup unsalted butter, softened - 1/2 cup granulated sugar - 1/2 cup brown sugar, packed - 1/2 cup honey - 1 large egg - 2 teaspoons vanilla extract - 3 cups all-purpose flour - 1 teaspoon baking soda - 1/2 teaspoon salt - Sea salt flakes for topping When you measure your ingredients, keep these tips in mind: - Use a dry measuring cup for flour and sugar. - Pack the brown sugar into the cup for accurate measuring. - Level off the top with a knife for precise amounts. - For honey, use a liquid measuring cup to avoid spills. The quality of your ingredients matters a lot. Use the best butter you can find for rich flavor. Choose local honey for a unique taste. Fresh eggs lead to better texture and rise. Use high-quality all-purpose flour for the best results. Always check the expiration dates on baking soda and salt. Fresh ingredients make for tastier cookies! {{ingredient_image_1}} Start by preheating your oven to 350°F (175°C). Line two baking sheets with parchment paper. In a large bowl, mix the softened butter, granulated sugar, and brown sugar. Beat them together until the mixture is light and fluffy. This should take about 2-3 minutes. Next, add in the honey, egg, and vanilla. Mix it all until well combined. In another bowl, whisk the flour, baking soda, and salt. Slowly mix this dry blend into the wet ingredients. Stop mixing as soon as it comes together. If you overmix, the cookies may become tough. Now it’s time to shape the cookies! Use a tablespoon or a cookie scoop to drop dough onto the sheets. Make sure to leave about 2 inches between each scoop. This gives them room to spread. Before baking, sprinkle a tiny pinch of sea salt flakes on each mound. Bake the cookies for 10-12 minutes. The edges should turn lightly golden, while the centers stay soft. Keep an eye on them to avoid burning. After baking, take the cookies out of the oven. Let them sit on the sheets for about 5 minutes. This helps them firm up a bit. Then, transfer the cookies to a wire rack to cool completely. Store the cooled cookies in an airtight container. They will stay fresh for about a week. For longer storage, consider freezing them. Just wrap each cookie well before placing them in a freezer bag. To make your cookies soft and chewy, cream your butter and sugars well. Mix for 2-3 minutes until light and fluffy. This step adds air, giving your cookies a nice rise. After adding flour, mix just until combined. Overmixing can lead to tough cookies. For a unique twist, add spices like cinnamon or nutmeg. This will give warmth to your cookies. You can also use dark honey for a richer taste. Consider adding a splash of almond extract to deepen the flavor. These small tweaks make a big difference! Avoid using cold butter; it won’t cream well. Butter should be soft but not melted. Make sure your oven is preheated to the right temperature. If it’s too hot, cookies can burn. Lastly, don’t skip the sea salt topping. It brings out the honey's sweetness and adds a nice crunch. Pro Tips Butter Temperature: Make sure the butter is softened but not melted for the best texture in your cookies. Honey Quality: Use high-quality honey for a richer flavor. Local or organic honey can enhance the taste of your cookies. Chilling the Dough: For thicker cookies, chill the dough for about 30 minutes before baking to prevent spreading. Storage Tips: Store cookies in an airtight container at room temperature for up to a week to keep them fresh and chewy. {{image_2}} You can make these cookies even better by adding nuts or chocolate chips. Try using chopped walnuts, pecans, or almonds. They add crunch and flavor. If you love chocolate, mix in semi-sweet or dark chocolate chips. Just fold them in gently before baking. This adds a rich taste that pairs well with honey. For a gluten-free version, swap the all-purpose flour with a gluten-free blend. Many options work well, like almond flour or coconut flour. You might need to adjust the amount slightly. Start with the same amount and see how the dough feels. It should be soft but not sticky. These options keep the cookies tasty and safe for those with gluten issues. You can also play with flavors in your cookies. Adding spices like cinnamon or nutmeg can give a warm twist. A teaspoon of ground ginger can add zest. If you want more depth, try different extracts like almond or maple. Just a little can change the whole flavor. Be creative and find what you love best! To keep your salted honey cookies fresh, store them in an airtight container. This helps to lock in moisture and flavor. Place parchment paper between layers of cookies. It prevents sticking and keeps them soft. Store the container at room temperature for up to one week. If you want to keep them longer, consider freezing. Freezing cookies is easy. First, let them cool completely on a wire rack. Next, place the cookies in a single layer on a baking sheet. Freeze them for about one hour. This step helps them hold their shape. After that, transfer the cookies to a freezer-safe bag. Make sure to remove as much air as possible before sealing. You can freeze these cookies for up to three months. When you're ready to enjoy your cookies, reheating is simple. Preheat your oven to 350°F (175°C). Place the cookies on a baking sheet lined with parchment paper. Heat them for about 5-8 minutes, just until warm. This will refresh the soft texture and bring back the comforting aroma. Enjoy your cookies with a cup of tea or coffee! You can tell your cookies are done by looking at the edges. They should be light golden brown. The centers may still look soft, but they will firm up as they cool. You want to bake them for about 10 to 12 minutes at 350°F. If the edges are set but the center still looks wet, give them a few more minutes. Remember, overbaking can make them hard! Yes, you can use other sweeteners if you like. Maple syrup or agave syrup can replace honey. Both will add a unique flavor. If you want less sugar, try using stevia or monk fruit. Just note that these sweeteners might change the cookie's texture. You may need to adjust the amount of flour to keep the right dough consistency. If your dough feels too sticky, you can fix it. Add a bit more flour, one tablespoon at a time, until it feels better. Make sure to mix it in well. You can also chill the dough for about 30 minutes. This helps the butter firm up and makes it easier to scoop. Don’t worry; a little stickiness is normal, but it should not be too hard to handle. In this post, we discussed the key ingredients for baking cookies, including quality and measurements. I provided step-by-step instructions to prepare, bake, and store your cookies. Additionally, I shared tips to enhance texture and flavor, common mistakes, and variations to try. With proper storage info, you can enjoy fresh cookies longer. Remember these points to make your cookie baking easier and more fun. Happy baking!
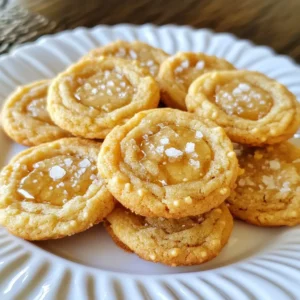
    Salted Honey Cookies Irresistible and Easy Recipe
  • To make gingerbread ice cream, gather these simple items: - 2 cups heavy cream - 1 cup whole milk - 3/4 cup granulated sugar - 1 tablespoon vanilla extract - 1 tablespoon ground ginger - 1 tablespoon ground cinnamon - 1/2 teaspoon ground nutmeg - 1/4 teaspoon ground cloves - 1/4 cup molasses - 1/2 cup finely chopped crystallized ginger (optional) - Pinch of salt You may need substitutes if you can't find some items. Here are a few tips: - For heavy cream, use coconut cream for a dairy-free option. - Substitute whole milk with almond milk or oat milk. - Instead of granulated sugar, try brown sugar for a richer flavor. - If you don't have crystallized ginger, use fresh ginger. Just chop it finely. Choosing fresh ingredients makes a big difference in taste. Here are my tips: - Look for cream that is thick and rich. Check the date to ensure freshness. - Whole milk should be creamy, not watery. It should smell fresh. - Choose spices that are fragrant. Old spices lose their flavor. - Check molasses for a rich color and thick texture. - If using crystallized ginger, pick pieces that are soft, not hard or dry. {{ingredient_image_1}} To make the ice cream base, start with a large mixing bowl. Combine 2 cups of heavy cream and 1 cup of whole milk. Whisk them together until they blend well. Next, add 3/4 cup of granulated sugar, 1 tablespoon of vanilla extract, and the spices: 1 tablespoon of ground ginger, 1 tablespoon of ground cinnamon, 1/2 teaspoon of ground nutmeg, and 1/4 teaspoon of ground cloves. Don’t forget a pinch of salt! Stir this mixture well until the sugar dissolves. If you like, fold in 1/2 cup of finely chopped crystallized ginger for texture and extra flavor. Once your base is ready, pour it into your ice cream maker. Churn the mixture according to the manufacturer’s instructions. This process usually takes about 20 to 30 minutes. You will know it’s ready when it reaches a soft-serve consistency. It should look thick and creamy. After churning, transfer the ice cream into an airtight container. Smooth the top with a spatula to make it nice and neat. Cover it well and freeze for at least 4 hours. If you wait longer, it will firm up even more! When ready to serve, scoop the gingerbread ice cream into bowls. You can top it with crushed ginger snaps or a drizzle of chocolate sauce for a fun twist. Enjoy this creamy holiday delight! One big mistake is not mixing your ingredients enough. Always blend the cream and milk first. Make sure the sugar dissolves fully. If you skip this step, the ice cream may not taste sweet. Another error is over-churning the ice cream. Churn it just until it's soft-serve texture, then freeze. If you churn too long, it may turn icy. To get that smooth, creamy texture, use cold ingredients. Make sure your cream and milk are chilled before mixing. This helps the ice cream freeze evenly. Adding a pinch of salt brings out the flavors, too. If you want a richer taste, use more heavy cream than milk. A little extra molasses also adds creaminess and a nice depth. For a fun presentation, scoop the ice cream into festive bowls. You can sprinkle a bit of ground cinnamon on top for a pop of color. Crushed gingerbread cookies make great toppings! You can also drizzle warm caramel or chocolate sauce over it. Serve with a slice of gingerbread cake on the side for a true holiday treat. Pro Tips Chill Your Ingredients: Make sure to chill your heavy cream and milk in the refrigerator for a few hours before starting. This helps the ice cream churn faster and results in a creamier texture. Use Fresh Spices: For the best flavor, use freshly ground spices instead of pre-ground ones. This enhances the aroma and taste of your gingerbread ice cream. Don't Over-Churn: Be careful not to over-churn your ice cream. Churn just until you reach a soft-serve consistency to avoid a grainy texture. Mix-In Variations: Experiment with different mix-ins like crushed cookies, nuts, or chocolate chips for added flavor and texture. Just fold them in gently before freezing. {{image_2}} You can make gingerbread ice cream even more fun with add-ins. Here are a few ideas: - Chopped nuts: Walnuts or pecans add a nice crunch. - Chocolate chips: Dark or white chocolate chips give a sweet twist. - Caramel swirls: Drizzle caramel sauce right before freezing for a rich flavor. - Dried fruits: Raisins or cranberries add a chewy texture. Mix and match these add-ins to find your favorite combo. They can make each scoop unique! Want to make this recipe dairy-free? No problem! Here’s how: - Coconut cream: Use full-fat coconut milk instead of heavy cream. - Almond milk: Swap whole milk with almond or oat milk. - Maple syrup: Replace granulated sugar with maple syrup for sweetness. These swaps keep the gingerbread flavor while making it vegan-friendly. You can enjoy this treat with a clear conscience! You can change the spice level to suit your taste. Want it spicier? Add more ground ginger or cinnamon. Start with an extra half teaspoon and taste as you go. If you prefer less spice, reduce the ginger and cinnamon by half. Experimenting with spices lets you make gingerbread ice cream just right for you. It’s all about your taste! To keep your gingerbread ice cream fresh, store it in an airtight container. This will prevent ice crystals from forming. Make sure to smooth the top with a spatula before sealing it. This helps keep the texture smooth and creamy. Gingerbread ice cream lasts about two weeks in the freezer. After that, the flavor may fade. For the best taste, aim to eat it within the first week. Always check for off smells or ice crystals before serving. If you have leftovers, you can re-freeze the ice cream. Just make sure it stays in the airtight container. When you're ready to eat it again, let it sit at room temperature for a few minutes. This will make it easier to scoop. If it gets too hard, you can stir it gently to restore some creaminess. Yes, you can make gingerbread ice cream without an ice cream maker. You need a few simple steps. First, create the ice cream base as usual. Then, pour it into a shallow dish. Place it in the freezer. Every 30 minutes, stir the mixture with a fork for about 3 hours. This helps break up ice crystals and makes it creamy. To boost the ginger flavor, try adding more ground ginger. Start with an extra half-teaspoon. You can also use fresh ginger. Grate about one tablespoon of fresh ginger and mix it in. This adds a bold taste. For a fun twist, add some chopped crystallized ginger. It gives a nice chew and extra spice. Gingerbread ice cream pairs well with many treats. I love serving it with warm gingerbread cookies. You can also try it with a drizzle of caramel sauce or chocolate syrup. For a festive touch, add whipped cream and a sprinkle of cinnamon. Crushed nuts or holiday sprinkles also make great toppings. This article explored the key steps to create gingerbread ice cream. First, we covered the essential ingredients and their substitutes. Next, I walked you through making the base, churning, and freezing. I shared tips for avoiding common mistakes and achieving a creamy texture. We also discussed fun variations and how to store your ice cream for fresh enjoyment. In summary, making gingerbread ice cream is an exciting process. With these tips, you can enjoy a delicious treat anytime.
    Gingerbread Ice Cream Creamy Holiday Delight Recipe
  • As summer rolls in, so do the vibrant colors and flavors of the season. One dish that embodies this spirit perfectly is fried corn on the cob. This delicious treat has become a favorite among food enthusiasts, picnic-goers, and barbecue lovers alike. The combination of juicy, sweet corn, crispy coating, and savory spices creates a flavor explosion that tantalizes the taste buds and evokes memories of summer days spent outdoors.
    Fried Corn on the Cob Delight: A Flavorful Summer Treat
  • Cajun cuisine is a vibrant tapestry of flavors that reflects the rich cultural heritage of Louisiana. Originating from the French-speaking Acadian people who settled in the bayous, Cajun cooking is characterized by its bold spices, hearty ingredients, and a touch of improvisation. From gumbo to jambalaya, the dishes are as diverse as the people who create them. One standout dish that has gained immense popularity is creamy Cajun chicken pasta—a perfect weeknight dinner option that combines the depth of Cajun spices with the comforting creaminess of a pasta dish.
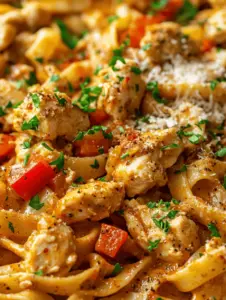
    Creamy Cajun Chicken Pasta: A Flavorful Weeknight Delight
  • Garlic Herb Muffin Pan Potato Galettes are a delightful twist on classic potato dishes, offering a unique blend of crispy textures and aromatic flavors that are sure to please any palate. This dish consists of thinly sliced potatoes, seasoned with garlic and fresh herbs, then baked to perfection in a muffin pan. The result is a visually stunning and delicious side dish or appetizer that can elevate any meal.
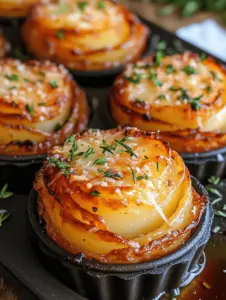
    Garlic Herb Muffin Pan Potato Galettes Recipe
  • Cinnamon rolls have long been cherished as a comforting treat, evoking memories of cozy mornings and decadent brunch gatherings. Their soft, pillowy texture and warm, sweet aroma fill homes with a sense of nostalgia. While traditional cinnamon rolls are delicious on their own, adding a unique twist can elevate them to a whole new level of taste and enjoyment. Enter the raspberry cinnamon rolls with lemon glaze—a delightful fusion of flavors that combines the warmth of cinnamon with the tartness of fresh raspberries and the brightness of zesty lemon. This recipe not only tantalizes the taste buds but also reinforces the importance of homemade pastries in creating memorable moments with loved ones.
    Raspberry Cinnamon Rolls with Lemon Glaze: A Sweet Indulgence
  • In the world of culinary delights, few dishes evoke the same sense of warmth and comfort as a steaming bowl of soup. Soups have carved a niche in various cuisines, celebrated for their ability to provide nourishment and warmth, especially during the chilly months. Among the myriad of soup options available, Classic Beef & Tomato Macaroni Soup stands out as a quintessential choice that combines the rich, savory flavors of beef with the bright, tangy notes of tomatoes, all enveloped in the comforting embrace of pasta. This dish is not just a meal; it’s an experience that many families cherish.
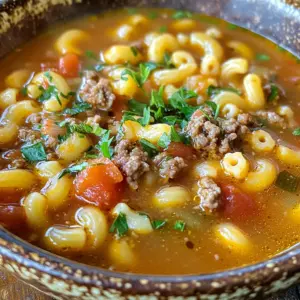
    Classic Beef & Tomato Macaroni Soup: A Hearty Comforting Delight
  • As the seasons shift and the temperatures drop, nothing warms the soul quite like a steaming bowl of Hearty Beef and Barley Soup. This dish is a robust and nourishing option that captures the essence of comfort food. The combination of tender beef, nutty barley, and fresh vegetables creates a satisfying meal that is not only delicious but also packed with nutrients. With its rich flavors and hearty texture, this soup is perfect for cozy evenings spent indoors, making it an ideal choice for cold weather.
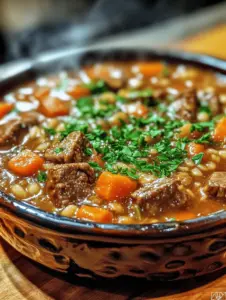
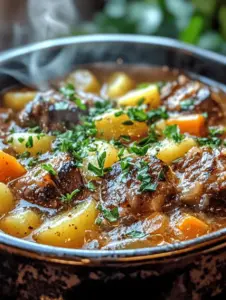
    Hearty Beef and Barley Soup: A Comforting Classic
  • - 24 Oreo cookies (plus 2 for topping), crushed - 1/4 cup unsalted butter, melted - 2 cups cream cheese, softened - 1 cup powdered sugar - 1 teaspoon vanilla extract - 1 cup heavy whipping cream - 1/2 cup mini chocolate chips When choosing Oreo cookies, go for the classic ones. They give the best flavor. For cream cheese, full-fat options work best. They create a rich, creamy texture. Use high-quality vanilla extract for a deeper flavor. Always pick fresh heavy cream for the best whipped topping. This makes your cheesecake bars light and fluffy. You can swap Oreo cookies with any chocolate cookies you like. This change will still give you a great crust. If you want a lighter option, use low-fat cream cheese. You can also use coconut cream instead of heavy cream for a dairy-free version. Lastly, if you don’t have mini chocolate chips, regular ones work too. {{ingredient_image_1}} To start, grab a medium bowl. Add 24 crushed Oreo cookies and 1/4 cup of melted butter. Mix them well until the crumbs look moist. This ensures the base sticks together. Next, take a 9x9 inch baking dish and press the mixture firmly into the bottom. I like using the back of a measuring cup for this. Aim for an even layer. Once done, set it aside to prepare the filling. Now, let’s make the creamy filling. In a large mixing bowl, beat 2 cups of softened cream cheese. Use an electric mixer to get it smooth and creamy. Next, add in 1 cup of powdered sugar and 1 teaspoon of vanilla extract. Mix until it’s well blended. In a separate bowl, whip 1 cup of heavy whipping cream until it forms stiff peaks. This adds lightness to your cheesecake. Gently fold the whipped cream into the cream cheese mixture. For extra fun, fold in 1/2 cup of mini chocolate chips. Pour the cheesecake filling over your Oreo crust. Use a spatula to spread it out evenly. Once that’s done, cover the dish and put it in the fridge. Let it chill for at least 4 hours. This helps it set properly. Before serving, crumble 2 Oreo cookies on top for a nice finish. Slice into squares and enjoy your delicious no-bake Oreo cheesecake bars! To get the best texture in your no-bake Oreo cheesecake bars, use softened cream cheese. It helps mix well and gives a smooth filling. Whip your heavy cream until stiff peaks form. This step adds volume and lightness to your cheesecake. When mixing, fold gently to keep that airy feel. Adding mini chocolate chips adds crunch and makes each bite fun. One common mistake is using cold cream cheese. Always soften it first for a creamy mix. If you skip whipping the cream enough, your bars may turn out dense. Make sure to press the crust firmly in the pan. A loose crust can crumble when you cut the bars. Also, don't rush the chilling time. They need at least four hours to set properly. Serving these cheesecake bars is easy and fun. Slice them into squares for a neat look. Top with crumbled Oreos for a nice touch. You can also add a drizzle of chocolate syrup for extra flair. For a party, arrange them on a colorful plate. Add fresh berries for contrast. This adds color and freshness to your dessert table. Pro Tips Use Room Temperature Cream Cheese: Ensure your cream cheese is at room temperature for a smoother filling without lumps. Chill the Bars Long Enough: Allowing the cheesecake bars to chill for at least 4 hours ensures they are set and easier to slice. Experiment with Toppings: Feel free to add different toppings like whipped cream or caramel drizzle for a unique twist. Store Properly: Keep any leftovers in an airtight container in the refrigerator to maintain freshness for up to 5 days. {{image_2}} You can change the flavor of these Oreo cheesecake bars easily. Try using different cookies. For example, use peanut butter or mint Oreos for a fun twist. You can also mix in flavors like lemon or raspberry into the cream cheese mixture. Just add some zest or fruit puree when you mix in the powdered sugar. This gives a fresh taste that pairs well with the creamy filling. Toppings can make your cheesecake bars even better. Instead of just crumbled Oreos, try adding fresh fruit on top. Strawberries or blueberries add color and flavor. You can also drizzle chocolate or caramel sauce over the bars. For a crunchy touch, sprinkle some chopped nuts or crushed candy bars. These toppings not only taste great, but they also make your dessert more fun to look at. These cheesecake bars shine at parties or family gatherings. Serve them on a nice platter with colorful fruit around them. For a birthday, add candles or colorful sprinkles on top. If you’re hosting a holiday, consider adding seasonal decorations or themed toppings. A simple dessert can become a star of the table with just a few changes. Remember, presentation matters as much as taste! Store your No Bake Oreo Cheesecake Bars in an airtight container. This keeps them fresh and tasty. Make sure to place a layer of plastic wrap over the bars before sealing. This adds extra protection. Refrigerate them right after they set. The cool temperature helps maintain their creamy texture. You can freeze these cheesecake bars for later. First, cut them into squares. Wrap each square tightly in plastic wrap. Place the wrapped pieces in a freezer-safe bag. Be sure to label the bag with the date. This way, you’ll know how long they’ve been in the freezer. In the fridge, these bars last about 5 days. If you freeze them, they can last up to 2 months. Just remember to thaw them in the fridge overnight before you eat them. Enjoy every bite of your delicious treats! Yes, you can make these bars a day or two ahead. They taste even better after chilling overnight. Just keep them covered in the fridge. This helps the flavors mix well. You can serve them straight from the fridge. You can tell the cheesecake is set when it feels firm. Press gently on the surface with your finger. If it springs back, it's ready. Chill them for at least four hours to ensure they firm up. If you have time, letting them chill longer is even better. You can use regular cream cheese if you prefer. It will make the bars richer and creamier. Just ensure it is softened for easy mixing. You will still get that great Oreo flavor with the regular cream cheese. This blog post covered how to make delicious cheesecake bars using Oreos. We discussed key ingredients, including quality choices and substitutes. You learned the steps for the base, the filling, and how to chill them right. I shared tips for texture, common errors, and serving ideas. You also explored flavor variations and storage practices. Making these bars is simple and fun. Remember, the right ingredients and preparation make all the difference. Enjoy experimenting with flavors and impressing your friends!
    No Bake Oreo Cheesecake Bars Simple and Delicious Treat
  • To make Hot Chocolate Lasagna, gather these tasty ingredients: - 12 chocolate graham crackers - 2 cups milk - 1 cup heavy cream - 1/2 cup cocoa powder - 1 cup granulated sugar - 1 teaspoon vanilla extract - 8 ounces cream cheese, softened - 1 cup powdered sugar - 1 cup mini marshmallows - 1/2 cup chocolate chips - Whipped cream for topping - 1/4 cup chocolate syrup for drizzling You can add a personal touch to your Hot Chocolate Lasagna. Here are some fun options: - Swap chocolate graham crackers for regular ones for a different taste. - Use flavored cream cheese like chocolate or vanilla for more flavor. - Add a sprinkle of sea salt on top for a sweet and salty mix. - Substitute almond milk or coconut milk for a dairy-free version. Choosing the right ingredients makes a big difference. Here are some tips: - Select high-quality cocoa powder for richer taste. - Use fresh cream cheese for a smooth texture. - Look for mini marshmallows that are soft and fluffy. - Buy chocolate chips that are made with real chocolate for the best flavor. With these ingredients, your Hot Chocolate Lasagna will be a delight! {{ingredient_image_1}} To start, gather your ingredients. You need milk, cocoa powder, granulated sugar, and a pinch of salt. In a medium saucepan, whisk these together. Heat this mix over medium heat. Stir often for about 5 to 7 minutes. You want it to thicken nicely. Once thick, take it off the heat and add the vanilla extract. Let it cool a bit before using. Grab a 9x13 inch dish for assembly. Start by placing 6 chocolate graham crackers at the bottom. You may need to break them to fit. Next, spread half of your chocolate pudding over the crackers. This creates a nice base. Now, add another layer of 6 graham crackers on top of the pudding. After that, take the cream cheese mixture you made. Spread it evenly over the graham crackers. Make sure to cover them well. Then, sprinkle mini marshmallows and chocolate chips on top. This adds a fun texture and taste. Next, pour the remaining chocolate pudding over these toppings. Spread it evenly, covering everything. Finish with another layer of 6 graham crackers on top. Now, it’s time for the final touches. Spread whipped cream over the top layer of graham crackers. Drizzle chocolate syrup over the whipped cream for extra flavor. This makes it look great, too! Cover the dish with plastic wrap and place it in the fridge. Allow it to chill for at least 4 hours, or overnight if you can wait. This helps everything set perfectly. When ready, cut it into squares and enjoy your delicious hot chocolate lasagna! When making hot chocolate lasagna, avoid these common errors: - Skipping the cooling step: Always let the pudding cool before adding it to the layers. This helps prevent the graham crackers from getting soggy. - Not mixing enough: Ensure the cream cheese and powdered sugar blend well. Lumps can ruin the texture. - Overstuffing the layers: Too many toppings can make the lasagna hard to cut. Stick to the recipe for the best results. To boost the flavors in your hot chocolate lasagna, try these tips: - Use high-quality cocoa powder: A richer cocoa powder gives a deeper chocolate flavor. - Add a pinch of sea salt: This enhances the sweetness and balances the chocolate. - Experiment with extracts: Add almond or peppermint extract for a fun twist. For the best dessert experience, consider these serving tips: - Chill Before Serving: Let your lasagna sit in the fridge for at least 4 hours. This helps the layers set. - Garnish Creatively: Top each square with extra whipped cream and a few mini marshmallows. This adds a fun touch. - Pair with a Beverage: Serve alongside a warm cup of hot chocolate or coffee. This makes the dessert extra cozy. Pro Tips Chill Your Ingredients: For a creamier texture, ensure that your heavy cream and cream cheese are chilled before mixing. This will help them blend smoothly. Layering Techniques: When assembling the layers, try to press down gently on each layer to ensure they stick together and create a more cohesive lasagna. Garnish Creatively: Enhance the visual appeal of your lasagna by garnishing with extra mini marshmallows, chocolate shavings, or even a sprinkle of crushed graham crackers on top of the whipped cream. Make Ahead: This dessert is perfect for making ahead of time. Allow it to set overnight in the refrigerator to achieve the best flavor and texture. {{image_2}} You can change up the flavors in your hot chocolate lasagna. Try using different types of cocoa powder. Dark cocoa adds a rich taste. You can also mix in flavored extracts like almond or mint. If you love coffee, add a shot of espresso to the pudding. You can even use flavored whipped cream for a fun twist. Making this dessert gluten-free is easy. Just swap the chocolate graham crackers for gluten-free ones. For a vegan version, replace the milk with almond or coconut milk. Use coconut cream instead of heavy cream. You can also use a vegan cream cheese. This way, everyone can enjoy this sweet treat. You can add special touches for the season. In winter, mix in peppermint extract and top with crushed candy canes. For fall, try adding a bit of pumpkin spice to the pudding. You can even layer in some apple pie filling for a fun surprise. Decorate with seasonal fruits like berries or pomegranate seeds for a festive look. I love how easy it is to store hot chocolate lasagna. You need to keep it in the fridge. Make sure you cover it tightly with plastic wrap or use a lid. This keeps it fresh and prevents other smells from getting in. If you have leftovers, you can also place them in an airtight container. This way, you enjoy the treat later without losing taste. If you want to freeze hot chocolate lasagna, it’s best to do it before adding whipped cream. Start by assembling the layers without the cream. Then, wrap it well in plastic wrap or aluminum foil. When you’re ready to eat, take it out and let it thaw in the fridge overnight. After it thaws, you can add the whipped cream. This keeps it nice and fluffy. Hot chocolate lasagna lasts about 3 to 5 days in the fridge. The longer it sits, the softer the graham crackers become. If you freeze it, it can last up to 3 months. Just remember to keep it well-wrapped. Always check for any odd smells or changes in texture before enjoying it. Storing it properly helps you savor that rich chocolate flavor for days! If you don’t have chocolate graham crackers, you can use regular graham crackers. You can also try chocolate cookies or chocolate wafer cookies. Crushed Oreos can work too. Just make sure they are sweet and chocolaty to match the dessert's flavor. Yes, you can make Hot Chocolate Lasagna a day in advance. Making it ahead gives the layers time to set. This also helps the flavors blend well together. Just store it in the fridge, covered tightly with plastic wrap. It stays fresh and tasty for the next day. To make the pudding layer thicker, cook it a bit longer. Keep stirring until it coats the back of a spoon. You can also add more cocoa powder for richness. If you want, try adding a bit of cornstarch mixed with cold milk. This will help it thicken up nicely. This blog post gave you the key to making hot chocolate lasagna. We covered ingredients, step-by-step instructions, and smart tips to avoid mistakes. You learned how to add fun flavors, follow storage tips, and answer common questions. Now, you can impress your friends and family with this treat. Enjoy your delicious creation!
    Hot Chocolate Lasagna Decadent Dessert Delight
  • When making a classic French butter cake, using the right ingredients is essential. Here’s what you need: - 1 ½ cups unsalted butter, softened - 1 ½ cups granulated sugar - 4 large eggs, room temperature - 2 ½ cups all-purpose flour - 1 tablespoon baking powder - ½ teaspoon salt - 1 teaspoon vanilla extract - 1 cup whole milk Each ingredient plays a key role in the cake's flavor and texture. The unsalted butter gives a rich taste, while the sugar adds sweetness. Using room temperature eggs helps the batter mix well. All-purpose flour provides a good base, while baking powder helps the cake rise. The salt balances the sweetness, and vanilla extract adds a lovely aroma. Whole milk keeps the cake moist and tender. Make sure you gather everything before you start. This way, you won’t miss anything. The quality of your ingredients matters too. Fresh eggs and good butter can make a big difference in taste. {{ingredient_image_1}} First, you need to preheat your oven to 350°F (175°C). This step is key for even baking. Next, grease and flour a 10-inch round cake pan. You can also use parchment paper to line the pan. This will help the cake come out easily once it is baked. In a large mixing bowl, cream together the softened butter and granulated sugar. Use an electric mixer on medium speed. Mix until the mixture is light and fluffy, which should take about 5 minutes. Next, add the eggs one at a time. Make sure to mix well after each egg. This helps the eggs blend into the batter fully. In another bowl, whisk together the flour, baking powder, and salt. Gradually add this dry mixture to the wet mixture. Alternate adding the whole milk as well. Start and end with the flour mixture. Mix until everything is just combined. Finally, stir in the vanilla extract until it is evenly mixed. Now, pour the batter into your prepared cake pan. Smooth the top with a spatula. Bake the cake in the preheated oven for 30 to 35 minutes. You will know it is ready when the top is golden brown. Insert a toothpick into the center; it should come out clean. Once baked, remove the cake from the oven. Let it cool in the pan for about 10 minutes. After that, transfer the cake to a wire rack to cool completely. This cooling step is important for the cake's texture and flavor. For a soft and fluffy cake, use room temperature butter and eggs. This helps the batter mix well. Cream the butter and sugar until light and airy. It should look pale and fluffy. Mixing too much can make the cake dense, so stop as soon as it's smooth. To keep your cake from sticking, grease the pan well. Use softened butter or cooking spray. Then, dust it with flour or line it with parchment paper. This simple step makes it easy to remove the cake after baking. Dust the cooled cake with powdered sugar before serving. This adds a nice touch. Pair it with crème fraîche for creaminess. Fresh berries add color and flavor too. Serve slices on a pretty plate to impress your guests. Pro Tips Room Temperature Ingredients: Make sure your butter, eggs, and milk are at room temperature before starting. This helps create a smoother batter and ensures even baking. Don't Overmix: When combining the dry and wet ingredients, mix until just combined. Overmixing can lead to a dense cake. Check for Doneness: Use a toothpick to check if the cake is done; it should come out clean or with a few crumbs attached, not wet batter. Cooling Time: Allow the cake to cool in the pan for at least 10 minutes before transferring to a wire rack. This helps prevent the cake from breaking. {{image_2}} You can make this cake even better with fun flavors. Adding lemon zest gives a nice fresh touch. It brightens the flavor and adds a lovely aroma. You can also add chocolate chips for a sweet surprise. The chips melt slightly in the oven, creating pockets of rich chocolate. Try nuts like almonds or walnuts for a nice crunch. They add texture and flavor that pairs well with the buttery cake. While the cake is tasty on its own, frosting can make it shine. A simple glaze made from powdered sugar and lemon juice is a great option. It adds sweetness and a little tang. You could also use a rich chocolate ganache for a more decadent treat. Whipped cream or a cream cheese frosting can be delicious too. Each option gives a new twist to this classic cake. If you need a gluten-free version, it's easy to adapt. Use a gluten-free flour blend in place of all-purpose flour. Make sure the blend includes a binding agent like xanthan gum. This will help the cake rise and hold together well. The texture might change a bit, but it will still taste great. Enjoying this cake is possible for everyone! To keep your classic French butter cake fresh, wrap it tightly. Use plastic wrap or aluminum foil. You can also store it in an airtight container. This helps to keep moisture in and air out. Place it at room temperature, away from direct sunlight. For best results, enjoy it within 3 days. Freezing the cake is easy. First, let it cool completely. Then, slice it into portions if you like. Wrap each piece tightly in plastic wrap. After that, place the wrapped slices in a freezer bag. Be sure to label the bag with the date. The cake can last up to 3 months in the freezer. At room temperature, the cake lasts about 3 days. If you store it in the fridge, it can last up to a week. For frozen cake slices, remember to eat them within 3 months. Always check for signs of spoilage before eating. Enjoying the cake fresh gives you the best taste and texture! A French butter cake is rich and moist. It uses a lot of butter to create flavor. This cake has a fine crumb and a tender texture. It is simple to make, yet it tastes elegant. French butter cakes often have vanilla as a key flavor, enhancing their sweetness. The classic method mixes the butter and sugar until light and fluffy. This technique helps add air to the batter, making it rise beautifully. You can use salted butter, but it may change the taste. Salted butter adds extra salt to the cake. This can affect the balance of flavors. If you choose salted butter, reduce the added salt in the recipe. This way, your cake will still taste great. Unsalted butter is best for precise flavor control in baking. To check if your cake is done, use a toothpick. Insert it into the center of the cake. If it comes out clean, the cake is ready. The cake should be golden brown on top. You can also gently press the surface; it should spring back. If it leaves an indent, it needs more time. Set a timer for 30 minutes and check often. Yes, you can make the batter ahead of time. However, it is best to bake it soon after mixing. If you need to store it, cover the bowl tightly and keep it in the fridge. Use the batter within 24 hours for the best results. If you wait too long, the baking powder may lose its power, affecting the rise. This blog covered the key steps to make a delicious French butter cake. We explored the ingredients, detailed the mixing and baking methods, and shared tips for the perfect texture. I also shared fun variations and storage tips to keep your cake fresh. Whether you try a new flavor or stick to the classic recipe, enjoy your cake! With these clear steps and helpful hints, you’ll bake confidently and create something tasty every time.
    Classic French Butter Cake Irresistible and Simple Recipe
  • Beef Stroganoff is a classic dish that has captured the hearts and taste buds of food lovers across the globe. Originating from Russia, this creamy, savory delight combines tender strips of beef with a rich sauce, typically served over pasta or rice. Its popularity continues to soar, thanks to its comforting flavors and satisfying texture, making it a staple in many households. Among the myriad variations of this beloved dish, Gordon Ramsay's interpretation stands out as a gourmet version that elevates the traditional recipe to new culinary heights.
    Gordon Ramsay's Gourmet Beef Stroganoff Recipe
  • The first step in creating Oreo Bliss Balls is to crush the Oreos into fine crumbs. There are two primary methods for achieving this:
    Oreo Bliss Balls: A Deliciously Simple Treat
  • The origins of the French dip sandwich can be traced back to the early 20th century in Los Angeles, California. The dish consists of a soft French roll filled with thinly sliced roast beef, served with a side of beef broth for dipping. As the sandwich gained popularity, food lovers began to experiment with variations, leading to the creation of the French dip biscuits. Instead of the traditional bread roll, these biscuits provide a fluffy and buttery base that complements the savory filling perfectly.
    Savory French Dip Biscuits: A Delicious Twist on a Classic Favorite
  • To make a tasty homemade vegetable broth, you need fresh vegetables, herbs, and spices. Here’s a list of the key ingredients: - 1 large onion, quartered - 2 carrots, roughly chopped - 2 celery stalks, roughly chopped - 4 cloves garlic, smashed - 1 cup mushrooms, sliced These fresh vegetables give the broth its rich and warm flavor. The onion adds sweetness, while the carrots bring a nice earthiness. The celery offers a crisp taste, and garlic boosts the flavor. Mushrooms add depth and umami. - 1 teaspoon dried thyme - 1 teaspoon dried rosemary - 1 bay leaf These herbs and spices enhance the broth’s aroma and taste. Thyme provides a subtle, herbal note. Rosemary adds a pine-like flavor that brightens the mix. The bay leaf introduces a hint of warmth. - 8 cups water - Salt and pepper to taste Water is the base for your broth. It carries all the flavors from the vegetables and herbs. Seasoning with salt and pepper at the end ensures you achieve the perfect balance of taste. Using fresh, high-quality ingredients makes a big difference. You can customize the flavors with your favorite herbs. Enjoy making this wholesome and flavorful broth! {{ingredient_image_1}} Start by chopping your vegetables. For the onion, cut it into quarters. Roughly chop two carrots and two celery stalks. Smash four cloves of garlic with the side of your knife. Slice one cup of mushrooms. This mix of fresh veggies gives the broth its rich taste. Now, let’s combine the ingredients in a stockpot. Add your quartered onion, chopped carrots, chopped celery, smashed garlic, and sliced mushrooms into the pot. Next, add one teaspoon of dried thyme, one teaspoon of dried rosemary, and one bay leaf. Pour in eight cups of water, making sure all the veggies are submerged. Place the pot on the stove and bring the mixture to a boil over medium-high heat. Once it’s boiling, reduce the heat to low. Let it simmer uncovered for 1.5 to 2 hours. During this time, skim off any foam or impurities that rise to the top. This helps keep your broth clear and clean. After simmering, remove the pot from heat and let it cool slightly. Now, it’s time to strain the broth. Use a fine-mesh sieve or cheesecloth to filter out the solids. Pour the broth into a large bowl or another pot, leaving the solids behind. Finally, season your broth with salt and pepper to taste. Give it a stir and adjust the seasoning as needed. Enjoy your homemade vegetable broth warm. You can also store it in the fridge for up to a week or freeze it for later use. Cooking vegetable broth on the stovetop is simple and rewarding. Follow these steps: 1. Start with a large stockpot. 2. Add 1 quartered onion, 2 chopped carrots, 2 chopped celery stalks, 4 smashed garlic cloves, and 1 cup of sliced mushrooms. 3. Mix in 1 teaspoon of dried thyme and 1 teaspoon of dried rosemary for flavor. 4. Add 1 bay leaf. 5. Pour in 8 cups of water. Make sure all the veggies are covered. 6. Heat the pot on medium-high until it boils. 7. After boiling, lower the heat to let it simmer uncovered for 1.5 to 2 hours. 8. Skim off any foam that forms on top. 9. When done, take the pot off the heat. Let it cool a bit. 10. Strain the broth through a fine-mesh sieve into a bowl. Discard the solids. 11. Season the broth with salt and pepper to your taste. The slow cooker method is great for busy days. It lets the flavors blend well. Here’s how to do it: 1. Place all the same ingredients into your slow cooker. 2. Combine the quartered onion, chopped carrots, chopped celery, smashed garlic cloves, sliced mushrooms, dried thyme, dried rosemary, and bay leaf. 3. Pour in 8 cups of water. 4. Cover and set the slow cooker on low for about 6 to 8 hours. 5. Once finished, strain the broth just like in the stovetop method. 6. Add salt and pepper to taste. The Instant Pot is perfect for a quick broth. It cuts down cooking time. Here’s how to make it: 1. Add the same ingredients into the Instant Pot: onion, carrots, celery, garlic, mushrooms, thyme, rosemary, and bay leaf. 2. Pour in 8 cups of water. 3. Close the lid and set it to high pressure for 30 minutes. 4. Once done, let the pressure release naturally for about 15 minutes. 5. Strain the broth into a bowl and discard the solids. 6. Season with salt and pepper to your taste. Each method gives you a rich and tasty broth. Pick the one that fits your schedule best! Pro Tips Freshness Matters: Using fresh vegetables will greatly enhance the flavor of your broth. Look for vibrant, firm vegetables with no blemishes. Layering Flavors: For a deeper flavor, consider roasting the vegetables before adding them to the broth. This adds a nice caramelized taste. Seasoning Wisely: Add salt gradually and taste as you go. This way, you can control the saltiness of the broth without overpowering the natural vegetable flavors. Storage Savvy: Make sure to let the broth cool completely before storing it. This prevents condensation from forming in the container, which can dilute the flavor. {{image_2}} To boost your vegetable broth, consider adding more flavors. Here are some ideas: - Leeks: They add a mild and sweet taste. - Tomatoes: Use fresh or canned for a rich flavor. - Bell Peppers: They bring a nice sweetness and color. - Corn: Adds a touch of sweetness and creaminess. - Zucchini: A mild, fresh taste that blends well. Feel free to mix and match these ingredients. Each addition can change the broth's taste. Experiment and find what you love! To make perfect broth, steer clear of these common mistakes: - Too much salt: Add salt at the end to control saltiness. - Overcooking: Simmer gently for 1.5 to 2 hours. - Ignoring skim foam: Skim off foam for a clear broth. - Not straining well: Use a fine-mesh sieve to remove solids. These tips help you get a clear and tasty broth. Presentation makes your broth appealing. Here are some tips: - Serve the broth warm in a bowl. - Garnish with fresh herbs like parsley or dill. - Pair it with crusty bread for dipping. - Add a splash of lemon juice for brightness. These small touches enhance the experience of your homemade broth. Enjoy! You can add many veggies to your broth. Seasonal vegetables add more flavor. Use zucchini in summer or butternut squash in fall. Sweet potatoes work well in winter. In spring, try asparagus or peas. The key is to use fresh, local produce when you can. This makes your broth taste even better. This broth is vegan, making it great for all diets. If you want a non-vegan version, add chicken scraps or beef bones. This will give your broth a richer flavor. You can also mix in a bit of fish sauce for depth. Just remember to adjust your seasoning since these options can be salty. Adding spices can change the whole taste. For warmth, try adding a pinch of red pepper flakes or a dash of hot sauce. If you like herbs, toss in some fresh basil or cilantro for a fresh twist. A splash of soy sauce or miso paste can also enrich the flavor. Experiment with different spices to find your favorite mix! To keep your homemade vegetable broth fresh, store it in the fridge. Use clean glass jars or airtight containers. Allow the broth to cool before packing it away. This helps prevent bacteria growth. It’s best to use the broth within a week. Freezing is a great way to extend your broth's life. Pour your cooled broth into freezer-safe bags or containers. Leave some space at the top for expansion. I like to freeze in portions. This way, I can grab just what I need. Label each bag with the date. Homemade vegetable broth can last in the fridge for up to seven days. If you freeze it, it can last for about three months. Always check for any off smells or changes in color before using. If it looks or smells strange, throw it away. Enjoy your broth in soups, stews, or sauces! You learned how to make a flavorful vegetable broth using fresh veggies, herbs, and spices. We covered how to prepare, cook, and store your broth. Remember, you can adjust flavors and try different vegetables based on your taste. Keep in mind the tips to avoid common mistakes and make the perfect broth. Whether you use a stovetop, slow cooker, or Instant Pot, this broth adds warmth to any meal. Enjoy your cooking adventure!
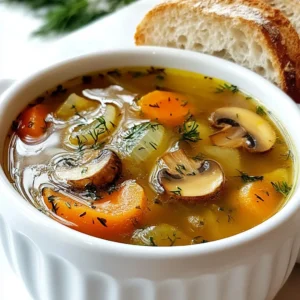
    Homemade Vegetable Broth Nourishing and Flavorful Dish
  • To create the perfect One Pan Parmesan Orzo with Shrimp, it's essential to understand the key ingredients and their roles in this delicious recipe. Each component adds its own unique flavor and nutritional benefit, making this dish a well-rounded meal.
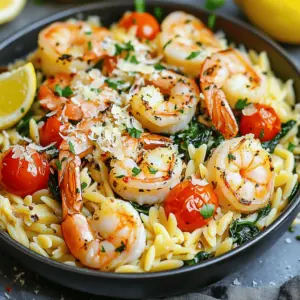
    One Pan Parmesan Orzo with Shrimp: A Quick and Delicious Meal Option
  • When it comes to making fried peanut butter and banana sandwiches, the quality and type of ingredients you choose can significantly influence the final product. Here’s a detailed breakdown of the key components you’ll need for this delicious treat.
    Fried Peanut Butter & Banana Sandwiches: A Delicious Twist on Comfort Food
  • Welcome to a culinary adventure that promises to tantalize your taste buds and elevate your salad game: the Crunchy Asian Delight Chicken Salad. This vibrant dish is a delightful fusion of fresh ingredients and bold flavors, making it a perfect addition to your meal repertoire. Known for its refreshing qualities and satisfying crunch, this salad is not just a side dish but a versatile main course that can suit any occasion—be it a casual family dinner, a potluck gathering, or a light lunch at work.
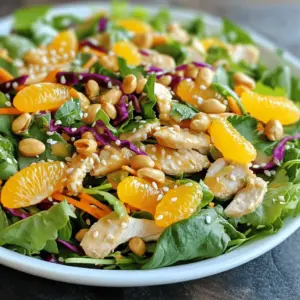
    Crunchy Asian Delight Chicken Salad Recipe
  • As the holiday season approaches, kitchens across the globe begin to fill with the delightful aromas of baking. Among the most beloved treats that grace Italian tables during this time are Crisp & Festive Italian Christmas Cookies. These cookies, renowned for their vibrant colors and rich, buttery flavors, are not just a treat for the taste buds; they also embody the spirit of celebration and joy that characterizes the festive season. Whether you are hosting a holiday gathering or looking for the perfect gift to share with friends and family, these cookies are an excellent choice that will intrigue both children and adults alike.
    Crisp & Festive Italian Christmas Cookies: A Holiday Baking Delight
  • Oxtail, once considered a humble cut of meat, has risen in prominence within the culinary world, celebrated for its rich flavor and exceptional texture. This gelatin-rich cut comes from the tail of cattle and boasts a deep, savory taste that adds depth to any dish, particularly soups and stews. When prepared correctly, oxtail transforms into a melt-in-your-mouth experience that warms not just the body, but the soul.
    Hearty Instant Pot Oxtail Soup: A Comforting Delight
  • In today's health-conscious culinary landscape, salads have transformed from simple side dishes into vibrant, nutrient-packed meals that are both satisfying and delicious. The rising popularity of healthy salads is largely attributed to their versatility and the ability to incorporate a wide range of fresh ingredients that not only taste great but also provide essential nutrients. Among the myriad of salad options, one stands out for its unique flavor profile and visual appeal: the "Green Goddess Meets Underwater King" salad. This delightful recipe harmoniously combines the fresh essence of a classic Green Goddess dressing with the oceanic richness of tuna, creating an exciting dish that is perfect for any occasion.
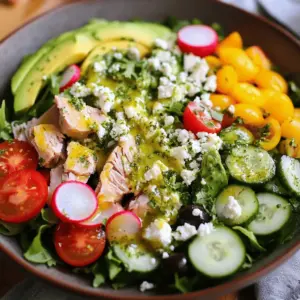
    Green Goddess Meets Underwater King: A Vibrant Tuna Salad Recipe
  • To make Italian Chicken and Zucchini Bake, you need the right ingredients. Here’s what you will use: - 4 boneless, skinless chicken breasts - 2 medium zucchinis, sliced into rounds - 1 cup cherry tomatoes, halved - 1 red bell pepper, diced - 1 onion, sliced - 3 cloves garlic, minced - 1 teaspoon dried oregano - 1 teaspoon dried basil - ½ teaspoon crushed red pepper flakes - 1 cup mozzarella cheese, shredded - ½ cup Parmesan cheese, grated - 2 tablespoons olive oil - Salt and pepper to taste - Fresh basil leaves for garnish (optional) These fresh ingredients create a colorful and tasty dish. The chicken stays juicy, while the veggies add a crunch. The cheeses melt into the bake, giving it a creamy finish. You can adjust the red pepper flakes for spice. Fresh basil adds a pop of flavor if you choose to use it. Each ingredient plays a role in making this meal special. {{ingredient_image_1}} Start by preheating your oven to 400°F (200°C). This step is key for even cooking. A hot oven helps the chicken cook well while giving the veggies a nice roast. Next, grab a large bowl. In it, combine the sliced zucchinis, halved cherry tomatoes, diced red bell pepper, sliced onion, and minced garlic. Drizzle in the olive oil. Then, add the dried oregano, dried basil, crushed red pepper flakes, salt, and pepper. Toss the mixture so every piece gets coated. This blend will add lots of flavor to your bake. Now, take a baking dish and lay out the chicken breasts flat. Season both sides with salt and pepper. This simple step boosts the chicken's taste. Spread the vegetable mixture around the chicken in the dish. It creates a colorful and tasty base. Finally, sprinkle the shredded mozzarella cheese on top, followed by the grated Parmesan cheese. This cheesy layer adds richness to every bite. To get a great bake, start by preheating your oven. Set it to 400°F (200°C). This heat helps the chicken cook well and keeps the veggies tender. Cover the dish with foil for the first part of baking. This step traps moisture and keeps the chicken juicy. After 25 minutes, remove the foil. This lets the cheese get bubbly and brown. Let the bake rest for five minutes before serving. This step helps the juices settle. Mozzarella cheese works well for this dish. It melts nicely and adds a creamy taste. Parmesan cheese offers a sharp flavor that enhances the bake. If you want a twist, try using provolone or fontina. These cheeses can add a unique touch. Make sure to shred or grate the cheese before adding it. This helps it melt evenly throughout the dish. The crushed red pepper flakes add a nice kick. If you like it spicy, keep the amount the same. If you prefer milder flavors, reduce the flakes. You can also add more herbs for extra taste. Fresh herbs like parsley or thyme can work well. Just chop them finely and sprinkle on top before serving. This adds flavor without heat. Pro Tips Use Fresh Ingredients: Opt for fresh, seasonal vegetables for the best flavor and texture in your dish. Marinate the Chicken: For added flavor, marinate the chicken breasts in olive oil, garlic, and herbs for at least 30 minutes before baking. Layering Technique: Ensure an even distribution of vegetables and cheese for a consistent bake and better flavor integration. Resting Period: Allow the dish to rest after baking; this helps the juices redistribute and enhances the overall flavor. {{image_2}} You can change the protein in this dish. Try using turkey breasts or pork chops instead of chicken. Each option brings a unique flavor. If you prefer meatless meals, use chickpeas or lentils. These options add protein without meat. They also soak up the tasty juices. Adjust cooking time if using different proteins. Always check for doneness before serving. Feel free to mix up the veggies. Instead of zucchini, try eggplant or yellow squash. You can also add spinach or kale for extra greens. Carrots or broccoli can give a nice crunch too. Each vegetable adds its own flavor. Just keep the cooking times in mind. Some veggies cook faster than others. You want everything to be tender and tasty. If you want a dairy-free option, skip the cheese. You can use nutritional yeast for a cheesy flavor without dairy. It adds a nice umami taste. Another option is to use a dairy-free cheese substitute. These products melt well in the oven. Check the labels to ensure they fit your needs. This way, everyone can enjoy this tasty dish! After enjoying your Italian Chicken and Zucchini Bake, let it cool. Store leftovers in an airtight container. This keeps the flavors fresh. Place the container in the fridge. It will stay good for about three to four days. Always check for any signs of spoilage before eating. Want to save some for later? You can freeze this dish! First, let it cool completely. Then, wrap it tightly in plastic wrap or foil. Place it in a freezer-safe container. This way, you can enjoy it for up to three months. When you're ready to eat, just thaw it overnight in the fridge. To reheat, preheat your oven to 350°F (175°C). Place the dish in the oven for about 20 minutes. Cover it with foil to keep it moist. You can also use a microwave. Just heat it in short bursts, stirring in between. Make sure it's heated all the way through. Enjoy your delicious meal again! Yes, you can prepare this dish ahead of time. To do this, follow the steps up to arranging the chicken and vegetables in the baking dish. Cover the dish with plastic wrap and place it in the fridge. It can sit there for up to 24 hours. When you are ready to bake, remove it from the fridge, let it warm for about 15 minutes, then bake as directed. This method saves time and is great for meal prep. This dish pairs well with several sides. You might serve it with: - A fresh green salad - Garlic bread for dipping - Steamed rice or quinoa - Pasta tossed in olive oil and garlic These options add variety and complement the flavors of the chicken and zucchini bake. To check if the chicken is done, use a meat thermometer. The chicken should reach an internal temperature of 165°F (75°C). If you don’t have a thermometer, cut into the thickest part of the chicken. The meat should be white, not pink, and the juices should run clear. This ensures that it is safe to eat. This blog post shared a simple and tasty recipe for Italian Chicken and Zucchini Bake. You learned about fresh ingredients, easy steps, and expert tips. You can add your twist with different proteins or veggies. Remember to store any leftovers correctly for later enjoyment. Cooking this dish can be an exciting way to impress your family or friends. Enjoy your culinary adventure and savor every bite of this delicious meal.
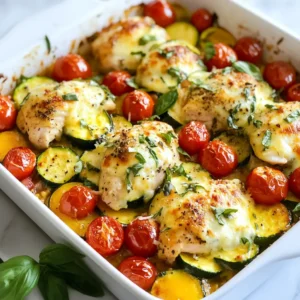
    Italian Chicken and Zucchini Bake Simple and Tasty
  • Are you ready to indulge in a dessert that perfectly marries the rich, creamy texture of cheesecake with the flaky, buttery goodness of crescent rolls? If so, let me introduce you to the delightful Blueberry Cheesecake Crescent Rolls. This innovative dessert takes two beloved treats and combines them into a single, mouthwatering dish that is sure to please any palate.
    Blueberry Cheesecake Crescent Rolls Recipe
  • To make a dreamy vanilla panna cotta, you need a few key items: - 2 cups heavy cream - 1 cup whole milk - 3/4 cup granulated sugar - 2 teaspoons pure vanilla extract - 1 packet (2 1/4 teaspoons) unflavored gelatin - 3 tablespoons cold water These ingredients work together to create a rich and creamy dessert. The heavy cream and whole milk give it a smooth texture. The sugar adds sweetness, while the vanilla brings a lovely flavor. For the berry compote, gather these fresh and vibrant items: - 1 cup mixed berries (strawberries, blueberries, raspberries) - 2 tablespoons honey - 1 tablespoon lemon juice This compote adds a fruity burst to your panna cotta. The berries bring color and natural sweetness. Honey and lemon juice balance the flavors perfectly. To make your panna cotta even more appealing, consider these garnishes: - Fresh mint leaves Adding mint not only looks great but also gives a fresh taste. You can also use extra berries or a dusting of powdered sugar if you like! {{ingredient_image_1}} To start, gather your ingredients. You need heavy cream, whole milk, sugar, and vanilla extract. In a medium saucepan, mix the heavy cream, whole milk, and sugar. Heat this mixture over medium heat. Stir until the sugar dissolves. Make sure it gets warm but does not boil. Once it’s warm, take it off the heat. Next, you need the gelatin. In a small bowl, sprinkle the gelatin over cold water. Let it sit for about 5 minutes. This lets the gelatin bloom. After it blooms, add the gelatin to the warm cream mixture. Stir until the gelatin fully dissolves. Now, mix in the vanilla extract. Pour this mixture into ramekins or a mold. Place them in the fridge for at least 4 hours. This time allows the panna cotta to set. While waiting for the panna cotta to set, let’s make the berry compote. Gather mixed berries, honey, and lemon juice. In a small saucepan, combine the berries, honey, and lemon juice. Cook this mixture over medium heat. Stir it gently for about 5 to 7 minutes. The berries will break down and thicken. Once it thickens, take it off the heat and let it cool. After the panna cotta sets, you are ready to serve. To remove it from the molds, briefly dip the bottom in warm water. Carefully invert it onto a plate. If you used ramekins, you can serve directly in them. Now, spoon a generous amount of berry compote on top. For a final touch, add fresh mint leaves as a garnish. This dessert not only tastes great but looks beautiful too! To get a creamy panna cotta, use quality heavy cream and whole milk. Heat these gently to avoid boiling. Boiling can ruin the smooth texture. When adding gelatin, let it bloom in cold water first. This step helps it dissolve well. Stir the gelatin mixture into the warm cream until fully mixed. Let it chill for at least four hours. This time allows it to set perfectly. One common mistake is not measuring the gelatin correctly. Too much gelatin makes it too firm. Too little leaves it too runny. Be sure to sprinkle it over cold water. Let it sit for five minutes. Another mistake is skipping the chilling time. Panna cotta needs time to firm up. Lastly, avoid boiling the cream mixture. This can cause it to curdle and change texture. To boost the flavor, use pure vanilla extract instead of imitation. You can also add a pinch of salt to balance the sweetness. For a stunning look, serve on a white plate. This makes the glossy panna cotta shine. Drizzle the berry compote artfully on top. Scatter fresh mint leaves around for a pop of color. This not only enhances taste but also makes the dish more appealing. Pro Tips Use Fresh Ingredients: For the best flavor, opt for fresh berries and high-quality vanilla extract. The freshness will enhance the overall taste of the panna cotta. Bloom Gelatin Properly: Ensure that the gelatin is fully bloomed before adding it to the warm mixture. This step is crucial for achieving a smooth, creamy texture. Chill Thoroughly: Allow the panna cotta to set in the refrigerator for at least 4 hours. For best results, overnight chilling is even better to achieve a perfect consistency. Serve with a Twist: Add a splash of citrus zest to the berry compote for an extra layer of flavor. Lemon or orange zest can brighten the dish and complement the sweetness. {{image_2}} You can easily change the flavor of panna cotta. Instead of vanilla, try using almond extract or coffee. You can even add citrus zest for a fresh twist. Infusing the cream with spices like cinnamon or cardamom also works well. Just remember to adjust the amount to keep the taste balanced. The berry compote can be made with many fruits. Instead of mixed berries, use peaches, cherries, or apples. Each fruit adds its own flavor. You can also mix different fruits for a unique taste. Just adjust the sugar based on the fruit's sweetness. This way, you create a compote that suits your palate. If you want a dairy-free or vegan panna cotta, use coconut cream or almond milk. Replace gelatin with agar-agar for a plant-based option. Follow the same steps as the original recipe, ensuring the agar-agar dissolves well. This approach gives you a creamy dessert that everyone can enjoy. To keep your panna cotta fresh, store it in the fridge. Use an airtight container. Cover the top with plastic wrap if you don’t have one. This prevents the panna cotta from absorbing odors. It will stay good for about 3 days. Remember, it’s best served cold. So, avoid leaving it out too long. For berry compote, let it cool first. Then, transfer it to a sealed jar or container. Store it in the fridge for up to a week. To reheat, place it in a small saucepan over low heat. Stir it gently until warm. You can also microwave it in short bursts, stirring in between. This keeps the flavors bright and fresh. Panna cotta has a short shelf life, about 3 days in the fridge. You can freeze it, but the texture may change. If you want to freeze, wrap it tightly in plastic wrap. Then place it in a freezer bag. It can last up to 2 months. To thaw, move it to the fridge overnight. Serve it chilled for the best taste. Yes, you can make panna cotta ahead of time. It actually tastes better when made a day before. Just prepare it and let it set in the fridge for at least 4 hours. You can store it in the fridge for up to 3 days. This way, you save time and stress when serving. Yes, panna cotta is gluten-free. It contains no flour or grains. The main ingredients are heavy cream, milk, sugar, and gelatin. All these ingredients are safe for those who avoid gluten. Always check labels if you buy pre-made products. If you want a lighter option, you can use half-and-half. It won’t be as rich, but it still works. Another option is coconut cream for a dairy-free version. Just chill a can of coconut milk and scoop out the thick part. This will give you a creamy texture and a nice flavor. In this post, we explored each step to make Vanilla Panna Cotta and berry compote. You learned about key ingredients, easy instructions, and tips for great texture. We also covered variations and storage methods to keep your dessert fresh. Remember, panna cotta is versatile and can fit your taste. With the right touches, you can wow your guests. Enjoy creating this beautiful dish that brings joy to any table. Your new dessert skills will impress everyone!
    Delicious Vanilla Panna Cotta with Berry Compote
  • Welcome to the world of crispy, flavorful Bang Bang Shrimp, made effortlessly in an air fryer. This recipe offers a delightful balance of texture and taste, perfect for a quick dinner or an impressive appetizer at your next gathering. With succulent shrimp coated in a crunchy panko crust and tossed in a creamy, spicy Bang Bang sauce, this dish is sure to become a staple in your kitchen. Dive into this article for a comprehensive guide, including preparation, cooking tips, and nutritional insights that make this recipe not just delicious, but also easy to follow.
    Crispy Air Fryer Bang Bang Shrimp: A Deliciously Easy Recipe
  • - 1 lb potato gnocchi - 1 cup fresh spinach, chopped - 1 cup frozen artichoke hearts, thawed and roughly chopped - 1 cup cream cheese, softened - 1 cup sour cream - 1 cup shredded mozzarella cheese - ½ cup grated Parmesan cheese - 2 cloves garlic, minced - 1 teaspoon onion powder - ½ teaspoon chili flakes (optional) - Salt and pepper, to taste - 1 tablespoon olive oil - ½ cup breadcrumbs (for topping) - Fresh parsley, chopped (for garnish) This dish starts with gnocchi, a soft Italian dumpling made from potatoes. It adds a fun texture and fills you up. Next, fresh spinach adds a bright green color and healthy nutrients. Frozen artichokes bring a unique flavor, making this bake special. For the creamy base, we use cream cheese and sour cream. These ingredients make the dish rich and smooth. Mozzarella and Parmesan cheese add a gooey, cheesy topping that melts perfectly in the oven. Seasonings play a big role too. Garlic brings a bold taste, and onion powder adds depth. Chili flakes give a slight kick, but you can skip them if you prefer mild flavors. A bit of salt and pepper rounds out the taste. Finally, we drizzle olive oil for a bit of richness and crisp the top with breadcrumbs. It gives the bake a crunchy texture that contrasts nicely with the creamy filling. Fresh parsley on top adds a pop of color and flavor. Each ingredient shines, making your Spinach Artichoke Gnocchi Bake a true comfort dish. {{ingredient_image_1}} 1. Preheat your oven to 375°F (190°C). This warm temperature helps the dish cook evenly and become bubbly. 2. Boil the gnocchi. In a large pot of boiling salted water, add 1 lb of potato gnocchi. Cook them until they float to the top, about 2-3 minutes. Once done, drain and set aside. Gnocchi are light and fluffy, making them perfect for this dish. 3. Sauté the garlic and spinach. In a skillet, heat 1 tablespoon of olive oil over medium heat. Add 2 cloves of minced garlic and sauté for about 1 minute until you smell the aroma. Then, stir in 1 cup of chopped fresh spinach. Cook for another 2-3 minutes until it wilts. This step brings out the flavors. 4. Mix the cream cheese and other ingredients. In a mixing bowl, combine 1 cup of softened cream cheese, 1 cup of sour cream, 1 teaspoon of onion powder, and ½ teaspoon of chili flakes (if you want some heat). Add half of the shredded mozzarella and grated Parmesan cheese. Season with salt and pepper to taste. This creamy mixture binds everything together. 1. Combine the gnocchi with the vegetable mixture. Gently fold the cooked gnocchi, sautéed spinach, and artichoke hearts into the cream cheese mixture until everything is well coated. This will create a delicious and rich filling. 2. Transfer to the baking dish. Take the gnocchi mixture and pour it into a greased 9x13 inch baking dish. Spread it evenly to ensure even cooking. 3. Top with cheese and breadcrumbs. Sprinkle the remaining mozzarella, Parmesan cheese, and ½ cup of breadcrumbs over the top. This will create a crispy, golden crust when baked. 1. Bake the dish. Place the baking dish in the preheated oven and bake for about 25-30 minutes. You want it to be bubbly and golden on top. 2. Final touches and garnishing. Once done, remove it from the oven and let it sit for 5 minutes. This resting time helps set the dish. Before serving, garnish with freshly chopped parsley for a pop of color and flavor. To cook gnocchi, use a big pot with salted water. Bring it to a boil. When you add the gnocchi, watch for them to float. This means they are ready, usually in about 2-3 minutes. Drain them well to avoid water in your bake. To keep your dish from being too watery, avoid overcooking the spinach. Cook it just until it wilts. Also, make sure to thoroughly drain the artichoke hearts. If needed, you can pat them dry with a paper towel. This helps keep the bake creamy, not soggy. For added flavor, try herbs like basil, oregano, or thyme. Fresh herbs can really lift the dish. You can also add a pinch of nutmeg for warmth. If you want to change the cheese, consider using goat cheese or feta. They give a tangy twist and a different texture. For a creamy feel, cream cheese works great. Mix and match to find your favorite taste! Pro Tips Use Fresh Spinach: Fresh spinach not only adds vibrant color but also enhances the flavor profile of the dish. You can substitute with frozen spinach, but make sure to thaw and drain it well to avoid excess moisture. Perfectly Cooked Gnocchi: Be careful not to overcook the gnocchi. They should be cooked until they float to the top, which indicates they are done. Overcooking can lead to a mushy texture. Customize the Cheese: Feel free to mix different types of cheese based on your preference. Adding a bit of goat cheese or feta can introduce a unique flavor to the dish. Breadcrumb Topping: For an extra crunch, consider using panko breadcrumbs instead of regular breadcrumbs. You can also mix in some herbs or grated Parmesan to elevate the topping. {{image_2}} To make this dish fit your needs, try some swaps. If you need gluten-free options, use gluten-free gnocchi. Many brands offer this choice, so look for one that you like. For those who avoid dairy, you can use cashew cream in place of cream cheese. A dairy-free sour cream is also a good option. Many stores carry these alternatives, making it easy to adapt the dish. You can add more taste to your Spinach Artichoke Gnocchi Bake. For a protein boost, try adding cooked chicken or shrimp. Simply cook the protein separately and mix it in with the gnocchi and veggies. This way, you get a heartier meal. You can also toss in other vegetables. Bell peppers, mushrooms, or even zucchini work great. Just chop them up and sauté them with the spinach and garlic. This adds color and flavor to your dish. Feel free to experiment with your favorite veggies! After you enjoy your Spinach Artichoke Gnocchi Bake, store any leftovers in an airtight container. This keeps the dish fresh and tasty. Place it in the fridge as soon as it cools. It will stay good for about 3 to 4 days. You can freeze the unbaked dish for later. To do this, prepare the gnocchi mixture as normal but don’t bake it. Instead, cover it tightly with plastic wrap and foil. This helps prevent freezer burn. It can last up to 2 months in the freezer. When you're ready to eat, thaw it in the fridge overnight. Bake it as usual, but add an extra 10 minutes to the baking time. Check the center to ensure it's hot and bubbly. Enjoy your comforting dish again! Yes, you can prepare this dish ahead of time. Cook the gnocchi and mix it with the spinach and artichoke blend. Then, place it in a baking dish. Cover it and store in the fridge. You can bake it the next day. Just add a few extra minutes to the baking time. This dish pairs well with a light salad. A fresh green salad with a vinaigrette is a great choice. You might also enjoy garlic bread on the side. It complements the creamy texture of the bake. The dish is ready when the top is golden and bubbly. You can check it by inserting a knife in the center. If it comes out hot, the dish is done. Let it cool for a few minutes before serving. This helps the flavors settle. This blog post covered a delicious Spinach Artichoke Gnocchi Bake. We explored key ingredients like gnocchi, creamy cheeses, and tasty seasonings. I provided step-by-step instructions that make cooking easy and enjoyable. You learned valuable tips to enhance flavor and storage advice for leftovers. Cooking this dish lets you experiment with unique variations. Have fun adding your favorite proteins or veggies. This meal is perfect for gatherings or a cozy night in. Enjoy every bite and share it with loved ones.
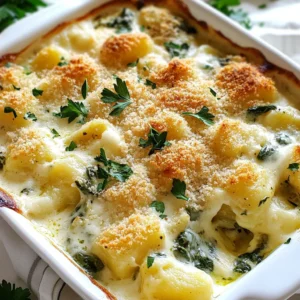
    Spinach Artichoke Gnocchi Bake Savory Comfort Dish
  • When it comes to comforting home-cooked meals, few dishes embrace the essence of warmth and satisfaction quite like Garlic Butter Chicken Bites with Creamy Parmesan Pasta. This recipe takes two beloved staples—chicken and pasta—and elevates them with the rich flavors of garlic butter and creamy Parmesan, resulting in a dish that is not only delightful but also incredibly satisfying.
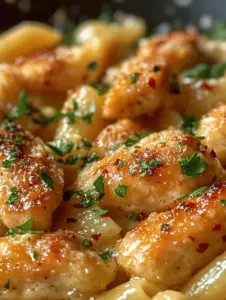
    Savor the Flavor: Garlic Butter Chicken Bites with Creamy Parmesan Pasta
  • In the realm of home cooking, few dishes can rival the allure of a perfectly cooked pork tenderloin. This cut of meat, renowned for its tenderness and flavor, serves as the star of our recipe for Savory Pork Tenderloin with Creamy Mustard Sauce. This dish is not only a feast for the senses but also a versatile choice that can elevate both weekday dinners and special gatherings. The harmonious blend of succulent pork and a rich, tangy mustard sauce creates a memorable culinary experience that will impress your family and guests alike.
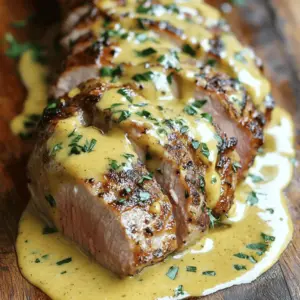
    Savory Pork Tenderloin with Creamy Mustard Sauce: A Culinary Delight for Any Occasion

Posts pagination

← Newer 1 … 49 50 51 52 53 … 66 Older →

Footer

↑ back to top

More information

  • Drinks
  • Appetizer
  • Dinner
  • Desserts
  • About
  • Contact
  • Privacy Policy

Our Policies

  • Privacy Policy
  • GDPR Policy
  • Terms Of Use
  • Copyright Policy
  • Cookie Policy
  • Disclaimer

Copyright © 2025 cheftaling