• Home
  • Recipe Index
    • Desserts
    • Dinner
    • Appetizer
    • Drinks
  • About
  • Contact
  • Privacy Policy
menu icon
go to homepage
  • Home
  • Recipe Index
    • Desserts
    • Dinner
    • Appetizer
    • Drinks
  • About
  • Contact
  • Privacy Policy

search icon
Homepage link
  • Home
  • Recipe Index
    • Desserts
    • Dinner
    • Appetizer
    • Drinks
  • About
  • Contact
  • Privacy Policy

×
Taling

Taling

Chef Taling is the creator and culinary voice behind Taling’s Recipes, an online hub where she turns her lifelong love of food into step-by-step dishes home cooks can trust.

Her journey began in her grandmother’s kitchen, soaking up the aromas of spices and the joy of shared meals an experience that sparked a passion for exploring global flavors and recreating them for friends, family, and now a worldwide audience.

  • - 4 chicken thighs, bone-in and skin-on - 1 tablespoon olive oil - 2 tablespoons fresh lemon juice - Zest of 1 lemon - 4 cloves garlic, minced - 1 teaspoon dried oregano - 1 teaspoon dried thyme - 1 teaspoon paprika - Salt and pepper to taste - Fresh parsley, chopped (for garnish) Choosing quality chicken thighs When picking chicken thighs, look for fresh, plump pieces. They should have a nice sheen. Choose thighs that are bone-in and skin-on for the best taste. The skin adds flavor and keeps the meat juicy. Importance of fresh herbs vs. dried Using fresh herbs can really boost your dish. Fresh lemon juice and zest give a bright flavor. Dried herbs are great for quick cooking, but they may not have the same pop as fresh. If you can, use fresh oregano and thyme for the best taste. They make all the difference in your lemon herb roasted chicken thighs! {{ingredient_image_1}} To start, gather your ingredients. In a large bowl, combine: - 1 tablespoon olive oil - 2 tablespoons fresh lemon juice - Zest of 1 lemon - 4 cloves garlic, minced - 1 teaspoon dried oregano - 1 teaspoon dried thyme - 1 teaspoon paprika - Salt and pepper to taste Mix well to create a bright and flavorful marinade. For the best flavor, use fresh lemon juice and zest. This will give your chicken a zesty kick. Fresh herbs also help boost the taste. If you can, use fresh thyme and oregano instead of dried. Now it's time to marinate the chicken. Add the chicken thighs to the marinade. Make sure each piece is well coated. For great flavor, marinate for at least 30 minutes. If you have time, let it sit in the fridge for up to 2 hours. This extra time lets the flavors soak into the meat. If you're short on time, even a quick 30-minute marinate will still taste great! Preheat your oven to 425°F (220°C). This high heat helps crisp the skin. Place the marinated chicken thighs skin-side up in a baking dish. Roast the chicken for 35-40 minutes. You want the internal temperature to reach 165°F (75°C). The skin should be golden brown and crispy. To check doneness, use a meat thermometer. This will help ensure you don’t overcook the chicken. Let the chicken rest for 5 minutes after taking it out. This step helps keep it juicy. Enjoy your delicious, lemon herb roasted chicken thighs! To make sure your chicken thighs are juicy and tender, check the internal temperature. Use a meat thermometer. Insert it into the thickest part of the thigh. When it reads 165°F (75°C), your chicken is done. This step helps avoid undercooked meat. It also prevents dry chicken thighs. To keep your chicken moist, don't rush the cooking. Roast at 425°F (220°C) for 35-40 minutes. Let the thighs rest for 5 minutes after cooking. This helps the juices redistribute. You can mix up the herbs and spices to fit your taste. Try fresh rosemary or basil for a twist. You can also add a pinch of red pepper flakes for heat. For more zest, add extra lemon juice or a splash of vinegar. This adds brightness to your dish. Pair your lemon herb chicken thighs with tasty sides. Roasted vegetables, rice, or a fresh salad work well. For garnish, sprinkle fresh parsley on top. This adds color and a fresh taste. You can also serve with lemon wedges for a zesty touch. Pro Tips Marinate Longer for Flavor: For an even more flavorful chicken, marinate the thighs for up to 2 hours or overnight in the refrigerator. Pat the Skin Dry: Before marinating, pat the chicken skin dry with paper towels to achieve a crispier skin when roasting. Use Fresh Herbs: If available, substitute dried herbs with fresh ones for a vibrant flavor boost; just double the amount when using fresh. Let it Rest: Allow the chicken to rest for about 5 minutes after roasting; this helps the juices redistribute for a juicier bite. {{image_2}} You can make lemon herb chicken thighs in a rotisserie style. This method gives a juicy and tender finish. Start by marinating your thighs as usual. Then, use a rotisserie attachment on your grill or oven. Cook them slowly, turning every few minutes. This ensures even cooking and crispy skin all around. Aim for an internal temperature of 165°F. You will love the rich flavor and juicy meat. If you want some heat, try adding spices. Mix cayenne pepper or red pepper flakes into the marinade. Start with half a teaspoon and adjust to your taste. The spice will balance well with the lemon's brightness. This twist makes the dish exciting and flavorful. Serve it with cooling sides like yogurt or cucumber salad to balance the heat. For a simple dinner, make a one-pan meal. Add chopped vegetables like potatoes, carrots, or bell peppers to the baking dish. Toss them with olive oil, salt, and pepper. Place the marinated chicken on top. The veggies soak up the chicken's flavors while they roast. This method cuts down on cleanup and gives a colorful, tasty meal. Enjoy the mix of flavors and textures in every bite. To keep your Lemon Herb Roasted Chicken Thighs fresh, place them in an airtight container. You can store them in the fridge for up to three days. Make sure the chicken cools down to room temperature before sealing it. This helps prevent moisture buildup. When you reheat chicken thighs, the goal is to keep them juicy. Preheat your oven to 350°F (175°C). Place the chicken on a baking sheet. Cover it with foil to maintain moisture. Heat for about 15 to 20 minutes. This way, the skin stays crispy and the meat stays tender. To freeze your chicken thighs, wrap each piece tightly in plastic wrap. Then, place them in a freezer bag. They can last up to three months in the freezer. To thaw, move the chicken to the fridge overnight. This keeps the texture nice. Never thaw chicken at room temperature, as this can cause bacteria to grow. You should marinate chicken thighs for at least 30 minutes. This allows the flavors to soak in. If you want more flavor, marinate them for up to 2 hours in the fridge. The longer they sit, the better they taste. Just don’t go over 2 hours, or the chicken may become too salty. Yes, you can use bone-in chicken breasts. They will cook a bit differently, though. Chicken breasts are leaner than thighs. This means they can dry out faster. Keep an eye on the cooking time. Use a meat thermometer to check for doneness. The internal temperature of chicken thighs should reach 165°F (75°C). This ensures the chicken is safe to eat. Use a meat thermometer to check the thickest part of the thigh. Once it hits that temperature, your chicken is ready to enjoy! This post covered everything you need for tasty chicken thighs. We looked at the best ingredients, like chicken, herbs, and spices. I shared tips on marinating and roasting for flavor and texture. You learned how to store leftovers and reheat them. As you try these recipes, keep experimenting with flavors and methods. Enjoy the process and make it your own! Your kitchen adventures can lead to delicious meals. Happy cooking!
    Lemon Herb Roasted Chicken Thighs Simple and Tasty
  • To make garlic butter steak bites, gather these key ingredients: - 1 lb beef sirloin, cut into 1-inch cubes - 4 tablespoons unsalted butter - 4 cloves garlic, minced - 1 teaspoon fresh rosemary, chopped - 1 teaspoon fresh thyme leaves - Salt and pepper to taste - Fresh parsley, chopped (for garnish) - Lemon wedges (for serving) These ingredients come together to create a dish that is both rich and flavorful. The beef sirloin offers a tender bite, while the garlic and herbs bring a burst of taste. You can add more flair with optional seasonings and garnishes: - A pinch of red pepper flakes for heat - A splash of Worcestershire sauce for depth - Grated Parmesan cheese for a savory finish These options let you customize the dish to your liking. Feel free to experiment and find what works best for you. While sirloin is great, you can try other cuts for varied flavor: - Ribeye for a fattier, more flavorful bite - Tenderloin for a melt-in-your-mouth experience - Flank steak for a leaner, chewier texture Choosing the right cut can elevate your dish. Each type of steak brings its own unique taste and texture, so pick one that fits your preference. {{ingredient_image_1}} Start by cutting 1 pound of beef sirloin into 1-inch cubes. This size helps the meat cook evenly. Next, season the cubes with salt and pepper. Be generous! This step adds flavor to every bite. Set the beef aside while you heat the skillet. Heat 2 tablespoons of unsalted butter in a large skillet over medium-high heat. Wait until the butter is sizzling. Then, add the beef cubes in a single layer. If your pan is small, cook in batches. Sear the meat for 2-3 minutes on each side. You want a nice brown crust. Once done, remove the steak bites from the pan and set them aside. In the same skillet, lower the heat to medium. Add the remaining 2 tablespoons of butter. Then, add 4 minced garlic cloves, 1 teaspoon of chopped rosemary, and 1 teaspoon of thyme leaves. Sauté for 1-2 minutes. Watch the garlic closely so it does not burn. When the kitchen smells great, return the steak bites to the skillet. Toss them in the garlic butter sauce to coat. Cook for an additional 1-2 minutes to heat everything through. Serve right away, garnished with chopped parsley and lemon wedges on the side. Enjoy your meal! To get tender steak bites, start with good quality beef. I prefer sirloin because it is juicy and flavorful. Cut the beef into 1-inch cubes to help it cook evenly. When you sear, make sure your pan is hot. This helps to lock in the juices. Sear for 2-3 minutes on each side. This gives a nice crust while keeping the inside tender. To avoid overcooking, keep an eye on the time. Use a meat thermometer if you have one. For medium-rare, aim for 130°F. Remove the steak from the pan when it's a bit underdone. It will continue to cook when you let it rest. If you work in batches, it helps keep the heat up. Don't crowd the pan; this keeps the temperature steady. Garlic can burn easily, so be careful. After cooking the steak, lower the heat before adding garlic. Add minced garlic to the melted butter and sauté for just 1-2 minutes. Stir often to keep it from sticking or burning. You want the garlic to become fragrant, not brown. This will give your steak bites a rich flavor. Pro Tips Rest the Meat: Allow the steak bites to rest for a few minutes after cooking. This helps the juices redistribute, ensuring a more flavorful and tender bite. High Heat Sear: Use high heat to sear the steak. This creates a nice crust, adding flavor and texture. Avoid moving the meat around too much while it's searing. Fresh Herbs Matter: Using fresh herbs like rosemary and thyme enhances the flavor of the garlic butter. Dried herbs can be a substitute but may not provide the same depth of flavor. Garnish Wisely: Finish with a sprinkle of fresh parsley for color and freshness. It brightens the dish and complements the rich garlic butter. {{image_2}} You can switch up the ingredients to add your own twist. Try using different herbs like oregano or basil. Instead of sirloin, use ribeye for a richer taste. You can also add some heat with red pepper flakes or a splash of hot sauce. For a smoky flavor, try adding smoked paprika. Each change can create a new flavor profile. Grilling gives a nice char to your steak bites. Preheat your grill to medium heat. Place the beef on skewers for easy flipping. Grill for 2-3 minutes on each side. Broiling is another great option. Set your oven to broil and place the steak bites on a baking sheet. Broil for about 3-4 minutes per side. Both methods add unique flavors to your dish. To elevate your garlic butter steak bites, serve them with different sides. Try creamy mashed potatoes or a fresh salad. You can also serve them with crusty bread to soak up the garlic butter sauce. For a fun twist, top with crumbled blue cheese or a drizzle of balsamic glaze. These options will make your meal even more exciting. After enjoying your garlic butter steak bites, store any leftovers in an airtight container. This keeps the flavors fresh and prevents the meat from drying out. Let the steak bites cool to room temperature before sealing them. Place the container in the fridge. They will stay good for up to three days. When you’re ready to enjoy leftovers, the best way to reheat them is in a skillet. Heat a little butter over medium heat. Add the steak bites and gently warm them. Stir occasionally to avoid burning. This method keeps the steak juicy and flavorful. You can also use a microwave, but it may dry out the meat. Heat on low power for 30 seconds at a time until warm. If you want to save steak bites for later, freezing works well. First, cool the bites completely. Then, place them in a freezer-safe bag. Remove as much air as possible to prevent freezer burn. Label the bag with the date. You can freeze them for up to three months. To thaw, move the bag to the fridge overnight. Reheat as mentioned above for the best taste. You can use cuts like ribeye or tenderloin. These cuts are tender and flavorful. They work great for steak bites. You can also try flank steak or sirloin tip. They are tasty too, but may need a little more care when cooking. Yes, you can prepare the steak bites ahead. Cook them and store in the fridge. They will keep for about three days. Just reheat before serving. You can also make the garlic butter ahead. Store it in the fridge and warm it up when ready. Many sides go well with steak bites. You can serve them with mashed potatoes or rice. Roasted vegetables also make a great choice. A fresh salad adds a nice crunch. Garlic bread is always a hit too! To add spice, use crushed red pepper flakes. You can mix them into the garlic butter. Another option is to add sliced jalapeños when cooking. For a smoky flavor, try smoked paprika. Adjust the spice to your taste for the best flavor! Garlic butter steak bites are easy and fun to make. You learned about key ingredients, cooking steps, and tips to avoid mistakes. I explained how to customize flavors and serve them well. Proper storage ensures you can enjoy leftovers later. Remember, great meals come from simple steps and a bit of care. Try these methods and have delicious steak bites ready to impress. Happy cooking!
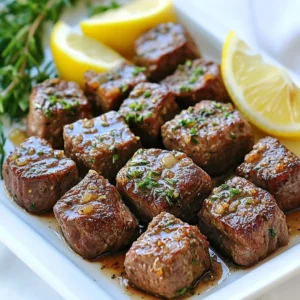
    Garlic Butter Steak Bites Savory and Tender Delight
  • To make these tasty cookies, you need some key ingredients: - 1 cup rolled oats - 1 cup all-purpose flour - 1/2 teaspoon baking soda - 1/2 teaspoon cinnamon - 1/4 teaspoon salt - 1/2 cup unsalted butter, softened - 1/2 cup brown sugar, packed - 1/4 cup honey - 1 large egg - 1 teaspoon vanilla extract These ingredients create a chewy texture. The oats give a hearty feel, while honey adds natural sweetness. You can make your cookies even better with some add-ins: - 1/2 cup raisins or chocolate chips (optional) - 1/2 cup chopped nuts (e.g., walnuts or pecans, optional) Raisins bring a hint of chewiness, and nuts add a nice crunch. Chocolate chips make everything sweeter, and you can mix and match! If you need substitutions, there are many options: - Use gluten-free flour instead of all-purpose flour for a gluten-free version. - Replace the egg with 1/4 cup of applesauce for a vegan choice. - Swap honey with maple syrup if you want a different flavor. These changes allow you to make cookies fit your needs. Enjoy experimenting and find what works best for you! {{ingredient_image_1}} Start by gathering your ingredients. You need rolled oats, flour, baking soda, cinnamon, salt, butter, brown sugar, honey, an egg, and vanilla extract. If you want, add raisins, chocolate chips, or nuts. 1. Preheat your oven to 350°F (175°C). Line a baking sheet with parchment paper. 2. In a medium bowl, mix the oats, flour, baking soda, cinnamon, and salt. Stir these until they blend well. 3. In a large bowl, cream the softened butter and brown sugar. Beat until it looks smooth and fluffy. 4. Add honey, the egg, and vanilla extract. Mix these together till smooth. 5. Gradually add the dry mix. Stir just until combined. Do not overmix. 6. If you choose, fold in raisins, chocolate chips, or nuts. 1. Use a tablespoon to scoop portions of the dough. Place them on the baking sheet. Leave space between each scoop for spreading. 2. Bake for 10-12 minutes. Watch for the edges to turn golden brown. The centers can look soft but will firm up as they cool. 3. For best results, rotate your baking sheet halfway through. This helps cookies bake evenly. 1. When done, take the cookies out of the oven. Let them cool on the baking sheet for 5 minutes. 2. After that, transfer them to a wire rack. Allow them to cool completely. 3. Serve these cookies on a pretty plate. Drizzle honey on top for extra sweetness. A sprinkle of powdered sugar also looks nice. Enjoy your warm and chewy cookies! To make the best honey oatmeal cookies, focus on the butter. Use softened butter, not melted. Creaming the butter and brown sugar helps create a light texture. Don't overmix your dough. Mix until just combined for chewy cookies. Bake them until the edges are golden but the centers seem soft. They will firm up as they cool. One mistake is not preheating the oven. Always preheat to 350°F (175°C). This helps the cookies bake evenly. Another issue is using the wrong flour. All-purpose flour works best for this recipe. Lastly, avoid crowding the baking sheet. Leave space between cookies to allow for spreading. Store leftover cookies in an airtight container. They stay fresh for about a week. If you want to keep them longer, freeze them. Just place them in a freezer-safe bag. To thaw, leave them at room temperature for a few hours. Enjoy your cookies soft and chewy again! Pro Tips Chill the Dough: For even chewier cookies, refrigerate the dough for at least 30 minutes before baking. This helps to prevent spreading and enhances the flavor. Use Fresh Ingredients: Ensure your baking soda and spices are fresh for the best flavor and texture. Old ingredients can lead to flat or bland cookies. Customize Your Add-ins: Feel free to experiment with various mix-ins like dried fruits, seeds, or different types of chocolate to suit your taste preferences. Perfect Storage: Store cookies in an airtight container at room temperature for up to a week. For longer freshness, freeze them in a single layer and transfer to a container once solid. {{image_2}} You can make these cookies healthier with some simple swaps. Instead of all-purpose flour, try using whole wheat flour. This adds fiber and nutrients. You can also replace some butter with unsweetened applesauce. This change cuts fat and adds moisture. Using less brown sugar can also help. Try just a third of a cup to reduce sugar while still keeping sweetness. Add-ins can change the flavor of your cookies in fun ways. Instead of raisins, try dried cranberries or cherries for a tart touch. For a nutty flavor, use chopped almonds or pecans. You can also mix in dark chocolate chips for a rich taste. If you want a spice kick, add a pinch of nutmeg or ginger. These add-ins make each batch unique and fun to explore. Seasonal changes inspire great variations. In fall, add pumpkin spice and chopped apples for a cozy vibe. During winter, mix in peppermint chips for a festive flair. In the summer, fresh berries can give a bright burst of flavor. These seasonal twists let you enjoy honey oatmeal cookies all year round. Each season brings a new taste adventure! Each Honey Oatmeal Cookie has about 100 calories. This number can change based on the add-ins you choose. If you use chocolate chips or nuts, the calories may go up a bit. To keep track, you can divide the total calories by the number of cookies you bake. These cookies have oats, which are good for heart health. Oats can help lower bad cholesterol. Honey gives a natural sweetness and has antioxidants. It can also help soothe a sore throat. Brown sugar adds flavor but is less processed than white sugar. Using nuts can add healthy fats and protein, making the cookies more filling. You can cut sugar by using less brown sugar or honey. Replace some of the sugar with mashed bananas or applesauce. This change keeps cookies moist and sweet. You can also try using whole wheat flour for more fiber. If you skip the raisins or chocolate chips, you lower the calories too. To make these cookies vegan, swap the butter for a plant-based option. Use coconut oil or vegan butter. Replace the egg with a flax egg. To make a flax egg, mix one tablespoon of ground flaxseed with two and a half tablespoons of water. Let it sit for five minutes until it thickens. You can still use honey, but for a fully vegan cookie, substitute it with maple syrup or agave nectar. If you want to skip the eggs, use a flax egg or applesauce. A quarter cup of unsweetened applesauce works great in place of one egg. You can also use mashed banana or yogurt as alternatives. Each option adds moisture and keeps your cookies chewy. Yes, you can freeze these cookies! After baking, let them cool completely. Place the cookies in an airtight container or a freezer bag. They will last for about three months. To enjoy later, thaw them overnight in the fridge or microwave them for a few seconds. They will taste fresh and delightful! In this article, we explored how to make delicious honey oatmeal cookies. We covered key ingredients, step-by-step instructions, and tips for success. You can try different flavors and healthier swaps to suit your taste. Remember to avoid common mistakes for the best texture. Finally, enjoy these cookies fresh or store them well for later. Each bite offers great taste and health benefits that you can feel good about.
    Honey Oatmeal Cookies Comforting and Chewy Delight
  • To make your blondies, you need simple yet tasty items: - 1 cup unsalted butter - 1 cup packed brown sugar - 1/2 cup granulated sugar - 2 large eggs - 1 teaspoon vanilla extract - 2 cups all-purpose flour - 1 teaspoon baking powder - 1/2 teaspoon baking soda - 1/4 teaspoon salt - 1 cup chocolate chips (semisweet or milk) - 1/2 cup chopped nuts (optional, like walnuts or pecans) Each ingredient plays a key role. The butter gives rich flavor. The sugars add sweetness and texture. Eggs bind everything together. Flour gives structure. Baking powder and baking soda help them rise. You can take your blondies up a notch with some fun add-ins! Here are some ideas: - 1/2 cup of shredded coconut for a tropical flair - 1/2 cup of dried fruit like cranberries or apricots for a chewy bite - A sprinkle of sea salt on top to enhance sweet flavors These add-ins let you customize your blondies. You can make each batch unique and exciting. If you need to swap some items, here are great options: - Use coconut oil instead of butter for a dairy-free treat - Replace all-purpose flour with oat flour for a gluten-free option - Try maple syrup in place of granulated sugar for a deeper flavor These substitutions will still give you delicious blondies. You can enjoy them no matter your dietary needs. {{ingredient_image_1}} Start by preheating your oven to 350°F (175°C). Line a 9x13 inch baking pan with parchment paper. Leave some paper over the sides to help lift out the blondies later. In a medium saucepan, melt one cup of unsalted butter over medium heat. Stir it often. Cook until the butter turns a golden brown and smells nutty. This takes about 5 to 7 minutes. Be careful not to burn it. After that, pour the browned butter into a mixing bowl and let it cool for a few minutes. Once cooled, mix in one cup of packed brown sugar and half a cup of granulated sugar. Stir until the mix is smooth. Add two large eggs, one at a time, mixing well after each egg. Next, stir in one teaspoon of vanilla extract. In another bowl, whisk together two cups of all-purpose flour, one teaspoon of baking powder, half a teaspoon of baking soda, and a quarter teaspoon of salt. Gradually add this dry mix to the wet ingredients, stirring until just combined. Be careful not to overmix. Finally, gently fold in one cup of chocolate chips and half a cup of chopped nuts, if you like. Now, pour the batter into your prepared baking pan. Spread it out evenly. Place the pan in the oven and bake for 20 to 25 minutes. The edges should look lightly golden. To check if they are done, insert a toothpick in the center. If it comes out with a few moist crumbs, your blondies are ready! After baking, let the blondies cool in the pan for about 10 minutes. Use the parchment paper to lift them out. Move them to a wire rack to cool completely. Once cool, cut them into squares. Enjoy your chewy brown butter blondies! To get that chewy texture, don’t overmix your batter. Mix just until the flour disappears. Adding brown sugar helps keep your blondies moist and chewy. The brown butter also adds richness that boosts the chewiness. Finally, let them cool before cutting. This helps them set and hold their shape. Brown butter is key to making these blondies shine. Melt your butter slowly over medium heat. Keep stirring until it turns a beautiful golden brown. You’ll know it’s done when it smells nutty. This process adds a deep, rich flavor that makes your blondies special. Remember to let it cool before mixing it with sugar and eggs. One common mistake is not measuring ingredients correctly. Use a kitchen scale for accuracy if you can. Another mistake is opening the oven door too soon. This can cause the blondies to sink. Always check for doneness with a toothpick. It should come out with a few moist crumbs, not wet batter. Avoiding these mistakes will help you bake perfect blondies every time. Pro Tips Use Fresh Ingredients: Always use fresh eggs and quality chocolate chips for the best flavor and texture in your blondies. Don't Overmix: When combining the wet and dry ingredients, mix just until combined to maintain a chewy texture. Cool Before Cutting: Allow the blondies to cool completely before cutting to ensure clean edges and prevent them from falling apart. Experiment with Mix-ins: Feel free to add your favorite mix-ins like dried fruit or different types of nuts for a unique twist on the classic blondie. {{image_2}} If you want nut-free blondies, simply skip the nuts. You can still enjoy a chewy texture and rich flavor. The chocolate chips will add enough sweetness. If you like, add a bit more flour to keep the texture nice. This way, those with nut allergies can enjoy this treat too! You can change the flavor of your blondies easily. Adding spices like cinnamon or nutmeg gives a warm taste. A teaspoon of almond extract can add a nice twist. Want a tropical touch? Add some shredded coconut. These small changes can create a whole new dessert experience. Taste buds will thank you! Using different types of chocolate is simple. If you love dark chocolate, swap in dark chocolate chips. They will give a richer flavor. For a sweeter treat, use white chocolate chips. You can even mix them for a fun blend. Each type of chocolate brings its own magic to these blondies. Enjoy experimenting! To keep your chewy brown butter blondies fresh, store them in an airtight container. This helps keep them soft and chewy. Place parchment paper between layers to prevent sticking. Store them at room temperature for up to five days. If you want them to last longer, the fridge can work too. Just know that cold blondies may lose some chewiness. Freezing blondies is easy and a smart choice. Start by letting them cool completely. Once cool, cut them into squares. Wrap each square in plastic wrap. Then, place the wrapped blondies in a freezer bag. They can stay in the freezer for up to three months. When you’re ready to enjoy, simply take one out and let it thaw at room temperature. If you want to warm up your blondies, the oven is best. Preheat your oven to 350°F (175°C). Place the blondies on a baking sheet for about 5-10 minutes. This warms them and brings back their chewy texture. You can also use a microwave. Heat them for about 10-15 seconds. Be careful not to overheat; you want them warm, not hot. Enjoy every bite! Blondies and brownies look alike, but they taste very different. Blondies use brown sugar, while brownies use cocoa powder. That gives blondies a sweet, butterscotch flavor. Brownies have richer chocolate flavor. The texture is also different. Blondies are chewy and soft, while brownies can be fudgy or cake-like. To check if your blondies are done, look at the edges. They should be lightly golden. Insert a toothpick in the center. If it comes out with a few moist crumbs, they are ready. If it comes out wet with batter, bake them a bit longer. This usually takes about 20 to 25 minutes. You can use margarine, but it will change the flavor a bit. Butter gives blondies a rich taste. Margarine may not brown like butter, which adds a nutty flavor. If you need to use margarine, choose one that has a higher fat content for better results. In this post, I covered key ingredients for chewy brown butter blondies and helpful tips for baking. You learned how to prepare the batter, bake your blondies, and cool them properly. I shared storage tips and answered common questions about blondies. Brown butter adds a rich taste you will love. Baking is fun, so don’t be afraid to try new flavors. Enjoy your blondies and share with friends.
    Chewy Brown Butter Blondies Perfectly Delicious Treat
  • To create a tasty creamy tomato basil tortellini soup, you need simple yet fresh ingredients. Each one adds to the warmth and flavor of the dish. Here’s the list of what you will need: - 2 tablespoons olive oil - 1 medium onion, diced - 3 cloves garlic, minced - 1 can (28 oz) crushed tomatoes - 3 cups vegetable broth - 1 teaspoon dried oregano - 1 teaspoon dried basil - 1/2 teaspoon red pepper flakes (optional) - 2 cups fresh spinach, chopped - 1 package (9 oz) cheese tortellini - 1 cup heavy cream - Salt and pepper to taste - Fresh basil leaves for garnish Each ingredient brings unique flavors. The olive oil helps to sauté the onion and garlic, giving a rich base. Onions add sweetness, while garlic brings warmth. Crushed tomatoes form the soup's heart, creating a vibrant red color. Vegetable broth enhances the overall flavor and adds depth. Dried herbs like oregano and basil give an aromatic boost. If you like a kick, red pepper flakes add a nice touch. Fresh spinach not only adds color but also a healthy element. Cheese tortellini brings a satisfying texture, while heavy cream makes it rich and creamy. Season with salt and pepper to taste, and finish with fresh basil leaves for a bright garnish. These ingredients work together to make a dish that is cozy and full of flavor. Enjoy cooking this delightful soup! {{ingredient_image_1}} - Sautéing onion and garlic Start by heating 2 tablespoons of olive oil in a large pot over medium heat. Add 1 medium diced onion. Cook the onion for about 5 minutes until it turns translucent. Next, stir in 3 cloves of minced garlic. Cook for another 1-2 minutes until the garlic smells great. - Adding tomatoes and broth Pour in 1 can of 28-ounce crushed tomatoes and 3 cups of vegetable broth. This mix gives the soup its rich base. Add 1 teaspoon of dried oregano, 1 teaspoon of dried basil, and 1/2 teaspoon of red pepper flakes if you like some heat. Stir everything together and bring it to a simmer. - Incorporating seasoning After the soup simmers, taste it and adjust the seasoning. You can add more salt or pepper based on your preference. This is key to a full flavor. - Cooking spinach and tortellini Now, add 2 cups of chopped fresh spinach and a package of 9-ounce cheese tortellini. Cook according to the package instructions, usually about 5-7 minutes. Make sure the tortellini is al dente for the best texture. - Adding heavy cream and final seasoning Reduce the heat to low and gently stir in 1 cup of heavy cream. This will make the soup creamy and rich. Warm it through, but avoid boiling. Taste once more and add salt and pepper if needed. Serve hot, garnished with fresh basil leaves. This soup will warm you up and delight your taste buds! - Best practices for sautéing: Start with a hot pot. Add olive oil first and let it heat. Then, add the diced onion. Sauté until it turns clear, about five minutes. This step builds a strong flavor base. - How to avoid curdling cream: To prevent curdling, always add cream at low heat. Never let the soup boil after adding the cream. Stir gently to mix it well. - Testing tortellini for doneness: Check the tortellini after five minutes. It should be soft yet firm. If it feels too hard, let it cook for another minute or two. - Pairing with bread or salad: This soup pairs well with crusty bread or a fresh salad. The bread soaks up the soup, while the salad adds a crisp texture. - Recommended garnishes: Top the soup with fresh basil leaves. A sprinkle of grated cheese can also add a nice touch. - Alternative herbs and spices: Try adding thyme or parsley for a different twist. A pinch of nutmeg can also enhance the creaminess. - Tips for homemade version: For a homemade flavor, use fresh tomatoes instead of canned. Roast them first to deepen the taste. Add more fresh herbs for a bright finish. Pro Tips Fresh Ingredients: Using fresh basil and spinach will elevate the flavor of your soup significantly compared to dried herbs. Adjusting Creaminess: If you prefer a lighter soup, reduce the amount of heavy cream or substitute with half-and-half for a similar texture. Flavor Boost: A splash of balsamic vinegar can add a wonderful depth of flavor to your soup just before serving. Meal Prep Friendly: This soup can be made ahead of time and stored in the fridge for up to three days. Reheat gently on the stove. {{image_2}} You can make this soup vegan by swapping out some ingredients. Instead of heavy cream, use coconut cream or cashew cream. This keeps it rich but dairy-free. For a gluten-free option, choose gluten-free tortellini. There are many brands available that offer tasty gluten-free pasta. If you want to try something different, substitute heavy cream with almond milk or oat milk. These options provide a lighter feel. Adding protein can also enhance the soup. Consider cooked chicken, turkey, or even beans for a hearty touch. Using seasonal vegetables can elevate your dish. In summer, try adding zucchini or bell peppers. In fall, pumpkin or butternut squash can add depth. Adjust spices based on the season too. In winter, add warming spices like nutmeg. In spring, fresh herbs like dill can brighten the flavors. To keep your creamy tomato basil tortellini soup fresh, store it in an airtight container. Make sure it cools down first. Place it in the fridge within two hours of cooking. The soup tastes best when used within three to four days. To freeze the soup, let it cool completely. Pour it into freezer-safe bags or containers. Make sure to leave some space for expansion. Label the bags with the date. You can freeze the soup for up to three months. When you are ready to eat, thaw the soup overnight in the fridge. Reheat it on the stove over low heat. Stir often to ensure it heats evenly. If it looks thick, add a splash of broth or cream. Enjoy your soup just like the first time! Can I use frozen tortellini? Yes, you can use frozen tortellini. It cooks well in this soup. Just add it directly to the pot. Follow the package directions for cooking time. Frozen tortellini usually cooks in about 8-10 minutes. The soup will stay creamy and flavorful. Can I make this soup ahead of time? You can make this soup ahead of time. It tastes even better the next day! Just store it in the fridge. Reheat it on low heat before serving. If you make it too early, the tortellini may get soft. You can cook them fresh when you reheat the soup. What can I do with leftovers? Leftovers are great for lunch or dinner. Store them in an airtight container. They will last for about three days in the fridge. You can also freeze the soup. To reheat, warm it on the stove or in the microwave. Add a splash of cream if it thickens too much. This blog post covered how to make a flavorful soup with tortellini. We went through the key ingredients, preparation steps, and useful tips. You learned how to store and freeze the soup, plus some great variations for dietary needs. Always feel free to adjust flavors and ingredients based on what you have. Cooking should be fun and simple. I hope you feel ready to enjoy this warm, comforting dish!
    Creamy Tomato Basil Tortellini Soup Flavorful Delight
  • To make a flourless chocolate lava cake, you need: - 1 cup semi-sweet chocolate chips - 6 tablespoons unsalted butter - 3 large eggs - 1/2 cup granulated sugar - 1 teaspoon vanilla extract - 1/4 teaspoon salt - 1/4 cup unsweetened cocoa powder These simple ingredients create a rich and gooey dessert that everyone loves. You can enhance your cake with these extras: - Powdered sugar for dusting - Vanilla ice cream for serving These additions make your lava cake even more delightful. This dessert is naturally gluten-free since it uses no flour. If you want to make it dairy-free, you can swap the butter and chocolate for dairy-free options. Always check labels to ensure they meet your needs. {{ingredient_image_1}} Start by preheating your oven to 425°F (220°C). Grease four ramekins with unsalted butter. Make sure to cover the entire inside. Then, dust each ramekin with cocoa powder. This step helps the cakes pop out easily after baking. In a microwave-safe bowl, mix the semi-sweet chocolate chips with the unsalted butter. Heat them in the microwave for 30 seconds. Stir the mixture well after each interval. Keep doing this until it is smooth and shiny. This blend is the heart of your lava cake. In another bowl, crack three large eggs. Add the granulated sugar, vanilla extract, and salt. Whisk these together until the mix is pale and frothy. Next, pour the melted chocolate mixture into this egg mix. Fold the two together gently. Be careful not to overmix; we want a rich, smooth batter. Sift the unsweetened cocoa powder over your batter. Gently fold it in until combined. Now, divide the batter evenly among the prepared ramekins, filling each about 3/4 full. Place the ramekins on a baking sheet for easy handling. Bake in your preheated oven for 12-14 minutes. The edges should be firm, but the center will still jiggle slightly. After baking, let the cakes cool for 1-2 minutes. Carefully flip each ramekin onto a serving plate. The cakes should slide out easily. If you want, dust them with powdered sugar for a nice touch. Serve warm, and don't forget a scoop of vanilla ice cream for extra delight! To get that gooey center, watch your baking time closely. Bake the cakes for 12 to 14 minutes. The edges should feel firm, but the center must jiggle. If you bake too long, the center will cook through. Use a timer to help you avoid overbaking. Every oven is different, so check a minute early. Trust me, the perfect lava cake is all about timing. If you have any leftover lava cakes, store them in the fridge. Place them in an airtight container to keep them fresh. They will last for about three days. When you’re ready to eat them, reheat in the microwave. Heat for about 20 seconds. This warms them without losing the gooey center. Enjoy them warm for the best taste. The type of chocolate you use makes a big difference. I recommend semi-sweet chocolate chips for a rich flavor. Dark chocolate works too, if you want a more intense taste. Just remember, the better the chocolate, the better the cake. Look for high-quality brands with simple ingredients. Always choose chocolate you love to eat on its own. Pro Tips Perfect Chocolate Melting: To avoid scorching the chocolate, melt it in short 30-second intervals, stirring in between to ensure even melting without burning. Check for Doneness: The ideal lava cake should have firm edges and a soft, gooey center. If unsure, do a toothpick test; it should come out with moist crumbs, not wet batter. Cooling Time: Allow the cakes to cool for just 1-2 minutes before inverting. This helps set the edges while keeping the center molten. Serving Suggestions: For an extra touch of elegance, serve with a dollop of whipped cream or a fresh raspberry alongside the vanilla ice cream. {{image_2}} You can spice up your flourless chocolate lava cake with fun flavors. Want a minty twist? Just add a few drops of mint extract to the batter. This will give it a cool and fresh taste. If you love coffee, add one tablespoon of instant coffee granules. It brings out the chocolate flavor nicely. For a fruity touch, mix in some orange zest. Each flavor adds a new layer of fun to this dessert. If you want a healthier cake, switch the granulated sugar. You can use coconut sugar or maple syrup. Coconut sugar has a lower glycemic index, so it’s a bit better for your health. If you use maple syrup, reduce the amount of butter slightly. This keeps the cake moist while making it a bit lighter. These swaps keep the richness you love but make it a tad healthier. Want to make this cake gluten-free? You're already set! The recipe contains no flour. For a dairy-free option, use vegan chocolate chips and coconut oil instead of butter. The taste remains rich and delicious. If you have egg allergies, try using flax eggs. Mix one tablespoon of ground flaxseed with three tablespoons of water for each egg. Let it sit until it thickens. These swaps help you enjoy this tasty dessert no matter your dietary needs. To store leftover lava cakes, let them cool first. Place them in airtight containers. Keep them in the fridge for up to three days. If you want to enjoy them later, wait to dust with powdered sugar until you're ready to serve. This keeps them looking fresh. When you're ready to eat, reheat the lava cakes. Preheat your oven to 350°F (175°C). Place the cakes on a baking sheet. Heat for about 8-10 minutes. This warms them without overcooking. You can also use the microwave. Heat on low for about 20-30 seconds. Check to see if they are warm enough. If you want to save lava cakes for later, freezing is a great option. Wrap each cooled cake tightly in plastic wrap. Then, place them in a freezer-safe bag. They can last up to three months. When you want to eat one, take it out and thaw it in the fridge overnight. Then, reheat as needed. Enjoy that molten center again! Yes, you can use dark chocolate or milk chocolate. Dark chocolate gives a rich taste. Milk chocolate offers a sweeter flavor. Just keep the same amount of chocolate chips. Adjust the sugar if you use a sweeter chocolate. Watch the edges closely while baking. They should be firm and set. The center should jiggle slightly when you shake the ramekin. If it looks too firm, it may not have a molten center. You can serve it with a scoop of vanilla ice cream. The cold ice cream pairs well with the warm cake. Fresh berries also add a nice touch. A sprinkle of powdered sugar makes it look fancy too. Yes, you can make the batter ahead of time. Just cover it and keep it in the fridge. When ready to bake, pour it into the ramekins and bake as usual. It’s a great way to save time before a dinner party! In this article, we explored making delicious chocolate lava cakes. You learned about the key ingredients and optional items to serve. I shared step-by-step instructions for perfecting your cakes, along with useful tips to achieve that molten center. We also discussed fun variations to customize your cakes and smart storage practices. As you try this recipe, have fun experimenting! Enjoy the rich flavors and warm centers. Happy baking!
    Flourless Chocolate Lava Cake Rich and Decadent Dessert
  • - 1 lb boneless, skinless chicken breasts, sliced into thin strips - 2 bell peppers (one red, one yellow), sliced - 1 red onion, sliced - 3 tablespoons olive oil - 1 tablespoon chili powder - 1 teaspoon cumin - 1 teaspoon garlic powder - 1 teaspoon smoked paprika - Salt and pepper to taste - Juice of 1 lime - Fresh cilantro, chopped (for garnish) The chicken is the star of this dish. It cooks up juicy and tender. The bell peppers add crunchy sweetness. The red onion gives a nice bite. Each spice brings its own flavor. Chili powder adds warmth, while cumin adds earthiness. Garlic powder and smoked paprika enhance the taste, making it rich and savory. - Flour or corn tortillas, for serving - Toppings like guacamole, sour cream, or salsa Tortillas wrap the fajitas perfectly. You can use flour or corn based on your taste. Toppings elevate the meal. Guacamole adds creaminess. Sour cream cools the spice. Salsa adds freshness. You can mix and match as you like. - Sheet pan - Mixing bowl - Measuring spoons A sheet pan is essential for easy cooking. Use a mixing bowl to combine all the flavors. Measuring spoons help get the spice amounts just right. With these tools, you'll create a fantastic meal with ease. {{ingredient_image_1}} 1. Preheat your oven to 400°F (200°C). This step gets your oven ready for baking the fajitas. 2. In a large bowl, combine the sliced chicken, bell peppers, and red onion. Mixing these ingredients ensures that each bite is full of flavor. 3. Drizzle 3 tablespoons of olive oil over the mixture. This oil will help cook the chicken and veggies properly. 1. In a small bowl, mix together the chili powder, cumin, garlic powder, smoked paprika, salt, and pepper. These spices give the fajitas their bold taste. 2. Sprinkle the spice mix over the chicken and vegetables. Toss well to coat everything evenly. This step is key for flavor. 3. Spread the chicken and vegetables in a single layer on a large sheet pan. This helps them cook evenly and get nice and tender. 4. Bake in the preheated oven for 20-25 minutes. Check that the chicken is cooked through and the veggies are tender. 1. Remove the sheet pan from the oven. Squeeze fresh lime juice over the top. This adds a bright flavor that balances the spices. 2. Garnish with chopped cilantro. This adds a fresh touch and makes your dish look beautiful. Serve warm with tortillas for a complete meal. To get the perfect chicken texture, use thin strips. They cook faster and stay juicy. Season the chicken well with spices for great flavor. Bake at 400°F (200°C) for 20-25 minutes. This ensures the chicken cooks through and stays moist. For roasting vegetables, cut them into similar sizes. This helps them cook evenly. Toss them with olive oil and spices before baking. The longer they roast, the better the flavor. Aim for tender veggies with slight browning for the best taste. To store leftovers, let them cool first. Place them in an airtight container. They can stay fresh in the fridge for about 3-4 days. If you want to store them longer, freeze in portions. Just make sure to label the date. When reheating, the oven is best. Preheat it to 350°F (175°C). Spread the fajitas on a sheet pan and bake for about 10-15 minutes. This keeps them crispy. You can also use the microwave if you're short on time. Just heat in intervals of 30 seconds, stirring in between. For a great presentation, serve the fajitas on a large platter. Keep the tortillas warm on the side. You can also add toppings like guacamole, sour cream, or salsa for extra flavor. Pair your fajitas with sides like Mexican rice or black beans. A refreshing drink, such as limeade or a light beer, complements the meal nicely. Enjoy your colorful and tasty feast! Pro Tips Marinate for More Flavor: If time allows, marinate the chicken in the spice mix and olive oil for at least 30 minutes or overnight. This enhances the flavor and tenderness. Use Fresh Ingredients: Opt for fresh bell peppers and onions for the best texture and flavor. Fresh cilantro adds a vibrant finish. Customize Your Spices: Feel free to adjust the spice levels according to your taste. Adding a pinch of cayenne can give it a nice kick! Serve with a Twist: Elevate your fajitas by offering a variety of toppings like pickled jalapeños or mango salsa for added freshness and flavor. {{image_2}} You can easily change up this recipe to suit your taste. For protein, you can use shrimp or tofu instead of chicken. Both options cook well and soak up flavors nicely. If you want to try different veggies, zucchini and mushrooms work great too. They add a nice texture and extra flavor. Want to spice things up? Add some jalapeños for heat. They bring a nice kick to your fajitas. For a smoky or tangy twist, consider using smoked chipotle or lime zest. These ingredients can elevate your dish to a whole new level. Just a little can make a big difference. If you need gluten-free options, use corn tortillas instead of flour. This makes your meal safe for those with gluten sensitivities. For a vegetarian version, skip the chicken and load up on veggies. You can use extra peppers, onions, and even beans for protein. This way, everyone can enjoy delicious fajitas! To keep your cooked fajitas fresh, place them in the fridge. They last about 3 to 4 days. For longer storage, you can freeze them. Just put the fajitas in a freezer-safe bag. They can stay frozen for up to 3 months. Using airtight containers helps maintain freshness. This prevents air from making the fajitas soggy. If you use a bag, squeeze out as much air as you can. This keeps the flavors strong and the texture nice. When you reheat your fajitas, aim for an internal temperature of 165°F (74°C). You can use a microwave or an oven. If using a microwave, heat in short bursts. Stir often to ensure even warming. The oven method takes longer but keeps the crispness. Preheat the oven to 350°F (175°C) and heat for about 10-15 minutes. How long to bake chicken fajitas? You should bake chicken fajitas for 20 to 25 minutes. Check that the chicken is cooked through. The veggies should be tender. This timing ensures great flavor and texture. Can I prepare fajitas in advance? Yes, you can prepare fajitas in advance. Slice the chicken and veggies the day before. Store them in the fridge. Mix the spices, but add them just before cooking. This keeps everything fresh and tasty. What's the best type of chicken for fajitas? The best type of chicken is boneless, skinless chicken breasts. They cook quickly and stay tender. Thin strips work best to absorb the spices and cook evenly. Can I use frozen vegetables? Yes, you can use frozen vegetables. However, fresh veggies give a better taste and texture. If using frozen, reduce the baking time slightly. Thaw them first for even cooking. How to make fajitas spicier? To make fajitas spicier, add jalapeños or extra chili powder. You can also use a spicy seasoning blend. Adjust based on your taste. Always start with a small amount, then add more. What toppings are best for chicken fajitas? Great toppings include guacamole, sour cream, and salsa. Fresh cilantro adds a nice touch too. You can also try cheese or diced tomatoes. Serve these on the side for a fun meal. You now have a complete guide to making delicious chicken fajitas. We explored the key ingredients, from tender chicken to tasty spices. I shared step-by-step instructions to help you prepare and cook your meal perfectly. We also looked at tips for storage, variations, and answers to common questions. Cooking can be fun and simple. Now you can impress your family and friends with tasty fajitas. Choose your favorite ingredients and let your creativity shine in the kitchen!
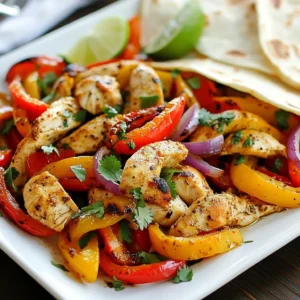
    Sheet Pan Chicken Fajitas Flavorful and Easy Recipe
  • - 1 sheet of puff pastry (thawed) - 3 large onions, thinly sliced - 2 tablespoons olive oil - 1 tablespoon butter - 1 teaspoon fresh thyme leaves - 1 cup grated Gruyère cheese - 2 large eggs - 1/2 cup heavy cream - 1 teaspoon sugar for caramelizing - Salt and pepper The main ingredients of this tart bring rich flavors together. Puff pastry forms the base. It is flaky and light. Onions add sweetness when cooked well. I like to use three large onions for depth of flavor. Olive oil and butter provide a smooth cooking fat. Fresh thyme gives a herby note that pairs well with cheese. Gruyère cheese is the star, adding creamy, nutty goodness. Eggs and heavy cream create a rich custard. You can add sugar to help caramelize the onions. Salt and pepper are key to balance the taste. {{ingredient_image_1}} Start by slicing your onions thinly. Heat olive oil and butter in a large skillet over medium heat. Once hot, add the onions and a pinch of salt. Stir them often. Cook for about 20 to 25 minutes. You want them soft and golden brown. This slow cooking helps with caramelization. Next, add the sugar and thyme. Stir well and cook for 5 more minutes. The sugar enhances the sweetness of the onions. The thyme adds a fresh, earthy taste. Remove the skillet from heat and let the onions cool slightly. Now, roll out your puff pastry on a floured surface. Aim for a size that fits your tart pan. Gently press the pastry into the pan and trim any excess. This step ensures a nice, even crust. Spread the caramelized onions evenly over the pastry shell. Use a spatula for a smooth layer. In a bowl, whisk together the eggs and heavy cream. Add salt and pepper to taste. Pour this mixture over the onions, covering them well. Finally, sprinkle the grated Gruyère cheese on top. This cheese melts beautifully, adding a rich flavor. Preheat your oven to 400°F (200°C). This high heat helps the tart cook evenly. Bake the tart for 30 to 35 minutes. Look for a golden brown color on top. The filling should be set but still creamy. Once baked, remove the tart from the oven and let it cool for a few minutes. This cooling time helps it firm up before slicing. Enjoy your delicious creation! To achieve the perfect caramelized onion texture, you need patience. Start by slicing your onions thinly. This helps them cook evenly. Heat your skillet to medium and add olive oil and butter. The fat helps with flavor and texture. Cook the onions slowly. This is key! Stir them every few minutes. Low heat allows the sugars in the onions to break down. This takes about 20-25 minutes. You want them soft and golden brown. Add your sugar and thyme at the end. This boosts the sweet flavor. To prevent soggy pastry, make sure your onions cool before adding them to the tart. Excess moisture can ruin the crispiness. Roll out the puff pastry on a lightly floured surface. Aim for an even thickness of about 1/8 inch. This helps it bake evenly. When placing the pastry in the tart pan, press gently. Trim any excess pastry around the edges. This gives a nice clean look and helps with cooking. Garnish your tart with fresh thyme sprigs for a pop of color. This also adds a nice herbal note. Consider pairing the tart with a light salad. A simple green salad with lemon vinaigrette works well. The fresh greens contrast with the rich tart flavors. Enjoy your savory delight! Pro Tips Use Sweet Onions: Opt for sweet onions like Vidalia or Walla Walla for a richer flavor that enhances the caramelization process. Chill the Puff Pastry: Keep the puff pastry chilled until you're ready to bake. This helps achieve a flakier texture when baked. Grate the Cheese Fresh: For the best melting and flavor, grate the Gruyère cheese just before using it rather than buying pre-grated cheese. Let it Rest: Allow the tart to rest for a few minutes before slicing. This helps the filling set and makes for cleaner slices. {{image_2}} You can swap Gruyère cheese for other cheeses. Cheddar adds a sharp flavor. Feta gives a tangy twist. Use what you like best. Herbs and spices can change the taste too. Try rosemary or oregano for a different aroma. A pinch of smoked paprika adds warmth and depth. If you need a gluten-free option, use a gluten-free puff pastry. Many brands offer this now. You can also make a crust with almond flour or oats. For a vegan version, replace eggs and cream with silken tofu and plant milk. Nutritional yeast can give a cheesy flavor. Enjoy a tasty tart without dairy! Adding veggies can make your tart even better. Sautéed mushrooms bring earthiness. Spinach adds color and nutrients. You could also toss in cooked bacon for a smoky touch. It adds richness and pairs well with onions. Want a unique twist? Sprinkle in some cumin or chili flakes. These spices can change the game and make your tart special. To keep your tart fresh, refrigerate it in an airtight container. This helps keep moisture in. Use it within three days for the best taste. When reheating, place slices in a warm oven. Set it to 350°F (175°C) and heat for about 10-15 minutes. This method keeps the crust crispy and the filling warm. Avoid using a microwave, as it can make the pastry soggy. You can freeze the tart before or after baking. If freezing before baking, wrap it tightly in plastic wrap and then foil. This keeps it safe from freezer burn. You can freeze it for up to three months. To bake from frozen, preheat your oven to 400°F (200°C) and add 10-15 minutes to the cooking time. If you freeze it after baking, let it cool completely first. Then wrap it tightly and store it in the freezer. To thaw, place it in the fridge overnight. Reheat in the oven at 350°F (175°C) for about 20 minutes. This way, your tart will taste fresh and delicious. You can prepare this tart ahead of time by making the filling and crust separately. First, caramelize the onions and let them cool. Then, store the onions in an airtight container in the fridge for up to three days. You can also roll out the puff pastry and keep it ready in the fridge. This way, you save time on the day you want to serve it. When ready, simply layer the onions on the pastry, add the egg mixture, and bake. This method keeps flavors fresh and makes serving easy. Yes, you can use different pastries. While puff pastry gives a light and flaky texture, you can try a shortcrust pastry for a sturdier base. You could even use phyllo dough for a crispier bite. If you prefer a gluten-free option, look for gluten-free pastry dough at the store. Each option will change the texture and taste slightly, but they will all work well with the onion and cheese filling. This tart pairs well with a fresh side salad. A simple mixed greens salad with a light vinaigrette works great. You could also serve it with roasted vegetables for added flavor. For drinks, a crisp white wine or sparkling water complements the tart nicely. If you want to go casual, serve it with a nice cup of soup. Each of these options enhances the meal and brings balance to the rich flavors of the tart. This article covered how to make a delicious Caramelized Onion Gruyère Tart. You learned about key ingredients like puff pastry, onions, and Gruyère cheese. We went through easy steps for preparation, assembly, and baking. Tips helped you perfect caramelization and avoid sogginess. In conclusion, you can customize this tart with different cheeses or spices. Enjoy it fresh, or store leftovers for later. Each bite will impress your family and friends. Experiment and make this tart your own!
    Caramelized Onion Gruyère Tart Flavorful Savory Delight
  • - 1 pound raw shrimp, peeled and deveined - 1 tablespoon ginger, finely minced - 2 green onions, finely chopped - 1 clove garlic, minced - 10-12 round dumpling wrappers The heart of these dumplings is the shrimp. Using fresh, raw shrimp gives the best flavor. I like to peel and devein them myself. This way, I know they are fresh. I also add ginger and green onions for a bright taste. Ginger adds a warm spice, while green onions bring a nice crunch. The garlic adds depth, making each bite full of flavor. For the dumpling wrappers, I prefer round ones. They hold the filling well and are easy to fold. - 1 tablespoon soy sauce - 1 teaspoon sesame oil - Salt and pepper to taste Seasonings make this dish pop! Soy sauce provides a savory base. Sesame oil adds a nutty flavor. Together, they make the shrimp taste amazing. I also sprinkle in salt and pepper to enhance the flavors. Adjust these to your liking; cooking should be fun! - Fresh cilantro, for garnish - Dipping sauce options: soy sauce, chili oil Garnishes are key to a great dish. I love adding fresh cilantro for color and freshness. It brightens up the dumplings. For dipping, soy sauce is a classic choice. If you want some heat, chili oil adds a nice kick. Mixing these options lets you customize your flavor experience! {{ingredient_image_1}} To make the filling, use a food processor. Add the raw shrimp, ginger, green onions, garlic, soy sauce, sesame oil, salt, and pepper. Pulse the mix until it is almost smooth. You want small bits of shrimp to remain for texture. This gives your dumplings a nice bite. Now, let’s fill the dumplings. Take a dumpling wrapper and scoop about a teaspoon of the shrimp filling into the center. Moisten the edges with a little water. Fold the wrapper in half to create a half-moon shape. Pinch the edges tightly to seal the dumpling. Make sure there are no openings. Repeat this process until you fill all the wrappers. Next, we will cook the dumplings. Set up a steamer pot on your stove and fill it with water. Bring the water to a gentle simmer. Place the dumplings in the steamer basket. Make sure they have space and are not crowded. Cover the steamer and cook for about 5 to 6 minutes. The shrimp filling should be fully cooked when done. You can tell they are ready when they are firm and cooked through. Remove the dumplings and let them cool slightly before serving. To make the best dumplings, avoid overfilling. Filling them too much can cause the wrappers to tear. Use about one teaspoon of filling per wrapper. This amount gives enough taste without risking a mess. When sealing dumplings, moisture is key. Moisten the edges of the wrapper with a little water. This helps the edges stick together better. After folding the wrapper, pinch the edges tightly. This keeps the filling inside while cooking. To amp up the taste, experiment with herbs and spices. Fresh cilantro adds brightness. Try adding a sprinkle of chili flakes for heat. You can also mix in some lime zest for a citrus kick. Choosing the right dipping sauce can elevate your meal. Soy sauce is classic, but you could try chili oil for a spicy twist. You can mix soy sauce with vinegar for a tangy option. A food processor makes mixing easy. It gives a smooth texture to the filling. A good steamer is also important. Use a bamboo or metal steamer for best results. When using the steamer, fill it with water just below the basket. Make sure the dumplings don’t touch the water. Cover the steamer tightly to keep the steam in. This way, your dumplings cook evenly. Pro Tips Prep Your Ingredients: Ensure all ingredients are prepped and within reach before starting. This will make the assembly process smoother and quicker. Seal the Dumplings Well: Make sure to moisten the edges of the dumpling wrappers adequately to ensure a tight seal. This prevents the filling from leaking during cooking. Don’t Overcrowd the Steamer: Steam the dumplings in batches if necessary. Overcrowding can lead to uneven cooking and sticking. Experiment with Dipping Sauces: Try different dipping sauces like soy sauce mixed with rice vinegar or spicy chili oil to enhance the flavor of your dumplings. {{image_2}} If you can't find shrimp, you can use chicken or tofu. For chicken, use cooked, shredded chicken. You can season it the same way as shrimp. For tofu, choose firm tofu. Press it to remove excess water, then mash it. Spice it up with ginger and garlic for flavor. For vegan options, use mushrooms, carrots, and bok choy. These veggies add a nice crunch. Blend them in a food processor like you do with shrimp. This gives your dumplings a fresh taste. You can cook dumplings in different ways. Pan-frying gives a crispy bottom. Heat oil in a pan, add dumplings, and cook until golden. Then, add water and cover to steam them. Boiling is another quick method. Just bring water to a boil, add dumplings, and cook for about 3-4 minutes. Baking is easier too. Preheat your oven and bake for about 15-20 minutes. This way, you get a nice golden color. Want to spice things up? Add red pepper flakes or sriracha to the filling. This gives your dumplings a nice kick. You can also mix in vegetables like finely chopped bell peppers or spinach. These add color and nutrition. Experiment with herbs too! Fresh basil or cilantro can enhance the taste. You can even try adding a splash of lime juice for a zesty twist. Each change makes your dumplings unique. Store your dumplings in the fridge for best results. Place them in an airtight container. This keeps them fresh and prevents them from drying out. They stay good for about 2-3 days. If you want to enjoy them later, think about freezing them. To freeze dumplings, first place them on a baking sheet. Make sure they do not touch each other. Freeze them for about 1-2 hours, until firm. After that, you can move them to a freezer bag. This helps save space. They can last up to 3 months in the freezer. When you're ready to eat, thaw them in the fridge overnight. Reheat your dumplings in a steamer for best texture and flavor. Just steam them for about 3-5 minutes until hot. You can also pan-fry them for a crispy finish. If you choose the microwave, cover them with a damp paper towel to keep moisture. This way, they won’t get tough. Enjoy your dumplings fresh! Shrimp dumplings last about 2 to 3 days in the fridge. Store them in an airtight container. This keeps them fresh and tasty. If you notice any odd smells or colors, it’s best to discard them. Yes, you can make shrimp dumplings ahead of time. Prepare the dumplings and place them on a tray. Cover them with plastic wrap and store them in the fridge for up to 24 hours. This way, you can steam them quickly when you’re ready to eat. Soy sauce and chili oil make a great dip for shrimp dumplings. You can also try sweet soy sauce or vinegar for a different taste. Feel free to mix and match! Shrimp dumplings are a delightful treat you can make at home. We covered the main ingredients, how to prepare the filling, and cooking tips. Remember to experiment with flavors and cooking methods for variety. Proper storage keeps your dumplings fresh for later. With these steps, you'll make tasty dumplings that impress. Enjoy the process, and happy cooking!
    Minute Shrimp Dumplings Flavorful and Easy Recipe
  • - 4 boneless, skinless chicken breasts - 1 cup fresh or frozen cranberries - 1 cup orange juice - Zest of 1 orange - 2 tablespoons honey - 2 cloves garlic, minced - 1 tablespoon fresh ginger, grated - 1 teaspoon thyme - Salt and pepper to taste - 2 tablespoons olive oil - ¼ cup green onions, sliced For this dish, I love using fresh ingredients to boost flavor. The chicken breasts provide a lean protein base. Fresh cranberries add a bright, tart taste. Orange juice gives a sweet and zesty kick. Don't forget the orange zest; it adds a fragrant touch. The marinade is key. Honey brings sweetness. Minced garlic adds depth. Grated ginger gives a warm zing. Thyme adds a hint of earthiness. Salt and pepper will enhance the overall taste. For cooking, olive oil helps in searing the chicken. Sliced green onions on top add a crunchy finish. They also brighten the dish's look. This combination creates a plate that is not just tasty but visually appealing too. {{ingredient_image_1}} To make the marinade, start by mixing fresh orange juice with orange zest. Add two tablespoons of honey, two minced garlic cloves, and one tablespoon of grated ginger. Then, stir in one teaspoon of thyme, along with salt and pepper to taste. Mix everything well to create a smooth marinade. Next, take your four chicken breasts and place them in a resealable plastic bag or a shallow dish. Pour the marinade over the chicken. Ensure each piece is coated well. Seal the bag or cover the dish with plastic wrap. Refrigerate the chicken for at least one hour. For more flavor, let it marinate overnight. First, preheat your oven to 375°F (190°C). In an oven-safe skillet, heat two tablespoons of olive oil over medium-high heat. Take the chicken out of the marinade, keeping the marinade for later. Sear each chicken breast for about 4-5 minutes on each side until golden brown. After searing, pour the reserved marinade over the chicken. Add one cup of fresh or thawed cranberries to the skillet. Stir gently to mix the cranberries with the chicken. Now, transfer the skillet to your preheated oven. Bake for 20-25 minutes, or until the chicken reaches an internal temperature of 165°F (74°C). Once cooked, take the skillet out of the oven. Let the chicken rest for five minutes before serving. For a nice touch, garnish the chicken with sliced green onions. This adds both color and flavor to your dish. Enjoy your zesty cranberry orange chicken! To make the best Zesty Cranberry Orange Chicken, start with marinating. Here’s how to do it right: - Use a resealable bag or a dish. - Coat the chicken well with the marinade. - Let it sit for at least 1 hour, or overnight for more flavor. Next, let’s talk about searing. Searing gives the chicken a nice crust. Here are tips for that: - Preheat your skillet with olive oil over medium-high heat. - Place chicken in the hot skillet, and do not crowd the pan. - Cook for 4-5 minutes per side until golden brown. Want to kick up the flavor? Here’s how: - Add zest from another orange or a squeeze of lime for extra zing. - For spice, sprinkle some red pepper flakes or a dash of cayenne. To enhance the dish’s profile, serve it with: - Fluffy rice to absorb the sauce. - Roasted vegetables for color and crunch. Avoiding mistakes can make your dish shine. Here are two to watch for: - Do not overcook the chicken. Check it at 20 minutes. The internal temperature should reach 165°F. - Don’t skimp on marinating time. Insufficient marinating will lead to bland chicken. Always aim for at least 1 hour. Pro Tips Marinade Longer for Flavor: For the best flavor, marinate the chicken overnight. This allows the flavors to penetrate the meat, resulting in a more delicious dish. Use Fresh Ingredients: Whenever possible, use fresh cranberries and freshly squeezed orange juice. Fresh ingredients enhance the overall taste and brightness of the dish. Check Chicken Temperature: Always use a meat thermometer to ensure your chicken is cooked to the safe internal temperature of 165°F (74°C) for optimal texture and safety. Experiment with Herbs: Feel free to experiment with other herbs like rosemary or sage. They can add a unique twist to the flavor profile of your chicken dish. {{image_2}} You can swap cranberries for other fruits. Cherries or pomegranate seeds work well. Both add a sweet-tart flavor. You can also try diced apples or peaches for a sweeter taste. If you want to change the sweetener, use maple syrup or agave nectar instead of honey. These options can bring a different twist to the dish. For gluten-free needs, use tamari instead of regular soy sauce in any marinade. Check all labels for hidden gluten. If you're watching sugar intake, reduce or skip the honey. You can use a sugar substitute like stevia. This way, you keep the taste without adding extra sugar. Pair this chicken with fluffy rice or roasted vegetables. Both bring balance and enhance flavors. For a colorful plate, add some steamed broccoli or green beans. When plating, place the chicken in the center. Spoon the cranberry sauce generously on top. Finish with a sprinkle of sliced green onions for a pop of color. To keep your leftover chicken fresh, store it in an airtight container. Make sure it cools down first. Place it in the fridge if you plan to eat it within three days. For longer storage, freeze the chicken. Wrap it tightly in plastic wrap or foil, then place it in a freezer bag. This helps prevent freezer burn. When reheating your chicken, avoid dry meat by using gentle heat. You can reheat it in the oven at 350°F (175°C). Cover it with foil to keep the moisture in. Another option is to use a microwave. Place the chicken on a plate, add a splash of water, and cover it. This keeps the chicken juicy. To maintain the flavor, consider adding a little extra cranberry sauce when reheating. This will bring back some of that zesty taste. Enjoy your tasty meal again! You can prep the chicken and marinade ahead of time. Start by mixing the marinade. Combine orange juice, zest, honey, garlic, ginger, thyme, salt, and pepper in a bowl. After that, place the chicken in a resealable bag. Pour the marinade over the chicken, ensuring it is well-coated. Seal the bag and store it in the fridge for up to 24 hours. This gives the flavors time to blend. When you’re ready to cook, you can simply sear and bake the chicken. Yes, you can use frozen chicken breasts. Just remember to thaw them before marinating. This helps the meat absorb the flavors better. Cooking time may vary slightly. Make sure the internal temperature reaches 165°F (74°C) to ensure it is safe to eat. If using frozen chicken, add 5-10 minutes to your cooking time. Check for doneness with a meat thermometer for best results. This dish pairs well with several sides. Fluffy rice soaks up the sauce well. Roasted vegetables add color and nutrition. You might also try a fresh salad for a light contrast. Mashed potatoes can be a creamy option too. Consider serving with crusty bread to soak up any extra sauce. These sides will enhance the meal's zesty flavor and make it more filling. This Zesty Cranberry Orange Chicken recipe combines vibrant flavors with simple steps. We reviewed the main ingredients, marinade components, and cooking process. I shared tips for marinating, flavor enhancements, and avoiding common mistakes. With alternative ingredients, dietary adjustments, and serving suggestions, you can customize it to your taste. Proper storage and reheating keep your chicken delicious and ready to enjoy. Remember, cooking is an art. Embrace your creativity and make it your own!
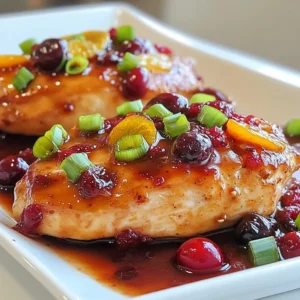
    Zesty Cranberry Orange Chicken Flavorful Dinner Idea
  • - 2 ripe avocados - 1/2 cup unsweetened cocoa powder - 1/3 cup maple syrup (or honey) - 1/4 cup almond milk (or any milk of choice) - 1 teaspoon vanilla extract - Pinch of sea salt - Fresh berries and mint leaves for garnish - Food processor - Measuring cups and spoons - Serving bowls or cups Gathering the right ingredients is key to making this creamy treat. Start with two ripe avocados. You want them soft but not brown. The cocoa powder gives the mousse its rich chocolate flavor. I use unsweetened cocoa to keep it healthy. Next, grab your sweetener. Maple syrup works well, but honey is great too. You can use either one, based on your taste. Almond milk helps blend it all together. You can swap it for any milk you prefer. Don't forget the vanilla extract! It adds a nice touch of flavor. A pinch of sea salt balances the sweetness. For garnishing, fresh berries and mint leaves make it look beautiful and fresh. Prepare your tools ahead of time. A food processor will make blending easy. Use measuring cups and spoons for accuracy. Finally, have serving bowls or cups ready for a fun presentation. With everything in place, you can dive into making this delicious avocado chocolate mousse! {{ingredient_image_1}} To start, take two ripe avocados. Ripe avocados are key to a smooth mousse. If they are hard, they won’t blend well. Slice each avocado in half, and remove the pit carefully. Use a spoon to scoop out the green flesh. Make sure you get every bit of the creamy avocado. Place the avocado in your food processor. This is the base of your mousse. Now, let’s add the other ingredients. Start with 1/2 cup of unsweetened cocoa powder. Then, pour in 1/3 cup of maple syrup or honey for sweetness. Next, add 1/4 cup of almond milk for creaminess. Don’t forget 1 teaspoon of vanilla extract and a pinch of sea salt. The order matters! Blend on high until it is smooth. Scrape the sides of the bowl to mix well. If it’s too thick, add a bit more milk. Taste your mousse, and if you want it sweeter, add more maple syrup. Blend again to combine everything. Once your mousse is smooth and creamy, it’s time to serve. Transfer the mousse into small bowls or cups. Cover them with plastic wrap. Refrigerate the mousse for at least 30 minutes. This chilling time helps the flavors mix and the texture firm up. When ready, serve the mousse chilled. Top it with fresh berries and a sprig of mint for a lovely finish. Enjoy your delicious treat! To get a velvety consistency, blend the mousse well. Use a food processor to mix everything until smooth. If it's too thick, add a splash of almond milk. If it's too thin, blend in a bit more cocoa powder. Sometimes, you may find little lumps. This can happen if the avocados are not ripe enough. Make sure to use ripe avocados for the best results. You can tell they are ripe if they feel soft when you press them gently. Tasting the mousse is key. After blending, take a small spoonful. If it needs more sweetness, add a bit more maple syrup. Blend again to mix it well. You can also try honey if you prefer. For a healthier option, consider using agave nectar or stevia. Both can give you sweetness without too many calories. Just remember to adjust the amount to your taste. Creative toppings can make your mousse look amazing. Fresh berries, like strawberries or raspberries, add color and taste. Mint leaves not only look good but also add a fresh flavor. Using berries has health benefits too. They are full of vitamins and antioxidants. Mint also helps with digestion. So, topping your mousse with these can make it both pretty and good for you. Pro Tips Use Ripe Avocados: Ensure your avocados are perfectly ripe for the best creamy texture and flavor. They should yield slightly to gentle pressure when squeezed. Adjust Sweetness: After blending, taste the mousse and adjust the sweetness to your preference. A little extra maple syrup or honey can enhance the flavor. Chill for Best Results: Allow the mousse to chill in the refrigerator for at least 30 minutes before serving. This helps the flavors to meld and improves the texture. Garnish Creatively: Top your mousse with a variety of fresh fruits, nuts, or a drizzle of chocolate sauce for an attractive presentation and added flavor. {{image_2}} You can boost the flavor of your avocado chocolate mousse in fun ways. Try adding a shot of espresso or a tablespoon of coffee. This gives the mousse a rich mocha taste. If you want to change the milk, use different nut milks. Almond milk adds a subtle flavor, but cashew or coconut milk offers a creamier touch. Want to make this mousse vegan? Just swap honey for maple syrup. Use plant-based milk to keep it dairy-free. If you're watching sugar intake, use less maple syrup or try a sugar substitute. You can enjoy this treat without guilt. For extra creaminess, add nut butters like almond or cashew. These add flavor and a smooth texture. Coconut is another great choice. You can also spice things up! A pinch of cinnamon gives warmth, while a hint of cayenne adds a kick. Experimenting with these options makes your mousse unique and tasty. To store leftover mousse, place it in an airtight container. This helps keep the mousse fresh. You can also cover the serving bowls with plastic wrap. Make sure the wrap touches the mousse to prevent air exposure. The mousse will stay fresh in the fridge for up to three days. Before serving, check the texture. If it seems too thick, stir in a little almond milk. This will restore its creamy goodness. Yes, you can freeze avocado chocolate mousse! To do this, scoop the mousse into a freezer-safe container. Make sure to leave some space at the top since it will expand when frozen. The mousse can last in the freezer for up to two months. When you want to enjoy it, remove it from the freezer. Let it thaw in the fridge for several hours or overnight. This keeps the texture smooth and creamy. If it feels a bit icy, blend it again to restore the velvety feel. Yes, you can make this mousse ahead of time. It stays fresh in the fridge for up to three days. Just store it in an airtight container to keep it from drying out. This makes it perfect for parties or special dinners. Making it ahead also lets the flavors blend nicely. The texture should be rich and creamy. It should feel smooth in your mouth. When you blend the ingredients well, it becomes velvety. If it’s too thick, add a bit more almond milk. If it’s too thin, blend it longer. You want a luscious mousse that feels indulgent. Yes, avocados offer many health benefits. They are high in healthy fats that are good for your heart. They also add fiber, which is great for digestion. Plus, avocados have vitamins like E and K. Using them in dessert gives you a treat that’s not only tasty but also nutritious. Absolutely! You can experiment with different chocolates. Dark chocolate gives a bold flavor. Milk chocolate makes it sweeter and creamier. You can even use white chocolate for a unique twist. Just keep in mind that the sweetness may vary, so adjust the maple syrup accordingly. This blog post walked you through making a creamy avocado chocolate mousse. We covered ingredients, tools needed, and step-by-step instructions. I shared tips for perfecting texture and sweetening to your taste. You learned fun variations and how to store your mousse for later enjoyment. Incorporating avocados into desserts gives a tasty twist and boosts nutrition. Now you can impress others with this healthy treat that everyone will love. Enjoy your delicious mousse!
    Avocado Chocolate Mousse Creamy and Decadent Treat
  • - Pasta: I use 12 oz. of penne pasta for this recipe. Penne’s shape holds sauce well, making every bite tasty. - Broth: I recommend using vegetable broth. It adds depth and flavor. You can use low-sodium broth for less salt. - Cream: Heavy cream is key for a rich, smooth sauce. It makes the dish creamy and comforting. - Fresh Ingredients: Fresh basil and garlic bring great taste. Basil gives a sweet, aromatic touch. Garlic adds depth and warmth. {{ingredient_image_1}} 1. Set your Instant Pot to Sauté mode. 2. Pour in 1 tablespoon of olive oil. 3. Heat the oil for about 1 minute. 4. Add the finely chopped onion. 5. Sauté until the onion is translucent, about 3-4 minutes. 6. Now, stir in 4 minced garlic cloves. 7. Add 1 teaspoon of dried oregano. 8. Cook for about 1 more minute until fragrant. 1. Cancel the Sauté mode. 2. Pour in 2 cups of vegetable broth. 3. Add the can of diced tomatoes, with juices. 4. Sprinkle in 1 teaspoon of salt and 1/2 teaspoon of black pepper. 5. Stir in 12 ounces of penne pasta, making sure it’s mostly submerged. 6. Close the lid of the Instant Pot. 7. Set the valve to Sealing. 8. Select Manual or Pressure Cook mode for 5 minutes. 1. After cooking, perform a quick release. 2. Carefully turn the valve to Venting to release pressure. 3. Once safe, open the lid. 4. Stir in 1 cup of heavy cream and 1 cup of chopped basil. 5. Mix well until everything is combined. 6. Taste and adjust the seasonings as needed. 7. If the sauce is too thick, add a splash of vegetable broth. 8. Serve warm, topped with grated Parmesan cheese if you like. 9. Garnish with extra basil leaves for a lovely touch. - Substitutions: You can swap heavy cream for half-and-half or coconut milk. If you prefer a lighter dish, use low-fat cream. You can also replace penne pasta with fusilli or bowtie pasta. Each type brings its own charm to the dish. - Spice Level: To adjust the spice level, add red pepper flakes or cayenne pepper. If you like it milder, reduce the black pepper. Always taste as you go to find the perfect balance for you. - Presentation Tips: Serve the pasta in large bowls. Garnish with fresh basil leaves and a sprinkle of Parmesan cheese. This adds color and makes the dish look fancy. A drizzle of olive oil on top can also enhance its appeal. - Pairings: Pair this dish with a side salad for a fresh crunch. Garlic bread or crusty bread works well, too. It’s perfect for soaking up the creamy sauce. You can also serve it with a light white wine for a lovely meal. Pro Tips Use Fresh Ingredients: Opt for fresh basil and high-quality tomatoes to elevate the flavor of your pasta dish. Adjust Consistency: If your sauce is too thick, gradually add more vegetable broth until you reach your desired creaminess. Perfect Pasta Texture: Make sure to stir the pasta well before sealing the Instant Pot to prevent sticking and ensure even cooking. Flavor Boost: Consider adding a pinch of red pepper flakes for a bit of heat or a squeeze of lemon juice for brightness. {{image_2}} Protein Additions: You can make this dish heartier by adding protein. Chicken and shrimp work well. For chicken, use bite-sized pieces and add them after sautéing the onions. Cook them for about five minutes until golden. For shrimp, add them just before sealing the pot. They cook quickly and add a nice touch. Vegan Options: If you prefer a plant-based version, swap the heavy cream for coconut cream or cashew cream. Both add creaminess without dairy. You can also use vegetable broth and keep all other ingredients the same. Choose a vegan Parmesan cheese for topping, or skip it altogether for a lighter meal. Additional Herbs: You can boost the flavor by adding herbs. Try thyme, parsley, or even a pinch of rosemary. These herbs add depth and can change the dish's profile. Just add them alongside the basil for a fresh taste. Spice Ideas: If you like heat, consider adding red pepper flakes or diced jalapeños. Start with a small amount, then taste and add more if you want it spicier. This gives the pasta a nice kick and extra flavor. To keep your Instant Pot creamy tomato basil pasta fresh, store leftovers in an airtight container. Let the pasta cool to room temperature before sealing the container. Place it in the fridge. This dish stays good for about 3 to 5 days. When you're ready to eat, simply reheat it on the stove or in the microwave. If it's too thick, add a splash of vegetable broth to loosen it up. If you want to save this meal for later, freezing is a great option. First, allow the pasta to cool completely. Then, divide it into individual portions and place them in freezer-safe bags or containers. Make sure to remove as much air as possible to prevent freezer burn. This pasta can last in the freezer for up to 3 months. When you’re ready to enjoy it, thaw it in the fridge overnight, then reheat on the stove with a little broth for the best texture. How long does this dish keep in the fridge? This dish stays fresh in the fridge for about 3-5 days. Store it in an airtight container. Can I use gluten-free pasta? Yes, you can use gluten-free pasta. Just keep an eye on the cooking time. How do I adjust the cooking time for different pasta types? For thinner pasta, reduce the cooking time by 1-2 minutes. For thicker pasta, add 1-2 minutes. Can I make this recipe ahead of time? Yes, you can make it ahead. Just reheat gently on the stove. Add a splash of broth if needed. This dish combines simple ingredients, clear steps, and tasty variations. You can use penne pasta, rich broth, and heavy cream for a creamy dish. Fresh basil and garlic add bright flavors. Remember, you can switch ingredients based on your taste. Whether you choose meat or plant-based options, the dish adapts well. Proper storage keeps leftovers fresh, making meal prep easy. Enjoy creating your version of this recipe, and share it with friends. You’ll impress your family and enjoy every bite!
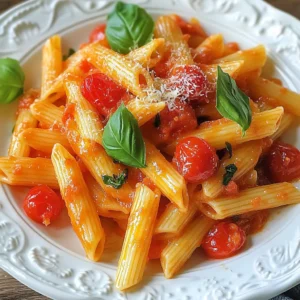
    Instant Pot Creamy Tomato Basil Pasta Delight
  • - 1 cup pumpkin puree - 1/2 cup granulated sugar - 1/2 cup brown sugar, packed - 1/2 cup unsalted butter, softened - 1 large egg - 1 teaspoon vanilla extract To make soft pumpkin pie cookies, you need key ingredients. First, pumpkin puree gives the cookies their rich flavor. Granulated sugar and brown sugar add sweetness, while butter makes them soft. One large egg binds everything together. Finally, vanilla extract gives a lovely taste. - 2 cups all-purpose flour - 1 teaspoon baking powder - 1/2 teaspoon baking soda - 1 tablespoon pumpkin pie spice - 1/4 teaspoon salt Next, you need dry ingredients for texture. All-purpose flour is the base. Baking powder helps the cookies rise, while baking soda adds softness. Pumpkin pie spice brings warmth and flavor, and salt balances the sweetness. - 1/2 cup white chocolate chips - Additional pumpkin pie spice for dusting For a twist, consider adding white chocolate chips. They create a sweet surprise in every bite. You can also sprinkle extra pumpkin pie spice on top for more flavor and a beautiful finish. {{ingredient_image_1}} - Preheat the oven to 350°F (175°C). - Line a baking sheet with parchment paper. This step is key for easy cleanup. The parchment helps cookies bake evenly and prevents sticking. - Cream butter with sugars. - Incorporate pumpkin puree, egg, and vanilla. Start by mixing the softened butter with both sugars. Beat them until fluffy. Then, add pumpkin puree, the egg, and vanilla. Mix well until it's smooth and creamy. This mixture gives the cookies their soft texture and flavor. - Whisk together flour, baking powder, baking soda, pumpkin pie spice, and salt. - Gradually combine with wet ingredients. In a separate bowl, whisk the flour with the baking powder, baking soda, pumpkin pie spice, and salt. This blend adds flavor and lift. Gradually mix it into the wet ingredients until just combined. Be careful not to overmix. - Drop rounded tablespoons on the baking sheet. - Bake for 12-15 minutes. Use a spoon to drop rounded tablespoons of dough onto the sheet. Space them about 2 inches apart. Bake them for 12-15 minutes until the edges are golden and the centers look set. Watch closely to avoid overbaking. - Let cool on baking sheet for 5 minutes. - Transfer to wire rack and dust with pumpkin pie spice. After baking, let the cookies cool on the sheet for 5 minutes. Then, move them to a wire rack to cool completely. Finally, dust with extra pumpkin pie spice for added flavor and a beautiful look. To get soft cookies, do not overmix the dough. Overmixing can make the cookies tough. Mix just until the flour disappears. That’s the key to soft texture. Monitor baking time closely. Cookies bake fast, so check them at 12 minutes. The edges should be golden, but the centers need to look soft. They will firm up after cooling. You can always add more pumpkin pie spice for extra flavor. If you love spice, try adding a bit more. It adds warmth and depth. You can also use different types of chocolate chips, like dark or milk chocolate. Nuts like pecans or walnuts can add crunch too. These options make your cookies unique and tasty. One big mistake is overbaking cookies. They should stay soft and chewy, so set a timer. If you forget, they can turn hard. Another mistake is not measuring ingredients accurately. Use measuring cups for dry and liquid ingredients. This helps ensure your cookies turn out perfect every time. Pro Tips Use Fresh Pumpkin Puree: For the best flavor, consider making your own pumpkin puree from fresh pumpkins instead of using canned. This will give your cookies a richer taste. Chill the Dough: If your cookie dough feels too soft, chill it in the refrigerator for about 30 minutes. This will help the cookies hold their shape while baking. Don’t Overbake: Keep an eye on your cookies as they bake. They should look slightly underbaked in the center when you take them out, as they will continue to firm up as they cool. Spice it Up: Feel free to experiment with additional spices like cinnamon or nutmeg for a personalized flavor. Just a pinch can elevate your cookies to the next level. {{image_2}} To make gluten-free pumpkin pie cookies, use a gluten-free flour blend. Look for a blend that has xanthan gum for the best texture. Start with a 1:1 blend. This means you can swap it directly for all-purpose flour. Make sure to check the packaging for specific instructions. You want your cookies to be soft and chewy. If you want vegan pumpkin pie cookies, you can replace the egg. Here are some great options: - Flaxseed meal: Mix 1 tablespoon of flaxseed meal with 3 tablespoons of water. Let it sit for 5 minutes before adding to your mix. - Chia seeds: Use 1 tablespoon of chia seeds with 3 tablespoons of water in the same way. For butter, use dairy-free alternatives like coconut oil or vegan butter. These options keep your cookies rich and tasty. Spices can change the flavor of your cookies. You can use cinnamon, nutmeg, or ginger for a twist. Try adding 1 teaspoon of cinnamon or 1/2 teaspoon of nutmeg. If you want more kick, add a pinch of ginger. Adjust the pumpkin pie spice to keep balance. This way, your cookies stay flavorful and soft. To keep your soft pumpkin pie cookies fresh, store them in an airtight container. This will shield them from air and moisture. You can stack the cookies with a layer of parchment paper in between. This layer helps prevent sticking. For added freshness, place a slice of bread in the container. The bread helps absorb moisture, keeping the cookies soft and tasty for longer. You can freeze these cookies to enjoy later. First, let the cookies cool completely after baking. Then, place them in a single layer on a baking sheet. Freeze them for about an hour. This step helps keep their shape. Once frozen, transfer the cookies to a freezer-safe bag. Label the bag with the date. To thaw, just take out the cookies and leave them at room temperature for about 30 minutes. You can also warm them in the oven for a few minutes if you prefer them warm. Soft pumpkin pie cookies can last up to a week at room temperature. Keep them in an airtight container to maintain freshness. If you store them in the fridge, they can last up to two weeks. The cooler temperature slows down spoilage, but they may dry out a bit. So, enjoy them fresh or store them wisely! Yes, you can use fresh pumpkin. Start by choosing a sugar pumpkin, also known as a pie pumpkin. Cut it in half and scoop out the seeds. Roast the pumpkin halves cut-side down on a baking sheet at 350°F (175°C) for about 45 minutes. Once soft, scoop out the flesh and blend it until smooth. Use this puree in your cookie recipe. Fresh pumpkin gives a nice flavor and texture. To make soft cookies, use room temperature butter. This helps create a light and fluffy mix. Do not overmix the dough; mix until just combined. Keep an eye on the baking time. Bake until the edges are golden but the centers are soft. If you want, add an extra egg yolk. This adds moisture and helps keep cookies soft. Yes, you can use other sweeteners. Try using coconut sugar for a richer taste. Maple syrup can also work, but reduce other liquids in the recipe. Honey is another option, but it may change the texture a bit. Adjust the amount based on how sweet you like your cookies. These cookies pair well with warm drinks. Try serving them with a cup of hot apple cider or chai tea. You can also enjoy them with a scoop of vanilla ice cream for a tasty treat. For a fun twist, serve with whipped cream and a sprinkle of cinnamon on top. Soft pumpkin pie cookies are easy to make and full of flavor. We explored the essential and optional ingredients, as well as step-by-step instructions for perfect cookies. I shared tips to enhance texture and flavor, along with common mistakes to avoid. You can also try gluten-free or vegan options. Remember to store your cookies properly to keep them fresh. With this guide, you can bake delicious cookies that everyone will love. Enjoy your time in the kitchen and share your treats with friends!
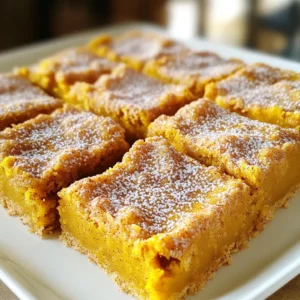
    Soft Pumpkin Pie Cookies Delightful Fall Treats
  • - 2 lbs lamb shoulder, cut into bite-sized pieces - 2 tablespoons vegetable oil - 1 large onion, finely chopped - 4 garlic cloves, minced - 1 tablespoon fresh ginger, grated Lamb shoulder is the star of this dish. It becomes tender and full of flavor as it cooks. I use vegetable oil to sear the lamb. This step gives it a nice brown color. Onions, garlic, and ginger add a great depth of taste. They create a base that makes your curry rich and aromatic. - 2 tablespoons curry powder - 1 tablespoon ground cumin - 1 teaspoon ground coriander - 1 teaspoon turmeric - Salt and pepper Spices are key to a great curry. I love using curry powder, cumin, coriander, and turmeric. They blend well together and give the dish its warm color and taste. Salt and pepper enhance all these flavors. - 1 can (14 oz) coconut milk - 1 cup vegetable broth - 1 can (14 oz) diced tomatoes - 2 medium carrots, sliced - 1 red bell pepper, diced - 1 cup frozen peas - Fresh cilantro, chopped for garnish Coconut milk makes the curry creamy and dreamy. Vegetable broth adds more flavor. Diced tomatoes give a nice tang. Carrots and red bell peppers add crunch and color. Frozen peas are added for sweetness. Finally, fresh cilantro is perfect for garnish, adding brightness to your dish. {{ingredient_image_1}} To start, I heat 2 tablespoons of vegetable oil in a large skillet. I use medium-high heat for this. Then, I add 2 pounds of lamb shoulder, cut into bite-sized pieces. I sear the lamb until it is browned on all sides. This step adds great flavor. Once browned, I remove the lamb from the skillet and set it aside. Next, I keep the same skillet for the next step. I add 1 large finely chopped onion, 4 minced garlic cloves, and 1 tablespoon of grated fresh ginger. I sauté these until the onion is soft and translucent, which takes about 5 minutes. After that, I stir in 2 tablespoons of curry powder, 1 tablespoon of ground cumin, 1 teaspoon of ground coriander, and 1 teaspoon of turmeric. I let the spices cook for another 1-2 minutes until they smell great. Now, I transfer the sautéed onion and spice mix to the slow cooker. I add the seared lamb back in. Next, I pour in 1 can of coconut milk, 1 cup of vegetable broth, and 1 can of diced tomatoes. I stir everything together well. Then, I add 2 medium sliced carrots and 1 diced red bell pepper. I season the mix with salt and pepper to taste. I cover the slow cooker and set it to cook. I can choose to cook on low for 8 hours or high for 4 hours. I prefer low heat for tender lamb. In the last 30 minutes of cooking, I stir in 1 cup of frozen peas. This adds color and sweetness. Before serving, I garnish the curry with fresh chopped cilantro. For the best slow cooker lamb curry, I recommend using lamb shoulder. This cut has great flavor and tenderness when cooked slowly. It breaks down well, making it perfect for a curry. Lamb leg is another option, but it can be a bit leaner. When considering price, lamb shoulder is often more affordable than leg. Check local markets and sales for the best deals. Sometimes, buying in bulk can save money too. To make your curry even tastier, adjust the seasoning based on your taste. You can add more salt or pepper if needed. I love using fresh herbs, like cilantro, to brighten the dish. For spices, try mixing curry powder with garam masala for an extra kick. You can also add a pinch of cinnamon for warmth. Don’t forget to taste as you go. This helps you find the perfect balance. Serve your slow cooker lamb curry over fluffy basmati rice. The rice soaks up the sauce and adds a nice texture. You can also use naan bread to scoop up the curry. For a beautiful presentation, garnish with fresh cilantro and a sprinkle of chili flakes. This adds color and a hint of heat. It makes your dish look as good as it tastes! Pro Tips Marinate the Lamb: For deeper flavor, marinate the lamb in yogurt and spices for a few hours or overnight before cooking. Layer the Flavors: Searing the meat and sautéing the aromatics first helps build a richer, more complex flavor in the curry. Customize the Vegetables: Feel free to add or substitute vegetables like potatoes or green beans based on your preference or what you have on hand. Serve with Accompaniments: Pair the curry with naan bread or a side of yogurt to balance the spices and enhance the meal. {{image_2}} You can switch up the protein in this curry. If you want to use beef or chicken, they work well with the same spices. Beef adds a rich flavor, while chicken offers a lighter taste. For a vegetarian twist, you can try chickpeas or lentils. They will soak up the curry flavors nicely. Do you like your curry mild or spicy? If you want a mild lamb curry, use less curry powder and skip hot peppers. For a spicy kick, add chili flakes or fresh chilies. You can also add a bit of cayenne pepper for extra heat. Adjust to your taste for the perfect balance. Curry has many regional styles. Indian curries often use yogurt and fresh herbs, while Thai curries may include lime leaves and basil. You can even make fusion dishes by adding ingredients like peanut butter for a Thai twist. Explore different spices to create your own unique flavor profile. After enjoying your meal, let the leftovers cool. Place them in airtight containers. This keeps them fresh and safe. Glass or plastic containers work well. Label them with the date so you remember when you stored them. To freeze your curry, let it cool completely. Transfer it to freezer-safe containers. Leave some space at the top, as it will expand. You can also use freezer bags. When ready to eat, thaw it in the fridge overnight. Reheat it on the stove until hot. For best taste, add a splash of coconut milk while reheating. In the fridge, your lamb curry lasts about 3 to 4 days. If frozen, it can last up to 3 months. Always check for signs of spoilage before eating. If you see any strange colors or smell anything off, toss it away. Safe food means tasty food! You can skip searing the lamb, but it has pros and cons. Searing gives the meat a rich, deep flavor and nice color. It also adds texture. If you skip it, your curry may be less rich but still tasty. For busy days, just add the raw lamb straight to the slow cooker. You can serve lamb curry with rice or bread. Basmati rice is a classic choice. Naan or roti adds a nice touch too. For a fresh side, try a simple salad. You can also serve yogurt or chutney for added flavor. These pairings balance the curry's richness and spice. Cook the lamb on low for 8 hours or on high for 4 hours. The lamb should be tender and fall apart easily. If you're short on time, use the high setting. Just be sure to check the lamb's doneness. Yes, you can use frozen vegetables in your curry. They save time and add nutrition. Just add them in the last 30 minutes of cooking. This keeps them bright and slightly crisp. Make sure to adjust the seasoning, as frozen veggies can be less flavorful. This blog post covers the essentials for making slow cooker lamb curry. You learned about the key ingredients, spices, and step-by-step instructions to create a flavorful dish. I shared tips for selecting the right lamb and adjusting flavors. You also found different variations to suit your taste and storage tips for leftovers. Slow cooker lamb curry is a delicious, versatile meal. It’s easy to make and perfect for sharing. With a few simple steps, you can enjoy this hearty dish anytime.
    Satisfying Slow Cooker Lamb Curry Easy Family Meal
  • For this dish, you need some key ingredients. Here is what you will need: - 1 lb (450g) boneless, skinless chicken thighs, cut into bite-sized pieces - 1 cup fresh broccoli florets - 1 red bell pepper, sliced - 1 cup snap peas - 2 tablespoons olive oil - 1 tablespoon sesame oil - Salt and pepper to taste - 1/4 cup teriyaki sauce (store-bought or homemade) - 2 cloves garlic, minced - 1 teaspoon fresh ginger, grated - 1 teaspoon sesame seeds for garnish - 2 green onions, chopped for garnish These ingredients come together to create a tasty meal. The chicken gives protein, while the veggies add color and crunch. The teriyaki sauce ties all the flavors together with a sweet and savory taste. You can make this dish even better with some optional garnishes. Here are some ideas: - Chopped cilantro for freshness - Crushed red pepper flakes for heat - Lime wedges for a zesty kick These extras can add flavor and style to your dish. You can mix and match to find your favorite combinations. For this recipe, I recommend using boneless, skinless chicken thighs. They stay juicy and tender during cooking. If you prefer, you can use chicken breasts. Just remember, they may dry out faster. Cut your chicken into bite-sized pieces. This helps them cook evenly and soak up the teriyaki sauce well. {{ingredient_image_1}} Start by preheating your oven to 400°F (200°C). This step ensures even cooking. Next, line a large baking sheet with parchment paper. This makes for easy cleanup and helps food not to stick. In a mixing bowl, take 1 pound of boneless, skinless chicken thighs. Cut them into bite-sized pieces. Add 2 tablespoons of olive oil, 1 tablespoon of sesame oil, salt, and pepper. Pour in 1/4 cup of teriyaki sauce, and add 2 cloves of minced garlic and 1 teaspoon of grated ginger. Toss everything together until the chicken pieces are well coated in the marinade. In another bowl, gather the fresh veggies: 1 cup of broccoli florets, 1 sliced red bell pepper, and 1 cup of snap peas. Drizzle a little olive oil over the veggies. Add a pinch of salt and pepper. Toss them well to make sure they are seasoned nicely. Now it’s time to arrange the ingredients. Spread the marinated chicken on one half of the prepared baking sheet. On the other half, lay out the seasoned vegetables. Make sure they are spread out evenly for even cooking. Place the sheet pan in the preheated oven. Bake for about 25-30 minutes. Check that the chicken is cooked through and the veggies are tender-crisp. Use a meat thermometer to ensure the chicken reaches 165°F (74°C) for safety. Once cooked, remove the sheet pan from the oven. Let it cool for a few minutes. For a final touch, sprinkle 1 teaspoon of sesame seeds and chopped green onions on top. Serve the teriyaki chicken and veggies on a large platter. Drizzle any leftover teriyaki sauce over the dish for added flavor. Enjoy! To get juicy, tender chicken, start with boneless, skinless thighs. They stay moist during cooking. Cut the chicken into small, even pieces. This helps it cook uniformly. Marinate the chicken in teriyaki sauce, olive oil, and spices for at least 30 minutes. This boosts flavor and tenderness. When baking, check the internal temperature. It should reach 165°F (74°C). Let the chicken rest for a few minutes after baking. This keeps the juices inside. For the best veggies, use fresh broccoli, red bell pepper, and snap peas. Cut them into similar sizes to ensure even cooking. Toss them lightly in olive oil and season with salt and pepper. This enhances their natural taste. Spread the veggies out on the sheet pan, leaving space between them. This allows heat to circulate and helps them stay crisp. Bake them until they are tender yet still vibrant in color. Meal prep makes weeknight cooking a breeze. Chop your chicken and vegetables ahead of time. Store them in separate containers in the fridge. You can marinate the chicken a day before cooking. This saves time and adds flavor. On busy nights, simply preheat the oven and bake. In about 30 minutes, you’ll have a tasty meal ready. Consider doubling the recipe. This way, you have extra servings for lunch or dinner later in the week. Pro Tips Marinate for Flavor: For even more flavor, marinate the chicken in the teriyaki sauce for at least 30 minutes or overnight in the refrigerator before cooking. Customize Your Veggies: Feel free to substitute any vegetables you have on hand, such as zucchini, bell peppers, or carrots, to suit your taste. Check Chicken Temperature: Always use a meat thermometer to ensure the chicken reaches an internal temperature of 165°F (74°C) for safe consumption. Leftover Storage: Store any leftovers in an airtight container in the refrigerator for up to 3 days. Reheat in the oven for best results. {{image_2}} To make this dish gluten-free, choose a gluten-free teriyaki sauce. Many brands offer tasty options. You can also make your own sauce using tamari instead of soy sauce. This gives you the same great flavor without gluten. You can swap in many veggies for this recipe. Some great choices include: - Carrots, sliced - Zucchini, chopped - Cauliflower florets - Bell peppers of any color Mix and match to find your favorite blend. Each veggie adds unique tastes and textures to your meal. Store-bought teriyaki sauce is quick and easy. However, making homemade teriyaki sauce is simple and fun. Combine soy sauce, honey, garlic, and ginger in a bowl for a fresh taste. Homemade sauce lets you control the flavor and sweetness. Plus, it can be free of preservatives. To keep your sheet pan teriyaki chicken and veggies fresh, let them cool first. Transfer the leftovers to an airtight container. Make sure to divide them into smaller portions. This helps them cool faster and makes reheating easier. Store the container in the fridge. They will stay good for up to three days. When you're ready to enjoy your leftovers, the best method is to use the oven. Preheat your oven to 350°F (175°C). Place the chicken and veggies on a baking sheet. Cover them with foil to keep moisture in. Heat for about 15-20 minutes, or until warmed through. You can also microwave them. Place the food in a microwave-safe dish. Heat in short bursts, stirring in between, until hot. If you want to save your leftovers for later, freezing works well. Use freezer-safe bags or containers. Make sure to remove as much air as possible to prevent freezer burn. Label the bags with the date. You can freeze them for up to three months. When ready to eat, thaw in the fridge overnight. Reheat as mentioned above for the best taste. You should bake the chicken for 25 to 30 minutes. Make sure the chicken reaches 165°F (74°C) for safety. This time lets the chicken cook through while keeping it juicy. Yes, you can use chicken breasts. They will cook faster than thighs. Adjust the baking time to around 20 to 25 minutes. The key is to check the internal temperature to ensure it is fully cooked. Great choices include broccoli, bell peppers, and snap peas. You can also add carrots, zucchini, or mushrooms. These veggies soak up the teriyaki sauce well and add color to the dish. Absolutely! You can mix soy sauce, honey, garlic, and ginger for a quick version. Combine: - 1/4 cup soy sauce - 2 tablespoons honey - 1 clove garlic, minced - 1 teaspoon grated ginger This sauce is easy and fresh! To make it meal prep-friendly, store leftovers in airtight containers. You can also cook extra chicken and veggies in advance. This way, you can quickly reheat them for lunch or dinner. This article covered all you need for a delicious sheet pan teriyaki chicken dinner. You learned about essential ingredients, marinating chicken, and arranging veggies. I shared tips for perfect cooking and meal prep. Variations like gluten-free options make this dish adaptable. Finally, we discussed storage and reheating to keep leftovers tasty. With these steps, you can make a fun and easy weeknight meal any time. Enjoy trying this recipe and making it your own!
    Sheet Pan Teriyaki Chicken & Veggies Savory Delight
  • - Pasta: You will need 400g of penne pasta. This type holds sauce well. - Fresh produce: Use 500g of cherry tomatoes. Halve them for easy cooking. Add 2 cloves of minced garlic for flavor. Fresh basil, about 1/4 cup, adds freshness. - Cheese selection: Use 300g of fresh mozzarella. Tear it into pieces. Top with 1/4 cup of grated Parmesan cheese for richness. - Other essentials: Use 2 tablespoons of olive oil to sauté. Season with salt, pepper, and optional red pepper flakes for a kick. These ingredients come together to create a warm and hearty dish. Each one plays a key role in the final flavor. The sweetness of the tomatoes pairs well with the creamy cheese. The basil adds a fresh note that brightens every bite. Using quality ingredients makes a big difference! {{ingredient_image_1}} To cook penne pasta perfectly, start with a large pot. Fill it with water and add a good amount of salt. The salt makes a big difference in flavor. Bring the water to a rolling boil. Add the penne pasta and stir well. Cook according to package instructions until it is al dente, or firm to the bite. This usually takes about 10-12 minutes. Once cooked, drain the pasta and set it aside. In a large skillet, pour in the olive oil and heat it over medium heat. Add the minced garlic and sauté for about 1 minute. Be careful not to brown the garlic; it should smell great but stay light. Next, add the halved cherry tomatoes. Stir them occasionally for about 5-7 minutes. You want them to soften and break down. Season the mix with salt, pepper, and red pepper flakes if you like some heat. Now it's time to bring everything together. Lower the heat and add the drained penne pasta to the skillet. Toss the pasta with the tomato mixture until every piece is coated. Tear the fresh mozzarella into pieces and add it to the pan. Stir gently so the cheese melts slightly but does not fully dissolve. Transfer the pasta to a serving dish and top it with grated Parmesan cheese. Add extra basil for a fresh touch. Enjoy your hearty Pasta alla Sorrentina! To get the best flavor in Pasta alla Sorrentina, balance is key. Use ripe cherry tomatoes for sweetness. Fresh mozzarella adds creaminess and a rich taste. Don't forget the fresh basil; it brightens the dish. A splash of olive oil brings everything together. Common mistakes often include overcooking pasta. Always cook until al dente, which means firm but not hard. When you sauté garlic, don't let it brown; it can turn bitter. Lastly, avoid adding too much salt to the sauce. You can always add more later, but you can't take it out. Pasta alla Sorrentina pairs well with a light salad. A simple arugula salad with lemon dressing works nicely. You can also serve it with crusty bread for dipping. For presentation, use a large serving dish. Top it with extra basil and a sprinkle of Parmesan cheese. This makes the dish look fresh and inviting. Serve it hot, and watch everyone enjoy your creation! Pro Tips Use Fresh Ingredients: For the best flavor, opt for fresh cherry tomatoes and mozzarella. They will elevate the dish and add authentic Sorrento taste. Adjust the Spice Level: If you prefer a milder dish, omit the red pepper flakes. For more heat, increase the amount according to your taste. Don't Overcook the Pasta: Cook the penne just until al dente, as it will continue to cook slightly when mixed with the hot tomato sauce. Garnish for Presentation: Sprinkle additional fresh basil and Parmesan cheese on top before serving to enhance the dish's visual appeal. {{image_2}} You can switch up the pasta in Pasta alla Sorrentina. While I love using penne, any pasta shape works. Fusilli or rigatoni hold sauce well too. Just cook according to package instructions. Seasonal vegetables can make this dish shine. In summer, try adding zucchini or bell peppers. In fall, roasted butternut squash adds sweetness. Toss these veggies in with the tomatoes for a tasty twist. To make Pasta alla Sorrentina vegetarian, just skip the cheese or use plant-based options. Vegan mozzarella is widely available now. It melts nicely and tastes great. If you need a gluten-free option, use gluten-free pasta. Many brands offer pasta that cooks well and tastes good. Follow the cooking instructions on the package for best results. To keep your leftover Pasta alla Sorrentina fresh, cool it down first. Place it in an airtight container. Store it in the fridge. It lasts for about three days. Make sure to label it with the date. For longer storage, freeze the pasta. Use a freezer-safe container or bag. This way, it can last for up to three months. When you are ready to enjoy your leftovers, use gentle heat to warm them up. The best methods are the oven or stovetop. For the stovetop, add a splash of water or olive oil. This helps keep the pasta moist. Stir often to prevent it from sticking. If using the oven, cover the dish with foil. This keeps the moisture in. Avoid using the microwave if you can. It tends to dry out the pasta. Enjoy your meal just like when it was fresh! What is the origin of Pasta alla Sorrentina? Pasta alla Sorrentina comes from Sorrento, Italy. This coastal town is known for its fresh ingredients. The dish highlights local tomatoes and mozzarella. It reflects the sunny flavors of Southern Italy. Can I make this dish ahead of time? Yes, you can prepare Pasta alla Sorrentina in advance. Cook the pasta and sauce separately. Combine them just before serving. This keeps the pasta from getting mushy. You can also store it in the fridge for up to three days. How do I know when my pasta is al dente? Pasta is al dente when it is firm but not hard. To check, taste a piece a minute before the package time ends. It should have a slight bite without being raw. What can I use instead of fresh mozzarella? If you don’t have fresh mozzarella, use low-moisture mozzarella. You can also try burrata cheese for a creamy texture. Another option is ricotta for a different taste. Just be sure to adjust the amount to suit your dish. This post covered all the key steps to make Pasta alla Sorrentina. We discussed the fresh ingredients needed and how to cook the pasta perfectly. You learned tips for making a tasty sauce and the best ways to combine everything. Use these ideas as a guide to create your own version. Enjoy the process and the flavors! Cooking should be fun and satisfying. Now it’s time to get in the kitchen and start making your dish.
    Pasta alla Sorrentina Flavorful and Hearty Dish
  • - 4 boneless, skinless chicken thighs - 2 tablespoons olive oil - 1 medium onion, thinly sliced - 2 cloves garlic, minced - 2 medium carrots, sliced - 1 cup Brussels sprouts, halved - 1 medium sweet potato, diced - 1 teaspoon dried thyme - 1 teaspoon paprika - ½ teaspoon ground cinnamon - Salt and pepper to taste These ingredients come together to create a warm, hearty dish for fall. The chicken thighs provide rich flavor and protein. The seasonal vegetables add color and nutrition. I love how the sweet potato brings a touch of sweetness. - 1 cup low-sodium chicken broth - 1 tablespoon apple cider vinegar - ¼ cup chopped fresh parsley (for garnish) Chicken broth adds moisture. It makes the dish even more savory. Apple cider vinegar adds a nice tang that brightens every bite. Fresh parsley makes a great garnish. It adds a pop of color and fresh flavor. By using these ingredients, you can create a meal that not only tastes great but also brings the cozy flavors of autumn to your table. {{ingredient_image_1}} First, let's prepare the chicken. Take the four boneless, skinless chicken thighs. Sprinkle salt, pepper, dried thyme, and paprika on both sides. This gives the chicken a nice flavor. Set it aside for a moment. Next, we slice and dice our vegetables. For the onion, thinly slice it. Mince the garlic cloves. Cut the carrots into slices. Halve the Brussels sprouts. Finally, dice the sweet potato into small cubes. Now, heat 2 tablespoons of olive oil in a large skillet over medium-high heat. Once the oil is hot, add the chicken thighs. Sear them for about five minutes on each side. Look for a golden brown color. Once cooked through, transfer the chicken to a plate. Cover it to keep warm. In the same skillet, add the sliced onion and minced garlic. Sauté these for about 2-3 minutes. You want them to soften and smell great. Next, add the sliced carrots, halved Brussels sprouts, and diced sweet potato. Stir well and let them cook for about five minutes. The vegetables should start to soften. Pour in 1 cup of low-sodium chicken broth and the 1 tablespoon of apple cider vinegar. Bring this mixture to a simmer. Reduce the heat to low. Return the chicken to the skillet. Nestle it among the vegetables. Cover the skillet and cook for an additional 10-15 minutes. Check that the vegetables are tender and the sweet potato is cooked through. Taste the dish. Adjust the seasoning if needed. You can add more salt, pepper, or even a pinch of cinnamon. Finally, remove the skillet from the heat. Sprinkle ¼ cup of chopped fresh parsley over the top before serving. This adds a fresh pop of color and flavor. To achieve a perfectly seared chicken, start with a hot skillet. Heat your olive oil until it shimmers. Season the chicken thighs with salt, pepper, thyme, and paprika. Place them in the pan and don’t move them for five minutes. This helps form a nice crust. Flip and cook the other side until golden brown. For cooking vegetables to tenderness, chop them into even pieces. This helps them cook at the same rate. Add the onions and garlic first, and let them soften. Then, add the carrots, Brussels sprouts, and sweet potato. Stir occasionally and let them cook for about five minutes. Pour in the chicken broth and let everything simmer. To enhance the autumn flavors, try adding nutmeg or sage. These spices bring warmth to your dish. You can also adjust the paprika for a smoky touch. Experiment with different spice levels to find what you like best. When using herbs, fresh herbs often provide brighter flavors. Add fresh parsley right before serving for a pop of color and taste. Dried herbs work well too but use less since they are more concentrated. A teaspoon of dried thyme or rosemary can add depth without overpowering. Pro Tips Use Bone-In Chicken: For added flavor and moisture, consider using bone-in chicken thighs. They will enhance the richness of the dish. Seasoning Variations: Feel free to experiment with different herbs like rosemary or sage instead of thyme for a unique twist on flavor. Vegetable Substitutions: Swap out Brussels sprouts or sweet potatoes for seasonal vegetables like butternut squash or parsnips to suit your taste. Make It One-Pan: For a complete meal, add quinoa or rice directly into the skillet along with the broth for a heartier dish. {{image_2}} You can easily switch up the veggies in this recipe. Use what’s fresh or in season. Try using butternut squash instead of sweet potato. You can also add parsnips or turnips for a unique taste. If Brussels sprouts aren’t your favorite, replace them with green beans or broccoli. When it comes to chicken, you can use different cuts. Chicken breasts work well if you prefer lean meat. Bone-in chicken legs will add more flavor, too. Just adjust the cooking time for thicker cuts. If you need a gluten-free meal, this recipe is perfect! All the ingredients are naturally gluten-free. Just make sure your chicken broth is gluten-free. For a low-carb version, skip the sweet potato. Instead, add more green veggies like zucchini or spinach. This keeps it light while still being filling. You can enjoy all the autumn flavors without the carbs! To store your Autumn Harvest Chicken Skillet, let it cool first. Then, place it in an airtight container. This keeps it fresh for up to three days in the fridge. When you're ready to eat, reheat it on the stove over low heat. Stir it often to warm it evenly. You can also use the microwave for quick reheating. Just cover it with a lid or a damp paper towel. This helps to keep the chicken moist and tasty. If you want to save some for later, freezing is a great option. First, let the skillet meal cool completely. Then, divide it into portions and place them in freezer-safe containers. Make sure to leave some space at the top for expansion. You can freeze it for up to three months. When you’re ready to enjoy it, take it out and thaw it overnight in the fridge. To cook from frozen, heat it in a skillet over medium heat. Add a splash of chicken broth to help it warm up evenly. Cook it until it's heated through, stirring often. This makes for a quick and easy meal later on! Yes, you can use bone-in chicken. It will add a richer flavor. Just adjust the cooking time. Bone-in chicken takes longer to cook than boneless. Make sure the chicken reaches an internal temperature of 165°F. This dish goes well with many sides. Here are some great options: - Crusty bread for dipping - A simple green salad - Roasted potatoes or sweet potatoes - Steamed green beans or broccoli These sides will balance the meal and add more colors to your plate. You can prepare this dish a day ahead. Cook it and let it cool completely. Store it in an airtight container in the fridge. When ready to serve, reheat it on the stove or in the oven. You may need to add a splash of broth to keep it moist. This way, you save time and still enjoy a tasty meal. This blog post shows you how to make a tasty Autumn Harvest Chicken Skillet. You learned about the key ingredients and how to prepare them. I shared cooking tips for perfect chicken and tender veggies. Variations let you customize the dish to fit your diet or taste. Don't forget how to store leftovers properly. Enjoy this meal with family or friends. It brings comfort and warmth to any table. Now, go ahead and create your own delicious version!
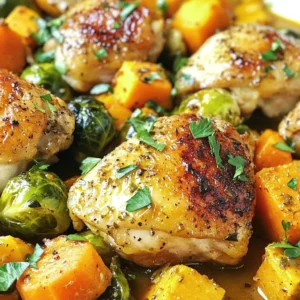
    Autumn Harvest Chicken Skillet Flavorful Family Meal
  • For this One-Pot Greek Chicken and Rice, you need some key items: - 4 boneless, skinless chicken thighs - 1 cup long-grain rice (like basmati or jasmine) - 2 cups chicken broth - 1 medium onion, diced - 3 cloves garlic, minced These main ingredients form the base of the dish. The chicken thighs bring flavor and protein. The rice soaks up all the tasty broth. The onion and garlic add depth to every bite. To make the dish pop with flavor, add these: - 1 cup diced tomatoes (fresh or canned) - 1 cup bell peppers, diced (red and yellow for color) - 1/2 cup Kalamata olives, pitted and sliced - 1 teaspoon dried oregano - 1 teaspoon dried thyme - 1 teaspoon paprika - Salt and pepper to taste These flavorings enhance the dish’s Greek roots. The tomatoes add juiciness. The bell peppers provide a sweet crunch. Olives add a briny touch, while the herbs and spices create a lovely aroma. For a fresh finish, you can use: - Fresh parsley, chopped (for garnish) - Lemon wedges (for serving) Garnishing with parsley adds a pop of color. Lemon wedges bring brightness and zest to the meal. These touches make each plate look and taste special. {{ingredient_image_1}} First, we need to create a tasty base. Heat 2 tablespoons of olive oil in a large pot over medium heat. Add 1 diced onion and sauté it for 3-4 minutes. You want it to be soft and clear. Next, stir in 3 minced garlic cloves. Cook for just 1 more minute. Make sure the garlic does not burn. This step adds a great flavor to your dish. Now it’s time to add the chicken. Take 4 boneless, skinless chicken thighs and season them with salt, pepper, 1 teaspoon of paprika, 1 teaspoon of oregano, and 1 teaspoon of thyme. Place the chicken in the pot. Cook it for 4-5 minutes on each side until it gets a nice brown color. This browning locks in the juices and adds depth to the dish. Once the chicken is browned, it’s time to add the rest. Toss in 1 cup of diced bell peppers and 1 cup of diced tomatoes. Stir everything so it mixes well. Next, add 1 cup of long-grain rice and 2 cups of chicken broth. Make sure the rice is evenly spread in the pot. This combination will create a wonderful harmony of flavors. Bring the pot to a gentle boil. Then, lower the heat and cover it. Let it simmer for about 20-25 minutes. The rice will soak up all the delicious broth. In the last 5 minutes, sprinkle 1/2 cup of sliced Kalamata olives on top. Cover the pot again to warm the olives. After cooking, let it sit for 5 minutes without removing the lid. Fluff the rice with a fork. Serve each portion with fresh parsley and lemon wedges on the side. Enjoy your meal! Sautéing and browning are key steps here. Start with medium heat to avoid burning. Use a large pot to give your chicken space. I prefer olive oil for its rich flavor. Cook the onion until soft and clear. This takes about 3-4 minutes. Then, add garlic for just one more minute. Watch it closely. You want it fragrant, not brown. Season your chicken well. Use salt, pepper, paprika, oregano, and thyme. This mix gives a great taste. Brown the chicken for 4-5 minutes on both sides. This step adds color and flavor. Don't overcrowd the pot; cook in batches if needed. Looking to boost the flavor? Try adding cumin or coriander for a warm note. A pinch of red pepper flakes brings heat. If you like tang, add a splash of red wine vinegar. You can also mix in some fresh herbs like dill or mint at the end for freshness. For a Mediterranean twist, add feta cheese before serving. This creamy cheese enhances the dish nicely. Pair this dish with a simple salad. A Greek salad with cucumber, tomatoes, and olives works great. For drinks, a chilled white wine or sparkling water is ideal. If you want more warmth, serve with warm pita bread. It’s perfect for soaking up the flavors of the dish. Don't forget to add lemon wedges. A squeeze of lemon brightens every bite. This dish is all about flavor and comfort! Pro Tips Use Fresh Herbs: Incorporating fresh oregano or thyme can enhance the flavor profile of your dish, adding brightness and freshness. Rest the Dish: Allowing the dish to sit covered after cooking helps the flavors meld and the rice to firm up, making for a better texture. Adjust the Olives: If you prefer less salt, consider rinsing the Kalamata olives before adding them to reduce their brininess. Serving Suggestions: Pair your meal with a light Greek salad or tzatziki for a refreshing contrast to the warm, savory dish. {{image_2}} You can switch up the proteins in this recipe. Try using boneless pork chops or shrimp for a fun twist. Both options will soak up the flavors well. If you want to go lighter, chicken breast works nicely too. For the rice, long-grain rice is great, but you can also use quinoa or couscous. Each option changes the dish's texture, making it exciting. To make this dish healthier, consider adding more veggies. You can toss in spinach, zucchini, or mushrooms. They will add color and nutrients without changing the taste much. Another option is to use brown rice instead of white rice. Brown rice has more fiber and keeps you full longer. You can also reduce the olive oil to lighten the dish while still keeping it flavorful. Want to make this a meat-free meal? It’s easy! Swap out the chicken for chickpeas or lentils. Both are packed with protein and will absorb the great flavors of the broth and spices. You can also use vegetable broth instead of chicken broth. This creates a rich and tasty base. Just remember to add your favorite veggies to keep it hearty and satisfying. After you enjoy your One-Pot Greek Chicken and Rice, store leftovers in an airtight container. This helps keep the dish fresh. It will last in the fridge for about 3 to 4 days. Make sure to let it cool before sealing it up. This step helps prevent moisture buildup. If you want to save some for later, freezing is a great option. Allow the dish to cool completely, then place it in a freezer-safe container. It can stay in the freezer for up to 3 months. For best results, split the dish into smaller portions. This way, you can take out only what you need. When you're ready to eat, thaw it overnight in the fridge. Reheat it gently on the stove or in the microwave until it's hot. Making this dish ahead of time is easy. You can prepare it on a day when you have some free time. Store it in the fridge for up to 4 days or freeze it for longer. For meal prep, divide it into single servings. This makes it easy to grab and go. Use different containers to keep things fun. You can also add extra veggies or sides for variety. To make this dish gluten-free, you need to use gluten-free rice. Long-grain rice like basmati or jasmine is often gluten-free. You should also check the chicken broth label. Ensure it does not contain gluten. Many store-bought brands are gluten-free. Yes, you can use brown rice. However, brown rice takes longer to cook. You need to adjust the cooking time. I suggest adding an extra 10-15 minutes to the cooking time. Keep an eye on the liquid level. Brown rice may need more broth. If your rice isn’t cooking, check the heat. Make sure it’s not too high. If the rice is still hard, add a bit more broth or water. Cover the pot and let it cook longer. Stir occasionally to prevent sticking. Yes, you can adapt this recipe for a slow cooker or Instant Pot. For a slow cooker, cook on low for 4-6 hours. For an Instant Pot, set it to manual for about 10 minutes. Make sure to adjust the liquid amount for both methods. This blog post shared a simple, delicious One-Pot Greek Chicken and Rice recipe. We covered the main ingredients, step-by-step instructions, and handy tips for cooking. You learned about variations to suit your taste and how to store leftovers. With these insights, you can easily create a flavorful meal. Enjoy experimenting with flavors, or make it your own. Remember, cooking is fun! Now, you have the tools to make a tasty dish anytime. Happy cooking!
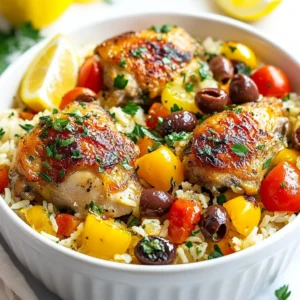
    One-Pot Greek Chicken and Rice Flavorful Comfort Dish
  • - 1 package yellow cake mix - 1 cup canned pumpkin puree - 3 large eggs - 1/2 cup vegetable oil - 1 cup water - 1 tablespoon pumpkin pie spice - 1 can (14 oz) sweetened condensed milk - 1/2 cup caramel sauce, plus extra for drizzling - 1 cup whipped topping (or whipped cream) - 1/4 cup chopped pecans (optional) - Ground cinnamon for dusting (optional) To make this pumpkin caramel poke cake, you need simple ingredients. Each one plays a role in creating the rich flavors and textures. The yellow cake mix gives the base its lightness. Canned pumpkin puree adds moisture and a warm, earthy taste. Eggs bind everything together while the vegetable oil keeps it soft. Water helps to mix the batter smoothly. Pumpkin pie spice brings in a blend of cinnamon, nutmeg, and clove, which gives that classic fall flavor. The sweetened condensed milk is key for soaking the cake, making it creamy and decadent. Caramel sauce adds a sweet touch, while whipped topping or cream contributes to the cake's richness. You can add chopped pecans for crunch and ground cinnamon for a lovely finish. These ingredients come together to make an irresistible dessert treat that everyone will love. - Mixing bowls - Electric mixer - Baking dish (9x13 inch) - Wooden spoon or skewer When preparing this cake, you will need some basic tools. Mixing bowls are essential for combining the ingredients. An electric mixer helps to beat the batter quickly and evenly. A 9x13 inch baking dish is perfect for baking this cake, giving it a nice, flat surface. Lastly, you will want a wooden spoon or skewer. This will help you poke holes in the cake for soaking it with caramel. With these tools, you are ready to create a delicious pumpkin caramel poke cake that will impress your friends and family! 1. Preheat the oven and prepare the baking dish. Start by setting your oven to 350°F (175°C). While it heats, take a 9x13 inch baking dish and grease it with oil or butter. Then, sprinkle some flour to coat the bottom and sides. This helps the cake come out easily. 2. Combining the ingredients in a mixing bowl. In a large mixing bowl, add one package of yellow cake mix, one cup of canned pumpkin puree, three large eggs, half a cup of vegetable oil, one cup of water, and one tablespoon of pumpkin pie spice. Use an electric mixer to beat these on medium speed for about two minutes. The mix should look smooth and well blended. 3. Pouring and spreading the batter. Next, pour the cake batter into your prepared baking dish. Use a spatula to spread it evenly across the dish. This ensures every bite is just as good as the last. 1. Baking time and temperature settings. Place the baking dish in your preheated oven. Bake for 25 to 30 minutes. The cake should rise and get a nice golden color. 2. Checking for doneness with a toothpick. To check if the cake is done, insert a toothpick into the center. If it comes out clean, your cake is ready. If it has batter on it, bake for a few more minutes. 1. Cooling the cake and poking holes. After baking, remove the cake from the oven and let it cool in the pan for about 10 minutes. Once it cools a bit, take the handle of a wooden spoon or a skewer and poke holes all over the cake. Space them about one inch apart. This is what makes it a poke cake! 2. Mixing the caramel and sweetened condensed milk. In a medium bowl, mix together one can of sweetened condensed milk and half a cup of caramel sauce until it’s well combined. 3. Pouring the mixture over the cake. Pour this caramel mixture evenly over the warm cake, letting it soak into all those holes. This gives the cake its sweet, gooey goodness. - To keep your cake moist, do not overbake it. Check for doneness at 25 minutes. - You can use a different cake mix if you want. Spice cake works great too. - For a lovely look, cut the cake into squares. Serve on nice plates. - Drizzle extra caramel on top. Add a sprinkle of pecans for crunch. - This cake pairs well with vanilla ice cream or a cup of coffee. - Overmixing the batter can make the cake tough. Mix just until combined. - Make sure to cool the cake before adding the caramel. This helps it soak in better. {{image_2}} You can take your Pumpkin Caramel Poke Cake to the next level. Add chocolate chips for a sweet touch. They melt into the cake, giving it a rich flavor. You can also toss in some nuts like pecans or walnuts for a nice crunch. This adds texture and makes each bite exciting. Another fun idea is to switch the cake mix. Instead of yellow cake mix, try spice cake mix. This adds more warmth and depth to the flavors. The spice mix pairs perfectly with pumpkin. You can even use a chocolate cake mix for a sweeter twist. The chocolate and caramel create a delightful contrast. For a twist on the topping, try cream cheese frosting instead of whipped topping. Cream cheese adds a tangy taste that balances the sweetness. It’s also smooth and rich, making your cake extra special. Just whip together some cream cheese, butter, and powdered sugar for a quick mix. If you want a more elegant touch, use a chocolate ganache. Melt chocolate with cream for a shiny topping. Pour it over the cake instead of caramel. This makes the dessert look fancy and taste divine. You can adapt this cake for different holidays. For Halloween, add spooky decorations like candy corn or chocolate spiders. This makes it fun for kids and adults alike. During Thanksgiving, top the cake with pecans and a sprinkle of cinnamon. This gives it a festive look and flavor. You can even serve it with a scoop of vanilla ice cream on the side. It’s a perfect treat for the holiday season. To keep your Pumpkin Caramel Poke Cake fresh, store it in the fridge. Use an airtight container to prevent the cake from drying out. You can also wrap it tightly with plastic wrap. If you want to save some for later, you can freeze it. Cut the cake into slices, wrap each slice in plastic wrap, and place them in a freezer bag. This way, you can enjoy a piece whenever you like. In the fridge, this delightful cake lasts about four to five days. After that, the taste and texture may start to fade. Look for signs of spoilage like a sour smell or mold. If you see any of these signs, it’s best to toss the cake. Enjoy your Pumpkin Caramel Poke Cake while it's fresh for the best flavor! A poke cake is a simple dessert where you poke holes in a baked cake and fill them. This allows toppings or sauces to soak into the cake, adding extra flavor and moisture. The idea became popular in the 1970s. It is fun to make and even more fun to eat! You can use any cake mix you like. For our Pumpkin Caramel Poke Cake, we use yellow cake mix and pumpkin puree. This gives it a rich, fall flavor. Yes, you can make this cake ahead of time! I suggest baking and soaking it the day before you plan to serve it. This way, the flavors meld nicely. After you poke the holes and pour the caramel mixture, let it cool. Then, cover it and place it in the fridge for at least two hours or overnight. This makes the cake even tastier when you serve it. Just remember to add the whipped topping and any garnishes right before serving. Absolutely! You can make this cake gluten-free by using a gluten-free cake mix. Many brands offer great options that taste just as good. Just check the packaging to ensure it’s safe for your needs. Also, be careful with the toppings. Ensure that the whipped topping and any other ingredients you use are gluten-free. This way, everyone can enjoy the deliciousness of the Pumpkin Caramel Poke Cake! This article covered how to make a delicious poke cake using simple ingredients and easy steps. You learned about the tools needed, baking tips, and common mistakes to avoid. I shared ways to enhance flavors and suggested storage tips. Get creative with toppings and variations to make this cake your own. Enjoy making and sharing this treat with friends and family. You will surely impress everyone with this tasty dessert!
    Pumpkin Caramel Poke Cake Irresistible Dessert Treat
  • To make Air Fryer Garlic Brussels Sprouts, you need fresh ingredients. Here’s what you will need: - 1 lb Brussels sprouts, trimmed and halved - 3 tablespoons olive oil - 4 cloves garlic, minced - 1 teaspoon smoked paprika - 1 teaspoon salt - 1/2 teaspoon black pepper - 1 tablespoon balsamic glaze (optional) - Fresh parsley, chopped (for garnish) Each ingredient plays a key role in flavor and texture. The Brussels sprouts give a nice crunch. Olive oil helps them crisp up in the air fryer. Garlic brings a rich taste, while smoked paprika adds warmth. Salt and black pepper enhance all the flavors. The balsamic glaze is a fun touch, adding sweetness at the end. Finally, fresh parsley brightens the dish and adds color. Enjoy these simple yet vibrant flavors as a side dish or snack! Start by preheating your air fryer to 375°F (190°C). This step takes about 5 minutes. Preheating helps the Brussels sprouts cook evenly and get crispy. Now, take 1 pound of Brussels sprouts. Trim the ends and cut them in half. This helps them cook faster and soak in more flavor. Place the halved sprouts in a large mixing bowl. Next, drizzle 3 tablespoons of olive oil over the Brussels sprouts. Toss them well so they are fully coated. Then, add 4 minced garlic cloves, 1 teaspoon of smoked paprika, 1 teaspoon of salt, and 1/2 teaspoon of black pepper. Toss everything again until the sprout halves are covered in the seasoning. Place the seasoned Brussels sprouts in the air fryer basket. Make sure they are in a single layer. If you have a lot, cook them in batches. Air fry the sprouts for 15-18 minutes. Shake the basket halfway through to ensure they cook evenly. Your goal is crispy, golden-brown Brussels sprouts. Once they are done, take them out of the air fryer. If you want, drizzle 1 tablespoon of balsamic glaze over the top. This adds a sweet touch. Finish by garnishing with chopped fresh parsley for color and flavor. Enjoy your tasty side dish! To get crispy Brussels sprouts, start with fresh ones. Choose firm, bright green sprouts. Trim the ends and cut them in half. This helps them cook evenly. Toss them well with olive oil. Make sure each sprout is coated. The oil helps them crisp up in the air fryer. Don't crowd the basket. This lets hot air flow around each sprout. Air fry them at 375°F for 15 to 18 minutes. Shake the basket halfway through to cook evenly. You can customize the flavors based on your taste. If you want more heat, add cayenne pepper or red pepper flakes. For a tangy twist, mix in lemon juice or zest. If you love cheese, sprinkle some Parmesan before serving. Taste the mixture before air frying. Adjust salt and pepper to your liking. A little more garlic can add more punch. Don’t be afraid to experiment! If you have a lot of Brussels sprouts, cook them in batches. This keeps them crispy and delicious. Follow the same steps for each batch. Keep the first batch warm in the oven at a low temp, around 200°F. This way, you serve them all hot at once. You can also prep them ahead. Store them in the fridge after seasoning. When ready, just air fry them. They will still taste fresh and tasty! {{image_2}} You can easily enhance these Brussels sprouts with cheese. Try adding Parmesan or feta. After air frying, sprinkle the cheese on top. The heat will melt it, creating a delicious topping. It adds a rich, creamy flavor that pairs well with garlic. Want a kick? Add some heat! You can mix in red pepper flakes or cayenne pepper. Start with a small amount to find your perfect spice level. You can also use a spicy sauce, like Sriracha, during the last few minutes of cooking. This will make the Brussels sprouts flavorful and exciting. These Brussels sprouts can be made vegan-friendly. Simply skip the cheese or use a plant-based alternative. You can also drizzle some lemon juice after cooking for extra flavor. This brightens the dish without any animal products. Enjoy a tasty, plant-based side dish that everyone will love! After enjoying your crispy air fryer garlic Brussels sprouts, let them cool. Store them in an airtight container. They will keep well in the fridge for up to three days. If you want them to stay fresh longer, avoid adding the balsamic glaze until you serve them. To reheat your Brussels sprouts, use the air fryer for the best results. Preheat it to 375°F (190°C). Place the leftovers in the basket. Heat for about 5 to 7 minutes. This makes them crispy again. You can also use the oven, but the air fryer works better. You can freeze Brussels sprouts, but they may lose some crispness. First, cool them completely. Spread them out on a baking sheet in a single layer. Freeze them for about an hour. Then, transfer them to a freezer-safe bag. They will last for up to three months. When ready to eat, thaw them in the fridge before reheating. You should air fry Brussels sprouts for 15 to 18 minutes at 375°F (190°C). This time gives them a nice crispy texture. Remember to shake the basket halfway through. This helps them cook evenly. Yes, you can cook frozen Brussels sprouts in the air fryer. Just add a few extra minutes to the cooking time. They may need about 20 to 25 minutes. Make sure to toss them halfway through for the best results. Air-fried Brussels sprouts pair well with many dishes. You can serve them with grilled chicken, steak, or fish. They also work great with pasta or as a side to a hearty grain bowl. Add a drizzle of balsamic glaze for extra flavor. To reduce bitterness, try these tips: - Choose small, fresh Brussels sprouts; they tend to be sweeter. - Trim off the ends and remove any yellow leaves before cooking. - Use a bit of sweetness, like a drizzle of balsamic glaze, to balance the flavors. In this post, I shared how to make delicious air-fried Brussels sprouts. You learned the key ingredients, step-by-step instructions, and helpful tips for perfect results. We also explored fun variations and easy storage ideas. Brussels sprouts can be a tasty and healthy side dish. With these methods, you can enjoy them anytime. Keep experimenting with flavors to find your favorite! Happy cooking!
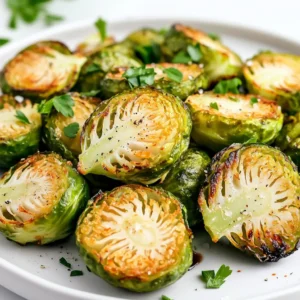
    Air Fryer Garlic Brussels Sprouts Flavorful Side Dish
  • To make the Apple Cinnamon Chia Pudding, you will need the following main ingredients: - 1 cup almond milk (or any milk of your choice) - 1/4 cup chia seeds - 1 medium apple, grated (preferably a sweeter variety like Fuji or Gala) - 1 tablespoon maple syrup (or to taste) - 1 teaspoon cinnamon - 1/2 teaspoon vanilla extract - Pinch of salt These ingredients work together to create a creamy and tasty pudding. Almond milk adds a light flavor and creaminess. Chia seeds are small but packed with nutrients. They help create the thick pudding texture. Grated apple brings sweetness and freshness. Maple syrup adds a natural sweetness that complements the cinnamon. Vanilla extract gives a warm note, while salt boosts all the flavors. You can make this pudding even better with some fun toppings. Here are some great options: - Diced apples - Cinnamon sprinkle - Crushed walnuts - Granola Using these toppings adds crunch and extra flavor. Diced apples keep the apple taste alive. A sprinkle of cinnamon enhances the warm spice flavor. Crushed walnuts add a nutty crunch. Granola brings a delightful texture and sweetness. You can mix and match these toppings to make it your own. Enjoy experimenting! 1. In a mixing bowl, whisk together these ingredients: - 1 cup almond milk (or any milk of choice) - 1 tablespoon maple syrup (or to taste) - 1 teaspoon cinnamon - 1/2 teaspoon vanilla extract - pinch of salt This mix should be smooth and well combined. 2. Gradually stir in 1/4 cup chia seeds. This step helps avoid clumps. Stir until they spread throughout the mix. 3. Fold in the grated apple. Use one medium apple, like Fuji or Gala for sweetness. Mix well to combine all flavors. 4. Cover the bowl with plastic wrap or a lid. Refrigerate for at least 4 hours or overnight. This chilling time lets the chia seeds swell, giving your pudding a creamy texture. 5. When ready to serve, stir the pudding well. If it's too thick, add a splash of almond milk. This helps adjust the consistency to your liking. 6. Serve the pudding in bowls or jars. For a pretty twist, layer the pudding with diced apples and toppings like crushed walnuts or granola. This adds crunch and flavor in every bite. For a great apple cinnamon chia pudding, pick sweet apples. Fuji and Gala are my favorites. They add a nice flavor and natural sweetness. You can also use Honeycrisp or Ambrosia for a twist. When it comes to milk, almond milk works well. But you can use any milk you like. Oat milk or coconut milk can give a creamier texture. Try different types to find your favorite! To avoid clumping, mix the chia seeds slowly. Stir them in gradually. This helps them spread out evenly in the mixture. After chilling, check the pudding's thickness. If it feels too thick, add a splash of milk. Stir well to get the right creamy feel. Make your pudding look fun and tasty! Layer it in clear jars. Start with chia pudding, then add diced apples. Top with a sprinkle of cinnamon and nuts for crunch. This not only looks good but also tastes great in each layer! {{image_2}} You can add a twist to your apple cinnamon chia pudding. Try mixing in a pinch of nutmeg or ginger. These spices bring warmth and depth to the flavor. If you want more sweetness, use honey or agave instead of maple syrup. Each option creates a unique taste that excites your palate. If you prefer dairy-free, use coconut milk or oat milk. Coconut milk adds a creamy texture and a hint of tropical flavor. Oat milk keeps it light and smooth. Both options work well with the other ingredients and keep the pudding rich without dairy. For some crunch, you can add nuts or seeds. Chopped walnuts or pecans provide a nice texture. You can also sprinkle in some sunflower seeds or pumpkin seeds. These extras not only enhance the taste but also boost the nutrition. Enjoy mixing and matching to find your favorite version! You can store your apple cinnamon chia pudding in the fridge for up to five days. This allows you to enjoy it as a quick breakfast or snack. Just make sure it stays covered to prevent it from absorbing other smells from the fridge. If you see any liquid separation, just stir it back together. Yes, you can freeze chia pudding! It lasts for up to three months in the freezer. To freeze, use an airtight container. When you're ready to eat it, thaw it in the fridge overnight. You may need to stir in a little milk to restore its creamy texture. Use glass or plastic containers with tight lids for the best storage. Mason jars work great, as they are easy to seal and look nice too. Make sure the pudding is cool before sealing the lid. This keeps it fresh and prevents condensation. Chia seeds are tiny black seeds from the Salvia hispanica plant. They are packed with nutrition. Chia seeds provide a great source of fiber, protein, and healthy fats. They also contain calcium, magnesium, and antioxidants. When mixed with liquid, chia seeds absorb water and swell. This creates a thick, pudding-like texture that is both fun and filling. You can use either fresh or cooked apples for this recipe. Fresh apples add a crisp bite and bright flavor. Grated apples are best for mixing well into the pudding. Cooked apples can add warmth and a softer texture. If you choose cooked apples, try sautéing them with a bit of cinnamon for extra flavor. This pudding can last up to five days in the fridge. To keep it fresh, store it in an airtight container. If you notice any liquid separation, just stir it before serving. For the best taste and texture, enjoy it within the first three days. Yes! This recipe is already vegan-friendly. Use almond milk or any plant-based milk. The other ingredients, like chia seeds and maple syrup, are also vegan. You can enjoy this tasty treat without any animal products. You learned how to make a tasty chia pudding, perfect for any meal. We discussed key ingredients like almond milk, chia seeds, and sweet apples. You now have steps to prepare and chill the pudding, plus tips for serving and storage. Remember, you can make this recipe your own by adding flavors or toppings. Enjoy getting creative with your ingredients while making this healthy treat. This pudding is easy to prepare and fun to personalize, so dig in and enjoy!
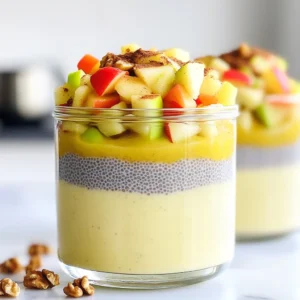
    Apple Cinnamon Chia Pudding Tasty and Nutritious Treat
  • To make a rich and creamy pumpkin hot chocolate, gather these key ingredients: - 2 cups milk (dairy or plant-based) - 1/2 cup of pumpkin puree (canned or fresh) - 1/4 cup semi-sweet chocolate chips - 2 tablespoons cocoa powder - 2 tablespoons sugar (or to taste) - 1 teaspoon vanilla extract - 1/2 teaspoon pumpkin pie spice (plus extra for garnish) These ingredients create a warm and cozy drink that makes the fall season special. You can enhance your pumpkin hot chocolate with some fun toppings: - Whipped cream (for topping) - Dark chocolate shavings or chocolate curls (for garnish) - A sprinkle of extra pumpkin pie spice These garnishes add flavor and make your drink look lovely. When picking your ingredients, focus on quality: - Choose fresh pumpkin puree for a brighter taste. - Select high-quality chocolate chips for a rich chocolate flavor. - Use whole milk for creaminess or a good plant-based milk for a lighter option. Quality ingredients make a noticeable difference in flavor. Always check labels for additives or preservatives. This helps ensure your drink is as healthy as it is tasty. Start by gathering your ingredients. You need milk, pumpkin puree, and a whisk. In a medium saucepan, combine 2 cups of milk and 1/2 cup of pumpkin puree. Whisk these together over medium heat. Keep mixing for about 3 to 5 minutes. You want the mixture warm and well blended. Be careful not to let it boil. Now, it’s time for the chocolate! Add 1/4 cup of semi-sweet chocolate chips, 2 tablespoons of cocoa powder, and 2 tablespoons of sugar to the pumpkin mix. Stir continuously for 2 to 3 minutes. The chocolate should melt nicely, making the drink smooth and rich. Next, stir in 1 teaspoon of vanilla extract and 1/2 teaspoon of pumpkin pie spice. Whisk until everything is combined and warm. Remove the saucepan from heat. Taste your hot chocolate and adjust the sweetness if you like. Pour the mixture into mugs. Top each mug with whipped cream. For a special touch, sprinkle some pumpkin pie spice on top. You can also add dark chocolate shavings or chocolate curls for extra flair. Enjoy your creamy fall delight! To make your pumpkin hot chocolate shine, think about adding flavors. A pinch of sea salt boosts sweetness. It balances the rich chocolate and creamy pumpkin. You can also try a dash of cinnamon or nutmeg. These spices add warmth and depth. If you want more chocolate, add extra chocolate chips. For a fun twist, stir in some caramel sauce for a sweet kick. Sweetness is key to a great hot chocolate. After mixing, taste your drink. If it’s not sweet enough, add sugar slowly. Try one tablespoon at a time. Stir well and taste again. You can also use honey or maple syrup for a natural option. Just remember to mix it in fully for even sweetness. Avoid cooking your mixture too fast. Medium heat is best to keep it smooth. Don’t let it boil; that can change the texture. If you add too much cocoa powder, it may taste bitter. Always whisk well to blend everything smoothly. Lastly, don’t skip the whipped cream! It adds a nice touch and makes it look fancy. {{image_2}} To make a vegan version of pumpkin hot chocolate, swap dairy milk for a plant-based milk. Almond, oat, or coconut milk works well. Use dairy-free chocolate chips for a rich taste. Follow the same steps in the recipe, and enjoy this creamy treat! If you want a dairy-free hot chocolate, simply choose non-dairy milk. Almond milk adds a nutty flavor. Coconut milk gives a rich, creamy texture. Soy milk is also a good choice. Each option keeps the drink smooth and delicious. Adjust the sweetness as you mix in the cocoa and chocolate. You can add fun flavors to your pumpkin hot chocolate! Try adding a splash of peppermint extract for a fresh twist. This pairs well with the pumpkin spice. For a sweeter touch, drizzle caramel syrup over the whipped cream. These add-ins make your drink feel special and festive. To store leftover pumpkin hot chocolate, let it cool first. Then, pour it into an airtight container. Make sure to seal it well to keep the flavors fresh. Store it in the fridge for up to three days. If you want to enjoy it later, you can freeze it. Just use a freezer-safe container. Leave some space at the top, as liquids expand when frozen. When you're ready to enjoy your hot chocolate, take it out of the fridge or freezer. If frozen, let it thaw in the fridge overnight. To reheat, pour it into a saucepan. Heat it over medium-low heat, stirring often. This helps it warm evenly without burning. If you prefer, you can use a microwave. Heat it in short bursts of 30 seconds, stirring in between. This way, it stays creamy and smooth. The shelf life of your ingredients varies. Milk lasts about a week after opening, while pumpkin puree is good for about a week once opened. Semi-sweet chocolate chips can last several months if stored well. Sugar and cocoa powder have a long shelf life. They stay fresh for years if kept dry and cool. Always check labels for specific dates, as freshness matters in your drink. To make one serving, simply halve the original recipe. Use 1 cup of milk and 1/4 cup of pumpkin puree. Add 2 tablespoons of chocolate chips, 1 tablespoon of cocoa powder, and 1 tablespoon of sugar. Mix these in a small saucepan over medium heat. Whisk until everything melts and blends well. This takes about 3-5 minutes. Pour into a mug, top with whipped cream, and sprinkle some pumpkin pie spice. Yes, you can use pumpkin pie filling. This filling has spices and sugar mixed in. It can add a nice flavor. Just remember to reduce the sugar in the recipe. Taste your drink first. Adjust the sweetness if needed. Pumpkin pie filling makes the drink sweeter and spicier. Pumpkin is rich in vitamins and minerals. It has a lot of vitamin A, which helps your eyes. It also contains fiber, which aids digestion. Pumpkin is low in calories, making it a healthy choice. You get antioxidants too, which help fight free radicals in your body. Enjoying this drink can add some health benefits to your cozy fall treat! This blog post covered how to make delicious pumpkin hot chocolate. We discussed essential ingredients and tips to choose the best ones. I shared easy steps to prepare, mix, and serve your drink. You learned how to enhance flavors and avoid common mistakes. We explored variations, like vegan options and seasonal add-ins. Finally, I provided storage tips and answered frequent questions. Enjoy creating this warm drink. It’s an easy way to savor fall flavors!
    Pumpkin Hot Chocolate Rich and Creamy Fall Delight
  • - 200g udon noodles - 6 cloves garlic, minced - 1 teaspoon red chili flakes Udon noodles are thick and chewy. They soak up flavors well. Garlic adds a strong, rich taste. Chili flakes bring heat to the dish. You can adjust the spice based on your taste. - 1 tablespoon soy sauce - 1 tablespoon oyster sauce (or mushroom sauce for a vegetarian option) - 3 tablespoons vegetable oil - 1 tablespoon sesame oil Soy sauce gives a salty kick. Oyster sauce adds depth and sweetness. Vegetable oil is great for cooking at high heat. Sesame oil adds a nutty flavor at the end. - 1 cup mixed vegetables (carrots, bell peppers, snap peas) - 2 green onions, sliced - Sesame seeds for garnish - Fresh cilantro for garnish Mixed vegetables add color and crunch. Green onions add freshness. Sesame seeds give a nice texture. Fresh cilantro brings a burst of flavor. Use these garnishes to make your dish pop! To cook the udon noodles, start with boiling water. Fill a pot with water and bring it to a rolling boil. Once boiling, add the udon noodles. Cook them for about 3 to 4 minutes, as per the package instructions. After cooking, drain the noodles and set them aside. Next, get your skillet ready. Heat 3 tablespoons of vegetable oil over medium heat. Once the oil is hot, add 6 minced garlic cloves. Sauté the garlic for about 30 seconds. Watch closely to avoid burning. Then, sprinkle in 1 teaspoon of red chili flakes. Stir it for another 15 seconds to blend the flavors. Now, it’s time to bring it all together. Add the cooked udon noodles to the skillet. Toss the noodles well to coat them in the garlic and oil mix. Pour in 1 tablespoon of soy sauce and 1 tablespoon of oyster sauce (or mushroom sauce). Stir-fry everything for 1 to 2 minutes. Next, add 1 cup of mixed vegetables like carrots, bell peppers, and snap peas. Cook for another 2 to 3 minutes until the veggies are tender yet vibrant. Finally, drizzle 1 tablespoon of sesame oil over the noodles. Toss everything one last time. Remove from heat and garnish with sliced green onions, sesame seeds, and fresh cilantro before serving. Enjoy your delicious Minute Chili Garlic Udon! To make great udon noodles, first, don't overcook them. Follow the package instructions closely. Usually, you will boil them for about 3-4 minutes. Check them a minute early to keep them chewy. For a chewy texture, rinse the cooked noodles under cold water. This stops the cooking process and helps keep them firm. Toss them with a bit of oil to avoid sticking. If you want more heat, you can add more chili flakes. Start with one teaspoon and increase as you like. Remember, a little goes a long way! You can also try other spices. Consider using fresh ginger for warmth or a dash of black pepper for depth. To boost flavor, think about using different sauces. Swap soy sauce for tamari if you want a gluten-free option. You can also add hoisin sauce for a sweet touch. Garnishing with fresh herbs makes a big difference. Cilantro adds freshness, while green onions bring crunch. Don't forget the sesame seeds for a nutty finish! {{image_2}} To make Minute Chili Garlic Udon vegetarian or vegan, swap the oyster sauce for mushroom sauce. This keeps the umami flavor but fits plant-based diets. If you want more protein, you can use tofu instead of meat. Tofu absorbs flavors well, making it a great choice. You can add chicken, beef, or tofu to your udon. For chicken, use thin slices and cook until no longer pink. If using beef, choose tender cuts and cook quickly. For tofu, press it to remove water, then cube it. Cook it until golden for a nice texture. Each protein adds its unique taste. Mix in seasonal veggies to change things up. Carrots, bell peppers, and snap peas are great, but feel free to add broccoli, zucchini, or bok choy. Each veggie brings its own flavor and texture. Adjust cooking time based on the veggies you choose. Cook until they are bright and tender for the best taste. To store leftovers, wait for the udon to cool. Place it in an airtight container. This keeps air out and helps maintain freshness. Try to eat it within two days for the best taste. For reheating, you can use a skillet or microwave. Heat a bit of oil in a skillet. Add the udon and stir until warm. If using a microwave, place it in a bowl with a splash of water. Cover it and heat in short bursts. This helps avoid sogginess and keeps the noodles tasty. Yes, you can freeze this dish! To freeze, cool the udon completely before packing it in a freezer-safe bag. When you want to enjoy it again, take it out and thaw it in the fridge overnight. Reheat it using your preferred method. This way, you can enjoy your Minute Chili Garlic Udon any time! Udon noodles usually cook in about 3-4 minutes. Boil water and add the noodles. After cooking, drain them and set them aside. This quick step gives you soft, chewy noodles that are perfect for your dish. Yes, you can make this dish gluten-free. Look for gluten-free udon noodles made from rice or other grains. These options work well and keep the dish tasty. Just check the package for cooking times, as they may vary. You can use many vegetables based on what you have. Try broccoli, zucchini, or bell peppers. Seasonal veggies like asparagus or snap peas are great, too. Just chop them small so they cook evenly and stay bright. This dish has moderate protein. Udon noodles provide some, but the garlic and vegetables add little. If you want more protein, add chicken, tofu, or shrimp. These options make the meal heartier while keeping it delicious. This article discussed how to make a tasty noodle dish with udon noodles. We covered the key ingredients like udon, garlic, and sauces. I shared step-by-step cooking instructions, plus tips for perfect texture and flavor. You can try vegetarian options or add proteins like chicken or tofu. In the end, cooking this meal is fun and rewarding. Adjust the spices and toppings to fit your taste. Enjoy experimenting with seasonings and ingredients to make it your own!
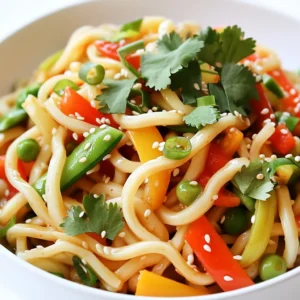
    Minute Chili Garlic Udon Quick and Tasty Delight
  • - 1.5 lbs flank steak, sliced against the grain - 2 cups broccoli florets - 1 cup beef broth - 1/4 cup soy sauce (or tamari for gluten-free) - 2 tablespoons brown sugar - 2 tablespoons cornstarch (plus 1 tablespoon for thickening) - 1 tablespoon garlic, minced - 1 tablespoon ginger, minced - 2 tablespoons sesame oil - 1 tablespoon sesame seeds (for garnish) - Cooked rice or noodles (for serving) For this dish, I love using flank steak. It has great flavor and gets very tender in the crockpot. The broccoli brings a nice crunch and bright color. The beef broth adds depth. Soy sauce or tamari gives it that rich umami taste. Brown sugar rounds out the flavors, making it sweet and savory. Don't forget the cornstarch! It helps to thicken the sauce. Garlic and ginger are must-haves for a punch of flavor. Sesame oil adds a lovely nuttiness. Finally, sesame seeds make the dish look pretty when you serve it over rice or noodles. {{ingredient_image_1}} - Slicing the flank steak: Start with 1.5 lbs of flank steak. Slice it against the grain into thin strips. This helps the beef stay tender. - Measuring out liquids and seasonings: In a bowl, measure 1 cup of beef broth and 1/4 cup of soy sauce. Add 2 tablespoons of brown sugar, 1 tablespoon of minced garlic, and 1 tablespoon of minced ginger. Finally, pour in 2 tablespoons of sesame oil. Whisk these together until well mixed. - Layering ingredients in the crockpot: Place the sliced flank steak at the bottom of the crockpot. Pour the sauce mixture over the beef. Make sure all the meat is coated well. - Cooking times for low and high settings: Cover the crockpot. Cook on low for about 6-7 hours. If you're short on time, cook on high for 3-4 hours. The beef should be tender when done. - Thickening the sauce with cornstarch: About 30 minutes before the dish is ready, mix 1 tablespoon of cornstarch with 2 tablespoons of water. This creates a slurry. Stir it into the crockpot. This will help thicken the sauce. - Adding broccoli at the right time: Add 2 cups of broccoli florets to the crockpot during the last 15 minutes. Stir gently to combine. Cover again to let the broccoli steam and become tender. Marinating the beef makes a big difference. I suggest marinating it for at least an hour. You can mix soy sauce, garlic, ginger, and a bit of brown sugar. This helps the beef soak up all the great flavors. Adjust the sweetness by adding more or less brown sugar. If you prefer a sweeter taste, add a little more. To avoid mushy broccoli, add it near the end of cooking. I recommend adding broccoli florets in the last 15 minutes. This keeps them bright and crisp. For the best sauce, use cornstarch to thicken it. Mix one tablespoon of cornstarch with water to make a slurry. Stir this into the sauce about half an hour before it's done. This gives you a nice, thick sauce. Cooked rice or noodles go great with this dish. They soak up the sauce well. For a touch of color, sprinkle sesame seeds on top. You can also add chopped green onions for a fresh look. Serve it all in deep bowls for a cozy feel. A drizzle of extra sesame oil adds flavor and shine. Pro Tips Cutting the Beef: Always slice the flank steak against the grain for maximum tenderness. Broccoli Timing: Add the broccoli during the last 15 minutes to retain its bright color and crunch. Thickening the Sauce: For a thicker sauce, allow the cornstarch slurry to simmer for a few minutes after adding it to the crockpot. Serving Suggestions: Pair with jasmine rice or udon noodles for a more authentic Asian-inspired meal. {{image_2}} You can switch flank steak with chicken or tofu. Chicken will cook fast. Use boneless, skinless chicken thighs or breasts. For tofu, choose firm or extra-firm. Cut it into cubes for the best texture. Adjust your cooking time based on the protein. Cook chicken on low for 4-5 hours or high for 2-3 hours. Tofu needs less time. Cook it on low for about 3 hours. Add fun veggies to your dish! Bell peppers bring sweetness, while carrots add crunch. Slice them thin to cook well in the crockpot. You can mix them in at the same time as broccoli. Want more heat? Add chili flakes or a splash of sriracha. Start with a small amount, then taste. You can always add more if you like it spicy! Make this dish gluten-free easily. Swap soy sauce for tamari. It has the same great taste without gluten. For low-sodium options, use low-sodium beef broth and soy sauce. You can also cut back on the brown sugar for a healthier twist. If you want it low-carb, skip the rice or noodles and serve it over steamed veggies instead. After enjoying your beef and broccoli, store any leftovers properly. Here are some best practices: - Refrigeration: Place the cooled dish in an airtight container. This keeps the food fresh for up to 3-4 days. Always label your container with the date. - Freezing: If you want to keep it longer, freeze the leftovers. Use freezer-safe bags or containers. Properly sealed, it can last up to 3 months. Make sure to remove as much air as possible to prevent freezer burn. When it's time to enjoy your leftovers, you have a couple of easy options. - Microwave: This method is quick and simple. Place your portion in a bowl. Cover it loosely with a lid or wrap. Heat for 1-2 minutes, stirring halfway. Check that it is hot all the way through. - Stovetop: For better texture, use the stovetop. Place your beef and broccoli in a pan over medium heat. Stir it gently. Add a splash of water or broth if it seems dry. Heat for about 5-7 minutes until warmed through. Keep these tips in mind to ensure your dish stays flavorful and enjoyable! Crockpot Beef and Broccoli takes 6-7 hours on low and 3-4 hours on high. Cooking on low gives the beef more time to become tender. If you're in a hurry, high will still yield great results. Yes, you can use frozen broccoli. However, it may change the texture. It can make the broccoli softer. If using frozen, add it during the last 15-20 minutes of cooking. This helps it warm through without getting too mushy. Crockpot Beef and Broccoli pairs well with several sides. Here are some ideas: - Steamed rice: White or brown rice absorbs the sauce well. - Noodles: Rice noodles or egg noodles are great choices. - Vegetable stir-fry: Lightly stir-fried veggies can add freshness. - Salad: A simple green salad can balance the meal. These options enhance your meal's flavor and texture. This blog post guided you through making Crockpot Beef and Broccoli. We covered key ingredients, step-by-step preparation, and cooking tips. You learned how to adjust flavors and textures to enhance the dish. We also discussed variations for different diets and the best storage solutions. Now you can create a delicious meal with ease. Enjoy your cooking and share this flavorful dish with friends!
    Crockpot Beef and Broccoli Tasty Flavorful Dinner
  • - 2 cups cooked chicken, shredded - 1 tablespoon olive oil - 1 teaspoon chili powder - 1 teaspoon cumin - 1/2 teaspoon smoked paprika - 1/2 teaspoon garlic powder - Salt and pepper to taste - 8 small corn tortillas - 1 cup red cabbage, thinly sliced - 1/2 cup fresh cilantro, chopped - 1/2 cup diced tomatoes - 1 avocado, diced - 2 tablespoons lime juice - 1/4 cup crumbled feta cheese (optional) To make Chicken Street Tacos, gather these simple ingredients. Start with cooked chicken. I love using rotisserie chicken for ease. The spices add great flavor. Chili powder and cumin bring warmth. Smoked paprika gives a nice depth, while garlic powder adds a touch of zest. You’ll need fresh toppings. Red cabbage adds crunch. Cilantro gives a fresh taste. Diced tomatoes and avocado add color and creaminess. Lime juice adds brightness and a tangy kick. If you like, sprinkle feta on top. It adds a salty, creamy finish. This list covers everything you need. Don’t skip any ingredients. Each one plays a role in making these tacos truly delicious. {{ingredient_image_1}} 1. Start by heating 1 tablespoon of olive oil in a skillet over medium heat. This helps the chicken cook evenly. 2. Next, add 2 cups of shredded chicken to the skillet. Sprinkle in 1 teaspoon of chili powder, 1 teaspoon of cumin, 1/2 teaspoon of smoked paprika, and 1/2 teaspoon of garlic powder. Season with salt and pepper to your liking. 3. Stir the chicken and spices together well. Cook for about 5-7 minutes. You want the chicken to be hot and well-coated with the spices. 1. While the chicken cooks, take 8 small corn tortillas and warm them in another dry skillet. 2. Heat each tortilla for about 30 seconds on each side. This keeps them soft and easy to fold. 3. To keep the tortillas pliable, stack them in a clean kitchen towel as you warm them. This traps heat and moisture. 1. Grab your warm tortillas. Spoon a generous amount of spiced chicken onto each one. 2. Now, it's time to add toppings! Use red cabbage, chopped cilantro, diced tomatoes, and avocado for a fresh burst of flavor. 3. Finish by drizzling 2 tablespoons of lime juice over the tacos. If you like, sprinkle some crumbled feta cheese on top for extra taste. Enjoy your tasty chicken street tacos! To make your chicken tacos just right, play with the spices. If you like heat, add more chili powder. If you prefer a milder taste, reduce the chili. You can swap spices too. Try fajita seasoning or taco seasoning for a twist. Layer your tacos carefully. Start with chicken, then add red cabbage for crunch. Next, sprinkle cilantro, tomatoes, and avocado on top. This helps each bite taste great. To keep them together, use small tortillas. They hold better than large ones. Pair your tacos with sides for a full meal. Rice or beans make great choices. You can also serve a fresh salad. For drinks, try a light beer or sparkling water with lime. They balance the flavors of the tacos perfectly. Pro Tips Use Leftover Chicken: This recipe is a fantastic way to use up leftover rotisserie chicken, making it quick and easy to prepare. Customize Your Toppings: Feel free to add other toppings like jalapeños, sour cream, or your favorite hot sauce for an extra kick. Warm Tortillas Properly: Warming the tortillas not only makes them pliable but also enhances their flavor. Don't skip this step! Add Freshness: For a burst of freshness, add a squeeze of lime juice just before serving, along with additional cilantro if desired. {{image_2}} You can swap chicken for other proteins. Beef works great for a heartier taco. Use ground beef or shredded beef for a tasty twist. Pork adds a sweet and savory flavor; try pulled pork for a rich filling. Tofu is a fun choice for a meatless option. Use firm tofu, and marinate it to soak up flavors. Each protein brings its own flair to the dish. Toppings can change the whole taco experience. Try adding pickled onions for a tangy bite. Radishes offer a crunchy texture that contrasts well with soft chicken. Pineapple salsa can add a sweet twist. Seasonal veggies keep your tacos fresh and exciting. Think of zucchini in summer or roasted butternut squash in fall. Mixing different toppings can create unique flavor profiles. Choosing the right sauce enhances your tacos. Store-bought sauces are easy but might lack freshness. Look for ones with natural ingredients. Homemade sauces can bring big flavor. Try a simple lime crema made with sour cream and lime juice. A chipotle sauce adds a smoky kick. Experiment with different sauces to find your favorite. Each option can change how your tacos taste. To keep your chicken street tacos fresh, store them right. Place any leftover tacos in an airtight container. Make sure to separate the chicken from the tortillas and toppings. This keeps everything from getting soggy. Store them in the fridge for up to three days. When it's time to eat again, reheating properly is key. For the chicken, place it in a skillet over medium heat. Stir it around for about five minutes, until it's hot. This keeps the flavor intact. To warm the tortillas, heat a dry skillet over medium heat. Place each tortilla in the skillet for about 30 seconds on each side. This makes them soft and easy to fold. You can freeze chicken street tacos, but it takes some steps. First, prepare the chicken and let it cool completely. Next, place the chicken in a freezer-safe bag. Remove as much air as possible before sealing. You can freeze the chicken for up to three months. When you're ready to eat, thaw the chicken in the fridge overnight. Reheat it in a skillet and warm the tortillas as mentioned before. This way, you can enjoy tasty tacos anytime! To make chicken street tacos from scratch, start with cooked chicken. Shred it into small pieces. Heat olive oil in a skillet. Add the chicken and spices like chili powder and cumin. Cook for about 5-7 minutes until hot. Warm small corn tortillas in another skillet for easy folding. Next, put a spoonful of chicken on each tortilla. Top with red cabbage, cilantro, tomatoes, and avocado. Finally, drizzle lime juice on top. If you need alternatives to corn tortillas, consider using flour tortillas. They are soft and easy to fold. For gluten-free options, try lettuce wraps. They add a fresh crunch. You can also use low-carb tortillas made from almond flour or coconut flour. These options work well for different diets. To boost flavor in your chicken, try marinating it. Use lime juice, garlic, and spices for a few hours. You can also add fresh herbs like cilantro or parsley. Another tip is to mix in some salsa or hot sauce while cooking. This adds moisture and taste, making every bite flavorful. Yes, you can prepare chicken street tacos ahead of time. Cook and shred the chicken, then store it in the fridge. Warm it up when you are ready to serve. You can also prep toppings like cabbage and tomatoes in advance. Just keep them in separate containers. This way, you can assemble tacos quickly when it's time to eat. In this blog post, we explored how to make delicious chicken street tacos. We listed the ingredients, provided step-by-step cooking instructions, and shared tips for perfecting your dish. You learned ways to customize your tacos with different proteins and toppings. We also covered how to store and reheat your leftovers effectively. Remember, cooking is about trying new things and having fun. Enjoy your tasty tacos and make them your own!
    Chicken Street Tacos Flavorful and Easy Recipe
  • - 2 medium sweet potatoes, peeled and diced - 1 can (15 oz) black beans, drained and rinsed - 1 can (14 oz) diced tomatoes (with juices) - 1 medium onion, diced - 3 cloves garlic, minced - 1 bell pepper (red or green), diced - 2 cups vegetable broth - 2 teaspoons ground cumin - 1 teaspoon smoked paprika - 1 teaspoon chili powder - ½ teaspoon cayenne pepper (adjust to taste) - Salt and pepper to taste - 1 tablespoon olive oil - Fresh cilantro, chopped (for garnish) - Avocado slices (for serving) - Lime wedges (for serving) Sweet potatoes bring a sweet taste and nice texture to this chili. Black beans add protein and fiber. Diced tomatoes add moisture and flavor. The onion, garlic, and bell pepper give a great base. Vegetable broth makes it all come together. Spices make this dish pop. Cumin adds warmth. Smoked paprika adds a slight smokiness. Chili powder gives heat, while cayenne pepper adds a kick. You can adjust the cayenne to your taste. Olive oil helps to sauté the vegetables. Fresh cilantro gives a burst of color and flavor. Avocado slices add creaminess, and lime wedges add brightness. This combination makes a hearty meal. 1. Start by heating olive oil in a large pot over medium heat. 2. Add the diced onion and bell pepper. Sauté until soft, about 5 minutes. 3. Next, stir in the minced garlic. Cook for another 1-2 minutes, but don’t let it burn. 1. Now, add the diced sweet potatoes, black beans, and diced tomatoes with their juices. 2. Pour in the vegetable broth, then sprinkle the ground cumin, smoked paprika, chili powder, cayenne pepper, salt, and pepper. 3. Bring everything to a boil. After it boils, lower the heat and cover the pot. 4. Let the chili simmer for 25-30 minutes. Stir occasionally until the sweet potatoes are tender. 1. Taste your chili. Adjust the seasoning if needed, adding salt, pepper, or spices. 2. Serve the chili hot. Garnish with fresh cilantro and avocado slices. Add lime wedges for a zesty kick. - Best practices for softening sweet potatoes: Cut sweet potatoes into small, even pieces. This helps them cook faster and become tender. Cook them in the chili from the start. The simmering chili will soften them well. You can also boil them for 10 minutes before adding them to the pot. - How to prevent burning the garlic: Add garlic after the onion and bell pepper start to soften. Cook the garlic for just 1-2 minutes. Stir it often and watch it closely. If it starts to brown too much, lower the heat. Burnt garlic tastes bitter, so keep it fresh and fragrant. - Serving suggestions with garnishes: Serve the chili in bright bowls. Top each bowl with fresh cilantro and avocado slices. Squeeze fresh lime juice on top for a zesty kick. This adds color and flavor. - Bowl and plate ideas for aesthetic appeal: Choose colorful bowls to make the dish pop. A deep bowl highlights the chili's texture. Use small plates for lime wedges and extra toppings. You can also add a sprinkle of chili powder for a nice touch on the rim of the bowl. {{image_2}} You can mix up the beans in this chili. Try kidney beans or pinto beans instead of black beans. You can also add more veggies. Zucchini, corn, or spinach work great in this dish. For extra protein, ground turkey or tofu makes a nice addition. Just brown the turkey first or press the tofu to remove extra water before adding it to the pot. Do you want more heat? Add more cayenne pepper or some diced jalapeños. If you prefer it milder, skip the cayenne and reduce the chili powder. You can also use sweet paprika instead of smoked paprika for a softer flavor. This chili is easy to make gluten-free. Just use gluten-free vegetable broth, and you're set. If you want vegan options, skip the ground turkey or tofu. You can also add more beans or veggies to keep it hearty and satisfying. Store leftover chili in an airtight container. Make sure it cools down first. This keeps flavors fresh. Use glass or plastic containers that seal well. Label with the date for easy tracking. To reheat, the stovetop works best. Heat on low, stirring often. This way, it warms evenly. If you choose the microwave, use a microwave-safe bowl. Stir halfway through to avoid hot spots. You can freeze this chili for later meals. Let it cool completely before freezing. Use freezer-safe bags or containers. Remove as much air as possible to prevent freezer burn. To thaw, place it in the fridge overnight. Reheat on the stovetop or microwave until hot. Yes, you can make this chili in a slow cooker. Start by sautéing the onion and bell pepper in a pan. After that, add all the ingredients to the slow cooker. Cook on low for 6-8 hours or on high for 3-4 hours. This method makes the flavors blend well and keeps your kitchen cool. You can store leftovers in the refrigerator for up to 5 days. Make sure to put the chili in an airtight container. This keeps it fresh and safe to eat. This chili pairs well with many sides. You can serve it with rice or cornbread. Toppings like avocado, lime, or cilantro add flavor. A fresh salad can also balance the meal. Yes, you can use fresh tomatoes instead of canned. Just chop about 2-3 medium tomatoes. Add them to the pot with some extra broth, as fresh tomatoes have more water. Absolutely! This chili is great for meal prep. It stores well and tastes even better the next day. You can pack it in single servings for easy lunches or dinners throughout the week. This blog post covered the key elements of making Sweet Potato Black Bean Chili. You learned about the best ingredients, step-by-step cooking, and tips for perfect taste. I shared ideas for variations and how to store leftovers. Remember, your chili can change based on your taste and needs. Enjoy experimenting with spices or adding protein! This dish is not just tasty; it’s also healthy and easy to make. Dive in, get creative, and serve up a bowlful of comfort!
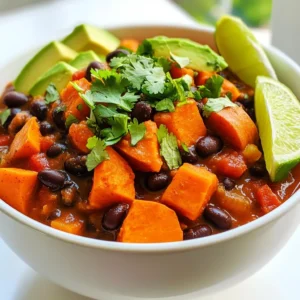
    Sweet Potato Black Bean Chili Hearty and Flavorful Dish
  • To make spicy air fryer jalapeño poppers, gather these ingredients: - 12 fresh jalapeño peppers - 8 oz cream cheese, softened - 1 cup shredded cheddar cheese - 1/2 cup cooked and crumbled turkey bacon (or plant-based bacon) - 1/4 teaspoon garlic powder - 1/4 teaspoon onion powder - 1/4 teaspoon smoked paprika - Salt and pepper to taste - Cooking spray You can swap ingredients to fit your taste. Try using: - A different cheese like pepper jack for extra heat. - Bacon bits for a quick option instead of crumbled bacon. - Greek yogurt instead of cream cheese for a lighter filling. Choosing the right jalapeños is key. Here’s how: - Look for firm, smooth peppers with a shiny skin. - Avoid any with soft spots or wrinkles. - Pick peppers that feel heavy for their size; this means they are fresh. - If you want milder poppers, choose larger jalapeños with fewer seeds. - For a spicier kick, go for smaller, thinner peppers. To start, you need fresh jalapeño peppers. Grab twelve of them. Slice each pepper in half lengthwise. Be sure to wear gloves if you want to avoid the heat on your hands. Next, remove the seeds and membranes. This step reduces the spice level. If you like heat, you can leave some seeds. Now, let's make the filling. In a bowl, mix eight ounces of softened cream cheese with one cup of shredded cheddar cheese. Add half a cup of crumbled turkey bacon for a great flavor. Toss in a quarter teaspoon of garlic powder, onion powder, and smoked paprika. Don’t forget salt and pepper to taste. Mix until everything combines well. This filling should be creamy and tasty. Before cooking, preheat your air fryer to 375°F (190°C). Lightly spray the air fryer basket with cooking spray. This helps prevent sticking. Next, fill each jalapeño half with your cheese mixture. Place them in the air fryer basket in a single layer. Make sure not to overcrowd them; it’s okay to cook in batches. Air fry for ten to twelve minutes. Watch for the jalapeños to soften and the cheese to melt. When done, carefully take them out and let them cool for a few minutes. Enjoy your spicy snack! To get that ideal crunch, use fresh jalapeños. They should be firm and shiny. When you fill them, don’t overstuff. Leave a little space for the cheese to expand. This helps keep the poppers from getting soggy. Air frying at 375°F gives them a nice golden finish. Cook them for about 10 to 12 minutes, so they are tender but not mushy. One common mistake is overcrowding the air fryer. Make sure to arrange the poppers in a single layer. If you stack them, they won’t cook evenly. Another mistake is not removing enough seeds. The seeds add heat, so if you want a milder flavor, be sure to scoop them out well. Also, remember to preheat your air fryer. This step helps cook the poppers evenly from the start. Serve the poppers warm for the best taste. They look great on a platter, so arrange them nicely. Add fresh cilantro or green onions on top for color. A side of ranch dressing or a spicy dipping sauce pairs well. You can also serve them with tortilla chips for a fun snack. Enjoy making these for game days or parties! {{image_2}} You can change the filling in your jalapeño poppers to suit your taste. Here are some ideas: - Cheeses: Try using goat cheese or pepper jack for a twist. - Meats: Substitute turkey bacon with crumbled sausage or chorizo for more flavor. - Veggies: Add spinach or roasted red peppers for a fresh touch. Mix and match these options to create your perfect popper! Want to change the heat? Here are a few ways to adjust the spice level: - Mild: Remove all the seeds and membranes for less heat. - Medium: Keep some seeds in the jalapeños for a bit of kick. - Hot: Add crushed red pepper or diced fresh chili to the cheese mix. You can make these poppers as spicy or mild as you like! You can easily make jalapeño poppers vegan. Here’s how: - Cheese Swap: Use vegan cream cheese and dairy-free cheese shreds. - Bacon Alternative: Replace turkey bacon with plant-based bacon or omit it completely. - Seasoning: Make sure your spices are vegan-friendly. These changes keep the flavor while meeting vegan needs. Enjoy your spicy snack! Once you make these jalapeño poppers, you may have some left. To store them, let the poppers cool completely. Place them in an airtight container. You can keep them in the fridge for up to three days. If you want to keep them longer, freezing is a great option. When you’re ready to enjoy your leftovers, it's easy to reheat them. Preheat your air fryer to 350°F (175°C). Place the poppers in the basket. Heat them for about 5-7 minutes. This will make them hot and crispy again. You can also use an oven. Set it to 350°F (175°C) and bake for 10-12 minutes. If you want to freeze your jalapeño poppers, first cool them completely. Then, place them on a baking sheet in a single layer. Freeze them for about 1-2 hours. After they are frozen, transfer them to a freezer-safe bag. They will stay fresh for up to three months. When you want to eat them, no need to thaw. Just air fry them straight from the freezer at 375°F (190°C) for about 12-15 minutes. Yes, you can prepare these jalapeño poppers ahead of time. After you stuff the jalapeños, cover them with plastic wrap. Place them in the fridge for up to 24 hours. When ready, just pop them in the air fryer. You may need to add a few extra minutes to the cooking time. Many dips pair nicely with jalapeño poppers. Ranch dressing is a classic choice. It cools the heat of the peppers. You can also try a spicy dipping sauce. A creamy garlic dip or guacamole works great too. These add extra flavor and fun. You will know the poppers are done when the cheese is melted and bubbly. The jalapeños should be tender. Check them at 10 minutes to see if they are ready. If they need more time, air fry them for an extra 2 minutes. Be careful when you take them out, as they will be hot! In this blog post, we explored how to make delicious jalapeño poppers. We covered the ingredients you need, including tips for choosing the best jalapeños. I detailed step-by-step instructions on prepping, filling, and cooking them in an air fryer. We also discussed variations, from different fillings to spice levels. Remember, perfect texture comes from careful cooking and serving them with great dips enhances the flavor. Now, you’re ready to enjoy these tasty treats and impress your friends and family. Happy cooking!
    Air Fryer Jalapeño Poppers Crunchy and Spicy Snack
  • - 24 Oreo cookies, crushed - 1/2 cup unsalted butter, melted - 16 oz cream cheese, softened - 1 cup powdered sugar - 1 teaspoon vanilla extract - 1 teaspoon peppermint extract - 1 cup heavy cream - 1 cup crushed peppermint candies (or candy canes) - Whipped cream for topping (optional) - Extra Oreo cookies for garnish (optional) The star of this cheesecake is the Oreo crust. It gives a sweet and crunchy base. The cream cheese filling is rich and creamy. The peppermint flavor brings a fresh twist. You mix the cream cheese with sugar and extracts. Heavy cream makes it light and fluffy. - 9-inch springform pan - Medium mixing bowl - Large mixing bowl - Electric mixer - Spatula - Plastic wrap These tools make your baking easy. The springform pan lets you remove the cheesecake easily. Mixing bowls help you combine your ingredients well. An electric mixer beats the cream cheese smoothly. A spatula ensures you mix well without mess. - Whipped cream - Crushed peppermint candies - Extra Oreo cookies Garnishes add fun and flair to your cheesecake. Whipped cream makes it look fancy. Crushed peppermint candies offer extra flavor. Extra Oreo cookies are perfect for a crunchy topping. You can also use a sprig of mint for color. To start, grab a medium bowl. Combine the crushed Oreo cookies and melted butter. Mix until it looks like wet sand. This will be your base. Next, press the mixture into the bottom of a 9-inch springform pan. Make sure to press down firmly for a sturdy crust. Once done, place the pan in the fridge. Let it chill while you prepare the filling. Now, take a large mixing bowl. Beat the softened cream cheese with an electric mixer. Keep mixing until it is smooth and creamy. Add the powdered sugar, vanilla extract, and peppermint extract. Mix these until they blend well. In another bowl, whip the heavy cream until stiff peaks form. Gently fold this whipped cream into the cream cheese mixture. Be careful not to deflate the whipped cream. Finally, add the crushed peppermint candies and fold them in evenly. Pour the cream cheese filling over the chilled Oreo crust. Use a spatula to spread it out evenly. Cover the cheesecake with plastic wrap. Put it back in the fridge for at least 4 hours, or overnight if you can wait. Once set, remove the cheesecake from the pan. If you like, top it with whipped cream and garnish with extra crushed Oreos or peppermint bits. Enjoy your delicious creation! To get a smooth cream cheese mixture, start with softened cream cheese. Take it out of the fridge 30 minutes before using. This way, it blends easier. Use an electric mixer on medium speed. Beat it until it is creamy and free of lumps. Add the powdered sugar slowly to avoid clumping. Mix until all the ingredients are smooth. To whip cream perfectly, use cold heavy cream. Chill your mixing bowl and beaters in the fridge for 10 minutes. Pour the heavy cream into the cold bowl. Start mixing on low speed, then increase to high. Stop mixing when stiff peaks form. This means the cream holds its shape. Be gentle when folding it into the cream cheese mixture. This keeps the whipped cream fluffy. Refrigerate your cheesecake for at least 4 hours, or overnight if you can wait. This time helps the cheesecake set properly. Cover it with plastic wrap to keep it fresh. Avoid opening the fridge often. Each time you open it, the temperature changes. Once set, remove it from the springform pan carefully. Enjoy your delicious cheesecake! {{image_2}} You can switch up the crust for fun. Use graham crackers for a classic flavor. Or try chocolate cookies for a richer taste. You can also use crushed nuts mixed with butter for a gluten-free option. This adds a nice crunch to every bite. Want to spice things up? Add chopped chocolate or different candies. You can mix in some crushed Oreos for extra texture. Try other extracts like almond or orange for a new twist. Each change can give your cheesecake a fresh taste. Make this cheesecake fit any holiday! For Christmas, add red and green sprinkles on top. For Valentine’s Day, use heart-shaped candies and pink whipped cream. In the summer, mix in fresh strawberries or blueberries. These ideas keep the dessert fun and festive all year long! To store your no bake peppermint Oreo cheesecake, cover it tightly. Use plastic wrap or aluminum foil. A sealed container also works well. Make sure to keep it in the fridge. This keeps it fresh and tasty. You can freeze leftovers for later. First, let the cheesecake chill fully. Then, slice it into pieces. Wrap each piece in plastic wrap and foil. Place the wrapped slices in a freezer-safe bag. They can stay frozen for up to three months. When you're ready to eat, thaw it in the fridge overnight. This cheesecake stays fresh in the fridge for about five days. After that, the taste may change. Always check for any off smells or changes in texture. If it smells funny or looks odd, it's best to toss it. Enjoy your cheesecake while it's fresh! To make this recipe gluten-free, use gluten-free Oreo cookies. Many brands offer gluten-free cookies that taste great. Check the label to ensure they fit your needs. You can still enjoy this delicious cheesecake without gluten. Yes, you can use different types of cream cheese. Neufchâtel cheese is a lighter option. It has less fat but still tastes creamy. You can also use vegan cream cheese for a dairy-free version. Each choice will change the flavor and texture slightly. If you don’t have peppermint extract, use mint extract instead. It has a similar flavor, though it is less sweet. You can also use fresh mint leaves for a natural taste. Just chop them finely and mix them in. You now know how to make a tasty No Bake Peppermint Oreo Cheesecake. We covered the key ingredients, tools, and optional garnishes to make it special. You learned step-by-step instructions for the crust and filling. I shared tips for a smooth mixture and perfect whipped cream. We explored variations to keep things exciting. Lastly, I gave storage tips to keep your cheesecake fresh. Enjoy making this easy dessert that brings a festive touch to any gathering!
    No Bake Peppermint Oreo Cheesecake Delight Recipe
  • - 3 ripe bananas, mashed - 1/2 cup unsalted butter, melted - 3/4 cup brown sugar - 1 large egg, beaten - 1 teaspoon vanilla extract - 1 teaspoon baking soda - 1/4 teaspoon salt - 1 1/2 cups all-purpose flour - 1/2 cup chocolate chips - 1/4 cup chopped walnuts (optional) - 1/2 teaspoon cinnamon Gather these ingredients before you start baking. Ripe bananas are key for a sweet and moist bread. Their flavor shines through, making it a treat. Melted butter gives a rich taste, while brown sugar adds depth. The egg helps bind everything together. Vanilla extract lifts the flavors, making them bright. Baking soda acts as a leavening agent, giving the bread a nice rise. Salt enhances all the sweetness in the mix. All-purpose flour forms the base of your batter. Chocolate chips add a delightful touch. Choose semi-sweet or dark based on your taste. If you love nuts, walnuts bring a nice crunch and extra flavor. Lastly, a hint of cinnamon can elevate the whole dish. This simple list packs a punch. Each ingredient plays a vital role in creating your bakery-style delight. Happy baking! - Preheat oven to 350°F (175°C). - Grease a 9x5 inch loaf pan. - In a large bowl, combine mashed bananas and melted butter. Mix until smooth. - Add brown sugar, egg, and vanilla extract. Stir well to blend. - Sprinkle in baking soda and salt. Mix gently to combine. - Gradually add flour and cinnamon. Stir just until no dry flour remains. - Carefully fold in chocolate chips and walnuts, if you choose to use them. - Pour the batter into the prepared loaf pan. Smooth the top with a spatula. - Bake for 60-65 minutes. A toothpick should come out clean when done. - Cool the banana bread in the pan for about 10 minutes. Then, transfer it to a wire rack to cool completely. To get that perfect bakery-style texture, start with your ingredients. Use room temperature butter and eggs. This helps your banana bread rise better. Cold ingredients can make the bread dense. Mix your batter gently. Over-mixing can lead to tough bread. Once you add flour, stir just until combined. A few lumps are fine. For a richer taste, try different types of chocolate. Semi-sweet chocolate chips give a classic touch. Dark chocolate adds a deep flavor. You can even mix both! Cinnamon is another great addition. Just half a teaspoon can boost the flavor. It pairs well with bananas and chocolate. When slicing, use a serrated knife for clean cuts. Cut thick pieces for a more rustic look. Serve your banana bread on a nice platter. Dust it with powdered sugar for charm. A dollop of whipped cream or a scoop of vanilla ice cream makes it even better! {{image_2}} If you want a nut-free banana bread, simply skip the walnuts. This keeps your loaf soft and delicious. The texture will still be great without them. You can enjoy the rich chocolate and banana flavor without any crunch. This option is perfect for kids or those with nut allergies. For those needing gluten-free options, use a gluten-free flour blend. Many blends work well in this recipe. Just replace the all-purpose flour with the same amount of gluten-free flour. This allows you to enjoy banana bread without gluten. If you want a vegan version, substitute the egg with a flaxseed egg. To make a flaxseed egg, mix 1 tablespoon of flaxseed meal with 2.5 tablespoons of water. Let it sit for a few minutes until it thickens. You can also use plant-based butter instead of regular butter. This keeps your banana bread tasty and friendly for all diets. You can jazz up your banana bread with dried fruits like raisins or cranberries. These add sweetness and chewiness. Another idea is to mix in spices like nutmeg or allspice for warmth. Just a pinch can change the whole flavor. Get creative and let your taste guide you! To keep your banana bread fresh, wrap it tightly with plastic wrap. This helps prevent it from drying out. You can also place it in an airtight container. Store it at room temperature for up to three days. If you want it to last longer, consider refrigerating it. Just remember that chilling can change the texture a bit. To freeze banana bread, let it cool completely. Then, wrap it in plastic wrap and foil. This extra layer helps keep the bread moist. Place the wrapped bread in a freezer bag. You can freeze it for up to three months. When you’re ready to eat it, take it out and let it thaw at room temperature. For a warm slice, you can pop it in the oven at a low temp for a few minutes. Banana bread can stay fresh at room temperature for about three days. If you keep it in the fridge, it can last up to a week. However, the best taste comes from enjoying it fresh. Always check for signs of spoilage, like a sour smell or mold, before eating. Yes, you can use frozen bananas. They work well in banana bread. When using frozen bananas, let them thaw first. This helps to remove excess water. You can mash them easily once thawed. The flavor stays rich and sweet, just like fresh bananas. To check if your banana bread is done, use a toothpick. Insert the toothpick into the center of the loaf. If it comes out clean, your bread is ready. If there are wet crumbs, bake for a few more minutes. Keep checking until the toothpick is clean. This method works great for all banana breads. Yes, you can replace brown sugar with white sugar. This change will alter the flavor and texture slightly. Brown sugar adds a deeper flavor and moisture. White sugar will make your bread a bit lighter. If you want a more caramel taste, stick with brown sugar. This blog post covered all you need to make perfect banana bread. We looked at essential ingredients, step-by-step instructions, and helpful tips. From mixing to baking, these steps guide you easily. You also learned variations to fit your taste and how to store your creation. Remember, with simple tweaks, you can make it your own. Enjoy every slice of your warm, homemade banana bread. It’s a treat worth sharing! Happy baking!
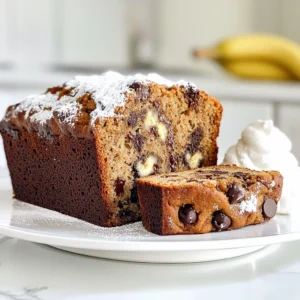
    Chocolate Chip Banana Bread Bakery Style Delight
  • To make Pumpkin Spice White Hot Chocolate, you need simple and tasty ingredients. Each one adds a special touch to this cozy drink. Here’s what you’ll need: - 2 cups whole milk - 1 cup heavy cream - 1 cup white chocolate chips - 1/2 cup pumpkin puree - 1 teaspoon vanilla extract - 1 teaspoon pumpkin spice mix - A pinch of salt - Whipped cream, for topping - Ground cinnamon or extra pumpkin spice, for garnish Whole milk and heavy cream make the drink rich and creamy. White chocolate chips melt into a sweet base. Pumpkin puree gives it a warm flavor. Vanilla extract adds a lovely aroma. Pumpkin spice mix brings in classic fall flavors. Just a pinch of salt enhances all the tastes. Lastly, whipped cream and a sprinkle of cinnamon or pumpkin spice make it pretty. Once you gather these ingredients, you’re ready to create a delicious drink that warms your heart. You can enjoy it alone or share it with friends and family. Each sip will remind you of cozy fall days. Making Pumpkin Spice White Hot Chocolate is easy and fun. Gather all your ingredients first. You will need whole milk, heavy cream, white chocolate chips, pumpkin puree, vanilla extract, pumpkin spice mix, a pinch of salt, whipped cream, and ground cinnamon or extra pumpkin spice for garnish. This recipe takes about 10 minutes to prep and 15 minutes in total. You can serve four people, so share it with friends or family! Start by pouring 2 cups of whole milk and 1 cup of heavy cream into a medium saucepan. Set your stove to medium heat. Stir the mixture gently. Heat it until it feels warm but do not let it boil. This step is important because boiling can change the texture. Once your milk and cream are warm, add 1 cup of white chocolate chips. Use a whisk and stir continuously. This will help the chocolate melt evenly into the milk. Keep whisking until the mixture is smooth and creamy. Next, stir in 1/2 cup of pumpkin puree, 1 teaspoon of vanilla extract, 1 teaspoon of pumpkin spice mix, and a pinch of salt. Make sure everything blends well. Once it's creamy and heated, remove the saucepan from the heat. Now, pour your hot chocolate into mugs. Top each serving with whipped cream. Finish by sprinkling ground cinnamon or extra pumpkin spice on top. Enjoy your delicious drink! To make your Pumpkin Spice White Hot Chocolate super creamy, use whole milk and heavy cream. These two ingredients work great together. They add richness that makes each sip feel like a warm hug. Heat them gently in a saucepan, but don’t let them boil. Boiling can change the texture and make it less smooth. Stir often to keep the mixture even and creamy. Everyone has different tastes. If you like your drink sweeter, add more white chocolate chips. Start with an extra tablespoon, then taste it. If it needs more, keep adding a little at a time. For those who prefer less sweetness, cut back on the white chocolate. You can also use less pumpkin puree. This will keep the flavor strong but make it less sweet. Whipped cream makes this drink even better! To get the best whipped cream, use heavy cream. Beat it until it forms stiff peaks. This means it should hold its shape well. You can add a bit of sugar or vanilla for extra flavor. Once your hot chocolate is in the mug, top it with a big scoop of whipped cream. Don’t forget to sprinkle a bit of ground cinnamon or pumpkin spice on top. This adds a nice touch and enhances the fall flavors. {{image_2}} If you want a dairy-free option, try using almond milk or oat milk. These milks create a creamy base without dairy. You can also swap out the heavy cream for coconut cream. It adds richness and a light coconut flavor. For the white chocolate, look for dairy-free chips. They melt well and keep the sweet taste. You can mix in some maple syrup for extra sweetness. It adds a nice fall flavor. Want a little heat? Add a pinch of cayenne pepper or a dash of chili powder. It gives a fun kick to your drink. You can also stir in some caramel sauce for a sweet twist. A splash of flavored extracts, like hazelnut or almond, can also elevate the taste. This drink is perfect for fall gatherings. Serve it at Halloween parties in cute mugs. You can even top it with marshmallows for a fun touch. For Thanksgiving, offer it as a warm drink option. Add a sprinkle of nutmeg on top for a festive look. You can create a hot chocolate bar with toppings like crushed cookies or chocolate shavings. This way, everyone can customize their own cup. You can store leftover Pumpkin Spice White Hot Chocolate in an airtight container. Let it cool first. Then, place it in the fridge. This keeps it fresh for later. To reheat, pour the hot chocolate into a saucepan. Heat over low heat. Stir it gently to avoid burning. You can also use the microwave. Heat it in short bursts. Stir in between to ensure even warming. Stored correctly, this treat lasts about three days in the fridge. For best taste, consume it within this time. If you see any changes in texture or smell, toss it out. Always trust your senses! Yes, you can make this drink vegan. Use almond milk or oat milk instead of whole milk and heavy cream. Replace white chocolate chips with dairy-free options. Pumpkin puree fits well in vegan recipes. If you can't find pumpkin puree, use butternut squash puree or sweet potato puree. Both options give a similar flavor and texture. You may also blend cooked pumpkin for a fresh taste. To add more spice, increase the pumpkin spice mix to two teaspoons. You can also add a pinch of cayenne pepper or more cinnamon for an extra kick. Adjust to your taste! Absolutely! Almond milk, soy milk, or coconut milk all work well. Choose a creamy milk alternative to maintain a rich texture. Just ensure it is unsweetened for better flavor balance. For garnishes, whipped cream is a must. You can sprinkle ground cinnamon or extra pumpkin spice on top. Chocolate shavings or caramel drizzle can add a fun twist. Enjoy your tasty drink! This blog post detailed how to make a delicious Pumpkin Spice White Hot Chocolate. We covered essential ingredients, simple steps, and helpful tips. You learned how to achieve creamy texture and customize sweetness. We shared dairy-free ideas and perfect serving suggestions for seasonal gatherings. In closing, enjoy crafting this cozy drink at home. It’s perfect for chilly days and gatherings. Your taste buds will thank you!
    Pumpkin Spice White Hot Chocolate Creamy Delight
  • - Pasta choices: Use 8 ounces of spaghetti or linguine. Both options cook well and taste great. - Shrimp specifics: You need 1 pound of large shrimp, peeled and deveined. Fresh or frozen shrimp work. - Butter: Use 4 tablespoons of unsalted butter for rich flavor. - Garlic: Mince 4 cloves of garlic for that strong, aromatic taste. - Spice: Adjust 1 teaspoon of red pepper flakes to your heat preference. - Vegetables: Add 1 cup of halved cherry tomatoes and 2 cups of fresh spinach. - Flavor enhancers: Use the zest and juice of 1 lemon for brightness. - Seasoning: Add salt and black pepper to taste for balance. - Garnish options: Top with chopped parsley and grated Parmesan cheese if you like. These ingredients come together to create a tasty meal that feels special yet is quick to make. {{ingredient_image_1}} 1. Start by filling a large pot with water. Add a generous amount of salt. 2. Bring the water to a boil over high heat. 3. Add 8 ounces of spaghetti or linguine to the boiling water. 4. Cook the pasta according to the package instructions until it is al dente. 5. Before draining, reserve 1 cup of pasta water. This helps to keep your dish moist. 6. Drain the pasta in a colander and set it aside. 1. In the same pot, melt 4 tablespoons of unsalted butter over medium heat. 2. Once the butter is melted, add 4 cloves of minced garlic. 3. Stir in 1 teaspoon of red pepper flakes and sauté for 1-2 minutes. 4. Add the shrimp, which should be 1 pound, peeled, and deveined. 5. Season the shrimp with salt and black pepper. 6. Cook the shrimp for 2-3 minutes on each side. They should turn pink and opaque. 1. Stir in 1 cup of halved cherry tomatoes and cook for another 2 minutes. 2. The tomatoes should begin to soften and release their juices. 3. Add 2 cups of fresh spinach, plus the zest and juice of 1 lemon. 4. Mix until the spinach wilts down and all flavors blend. 5. Return the drained pasta to the pot. 6. If it looks dry, add the reserved pasta water, a little at a time, until it's creamy. 7. Taste and adjust the seasoning if needed, then serve hot. To avoid overcooking shrimp, watch the clock. Cook them for 2-3 minutes per side. When they turn pink and opaque, they are done. Overcooked shrimp can become tough. So, stay attentive while they cook. Signs of properly cooked shrimp include a firm texture and a bright pink color. If they curl too tightly, they are likely overcooked. Aim for a gentle curve for the best bite. Adjust the seasoning to suit your taste. If you like spice, add more red pepper flakes. Try a pinch of smoked paprika for a different kick. For herbs, fresh basil or thyme works well. You can mix them into the dish or use them as a garnish. Lemon zest adds bright notes to your pasta. Don't be afraid to experiment with flavors. To prepare in advance, cook the pasta and shrimp separately. Store them in airtight containers, and keep the sauce separate. This way, you maintain texture and flavor. When reheating, use the stovetop for best results. Add a splash of water or broth to keep it moist. Microwaving is quick but may make the shrimp tough. Always check the temperature to ensure safe reheating. Pro Tips Adjust the Spice Level: If you prefer a milder dish, reduce the amount of red pepper flakes or omit them altogether. Perfectly Cooked Shrimp: Be careful not to overcook the shrimp; they should be pink and opaque after about 2-3 minutes on each side. Use Fresh Ingredients: Whenever possible, opt for fresh garlic, spinach, and tomatoes for the best flavor and texture. Pasta Water Magic: The reserved pasta water is starchy and helps create a silky sauce. Add it gradually to achieve your desired consistency. {{image_2}} You can switch out shrimp for chicken or tofu. Chicken gives you a hearty option. Tofu is great for a plant-based meal. Both choices work well with the garlic and butter flavor. For veggies, you can mix in seasonal options. Try zucchini, bell peppers, or asparagus. These add color and nutrition. You can even use frozen vegetables if fresh ones aren’t available. To change up the taste, consider adding different sauces. Alfredo sauce gives a creamy twist. Pesto adds a fresh, herby flavor. Just mix them in when you add the pasta. You can also adjust the spice level. If you like heat, add more red pepper flakes. If you prefer mild, use less. You could even leave them out for a sweet garlic taste. If you need gluten-free pasta, there are great options. Look for rice or chickpea pasta. They cook well and taste good with this dish. Whole wheat pasta is another choice. It has more fiber and a nutty flavor. You could also try other grains like quinoa. Each choice gives a unique spin to your dish. To keep your One-Pan Garlic Butter Shrimp Pasta fresh, use airtight containers. Place leftovers in them right after your meal. They last for up to three days in the fridge. Before you store, let the pasta cool down for about 30 minutes. This keeps moisture from building up inside the container. You can freeze this dish for up to three months. To freeze, let it cool completely. Then, divide it into portions and put them in freezer-safe bags or containers. When you want to enjoy it again, thaw it overnight in the fridge. For the best taste, reheat it within two days after thawing. For reheating, the stovetop works best. Heat it in a pan over low heat. If it seems dry, add a splash of water or broth. You can also use the microwave. Just cover it and heat in short bursts, stirring in between. This way, you keep the texture and flavor nice and fresh. Yes, you can use frozen shrimp. Just thaw them first. Place them in cold water for about 15 minutes. This helps to make them easier to cook. Be sure to pat them dry before adding to the pan. Shrimp are done when they turn pink and opaque. This usually takes about 2-3 minutes on each side. If they curl up into a "C" shape, they are ready. Avoid overcooking, as they can become tough and rubbery. If you lack cherry tomatoes, use diced regular tomatoes. You can also try sun-dried tomatoes for a different flavor. Fresh bell peppers or zucchini can add color and taste, too. Yes, this recipe is great for meal prep. You can make it in advance and store it in the fridge for up to three days. Just reheat it on the stove or in the microwave. Absolutely! You can add vegetables like bell peppers, broccoli, or asparagus. Just chop them small and cook them with the shrimp. This adds more nutrients and colors to your meal. You learned how to make One-Pan Garlic Butter Shrimp Pasta from fresh ingredients to perfect cooking techniques. Each step helps you create a tasty dish everyone will love. Remember to adjust spices and try ingredient swaps based on what you like. This recipe is quick, easy, and perfect for any meal. Enjoy your cooking adventure, and feel free to get creative with flavors!
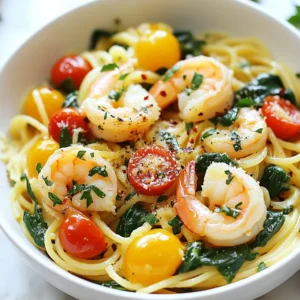
    One-Pan Garlic Butter Shrimp Pasta Easy Weeknight Meal
  • - 2 large sweet potatoes, peeled and diced - 1 can (15 oz) chickpeas, drained and rinsed - 1 red bell pepper, diced - 1 red onion, chopped - 2 tablespoons olive oil - 1 tablespoon chili powder - 1 teaspoon cumin - 1/2 teaspoon smoked paprika - Salt and pepper to taste - 8 small corn tortillas - Fresh cilantro, for garnish - Lime wedges, for serving You need a few simple ingredients to create these delicious tacos. Start with sweet potatoes. They add a nice sweetness and great texture. Chickpeas bring protein and fiber, making these tacos filling and nutritious. Next, grab a red bell pepper and a red onion. They add color and crunch. The spices are key. Chili powder gives heat, while cumin and smoked paprika add depth. Don’t forget salt and pepper to enhance all the flavors. You will also need corn tortillas. They are the perfect vessel for your filling. Lastly, have fresh cilantro and lime wedges on hand. They make great toppings to brighten up your tacos. - Preheat your oven to 425°F (220°C). - Peel and dice the sweet potatoes. - Rinse and drain the chickpeas. - Dice the red bell pepper. - Chop the red onion. - In a large mixing bowl, add the sweet potatoes, chickpeas, bell pepper, and onion. - Drizzle 2 tablespoons of olive oil over the veggies. - Add 1 tablespoon of chili powder, 1 teaspoon of cumin, and 1/2 teaspoon of smoked paprika. - Season with salt and pepper to taste. - Toss everything until the veggies are well coated in oil and spices. - Spread the mixture evenly on a baking sheet lined with parchment paper. - Roast in the preheated oven for 25-30 minutes. - Stir halfway through to ensure even cooking. - Look for tender sweet potatoes that are slightly caramelized. - While the veggies roast, warm the corn tortillas on a skillet or over an open flame. - Once warm, take a tortilla and add a generous spoonful of the sweet potato and chickpea mix. - Garnish with fresh cilantro. - Serve with lime wedges on the side for a zesty kick. To ensure even roasting, cut your sweet potatoes into similar-sized pieces. This helps them cook at the same rate. Spread the veggies out on the pan without crowding them. If they are too close, they will steam instead of roast. Stir the mixture halfway through the cooking time. This will help them brown evenly. Choosing the right spices is key for flavor. I love using chili powder and cumin for warmth. Smoked paprika adds a nice, smoky touch. Feel free to adjust these spices to fit your taste. If you want more heat, add cayenne pepper. For a milder flavor, use less chili powder. For serving arrangements, I recommend placing the assembled tacos on a colorful platter. This makes the dish more inviting. You can also layer them in a stack to save space. It’s fun to see all the colors of the veggies. Garnishing suggestions can elevate your tacos. Fresh cilantro adds a pop of green and flavor. You can also add lime wedges for a zesty touch. Just squeeze the lime over the tacos right before eating. It brightens up the dish. Consider adding additional toppings to boost flavor. Sliced avocado or diced tomatoes work well. You can also add a dollop of sour cream or Greek yogurt for creaminess. Pairing suggestions with sauces can enhance the meal. A drizzle of hot sauce gives a spicy kick. A tangy yogurt sauce balances the flavors nicely. You can even try a fresh salsa for added freshness. {{image_2}} You can easily change the veggies in this recipe. Think of using zucchini, cauliflower, or carrots. Each swap brings a new taste and texture. You can also add proteins. Try slices of avocado or different beans like black beans or pinto beans. These swaps will keep your tacos fresh and fun. This recipe is vegan, which is great for plant lovers. You can enjoy it without any animal products. If you're gluten-free, use corn tortillas. They are naturally gluten-free. Always check the label to be sure. These small changes make the dish fit your diet. You can make your tacos spicy or mild. Add more chili powder for heat or skip it for a milder taste. If you want extra flavor, try adding garlic powder or fresh herbs like oregano. These little changes can make your tacos pop with flavor! Store leftover tacos in an airtight container in the fridge. This keeps them fresh and tasty. You can enjoy them for up to three days after cooking. Make sure they cool down before sealing the container. This helps avoid moisture build-up. To freeze tacos, first, let them cool completely. Then, wrap each taco tightly in plastic wrap. Place them in a freezer bag or container. They can last for about three months in the freezer. When you want to eat them, take them out and thaw in the fridge overnight. Reheat tacos in the oven or on the stove. Set the oven to 350°F (175°C) and heat for about 10 minutes. If using a skillet, warm them over medium heat for a few minutes on each side. This keeps the tortillas crispy and the filling warm. Avoid microwaving, as this can make tortillas soggy. Enjoy your flavorful tacos again! How long do these tacos take to prepare? These tacos take about 15 minutes to prep. The roasting time is 25 to 30 minutes. So, you can have them ready in about 40 minutes. Can I make these tacos in advance? Yes, you can prepare the sweet potato and chickpea mix ahead of time. Store it in the fridge for up to three days. Just warm it up before serving. What can I serve with sheet pan tacos? You can serve these tacos with a fresh salad, rice, or beans. Guacamole and salsa also make great sides. Are sheet pan tacos healthy? Yes, these tacos are healthy! They use sweet potatoes and chickpeas, which are full of nutrients. You get fiber, vitamins, and plant protein in every bite. Can I use different types of tortillas? Absolutely! You can use flour tortillas or even lettuce wraps for a low-carb option. Just make sure to warm them up for the best taste. How to adjust the recipe for more servings? To serve more people, simply double or triple the ingredients. Just keep the same cooking time, but check for doneness. Can I make this recipe in an air fryer? Yes, you can! Cook the mixture in batches in the air fryer. Set it to 400°F (200°C) and cook for about 15-20 minutes. Shake the basket halfway for even cooking. This blog post covered a delicious taco recipe using sweet potatoes, chickpeas, and spices. You learned how to prepare, mix, and roast these ingredients for tasty tacos. I shared tips for cooking, presentation, and flavor enhancements to elevate your dish. Plus, we explored variations for dietary needs and storage methods to keep your leftovers fresh. These tacos are not just simple—they're full of flavor and versatility. Enjoy making them your way!
    Sheet Pan Sweet Potato Chickpea Tacos Easy Recipe
  • - 4 boneless, skinless chicken thighs - 1/4 cup honey - 1/4 cup low sodium soy sauce - 4 cloves garlic, minced - 1 tablespoon fresh ginger, grated - 1 tablespoon apple cider vinegar - 1 teaspoon sesame oil - 1 cup chicken broth - 1/2 teaspoon black pepper - 2 tablespoons cornstarch - 2 tablespoons water - Sliced green onions and sesame seeds When you make Slow Cooker Honey Garlic Chicken, you want the best flavors. Start with fresh chicken thighs. They stay juicy and tender. Honey adds sweetness, while soy sauce gives a salty kick. Garlic and ginger bring in a rich taste. Use low sodium soy sauce to keep it balanced. You can add apple cider vinegar. It gives a nice tang that cuts through the sweetness. The sesame oil adds a hint of nuttiness. Chicken broth keeps everything moist and flavorful. For finishing touches, black pepper gives a little heat. Cornstarch thickens the sauce to make it rich. Mix cornstarch with water for a smooth slurry. Finally, sliced green onions and sesame seeds bring color and crunch to your dish. They make the meal look great and taste even better! Whisk together these ingredients in a medium bowl: - 1/4 cup honey - 1/4 cup low sodium soy sauce - 4 cloves garlic, minced - 1 tablespoon fresh ginger, grated - 1 tablespoon apple cider vinegar - 1 teaspoon sesame oil - 1 cup chicken broth - 1/2 teaspoon black pepper Mix until smooth. This sauce brings sweet and savory flavors together. It coats the chicken well, making every bite delicious. Place 4 boneless, skinless chicken thighs in the slow cooker. Pour the honey garlic sauce over the chicken. Be sure to cover the chicken completely. Once done, cover the slow cooker. Cook on low for 6-7 hours or high for 3-4 hours. The chicken should be tender and juicy when finished. After cooking, carefully remove the chicken thighs. Use two forks to shred the chicken into bite-sized pieces. Set this aside. In a small bowl, mix 2 tablespoons of cornstarch with 2 tablespoons of water to create a slurry. Pour the slurry into the slow cooker and stir well. Set the slow cooker to high for 15-20 minutes to thicken the sauce. Return the shredded chicken back into the slow cooker. Mix it with the thickened sauce and heat for another 5 minutes. - Choose boneless, skinless chicken thighs for best results. They stay juicy and tender. - Adjust the cooking time based on your slow cooker model. Each one cooks a bit differently. - Serve the honey garlic chicken over cooked rice or steamed vegetables for a tasty meal. - Add garnishes like sliced green onions and sesame seeds for extra flavor and crunch. - Use maple syrup instead of honey for a different flavor profile. It adds a nice twist. - Substitute chicken broth with vegetable broth for a lighter option. This keeps it fresh and bright. {{image_2}} Want some heat? You can easily spice things up! Add red pepper flakes or sriracha to the sauce. Start with a pinch and taste. If you want more kick, add a little more. This adds a fun twist to your dish. Make this meal even better by adding vegetables. Toss in bell peppers and carrots for color and crunch. You can add other veggies too, like broccoli or snap peas. This not only makes the dish look nice but gives it more taste and nutrition. If you're watching carbs, try cauliflower rice. It’s a great substitute for traditional rice. Just steam or sauté the cauliflower rice before serving. It will soak up the honey garlic sauce well. Plus, it keeps your meal light and healthy. Store any leftover honey garlic chicken in an airtight container. It stays fresh for 3-4 days. Just make sure to let it cool before sealing. This helps keep the flavors intact and prevents sogginess. If you want to save it longer, freeze the chicken in a suitable container. It will last up to 3 months in the freezer. Remember to label the container with the date. This keeps track of how long it’s been stored. To enjoy your leftovers, reheat them in the microwave or on the stovetop. Heat until warmed through. Stir often to ensure even heating. If the sauce seems thick, add a splash of water or broth to loosen it up. Yes, chicken breasts can be used, but adjust the cook time as needed. Chicken breasts cook faster than thighs. If you use breasts, check them earlier. Aim for a soft, juicy texture. The sauce will still add great flavor. Use a meat thermometer; chicken should reach an internal temperature of 165°F. Insert the thermometer into the thickest part of the chicken. This ensures it is safe to eat. If it is not at 165°F, cook it longer. Yes, you can prepare the sauce and chicken ahead of time and cook later. Just mix the sauce and marinate the chicken. Store them in the fridge until you are ready to cook. This saves time on busy days. This recipe delivers quick, tasty slow-cooked honey garlic chicken. You learned the main ingredients, preparation steps, and how to store leftovers. My tips and variations show how to suit your tastes. Try serving it with rice or veggies for a meal that is both simple and satisfying. With these easy instructions, you can impress anyone at your table. Enjoy cooking and creating your version of this dish!
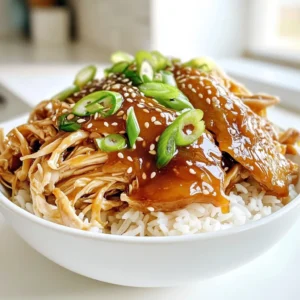
    Slow Cooker Honey Garlic Chicken Flavorful Dinner Delight
  • - 2 cups butternut squash, cubed - 2 cups Brussels sprouts, halved - 1 red onion, cut into wedges - 2 cups carrots, sliced - 1 red bell pepper, chopped - 4 cloves garlic, minced - 1 teaspoon dried thyme - 1 teaspoon smoked paprika - Salt and pepper to taste - 3 tablespoons olive oil - ¼ cup pumpkin seeds (optional, for garnish) The first step in making sheet pan roasted fall veggies is gathering fresh ingredients. Each vegetable adds its own flavor and texture. Butternut squash brings sweetness, while Brussels sprouts add a hearty bite. Red onion gives a nice sharpness, and carrots add a pop of color. Red bell pepper adds crunch and sweetness. You also need spices to enhance the taste. Garlic offers a robust flavor, while dried thyme and smoked paprika give warmth. Salt and pepper are essential for balance. Next, we have oils and garnishes. Olive oil helps the veggies roast nicely. It adds a rich taste and helps the spices stick. If you want some crunch, add pumpkin seeds on top. They are optional but tasty. Now you have a full list of ingredients to create a simple and tasty dish. - Preheat your oven to 425°F (220°C). - While the oven heats, wash and chop the vegetables. - Cut the butternut squash into cubes. - Halve the Brussels sprouts and cut the red onion into wedges. - Slice the carrots and chop the red bell pepper. - Mince the garlic cloves. - In a large mixing bowl, combine all the veggies. - Add the minced garlic, olive oil, dried thyme, and smoked paprika. - Sprinkle in salt and pepper to taste. - Toss everything well until the veggies get a nice coat of oil and spices. - Spread the veggies in a single layer on a baking sheet. - Make sure they aren't crowded; this helps them roast well. - Roast in the preheated oven for 25-30 minutes. - Stir the vegetables halfway through for even cooking. - They are done when they are tender and slightly caramelized. To get the best results, you need even coating. This means each piece of veggie should be covered with oil and spices. If they are not coated well, some will burn while others stay raw. To do this, toss the veggies in a bowl before spreading them on the pan. Stirring halfway through roasting is key too. This helps them cook evenly and get that nice golden color. You can easily boost the taste of your roasted veggies. Try adding a bit of lemon juice for brightness. A dash of chili powder can give it a kick. Rosemary or basil can add a fresh touch. Fresh herbs work great as a garnish too. They not only add flavor but also make the dish look lovely. Serving your roasted veggies on a large platter makes a big impact. Scatter some fresh arugula or herbs around the edges for color. Drizzling balsamic glaze over them gives a nice shine and adds sweetness. It makes the dish pop and looks restaurant-worthy. {{image_2}} You can swap in many seasonal veggies. Try sweet potatoes for a sweeter taste. Turnips add a nice kick. You can also use parsnips, beets, or even cauliflower. Each brings a new flavor. Adding root vegetables brings a hearty touch. The earthiness of these veggies pairs well with the other flavors. For a twist, mix in some radishes or even kohlrabi. Each option can change the dish in fun ways. You can make this dish your own by adding spices. Try cumin for warmth or turmeric for color. A sprinkle of chili powder adds heat. Explore global seasonings, too. Italian herbs can bring a fresh taste. A touch of curry powder can create an exotic vibe. Don't be afraid to experiment; each spice adds a new layer of flavor. Think of what to serve alongside your roasted veggies. Grilled chicken or fish works well. It adds protein and balances the meal. Complementary side dishes can enhance your meal. A simple quinoa salad can add texture. You can also serve these veggies with crusty bread for a cozy dinner. Each pairing makes the dish even more special. To keep your roasted veggies fresh, store them in an airtight container. Place them in the fridge within two hours of cooking. They stay good for up to four days. Label your container with the date to track freshness. To reheat, use an oven or a skillet. Preheat the oven to 350°F (175°C). Spread the veggies on a baking sheet and heat for about 10-15 minutes. If using a skillet, add a splash of olive oil. Heat on medium until warm. This keeps them crisp and tasty. You can freeze roasted veggies, but they work best if frozen before cooking. Toss the raw veggies with oil and spices, then spread them on a sheet pan. Freeze until firm, then transfer them to a freezer bag. They can last up to three months. To thaw, place them in the fridge overnight. Reheat in the oven or skillet as mentioned above. Yes, you can use frozen vegetables. They are a quick option. However, fresh veggies give a better taste and texture. Frozen vegetables may not roast as well. They can become mushy. If you use them, cut down the roasting time. Check them often to avoid overcooking. The veggies are done when they are tender and lightly brown. Stick a fork in them to check. If it goes in easily, they are ready. You should see some caramelization on the edges. The perfect time is about 25-30 minutes, but check halfway through. You can pair these veggies with many dishes. Here are some ideas: - Recommended proteins or grains: - Grilled chicken - Baked salmon - Quinoa - Brown rice - Ideas for salads or dips: - Mixed green salad with a lemon vinaigrette - Hummus for a tasty dip - Yogurt dip with herbs - Spinach salad with nuts and cheese This blog covers how to make delicious sheet pan roasted fall veggies. We discussed fresh vegetables, spices, oils, and tips for roasting. You learned storage info and answers to common questions. Roasting veggies is easy and fun. Try different veggies and flavors to make it yours. Enjoy the tasty results and share them with friends and family. Happy cooking!
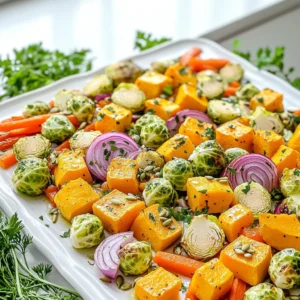
    Sheet Pan Roasted Fall Veggies Simple and Tasty Dish
  • - 1 pound boneless, skinless chicken thighs - 1/2 cup cornstarch - 1/2 cup all-purpose flour - 1/2 cup orange juice - 1 tablespoon soy sauce - 1/4 cup granulated sugar - 1 tablespoon rice vinegar - 1 teaspoon grated fresh ginger - 1 clove garlic, minced This recipe shines with simple yet flavorful ingredients. For the chicken, I love using boneless, skinless thighs. They stay juicy and tender, making every bite delightful. The cornstarch and flour mix gives the chicken a crispy exterior. This crunch is key to mimicking the beloved takeout dish. For the orange sauce, fresh orange juice is a must. It brings zesty brightness to the dish. The soy sauce adds a savory touch, while the sugar balances sweetness. Rice vinegar, ginger, and garlic enhance the flavor profile, making it rich and complex. These ingredients combine to create that famous sweet and tangy flavor. Each component plays a role in building layers of taste. You can easily find these items at your local grocery store. I recommend using fresh ginger for the best flavor. It elevates the dish, making it even more special. Enjoy gathering your ingredients, and get ready for a tasty cooking adventure! {{ingredient_image_1}} To start, gather your ingredients. In a bowl, mix together: - 1/2 cup cornstarch - 1/2 cup all-purpose flour - 1 teaspoon baking powder - Salt and pepper to taste In another bowl, whisk together: - 1 large egg, beaten - 1/4 cup water Take your chicken thighs, cut into bite-sized pieces. Dip each piece into the egg wash. Then, coat it in the dry mix. Make sure every piece is covered well. Lay the coated chicken aside as you prepare to fry. Now, heat 1/4 cup vegetable oil in a large skillet over medium-high heat. You want the oil hot, but not smoking. Carefully add the chicken pieces in batches. Fry them for about 5 to 6 minutes. You want them golden brown and cooked through. Once done, remove the pieces and let them drain on paper towels. In a saucepan, combine the following ingredients: - 1/2 cup orange juice - 1 tablespoon soy sauce - 1/4 cup granulated sugar - 1 tablespoon rice vinegar - 1 teaspoon grated fresh ginger - 1 clove garlic, minced - 1 teaspoon sesame oil - Zest of 1 orange Cook this mixture over medium heat. Stir it often until the sugar dissolves. Then, mix 1 teaspoon cornstarch with 2 teaspoons water. Stir this into the sauce to thicken it. Cook for another 2 to 3 minutes. When it thickens, remove it from the heat. Now, toss the fried chicken in the orange sauce until each piece is well coated. You’re almost ready to serve your dish! Using fresh ingredients is key for great taste. Fresh chicken enhances flavor and texture. Opt for real orange juice, not from a carton. It adds brightness that is hard to beat. Balancing sweetness and acidity is vital. Too much sugar can overpower the dish. Use just enough sugar to complement the tangy orange. A splash of rice vinegar brings in that needed zing. For the best crispy chicken, use a deep pan. Oil should be hot before adding chicken. Fry in batches to avoid crowding. This way, each piece gets nice and crispy. To make a thicker sauce, stir in the cornstarch-water mix slowly. Let it cook until it bubbles and thickens. This makes the sauce cling to the chicken better. Garnishing makes your dish look special. A sprinkle of orange zest adds color and aroma. Chopped green onions or sesame seeds also look great on top. Serve the chicken over steamed rice. This adds a nice base and balances flavors. You can add sautéed veggies on the side for a pop of color and nutrition. Pro Tips Perfect Frying Temperature: Ensure the oil is hot enough before adding the chicken. The ideal temperature is around 350°F (175°C) to achieve a crispy exterior without absorbing too much oil. Flavor Boost: For an extra layer of flavor, marinate the chicken pieces in a mixture of soy sauce, garlic, and ginger for 30 minutes before coating and frying. Thicker Sauce: If you prefer a thicker sauce, add a bit more cornstarch mixed with water while cooking the orange sauce until it reaches your desired consistency. Garnish for Presentation: Consider garnishing the finished dish with toasted sesame seeds and thinly sliced green onions for an appealing and vibrant look. {{image_2}} You can create a baked orange chicken. This method cuts down on oil and fat. Simply coat the chicken with the mix and bake it at 400°F for 20-25 minutes. It will still taste great! Or try using tofu or vegetables instead of chicken. Tofu absorbs the sauce well. Cut it into cubes and follow the same steps as chicken. For veggies, use bell peppers or broccoli. This adds color and nutrition. Want to spice things up? Make a spicy orange chicken. Add red pepper flakes or sriracha to the orange sauce. This gives a nice kick without losing the sweet flavor. You can also mix in other citrus fruits. Try lemon or lime juice for a twist. This adds a unique taste that pairs well with the orange. You’ll enjoy a fresh and zesty dish! For a fun twist, try orange chicken lettuce wraps. Use large lettuce leaves to hold the chicken. This makes a light, crunchy meal great for lunch or dinner. Another idea is to serve orange chicken in bowls with quinoa. Quinoa adds protein and fiber. Top with chopped green onions and sesame seeds for a tasty meal that looks good too! To store your orange chicken properly, let it cool down first. This step helps prevent sogginess. Use an airtight container to keep the dish fresh. In the fridge, it lasts about three to four days. Be sure to check for any signs of spoilage before eating. When you’re ready to enjoy leftovers, reheating is key. The best way is to use an oven. Preheat the oven to 350°F. Place the chicken on a baking sheet for about 10 minutes. This method keeps the chicken crispy. If you use a microwave, heat in short bursts. This way, the chicken stays moist but can lose some crunch. For long-term storage, freezing is a great option. First, let the chicken cool down completely. Then, place it in a freezer-safe bag or container. It can last up to three months in the freezer. When you want to eat it, move it to the fridge overnight to thaw. Reheat it in the oven for the best texture. Yes, you can use chicken breasts. However, thighs have more fat. This fat gives a richer flavor and juiciness. Breasts can dry out if overcooked. If you prefer breasts, watch the cooking time closely. Cut the pieces small to help them cook evenly. You can use other citrus juices like lemon or lime. Pineapple juice works too for a sweet twist. For a less sweet flavor, try apple cider vinegar mixed with water. Adjust the sugar in the sauce if needed. This keeps the sauce balanced and tasty. To make this dish gluten-free, use gluten-free flour. You can find blends at most stores. For soy sauce, choose a gluten-free version. Some brands offer tamari sauce, which is a good option. Ensure all your ingredients are labeled gluten-free for safety. In this blog post, I broke down how to make delicious orange chicken. We reviewed the key ingredients like chicken thighs, cornstarch, and fresh orange juice, plus steps for frying and making the sauce. I also shared tips for the best flavor, cooking methods, and variations, like healthier options and different ways to serve it. In the end, you'll have a tasty dish that’s fun to make and can fit your needs. Enjoy your cooking!
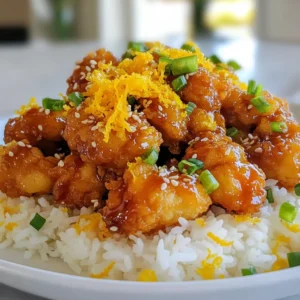
    Copycat Panda Express Orange Chicken Recipe Delight
  • - 200g ramen noodles - 1 red bell pepper, sliced - 1 cup broccoli florets - 1 carrot, julienned - 1 zucchini, sliced - 4 cloves garlic, minced - 1 teaspoon ginger, grated In this dish, the ramen noodles are the star. They soak up all the flavors and give your meal a nice base. The vibrant vegetables bring color and crunch. The red bell pepper adds sweetness, while broccoli brings a nice bite. Carrots and zucchini add texture and taste. Garlic and ginger give a warm, fragrant touch. - 3 tablespoons soy sauce - 2 tablespoons chili paste (adjust for spice level) - 1 teaspoon sesame oil The soy sauce is key for saltiness. It makes the dish savory and rich. Chili paste adds heat and depth. You can adjust this to suit your taste. A touch of sesame oil brings a nutty flavor that ties everything together. - 1 green onion, chopped for garnish - 1 tablespoon sesame seeds for garnish Green onion adds a fresh crunch on top. It makes the dish look pretty, too. Sesame seeds add a nice nutty flavor and a bit of texture. These final touches elevate your meal from good to great. To start, boil the ramen noodles. Follow the package instructions. Use a large pot of salted water. This adds flavor. Cook until al dente, which means they should be firm but not hard. Typically, this takes about 3-4 minutes. Drain the noodles once done. Rinse them briefly under cold water. This stops the cooking and keeps them from sticking. Next, grab a large pan or wok. Heat 2 tablespoons of vegetable oil over medium-high heat. Use a high smoke point oil for best results. Once the oil is hot, add 4 cloves of minced garlic and 1 teaspoon of grated ginger. Sauté them for about 30 seconds. You want to smell that amazing aroma! Now, toss in the sliced red bell pepper, 1 cup of broccoli florets, 1 julienned carrot, and 1 sliced zucchini. Stir-fry these for 4-5 minutes. You want the veggies to be tender but still crisp. Keep stirring to avoid burning. Now it’s time to combine everything. Add the drained ramen noodles to the pan with the veggies. In a small bowl, mix 3 tablespoons of soy sauce, 2 tablespoons of chili paste, and 1 teaspoon of sesame oil. Adjust the chili paste for your spice level. Pour this sauce over the noodles and vegetables. Mix everything well. Cook for another 2-3 minutes. This helps the noodles soak up the sauce. Make sure every noodle gets coated. Once everything is hot and well combined, it’s ready to serve! To make the best stir fry, use high heat. High heat cooks food fast, keeping it crisp. Heat your pan or wok until it’s hot before adding oil. Sauté your garlic and ginger for just 30 seconds. This gets their flavors out quickly. If you cook them too long, they can burn. When adding vegetables, toss them in as you stir. This helps them cook evenly. Start with harder veggies like carrots and broccoli. Add softer ones like bell peppers and zucchini later. This keeps everything at the right texture. Choosing the right chili paste is key. Some pastes are very hot, while others are mild. If you want more heat, add more chili paste. If you prefer less spice, try a milder brand. You can also use sriracha or sweet chili sauce as a substitute. These options add flavor without too much heat. Serve your Chili Garlic Ramen Stir Fry with fresh sides. Steamed rice or a simple salad pairs well. For added protein, top with chicken, shrimp, or tofu. These options make the meal more filling. You can also sprinkle extra green onions or sesame seeds for crunch. {{image_2}} You can add protein to your Chili Garlic Ramen Stir Fry to make it heartier. Here are a few great choices: - Chicken: Thinly slice chicken breast and sauté it before adding veggies. Cook it until golden brown and fully cooked. - Tofu: Use firm or extra-firm tofu for a plant-based option. Dice it, sauté it until crispy, then toss it in with the noodles. - Shrimp: Fresh or frozen shrimp works well. Cook them until pink and tender, then mix them into the stir fry. Each protein brings its own flavor, so pick what you love best! If you follow a vegetarian or vegan diet, there are easy swaps to make your meal fit. - Tofu: As mentioned, it’s a fantastic choice. Silken tofu can also work for a softer texture. - Vegetables: You can add any veggies you like! Consider mushrooms, snap peas, or bok choy. - Sauces: Make sure the soy sauce is vegan. There are many brands that offer plant-based options. These swaps keep your dish tasty and satisfying. If you need a gluten-free version, you have options too! - Gluten-Free Ramen: Look for ramen made from rice or buckwheat. These are great substitutes. - Sauces: Use gluten-free soy sauce or tamari in place of regular soy sauce. - Check Labels: Always read labels on sauces and pastes to ensure they are gluten-free. These changes let anyone enjoy this delicious meal! To keep your Chili Garlic Ramen Stir Fry fresh, store it in an airtight container. Make sure to let it cool down first. Place the container in the fridge. This dish stays good for up to three days. If you notice any bad smells or changes in color, it’s best to toss it out. You can reheat your stir fry using a microwave or a stove. For the microwave, put the food in a safe dish. Add a splash of water to keep it moist. Heat it in short bursts, stirring in between. On the stove, use a pan on medium heat. Add a tiny bit of oil to prevent sticking. Stir often until it's heated through. Both methods work well, but the stove keeps the noodles a bit firmer. To freeze your stir fry, let it cool completely. Portion it into freezer-safe bags or containers. Remove as much air as you can to prevent freezer burn. It can last up to three months in the freezer. When you’re ready to eat, defrost it in the fridge overnight. Heat it on the stove or microwave until hot. Enjoy your meal even after a long time! To make Chili Garlic Ramen Stir Fry from scratch, gather fresh ingredients. Use homemade ramen noodles for a chewy texture. Fresh vegetables like red bell pepper, broccoli, carrot, and zucchini add color and flavor. You can use fresh garlic and ginger to enhance the taste. Store-bought noodles can work, but they may lack the freshness of homemade. A quick stir fry with a simple sauce gives the dish its bold flavor. Yes, you can use instant ramen. Instant ramen cooks quickly and is very convenient. However, it often becomes softer than regular ramen. This can change the texture of your stir fry. To maintain some bite, don't overcook the noodles. Drain them well and add them to the pan last. This way, they absorb the sauce without getting mushy. If you don't have chili paste, use sriracha or red pepper flakes. Sriracha offers a sweet and tangy heat. Red pepper flakes give a more straightforward spice without extra flavor. Adjust the amount based on your spice preference. For a milder option, consider using sweet chili sauce. This will add flavor without much heat. Each substitute will change the dish slightly, so choose what suits your taste best. You learned how to make a tasty Chili Garlic Ramen Stir Fry. We covered the best ingredients like fresh veggies and savory sauces. I shared easy step-by-step instructions for cooking perfect ramen. You now have tips to adjust spice levels and serve it well. Remember, you can add proteins or make it vegan. Store and reheat leftovers properly to enjoy later. Lastly, don't hesitate to try different flavors. Cooking should be fun and creative! Enjoy your delicious stir fry!
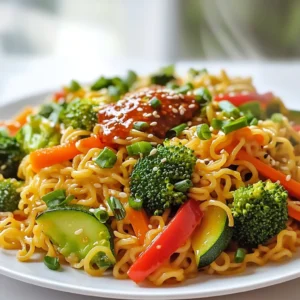
    Chili Garlic Ramen Stir Fry Flavorful Quick Meal
  • - 4 cups Rice Krispies cereal - 3 tablespoons unsalted butter - 1 package (10 oz) mini marshmallows - 1 teaspoon vanilla extract - 1 teaspoon pumpkin pie spice - 1 cup pumpkin puree - Pinch of salt These ingredients create a tasty treat. The Rice Krispies give crunch, while the marshmallows add chewiness. Butter helps everything stick together, and pumpkin puree provides a rich flavor. Vanilla and pumpkin pie spice bring warmth to each bite. - Orange and yellow sprinkles Adding sprinkles makes the treats festive. It is a fun way to enjoy these treats, especially for holidays. You can choose any color you like. Sprinkles add color and a bit of extra sweetness. These treats are not gluten-free due to Rice Krispies, which may contain gluten. To make them gluten-free, look for gluten-free Rice Krispies. They also contain dairy from the butter. For a dairy-free option, try using a plant-based butter. First, grab a large saucepan. Place it on low heat. Add 3 tablespoons of unsalted butter. Watch it melt slowly. Once it melts, toss in the whole package of mini marshmallows. Stir them with a spatula. Keep stirring until they melt and become smooth. This part takes just a few minutes. After melting, take the saucepan off the heat. Now, add 1 teaspoon of vanilla extract. Next, add 1 teaspoon of pumpkin pie spice. Mix these in well until combined. Then, add 1 cup of pumpkin puree. Make sure to stir until there are no lumps. This step makes your treats taste like fall! Gradually, add 4 cups of Rice Krispies cereal. Gently fold it into the mixture. You want every piece coated well. It helps to use a spatula or your hands, lightly greased. Once mixed, line a 9x9 inch baking pan with parchment paper. Pour the mixture into the pan. Press it down firmly with the back of the spatula. You want an even layer. Then, if you like, sprinkle some orange and yellow sprinkles on top. Let the treats cool for at least 30 minutes. After cooling, cut them into squares or rectangles. Enjoy! To make the best Pumpkin Rice Krispie Treats, focus on texture. Start by melting the butter and marshmallows slowly. This keeps them smooth. If you rush, the mix may clump. After melting, mix in the pumpkin puree well. This adds moisture and flavor. If the mixture feels too sticky, add a bit more Rice Krispies. This helps balance the texture. When mixing the Rice Krispies, take your time. Gently fold the cereal into the melted marshmallow mix. Use a rubber spatula to reach all corners. If you use your hands, lightly grease them. This will stop the mix from sticking. Make sure every piece of cereal is coated. This creates a better flavor in each bite. Cutting the treats right takes a little care. Let them cool for at least 30 minutes. This helps them hold their shape. Use a sharp knife for clean edges. Lightly grease the knife to prevent sticking. Cut them into squares or rectangles based on your preference. For a fun touch, top with colorful sprinkles before cutting. Enjoy the fun shapes! {{image_2}} You can add chocolate or peanut butter for a fun twist. Just melt 1 cup of chocolate chips or 1/2 cup of peanut butter with the marshmallows. Stir them in until smooth. These flavors mix well with pumpkin. The result is a richer treat that kids will love. You can also drizzle melted chocolate on top for extra flair. Adding nuts or seeds boosts texture and flavor. Try 1/2 cup of chopped pecans or walnuts. You can also use pumpkin seeds for a seasonal touch. Stir them in with the Rice Krispies. This adds crunch and nutrition to your treats. Just be careful if serving to little ones or guests with allergies. You can mix in other flavors to change things up. Consider using 1 teaspoon of cinnamon or maple syrup for a sweet twist. A splash of almond extract can add a nice touch. Experimenting with different flavors keeps it exciting. You might find a new favorite combo that everyone enjoys! You can store your Pumpkin Rice Krispie Treats in an airtight container. Keep them at room temperature for up to three days. If you live in a warm area, consider placing them in the fridge. This keeps them fresh and chewy for longer. To freeze these treats, cut them into squares first. Wrap each square in plastic wrap. Place the wrapped treats in a freezer-safe bag or container. They can last in the freezer for up to two months. When you want to enjoy them, let them thaw at room temperature for about 30 minutes. Always keep your treats sealed tightly to avoid air exposure. This helps prevent them from getting hard or stale. If they start to lose their softness, you can microwave them for a few seconds to regain some chewiness. Enjoy your treats while they are fresh for the best taste! Yes, you can use homemade marshmallows. They add a unique touch. Just make sure they are soft and fluffy. Melt them the same way as the store-bought ones. This will create a nice, gooey base for your treats. To make these treats vegan, swap out the butter for coconut oil or vegan butter. Use vegan marshmallows instead of regular ones. These changes keep the flavor and texture while being plant-based. Enjoy your vegan Pumpkin Rice Krispie Treats just as much! If you need a substitute for Rice Krispies, try using puffed rice or cornflakes. You can even use crispy rice cereal made from brown rice for a healthier option. The key is to keep the texture light and crunchy. This way, your treats will still turn out delicious! In this article, you learned how to make delicious Pumpkin Rice Krispie Treats. We covered key ingredients, step-by-step instructions, and tips for perfect treats. You can mix in flavors like chocolate or nuts and store your treats fresh. Keep these ideas in mind when you create your own treats. Enjoy your fun, tasty snacks!
    Pumpkin Rice Krispie Treats Simple and Tasty Recipe
  • - 2 cups cooked chicken, shredded - 1 cup shredded mozzarella cheese - 1/2 cup cream cheese, softened - 2 cloves garlic, minced - 1 teaspoon dried oregano - 1/2 teaspoon black pepper - 4 large flour tortillas - 1 cup fresh spinach, roughly chopped - 1/2 cup diced tomatoes - 2 tablespoons olive oil - Optional: Hot sauce for serving Gather these ingredients for a quick meal. This recipe is simple and fun. Start with cooked chicken, shredded. Mozzarella cheese adds a creamy touch. Cream cheese gives a rich flavor. Minced garlic brings out the savory taste. Dried oregano adds a nice herbal note. Black pepper gives a little heat. Next, you need large flour tortillas. They hold the filling well. Fresh spinach adds color and nutrition. Diced tomatoes boost freshness and flavor. Olive oil helps sauté the spinach. Hot sauce is an optional kick at the end. These ingredients make a great base for wraps. They are quick to prepare. You can mix and match as you like. Enjoy the process of cooking! - In a large mixing bowl, combine 2 cups of shredded chicken with 1 cup of mozzarella cheese and 1/2 cup of cream cheese. - Add 2 minced garlic cloves, 1 teaspoon of dried oregano, and 1/2 teaspoon of black pepper. - Mix until creamy and all ingredients blend well together. - Heat 2 tablespoons of olive oil in a skillet over medium heat. - Add 1 cup of roughly chopped fresh spinach. - Sauté the spinach for about 2-3 minutes until it wilts down. - Lay 4 large flour tortillas flat on a clean surface. - Spoon a generous amount of the cheesy garlic chicken mixture onto the lower half of each tortilla, leaving space at the edges. - Sprinkle 1/2 cup of diced tomatoes on top of the filling for added flavor. - Fold the sides of the tortilla inward and roll tightly from the bottom up. - Place the wraps seam-side down in the skillet and grill for 2-3 minutes on each side until golden and crispy. - Remove from heat, slice in half, and serve warm. Enjoy with hot sauce if you like some heat! To roll your wraps like a pro, start with a clean, flat surface. Lay your tortilla down and scoop a generous amount of the cheesy garlic chicken mixture onto the lower half. Leave space at the edges. Next, fold in the sides of the tortilla. This keeps your filling from spilling out. Now, roll from the bottom up tightly. This will ensure a neat wrap that holds together well. Make sure to distribute your filling evenly. This helps every bite taste great. Too much filling on one side can cause it to break apart. Want to switch things up? You can try different cheeses. Cheddar or pepper jack can add a nice twist. If you're feeling bold, mix in some blue cheese for a strong flavor. You can also add extra veggies. Consider bell peppers or mushrooms for more texture. If you want more protein, try adding black beans or cooked shrimp. Pair your wraps with sides like a fresh salad or crispy chips. A creamy dip, like ranch or guacamole, can take it to the next level. These wraps are perfect for busy nights. Serve them at casual dinners or game nights. They are also great for lunchboxes or picnics. Enjoy them warm or at room temperature for easy eating. {{image_2}} You can switch up the protein in your wraps. Turkey makes a great swap for chicken. It has a similar taste and is lean. You can also use beef for a heartier option. Just make sure to cook it well. For a vegetarian twist, try chickpeas or black beans. These options add a great texture and flavor. Want to spice things up? Add chili powder or paprika to the mix. A little heat can really enhance the flavor. You can also explore different cheeses. Try cheddar for a sharp taste or feta for something unique. Mixing cheeses gives you a fun flavor boost. If you're looking for a healthier choice, try whole wheat tortillas. They add fiber and a nutty taste. You can also use gluten-free tortillas if you need them. For a low-carb option, lettuce wraps work wonders. They keep things light and fresh while still being tasty. To keep your cheesy garlic chicken wraps fresh, store them properly. First, wrap each one tightly in plastic wrap or foil. This step prevents air from getting in and keeps them from drying out. Place the wrapped wraps in an airtight container. For refrigeration, they can last up to three days. If you want to keep them longer, freezing is a great option. To freeze, place the wraps in a freezer-safe bag or container. They can last up to three months in the freezer. When it's time to enjoy your leftovers, reheating is key. I recommend using the oven for the best results. Preheat your oven to 350°F (175°C). Place the wraps on a baking sheet and heat them for about 10-15 minutes. This method helps keep the wraps crispy. If you're in a hurry, the microwave works too. Just heat each wrap for about 30-60 seconds. However, this may make them a bit soggy. To combat this, you can place a paper towel under the wrap while microwaving to absorb moisture. In the fridge, your wraps will last about three days. If you freeze them, they can stay good for up to three months. Always check for signs of spoilage. If the wraps smell off or have a slimy texture, it’s best to toss them. Freshness is key to enjoying your cheesy garlic chicken wraps. Yes, you can use leftover rotisserie chicken. It saves time and adds flavor. Rotisserie chicken is already cooked and seasoned. Just shred it and mix it with other ingredients. This makes your prep fast and easy. It helps you enjoy a tasty meal without extra work. If you need a substitute for cream cheese, try Greek yogurt or cottage cheese. Both options are creamy and lower in fat. If you want a dairy-free choice, use cashew cream or tofu. These alternatives keep the wraps creamy and delicious. To add heat, use spicy seasonings. You can add cayenne pepper or red pepper flakes. Another option is to mix in hot sauce with the chicken mixture. This gives a nice kick without overpowering the dish. Adjust the spice level to your taste. Enjoy your spicy cheesy garlic chicken wraps! This article covered simple ideas for making delicious chicken wraps. We talked about key ingredients like cooked chicken and cheeses, as well as spices and fresh veggies. The step-by-step guide helps you prepare, sauté, and roll your wraps efficiently. You can customize them with various proteins and tortillas for more flavor. Lastly, storing and reheating tips ensure your wraps stay fresh. Enjoy creating these tasty meals that fit your style and taste preferences!
    Cheesy Garlic Chicken Wraps for Busy Nights Delight
  • - 8 oz. elbow macaroni - 1 lb. ground beef or turkey - 1 packet taco seasoning - 1 can (15 oz) diced tomatoes with green chilies - 1 cup corn (frozen or canned) - 2 cups beef broth (or vegetable broth) - 2 cups shredded cheddar cheese - 1 cup diced bell peppers (red and green) - 1/2 cup diced onion - Fresh cilantro or green onions for garnish The Cheesy Taco Pasta Skillet needs simple ingredients that pack a punch. Start with 8 oz. of elbow macaroni. This pasta holds sauce well and cooks quickly. Next, use 1 lb. of ground beef or turkey for a hearty base. A packet of taco seasoning brings the flavor. You’ll also want a can of diced tomatoes with green chilies, which adds a nice kick. A cup of corn brings sweetness and texture. Pour in 2 cups of beef broth or vegetable broth for a rich taste. For toppings, grab 2 cups of shredded cheddar cheese. This melts into gooey goodness. Add 1 cup of diced bell peppers and 1/2 cup of diced onion for crunch and color. Finish with fresh cilantro or green onions for that pop of flavor. These ingredients make this meal quick, tasty, and fun to eat. - Heat olive oil in a skillet. - Sauté onions and bell peppers. Start by adding two tablespoons of olive oil to your skillet. Set the heat to medium. Once the oil is hot, toss in 1/2 cup of diced onion and 1 cup of diced bell peppers. Sauté these for about 3-4 minutes. You want them to soften and become fragrant. This step builds a great flavor base for your dish. - Add ground meat and taco seasoning. - Stir in diced tomatoes, corn, and broth. - Mix in elbow macaroni and cover to cook. Next, add 1 pound of ground beef or turkey to the skillet. Use a spatula to break it into small pieces. Cook until browned, which takes about 5-7 minutes. Drain any excess fat if needed. After that, sprinkle in your taco seasoning packet and stir to coat the meat. Pour in a can of diced tomatoes with green chilies, 1 cup of corn, and 2 cups of beef or vegetable broth. Mix everything well. Bring this mixture to a simmer. Now, add 8 oz. of elbow macaroni. Stir to make sure the pasta is covered in the liquid. Cover the skillet and let it cook on medium heat for about 10-12 minutes. Stir occasionally to keep the pasta from sticking. - Stir in cheddar cheese until melted. - Season with salt and pepper to taste. - Allow to sit before serving. When the pasta is al dente, reduce the heat. Add 2 cups of shredded cheddar cheese. Stir until the cheese melts and becomes creamy. Taste your dish and season with salt and pepper as needed. Finally, let it sit for a couple of minutes before serving. This helps the flavors meld together. Enjoy your cheesy taco pasta skillet! - Avoid overcooking the pasta. This keeps it firm and prevents mushy bites. - Stir occasionally to prevent sticking. This helps the pasta mix well with the sauce. - Customize seasoning levels with additional spices. You can add chili powder for heat or cumin for depth. - Experiment with different types of cheese. Try pepper jack for a kick or mozzarella for a milder taste. - Pair with tortilla chips for crunch. The chips add a nice texture contrast to the creamy pasta. - Serve garnished with cilantro or green onions. This adds freshness and a pop of color to your dish. {{image_2}} You can switch up the meat in this dish. Ground turkey works well if you want a leaner option. For a plant-based choice, use lentils or a meat substitute. Each will give a new taste. You can also try shredded chicken. This adds a different flavor profile while keeping the dish hearty. Adding more veggies can boost the nutrients in your meal. Zucchini or spinach are great options. They mix well and add color. You can also swap corn for black beans. This change adds protein and a different texture. Experiment with what you have at home! If you're watching carbs, you can still enjoy this dish. Use low-carb pasta alternatives like zucchini noodles or shirataki noodles. They keep the meal light and tasty. To add richness, sprinkle in extra cheese. It melts beautifully and makes the dish even more satisfying. Store any leftovers in an airtight container in the fridge. I suggest using them within 3-4 days for the best taste. This ensures the flavors stay fresh and vibrant. If you want to save some for later, cool the dish completely before freezing. Use freezer-safe containers to keep it fresh for up to 3 months. This way, you can enjoy a quick meal on busy days. To reheat, warm it on the stove with a splash of broth. This helps bring back the creamy texture. If you prefer the microwave, heat it in short intervals. Make sure to stir in between to heat it evenly. This keeps your cheesy taco pasta skillet delicious every time! Making Cheesy Taco Pasta Skillet takes about 30 minutes. You will spend 10 minutes prepping the ingredients. The cooking time is roughly 20 minutes. This dish cooks quickly, making it perfect for busy weeknights. Yes, you can make this dish in advance. It stores well in the fridge for up to 3-4 days. Just keep it in an airtight container. You can also freeze it for up to 3 months. Make sure to cool it completely before freezing. When ready to eat, thaw it in the fridge overnight for the best results. If you need a substitute for elbow macaroni, there are many options. You can use shells, penne, or rotini as alternatives. For a gluten-free version, try gluten-free pasta made from rice or corn. This way, everyone can enjoy this tasty meal! You now have all the steps to make a tasty Cheesy Taco Pasta Skillet. From selecting your ingredients to adding your own twists, this dish is fun and easy. Remember to keep the pasta al dente and enjoy the flavors of your chosen proteins and veggies. This recipe is great for meal prep or serving a crowd. So gather your ingredients and get cooking. You’ll love how simple and satisfying this meal can be.
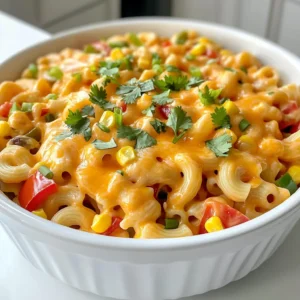
    Cheesy Taco Pasta Skillet Quick and Flavorful Meal
  • - 1 pound ground chicken - 1/2 cup breadcrumbs - 1/4 cup grated Parmesan cheese - 2 tablespoons sweet chili sauce - 1 tablespoon soy sauce - 2 cloves garlic, minced - 1/2 teaspoon black pepper - 1/4 teaspoon salt - 1 teaspoon minced ginger To make these tasty meatballs, gather your ingredients first. I love using ground chicken for its mild flavor. It mixes well with the breadcrumbs and Parmesan cheese, adding a nice texture. The sweet chili sauce is key. It brings a sweet and spicy kick to the dish. Soy sauce adds depth and a savory note. Minced garlic gives your meatballs a fresh taste. For seasoning, use black pepper and salt to balance the flavors. Minced ginger adds warmth and a unique twist. Each ingredient works together to create mouth-watering meatballs that everyone will love. Take time to mix everything well in a bowl. This ensures each bite is full of flavor. Trust me, the effort pays off! Mixing the ingredients Start by gathering all your ingredients. In a large bowl, mix the ground chicken, breadcrumbs, and grated Parmesan cheese. Add the chopped green onions, minced garlic, sweet chili sauce, soy sauce, minced ginger, black pepper, and salt. Use your hands or a spoon to mix everything well. Make sure all the ingredients blend perfectly. Preheating the air fryer While you mix, preheat your air fryer to 375°F (190°C). Preheating helps cook the meatballs evenly. This step is key for a nice, crispy outside. Shaping the meatballs Once mixed, shape the chicken mixture into golf ball-sized meatballs. Aim for 1 to 2 inches in diameter. Place them on a plate as you shape them. Make sure they are not touching each other. This spacing helps them cook better. Air frying process Lightly spray the air fryer basket with cooking spray. Place your meatballs in the basket, ensuring they have space around them. Cook the meatballs for 12 to 15 minutes. Halfway through, shake the basket to help them cook evenly. Check if they're golden brown and cooked inside. Resting the meatballs Once cooked, take the meatballs out of the air fryer. Allow them to rest for a couple of minutes. This helps keep them juicy. Presentation tips Serve the meatballs on a platter. Drizzle extra sweet chili sauce on top. Garnish with chopped green onions and sesame seeds for color. Enjoy them warm as a tasty appetizer or with rice for a main dish. To ensure even cooking, space the meatballs apart in the air fryer. This way, hot air can flow around them. Preheat your air fryer to 375°F (190°C) before cooking. Cook the meatballs for 12-15 minutes. Shake the basket halfway through to help them cook evenly. You can swap ground chicken for ground turkey for a lighter option. If you need gluten-free meatballs, use gluten-free breadcrumbs. These small changes keep the flavor while making the dish fit your needs. Boost the taste with extra spices. Try adding a pinch of cayenne for heat or paprika for smokiness. You can also use different sweet chili sauces. Some are sweeter, while others have a spicy kick. Experiment to find your favorite! {{image_2}} You can switch up the protein in these meatballs. Try using ground pork or beef for a different taste. You can also use ground turkey if you want a leaner option. For a vegetarian choice, use lentils or chickpeas. Just mash them well and mix with the other ingredients. If you want to make your own sweet chili sauce, mix sugar, vinegar, and red chili flakes. Heat this mix until the sugar melts. You can also try other sauces. Barbecue sauce or honey mustard works great as dipping sauces. These meatballs are great in many ways. Make a meatball sub by placing them in a roll with sauce and cheese. You can also use them as salad toppings. They add flavor and protein to your greens. Enjoy them any way you like! To keep your air fryer sweet chili chicken meatballs fresh, store them in the fridge. Place them in an airtight container. They will stay good for up to three days. For longer storage, you can freeze them. Pack them into freezer bags, removing as much air as possible. They will last up to three months in the freezer. When it’s time to enjoy your leftovers, use the air fryer for the best results. Preheat it to 350°F (175°C). Place the meatballs in the basket and heat for about 5-7 minutes. This method helps keep them juicy and warm. Avoid using the microwave, as it can make them dry and tough. Batch cooking is a great way to save time. Make a double batch of meatballs on the weekend. Store some in the fridge and freeze the rest. You can add these meatballs to salads, pasta, or rice dishes. They are also perfect for sandwiches or wraps. This way, you always have a quick meal ready to go! I recommend cooking air fryer meatballs for 12-15 minutes at 375°F (190°C). Check them halfway through and shake the basket for even cooking. When they are golden brown and cooked through, they are ready to eat. Yes, you can use frozen ground chicken. Just make sure to thaw it before mixing. If you cook from frozen, add a few extra minutes to the cooking time. Always check the internal temperature to ensure it's safe. Sweet chili chicken meatballs pair well with many sides. Here are some ideas: - Steamed rice - Quinoa salad - Roasted vegetables - Fresh cucumber salad - Noodles with soy sauce This article shared how to create tasty sweet chili chicken meatballs. You learned the key ingredients, from ground chicken to parmesan cheese. I walked you through preparation, cooking, and serving steps to get delicious results. We explored tips for even cooking and ingredient swaps for flavor. In summary, making these meatballs is easy and fun. You can impress friends or family with your new skills. Now, go enjoy your sweet chili meatballs, and don’t be afraid to experiment!
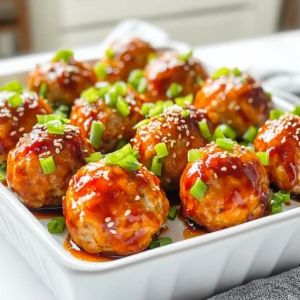
    Air Fryer Sweet Chili Chicken Meatballs Tasty Recipe
  • - 1 lb ground beef (or plant-based alternative) - 8 oz cremini mushrooms, finely chopped - 1 small onion, finely chopped - 2 cloves garlic, minced - 1 tablespoon Worcestershire sauce - 1 teaspoon dried thyme - Salt and pepper to taste - 4 ounces Swiss cheese, sliced - 12 slider buns - 2 tablespoons butter, melted - Fresh parsley, chopped To start, you need to sauté onions and garlic. Heat some olive oil in a large skillet over medium heat. Once hot, add the chopped onions and garlic. Cook until they are soft and clear, about 3-4 minutes. This step builds a great base of flavor. Next, add the finely chopped mushrooms to the skillet. Cook these for about 5-7 minutes. You want them to release their moisture and become tender. After that, add the ground beef. Cook until it turns brown and break it apart with a spoon. This ensures even cooking and flavor throughout. Now, it’s time to mix in some bold flavors. Stir in Worcestershire sauce, dried thyme, salt, and pepper. These ingredients enhance the filling's taste. Cook everything together for another 2-3 minutes. This helps the flavors blend well. After that, remove the skillet from heat and let the mixture cool a bit before moving on. Grab your slider buns and slice them in half. Place the bottom halves on a baking sheet. Now, spoon a good amount of the mushroom and beef mixture onto each bun. Make sure to pile it on for a hearty bite! Top each slider with a slice of Swiss cheese. Next, place the top halves of the buns back on. Brush melted butter on top of them. This will give the buns a lovely golden color when they bake. Before you bake, preheat your oven to 350°F (175°C). Once it’s ready, place the baking sheet in the oven. Bake the sliders for about 10-12 minutes. Keep an eye on them; you want the buns to be golden and the cheese to melt perfectly. When they are done, take them out of the oven. Enjoy your savory mushroom and Swiss sliders! To get the best flavor from your mushrooms and beef, focus on freshness. Use fresh cremini mushrooms, as they bring more taste. For the beef, choose a good quality ground beef or plant-based option. I like to finely chop the mushrooms to mix well with the beef. This helps blend the flavors together. Seasoning matters a lot. Don’t be shy with salt and pepper. Taste as you cook! Adjust the seasoning until it feels right for you. A dash of Worcestershire sauce adds depth too. Sautéing is key for even cooking. Start with a hot skillet and a bit of oil. Add onions and garlic first. They should cook until soft, about three to four minutes. Then, add the mushrooms. Stir often, and let them release their moisture. This takes about five to seven minutes. When it’s time to bake, preheat your oven to 350°F (175°C). This helps the buns turn golden. Brush melted butter on the tops of the buns before baking. It creates a nice, crispy crust and enhances flavor. Pair these sliders with sides like sweet potato fries. The sweetness complements the savory sliders. You can also add a fresh salad to balance the meal. For plating, serve the sliders on a wooden board. Use small skewers for easy handling. Add some fresh parsley on top for color. This makes your dish look more inviting and fun! {{image_2}} You can change the type of meat in these sliders. Ground turkey or chicken works great. You can also use plant-based ground meat. This option is perfect for those who want a lighter meal or follow a vegan diet. For cheese, Swiss is classic, but feel free to swap it out. Try cheddar or pepper jack for a twist. If you want a dairy-free option, use vegan cheese. There are many brands that melt well and taste great. Adding herbs and spices can change the flavor. You might try rosemary or oregano. A pinch of smoked paprika adds a smoky touch. Garlic powder is another great option. You can also incorporate more vegetables into the mix. Diced bell peppers add crunch. Spinach or kale can boost nutrition and flavor too. Just make sure to chop them small so they blend well. Mini sliders are fun for parties. Use the same recipe but shape smaller patties. This way, guests can enjoy a few at once. They are perfect for kids or as appetizers. If you're hosting a larger gathering, just adjust the recipe. You can double or triple the ingredients. This ensures plenty for everyone. Larger buns can also work if you want bigger sliders. Just keep an eye on baking time to avoid burning. To store leftover Savory Mushroom and Swiss Sliders, place them in an airtight container. This keeps them fresh and prevents drying out. Make sure to refrigerate the sliders within two hours of cooking. They stay good for about three days. If you want them to last longer, consider freezing them. Reheating in the oven gives the best texture for sliders. Preheat your oven to 350°F (175°C). Place the sliders on a baking sheet and cover them with foil. Heat for about 10-12 minutes. This ensures the cheese melts and the buns stay soft. If you’re short on time, you can use a microwave. Place one slider on a microwave-safe plate. Heat for 30-45 seconds. Check if it's warm enough; if not, add more time in small bursts. To freeze prepared sliders, let them cool completely. Wrap each slider in plastic wrap, then place them in a freezer bag. Remove as much air as possible to avoid freezer burn. You can freeze them for up to three months. To thaw, take the sliders out and place them in the fridge overnight. Reheat them in the oven or microwave as described above. Enjoy your tasty sliders even after a while! Yes, you can prepare the filling in advance. Simply cook the mushrooms, onions, and beef as directed. Let it cool, then store it in the fridge for up to two days. When you're ready to assemble, just spoon it onto the buns and add cheese. For assembly and baking, you can place the assembled sliders on a baking sheet. Cover with foil and refrigerate. Bake them when you're ready. This method works well and keeps them fresh. If you want an alternative to Swiss cheese, try provolone or mozzarella. These cheeses melt well and taste great. Cheddar is another option, but it has a sharper flavor. Using different cheese can change the slider's taste and texture. Provolone adds a mild flavor, while cheddar gives a richer taste. Mozzarella keeps it creamy and soft. To make these sliders gluten-free, choose gluten-free buns. Many brands offer tasty options. Check labels to ensure they are truly gluten-free. You may also want to adjust other ingredients. Ensure the Worcestershire sauce and other condiments are gluten-free. This way, everyone can enjoy these delicious sliders without worry. In this post, we explored the steps to make Savory Mushroom and Swiss Sliders. We covered the main ingredients, including ground beef and cremini mushrooms, as well as essential seasonings like Worcestershire sauce. You learned how to prepare the filling and assemble the sliders for baking. We also discussed tips for flavor and cooking methods, along with storage and reheating options. These sliders are versatile and perfect for any gathering. Enjoy experimenting with flavors, and make them your own!
    Savory Mushroom and Swiss Sliders Tasty Bite-Sized Treat
  • - 1 cup unsalted butter - 1 cup pumpkin puree - 1 1/2 cups granulated sugar - 1/2 cup brown sugar, packed - 2 large eggs - 1 teaspoon vanilla extract - 3 cups all-purpose flour - 1 teaspoon baking soda - 1 teaspoon cream of tartar - 1/2 teaspoon salt - 1 tablespoon pumpkin spice - 1/4 cup granulated sugar (for rolling) - 1 tablespoon cinnamon (for rolling) I use common measurements like cups and teaspoons. This keeps it simple. When baking, precise measurements matter. A cup of flour is not the same as a cup of brown sugar. Use dry measuring cups for solids and liquid measuring cups for liquids. Pumpkin puree is key here. You can use store-bought or homemade puree. If you can’t find pumpkin spice, mix cinnamon, nutmeg, and ginger instead. Brown butter adds a rich flavor. If you prefer, use regular unsalted butter. This will change the taste, but it will still be good. Feel free to experiment with flavors. You can add chocolate chips or nuts if you like. Always taste as you go. This makes your baking more fun and personal! First, set your oven to 350°F (175°C). Grease a 9x13 inch baking pan or line it with parchment paper. This helps the bars come out easily. Next, take 1 cup of unsalted butter and melt it in a medium saucepan over medium heat. Stir it often. Watch as it foams up, then turns golden brown. This should take about 5-7 minutes. Once it smells nutty, remove it from heat and let it cool down a little. In a big mixing bowl, mix the browned butter, 1 cup pumpkin puree, 1 ½ cups granulated sugar, and ½ cup packed brown sugar. Beat this mixture until it looks smooth. Now, add in 2 large eggs and 1 teaspoon vanilla extract. Mix until everything is well combined. In a different bowl, whisk together 3 cups of all-purpose flour, 1 teaspoon baking soda, 1 teaspoon cream of tartar, ½ teaspoon salt, and 1 tablespoon pumpkin spice. This will be your dry mix. Slowly add the dry mix into the wet mix. Stir gently until everything comes together. Do not overmix. A few lumps are okay. Pour the batter into your prepared baking pan, spreading it evenly with a spatula. In a small bowl, mix ¼ cup granulated sugar with 1 tablespoon cinnamon. Sprinkle this mix on top of the batter. Bake the bars for 25-30 minutes. Use a toothpick to check if they are done. If it comes out clean, they are ready. After baking, let the bars cool in the pan for about 10 minutes. Then, move them to a wire rack to cool completely. Cut them into squares and serve. For a nice touch, you can dust them with powdered sugar or drizzle caramel sauce on top. Enjoy! To make brown butter, you need to watch it closely. Start with unsalted butter in a medium saucepan. Heat it on medium. Stir it often. Look for foaming, a golden color, and a nutty smell. This process takes about 5-7 minutes. If it burns, you must start over. Brown butter adds a rich flavor to the bars. One common mistake is overmixing the batter. After you combine the wet and dry ingredients, mix until just blended. A few lumps are okay. Overmixing can make the bars tough and chewy instead of soft. Also, make sure to measure your ingredients accurately. Too much flour makes the bars dry. To serve your bars beautifully, use a rustic wooden platter. Dust the tops lightly with powdered sugar. For a fun twist, drizzle caramel sauce on top. This adds a nice touch and makes the bars look more inviting. A few pecans or walnuts can add texture and elegance. {{image_2}} You can make these bars even better by adding chocolate chips. I like to use semi-sweet chocolate chips for a rich taste. Just fold in about one cup of chocolate chips to the batter before you pour it into the pan. The warm, gooey chocolate complements the pumpkin flavor perfectly. If you want a nut-free treat, you're in luck! This recipe does not call for nuts. If you want to add some crunch, try using pumpkin seeds or sunflower seeds instead. They add a nice texture while keeping it safe for those with nut allergies. To make these bars gluten-free, swap the all-purpose flour for a gluten-free blend. Look for a blend that includes xanthan gum for the best results. The texture will still be soft and chewy, just like the original. Enjoy your gluten-free treat without missing out on flavor! Store your Brown Butter Pumpkin Snickerdoodle Bars in an airtight container. Place parchment paper between layers to keep them fresh. Keep the bars at room temperature for up to three days. If you want them to last longer, refrigerate them. They can stay good for up to a week in the fridge. To freeze the bars, first let them cool completely. Cut them into squares. Wrap each square in plastic wrap, then place them in a freezer bag. Label the bag with the date. These bars can last in the freezer for up to three months. When you’re ready to eat them, thaw them overnight in the fridge. Reheating is simple. Preheat your oven to 350°F (175°C). Place the bars on a baking sheet. Heat them for about 10 minutes, or until warm. You can also use a microwave. Heat each square for 15-20 seconds. Enjoy them warm for a cozy treat! Yes, you can use canned pumpkin puree. It saves time and gives great flavor. Just make sure it is pure pumpkin and not a pie filling. You can check if the bars are done by inserting a toothpick. If it comes out clean, they are ready. The edges will look slightly golden, and the center will feel set. These bars pair well with vanilla ice cream or whipped cream. You can add a drizzle of caramel sauce for extra sweetness. The bars last about 3 to 5 days when stored in an airtight container. Keep them at room temperature. If you want to store them longer, you can freeze them. Yes, you can make these bars ahead of time. They taste great after a day or two. Just store them properly to keep them fresh. This blog post covered the main aspects of creating delicious bars. You learned about key ingredients and their measurements, along with special substitutions. I provided step-by-step instructions for every part of the baking process. Useful tips helped you avoid common mistakes and improve presentation. Variations allow you to customize your bars, while storage info keeps them fresh. With this knowledge, you can bake with confidence and enjoy your treats!
    Brown Butter Pumpkin Snickerdoodle Bars Delight

Posts pagination

1 2 3 … 66 Older →

Footer

↑ back to top

More information

  • Drinks
  • Appetizer
  • Dinner
  • Desserts
  • About
  • Contact
  • Privacy Policy

Our Policies

  • Privacy Policy
  • GDPR Policy
  • Terms Of Use
  • Copyright Policy
  • Cookie Policy
  • Disclaimer

Copyright © 2025 cheftaling