Chef Taling

  • Home
  • Recipe Index
    • Desserts
    • Dinner
    • Appetizer
    • Drinks
  • About
  • Contact
  • Privacy Policy
menu icon
go to homepage
  • Home
  • Recipe Index
    • Desserts
    • Dinner
    • Appetizer
    • Drinks
  • About
  • Contact
  • Privacy Policy
Kick your taste buds into gear with these sizzling sausage stuffed jalapeños! Perfect for parties or game day, this flavor-packed appetizer combines zesty jalapeños with savory sausage and a creamy cheese filling. Easy to make and bursting with flavor, these bite-sized treats are sure to impress your guests. Discover the secret to the ultimate crowd-pleaser and elevate your snack game with this delectable recipe. Pin it now for your next gathering!

search icon
Homepage link
  • Home
  • Recipe Index
    • Desserts
    • Dinner
    • Appetizer
    • Drinks
  • About
  • Contact
  • Privacy Policy
Kick your taste buds into gear with these sizzling sausage stuffed jalapeños! Perfect for parties or game day, this flavor-packed appetizer combines zesty jalapeños with savory sausage and a creamy cheese filling. Easy to make and bursting with flavor, these bite-sized treats are sure to impress your guests. Discover the secret to the ultimate crowd-pleaser and elevate your snack game with this delectable recipe. Pin it now for your next gathering!

×

Sizzling Sausage Stuffed Jalapeños: A Flavor-Packed Appetizer

Published: Nov 12, 2024 · by Taling · Leave a Comment

WANT TO SAVE THIS RECIPE?

899 shares
Kick your taste buds into gear with these sizzling sausage stuffed jalapeños! Perfect for parties or game day, this flavor-packed appetizer combines zesty jalapeños with savory sausage and a creamy cheese filling. Easy to make and bursting with flavor, these bite-sized treats are sure to impress your guests. Discover the secret to the ultimate crowd-pleaser and elevate your snack game with this delectable recipe. Pin it now for your next gathering!

Introduction

Stuffed jalapeños have earned their place as one of the most beloved appetizers in culinary circles, celebrated for their perfect marriage of heat and flavor. These spicy little bites can elevate any occasion, whether it’s a casual gathering, a festive party, or the ever-popular game day. Among the myriad of ways to stuff these vibrant peppers, Sizzling Sausage Stuffed Jalapeños stand out as a mouthwatering favorite. This recipe showcases a delightful blend of savory Italian sausage, creamy cheeses, and aromatic spices, creating a dish that tantalizes the taste buds and leaves guests craving more.

Stuffed jalapeños have earned their place as one of the most beloved appetizers in culinary circles, celebrated for their perfect marriage of heat and flavor. These spicy little bites can elevate any occasion, whether it's a casual gathering, a festive party, or the ever-popular game day. Among the myriad of ways to stuff these vibrant peppers, Sizzling Sausage Stuffed Jalapeños stand out as a mouthwatering favorite. This recipe showcases a delightful blend of savory Italian sausage, creamy cheeses, and aromatic spices, creating a dish that tantalizes the taste buds and leaves guests craving more.

What makes Sizzling Sausage Stuffed Jalapeños especially appealing is not just their incredible flavor profile but also their simplicity. With just a few ingredients, this dish can be prepared quickly, allowing you to focus on enjoying the moment rather than spending hours in the kitchen. Whether you’re a seasoned chef or a novice cook, this recipe is user-friendly, making it an ideal choice for any home cook looking to impress.

Understanding the Ingredients

To create the ultimate Sizzling Sausage Stuffed Jalapeños, it’s essential to understand the role each ingredient plays in building the dish’s flavor and texture. Let’s delve into the main components that contribute to this delicious appetizer.

Jalapeño Peppers

At the heart of this recipe are the jalapeño peppers themselves. Known for their vibrant green color and signature heat, jalapeños bring a zesty kick to the dish. The flavor profile of jalapeños is a delightful combination of fresh, grassy notes with a moderate to high heat level, typically ranging from 2,500 to 8,000 Scoville heat units. This variability allows cooks to select peppers that suit their spice tolerance. Furthermore, removing the seeds and membranes can help control the heat, making it possible to tailor the spice level to your personal preference or that of your guests.

Italian Sausage

The next star ingredient in this recipe is Italian sausage, which adds a rich, savory flavor that perfectly complements the jalapeños. When selecting sausage, you have options: mild, sweet, or hot. Each variety brings its own unique taste to the dish. For those who enjoy a little heat, opting for a spicy Italian sausage can amplify the overall flavor profile. Alternatively, for a milder experience, sweet Italian sausage is a fantastic choice. Regardless of the type you choose, the sausage should be cooked thoroughly to achieve the ideal texture and flavor balance before being mixed with the other ingredients.

Cream Cheese

Cream cheese is the ingredient that ties everything together, providing a creamy texture that balances the heat from the jalapeños and the savory notes of the sausage. Its mild flavor allows the other ingredients to shine while adding a luscious mouthfeel that elevates the overall experience of the dish. The creaminess of the cheese ensures that each bite is indulgent and satisfying, making it an essential component of this appetizer.

Cheddar and Parmesan

A combination of cheddar and Parmesan cheese further enhances the flavor complexity of the stuffing. Cheddar cheese, with its sharpness and excellent melting properties, creates a gooey, cheesy filling that melds beautifully with the other ingredients. Parmesan, on the other hand, adds a nutty depth and a slight saltiness, rounding out the flavors and boosting the overall richness of the dish. Together, these two cheeses create a delightful cheesy experience that is irresistible.

Spices and Seasonings

To ensure the stuffing is bursting with flavor, the inclusion of spices and seasonings is crucial. Garlic and onion powder add aromatic depth and enhance the overall savory notes. Smoked paprika introduces a subtle smokiness that complements the sausage and jalapeños, while other optional spices like cumin or chili powder can be added to taste for an extra layer of flavor. These spices work harmoniously to create a well-rounded filling that is both flavorful and satisfying.

Preparation Steps in Detail

Now that we have a solid understanding of the ingredients, it’s time to dive into the preparation steps that will lead you to delicious Sizzling Sausage Stuffed Jalapeños. Following these steps ensures that your appetizer will turn out perfectly every time.

Preheating the Oven

Before you begin assembling your stuffed jalapeños, it’s essential to preheat your oven to 375°F (190°C). Preheating is a critical step as it ensures that your jalapeños cook evenly and achieve the desired crispy texture on the outside while remaining tender on the inside. Take this time to gather all your ingredients and tools to streamline your cooking process.

Preparing Jalapeños

The next step involves preparing the jalapeños for stuffing. Begin by slicing each pepper in half lengthwise. Be careful to maintain the integrity of the pepper so that each half can hold the filling. Once sliced, it’s time to deseed the jalapeños. Wearing gloves is highly recommended during this process, as the oils from the peppers can cause irritation to your skin and eyes. Using a small spoon or a melon baller, gently scrape the seeds and membranes from the inside of each jalapeño half. This step is crucial for controlling the heat level; the more seeds you remove, the milder the pepper will be.

Cooking Sausage

Now it’s time to cook the Italian sausage. In a skillet over medium heat, crumble the sausage and cook until it is browned and fully cooked, approximately 5 to 7 minutes. Stir frequently to break up the meat and ensure even cooking. Once cooked, drain any excess fat from the skillet, and let the sausage cool slightly before mixing it with the other ingredients. This step not only enhances the flavor but also ensures a satisfying texture in the final dish.

Mixing the Filling

With the sausage cooked and jalapeños prepared, it’s time to combine the filling. In a mixing bowl, combine the cooked sausage, softened cream cheese, shredded cheddar, grated Parmesan, and your chosen spices. Use a fork or spatula to thoroughly mix the ingredients until you achieve a creamy, cohesive filling. It’s important to ensure that the cream cheese is softened to room temperature, as this will make it easier to blend with the other ingredients and create a smooth filling.

Stuffing the Jalapeños

Once your filling is ready, it’s time to stuff the jalapeños. There are a couple of techniques you can use for this part of the process.

Techniques for Stuffing

You can choose to use either a small spoon or a piping bag to fill the jalapeño halves with your delicious sausage and cheese mixture. Using a spoon may be the simplest approach, allowing you to scoop and fill each half with care. However, for a more polished and even filling, a piping bag can help you achieve a professional-looking presentation. Simply fill the piping bag with the mixture, snip off the end, and pipe the filling into each jalapeño half, ensuring they are generously stuffed.

Ensuring Even Distribution

Regardless of the method you choose, it’s essential to ensure that each jalapeño half is filled evenly. This guarantees that every bite is packed with flavor and that the cooking time is uniform. After stuffing, you can sprinkle a little extra shredded cheese on top of each jalapeño for an added cheesy crust that melts beautifully during baking.

By following these steps, you will be well on your way to creating Sizzling Sausage Stuffed Jalapeños that are sure to impress your guests and become a staple at your gatherings. As you move forward with the baking and serving of these flavorful appetizers, remember that the joy of cooking also lies in sharing delicious food with friends and family. Stay tuned for the next part, where we will explore the baking process and additional serving suggestions for these irresistible stuffed jalapeños.

Stuffed jalapeños have earned their place as one of the most beloved appetizers in culinary circles, celebrated for their perfect marriage of heat and flavor. These spicy little bites can elevate any occasion, whether it's a casual gathering, a festive party, or the ever-popular game day. Among the myriad of ways to stuff these vibrant peppers, Sizzling Sausage Stuffed Jalapeños stand out as a mouthwatering favorite. This recipe showcases a delightful blend of savory Italian sausage, creamy cheeses, and aromatic spices, creating a dish that tantalizes the taste buds and leaves guests craving more.

Baking Method

Once your jalapeños are stuffed and ready for the oven, it’s time to focus on the baking method that will ensure your Sizzling Sausage Stuffed Jalapeños achieve the perfect texture and flavor. Preheat your oven to 375°F (190°C), which is an ideal temperature for cooking the jalapeños thoroughly while allowing the stuffing to become golden and bubbly.

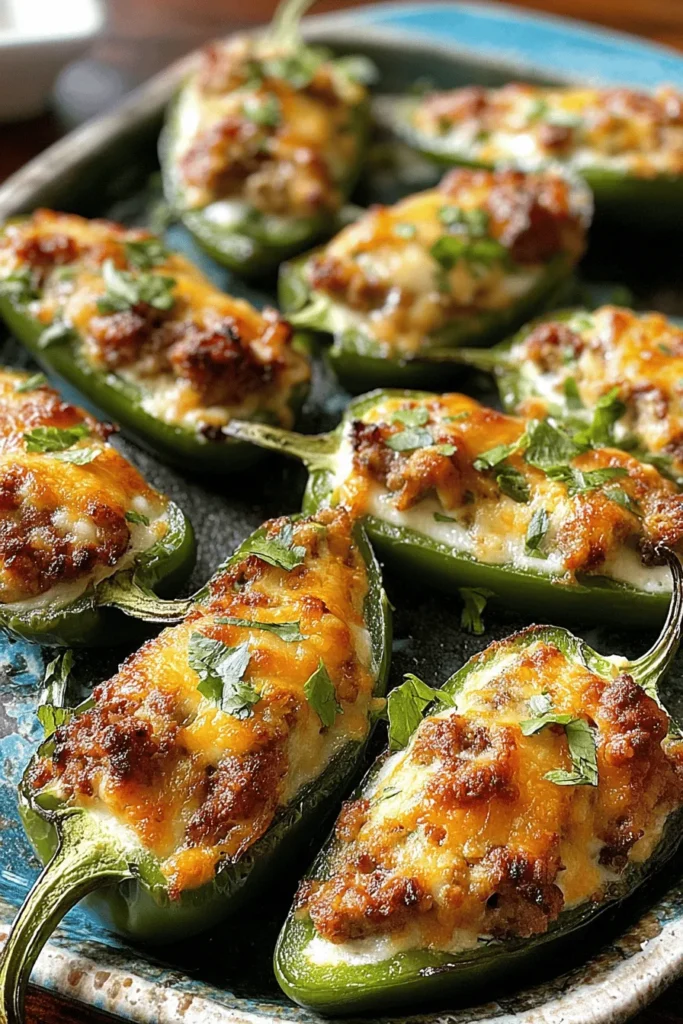
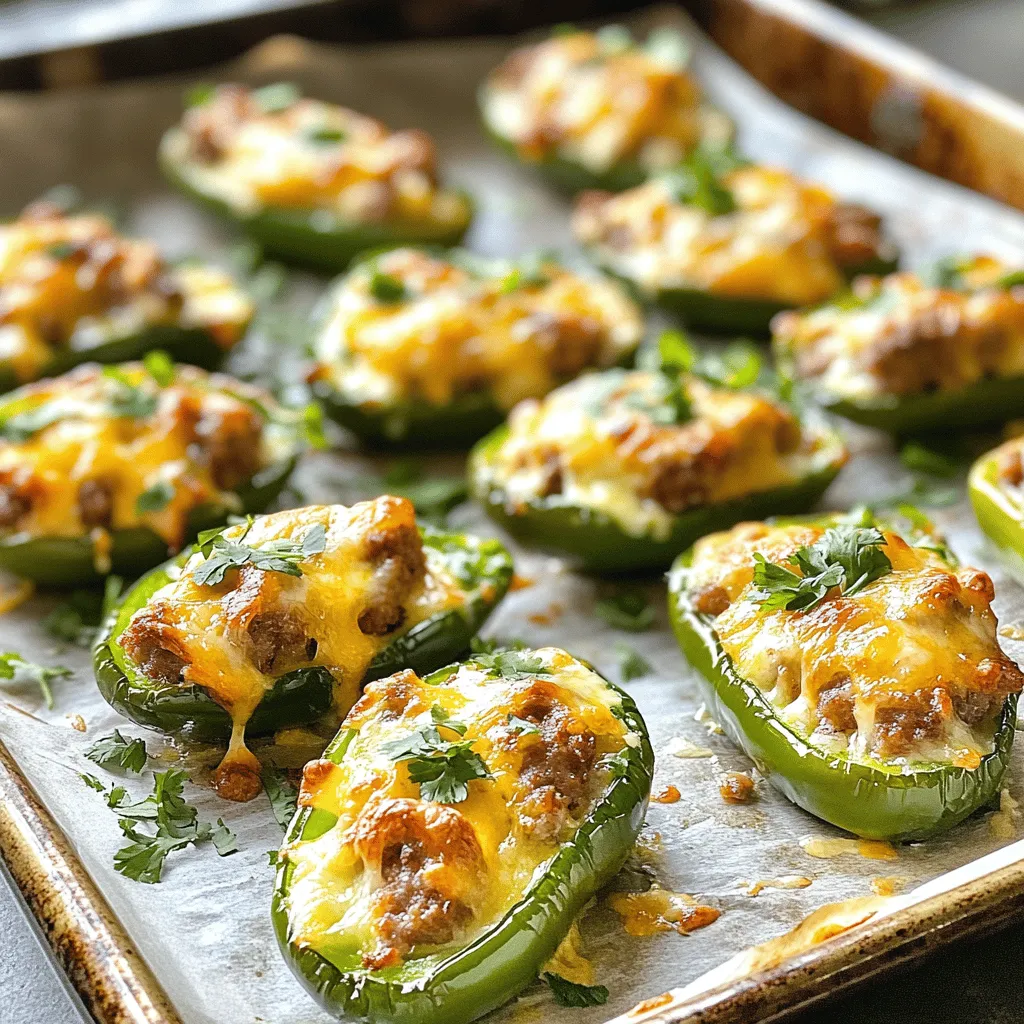
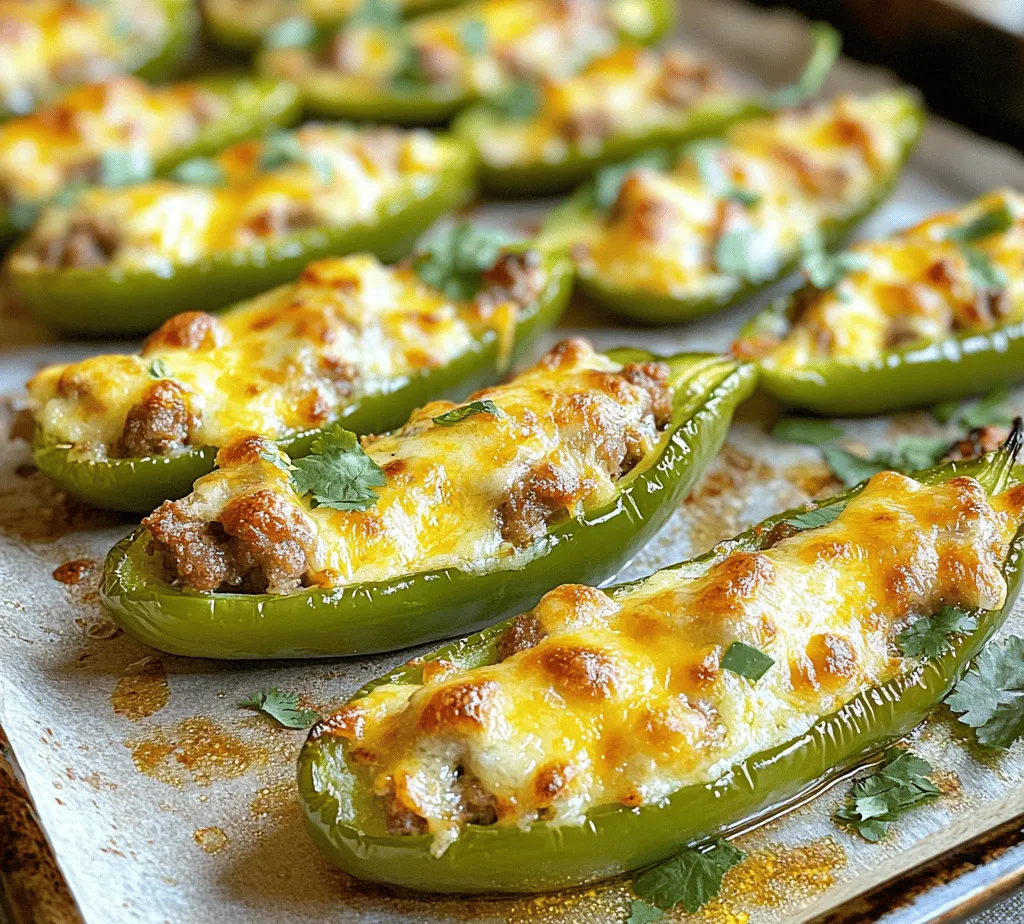
Baking the Stuffed Jalapeños

Arrange the stuffed jalapeños on a baking sheet lined with parchment paper, which prevents sticking and makes cleanup a breeze. Leave some space between each jalapeño to allow for even cooking and heat circulation. Bake them in the preheated oven for approximately 20-25 minutes.

During this time, keep an eye on the stuffed peppers. The baking time may vary depending on the size of the jalapeños and the amount of stuffing used. You want to achieve a result where the peppers are tender yet still firm enough to hold their shape.

Indicators of Doneness

To determine if your stuffed jalapeños are done, look for a few visual and tactile cues. The cheese on top should be melted and starting to bubble, potentially with a slight golden brown color. You can also gently press the top of a jalapeño with a fork or your finger; if it feels tender but not mushy, it’s ready to be removed from the oven. Additionally, the jalapeño skin should appear slightly wrinkled, indicating that they have cooked through.

Serving Suggestions

Once your Sizzling Sausage Stuffed Jalapeños are perfectly baked, it’s time to think about presentation and serving. These stuffed peppers are not just a treat for the taste buds; they are also visually appealing.

Presentation Ideas

For a delightful presentation, arrange the stuffed jalapeños on a large platter. Garnish with fresh chopped cilantro or parsley for a pop of color. A drizzle of sour cream or a dollop of guacamole alongside the jalapeños enhances both the flavor and visual appeal. You can even sprinkle some extra cheese on top just before serving for that added meltiness.

Consider placing the platter on a colorful tablecloth to enhance the festive vibe, especially if you’re serving them at a party or gathering. Adding some lime wedges around the plate can also provide a vibrant touch and an option for guests to squeeze fresh lime juice over the peppers.

Pairings

Pair your Sizzling Sausage Stuffed Jalapeños with complementary dishes to create a well-rounded meal. They make an excellent appetizer alongside a refreshing salsa or pico de gallo. If you’re looking for something heartier, consider serving them with a side of Mexican rice or refried beans.

For beverages, a chilled Mexican lager or a classic margarita can beautifully complement the flavors of the stuffed jalapeños, enhancing the overall dining experience. If you’re serving them for a game day or casual get-together, a batch of homemade guacamole and tortilla chips can round out the menu.

Nutritional Information

Understanding the nutritional components of your Sizzling Sausage Stuffed Jalapeños can help you enjoy them guilt-free. Each stuffed jalapeño contains a combination of key nutrients from the sausage, cheese, and peppers.

A standard serving (typically 2-3 jalapeños) can provide around 250-300 calories, depending on the type of sausage and cheese used. They are rich in protein from the sausage and cheese, while the jalapeños contribute dietary fiber and vitamins A and C.

Discussion on the Balance Between Indulgence and Nutrition

While stuffed jalapeños are undeniably indulgent, they can still fit into a balanced diet. The key is moderation and portion control. You can enhance the nutritional profile by opting for leaner sausage options or using low-fat cheese. Additionally, consider pairing them with a fresh salad to increase your vegetable intake while enjoying this flavorful appetizer.

Variations and Customizations

One of the best aspects of Sizzling Sausage Stuffed Jalapeños is their versatility. You can easily customize the recipe to cater to different dietary preferences or to create new flavor profiles.

Alternative Ingredients for Different Dietary Preferences

For those following a vegetarian diet, consider substituting the sausage with a plant-based sausage or a mixture of sautéed vegetables, black beans, and quinoa. This alternative keeps the dish hearty while accommodating dietary restrictions.

For a gluten-free option, ensure your sausage is gluten-free and use gluten-free breadcrumbs if you choose to include them. The stuffing can also be enhanced with additional spices or herbs to boost flavor without relying on gluten-containing ingredients.

Different Types of Cheese or Sausage

Experimenting with different types of cheese can yield delicious results. Cream cheese provides a rich and creamy texture, while cheddar adds a sharp bite. For a spicier kick, try pepper jack cheese, which complements the jalapeños beautifully.

When it comes to sausage, the world is your oyster. Italian sausage, chorizo, or chicken sausage can all be used to bring unique flavors to your stuffed jalapeños. Adjust the type of sausage based on your flavor preferences or what you have on hand.

Adjusting Spiciness Levels

To modify the spiciness of your Sizzling Sausage Stuffed Jalapeños, consider the following tips. If you prefer a milder flavor, choose larger jalapeños, as they tend to be less spicy than smaller ones. Additionally, you can remove the seeds and membranes from the jalapeños before stuffing them, as these parts contain most of the heat.

Conversely, if you’re looking for a fiery experience, spice up your filling with diced serrano peppers or a splash of hot sauce. You can also experiment with different pepper varieties for a more intense heat level.

Cultural Significance

Jalapeños are a staple in Mexican cuisine and have become increasingly popular in various culinary traditions around the world. Originating from Mexico, these versatile peppers have a long history, with their cultivation dating back to ancient Mesoamerican cultures.

Brief Historical Context of Jalapeños in Cuisine

Jalapeños are named after the city of Xalapa, Veracruz, where they were first cultivated. These peppers are often used fresh, pickled, or smoked (as in chipotle), showcasing their versatility in different dishes. As they gained popularity, jalapeños found their way into various cuisines, transcending borders and becoming beloved ingredients in Tex-Mex cuisine, barbecue, and even gourmet dishes.

The Evolution of Stuffed Jalapeños

Stuffed jalapeños, in particular, have evolved from traditional recipes to modern interpretations. Originally filled with cheese or meats, they have now become a canvas for culinary creativity. Chefs and home cooks alike experiment with fillings, incorporating everything from seafood to grains, making stuffed jalapeños a popular appetizer at gatherings and celebrations.

Conclusion

Sizzling Sausage Stuffed Jalapeños are more than just an appetizer; they are a celebration of flavor and creativity. With their perfect balance of spice, creaminess, and savory goodness, they are sure to impress your family and friends. The versatility of this dish allows you to customize it to your liking, making it a go-to recipe for any occasion.

We encourage you to try this recipe and experiment with different flavor combinations. The joy of sharing delicious food with loved ones is an experience like no other, and your Sizzling Sausage Stuffed Jalapeños will undoubtedly become a crowd-pleaser at your next gathering. So gather your ingredients, fire up the oven, and get ready to enjoy a mouthwatering treat that brings everyone together.

Stuffed jalapeños have earned their place as one of the most beloved appetizers in culinary circles, celebrated for their perfect marriage of heat and flavor. These spicy little bites can elevate any occasion, whether it's a casual gathering, a festive party, or the ever-popular game day. Among the myriad of ways to stuff these vibrant peppers, Sizzling Sausage Stuffed Jalapeños stand out as a mouthwatering favorite. This recipe showcases a delightful blend of savory Italian sausage, creamy cheeses, and aromatic spices, creating a dish that tantalizes the taste buds and leaves guests craving more.

Sausage Stuffed Jalapenos

Get ready to spice up your next gathering with these Sizzling Sausage Stuffed Jalapeños! This mouthwatering appetizer combines zesty jalapeños, savory Italian sausage, creamy cheeses, and aromatic spices for a flavor explosion that your guests won’t forget. Perfect for game day, casual parties, or any occasion. Plus, it’s easy to make and customize to fit any taste! Try this delicious recipe now! #JalapenoPoppers #Appetizers #GameDayFood #SpicySnacks #YummyEats #PartyRecipes
Print Recipe Pin Recipe

Ingredients
  

12 large jalapeño peppers

1 lb Italian sausage (or your choice of sausage)

1 cup cream cheese, softened

1 cup shredded sharp cheddar cheese

½ cup grated Parmesan cheese

2 cloves garlic, minced

1 teaspoon onion powder

1 teaspoon smoked paprika

½ teaspoon black pepper

¼ teaspoon salt

Fresh cilantro or parsley for garnish (optional)

Olive oil for greasing the baking sheet

Instructions
 

Preheat Oven: Start by preheating your oven to 375°F (190°C). Line a baking sheet with parchment paper and lightly grease it with olive oil.

    Prepare Jalapeños: Slice each jalapeño in half lengthwise and remove the seeds and membranes using a small spoon. The more seeds you remove, the milder they will be.

      Cook Sausage: In a skillet over medium heat, crumble and cook the Italian sausage until browned and fully cooked (about 7-10 minutes). Drain excess fat if necessary and remove from heat.

        Mix Filling: In a mixing bowl, combine the cooked sausage, softened cream cheese, shredded cheddar cheese, grated Parmesan cheese, minced garlic, onion powder, smoked paprika, black pepper, and salt. Mix until all ingredients are well combined and creamy.

          Stuff Jalapeños: Use a spoon or a piping bag to generously fill each jalapeño half with the sausage and cheese mixture.

            Bake: Arrange the stuffed jalapeños on the prepared baking sheet and bake in the preheated oven for 20-25 minutes or until the jalapeños are tender and the cheese is bubbly and golden.

              Garnish & Serve: Remove from the oven and let them cool slightly. Garnish with chopped fresh cilantro or parsley if desired. Serve warm as a delightful appetizer!

                Prep Time: 15 mins | Total Time: 40 mins | Servings: 6-8

                  Related Recipes

                  • - 1 pound ground chicken - 1/2 cup breadcrumbs - 1/4 cup grated Parmesan cheese - 2 tablespoons sweet chili sauce - 1 tablespoon soy sauce - 2 cloves garlic, minced - 1/2 teaspoon black pepper - 1/4 teaspoon salt - 1 teaspoon minced ginger To make these tasty meatballs, gather your ingredients first. I love using ground chicken for its mild flavor. It mixes well with the breadcrumbs and Parmesan cheese, adding a nice texture. The sweet chili sauce is key. It brings a sweet and spicy kick to the dish. Soy sauce adds depth and a savory note. Minced garlic gives your meatballs a fresh taste. For seasoning, use black pepper and salt to balance the flavors. Minced ginger adds warmth and a unique twist. Each ingredient works together to create mouth-watering meatballs that everyone will love. Take time to mix everything well in a bowl. This ensures each bite is full of flavor. Trust me, the effort pays off! Mixing the ingredients Start by gathering all your ingredients. In a large bowl, mix the ground chicken, breadcrumbs, and grated Parmesan cheese. Add the chopped green onions, minced garlic, sweet chili sauce, soy sauce, minced ginger, black pepper, and salt. Use your hands or a spoon to mix everything well. Make sure all the ingredients blend perfectly. Preheating the air fryer While you mix, preheat your air fryer to 375°F (190°C). Preheating helps cook the meatballs evenly. This step is key for a nice, crispy outside. Shaping the meatballs Once mixed, shape the chicken mixture into golf ball-sized meatballs. Aim for 1 to 2 inches in diameter. Place them on a plate as you shape them. Make sure they are not touching each other. This spacing helps them cook better. Air frying process Lightly spray the air fryer basket with cooking spray. Place your meatballs in the basket, ensuring they have space around them. Cook the meatballs for 12 to 15 minutes. Halfway through, shake the basket to help them cook evenly. Check if they're golden brown and cooked inside. Resting the meatballs Once cooked, take the meatballs out of the air fryer. Allow them to rest for a couple of minutes. This helps keep them juicy. Presentation tips Serve the meatballs on a platter. Drizzle extra sweet chili sauce on top. Garnish with chopped green onions and sesame seeds for color. Enjoy them warm as a tasty appetizer or with rice for a main dish. To ensure even cooking, space the meatballs apart in the air fryer. This way, hot air can flow around them. Preheat your air fryer to 375°F (190°C) before cooking. Cook the meatballs for 12-15 minutes. Shake the basket halfway through to help them cook evenly. You can swap ground chicken for ground turkey for a lighter option. If you need gluten-free meatballs, use gluten-free breadcrumbs. These small changes keep the flavor while making the dish fit your needs. Boost the taste with extra spices. Try adding a pinch of cayenne for heat or paprika for smokiness. You can also use different sweet chili sauces. Some are sweeter, while others have a spicy kick. Experiment to find your favorite! {{image_2}} You can switch up the protein in these meatballs. Try using ground pork or beef for a different taste. You can also use ground turkey if you want a leaner option. For a vegetarian choice, use lentils or chickpeas. Just mash them well and mix with the other ingredients. If you want to make your own sweet chili sauce, mix sugar, vinegar, and red chili flakes. Heat this mix until the sugar melts. You can also try other sauces. Barbecue sauce or honey mustard works great as dipping sauces. These meatballs are great in many ways. Make a meatball sub by placing them in a roll with sauce and cheese. You can also use them as salad toppings. They add flavor and protein to your greens. Enjoy them any way you like! To keep your air fryer sweet chili chicken meatballs fresh, store them in the fridge. Place them in an airtight container. They will stay good for up to three days. For longer storage, you can freeze them. Pack them into freezer bags, removing as much air as possible. They will last up to three months in the freezer. When it’s time to enjoy your leftovers, use the air fryer for the best results. Preheat it to 350°F (175°C). Place the meatballs in the basket and heat for about 5-7 minutes. This method helps keep them juicy and warm. Avoid using the microwave, as it can make them dry and tough. Batch cooking is a great way to save time. Make a double batch of meatballs on the weekend. Store some in the fridge and freeze the rest. You can add these meatballs to salads, pasta, or rice dishes. They are also perfect for sandwiches or wraps. This way, you always have a quick meal ready to go! I recommend cooking air fryer meatballs for 12-15 minutes at 375°F (190°C). Check them halfway through and shake the basket for even cooking. When they are golden brown and cooked through, they are ready to eat. Yes, you can use frozen ground chicken. Just make sure to thaw it before mixing. If you cook from frozen, add a few extra minutes to the cooking time. Always check the internal temperature to ensure it's safe. Sweet chili chicken meatballs pair well with many sides. Here are some ideas: - Steamed rice - Quinoa salad - Roasted vegetables - Fresh cucumber salad - Noodles with soy sauce This article shared how to create tasty sweet chili chicken meatballs. You learned the key ingredients, from ground chicken to parmesan cheese. I walked you through preparation, cooking, and serving steps to get delicious results. We explored tips for even cooking and ingredient swaps for flavor. In summary, making these meatballs is easy and fun. You can impress friends or family with your new skills. Now, go enjoy your sweet chili meatballs, and don’t be afraid to experiment!
                    Air Fryer Sweet Chili Chicken Meatballs Tasty Recipe
                  • - 4 large russet potatoes - 1/4 cup grated Parmesan cheese - 2 tablespoons olive oil - 1 teaspoon garlic powder - 1 teaspoon onion powder - 1/2 teaspoon smoked paprika - 1/2 teaspoon dried oregano - Salt and pepper to taste - Fresh parsley, chopped When I make Parmesan potato wedges, I want them crispy and flavorful. Start with fresh russet potatoes. They have the right starchiness for great texture. Wash and scrub them well. No dirt should remain. I slice each potato into about eight wedges. Aim for even sizes to cook them uniformly. Next, I use olive oil to coat the wedges. This helps the seasoning stick and promotes crispiness. I mix grated Parmesan cheese with garlic powder, onion powder, smoked paprika, dried oregano, salt, and pepper. This blend gives the wedges a tasty kick. I toss the potato wedges in the seasoning well. Each wedge should get a nice coating. Before cooking, I preheat my air fryer to 400°F (200°C). This step is key for crispiness. I arrange the wedges in a single layer. Avoid overcrowding. It ensures that each wedge cooks evenly. Cooking takes about 15-20 minutes. I shake the basket halfway through. The wedges will turn golden brown and crispy. For a fresh touch, I sprinkle chopped parsley on top before serving. It adds a pop of color and brightness. - Wash and scrub the potatoes. - Slice into wedges (about 8 wedges per potato). Start by giving your russet potatoes a good wash. This removes dirt and makes them clean. After that, slice each potato into about eight wedges. Aim for even sizes to help them cook well. - Toss potato wedges with olive oil. - Combine Parmesan and spices in a bowl. Next, put your potato wedges in a large bowl. Drizzle olive oil over them and toss until each wedge is coated. In a separate bowl, mix the grated Parmesan cheese with garlic powder, onion powder, smoked paprika, oregano, salt, and pepper. This blend gives the wedges a tasty kick. - Preheat the air fryer to 400°F (200°C). - Arrange wedges in a single layer. - Cook for 15-20 minutes, shaking halfway. Now, preheat your air fryer to 400°F (200°C). Once it’s ready, place the potato wedges in the fryer basket in a single layer. This helps them cook evenly and get crispy. Cook for 15-20 minutes, but remember to shake the basket halfway through. This step ensures all sides get that golden-brown color you want. To get those perfect crispy wedges, start with the right coating. Use enough olive oil so each wedge glistens. This helps the seasonings stick. Mix your Parmesan and spices well before adding to the wedges. Even coverage is key. Preheating the air fryer is also important. Set it to 400°F (200°C) before adding your wedges. This step ensures they cook evenly and get that nice crunch. These potato wedges shine when served with tasty dips. Creamy ranch and garlic aioli are my favorites. They add flavor and richness. For a fun touch, serve the wedges on a wooden platter. A white dish also makes the golden color pop. Garnish with fresh parsley before serving. It adds color and a fresh taste. You can customize the flavors of your wedges easily. Love heat? Add a pinch of cayenne pepper. Prefer something milder? Skip the smoked paprika. If you want a cheese alternative, try cheddar or nutritional yeast. Both can give a great flavor boost while keeping it dairy-free. {{image_2}} You can switch it up by using sweet potatoes. They add a natural sweetness and a vibrant color. Sweet potato wedges get crispy, too, and taste great with Parmesan. Another option is to try Yukon Gold potatoes. They are creamy and have a buttery taste. You can even mix different types of potatoes for more fun and flavor. To make your wedges unique, add herbs and spices. Fresh rosemary gives a nice touch. You can also sprinkle some chili powder for a bit of heat. If you want to change the cheese, try cheddar. It melts well and has a rich flavor. Nutritional yeast is a great choice for a vegan option. It adds a cheesy taste without dairy. If you don't have an air fryer, no worries! You can bake these wedges in the oven. Preheat your oven to 425°F (220°C) and spread the wedges on a baking sheet. Bake for 25-30 minutes, flipping halfway through. For a classic crispy taste, you can deep fry the wedges. Heat oil in a pot and fry them until golden. This method gives a crunchy texture, but it adds more oil. Choose what works best for you! To keep your Parmesan potato wedges fresh, store them in an airtight container. Place a piece of parchment paper in between the layers to absorb moisture. This helps keep them crispy. You can keep them in the fridge for up to three days. If you want to store them longer, freezing is a great option. Let the wedges cool completely. Then, spread them in a single layer on a baking sheet. Freeze until solid, then transfer to a freezer bag. This way, they can last for up to three months. To re-crisp your wedges, use the air fryer. Preheat the air fryer to 400°F (200°C). Place the wedges in a single layer and heat for about 5 to 7 minutes. This method keeps them crispy and delicious. You can also use the microwave, but that may make them soft. If you choose the oven, preheat it to 400°F (200°C) and heat the wedges for about 10 minutes. This helps maintain some crunch. When stored correctly, your Parmesan potato wedges can stay fresh for up to three days in the fridge. Check for signs of spoilage, like an off smell or a mushy texture. If they look or smell bad, it’s best to toss them. Keeping an eye on freshness ensures you get the best taste every time you enjoy them. To achieve crispy potato wedges, follow these tips: - Cut the potatoes evenly into wedges for uniform cooking. - Coat them well with olive oil; this helps with crispiness. - Use a mix of Parmesan and spices to enhance the crunch. - Preheat your air fryer before cooking; this gives a better texture. - Cook in a single layer; overcrowding can make them soggy. Yes, you can use different cheeses. Here are some options: - Cheddar gives a sharp flavor. - Gouda adds a creamy, smoky taste. - Nutritional yeast is great for a vegan option. Each cheese alters the flavor, so choose based on your taste. Cooking potato wedges in an air fryer takes about 15-20 minutes. - Preheat your air fryer to 400°F (200°C). - Cook the wedges for 15-20 minutes, shaking halfway. - They should be golden brown and crispy when done. Soaking potatoes before cooking is not required but has benefits. - Soaking helps remove extra starch, leading to crispier wedges. - If you're short on time, you can skip this step. - Direct frying works, but soaking can enhance the final texture. This post shared how to make crispy and tasty potato wedges in an air fryer. We covered the key ingredients, step-by-step cooking methods, and tips to customize flavors. Remember, you can adjust seasonings and try different potatoes to suit your taste. Storing and reheating leftovers was also discussed for easy enjoyment later. Now, you have the tools to create great wedges anytime. Enjoy your cooking and discovering new flavors!
                    Parmesan Potato Wedges Air Fryer Easy Crispy Snack
                  • - 1.5 lbs baby potatoes, halved - 3 tablespoons olive oil - 4 cloves garlic, minced - 1 teaspoon dried oregano - 1 teaspoon smoked paprika - Salt and pepper to taste - ½ cup grated Parmesan cheese - 2 tablespoons fresh parsley, chopped (for garnish) These ingredients create a tasty and crispy dish. I love using baby potatoes for this recipe. They cook evenly and have a nice texture. Olive oil gives the potatoes a rich flavor. Next, minced garlic adds a strong aroma and taste. Dried oregano brings in a herby note that complements the garlic well. Smoked paprika adds a bit of warmth and depth. Salt and pepper enhance all the flavors. Grated Parmesan cheese makes everything extra cheesy and delicious. Finally, fresh parsley adds a pop of color and freshness as a garnish. Gather all these ingredients before you start cooking. It makes the process easier and more fun! Preheating your air fryer is key. Set it to 400°F (200°C) and let it warm up for about 5 minutes. This step helps the potatoes cook evenly. If you skip this, your potatoes may not get that nice, crispy texture we all love. Start by halving 1.5 pounds of baby potatoes. Place them in a large bowl. Add 3 tablespoons of olive oil, 4 minced garlic cloves, 1 teaspoon dried oregano, 1 teaspoon smoked paprika, and salt and pepper to taste. Mix everything well until the potatoes are coated. Now, sprinkle in ½ cup of grated Parmesan cheese. Toss again to make sure every piece is nicely covered in cheese. Place the seasoned potatoes in the air fryer basket. Spread them out in a single layer. This allows hot air to circulate, cooking them evenly. Air fry for 15 to 20 minutes. Shake the basket halfway through. This helps them cook on all sides. You want them golden brown and crispy on the outside. Once done, transfer them to a bowl and garnish with 2 tablespoons of chopped fresh parsley for a fresh touch. To get that perfect crunch, cook your potatoes for 15-20 minutes. Check them halfway through and shake the basket. This helps them cook evenly. If you like them extra crispy, add a few more minutes. You can also try different cooking times for softer or firmer potatoes. To boost the taste, consider adding other spices. Paprika gives a smoky flavor, while garlic powder adds depth. You can also try fresh herbs like rosemary or thyme. Fresh herbs have a bright flavor, while dried herbs offer a more subtle taste. Mix and match to find your favorite blend! For a beautiful presentation, use a rustic bowl or a wooden platter. Top with extra Parmesan cheese and parsley for color. Serve with a dipping sauce, like ranch or yogurt. This adds a creamy contrast to the crispy potatoes. Pair them with grilled chicken or a fresh salad for a complete meal. {{image_2}} You can switch up the potatoes for different flavors. Try red or yellow potatoes. These add a nice texture and taste. You can also mix in other seasonings. Rosemary or thyme works great for herbal notes. Feel free to experiment and find your favorite combo! Want to add some heat? You can easily make your potatoes spicy. Try adding chili flakes or a dash of hot sauce. This option gives a fun kick to every bite. Adjust the amount to match your spice level. Enjoy the extra zing! If you prefer a vegan dish, you can skip the cheese. Use a dairy-free cheese substitute for a similar taste. You can also use avocado oil instead of olive oil. This way, you keep the rich flavor without using any dairy. Enjoy the same great taste while sticking to your diet! To keep your Air Fryer Garlic Parmesan Potatoes fresh, follow these tips: - Cool them down: Let the potatoes cool to room temperature. - Use an airtight container: Store them in a container with a tight lid. - Refrigerate: Keep them in the fridge within two hours of cooking. - Freshness: Eat leftovers within 3 days for the best taste. You can reheat your potatoes in different ways. Here are some options: - Air Fryer: This method is best. Set it to 350°F (175°C) for about 5-7 minutes. - Oven: Preheat your oven to 375°F (190°C). Bake for 10-15 minutes. - Crispiness tips: Add a little olive oil before reheating to keep them crunchy. - Check often: Stir or shake the potatoes halfway through to heat evenly. Cooking Air Fryer Garlic Parmesan Potatoes takes about 30 minutes total. Here’s the breakdown: - Prep time: 10 minutes - Cooking time: 15-20 minutes Preheat your air fryer at 400°F (200°C) for about 5 minutes. Then, mix your ingredients and air fry. Yes, you can make these potatoes ahead of time. Here’s how to store and reheat them: - Storage: Let the potatoes cool. Place them in an airtight container. They stay fresh in the fridge for 3-4 days. - Reheating: Use the air fryer to maintain crispiness. Heat them at 350°F (175°C) for about 5-7 minutes. To get crispy potatoes, follow these tips: - Cut evenly: Halve the baby potatoes so they cook uniformly. - Toss well: Make sure to coat them evenly with olive oil and seasonings. - Single layer: Place potatoes in a single layer in the air fryer basket. This helps hot air circulate. - Shake halfway: Shake the basket halfway through cooking to ensure all sides get crispy. These steps will help you achieve the perfect crispy texture every time. Now you know how to make Air Fryer Garlic Parmesan Potatoes. We covered the ingredients, step-by-step instructions, and tips for perfect crispiness. Remember, preheating your air fryer is key to great results. You can try variations with different spices or potatoes to mix things up. Proper storage and reheating methods keep leftovers fresh. Enjoy impressing family and friends with this simple and tasty dish. Happy cooking!
                    Air Fryer Garlic Parmesan Potatoes Tasty and Crispy Dish
                  • - Sweet potatoes: You need 2 large sweet potatoes. They provide a sweet base for the nachos. - Olive oil and seasonings: Use 1 tablespoon of olive oil, 1 teaspoon of smoked paprika, and 1 teaspoon of garlic powder. These add flavor and help the sweet potatoes crisp up. - Toppings and garnishes: Gather 1 cup of black beans, 1 cup of corn, and 1 cup of cherry tomatoes. You will also need 1 avocado, 1 cup of shredded cheese, 1/4 cup of green onions, 1/4 cup of fresh cilantro, and 1/2 cup of Greek yogurt or sour cream for serving. Don't forget the optional jalapeño slices for heat. These ingredients create a hearty dish that is both tasty and nutritious. Sweet potatoes offer fiber and vitamins. Black beans add protein, while the toppings bring freshness and color. The cheese melts beautifully, making every bite delicious. Enjoy the mix of flavors and textures in this fun dish! Slicing and seasoning Start with two large sweet potatoes. Slice them into thin rounds. You want them about 1/4 inch thick. This helps them bake evenly and get crispy. In a mixing bowl, add the sweet potato slices. Drizzle with one tablespoon of olive oil. Sprinkle in one teaspoon of smoked paprika and one teaspoon of garlic powder. Add salt and pepper to taste. Toss until the slices are well coated. Arranging for baking Now, lay the sweet potato rounds on a large baking sheet. Make sure to arrange them in a single layer. This allows hot air to circulate around each piece. If they overlap, they won’t crisp up well. Initial bake to crisp Preheat your oven to 425°F (220°C). Bake the sweet potatoes for 20-25 minutes. Flip them halfway through the time. You want them to turn golden brown and crispy around the edges. Once they are done, take them out and reduce the oven temperature to 350°F (175°C). Layering the toppings On a large oven-safe platter, layer half of the baked sweet potato rounds. Then, top with half of the black beans, corn, cherry tomatoes, and shredded cheese. Repeat this with the remaining ingredients. The layers build flavor and texture. Melting the cheese Now, bake the loaded sweet potato nachos for another 10-15 minutes. Keep an eye on them until the cheese melts and bubbles. This is where the magic happens. Adding fresh toppings After baking, carefully remove the nachos from the oven. Let them cool for a minute. Top with diced avocado, green onions, and cilantro. If you like some heat, add jalapeño slices on top. Serve warm with a dollop of Greek yogurt or sour cream on the side. Enjoy your delicious and nutritious creation! Achieving optimal crispiness To get crispy sweet potato nachos, slice the sweet potatoes thin. Aim for 1/4 inch thick rounds. A thin slice helps them cook evenly. Toss them with olive oil, smoked paprika, garlic powder, salt, and pepper. This mix adds flavor and helps with crispiness. Bake them at 425°F for 20-25 minutes. Flip them halfway to ensure even browning. Balancing flavors To balance flavors, mix savory and fresh toppings. Use black beans for protein and corn for sweetness. Fresh cherry tomatoes add color and tang. Diced avocado brings creaminess that contrasts well with the crispy sweet potatoes. Top it with green onions and cilantro for a fresh burst. If you love spice, add jalapeño slices for an extra kick. Additional toppings options Get creative with toppings! You can add sautéed bell peppers or onions for extra flavor. Try using different cheeses like pepper jack for heat or mozzarella for a mild taste. Add a layer of refried beans for richness or some cooked ground turkey for more protein. The options are endless! Spice level adjustments Want more heat? Add more jalapeños or a drizzle of hot sauce. For a milder version, skip the jalapeños. You can also try adding chili powder or cayenne pepper to the sweet potatoes before baking. Adjust the spice to fit your taste. Always remember, you can start small and add more as you go! {{image_2}} You can make loaded sweet potato nachos even healthier with some easy swaps. Use vegan cheese instead of regular cheese. You can find many tasty options at stores. Replace Greek yogurt with a plant-based yogurt. You can also add more veggies like bell peppers or zucchini. This makes the dish colorful and nutritious. Sweet potatoes are naturally gluten-free, so you’re already on the right track! Just make sure any toppings you choose, like cheese or beans, are also gluten-free. Look for brands that clearly mark their products. You can use corn chips if you want a crunchy texture instead of the sweet potatoes. Let your taste buds explore with unique toppings! Try adding roasted chickpeas for extra crunch. Pineapple or mango can add a sweet twist. You might also enjoy adding spicy salsa or guacamole for flavor. Each topping can change the whole dish! Take inspiration from global cuisines. For a Mexican twist, add jalapeños and fresh cilantro. Go Mediterranean by using feta cheese and olives. If you like Asian flavors, top with sesame seeds and green onions. Each variation can bring a new experience to your plate! After enjoying your loaded sweet potato nachos, you may have some left. Store them in an airtight container. This keeps them fresh for up to three days in the fridge. Make sure to let them cool down first. If they stay warm, they can become soggy. For reheating, preheat your oven to 350°F (175°C). Place the nachos on a baking sheet. Heat them for about 10 minutes. This will help regain that crispy texture. You can also use a microwave, but the nachos may not stay crispy. If you want to save nachos for later, freezing is a great option. Start by letting them cool completely. Place them in freezer-safe bags or containers. Remove as much air as possible to avoid freezer burn. They can last up to three months in the freezer. To thaw, move the nachos from the freezer to the fridge overnight. When you're ready to eat, reheat them in the oven at 350°F (175°C) for about 15 minutes. This method keeps the flavors intact and the texture delightful. How to make sweet potato nachos crispy? To make sweet potato nachos crispy, slice the sweet potatoes thin. Toss them with olive oil, smoked paprika, garlic powder, salt, and pepper. Spread them evenly on a baking sheet. Bake at 425°F for 20-25 minutes, flipping halfway. This helps them turn golden and crisp. Can I use different cheese? Yes, you can use different cheeses. Try mozzarella, feta, or pepper jack. Each cheese will add a unique taste. Mix and match to find your favorite combination. Just make sure it melts well. Are sweet potato nachos healthy? Yes, sweet potato nachos are healthy. Sweet potatoes offer fiber, vitamins, and minerals. They provide energy without too many calories. Topping them with black beans and veggies adds extra nutrients. It’s a great dish if you want something tasty and good for you. What are good side dishes to serve with nachos? Good side dishes include fresh salads, guacamole, or salsa. You can also serve a yogurt dip or a light soup. These sides balance the flavors and add freshness to your meal. Enjoying nachos with a variety of sides makes it more fun! Loaded sweet potato nachos are easy to make and taste great. We covered the best ingredients, step-by-step baking, and how to top them for a delicious finish. Remember, you can customize your nachos with different toppings and spices to fit your taste. Storage tips help keep them fresh for later. Sweet potato nachos can be healthy, too. Enjoy experimenting with flavors and creating your perfect plate. You now know how to make these tasty nachos that everyone will love. Give them a try!
                    Loaded Sweet Potato Nachos Tasty and Nutritious Dish

                  WANT TO SAVE THIS RECIPE?

                  899 shares

                  Leave a Reply Cancel reply

                  Your email address will not be published. Required fields are marked *

                  Recipe Rating


                  Kick your taste buds into gear with these sizzling sausage stuffed jalapeños! Perfect for parties or game day, this flavor-packed appetizer combines zesty jalapeños with savory sausage and a creamy cheese filling. Easy to make and bursting with flavor, these bite-sized treats are sure to impress your guests. Discover the secret to the ultimate crowd-pleaser and elevate your snack game with this delectable recipe. Pin it now for your next gathering!

                  Hi I’m Taling

                  I love sharing perfected dishes from my kitchen. I’m sure they’ll earn a spot in your heart. Let’s savor this journey together!.

                  More about me

                  Recent Desserts

                  • - 8 oz cream cheese, softened - 1 cup powdered sugar - 1 teaspoon vanilla extract - 1 cup whipped cream - 1 medium apple, diced (preferably Granny Smith) - ½ cup caramel sauce (store-bought or homemade) - ¼ cup chopped nuts (such as pecans or walnuts, optional) - Sliced apples, graham crackers, or pretzels for dipping I love using Granny Smith apples for this dip. Their tartness balances the sweet caramel and rich cream cheese. Other great options include Honeycrisp and Fuji apples. These apples add a nice crunch and juicy flavor. You can customize this dip further! Try adding chocolate chips for extra sweetness. A sprinkle of cinnamon gives a warm spice note. If you want more texture, mix in some crushed graham crackers. These add a nice crunch and depth to the dip. To begin, gather your ingredients. You need 8 oz of softened cream cheese, 1 cup of powdered sugar, and 1 teaspoon of vanilla extract. In a large bowl, use a hand mixer to beat the cream cheese until it is smooth. This step is key for a creamy dip. Next, slowly add the powdered sugar and vanilla. Mix until everything is well combined. Now, it’s time to make this dip fluffy. Gently fold in 1 cup of whipped cream. This adds lightness to our dip. After that, carefully add 1 medium diced apple. I prefer Granny Smith for its tartness. If you like, you can also mix in ¼ cup of chopped nuts for a crunchy twist. Now for the fun part! In a serving dish, spread the cheesecake mixture evenly. Drizzle ½ cup of caramel sauce all over the top. The golden caramel makes it look amazing! If you added nuts, sprinkle them on top. Serve this dip right away with sliced apples, graham crackers, or pretzels. Each bite is a sweet treat! To make your dip creamy, start with soft cream cheese. I let mine sit out for about 30 minutes. Then, beat it with a hand mixer until it is smooth. Add powdered sugar slowly. This helps it blend well. Mix in vanilla extract for extra flavor. Next, you want to fold in whipped cream gently. This keeps the dip light and fluffy. If you mix too hard, it can lose that nice texture. When dicing apples, choose a firm apple like Granny Smith. This type stays crisp and tangy. Wash the apple first, then cut it into quarters. Remove the core and seeds. Slice each quarter into thin pieces. Then, chop those slices into small cubes. Aim for even sizes so they mix well. This way, every bite has a bit of apple. Toss the diced apples in a little lemon juice to keep them fresh and bright. For serving, choose a nice dish to show off your dip. Spread the cheesecake mixture evenly in the dish. Drizzle caramel sauce over the top. You can create a fun design with the sauce. If you like, sprinkle chopped nuts on top for crunch. Use colorful sliced apples, graham crackers, or pretzels for dipping. Arrange them nicely around the dip. This makes it look inviting and fun. Enjoy your treat with friends or family! {{image_2}} You can easily change the flavor of this dip. Want a chocolate twist? Add some cocoa powder to the cream cheese mix. You can also drizzle chocolate syrup on top for extra sweetness. If you like spices, try adding cinnamon or nutmeg. These spices make the dip warm and cozy, perfect for fall. If you want a lighter dip, there are ways to cut back on sugar. Use a sugar substitute for the powdered sugar. You could also swap the whipped cream for Greek yogurt. This gives you the creaminess without all the calories. This way, you enjoy taste without feeling guilty. Feel free to play with the nuts in this recipe. Pecans and walnuts are great, but almonds or hazelnuts work well too. You can also skip the nuts if you have nut allergies. Instead, sprinkle some granola on top for a nice crunch. This gives you options and lets everyone enjoy the dip! To keep your caramel apple cheesecake dip fresh, store it in an airtight container. This helps keep the dip creamy and delicious. Make sure to cover the surface with plastic wrap before sealing the lid. This extra step prevents air from getting in and helps maintain the flavor. You can keep this dip in the fridge for up to three days. After that, the apples may start to brown, and the dip may lose its creaminess. Always check for any off smells or changes in texture before eating leftovers. Freezing caramel apple cheesecake dip is not recommended. The cream cheese and whipped cream can change in texture when thawed. If you need to store it longer, consider freezing the dip without the apples. When you’re ready to enjoy it, thaw in the fridge overnight and fold in fresh apple pieces before serving. Yes, you can make this dip ahead of time. I suggest mixing everything but the caramel sauce. Store the dip in the fridge for up to two days. Just before serving, drizzle the caramel on top. This keeps the dip fresh and creamy. Making homemade caramel sauce is easy! Here’s a quick method: - Ingredients: - 1 cup sugar - 6 tablespoons butter - ½ cup heavy cream - Steps: 1. In a pot, heat sugar over medium heat. Stir until it melts and turns golden brown. 2. Add the butter and mix until it melts. 3. Slowly pour in the cream, stirring constantly. 4. Remove from heat and let it cool. This sauce adds a rich, sweet taste to your dip. You have many options for dipping! Here are some great choices: - Graham crackers - Pretzels - Vanilla wafers - Sliced strawberries - Biscotti These options offer a fun twist to enjoy your creamy dip. This blog post covered how to create a delicious caramel apple cheesecake dip. You learned about the key ingredients and recommended apple types. I shared tips for the best texture and how to serve it well. We explored flavor variations and healthy swaps for your needs. Remember, you can store leftovers safely and even freeze the dip. Enjoy customizing this treat to suit your taste. With these ideas and tips, you can impress everyone at your next gathering. Happy dipping!
                    Caramel Apple Cheesecake Dip Irresistibly Creamy Treat
                  • - 1 cup unsalted butter - 1 cup pumpkin puree - 1 ½ cups granulated sugar - ½ cup brown sugar, packed - 2 large eggs - 1 teaspoon vanilla extract - 3 cups all-purpose flour - 1 teaspoon baking soda - 1 teaspoon cream of tartar - ½ teaspoon salt - 1 tablespoon pumpkin spice - ¼ cup granulated sugar (for rolling) - 1 tablespoon cinnamon (for rolling) I use common measurements like cups and teaspoons. This keeps it simple. When baking, precise measurements matter. A cup of flour is not the same as a cup of brown sugar. Use dry measuring cups for solids and liquid measuring cups for liquids. Pumpkin puree is key here. You can use store-bought or homemade puree. If you can’t find pumpkin spice, mix cinnamon, nutmeg, and ginger instead. Brown butter adds a rich flavor. If you prefer, use regular unsalted butter. This will change the taste, but it will still be good. Feel free to experiment with flavors. You can add chocolate chips or nuts if you like. Always taste as you go. This makes your baking more fun and personal! First, set your oven to 350°F (175°C). Grease a 9x13 inch baking pan or line it with parchment paper. This helps the bars come out easily. Next, take 1 cup of unsalted butter and melt it in a medium saucepan over medium heat. Stir it often. Watch as it foams up, then turns golden brown. This should take about 5-7 minutes. Once it smells nutty, remove it from heat and let it cool down a little. In a big mixing bowl, mix the browned butter, 1 cup pumpkin puree, 1 ½ cups granulated sugar, and ½ cup packed brown sugar. Beat this mixture until it looks smooth. Now, add in 2 large eggs and 1 teaspoon vanilla extract. Mix until everything is well combined. In a different bowl, whisk together 3 cups of all-purpose flour, 1 teaspoon baking soda, 1 teaspoon cream of tartar, ½ teaspoon salt, and 1 tablespoon pumpkin spice. This will be your dry mix. Slowly add the dry mix into the wet mix. Stir gently until everything comes together. Do not overmix. A few lumps are okay. Pour the batter into your prepared baking pan, spreading it evenly with a spatula. In a small bowl, mix ¼ cup granulated sugar with 1 tablespoon cinnamon. Sprinkle this mix on top of the batter. Bake the bars for 25-30 minutes. Use a toothpick to check if they are done. If it comes out clean, they are ready. After baking, let the bars cool in the pan for about 10 minutes. Then, move them to a wire rack to cool completely. Cut them into squares and serve. For a nice touch, you can dust them with powdered sugar or drizzle caramel sauce on top. Enjoy! To make brown butter, you need to watch it closely. Start with unsalted butter in a medium saucepan. Heat it on medium. Stir it often. Look for foaming, a golden color, and a nutty smell. This process takes about 5-7 minutes. If it burns, you must start over. Brown butter adds a rich flavor to the bars. One common mistake is overmixing the batter. After you combine the wet and dry ingredients, mix until just blended. A few lumps are okay. Overmixing can make the bars tough and chewy instead of soft. Also, make sure to measure your ingredients accurately. Too much flour makes the bars dry. To serve your bars beautifully, use a rustic wooden platter. Dust the tops lightly with powdered sugar. For a fun twist, drizzle caramel sauce on top. This adds a nice touch and makes the bars look more inviting. A few pecans or walnuts can add texture and elegance. {{image_2}} You can make these bars even better by adding chocolate chips. I like to use semi-sweet chocolate chips for a rich taste. Just fold in about one cup of chocolate chips to the batter before you pour it into the pan. The warm, gooey chocolate complements the pumpkin flavor perfectly. If you want a nut-free treat, you're in luck! This recipe does not call for nuts. If you want to add some crunch, try using pumpkin seeds or sunflower seeds instead. They add a nice texture while keeping it safe for those with nut allergies. To make these bars gluten-free, swap the all-purpose flour for a gluten-free blend. Look for a blend that includes xanthan gum for the best results. The texture will still be soft and chewy, just like the original. Enjoy your gluten-free treat without missing out on flavor! Store your Brown Butter Pumpkin Snickerdoodle Bars in an airtight container. Place parchment paper between layers to keep them fresh. Keep the bars at room temperature for up to three days. If you want them to last longer, refrigerate them. They can stay good for up to a week in the fridge. To freeze the bars, first let them cool completely. Cut them into squares. Wrap each square in plastic wrap, then place them in a freezer bag. Label the bag with the date. These bars can last in the freezer for up to three months. When you’re ready to eat them, thaw them overnight in the fridge. Reheating is simple. Preheat your oven to 350°F (175°C). Place the bars on a baking sheet. Heat them for about 10 minutes, or until warm. You can also use a microwave. Heat each square for 15-20 seconds. Enjoy them warm for a cozy treat! Yes, you can use canned pumpkin puree. It saves time and gives great flavor. Just make sure it is pure pumpkin and not a pie filling. You can check if the bars are done by inserting a toothpick. If it comes out clean, they are ready. The edges will look slightly golden, and the center will feel set. These bars pair well with vanilla ice cream or whipped cream. You can add a drizzle of caramel sauce for extra sweetness. The bars last about 3 to 5 days when stored in an airtight container. Keep them at room temperature. If you want to store them longer, you can freeze them. Yes, you can make these bars ahead of time. They taste great after a day or two. Just store them properly to keep them fresh. This blog post covered the main aspects of creating delicious bars. You learned about key ingredients and their measurements, along with special substitutions. I provided step-by-step instructions for every part of the baking process. Useful tips helped you avoid common mistakes and improve presentation. Variations allow you to customize your bars, while storage info keeps them fresh. With this knowledge, you can bake with confidence and enjoy your treats!
                    Brown Butter Pumpkin Snickerdoodle Bars Delight
                  • - 1 ½ cups all-purpose flour This is the base of your loaf. It gives structure. - 1 teaspoon baking powder This helps the loaf rise. It makes it light. - ½ teaspoon baking soda This works with the yogurt to create fluffiness. - ¼ teaspoon salt Salt enhances flavors. It balances the sweetness. - ⅓ cup unsalted butter, softened Butter adds richness and moisture to the loaf. - 1 cup granulated sugar Sugar sweetens the loaf and helps it brown. - 2 large eggs Eggs provide structure and moisture. They bind everything. - 1 teaspoon vanilla extract Vanilla adds depth to the flavor. It complements the lemon. - ½ cup plain yogurt (or sour cream) Yogurt keeps the loaf moist and adds tang. - Zest of 1 large lemon Lemon zest gives a bright, fresh flavor. It boosts the lemon taste. - 2 tablespoons fresh lemon juice The juice adds a tartness that lifts the flavors. - 1 ½ cups fresh blueberries (or frozen, if unavailable) Blueberries add sweetness and tartness. They make the loaf fruity. Each ingredient plays a role in making your loaf tasty and moist. The flour and eggs give structure. Butter and yogurt add moisture. Baking powder and soda help it rise. The blueberries and lemon bring freshness. You can swap yogurt for sour cream. If you need gluten-free, try a gluten-free flour blend. You can also use coconut oil instead of butter for a dairy-free version. Choose blueberries that are firm, plump, and deep blue. Avoid any with wrinkles or mold. For lemons, pick ones that feel heavy and have a smooth skin. The zest from fresh lemons is key to flavor. Proper preparation is key to a great loaf. Start by preheating your oven to 350°F (175°C). This temperature gives the loaf a nice rise. Next, you need to prepare your pan. Greasing and flouring a 9x5-inch loaf pan helps the loaf release easily. You can also use parchment paper for easy removal. Just cut it to fit the bottom and sides of the pan. Start by mixing the butter and sugar. Use a large bowl and beat them together until light and fluffy. This takes about 3-4 minutes. It is important because it adds air to the batter. Next, add the eggs one at a time. Mix well after each egg. This helps to bind the ingredients together. After that, stir in the vanilla extract, lemon zest, and lemon juice. These add flavor and brightness to your loaf. Now comes the fun part—adding the blueberries! Gently fold them into the batter. Use a spatula and be careful not to break them. If you break the berries, they can burst and make the batter watery. To avoid this, handle them gently and mix just until incorporated. This way, you keep those lovely whole blueberries intact in your loaf. Importance of Oven Temperature Oven temperature is key to a great loaf. Always preheat your oven to 350°F (175°C). This helps the loaf rise evenly. If your oven runs hot or cold, it can change the baking time. Use an oven thermometer for accuracy. How to Know When the Loaf is Done To check if the loaf is done, insert a toothpick into the center. If it comes out clean, your loaf is ready. If it has wet batter on it, bake for a few more minutes. Keep an eye on the time, but trust your toothpick. Role of Yogurt/Sour Cream in the Recipe Yogurt or sour cream adds moisture to your loaf. They also make the texture soft and fluffy. This helps balance the tartness of lemon with the sweetness of blueberries. If you want, you can use buttermilk as a substitute. Achieving the Desired Balance of Flavors Balancing flavors is crucial. The bright lemon zest and juice bring a fresh taste. The blueberries add sweetness and color. Taste your batter before baking, but remember, it will taste different when baked. Adjust the lemon or sugar if you want a stronger flavor. Decorating and Garnishing Your Loaf A beautiful loaf looks inviting. After it cools, dust the top with powdered sugar. Add fresh blueberries and lemon slices for color. You can also drizzle a simple lemon glaze on top for a sweet touch. Serving Suggestions for Special Occasions Serve your loaf on a nice plate for gatherings. Pair it with tea or coffee for a cozy feel. For brunch, slice it up and display it with fruit or whipped cream. This will make your blueberry lemon loaf a star at any event! {{image_2}} You can mix in other berries for fun twists. Strawberries, raspberries, or blackberries work well. Each berry adds a different flavor. You can also try seasonal fruits. Peaches and cherries taste great in summer. Apples and pears give a cozy touch in fall. Add spices or nuts to boost flavor. Consider cinnamon or nutmeg for warmth. Chopped walnuts or almonds add crunch. You can also swap lemon zest. Try orange or lime for a new taste. Each zest brings its own unique aroma. To make this loaf gluten-free, use a 1:1 gluten-free flour blend. This keeps the texture light. For a vegan option, substitute eggs with flax eggs. Mix one tablespoon of flaxseed meal with two and a half tablespoons of water. Let it sit until it thickens. Use plant-based yogurt instead of regular yogurt for a creamy texture. To keep your loaf fresh, wrap it tightly in plastic wrap. This traps moisture and keeps it soft. You can also place it in an airtight container. Make sure it cools completely before wrapping. This prevents sogginess. Store it at room temperature for up to 3 days. If you want it to last longer, consider freezing. To freeze your loaf, let it cool completely. Then, wrap it in plastic wrap and foil. This double layer protects it from frost. You can freeze it for up to 3 months. When you want to eat it, remove it from the freezer. Thaw it in the fridge overnight. If you need it fast, leave it on the counter for a few hours. For reheating, the best method is to use an oven. Preheat it to 350°F (175°C). Place the loaf in the oven for about 10-15 minutes. This warms it up and keeps the texture nice. Avoid using a microwave, as it can make the loaf soggy. Enjoy your slice warm, with a little butter if you like! How can I tell if my loaf is done baking? You can check if your loaf is done by inserting a toothpick into the center. If it comes out clean, your loaf is ready. This usually takes about 50 to 60 minutes in the oven. Can I use frozen blueberries instead of fresh? Yes, you can use frozen blueberries. They work well in this recipe. Just fold them in gently to avoid breaking them. What can I substitute for yogurt in this recipe? You can use sour cream as a substitute for yogurt. It will give your loaf a similar texture and flavor. Can I change the sugar content? Yes, you can reduce the sugar for a less sweet loaf. Start by cutting the sugar in half. You can always add a bit back if you want more sweetness. What happens if I skip the lemon zest or juice? If you skip the lemon zest or juice, your loaf will lose some of its bright flavor. Lemon adds a fresh taste that balances the sweetness of the blueberries. Why did my loaf sink in the middle? A loaf can sink if it has too much liquid or if it was underbaked. Make sure to measure ingredients carefully and check for doneness with a toothpick. How can I make sure the loaf rises properly? Make sure your baking powder and baking soda are fresh. Also, do not overmix the batter. Mix until just combined for the best rise. This blog post covers key steps to bake a delicious blueberry lemon loaf. We explored the right ingredients, helpful techniques, and storage tips. Remember, fresh blueberries and lemons make a big difference. Proper mixing and folding techniques yield great results. Consider variations to suit your taste, like adding different fruits or making it vegan. With the right care, your loaf will impress. Keep these tips in mind for future baking. Enjoy your tasty creations!
                    Blueberry Lemon Loaf Bakery Style Easy and Delicious Recipe
                  • To make pumpkin cream cheese danish, you need a few key items. Here’s the list: - 1 sheet of puff pastry, thawed - 8 oz cream cheese, softened - ½ cup pumpkin puree (canned or fresh) - ¼ cup granulated sugar - 1 teaspoon vanilla extract - 1 teaspoon pumpkin pie spice - 1 egg, beaten (for egg wash) - 1 tablespoon confectioners' sugar (for dusting) These simple ingredients come together to create a rich and creamy filling. The puff pastry adds a flaky and buttery texture, making each bite a delight. You will need a few basic tools to make these danishes. Gather these items: - Baking sheet - Parchment paper - Rolling pin - Medium mixing bowl - Measuring cups and spoons - Pastry brush - Knife or pizza cutter Having these tools ready will make your process smooth and easy. Feel free to customize your danish with some optional ingredients. Here are some tasty ideas: - Chopped nuts, like walnuts or pecans, for crunch - Chocolate chips for a sweet twist - Cream cheese frosting for a richer topping - A pinch of salt to enhance the flavors These little changes can make your danish even more special. Mix and match to find your favorite! First, preheat your oven to 400°F (200°C). This step is key for a nice bake. Line a baking sheet with parchment paper to prevent sticking. Next, roll out the thawed puff pastry on a floured surface. Aim for about ⅛-inch thick. Cut the pastry into rectangles, about 4x6 inches. In a medium bowl, mix the softened cream cheese and pumpkin puree. Add ¼ cup of granulated sugar, 1 teaspoon of vanilla extract, and 1 teaspoon of pumpkin pie spice. Stir until the mixture is smooth. It should smell amazing! Place a generous spoonful of the pumpkin cream cheese mixture in the center of each pastry rectangle. Fold the edges over the filling. Pinch to seal and make a small pocket. You can also fold the pastry into a triangle shape. Brush the tops with the beaten egg for a golden finish. Now, bake in your preheated oven for 15 to 18 minutes. Look for a puffed and golden brown color. Once done, let the danishes cool slightly. Dust them with confectioners' sugar before serving to add a sweet touch. Use fresh cream cheese for a smooth mixture. It helps the filling taste rich and creamy. Ensure your puff pastry is well-thawed for easy rolling. If you want a flaky texture, avoid overworking the dough. Serve these danishes warm for the best flavor. They make a fantastic breakfast or snack! To get the best puff pastry, start with a good quality sheet. Thaw it in the fridge to keep it cold. Roll it out gently on a floured surface. Aim for about ⅛-inch thick. This thickness helps it puff nicely. Cut the pastry into rectangles, about 4x6 inches. This size holds the filling well without spilling. Make sure your oven is at 400°F (200°C) before baking. Preheating helps the pastry rise quickly. When you bake, space the danishes apart on the baking sheet. This allows hot air to circulate. Watch for a golden brown color. This means they are done! The cream cheese mixture is key to this treat. Start with softened cream cheese. It mixes better and becomes smooth. Add pumpkin puree, granulated sugar, vanilla extract, and pumpkin pie spice. Mix until combined and creamy. Don't skip the pumpkin pie spice! It adds warmth and flavor. Taste the mixture before filling the pastry. Adjust sweetness if needed. If you want a richer flavor, add a bit more vanilla. This will enhance the overall taste. Enjoy your danishes warm or at room temperature. They taste great on their own. For extra flair, serve with a drizzle of caramel sauce. This adds sweetness and richness. Pair them with a hot drink like coffee or tea. The flavors complement each other perfectly. For a fun twist, try adding chopped nuts on top before baking. They add crunch and flavor. Dust the cooled danishes with confectioners' sugar for a sweet finish. {{image_2}} You can change the flavor of your Pumpkin Cream Cheese Danish easily. Try adding nuts like pecans or walnuts for a crunchy texture. Chopped chocolate or chocolate chips can add a rich flavor. You might also swap pumpkin pie spice for cinnamon or nutmeg for a different taste. Each option brings a new twist to this fall treat. If you need gluten-free options, use gluten-free puff pastry. Many stores sell this option now. You can also make a dairy-free version. Just swap the cream cheese for a dairy-free cream cheese. Pumpkin puree is naturally dairy-free, so you are already on the right track! While puff pastry is delicious, you can try other types too. Use crescent roll dough for a softer texture. A flaky pie crust can also work well for a different taste. Each type of pastry changes the danish but keeps it just as tasty. Experiment and find your favorite! After you enjoy your Pumpkin Cream Cheese Danish, store any leftovers in the fridge. Place them in an airtight container. This keeps them fresh for up to three days. If you don’t have a container, wrap them tightly in plastic wrap. Make sure they are cool before wrapping to avoid sogginess. You can freeze these danishes if you want to save some for later. First, let them cool completely. Then, wrap each danish in plastic wrap. Place them in a freezer-safe bag or container. They can last in the freezer for up to three months. When you’re ready to eat one, just take it out and let it thaw in the fridge overnight. To reheat your Pumpkin Cream Cheese Danish, preheat your oven to 350°F (175°C). Place the danish on a baking sheet. Heat for about 10 minutes or until warm. This will help keep the pastry crisp. You can also use a microwave, but the pastry might get soft. If using a microwave, heat for 20-30 seconds at a time, checking often. Enjoy your warm danish as a tasty treat! Yes, you can use homemade pumpkin puree. Just make sure it is smooth and thick. If it is too watery, it may affect the filling's texture. To make homemade pumpkin puree, cook a pumpkin, scoop out the flesh, and blend until smooth. These danishes last for about 2-3 days at room temperature. Keep them in an airtight container to keep them fresh. You can also store them in the fridge for up to a week. Just make sure to reheat them before serving for the best taste. Absolutely! You can make the pumpkin cream cheese filling a day ahead. Store it in an airtight container in the fridge. When you're ready to bake, just fill your pastry and follow the rest of the steps. This saves time and makes baking easier! This blog post covered how to make a delicious Pumpkin Cream Cheese Danish. We explored essential ingredients and useful tools. I shared step-by-step instructions for preparation and baking. You'll find tips for perfect puff pastry and serving ideas. We also covered fun flavor variations and dietary options. Remember, proper storage keeps your danishes fresh. Use this guide to bake, enjoy, and share your treats with others. Baking should be fun, so try new flavors and enjoy the process!
                    Pumpkin Cream Cheese Danish Irresistible Fall Treat

                  Recent Drinks

                  • - 1 ripe banana - 2 tablespoons natural peanut butter - 1 cup unsweetened almond milk (or any milk of choice) - 1 scoop vanilla protein powder (plant-based or whey) - 1 tablespoon chia seeds - 1 teaspoon honey (optional for sweetness) - A pinch of cinnamon - Ice cubes (optional, for a thicker texture) Gather these simple items before you start. A ripe banana gives natural sweetness and creaminess. Use two tablespoons of natural peanut butter for a rich flavor. Almond milk is my go-to, but any milk you love works great. The protein powder adds a boost of nutrition. Choose vanilla to match the banana. Chia seeds are tiny but mighty. They add fiber and help keep you full. If you like it sweeter, add honey, but it’s not a must. A pinch of cinnamon brings warmth and depth to this drink. For a thicker texture, toss in some ice cubes. This smoothie is flexible, so feel free to mix and match based on your taste. Now, let's blend it all together! 1. Start by peeling the ripe banana. Break it into small chunks. 2. In a blender, combine the banana chunks, natural peanut butter, almond milk, protein powder, chia seeds, and a pinch of cinnamon. 3. If you like a colder and thicker smoothie, add some ice cubes. 1. Blend all the ingredients on high speed. Keep blending until you have a smooth and creamy mix. 2. Stop the blender and taste your smoothie. If you want it sweeter, add honey. Blend again for a few seconds to mix. 1. Pour the smoothie into a tall glass. Enjoy it right away for the best taste and creaminess. 2. For a fun twist, you can top it with extra chia seeds or banana slices. This makes it look pretty too! To get the perfect texture, use a ripe banana. A ripe banana makes the smoothie creamy. Add ice cubes if you want it thicker. If you prefer a smoother drink, blend longer. Scrape the sides of the blender to mix all the ingredients well. This ensures a silky-smooth result. If your smoothie tastes too bland, add honey or more banana. Start with a teaspoon of honey. Blend and taste again. You can always add more honey if needed. This way, you control the sweetness to match your taste. Remember, ripe bananas also add natural sweetness. Use a high-speed blender for the best results. A strong blender breaks down the ingredients quickly. If you have a less powerful blender, blend in stages. Start with the liquids first, then add the solids. This helps everything mix better. Make sure your blender is clean for the best flavor. {{image_2}} You can switch the peanut butter for other nut butters. Almond butter offers a nutty taste. Cashew butter is creamy and sweet. Sunflower seed butter is a great choice for allergies. Each nut butter brings its own flavor and health benefits. Experiment to find your favorite. You can add many fruits to the smoothie. Frozen berries add sweetness and color. Spinach or kale boosts nutrition without changing the taste. Try mango for a tropical twist. Each fruit adds vitamins and makes the smoothie fun. Mix and match to discover new flavors. Choosing the right protein powder is key. Plant-based powders are great for vegan diets. Whey protein is popular for muscle recovery. Look for flavors that match your taste, like chocolate or vanilla. The right powder can enhance the smoothie’s flavor and nutrition. Test different types to see what you prefer. Store any leftover smoothie in an airtight container. You want to keep it fresh. Place it in the fridge right after making it. It will stay good for about one day. When you are ready to drink it again, shake or stir well. This helps mix any settled ingredients. You can freeze your smoothie for later. Pour it into ice cube trays or freezer-safe bags. This way, you can grab a portion whenever you want. To use, thaw the smoothie overnight in the fridge. You can also blend it again for a fresh taste. In the fridge, your smoothie lasts about 24 hours. In the freezer, it can last up to three months. Just remember, the sooner you drink it, the better the taste and texture will be! Yes, this smoothie is gluten-free. All the ingredients listed are naturally free from gluten. The peanut butter, banana, almond milk, protein powder, chia seeds, and honey do not contain gluten. Always check labels if you use store-bought items to confirm they are gluten-free. Absolutely! To make this smoothie vegan, simply use plant-based protein powder. Ensure your peanut butter is also free from animal products. Replace honey with maple syrup or agave nectar for sweetness. All other ingredients are already vegan-friendly. This smoothie offers many health benefits. It provides protein from the peanut butter and protein powder, which helps build muscle. Bananas add potassium, good for heart health. Chia seeds are packed with fiber, aiding digestion. Almond milk is low in calories and rich in vitamins. Yes, you can use various milk types. Cow’s milk will add creaminess and protein. Soy milk is a great option for extra protein. Coconut milk gives a tropical flavor. Each milk option changes the taste and texture slightly, so choose what you enjoy best. This smoothie recipe combines simple ingredients for great taste and nutrition. You learned step-by-step how to prepare it and tips for perfect texture. Variations let you customize your drink to fit your taste. Remember to store leftovers properly for later enjoyment. Smoothies can be healthy and fun. Try new mixtures to find what you love best. Keep experimenting and enjoy your delicious creations!
                    Peanut Butter Banana Protein Smoothie Easy Recipe
                  • To make a delicious Turmeric Golden Milk Latte, gather these simple ingredients: - 2 cups almond milk (or your preferred milk) - 1 teaspoon ground turmeric - ½ teaspoon ground ginger - ¼ teaspoon cinnamon - 1 tablespoon honey or maple syrup (adjust to taste) - Pinch of black pepper - ½ teaspoon vanilla extract - Optional: a sprinkle of nutmeg for garnish - Almond Milk: This milk is low in calories and rich in vitamins. It helps with heart health. - Turmeric: This spice has curcumin, known for its anti-inflammatory properties. It may help improve brain function. - Ginger: Ginger can help with digestion and nausea. It adds a nice warmth to the drink. - Cinnamon: This spice is rich in antioxidants. It may help lower blood sugar and improve heart health. - Honey or Maple Syrup: Both sweeteners can boost energy. They also provide antioxidants. - Black Pepper: This spice enhances turmeric absorption. It makes the drink more effective. - Vanilla Extract: It adds flavor and can help reduce stress. - Nutmeg: This spice is optional, but it adds warmth and a nice aroma. - Milk Options: You can use oat milk, soy milk, or coconut milk for different flavors. - Sweeteners: If you prefer, try agave syrup or stevia as sugar-free options. - Spices: Experiment with cardamom or cloves for added flavor. - Nutmeg: You can skip it if you don't like nutmeg, or use a touch of cocoa powder instead. 1. Start by taking a small saucepan. 2. Add 2 cups of almond milk to the pan. 3. Measure and add 1 teaspoon of ground turmeric. 4. Next, add ½ teaspoon of ground ginger. 5. Sprinkle in ¼ teaspoon of cinnamon. 6. Sweeten your drink with 1 tablespoon of honey or maple syrup. 7. Don't forget a pinch of black pepper for better absorption of turmeric. 8. Lastly, add ½ teaspoon of vanilla extract. 9. Whisk all the ingredients well in the pan. 10. Place the saucepan on medium heat. 11. Gently warm the mixture while stirring often. 12. Keep an eye on it; do not let it boil. 13. After about 5-7 minutes, it should be hot enough. 14. Remove the pan from heat and let it cool slightly. 15. If you want a frothy drink, use a milk frother or whisk it quickly. 16. Pour the golden milk into your favorite mugs. 17. Optionally, sprinkle a bit of nutmeg on top for a nice touch. 18. Serve warm and enjoy this comforting drink! - Always use a whisk to blend the spices into the milk. - Whisking helps mix the turmeric and other spices evenly. - When heating, keep the heat low to avoid scalding the milk. - Stir often to prevent sticking at the bottom of the pan. - If you see steam but no bubbles, you are at the right temperature. - A milk frother works wonders for a smooth, frothy finish. - If you don’t have a frother, whisk vigorously by hand. - Frothing adds air, giving the latte a creamy feel. - The more you froth, the lighter and fluffier your drink will become. - For an extra touch, froth some almond milk separately and top your latte with it. You can mix spices to make your turmeric latte tastier. Try adding a pinch of nutmeg or a dash of cardamom. These spices add warmth to the drink. You can also use fresh ginger instead of ground ginger. This will give your latte a bright, zesty kick. Just remember, fresh ginger may need more time to steep. Many people rush the heating process. Always warm your milk slowly over medium heat. If you boil it, the spices can lose flavor. Another mistake is not blending the spices well. Make sure to whisk the mixture thoroughly. This helps avoid clumps of turmeric or ginger. Lastly, avoid skipping the black pepper. It helps your body absorb turmeric better. Sweetness is personal. Start with one tablespoon of honey or maple syrup. Taste your latte and add more if you like it sweeter. For creaminess, use full-fat coconut milk for a richer feel. Almond milk is lighter but still delicious. You can also mix almond and coconut milk for the best of both worlds. {{image_2}} You can easily make this latte vegan. Just use almond milk, coconut milk, or oat milk. These milks work great in this recipe. They keep the drink creamy and delicious. If you want a nut-free option, oat milk is the best choice. It blends well with turmeric and spices. To make an iced version, start with brewed turmeric milk. Follow the same steps but let it cool. Pour over ice instead of serving warm. This drink is refreshing on hot days. You can also add some ice cream for a treat! You can mix and match flavors for fun. Try adding matcha for a green twist. This adds a fresh taste and boosts energy. You can also use cocoa for a chocolatey version. The cocoa pairs well with turmeric and spices. For a special touch, add a dash of vanilla extract. This enhances the overall flavor and aroma. To store leftover turmeric golden milk, let it cool first. Then, pour it into an airtight container. Keep it in the fridge for up to three days. This way, you can enjoy the drink again without losing its flavor. When reheating your golden milk, do it gently. Pour it into a small saucepan. Heat it over low to medium heat. Stir it often to avoid burning. Never let it boil, as this can change the taste and texture. You can also use a microwave. Heat in short bursts, stirring in between. Turmeric golden milk lasts about three days in the fridge. Check for signs of spoilage. If it smells sour or has any mold, discard it. Always trust your senses. If it looks or smells off, it’s best to throw it away. Turmeric has many health benefits. It is known for its bright yellow color and active compound called curcumin. Curcumin may help reduce inflammation. It can also support joint health. Some studies suggest it may boost your mood. Turmeric might even help with digestion. Drinking turmeric may also support your immune system. Yes, you can use any milk you like. Almond milk is great, but coconut milk adds creaminess. Oat milk is a good choice for a thicker texture. If you prefer dairy, whole or skim milk works too. Just remember, different types of milk will change the flavor a bit. To make this recipe sugar-free, skip the honey or maple syrup. You can use a sugar substitute like stevia or monk fruit instead. These options will give you sweetness without the calories. Just adjust the amount to your taste. Yes, it is safe for most people to have turmeric daily. Using it in cooking or drinks is a great way to enjoy its benefits. However, if you have health issues or take certain medications, check with a doctor first. Moderation is key, as with any food. In this blog post, we explored the ingredients and health benefits of Turmeric Golden Milk. I shared step-by-step instructions for making it frothy and delicious. We also discovered tips, tricks, and variations to enhance your drink. Proper storage and reheating advice can help you enjoy leftovers. Remember, turmeric offers many health benefits, so enjoy this drink often. Use alternative ingredients if you prefer. With these ideas, you can create the perfect golden milk to suit your taste and health needs. Enjoy your journey to wellness!
                    Turmeric Golden Milk Latte Simple and Creamy Recipe
                  • - 1 ripe mango, peeled and diced - 1 cup fresh pineapple chunks - 1 banana, sliced - 1 cup coconut water (or regular water) - ½ cup plain Greek yogurt (or dairy-free alternative) - 1 tablespoon honey or agave syrup (optional) - A handful of fresh mint leaves (for garnish) - Ice cubes (optional) The key to a delicious mango pineapple smoothie lies in its fresh ingredients. You want ripe fruits for the best flavor. The mango should feel soft when you squeeze it gently. Pineapples should smell sweet and fruity. This smoothie combines sweet mango, tangy pineapple, and creamy banana. Coconut water adds hydration, while Greek yogurt gives it a nice creaminess. You can add honey for extra sweetness if you like. Mint leaves add a refreshing touch when you serve it. Each ingredient plays a role in making this smoothie flavorful and refreshing. Trust me, using fresh ingredients will make a big difference in taste! To make this smoothie, start by gathering your main ingredients. You need a ripe mango, fresh pineapple, and a banana. 1. In a blender, combine the diced mango, pineapple chunks, and banana slices. This mix brings a burst of tropical flavor. 2. Next, add one cup of coconut water to the blender. This not only hydrates but also adds a refreshing twist. 3. For creaminess, pour in half a cup of plain Greek yogurt. If you want it sweeter, drizzle in one tablespoon of honey or agave syrup. 4. Blend on high until the mixture is smooth and creamy. If you like your smoothie chilled, toss in a few ice cubes and blend again until they are fully mixed in. 5. After blending, taste your smoothie. If it needs to be sweeter or thicker, add more honey or coconut water as needed. Once your smoothie is ready, it’s time to serve it. I recommend using tall glasses to show off the vibrant color. For a fun touch, garnish each glass with a few fresh mint leaves on top. This not only looks nice but also adds a fresh aroma. Enjoy your delicious Mango Pineapple Smoothie! For the Full Recipe, please refer back to the ingredient list and instructions. To get your smoothie just right, focus on creaminess. Use ripe fruits like mango and banana. The Greek yogurt adds a nice, smooth texture. If you want a richer taste, try full-fat yogurt. For a lighter feel, use low-fat or dairy-free yogurt. Adjust the thickness by adding more liquid. Coconut water is great for this. If your smoothie is too thick, just pour in a bit more. Blend again until it’s just how you like it. If you want a thicker smoothie, add more banana or ice cubes. Boosting flavor can take your smoothie to the next level. Try adding spices like cinnamon or ginger. These spices not only add warmth but also great health benefits. A dash of cinnamon can make the smoothie taste cozy. A pinch of ginger gives it a nice kick. You can also use flavored yogurts for extra taste. Vanilla or coconut yogurt work well. If you want sweetness, think about honey or agave syrup. These can make your smoothie more enjoyable. For a fun twist, try adding a splash of vanilla extract. It will add a lovely aroma to your drink. For a full taste experience, explore the [Full Recipe]. {{image_2}} You can change the fruit in your smoothie to keep it fresh. Adding strawberries or blueberries gives a sweet twist. These berries add a nice color and taste. You can also try using other tropical fruits like papaya or kiwi. These fruits bring new flavors and nutrients to your drink. Each fruit will change the smoothie’s taste and make it unique. If you want a dairy-free smoothie, swap the Greek yogurt for a plant-based option. Almond, coconut, or soy yogurt works well. These alternatives keep your smoothie creamy without dairy. For sweeteners, you can use maple syrup or agave syrup for a vegan choice. These options add sweetness while keeping your drink plant-based. Enjoy the fruity goodness in many ways! Don't forget to check the Full Recipe for more ideas. You may have some smoothie left after making your Mango Pineapple Smoothie. To keep it fresh, use a glass jar or a BPA-free plastic container. Seal it tightly to prevent air from spoiling the flavor. Store it in the fridge for up to 24 hours. After that, it may lose some taste and texture. If you want to enjoy the smoothie later, freezing is a great option. Pour the smoothie into ice cube trays or freezer-safe bags. Leave some space in the bags for expansion. You can freeze it for up to three months. When you’re ready to drink it, take out what you need. Thaw it in the fridge overnight or blend it straight from the freezer for a slushy treat. Enjoy your refreshing Mango Pineapple Smoothie anytime! Yes, you can make this smoothie ahead of time. If you want to save it, store it in an airtight container. Keep it in the fridge for up to one day. The smoothie may separate, so stir it well before you drink it. If you don’t have coconut water, use regular water or fruit juice instead. Fruit juice can add a nice flavor. You can also try almond milk for a creamier touch. Just remember, the taste will change a bit based on what you use. To make the smoothie thicker, add more Greek yogurt or a banana. You can also use frozen fruit instead of fresh. Frozen fruit gives you a nice, thick texture. Just blend it well, and you’ll get a creamy drink. Yes, this smoothie is great for kids! It is packed with fruits and tastes sweet. You can adjust the sweetness by adding less honey. The bright colors and fresh flavors will appeal to children, making it a fun treat. You can find the Full Recipe for the Tropical Bliss Mango Pineapple Smoothie above in this article. This will guide you through every step to create your own refreshing drink. This blog post covers a simple and tasty smoothie recipe. You learned about the key ingredients and their nutritional benefits. I provided steps to prepare and serve the smoothie perfectly. Tips for texture and flavor help you make it your own. You can explore variations to suit your tastes or dietary needs. Don’t forget storage tips to keep leftovers fresh. Enjoy your smoothie making journey. It’s all about trying new things and having fun!
                    Mango Pineapple Smoothie Refreshing and Flavorful Blend
                  • - 2 packets of frozen açaí puree - 1 ripe banana - 1 cup of fresh pineapple chunks - 1 cup of coconut milk (or any non-dairy milk) - 1 tablespoon of honey or agave syrup (optional) For a vibrant tropical taste, the main ingredients are key. Açaí puree brings rich color and flavor. It is full of antioxidants. Bananas add creaminess and natural sweetness. Fresh pineapple gives a bright, juicy touch. Coconut milk offers a smooth base. You can use any non-dairy milk you prefer. Honey or agave syrup adds sweetness if needed. - Sliced kiwi - Coconut flakes - Granola - Chia seeds - Fresh berries (e.g., strawberries, blueberries) Toppings make your smoothie bowl pop! Sliced kiwi adds a zesty kick. Coconut flakes give it a tropical crunch. Granola provides texture and flavor. Chia seeds offer extra nutrients. Fresh berries, like strawberries and blueberries, add color and taste. You can mix and match these toppings for a fun look. For the full recipe, please refer to the section above. 1. Blend the ingredients Start by adding the frozen açaí puree, ripe banana, fresh pineapple chunks, and coconut milk into a blender. If you want it sweeter, you can add honey or agave syrup. Blend this mixture on high speed until it becomes creamy and smooth. 2. Adjust consistency with coconut milk If your smoothie is too thick, just add a bit more coconut milk. Blend again until you reach the texture you want. This step is key to making your smoothie bowl enjoyable. 3. Pour into a bowl Once blended, carefully pour the smoothie mixture into a bowl. Make sure to use a large enough bowl to hold all the goodness. 4. Add toppings creatively Now comes the fun part! Arrange your toppings, such as sliced kiwi, coconut flakes, granola, chia seeds, and fresh berries, over the smoothie. Try to create a colorful pattern. I love making a circular design to highlight all the vibrant colors. - Tips for presentation Use a shallow bowl to show off your beautiful toppings. You can also sprinkle some extra coconut flakes around the edge for a nice touch. A colorful presentation makes your smoothie bowl more fun to eat. - Recommended serving utensils Serve your smoothie bowl with a regular spoon. If you want to make it more special, use a wooden spoon or a cute, colorful one. Enjoy your tropical treat right away to keep it fresh and tasty. For the full recipe, refer to the earlier sections. To make a great smoothie bowl, start with ripe fruits. Ripe fruits taste better and add natural sweetness. Look for bananas that are yellow with some brown spots. When it comes to pineapples, choose ones that smell sweet. It ensures they are juicy and fresh. Blending is key to your smoothie bowl. You want a smooth and creamy texture. If your mix is too thick, add more coconut milk. Blend again until you reach the right consistency. A good blend makes your bowl enjoyable and easy to eat. A colorful topping arrangement makes your smoothie bowl pop. Use fresh berries, sliced kiwi, and coconut flakes. Lay them out in a pattern. A circular design looks appealing and fun. To elevate your smoothie bowl's look, use bowls with interesting shapes. Tall bowls or wide, shallow ones can change the game. Garnish with a sprinkle of chia seeds for a fancy touch. This not only looks great but adds a bit of crunch too. {{image_2}} You can change the non-dairy milk for this smoothie. Almond, soy, or oat milk work well. Each milk adds a different taste. Try using seasonal fruits too. Mango, papaya, or berries add a fresh twist. You can mix and match to find your favorite blend. Want more nutrients? Add spinach or kale to your smoothie. They blend well and boost health. You won’t even taste them! For extra energy, stir in nut butter or protein powder. Both will make your smoothie more filling. They add great flavor too! You can also experiment with different combinations to find the best taste for you. To store leftovers, place your smoothie bowl in the fridge. Use a tight container to keep it fresh. Glass or BPA-free plastic works well for storage. I prefer glass because it keeps flavors better. You can freeze smoothie bowls for later. Just pour the mixture into an airtight container. Leave some space at the top, as it will expand when frozen. To defrost, place it in the fridge overnight. If you’re in a rush, you can use the microwave. Just heat it in short bursts to avoid cooking. Enjoy your tropical treat later with ease! For the recipe, check out the Full Recipe. What is açaí and what are its benefits? Açaí is a small, dark purple berry from Brazil. It is full of antioxidants, which help fight free radicals in the body. Açaí is also rich in fiber, promoting good digestion. Plus, it has healthy fats that support heart health. You can enjoy its fruity taste in many dishes. Can I make this smoothie bowl ahead of time? Yes! You can prepare the smoothie mix and store it in the fridge for up to 24 hours. Just remember to keep the toppings separate. This way, your bowl stays fresh and tasty. How can I make this recipe vegan or gluten-free? To make it vegan, use agave syrup instead of honey. For gluten-free, ensure your granola and any other toppings are gluten-free. Most fruits and coconut milk are naturally gluten-free, so you’re all set! Can I substitute açaí with other fruits? Yes, you can! If you can’t find açaí, try using frozen berries like blueberries or strawberries. These fruits will add sweetness and a burst of color to your bowl. What to do if the smoothie is too thick? If your smoothie is too thick, just add a little more coconut milk. Blend again until you reach your desired creaminess. This will make it easier to pour and enjoy. How to fix a smoothie bowl that tastes too bland? If your smoothie bowl lacks flavor, try adding a splash of vanilla extract or a pinch of salt. You can also mix in a bit of honey or agave syrup for sweetness. Adjust the toppings to add more taste and texture. This article covers how to make a delicious açaí smoothie bowl. You learned about the key ingredients, easy steps for preparation, and creative topping ideas. I shared tips to improve taste and presentation, plus fun variations to try. Don’t forget storage techniques to keep your bowl fresh. With all this information, you can enjoy a tasty and nutritious treat anytime. Get creative with your favorites and make this recipe truly yours. Enjoy every bite!
                    Tropical Acai Smoothie Bowl Energizing Healthy Treat

                  Footer

                  Kick your taste buds into gear with these sizzling sausage stuffed jalapeños! Perfect for parties or game day, this flavor-packed appetizer combines zesty jalapeños with savory sausage and a creamy cheese filling. Easy to make and bursting with flavor, these bite-sized treats are sure to impress your guests. Discover the secret to the ultimate crowd-pleaser and elevate your snack game with this delectable recipe. Pin it now for your next gathering!
                  ↑ back to top

                  More information

                  • Drinks
                  • Appetizer
                  • Dinner
                  • Desserts
                  • About
                  • Contact
                  • Privacy Policy

                  Our Policies

                  • Privacy Policy
                  • GDPR Policy
                  • Terms Of Use
                  • Copyright Policy
                  • Cookie Policy
                  • Disclaimer

                  Copyright © 2025 cheftaling