Chef Taling

  • Dinner
  • Desserts
  • Appetizer
  • Drinks
  • Privacy Policy
  • Contact
  • About
menu icon
go to homepage
  • Dinner
  • Desserts
  • Appetizer
  • Drinks
  • Privacy Policy
  • Contact
  • About

search icon
Homepage link
  • Dinner
  • Desserts
  • Appetizer
  • Drinks
  • Privacy Policy
  • Contact
  • About

×

Creamy Garlic Tuscan Salmon Skillet Flavorful Dinner

Published: Aug 25, 2025 · by Natalie · Leave a Comment

WANT TO SAVE THIS RECIPE?

1 shares

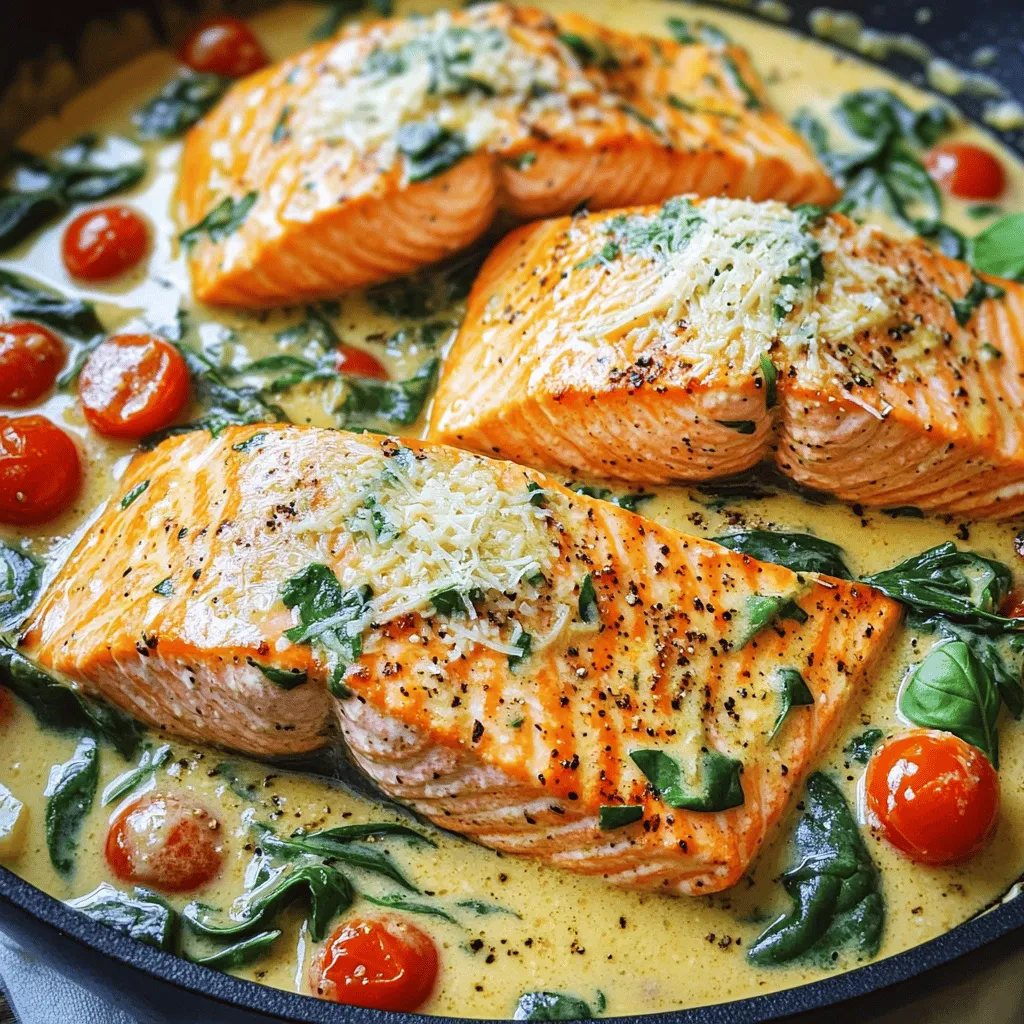
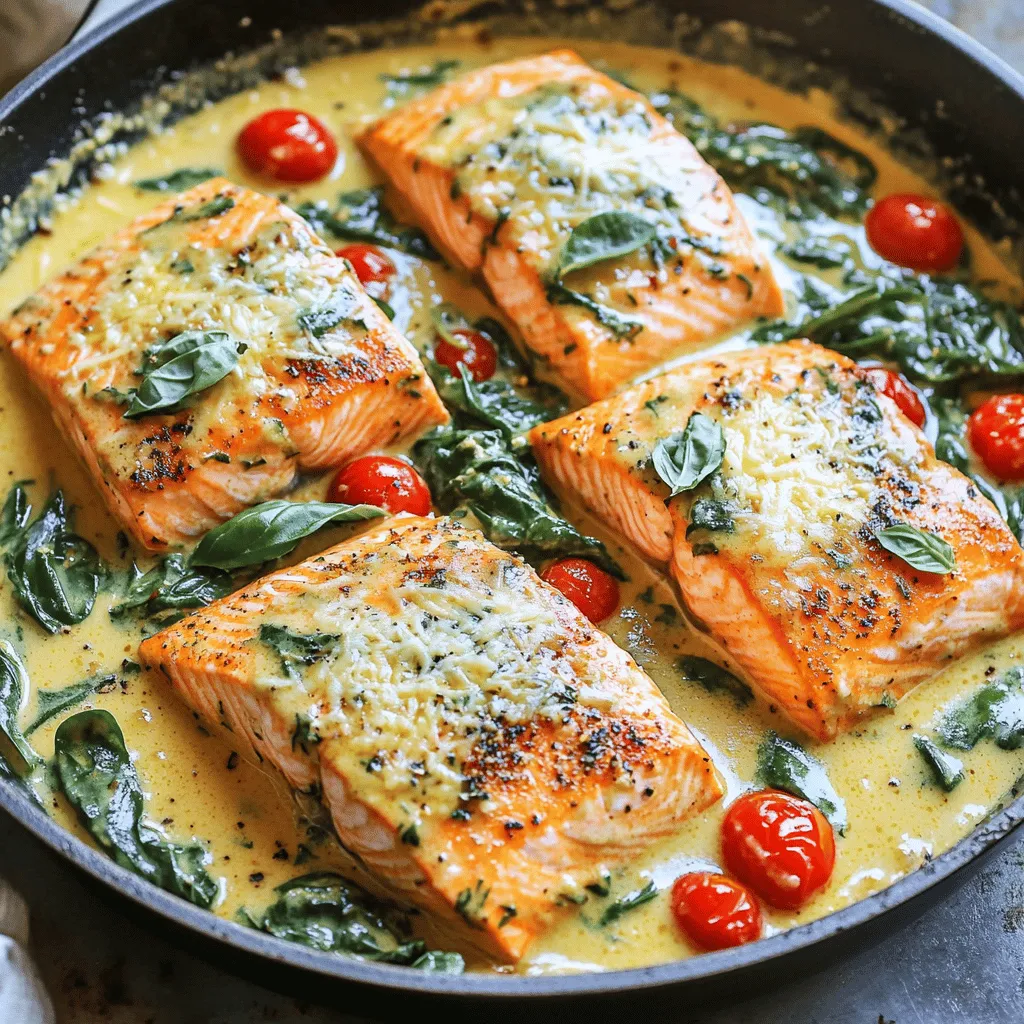
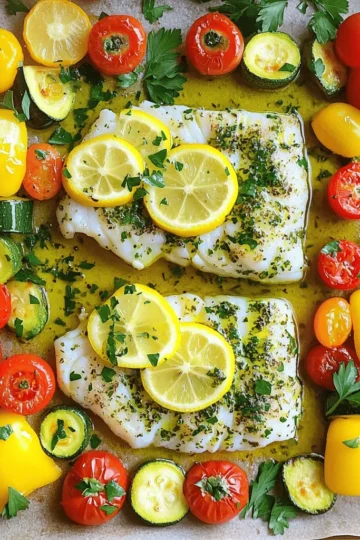
If you love bold, rich flavors, you need this Creamy Garlic Tuscan Salmon Skillet in your life. This dish blends savory salmon with fragrant garlic, fresh spinach, and juicy tomatoes in a luscious cream sauce. It’s an easy, one-pan meal packed with taste and nutrition. Whether it's a weeknight dinner or a special occasion, this recipe will impress. Let’s dive into how to make this flavorful dinner that everyone will adore!

To make Creamy Garlic Tuscan Salmon, you need a few key ingredients. Each one adds flavor and texture to the dish. Here’s the list: - Salmon fillets - Olive oil - Garlic - Cherry tomatoes - Baby spinach - Heavy cream - Parmesan cheese - Italian seasoning - Salt and pepper - Fresh basil Gather these ingredients before you start cooking. Fresh ingredients make a big difference. The salmon fillets should be bright and firm. Choose ripe cherry tomatoes for sweetness. Garlic adds depth, while the spinach gives a nice color. Heavy cream and Parmesan cheese create that rich, creamy sauce. Italian seasoning brings warmth and balance. Salt and pepper enhance all the flavors. Don’t forget fresh basil for garnish. It adds a pop of color and fresh taste! To start, you need to season the salmon fillets. Sprinkle salt and pepper on both sides. This step adds flavor and brings out the best in the fish. Next, heat the olive oil in a large skillet over medium heat. When the oil is hot, place the salmon fillets skin-side down. Cook for about 4-5 minutes. Then, flip the fillets and cook for another 3-4 minutes. The salmon should be cooked through and flake easily. Once done, remove the salmon from the skillet and set it aside. In the same skillet, add the minced garlic. Sauté it for about 1 minute until it smells amazing. Then, add the halved cherry tomatoes and Italian seasoning. Cook this mix for about 3-4 minutes until the tomatoes soften. Stir in the baby spinach and cook until it wilts. Now, pour in the heavy cream and add the grated Parmesan cheese. Stir well to combine and let the sauce simmer for about 2-3 minutes. This thickens the sauce and makes it rich. Return the cooked salmon to the skillet. Nestle the fillets in the creamy sauce. Spoon some sauce over the tops of the salmon. Cook for another minute or two until everything is heated through. Taste the sauce and adjust seasoning with salt and pepper if needed. This little step ensures the dish is just right before serving. How to ensure perfect salmon: To cook salmon just right, start with fresh fillets. Pat them dry to remove excess moisture. This helps achieve a nice sear. Season both sides with salt and pepper. Heat olive oil in a hot skillet. Place the salmon skin-side down. Cook for 4-5 minutes without moving it. This allows the skin to crisp. Flip carefully and cook for another 3-4 minutes. The salmon should be opaque and flake easily with a fork. Tips for sautéing garlic: Garlic can burn fast, so be careful. Add it to the hot oil after the salmon is cooked. Sauté the minced garlic for about one minute until it smells great. Keep stirring to prevent it from browning too much. If it browns, the flavor can turn bitter. Once you see it start to soften, you can add the tomatoes. Suggested spices and herbs: For extra flavor, try adding some red pepper flakes. This gives a nice kick. Fresh herbs like thyme or oregano also work well. They add a bright taste that pairs nicely with salmon. You can also use lemon zest for a zesty note. Substitute options for cream and cheese: If you want a lighter dish, swap heavy cream for Greek yogurt or coconut milk. They still give a creamy texture but with fewer calories. For cheese, you can use nutritional yeast for a dairy-free option. It adds a cheesy flavor without the creaminess. {{image_2}} You can swap salmon for other fish. Try using tilapia or cod. Both work well. You can also use chicken breasts. They will soak up the sauce nicely. For veggies, cherry tomatoes are great, but you can add others. Try bell peppers or zucchini. They add color and taste. You could also use asparagus for a nice crunch. To make this dish lighter, use less cream. You can replace it with Greek yogurt. This will still give you a creamy texture without the extra fat. If you need a gluten-free option, don't worry! This recipe is already gluten-free. Just ensure your Italian seasoning has no gluten. You can enjoy this dish without any worry. To store leftover creamy garlic Tuscan salmon, place it in an airtight container. This keeps the salmon fresh and prevents odors in your fridge. Make sure to let the dish cool down to room temperature before sealing it. You can store it for up to three days in the refrigerator. The creamy sauce will blend with the salmon, keeping it moist. To reheat your salmon, use a skillet over low heat. This method warms the dish evenly and helps keep the creaminess. You can also add a splash of water or broth if the sauce thickens too much. Stir gently while heating. Avoid using the microwave, as it can dry out the salmon and sauce. Enjoy your delicious leftover meal! Yes, you can use frozen salmon. Just make sure to thaw it first. Place it in the fridge overnight or run it under cold water. This helps it cook evenly. Frozen salmon works well, but fresh salmon tastes better. You can serve this dish with several sides. Here are some great options: - Steamed broccoli - Garlic bread - Rice or quinoa - A fresh salad These sides balance the rich, creamy sauce of the salmon. You know the salmon is done when it flakes easily with a fork. The inside should be a light pink color. If you have a food thermometer, check for 145°F (63°C). This ensures it is safe to eat. Cooked salmon should not appear raw or translucent. This blog post covered everything you need for a tasty Creamy Garlic Tuscan Salmon. I shared the key ingredients and simple steps to make it. You learned tips to cook perfect salmon and ways to adjust the recipe. We also discussed how to store and reheat leftovers. Incorporating these ideas will make your meal enjoyable and easy to prepare. Keep exploring new variations to make it your own. Happy cooking and savor every bite!

Ingredients

To make Creamy Garlic Tuscan Salmon, you need a few key ingredients. Each one adds flavor and texture to the dish. Here’s the list:

  1. Salmon fillets
  2. Olive oil
  3. Garlic
  4. Cherry tomatoes
  5. Baby spinach
  6. Heavy cream
  7. Parmesan cheese
  8. Italian seasoning
  9. Salt and pepper
  10. Fresh basil

Gather these ingredients before you start cooking. Fresh ingredients make a big difference. The salmon fillets should be bright and firm. Choose ripe cherry tomatoes for sweetness. Garlic adds depth, while the spinach gives a nice color. Heavy cream and Parmesan cheese create that rich, creamy sauce. Italian seasoning brings warmth and balance. Salt and pepper enhance all the flavors. Don’t forget fresh basil for garnish. It adds a pop of color and fresh taste!

Step-by-Step Instructions

Preparation of Salmon

To start, you need to season the salmon fillets. Sprinkle salt and pepper on both sides. This step adds flavor and brings out the best in the fish.

Next, heat the olive oil in a large skillet over medium heat. When the oil is hot, place the salmon fillets skin-side down. Cook for about 4-5 minutes. Then, flip the fillets and cook for another 3-4 minutes. The salmon should be cooked through and flake easily. Once done, remove the salmon from the skillet and set it aside.

Making the Tuscan Sauce

In the same skillet, add the minced garlic. Sauté it for about 1 minute until it smells amazing.

Then, add the halved cherry tomatoes and Italian seasoning. Cook this mix for about 3-4 minutes until the tomatoes soften. Stir in the baby spinach and cook until it wilts.

Now, pour in the heavy cream and add the grated Parmesan cheese. Stir well to combine and let the sauce simmer for about 2-3 minutes. This thickens the sauce and makes it rich.

Combining Ingredients

Return the cooked salmon to the skillet. Nestle the fillets in the creamy sauce. Spoon some sauce over the tops of the salmon.

Cook for another minute or two until everything is heated through. Taste the sauce and adjust seasoning with salt and pepper if needed. This little step ensures the dish is just right before serving.

Tips & Tricks

Cooking Techniques

How to ensure perfect salmon:

To cook salmon just right, start with fresh fillets. Pat them dry to remove excess moisture. This helps achieve a nice sear. Season both sides with salt and pepper. Heat olive oil in a hot skillet. Place the salmon skin-side down. Cook for 4-5 minutes without moving it. This allows the skin to crisp. Flip carefully and cook for another 3-4 minutes. The salmon should be opaque and flake easily with a fork.

Tips for sautéing garlic:

Garlic can burn fast, so be careful. Add it to the hot oil after the salmon is cooked. Sauté the minced garlic for about one minute until it smells great. Keep stirring to prevent it from browning too much. If it browns, the flavor can turn bitter. Once you see it start to soften, you can add the tomatoes.

Flavor Enhancements

Suggested spices and herbs:

For extra flavor, try adding some red pepper flakes. This gives a nice kick. Fresh herbs like thyme or oregano also work well. They add a bright taste that pairs nicely with salmon. You can also use lemon zest for a zesty note.

Substitute options for cream and cheese:

If you want a lighter dish, swap heavy cream for Greek yogurt or coconut milk. They still give a creamy texture but with fewer calories. For cheese, you can use nutritional yeast for a dairy-free option. It adds a cheesy flavor without the creaminess.

Variations

Ingredient Swaps

You can swap salmon for other fish. Try using tilapia or cod. Both work well. You can also use chicken breasts. They will soak up the sauce nicely.

For veggies, cherry tomatoes are great, but you can add others. Try bell peppers or zucchini. They add color and taste. You could also use asparagus for a nice crunch.

Dietary Adjustments

To make this dish lighter, use less cream. You can replace it with Greek yogurt. This will still give you a creamy texture without the extra fat.

If you need a gluten-free option, don't worry! This recipe is already gluten-free. Just ensure your Italian seasoning has no gluten. You can enjoy this dish without any worry.

Storage Info

Storing Leftovers

To store leftover creamy garlic Tuscan salmon, place it in an airtight container. This keeps the salmon fresh and prevents odors in your fridge. Make sure to let the dish cool down to room temperature before sealing it. You can store it for up to three days in the refrigerator. The creamy sauce will blend with the salmon, keeping it moist.

Reheating Instructions

To reheat your salmon, use a skillet over low heat. This method warms the dish evenly and helps keep the creaminess. You can also add a splash of water or broth if the sauce thickens too much. Stir gently while heating. Avoid using the microwave, as it can dry out the salmon and sauce. Enjoy your delicious leftover meal!

FAQs

Can I use frozen salmon?

Yes, you can use frozen salmon. Just make sure to thaw it first. Place it in the fridge overnight or run it under cold water. This helps it cook evenly. Frozen salmon works well, but fresh salmon tastes better.

What can I serve with Creamy Garlic Tuscan Salmon?

You can serve this dish with several sides. Here are some great options:

  1. Steamed broccoli
  2. Garlic bread
  3. Rice or quinoa
  4. A fresh salad

These sides balance the rich, creamy sauce of the salmon.

How do I know when the salmon is cooked properly?

You know the salmon is done when it flakes easily with a fork. The inside should be a light pink color. If you have a food thermometer, check for 145°F (63°C). This ensures it is safe to eat. Cooked salmon should not appear raw or translucent.

This blog post covered everything you need for a tasty Creamy Garlic Tuscan Salmon. I shared the key ingredients and simple steps to make it. You learned tips to cook perfect salmon and ways to adjust the recipe. We also discussed how to store and reheat leftovers.

Incorporating these ideas will make your meal enjoyable and easy to prepare. Keep exploring new variations to make it your own. Happy cooking and savor every bite!

To make Creamy Garlic Tuscan Salmon, you need a few key ingredients. Each one adds flavor and texture to the dish. Here’s the list: - Salmon fillets - Olive oil - Garlic - Cherry tomatoes - Baby spinach - Heavy cream - Parmesan cheese - Italian seasoning - Salt and pepper - Fresh basil Gather these ingredients before you start cooking. Fresh ingredients make a big difference. The salmon fillets should be bright and firm. Choose ripe cherry tomatoes for sweetness. Garlic adds depth, while the spinach gives a nice color. Heavy cream and Parmesan cheese create that rich, creamy sauce. Italian seasoning brings warmth and balance. Salt and pepper enhance all the flavors. Don’t forget fresh basil for garnish. It adds a pop of color and fresh taste! To start, you need to season the salmon fillets. Sprinkle salt and pepper on both sides. This step adds flavor and brings out the best in the fish. Next, heat the olive oil in a large skillet over medium heat. When the oil is hot, place the salmon fillets skin-side down. Cook for about 4-5 minutes. Then, flip the fillets and cook for another 3-4 minutes. The salmon should be cooked through and flake easily. Once done, remove the salmon from the skillet and set it aside. In the same skillet, add the minced garlic. Sauté it for about 1 minute until it smells amazing. Then, add the halved cherry tomatoes and Italian seasoning. Cook this mix for about 3-4 minutes until the tomatoes soften. Stir in the baby spinach and cook until it wilts. Now, pour in the heavy cream and add the grated Parmesan cheese. Stir well to combine and let the sauce simmer for about 2-3 minutes. This thickens the sauce and makes it rich. Return the cooked salmon to the skillet. Nestle the fillets in the creamy sauce. Spoon some sauce over the tops of the salmon. Cook for another minute or two until everything is heated through. Taste the sauce and adjust seasoning with salt and pepper if needed. This little step ensures the dish is just right before serving. How to ensure perfect salmon: To cook salmon just right, start with fresh fillets. Pat them dry to remove excess moisture. This helps achieve a nice sear. Season both sides with salt and pepper. Heat olive oil in a hot skillet. Place the salmon skin-side down. Cook for 4-5 minutes without moving it. This allows the skin to crisp. Flip carefully and cook for another 3-4 minutes. The salmon should be opaque and flake easily with a fork. Tips for sautéing garlic: Garlic can burn fast, so be careful. Add it to the hot oil after the salmon is cooked. Sauté the minced garlic for about one minute until it smells great. Keep stirring to prevent it from browning too much. If it browns, the flavor can turn bitter. Once you see it start to soften, you can add the tomatoes. Suggested spices and herbs: For extra flavor, try adding some red pepper flakes. This gives a nice kick. Fresh herbs like thyme or oregano also work well. They add a bright taste that pairs nicely with salmon. You can also use lemon zest for a zesty note. Substitute options for cream and cheese: If you want a lighter dish, swap heavy cream for Greek yogurt or coconut milk. They still give a creamy texture but with fewer calories. For cheese, you can use nutritional yeast for a dairy-free option. It adds a cheesy flavor without the creaminess. {{image_2}} You can swap salmon for other fish. Try using tilapia or cod. Both work well. You can also use chicken breasts. They will soak up the sauce nicely. For veggies, cherry tomatoes are great, but you can add others. Try bell peppers or zucchini. They add color and taste. You could also use asparagus for a nice crunch. To make this dish lighter, use less cream. You can replace it with Greek yogurt. This will still give you a creamy texture without the extra fat. If you need a gluten-free option, don't worry! This recipe is already gluten-free. Just ensure your Italian seasoning has no gluten. You can enjoy this dish without any worry. To store leftover creamy garlic Tuscan salmon, place it in an airtight container. This keeps the salmon fresh and prevents odors in your fridge. Make sure to let the dish cool down to room temperature before sealing it. You can store it for up to three days in the refrigerator. The creamy sauce will blend with the salmon, keeping it moist. To reheat your salmon, use a skillet over low heat. This method warms the dish evenly and helps keep the creaminess. You can also add a splash of water or broth if the sauce thickens too much. Stir gently while heating. Avoid using the microwave, as it can dry out the salmon and sauce. Enjoy your delicious leftover meal! Yes, you can use frozen salmon. Just make sure to thaw it first. Place it in the fridge overnight or run it under cold water. This helps it cook evenly. Frozen salmon works well, but fresh salmon tastes better. You can serve this dish with several sides. Here are some great options: - Steamed broccoli - Garlic bread - Rice or quinoa - A fresh salad These sides balance the rich, creamy sauce of the salmon. You know the salmon is done when it flakes easily with a fork. The inside should be a light pink color. If you have a food thermometer, check for 145°F (63°C). This ensures it is safe to eat. Cooked salmon should not appear raw or translucent. This blog post covered everything you need for a tasty Creamy Garlic Tuscan Salmon. I shared the key ingredients and simple steps to make it. You learned tips to cook perfect salmon and ways to adjust the recipe. We also discussed how to store and reheat leftovers. Incorporating these ideas will make your meal enjoyable and easy to prepare. Keep exploring new variations to make it your own. Happy cooking and savor every bite!

Creamy Garlic Tuscan Salmon Skillet

Elevate your dinner with this creamy garlic Tuscan salmon skillet recipe! In just 25 minutes, whip up tender salmon fillets nestled in a rich, flavorful sauce packed with garlic, cherry tomatoes, and baby spinach. Perfect for a quick weeknight meal or impressing guests, this dish is sure to delight. Ready to make deliciousness happen? Click through for the full recipe and treat your taste buds to a culinary adventure!
Print Recipe Pin Recipe

Ingredients
  

4 salmon fillets

2 tablespoons olive oil

4 cloves garlic, minced

1 cup cherry tomatoes, halved

1 cup baby spinach

½ cup heavy cream

½ cup grated Parmesan cheese

1 teaspoon Italian seasoning

Salt and pepper to taste

Fresh basil for garnish

Instructions
 

Heat the olive oil in a large skillet over medium heat. Season the salmon fillets with salt and pepper.

    Once the oil is hot, place the salmon fillets skin-side down in the skillet. Cook for about 4-5 minutes, then flip and cook for another 3-4 minutes, until the salmon is cooked through and flakes easily. Remove salmon from the skillet and set aside.

      In the same skillet, add minced garlic and sauté for about 1 minute until fragrant.

        Add the cherry tomatoes and Italian seasoning; cook until the tomatoes are softened, about 3-4 minutes.

          Stir in the baby spinach and cook until wilted.

            Pour in the heavy cream and add the grated Parmesan cheese. Stir well to combine and let the sauce simmer for about 2-3 minutes, allowing it to thicken slightly.

              Return the salmon fillets to the skillet, nestling them in the creamy sauce. Spoon some sauce over the tops of the salmon.

                Cook for another minute or two until everything is heated through. Taste and adjust seasoning with salt and pepper if necessary.

                  Garnish with fresh basil before serving.

                    Prep Time: 10 minutes | Total Time: 25 minutes | Servings: 4

                      Related Recipes

                      • - Shrimp specifications: Use 200g of shrimp that is peeled and deveined. I recommend medium to large shrimp. They cook quickly and add a nice texture. Look for fresh shrimp if possible, but frozen works too. Just thaw them before cooking. - Ramen noodles options: You can choose between fresh or dried ramen noodles. Fresh noodles cook in just 3-4 minutes. Dried noodles are easy to store and take around the same time. Both types work well in this dish, so pick what you like! - Best chili paste brands for spice level: For a great kick, I suggest brands like Sriracha, Sambal Oelek, or Gochujang. These add flavor along with heat. Start with 1 teaspoon and add more if you want it spicier. Remember, you can always add more, but you can't take it out! First, bring a pot of water to a boil. Add the ramen noodles and cook them for 3-4 minutes. Follow the package instructions for best results. Once cooked, drain the noodles well. Be careful not to overcook them; they should be firm. After draining, set the noodles aside. You want them ready for mixing later. Garlic and ginger are key for flavor in this dish. Heat sesame oil in a large pan over medium heat. Add minced garlic and ginger to the pan. Sauté them for about one minute until they smell great. Keep an eye on the heat; you want to avoid burning the garlic. Perfect sautéing makes the dish pop with flavor. Next, it’s time for the shrimp. Add them to the pan with the garlic and ginger. Cook for 2-3 minutes. Watch closely as the shrimp change color. They should turn pink and opaque when done. This shows they are cooked just right. If you cook them too long, they become tough. You want tender, juicy shrimp in your ramen. Now, let’s add some flavor. Stir in the chili paste, soy sauce, and a pinch of salt and pepper. Mix well to coat the shrimp. Then, pour in the chicken or vegetable broth. Bring it to a gentle simmer. This step is crucial for a rich broth. Add baby spinach to the pan and cook for another 1-2 minutes. The spinach wilts quickly, adding great color and taste. Finally, gently add the drained ramen noodles to the pan. Toss everything together carefully. You want to ensure the noodles mix well with the shrimp and broth. This helps each bite be full of flavor. Once everything is heated through, it's ready to serve. - Add spices: Consider using fresh herbs like cilantro or basil. They add brightness and depth. - Homemade broth: Making broth at home improves taste. It lets you control salt and flavor. - Adjust chili paste: Start with one teaspoon. You can always add more if you like heat. - Mild variations: For less spice, use less chili paste. You can use sweet soy sauce for a different taste. - Accompaniments: Pair this dish with a light salad or steamed veggies. A cold drink like iced tea works well too. - Presentation tips: Use deep bowls for a restaurant-style look. Garnish with green onions and sesame seeds for flair. {{image_2}} You can easily swap shrimp for other proteins. Chicken works well and cooks quickly. Just cut it into small pieces, and cook it for about 5-6 minutes. If you prefer a vegetarian option, tofu is a great choice. Use firm tofu for the best texture. Cut it into cubes and sauté it until golden brown. Ramen noodles are not your only option. Soba noodles are a fun twist. They cook in about 4-5 minutes. If you need gluten-free noodles, try rice noodles. They also cook quickly, usually in 3-4 minutes. Just check the package for exact times. Adding vegetables boosts the meal's nutrition. Baby spinach is a great choice, but feel free to mix in other veggies. Carrots, bell peppers, or snap peas work well. To cook them, add them to the broth for the last few minutes. This way, they stay bright and crunchy. This makes your dish colorful and tasty! To keep your Minute Spicy Garlic Shrimp Ramen fresh, store leftovers in an airtight container. Glass or plastic containers work well. Make sure to cool down the ramen before sealing. This helps prevent moisture buildup, which can make it soggy. You can store leftovers in the fridge for up to three days. When it's time to reheat, use a microwave or a stovetop. If using a microwave, place the ramen in a bowl and add a splash of broth or water. Cover it to keep moisture in, and heat for about two minutes. Stir halfway through to ensure even heating. On the stovetop, add a bit of broth in a pan and warm over low heat. Stir gently until warm. If you want to freeze your ramen, it’s best to freeze components separately. Freeze the broth and shrimp in one container. Store the noodles and vegetables in another. This helps maintain texture. For best results, use freezer-safe bags or containers. When you want to enjoy your frozen ramen, take it out the night before and place it in the fridge. This allows it to defrost slowly. If you forget, you can thaw it in warm water for a quicker method. To reheat, heat the broth in a pot first. Once it’s hot, add the shrimp and noodles. Cook until everything is warmed through. This method keeps the shrimp tender and the noodles from becoming mushy. Enjoy your meal just like the first time! Yes, you can make this dish ahead of time. Here’s how to prepare it in advance: - Cook the ramen noodles and set them aside. - Sauté the garlic and ginger, then store them in the fridge. - Cook the shrimp and mix in the chili paste and soy sauce. Let it cool and store it in a container. - When ready to serve, reheat the shrimp and broth mix. Add the noodles and spinach, then heat until warm. This method saves time when you’re ready to eat! To kick up the heat, follow these tips: - Use more chili paste. Start with one extra teaspoon and taste. - Add fresh chilies, like sliced jalapeños or Thai bird chilies. - Include a dash of hot sauce or chili oil for extra flavor. - Experiment with spicy garlic or chili flakes as a topping. Adjust the spice to suit your taste! If you have a shrimp allergy, here are some tasty options: - Chicken: Use small pieces of cooked chicken or shredded rotisserie chicken. - Tofu: Firm tofu works great. Cut it into cubes and sauté until golden. - Mushrooms: Shiitake or portobello mushrooms add a meaty texture. - Fish: Any mild white fish can replace shrimp, like cod or tilapia. These swaps keep the dish flavorful and satisfying. Absolutely! Here’s how to adapt it: - Cook the instant ramen according to package directions. Usually, this takes only 3 minutes. - Drain and set aside while you cook the shrimp and broth mix. - Combine the instant noodles with the shrimp and broth at the end, just like with regular ramen. This makes the dish even quicker to prepare. Yes, you can find low-sodium broth options: - Look for low-sodium chicken or vegetable broth at the store. - You can also make homemade broth with less salt. - Use herbs and spices to enhance flavor without adding salt. - Add a splash of vinegar or lemon juice for brightness. These options help reduce sodium while keeping the taste delicious. This blog post covered how to create a delicious shrimp ramen. We looked at the key ingredients, step-by-step cooking instructions, and tips for enhancing the dish's flavor. I shared variations to suit different diets and preferences, plus proper storage techniques for leftovers. Cooking ramen can be fun and rewarding. With practice, you can make a meal that impresses. Enjoy experimenting with flavors and methods to find your perfect bowl of ramen!
                        Minute Spicy Garlic Shrimp Ramen Instant Flavor Boost
                      • - 4 salmon fillets (about 6 ounces each) - 1 pound fresh green beans, trimmed - 1 lemon, zested and juiced - 3 tablespoons fresh dill, chopped - 2 tablespoons olive oil For this dish, the salmon is the star. Each fillet provides rich, flaky goodness. Pair it with fresh green beans for a crunchy texture. The lemon adds a bright zing, while the dill gives it a fresh herb flavor. Olive oil helps bind everything together and gives a nice sheen. - 3 cloves garlic, minced - Salt and pepper to taste - 1 teaspoon paprika - Lemon wedges for serving Garlic brings a savory punch to this dish. Salt and pepper are essential to enhance all the flavors. Paprika adds a gentle warmth, making the meal more inviting. Finally, lemon wedges are perfect for serving. A squeeze of fresh lemon right before eating can brighten the plate. These ingredients combine to make a simple yet delightful meal. You’ll enjoy how they work together to create a balanced flavor profile. 1. Preheat your oven to 400°F (200°C). This heat helps cook the salmon and beans perfectly. 2. Line a large baking sheet with parchment paper. This makes cleanup quick and easy. 3. In a small bowl, whisk together the lemon juice, lemon zest, chopped dill, olive oil, minced garlic, paprika, salt, and pepper. This mixture will add great flavor. 1. Place the salmon fillets on one side of the baking sheet. Make sure they have space between them for even cooking. 2. Brush half of the lemon dill mixture over the salmon fillets. This adds moisture and taste. 3. On the other side of the baking sheet, spread the trimmed green beans in a single layer. 4. Drizzle the remaining lemon dill mixture over the green beans. Toss them to coat evenly. This step enhances their flavor. 1. Roast in the preheated oven for 15-20 minutes. The salmon should flake easily with a fork when it is done. 2. The green beans should be tender but still crisp. This gives them a nice texture. 3. Keep an eye on the dish while it cooks. You want both the salmon and beans to reach the right doneness. 4. Once done, remove the sheet pan from the oven. Let it cool slightly before serving. To cook salmon and green beans evenly, place them on the same sheet pan. Salmon cooks fast, while beans need a bit longer. Try to spread the beans out in a single layer. This helps them roast well without steaming. If your beans are small, check them after 10 minutes. You might need to adjust the cooking time based on your oven. Some ovens run hot or cool. Always keep an eye on both ingredients. For a vibrant display, serve the salmon and beans on a large platter. Drizzle any leftover pan juices over the dish. This adds flavor and a nice shine. Garnish with extra dill and lemon wedges. The bright colors will make the dish pop. You can also use a sprinkle of paprika for extra flair. This simple touch can make your meal look gourmet. {{image_2}} You can switch out the salmon for other fish. Try using cod, trout, or tilapia. These fish work well with the lemon and dill flavor too. If you want to go meatless, try tofu. Just make sure to press it first to remove extra water. For greens, green beans are tasty, but you can use asparagus or broccoli. Snap peas also add a nice crunch. You can even mix different veggies together for more flavor. Just cut them to similar sizes for even cooking. You can spice things up by adding a pinch of red pepper flakes. This will give your dish a little kick! If you want different herbs, try parsley or thyme. Both add fresh flavors that work well with salmon. For the lemon dill mixture, consider adding a splash of honey or mustard. This gives a sweet and tangy twist. You can also use lime juice instead of lemon for a different zest. Feel free to get creative and find what you like best! To keep your leftover salmon and beans fresh, let them cool first. Place them in airtight containers. This step prevents moisture loss and keeps flavors intact. Store the containers in the fridge. Your dish can last up to three days this way. If you want to store it longer, consider freezing. Just remember, freezing may change the texture. For the best results, reheat your salmon and beans in the oven. Set it to 350°F (175°C). Place the dish in a baking pan, cover it with foil, and heat for about 10-15 minutes. This method helps maintain the texture of the fish and keeps the beans crisp. You can also use the microwave, but be cautious. Heat it in short intervals to avoid drying out the salmon. Always check the temperature to ensure it's warm throughout. How long does it take to cook the salmon? It takes about 15 to 20 minutes to cook salmon. The salmon is done when it flakes easily with a fork. I find that checking at 15 minutes is best to avoid overcooking. Can I use frozen salmon instead? Yes, you can use frozen salmon. Just remember to thaw it first. Thawing allows the salmon to cook evenly. Frozen salmon may need a few extra minutes in the oven. What other vegetables work well on a sheet pan? You can use many vegetables on a sheet pan. Asparagus, bell peppers, or zucchini are great choices. Make sure to cut them into similar sizes for even cooking. What to serve with lemon dill salmon & beans? This dish pairs well with rice or quinoa. You can also serve it with a fresh salad. A light, tangy dressing complements the flavors nicely. Can this dish be made ahead of time? Yes, you can prep this dish ahead of time. Marinate the salmon and beans in the fridge for a few hours. This saves time and boosts the flavor when you’re ready to cook. This blog post covered a simple lemon dill salmon dish. You learned about key ingredients like salmon, green beans, and fresh herbs. I shared easy steps for cooking and tips to enhance your meal's look and taste. Remember, you can swap ingredients or add spices for variety. Proper storage and reheating tips keep leftovers fresh. Enjoy cooking and impressing others with your new skills! This dish is tasty and adjustable, making it a great choice for meal planning.
                        Sheet-Pan Lemon Dill Salmon & Beans Simple Dish
                      • To make this tasty dish, gather these main ingredients: - 4 boneless, skinless chicken thighs - 1 cup long-grain rice - 2 cups chicken broth - 1/4 cup honey - 1/4 cup Dijon mustard - 2 tablespoons olive oil - 1 teaspoon garlic powder - 1 teaspoon onion powder - 1 teaspoon dried thyme - Salt and pepper to taste - 1 cup frozen peas These items create a balanced meal with protein and carbs. The spices in this recipe add layers of flavor. You will need: - 1 teaspoon garlic powder - 1 teaspoon onion powder - 1 teaspoon dried thyme - Salt and pepper to taste These spices enhance the chicken and rice, making them more tasty. Garnishes can make your dish look great. Consider these: - Fresh parsley, chopped Sprinkling parsley on top gives your dish a fresh look and extra flavor. First, gather your chicken and marinade ingredients. You need four boneless, skinless chicken thighs. In a small bowl, mix 1/4 cup honey, 1/4 cup Dijon mustard, 2 tablespoons olive oil, 1 teaspoon garlic powder, 1 teaspoon onion powder, and 1 teaspoon dried thyme. Add salt and pepper to taste. Whisk until smooth. Place the chicken thighs in a large bowl. Pour half of the marinade over them. Toss well to coat. Let it sit while you heat the skillet. Heat 2 tablespoons of olive oil in a large oven-safe skillet over medium-high heat. Once hot, add the marinated chicken thighs. Sear each side for about 3 to 4 minutes. Look for a nice golden brown color. The chicken will not be cooked through yet. This step adds flavor and texture. Once seared, remove the chicken and set it aside. In the same skillet, add 1 cup of long-grain rice. Stir it around to soak up the chicken juices. Cook for 1 to 2 minutes. This step gives the rice a rich flavor. Pour in 2 cups of chicken broth and stir. Nestle the seared chicken thighs back into the skillet on top of the rice. Make sure everything is evenly spread out. Cover the skillet with a lid or foil. Place it in the preheated oven at 375°F (190°C). Bake for 25 to 30 minutes. Check that the rice is tender and the chicken is cooked through. After baking, take the skillet out of the oven. Stir in 1 cup of frozen peas. Cover again and let it sit for 5 minutes. This allows the peas to heat through. Finally, fluff the rice with a fork. Drizzle the remaining honey mustard sauce over everything and sprinkle with chopped parsley before serving. To get a nice sear on chicken, heat your skillet first. Use medium-high heat and add a little olive oil. Place the chicken in the skillet without crowding it. Sear each side for about 3-4 minutes until golden brown. This step seals in the juices. Make sure not to move the chicken too much while it cooks. Let it form a crust before flipping. For fluffy rice, rinse it under cold water before cooking. This removes excess starch and prevents clumping. When adding the rice to the skillet, stir it well to coat in chicken juices. Use the right amount of chicken broth, which helps the rice absorb flavor. Cover the skillet tightly while baking. This keeps steam in and helps the rice cook evenly. Serving straight from the skillet adds a rustic touch. Fluff the rice with a fork before serving to separate the grains. Drizzle the extra honey mustard sauce over the chicken and rice for added flavor. A sprinkle of fresh parsley gives a pop of color. For a special touch, serve with a side of crusty bread. {{image_2}} You can switch the chicken for other meats. Try boneless turkey thighs for a leaner option. Pork chops also work well and add a different flavor. For a plant-based choice, use firm tofu or tempeh. Just ensure they soak in the honey mustard marinade before cooking. Rice is great, but you can try other grains. Quinoa adds a nutty taste and cooks quickly. Barley is hearty and gives a chewy texture. Couscous cooks fast and absorbs flavors well. Each grain brings its own unique taste to the dish. Boost nutrition by adding veggies to the mix. Carrots give a sweet crunch when diced small. Bell peppers add color and sweetness. Spinach wilts nicely and packs nutrients. Just toss them in with the rice for extra flavor and health benefits. To store your One-Pan Honey Mustard Chicken & Rice, let it cool first. Then, transfer it to an airtight container. This keeps the dish fresh and tasty. Make sure to store it in the fridge. It will stay good for up to 3 days. If you want to keep it longer, consider freezing. When you’re ready to eat leftovers, reheat them in the oven or on the stove. For the oven, preheat to 350°F (175°C). Place the chicken and rice in a baking dish. Cover it with foil to keep moisture in. Heat for about 20 minutes. On the stove, use medium heat. Add a splash of broth or water to avoid drying it out. Stir occasionally until hot. To freeze this dish, let it cool completely. Then, portion it into freezer-safe bags or containers. Remove as much air as possible before sealing. Label them with the date. You can freeze it for up to 3 months. When ready to eat, thaw it overnight in the fridge. Then, reheat as mentioned above. Enjoy your delicious meal anytime! Yes, you can use bone-in chicken thighs. They add flavor and moisture. Just increase the cooking time. Bone-in thighs may need about 10 more minutes in the oven. Check the internal temperature with a meat thermometer. It should reach 165°F (74°C) to be safe to eat. You can use yellow mustard if you want a milder taste. Honey mustard is also a great choice. If you want zest, try spicy brown mustard. Each will change the flavor a bit. Adjust the honey in the recipe if your substitute is sweeter. Yes, you can use gluten-free rice. Look for brands labeled as gluten-free. Quinoa or cauliflower rice are also good swaps. They keep the meal healthy and tasty. Ensure the broth you use is gluten-free too. Check the chicken's internal temperature with a meat thermometer. It should read 165°F (74°C). You can also cut into the thickest part. The meat should be white, not pink. Juices should run clear. These tips will help you serve safe and delicious chicken. You learned how to make one-pan honey mustard chicken and rice. We covered key ingredients, cooking steps, and tips for success. Remember, perfect searing and fluffy rice make all the difference. You can also switch proteins or add veggies to fit your taste. Store leftovers properly to enjoy later or freeze for convenience. With your new skills, impressing family and friends is easy. You now have a delicious recipe that ticks all the boxes for flavor and fun. Enjoy your cooking adventure!
                        One-Pan Honey Mustard Chicken & Rice Tasty Delight
                      • To make Lemon Herb Baked Cod, gather these key items: - 4 cod fillets (approx. 6 oz each) - 3 tablespoons olive oil - 2 lemons (1 for juice, 1 sliced) - 3 cloves garlic, minced - 1 teaspoon dried oregano - 1 teaspoon dried thyme - 1 teaspoon paprika - Salt and pepper to taste - 1 cup cherry tomatoes, halved - 1 medium zucchini, sliced - 1 bell pepper (red or yellow), sliced - Fresh parsley for garnish You can enhance your dish with these tasty extras: - Fresh basil for a garden touch - Red pepper flakes for a hint of heat - Capers for a briny twist - A splash of white wine for depth Make your cooking smooth with these handy tools: - Large baking sheet - Parchment paper for easy clean-up - Small mixing bowl for the herb mixture - Whisk or fork for blending ingredients - Knife and cutting board for prep These ingredients and tools will help you create a delicious and vibrant meal. Enjoy the process and the tasty results! First, gather your ingredients. You need four cod fillets, olive oil, two lemons, garlic, and some spices. For veggies, get cherry tomatoes, zucchini, and a bell pepper. Don't forget the fresh parsley for garnish! Next, preheat your oven to 400°F (200°C). This step is key for even cooking. Line a large baking sheet with parchment paper. This makes clean-up easy. In a small bowl, mix together three tablespoons of olive oil, juice from one lemon, and three minced garlic cloves. Add one teaspoon each of oregano, thyme, and paprika. Season with salt and pepper. Whisk until it's smooth. Now, place the cod fillets on one side of your sheet pan. Brush half of your herb-lemon mixture over the fillets. On the other side, arrange the cherry tomatoes, zucchini slices, and bell pepper. Drizzle the rest of the mixture over the veggies and toss them lightly. Next, lay lemon slices on top of the cod and around the veggies. This adds flavor and looks great too! Bake everything in your preheated oven for 15 to 20 minutes. You want the cod to flake easily with a fork. The veggies should be tender and bright. After baking, take the pan out of the oven. Let it sit for a couple of minutes. This helps the flavors settle. To check if the cod is done, use a fork to flake it. If it breaks apart easily, it is ready. You can also check the internal temperature. It should reach 145°F (63°C). The veggies should be soft but still colorful. If they look too firm, bake for a few more minutes. Enjoy your tasty meal! To get the best flavor from your cod, use fresh ingredients. Fresh lemons and herbs brighten the dish. I love using garlic that I chop myself. Fresh garlic has a strong taste that dried cannot match. Make sure to coat the cod well with the herb-lemon mix. This ensures every bite is full of flavor. Adding lemon slices on top gives a nice zest. One common mistake is overcooking the cod. Cod cooks quickly, so keep an eye on it. It should flake easily with a fork when done. Another mistake is not seasoning enough. Salt and pepper enhance the taste. Don't skip them! Also, make sure to cut your veggies evenly. This helps them cook at the same time as the fish. Start by preheating your oven to 400°F (200°C). Baking at this temperature cooks everything evenly. Check your cod after 15 minutes. If it flakes easily, it's done! If not, give it a few more minutes. Remember, the veggies should be tender but not mushy. They should still have a bit of bite for the best texture. {{image_2}} You can switch up the veggies for this dish. Try using asparagus, broccoli, or carrots. Each adds its own flavor and color. You can even mix in some snap peas for a nice crunch. Choose veggies that cook at the same time as the cod. This keeps your meal simple and tasty. Feel free to play with the seasonings. Instead of oregano and thyme, try dill or rosemary. These herbs bring a fresh taste to the cod. You can also use lemon zest for extra zing. A dash of red pepper flakes can add some heat. Experiment with your favorite spices for a unique twist. If you want a different fish, use halibut or tilapia. Both cook well and have mild flavors. You can also use salmon for a richer taste. Just adjust the cooking time. For a plant-based option, try firm tofu or tempeh. These options soak up the flavors well and keep the meal light. To keep your Lemon Herb Baked Cod fresh, let it cool first. Place the cod and veggies in an airtight container. Store it in the fridge for up to three days. Make sure to separate the fish from the veggies if you want them to stay crisp. When you're ready to eat the leftovers, preheat your oven to 350°F (175°C). Place the cod and veggies on a baking sheet. Heat them for about 10-15 minutes. This will help keep the fish moist and the veggies warm. Avoid using the microwave, as it can make the fish rubbery. If you want to save some for later, you can freeze the cooked cod. Wrap the fish tightly in plastic wrap, then place it in a freezer bag. Make sure to remove as much air as possible. You can freeze it for up to three months. For best results, freeze the cod without the veggies, as they don’t freeze well. When you're ready to enjoy it again, thaw in the fridge overnight and reheat as mentioned above. Cod needs to bake for 15 to 20 minutes at 400°F (200°C). The cooking time may vary based on the thickness of the fillets. To check if it’s done, gently flake the cod with a fork. If it flakes easily, it is ready to eat. This quick cooking time makes it perfect for busy nights. Yes, you can use frozen cod. Just make sure to thaw it completely before cooking. Thawing helps the cod cook evenly. If you forget to thaw it, you can bake it straight from frozen, but add a few extra minutes to the cooking time. This is a great option if you’re in a rush. A few sides go well with Lemon Herb Baked Cod. Here are some tasty choices: - Steamed broccoli - Rice pilaf - Quinoa salad - Roasted asparagus - Garlic bread These sides complement the light flavors of the cod. Choose one or mix and match to create a full meal. Enjoy! This post covered essential ingredients, step-by-step cooking, and helpful tips for baking cod. You learned about optional ingredients and tools to enhance your dish. I shared common mistakes to avoid and creative variations for flavor. Storing your leftovers properly keeps the taste fresh. By answering FAQs, we ensured you have all necessary details. Remember, focus on the process for great results. Enjoy your cooking journey with Lemon Herb Baked Cod!
                        Lemon Herb Baked Cod Sheet Pan Quick and Tasty Meal

                      WANT TO SAVE THIS RECIPE?

                      1 shares

                      Leave a Reply Cancel reply

                      Your email address will not be published. Required fields are marked *

                      Recipe Rating


                      Hi I’m Taling

                      I love sharing perfected dishes from my kitchen. I’m sure they’ll earn a spot in your heart. Let’s savor this journey together!.

                      More about me

                      Recent Desserts

                      • To make Chocolate Mocha Overnight Oats, you need the following ingredients: - 1 cup rolled oats - 2 cups almond milk (or any milk of choice) - 2 tablespoons cocoa powder - 1 tablespoon instant coffee granules - 2 tablespoons maple syrup (or honey) - ½ teaspoon vanilla extract - A pinch of salt - ¼ cup Greek yogurt (optional for creaminess) - 2 tablespoons chocolate chips (optional for topping) - Sliced banana or berries for topping These ingredients come together to create a rich, chocolatey breakfast. The oats soak up the almond milk and cocoa, making each bite creamy and satisfying. Using almond milk keeps it light, while maple syrup adds natural sweetness. The instant coffee gives it a nice mocha flavor. If you want extra creaminess, add Greek yogurt. Don’t forget the toppings! Sliced bananas or fresh berries add color and taste. You can even sprinkle some chocolate chips on top for a sweet finish. This mix of ingredients makes the perfect breakfast for any day. Enjoy the ease and deliciousness of Chocolate Mocha Overnight Oats! - In a large bowl, combine: - 1 cup rolled oats - 2 cups almond milk (or any milk of choice) - 2 tablespoons cocoa powder - 1 tablespoon instant coffee granules - 2 tablespoons maple syrup (or honey) - ½ teaspoon vanilla extract - A pinch of salt - If you want creaminess, mix in ¼ cup Greek yogurt. This makes your oats extra smooth. - Now, divide the mixture into two jars. - Seal the jars tightly to lock in flavor. - Place them in the refrigerator. Let them chill overnight or for at least 4-6 hours. - When it’s time to eat, stir the oats well. - If they look too thick, add a splash of milk. - Top with chocolate chips, banana slices, or berries. This adds fun flavors and textures. To get the right thickness, adjust the milk amount. Start with two cups of almond milk. If your oats seem too thick, add a splash of milk. This will help create a creamy texture. Always stir your oats before serving. This mixes the flavors well and ensures every bite is tasty. You can experiment with different types of milk. Oat milk is a great choice for creaminess. Coconut milk adds a tropical twist. For extra flavor, use flavored Greek yogurt. This adds a delicious taste and makes your oats even creamier. Make a big batch of oats for quick breakfasts all week. Divide the mixture into jars. This makes it easy to grab one in the morning. Store the jars in the fridge for a fresh start to your day. {{image_2}} You can change up the flavors easily. - Add nut butter for creaminess and taste. - Try different toppings like nuts or seeds for crunch. Want a lower-calorie option? - Substitute maple syrup with a sugar-free sweetener. - Use dairy-free yogurt for a vegan choice. Make your oats special with seasonal flavors. - Add pumpkin spice in fall or peppermint extract in winter. - For freshness, include fruits like apples in fall or strawberries in summer. Store your overnight oats in the refrigerator. This keeps them fresh and tasty. Use airtight containers to stop any spoilage from happening. Your chocolate mocha overnight oats can last up to 5 days in the fridge. They are best eaten fresh but can stay good this long. Do not freeze them, as the texture will change when thawed. You can enjoy your oats cold right from the fridge. If you prefer them warm, heat in the microwave for a quick breakfast. Stir them well and add a splash of milk if they seem too thick when reheating. Yes, if you prefer a non-caffeinated version, simply omit the coffee. The oats will still taste great with chocolate and other flavors. You can add more cocoa powder or a dash of vanilla to keep it yummy. For best results, soak the oats overnight or for at least 4-6 hours. This helps the oats absorb the milk and flavors. If you rush it, the oats might be too chewy. Letting them soak overnight gives you the best texture. Absolutely! Use plant-based yogurt and a suitable sweetener to keep it vegan-friendly. Almond milk is great, but you can also try oat or coconut milk. This way, everyone can enjoy this tasty breakfast delight! You learned how to make easy overnight oats packed with flavor and nutrition. This recipe uses simple ingredients like oats, cocoa powder, and your choice of milk. I shared tips for personalizing flavors and storage. Remember, meal prep helps you save time during busy mornings. With endless variations, you can enjoy this healthy dish all week long. Now, get started on your tasty and nutritious breakfast!
                        Chocolate Mocha Overnight Oats Easy Breakfast Delight
                      • To make No-Bake Nutella Cheesecake Squares, you need simple ingredients that pack a lot of flavor. Here’s what you will need: - 1 cup graham cracker crumbs - ¼ cup melted butter - ¼ cup granulated sugar - 16 oz cream cheese, softened - 1 cup Nutella - ½ cup powdered sugar - 1 teaspoon vanilla extract - 1 cup heavy whipping cream - Chocolate shavings or cocoa powder for garnish Each ingredient plays a key role in creating a smooth and rich dessert. The graham cracker crumbs form the tasty crust, while the Nutella brings a delightful chocolate hazelnut flavor. Cream cheese adds creaminess, and whipped cream gives it a light texture. When you mix all these ingredients, you create layers of flavor. The sweetness from the sugar balances the rich Nutella. You can also choose your garnish based on your mood. Chocolate shavings add elegance, while cocoa powder gives a nice finish. Make sure to use fresh ingredients, especially the cream cheese and heavy cream, for the best taste. You can find these ingredients at your local grocery store. Enjoy the fun of putting this recipe together! To start, you need to make the crust. In a medium bowl, combine graham cracker crumbs, melted butter, and granulated sugar. Mix until it feels like wet sand. This helps hold the crust together. Next, press the mixture firmly into the bottom of an 8x8 inch square pan. Make sure it's even and packed well. Refrigerate this for about 10 minutes to let it set. Now, let’s make the cheesecake filling. In a large bowl, beat the softened cream cheese until it is smooth. This step is key for a creamy texture. Add the Nutella, powdered sugar, and vanilla extract to the cream cheese. Mix until everything is combined and there are no lumps left. The Nutella gives it a rich, chocolate flavor. Next, whip the heavy cream in a separate bowl. Beat it until stiff peaks form. This means it should hold shape when you lift the whisk. Once that's done, gently fold the whipped cream into the Nutella mixture. Be careful not to deflate the whipped cream. This helps keep the filling light and fluffy. Finally, pour the Nutella cheesecake filling over the chilled crust. Spread it out evenly with a spatula. Cover the pan with plastic wrap and refrigerate for at least four hours or until it sets. Once it’s firm, you can cut it into squares and serve. Enjoy your delicious, no-bake Nutella cheesecake squares! To make a great crust, start with good graham cracker crumbs. You want them fine, like sand. Mix the crumbs with melted butter and sugar. This helps the crust stick together. Press the crust into the pan firmly. Use the bottom of a measuring cup or your hands. You want it to be even. A well-pressed crust gives a nice base for the cheesecake. Refrigerate it for 10 minutes to set. Room temperature cream cheese is key. Cold cream cheese makes it hard to mix. Soft cream cheese blends easily and makes a smooth filling. When mixing in the whipped cream, fold gently. Use a spatula to lift and turn the mixture. This keeps air bubbles in the cream. Air bubbles make the cheesecake light and fluffy. For a stunning look, add chocolate shavings on top. You can also sprinkle cocoa powder for a rich touch. Both options make your cheesecake squares pop. Serve the squares on a pretty plate. This makes them look fancy for parties. You can cut them into different shapes too, like triangles or rectangles. Get creative and impress your guests! {{image_2}} You can easily change the flavor of these cheesecake squares. One fun option is to add espresso for a coffee kick. Just mix in one tablespoon of espresso powder to the Nutella mix. If you love mint, consider adding a few drops of mint extract. This gives your dessert a fresh taste. If you want to swap the Nutella, try different nut spreads. Almond butter or cashew butter can work well. Each choice gives a unique twist to the classic recipe. For a gluten-free version, use gluten-free graham crackers. Many stores sell these now. This simple swap keeps the taste but makes it safe for those with gluten issues. Want a vegan option? Replace cream cheese with a vegan cream cheese alternative. You can also swap the heavy cream with coconut cream. This keeps it rich and creamy while being plant-based. Pair these Nutella cheesecake squares with fresh fruit. Strawberries or raspberries add a nice tartness. You can also serve them with whipped cream for extra indulgence. These squares are perfect for parties or family gatherings. They are easy to transport and look great on a platter. Serve them at birthdays or any celebration for a sweet treat everyone will enjoy. To keep your Nutella cheesecake squares fresh, place them in an airtight container. This helps lock in moisture and flavor. I recommend using a glass or BPA-free plastic container. Always store the cheesecake squares in the fridge. This will keep them cool and tasty. You can freeze leftover squares for later. First, cut them into squares and wrap each piece in plastic wrap. Then, place the wrapped squares in a freezer-safe bag. Press out any air before sealing. To enjoy them later, just thaw them in the fridge overnight. This keeps the taste rich and creamy. These cheesecake squares last about five days in the fridge. Keep an eye out for any off smells or changes in texture. If you see any liquid pooling or the squares look dry, it’s best to toss them. Enjoy these delights while they are fresh for the best taste! The cheesecake needs at least 4 hours to set. For best results, let it chill overnight. This helps the flavors blend well and makes slicing easier. Yes, you can use light cream cheese. It will still work well in this recipe. Just remember, it may change the texture slightly. The cheesecake might not be as rich, but it will still taste great! You can use other chocolate spreads, like chocolate hazelnut spread or peanut butter. For a different flavor, try almond butter or a fruit spread. Each will give a unique taste while keeping the recipe fun. Absolutely! You can make these squares a day or two before serving. Just keep them covered in the fridge. This is great for parties or events when you want to save time. Yes, an 8x8 pan is perfect for this recipe. It helps create nice, thick squares. If you prefer thinner squares, you can use a larger pan. Just adjust the chilling time as needed. This blog post covered how to make delicious Nutella cheesecake squares. We went over the key ingredients and the easy steps to prepare both the crust and the filling. You learned tips for perfecting your dessert's texture and ways to present it beautifully. Feel free to experiment with flavors and adjust for dietary needs. Remember, make it ahead of time, and store it properly to keep it fresh. Enjoy making this treat for any occasion!
                        No-Bake Nutella Cheesecake Squares Delightful Treat
                      • To make delicious apple pie cheesecake bars, gather the following ingredients: - 2 cups graham cracker crumbs - ½ cup unsalted butter, melted - 2 tablespoons granulated sugar - 16 oz cream cheese, softened - 1 cup granulated sugar - 3 large eggs - 1 teaspoon vanilla extract - 1 teaspoon ground cinnamon - 2 cups sautéed apples (from about 2-3 medium apples, peeled and diced) - 1 tablespoon lemon juice - ½ teaspoon nutmeg - ¼ cup caramel sauce (for drizzling) You can make some changes if you need to. Here are a few ideas: - Use coconut oil instead of unsalted butter for a dairy-free option. - Swap granulated sugar with brown sugar for a richer flavor. - If you don’t have cream cheese, try mascarpone cheese. - You can use any apples you like, such as Granny Smith or Honeycrisp. - For a nut-free version, leave out the nutmeg or use allspice. Understanding the nutrition can help you enjoy these bars mindfully. Each bar contains roughly: - Calories: 250 - Total Fat: 15g - Saturated Fat: 8g - Cholesterol: 75mg - Sodium: 180mg - Total Carbohydrates: 28g - Dietary Fiber: 1g - Sugars: 16g - Protein: 3g This information can vary based on ingredient choices. Enjoy these tasty bars as an occasional treat! Start by gathering all your ingredients. You need graham cracker crumbs, butter, sugar, cream cheese, eggs, vanilla, cinnamon, sautéed apples, lemon juice, nutmeg, and caramel sauce. Preheat your oven to 325°F (163°C). Line a 9x13 inch baking pan with parchment paper. Leave some paper hanging over the edges. This makes it easier to lift out your bars later. In a medium bowl, mix 2 cups of graham cracker crumbs, ½ cup of melted butter, and 2 tablespoons of sugar. Stir it until the crumbs are well coated. Press this mixture firmly into the bottom of the prepared pan. Make sure it is even all over. Bake this crust for about 10 minutes. After baking, take it out of the oven and let it cool completely. In a large bowl, beat 16 oz of softened cream cheese until smooth. This step is key for a creamy texture. Slowly add 1 cup of sugar while beating the cream cheese. Next, add 3 eggs, one at a time. Mix well after each egg. Then, stir in 1 teaspoon of vanilla extract, 1 teaspoon of ground cinnamon, and ½ teaspoon of nutmeg. Now, gently fold in the sautéed apples, which you made with 2-3 medium apples and 1 tablespoon of lemon juice. Pour the apple cheesecake filling over the cooled crust. Spread it evenly. Bake in the oven for 35-40 minutes. Check if the center is set but still jiggles slightly. Once done, remove it from the oven and let the bars cool at room temperature for about an hour. After cooling, refrigerate them for at least 4 hours. This helps the bars set completely. When you are ready to serve, drizzle caramel sauce on top. Now your apple pie cheesecake bars are ready to enjoy! To get a smooth and creamy texture, start with softened cream cheese. Cold cheese makes lumps. Beat the cream cheese until it's silky. Add sugar slowly while mixing. This helps blend the sugar evenly. Mix in eggs one at a time. This keeps the filling light and airy. Avoid overmixing after adding eggs. Too much mixing can add air, causing cracks. Sautéing apples gives them a soft and sweet flavor. Use medium heat to cook the apples evenly. Add lemon juice to help them keep their color. This also brightens their taste. Cook the apples until they're just tender, about 5-7 minutes. If you want a spicier taste, sprinkle in some cinnamon while they cook. This adds warmth to your bars. Serve the cheesecake bars chilled for the best flavor. Drizzle caramel sauce on top right before serving. This adds a sweet touch. You can also sprinkle some crushed nuts for crunch. A dollop of whipped cream can make it fancy. For extra fun, pair with vanilla ice cream. It's a treat everyone will love! {{image_2}} You can change the flavor of your Apple Pie Cheesecake Bars. For a spiced apple twist, add more cinnamon and a pinch of ginger. You can also use a mix of apples for a richer taste. If you want to go seasonal, try pumpkin. Replace some cream cheese with pumpkin puree. Add pumpkin spice for a cozy fall vibe. This gives your bars a fun twist while keeping them creamy. You can make these bars gluten-free easily. Swap the graham cracker crumbs with gluten-free crumbs. You can find these in many stores. Make sure your butter and sugar are gluten-free as well. This way, everyone can enjoy these delicious treats without worry. If you want a vegan version, there are simple swaps. Use vegan cream cheese instead of regular cream cheese. Try flax eggs or chia eggs in place of the eggs. Mix one tablespoon of flaxseed meal with three tablespoons of water. Let it sit until it thickens. For the crust, look for vegan butter or use coconut oil. This way, you keep the creamy texture while making it plant-based. To store leftover apple pie cheesecake bars, place them in an airtight container. This keeps them fresh and prevents drying out. If you cut the bars, wrap them individually in plastic wrap. Make sure to refrigerate them right away. You can freeze these cheesecake bars for later. First, let them cool completely. Then, wrap each bar in plastic wrap. Place the wrapped bars in a freezer-safe bag or container. This method helps to keep the flavor and texture intact when you are ready to enjoy them again. When stored in the fridge, these cheesecake bars last about 5-7 days. If frozen, they can last for up to 3 months. Always check for any signs of freezer burn before eating. For the best taste, enjoy them within the recommended time frame. Yes, using a store-bought graham cracker crust is a great option. It saves time and still tastes good. If you choose this, skip the step for making your crust. Just place the crust in your baking pan and fill it with the cheesecake mixture. To check if your cheesecake bars are done, look for a slight jiggle in the center when you shake the pan. The edges should be set, but the middle can still wiggle a bit. This means they will firm up as they cool. Yes! You can use other fruits like peaches or pears. Just make sure to sauté them like you do with apples. This step helps to soften the fruit and bring out its flavor. To cut the bars neatly, use a sharp knife. Dip the knife in warm water and wipe it dry before each cut. This helps prevent sticking and keeps the edges clean. You can also chill the bars before slicing for easier cutting. We explored the key ingredients needed for the perfect cheesecake bars. You learned about substitutes and nutritional facts. Next, we walked through the steps to prepare, bake, and cool your cheesecake. I shared tips for great texture and serving ideas. You can even try variations to make it your own. Remember to store leftovers properly for best taste later. With these insights, you can create delicious cheesecake bars that impress everyone. Happy baking!
                        Apple Pie Cheesecake Bars Tempting Dessert Recipe
                      • - 8 oz dark chocolate (70% cocoa or higher), chopped - ½ cup heavy cream - 1 teaspoon vanilla extract - 1 cup fresh raspberries (plus a few for garnish) - 1 cup cocoa powder (for rolling) - ¼ cup powdered sugar (for rolling) - Pinch of sea salt - Alternative chocolate options: If you prefer a sweeter chocolate, use semi-sweet chocolate. You can also try milk chocolate, but it will change the flavor. - Vegan cream substitutes: Use coconut cream or almond milk for a vegan option. These will give a rich texture, too. - Fresh vs. frozen raspberries: Fresh raspberries work best for flavor and texture. Frozen can be used, but they may be mushy after thawing. If using frozen, drain excess water before mixing. Heating the heavy cream Start by putting the heavy cream in a medium saucepan. Heat it on low. Watch it closely. You want it hot but not boiling. This step helps the chocolate melt well. Melting and mixing chocolate Once the cream is hot, take it off the heat. Add the chopped dark chocolate right away. Stir until the chocolate melts into the cream. The mixture should be smooth and shiny. This is where the magic begins! Incorporating flavors Now, mix in the vanilla extract and a pinch of sea salt. These flavors add depth to the truffles. Then, gently fold in the fresh raspberries. Be careful not to crush them too much. You want small pieces for bursts of flavor. Chilling the mixture Let the chocolate mixture cool at room temperature. After about 30 minutes, cover it. Place it in the fridge for about 2 hours. The mixture needs to be firm enough to handle. Rolling into balls When the chocolate is ready, scoop out small portions. Use a teaspoon or a melon baller. Roll each portion into a ball with your hands. Keep them small and round for a lovely shape. Coating techniques In a shallow bowl, mix cocoa powder and powdered sugar. Roll each truffle in this mix until well coated. This adds a nice texture and look to your truffles. Refrigeration process Place the rolled truffles on a parchment-lined tray. Put them back in the fridge for about 30 minutes. This helps them set well and hold their shape. Presentation recommendations Serve the truffles on a nice plate. Add a few fresh raspberries on top. A light dusting of cocoa powder makes them look fancy. For extra flair, drizzle some melted chocolate over them before serving. Enjoy your creation! - Overheating the chocolate: Heat the cream until it’s just about to simmer. If you boil it, the chocolate can seize up and become grainy. - Incorrect chilling time: Allow the mixture to chill for at least two hours. If it’s too soft, rolling the truffles will be messy. - Folding in raspberries without breaking them: Use a gentle hand when folding in the raspberries. This keeps them intact and adds lovely bursts of flavor. - Achieving the right size for truffles: Aim for a bite-sized ball, about one inch in diameter. This size ensures a good chocolate-to-raspberry ratio. - Adding extracts or spices: Try adding a touch of almond extract or a sprinkle of cinnamon for extra flavor depth. Just a little goes a long way! - Using different rolling ingredients: Besides cocoa powder and powdered sugar, consider rolling in crushed nuts or coconut for added texture and taste. Feel free to explore these tips to make your truffles even more delightful! {{image_2}} You can tweak the flavor of your truffles. One option is to add orange zest. This gives a fresh, citrusy kick. Mix the zest into the melted chocolate before adding the raspberries. Another great choice is mint-infused truffles. Add a few drops of mint extract to the chocolate. It adds a cool taste that pairs well with dark chocolate. If you need gluten-free options, you are in luck! All the ingredients in this recipe are naturally gluten-free. Just make sure to check for any cross-contamination. For vegan versions, swap the heavy cream for coconut cream. Use dairy-free chocolate for a fully vegan treat. This way, everyone can enjoy these truffles. How you present your truffles can be fun! Serve them on a decorative plate. Add some fresh raspberries for color. A light dusting of cocoa powder on top makes them look fancy. You can also drizzle melted chocolate over them for extra flair. For special occasions, think about themed garnishes. Use sprinkles or edible flowers to match your event. These ideas make your truffles not just tasty, but beautiful too! To keep your dark chocolate raspberry truffles fresh, store them properly. - Refrigerating truffles: Place them in an airtight container. This keeps them cool and prevents them from absorbing odors. They are best stored in the fridge for short-term use. - Freezing instructions for long-term storage: For longer storage, freeze the truffles. Arrange them in a single layer on a tray. Once frozen, transfer them to a freezer-safe bag. They can last up to three months in the freezer. When you're ready to enjoy them, let them thaw in the fridge overnight. How long do these truffles last? In the fridge, dark chocolate raspberry truffles stay fresh for about one week. What are the signs of truffle spoilage? Look for changes in texture or smell. If they develop an off odor or appear dry, it's best to toss them. Enjoy your truffles while they're fresh for the best taste! To make dark chocolate raspberry truffles, follow these basic steps: 1. Heat heavy cream in a saucepan over low heat until it's almost simmering. 2. Remove from heat and stir in chopped dark chocolate. Mix until smooth. 3. Add vanilla extract and a pinch of sea salt for flavor. 4. Fold in fresh raspberries gently so they don’t break. 5. Cool the mixture at room temperature. Then refrigerate for about 2 hours. 6. Once firm, scoop out small portions and roll them into balls. 7. Roll each ball in a mix of cocoa powder and powdered sugar. 8. Place on a tray and refrigerate for another 30 minutes to set. Yes! You can use various fruits in your truffles. Here are some options: - Strawberries: They add a sweet and tangy flavor. - Cherries: These give a rich, fruity taste and pair well with chocolate. - Blueberries: They add a burst of flavor and are easy to fold in. - Peaches: These can add a soft, juicy texture for a unique twist. Feel free to experiment with fruits you love! To melt dark chocolate perfectly, follow these tips: - Use a double boiler. Place a heatproof bowl over simmering water. This keeps the chocolate from direct heat. - Stir often. This helps the chocolate melt evenly and prevents burning. - If using a microwave, heat in short intervals. Start with 15 seconds, then stir, and repeat until melted. - Always remove the chocolate from heat before it’s fully melted. It will continue to melt from residual heat. Using these methods ensures smooth, melted chocolate for your truffles. You now know how to make dark chocolate raspberry truffles. We covered key ingredients like dark chocolate and fresh raspberries. I shared step-by-step instructions to guide your process. We explored tips to avoid common mistakes and enhance flavor. Finally, I highlighted variations to suit different tastes and dietary needs. With this knowledge, you can create delightful truffles that impress everyone. Enjoy the fun of making your own sweet treats!
                        Decadent Dark Chocolate Raspberry Truffles Recipe

                      Recent Drinks

                      • - 1 ripe banana - 2 tablespoons natural peanut butter - 1 cup unsweetened almond milk (or any milk of choice) - 1 scoop vanilla protein powder (plant-based or whey) - 1 tablespoon chia seeds - 1 teaspoon honey (optional for sweetness) - A pinch of cinnamon - Ice cubes (optional, for a thicker texture) Gather these simple items before you start. A ripe banana gives natural sweetness and creaminess. Use two tablespoons of natural peanut butter for a rich flavor. Almond milk is my go-to, but any milk you love works great. The protein powder adds a boost of nutrition. Choose vanilla to match the banana. Chia seeds are tiny but mighty. They add fiber and help keep you full. If you like it sweeter, add honey, but it’s not a must. A pinch of cinnamon brings warmth and depth to this drink. For a thicker texture, toss in some ice cubes. This smoothie is flexible, so feel free to mix and match based on your taste. Now, let's blend it all together! 1. Start by peeling the ripe banana. Break it into small chunks. 2. In a blender, combine the banana chunks, natural peanut butter, almond milk, protein powder, chia seeds, and a pinch of cinnamon. 3. If you like a colder and thicker smoothie, add some ice cubes. 1. Blend all the ingredients on high speed. Keep blending until you have a smooth and creamy mix. 2. Stop the blender and taste your smoothie. If you want it sweeter, add honey. Blend again for a few seconds to mix. 1. Pour the smoothie into a tall glass. Enjoy it right away for the best taste and creaminess. 2. For a fun twist, you can top it with extra chia seeds or banana slices. This makes it look pretty too! To get the perfect texture, use a ripe banana. A ripe banana makes the smoothie creamy. Add ice cubes if you want it thicker. If you prefer a smoother drink, blend longer. Scrape the sides of the blender to mix all the ingredients well. This ensures a silky-smooth result. If your smoothie tastes too bland, add honey or more banana. Start with a teaspoon of honey. Blend and taste again. You can always add more honey if needed. This way, you control the sweetness to match your taste. Remember, ripe bananas also add natural sweetness. Use a high-speed blender for the best results. A strong blender breaks down the ingredients quickly. If you have a less powerful blender, blend in stages. Start with the liquids first, then add the solids. This helps everything mix better. Make sure your blender is clean for the best flavor. {{image_2}} You can switch the peanut butter for other nut butters. Almond butter offers a nutty taste. Cashew butter is creamy and sweet. Sunflower seed butter is a great choice for allergies. Each nut butter brings its own flavor and health benefits. Experiment to find your favorite. You can add many fruits to the smoothie. Frozen berries add sweetness and color. Spinach or kale boosts nutrition without changing the taste. Try mango for a tropical twist. Each fruit adds vitamins and makes the smoothie fun. Mix and match to discover new flavors. Choosing the right protein powder is key. Plant-based powders are great for vegan diets. Whey protein is popular for muscle recovery. Look for flavors that match your taste, like chocolate or vanilla. The right powder can enhance the smoothie’s flavor and nutrition. Test different types to see what you prefer. Store any leftover smoothie in an airtight container. You want to keep it fresh. Place it in the fridge right after making it. It will stay good for about one day. When you are ready to drink it again, shake or stir well. This helps mix any settled ingredients. You can freeze your smoothie for later. Pour it into ice cube trays or freezer-safe bags. This way, you can grab a portion whenever you want. To use, thaw the smoothie overnight in the fridge. You can also blend it again for a fresh taste. In the fridge, your smoothie lasts about 24 hours. In the freezer, it can last up to three months. Just remember, the sooner you drink it, the better the taste and texture will be! Yes, this smoothie is gluten-free. All the ingredients listed are naturally free from gluten. The peanut butter, banana, almond milk, protein powder, chia seeds, and honey do not contain gluten. Always check labels if you use store-bought items to confirm they are gluten-free. Absolutely! To make this smoothie vegan, simply use plant-based protein powder. Ensure your peanut butter is also free from animal products. Replace honey with maple syrup or agave nectar for sweetness. All other ingredients are already vegan-friendly. This smoothie offers many health benefits. It provides protein from the peanut butter and protein powder, which helps build muscle. Bananas add potassium, good for heart health. Chia seeds are packed with fiber, aiding digestion. Almond milk is low in calories and rich in vitamins. Yes, you can use various milk types. Cow’s milk will add creaminess and protein. Soy milk is a great option for extra protein. Coconut milk gives a tropical flavor. Each milk option changes the taste and texture slightly, so choose what you enjoy best. This smoothie recipe combines simple ingredients for great taste and nutrition. You learned step-by-step how to prepare it and tips for perfect texture. Variations let you customize your drink to fit your taste. Remember to store leftovers properly for later enjoyment. Smoothies can be healthy and fun. Try new mixtures to find what you love best. Keep experimenting and enjoy your delicious creations!
                        Peanut Butter Banana Protein Smoothie Easy Recipe
                      • To make a delicious Turmeric Golden Milk Latte, gather these simple ingredients: - 2 cups almond milk (or your preferred milk) - 1 teaspoon ground turmeric - ½ teaspoon ground ginger - ¼ teaspoon cinnamon - 1 tablespoon honey or maple syrup (adjust to taste) - Pinch of black pepper - ½ teaspoon vanilla extract - Optional: a sprinkle of nutmeg for garnish - Almond Milk: This milk is low in calories and rich in vitamins. It helps with heart health. - Turmeric: This spice has curcumin, known for its anti-inflammatory properties. It may help improve brain function. - Ginger: Ginger can help with digestion and nausea. It adds a nice warmth to the drink. - Cinnamon: This spice is rich in antioxidants. It may help lower blood sugar and improve heart health. - Honey or Maple Syrup: Both sweeteners can boost energy. They also provide antioxidants. - Black Pepper: This spice enhances turmeric absorption. It makes the drink more effective. - Vanilla Extract: It adds flavor and can help reduce stress. - Nutmeg: This spice is optional, but it adds warmth and a nice aroma. - Milk Options: You can use oat milk, soy milk, or coconut milk for different flavors. - Sweeteners: If you prefer, try agave syrup or stevia as sugar-free options. - Spices: Experiment with cardamom or cloves for added flavor. - Nutmeg: You can skip it if you don't like nutmeg, or use a touch of cocoa powder instead. 1. Start by taking a small saucepan. 2. Add 2 cups of almond milk to the pan. 3. Measure and add 1 teaspoon of ground turmeric. 4. Next, add ½ teaspoon of ground ginger. 5. Sprinkle in ¼ teaspoon of cinnamon. 6. Sweeten your drink with 1 tablespoon of honey or maple syrup. 7. Don't forget a pinch of black pepper for better absorption of turmeric. 8. Lastly, add ½ teaspoon of vanilla extract. 9. Whisk all the ingredients well in the pan. 10. Place the saucepan on medium heat. 11. Gently warm the mixture while stirring often. 12. Keep an eye on it; do not let it boil. 13. After about 5-7 minutes, it should be hot enough. 14. Remove the pan from heat and let it cool slightly. 15. If you want a frothy drink, use a milk frother or whisk it quickly. 16. Pour the golden milk into your favorite mugs. 17. Optionally, sprinkle a bit of nutmeg on top for a nice touch. 18. Serve warm and enjoy this comforting drink! - Always use a whisk to blend the spices into the milk. - Whisking helps mix the turmeric and other spices evenly. - When heating, keep the heat low to avoid scalding the milk. - Stir often to prevent sticking at the bottom of the pan. - If you see steam but no bubbles, you are at the right temperature. - A milk frother works wonders for a smooth, frothy finish. - If you don’t have a frother, whisk vigorously by hand. - Frothing adds air, giving the latte a creamy feel. - The more you froth, the lighter and fluffier your drink will become. - For an extra touch, froth some almond milk separately and top your latte with it. You can mix spices to make your turmeric latte tastier. Try adding a pinch of nutmeg or a dash of cardamom. These spices add warmth to the drink. You can also use fresh ginger instead of ground ginger. This will give your latte a bright, zesty kick. Just remember, fresh ginger may need more time to steep. Many people rush the heating process. Always warm your milk slowly over medium heat. If you boil it, the spices can lose flavor. Another mistake is not blending the spices well. Make sure to whisk the mixture thoroughly. This helps avoid clumps of turmeric or ginger. Lastly, avoid skipping the black pepper. It helps your body absorb turmeric better. Sweetness is personal. Start with one tablespoon of honey or maple syrup. Taste your latte and add more if you like it sweeter. For creaminess, use full-fat coconut milk for a richer feel. Almond milk is lighter but still delicious. You can also mix almond and coconut milk for the best of both worlds. {{image_2}} You can easily make this latte vegan. Just use almond milk, coconut milk, or oat milk. These milks work great in this recipe. They keep the drink creamy and delicious. If you want a nut-free option, oat milk is the best choice. It blends well with turmeric and spices. To make an iced version, start with brewed turmeric milk. Follow the same steps but let it cool. Pour over ice instead of serving warm. This drink is refreshing on hot days. You can also add some ice cream for a treat! You can mix and match flavors for fun. Try adding matcha for a green twist. This adds a fresh taste and boosts energy. You can also use cocoa for a chocolatey version. The cocoa pairs well with turmeric and spices. For a special touch, add a dash of vanilla extract. This enhances the overall flavor and aroma. To store leftover turmeric golden milk, let it cool first. Then, pour it into an airtight container. Keep it in the fridge for up to three days. This way, you can enjoy the drink again without losing its flavor. When reheating your golden milk, do it gently. Pour it into a small saucepan. Heat it over low to medium heat. Stir it often to avoid burning. Never let it boil, as this can change the taste and texture. You can also use a microwave. Heat in short bursts, stirring in between. Turmeric golden milk lasts about three days in the fridge. Check for signs of spoilage. If it smells sour or has any mold, discard it. Always trust your senses. If it looks or smells off, it’s best to throw it away. Turmeric has many health benefits. It is known for its bright yellow color and active compound called curcumin. Curcumin may help reduce inflammation. It can also support joint health. Some studies suggest it may boost your mood. Turmeric might even help with digestion. Drinking turmeric may also support your immune system. Yes, you can use any milk you like. Almond milk is great, but coconut milk adds creaminess. Oat milk is a good choice for a thicker texture. If you prefer dairy, whole or skim milk works too. Just remember, different types of milk will change the flavor a bit. To make this recipe sugar-free, skip the honey or maple syrup. You can use a sugar substitute like stevia or monk fruit instead. These options will give you sweetness without the calories. Just adjust the amount to your taste. Yes, it is safe for most people to have turmeric daily. Using it in cooking or drinks is a great way to enjoy its benefits. However, if you have health issues or take certain medications, check with a doctor first. Moderation is key, as with any food. In this blog post, we explored the ingredients and health benefits of Turmeric Golden Milk. I shared step-by-step instructions for making it frothy and delicious. We also discovered tips, tricks, and variations to enhance your drink. Proper storage and reheating advice can help you enjoy leftovers. Remember, turmeric offers many health benefits, so enjoy this drink often. Use alternative ingredients if you prefer. With these ideas, you can create the perfect golden milk to suit your taste and health needs. Enjoy your journey to wellness!
                        Turmeric Golden Milk Latte Simple and Creamy Recipe
                      • - 1 ripe mango, peeled and diced - 1 cup fresh pineapple chunks - 1 banana, sliced - 1 cup coconut water (or regular water) - ½ cup plain Greek yogurt (or dairy-free alternative) - 1 tablespoon honey or agave syrup (optional) - A handful of fresh mint leaves (for garnish) - Ice cubes (optional) The key to a delicious mango pineapple smoothie lies in its fresh ingredients. You want ripe fruits for the best flavor. The mango should feel soft when you squeeze it gently. Pineapples should smell sweet and fruity. This smoothie combines sweet mango, tangy pineapple, and creamy banana. Coconut water adds hydration, while Greek yogurt gives it a nice creaminess. You can add honey for extra sweetness if you like. Mint leaves add a refreshing touch when you serve it. Each ingredient plays a role in making this smoothie flavorful and refreshing. Trust me, using fresh ingredients will make a big difference in taste! To make this smoothie, start by gathering your main ingredients. You need a ripe mango, fresh pineapple, and a banana. 1. In a blender, combine the diced mango, pineapple chunks, and banana slices. This mix brings a burst of tropical flavor. 2. Next, add one cup of coconut water to the blender. This not only hydrates but also adds a refreshing twist. 3. For creaminess, pour in half a cup of plain Greek yogurt. If you want it sweeter, drizzle in one tablespoon of honey or agave syrup. 4. Blend on high until the mixture is smooth and creamy. If you like your smoothie chilled, toss in a few ice cubes and blend again until they are fully mixed in. 5. After blending, taste your smoothie. If it needs to be sweeter or thicker, add more honey or coconut water as needed. Once your smoothie is ready, it’s time to serve it. I recommend using tall glasses to show off the vibrant color. For a fun touch, garnish each glass with a few fresh mint leaves on top. This not only looks nice but also adds a fresh aroma. Enjoy your delicious Mango Pineapple Smoothie! For the Full Recipe, please refer back to the ingredient list and instructions. To get your smoothie just right, focus on creaminess. Use ripe fruits like mango and banana. The Greek yogurt adds a nice, smooth texture. If you want a richer taste, try full-fat yogurt. For a lighter feel, use low-fat or dairy-free yogurt. Adjust the thickness by adding more liquid. Coconut water is great for this. If your smoothie is too thick, just pour in a bit more. Blend again until it’s just how you like it. If you want a thicker smoothie, add more banana or ice cubes. Boosting flavor can take your smoothie to the next level. Try adding spices like cinnamon or ginger. These spices not only add warmth but also great health benefits. A dash of cinnamon can make the smoothie taste cozy. A pinch of ginger gives it a nice kick. You can also use flavored yogurts for extra taste. Vanilla or coconut yogurt work well. If you want sweetness, think about honey or agave syrup. These can make your smoothie more enjoyable. For a fun twist, try adding a splash of vanilla extract. It will add a lovely aroma to your drink. For a full taste experience, explore the [Full Recipe]. {{image_2}} You can change the fruit in your smoothie to keep it fresh. Adding strawberries or blueberries gives a sweet twist. These berries add a nice color and taste. You can also try using other tropical fruits like papaya or kiwi. These fruits bring new flavors and nutrients to your drink. Each fruit will change the smoothie’s taste and make it unique. If you want a dairy-free smoothie, swap the Greek yogurt for a plant-based option. Almond, coconut, or soy yogurt works well. These alternatives keep your smoothie creamy without dairy. For sweeteners, you can use maple syrup or agave syrup for a vegan choice. These options add sweetness while keeping your drink plant-based. Enjoy the fruity goodness in many ways! Don't forget to check the Full Recipe for more ideas. You may have some smoothie left after making your Mango Pineapple Smoothie. To keep it fresh, use a glass jar or a BPA-free plastic container. Seal it tightly to prevent air from spoiling the flavor. Store it in the fridge for up to 24 hours. After that, it may lose some taste and texture. If you want to enjoy the smoothie later, freezing is a great option. Pour the smoothie into ice cube trays or freezer-safe bags. Leave some space in the bags for expansion. You can freeze it for up to three months. When you’re ready to drink it, take out what you need. Thaw it in the fridge overnight or blend it straight from the freezer for a slushy treat. Enjoy your refreshing Mango Pineapple Smoothie anytime! Yes, you can make this smoothie ahead of time. If you want to save it, store it in an airtight container. Keep it in the fridge for up to one day. The smoothie may separate, so stir it well before you drink it. If you don’t have coconut water, use regular water or fruit juice instead. Fruit juice can add a nice flavor. You can also try almond milk for a creamier touch. Just remember, the taste will change a bit based on what you use. To make the smoothie thicker, add more Greek yogurt or a banana. You can also use frozen fruit instead of fresh. Frozen fruit gives you a nice, thick texture. Just blend it well, and you’ll get a creamy drink. Yes, this smoothie is great for kids! It is packed with fruits and tastes sweet. You can adjust the sweetness by adding less honey. The bright colors and fresh flavors will appeal to children, making it a fun treat. You can find the Full Recipe for the Tropical Bliss Mango Pineapple Smoothie above in this article. This will guide you through every step to create your own refreshing drink. This blog post covers a simple and tasty smoothie recipe. You learned about the key ingredients and their nutritional benefits. I provided steps to prepare and serve the smoothie perfectly. Tips for texture and flavor help you make it your own. You can explore variations to suit your tastes or dietary needs. Don’t forget storage tips to keep leftovers fresh. Enjoy your smoothie making journey. It’s all about trying new things and having fun!
                        Mango Pineapple Smoothie Refreshing and Flavorful Blend
                      • - 2 packets of frozen açaí puree - 1 ripe banana - 1 cup of fresh pineapple chunks - 1 cup of coconut milk (or any non-dairy milk) - 1 tablespoon of honey or agave syrup (optional) For a vibrant tropical taste, the main ingredients are key. Açaí puree brings rich color and flavor. It is full of antioxidants. Bananas add creaminess and natural sweetness. Fresh pineapple gives a bright, juicy touch. Coconut milk offers a smooth base. You can use any non-dairy milk you prefer. Honey or agave syrup adds sweetness if needed. - Sliced kiwi - Coconut flakes - Granola - Chia seeds - Fresh berries (e.g., strawberries, blueberries) Toppings make your smoothie bowl pop! Sliced kiwi adds a zesty kick. Coconut flakes give it a tropical crunch. Granola provides texture and flavor. Chia seeds offer extra nutrients. Fresh berries, like strawberries and blueberries, add color and taste. You can mix and match these toppings for a fun look. For the full recipe, please refer to the section above. 1. Blend the ingredients Start by adding the frozen açaí puree, ripe banana, fresh pineapple chunks, and coconut milk into a blender. If you want it sweeter, you can add honey or agave syrup. Blend this mixture on high speed until it becomes creamy and smooth. 2. Adjust consistency with coconut milk If your smoothie is too thick, just add a bit more coconut milk. Blend again until you reach the texture you want. This step is key to making your smoothie bowl enjoyable. 3. Pour into a bowl Once blended, carefully pour the smoothie mixture into a bowl. Make sure to use a large enough bowl to hold all the goodness. 4. Add toppings creatively Now comes the fun part! Arrange your toppings, such as sliced kiwi, coconut flakes, granola, chia seeds, and fresh berries, over the smoothie. Try to create a colorful pattern. I love making a circular design to highlight all the vibrant colors. - Tips for presentation Use a shallow bowl to show off your beautiful toppings. You can also sprinkle some extra coconut flakes around the edge for a nice touch. A colorful presentation makes your smoothie bowl more fun to eat. - Recommended serving utensils Serve your smoothie bowl with a regular spoon. If you want to make it more special, use a wooden spoon or a cute, colorful one. Enjoy your tropical treat right away to keep it fresh and tasty. For the full recipe, refer to the earlier sections. To make a great smoothie bowl, start with ripe fruits. Ripe fruits taste better and add natural sweetness. Look for bananas that are yellow with some brown spots. When it comes to pineapples, choose ones that smell sweet. It ensures they are juicy and fresh. Blending is key to your smoothie bowl. You want a smooth and creamy texture. If your mix is too thick, add more coconut milk. Blend again until you reach the right consistency. A good blend makes your bowl enjoyable and easy to eat. A colorful topping arrangement makes your smoothie bowl pop. Use fresh berries, sliced kiwi, and coconut flakes. Lay them out in a pattern. A circular design looks appealing and fun. To elevate your smoothie bowl's look, use bowls with interesting shapes. Tall bowls or wide, shallow ones can change the game. Garnish with a sprinkle of chia seeds for a fancy touch. This not only looks great but adds a bit of crunch too. {{image_2}} You can change the non-dairy milk for this smoothie. Almond, soy, or oat milk work well. Each milk adds a different taste. Try using seasonal fruits too. Mango, papaya, or berries add a fresh twist. You can mix and match to find your favorite blend. Want more nutrients? Add spinach or kale to your smoothie. They blend well and boost health. You won’t even taste them! For extra energy, stir in nut butter or protein powder. Both will make your smoothie more filling. They add great flavor too! You can also experiment with different combinations to find the best taste for you. To store leftovers, place your smoothie bowl in the fridge. Use a tight container to keep it fresh. Glass or BPA-free plastic works well for storage. I prefer glass because it keeps flavors better. You can freeze smoothie bowls for later. Just pour the mixture into an airtight container. Leave some space at the top, as it will expand when frozen. To defrost, place it in the fridge overnight. If you’re in a rush, you can use the microwave. Just heat it in short bursts to avoid cooking. Enjoy your tropical treat later with ease! For the recipe, check out the Full Recipe. What is açaí and what are its benefits? Açaí is a small, dark purple berry from Brazil. It is full of antioxidants, which help fight free radicals in the body. Açaí is also rich in fiber, promoting good digestion. Plus, it has healthy fats that support heart health. You can enjoy its fruity taste in many dishes. Can I make this smoothie bowl ahead of time? Yes! You can prepare the smoothie mix and store it in the fridge for up to 24 hours. Just remember to keep the toppings separate. This way, your bowl stays fresh and tasty. How can I make this recipe vegan or gluten-free? To make it vegan, use agave syrup instead of honey. For gluten-free, ensure your granola and any other toppings are gluten-free. Most fruits and coconut milk are naturally gluten-free, so you’re all set! Can I substitute açaí with other fruits? Yes, you can! If you can’t find açaí, try using frozen berries like blueberries or strawberries. These fruits will add sweetness and a burst of color to your bowl. What to do if the smoothie is too thick? If your smoothie is too thick, just add a little more coconut milk. Blend again until you reach your desired creaminess. This will make it easier to pour and enjoy. How to fix a smoothie bowl that tastes too bland? If your smoothie bowl lacks flavor, try adding a splash of vanilla extract or a pinch of salt. You can also mix in a bit of honey or agave syrup for sweetness. Adjust the toppings to add more taste and texture. This article covers how to make a delicious açaí smoothie bowl. You learned about the key ingredients, easy steps for preparation, and creative topping ideas. I shared tips to improve taste and presentation, plus fun variations to try. Don’t forget storage techniques to keep your bowl fresh. With all this information, you can enjoy a tasty and nutritious treat anytime. Get creative with your favorites and make this recipe truly yours. Enjoy every bite!
                        Tropical Acai Smoothie Bowl Energizing Healthy Treat

                      Footer

                      ↑ back to top

                      More information

                      • Home
                      • Drinks
                      • Appetizer
                      • Dinner
                      • Desserts
                      • About
                      • Contact
                      • Privacy Policy

                      Our Policies

                      • Privacy Policy
                      • GDPR Policy
                      • Terms Of Use
                      • Copyright Policy
                      • Cookie Policy
                      • Disclaimer

                      Copyright © 2025 cheftaling