Go Back
Pink velvet cookies offer a sweet twist on the classic cookie. Their soft, chewy texture makes them a favorite. You might wonder, what is the origin of pink velvet cookies? They trace back to the popular red velvet cake, which gained fame in the early 20th century. The pink color often comes from the use of red food coloring, adjusted for a lighter hue.

Pink Velvet Cookies

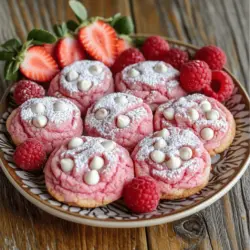
Indulge in the magic of pink velvet cookies with this delightful and easy recipe! These soft, chewy treats are perfect for any occasion, boasting a sweet flavor and striking pink hue. Discover simple steps to create your own batch at home, along with helpful baking tips and fun variations. Ready to impress your friends and family? Click through to explore the full recipe and start baking these delicious cookies today!

Ingredients
  

2 ½ cups all-purpose flour

1 teaspoon baking powder

½ teaspoon baking soda

½ teaspoon salt

¾ cup unsalted butter, softened

1 cup granulated sugar

1 large egg

2 tablespoons milk

1 tablespoon vanilla extract

2 tablespoons red food coloring (or more for a deeper pink)

1 cup white chocolate chips

½ cup powdered sugar (for dusting)

Instructions
 

Preheat your oven to 350°F (175°C). Line a baking sheet with parchment paper.

    In a mixing bowl, whisk together the flour, baking powder, baking soda, and salt. Set aside.

      In another large bowl, cream together the softened butter and granulated sugar until light and fluffy, about 3-4 minutes.

        Add the egg, milk, vanilla extract, and red food coloring to the butter mixture. Mix until well combined.

          Gradually incorporate the dry ingredient mixture into the wet ingredients, mixing just until combined. Do not overmix.

            Gently fold in the white chocolate chips, ensuring they are evenly distributed throughout the dough.

              Using a cookie scoop or tablespoon, drop mounds of dough onto the prepared baking sheet, spacing them about 2 inches apart.

                Bake in the preheated oven for 10-12 minutes or until the edges are set but the centers are still soft.

                  Once baked, allow the cookies to cool on the sheet for 5 minutes before transferring them to a wire rack to cool completely.

                    Once cooled, dust the tops of the cookies with powdered sugar for an extra touch of sweetness and visual appeal.

                      Prep Time: 15 mins | Total Time: 30 mins | Servings: 24 cookies

                        - Presentation Tips: Arrange the cookies on a decorative plate and place a few fresh strawberries or raspberries around them for a pop of color and a delightful pairing!