Go Back
- 1 cup creamy peanut butter - 1 cup rolled oats - 1 cup graham cracker crumbs These three ingredients form the base of the bars. Creamy peanut butter adds richness and flavor. Rolled oats give the bars a hearty texture. Graham cracker crumbs bind everything together, making them easy to slice. - ½ cup honey or maple syrup - 1 teaspoon vanilla extract - Pinch of salt Honey or maple syrup provides natural sweetness. They help balance the rich peanut butter. Vanilla extract adds depth to the flavor. A pinch of salt enhances all the tastes. - ½ cup dark chocolate chips - 2 tablespoons coconut oil Dark chocolate chips create a smooth, sweet topping. Coconut oil helps the chocolate melt evenly. Together, they form a delicious layer that makes these bars extra special. {{ingredient_image_1}} 1. In a large bowl, combine 1 cup of creamy peanut butter, ½ cup of honey, and 1 teaspoon of vanilla extract. Stir until smooth. 2. Gradually add in 1 cup of rolled oats and 1 cup of graham cracker crumbs. Mix until fully combined. The mixture should be thick and sticky. 1. Line an 8x8-inch baking dish with parchment paper. Leave some overhang for easy removal. 2. Spread the peanut butter mixture evenly in the dish. Press it down firmly with your hands or a spatula to make it compact. 1. In a microwave-safe bowl, combine ½ cup of dark chocolate chips and 2 tablespoons of coconut oil. 2. Microwave the bowl in 30-second intervals, stirring in between, until melted and smooth. 3. Pour the melted chocolate over the peanut butter layer. Use a spatula to spread it evenly. 4. Add a pinch of salt on top for an extra flavor boost. 5. Refrigerate for at least 2 hours until the bars are firm. 6. Once set, lift the bars out of the dish using the parchment overhang. Cut into squares or rectangles. To get the right thickness for your bars, start with a firm hand. After mixing your peanut butter mixture, you need to press it down well in the baking dish. If you don’t press it firmly, the bars may crumble when you cut them. Use your hands or a spatula to pack it tightly. This step is key for a smooth bite. Microwaving is a great way to melt chocolate. Place dark chocolate chips and coconut oil in a microwave-safe bowl. Heat in 30-second bursts, stirring after each round. This helps prevent burning. If you prefer not to use a microwave, you can melt chocolate using a double boiler. Just place a bowl over simmering water and stir until smooth. For a nice presentation, serve your bars on a decorative platter. Drizzle some melted chocolate over the top for added flair. You can also sprinkle crushed peanuts on top. When cutting the bars, lift them out of the dish using the parchment paper. This makes cutting easier and cleaner. Try cutting into squares or rectangles for fun shapes. Pro Tips Use Natural Peanut Butter: For a healthier option, opt for natural peanut butter without added sugars or oils. It will enhance the flavor and texture of the bars. Customize Your Sweetness: Adjust the amount of honey or maple syrup based on your taste preference. You can reduce it for a less sweet treat or add more for a sweeter bar. Experiment with Mix-Ins: Feel free to add extras like mini marshmallows, chopped nuts, or dried fruits to the peanut butter mixture for added flavor and texture. Store Properly: Keep the bars in an airtight container in the fridge to maintain freshness. They can last up to a week, but you can also freeze them for longer storage. {{image_2}} If you have nut allergies, you can still enjoy these bars! Just swap out the creamy peanut butter for sunbutter or almond butter. Sunbutter gives a nice, nutty flavor without any nuts. Almond butter offers a lighter taste. Both options keep the bars creamy and delicious. Want to add some fun? You can mix in shredded coconut for a tropical twist. This adds a chewy texture and a hint of sweetness. You can also toss in some nuts or seeds. Chopped walnuts or sunflower seeds add crunch and nutrition. Be creative and find flavors you love! For those looking for sugar-free options, try using agave syrup or stevia. Agave syrup is sweeter than honey, so you might need less. Stevia is a great choice for a low-calorie option. Just make sure to adjust the amount to taste. These swaps keep the bars tasty and healthy! To keep your no-bake chocolate peanut butter bars fresh, store them in an airtight container. Make sure to layer parchment paper between the bars. This step helps prevent them from sticking together. Keep the container in the fridge. This method will help retain the texture and taste. Yes, you can freeze these bars! First, wrap each bar in plastic wrap. Then, place them in a freezer-safe bag. Make sure to remove as much air as possible. For thawing, take them out and place them in the fridge overnight. This method keeps them tasty and easy to enjoy. These delicious bars last about one week in the fridge. If you freeze them, they can last up to three months. This makes them a great snack option for later! Yes, you can! Crunchy peanut butter adds texture and a nice crunch. The taste remains rich and nutty. However, the bars may be less smooth. If you like that extra bite, go for it! Just remember, it may change how the bars hold together a bit. No worries at all! You can use crushed cookies like Digestive biscuits or vanilla wafers. Rolled oats can also work as a substitute. If you want a gluten-free option, try almond flour or ground nuts. Each adds a unique flavor twist, so get creative! To check if the bars are set, gently press the top. It should feel firm but slightly springy. You can also check the edges; they should pull away from the sides of the dish. If they feel soft, give them more time in the fridge. Patience pays off with these tasty treats! In this blog post, we explored how to make delicious no-bake peanut butter bars. We discussed key ingredients like creamy peanut butter and oats, along with sweeteners like honey. You learned step-by-step instructions for mixing and melting chocolate layers. I shared tips for perfect texture and storage methods, including freezing. You can also try variations like nut-free options or different flavors. Remember, making these bars is fun and easy. Enjoy your tasty treat with friends or family!

Delicious No-Bake Chocolate Peanut Butter Bars

A quick and easy recipe for rich chocolate peanut butter bars that require no baking.
Prep Time 15 minutes
Total Time 2 hours 15 minutes
Course Dessert
Cuisine American
Servings 16
Calories 200 kcal

Ingredients
  

  • 1 cup creamy peanut butter
  • 1 cup rolled oats
  • 1 cup graham cracker crumbs
  • ½ cup honey or maple syrup
  • ½ cup dark chocolate chips
  • 2 tablespoons coconut oil
  • 1 teaspoon vanilla extract
  • 1 pinch salt

Instructions
 

  • In a large mixing bowl, combine the creamy peanut butter, honey (or maple syrup), and vanilla extract. Stir until smooth.
  • Gradually add in the rolled oats and graham cracker crumbs, mixing until fully combined. The mixture should be thick and sticky.
  • Line an 8x8-inch baking dish with parchment paper, leaving some overhang for easy removal.
  • Spread the peanut butter mixture evenly in the prepared baking dish, pressing it down firmly with your hands or a spatula to ensure it’s compact.
  • In a small microwave-safe bowl, combine the dark chocolate chips and coconut oil. Microwave in 30-second intervals, stirring in between until melted and smooth.
  • Pour the melted chocolate over the peanut butter layer, spreading it evenly with a spatula.
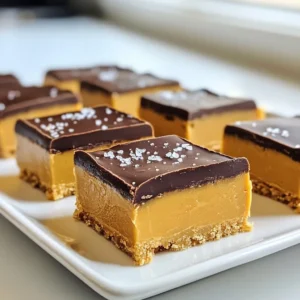
  • Sprinkle a pinch of salt over the chocolate layer for an extra flavor boost.
  • Refrigerate for at least 2 hours or until the bars are firm.
  • Once set, lift the bars out of the dish using the parchment overhang and cut into squares or rectangles.

Notes

Serve the bars on a decorative platter, drizzled with extra melted chocolate or topped with crushed peanuts for added texture and visual appeal.
Keyword bars, chocolate, dessert, no-bake, peanut butter