Go Back
To make classic buttermilk fried chicken, gather these main ingredients: - 4 chicken thighs, bone-in, skin-on - 4 chicken drumsticks, bone-in, skin-on - 2 cups buttermilk - 2 cups all-purpose flour - 1 tablespoon garlic powder - 1 tablespoon onion powder - 1 teaspoon paprika - 1 teaspoon cayenne pepper (adjust for spice level) - Salt and pepper to taste - Vegetable oil for frying These ingredients create a rich and flavorful dish. The buttermilk helps tenderize the chicken. It also adds a tangy taste. The spices give the chicken its distinctive flavor. For the homemade gravy, you will need: - 2 tablespoons butter - 2 tablespoons all-purpose flour - 1 cup chicken broth - Salt and pepper to taste This gravy adds richness to the fried chicken. The butter and flour create a roux. The chicken broth brings in a savory depth. To enhance your meal, consider these garnishes and sides: - Fresh parsley, chopped (for garnish) - Mashed potatoes - Side salad Fresh parsley adds color and a hint of freshness. Mashed potatoes make a classic pairing. A side salad can balance the meal with crispiness. Enjoy your buttermilk fried chicken with these tasty options! To start, gather your chicken thighs and drumsticks. Place them in a large bowl. Pour in 2 cups of buttermilk. Make sure each piece is well coated. Cover the bowl and refrigerate it. Let the chicken marinate for at least 4 hours. For the best flavor, overnight is ideal. This step makes the chicken tender and juicy. In another bowl, mix your dry ingredients. Combine 2 cups of all-purpose flour, 1 tablespoon of garlic powder, 1 tablespoon of onion powder, 1 teaspoon of paprika, and 1 teaspoon of cayenne pepper. Add salt and pepper to taste. Stir well to blend everything. This mixture gives the chicken its amazing flavor and crispy texture. After marinating, take the chicken from the fridge. Let the excess buttermilk drip off. Dredge each piece in the flour mixture. Press lightly to ensure a good coating. Place the coated chicken on a wire rack. Let it rest for about 15 minutes. This step helps the coating stick better during frying. In a large skillet or Dutch oven, heat about 1 inch of vegetable oil. Use medium-high heat. The oil should reach about 350°F (175°C). Be careful not to let it smoke. Gently place the breaded chicken in the hot oil. Do not overcrowd the pan. Fry in batches for about 12-15 minutes per side. The chicken should turn golden brown and reach an internal temperature of 165°F (74°C). Transfer the fried chicken to a wire rack to drain any excess oil. In a separate saucepan, melt 2 tablespoons of butter over medium heat. Once melted, stir in 2 tablespoons of flour. Cook this mixture for about 1 minute until it turns light brown. Gradually whisk in 1 cup of chicken broth. Stir constantly until the gravy thickens, which takes about 3-5 minutes. Season with salt and pepper to taste. To serve, plate the fried chicken on a rustic dish. Drizzle the homemade gravy generously over the chicken. For a nice touch, sprinkle fresh chopped parsley on top. Pair it with mashed potatoes or a side salad for a complete meal. This dish looks as good as it tastes and will impress anyone at your table. To get that perfect crispy skin, use a few tricks. First, let the chicken marinate in buttermilk overnight. This step makes the meat juicy and tender. After coating the chicken in the flour mix, let it rest on a wire rack. This helps the coating stick better. When frying, make sure the oil is hot, around 350°F. Fry in batches, giving each piece space to cook evenly. Flip the chicken only once to avoid losing the crispy coating. Choosing the right oil is key. I recommend using vegetable oil. It has a high smoke point, which means it can handle the heat without burning. Other good options include canola or peanut oil. These oils let the chicken cook well and stay crispy. Avoid using olive oil, as it has a lower smoke point. You can save time with a few simple tricks. Marinate the chicken the night before. This allows flavors to soak in and cuts down on prep time. While the chicken marinates, mix your flour and spices. When you take the chicken out of the buttermilk, coat it quickly. If you're short on time, use a store-bought spice mix. This way, you can get that great flavor without all the extra steps. {{image_2}} Want more heat? Add cayenne pepper to your marinade. You can use 1 to 2 teaspoons, based on your spice love. You can also mix in hot sauce for a zesty kick. This will give your chicken a nice, spicy flavor. After frying, serve with a cooling dip, like ranch or yogurt. Baking is a healthier option. Preheat your oven to 425°F (220°C). After coating the chicken, place it on a baking sheet lined with parchment paper. Mist the chicken lightly with oil for crispiness. Bake for 35 to 45 minutes, turning halfway. Check for an internal temperature of 165°F (74°C) to ensure it’s done. For a gluten-free version, swap all-purpose flour for gluten-free flour. Almond flour or a gluten-free baking mix works well. Ensure your buttermilk is gluten-free, too. This way, everyone can enjoy fried chicken without worry. The taste and texture will still be delightful. Store leftover fried chicken in an airtight container. Keep it in the fridge. It lasts for about 3 to 4 days. Make sure the chicken is cool before sealing. This keeps it crispy and tasty. Lay paper towels at the bottom of the container to absorb moisture. To reheat fried chicken, use the oven for best results. Preheat your oven to 375°F (190°C). Place the chicken on a wire rack above a baking sheet. This helps air circulate, keeping it crispy. Heat for about 15-20 minutes, or until hot. You can also use an air fryer. Set it to 350°F (175°C) for about 8-10 minutes. You can freeze fried chicken for later use. Let it cool completely, then wrap each piece in plastic wrap. Place the wrapped chicken in a freezer bag. It can last for up to 3 months in the freezer. For the gravy, cool it down, then pour it into an airtight container. Freeze it for up to 2 months. Remember to label everything with dates! I recommend marinating the chicken for at least 4 hours. For best taste and texture, marinate it overnight. This helps the chicken soak up the buttermilk's tangy flavor. It also makes the meat juicy and tender. Yes, you can use chicken breasts. They will cook faster than thighs and drumsticks. Just remember to adjust your cooking time. Ensure the internal temperature reaches 165°F for safety. If you don't have buttermilk, you can easily make your own. Mix 1 cup of milk with 1 tablespoon of vinegar or lemon juice. Let it sit for about 5 minutes. This gives you a similar tangy flavor and acidity. To check if the chicken is done, use a meat thermometer. The internal temperature should be at least 165°F. You can also cut into a piece. The juices should run clear, not pink. Yes, you can prepare the gravy ahead of time. Just store it in the fridge after cooking. When ready to serve, warm it on the stove. If it thickens too much, add a splash of chicken broth to loosen it up. Fried chicken is a fun dish that anyone can make at home. We covered key ingredients, from chicken to gravy and tasty sides. I shared step-by-step instructions to help you fry the best chicken ever. You learned tips for crunchiness and time-saving tricks. Plus, I offered variations for every taste and how to store leftovers right. With these methods, you can enjoy delicious meals anytime. Enjoy your cooking journey!

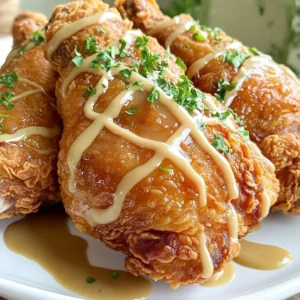
Classic Buttermilk Fried Chicken with Homemade Gravy

Indulge in the ultimate comfort food with this Classic Buttermilk Fried Chicken recipe! Juicy chicken thighs and drumsticks marinated in creamy buttermilk and perfectly seasoned create a mouthwatering dish everyone will love. Follow our easy step-by-step guide for crispy golden perfection, complete with delicious homemade gravy. Click through for the full recipe and elevate your dinner game tonight! #FriedChicken #ComfortFood #ButtermilkChicken #HomeCooking

Ingredients
  

4 chicken thighs, bone-in, skin-on

4 chicken drumsticks, bone-in, skin-on

2 cups buttermilk

2 cups all-purpose flour

1 tablespoon garlic powder

1 tablespoon onion powder

1 teaspoon paprika

1 teaspoon cayenne pepper (adjust for spice level)

Salt and pepper to taste

Vegetable oil for frying

2 tablespoons butter (for the gravy)

2 tablespoons all-purpose flour (for the gravy)

1 cup chicken broth

Fresh parsley, chopped (for garnish)

Instructions
 

Marinate the Chicken: In a large bowl, combine the chicken pieces and buttermilk. Ensure they are well coated. Cover and refrigerate for at least 4 hours or overnight for best results.

    Prepare the Breading: In another bowl, mix together the flour, garlic powder, onion powder, paprika, cayenne pepper, salt, and pepper.

      Coat the Chicken: Remove the marinated chicken from the refrigerator. Take each piece, letting excess buttermilk drip off, and dredge it in the flour mixture, pressing lightly to ensure an even coating. Place on a wire rack and let rest for 15 minutes.

        Heat the Oil: In a large, deep skillet or Dutch oven, heat about 1 inch of vegetable oil over medium-high heat until it's hot but not smoking (about 350°F or 175°C).

          Fry the Chicken: Carefully place the breaded chicken in the hot oil, without overcrowding the pan. Fry in batches, cooking for about 12-15 minutes per side, or until golden brown and cooked through (internal temperature should reach 165°F or 74°C). Transfer the fried chicken to a wire rack to drain excess oil.

            Make the Gravy: In a separate saucepan, melt the butter over medium heat. Stir in the 2 tablespoons of flour and cook for about 1 minute until lightly browned. Gradually whisk in the chicken broth, cooking until the gravy thickens (about 3-5 minutes). Season with salt and pepper to taste.

              Serve: Plate the fried chicken and generously drizzle with homemade gravy.

                - Prep Time: 10 mins | Total Time: 1 hr 30 mins | Servings: 4

                  - Presentation Tips: Serve on a rustic plate with a sprinkle of fresh chopped parsley on top, alongside mashed potatoes or a side salad for a complete meal.