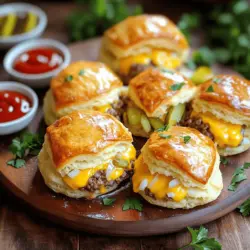
Go Back
- 1 lb ground beef: This is the heart of your bombs. It gives them flavor and fills you up. - 1 cup shredded cheddar cheese: Cheese adds richness and gooeyness. It melts beautifully when baked. - 1/2 cup diced onions: Onions bring sweetness and crunch. They add great texture to the filling. - 1/4 cup dill pickles, finely chopped: Pickles give a tangy kick. They balance the richness of the beef and cheese. - 1 teaspoon garlic powder: Garlic powder boosts the savory flavor. It adds depth without being overpowering. - 1 teaspoon onion powder: This enhances the onion flavor without the texture of fresh onions. - Salt and pepper to taste: These seasonings bring out all the flavors. They are key for a well-balanced dish. - 1 can refrigerated biscuit dough (8 biscuits): This is the outer layer. It’s soft and flaky, perfect for holding the filling. - 1 tablespoon mustard (optional for filling): Mustard adds a bit of spice and tang. Use it if you like a little kick. - 1 egg, beaten (for egg wash): The egg wash gives a shiny, golden finish. It makes your bombs look appealing. Each ingredient plays a role in making these cheeseburger bombs super tasty. They come together to create a fun and satisfying treat. - Different cheeses: Try mozzarella or pepper jack for a twist. Each cheese brings its unique flavor. - Bacon bits: Adding bacon gives a smoky taste. It adds crunch that many love. - Vegetables: Consider adding bell peppers or mushrooms. They can enhance flavor and add nutrition. - Ground turkey or chicken: These can replace beef for a lighter option. They are great for those wanting leaner meat. For dietary needs, you can switch the biscuit dough to gluten-free options. You can also make these bombs low-carb by using cauliflower dough. The variations are endless, so feel free to get creative! Start by preheating your oven to 375°F (190°C). This step is key for getting that perfect bake. While the oven heats, line a baking sheet with parchment paper. This makes cleanup easier and keeps the bombs from sticking. Next, grab a skillet and heat it over medium heat. Add 1 pound of ground beef to the pan. Use a spatula to break the beef into small pieces. Cook it until browned. This should take about 5-7 minutes. Season the beef with 1 teaspoon of garlic powder, 1 teaspoon of onion powder, salt, and pepper. These spices boost the flavor. Once cooked, drain any fat from the pan. Remove the beef from the heat. Now, mix in 1/2 cup of diced onions and 1/4 cup of finely chopped dill pickles. Stir until everything is well combined. Finally, fold in 1 cup of shredded cheddar cheese. This adds a creamy, cheesy touch to each bomb. Now comes the fun part! Open the can of refrigerated biscuit dough. Separate each biscuit and flatten them in your hands to form small discs. Aim for about 4 inches wide. This makes it easy to fill. Spoon about 2 tablespoons of the cheeseburger filling into the center of each disc. If you like, add a small dab of mustard on top for extra zing. Carefully fold the edges of the dough over the filling. Pinch the edges to seal them tightly. This helps keep all the cheesy goodness inside. Place each bomb seam-side down on your prepared baking sheet. Repeat this process until you use up all the dough and filling. Brush the tops of the bombs with a beaten egg. This gives them a nice, golden finish. Place the baking sheet in your preheated oven. Bake for 12-15 minutes. Keep an eye on them until they turn a beautiful golden brown. Once done, take them out and let them cool for a few minutes. This helps avoid burns from the hot filling. Serve your cheeseburger bombs warm for the best taste. For a great presentation, serve them with ketchup and mustard on the side. Enjoy this flavorful treat! For the full recipe, check out the details above. To cook the beef just right, use medium heat. This helps brown the meat evenly. Break it apart as it cooks. This way, it cooks through without being dry. Drain any extra fat before mixing in the cheese and veggies. This keeps the filling tasty and not greasy. To avoid soggy dough, don't overfill the biscuits. Use about 2 tablespoons of filling per bomb. Seal the edges well to keep the filling inside. Brush the tops with egg wash. This will help them bake up crisp and golden. For a fun look, garnish the cheeseburger bombs with fresh parsley. You can also sprinkle sesame seeds on top before baking. This adds a nice touch. Serve the bombs warm on a platter. Pair them with ketchup and mustard for dipping. This makes for a tasty and colorful spread. Store leftovers in an airtight container. They will stay fresh in the fridge for up to three days. If you want to keep them longer, freeze them for up to two months. Just make sure they are cool before packing. To reheat without losing texture, use the oven. Preheat it to 350°F (175°C). Place the bombs on a baking sheet and heat for about 10 minutes. This will help them get warm and crispy again. Avoid the microwave, as it can make the dough chewy. {{image_2}} You can switch up the filling for your cheeseburger bombs. If you want a vegetarian option, try using black beans or lentils. Both offer great taste and texture. You can also go for plant-based ground meat. These choices keep the dish fun for everyone. For cheese lovers, experiment with different cheeses. Mozzarella adds a nice stretch, while pepper jack gives a spicy kick. You can even mix several cheeses for a flavor party. Don't be afraid to get creative with your fillings. Want to add some heat? You can mix in spices like cayenne or chili powder. Hot sauces work well too. Just a dash can spice things up. This is great for those who love bold flavors. If you have kids or prefer mild food, skip the heat. Stick to classic flavors. You can still enjoy all the cheeseburger goodness without spice. Everyone can find a version they love. For those needing gluten-free options, look for gluten-free biscuit dough. Many brands offer this, making it easy to enjoy the bombs. Check your local store for options. If you're watching carbs, try using cauliflower instead of biscuit dough. You can make a cauliflower crust. It’s low-carb and still delicious. This way, you can enjoy cheeseburger bombs while sticking to your diet. For the full recipe, please refer to the Cheeseburger Bombs section. To keep your cheeseburger bombs fresh, you'll want to store them properly. You have two main options: refrigeration and freezing. - Refrigeration: Place the cooled bombs in an airtight container. They stay fresh for about 3 to 4 days in the fridge. - Freezing: For longer storage, freeze the bombs. Wrap each one in plastic wrap, then place them in a freezer bag. They can last up to 2 months this way. When packing, make sure to label the containers with the date. This helps you keep track of freshness. Leftovers are great, but how long do they last? - Refrigerated: You can enjoy them for 3 to 4 days. If you notice any off smell or mold, it's time to toss them. - Frozen: When frozen, they can last up to 2 months. After this, the taste may fade. Look for signs of spoilage. If you see any discoloration or an unusual odor, it's best to throw them out. Always trust your senses when it comes to food safety. To keep your Cheeseburger Bombs sealed, pinch the dough tightly. Make sure there are no gaps. You can also roll the dough into a tighter ball, which helps maintain the shape. A good egg wash on top also helps to seal the dough. Yes, you can prep these bombs ahead. Make the filling and assemble them. Place the bombs on a baking sheet and cover with plastic wrap. Store them in the fridge for up to a day. Just remember to bake them right before serving for the best taste. Serve the bombs warm on a nice platter. Pair them with ketchup and mustard for dipping. You can also add some sliced pickles or fresh veggies for crunch. This adds fun and flavor to the meal. To make more Cheeseburger Bombs, simply double the ingredients. Use two cans of biscuit dough and increase the filling. Bake them in batches on separate sheets. Keep an eye on the time as baking may take a bit longer. Enjoy these tasty treats with friends! For the full recipe, check out the detailed instructions! Cheeseburger Bombs are easy and fun to make at home. We covered key ingredients, options for dietary needs, and ways to prepare and bake. I shared tips on cooking and presenting these tasty bites, plus storage advice for leftovers. Don't hesitate to get creative with flavors and fillings. You can adapt this recipe to suit anyone’s tastes. Now, it’s time to enjoy your delicious Cheeseburger Bombs with friends and family!

Cheeseburger Bombs

Get ready to impress your family and friends with these mouthwatering cheeseburger bombs! Made with juicy ground beef, melty cheddar cheese, and a hint of pickles, these easy-to-make bites are perfect for game day or any gathering. Just roll, bake, and enjoy a delicious golden treat that everyone will love. Click through to get the full recipe and take your snack game to the next level!

Ingredients
  

1 lb ground beef

1 cup shredded cheddar cheese

1/2 cup diced onions

1/4 cup dill pickles, finely chopped

1 teaspoon garlic powder

1 teaspoon onion powder

Salt and pepper to taste

1 can refrigerated biscuit dough (8 biscuits)

1 tablespoon mustard (optional for filling)

1 egg, beaten (for egg wash)

Instructions
 

Preheat your oven to 375°F (190°C) and line a baking sheet with parchment paper.

    In a skillet over medium heat, brown the ground beef, breaking it apart as it cooks. Season with garlic powder, onion powder, salt, and pepper. Once cooked through, drain any excess fat and remove from heat.

      Stir in diced onions and pickles into the cooked beef, then mix in the shredded cheddar cheese until fully combined.

        Open the can of biscuit dough and separate each biscuit. Flatten each biscuit in your hand to form a small disc.

          Spoon about 2 tablespoons of the cheeseburger filling onto the center of each disc. If desired, add a small dab of mustard on top of the filling.

            Carefully fold the edges of the dough over the filling, pinching them to seal completely and form a ball.

              Place the bomb seam-side down on the prepared baking sheet, and repeat with remaining biscuits and filling.

                Brush the tops of the cheeseburger bombs with the beaten egg for a golden finish.

                  Bake in the preheated oven for 12-15 minutes, or until the bombs are golden brown.

                    Allow to cool for a few minutes before serving to prevent burns from the molten filling.

                      Prep Time: 15 minutes | Total Time: 30 minutes | Servings: 8

                        - Presentation Tips: Serve the cheeseburger bombs warm on a platter with a side of ketchup and mustard for dipping. Garnish with fresh parsley for a pop of color. Enjoy!