Introduction
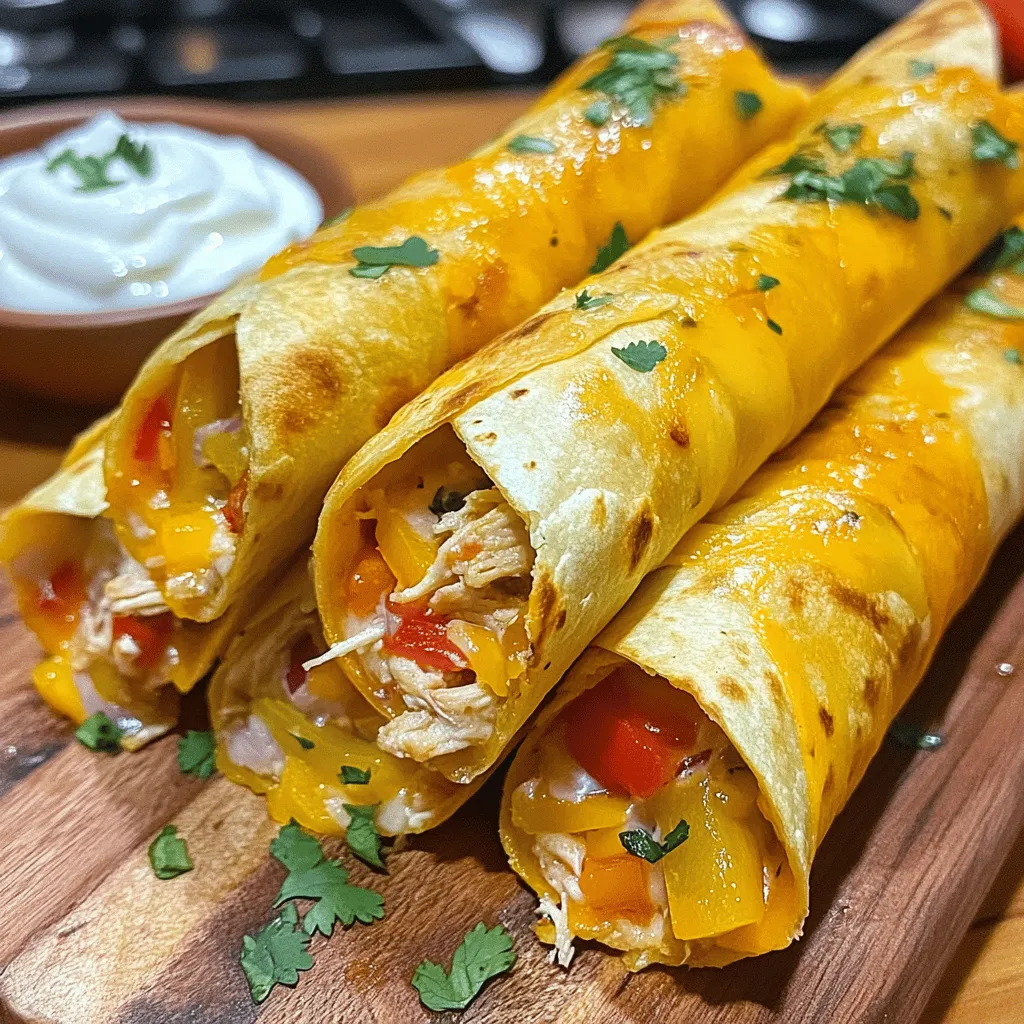
In the world of culinary delights, few things can match the comfort and satisfaction of a perfectly made quesadilla. Now, imagine that iconic dish transformed into a fun, portable snack. Enter Quesadilla Cones—a creative spin on the traditional quesadilla that brings together the rich, savory flavors of Mexican cuisine in a playful, cone-shaped presentation. These delightful treats are not just visually appealing; they also offer an exciting way to serve a classic favorite at parties, family gatherings, or even a casual night in.
The beauty of Quesadilla Cones lies in their versatility. You can easily customize them to cater to various dietary preferences. Whether you prefer a classic cheese option, a protein-packed version, or a vegetarian delight, the possibilities are endless. In this article, we will delve into the origins, preparation, and serving suggestions for Quesadilla Cones, ensuring that you can recreate this delightful dish in your own kitchen.
Understanding Quesadilla Cones
Exploring the Origins and Popularity of Quesadilla Cones
While quesadillas have enjoyed a long-standing place in Mexican cuisine, the evolution into Quesadilla Cones showcases the culinary innovation that restaurant chefs and home cooks alike are embracing. The concept of serving food in a cone is not entirely new. Cone-shaped snacks have gained popularity in recent years, particularly in street food culture, where convenience and portability are essential. This trend has inspired many cooks to think outside the box, leading to the delicious creation of Quesadilla Cones.
As this inventive dish has gained traction, it’s become a staple at food festivals, food trucks, and casual dining establishments, captivating the taste buds of many. The combination of the traditional quesadilla’s comforting flavors with the novelty of a cone has made it a favorite choice for those looking to elevate their snacking experience.
Highlighting the Versatility and Customization Options
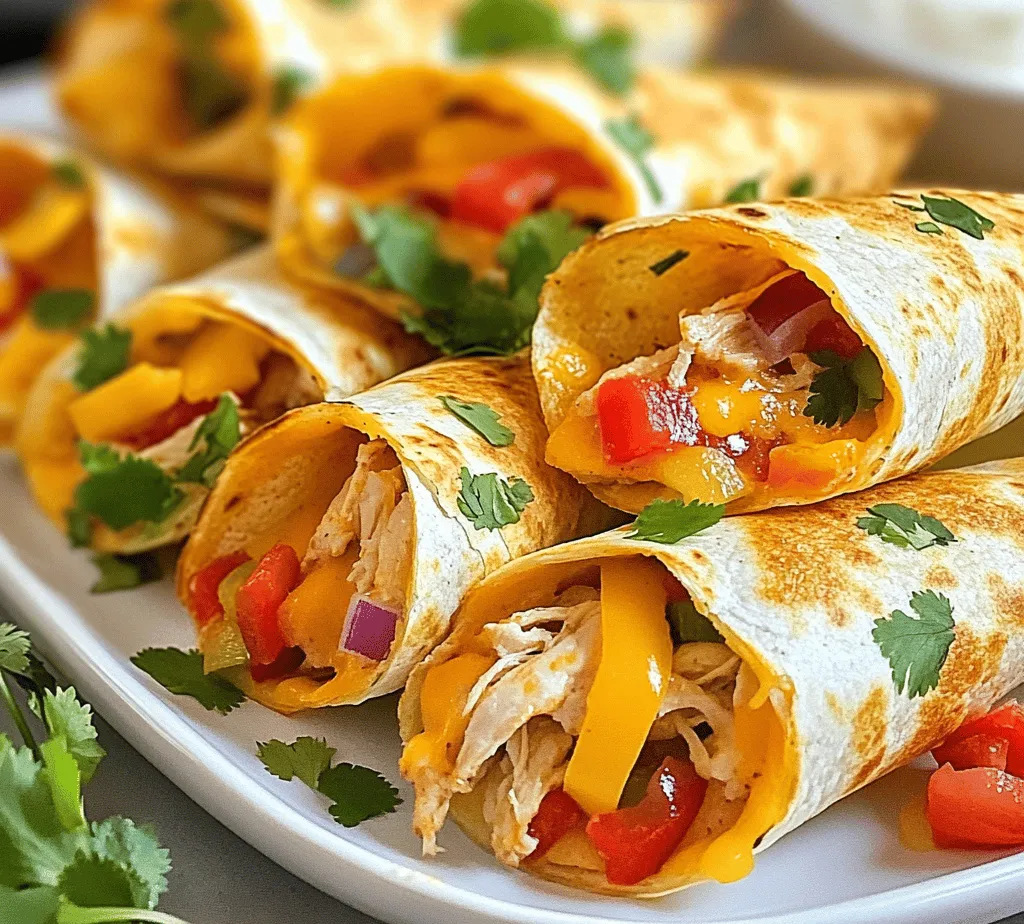
One of the standout features of Quesadilla Cones is their adaptability. You can fill them with a variety of ingredients, making them suitable for different tastes and dietary needs. Traditionalists may opt for classic fillings like melted cheese and shredded chicken, while those embracing plant-based diets can fill their cones with sautéed vegetables, beans, and vegan cheese.
The ability to customize doesn’t stop with ingredients. You can also experiment with different spice blends, sauces, and garnishes. Whether you prefer a spicy jalapeño kick or a refreshing avocado crema, the options are as diverse as your culinary imagination. This level of customization makes Quesadilla Cones an excellent choice for entertaining guests with varied preferences or simply satisfying your own cravings.
Discussing the Appeal of Handheld Snacks in Contemporary Dining
In today’s fast-paced world, the appeal of handheld snacks has never been greater. People are increasingly seeking convenient options that allow them to enjoy delicious food without the need for utensils or formal dining settings. Quesadilla Cones fit perfectly into this trend. They are easy to hold, easy to eat, and packed with flavor, making them an ideal choice for casual gatherings, road trips, or even a quick lunch.
Moreover, the fun presentation of Quesadilla Cones adds an element of excitement to any meal. Guests will appreciate the creativity and thoughtfulness behind serving food in a unique way, sparking conversations and elevating the overall dining experience.
Ingredients Overview
To create delicious Quesadilla Cones, it’s essential to gather the right ingredients. Below is a detailed breakdown of the key components that will ensure your cones are flavorful and satisfying.
Tortillas: Flour vs. Corn and Their Flavor Profiles
At the heart of every quesadilla, including Quesadilla Cones, is the tortilla. You have the option to choose between flour tortillas and corn tortillas, each offering a distinct flavor and texture. Flour tortillas are generally softer and more pliable, making them easier to shape into cones. They also have a mild flavor that pairs well with various fillings. On the other hand, corn tortillas provide a slightly firmer texture and a more robust flavor, which can add depth to your cones.
When selecting tortillas, consider the type of filling you plan to use. Flour tortillas work well with rich, cheesy fillings, while corn tortillas can complement spicier or more savory ingredients. Both options can yield delicious results, so feel free to experiment with both types to find your favorite.
Cheese: Options and Their Melting Properties
No quesadilla is complete without cheese, and Quesadilla Cones are no exception. The type of cheese you choose can significantly impact the flavor and texture of your cones. Popular options include:
– Cheddar: A classic choice, cheddar offers a sharp flavor and melts beautifully, making it a favorite for quesadillas.
– Monterey Jack: Known for its creamy texture, Monterey Jack melts easily and adds a mild flavor that complements other ingredients.
– Mozzarella: For a gooey, stretchy texture, mozzarella is an excellent choice. It can provide a delightful contrast to spicier fillings.
– Pepper Jack: If you’re looking to add a little heat to your cones, pepper jack cheese is infused with jalapeños and spices, giving your quesadilla an extra kick.
Consider mixing different cheeses for a more complex flavor profile. The combination of cheeses can provide a rich, gooey filling that will have everyone coming back for more.
Protein Alternatives: Chicken vs. Vegetarian Options
When it comes to protein options, Quesadilla Cones can cater to both meat lovers and vegetarians. Traditional fillings often include shredded chicken, which pairs well with cheese and spices. However, many delicious alternatives can elevate your cones:
– Beef: Ground beef or shredded beef can add a hearty element to your quesadilla cones.
– Pork: Carnitas or pulled pork can provide a rich, savory flavor that complements other ingredients.
– Vegetarian: Black beans, refried beans, or sautéed vegetables such as bell peppers, onions, and zucchini can create a satisfying filling for vegetarians or anyone looking to reduce their meat intake.
By utilizing different proteins or plant-based alternatives, you can create Quesadilla Cones that suit your dietary preferences or those of your guests.
Vegetables: Importance of Freshness and Flavor Combinations
Fresh vegetables can elevate the taste and nutrition of your Quesadilla Cones. Not only do they add vibrant colors, but they also contribute essential nutrients and flavors. Some great vegetable options include:
– Bell Peppers: Sweet and crunchy, bell peppers add a refreshing bite to your cones.
– Onions: Sautéed onions can enhance the flavor profile, providing a sweet and savory component.
– Spinach: A handful of fresh spinach can add a nutritious element while maintaining a mild flavor.
– Mushrooms: Sautéed mushrooms bring an earthy flavor and a meaty texture to vegetarian options.
When selecting vegetables, opt for seasonal produce to ensure maximum freshness and flavor. Combining different vegetables can create a delicious medley that complements the cheese and protein in your cones.
Spices and Seasonings: Enhancing Flavor Without Overpowering
To enhance the flavor of your Quesadilla Cones, consider using a variety of spices and seasonings. While quesadillas are often seasoned simply with salt and pepper, adding herbs and spices can elevate the dish to new heights. Some popular choices include:
– Cumin: Adds warmth and earthiness, making it a great complement to savory fillings.
– Chili Powder: Provides a mild heat that can bring depth to your cones.
– Garlic Powder: A must-have for adding richness and flavor without overpowering other ingredients.
– Oregano: A staple in Mexican cuisine, oregano can add an aromatic touch to your filling.
When seasoning your fillings, remember that a little goes a long way. Start with small amounts and adjust to your taste preferences.
Prepping Your Kitchen
Before diving into the delightful process of making Quesadilla Cones, it’s important to prepare your kitchen. Having the right tools and equipment at your disposal will streamline the cooking process and ensure that your cones turn out perfectly.
Gathering the Necessary Tools and Equipment
To make Quesadilla Cones, you’ll need to gather a few essential tools and equipment:
– Cone Molds vs. Muffin Tin: Depending on your preference, you can use specialized cone molds designed for baking, or you can repurpose a muffin tin to shape your cones. Cone molds provide a more uniform shape, while a muffin tin can be a more accessible option if you don’t have molds on hand.
– Essential Kitchen Tools: Mixing bowls, measuring cups, and baking sheets are fundamental to any recipe. Additionally, a spatula will come in handy for flipping the cones and ensuring they cook evenly.
– Importance of Preheating the Oven or Air Fryer: Before you begin assembling your Quesadilla Cones, it’s crucial to preheat your oven or air fryer. Proper preheating ensures that the cones cook evenly and achieve a crispy texture. Aim for a temperature of around 375°F (190°C) for optimal cooking results.
With your kitchen prepared and your ingredients ready, you’ll be well-equipped to create delicious Quesadilla Cones that will impress your family and friends.
Step-by-Step Instructions for Making Quesadilla Cones
Now that you have a good understanding of the essential components needed to make Quesadilla Cones, it’s time to dive into the actual preparation. The following comprehensive guide will walk you through each step, from preparation to serving.
Preheating: Why It Matters for Cooking Results
As mentioned earlier, preheating your oven or air fryer is a crucial step in the cooking process. This action helps ensure that your Quesadilla Cones cook evenly, allowing the tortillas to crisp up perfectly while the cheese melts beautifully. Failing to preheat can result in uneven cooking, leading to a soggy or burnt exterior.
Step-by-Step Instructions
1. Prepare Your Ingredients: Gather all the ingredients you will need, including tortillas, cheese, proteins, vegetables, and spices. Chop or shred the ingredients as necessary to make assembly easier.
2. Shape the Tortillas: If using cone molds, gently press the tortillas into the molds, shaping them into a cone. If using a muffin tin, you can lay the tortillas into the cups, creating a cone shape.
3. Layer Your Fillings: Start by adding a layer of cheese at the bottom of each cone. This layer will help hold the other ingredients in place. Follow with your choice of protein or vegetables, and top with another layer of cheese. The cheese acts as a glue, ensuring everything stays together during cooking.
4. Season: Sprinkle your chosen spices and seasonings over the fillings, ensuring an even distribution for maximum flavor.
5. Bake or Air Fry: Carefully place your filled cones in the preheated oven or air fryer. Bake for 12-15 minutes, or until the tortillas are golden brown and crispy, and the cheese has fully melted.
6. Serve and Enjoy: Once cooked, remove the cones from the oven or air fryer and let them cool slightly before serving. Pair your Quesadilla Cones with your favorite dipping sauces, such as salsa, guacamole, or sour cream.
This step-by-step guide will have you on your way to creating delicious Quesadilla Cones that are sure to impress. Stay tuned for the next part of this article, where we will explore more tips for achieving the best results and answer common questions about this mouthwatering dish.
Preparing Cone Molds: Ensuring Easy Removal After Cooking
When making Quesadilla Cones, the cone structure is crucial for both presentation and functionality. To prepare your molds effectively, you can use either metal or silicone cone molds, which are widely available. If you’re using metal molds, consider greasing them lightly with cooking spray or brushing them with a thin layer of oil to prevent the tortillas from sticking. For silicone molds, a light oiling is often unnecessary, but a quick rinse with warm water can help ensure a smooth release.
For those who want to create their own molds at home, you can shape aluminum foil into cone-like structures. Simply cut a piece of foil, fold it into a cone shape, and ensure the base is secured tightly to hold the filling. This DIY approach is not only cost-effective but also allows for customization in size and shape.
Creating the Filling: Balancing Flavors and Textures
The filling is where you can really get creative with your Quesadilla Cones. A well-balanced filling should combine proteins, vegetables, cheeses, and spices to enhance the overall flavor. For instance, consider using shredded chicken, black beans, or sautéed bell peppers as your protein source. Adding a mix of mozzarella and cheddar cheese can provide both creaminess and a gooey texture, while spices like cumin, paprika, and fresh cilantro can elevate the flavor profile.
To create a filling that’s both flavorful and textured, aim for a combination of soft and crunchy ingredients. For example, cooked corn or crispy tortilla strips can add an enjoyable crunch to your filling. Don’t forget to season your ingredients well; salt and pepper are essential, but a squeeze of lime can brighten the flavors beautifully.
Shaping the Tortillas: Techniques for Pliability and Structure
The key to a successful Quesadilla Cone lies in using tortillas that are pliable enough to bend without breaking. Flour tortillas are generally preferred due to their flexibility, but corn tortillas can work as well if they are warmed properly. To soften the tortillas, gently heat them in a skillet for about 10-15 seconds on each side. This process increases their pliability, making them easier to mold into cones.
Once warmed, it’s crucial to shape the tortillas around the molds quickly. Lay the tortilla over the cone mold and gently press it down, ensuring that it conforms to the shape of the mold without tearing. For added stability, you can use two tortillas layered on top of each other, which also enhances the flavor.
Filling and Packing: Tips for Achieving the Perfect Cone Shape
When it comes to filling your Quesadilla Cones, less is often more. Overstuffing can lead to messy results and difficulty in sealing the cones. Start by adding a spoonful of your filling mixture at the bottom of the cone, then pack it gently, allowing the tortilla to maintain its shape. Aim for a balance between filling the cone adequately and keeping it manageable. A good rule of thumb is to leave about half an inch of space at the top to prevent spillage during cooking.
To secure the opening of the cone, fold over the top of the tortilla slightly, tucking it in to create a neat finish. If you find that your tortillas are not holding their shape, you can use toothpicks to secure the edges until they are cooked.
Applying Oil: The Role of Oil in Achieving Crispiness
Applying oil to the outside of your filled Quesadilla Cones is essential for achieving that desirable crispiness. Use a brush or spray to lightly coat the surface of each cone with oil. Olive oil, avocado oil, or even melted butter work well for this purpose. The oil not only helps to crisp the tortilla while cooking but also adds an additional layer of flavor.
For those looking for a healthier option, consider using an air fryer spray that contains minimal calories. Ensure that each cone is evenly coated for consistent cooking results.
Cooking Methods: Oven vs. Air Fryer
When it comes to cooking your Quesadilla Cones, both the oven and air fryer are excellent options, each with its advantages.
Oven Baking: Achieving Uniform Cooking and Crispiness
Baking your Quesadilla Cones in the oven is a straightforward method that allows for even cooking. Preheat your oven to 400°F (200°C) and place the cones upright in a baking dish or on a lined baking sheet. Bake for about 15-20 minutes, or until the tortillas are golden brown and crispy. The oven method is great if you’re preparing a large batch, as it provides ample space for multiple cones at once.
One tip for ensuring even cooking is to rotate the baking sheet halfway through the baking process. This will help expose all sides of the cones to the heat, resulting in a beautifully crisp texture.
Air Frying: Time Efficiency and Texture Benefits
The air fryer is a fantastic option for those short on time. This method requires less cooking time, usually around 10-15 minutes, and results in a wonderfully crispy exterior. Preheat your air fryer to 375°F (190°C), then arrange the cones in the basket, making sure they do not touch to allow for proper air circulation. Air frying also offers a unique texture that some find preferable, as the hot air circulates around the cones, creating a crunchy outer layer.
To check for doneness, gently peek inside a cone after about 8 minutes. If the tortilla reaches a golden brown color and feels firm to the touch, it’s ready to come out.
Serving Suggestions
Once your Quesadilla Cones are cooked to perfection, it’s time to present them in an appealing way that highlights their deliciousness.
Recommended Dipping Sauces: Enhancing Flavor Profiles
Dipping sauces can elevate your Quesadilla Cones and add an extra layer of flavor. Consider serving them with:
– Sour Cream: A classic choice that provides a cool contrast.
– Guacamole: Creamy and rich, it complements the spices in the filling beautifully.
– Pico de Gallo: Fresh and zesty, it can brighten up each bite.
– Chipotle Sauce: For a smoky kick, use a chipotle-infused dipping sauce.
Each of these sauces not only enhances the flavor but also adds visual appeal to your presentation.
Garnishing Ideas: Elevating the Presentation
A simple garnish can turn your dish into a showstopper. Consider topping your Quesadilla Cones with:
– Chopped Fresh Cilantro: Adds a pop of color and freshness.
– Sliced Jalapeños: For those who enjoy a bit more heat.
– Crumbled Feta or Queso Fresco: Adding a sprinkle of cheese can elevate the flavor profile.
These garnishes not only enhance the visual appeal but also add complementary flavors.
Pairing with Side Dishes: Complementary Options for a Complete Meal
To make your Quesadilla Cones a complete meal, consider serving them alongside:
– Mexican Rice: A flavorful side that pairs well with the cones.
– Refried Beans: Creamy and filling, they balance the dish.
– A Fresh Salad: A light salad with a citrus vinaigrette can provide a refreshing contrast to the richness of the cones.
Nutritional Information
Understanding the nutritional aspects of your Quesadilla Cones can help you make informed choices, especially if you’re considering dietary modifications.
Breakdown of Calories, Protein, and Other Macronutrients
The nutritional content of Quesadilla Cones will vary depending on the ingredients used, but a typical serving may contain around 250-300 calories, 10-15 grams of protein, and 15-20 grams of fat. The use of lean proteins and fresh vegetables can help boost the nutritional value while keeping the calorie count manageable.
Discussion on Potential Dietary Modifications
If you or your guests have specific dietary needs, Quesadilla Cones can easily be adapted:
– Gluten-Free: Use corn tortillas or gluten-free wraps to accommodate those with gluten sensitivities.
– Vegetarian: Load the cones with a variety of vegetables and beans for a satisfying vegetarian option.
– Dairy-Free: Substitute traditional cheese with dairy-free alternatives or omit it altogether for a lighter, vegan-friendly version.
Balancing Indulgence with Nutrition
While Quesadilla Cones are undeniably indulgent, they can be part of a balanced diet when made with wholesome ingredients. Incorporating plenty of vegetables and opting for lean proteins can create a more nutritious meal without sacrificing flavor.
Conclusion
Quesadilla Cones are a delightful and creative way to enjoy traditional Mexican flavors in a modern format. With their customizable nature and easy preparation, they are perfect for any occasion, whether it’s a casual weeknight dinner or a festive gathering. By following this guide, you can ensure that your Quesadilla Cones will be a hit, satisfying both taste buds and appetites alike.
With the right techniques for preparation, cooking, and presentation, your Quesadilla Cones will not only impress your guests but also become a favorite in your household. So gather your ingredients, unleash your creativity, and enjoy the deliciousness that is Quesadilla Cones!