Indulge in Richness: Red Velvet Cinnamon Rolls with Cream Cheese Glaze

WANT TO SAVE THIS RECIPE?

Introduction

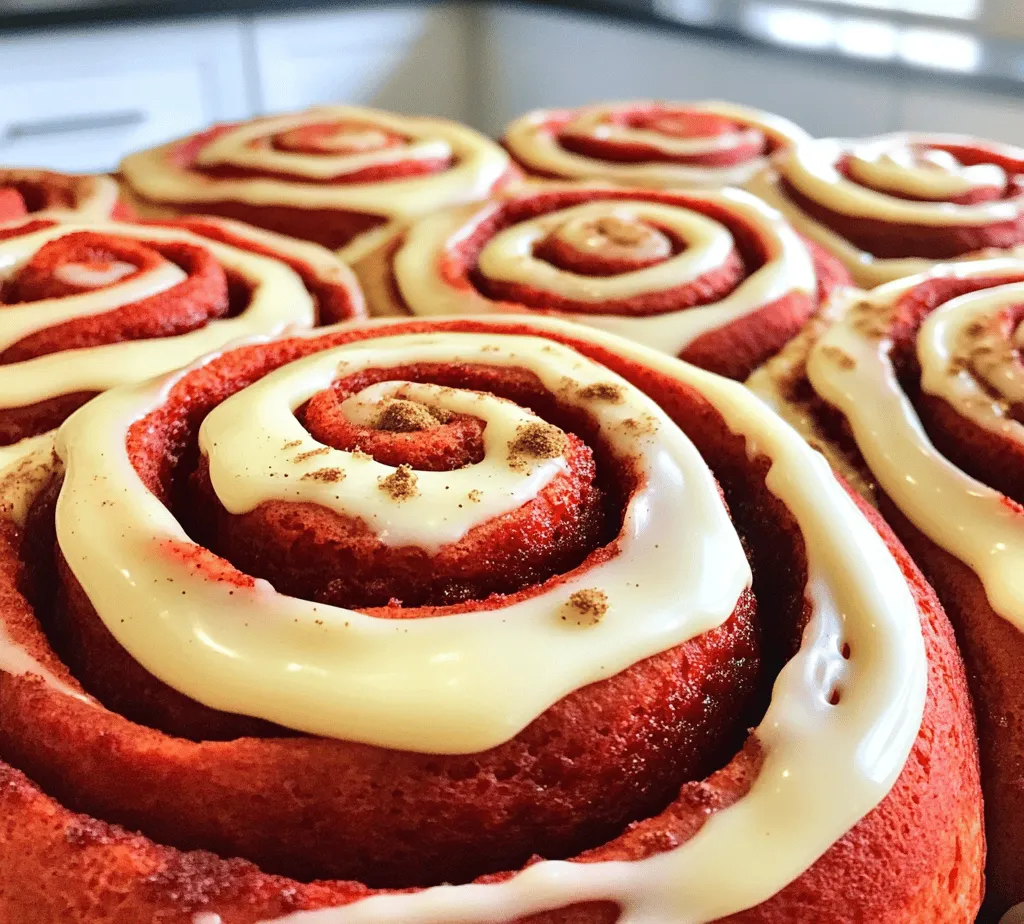
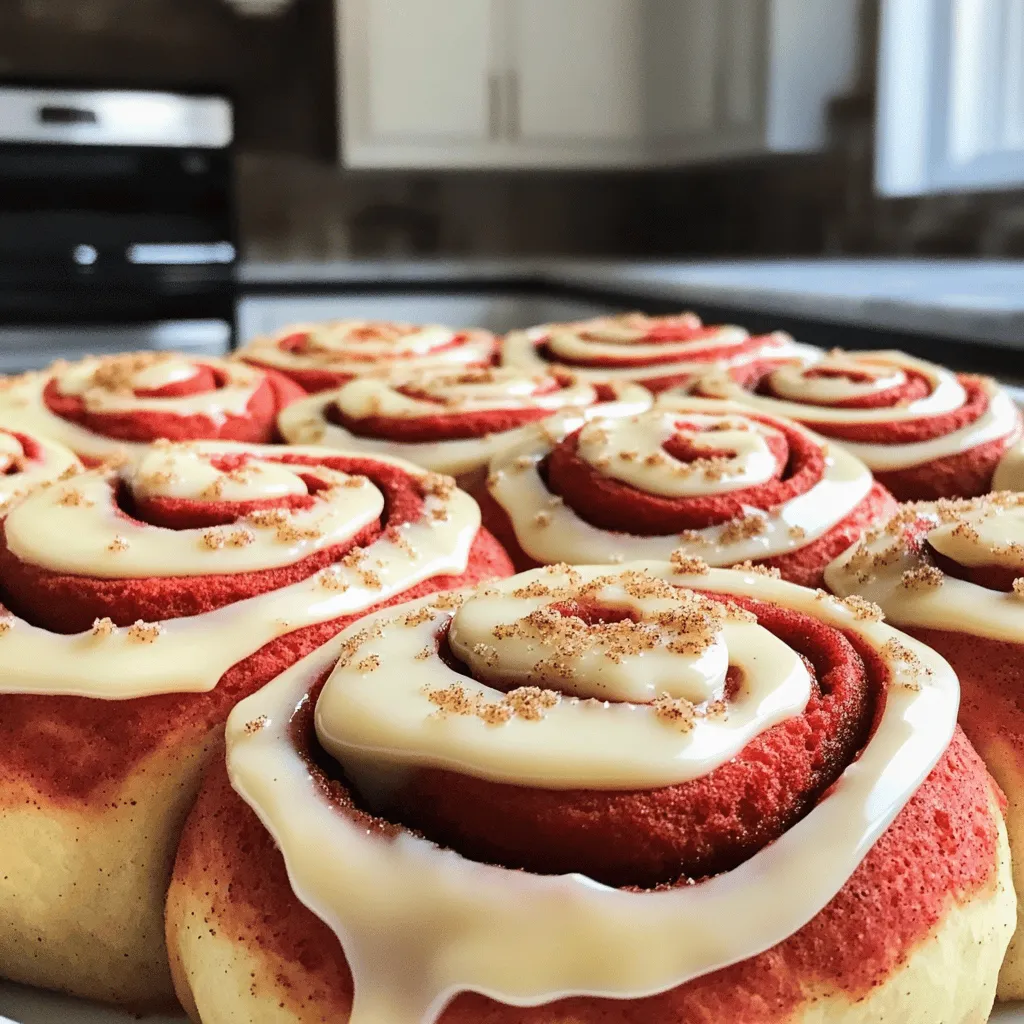
Step into the delightful world of baking with our Red Velvet Cinnamon Rolls, a sumptuous twist on the classic cinnamon roll that beautifully blends rich flavors with eye-catching presentation. Imagine fluffy, tender rolls, each infused with subtle cocoa and vibrant red coloring, topped off with a luscious cream cheese glaze. These rolls are not just a feast for the eyes but also a treat for the taste buds, making them perfect for breakfast, brunch, or an indulgent snack at any time of the day. Whether you’re hosting a gathering or simply want to brighten your morning, these Red Velvet Cinnamon Rolls are sure to impress family and friends alike.

But where did this delightful creation come from? The origins of red velvet desserts date back to the 1920s, with roots in the Southern United States. Initially known as “red velvet cake,” this dessert gained popularity for its soft texture and rich flavor, thanks in part to the addition of cocoa powder and buttermilk. Over the years, bakers have taken the traditional red velvet cake and transformed it into various desserts, including cupcakes and, of course, cinnamon rolls. The combination of the classic cinnamon roll’s comforting flavors with the unique characteristics of red velvet has made this dish a favorite among baking enthusiasts.

In this article, we will guide you through each step of creating these eye-catching Red Velvet Cinnamon Rolls, providing insights into the ingredients that give them their unique flavor and texture. We’ll cover everything from mixing the dough to achieving that perfect rise, ensuring that even novice bakers can master this recipe. So, roll up your sleeves and get ready to embark on a baking adventure that promises to fill your kitchen with irresistible aromas and delight your palate.

Understanding the Ingredients

Before diving into the preparation and cooking process, it’s essential to understand the key ingredients that make these Red Velvet Cinnamon Rolls so special. Each component plays a crucial role in achieving the perfect balance of flavor, texture, and visual appeal.

Key Ingredients

1. All-Purpose Flour: This is the foundation of our dough. All-purpose flour provides the necessary structure and texture, ensuring that the rolls rise properly and maintain their fluffy texture. It’s versatile and easily accessible, making it the go-to choice for most baking recipes.

2. Cocoa Powder: While red velvet is often thought of as a chocolate dessert, the cocoa powder in this recipe adds only a subtle chocolate flavor. More importantly, it enhances the red color of the dough, contributing to the signature look of these cinnamon rolls.

3. Sugar: Sugar is vital for balancing the flavors in our cinnamon rolls. It adds sweetness and also plays a role in the dough’s texture, helping to create a tender crumb. The combination of granulated sugar in the dough and brown sugar in the filling creates a depth of flavor that elevates the rolls.

4. Active Dry Yeast: This ingredient is essential for leavening the dough. The yeast ferments the sugars in the flour, producing carbon dioxide that causes the dough to rise. This process gives the rolls their light and airy quality, making each bite a cloud-like experience.

5. Whole Milk: Milk adds moisture and richness to the dough. Using whole milk enhances the flavor and contributes to a tender texture. It’s important to warm the milk before mixing it with other wet ingredients, as this helps activate the yeast more effectively.

6. Eggs and Butter: Eggs provide structure and richness, while butter adds flavor and contributes to the overall texture of the rolls. These fats are crucial for achieving a soft, tender dough that melts in your mouth.

7. Red Food Coloring: The signature ingredient that gives these rolls their vibrant hue. While the cocoa powder provides a hint of chocolate, the red food coloring is what truly makes these cinnamon rolls stand out visually. It’s important to use the right amount to achieve that eye-catching color without overpowering the flavor.

8. Brown Sugar and Cinnamon: This dynamic duo creates a deliciously sweet filling that perfectly complements the rolls. The warm, spicy notes of cinnamon combined with the rich sweetness of brown sugar are what make cinnamon rolls irresistible.

9. Cream Cheese Glaze: The perfect finishing touch for our Red Velvet Cinnamon Rolls, the cream cheese glaze adds a creamy, tangy sweetness that balances the richness of the rolls. This glaze not only enhances the flavor but also creates a beautiful visual contrast against the vibrant red of the dough.

Preparation and Cooking Process

Now that we have a solid understanding of the ingredients that make up our Red Velvet Cinnamon Rolls, it’s time to dive into the preparation and cooking process. This section will provide detailed, step-by-step instructions to ensure that your baking experience is smooth and enjoyable.

Mixing the Dough

The first step in creating these delightful rolls is to mix the dough. This process involves combining both the dry and wet ingredients to form a soft, pliable dough that will rise beautifully.

Combining Dry Ingredients

Start by gathering your dry ingredients: all-purpose flour, cocoa powder, sugar, active dry yeast, and salt. It’s essential to whisk these ingredients together thoroughly in a large mixing bowl. This step ensures that the yeast is evenly distributed throughout the flour, which is crucial for proper rising.

Why Whisking Matters: Whisking helps to aerate the flour, breaking up any clumps and ensuring that the cocoa powder and salt are evenly dispersed. This will lead to a more consistent texture in your rolls.

Once the dry ingredients are well combined, set this bowl aside and move on to the wet ingredients.

Preparing the Wet Ingredients

For the wet ingredients, you will need whole milk, butter, an egg, and red food coloring. Begin by gently warming the milk in a saucepan or microwave until it’s warm but not hot (about 110°F or 43°C). This temperature is ideal for activating the yeast without killing it.

Melting the Butter: In a separate small bowl, melt the butter and let it cool slightly before adding it to the warm milk. This helps to ensure that the mixture remains at an effective temperature for yeast activation.

Next, whisk together the warm milk, melted butter, egg, and red food coloring in a medium bowl. Ensure that the food coloring is fully incorporated for an even red hue throughout the dough.

Combining Wet and Dry Mixtures

Once your wet ingredients are ready, create a well in the center of your dry ingredient mixture. Pour the wet ingredients into this well and gently stir with a spatula or wooden spoon until the dough begins to come together.

Kneading the Dough: Once the ingredients are combined into a shaggy dough, transfer it to a lightly floured surface. Knead the dough for about 8-10 minutes until it becomes smooth and elastic. If the dough is too sticky, sprinkle a little more flour as needed, but be careful not to add too much, as this can lead to dense rolls.

Kneading and Rising

After kneading, it’s time to let the dough rise. This step is crucial for developing flavor and achieving that light and airy texture we love in cinnamon rolls.

First Rise

Place the kneaded dough in a lightly greased bowl, turning it once to coat the surface with oil. Cover the bowl with a clean kitchen towel or plastic wrap to keep the moisture in. Allow the dough to rise in a warm, draft-free area until it has doubled in size, which typically takes about 1 to 1.5 hours.

Creating a Warm Environment: If your kitchen is cool, you can create a warm environment by placing the bowl in an oven that has been preheated to a low temperature (around 100°F) and then turned off. This method helps the dough rise more effectively.

Once the dough has risen, it’s time to move on to shaping and filling the rolls.

As you embark on this baking adventure, remember that the process is just as important as the final product. Enjoy each step, and soon you will be rewarded with a batch of beautiful Red Velvet Cinnamon Rolls that are sure to become a favorite in your home. Stay tuned as we dive deeper into the next stages of preparing these delightful treats, including shaping, filling, and baking to perfection.

1. <strong>All-Purpose Flour</strong>: This is the foundation of our dough. All-purpose flour provides the necessary structure and texture, ensuring that the rolls rise properly and maintain their fluffy texture. It’s versatile and easily accessible, making it the go-to choice for most baking recipes.” /></p>
</p>
<h2>Techniques for Kneading</h2>
</p>
<p>Kneading is a crucial process when making dough, as it develops the gluten structure, which helps achieve a light and fluffy texture in your Red Velvet Cinnamon Rolls. Start by lightly flouring your work surface and your hands to prevent sticking. Take the dough, which should be slightly tacky but not overly sticky, and place it on the floured surface.</p>
</p>
<p>1. <strong>Begin Kneading</strong>: Use the heel of your hand to push the dough away from you, then fold it back over itself. Turn the dough a quarter turn and repeat the process. This technique allows for even gluten development.</p>
</p>
<p>2. <strong>Knead for Time</strong>: Continue kneading for about 8 to 10 minutes. You should notice the dough becoming smoother and more elastic. If the dough is sticking excessively to your hands or the countertop, sprinkle a little flour, but be careful not to add too much, as this can lead to a dry roll.</p>
</p>
<p>3. <strong>Check for Windowpane Test</strong>: After kneading, perform the windowpane test to check gluten development. Take a small piece of dough and stretch it gently. If it stretches to form a thin, translucent membrane without tearing, your dough is well-kneaded and ready for the first rise.</p>
</p>
<h2>First Rise</h2>
</p>
<p>The first rise, also known as proofing, is essential for letting the yeast work its magic. This process helps develop the flavor and texture of your rolls.</p>
</p>
<p>1. <strong>Ideal Conditions</strong>: Place the kneaded dough in a lightly greased bowl. Cover it with a clean kitchen towel or plastic wrap to keep moisture in. For optimal yeast activation, find a warm, draft-free spot in your kitchen, such as near a sunny window or inside an oven (turned off) with just the light on.</p>
</p>
<p>2. <strong>Timing</strong>: Allow the dough to rise for about 1 to 1.5 hours, or until it has doubled in size. The ideal temperature for yeast activation is between 75°F to 85°F (24°C to 29°C). If the dough is rising slowly, it may be too cold; if it’s rising too quickly, it might be too warm.</p>
</p>
<h2>Creating the Filling</h2>
</p>
<h3>Spreading and Rolling</h3>
</p>
<p>The filling is what makes these cinnamon rolls truly special. Here’s how to achieve an even distribution of flavor:</p>
</p>
<p>1. <strong>Prepare the Filling</strong>: In a small bowl, mix together softened butter, brown sugar, ground cinnamon, and a pinch of salt until well combined.</p>
</p>
<p>2. <strong>Spread the Filling</strong>: After the dough has risen, turn it out onto a floured surface and gently roll it into a large rectangle, about 16 inches by 12 inches. Using a spatula or your hands, spread the filling evenly over the dough, leaving about half an inch around the edges free from filling.</p>
</p>
<p>3. <strong>Rolling</strong>: Starting at one long edge, carefully roll the dough tightly into a log. Aim for a tight roll to ensure the filling stays within each roll.</p>
</p>
<h3>Cutting the Rolls</h3>
</p>
<p>Achieving uniform slices is essential for even baking, so here’s how to cut your rolls properly:</p>
</p>
<p>1. <strong>Use a Sharp Knife or Dental Floss</strong>: Instead of using a knife, which can squish the rolls, consider using unflavored dental floss. Slide a piece of dental floss underneath the log, bring the ends up, cross them, and pull to cut through the dough cleanly. This method helps maintain the shape of the rolls.</p>
</p>
<p>2. <strong>Slice Evenly</strong>: Aim for slices that are about 1.5 inches wide. This will ensure that each roll bakes evenly and provides a good balance of dough and filling.</p>
</p>
<h2>Baking the Rolls</h2>
</p>
<h3>Preheating and Timing</h3>
</p>
<p>Proper baking techniques are crucial for achieving perfect cinnamon rolls:</p>
</p>
<p>1. <strong>Preheat the Oven</strong>: About 30 minutes before baking, preheat your oven to 350°F (175°C). This ensures that the rolls will be placed in a hot environment, promoting even baking and proper rise.</p>
</p>
<p>2. <strong>Arrange the Rolls</strong>: Place the sliced rolls in a greased baking dish, ensuring that they are snug but not overcrowded. This helps them to rise beautifully while baking.</p>
</p>
<h3>Indicators of Doneness</h3>
</p>
<p>Knowing when your rolls are perfectly baked is key:</p>
</p>
<p>1. <strong>Visual Cues</strong>: The rolls should be golden brown on top and have risen significantly.</p>
</p>
<p>2. <strong>Touch Test</strong>: Gently press the top of a roll; it should spring back when lightly pressed, indicating that it is cooked through.</p>
</p>
<p>3. <strong>Internal Temperature</strong>: For a more precise check, use an instant-read thermometer. The internal temperature should reach about 190°F (88°C).</p>
</p>
<h2>Crafting the Cream Cheese Glaze</h2>
</p>
<p>A delicious cream cheese glaze elevates the flavor of your Red Velvet Cinnamon Rolls:</p>
</p>
<h3>Mixing the Glaze</h3>
</p>
<p>1. <strong>Ingredients</strong>: In a mixing bowl, combine softened cream cheese, powdered sugar, vanilla extract, and a splash of milk.</p>
</p>
<p>2. <strong>Mixing Technique</strong>: Using an electric mixer or a whisk, beat the mixture until smooth and creamy. If the glaze is too thick, add more milk a teaspoon at a time until you reach your desired consistency.</p>
</p>
<h3>Application Techniques</h3>
</p>
<p>1. <strong>Drizzling</strong>: Once your rolls are out of the oven and slightly cooled, use a spoon or a piping bag to drizzle the glaze over the top. This not only adds flavor but also enhances the visual appeal of the rolls.</p>
</p>
<p>2. <strong>Presentation</strong>: For an extra touch, sprinkle some extra cinnamon or finely chopped nuts on top of the glaze before it sets. This adds both flavor and texture.</p>
</p>
<h2>Nutritional Information</h2>
</p>
<p>Being mindful of dietary choices is important. Here’s a breakdown of the nutritional content for one serving (one roll) of Red Velvet Cinnamon Rolls with Cream Cheese Glaze:</p>
</p>
<p>– <strong>Calories</strong>: Approximately 350</p>
<p>– <strong>Total Fat</strong>: 15g</p>
<p>– <strong>Saturated Fat</strong>: 8g</p>
<p>– <strong>Cholesterol</strong>: 50mg</p>
<p>– <strong>Sodium</strong>: 270mg</p>
<p>– <strong>Total Carbohydrates</strong>: 50g</p>
<p>– <strong>Dietary Fiber</strong>: 1g</p>
<p>– <strong>Sugars</strong>: 20g</p>
<p>– <strong>Protein</strong>: 4g</p>
</p>
<p>This information can vary based on specific ingredients and portion sizes, so consider adjusting as needed for dietary preferences.</p>
</p>
<h2>The History of Cinnamon Rolls</h2>
</p>
<p>Cinnamon rolls have a rich history that spans centuries and cultures. Originating from Sweden, these delightful pastries are known as “kanelbullar” and were traditionally served during special occasions and holidays. Over time, they made their way to North America, where variations like the American cinnamon roll, characterized by its sweet icing, became popular.</p>
</p>
<p>The evolution of these rolls reflects broader culinary trends, with unique twists emerging in various cultures. Today, cinnamon rolls are enjoyed worldwide, often served as breakfast or dessert, embodying a sense of comfort and indulgence.</p>
</p>
<h2>Variations and Customizations</h2>
</p>
<p>One of the joys of baking is the ability to customize recipes to suit different tastes. Here are some creative ideas for modifying your Red Velvet Cinnamon Rolls:</p>
</p>
<p>1. <strong>Gluten-Free Option</strong>: Substitute all-purpose flour with a 1:1 gluten-free baking blend. Ensure your other ingredients, like baking powder and vanilla extract, are also gluten-free.</p>
</p>
<p>2. <strong>Alternative Frostings</strong>: Experiment with different frosting flavors, such as chocolate ganache or a simple vanilla glaze for a different taste profile.</p>
</p>
<p>3. <strong>Mix-Ins</strong>: Consider adding chocolate chips or chopped nuts to the filling for added texture and flavor.</p>
</p>
<p>4. <strong>Seasonal Variations</strong>: Incorporate seasonal spices like nutmeg or pumpkin spice during the autumn months for a fall-inspired twist.</p>
</p>
<h2>Pairing Suggestions</h2>
</p>
<p>Enhance your experience of enjoying Red Velvet Cinnamon Rolls with thoughtful pairings:</p>
</p>
<p>1. <strong>Beverages</strong>: Pair your rolls with a creamy latte, a hot cup of cocoa, or a refreshing glass of cold milk. These beverages complement the sweetness of the rolls beautifully.</p>
</p>
<p>2. <strong>Accompaniments</strong>: Serve alongside fresh fruit, such as strawberries or raspberries, to add a tart contrast to the rich sweetness of the rolls. You might also consider a light salad for a balanced brunch.</p>
</p>
<h2>Conclusion</h2>
</p>
<p>Red Velvet Cinnamon Rolls are more than just a dessert; they embody comfort and celebration. With their visually stunning appearance and delectable taste, these rolls can elevate any occasion. Whether you’re baking them for a special gathering or simply indulging in a sweet treat, the joy of creating and sharing these rolls is unmatched. We hope this guide has provided you with a comprehensive understanding of how to make these delightful cinnamon rolls, along with insights into their rich history and possibilities for customization. Enjoy the process of baking and the delicious rewards that follow.</p>
</div>

1. All-Purpose Flour: This is the foundation of our dough. All-purpose flour provides the necessary structure and texture, ensuring that the rolls rise properly and maintain their fluffy texture. It's versatile and easily accessible, making it the go-to choice for most baking recipes.

Red Velvet Cinnamon Roll

Discover the decadent delight of Red Velvet Cinnamon Rolls with Cream Cheese Glaze! These fluffy, cocoa-infused rolls are topped with a luscious glaze, making them perfect for any occasion. Whether you're a seasoned baker or a novice, follow our step-by-step guide to create this eye-catching treat that will impress your family and friends. Click through to explore the full recipe and bring this delicious twist on a classic favorite to your kitchen!

Ingredients
  

2 ½ cups all-purpose flour

2 tablespoons cocoa powder

¼ cup granulated sugar

1 packet (2 ¼ teaspoons) active dry yeast

½ teaspoon salt

½ cup whole milk, warmed

1 large egg

2 tablespoons unsalted butter, melted

1 tablespoon red food coloring

½ cup brown sugar, packed

1 tablespoon ground cinnamon

¼ cup unsalted butter, softened (for filling)

½ cup cream cheese, softened

1 cup powdered sugar

2 tablespoons milk (for glaze)

1 teaspoon vanilla extract

Instructions
 

In a large mixing bowl, combine 2 cups of flour, cocoa powder, sugar, yeast, and salt. Whisk together until fully mixed.

    In a separate bowl, combine the warmed milk, melted butter, egg, and red food coloring. Stir well to combine.

      Make a well in the dry ingredients and pour in the wet mixture. Gradually add the remaining flour (about ½ cup) as needed until a soft dough forms.

        Turn the dough onto a floured surface and knead for about 5-7 minutes until smooth and elastic. Place in a greased bowl, cover with a damp cloth, and let rise for 1 hour or until doubled in size.

          After the dough has risen, punch it down to release air, then roll it out into a rectangular shape (about 16x12 inches).

            Spread the softened butter over the dough, then sprinkle the brown sugar and cinnamon evenly on top. Roll the dough tightly from the long side to form a log.

              Cut the log into 12 equal-sized rolls and place them in a greased baking dish. Cover and let them rise for another 30 minutes.

                Preheat the oven to 350°F (175°C). Once the rolls have risen, bake them for 25-30 minutes until lightly golden.

                  While the rolls are baking, prepare the glaze by mixing the softened cream cheese, powdered sugar, milk, and vanilla extract in a bowl until smooth.

                    Once the rolls are done, let them cool for about 10 minutes, then drizzle the cream cheese glaze over the top. Serve warm and enjoy!

                      Prep Time: 20 minutes | Total Time: 2 hours | Servings: 12 rolls

                        WANT TO SAVE THIS RECIPE?

                        Leave a Comment

                        Recipe Rating