Introduction
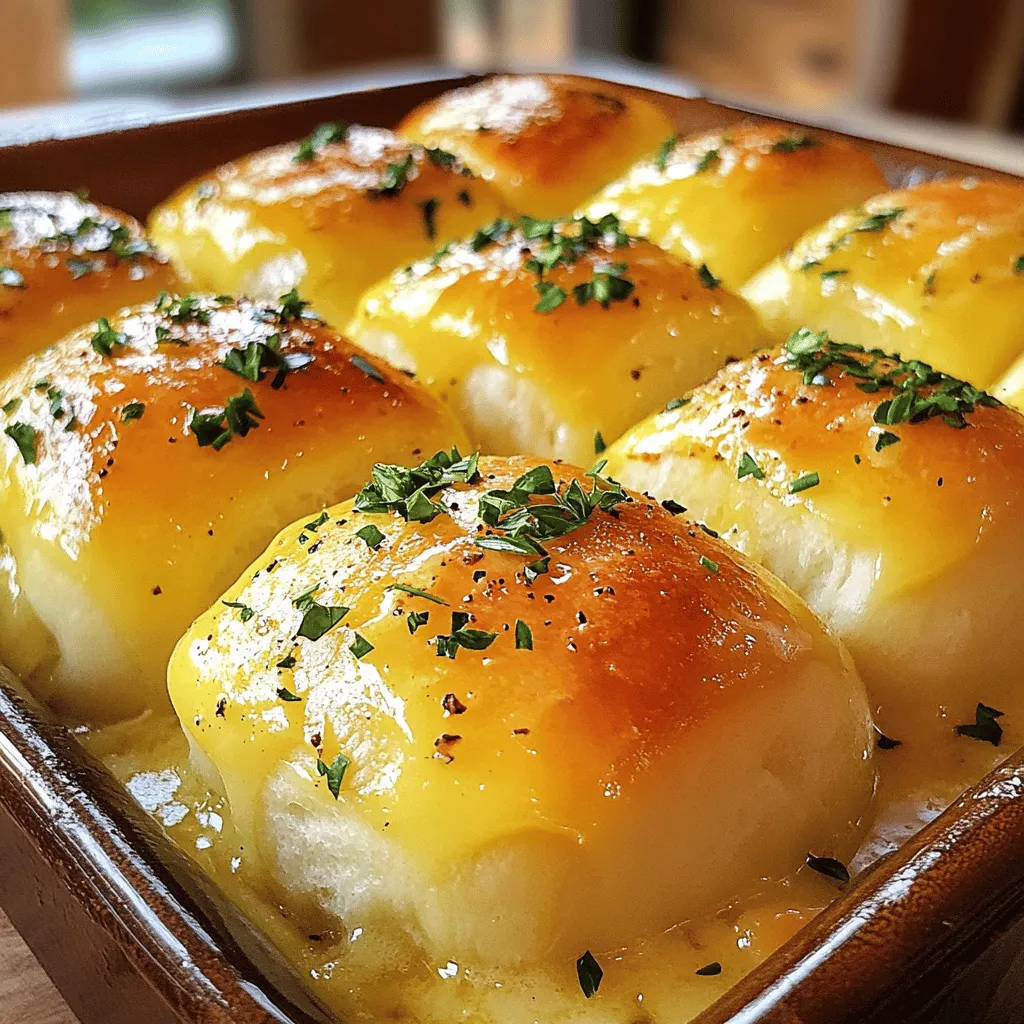
There’s something undeniably appealing about the aroma of freshly baked bread wafting through the kitchen. The enticing smell of homemade dinner rolls has a unique ability to evoke feelings of warmth, comfort, and nostalgia. When it comes to dinner rolls, few recipes can compete with the allure of Heavenly Garlic Butter Dinner Rolls. Imagine soft, pillowy rolls, infused with a rich garlic flavor, slathered with decadent garlic butter, and garnished with a sprinkle of fresh parsley. These rolls are not only a feast for the palate but also a visual delight that can elevate any meal, making them perfect for gatherings, holiday dinners, or simply a cozy family night.
The combination of fluffy texture and robust garlic flavor creates a dining experience that is hard to forget. Each bite offers a buttery richness, complemented by the aromatic essence of garlic, making these rolls a favorite for many. Whether served alongside a hearty stew, a crisp salad, or simply enjoyed on their own, these Heavenly Garlic Butter Dinner Rolls are sure to impress your family and guests alike.
In this article, we will delve into the details of this delightful recipe, exploring not only how to make these rolls but also the roles played by each ingredient. We’ll guide you through the entire process, ensuring you can recreate this delectable dish in your own kitchen.
Understanding the Ingredients
A successful recipe begins with understanding the ingredients that contribute to its flavor and texture. Each component of our Heavenly Garlic Butter Dinner Rolls plays a crucial role, and knowing how they work together can help you achieve the best results.
All-Purpose Flour
The backbone of our dinner rolls, all-purpose flour provides the necessary structure and texture. With a moderate protein content, it strikes a balance between creating a soft, airy roll and providing enough strength to hold its shape. The gluten developed during mixing and kneading is essential for achieving that desirable fluffy texture.
Warm Water
Water is vital in activating the yeast and hydrating the flour. However, the temperature of the water is crucial; it should be warm but not hot, ideally between 100°F and 110°F (37°C to 43°C). This temperature range helps to activate the yeast effectively, encouraging it to multiply and produce carbon dioxide, which in turn helps the rolls rise.
Active Dry Yeast
As the primary leavening agent in our recipe, active dry yeast is responsible for making the rolls light and fluffy. When activated in warm water, the yeast begins to ferment, creating bubbles of carbon dioxide. This process causes the dough to rise and develop that airy, soft texture we all love in dinner rolls.
Granulated Sugar
Sugar serves a dual purpose in this recipe. Firstly, it enhances the flavor of the rolls, providing a subtle sweetness. More importantly, sugar is a vital food source for the yeast, promoting its activity and aiding in the fermentation process. This results in a better rise and improved texture.
Salt
While it might seem counterintuitive, salt is essential in bread making. It not only balances flavors but also strengthens gluten, improving the overall structure of the dough. Additionally, salt helps to control the fermentation process, ensuring the yeast doesn’t become overly active, which can lead to dense rolls.
Unsalted Butter
Butter adds richness and moisture to the rolls, contributing to their tender texture. Unsalted butter is preferred, as it allows you to have full control over the salt content in your recipe. The addition of melted butter in the dough also enhances the flavor profile, making these rolls incredibly indulgent.
Garlic
Garlic is the star flavor profile in our Heavenly Garlic Butter Dinner Rolls. It adds a robust, savory taste that complements the buttery richness perfectly. Fresh garlic cloves will infuse the rolls with a delightful aroma and flavor that is simply irresistible.
Parsley
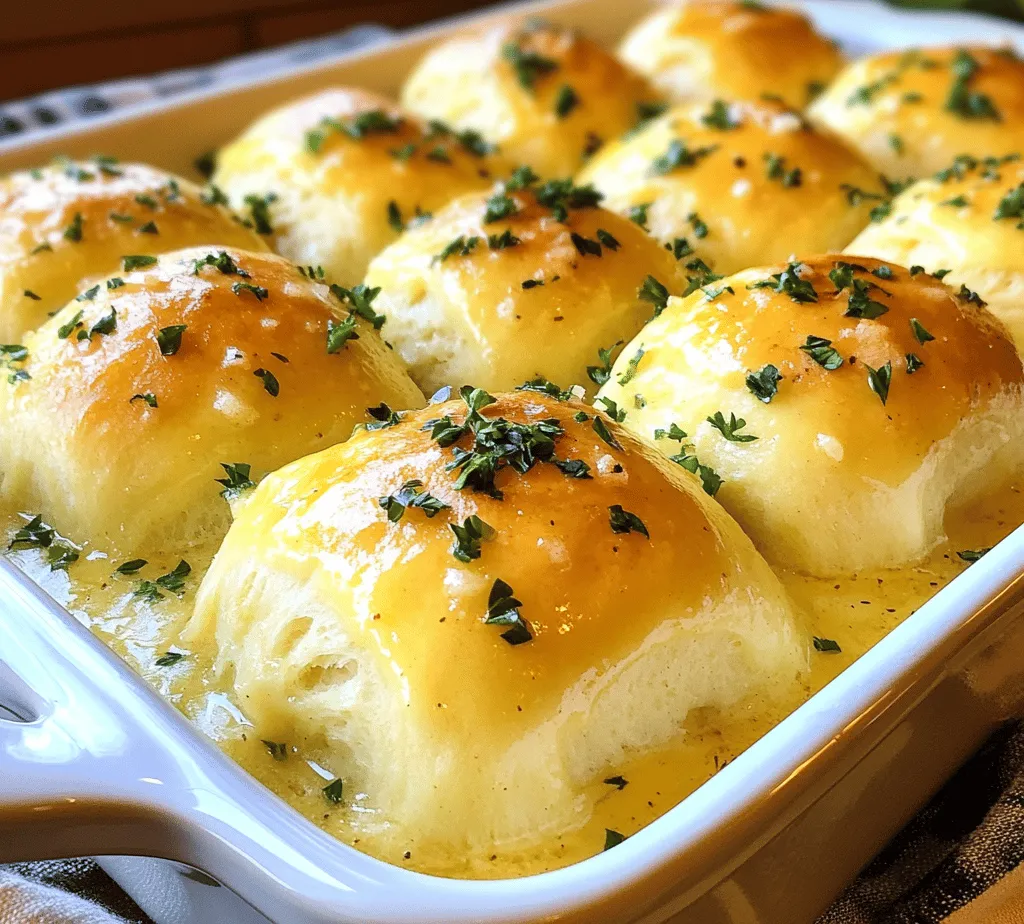
Fresh parsley isn’t just a garnish; it adds a pop of color and a hint of freshness to the rolls. The bright green flecks provide a pleasing contrast against the golden brown rolls and enhance the overall visual appeal of your dish.
Garlic Powder
In addition to fresh garlic, garlic powder amplifies the garlic flavor in the rolls. It ensures that every bite is packed with that beloved garlic essence, providing an even more intense flavor experience.
Additional Melted Butter
Finally, a generous brushing of melted butter before serving gives the rolls a beautiful golden finish and an extra layer of richness. It’s the finishing touch that takes these rolls from delicious to heavenly.
Step-by-Step Instructions
Now that we have a solid understanding of the ingredients, let’s move on to the step-by-step instructions for making these Heavenly Garlic Butter Dinner Rolls. Each step is designed to guide you through the process, ensuring you achieve the best possible results.
Step 1: Activating the Yeast
Begin by activating the yeast, which is critical for ensuring your rolls rise properly. In a small bowl, combine the warm water and granulated sugar. Stir until the sugar dissolves, then sprinkle the active dry yeast over the top. Allow the mixture to sit for about 5 to 10 minutes. You’ll know the yeast is activated when it becomes frothy and bubbly, indicating that the yeast is alive and ready to work its magic in your dough.
Step 2: Mixing the Dough
In a large mixing bowl, combine the all-purpose flour and salt. Create a well in the center of the flour mixture and pour in the activated yeast mixture, along with the melted unsalted butter and minced garlic. Using a wooden spoon or a dough whisk, mix the ingredients until a shaggy dough forms. At this stage, you may need to adjust the flour or water slightly, depending on the humidity and temperature of your environment.
Step 3: Kneading the Dough
Once the dough has come together, transfer it to a lightly floured surface. Knead the dough by pressing it down and folding it over itself, turning it a quarter turn after each fold. This process develops the gluten, which is essential for the structure of the rolls. Knead for about 8 to 10 minutes, until the dough is smooth and elastic. You can test the dough’s readiness by performing the “windowpane test”: stretch a small piece of dough; if it forms a thin, translucent membrane without tearing, it’s ready.
Step 4: First Rise
Form the kneaded dough into a ball and place it in a greased bowl, turning it to coat the surface lightly in oil. Cover the bowl with a clean kitchen towel or plastic wrap, and place it in a warm, draft-free area. Allow the dough to rise until it has doubled in size, which typically takes about 1 to 1.5 hours.
This initial rise is crucial for developing flavor and texture in the rolls. As the dough rises, the yeast ferments, producing carbon dioxide and alcohol, which contribute to the unique flavor profile of the rolls.
Step 5: Shaping the Rolls
After the dough has risen, gently punch it down to release the built-up gas. Turn the dough out onto a floured surface and divide it into equal pieces, about 12 to 15, depending on how large you want your rolls. Shape each piece into a smooth ball by tucking the edges underneath to create surface tension.
Step 6: Second Rise
Place the shaped rolls in a greased baking dish or on a parchment-lined baking sheet, leaving some space between each roll for expansion. Cover them again with a kitchen towel and allow them to rise a second time for about 30 to 45 minutes, or until they have puffed up significantly.
This second rise is essential for achieving that light, fluffy texture. It allows the rolls to develop further flavor and ensures they will rise nicely in the oven.
Step 7: Preheat the Oven
While the rolls are rising, preheat your oven to 375°F (190°C). This ensures that the rolls will bake evenly and develop a beautiful golden crust.
Step 8: Baking the Rolls
Once the rolls have completed their second rise, uncover them and brush the tops with melted butter for a golden finish. Bake in the preheated oven for about 15 to 20 minutes, or until they are golden brown and sound hollow when tapped on the bottom.
As the rolls bake, the aroma of garlic and butter will fill your kitchen, making it nearly impossible to resist sneaking a taste before they cool.
Step 9: Adding the Garlic Butter Topping
As soon as the rolls come out of the oven, brush them generously with melted garlic butter (made by combining more melted butter with minced garlic and chopped parsley). This final touch enhances the flavor and gives the rolls a glossy finish.
Step 10: Cool and Serve
Allow the rolls to cool slightly in the pan before serving. They are best enjoyed warm, fresh out of the oven, but can be stored in an airtight container for a few days.
These Heavenly Garlic Butter Dinner Rolls are not just a side; they are a star in their own right, perfect for any occasion. Whether you are celebrating a holiday, hosting a dinner party, or simply enjoying a family meal, these rolls will undoubtedly steal the show.
The First Rise: Importance of Warm Environments for Yeast
The first rise, or fermentation, is a critical step in the bread-making process. It’s during this time that the yeast activates, consuming sugars and releasing carbon dioxide, which causes the dough to rise. To achieve the best results, it’s essential to provide a warm environment for the yeast to thrive. Ideally, the temperature should be between 75°F to 85°F (24°C to 29°C). If your kitchen is cool, consider placing the dough in a slightly warmed oven (turned off) or near a warm spot in your home, like on top of the refrigerator. Cover the bowl with a clean kitchen towel or plastic wrap to retain moisture, allowing the dough to double in size, which typically takes about 1 to 2 hours.
Preparing Garlic Butter: Techniques for Flavor Infusion
While the dough is rising, it’s the perfect time to prepare your garlic butter. For the most flavorful infusion, start with unsalted butter; this allows you to control the saltiness of your rolls. Melt the butter gently in a saucepan over low heat. Once melted, add minced garlic—fresh garlic works best for a robust flavor. Sauté the garlic briefly (just a minute or two) until fragrant but not browned, as burnt garlic can impart a bitter flavor. For added depth, consider infusing the butter with fresh herbs such as parsley or thyme as it melts. This garlic butter can be prepared ahead of time and stored in the refrigerator until you’re ready to use it.
Shaping the Rolls: Tips for Uniformity and Appearance
Once the dough has risen, it’s time to shape the rolls. Gently punch down the dough to release excess gas, then turn it out onto a lightly floured surface. Divide the dough into equal pieces, typically about 12 to 16, depending on your preferred size. For uniformity, use a kitchen scale to measure each piece if you want precision. Roll each piece into a smooth ball by cupping your hand over it and making circular motions against the countertop. This technique creates tension on the surface of the dough, leading to beautifully shaped rolls. Place the shaped rolls in a greased baking dish, ensuring they are close together but not touching, as they will rise further during the second proofing.
The Second Rise: Final Proofing for Fluffy Rolls
After shaping the rolls, cover them again with a clean kitchen towel and let them rise for another 30 to 45 minutes in a warm environment. This second rise, or proof, allows the gluten to relax and the yeast to further aerate the dough, yielding fluffy and light rolls. To check if they are ready, gently poke one roll with your finger; if the indentation springs back slowly, the rolls are perfectly proofed. If it springs back quickly, they need a bit more time.
Preheating the Oven: Ensuring Even Baking
While the rolls are undergoing their second rise, preheat your oven to 375°F (190°C). Proper preheating is crucial for even baking and achieving that desired golden crust. An oven thermometer can be helpful to ensure your oven is at the correct temperature, as many home ovens can be off by a few degrees. Once preheated, your rolls will benefit from the hot air circulating evenly around them, leading to a beautifully baked exterior.
Baking the Rolls: Signs of Doneness and Achieving a Golden Crust
Once the rolls have risen beautifully, it’s time to bake them. Carefully place the baking dish in the oven and set a timer for 20 to 25 minutes. The rolls are done when they are golden brown on top and sound hollow when tapped on the bottom. Internal temperature should reach around 190°F (88°C). If you prefer an extra crispy crust, you can place a shallow pan of water in the oven to create steam during the first 10 minutes of baking, which helps develop a nice crust.
Brushing with Garlic Butter: Enhancing the Flavor Post-Baking
As soon as you pull the rolls from the oven, brush them generously with the prepared garlic butter. This step not only adds flavor but also gives the rolls a beautiful sheen. Allow the rolls to cool for a few minutes before serving, which helps them set while still retaining their soft, fluffy texture. The aroma of garlic wafting through your kitchen will be irresistible.
Baking Tips and Techniques
To ensure your garlic butter dinner rolls turn out perfectly, here are some essential tips and techniques:
– Common Pitfalls and How to Avoid Them: One common mistake is over-proofing the dough, which can lead to dense rolls. If the dough rises too long, it may collapse during baking. Always keep an eye on the dough and perform the poke test.
– Importance of Measuring Ingredients Accurately: Baking is a science, so accurate measurement is vital. Use a kitchen scale for dry ingredients and liquid measuring cups for wet ingredients to guarantee consistency.
– Tips for Achieving the Perfect Texture and Flavor Balance: For a richer flavor, consider using bread flour instead of all-purpose flour, as it has a higher protein content, which helps create a chewier texture.
– Alternative Methods for Infusing Garlic Flavor: If you prefer a milder garlic flavor, try using garlic powder in the butter instead of fresh garlic. You can also experiment with roasted garlic for a sweeter, richer taste.
Serving Suggestions
These heavenly garlic butter dinner rolls are versatile and pair beautifully with a variety of meals. Here are some ideas:
– Pairing with Meals: Serve them alongside hearty soups, such as minestrone or chicken noodle, or with roasted meats like chicken, beef, or pork. They also complement pasta dishes, making them a fantastic addition to Italian feasts.
– Family Gatherings and Special Occasions: These rolls are perfect for family dinners, holiday gatherings, or any special occasion. Present them in a basket lined with a cloth for a rustic touch that enhances their homemade appeal.
– Creative Uses for Leftover Rolls: If you have any rolls left over, consider making garlic bread by slicing them in half, spreading more garlic butter, and toasting them in the oven. Alternatively, use them to create a savory bread pudding or as a base for sliders.
Nutritional Information
These garlic butter dinner rolls are an indulgent treat, but they also provide essential nutrients. Each roll contains roughly 150 calories, depending on the size and exact ingredients used. Made primarily with flour, yeast, butter, and garlic, they offer carbohydrates for energy, while the butter adds fats and flavor. Incorporating fresh herbs can enhance the nutritional profile as well.
Conclusion
There’s immense joy in making and enjoying homemade garlic butter dinner rolls. From the delightful aroma filling your kitchen to the satisfaction of pulling perfectly baked rolls from the oven, this recipe is sure to become a cherished staple in your home. The process is simple yet rewarding, allowing you to master the art of bread-making while creating a beloved dish for family and friends. We encourage you to try making these rolls, savor the rich flavors, and share your experiences with others. Happy baking!