Introduction
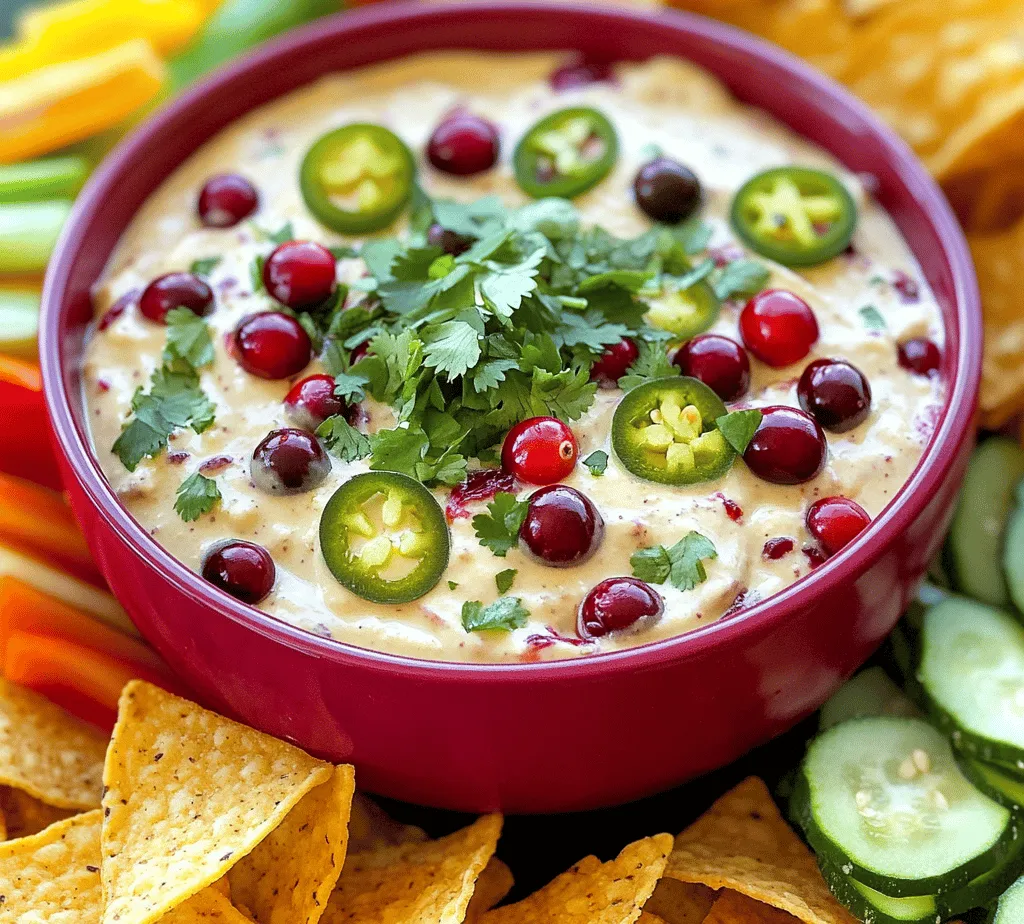
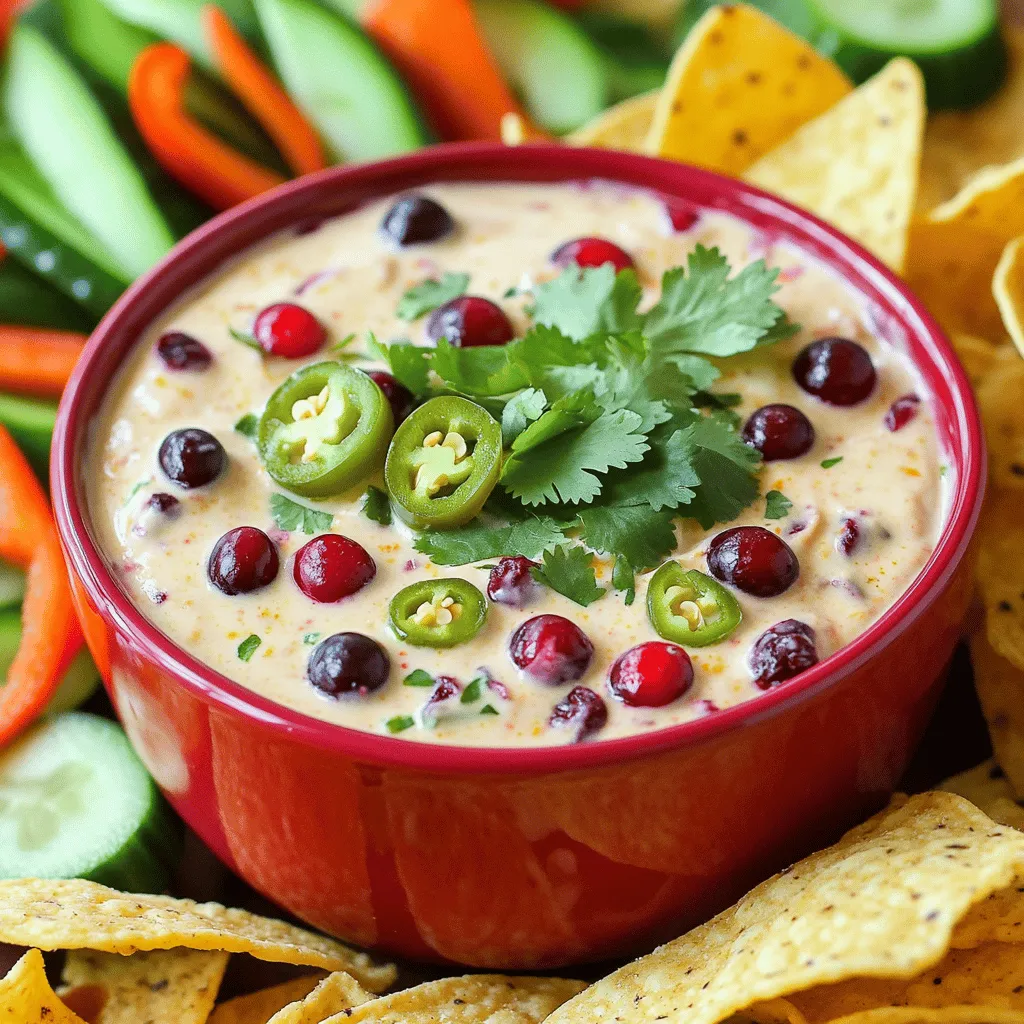
When it comes to creating the perfect atmosphere for gatherings and celebrations, the right dip can make all the difference. Among the many options available, the Creamy Cranberry Jalapeño Dip stands out as a unique and enticing choice that combines a delightful medley of flavors. This dip offers a tantalizing blend of tartness from fresh cranberries, rich creaminess from dairy ingredients, and a spicy kick from jalapeños.
The beauty of this dip lies not only in its complex flavor profile but also in its versatility. Whether you’re hosting a festive holiday party, a casual get-together with friends, or a summer barbecue, this dip is sure to impress your guests. It pairs beautifully with an array of dippers, from crispy tortilla chips to fresh vegetable sticks, making it a go-to option for any occasion.
In an era where convenience is key, having a simple yet flavorful dip recipe in your repertoire is invaluable. This Creamy Cranberry Jalapeño Dip is easy to prepare, requiring minimal effort while delivering maximum taste. It’s the kind of dish that will have everyone reaching for more, sparking conversations and creating memories. Let’s dive deeper into the ingredients that make this dip so special and explore how to bring it to life in your kitchen.
Understanding the Ingredients
To truly appreciate the Creamy Cranberry Jalapeño Dip, it’s essential to understand each ingredient’s role and how they work together to create this mouthwatering treat.
Fresh vs. Frozen Cranberries
At the heart of this dip lies the cranberry, which provides both tartness and a vibrant color. When choosing cranberries, you may wonder whether to opt for fresh or frozen. Fresh cranberries are typically available in the fall and winter months, while frozen cranberries can be found year-round.
Nutritional Benefits: Both fresh and frozen cranberries are rich in antioxidants, particularly vitamin C and dietary fiber, which promote overall health. Fresh cranberries may have a slight advantage in flavor, as they are often brighter and more tart. However, frozen cranberries are just as nutritious and can be just as flavorful when cooked. For this recipe, cooking the cranberries will enhance their sweetness and reduce some of their tartness, making them the perfect base for your dip.
Cream Cheese, Sour Cream, and Mayonnaise
The creaminess of this dip is achieved through a combination of cream cheese, sour cream, and mayonnaise. Each of these ingredients contributes to the overall texture and flavor:
– Cream Cheese: This ingredient provides a rich and smooth base that helps bind all the flavors together. It adds a subtle tanginess while also ensuring the dip has a thick, spreadable consistency.
– Sour Cream: With its slightly tart flavor, sour cream enhances the creaminess while providing a refreshing element. It helps to balance the heat from the jalapeños and the sweetness from the cranberries.
– Mayonnaise: A touch of mayonnaise adds richness and depth to the dip. It helps to elevate the creaminess without overpowering the other flavors, creating a well-rounded taste experience.
Jalapeños: Adjusting Spice Levels
Jalapeños are the star of the show when it comes to adding heat to the Creamy Cranberry Jalapeño Dip. Their bright flavor and moderate spice level make them an excellent choice for this recipe. However, spice tolerance varies from person to person, and you may want to adjust the level of heat based on your preference.
Health Benefits: Jalapeños are not just about heat; they also offer health benefits. They are low in calories and packed with vitamins A and C, as well as capsaicin, which has been linked to various health benefits, including improved metabolism and pain relief.
For those who prefer a milder dip, you can remove the seeds and membranes of the jalapeños, where most of the heat resides. Alternatively, if you love a kick, feel free to add more jalapeños or even experiment with other spicy peppers.
Honey: Balancing Tartness and Sweetness
To create a well-balanced flavor profile, honey is added to the dip. Its natural sweetness counteracts the tartness of the cranberries and enhances the overall taste. Using honey allows you to achieve a perfect harmony of flavors without the need for refined sugars, making it a healthier option.
Lime Juice: Adding Acidity and Freshness
A splash of fresh lime juice not only adds acidity but also brings a burst of freshness to the dip. The bright citrus notes complement the cranberries and jalapeños, elevating the flavor profile. Lime juice also helps to cut through the creaminess, ensuring that each bite is refreshing and light.
Garlic Powder: Enhancing Flavor Depth
Garlic powder is a pantry staple that adds depth to the dip’s flavor. It provides a savory note that balances the sweetness of the cranberries and the heat of the jalapeños. Using garlic powder instead of fresh garlic ensures that the dip has a smooth texture, without any chunks that could disrupt the creamy consistency.
Importance of Seasoning: Salt and Pepper
Finally, don’t underestimate the importance of seasoning. A pinch of salt and a dash of black pepper can elevate the flavors of the dip significantly. Salt enhances the sweetness of the cranberries and brings out the natural flavors of the other ingredients, while pepper adds just a hint of warmth.
Step-by-Step Instructions
Now that we’ve explored the ingredients that make up this delightful dip, let’s move on to the preparation process. Follow these clear and concise steps to create your own Creamy Cranberry Jalapeño Dip, perfect for your next gathering.
Step 1: Cooking the Cranberries
Start by rinsing your cranberries thoroughly. If you’re using fresh cranberries, remove any stems or blemished berries. In a medium saucepan over medium heat, combine the cranberries with a splash of water and a drizzle of honey. Cook the cranberries until they begin to burst, which should take about 5-7 minutes. Stir occasionally to ensure they don’t stick to the bottom of the pan. Once they’ve burst and softened, remove them from heat and let them cool completely.
Step 2: Mixing the Cream Base
While the cranberries are cooling, prepare the creamy base for your dip. In a mixing bowl, combine softened cream cheese, sour cream, and mayonnaise. Using an electric mixer or a whisk, beat the ingredients until they are smooth and creamy. Take your time with this step; a well-mixed base will ensure a velvety texture in the final dip.
Step 3: Combining Ingredients
Once the cranberries have cooled, fold them into the cream mixture. Add the diced jalapeños, lime juice, garlic powder, and a pinch of salt and pepper. Use a spatula to gently combine the ingredients, ensuring that the cranberries and jalapeños are evenly distributed throughout the creamy base. Taste the mixture and adjust the seasoning if needed, adding more honey for sweetness or lime juice for acidity, depending on your preference.
Step 4: Cooling and Refrigeration
For the best flavor, it’s crucial to let the dip rest in the refrigerator for at least an hour before serving. This allows the flavors to meld together and intensify. Transfer the dip to a serving bowl, cover it with plastic wrap, and chill it in the fridge.
Step 5: Presentation Techniques
When you’re ready to serve, consider garnishing the dip with additional chopped jalapeños, fresh herbs, or a sprinkle of lime zest for an added touch of color and flavor. Serve the Creamy Cranberry Jalapeño Dip alongside an array of dippers, such as tortilla chips, crackers, or fresh vegetable sticks, to create a visually appealing and inviting spread.
Nutritional Information
As with any recipe, understanding the nutritional benefits of your dish is essential. The Creamy Cranberry Jalapeño Dip offers a range of nutrients from its ingredients. Packed with antioxidants from the cranberries, healthy fats from the cream cheese and mayonnaise, and vitamins from the jalapeños and lime juice, this dip is not only delicious but can also be part of a balanced diet when enjoyed in moderation.
Stay tuned for more tips and insights in the next part of this article, where we’ll delve into variations of the dip, serving suggestions, and answers to common questions about this crowd-pleasing appetizer.