Craving a sweet treat that’s both simple and delicious? Our Cookies and Cream Icebox Cake is the answer! This delightful dessert requires no baking and uses just a few tasty ingredients. Imagine layers of creamy goodness paired with crunchy chocolate cookies. Perfect for any occasion, it will impress your family and friends. Ready to create this delightful cake? Let’s dive into the easy steps and flavorful tips!
Why I Love This Recipe
- Easy to Make: This icebox cake requires no baking, making it a simple and fun dessert to prepare.
- Delicious Layers: The combination of crushed chocolate cookies and creamy filling creates a delightful balance of textures and flavors.
- Perfect for Gatherings: This dessert serves a crowd, making it ideal for parties and family gatherings.
- Make-Ahead Option: You can prepare this icebox cake in advance, allowing the flavors to develop while you focus on other meal prep.
Ingredients
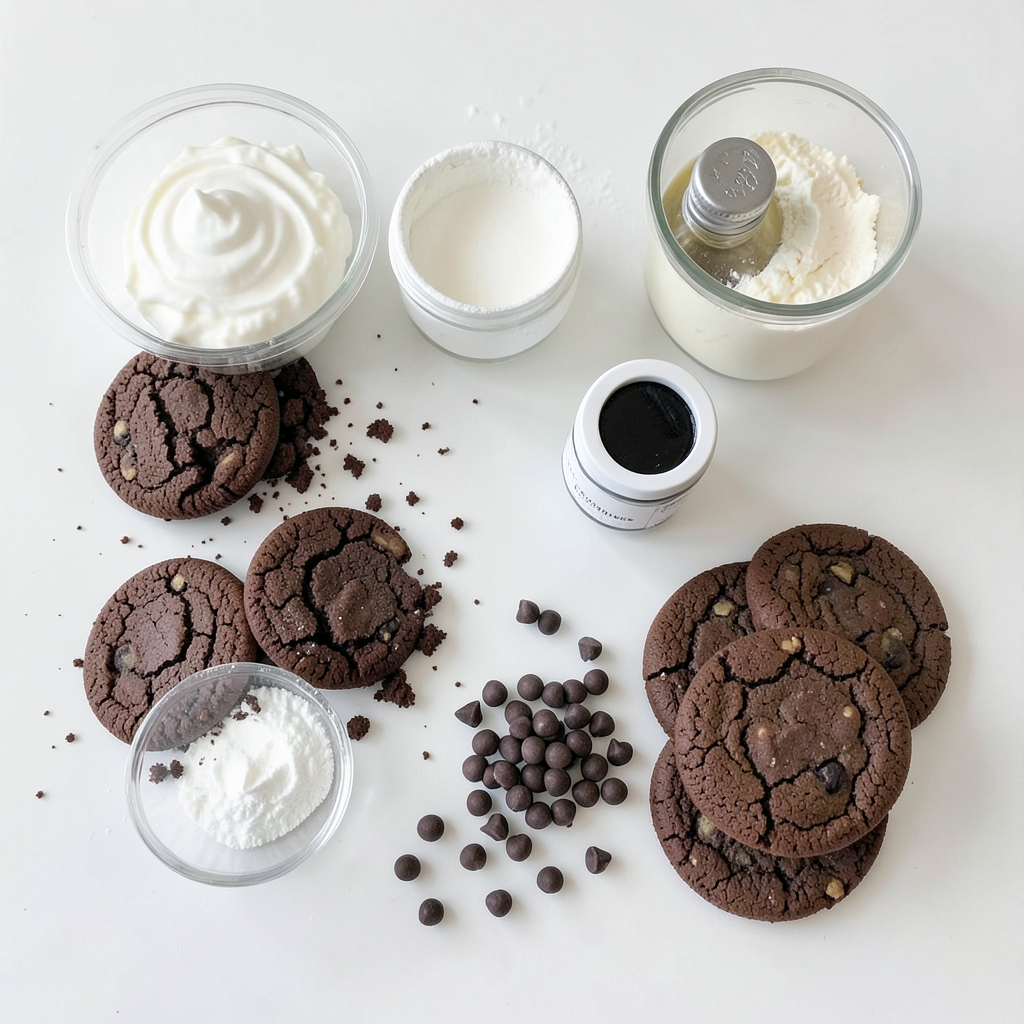
List of Required Ingredients
- Chocolate sandwich cookies (Oreos)
- Heavy whipping cream
- Powdered sugar
- Vanilla extract
- Cream cheese
- Mini chocolate chips (optional)
- Additional cookies for decoration
To make this Cookies and Cream Icebox Cake, gather your ingredients first. You will need one package of chocolate sandwich cookies, like Oreos. These cookies give the cake its sweet and rich flavor.
Next, grab two cups of heavy whipping cream. This will create your fluffy whipped topping. You will also need half a cup of powdered sugar to sweeten the cream. A teaspoon of vanilla extract adds a nice touch of flavor.
For the creamy filling, use one cup of softened cream cheese. Softening the cream cheese helps it mix well. If you like, add one cup of mini chocolate chips for extra fun. Lastly, keep some whole cookies for decoration on top.
Each ingredient plays a key role in making this cake delicious. The balance of flavors and textures will make your dessert a hit. Happy baking!
Step-by-Step Instructions
Preparing the Whipped Cream
To start, grab a medium bowl. Use an electric mixer to beat 2 cups of heavy whipping cream. Beat until soft peaks form. This means the cream holds its shape but is still soft. Next, slowly add 1/2 cup of powdered sugar and 1 teaspoon of vanilla extract. Keep beating until you see stiff peaks. The cream should look thick and creamy. Set this aside for later.
Making the Cream Cheese Mixture
Now, take another bowl. Beat 1 cup of softened cream cheese until it is smooth and fluffy. This step is key for a light texture. After that, gently fold in half of the whipped cream into the cream cheese. Use a spatula to mix until well blended. Then, fold in the rest of the whipped cream. Be careful not to deflate your mixture. It should remain airy and light.
Layering the Icebox Cake
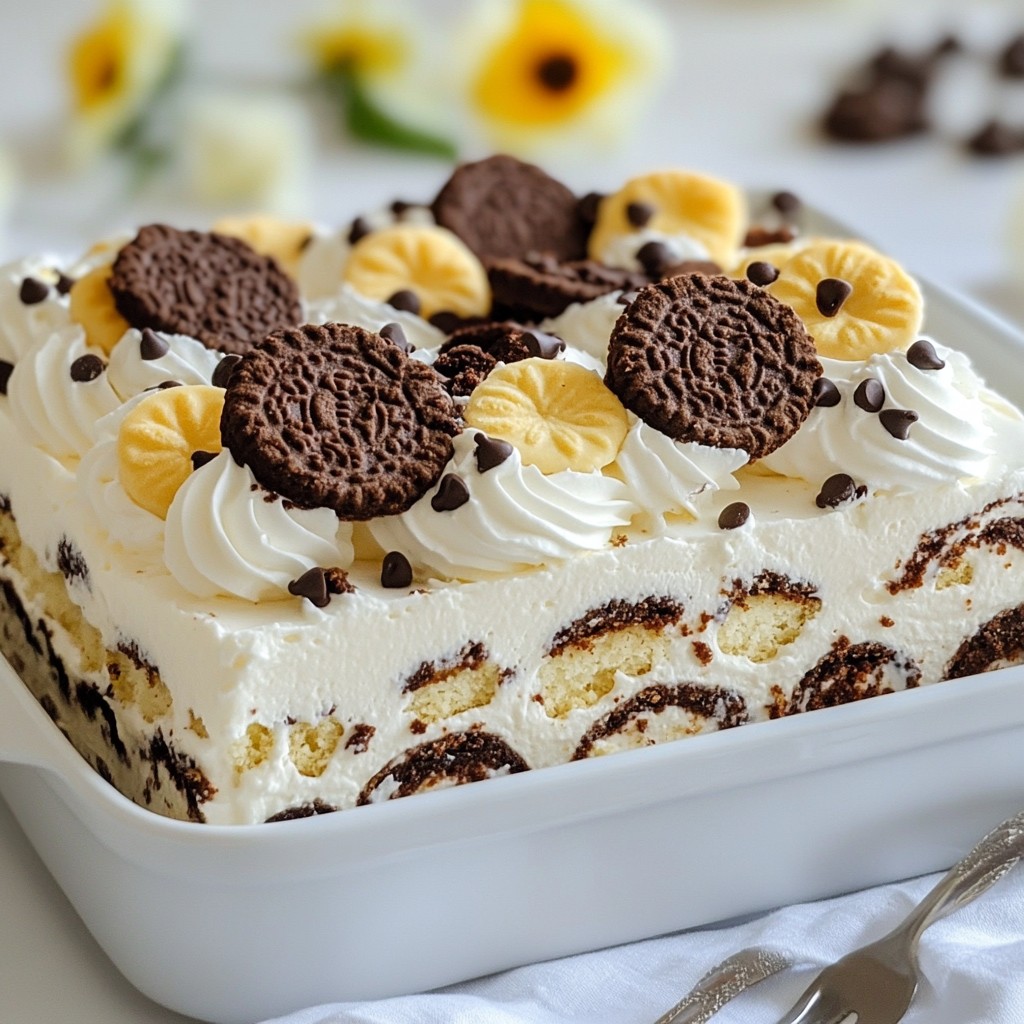
Get your 9x13 inch baking dish and start layering. First, add a layer of crushed chocolate sandwich cookies at the bottom. You can use about 1 package, crushed. Next, spread half of the cream cheese mixture over the cookie layer. This adds a rich layer of flavor. Then, repeat the layers. Add another layer of crushed cookies, followed by the remaining cream cheese mixture.
For the final touch, sprinkle a last layer of crushed cookies on top. If you want, you can also add mini chocolate chips for extra fun. Cover the dish with plastic wrap. Chill it in the fridge for at least 4 hours, or overnight for the best taste. The cookies will soften, and the flavors will blend beautifully.
Tips & Tricks
Best Practices for Whipping Cream
For the best whipped cream, start with chilled tools. Use a metal bowl and beaters. Cold tools help the cream whip faster. Heavy whipping cream works best for thick peaks. Remember, don't rush. Whip until soft peaks form, then add sugar and vanilla. Keep mixing until you see stiff peaks. Over-whipping can turn cream into butter. Stop as soon as it thickens.
Flavor Enhancements
To boost flavor, try adding extracts. Almond or mint extract can add a fun twist. You can also mix in liqueurs for adults. A splash of coffee liqueur makes it rich. Just remember to keep it balanced. Too much can overpower the cookies and cream flavor.
Presentation Ideas
Serve the cake in squares for a nice touch. Place each square on a dessert plate. Drizzle with chocolate sauce for extra flair. For a pop of color, add mint leaves on top. Garnish with whole cookies for a fun look. These small details make your icebox cake shine!
Pro Tips
- Chill Your Mixing Bowl: For even better whipped cream, chill your mixing bowl and beaters in the freezer for about 10-15 minutes before whipping the cream. This helps achieve stiffer peaks.
- Use High-Quality Cookies: Opt for high-quality chocolate sandwich cookies for the best flavor. The richer the cookies, the tastier your icebox cake will be.
- Experiment with Flavors: Feel free to add different flavor extracts to the cream cheese mixture, such as peppermint or almond, for a unique twist on the classic recipe.
- Make Ahead: This icebox cake tastes even better the next day. Make it a day in advance to allow the flavors to meld perfectly.
Variations
Using Different Cookies
You can switch out chocolate sandwich cookies for other types. Try vanilla cookies or even ginger snaps for a new taste. If you need gluten-free options, look for gluten-free sandwich cookies. Many brands sell tasty gluten-free choices. They work well in this icebox cake too!
Flavor Infusions
Adding fruit layers can make this dessert even more fun. Berries like strawberries or raspberries add a fresh touch. Sliced bananas also mix well with the cream. For a twist, try different chocolate types. Use white chocolate or dark chocolate for extra flavor.
Healthier Options
If you want a lighter version, swap regular cream cheese for low-fat cream cheese. This change keeps the creamy texture while cutting calories. You can also reduce sugar in the whipped cream. Try using less powdered sugar or even a sugar substitute. This way, you can enjoy a tasty treat without the guilt!
Storage Info
Refrigeration Guidelines
Store your Cookies and Cream Icebox Cake in the fridge. Use an airtight container or cover it well with plastic wrap. This keeps it fresh and prevents it from absorbing other smells. When stored properly, the cake lasts for about 3 to 5 days. Make sure to check for any changes in texture or smell before serving.
Freezing the Icebox Cake
You can freeze this icebox cake if you want to keep it longer. To freeze, cut pieces and wrap them tightly in plastic wrap, then in foil. This helps prevent freezer burn. It can last for about 1 to 2 months in the freezer. When you're ready to enjoy it, take it out and place it in the fridge for a few hours. This lets it thaw slowly and stay creamy.
Serving After Storage
When you have leftovers, slice the cake and serve individual pieces. If the cake seems a bit soft, you can chill it in the fridge for about 30 minutes to firm it up. To freshen it up, add a drizzle of chocolate sauce or a sprinkle of crushed cookies on top. This adds a nice touch and makes it look great again!
FAQs
What is an Icebox Cake?
An icebox cake is a no-bake dessert that layers cookies and cream. It dates back to the early 20th century. People often used iceboxes to keep food cool before fridges became common. This cake uses simple ingredients like cookies, cream, and sugar. The magic happens as the layers sit in the fridge, allowing flavors to mix and cookies to soften.
Can I make this cake in advance?
Yes, you can make this cake ahead of time. In fact, it tastes better after chilling. I suggest making it one day before you plan to serve it. Just cover it tightly with plastic wrap. This keeps it fresh and tasty. You can also prepare the whipped cream and cream cheese mix a few hours before. Just store them separately in the fridge until you layer them.
Is it possible to use non-dairy ingredients?
Yes, you can use non-dairy ingredients. For the cream, try coconut cream or almond milk cream. They work well and taste great. Use non-dairy cream cheese for a dairy-free option. These swaps keep the cake creamy and delicious without dairy. Always check labels to ensure they fit your needs.
You now have a simple, tasty icebox cake recipe. We covered the key ingredients, steps, and storage tips. You learned tips for making the best whipped cream and other flavor ideas. Feel free to experiment with different cookie types and toppings. This dessert can easily fit various diets. Whether you make it in advance or serve it fresh, it will delight everyone. Enjoy your icebox cake adventure and impress your friends with this fun treat!