• Home
  • Recipe Index
    • Desserts
    • Dinner
    • Appetizer
    • Drinks
  • About
  • Contact
  • Privacy Policy
menu icon
go to homepage
  • Home
  • Recipe Index
    • Desserts
    • Dinner
    • Appetizer
    • Drinks
  • About
  • Contact
  • Privacy Policy

search icon
Homepage link
  • Home
  • Recipe Index
    • Desserts
    • Dinner
    • Appetizer
    • Drinks
  • About
  • Contact
  • Privacy Policy

×
Taling

Taling

Chef Taling is the creator and culinary voice behind Taling’s Recipes, an online hub where she turns her lifelong love of food into step-by-step dishes home cooks can trust.

Her journey began in her grandmother’s kitchen, soaking up the aromas of spices and the joy of shared meals an experience that sparked a passion for exploring global flavors and recreating them for friends, family, and now a worldwide audience.

  • Garlic butter chicken bites are tasty and easy to make. They use simple ingredients but pack a lot of flavor. You can find them in many homes and restaurants. Their rich garlic flavor makes them a favorite for many.
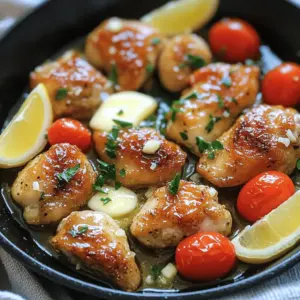
    Garlic Butter Chicken Bites Easy and Flavorful Recipe
  • For a great chocolate covered strawberry cookies recipe, you need key ingredients. First, fresh strawberries for baking are vital. They add sweetness and moisture. I always use ripe, juicy strawberries. Their flavor shines through in every bite.
    Chocolate Covered Strawberry Cookies Delightful Treat
  • Strawberry crunch cookies are a fun twist on classic cookies. They mix sweet cookie dough with crunchy bits of strawberry. This gives you a burst of summer flavor in every bite.
    Strawberry Crunch Cookies Simple and Fun Summer Treat
  • Mediterranean hummus nachos mix fun and fresh flavors. These nachos use blue corn tortilla chips as a base. The chips hold up well against the creamy hummus dip. Hummus is made from chickpeas, which are healthy and tasty.
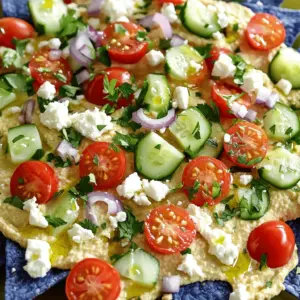
    Mediterranean Hummus Nachos Flavorful and Fun Dish
  • To make small batch almond joy cookies, you need simple ingredients. Gather 1 cup of almond flour. This flour gives the cookies a nice nutty flavor. Next, you need 1/4 cup of shredded unsweetened coconut. This adds texture and a hint of sweetness. You will also need 1/4 cup of dark chocolate chips. If you want, use dairy-free chips for a vegan option. For sweetness, grab 1/4 cup of maple syrup. You will also need 1/4 cup of melted coconut oil. This oil keeps the cookies moist. Don't forget 1/2 teaspoon of vanilla extract for flavor. Lastly, you need 1/4 teaspoon each of baking soda and salt. This helps the cookies rise and balance the sweetness. You will top each cookie with a whole almond, which adds crunch and flavor.
    Small Batch Almond Joy Cookies Irresistible Treats
  • To make the best chicken tortilla soup, gather these fresh ingredients. You need olive oil, onion, garlic, bell pepper, and carrots. These veggies add great flavor and texture. You also need cooked chicken, black beans, and diced tomatoes with green chilies. The chicken gives protein, while the beans and tomatoes add depth.
    Creamy Chicken Tortilla Soup Flavorful and Simple Recipe
  • To make a great beef ham and corn chowder, you need key ingredients. The main ones are ground beef, corn, and potatoes. These ingredients form a hearty base. You can also add carrots and onion for extra flavor. The beef gives a rich taste. The corn adds sweetness, while the potatoes make it creamy.
    Hearty Beef Ham and Corn Chowder Easy Comfort Meal
  • Chicken sopas is a comforting soup from Filipino cuisine. It blends chicken, macaroni, and rich broth. Many families enjoy it at home or at gatherings.
    Chicken Sopas Comforting and Flavorful Recipes
  • The key to great cream of mushroom soup lies in its ingredients. You need fresh, tasty mushrooms. The best mushrooms for soup include cremini, shiitake, and oyster. Each type adds its own unique flavor. I love using a mix for depth.
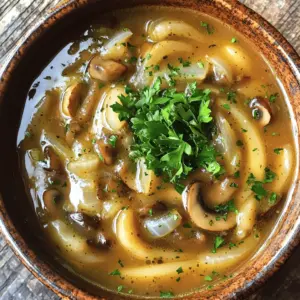
    Cream of Mushroom Soup Rich and Flavorful Recipe
  • The main ingredients in the beef and bowtie pasta recipe are simple yet delicious. You need:
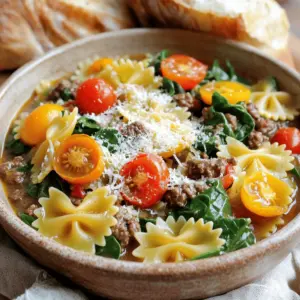
    Satisfying Beef and Bowtie Pasta Comfort Food Recipe
  • For this tasty dish, you will need: - 12 oz fettuccine pasta - 4 cups fresh spinach, roughly chopped - 2 tablespoons olive oil - 3 cloves garlic, minced - 2 cups vegetable broth - 1 cup heavy cream - 1 cup grated Parmesan cheese - Salt and pepper to taste - 1/4 teaspoon nutmeg (optional) - Red pepper flakes for garnish (optional) These ingredients blend to create a rich and creamy meal that everyone loves. You can add a few extras to enhance the dish: - A pinch of red pepper flakes for heat - Fresh herbs like basil or parsley for freshness - Chicken or shrimp for added protein These options can change the dish's flavor to fit your taste. To make this recipe, gather these tools: - A large pot for cooking - A wooden spoon for stirring - Measuring cups for accuracy - A grater for the Parmesan cheese Having these items will help you cook smoothly and enjoyably. {{ingredient_image_1}} Start by gathering all your ingredients. You need fettuccine, spinach, olive oil, garlic, vegetable broth, heavy cream, and Parmesan cheese. Don’t forget salt, pepper, and nutmeg if you like. Heat the olive oil in a large pot over medium heat. Add the minced garlic and sauté for about one minute. The smell will be amazing! Next, add your fettuccine pasta to the pot. Pour in the vegetable broth and stir it all together. Bring the broth to a boil. Once it boils, lower the heat and let it simmer. Cover the pot and cook for about 10 to 12 minutes. Stir the pasta occasionally to keep it from sticking. You want the pasta to be al dente, which means it should still have a little bite. Once the pasta is cooked, it’s time to create the sauce. Stir in the heavy cream and grated Parmesan cheese. Mix well until the cheese melts and the sauce becomes creamy. This is where the magic happens! The sauce will cling to the pasta and taste delicious. Now, add in the chopped spinach gradually. Stir until the spinach wilts and mixes well with the pasta. Season with salt, pepper, and nutmeg if you’re using it. Cook for one to two more minutes to heat everything through. After that, remove the pot from the heat. Let it sit for a minute to thicken. Serve your dish hot. If you like some spice, sprinkle red pepper flakes on top for garnish! To cook fettuccine just right, start with boiling water. Use a large pot for best results. Add a pinch of salt to the water. This adds flavor as the pasta cooks. Stir the pasta often to prevent it from sticking. Cook it until it's al dente, which means firm but not hard. This usually takes about 10-12 minutes. Always check the package for exact times. Once done, drain the pasta quickly, but save some pasta water. It can help adjust the sauce later. To get that perfect creamy sauce, timing is key. Add the heavy cream after the pasta is cooked. This keeps the sauce smooth and rich. Stir in grated Parmesan cheese right after the cream. The heat will melt the cheese and make the sauce thick. If it’s too thick, use that saved pasta water. Just add a little at a time. Nutmeg adds a warm flavor, but it’s optional. Make sure to mix everything well for the best texture. To boost flavor, garlic is a must. Sauté it in olive oil until fragrant. You can also add a pinch of red pepper flakes for heat. Fresh herbs like basil or parsley add freshness and color. If you want a deeper taste, consider adding lemon zest. It brightens the dish and balances the creaminess. Always taste your dish before serving. Adjust salt and pepper as needed to make it perfect. Pro Tips Choose Fresh Spinach: Using fresh spinach instead of frozen will enhance the flavor and texture of the dish. Fresh spinach wilts beautifully and retains more nutrients. Adjust Creaminess: If you prefer a lighter sauce, you can substitute half of the heavy cream with additional vegetable broth. This will still keep the dish creamy without being too rich. Perfectly Cooked Pasta: To ensure your fettuccine is perfectly cooked, taste it a minute or two before the recommended cooking time. You want it al dente—firm to the bite. Garnish Wisely: A sprinkle of red pepper flakes adds a nice kick to the dish. Consider serving with additional Parmesan cheese for extra flavor and presentation. {{image_2}} You can easily add protein to your One-Pot Alfredo Spinach Pasta. Try cooked chicken, shrimp, or sausage. Just sauté them before adding the garlic. For a quick option, use rotisserie chicken. This step adds flavor and makes the dish heartier. For a vegetarian twist, use plant-based cream and cheese. Cashew cream works well for a creamy texture. You can also use nutritional yeast in place of Parmesan. These swaps keep the dish rich while making it suitable for vegans. Feel free to swap in seasonal veggies. During spring, add peas or asparagus. In the fall, try butternut squash or mushrooms. Using seasonal ingredients not only enhances flavor but also adds nutrients. You can mix and match based on what you have at home. You can store your One-Pot Alfredo Spinach Pasta in the fridge. Place it in an airtight container. It will stay fresh for about 3 to 4 days. Make sure it cools down before sealing. This keeps the pasta from getting soggy. If you want to save leftovers for later, freezing is a great option. First, let the pasta cool completely. Then, transfer it to a freezer-safe container. It can last in the freezer for up to 2 months. When you're ready to eat, just thaw it in the fridge overnight. To reheat your pasta, you can use the stove or the microwave. If using the stove, add a splash of broth or cream. Heat it over low heat, stirring often. For the microwave, place it in a bowl and cover it. Heat in short bursts, stirring between, until warm. This helps keep the pasta creamy and delicious. You can use half-and-half instead of heavy cream. This will make the dish lighter. You can also try coconut milk for a dairy-free option. It adds a nice flavor too. If you want a thicker sauce, blend silken tofu. This works well and keeps the dish creamy. Yes, you can use any pasta you like. Penne or rotini are great choices. They hold the sauce well. Even spaghetti works if you prefer it. Just keep an eye on the cooking time. Different shapes may take longer or shorter to cook. You can add kale or arugula along with spinach. Both add great flavor and nutrition. Broccoli florets or peas also work well. Just add them at the same time as the spinach. They will cook quickly and stay bright green. This recipe is perfect for meal prep. It keeps well in the fridge for a few days. Just store it in an airtight container. When ready to eat, heat it in a pan or microwave. You may need to add a splash of broth or cream to loosen it up. You learned how to make One-Pot Alfredo Spinach Pasta. We covered main and optional ingredients, equipment, and detailed steps. Tips for cooking pasta and making a creamy sauce help you succeed. Variations let you switch proteins or try vegan options. Plus, we shared storage and reheating info. Now, you can enjoy a delicious meal that’s easy to prepare and customize. I hope this recipe brings joy to your kitchen!
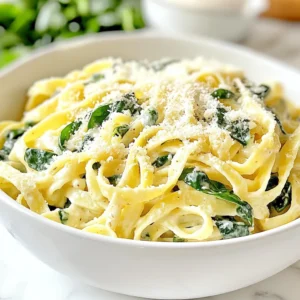
    One-Pot Alfredo Spinach Pasta Quick and Creamy Dish
  • - 1 cup creamy peanut butter - 1 cup rolled oats - 1 cup graham cracker crumbs These three ingredients form the base of the bars. Creamy peanut butter adds richness and flavor. Rolled oats give the bars a hearty texture. Graham cracker crumbs bind everything together, making them easy to slice. - ½ cup honey or maple syrup - 1 teaspoon vanilla extract - Pinch of salt Honey or maple syrup provides natural sweetness. They help balance the rich peanut butter. Vanilla extract adds depth to the flavor. A pinch of salt enhances all the tastes. - ½ cup dark chocolate chips - 2 tablespoons coconut oil Dark chocolate chips create a smooth, sweet topping. Coconut oil helps the chocolate melt evenly. Together, they form a delicious layer that makes these bars extra special. {{ingredient_image_1}} 1. In a large bowl, combine 1 cup of creamy peanut butter, ½ cup of honey, and 1 teaspoon of vanilla extract. Stir until smooth. 2. Gradually add in 1 cup of rolled oats and 1 cup of graham cracker crumbs. Mix until fully combined. The mixture should be thick and sticky. 1. Line an 8x8-inch baking dish with parchment paper. Leave some overhang for easy removal. 2. Spread the peanut butter mixture evenly in the dish. Press it down firmly with your hands or a spatula to make it compact. 1. In a microwave-safe bowl, combine ½ cup of dark chocolate chips and 2 tablespoons of coconut oil. 2. Microwave the bowl in 30-second intervals, stirring in between, until melted and smooth. 3. Pour the melted chocolate over the peanut butter layer. Use a spatula to spread it evenly. 4. Add a pinch of salt on top for an extra flavor boost. 5. Refrigerate for at least 2 hours until the bars are firm. 6. Once set, lift the bars out of the dish using the parchment overhang. Cut into squares or rectangles. To get the right thickness for your bars, start with a firm hand. After mixing your peanut butter mixture, you need to press it down well in the baking dish. If you don’t press it firmly, the bars may crumble when you cut them. Use your hands or a spatula to pack it tightly. This step is key for a smooth bite. Microwaving is a great way to melt chocolate. Place dark chocolate chips and coconut oil in a microwave-safe bowl. Heat in 30-second bursts, stirring after each round. This helps prevent burning. If you prefer not to use a microwave, you can melt chocolate using a double boiler. Just place a bowl over simmering water and stir until smooth. For a nice presentation, serve your bars on a decorative platter. Drizzle some melted chocolate over the top for added flair. You can also sprinkle crushed peanuts on top. When cutting the bars, lift them out of the dish using the parchment paper. This makes cutting easier and cleaner. Try cutting into squares or rectangles for fun shapes. Pro Tips Use Natural Peanut Butter: For a healthier option, opt for natural peanut butter without added sugars or oils. It will enhance the flavor and texture of the bars. Customize Your Sweetness: Adjust the amount of honey or maple syrup based on your taste preference. You can reduce it for a less sweet treat or add more for a sweeter bar. Experiment with Mix-Ins: Feel free to add extras like mini marshmallows, chopped nuts, or dried fruits to the peanut butter mixture for added flavor and texture. Store Properly: Keep the bars in an airtight container in the fridge to maintain freshness. They can last up to a week, but you can also freeze them for longer storage. {{image_2}} If you have nut allergies, you can still enjoy these bars! Just swap out the creamy peanut butter for sunbutter or almond butter. Sunbutter gives a nice, nutty flavor without any nuts. Almond butter offers a lighter taste. Both options keep the bars creamy and delicious. Want to add some fun? You can mix in shredded coconut for a tropical twist. This adds a chewy texture and a hint of sweetness. You can also toss in some nuts or seeds. Chopped walnuts or sunflower seeds add crunch and nutrition. Be creative and find flavors you love! For those looking for sugar-free options, try using agave syrup or stevia. Agave syrup is sweeter than honey, so you might need less. Stevia is a great choice for a low-calorie option. Just make sure to adjust the amount to taste. These swaps keep the bars tasty and healthy! To keep your no-bake chocolate peanut butter bars fresh, store them in an airtight container. Make sure to layer parchment paper between the bars. This step helps prevent them from sticking together. Keep the container in the fridge. This method will help retain the texture and taste. Yes, you can freeze these bars! First, wrap each bar in plastic wrap. Then, place them in a freezer-safe bag. Make sure to remove as much air as possible. For thawing, take them out and place them in the fridge overnight. This method keeps them tasty and easy to enjoy. These delicious bars last about one week in the fridge. If you freeze them, they can last up to three months. This makes them a great snack option for later! Yes, you can! Crunchy peanut butter adds texture and a nice crunch. The taste remains rich and nutty. However, the bars may be less smooth. If you like that extra bite, go for it! Just remember, it may change how the bars hold together a bit. No worries at all! You can use crushed cookies like Digestive biscuits or vanilla wafers. Rolled oats can also work as a substitute. If you want a gluten-free option, try almond flour or ground nuts. Each adds a unique flavor twist, so get creative! To check if the bars are set, gently press the top. It should feel firm but slightly springy. You can also check the edges; they should pull away from the sides of the dish. If they feel soft, give them more time in the fridge. Patience pays off with these tasty treats! In this blog post, we explored how to make delicious no-bake peanut butter bars. We discussed key ingredients like creamy peanut butter and oats, along with sweeteners like honey. You learned step-by-step instructions for mixing and melting chocolate layers. I shared tips for perfect texture and storage methods, including freezing. You can also try variations like nut-free options or different flavors. Remember, making these bars is fun and easy. Enjoy your tasty treat with friends or family!
    No-Bake Chocolate Peanut Butter Bars Easy Delight
  • To make chili lime grilled chicken tacos, you need fresh, quality ingredients. Here’s what you will need: - 4 boneless, skinless chicken breasts - 2 tablespoons olive oil - Juice of 2 limes - Zest of 1 lime - 1 tablespoon chili powder - 1 teaspoon cumin - 1 teaspoon garlic powder - 1 teaspoon onion powder - 1/2 teaspoon smoked paprika - Salt and pepper to taste These main ingredients bring bold flavors to the chicken. The lime juice adds tang, while the chili powder brings heat. The marinade makes the chicken juicy and full of flavor. Use these components: - Olive oil - Lime juice - Lime zest - Chili powder - Cumin - Garlic powder - Onion powder - Smoked paprika - Salt and pepper Mix these well to coat the chicken. The olive oil helps keep the meat moist. The spices create a rich taste. Toppings make your tacos exciting. Here’s what I suggest: - 8 small corn or flour tortillas - 1 cup shredded cabbage (green or purple) - 1/2 cup fresh cilantro, chopped - 1 avocado, sliced - Lime wedges for serving These toppings add crunch and freshness. The avocado gives creaminess, while lime wedges let you add more zing. Enjoy your tacos with these simple yet delicious toppings! {{ingredient_image_1}} To start, you need to make the marinade. In a bowl, mix olive oil, lime juice, lime zest, chili powder, cumin, garlic powder, onion powder, smoked paprika, salt, and pepper. This mix creates a bright and spicy flavor for the chicken. Next, put the chicken breasts in a resealable bag or shallow dish. Pour the marinade over the chicken. Make sure each piece is covered. Seal the bag or cover the dish. Place it in the fridge for at least 30 minutes. If you have more time, marinate for up to 2 hours. This helps the chicken soak up all that great flavor. Now, it’s time to grill! Preheat your grill to medium-high heat. Take the chicken out of the marinade and throw away the leftover marinade. Grill the chicken for about 6-7 minutes on each side. You want the internal temperature to reach 165°F. This ensures the chicken is safe to eat. Once the chicken is cooked, take it off the grill. Let it rest for 5 minutes. This resting time keeps the chicken juicy. After resting, slice it into strips. Now, warm the tortillas on the grill for about 30 seconds on each side. This makes them soft and easy to fold. To build your tacos, place a few strips of grilled chicken in each tortilla. Top it with shredded cabbage, fresh cilantro, and avocado slices. For a zesty touch, serve lime wedges on the side. Squeeze some lime juice over your tacos for extra flavor. Enjoy your delicious chili lime grilled chicken tacos! To grill chicken well, start with a clean grill. Clean grates help prevent sticking. Preheat your grill to medium-high. This temperature is best for juicy chicken. Use a meat thermometer to check doneness. Aim for 165°F (75°C) inside the chicken. Avoid flipping too often. Each side needs time to sear properly. Add more flavor with fresh herbs. You can use thyme or oregano for a twist. A sprinkle of lime zest over the tacos gives a fresh kick. Try adding a dash of hot sauce if you like heat. Before serving, drizzle some extra lime juice on top. This brightens the dish and adds zest. Marinating the chicken is key for flavor. I recommend at least 30 minutes. For the best taste, marinate for up to 2 hours. Do not marinate longer than 4 hours. The acid in lime juice can change the chicken's texture. Always keep marinated chicken in the fridge. This keeps it fresh and safe to eat. Pro Tips Marinate for Maximum Flavor: Allow the chicken to marinate for at least 2 hours, or even overnight, to enhance the flavor and tenderness. Check for Doneness: Use a meat thermometer to ensure the chicken reaches an internal temperature of 165°F (75°C) for safe consumption. Warm Tortillas Properly: Warm the tortillas on the grill or in a skillet just until pliable to prevent them from tearing when filling. Customize Your Toppings: Feel free to add toppings like diced tomatoes, jalapeños, or your favorite salsa to personalize your tacos. {{image_2}} You can swap chicken for other proteins. Try shrimp for a lighter taste. Pork is also great with chili and lime. You can use tofu for a vegetarian option. Just ensure you adjust cooking times for each protein. Change up the taco style to suit your taste. Use hard shell tacos for a crunchy bite. Soft tortillas are perfect if you prefer a classic feel. You can even turn this dish into a burrito. Just wrap everything up in a larger tortilla. If you don’t have all the ingredients, don’t worry! You can replace olive oil with avocado oil. Lemon juice works in place of lime juice. If you lack chili powder, use a mix of paprika and cayenne. Choose any fresh herbs as a substitute for cilantro. Enjoy mixing and matching to find your favorite flavors! Store leftover chicken tacos in an airtight container. Keep them in the fridge for up to three days. If you have extra toppings, store those separately. This keeps everything fresh and tasty. To reheat chicken, use a skillet over medium heat. Add a splash of water to keep it moist. Heat for about five minutes, stirring often. You can also use the microwave. Cover the chicken and heat it for 30 seconds. Check if it's warm and heat more if needed. To freeze, wrap each taco tightly in plastic wrap. Place them in a freezer bag. They can last for up to three months. When you're ready to eat, thaw them overnight in the fridge. Reheat as mentioned before for the best taste. You should marinate chicken for at least 30 minutes. This time allows the flavors to soak in. For the best taste, marinate for up to 2 hours. Longer marinating makes the chicken juicier and more flavorful. I love using simple toppings for these tacos. Here are my favorites: - Shredded cabbage (green or purple) - Fresh cilantro, chopped - Slices of avocado - Lime wedges for extra zest These toppings add color and taste. They balance the spicy and tangy chicken well. Feel free to mix and match based on your taste. Yes, you can prepare some parts ahead. Grill the chicken and store it in the fridge. You can warm it later. You can also chop toppings in advance. Keep them in separate containers. Just warm the tortillas before serving for the best taste. Chili lime grilled chicken tacos are easy and fun to make. We covered the main ingredients, marinade components, and tasty toppings. I walked you through marinating, grilling, and assembling your tacos. You also learned tips for grilling, flavor boosts, and different versions to try. Finally, I shared how to store leftovers and answer some common questions. Enjoy your cooking, and don't hesitate to get creative!
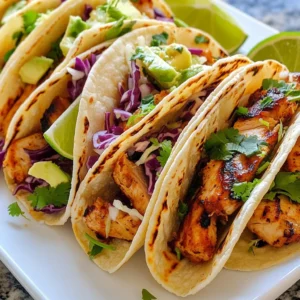
    Chili Lime Grilled Chicken Tacos Easy and Flavorful Meal
  • To make red velvet cream cheese frosting, you need a few key items. First, cream cheese is a must. It adds that rich and tangy taste that makes this frosting special. Without it, the flavor falls flat.
    Red Velvet Cream Cheese Frosting Simple Guide
  • Mini red velvet cheesecakes are small, rich desserts. They blend the classic red velvet cake with creamy cheesecake. Each mini cheesecake is a perfect bite-sized treat.
    Mini Red Velvet Cheesecakes Delightful and Dreamy Treat
  • Cream cheese wontons are a tasty treat. They combine crunchy wrappers and a creamy filling. This dish has roots in Chinese cuisine, but it has changed over time.
    Cream Cheese Wontons Tasty Appetizer Recipe Guide
  • Lemon-pepper wings are a tasty dish loved by many. They mix crispy chicken wings with bright lemon zest and pepper. This flavor combo makes them stand out.
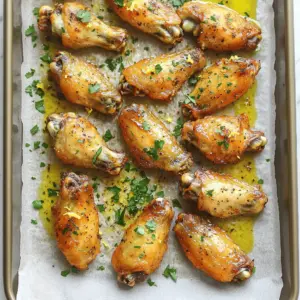
    Lemon-Pepper Wings Delightful and Flavorful Dish
  • Olive Garden offers a range of delicious pasta meals that many love. Some popular choices include Fettuccine Alfredo, Spaghetti with Meat Sauce, and the Tour of Italy. Each dish brings its own flavor and charm to the table.
    Olive Garden Pasta Favorites Tasty Dishes to Enjoy
  • Thai curry noodle soup is a delight for the senses. It offers a rich mix of flavors and textures. The soup brings together fresh vegetables, noodles, and a creamy broth.
    Thai Curry Noodle Soup Rich in Flavor and Easy to Make
  • For a great vegetable beef soup recipe, you need key ingredients. Start with 1 lb of beef stew meat. This meat gives your soup a rich base. Cut it into small pieces for easy cooking.
    Vegetable Beef Soup Flavorful and Hearty Recipe
  • Cuban chicken soup shines with fresh and bold ingredients. First, you need chicken. I recommend using boneless, skinless chicken thighs. They stay juicy and add rich flavor.
    Cuban Chicken Soup Comforting and Flavorful Recipe
  • What main ingredients are needed for the recipe? The main ingredients for raspberry cheesecake cookies include cream cheese, butter, sugars, flour, eggs, baking powder, salt, fresh raspberries, and white chocolate chips. Cream cheese gives the cookies their rich and creamy texture. Butter adds softness, while sugars sweeten the cookies. Flour provides structure, and the egg binds everything together.
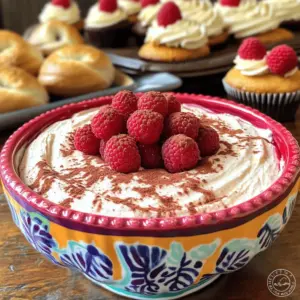
    Raspberry Cheesecake Cookies Tasty Flavorful Treat
  • To make chocolate strawberry mini cheesecakes, you need key ingredients. The crust needs graham cracker crumbs, cocoa powder, sugar, and melted butter. These create a rich and tasty base.
    Chocolate Strawberry Mini Cheesecakes Delightful Treat
  • You can make crackers party sandwiches fun and unique. Start with different types of crackers. Use wheat, rice, or seed crackers. Each type brings its own crunch and flavor. You can even mix different crackers on the platter. This adds variety to your spread.
    Crackers Party Sandwiches Easy and Creative Ideas
  • Deep-dish pizza muffins are a fun twist on classic pizza. They combine the rich, cheesy taste of deep-dish pizza with the convenience of muffins. You get all the flavors of pizza in a portable snack.
    Deep-Dish Pizza Muffins Flavorful and Easy Recipe
  • Cheesy chicken crescent rolls are a tasty and easy dish. They mix tender chicken with creamy cheese in flaky dough. This recipe is great for busy nights or family gatherings. The flavors blend well, making every bite delightful.
    Cheesy Chicken Crescent Rolls Tasty and Simple Recipe
  • - 1 cup rolled oats - 1/2 cup almond butter (or peanut butter) - 1/4 cup honey or maple syrup - 2 tablespoons unsweetened cocoa powder - 1 tablespoon finely ground espresso or instant coffee - 1/4 cup mini dark chocolate chips - 1/4 teaspoon salt - 1/2 teaspoon vanilla extract - 1/4 cup shredded coconut (optional) Rolled oats give these bites great nutrition. They provide fiber that helps you feel full. Fiber also aids digestion, which is a plus. You can choose almond butter or peanut butter. Almond butter has more vitamins and minerals. It also has healthy fats that are good for your heart. Peanut butter has protein, which helps build muscles. Both options work well in this recipe. Cocoa powder adds rich flavor and antioxidants. Antioxidants help protect your body from damage. Plus, it gives a delightful chocolatey taste without added sugar. This makes the energy bites even more enjoyable. {{ingredient_image_1}} To start, gather your ingredients. In a large mixing bowl, add: - 1 cup rolled oats - 1/2 cup almond butter (or peanut butter) - 1/4 cup honey or maple syrup - 2 tablespoons unsweetened cocoa powder - 1 tablespoon finely ground espresso or instant coffee - 1/4 teaspoon salt - 1/2 teaspoon vanilla extract - 1/4 cup mini dark chocolate chips Mix the dry and wet ingredients until they blend well. It should look even and smooth. If you want to add shredded coconut, fold it in now. This adds a nice texture and flavor. After mixing, cover the bowl with plastic wrap. Chill in the fridge for about 30 minutes. Chilling helps the mixture firm up, making it easier to shape. Once the mixture is chilled, take it out. Use your hands to form small balls, about 1 inch in size. This helps them cook evenly and look good. You can also use a cookie scoop for more uniform bites. A scoop helps make the balls the same size, which is great for sharing. For extra flair, roll some of the bites in shredded coconut or cocoa powder. This adds a fun look and a bit more flavor. After rolling, place the bites on a parchment-lined baking sheet. To finish, refrigerate them again for about 15 minutes. This helps them set before you enjoy or store them. - Overmixing vs. under-mixing the ingredients: Mixing your ingredients is key. Overmixing can make the bites tough. Under-mixing may leave dry spots. Aim for a uniform mix without overworking the dough. - Not refrigerating long enough: Chilling your mixture is vital. If you skip this step, the bites won’t hold their shape. Refrigerate for at least 30 minutes to ensure they firm up properly. - Adding spices or flavors to the mix: You can boost flavor by adding cinnamon or nutmeg. A pinch of sea salt can also enhance the taste of the chocolate. Feel free to get creative! - Adjusting sweetness to taste: If you prefer sweeter bites, add more honey or maple syrup. Taste the mixture before shaping to find the right balance for your sweet tooth. - Pairing with drinks or other snacks: These energy bites pair well with coffee or tea. Enjoy them as a quick snack with a smoothie for a great energy boost. - Creative ways to serve energy bites: Try serving them on a platter with fresh fruit or nuts. You can also use them as toppings for yogurt or oatmeal. This adds crunch and flavor to your meals. Pro Tips Use Fresh Ingredients: Ensure your cocoa powder and espresso are fresh for the best flavor. Stale ingredients can diminish the overall taste of your energy bites. Customize Your Sweetness: Adjust the amount of honey or maple syrup based on your taste preference. You can even substitute with a sugar-free sweetener if desired. Experiment with Add-ins: Feel free to add nuts, seeds, or dried fruits to the mixture for added texture and nutrients. This can personalize your energy bites even more! Chill for Firmness: Don’t skip the refrigeration step! Chilling the mixture helps it firm up, making it easier to roll into bites and improving their overall texture. {{image_2}} You can change the nut butter in this recipe. Almond butter gives a smooth taste. Peanut butter has a stronger flavor. Both work well. Try sun butter if you're allergic to nuts. You can also swap sweeteners. Honey adds a nice touch, but maple syrup works too. Each sweetener gives a different taste. Pick what you like best. Want more crunch? Add seeds or nuts. Chia seeds or flaxseeds boost nutrition. Walnuts or pecans give a nice texture. Try adding dried fruit for a sweet twist. Diced dates or raisins work well. You can also enhance the flavor. A pinch of cinnamon adds warmth. A dash of sea salt can bring out the chocolate taste. Experiment to find your favorite mix-ins. If you're gluten-free, use certified gluten-free oats. This keeps your bites safe to eat. Many people enjoy these bites without gluten. To make them vegan, swap honey for maple syrup. Use dairy-free chocolate chips. These small changes keep everyone happy and healthy. To keep your Chocolate Espresso Energy Bites fresh, use an airtight container. This helps maintain their flavor and texture. I recommend glass containers with tight-sealing lids. Plastic containers work too, but glass is often better for long-term storage. If you want to freeze them, wrap each bite in plastic wrap. Then, place them in a freezer bag or airtight container. This prevents freezer burn and keeps them tasty. In the fridge, these energy bites last about one week. After that, they may start to lose quality. Keep an eye out for any changes in smell or texture. If they look dry or have an off smell, it's best to toss them. Making a larger batch is a great idea. You can easily double or triple the recipe. This saves time and gives you snacks for days. For portion control, use a cookie scoop when shaping the bites. This way, each one is the same size. It makes it easier to track how many you eat. To make these bites, follow these easy steps: 1. In a large bowl, mix rolled oats, almond butter, and honey. 2. Add cocoa powder and finely ground espresso. Stir until smooth. 3. Mix in salt, vanilla extract, and chocolate chips. Fold in shredded coconut if using. 4. Cover the bowl and refrigerate for 30 minutes. This helps the mixture firm up. 5. Shape the chilled mixture into small balls, about 1 inch wide. 6. Place the balls on a lined baking sheet. 7. For a fun touch, roll some in coconut or cocoa powder, then chill again for 15 minutes. 8. Store in an airtight container in the fridge for up to one week. Yes, you can! Almond butter adds a nice flavor, but peanut butter works too. Each nut butter brings its taste and texture. Peanut butter has a stronger flavor, while almond butter is milder. You can also try sunflower seed butter for a nut-free option. Just remember, different butters may change the texture slightly. Absolutely! These bites are packed with good ingredients. Here’s why they are healthy: - Rolled oats provide fiber and keep you full. - Nut butter adds protein and healthy fats. - Cocoa powder is rich in antioxidants. - Honey or maple syrup offers natural sweetness. - Espresso gives you a boost of energy. These bites are not only tasty but also a great snack for energy! In this blog post, we explored how to make delicious Chocolate Espresso Energy Bites. We covered the ingredients, providing their health benefits and easy preparation steps. Tips on flavor enhancement and variations help you customize your bites. Proper storage ensures you enjoy them longer, and we answered common questions about the recipe. I hope you feel confident in making your own energy bites. They are a fun, healthy snack for any time!
    Chocolate Espresso Energy Bites for Instant Fuel
  • - 4 large russet potatoes, peeled and diced - 1 medium onion, chopped - 2 cloves garlic, minced - 4 cups vegetable broth - 1 cup heavy cream - 2 tablespoons butter - 1 teaspoon thyme (fresh or dried) - Salt and pepper to taste - 1 cup shredded sharp cheddar cheese - 1/4 cup chopped fresh chives (for garnish) When you choose potatoes, go for russets. They are starchy and creamy. You need four large ones. For the onion, use a medium-sized one, finely chopped. Garlic adds flavor; two cloves will do. For broth, four cups of vegetable broth give a rich base. Heavy cream adds that creamy texture, so one cup is perfect. Butter adds flavor; two tablespoons will help sauté the onions. Thyme brings a nice aroma; one teaspoon is enough. Salt and pepper should be adjusted to your taste. Lastly, for that cheesy goodness, one cup of shredded sharp cheddar is key, topped with a quarter cup of fresh chives for garnish. This recipe contains dairy. The heavy cream and cheddar cheese may not suit those with lactose intolerance. Always check for allergies before serving. If you have nut allergies, this recipe is safe. There are no nuts included. {{ingredient_image_1}} Start by gathering all your ingredients. You will need: - 4 large russet potatoes, peeled and diced - 1 medium onion, chopped - 2 cloves garlic, minced - 4 cups vegetable broth - 1 cup heavy cream - 2 tablespoons butter - 1 teaspoon thyme (fresh or dried) - Salt and pepper to taste - 1 cup shredded sharp cheddar cheese - 1/4 cup chopped fresh chives (for garnish) Peeling and dicing the potatoes is key. Take your time to ensure even pieces. This helps the potatoes cook at the same rate. Chop the onion and mince the garlic too. Fresh ingredients make a big difference in flavor. In a large pot, melt the butter over medium heat. Once the butter is hot, add the chopped onion. Sauté it for about 5 minutes. You want the onion to be soft and translucent. Next, add the minced garlic and thyme. Cook for another 1-2 minutes. You’ll smell that lovely aroma! Now, stir in the diced potatoes. Pour in the vegetable broth next. Bring the mixture to a boil. Then, reduce the heat and let it simmer. Cook for 15-20 minutes until the potatoes are tender. Once the potatoes are soft, it’s time to blend the soup. You can use an immersion blender for this step. Blend it to your desired smoothness. If you don’t have one, carefully transfer the soup in batches to a regular blender. After blending, return the soup to the pot. Stir in the heavy cream and let it heat through on low heat for 5-10 minutes. This step adds creaminess and richness. Mix in the shredded cheddar cheese until it melts completely. Season with salt and pepper to taste. Finally, serve the soup hot. Top it with fresh chives for a nice touch. Enjoy your delicious creation! To get the best creamy potato soup, follow these tips: - Use starchy potatoes like russets. They make the soup thick and smooth. - Blend the soup well. An immersion blender works great for this. It gives a nice, even texture. - Add heavy cream slowly. This keeps the soup rich without making it too watery. - Simmer the soup gently after blending. This helps the flavors meld and keeps it creamy. Want to boost the flavor? Try these ideas: - Add herbs like rosemary or parsley. They give a fresh taste. - Include spices like paprika for a little heat. Just a pinch will do! - Stir in some sautéed leeks or celery for added depth. They add a nice crunch. - A splash of lemon juice brightens the whole dish. It makes the flavors pop! Here are some pitfalls to watch out for: - Don't rush the cooking time. Undercooked potatoes will ruin the texture. - Avoid using too much broth. Too much liquid can make the soup thin and watery. - Forgetting to season properly can dull the flavors. Always taste and adjust. - Blending too long can make the soup gummy. Blend just until smooth for the best result. Pro Tips Choose the Right Potatoes: Russet potatoes are ideal for creamy soups due to their high starch content, which helps achieve that velvety texture. Don’t Skip the Sauté: Sautéing the onions and garlic in butter enhances their flavors, creating a more aromatic base for your soup. Adjust Consistency: If you prefer a thicker soup, blend only half of the potatoes and leave the rest chunky for added texture. Garnish for Flavor: Fresh chives not only add color but also a mild onion flavor that complements the richness of the soup perfectly. {{image_2}} You can make this soup creamy without dairy. Use full-fat coconut milk instead of heavy cream. It gives a rich flavor that pairs well with the potatoes. You can also try almond milk or oat milk for a lighter option. Just make sure to balance the flavors with a bit of lemon juice or vinegar for a nice zing. Want to make the soup heartier? Add protein or veggies! Cooked bacon or ham makes a tasty addition. You can also stir in cooked chicken or turkey for extra protein. For veggies, try adding carrots or celery. They add color and nutrition. Just chop them small and add them in early when you sauté the onions. Cheese can change the soup's flavor. If you want a twist, try gouda or Monterey Jack. These cheeses melt well and add a nice, creamy taste. For a sharper flavor, use blue cheese or feta. Always mix the cheese in when the soup is off the heat. This keeps it creamy and prevents clumping. To store the creamy potato soup, let it cool to room temp. Pour it into an airtight container. You can keep it in the fridge for up to three days. Make sure to cover it tightly. This helps keep the flavors fresh. When you want to eat the soup again, take it out of the fridge. Pour the soup into a pot. Heat it on medium-low heat. Stir it often to avoid sticking. If the soup is too thick, add a splash of broth or cream. Heat until it’s warm all the way through. If you want to keep the soup longer, you can freeze it. Use a freezer-safe container or bag. Leave some space at the top, as soup expands when frozen. The soup can last for about three months in the freezer. To thaw, place it in the fridge overnight. Then, reheat it as mentioned above. To thicken your potato soup, you have a few options. First, you can mash some of the cooked potatoes in the pot. This adds body and keeps it creamy. Second, you can mix in a slurry made of cornstarch and water. Just stir it in and let it cook for a few minutes. Lastly, you can add more heavy cream for a richer texture. Each method gives you a thick, hearty soup. Yes, you can use different potatoes. While russet potatoes are great for this soup, Yukon Golds work well too. They have a creamy texture that blends nicely. Red potatoes can also be used, but they are waxy. This means they may not get as soft. Whichever potato you choose, the soup will still taste great. Creamy potato soup pairs well with many sides. A simple green salad adds freshness. You can also serve it with crusty bread for dipping. Grilled cheese sandwiches are a classic choice too. For a heartier meal, add cooked bacon bits or croutons on top. These options make your meal more satisfying and fun. In this blog post, we covered the key steps for making creamy potato soup. We discussed the ingredients, preparation, cooking methods, and storage tips. You learned how to create a delicious dish that suits your taste. My final thought is simple: this soup is easy and fun to make. With a few tips and variations, you can enjoy a new favorite meal. Don't hesitate to experiment and find what you love!
    Ultimate Creamy Potato Soup Easy and Flavorful Recipe
  • The right ingredients make all the difference in your strawberry sugar cookies recipe. Here’s what you need to know.
    Irresistible Strawberry Sugar Cookies Tasty Treat Recipe
  • Pink velvet cookies offer a sweet twist on the classic cookie. Their soft, chewy texture makes them a favorite. You might wonder, what is the origin of pink velvet cookies? They trace back to the popular red velvet cake, which gained fame in the early 20th century. The pink color often comes from the use of red food coloring, adjusted for a lighter hue.
    Pink Velvet Cookies Delightful and Easy Recipe
  • Cheesy Parmesan Mozzarella Bites are a fun snack loved by many. They are small, crispy balls filled with gooey cheese. You can make them easily at home.
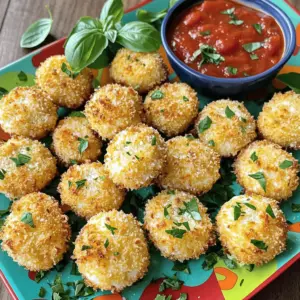
    Cheesy Parmesan Mozzarella Bites Flavorful Snack Idea
  • Easy salami roll-ups are fun, tasty snacks. They are quick to make and need no cooking. You can find them at parties or serve them at home. These roll-ups are also great for kids and adults.
    Easy Salami Roll-Ups Quick and Tasty Snack Idea
  • Cheesy garlic bombs are tasty little bites filled with rich cheese and garlic. They are loved for their gooey center and crispy outside. These bombs are a fun way to enjoy cheese in a new way. You can make them easily at home, which adds to their charm.
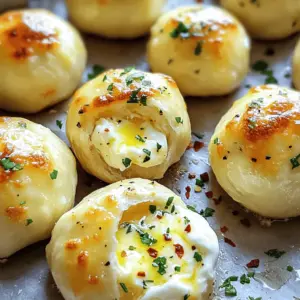
    Cheesy Garlic Bombs Irresistible Savory Snack Recipe
  • Loaded potato waffles are a fun twist on a classic dish. They blend the best traits of waffles and potatoes. These waffles bring together crispy edges and a soft, flavorful inside. You may wonder, how did loaded potato waffles originate?
    Loaded Potato Waffles Crispy and Flavorful Delight
  • Korean cheesy potato pancakes are a tasty treat. They mix simple ingredients like potatoes, cheese, and scallions. This dish brings comfort and joy to many.
    Korean Cheesy Potato Pancakes Delicious Comfort Dish
  • Air fryer apple pie bombs are tasty little treats. They bring all the flavors of apple pie in a fun, bite-sized form. You can enjoy this dessert without all the fuss of making a full pie.
    Air Fryer Apple Pie Bombs Irresistible Dessert Delight
  • Blueberry pie cookies blend the joy of pie with the fun of cookies. These treats taste like a slice of blueberry pie, but they are easy to grab and eat. I love sharing them at gatherings or enjoying them as a snack.
    Blueberry Pie Cookies Tasty and Simple Recipe
  • Chocolate chip cheesecake cookies are a fun twist on two classic treats. They blend a rich cheesecake flavor with chocolate chip cookies. This combo makes each bite creamy, sweet, and slightly tangy. The best chocolate chip cheesecake cookies bring joy to any dessert table.
    Chocolate Chip Cheesecake Cookies Delightful Treat
  • Sweet cream cheese wontons are little bites of joy. They combine creamy goodness with a crispy shell. The main ingredient is cream cheese. This cheese offers a rich and smooth taste. When mixed with sugar and vanilla, it creates a delightful filling.
    Sweet Cream Cheese Wontons Delightful Dessert Bites
  • To make a Vegan Strawberry Cream Danish, you will need a few key ingredients.
    Vegan Strawberry Cream Danish Tasty Bakery Treat
  • To make shrimp tacos with mango salsa, you need fresh, simple ingredients.
    Mouthwatering Shrimp Tacos with Mango Salsa Recipe
  • To make Air Fryer Everything Bagel Chickpeas, you need just a few simple ingredients: - 1 can (15 oz) chickpeas, rinsed and drained - 2 tablespoons olive oil - 2 tablespoons everything bagel seasoning - 1 teaspoon garlic powder - 1/2 teaspoon onion powder - Salt to taste These ingredients come together to create a tasty snack that's crunchy and full of flavor. The chickpeas are the star, providing a great base for all the seasonings. When picking chickpeas, choose a can that is BPA-free. Look for ones with no added salt when possible. A quick check of the expiration date ensures freshness. If you prefer, you can use dry chickpeas. Just remember to soak and cook them first. Quality chickpeas make a big difference in taste and texture. Fresh seasoning brings out the best in your chickpeas. Everything bagel seasoning is key here. It usually contains sesame seeds, poppy seeds, garlic, and onion. The flavors mix well and create a great crunch. If you can, buy fresh spices. They pack more flavor than old ones. A little freshness goes a long way in making your snack truly delicious. {{ingredient_image_1}} Start by preheating your air fryer to 400°F (200°C). This step takes about 5 minutes. Preheating ensures even cooking. A hot air fryer gives the chickpeas that perfect crunch. Set a timer to avoid forgetting. Grab a can of chickpeas. Rinse and drain them well. This step removes extra sodium and makes them taste better. Place the chickpeas in a mixing bowl. Add 2 tablespoons of olive oil. Toss the chickpeas until each one is covered in oil. Next, sprinkle in the seasoning. Use 2 tablespoons of everything bagel seasoning, 1 teaspoon of garlic powder, and 1/2 teaspoon of onion powder. Add a pinch of salt if you like. Mix well so the flavors stick to the chickpeas. Transfer your seasoned chickpeas to the air fryer basket. Make sure they lie flat. Avoid overcrowding, as this helps them cook evenly. Air fry the chickpeas for 12 to 15 minutes. Shake the basket halfway through cooking. This action helps them crisp up nicely. Keep a close eye on them. You want them golden-brown and crunchy. After cooking, let the chickpeas cool in the basket. They will become even crispier as they cool down. Enjoy your tasty snack! To get crispy chickpeas, start with well-drained chickpeas. Rinse them under cold water first. Pat them dry with a towel. This step removes excess moisture. The less moisture, the crispier they get. Preheat your air fryer to 400°F (200°C) for five minutes. This heat helps create that perfect crunch. When you add the chickpeas, spread them in a single layer. Crowding will lead to uneven cooking. Shake the basket halfway through. This simple step ensures all sides crisp up nicely. You can tweak the flavor to your liking. Try adding a pinch of cayenne for heat. A splash of lemon juice gives a fresh taste. If you love herbs, add dried dill or thyme. These can complement the everything bagel seasoning. Don’t forget to taste before cooking! Adjust salt as needed. This ensures the chickpeas are seasoned just right. For a richer taste, use garlic salt instead of regular salt. This small swap can make a big difference. One common mistake is using unseasoned chickpeas. Always season them well before cooking. Another mistake is not drying them enough. Wet chickpeas won’t crisp up. Avoid overcrowding the air fryer basket. If you do, some chickpeas will remain soft. Keep an eye on cooking time too. Overcooking can lead to burnt chickpeas. Let them cool in the basket after cooking. They will crisp up more while cooling. Pro Tips Dry Chickpeas Well: Ensure the chickpeas are thoroughly dried after rinsing to achieve maximum crispiness. Adjust Seasoning: Feel free to customize the seasoning blend by adding your favorite herbs or spices for a personal touch. Check for Doneness: Keep an eye on the chickpeas towards the end of cooking; they can go from perfectly crispy to burnt quickly. Storage Tips: Store leftover chickpeas in an airtight container; they can lose their crunch, so re-crisp them in the air fryer before serving. {{image_2}} You can switch up the flavor of your chickpeas easily. Try adding smoked paprika for a smoky taste. You can also use taco seasoning for a fun twist. If you love heat, sprinkle some cayenne pepper for spice. For a sweet touch, try cinnamon and sugar. These blends keep the snack exciting! If you do not have an air fryer, you can bake the chickpeas. Preheat your oven to 400°F (200°C). Follow the same steps to prepare the chickpeas. Spread them out on a baking sheet. Bake for about 25-30 minutes. Shake the pan halfway to ensure even cooking. The chickpeas will still be tasty and crunchy. Serve these chickpeas in a fun way. You can toss them on salads for extra crunch. They also make a great topping for soups. Try mixing them with yogurt and herbs for a dip. You can even snack on them straight from the bowl! Don't forget to add extra seasoning when serving to wow your guests. To keep your leftover chickpeas fresh, store them in an airtight container. Place them in the fridge for up to three days. If you want to keep them longer, consider freezing them. Just make sure to let them cool before storing. When you reheat your chickpeas, use the air fryer for the best results. Set it to 350°F (175°C) and cook for about 5-7 minutes. This method helps them stay crispy. You can also use an oven if you don’t have an air fryer. Spread them on a baking sheet and heat at 350°F. Prepared chickpeas last about three days in the fridge. If frozen, they can last for up to three months. Just remember to thaw them in the fridge overnight before reheating. Enjoying them fresh is best, but these tips help you enjoy your snack longer! Yes, you can use dry chickpeas. First, soak them overnight. Then, cook until soft. After that, follow the same steps as with canned chickpeas. This process takes longer but can give you great taste. These chickpeas shine as a snack on their own. You can also use them as a topping for salads or soups. They add a crunchy twist to your meals. Try them in wraps or grain bowls for extra texture. To keep chickpeas crispy, ensure they are dry before cooking. Rinse and drain them well. Toss with olive oil and seasoning immediately. Air fry them in a single layer. This helps them cook evenly and stay crunchy. In this article, I covered how to make Air Fryer Everything Bagel Chickpeas. You learned about key ingredients, tips for picking good chickpeas, and the need for fresh seasoning. I provided step-by-step cooking instructions, along with tips for crispiness and flavor. You also discovered variations and storage tips to keep your snacks fresh. Remember, making these chickpeas is simple, and they pack great flavor. Enjoy experimenting with different seasonings and serving ideas. Happy cooking!
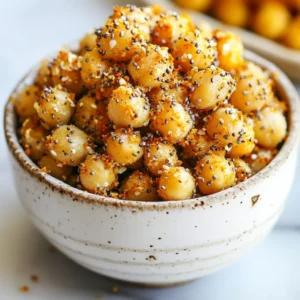
    Air Fryer Everything Bagel Chickpeas Crispy Snack Treat

Posts pagination

← Newer 1 … 38 39 40 41 42 … 66 Older →

Footer

↑ back to top

More information

  • Drinks
  • Appetizer
  • Dinner
  • Desserts
  • About
  • Contact
  • Privacy Policy

Our Policies

  • Privacy Policy
  • GDPR Policy
  • Terms Of Use
  • Copyright Policy
  • Cookie Policy
  • Disclaimer

Copyright © 2025 cheftaling