• Home
  • Recipe Index
    • Desserts
    • Dinner
    • Appetizer
    • Drinks
  • About
  • Contact
  • Privacy Policy
menu icon
go to homepage
  • Home
  • Recipe Index
    • Desserts
    • Dinner
    • Appetizer
    • Drinks
  • About
  • Contact
  • Privacy Policy

search icon
Homepage link
  • Home
  • Recipe Index
    • Desserts
    • Dinner
    • Appetizer
    • Drinks
  • About
  • Contact
  • Privacy Policy

×
Natalie

Natalie

Natalie is a passionate food storyteller and recipe developer at Taling’s Recipes, where she brings her love of seasonal ingredients and approachable cooking to life.

Her culinary path started in farmers’ markets, where she discovered the beauty of cooking with what’s fresh and local. Over time, she honed her skills in home kitchens and community gatherings, creating comforting meals that balance flavor with simplicity. Today, Natalie shares her recipes with a global audience, inspiring home cooks to embrace creativity, confidence, and joy in everyday meals.

  • To make this dish, you need a few key items. Here’s what you’ll need: - 4 boneless, skinless chicken breasts - 3 tablespoons olive oil - 2 cloves garlic, minced - 1 tablespoon fresh rosemary, chopped - 1 tablespoon fresh thyme, chopped - 1 teaspoon paprika - Salt and pepper to taste - 1 lemon, sliced These main items give you the juicy chicken you want. Seasoning makes the chicken shine. Here are the important ones: - Fresh rosemary - Fresh thyme - Paprika - Salt and pepper These seasonings bring out the best flavor in the chicken. You want colorful veggies to go with your chicken. Try these: - 1 cup cherry tomatoes, halved - 1 bell pepper, sliced (any color) These veggies add flavor and nutrients. They also look great on the plate! {{ingredient_image_1}} Start by gathering all your ingredients. You need: - 4 boneless, skinless chicken breasts - 3 tablespoons olive oil - 2 cloves garlic, minced - 1 tablespoon fresh rosemary, chopped - 1 tablespoon fresh thyme, chopped - 1 teaspoon paprika - Salt and pepper to taste - 1 lemon, sliced - 1 cup cherry tomatoes, halved - 1 bell pepper, sliced (any color) - Fresh parsley for garnish (optional) Preheat your oven to 425°F (220°C). Line a large baking sheet with parchment paper. This step helps with easy cleanup later. In a small bowl, whisk together the olive oil, minced garlic, and herbs. Add paprika, salt, and pepper to the mix. This oil will infuse the chicken with great flavor. Place the chicken breasts on the baking sheet. Brush both sides with the herb-infused oil. Make sure each piece is well coated. Next, arrange the lemon slices, cherry tomatoes, and bell pepper around the chicken. This adds color and taste to the dish. Drizzle any leftover oil over the veggies for extra flavor. Now, it's time to bake! Place the baking sheet in the oven. Bake for 25-30 minutes. The chicken is done when it reaches an internal temperature of 165°F (74°C). It should look golden brown. After baking, let the chicken rest for a few minutes. This helps keep it juicy. If you like, you can garnish it with fresh parsley before serving. Enjoy your meal! To keep your chicken breasts juicy, start with good quality meat. Use boneless, skinless chicken breasts for even cooking. The olive oil and herbs help lock in moisture. Brush both sides of the chicken well with the herb-infused oil. After baking, let the chicken rest for a few minutes. This rest time allows the juices to settle, making each bite tender and flavorful. Baking chicken at 425°F (220°C) is key for a crispy outside and juicy inside. Bake the chicken for 25-30 minutes. Use a meat thermometer to check for doneness. The chicken should reach 165°F (74°C). If you have larger breasts, you may need to bake longer. Always check that the meat is not pink in the center. For a complete meal, serve your chicken with fresh veggies like bell peppers and tomatoes. A large platter is perfect for presentation. Drizzle extra olive oil and a squeeze of lemon juice over everything. This adds brightness and flavor. You can also pair it with rice or quinoa for a hearty side. Don't forget to sprinkle fresh parsley for a pop of color! Pro Tips Marinate for Extra Flavor: If time allows, marinate the chicken in the herb-infused oil mixture for 30 minutes to several hours before baking. This enhances the flavor and tenderness of the meat. Customize Your Vegetables: Feel free to use seasonal vegetables like zucchini, asparagus, or carrots. This dish is versatile, and swapping out ingredients can bring new flavors to the table. Check Chicken Temperature: Use a meat thermometer to ensure the chicken is cooked to the ideal internal temperature of 165°F (74°C) for safe consumption and juiciness. Rest Before Serving: Allow the chicken to rest for 5-10 minutes after baking. This step keeps the juices locked in, resulting in a more succulent bite. {{image_2}} You can change the flavor of your chicken easily. Try using different herbs and spices. For a spicy kick, add chili powder or cayenne pepper. For a sweet touch, use honey and soy sauce. You can also try a blend of Italian herbs like oregano and basil. Each mix gives a new taste adventure. Just remember to keep the oil and garlic base for the best results. While cherry tomatoes and bell peppers are great, you can swap them. Try using zucchini, carrots, or asparagus. Broccoli or cauliflower can also add a nice crunch. Just cut your veggies to similar sizes for even cooking. This way, they will roast perfectly with the chicken. Feel free to mix and match based on what you have. This recipe is already low in carbs and gluten-free. To keep it that way, use fresh veggies and skip starchy sides. You can add more protein too. Consider adding shrimp or tofu if you want a different protein. Just be mindful of cooking times. Adjust them based on what you choose so everything cooks evenly. After enjoying your meal, let the chicken cool down. Place the chicken and veggies in an airtight container. They will stay fresh in the fridge for up to four days. Make sure to separate the veggies from the chicken if you can. This helps keep everything fresh. If you want to save some for later, freezing is a great option. Wrap the chicken and veggies tightly in plastic wrap. Then, place them in a freezer bag. They can last for up to three months. To reheat, let them thaw in the fridge overnight. Heat them in the oven at 350°F (175°C) until warm, about 15-20 minutes. Meal prep can save you time and energy. Cook a batch of chicken at the start of the week. Store it in single-serving containers. Pair each with your favorite sides. This way, you’ll have quick meals ready to go. Also, try mixing different veggies for variety throughout the week. The best side dishes for sheet-pan chicken are simple and colorful. You can serve: - Roasted potatoes - Steamed broccoli - Garlic bread - Green salad - Rice pilaf These sides match well with the chicken's flavors. They add crunch and color to your meal. You can use any of your favorite veggies too. To check if chicken breasts are cooked, use a meat thermometer. Insert it into the thickest part of the chicken. The internal temperature should be 165°F (74°C). Another way is to cut into the chicken. The meat should be white, not pink. Juices should run clear, not red. Always let the chicken rest for a few minutes after cooking. This keeps it juicy. Yes, you can use bone-in chicken. Just keep a few things in mind. Bone-in chicken takes longer to cook. Adjust your baking time to about 35-40 minutes. Check the internal temperature as before, aiming for 165°F (74°C). The bone adds flavor and moisture. You might need to adjust the veggies' cooking time too. Keep an eye on them so they don’t overcook. This post covered how to make simple sheet-pan oven-baked chicken breasts. We discussed key ingredients, essential seasonings, and the best vegetables to use. You learned step-by-step instructions for prepping, marinating, and baking. Tips ensured juicy chicken, while variations included different seasonings and veggies. Finally, I provided storage info and answered common questions. Remember, with a few simple steps, you can create a tasty meal that fits your diet. Enjoy your cooking and feel proud of your delicious results!
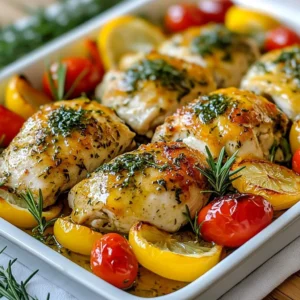
    Simple Sheet-Pan Oven Baked Chicken Breasts Delight
  • - 2 grilled chicken breasts, sliced - 1 cup basil pesto - 1 large ripe tomato, sliced - 1 cup fresh mozzarella, sliced - 4 ciabatta rolls The main ingredients create a tasty sandwich. Grilled chicken adds protein and flavor. Use fresh basil pesto for a rich taste. The ripe tomato gives a juicy burst. Fresh mozzarella melts perfectly, adding creaminess. Ciabatta rolls hold everything together with a nice crunch. - 2 tablespoons balsamic glaze - Fresh basil leaves for garnish - Olive oil for brushing - Salt and pepper to taste The additional ingredients add depth. Drizzling balsamic glaze brings sweetness and tang. Fresh basil leaves boost the flavor and look great. Brushing the rolls with olive oil ensures a golden toast. Salt and pepper enhance all the tastes. Each ingredient plays a key role in making this Chicken Pesto Caprese Sandwich a delight. {{ingredient_image_1}} First, grill your chicken breasts. Preheat your grill or grill pan on medium-high heat. Season the chicken with salt and pepper. Grill each breast for about 6-8 minutes per side. You want the juices to run clear. Once done, take the chicken off the grill. Let it rest for a few minutes. This step keeps the meat juicy. After resting, slice the chicken into thin pieces. Next, slice your ciabatta rolls in half. Brush the cut sides with olive oil. This adds flavor and helps with toasting. Place the rolls cut side down on the grill. Toast them for about 2-3 minutes until they turn golden and crispy. Keep an eye on them to avoid burning. Now it’s time to build your sandwich. Start with the bottom half of each toasted roll. Spread a generous layer of basil pesto on it. Then, add the sliced chicken on top of the pesto. Next, layer on the fresh tomato slices. Follow that with slices of fresh mozzarella. Drizzle balsamic glaze over the mozzarella for an extra kick. Finally, sprinkle fresh basil leaves on top. Place the other half of the roll on top to finish your sandwich. For an extra crispy sandwich, you can grill the assembled sandwich. Put the whole sandwich back on the grill for an additional 2-3 minutes on each side. This melts the cheese and gives a nice crunch. Once done, cut the sandwich in half and serve right away. To make sure your chicken is fully cooked, use a meat thermometer. The thickest part should reach 165°F (75°C). If you don't have a thermometer, cut into the chicken. The juices should run clear, not pink. For toasting ciabatta perfectly, brush the cut sides with olive oil. This helps achieve a golden and crispy texture. Grill them cut side down for 2-3 minutes. Keep an eye on them so they don’t burn. For a great presentation, serve the sandwiches on a wooden cutting board. Add extra basil leaves around the sandwiches for color. A small bowl of balsamic glaze looks nice for dipping. Pair these sandwiches with a fresh salad or crispy potato chips. A side of sweet potato fries also works well for a tasty combo. You can add spices to the chicken to boost flavor. Try garlic powder, paprika, or Italian herbs before grilling. These spices add depth to the taste. Other toppings can make your sandwich even better. Consider adding avocado slices or roasted red peppers. These add creaminess and a nice pop of color. Pro Tips Chicken Marinade: Marinate the chicken breasts in the basil pesto for at least 30 minutes before grilling to enhance flavor. Fresh Ingredients: Use fresh mozzarella and ripe tomatoes for the best taste and texture in your sandwich. Grilling Technique: For perfectly grilled chicken, use a meat thermometer; it should reach an internal temperature of 165°F (75°C). Serving Suggestion: Pair the sandwich with a simple side salad or sweet potato fries for a complete meal. {{image_2}} You can make a great vegetarian version of this sandwich. Just swap out the grilled chicken for roasted vegetables. Use veggies like zucchini, bell peppers, and eggplant. Roasting brings out their natural sweetness and flavor. Simply toss them in olive oil, salt, and pepper, then roast until tender. This option keeps the sandwich hearty and satisfying. The cheese can change the flavor of your sandwich. While fresh mozzarella is delicious, you can try other cheeses too. Goat cheese adds a tangy flavor that pairs well with basil. Cheddar gives a sharp taste that contrasts nicely with the pesto. Feel free to mix and match until you find your favorite cheese. Pesto doesn’t have to be just basil. You can try different types for a twist. Sun-dried tomato pesto brings a rich, sweet flavor. It adds a nice touch to the sandwich. Spinach pesto is another option; it’s fresh and vibrant. Both variations will make your Chicken Pesto Caprese Sandwich unique and exciting! To keep your Chicken Pesto Caprese Sandwich fresh, store leftovers properly. First, place the sandwich in an airtight container. This method protects it from odors and keeps it moist. If you want to store the sandwich for a longer time, consider separating the ingredients. Keep the grilled chicken, pesto, and veggies in different containers. Ensure the refrigerator is set to 40°F (4°C) or lower. This temperature helps prevent spoilage. Enjoy your leftovers within 2-3 days for the best taste. When you're ready to enjoy your sandwich again, reheating it properly is key. You can use a skillet or grill pan for the best results. Heat the pan over medium heat. Place the sandwich in the pan and cover it. Heat for about 3-5 minutes on each side. This method warms the sandwich evenly and keeps it crispy. If you're in a hurry, a microwave works too. Just place the sandwich on a microwave-safe plate and heat for 30 seconds. Check if it's warm, and add 15-second intervals if needed. If you want to freeze the sandwich, it’s best to freeze the parts separately. Wrap the grilled chicken in plastic wrap and place it in a freezer bag. You can also freeze the pesto in ice cube trays. Once frozen, transfer the cubes to a freezer bag. For the ciabatta rolls, wrap them tightly in foil or plastic wrap. When you’re ready to eat, thaw the chicken and pesto overnight in the fridge. Toast the ciabatta rolls fresh for a tasty sandwich! Yes, you can make this sandwich ahead of time. To do this, you should prepare the chicken and pesto first. After cooking the chicken, let it cool, then slice it. Store the sliced chicken in the fridge. For the ciabatta rolls, toast them just before serving. This keeps them fresh and crispy. You can also layer the pesto, chicken, tomato, and mozzarella in advance. Just add the balsamic glaze and fresh basil right before eating. This way, your sandwich stays tasty and vibrant. If you can't find ciabatta rolls, there are great alternatives. You can use: - Baguette - Sourdough bread - Whole grain rolls - Focaccia These breads offer different textures and flavors. Pick one that you enjoy most! Making your own basil pesto is simple and fun. Here is a quick recipe: 1. Ingredients: - 2 cups fresh basil leaves - 1/2 cup olive oil - 1/3 cup pine nuts (or walnuts) - 1/2 cup grated Parmesan cheese - 2 cloves garlic - Salt to taste 2. Instructions: - Add basil, garlic, and nuts to a food processor. - Pulse until finely chopped. - With the processor running, slowly pour in olive oil. - Scrape down the sides and blend until smooth. - Stir in cheese and salt. This homemade pesto adds fresh flavor to your sandwich! The Chicken Pesto Caprese Sandwich is both tasty and nutritious. Here’s a basic breakdown per sandwich: - Calories: About 450 - Protein: 30g - Carbohydrates: 40g - Fat: 20g - Fiber: 3g This meal provides a good mix of protein and healthy fats. It’s filling without being too heavy, making it perfect for lunch or dinner. Enjoy your delicious creation! This blog post covered how to make a delicious sandwich with grilled chicken, fresh basil pesto, and mozzarella. You learned about key ingredients, step-by-step assembly, and tips for perfecting your dish. Remember, you can switch ingredients for variations or store leftovers properly. With these ideas, you can create a tasty meal that suits your tastes. Enjoy sharing this sandwich with friends and family!
    Chicken Pesto Caprese Sandwich Flavorful and Quick Meal
  • - 1 lb Italian sausage (mild or spicy, your choice), casings removed - 2 cups long-grain rice - 1 medium onion, diced - 3 cloves garlic, minced - 1 bell pepper (any color), diced - 1 can (14.5 oz) diced tomatoes with chili - 4 cups chicken broth The main ingredients create a balanced dish. The Italian sausage adds rich flavor and protein. The long-grain rice absorbs all the tasty juices. Diced onion, garlic, and bell pepper bring color and sweetness. Diced tomatoes with chili add a nice kick. Chicken broth ties everything together with a savory base. - 1 teaspoon paprika - 1 teaspoon dried oregano - Salt and pepper to taste - Fresh parsley, chopped (for garnish) Seasoning makes your dish shine. Paprika gives a warm color and smoky taste. Dried oregano adds a herby note. Salt and pepper enhance all the flavors. Fresh parsley is the final touch. It adds brightness and makes your meal look beautiful. {{ingredient_image_1}} First, take your large pot or Dutch oven and heat it over medium-high heat. Add the Italian sausage, making sure to remove the casings. Cook it for about 5 to 7 minutes. Use a spoon to break the sausage into small pieces. Cook until it turns brown and no pink remains. Next, add the diced onion, minced garlic, and diced bell pepper to the pot. Sauté these for about 3 to 4 minutes. You want the vegetables to soften and smell great. Stir them often to avoid burning. Now, it’s time to add the rice. Stir it in and toast it for about 2 minutes. Keep stirring to prevent it from burning. Then, pour in the can of diced tomatoes and the chicken broth. Add the paprika, oregano, and season with salt and pepper. Stir everything well to mix. Bring the pot to a boil, then lower the heat and cover it. Let it simmer for 20 to 25 minutes. Check the rice to see if it has absorbed the liquid. Once done, fluff the rice with a fork. Serve hot and garnish with fresh parsley for a nice touch. Pick the sausage that fits your taste. You can choose mild for a gentle flavor. Spicy sausage adds a kick if you like heat. Experiment to find your favorite mix. To avoid mushy rice, rinse it well before cooking. This step removes excess starch. Toast the rice in the pot with the sausage and veggies. It helps to add a nice flavor and keeps the rice firm. Follow the cooking times closely. Simmer until the liquid is gone, then fluff it with a fork. Add spices for extra depth. Consider a pinch of cayenne for heat or smoked paprika for a rich taste. Fresh herbs like basil or thyme can brighten the dish. A squeeze of lemon juice before serving adds a fresh touch. Keep experimenting to make it your own! Pro Tips Use Quality Sausages: Choose high-quality Italian sausage for the best flavor. Fresh sausage can add a nice touch to the dish. Toast the Rice: Toasting the rice for a couple of minutes before adding the liquid enhances its nutty flavor and improves the overall dish. Adjust the Spice Level: Feel free to adjust the spice by using spicy sausage or adding extra chili powder if you like it hot. Let it Rest: After cooking, let the dish sit covered for a few minutes before serving. This allows the flavors to meld and the rice to firm up. {{image_2}} You can use many kinds of sausage in this dish. Italian sausage is a classic choice. You can pick mild or spicy, depending on your taste. If you want something different, try chorizo. It adds a smoky flavor. Chicken sausage is another great option if you want leaner meat. For a plant-based meal, use vegan sausage. It gives you the same taste without meat. Adding vegetables can make this dish even better. Fresh or frozen veggies work well. Use bell peppers, zucchini, or spinach. You can also add peas or corn for sweetness. If you have seasonal vegetables, throw them in for added flavor. Just chop them small so they cook evenly. Mixing in veggies boosts nutrition and color. To make this dish even tastier, think about flavor upgrades. Adding cheese can give a creamy touch. Cheddar or mozzarella melts well into the rice. A dash of hot sauce can spice things up if you like heat. You can also sprinkle in fresh herbs like basil or thyme for a fresh taste. These simple additions can elevate your meal from good to great! To keep your one-pot sausage and rice fresh, store leftovers in a sealed container. Place the container in the fridge within two hours of cooking. This helps keep bacteria away. You can also freeze leftovers. Use freezer-safe bags or containers. Remove as much air as possible to prevent freezer burn. When it’s time to eat again, reheat the dish on the stove or in the microwave. If using the stove, add a splash of chicken broth. This keeps the rice moist. Heat over low heat, stirring often. In the microwave, cover the bowl with a lid or wrap. Heat in short bursts, stirring in between. This prevents hot spots. In the fridge, your one-pot sausage and rice lasts about three to four days. If you freeze it, it stays good for about two to three months. Always check for signs of spoilage before eating. Look for off smells or changes in texture. If it seems off, toss it out. Yes, you can use brown rice. Brown rice takes longer to cook. You should add extra water and increase the cooking time by about 10 minutes. This way, the rice will cook well with the sausage and other flavors. To make this dish vegetarian, swap the sausage for a plant-based option. You can use veggie sausage or mushrooms for a hearty texture. Also, use vegetable broth instead of chicken broth. This keeps the flavors rich and satisfying. You can serve this dish with many sides. Here are some great options: - A fresh garden salad with vinaigrette - Steamed broccoli or green beans - Corn on the cob seasoned with butter - Garlic bread to soak up the flavors - A simple coleslaw for crunch These sides will add color and texture to your meal. Enjoy your feast! You now have a clear guide to make One Pot Sausage and Rice. We covered main ingredients, step-by-step cooking, and tips for great flavor. You can switch things up with different sausages or add veggies based on your taste. Storing leftovers is simple, and reheating keeps the dish tasty. Don't hesitate to try variations that suit your diet. Enjoy making this meal and share it with friends or family. It's a perfect blend of flavor and ease. Your kitchen will soon be the place everyone wants to be!
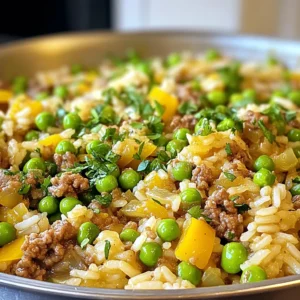
    One Pot Sausage and Rice Flavorful Dinner Recipe
  • - 1 lb ground beef - 1 medium onion, thinly sliced - 1 green bell pepper, thinly sliced - 1 tablespoon garlic, minced - 2 teaspoons Worcestershire sauce - Salt and pepper to taste - 4 hoagie rolls - 8 slices provolone cheese - 2 tablespoons olive oil - Optional: sliced jalapeños for spice Using high-quality ingredients makes a big difference. Choose fresh ground beef for the best flavor. Look for ground beef that is at least 80% lean. Fresh vegetables give your cheesesteak a great crunch. Select onions and bell peppers that are firm and bright in color. For cheese, use good-quality provolone. It melts well and adds a rich taste. You can add sliced jalapeños for some heat. They give your cheesesteak a nice kick. Other options include mushrooms or spinach. These add more layers of taste. If you want a smoky flavor, try adding smoked paprika. Each of these choices can make your cheesesteak unique and exciting. {{ingredient_image_1}} Start by gathering all your ingredients. You will need ground beef, onion, bell pepper, garlic, Worcestershire sauce, salt, pepper, hoagie rolls, provolone cheese, and olive oil. Slice the onion and green bell pepper thinly. Mince the garlic. This will help the flavors mix well. Heat olive oil in a large skillet over medium heat. Add the sliced onion and bell pepper. Cook them for about 7-8 minutes until they soften. Stir in the minced garlic and let it cook for one more minute. This will make your kitchen smell great! Remove the veggies from the skillet and set them aside. In the same skillet, add your ground beef. Season it with salt, pepper, and Worcestershire sauce. Cook the beef for about 5-6 minutes. Break it up with a spatula as it cooks. Make sure it is browned and cooked through. Drain any extra fat from the skillet. Next, add the cooked onion and bell pepper back to the skillet. Stir everything together and cook for another 2-3 minutes. This helps all the flavors blend together perfectly. Preheat your oven to 350°F (175°C). Take your hoagie rolls and slice them lengthwise, but do not cut all the way through. You want to create a pocket for the filling. Place them on a baking sheet. Fill each hoagie roll with the ground beef and veggie mixture. Top each one with two slices of provolone cheese. Bake in the oven for 5-7 minutes, until the cheese melts and bubbles. If you want a golden top, broil it for 1-2 minutes, but watch it closely so it does not burn. Once done, remove from the oven. If you like some heat, add sliced jalapeños on top. Serve your delicious Ground Beef Philly Cheesesteaks right away! To boost the taste of your Ground Beef Philly Cheesesteaks, use fresh ingredients. Fresh onions and peppers add brightness. Worcestershire sauce gives depth and richness. Try adding a pinch of smoked paprika for a smoky twist. You can also experiment with different cheeses. Cheddar or gouda can add a unique flavor. If you like heat, toss in sliced jalapeños. They add a spicy kick that excites the palate. For tender ground beef, use medium heat when cooking. This helps the beef cook evenly without getting tough. Keep breaking the meat apart with a spatula. This allows it to brown nicely. Don't rush it! Let it cook fully to get that nice caramel color. Drain any excess fat after cooking. This keeps your cheesesteaks from being greasy. Serve your cheesesteaks with a side of crispy fries or a fresh salad. You can offer dipping sauces like ranch or spicy mayo for extra flavor. For a fun twist, try serving them with pickles or slaw on the side. These add crunch and brightness to your meal. Enjoy your cheesesteaks hot and fresh from the oven for the best taste! Pro Tips Choose the Right Beef: For the best flavor and texture, opt for ground beef with a higher fat content, such as 80/20. It will keep the cheesesteaks juicy and delicious. Don't Skip the Worcestershire Sauce: This ingredient adds a depth of flavor and enhances the umami in the beef. A little goes a long way, so measure it out carefully. Customize Your Veggies: Feel free to add other vegetables like mushrooms or diced tomatoes for extra flavor and texture. Just sauté them along with the onions and peppers. Perfect Cheese Melt: For a perfectly melted cheese topping, consider covering the hoagies with foil for the first half of the baking time, then remove it to broil for a golden finish. {{image_2}} You can switch up the cheese for your cheesesteak. Provolone is great, but try these: - Cheddar for a sharp flavor - Mozzarella for a stretchy, creamy bite - Swiss for a nutty taste - Pepper jack for a spicy kick Each cheese adds a different twist. Mix and match to find your favorite! Want to boost flavor? Add more veggies or spices. Some great options include: - Mushrooms for an earthy taste - Spinach for a fresh touch - Sliced jalapeños for heat - Hot sauce for an extra kick You can also sprinkle in spices like paprika or Italian herbs. These add depth and make your meal special. You can enjoy cheesesteaks even if you're gluten-free or on a low-carb diet. Here are some ideas: - Use lettuce wraps instead of hoagie rolls - Try gluten-free hoagie rolls available in stores - Use cauliflower rice as a base for a low-carb version These swaps help you enjoy the dish without the extra carbs or gluten. You can still savor every bite! To store your leftovers, let them cool first. Place them in an airtight container. Keep them in the fridge for up to three days. This way, your cheesesteaks stay fresh and tasty. Make sure the container seals well to avoid air and moisture. When you’re ready to enjoy your leftovers, preheat your oven to 350°F. Place the cheesesteaks on a baking sheet. Heat them for about 10-15 minutes until warm. You can also use a microwave. Just place the cheesesteak on a plate and heat for one to two minutes. This keeps the bread soft while warming the filling. To freeze your cheesesteaks, wrap each one tightly in foil. Then, place them in a freezer bag or container. Label the bag with the date. You can freeze them for up to three months. When you’re ready to eat, thaw them in the fridge overnight. Then, reheat as mentioned above for a quick meal. Yes, you can use other meats. Chicken or turkey works well. You can also use pork if you prefer. Just remember to cook them until fully done. Adjust your cooking times based on the meat you choose. Ground turkey is leaner but still tasty. To make your cheesesteaks taste more authentic, use ribeye or sirloin. These meats have great flavor and tenderness. Also, use classic cheese like Cheez Whiz or provolone. Add sautéed mushrooms for extra flavor and texture. Use fresh hoagie rolls for the best sandwich experience. Many sides go well with Ground Beef Philly Cheesesteaks. Here are some great options: - French fries: Crispy and salty, they are a classic choice. - Potato chips: For a quick and easy crunch. - Coleslaw: Adds a fresh, crunchy contrast. - Pickles: They give a nice tangy bite. - Salad: A light side to balance the richness of the cheesesteaks. These sides enhance your meal and make it more enjoyable. This blog post covered the key aspects of making Ground Beef Philly Cheesesteaks. We explored the best ingredients and their quality, along with optional additions for flavor. I shared clear, step-by-step instructions for preparation and cooking. Tips for enhancing flavor and perfect serving methods were also included. Plus, we discussed various ingredient variations and how to store leftovers. In conclusion, you can create a delicious cheesesteak at home with ease. Enjoy experimenting with flavors and sharing your tasty creation!
    Ground Beef Philly Cheesesteaks Flavorful and Easy Meal
  • To make a tasty keto broccoli cheddar soup, gather these fresh ingredients: - 4 cups fresh broccoli florets - 1 cup shredded sharp cheddar cheese - 1 cup heavy cream - 1 cup vegetable broth - 1 small onion, diced - 2 cloves garlic, minced - 2 tablespoons butter - 1 teaspoon garlic powder - 1 teaspoon onion powder - Salt and pepper to taste Each ingredient plays a key role. Fresh broccoli gives the soup its base and nutrition. Sharp cheddar cheese adds rich flavor and creaminess. Heavy cream makes the soup smooth and decadent. Vegetable broth brings all the flavors together. Onion and garlic add depth to the dish. They release their natural sweetness when sautéed. The garlic powder and onion powder boost flavor. Salt and pepper enhance every bite, balancing the taste. When you combine these ingredients, you create a warm, comforting dish. This soup is perfect for a cozy night in or a family meal. Enjoy the process of cooking and taste the delightful flavors that come together! {{ingredient_image_1}} Prepping the vegetables Start by washing your broccoli. Cut it into small florets. This helps it cook evenly. Dice the onion finely. Mince the garlic cloves. You want these to blend well in the soup. Sautéing the onion and garlic In a large pot, melt the butter over medium heat. Once melted, add the diced onion. Sauté it for about five minutes until it turns translucent. Next, add the minced garlic. Sauté for one more minute. You want the garlic to be fragrant but not burnt. Simmering and blending the soup Add the vegetable broth to the pot and bring it to a simmer. Once it simmers, toss in the broccoli florets. Cook them for about eight to ten minutes. You want the broccoli to be soft. After it’s soft, use an immersion blender to blend the soup until smooth. If you don’t have one, you can use a regular blender in batches. Return the blended mixture to the pot. Incorporating cream and cheese Now, stir in the heavy cream. Add the garlic powder and onion powder next. Season with salt and pepper to taste. Let the soup simmer for another five minutes. This helps mix all the flavors together. Gradually add the shredded cheddar cheese. Stir continuously until it melts into the soup. Adjusting seasonings before serving Before serving, taste the soup. Adjust the salt and pepper as needed. This step ensures the soup tastes just right. For a nice touch, serve the soup with extra cheddar on top. You can also add a few small broccoli florets for garnish. A drizzle of olive oil will make it look even better. To make your Keto Broccoli Cheddar Soup burst with flavor, add some great seasonings. Besides garlic and onion powder, you can try a pinch of cayenne for heat. A sprinkle of smoked paprika adds depth and warmth. Fresh herbs like thyme or parsley can also brighten the taste. When blending the soup, ensure it is cool enough to handle. If using a traditional blender, blend in small batches to avoid spills. You want a smooth texture, so blend until it looks creamy and velvety. Using an immersion blender is a game changer for this soup. It lets you blend right in the pot. This saves time and reduces mess. If you prefer a traditional blender, wait until the soup cools slightly. This helps avoid splatters and burns. Incorporating cheese is key to your soup's richness. Add the shredded cheddar gradually while stirring. This way, the cheese melts evenly. Be patient; let it melt completely for that perfect creamy finish. Pro Tips Cheese Selection: Use a mix of cheeses like Gruyere or mozzarella for a more complex flavor profile. Broccoli Prep: For a vibrant green color, plunge the cooked broccoli in ice water before blending. Texture Control: If you prefer a chunkier soup, reserve some broccoli florets and add them back after blending. Seasoning Adjustment: Always taste and adjust seasoning after adding the cheese, as it can alter the overall flavor. {{image_2}} You can make this soup fit your needs easily. If you want a dairy-free option, use coconut cream instead of heavy cream. This keeps the soup rich and creamy without dairy. You can also swap the cheddar for a nut-based cheese or a vegan cheese blend. If you want to switch things up, try different vegetables. Cauliflower can replace broccoli for a milder taste. Spinach or kale can add great nutrition and color. You can even toss in some carrots or bell peppers for a sweet twist. Spices can boost the flavor of this soup. Add a pinch of cayenne for heat or smoked paprika for depth. Fresh herbs like thyme or basil can make it pop too. You can also change the cheese. While sharp cheddar is great, try Gruyère for a nutty flavor. Monterey Jack can add a creamy texture. Mixing different cheeses can create a unique taste that makes each bowl special. To keep your soup fresh, store it in an airtight container. Place it in the fridge if you plan to eat it within three days. This keeps the flavors intact and ensures you enjoy every spoonful. If you want to keep it longer, freezing works great. Pour the cooled soup into freezer-safe bags or containers. Make sure to leave some space for expansion. Label the bags with the date, and it can last up to three months in the freezer. When it’s time to enjoy your leftovers, reheating is key. I suggest using the stovetop. Pour the soup into a pot over low heat. Stir often to prevent sticking. This method helps maintain its creamy texture and flavors. If you’re in a rush, you can use the microwave. Just heat it in short bursts. Stir between each burst to ensure even heating. Avoid boiling the soup, as this can change its texture. Enjoy every warm, cheesy bite! Is this soup keto-friendly? Yes, this soup is keto-friendly. It uses low-carb ingredients like broccoli and heavy cream. Cheese adds flavor and protein, making it perfect for a keto diet. Can I make this soup ahead of time? You can make this soup ahead of time. Just store it in the fridge for up to three days. Reheat it on the stove when you're ready to eat. How can I make this soup thicker? To thicken the soup, blend it longer or add more cheese. You can also add a low-carb thickener like xanthan gum. What can I substitute for heavy cream? If you need a substitute for heavy cream, try full-fat coconut milk. It adds creaminess while keeping it keto. You can also use cream cheese for a thicker texture. Can I use frozen broccoli instead of fresh? Yes, you can use frozen broccoli. Just make sure to thaw it first. Frozen broccoli cooks faster, so check it often while simmering. This blog post covered delicious broccoli cheddar soup. We shared the main ingredients and precise measurements to help you gather what you need. I outlined easy steps for cooking, along with tips to enhance flavor. You learned about ingredient substitutions and variations for your soup. Finally, we discussed how to store leftovers and reheat them perfectly. With this knowledge, you can make a tasty soup that's perfect for any occasion. Now, enjoy your cooking and feel free to experiment with your own ideas!
    Keto Broccoli Cheddar Soup Creamy and Flavorful Dish
  • To make Easy Chicken Stuffing Casserole, you need these simple ingredients: - 2 cups cooked chicken, shredded - 1 cup chicken broth - 1 package (6 oz) stuffing mix (herb-flavored) - 1 can (10.5 oz) cream of chicken soup - 1 cup frozen mixed vegetables (peas, carrots, corn) - 1/2 cup shredded cheddar cheese - 1/4 cup milk - 1 teaspoon garlic powder - 1 teaspoon onion powder - Salt and pepper to taste Using quality ingredients makes a big difference. Here are some brands I recommend: - Chicken Broth: Swanson or College Inn are both great options. - Stuffing Mix: Stove Top offers a tasty herb-flavored mix. - Cream of Chicken Soup: Campbell's is a classic choice that works well. - Cheddar Cheese: Kraft shredded cheese melts perfectly in casseroles. Choosing fresh ingredients will improve the taste of your casserole. Here are my tips: - Chicken: Use freshly cooked chicken. It should smell good and not be slimy. - Vegetables: Look for bright colors and firm textures. Frozen mixed veggies are easy and quick. - Cheese: Check for a firm texture and a fresh smell. Avoid cheese with any mold. - Broth and Soup: Make sure these cans are not dented or rusted. Check the expiration date. {{ingredient_image_1}} First, gather all your ingredients. You need shredded chicken, soup, broth, and milk. Grab the stuffing mix and cheese too. Don't forget the frozen veggies, garlic powder, and onion powder. Measure out each item to make this easy. Next, preheat your oven to 350°F (175°C). This step is important. A hot oven helps the casserole cook evenly. Prepare a 9x13 inch baking dish by greasing it lightly. This will keep the casserole from sticking. In a large bowl, combine the cream of chicken soup, chicken broth, and milk. Stir these together until they are smooth. Then, add the shredded chicken and frozen mixed veggies. Sprinkle in the garlic powder, onion powder, salt, and pepper. Mix well until everything is coated. Now, take the stuffing mix and fold it into the mixture. Do this slowly to keep the stuffing fluffy. The mixture should feel moist but not too wet. This balance is key for a great texture. Once mixed, pour the casserole mixture into the greased baking dish. Spread it out evenly for even cooking. Next, sprinkle the shredded cheddar cheese on top. This will melt and create a tasty crust. Cover the dish with aluminum foil. Bake it in the oven for 25 minutes. After that, take off the foil and bake for another 10-15 minutes. This helps the cheese get bubbly and golden brown. After baking, let the casserole sit for about 5 minutes. This will help it set. Then, it’s ready to serve! Enjoy this warm, comforting dish. To keep your casserole moist, use enough broth. The chicken broth adds flavor and helps the stuffing mix soak up moisture. If you want it extra creamy, add a bit more cream of chicken soup or milk. Mixing in frozen vegetables also helps retain moisture. They release steam while baking, which keeps everything juicy. Remember to cover the dish with foil during the first part of baking. This traps steam and prevents drying out. Baking your casserole at 350°F is key. This temperature ensures even cooking. Start with 25 minutes covered with foil. This helps the inside cook well. After that, remove the foil and bake for another 10 to 15 minutes. This step allows the cheese to melt and turn golden brown. Use a timer to avoid overcooking. If you check too often, the heat escapes, slowing down the process. This casserole is great on its own, but you can make it even better. Serve it warm with a side salad for a fresh touch. You can also add some crusty bread or biscuits for a hearty meal. For a pop of color, sprinkle fresh parsley on top before serving. You can pair it with your favorite dipping sauce, like ranch or BBQ, for extra flavor. Enjoy it with your family or friends for a cozy meal! Pro Tips Use Leftover Chicken: This recipe is perfect for utilizing any leftover rotisserie or cooked chicken, saving time and reducing waste. Customize Your Veggies: Feel free to swap out the frozen mixed vegetables for your favorites, like broccoli or bell peppers, to suit your taste. Make It Creamier: For a creamier texture, add an extra can of cream of chicken soup or a dollop of sour cream before baking. Storage Tips: Store leftovers in an airtight container in the fridge for up to 3 days, and reheat in the oven for best results. {{image_2}} You can switch the chicken for other proteins. Try shredded turkey for a holiday twist. Ground beef or sausage can work too. They add a nice flavor. If you want a meat-free option, use beans or lentils. They give protein and texture. Feel free to change the veggies in this dish. You can use broccoli, bell peppers, or even spinach. These choices bring new colors and tastes. Just make sure to chop them small. This helps them cook evenly. If you need gluten-free options, choose gluten-free stuffing mix. You can also use gluten-free broth. For a dairy-free casserole, swap regular milk for almond or coconut milk. Use dairy-free cheese for a cheesy touch. These swaps keep the dish tasty while meeting your needs. To store leftover chicken stuffing casserole, let it cool first. Place it in an airtight container. You can keep it in the fridge for up to three days. If you want to save it longer, consider freezing it. Reheat the casserole in the oven for the best results. Preheat your oven to 350°F (175°C). Cover the dish with foil to keep it moist. Heat for about 20 minutes or until it is warm throughout. You can also use the microwave for quick reheating. Just make sure to cover it to avoid drying out. To freeze the casserole, wrap it tightly in plastic wrap or aluminum foil. Label it with the date. Store it in the freezer for up to three months. When you’re ready to eat, thaw it overnight in the fridge. Then follow the reheating instructions to enjoy a warm dish. No, I do not recommend using raw chicken. The dish needs cooked chicken to ensure safety. Raw chicken will not cook fully in the casserole's baking time. Instead, use shredded or diced cooked chicken. You can use rotisserie chicken or leftover chicken, which works well. You can use several options if you want a substitute for cream of chicken soup. Try using cream of mushroom soup for a different flavor. You can also use homemade chicken gravy. Another option is to mix sour cream with chicken broth. These substitutes add flavor without losing the dish's creamy texture. To check if the casserole is done, look for a bubbly, golden top. The cheese should melt and lightly brown. You can also use a food thermometer. The internal temperature should reach 165°F (74°C). Let it cool for about five minutes before serving for the best texture. In this post, we covered how to choose and prep your ingredients, mix and bake your casserole, and tips to keep it moist. I shared brands and ideas for fresh selections. You learned about variations like proteins and veggies. Plus, we discussed how to store and reheat leftovers effectively. The right ingredients and methods make a big difference in your casserole's taste. Use these tips to create a meal that everyone will love. Enjoy your cooking!
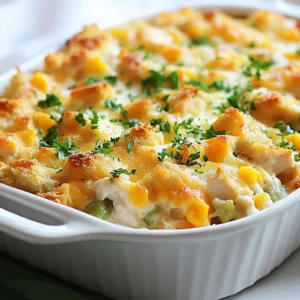
    Easy Chicken Stuffing Casserole Quick and Tasty Dish
  • - 20 store-bought or homemade potstickers - 1 can (400 ml) coconut milk - 2 cups chicken or vegetable broth - 1 onion, diced - 4 garlic cloves, minced - 1 inch piece of ginger, grated - 1 red bell pepper, sliced - 1 cup bok choy, chopped - 1 tablespoon olive oil - 2 tablespoons red curry paste - 1 tablespoon soy sauce - 1 tablespoon lime juice - Salt and pepper to taste - Fresh cilantro and sliced green onions for garnish When I make this Thai Coconut Potsticker Stew, I start with the main ingredients. Potstickers give the stew its heartiness. You can use store-bought or make your own. Both work well. The coconut milk adds creaminess and sweetness. It balances the flavors nicely. The broth adds depth and helps create a warm base. Next, I focus on the vegetables and seasonings. Onions, garlic, and ginger bring a fragrant base. I love how they fill my kitchen with warmth. The red bell pepper adds color and sweetness. Bok choy gives a nice crunch and freshness to every bite. For extra flavor, I use olive oil, red curry paste, and soy sauce. The red curry paste gives the stew its spice. Lime juice adds a bright, zesty touch. I always taste and adjust the salt and pepper. Fresh cilantro and green onions are key for garnish. They not only look great but also add freshness. Each ingredient plays a role in making this dish comforting and full of flavor. {{ingredient_image_1}} - Heat olive oil in a large pot. - Sauté onion until soft. - Add garlic and ginger, then cook until fragrant. Start by warming the olive oil in your pot over medium heat. Once hot, toss in the diced onion. Sauté it for about 3-4 minutes until it becomes soft. Next, add the minced garlic and grated ginger. Stir them in for about a minute. You want to let those lovely aromas fill your kitchen! - Stir in red curry paste. - Pour in coconut milk and broth, then bring to a simmer. After the garlic and ginger have cooked, add the red curry paste. Mix it in well. This step adds a great kick! Now, pour in the coconut milk and your broth. Bring the mixture to a gentle simmer. You’ll see the colors blend beautifully. - Add soy sauce and lime juice. - Simmer potstickers until heated through. - Stir in red bell pepper and bok choy, cooking until tender. Once simmering, stir in the soy sauce and lime juice. Let it simmer for about 5 minutes. This step helps deepen the flavors. Carefully add in the potstickers. Simmer them for another 5-7 minutes. They should heat up nicely. Finally, toss in the sliced red bell pepper and chopped bok choy. Cook them for about 3-4 minutes. You want the veggies tender but still vibrant. Taste your stew and add salt and pepper if needed before serving. To adjust seasoning in your stew, taste as you go. Start with salt and pepper. Add a pinch of each. If you want more flavor, try adding a bit more soy sauce or lime juice. This will help balance the sweetness of coconut milk. Cooking potstickers without breaking them can be tricky. First, gently add them to the stew. Make sure the stew is not boiling too hard. Stir carefully to keep them intact. This way, your potstickers will stay whole and delicious. Garnishing your stew adds a nice touch. Use fresh cilantro and sliced green onions. Sprinkle them on top of each bowl. This adds color and freshness. It makes your dish look even more appetizing! Serving lime wedges on the side is a great idea. They add a zesty kick. Squeeze a wedge over your stew before eating. This will brighten the flavors and enhance your experience. For this recipe, a large pot works best. It allows enough space for the stew and potstickers. A heavy-bottomed pot helps prevent burning. Some kitchen gadgets can make cooking easier. A good cutting board and sharp knife speed up prep. A ladle is perfect for serving the stew into bowls. These tools can help improve your cooking efficiency. Pro Tips Use Homemade Broth: For an even richer flavor, consider using homemade chicken or vegetable broth instead of store-bought. Adjust the Spice: If you prefer a milder stew, start with a smaller amount of red curry paste and gradually add more to taste. Fresh Herbs Boost Flavor: Adding fresh herbs like Thai basil or mint just before serving can elevate the dish with a burst of freshness. Customize Veggies: Feel free to swap in your favorite vegetables or whatever you have on hand; carrots, snap peas, or spinach work great! {{image_2}} You can change the proteins in this stew. Shrimp or tofu work well. Both give a nice taste. If you use shrimp, add them later in the cooking. Tofu can soak up flavors well. You can also swap out vegetables. Snap peas or bok choy are great options. They add crunch and color. Try different veggies to find your favorite mix. If you want a milder stew, reduce the curry paste. This makes it better for kids. You can also remove the ginger for less heat. If you like it spicy, add chili flakes. Fresh chilies can give a nice kick too. Just be careful not to add too much at once. Taste as you go to find the right heat. For gluten-free options, choose gluten-free potstickers. Many brands offer these now. You can also make your own from rice flour. If you want a vegan stew, use vegetable broth. Look for vegan red curry paste too. This keeps all the great flavors without meat. After you enjoy the Thai Coconut Potsticker Stew, store any leftovers in the fridge. Place the stew in an airtight container. This keeps it fresh and safe. The stew lasts about 3 to 4 days in the fridge. To freeze the stew, let it cool down first. Transfer the cooled stew to a freezer-safe container. Leave some space at the top for expansion. You can freeze it for up to 3 months. When you want to eat it, thaw it in the fridge overnight. Reheat it on the stove over medium heat. Stir it gently until it becomes hot. You can prep ingredients ahead of time. Chop the veggies and store them in the fridge. You can also make the stew base a day ahead. When you're ready to eat, just add the potstickers and heat. Use the microwave or stove for easy reheating. This saves time and makes meals quick and easy. Can I use frozen potstickers? Yes, you can use frozen potstickers. Just add them to the stew without thawing. They will cook while the stew simmers. It’s an easy way to save time. What can I serve with Thai Coconut Potsticker Stew? This stew pairs well with rice or noodles. You could also serve it with a side salad. Fresh lime wedges add a nice touch too. How to ensure potstickers don’t get mushy? To keep potstickers firm, avoid boiling them too long. Add them near the end of cooking. This way, they heat through without getting too soft. Can I make the stew ahead of time? Yes, you can make the stew ahead. Just store it in the fridge and reheat when ready. Add potstickers fresh to keep them nice. Can I use coconut cream instead of coconut milk? Yes, coconut cream works well. It will make the stew richer and creamier. Just adjust the broth to keep the right consistency. What’s a good substitute for red curry paste? If you don’t have red curry paste, use green curry paste or homemade spice blends. You can mix chili paste with coconut milk for a similar flavor. This blog post shared a simple recipe for Thai Coconut Potsticker Stew. We covered key ingredients like potstickers, coconut milk, and fresh veggies. I provided step-by-step cooking instructions to blend flavors perfectly. You learned tips for seasoning and presentation, plus variations for dietary needs. Cooking is all about creativity and joy. Experiment with your favorite flavors for a personal touch. Enjoy this comforting stew that warms both the body and soul.
    Thai Coconut Potsticker Stew Flavorful and Comforting Dish
  • To make this Mushroom Spinach Pasta, you'll need the following main ingredients: - 8 oz (225 g) fettuccine or spaghetti - 2 cups fresh spinach, roughly chopped - 8 oz (225 g) cremini mushrooms, sliced - 3 cloves garlic, minced - 1 small onion, finely chopped - 1/2 cup vegetable broth - 1/4 cup heavy cream (or coconut cream for a dairy-free option) - 2 tablespoons olive oil - 1 teaspoon dried Italian herbs (oregano, basil, thyme) - Salt and pepper to taste These ingredients come together to create a delightful dish. The fettuccine or spaghetti serves as the base. The spinach and mushrooms add great flavor and texture. You can enhance your dish with these optional ingredients: - Freshly grated Parmesan cheese (for serving) - Chopped fresh parsley (for garnish) Parmesan cheese adds a rich flavor, while parsley gives a fresh touch. Feel free to add these based on your taste. This dish offers several health benefits: - Spinach is packed with vitamins A and C. It also has iron and fiber. - Mushrooms provide antioxidants and are low in calories. They can boost your immune system. - Olive oil is a healthy fat. It can help reduce heart disease risk. - Garlic has anti-inflammatory properties. It may help lower blood pressure. Overall, this dish is not only tasty but also nutritious. You will enjoy every bite while knowing you're eating healthy! {{ingredient_image_1}} Start by boiling a large pot of salted water. Once the water is bubbling, add 8 oz of fettuccine or spaghetti. Cook the pasta according to the package instructions until it is al dente. This usually takes about 8-10 minutes. When the pasta is ready, drain it and set it aside. Remember to save about 1/2 cup of that pasta water for later. In a large skillet, heat 2 tablespoons of olive oil over medium heat. Once the oil is warm, add 1 small finely chopped onion. Sauté the onion for about 3-4 minutes. It should become nice and translucent. Next, add 3 cloves of minced garlic. Cook this for another minute until it smells great. Now, it’s time to add 8 oz of sliced cremini mushrooms to the skillet. Cook these for about 5-7 minutes until they turn golden brown and release their moisture. Finally, add 2 cups of roughly chopped fresh spinach. Stir this in and cook for about 2-3 minutes until the spinach has wilted. Now, let’s make the sauce! Pour in 1/2 cup of vegetable broth and 1/4 cup of heavy cream into the skillet. Stir well to mix everything. Add 1 teaspoon of dried Italian herbs, along with salt and pepper to taste. Let the sauce simmer for about 5 minutes. This will help it thicken up a bit. Once the sauce is ready, gently add the cooked pasta to the skillet. Toss everything together until the pasta is well coated. If the sauce feels too thick, add some of that reserved pasta water until it reaches the right consistency. Your meal is almost ready! To get your sauce just right, pay close attention to the thickness. Start with the heavy cream and vegetable broth. If it’s too thick, add a bit of the reserved pasta water. This helps make the sauce silky and smooth. If it’s too thin, let it simmer a little longer. The goal is a creamy sauce that coats the pasta well. Use a large skillet for cooking the mushrooms and spinach. This allows for even cooking and helps the mushrooms brown nicely. When cooking the garlic and onion, be careful not to burn them. Stir often to keep them from sticking. Sautéing at medium heat gives you great flavor without burning. Herbs can take your dish to a new level. Italian herbs like oregano, basil, and thyme add depth. Fresh parsley adds brightness when you serve the pasta. If you enjoy cheese, sprinkle freshly grated Parmesan on top for rich flavor. Mix it into the sauce for more creaminess. Each herb and cheese choice enhances the dish’s taste, making it truly delightful. Pro Tips Use Fresh Ingredients: Fresh spinach and mushrooms enhance the flavor and texture of the dish. Try to use them as close to their harvest date as possible for the best taste. Adjust Creaminess: If you prefer a lighter sauce, reduce the amount of heavy cream or substitute it with more vegetable broth. For a richer flavor, consider adding a bit more cream. Pasta Cooking Water: Always reserve pasta cooking water before draining. It’s starchy and can help adjust the sauce consistency while adding flavor. Herb Variations: Feel free to experiment with different herbs, such as fresh basil or parsley, to give your pasta a unique flavor profile. Adding fresh herbs at the end maximizes their aroma. {{image_2}} You can swap out heavy cream for coconut cream. This change keeps the dish creamy without dairy. Coconut cream adds a hint of sweetness. It pairs well with mushrooms and spinach. To use coconut cream, simply replace the heavy cream in the recipe. The texture will stay rich and smooth. Want to add some protein? You can use chicken or tofu. If you choose chicken, slice it thinly. Cook it in the skillet before adding the mushrooms. If you prefer tofu, use firm or extra-firm tofu. Cut it into cubes and sauté it until golden. Both options bring heartiness to the meal and make it more filling. While fettuccine or spaghetti works great, many other pasta types fit well. Penne, rigatoni, or farfalle all work nicely. These shapes hold the sauce well. You can also try whole grain or gluten-free pasta for a different twist. Each type will give a new texture and taste to your dish. To store leftover mushroom spinach pasta, let it cool first. Place it in an airtight container. Make sure to seal it tightly to keep it fresh. Leftovers can last in the fridge for up to 3 days. Label the container with the date to track freshness. When you're ready to enjoy your pasta again, take it out of the fridge. You can reheat it in a few ways. One way is to use a microwave. Place the pasta in a bowl and cover it. Heat it in 30-second bursts, stirring in between. Another way is to use a skillet. Add a splash of water or broth to the skillet. Heat over medium until warm, stirring often. This helps keep the pasta moist. If you want to freeze mushroom spinach pasta, follow these steps. Cool the pasta completely before freezing. Portion it into freezer-safe bags or containers. Remove as much air as possible to prevent freezer burn. Label each bag with the date. You can freeze it for up to 2 months. When you’re ready to eat, thaw it in the fridge overnight and reheat as mentioned above. Yes, you can use frozen spinach. It’s easy to find and saves time. Just be sure to thaw and drain it well before adding it to the dish. This helps avoid excess water in your pasta. Frozen spinach is often picked at peak freshness, so it still has good flavor and nutrients. Fettuccine or spaghetti works well for this dish. They hold the sauce nicely and give a good bite. You can also try other pasta shapes like penne or farfalle. Choose what you like best! The key is to cook the pasta until it is al dente for the best texture. To make it vegan, simply replace the heavy cream with coconut cream. This adds a creamy texture without dairy. You can also omit the Parmesan cheese or use a vegan alternative. With these swaps, you keep all the flavor while making it plant-based. Enjoy every bite guilt-free! This blog post covered how to make a tasty Mushroom Spinach Pasta. We talked about the key ingredients and their health perks. I shared step-by-step instructions to guide you through cooking. Useful tips and tricks can help you perfect your meal. You learned about variations like dairy-free options and using different pasta. Lastly, I offered storage info for leftovers. With these insights, you can create a great dish while enjoying its health benefits. Happy cooking!
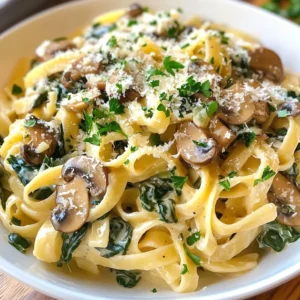
    Mushroom Spinach Pasta Healthy and Flavorful Dish
  • - 8 oz beef sirloin, thinly sliced - 10 oz rice noodles - 2 tablespoons hoisin sauce - 1 tablespoon soy sauce - 1 tablespoon sesame oil - 2 cloves garlic, minced - 1-inch piece ginger, grated - 1 red bell pepper, sliced - 1 cup snap peas - 3 green onions, sliced - 1 teaspoon sesame seeds for garnish - Fresh cilantro for garnish (optional) - Salt and pepper The star of this dish is the beef sirloin. It gives a rich, juicy flavor. You want to slice it thinly for quick cooking. The rice noodles serve as a perfect base, soaking up all the tasty sauces. Hoisin sauce adds sweetness and depth. Soy sauce brings saltiness, making this dish balanced. Aromatics like garlic and ginger are key. They add warmth and a burst of flavor. Red bell pepper and snap peas bring color and crunch. They make the dish look bright and fresh. Green onions, sesame seeds, and cilantro are great for adding a lovely finish. Finally, salt and pepper help to elevate all the flavors. These ingredients come together quickly, making a tasty meal in just 30 minutes. You can impress your family or friends without spending all day cooking! {{ingredient_image_1}} To start, fill a pot with water and bring it to a boil. Use enough water to fully cover the rice noodles. Once it’s boiling, add the noodles and cook them until they are al dente. This usually takes about 4 to 6 minutes, but check the package for exact times. After cooking, drain the noodles in a colander and set them aside. This step is key for getting the perfect texture. Next, take your thinly sliced beef sirloin and place it in a bowl. Add two tablespoons of hoisin sauce and one tablespoon of soy sauce. Mix well, ensuring the beef is evenly coated. Sprinkle in a pinch of salt and pepper to enhance flavor. Let the beef marinate for about 15 minutes. This short time allows the flavors to soak in, making the beef taste amazing. Now, it’s time to bring everything together. Heat one tablespoon of sesame oil in a large skillet or wok over medium-high heat. Once hot, add two cloves of minced garlic and one-inch grated ginger. Stir-fry these for about 30 seconds until they smell great. Then, add the marinated beef to the skillet. Cook it for about 3 to 4 minutes. You want the beef to be browned and cooked all the way through. After that, remove the beef from the skillet and set it aside. In the same skillet, toss in one sliced red bell pepper and one cup of snap peas. Stir-fry these for about 2 to 3 minutes. You want them to be bright and tender-crisp, which adds great texture and color. Finally, return the beef to the skillet along with the cooked noodles. Toss everything together gently. Ensure the noodles are well-coated with the tasty sauce from the beef. Stir in three sliced green onions for a fresh finish. Taste your dish and adjust the seasoning if needed. How long to marinate: Marinating the beef for 15 minutes works well. This short time allows the flavors to soak in without overdoing it. If you have more time, you can let it marinate for up to an hour for deeper flavor. Ideal beef cuts to use: I recommend using beef sirloin for this recipe. It is tender and cooks quickly. Other good options include flank steak or ribeye. Both cuts will give you a nice bite and great taste. Ensuring noodles are al dente: To get the best texture, follow the package instructions carefully. Cook the rice noodles until they are firm but not hard. They should have a slight bite to them, also known as al dente. Tips for not sticking: After draining the noodles, rinse them with cold water. This step helps remove excess starch that can make them sticky. Toss them lightly with a bit of oil to keep them separate until you mix them with the beef. Additional sauces or spices to consider: You can spice things up by adding chili paste or sriracha for heat. A splash of rice vinegar can add brightness, too. Just remember to add these in small amounts to avoid overpowering the dish. Suggestions for adjusting seasoning: Always taste before serving. If you find the dish needs more flavor, add a pinch of salt or a drizzle of soy sauce. Fresh herbs like cilantro or basil can also boost the taste and freshness of your meal. Pro Tips Choose Quality Beef: Opt for grass-fed or organic beef sirloin for a richer flavor and better texture. Soak Noodles Ahead: For an even better texture, soak the rice noodles in warm water for 20 minutes before cooking. Customize Veggies: Feel free to substitute snap peas and bell peppers with your favorite vegetables like broccoli or carrots for added nutrition. Garnish Generously: Don’t skip the sesame seeds and cilantro—they add a burst of flavor and a beautiful presentation. {{image_2}} You can change up the protein in your Hoisin beef noodles. Chicken, tofu, and shrimp work great. - Chicken: Use thinly sliced chicken breast. It cooks fast and absorbs flavors well. - Tofu: Opt for firm tofu. Cube it, and pan-fry until golden for a crispy texture. - Shrimp: Add peeled shrimp for a quick cook. They’ll add a sweet taste to the dish. Switching proteins keeps this meal fresh and fun. You can play with the vegetables in this dish too. Many pair well with the sauce and noodles. - Broccoli: This veggie adds crunch and a nice green color. - Carrots: Thinly sliced carrots bring sweetness and a pop of orange. - Bell Peppers: You can mix colors. Yellow or green bell peppers work as well. - Zucchini: Sliced zucchini adds a soft texture and mild flavor. Feel free to experiment with your favorites or what you have on hand. If you need gluten-free options, you have choices. - Noodles: Look for rice noodles labeled gluten-free. They are often made from rice flour. - Sauces: Use tamari instead of soy sauce. Tamari is a gluten-free soy sauce alternative. These simple swaps make this dish safe for gluten-sensitive diets. Enjoy your meal without worry! You can store Hoisin Beef Noodles in an airtight container. Keep them in the fridge for up to three days. If you want to keep them longer, consider freezing. Just make sure they cool down before storing. To reheat your noodles, use a skillet over medium heat. Add a splash of water for moisture. Stir gently until heated through. This keeps the noodles from getting mushy. You can also use the microwave. Heat in short bursts, stirring in between. Yes, you can freeze Hoisin Beef Noodles. Put them in a freezer-safe container. They will stay good for about three months. When ready to eat, thaw them in the fridge overnight. Then reheat as mentioned above. This method helps preserve the texture and flavor. Hoisin sauce is a thick, dark sauce used in many Asian dishes. It has a sweet and salty flavor. The key components include: - Fermented soybeans - Sugar - Vinegar - Garlic - Spices These ingredients create a unique taste. You can use hoisin sauce in marinades, stir-fries, or as a dip. It adds depth to Hoisin Beef Noodles. Yes, you can prepare Hoisin Beef Noodles in advance. Here are some best practices for meal prep: - Cook the Noodles: Prepare the rice noodles as instructed and drain them. - Marinate the Beef: Marinate the beef with hoisin and soy sauce. You can do this up to a day ahead. - Store Separately: Keep the noodles, beef, and vegetables in separate containers. This prevents sogginess. - Reheat Carefully: When ready to serve, stir-fry everything together again. This keeps the flavors fresh. You can enhance your meal with side dishes or pairings. Consider these options: - Spring Rolls: Fresh or fried, they add a nice crunch. - Stir-Fried Vegetables: Broccoli, bok choy, or carrots pair well. - Rice: Steamed jasmine or fried rice complements the flavors. - Soup: A light broth can balance the meal. These sides make your dinner more enjoyable and complete. This blog post covered how to make delicious Hoisin Beef Noodles. We talked about the key ingredients, step-by-step cooking instructions, and tips for perfect results. Remember, marinating beef enhances the flavor, and choosing the right noodles matters. In summary, you can adjust the recipe to suit your taste and dietary needs. So get creative! Enjoy trying different proteins and veggies. With easy storage and reheating tips, you can savor your dish even longer. Happy cooking!
    Hoisin Beef Noodles Flavorful and Quick Dinner Recipe
  • To make Mango Coconut Chia Pudding, you need a few simple ingredients. Each one plays a key role in flavor and texture. Here’s what you will use: - 1 cup coconut milk (canned or carton) - 1/2 cup almond milk (or any preferred milk) - 1/4 cup chia seeds - 2 tablespoons maple syrup (or honey) - 1 ripe mango, diced - 1/4 teaspoon vanilla extract - A pinch of salt - Toasted coconut flakes for garnish Coconut milk adds creaminess and a tropical vibe. Almond milk lightens the mix. Chia seeds are the star here; they thicken the pudding and add fiber. Maple syrup or honey gives it sweetness, while vanilla extract adds depth. Salt balances the flavors wonderfully. Finally, diced mango brings a burst of freshness. You can top it all off with toasted coconut flakes for crunch. Gather these items, and you are ready to start making this delightful treat! {{ingredient_image_1}} 1. First, grab a mixing bowl. Pour in 1 cup of coconut milk and 1/2 cup of almond milk. Add 2 tablespoons of maple syrup, 1/4 teaspoon of vanilla extract, and a pinch of salt. Whisk these ingredients well until they blend smoothly. 2. Next, slowly sprinkle in 1/4 cup of chia seeds. Keep whisking to prevent clumps. This step is key! You want the seeds to mix evenly in the liquid. 3. Now, cover the bowl with plastic wrap and put it in the fridge. Let it chill for at least 4 hours or overnight. This allows the chia seeds to soak up the liquid and thicken the pudding. 1. Once ready, take the pudding out of the fridge. Stir it well to mix any chia seeds that settled at the bottom. 2. For a fun way to serve, grab some clear glasses or bowls. Start with a spoonful of chia pudding at the bottom. Then layer in some diced mango. Repeat this with another layer of pudding, followed by more mango on top. 3. Finish by sprinkling some toasted coconut flakes on top for a crunchy bite. You can also add a mint leaf for a pop of color and freshness. Enjoy your delightful treat! To make the best mango coconut chia pudding, whisking is key. When you mix the coconut milk, almond milk, maple syrup, vanilla, and salt, whisk until it is smooth. This helps blend all flavors well. Next, add the chia seeds slowly. If you pour them in all at once, they clump together. Keep whisking as you add them. This step ensures each seed can soak up the liquid. Let the mixture sit in the fridge for at least four hours. Chia seeds need time to absorb the liquid. If you want a thicker pudding, leave it overnight. After chilling, stir the pudding. This helps break up any seeds that may have settled. Achieving a creamy and smooth texture is the goal. Serving your pudding in clear glasses is a great idea. This lets the beautiful layers shine through. Start by spooning some chia pudding into the glass. Then, add a layer of diced mango. Repeat this for a lovely effect. Top it off with more mango for a colorful finish. For a touch of freshness, add a mint leaf on top. This not only looks pretty but also adds a nice aroma. You can also sprinkle toasted coconut flakes for added crunch. These simple touches make your dessert look and taste amazing. Pro Tips Use Fresh Mango: For the best flavor, choose a ripe mango that yields slightly to pressure and has a sweet aroma. Chia Seed Soaking: Ensure you allow enough time for the chia seeds to absorb liquid, ideally letting them sit overnight for optimal thickness. Layering Technique: When layering, use a spoon to gently drop the chia pudding and mango to maintain distinct layers. Flavor Variations: Experiment with different milk alternatives or add spices like cinnamon for a unique twist on the flavor. {{image_2}} You can easily make this pudding dairy-free. First, use coconut milk. This gives a rich flavor. If you want a lighter taste, almond milk works well. You can also try oat milk or soy milk. Each will change the taste a bit but still make it creamy. Want to spice things up? Adding cinnamon gives a warm flavor. Just a dash will do. You can also layer in different fruits for variety. Try berries or pineapple for a burst of color. Each fruit adds its unique taste and makes the dish fun. Mix and match to find your favorite combo! To keep your mango coconut chia pudding fresh, use a glass jar or airtight container. These containers prevent air from spoiling your pudding. You can store it in the fridge for up to five days. Just remember to keep it covered to avoid odors from other foods. Yes, you can freeze chia pudding! It freezes well and makes a quick snack. To freeze, pour the pudding into a freezer-safe container. Leave some space at the top for expansion. When you want to enjoy it, take it out and thaw it in the fridge overnight. Avoid using a microwave as it can change the texture. Chia seeds are tiny but mighty. They offer high amounts of fiber, which helps with digestion. They also have protein, which supports muscle growth. Omega-3 fatty acids in chia seeds are good for heart health. Plus, they contain important minerals like calcium and magnesium. Mango Coconut Chia Pudding can last for up to five days in the fridge. Make sure to store it in an airtight container. This will keep it fresh and tasty. If you notice any changes in smell or texture, it is best to throw it away. Yes, you can use frozen mango. Just thaw it first and drain any extra liquid. Frozen mango can still give you a lovely flavor. Plus, it’s often easier to find and lasts longer than fresh mango. Chia pudding is safe for kids and pregnant women. Chia seeds are full of nutrients that can be healthy for all ages. However, always check for allergies first. If you have any concerns, consult a doctor before adding chia seeds to your diet. This blog post covered the ingredients and steps to make a delicious Mango Coconut Chia Pudding. You learned about important tips for texture and presentation, plus some fun variations. Experiment with different milks and fruits to make it your own. Remember to store it well for freshness. Enjoy this tasty treat knowing how easy it is to make! It’s great for you and your family. Let's get blending!
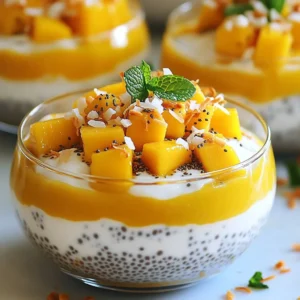
    Mango Coconut Chia Pudding Delightful and Healthy Treat
  • - 1 cup sparkling water - 2 tablespoons elderflower syrup - 1 tablespoon fresh lemon juice - 1 teaspoon edible glitter (various colors) - Fresh mint leaves for garnish - Slices of lemons or limes for garnish To create Fairy Dust Shots, gather these simple ingredients. Sparkling water adds fizz and fun. Elderflower syrup gives a sweet, floral taste. Fresh lemon juice adds a zesty twist. Edible glitter makes the drink shine. Fresh mint leaves and citrus slices make great garnishes. When choosing your ingredients, pick high-quality sparkling water. It should be bubbly and refreshing. The elderflower syrup should be pure and natural for the best flavor. Fresh lemons and limes will brighten your shots. Always use edible glitter made for food, not craft supplies. This ensures safety and taste. This recipe serves six. It takes just ten minutes to prepare. Get ready to impress your friends with these magical drinks! {{ingredient_image_1}} To start, I take a mixing bowl. I add 2 tablespoons of elderflower syrup and 1 tablespoon of fresh lemon juice. Then, I stir the mix until it is well combined. This blend gives the shots a sweet and tangy flavor. Next, I prepare my shot glasses. I take a lemon and gently run it around the rim of each glass. This makes the rim sticky. Now, I dip each glass into edible glitter. The glitter sticks to the rim, adding a magical touch! Now comes the fun part! I carefully pour the elderflower mixture into each shot glass, filling them halfway. Then, I top the glasses with 1 cup of sparkling water. I watch as the bubbles rise and the glitter swirls beautifully in the drink! To finish, I garnish each shot with a fresh mint leaf and a small slice of lemon or lime on the rim. This adds a pop of color and freshness. When picking edible glitter, look for high-quality brands. I love using brands like Wilton or Sugarflair. They offer a range of colors and shine. Avoid craft glitters, as they are not safe to eat. For cocktails, fine glitter works best. It mixes well in drinks and creates a magical effect. Next, think about color combinations. Bright colors like gold, silver, or pink pop in your shots. You can mix colors for a fun look. Try blue and green for a fairy-tale vibe. A rainbow mix can also add excitement to your drink. Pair these shots with light snacks. They go well with cheese platters or fresh fruits. You can also serve them at parties with finger foods. Think of mini sandwiches or veggie trays. For a special touch, use sparkly napkins and colorful straws. For presentation, use clear shot glasses. This lets the glitter shine and swirl. You can also add fairy lights to your table. This creates a magical atmosphere for your guests. You can prepare some parts in advance. Mix the elderflower syrup and lemon juice a few hours before serving. Just store it in the fridge. When ready, rim the shot glasses and add glitter. To store any leftover ingredients, keep the edible glitter in a cool, dry place. Make sure the lid is tight. You can keep the elderflower syrup in the fridge for up to a month. It stays fresh and ready for your next drink. Remember, these shots taste best when served right away. Enjoy the sparkle and fun with your guests! Pro Tips Use Chilled Ingredients: For the best flavor and to keep your shots refreshing, ensure that your sparkling water and elderflower syrup are chilled before mixing. Choose Quality Edible Glitter: Opt for high-quality edible glitter that is safe for consumption; this will enhance the visual appeal without compromising on taste. Mix Before Serving: To maintain the enchanting swirl of glitter, serve immediately after topping with sparkling water to prevent the glitter from settling. Experiment with Flavors: Feel free to substitute elderflower syrup with other flavored syrups like lavender or rose for a unique twist on your fairy dust shots. {{image_2}} You can make Fairy Dust Shots even more fun! Try using different syrups or juices. Here are some tasty ideas: - Lavender syrup: It adds a sweet floral taste. - Rose syrup: For a lovely pink hue and a unique flavor. - Pineapple juice: This gives a tropical twist. - Raspberry puree: Add sweetness and a bright color. Each of these flavors pairs well with the sparkling water. Mix and match to find your favorite! Want a mocktail? It’s easy to create a non-alcoholic Fairy Dust Shot. Just follow the same steps, but skip any alcohol. - Use sparkling water as usual. - Keep the elderflower syrup and fresh lemon juice. - Add a splash of your favorite fruit juice for extra flavor. This way, everyone can enjoy the magic, even kids! You can also change your Fairy Dust Shots with seasonal ingredients. Here are some ideas for each season: - Spring: Add fresh berries like strawberries or blueberries. - Summer: Use fresh mint or basil for a refreshing twist. - Fall: Try apple cider or a dash of cinnamon for warmth. - Winter: Add pomegranate juice for a festive touch. These variations keep your drinks fresh and exciting all year round! To keep edible glitter fresh, store it in a cool, dry place. Use an airtight container to avoid moisture. Keep it away from sunlight to maintain its color. For unused elderflower syrup, seal it tightly in a bottle. Store it in the fridge. It can last for up to a month if properly stored. Fresh mint leaves are best used right away. If you have extras, wrap them in a damp paper towel. Then, place them in a plastic bag in the fridge. They should stay fresh for about a week. Elderflower syrup lasts about three to four weeks in the fridge. Fresh lemon juice is best used within a week for the best taste. Sparkling water should be consumed within a few days if opened. An unopened bottle can last for months. Edible glitter has no real expiration date but keep it sealed for freshness. To keep everything fresh, always check for signs of spoilage. If it smells off or looks strange, it’s best to toss it out. Fairy Dust Shots are best served fresh. They taste best when bubbly. However, if you have leftovers, store them in the fridge. Place the shots in a covered container. Drink them within a day to keep the sparkle. The longer they sit, the less fizzy they become. If you want to serve them later, prepare the elderflower mix and glitter. Store these separately and mix them just before serving. This way, the shots stay magical and refreshing! Edible glitter is usually made from sugar or starch. Some brands use food-safe colorings. It is safe to eat in small amounts. Always check the label for safety. Look for products marked as "edible" to ensure they are safe. No, do not use regular glitter in drinks. Regular glitter is not safe for eating. It can cause health issues or harm your stomach. Always choose edible glitter made for food use. This keeps your drinks safe and fun. Making elderflower syrup is simple. You need just a few items. Here’s how to do it: - Ingredients: - 1 cup elderflowers (fresh) - 4 cups water - 2 cups sugar - 1 lemon (sliced) - 1 teaspoon citric acid (optional) - Instructions: 1. Rinse the elderflowers gently to remove dirt or bugs. 2. In a pot, combine water and sugar. Heat until sugar dissolves. 3. Add elderflowers and lemon slices to the pot. 4. Let the mixture sit for 24 hours in the fridge. 5. Strain the liquid through a fine sieve. 6. Store the syrup in a bottle in the fridge. Use it for drinks or desserts. This syrup adds a sweet, floral touch to your Fairy Dust Shots! You can create delightful Fairy Dust Shots using simple ingredients and easy steps. We covered the essential elements, from making the elderflower mix to adding that magical glitter. Remember, you can vary the flavors and serve them at any party. With proper storage, your components will stay fresh for your next gathering. Enjoy trying different ideas to make these shots your own. Get creative, and impress your guests with this fun and tasty treat!
    Fairy Dust Shots Sparkling and Refreshing Delight
  • To make Garlic Butter Beef and Rice Skillet, gather these key items: - 1 lb (450g) ground beef - 1 cup uncooked jasmine rice - 4 cups beef broth - 4 tablespoons unsalted butter - 5 cloves garlic, minced - 1 medium onion, diced - 1 bell pepper, diced (any color) - 1 teaspoon dried oregano - 1 teaspoon dried thyme - Salt and pepper to taste - 1 cup frozen peas - Fresh parsley, chopped (for garnish) You can switch some ingredients if needed. Here are a few options: - Use brown rice instead of jasmine for a healthier choice. - Swap ground beef for ground turkey or chicken for a lighter dish. - If you lack fresh garlic, use garlic powder instead, about 1 teaspoon. - Replace bell pepper with any other vegetable, like zucchini or carrots. Selecting good ingredients matters. Here’s how to pick the best: - For beef, choose lean ground beef with a bright red color. - Check for a fresh smell; it should not have any sour or off odor. - Look for high-quality jasmine rice that feels light and dry. - Avoid any rice with a lot of broken pieces, as it can affect the texture. These tips help ensure you cook a delicious and satisfying meal. {{ingredient_image_1}} Start by melting 2 tablespoons of butter in a large skillet over medium heat. Add the diced onion and bell pepper. Sauté them for about 3-4 minutes. You want them soft and fragrant. Next, add the minced garlic and cook for 1-2 more minutes. Be careful not to burn the garlic; it can turn bitter if you do. Turn up the heat to medium-high and add the ground beef. Cook the beef until it is browned. Use a spatula to break it apart as it cooks. This usually takes about 5-7 minutes. If there is extra fat in the skillet, drain it off. Now, stir in the uncooked jasmine rice, dried oregano, dried thyme, salt, and pepper. Cook this mixture for another 1-2 minutes to toast the rice slightly. Pour in the beef broth and bring everything to a gentle boil. Once it boils, reduce the heat to low. Cover the skillet and let it simmer for 15-20 minutes. The rice should be fluffy and absorb most of the liquid. When the rice is cooked, mix in the frozen peas and the rest of the butter. Let it simmer for another 5 minutes until the peas are hot. Taste it and adjust the seasoning as needed. Finally, garnish with fresh parsley before serving. To get fluffy rice, rinse it first. Rinsing removes excess starch. This helps prevent clumping. Use jasmine rice for a fragrant touch. When cooking, let it simmer gently. Keep the lid on while it cooks. This traps steam and helps the rice absorb the broth. Check it after 15 minutes. If it needs more time, cover it again for a few minutes. Flavor is key in this dish. Use fresh garlic for its strong aroma. A mix of dried oregano and thyme adds depth. Adjust salt and pepper to your taste. Don't be shy! Taste as you go. Add a dash of paprika if you like a little heat. Lastly, fresh parsley on top gives a nice finish and brightens the dish. Want to save time? Prep your veggies ahead of time. Dice the onion and bell pepper earlier in the day. You can also use frozen peas straight from the bag. They cook quickly and add color. While the rice simmers, clean up your workspace. This way, your meal is ready in about 40 minutes. Enjoy your time in the kitchen! Pro Tips Use Fresh Herbs: Fresh herbs like parsley or thyme can elevate the flavor of your dish. Add them at the end for a burst of freshness. Rest the Meat: After cooking, let the beef rest for a few minutes before serving. This helps retain the juices, making it more flavorful. Toasting Rice: Toasting the rice briefly before adding the broth enhances its nutty flavor and improves the overall taste of the dish. Adjusting Consistency: If the rice absorbs too much liquid, simply add a little more broth or water to achieve your desired consistency. {{image_2}} You can adjust this dish to fit different diets. For a lighter meal, use ground turkey or chicken instead of beef. If you want a vegetarian version, swap the beef for cooked lentils or mushrooms. You can also use vegetable broth instead of beef broth for a plant-based option. If you are gluten-free, make sure to pick gluten-free broth and rice. Want to give your skillet a new taste? Try adding different spices. A pinch of smoked paprika adds warmth. You can also add a splash of soy sauce for a savory kick. If you love heat, toss in red pepper flakes or diced jalapeños. You can also add veggies like diced carrots or zucchini for extra nutrients. These additions enhance flavor and make your meal colorful. This meal stands alone, but you can pair it with sides. A simple garden salad brings freshness to the table. You might also serve it with crusty bread to soak up extra sauce. If you want something warm, garlic bread is a great choice too. For a healthy option, steamed broccoli or green beans work well. These sides will balance the richness of the garlic butter beef and rice. After cooking your garlic butter beef and rice skillet, let it cool. Transfer leftovers to an airtight container. This keeps the dish fresh. Store it in the fridge for up to three days. If you want to save it longer, freezing is a great option. To reheat, place your skillet on the stove over medium heat. Add a splash of beef broth or water to keep it moist. Stir often until it’s heated through. You can also use a microwave. Cover the bowl with a paper towel and heat in short bursts. Stir between each burst to avoid hot spots. If you freeze it, use a freezer-safe container. Label it with the date. It can last for about three months in the freezer. When you’re ready to eat, move it to the fridge to thaw overnight. After thawing, reheat as mentioned above for the best taste and texture. Yes, you can use brown rice. Brown rice is whole grain and has more fiber. It will take longer to cook than jasmine rice. Adjust the beef broth amount and cooking time. Use about 4.5 cups of broth and simmer for 30-40 minutes. You can use turkey, chicken, or even plant-based meat. Ground turkey is lean and healthy. If you want a veggie option, try crumbled tofu or lentils. Both options add great flavor. Leftovers will last about 3-4 days in the fridge. Store them in an airtight container to keep them fresh. Reheat your meal on the stove or in the microwave. Make sure it heats evenly for best taste. This blog post gives you all the details to create a tasty beef and rice dish. We discussed key ingredients and how to pick good beef and rice. I shared step-by-step cooking tips and tricks to make your rice perfect. You explored variations to suit your tastes and learned proper storage techniques. In the end, cooking should feel fun and easy. With these insights, you can make a meal that everyone will love. Happy cooking!
    Garlic Butter Beef and Rice Skillet Soothing Meal
  • - 1 ½ cups graham cracker crumbs - ½ cup unsalted butter, melted - 2 cups cream cheese, softened - 1 cup granulated sugar - ¾ cup sour cream - 3 large eggs - 1 teaspoon vanilla extract - ½ cup strong brewed coffee, cooled - ½ cup caramel sauce (plus more for drizzling) - 2 tablespoons espresso powder - A pinch of salt Let’s dive into the ingredients for this caramel macchiato cheesecake. Each one plays a key role in creating a rich and creamy delight. First, we have graham cracker crumbs. They form the perfect crust. Their sweetness balances the cheesecake's richness. Next is unsalted butter, which binds the crumbs and adds flavor. Then, we use cream cheese. It gives the cheesecake its smooth texture and creamy taste. Granulated sugar sweetens the mix. It helps to balance the coffee flavor. Sour cream adds a nice tang. This helps to cut through the sweetness. Then, we have eggs. They provide structure and help the cheesecake set. Vanilla extract adds warmth and depth. Strong brewed coffee brings that classic macchiato flavor. It enhances the overall taste of the cheesecake. Next is caramel sauce. This adds sweetness and richness. You can drizzle more on top for a pretty finish. Espresso powder boosts the coffee flavor even more. Finally, a pinch of salt enhances all the flavors. Each ingredient works together to create a dessert that's rich, creamy, and full of flavor. {{ingredient_image_1}} - Preheat the oven to 325°F (160°C). - Prepare the springform pan with aluminum foil. This keeps the water out while baking. - Mix 1 ½ cups of graham cracker crumbs and ½ cup of melted butter in a bowl. - Press the mixture firmly into the bottom of the pan. This forms a strong crust. - Bake the crust for 10 minutes and then set it aside to cool. - Beat 2 cups of softened cream cheese in a large bowl until smooth. - Gradually add in 1 cup of granulated sugar while mixing. This helps it blend well. - Incorporate ¾ cup of sour cream and 3 large eggs, one at a time. - Add 1 teaspoon of vanilla extract, ½ cup of cooled brewed coffee, ½ cup of caramel sauce, 2 tablespoons of espresso powder, and a pinch of salt. - Mix on low speed until just combined and smooth. Be careful not to over-mix. - Pour the cheesecake batter over the cooled crust. Use a spatula to smooth the top. - Tap the pan gently on the counter to release any air bubbles. - Bake for 50-60 minutes. The center should be set but still slightly jiggly. - Turn off the oven and let the cheesecake cool inside with the door slightly ajar. This helps it set evenly. - After an hour, move it to the fridge. Chill for at least 4 hours, or overnight for the best results. To get a smooth and creamy cheesecake, avoid over-mixing the batter. When you mix too much, air gets in. This air can cause cracks as the cheesecake bakes. Mix just until everything is combined for the best results. Cooling the cheesecake in the oven is also key. After baking, turn off the oven but let the cheesecake stay inside for an hour. This gentle cooling helps prevent cracks. It also makes the texture rich and creamy. For the best flavor, use strong coffee. Brew it fresh and let it cool before adding it to the batter. A robust coffee will shine through the cheesecake. When it comes to caramel, choose a high-quality sauce. A thick, rich caramel adds depth. You can also make your own caramel for an extra treat. For toppings, consider adding whipped cream or chocolate shavings. A sprinkle of sea salt over the caramel enhances the sweet flavor. You can also add a dash of cinnamon for warmth. Each of these options adds fun twists to your cheesecake. Pro Tips Use Room Temperature Ingredients: Ensuring your cream cheese and eggs are at room temperature will help achieve a smoother batter, preventing lumps in your cheesecake. Don’t Overmix: Once you add the eggs, mix just until combined. Overmixing can incorporate too much air, which may cause the cheesecake to crack during baking. Water Bath Technique: For an ultra-creamy texture, consider baking your cheesecake in a water bath. Wrap the springform pan in foil and place it in a larger pan filled with hot water during baking. Chill Overnight: For the best flavor and texture, allow the cheesecake to chill overnight in the refrigerator. This helps the flavors meld and sets the cheesecake perfectly. {{image_2}} You can play with flavors in your caramel macchiato cheesecake. Adding chocolate or mocha can make it even richer. Just mix in some cocoa powder or melted chocolate into the batter. This twist gives a deep, chocolatey taste that pairs well with coffee. For toppings, think beyond caramel. You can use whipped cream, chocolate shavings, or crushed nuts. Fresh coffee beans sprinkled on top can add a nice touch. They look great and enhance the coffee flavor. If you need a gluten-free option, you can swap the graham cracker crust. Use almond flour or gluten-free cookies instead. Just mix them with melted butter, and press them into the pan as usual. For those avoiding dairy, choose vegan cream cheese and coconut yogurt for sour cream. These alternatives work well, keeping the cake creamy. You won’t lose the rich taste. Enjoy your tasty cheesecake while meeting your dietary needs! To keep your caramel macchiato cheesecake fresh, store it in the fridge. Use an airtight container or wrap it tightly with plastic wrap. Make sure it is completely cool before storing. This cheesecake stays good for about 5 days in the fridge. For longer storage, you can freeze the cheesecake. Wrap it well in plastic wrap and then place it in a freezer-safe bag or container. It can last up to 3 months in the freezer. When you are ready to enjoy it, move it to the fridge to thaw overnight. If you want to serve your cheesecake after refrigeration, simply slice it and let it sit at room temperature for about 15 minutes. This helps the flavors come alive. You can also warm individual slices in the microwave for about 10-15 seconds. Just be careful not to overheat it. The cheesecake tastes best when it is cool and creamy. Remember to drizzle some extra caramel sauce on top before serving. Enjoy your delicious treat! The cheesecake lasts about 5 to 7 days in the fridge. Store it covered to keep it fresh. After this time, the taste and texture may change. Yes, you can make this cheesecake a day or two ahead. It actually tastes better after chilling overnight. Just be sure to let it cool fully before refrigerating. You can use plain Greek yogurt or cream cheese instead of sour cream. Both give a similar creamy texture. If you want a lighter option, try using cottage cheese blended until smooth. Using a springform pan is best for this cheesecake. It helps you remove the cheesecake easily without breaking it. If you don’t have one, you can use a regular pan, but be careful when serving. This cheesecake combines simple ingredients for a rich, creamy treat. You learned all about the steps, tips, and variations to customize your dessert. Remember to cool it correctly for the best texture. Feel free to explore different flavors and ways to store leftovers. Enjoy every bite of your delicious creation and share it with others. This dessert can bring joy to any gathering. Embrace your new skills and let your cheesecake shine.
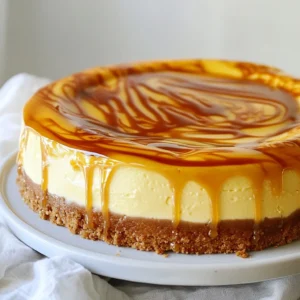
    Caramel Macchiato Cheesecake Rich and Creamy Delight
  • - 1 pound ground beef - 3 cups broccoli florets - 1 red bell pepper, sliced - 1/4 cup soy sauce (low sodium) - 2 tablespoons sesame oil - 1 tablespoon honey - Sesame seeds - Chopped green onions - Lime wedges Ground beef and broccoli make a simple and tasty meal. You start with ground beef, which gives a hearty base. Next, add fresh broccoli florets. These add color and crunch to your dish. You can also throw in a sliced red bell pepper for sweetness. For flavor, use low-sodium soy sauce. This gives umami without too much salt. Add sesame oil for a nutty taste. A touch of honey adds a hint of sweetness. These seasonings work well together. If you want to dress up your dish, consider optional garnishes. Sesame seeds add a nice crunch. Chopped green onions bring freshness. A lime wedge adds a zesty kick when squeezed on top. Each ingredient plays a role in making this meal satisfying and full of flavor. {{ingredient_image_1}} - Mince the garlic. - Grate the ginger. - Slice the bell pepper. Start by prepping your ingredients. Mince three cloves of garlic. Use a grater for one inch of fresh ginger. Slice one red bell pepper into thin strips. This prep helps the dish cook evenly and adds great flavor. - Heat sesame oil in skillet. - Add garlic and ginger. Heat two tablespoons of sesame oil in a large skillet over medium-high heat. Once the oil is hot, add the minced garlic and grated ginger. Sauté for one to two minutes, until fragrant. This step builds a flavorful base for your dish. - Add ground beef to skillet. - Break apart and brown. Add one pound of ground beef to the skillet. Use a spatula to break it apart. Cook for about five to seven minutes until the beef is browned and cooked through. Drain any extra fat if needed. This keeps your dish lean and healthy. - Stir in broccoli and bell pepper. - Cook until broccoli is tender. Now, stir in three cups of broccoli florets and your sliced red bell pepper. Cook for four to five minutes. You want the broccoli to be tender but still bright green. This adds color and crunch to your meal. - Combine soy sauce, honey, and cornstarch slurry. - Pour over beef and veggies. In a bowl, mix together 1/4 cup of low-sodium soy sauce, one tablespoon of honey, and a cornstarch slurry made from one tablespoon of cornstarch mixed with two tablespoons of water. Pour this mixture over the beef and vegetables. This sauce brings all the flavors together. - Thicken sauce and season. - Serve with rice or quinoa. Let the sauce cook for another two to three minutes until it thickens. Season with salt and pepper to taste. Serve your beef and broccoli hot over cooked rice or quinoa. This meal is simple yet packed with flavor. - Browning ground beef tips: Start with a hot skillet. Use medium-high heat for best results. Break the beef apart with a spatula. Cook until it is a rich brown color. This adds great flavor. - Cooking broccoli for optimal texture: Add broccoli when the beef is almost done. Cook it for just 4-5 minutes. You want it tender but still bright green. This keeps it crunchy and fresh. - Suggested spices to add: Try adding black pepper or crushed red pepper. A pinch of garlic powder also works well. These spices elevate the taste and give it a kick. - Using different sauces or marinades: Soy sauce is a classic, but you can mix things up. Try teriyaki or oyster sauce for a different vibe. Add honey for sweetness or chili sauce for heat. - Serving suggestions for visual appeal: Serve the dish in shallow bowls. This makes it look nice and inviting. A scoop of rice or quinoa underneath adds depth to the meal. - Garnishing tips for added flavor and color: Sprinkle sesame seeds on top for crunch. Chopped green onions add a pop of color. A lime wedge on the side gives a fresh zest. Pro Tips Use Fresh Ingredients: Fresh broccoli and vibrant bell peppers enhance the flavor and texture of the dish. Look for firm, bright-colored vegetables for the best results. Adjust the Spice Level: If you enjoy a bit of heat, consider adding red pepper flakes or a dash of sriracha to the sauce for an extra kick. Make it a Meal Prep Favorite: This dish stores well in the fridge for up to 3 days. Prepare it in advance for quick lunches or dinners throughout the week. Experiment with Proteins: Feel free to substitute ground beef with ground turkey, chicken, or a plant-based alternative for a different flavor profile while keeping it healthy. {{image_2}} You can change the meat in this dish. Try using turkey or chicken instead of ground beef. These options make the meal lighter. You can also add other veggies. Carrots or snap peas work well. They add sweetness and crunch to the dish. If you need gluten-free options, use tamari sauce instead of soy sauce. This keeps the flavor while avoiding gluten. For those on a low-carb diet, consider using cauliflower rice instead of regular rice. It adds fiber and cuts carbs while still tasting great. Want to spice things up? Add chili flakes to the cooking beef. This gives your dish a nice kick. If you enjoy sweet and sour flavors, mix in a bit more honey or a splash of vinegar. This balance enhances the overall taste and makes the meal unique. To keep your leftovers fresh, store them in an airtight container. This method helps keep your dish tasty and safe. In the fridge, your ground beef and broccoli will last for about three to four days. Always label your container with the date to stay organized. For the best taste, reheat your meal on the stove. Just add a splash of water or broth to prevent sticking. Heat it over medium heat, stirring often, until warm. If you use a microwave, cover the bowl with a microwave-safe lid or wrap. Heat in short bursts, checking often to avoid overcooking. If you want to freeze your dish, let it cool completely. Then, portion it into freezer-safe bags or containers. Squeeze out any air to prevent freezer burn. For the best flavor, use it within three months. When ready to eat, thaw it in the fridge overnight before reheating. You can serve ground beef and broccoli with a few tasty sides. Here are some great options: - Steamed rice - Quinoa - Cauliflower rice - Noodles - Side salad These sides add balance and extra flavors to the meal. A fresh salad brings a nice crunch and brightens the plate. Yes, you can make this recipe ahead of time. Here are some steps for meal prepping: 1. Cook the ground beef and vegetables as directed. 2. Let the dish cool completely. 3. Place it in an airtight container. 4. Store in the fridge for up to three days. When you’re ready to eat, reheat it on the stove or in the microwave. This makes busy days easier. Ground beef and broccoli can be a healthy choice. Here’s a quick look at its nutrition: - Ground beef provides protein and iron. - Broccoli is rich in vitamins C and K. - The dish is low in carbs if served without rice. This meal offers balanced nutrients and can fuel your body well. Yes, you can use frozen broccoli. Just keep these adjustments in mind: - Thaw the broccoli before cooking. - Cook it for a shorter time, about 2-3 minutes. Frozen broccoli can save time and still taste great. Just make sure it’s tender but still bright green. This blog post covered a tasty recipe for ground beef and broccoli. You learned about key ingredients, like fresh veggies and savory sauces. I shared step-by-step instructions to make cooking easy. Plus, I provided tips to make it even better and variations to try. Cooking can be fun and rewarding. With these ideas, you can enjoy a great meal. Try mixing things up and making it your own! Your kitchen adventures are just beginning.
    Ground Beef and Broccoli Savory Nourishing Meal
  • To make Cheesy Taco Pasta Skillet, you need: - 8 oz elbow macaroni - 1 lb ground turkey or beef - 1 medium onion, diced - 2 cloves garlic, minced - 1 packet taco seasoning - 1 can (15 oz) black beans, rinsed and drained - 1 cup corn (frozen or canned) - 1 can (14.5 oz) diced tomatoes, with juices - 2 cups chicken broth - 1 cup shredded cheddar cheese - 1/2 cup sour cream - Salt and pepper to taste For added flair, consider these garnishes: - Chopped fresh cilantro - Sliced jalapeños (for heat) You can swap ingredients if needed: - Use whole wheat pasta for added fiber. - Ground chicken works well instead of turkey or beef. - Replace sour cream with Greek yogurt for a tangy twist. - Canned corn can be replaced with fresh corn off the cob. {{ingredient_image_1}} Start by heating a large skillet over medium heat. Add one pound of ground turkey or beef. Cook until the meat is brown. This will take about five to seven minutes. If there is any extra fat, drain it off. This keeps the dish light and tasty. Next, add a diced medium onion and two minced garlic cloves. Sauté them for three to four minutes. You want the onion to turn soft and clear. Then, stir in one packet of taco seasoning. Mix well so every bit of meat gets that zesty flavor. Now it’s time to add more good stuff! Toss in eight ounces of elbow macaroni, one can of rinsed black beans, and one cup of corn. Add one can of diced tomatoes with their juices and two cups of chicken broth. Stir everything together until it looks colorful and mixed. Bring your skillet to a gentle boil. Once it bubbles, reduce the heat to low. Cover the skillet and let it simmer for twelve to fifteen minutes. Stir it occasionally to make sure the pasta cooks evenly. When the pasta is al dente, remove the skillet from heat. Now, mix in one cup of shredded cheddar cheese and half a cup of sour cream. Stir until it’s all melted and creamy. Season with salt and pepper to taste. To finish, sprinkle chopped fresh cilantro on top. You can add sliced jalapeños for some heat if you like. To get the best texture, cook the elbow macaroni just right. It should be al dente, which means it is firm but not hard. This adds a nice bite to your dish. Stir the pasta often while it cooks. This helps prevent sticking and ensures even cooking. If your dish looks too dry, add a splash of chicken broth. This keeps everything creamy and smooth. You can boost the flavor in many ways. Add a squeeze of lime juice for a fresh taste. Fresh cilantro adds brightness too. If you want heat, toss in sliced jalapeños. For a cheesy kick, mix in pepper jack cheese with the cheddar. Try using fresh spices like cumin and chili powder if you want more depth. They can really make your dish pop! One mistake is overcooking the pasta. This can make it mushy and less enjoyable. Another common error is forgetting to season. Always taste your dish before serving. Adjust the salt and pepper as needed. Don’t skip the sour cream; it adds creaminess. Lastly, be sure to drain the beans well. Too much liquid can make your pasta soggy. Pro Tips Cook Pasta Separately: For a firmer texture, cook the pasta separately and add it to the skillet just before serving. This prevents the pasta from overcooking and becoming mushy. Use Fresh Ingredients: Using fresh vegetables and herbs can enhance the flavor of your dish significantly. Consider adding bell peppers or fresh corn for added sweetness. Adjust Spice Level: To control the heat, taste the mixture before adding jalapeños or other spicy ingredients. You can always add more, but it’s hard to take heat out! Leftover Storage: Store leftovers in an airtight container in the fridge for up to 3 days. Reheat gently on the stove, adding a splash of broth for moisture. {{image_2}} You can easily make this dish vegetarian. Simply swap the ground meat for 1 cup of lentils or 1 cup of diced mushrooms. This keeps the rich flavors while adding healthy plant protein. You can also add more beans or veggies to enhance the mix. Zucchini and bell peppers work great here. If you want a different protein, consider chicken or shrimp. These options add unique flavors to the dish. Ground chicken or turkey gives a lighter taste. For shrimp, cook them until pink and tender. They add a nice touch of sweetness. Adjust the spice level to fit your taste. If you want it mild, use less taco seasoning. You can add diced bell peppers for sweetness too. For a kick, toss in more jalapeños or a dash of cayenne pepper. Taste as you go to find your perfect heat level. To store leftovers, let the Cheesy Taco Pasta Skillet cool down first. Then, place it in an airtight container. You can keep it in the fridge for up to three days. Make sure to label the container with the date. This way, you know when to eat it. To reheat, you can use the microwave or the stove. If using the microwave, place a portion in a bowl and cover it. Heat it for 1-2 minutes or until warm. If using the stove, add a splash of water to the skillet. Heat over low heat, stirring until hot. This helps keep the pasta creamy. You can freeze this dish for longer storage. First, let it cool completely. Then, transfer it to a freezer-safe container or bag. Remove as much air as possible to prevent freezer burn. It can last up to three months in the freezer. When ready to eat, thaw it in the fridge overnight before reheating. Yes, you can use different pasta shapes. Penne, fusilli, or even spaghetti work well. Just keep an eye on cooking times. Each type may need a slight adjustment to get it just right. To add heat, use sliced jalapeños in the skillet. You can also add a dash of hot sauce. Another option is to sprinkle in some cayenne pepper with the taco seasoning. Adjust these to your taste for the perfect kick. Greek yogurt is a great swap for sour cream. It offers a similar creaminess. If you prefer a dairy-free option, try using cashew cream or coconut yogurt. These keep the dish rich and smooth but change the flavor slightly. This blog post covered key ingredients, steps, tips, and variations to make a tasty dish. We explored the main ingredients, optional garnishes, and smart substitutions. You learned how to cook the meat, add veggies, and perfect texture. We also shared ways to store leftovers and answered common questions. Try mixing flavors or adding your favorite spices. Cooking should be fun, so enjoy making this dish your own!
    Cheesy Taco Pasta Skillet Flavorful and Easy Meal
  • - Chicken and protein options I use 1 pound of boneless, skinless chicken breasts. You can also try chicken thighs for more flavor. If you want a vegetarian option, use beans or tofu. - Beans and vegetables Black beans are a must! Use 1 can (15 oz), rinsed and drained. I also add 1 can (15 oz) of corn, drained. For veggies, I include 1 medium onion, diced, and 2 cloves of minced garlic. These add a nice base to the soup. - Spices and seasonings For spice, I use 1 tablespoon of chili powder, 1 teaspoon of cumin, and 1 teaspoon of paprika. Salt and pepper to taste are key too. Don’t forget the juice of 1 lime for some zing! - Fresh herbs and garnishes Fresh cilantro adds a burst of flavor. I chop some right before serving. It makes the soup look vibrant too. - Cheese and avocado options Shredded cheese is a great addition. I like to use Monterey Jack or cheddar. Avocado slices also add creaminess and richness. - Tortilla strips Don’t skip the tortilla strips! They add a fun crunch. You can buy them or make your own by frying corn tortillas until crispy. {{ingredient_image_1}} Start with the chicken. Use boneless, skinless chicken breasts. Place them at the bottom of your Crockpot. This helps keep the chicken moist. Next, dice the onion and mince the garlic. Use a sharp knife for clean cuts. When dicing, slice the onion in half. Then, make small cuts across and down. This gives you nice, even pieces. For the garlic, crush it lightly before mincing. This makes it easier to chop finely. Now, layer your ingredients. Add the diced onion and minced garlic on top of the chicken. Then, pour in the black beans, corn, and diced tomatoes. Each layer adds flavor. Make sure to spread them out evenly. Set your Crockpot to low or high. For low, it cooks for 6-8 hours. For high, it cooks for 3-4 hours. I recommend low for the best flavor. The longer cooking time allows the chicken to become tender. Cover your Crockpot and wait. Don’t open the lid too often. Each time you lift the lid, heat escapes. Once your cooking time is up, check the chicken. It should be fully cooked and easy to shred. Use two forks to pull it apart gently. This makes the chicken nice and fluffy. Return the shredded chicken to the soup. Now, it’s time for the lime juice. Squeeze the juice from one lime into the soup. This brightens the flavors. Taste the soup and adjust the seasoning if needed. You can add salt, pepper, or more spices to fit your taste. Serve the soup hot. Garnish with fresh cilantro and top with tortilla strips for crunch. Add avocado and shredded cheese if you want extra flavor. Enjoy your delicious Crockpot Chicken Tortilla Soup! To ensure your chicken is tender, pay close attention to cooking times. When using a crockpot, cook on low for 6-8 hours or on high for 3-4 hours. This gentle heat breaks down the chicken fibers, making it juicy and soft. If you use frozen chicken, add an extra hour to the cooking time. You can also substitute different meats if you wish. Turkey breasts work well and give a nice flavor. Shredded beef can also add a unique twist to the soup. Just remember, adjust cooking times as needed for the type of meat you use. To enhance the flavor of your soup, use the right spices and proportions. I recommend 1 tablespoon of chili powder for a rich taste. Add 1 teaspoon of cumin for warmth and 1 teaspoon of paprika for depth. You can also try adding a pinch of cayenne pepper for some heat. Adding extra vegetables can boost flavor and nutrition. Consider bell peppers, zucchini, or even corn for a sweet touch. Just chop them small and mix them in with the other ingredients. For sides, tortilla chips are a great match. They add crunch and texture. Serve with a fresh salad or cornbread for a complete meal. This soup is perfect for casual gatherings or family dinners. It warms you up on cold days and adds comfort to your table. Enjoy it during game nights or when hosting friends for a cozy meal. Pro Tips Ensure Even Cooking: Cut the chicken breasts into smaller pieces to help them cook more evenly and quickly. Customize Your Spices: Feel free to adjust the amount of chili powder and cumin to suit your taste preferences for heat and flavor. Make it Creamy: For a creamier texture, add a splash of heavy cream or a dollop of sour cream right before serving. Store Leftovers Properly: Store any leftovers in an airtight container in the refrigerator for up to 4 days, or freeze for longer storage. {{image_2}} For a vegetarian twist, you can replace the chicken with extra beans or lentils. Both options give protein and texture. You could also add diced tofu for a nice bite. To enhance flavor, use vegetable broth instead of chicken broth. You might also want to add more spices, like smoked paprika, to deepen the taste. Fresh herbs like cilantro will brighten the dish. If you like heat, add jalapeños or diced green chiles to the soup. You can adjust the heat by using fewer or more peppers. Consider adding a dash of hot sauce or cayenne pepper for an extra kick. Always taste as you go. This way, you can find the right level of spice for your palate. For a low-carb option, skip the beans and corn. Instead, try adding zucchini or cauliflower. Both vegetables soak up flavors well and add bulk. You can also use riced cauliflower to mimic the texture of beans. This makes your soup filling without the carbs. Don't forget to add more spices to keep the flavor strong! Crockpot Chicken Tortilla Soup lasts about 3 to 4 days in the fridge. To store it, let the soup cool first. Then, put it in an airtight container. Make sure the lid is tight. This keeps the soup fresh and tasty. When you want to eat it, just heat it on the stove or in the microwave. You can freeze this soup for longer storage. To do this, let the soup cool completely. Then, pour it into freezer-safe bags or containers. Make sure to leave some space at the top for expansion. It can last for about 2 to 3 months in the freezer. When you are ready to eat it, take the soup out of the freezer. Let it thaw overnight in the fridge. Then, reheat it on the stove or in a microwave. Stir well to make sure it heats evenly. Enjoy your warm soup! Yes, you can use frozen chicken. Just remember to cook it longer. If you use frozen chicken breasts, set your Crockpot to high heat. Cook for about 4 to 5 hours. This helps the chicken thaw and cook evenly. Always check that the chicken reaches 165°F for safety. If you don’t have black beans, try pinto beans or kidney beans. Both will add a nice texture and flavor. You can also use chickpeas for a different taste. Just rinse and drain them like black beans before adding to the soup. Yes, this soup is perfect for meal prep. You can make it ahead and store it in the fridge. It stays fresh for about 3 to 4 days. For longer storage, freeze it in airtight containers. Thaw overnight in the fridge before reheating. Enjoy it warm on busy days! Crockpot Chicken Tortilla Soup is simple to make and full of flavor. You learned about key ingredients like chicken, beans, and spices. I shared tips for perfect cooking and enhancing the taste. Variations let you customize the soup to your taste—vegan, spicy, or low-carb options. Lastly, proper storage ensures you can enjoy it later. This soup is not just a meal; it's a comforting experience you can share.
    Crockpot Chicken Tortilla Soup Simple and Tasty Meal
  • - 1 cup honey - 1 cup walnuts, finely chopped - 1 cup almonds, finely chopped - 1 package phyllo dough (approximately 16 oz), thawed - 1 cup unsalted butter, melted - Extra chopped nuts for topping - Cinnamon for garnishing - Baking dish - Mixing bowls - Saucepan For my Greek Honey Pie, I use simple yet rich ingredients. Honey gives it sweetness and warmth. Walnuts and almonds add a nice crunch and flavor. Phyllo dough creates a flaky texture that everyone loves. Butter brings it all together, keeping the layers rich and moist. You can also add extra nuts on top for a lovely finish. A sprinkle of cinnamon can enhance its warm taste. To make this pie, you will need a sturdy baking dish. Mixing bowls help to blend your nut filling. A saucepan is key for making the sweet syrup that soaks into the pie. Gather these ingredients and tools, and you’re ready to create this delicious dessert! {{ingredient_image_1}} 1. Preheat your oven to 350°F (175°C). This helps the pie cook evenly. 2. Grease a deep baking dish with some melted butter. This stops the pie from sticking. 3. Unfold the phyllo dough and cover it with a damp towel to keep it moist. Place one sheet in the dish and brush it with melted butter. 4. Repeat this layering process with 6 to 8 sheets of phyllo. Each layer should be brushed with butter. 1. In a bowl, mix the chopped walnuts, chopped almonds, ground cinnamon, and vanilla extract. Spread half of this nut mixture over the phyllo. 2. Add 3 to 4 more sheets of phyllo on top, buttering each layer. 3. Once you have layered about 6 to 8 more sheets, add the rest of the nut mixture. 4. Finish with more phyllo layers, using the same method until you've used all your phyllo. Make sure the top has about 6 sheets. 1. For the syrup, gather these ingredients: - 1 cup honey - 1/2 cup sugar - 1/4 cup water - 1 teaspoon lemon juice 2. In a saucepan, combine all these ingredients. Heat the mixture until it gently boils. 3. Simmer for about 10 minutes until it thickens a little. Let it cool. 1. Before baking, cut the pie into diamond or square shapes. 2. Bake for 35 to 40 minutes until the top is golden brown and crispy. 3. Once baked, immediately pour the cooled syrup over the pie. This allows the syrup to soak in well. 4. Let the pie sit for at least 30 minutes before serving. This waiting time helps the flavors blend. To get the best phyllo layers, you must keep the dough moist. When you take it out, cover it with a damp towel. This stops it from drying out while you work. Buttering each layer is key. Use a brush to spread melted butter evenly on each sheet. This adds flavor and helps the layers stay crispy. To make the syrup just right, you want it thick but not sticky. Simmering it for about ten minutes works well. Stir it often to avoid burning. Once it thickens, let it cool before pouring it over the pie. This cooling step is very important. It helps the syrup soak into the pie better. When it comes to plating, presentation matters. Use a bright plate to make the pie stand out. You can garnish it with whole nuts on top and a sprinkle of cinnamon. This adds a nice touch and makes it look fancy. For the best experience, serve it with a scoop of vanilla ice cream or a dollop of whipped cream. Pro Tips Use Fresh Nuts: For the best flavor, use fresh walnuts and almonds. Toasting them lightly before adding to the mixture can enhance their nuttiness. Layering Technique: Ensure each layer of phyllo dough is brushed generously with melted butter to achieve a flaky and crispy texture throughout the pie. Cool the Syrup: Allow the honey syrup to cool before pouring it over the hot pie. This helps the syrup soak in better, resulting in a moister dessert. Presentation Matters: For an elegant touch, garnish the pie with a sprinkle of cinnamon and extra chopped nuts before serving. {{image_2}} You can change the nuts in Greek Honey Pie. Try using pistachios or pecans instead of walnuts and almonds. - Pistachios: These add a lovely green color and a unique taste. - Pecans: Their buttery flavor brings a different richness. You can also mix different nuts. Combining walnuts, almonds, and pistachios gives a fun texture. This makes each bite exciting and full of flavor. To make this pie more flavorful, add orange zest or spices like nutmeg. - Orange Zest: This brightens the dish with a fresh aroma. - Spices: Nutmeg or cardamom can add warmth and depth. You can also infuse the syrup with herbs. Rosemary or thyme adds a nice twist. Just simmer the herbs in your syrup for the last few minutes of cooking. This will give your honey syrup an aromatic boost. If you need a gluten-free version, use gluten-free phyllo dough. Many stores carry it now. - Substitution: Make sure to follow the same layering method as regular phyllo. - Baking: Check the baking time, as gluten-free dough may cook faster. Try these variations to make the Greek Honey Pie your own. Each change can make it special and delightful. To keep your Greek Honey Pie fresh, store it in the fridge. Place it in an airtight container or cover it tightly with plastic wrap. This helps prevent it from drying out. You can enjoy it for about 5 to 7 days after baking. If you want to freeze the pie, wrap it well in plastic wrap. Then, place it in a freezer-safe bag or container. This keeps it safe from freezer burn. The pie can last up to 3 months in the freezer. When you're ready to eat, let it thaw in the fridge overnight. To reheat the pie, preheat your oven to 350°F (175°C). Place the pie on a baking sheet. Cover it with foil to avoid burning the top. Heat it for about 15-20 minutes. This method keeps the crust crispy and the filling warm. Enjoy your delicious dessert like it's fresh out of the oven! Yes, you can make Greek Honey Pie ahead of time. Prepare the pie and bake it. Let it cool completely. Then, cover it well with plastic wrap. Store it in the fridge for up to three days. To serve, simply pour the syrup over it just before slicing. This keeps it fresh and tasty. Baklava and Greek Honey Pie share some ingredients but differ in structure. Baklava has more layers of phyllo and usually includes honey syrup between layers. Greek Honey Pie has fewer layers and a thick nut filling. The nut mixture is the star here, while baklava focuses more on the phyllo texture. Greek Honey Pie lasts about three days when stored in the fridge. Keep it covered to prevent it from drying out. If you leave it at room temperature, consume it within two days. The honey syrup helps keep it moist, but it’s best fresh. Absolutely! You can change the nuts to suit your taste. Try pistachios or hazelnuts for a different flavor. You can also mix nuts for a unique crunch. Just keep the total amount the same, about two cups of nuts. This way, you still maintain the pie's texture and taste. In this post, I shared how to make a delicious Greek Honey Pie. You learned about the key ingredients like honey, nuts, and phyllo dough. I provided easy steps for preparing, baking, and making syrup. Plus, I included tips for perfect layers and tasty variations like gluten-free options. With these insights, you can create a perfect dessert for any occasion. Enjoy experimenting, and I hope your pie turns out amazing!
    Greek Honey Pie Irresistible Dessert Recipe Guide
  • To make Marry Me Chicken Pasta, gather these simple ingredients: - 2 boneless, skinless chicken breasts - 2 cups pasta (fettuccine or penne) - 1 tablespoon olive oil - Salt and pepper to taste - 1 teaspoon garlic powder - 1 teaspoon Italian seasoning - 1 cup heavy cream - 1 cup sun-dried tomatoes, chopped - 1 cup fresh spinach - 1/2 cup grated Parmesan cheese - Fresh basil leaves for garnish These ingredients come together to create a rich and creamy dish that feels special. The chicken adds protein while the pasta makes it filling. Sun-dried tomatoes bring a tangy punch, and fresh spinach adds color and nutrition. The heavy cream and Parmesan create a luscious sauce that binds everything nicely. Each bite feels like a hug on a plate. When choosing your ingredients, opt for fresh spinach and good-quality Parmesan. This will elevate your dish and enhance the flavors. Enjoy the cooking process and get ready to impress! {{ingredient_image_1}} To cook pasta until al dente, follow these steps: - Boil a large pot of salted water. - Add the pasta and cook as directed on the package. - Check the pasta a minute or two before the time ends. - It should be firm but not hard. - Drain the pasta in a colander. - Set it aside, but do not rinse. For optimal flavor, season the chicken breasts well: - Use salt, pepper, garlic powder, and Italian seasoning. - Coat both sides of the chicken evenly. - Heat olive oil in a large skillet over medium heat. - Add the chicken breasts and cook for 6-7 minutes per side. - Look for a golden brown color and check if cooked through. - Remove the chicken and let it rest before slicing. To create the sauce, start by adding sun-dried tomatoes: - Place the chopped sun-dried tomatoes in the same skillet. - Cook them for about 2 minutes until warmed. - Now pour in the heavy cream and stir gently. - Bring it to a gentle simmer while stirring continuously. - Allow it to thicken for about 3-4 minutes. Incorporate the spinach and cheese into the sauce: - Add fresh spinach and cook until wilted, about 2 minutes. - Stir in the grated Parmesan cheese until melted. - Adjust the taste with more salt and pepper if needed. Finally, slice the chicken and add it back into the skillet: - Toss the drained pasta and chicken together gently. - Ensure everything is well-coated in the creamy sauce. To make your Marry Me Chicken Pasta shine, focus on seasoning. Use salt and pepper to bring out the chicken's flavor. Add garlic powder and Italian seasoning for a tasty kick. Taste as you cook. If it needs more flavor, season it again. For the chicken, cook it until golden brown. Heat olive oil over medium heat. Cook chicken for about 6-7 minutes on each side. Check that it reaches 165°F inside. Let it rest before slicing. This keeps it juicy. One big mistake is overcooking the pasta. Cook it just until al dente. This means it should be firm but not hard. Drain it right away to stop cooking. Another mistake is getting salt wrong. Too much salt makes the dish too salty. Too little salt leaves it bland. Always taste your food as you go. Presenting Marry Me Chicken Pasta well makes it more appealing. Serve it in a wide, shallow bowl. This lets the creamy sauce spread out nicely. Garnish with fresh basil leaves. They add color and a fresh smell. You can also sprinkle more Parmesan cheese on top for a cheesy touch. A little goes a long way! Pro Tips Use Fresh Ingredients: Fresh spinach and high-quality sun-dried tomatoes can significantly enhance the flavor of your dish. Don't Overcook the Chicken: To ensure your chicken remains juicy, cook it just until it's no longer pink in the center. Adjust the Creaminess: If you prefer a lighter sauce, you can substitute half of the heavy cream with chicken broth. Garnish with Extra Flavor: Adding a sprinkle of extra Parmesan and a squeeze of lemon juice right before serving can elevate the dish. {{image_2}} If you want to try something new, swap the chicken for shrimp or tofu. Shrimp cooks quickly and adds a nice seafood flavor. Tofu is great for a vegetarian option. You can use any type of pasta you like, such as spaghetti, farfalle, or even whole wheat. Just remember to adjust the cooking time for different pasta shapes. To make the dish even better, add some fresh vegetables. Bell peppers and mushrooms bring color and crunch. They also add extra nutrients. You can mix in sun-dried tomatoes or even olives for a salty kick. Herbs like thyme or rosemary can replace Italian seasoning for a different taste. Experimenting with flavors keeps your meals exciting. Making this dish gluten-free is easy. Just choose gluten-free pasta. Check the labels to ensure it fits your needs. For a vegetarian version, skip the chicken and use mushrooms or more vegetables instead. You can also add some chickpeas for protein. These changes allow everyone to enjoy this meal without worry. To keep your Marry Me Chicken Pasta fresh, follow these steps: - Refrigerate promptly: Place leftovers in the fridge within two hours. - Use airtight containers: Glass or plastic containers with lids work best. When reheating, you want to keep it moist. Here are some great methods: - Stovetop method: Add a splash of cream or broth in a skillet. - Microwave method: Cover with a damp paper towel. Heat in short bursts, stirring. - Ideal temperature: Aim for 165°F (74°C) to ensure it's heated through. Yes, you can freeze Marry Me Chicken Pasta! Here’s how: - Cool before freezing: Let it cool down before placing it in the freezer. - Use freezer-safe containers: Make sure they are airtight to prevent freezer burn. - Thawing tips: Thaw overnight in the fridge or use the microwave for quick defrosting. This way, you can enjoy this dish later without losing flavor! Marry Me Chicken Pasta is a rich and creamy dish. It features tender chicken and pasta in a delicious sauce. The sun-dried tomatoes add a tangy kick. Spinach brings a fresh taste to the plate. This dish is popular for its comforting flavors. It’s perfect for date nights or special occasions. The name hints at its romantic appeal, making it a favorite for couples. Making Marry Me Chicken Pasta takes about 35 minutes. You’ll spend 15 minutes prepping the ingredients. Cooking the dish takes around 20 minutes. This quick time makes it great for busy weeknights. You can serve a tasty meal without much wait. Yes, you can prepare Marry Me Chicken Pasta ahead of time. Cook the pasta and chicken in advance. Store them separately in airtight containers. This helps keep everything fresh. When ready to eat, mix them with the sauce. To keep flavors intact, store in the fridge for up to 3 days. Pair Marry Me Chicken Pasta with a crisp salad. A simple green salad with vinaigrette works well. Garlic bread also complements the dish nicely. For drinks, a light white wine like Pinot Grigio is a good choice. It balances the creaminess of the pasta and chicken. In this article, we explored crafting Marry Me Chicken Pasta from start to finish. You learned about the key ingredients, step-by-step instructions, and helpful tips for perfecting the dish. I shared variations to suit different tastes and dietary needs, along with best practices for storage and reheating. Now, get ready to impress your family or friends with this delicious meal. Enjoy the cooking process, and remember that practice makes perfect! Your culinary skills will shine with each bite of this tasty dish.
    Marry Me Chicken Pasta Quick and Flavorful Dish
  • For cheesy chicken quesadillas, you need simple and tasty items. Here’s what to gather: - 2 cups cooked chicken, shredded - 1 cup shredded mozzarella cheese - 1 cup shredded cheddar cheese - 1/2 cup cream cheese, softened - 1 tablespoon taco seasoning - 1/2 cup bell peppers, diced (any colors) - 1/2 cup onion, diced - 4 large flour tortillas - 2 tablespoons olive oil - Salsa and sour cream for serving These ingredients create a rich and flavorful quesadilla. The mix of cheeses adds great texture. Choosing the right cheese makes a big difference. I love using mozzarella and cheddar together. Mozzarella melts nicely, while cheddar adds sharpness. You can also try Monterey Jack or pepper jack for a spicy kick. Experiment with different types of cheese to find your favorite blend. You can personalize your quesadillas with extra ingredients. Here are some ideas: - Black beans for added protein - Corn for sweetness - Jalapeños for heat - Fresh cilantro for freshness - Avocado for creaminess Feel free to mix and match these add-ins. They can make your quesadillas more fun and tasty! {{ingredient_image_1}} First, grab a big bowl. Add 2 cups of shredded chicken. Then, mix in 1 cup of mozzarella cheese and 1 cup of cheddar cheese. Next, add 1/2 cup of softened cream cheese. Toss in 1 tablespoon of taco seasoning for flavor. Finally, add 1/2 cup of diced bell peppers and 1/2 cup of diced onion. Stir it all together until everything is well mixed. This mixture gives the quesadillas a creamy and cheesy texture. Heat a non-stick skillet over medium heat. Pour in 1 tablespoon of olive oil. Take a large flour tortilla and place it in the skillet. On one half of the tortilla, spread half of the chicken and cheese mixture. Fold the other half over the filling. Cook for 3-4 minutes until golden brown. Flip and cook the other side for the same time. The cheese must melt well. Remove the quesadilla from the skillet and cut it into wedges. Repeat with the rest of the tortillas and filling. Serve your quesadillas warm. Arrange the wedges on a nice plate. You can add salsa and sour cream on the side for dipping. This adds extra flavor. For a pop of color, sprinkle some chopped herbs on top. Enjoy your tasty creation with family and friends! To make your quesadillas crispy, use a non-stick skillet. Heat it on medium heat, but do not let it get too hot. This way, the tortilla cooks evenly without burning. Use enough oil, about one tablespoon per quesadilla, to help the tortilla crisp up. Flip your quesadilla gently to keep the filling inside. Cook each side for 3-4 minutes until golden brown. One common mistake is overfilling the quesadilla. If you add too much filling, it can spill out and make a mess. Aim for a balance of chicken and cheese; too much of either can make it hard to fold. Also, avoid cooking on high heat. This can burn the tortilla while leaving the cheese unmelted. If you have leftover quesadillas, store them in an airtight container. Place parchment paper between each quesadilla to keep them from sticking together. They will last in the fridge for 3-4 days. To reheat, use a skillet on low heat or a microwave. If using a microwave, place a damp paper towel over the quesadilla to keep it from drying out. Pro Tips Use Leftover Chicken: Shredded rotisserie chicken works great for this recipe, saving you time and adding flavor. Customize Your Veggies: Feel free to add other vegetables like spinach, mushrooms, or corn for extra flavor and nutrition. Cheese Variations: Experiment with different cheese blends such as pepper jack for a spicy kick or gouda for a smoky flavor. Serve with Fresh Ingredients: Garnish with fresh cilantro or diced avocado for a refreshing contrast to the cheesy quesadillas. {{image_2}} You can easily make a veggie version of these cheesy quesadillas. Instead of chicken, use a mix of sautéed veggies. Try bell peppers, mushrooms, and spinach. You can add beans for extra protein. Swap the cream cheese for a vegan cheese option if needed. This keeps the quesadilla tasty and satisfying. If you want to change up the protein, there are many options. Ground turkey works well and adds a nice flavor. You can also use shredded beef or pork. For a lighter choice, try diced shrimp. Each protein gives a unique taste to your quesadilla. Just make sure to season them well! You don’t have to stick with flour tortillas. Corn tortillas are a great gluten-free choice. Whole wheat tortillas add fiber and a nutty flavor. You can even use large lettuce leaves for a low-carb option. Each tortilla type gives a different twist to your quesadilla. Experiment to find your favorite! To keep your cheesy chicken quesadillas fresh, let them cool first. Place them in an airtight container. You can stack them with parchment paper between layers. This keeps them from sticking together. Store the container in the fridge. They will stay good for up to three days. When you are ready to eat leftovers, you can reheat them easily. Use a skillet for the best results. Heat the skillet over medium heat. Place the quesadilla in the skillet. Cook for about 2-3 minutes on each side. This will make them crispy again. You can also use a microwave, but they may become soft. Heat them for about 30 seconds to 1 minute, checking often. If you want to save cheesy chicken quesadillas for later, freezing is a great option. Wrap each quesadilla in plastic wrap. Then place them in a freezer bag. Try to remove as much air as possible. They can last up to three months in the freezer. When you are ready to eat, thaw them in the fridge overnight. Reheat as mentioned before for the best taste. Yes, rotisserie chicken works great in this dish. It saves time and adds flavor. Just shred the chicken and mix it with the other ingredients. You’ll have a tasty meal in no time. If you don’t have cream cheese, try using sour cream or Greek yogurt. Both options give a creamy texture. You may also use a soft cheese like ricotta for a different flavor. To spice things up, add diced jalapeños or a dash of hot sauce. You can also use spicy taco seasoning instead of regular. This will give your quesadillas a nice kick. Yes, you can make the filling ahead of time. Store it in the fridge for up to two days. When you’re ready, just assemble and cook your quesadillas fresh. Salsa and sour cream are classic choices. Guacamole also tastes great with these quesadillas. You can try different hot sauces for extra flavor. Cheesy chicken quesadillas are an easy and fun meal. We discussed the key ingredients, including the best cheeses and add-ins. I shared simple steps to prepare and cook them for a perfect result. You learned great tips for crispiness and how to avoid mistakes. There are also easy variations to meet different tastes. Store leftovers properly to enjoy them later. With this guide, you can make tasty quesadillas every time. Enjoy your cooking journey and share your delicious creations!
    Cheesy Chicken Quesadillas Tasty and Simple Recipe
  • To make Garlic Parmesan Tortellini Skillet, you need the following: - 1 (9 oz) package cheese tortellini (fresh or frozen) - 3 tablespoons olive oil - 4 cloves garlic, minced - 1 cup cherry tomatoes, halved - 3 cups baby spinach - ½ cup grated Parmesan cheese - 1 teaspoon red pepper flakes (optional) - Salt and pepper to taste - Fresh basil leaves for garnish You can make this dish with some easy swaps. If you don’t have tortellini, use any pasta you like. For cheese, swap Parmesan with Pecorino Romano for a sharper taste. If you want a lighter option, try using olive oil spray instead of oil. If you can't find fresh spinach, kale works well, too. I often use fresh tortellini for its great flavor and texture. It cooks quickly and adds a nice bite. Frozen tortellini is also a good choice. It lasts longer in the freezer and is easy to use. Just make sure to cook it according to the package instructions. Both types work well in this dish, so choose what fits your needs! {{ingredient_image_1}} First, grab a pot and fill it with water. Bring the water to a boil. Add a pinch of salt to the water for flavor. Once boiling, add the tortellini. Cook according to the package instructions until al dente, usually about 3-5 minutes. Drain the tortellini in a colander and set it aside. Next, take a large skillet and place it on medium heat. Pour in 3 tablespoons of olive oil. When the oil is hot, add 4 cloves of minced garlic. Sauté the garlic for about 1 minute. You want it fragrant but not burnt. After that, add 1 cup of halved cherry tomatoes. Cook these for around 3-4 minutes until they soften. Then, toss in 3 cups of baby spinach. Stir and cook until the spinach wilts, which takes about 2 minutes. Now it's time to bring it all together. Add the drained tortellini to the skillet. Mix everything gently. It should look colorful and inviting. Sprinkle ½ cup of grated Parmesan cheese over the top. Stir until the cheese melts and coats the tortellini. Season with red pepper flakes, salt, and pepper to taste. Once everything is well mixed and heated through, remove the skillet from the heat. Plate the dish nicely for serving. Garnish with fresh basil leaves to add a burst of flavor. This simple step makes the meal look even better. Enjoy your Garlic Parmesan Tortellini Skillet! When cooking tortellini, follow these tips for the best results: - Use plenty of water: Boil at least 4 quarts of water. This helps the pasta cook evenly. - Salt the water: Add a good amount of salt before boiling. This enhances the flavor of the tortellini. - Check the time: Cook according to the package instructions. Fresh tortellini cooks faster than frozen. - Stir gently: Stir the tortellini in the pot to prevent sticking. Garlic brings great taste to this dish. Here are some ways to boost its flavor: - Slice instead of mince: Slicing garlic gives a milder taste. This is great if you love garlic but want less bite. - Use roasted garlic: Roasting garlic adds a sweet, rich flavor. Wrap whole cloves in foil, roast, and mash them. - Add garlic powder: If you want a stronger taste, sprinkle a bit of garlic powder on top. Melting cheese is an art. Here’s how to do it well: - Grate your cheese: Grate Parmesan instead of using blocks. This helps it melt faster and coat the pasta evenly. - Add cheese at the right time: Stir in the cheese right after adding the tortellini. This ensures it melts well with the heat of the dish. - Use low heat: Keep the skillet on low heat when adding cheese. This helps it melt without burning. These tips will help you make a tasty Garlic Parmesan Tortellini Skillet that shines with flavor. Enjoy every bite! Pro Tips Use Fresh Ingredients: Whenever possible, opt for fresh garlic and spinach for a more vibrant flavor and texture in your dish. Customize Your Spice Level: Adjust the amount of red pepper flakes according to your heat preference; you can also add a pinch of cayenne for an extra kick! Add Protein: For a heartier meal, consider adding grilled chicken, shrimp, or sautéed mushrooms to the skillet along with the tortellini. Experiment with Cheese: While Parmesan is classic, try using Pecorino Romano or even a blend of cheeses to give the dish a unique twist. {{image_2}} You can easily add protein to your garlic Parmesan tortellini skillet. Chicken and shrimp work great. For chicken, use cooked, diced pieces. Add them after sautéing the garlic. If you choose shrimp, add them in the skillet when you cook the tomatoes. They only need a few minutes to cook. This addition makes the meal heartier and adds flavor. You can boost nutrition by adding more veggies. Broccoli and zucchini are fantastic options. For broccoli, add it in with the spinach. Cook until tender. For zucchini, slice it and add it with the tomatoes. This way, they can cook together. These veggies not only add color but also crunch and taste. Want to change the flavor? Try different herbs and spices. Fresh herbs like thyme or oregano can add a great twist. You can also use dried herbs if fresh ones are not available. If you like heat, add more red pepper flakes or a dash of cayenne pepper. These swaps can make your dish unique every time you cook it. To store leftovers, let the Garlic Parmesan Tortellini cool down first. Place it in an airtight container. Make sure to cover it well to keep out air. Store the container in the fridge. It will last for about 3 to 4 days. When you are ready to eat the leftovers, reheat them gently. You can use a skillet on low heat. Add a splash of olive oil or water to help it warm up. Stir often to heat evenly. You can also microwave it. Use a microwave-safe bowl and cover it with a lid. Heat in 30-second bursts, stirring in between. This helps keep the dish moist and tasty. If you want to save some for later, you can freeze it. Allow the dish to cool completely before freezing. Use freezer-safe containers or bags. Make sure to remove as much air as you can. You can freeze it for up to 2 months. When ready to enjoy, thaw it overnight in the fridge. Reheat as described above for the best taste. Yes, you can use other cheeses. Mozzarella, feta, or goat cheese all work well. Each cheese brings its own flavor. For a creamier dish, try using ricotta. Just adjust the amount based on your taste. Absolutely! This dish is great for meal prep. You can make it ahead of time and store it in the fridge. It keeps well for up to three days. Just reheat it in a pan or microwave when you're ready to eat. To add spice, include red pepper flakes as the recipe suggests. You can also add sliced jalapeños or crushed chili peppers. Adjust the amount based on your heat preference. Start small, then taste as you go. Enjoy the kick! This blog post covered how to make a tasty tortellini dish. We talked about the key ingredients, how to cook them, and the best ways to enhance flavors. You learned about substitutes and how to store leftovers. In the end, feel free to mix and match ingredients for your perfect meal. Enjoy cooking and let each bite inspire your culinary creativity!
    Garlic Parmesan Tortellini Skillet Tasty One-Pan Meal
  • - 1 cup fresh cherries, pitted and halved - 1/4 cup sliced almonds - 1 cup whole milk - 3 large eggs - 3/4 cup granulated sugar - 1/2 cup all-purpose flour - 1/4 teaspoon salt - 1 teaspoon almond extract - Powdered sugar for dusting (optional) You need fresh ingredients for the best taste. Start with one cup of cherries. Make sure they are pitted and cut in half. This way, they mix well with the batter. The cherries give clafoutis its sweet and fruity flavor. Next, use sliced almonds. You need one-fourth cup of them. They add a nice crunch and a nutty taste. Now, let’s talk about pantry staples. You will need one cup of whole milk. It helps make the batter creamy. Then, grab three large eggs. They help the clafoutis rise and hold everything together. You will also need three-fourths cup of granulated sugar. This gives sweetness to the dish. Use half a cup of all-purpose flour to create a smooth batter. Don't forget one-fourth teaspoon of salt. Salt enhances the flavors. Finally, you need one teaspoon of almond extract. This adds a lovely almond flavor that pairs well with cherries. Powdered sugar is optional for dusting at the end. It gives a nice touch when serving. With these ingredients, you can make a delightful Cherry Almond Clafoutis that everyone will enjoy! {{ingredient_image_1}} - Preheat the oven to 350°F (175°C). - Grease a 9-inch round pie dish with butter or cooking spray. Start by warming up your oven. This step helps your clafoutis cook evenly. While the oven heats, grab your pie dish. Greasing it will keep the dessert from sticking later. - Whisk together eggs and sugar. - Add milk and almond extract, then sift in flour and salt. Next, take a medium bowl. Crack in three large eggs and add three-fourths cup of sugar. Whisk them together until they look frothy. Then, pour in one cup of milk and one teaspoon of almond extract. Mix until smooth. Now, sift in half a cup of flour and a pinch of salt. Stir gently. Remember, don’t overmix. The batter should be thin. - Scatter cherries in the dish, pour batter over, and sprinkle almonds. - Bake and cool before serving. Now, it’s time to assemble. Scatter one cup of pitted and halved cherries evenly in the dish. Pour the batter over the cherries, making sure they’re covered. Finally, sprinkle a quarter cup of sliced almonds on top. Slide the dish into your preheated oven. Bake for 35-40 minutes. Check if it’s done by inserting a toothpick. If it comes out clean, your clafoutis is ready. Let it cool for a few minutes before serving. Enjoy this delightful treat warm or at room temperature! To make the best cherry almond clafoutis, avoid overmixing the batter. When you mix too much, the clafoutis can turn out dense rather than light. Just stir until the flour disappears. Using fresh cherries is key to great flavor. Look for cherries that are firm and shiny. They should smell sweet. Ripe cherries add natural sweetness and a burst of juice to each bite. If you can, pit and halve them right before you bake. Dusting with powdered sugar adds a nice touch. To do this, use a fine sieve. Hold it over the clafoutis and gently shake the sugar. This creates a light, even layer on top. For serving, cut the clafoutis into wedges. Place them on pretty plates. You can add a few extra cherries on the side. A sprig of mint can also brighten the look. Serve warm for a cozy dining experience. Pro Tips Use Fresh Cherries: The quality of cherries significantly affects the flavor of your clafoutis. Opt for ripe, sweet cherries for the best results. Don’t Overmix: When combining the wet and dry ingredients, mix until just combined. Overmixing can lead to a dense texture instead of a light and airy clafoutis. Experiment with Flavors: Feel free to add a splash of vanilla extract or a hint of orange zest to the batter for a unique twist on the classic clafoutis. Serve Warm: Clafoutis is best enjoyed warm or at room temperature. Reheat gently in the oven if needed for the perfect texture. {{image_2}} You can change up the nuts in this recipe. Try using hazelnuts or walnuts. Each nut brings a unique flavor. Hazelnuts add a rich, earthy taste. Walnuts give a slight bitterness that pairs well with sweet fruit. You can also add vanilla or citrus zest. Vanilla extract gives a warm, sweet aroma. A touch of lemon or orange zest brightens the dish. Just a little zest enhances the clafoutis without overpowering it. If you want to swap cherries, blueberries or raspberries work well too. Blueberries offer a burst of sweetness. Raspberries add a tangy note that balances the dish. Creating a mixed berry clafoutis is another fun idea. Use equal parts of cherries, blueberries, and raspberries. This mix gives a beautiful color and diverse flavor. You can enjoy a new twist on the classic clafoutis. To keep your cherry almond clafoutis fresh, store it in the fridge. Place leftovers in an airtight container. This helps maintain moisture and flavor. You can keep it in the fridge for up to three days. If you want to save some for later, freezing is great too. Cut the clafoutis into slices. Wrap each slice tightly in plastic wrap. Then, place the slices in a freezer bag. This method allows you to enjoy clafoutis even after a few weeks. To reheat clafoutis, the oven works best. Preheat your oven to 350°F (175°C). Place the slices on a baking sheet. Heat for about 10-15 minutes. This keeps the texture nice and fluffy. You can also use a microwave. Place a slice on a microwave-safe plate. Heat for 30 seconds, then check it. If it needs more time, heat in 10-second bursts. Enjoy your clafoutis warm! Clafoutis is a classic French dessert. It features fruit baked in a thick batter. Traditionally, people use black cherries, but you can use other fruits too. This dish is like a mix between a pancake and a custard. It’s simple to make and perfect for any occasion. The soft, sweet fruit pairs well with the creamy batter, creating a delightful treat. You can tell the clafoutis is ready when it puffs up and turns golden brown. A toothpick test works well too. Insert a toothpick in the center; it should come out clean. If the batter sticks to the toothpick, give it a few more minutes. Keep an eye on it, as baking times can vary slightly. Yes, you can prepare clafoutis ahead of time! You can mix the batter and store it in the fridge. Just remember to add the fruit right before baking. This helps keep the cherries fresh and firm. You can also bake it a day early and store it in the fridge. Just reheat it in the oven before serving. We explored the tasty recipe for clafoutis, highlighting key ingredients, steps, and tips. Fresh cherries and pantry staples come together for a delightful dish. Remember to avoid overmixing the batter for the right texture. You can also try different nuts or fruits to mix it up. Proper storage ensures your clafoutis stays fresh. This French dessert is not only simple to make but also rewarding. Enjoy making and sharing it with friends and family!
    Cherry Almond Clafoutis Delightful and Easy Recipe
  • - 12 oz rigatoni pasta - 1 lb Italian sausage, casing removed - 1 medium onion, diced - 3 cloves garlic, minced - 1 can (14 oz) crushed tomatoes - 1 cup heavy cream - 1 teaspoon dried oregano - 1 teaspoon dried basil - 1/2 teaspoon red pepper flakes - Salt and pepper to taste - 1/2 cup grated Parmesan cheese - Fresh basil leaves for garnish - Olive oil for cooking Using the right amounts makes a big difference. Here are the key measurements: - Rigatoni Pasta: 12 ounces is perfect for four servings. - Italian Sausage: One pound gives a rich flavor. - Onion: A medium onion adds the right sweetness. - Garlic: Three cloves bring a strong aroma. - Crushed Tomatoes: Use a 14-ounce can for the sauce base. - Heavy Cream: One cup makes the sauce creamy. - Dried Oregano and Basil: One teaspoon each enhances the flavor. - Red Pepper Flakes: Use half a teaspoon for a bit of heat. - Parmesan Cheese: Half a cup adds depth to the dish. - Olive Oil: Just enough to coat the pan for browning. - Italian Sausage: Choose a good quality sausage for the best flavor. You can use mild or spicy based on your taste. - Cheese: Freshly grated Parmesan melts better and tastes richer than pre-grated. - Tomatoes: Crushed tomatoes provide a smooth sauce. You can use diced tomatoes if you prefer more texture. - Fresh Basil: It is a great garnish that adds color and fresh flavor. Always use it at the end for best results. {{ingredient_image_1}} Start by boiling a large pot of salted water. Add 12 oz of rigatoni pasta. Cook it until it is al dente, about 8 to 10 minutes. You want it to be firm but not hard. Before draining, save 1 cup of the pasta water. Drain the pasta and set it aside. This water helps to adjust the sauce later. In a large skillet, drizzle in some olive oil. Heat it over medium heat. Add 1 lb of Italian sausage, removing its casing first. Break the sausage into pieces with a wooden spoon. Cook it for 5 to 7 minutes. You want it browned and fully cooked. This adds great flavor to your dish. Next, add 1 diced medium onion to the skillet. Cook for about 3 to 4 minutes until it becomes soft and clear. Stir in 3 minced garlic cloves and cook for 1 more minute. You’ll love the smell! Now, pour in 1 can of crushed tomatoes and 1 cup of heavy cream. Mix it well. Add 1 tsp of dried oregano, 1 tsp of dried basil, and 1/2 tsp of red pepper flakes. Let this mix simmer for 5 to 10 minutes. This helps the sauce thicken. Now, it’s time to add the rigatoni back into the skillet. Toss the pasta in the sauce until it is fully coated. If the sauce is too thick, add some of that reserved pasta water. This will help you get the right sauce consistency. Taste the dish and add salt and pepper as needed. Stir in 1/2 cup of grated Parmesan cheese until it melts. This makes everything creamy and rich. Serve the dish right away. Top with fresh basil leaves and more Parmesan if you want. Enjoy your tasty Italian sausage rigatoni! To get the sauce just right, watch the heat. Simmer it on low. This helps the flavors mix well. You want a creamy texture, not too thick. If it gets too thick, add some reserved pasta water. Stir until it’s nice and smooth. This makes the sauce cling to the rigatoni perfectly. You can cook rigatoni in many ways. Boiling is the most common. But you could also bake it. For baking, cook the pasta until just underdone. Then mix with the sauce and bake until bubbly. This gives a nice crust on top. You can even try cooking it in a pressure cooker for speed. Garnishing makes your dish look great. Fresh basil leaves add color and flavor. Grated Parmesan cheese gives a rich taste. You can also sprinkle some red pepper flakes on top for extra spice. Serve with crusty bread on the side for a complete meal. Pro Tips Use Fresh Ingredients: For the best flavor, use fresh Italian sausage and high-quality crushed tomatoes. Fresh ingredients can elevate the entire dish. Customize Your Spice Level: Adjust the amount of red pepper flakes based on your heat preference. Add a little at a time and taste as you go to avoid overpowering the dish. Perfect Pasta Cooking: Always cook the pasta al dente to prevent it from becoming mushy when combined with the sauce. The pasta will continue to cook slightly when mixed with the hot sauce. Garnish for Flavor: Don't skip the fresh basil garnish! It adds a burst of freshness that complements the rich flavors of the dish beautifully. {{image_2}} You can make this dish lighter by using turkey sausage. Turkey sausage has less fat but still delivers great taste. You can also swap regular pasta for whole wheat rigatoni. Whole wheat pasta adds fiber and nutrients. If you want a meat-free meal, try plant-based sausage. It cooks just like regular sausage but is made from plants. You can find many brands that taste great. Use the same cooking steps, and you will enjoy a hearty dish. Change up the flavor with herbs and spices. Try adding fresh thyme or rosemary for a different twist. You can also use smoked paprika for a smoky flavor. Adjust the red pepper flakes for your heat level. Don't be afraid to mix and match to find your favorite combination. To store leftovers, let the rigatoni cool down. Place it in an airtight container. Make sure to seal it tightly. This helps keep the flavors fresh. You can store the dish in the fridge for up to three days. If you want to keep it longer, consider freezing. For freezing, use a freezer-safe container. Divide the rigatoni into portions. This makes it easier to thaw later. Make sure to leave some space in the container. Foods expand when frozen. You can freeze the rigatoni for up to three months. Label the container with the date for easy tracking. To reheat, you can use the microwave or the stovetop. If using the microwave, place it in a bowl and cover it. Heat in short bursts, stirring in between. If you prefer the stovetop, add a splash of water or broth. Heat on low, stirring often. This keeps the pasta moist and tasty. Enjoy your flavorful meal again! You can use many types of noodles. Penne or ziti are great choices. They hold sauce well and have a similar shape. Fusilli or farfalle can also work. They give a fun twist to the dish. Yes, you can make Italian Sausage Rigatoni ahead of time. Just cook it and store it in the fridge. Keep it in an airtight container for up to three days. When you are ready to eat, reheat it on the stove. Add a splash of water or cream to keep it moist. Many sides go well with this dish. A simple green salad adds freshness. Garlic bread is a tasty choice too. You can also serve roasted vegetables for extra flavor. These sides balance the rich pasta nicely. To make the dish less spicy, cut the red pepper flakes in half. You can leave them out completely if you prefer. Adding more cream will also tone down the heat. Serve with a dollop of sour cream for a cool touch. This blog post covered everything you need to know to make Italian sausage rigatoni. We discussed the key ingredients and their measurements, provided step-by-step cooking instructions, and offered tips for perfection. I also shared tasty variations and smart storage tips. Remember, making this dish can be fun and flexible. Experiment with ingredients and spices to match your taste. Enjoy crafting a meal that warms hearts and brings everyone together. With these strategies, you'll create a delicious dish every time!
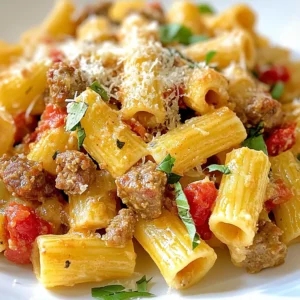
    Italian Sausage Rigatoni Simple and Flavorful Dish
  • - 2 cups all-purpose flour - 1 cup granulated sugar - ½ cup unsalted butter, softened - 1 cup sour cream - 2 large eggs - 1 teaspoon vanilla extract - 1 teaspoon baking powder - ½ teaspoon baking soda - ½ teaspoon salt - 1 teaspoon ground cinnamon To make a great coffee cake, you need basic ingredients. All-purpose flour gives the cake structure. Granulated sugar adds sweetness. Softened butter helps create a fluffy texture. Sour cream keeps the cake moist and adds a tangy taste. Eggs bind the ingredients together. Vanilla extract gives a warm flavor. Baking powder and baking soda help the cake rise. Salt balances the sweetness. Ground cinnamon adds warmth and spice. - ½ cup packed brown sugar - ½ cup all-purpose flour - ¼ cup unsalted butter, cold and cubed - 1 teaspoon ground cinnamon The streusel topping is key for texture. Brown sugar gives a rich flavor. All-purpose flour creates a crumbly mix. Cold butter is important. It helps form clumps in the topping. Ground cinnamon in the streusel adds extra spice. - Using Greek yogurt instead of sour cream - Vegan butter alternatives - Gluten-free flour options You can swap ingredients for different diets. Greek yogurt works well if you're out of sour cream. It keeps the cake moist. If you need a vegan option, use plant-based butter. For gluten-free options, look for a good gluten-free flour blend. This will help you enjoy coffee cake no matter your needs. {{ingredient_image_1}} - Preheat the oven to 350°F (175°C). - Grease a 9-inch round cake pan or a 9x9 inch square baking dish. First, you need to get your oven ready. This step is important. Preheating ensures even baking. Greasing the pan helps the cake come out easily. - Combine brown sugar, flour, and cinnamon. - Mix in cold cubed butter until crumbly. In a small bowl, mix brown sugar, flour, and cinnamon. This mixture gives the cake a sweet crunch. Now, add cold butter. Use a fork to mix until it looks like coarse crumbs. Set this aside for later. - Cream butter and sugar until light and fluffy. - Incorporate eggs, sour cream, and vanilla extract. In a large bowl, beat softened butter and granulated sugar. Mix until it feels light and fluffy. Next, add the eggs one at a time. Make sure each egg mixes well. Add sour cream and vanilla extract. Keep mixing until it's smooth. - Whisk together dry ingredients. - Mix dry and wet ingredients until just combined. In another bowl, whisk together flour, baking powder, baking soda, salt, and ground cinnamon. Slowly add this dry mix to the wet ingredients. Stir gently until both mixes come together. Don’t overmix; that helps keep the cake soft. - Layering the cake batter and streusel. - Baking time and checking for doneness. Pour half of the cake batter into your greased pan. Smooth it out evenly. Next, sprinkle half of the streusel topping over the batter. Pour the rest of the batter on top. Now, add the remaining streusel. Bake for 40-50 minutes. Check with a toothpick; it should come out clean. - Cooling time in the pan and on a wire rack. - Slicing and serving suggestions. Let the cake cool in the pan for about ten minutes. Then, transfer it to a wire rack to cool completely. Once cool, slice the cake. Serve it plain or with a dusting of powdered sugar. Enjoy with coffee or tea for a perfect treat! To make a great coffee cake, use room temperature ingredients. Cold butter and eggs can lead to a dense cake. Let them sit out for about 30 minutes before you start baking. This simple step helps the batter mix well and rise nicely. Also, avoid overmixing the batter. Mix just until the ingredients blend together. Overmixing makes the cake tough. It’s okay if you still see a few flour streaks. The cake will turn out light and fluffy. You can boost flavor by adding nuts or fruits to the batter. Chopped walnuts or pecans add a nice crunch. Fresh berries or diced apples give a sweet burst of flavor. You can mix in about a cup of your favorite fruit or nuts. Try adding a splash of almond extract too. This small addition gives a lovely nutty taste that pairs well with coffee. Just one teaspoon can make a big difference in flavor. If you have leftovers, store them properly. Place the coffee cake in an airtight container at room temperature. This keeps it fresh for up to three days. You can also wrap it in plastic wrap for added protection. Coffee cake tastes great with a hot cup of coffee or tea. The warm drink balances the sweetness of the cake. Serve slices with a dollop of whipped cream for a special treat. Enjoy it during brunch or as an afternoon snack! Pro Tips Use Room Temperature Ingredients: Ensure your butter, eggs, and sour cream are at room temperature for a smoother batter and better rise. Don’t Overmix the Batter: Mix the batter just until the dry ingredients are incorporated to keep the cake light and fluffy. Customize Your Topping: Feel free to add nuts or chocolate chips to the streusel topping for an extra flavor boost and texture. Check for Doneness: Use a toothpick to test the center of the cake; it should come out clean or with a few moist crumbs, not wet batter. {{image_2}} You can easily make a chocolate coffee cake. Start by adding cocoa powder to the batter. This gives the cake a rich, chocolate flavor. I suggest using about ½ cup of cocoa powder. You can also add chocolate chips to the streusel topping. This adds a fun surprise when you take a bite. Another great twist is a fruit-infused coffee cake. You can incorporate berries or apples right into the batter. Adding about a cup of fresh or frozen berries works well. For apples, chop them finely and mix them in. You can also create a fruit layer within the cake. Just pour half of the batter, add a layer of fruit, and then top with the remaining batter. If you need gluten-free options, use alternative flours. Almond flour or a gluten-free blend works great as substitutes. For a vegan version, replace eggs with flaxseed meal or applesauce. Use almond milk or coconut milk instead of dairy. These changes let everyone enjoy this delicious cake! To keep your classic coffee cake fresh, store it at room temperature. Place it in an airtight container. This helps to maintain moisture and flavor. You can also wrap the cake in plastic wrap. It will stay fresh for about three days. If you want to save some cake for later, freeze it. First, let the cake cool completely. Then, wrap it tightly in plastic wrap and aluminum foil. This protects it from freezer burn. When you're ready to enjoy it, thaw the cake in the fridge overnight. Reheat slices in the oven at 350°F for about 10 minutes. Your coffee cake will stay fresh for about three days at room temperature. If you freeze it, it can last up to three months. Keep an eye out for signs of spoilage. Look for a dry texture or off smells. If the cake seems hard or smells funny, it's best to toss it. Coffee cake pairs well with several drinks. Here are some great options: - Freshly brewed coffee - Tea, like Earl Grey or chamomile - Hot chocolate for a sweet twist - Cold milk for a classic touch These drinks enhance the cake's flavors and make for cozy moments. Yes, you can make coffee cake ahead of time. Here are some tips: - Bake the cake, then let it cool completely. - Wrap it tightly in plastic wrap. - Store it in the fridge for up to three days. - For longer storage, freeze it for up to three months. This way, you can enjoy it later without losing taste. Check for doneness with these simple techniques: - Insert a toothpick into the center of the cake. - If it comes out clean, the cake is done. - Look for a golden-brown top and a springy texture. These signs ensure you have a perfectly baked cake. Yes, you can use different pan sizes. Here’s what to adjust: - For a 9-inch round pan, bake for 40-50 minutes. - For a 9x13 inch pan, reduce baking time to 30-40 minutes. - Always check for doneness with a toothpick. This helps you use what you have at home. Coffee cake has a rich history. It began in Europe, especially Germany. Here’s a brief overview: - Early recipes appeared in the 17th century. - It was often served with coffee during gatherings. - The cake varies by region, featuring local flavors. This cake brings people together, making it special. Classic coffee cake is simple yet delicious. We covered its main ingredients, step-by-step instructions, and tips to make it tasty. You can enjoy it with your favorite drink or share it with friends. Remember to try different flavors and make it your own. With these tips, your coffee cake will impress everyone. Now, get baking and savor the delightful taste of your homemade coffee cake!
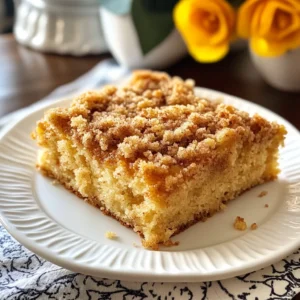
    Classic Coffee Cake Delightful and Easy Recipe Guide
  • - 2 cups cooked chicken, shredded - 1 cup cooked lobster meat, chopped - 1 cup frozen peas and carrots - 1/2 cup green beans, chopped - 1/3 cup onion, diced - 1/3 cup celery, diced - 2 cloves garlic, minced - 1 cup chicken broth - 1/2 cup heavy cream - 1 teaspoon dried thyme - 1 teaspoon dried basil - Salt and pepper to taste - 1 cup shredded cheddar cheese - 1 package of Red Lobster biscuit mix (includes garlic herb blend) - 1/2 cup milk (for the biscuit mix) - Fresh parsley for garnish - Additional seasonings or herbs This dish brings comfort to your kitchen. You can easily find these ingredients at your local store. The chicken and lobster give it a rich flavor. The mix of peas and carrots adds color and nutrition. The biscuits on top create a fluffy layer that is hard to resist. If you want to make this dish special, add fresh parsley for a nice touch. You can also play with herbs to boost the taste. Each ingredient works together to make this pot pie a delight. {{ingredient_image_1}} - Preheat your oven to 375°F (190°C). - In a large skillet, heat a splash of oil. Sauté the onions, garlic, and celery until soft, about 3-4 minutes. - Stir in the shredded chicken and chopped lobster. Cook for an additional 2 minutes. - Add the frozen peas, carrots, and green beans to the skillet. Pour in the chicken broth and heavy cream. Stir to mix everything well. - Transfer this chicken-lobster mixture to a baking dish. Spread it evenly across the bottom. - In a mixing bowl, prepare the Red Lobster biscuit mix as the package directs. Mix it with milk, then fold in the shredded cheddar cheese. - Spoon dollops of the biscuit mixture over the chicken pot pie filling. Make sure to cover the top evenly. - Bake in the preheated oven for 25-30 minutes. Look for golden brown biscuits on top. - Remove from the oven and let it cool for a few minutes before serving. To get those biscuits golden brown, watch the oven closely. Bake them for 25-30 minutes. The top should be a nice golden color. If they look pale, leave them in for a few extra minutes. Just be careful not to burn them. To thicken the filling, let it simmer longer. This allows the liquids to cook down. If it’s still too thin, mix a tablespoon of cornstarch with water. Stir this mixture into the filling and heat until thick. This will give you that rich, creamy texture. For serving, use individual bowls. This makes it fun and special. Garnish with fresh parsley for a bright touch. You can also add a sprinkle of cheddar on top for extra flavor. Pair your pot pie with a simple side salad. A mix of greens, cherry tomatoes, and a light vinaigrette works great. You can also serve it with crusty bread. This adds a nice crunch and rounds out your meal. Enjoy! Pro Tips Use Fresh Ingredients: Whenever possible, opt for fresh lobster and vegetables to enhance the flavor and texture of your pot pie. Customize Your Vegetables: Feel free to replace or add vegetables based on your preference, such as corn, bell peppers, or mushrooms for extra flavor. Make Ahead: You can prepare the filling in advance and store it in the fridge. Just assemble with the biscuits and bake when ready to serve. Perfect Biscuit Topping: Avoid overmixing the biscuit dough to keep it light and fluffy. A few lumps are okay! {{image_2}} To make this dish lighter, you can use low-fat cream and cheese. This change keeps the creamy texture while cutting calories. You can replace heavy cream with low-fat milk or even unsweetened almond milk. Use low-fat cheese or a blend of cottage cheese and mozzarella for a tasty twist. If you want a vegetarian option, swap out chicken and lobster. You can use mushrooms, tofu, or chickpeas as protein sources. Add more veggies like bell peppers or zucchini for extra flavor and texture. This will keep the dish hearty and satisfying without meat. To boost flavor, consider adding spices like paprika or cayenne pepper. These give the dish a nice kick. Fresh herbs like parsley or dill can also add a bright touch. You can mix in different proteins too. Shrimp or crab can replace lobster for a different taste. If you love seafood, this adds a delicious touch. Each protein brings its own flavor, making the dish unique every time you make it! To store leftover pot pie, let it cool first. Place it in an airtight container. Use a shallow dish for faster cooling. This helps keep the crust crispy. You can store it in the fridge for up to 3 days. Recommended storage containers include glass or plastic with tight lids. These containers help keep the pot pie fresh. Avoid using metal containers, as they can react with the food. To freeze portions, let the pot pie cool completely. Cut it into individual servings. Wrap each piece in plastic wrap, then place in a freezer bag. This method prevents freezer burn. You can freeze it for up to 3 months. For thawing, move the pot pie from the freezer to the fridge overnight. This slow thaw helps maintain texture. To reheat, place it in the oven at 350°F (175°C) for about 25 minutes. You want it hot all the way through. Cover it with foil to keep the crust from burning. Enjoy your delicious pot pie! Can I use canned chicken or lobster? Yes, you can use canned chicken or lobster. Just drain and rinse them before adding to the dish. This saves time and adds protein. How can I make the pot pie ahead of time? You can prepare the filling a day before. Store it in the fridge. Then, just add the biscuit topping before baking. This keeps it fresh and ready to enjoy. What can I substitute if I don't have the biscuit mix? If you lack biscuit mix, you can use homemade biscuit dough. Combine flour, baking powder, and butter. Add milk to make a dough. How long to bake if using a different baking dish? If you use a smaller or larger dish, check the pot pie after 20 minutes. Adjust the time as needed. Look for golden biscuits as your guide. Adjusting cooking times for smaller or larger portions For smaller portions, bake for about 20 minutes. For larger portions, it may take up to 40 minutes. Always check for doneness by looking for a golden top. This pot pie combines chicken, lobster, and veggies for a rich flavor. You learned the main ingredients, cooking steps, and tips to make it better. Remember to use fresh herbs or spices to elevate it. Store leftovers well for tasty meals later. With these insights, you can create a delightful dish everyone will love. Enjoy cooking, and share the joy of good food!
    Red Lobster Biscuit Chicken Pot Pie Delight Recipe
  • For this dish, you need: - 4 boneless, skinless chicken thighs - 2 tablespoons olive oil - 1/4 cup honey - 3 cloves garlic, minced - 2 tablespoons low-sodium soy sauce - 1 tablespoon apple cider vinegar - 1 teaspoon grated fresh ginger - Salt and pepper to taste First, I season the chicken thighs with salt and pepper. This adds flavor right from the start. The marinade is a mix of honey, soy sauce, vinegar, garlic, and ginger. This mix gives the chicken a sweet and savory taste that you will love. You will need: - 1 cup broccoli florets - 1 cup sliced carrots The broccoli and carrots add color and nutrition. They also soak up the honey garlic sauce. You can use any vegetables you like. Just make sure they cook well in the pan. For garnishes, gather: - 1 teaspoon sesame seeds - Fresh cilantro or green onions The sesame seeds add a nice crunch. The fresh herbs give a pop of flavor and color. These small touches make your meal look and taste amazing. {{ingredient_image_1}} Start by seasoning the chicken thighs. Use salt and pepper on both sides. This simple step adds flavor. It helps the chicken taste great. Next, heat the olive oil in a large skillet. Set the heat to medium-high. Add the seasoned chicken thighs to the pan. Sear them for about 5-6 minutes on each side. You want them golden brown. Once cooked, take the chicken out and set it aside. In the same skillet, lower the heat to medium. Add the minced garlic. Sauté it for about 30 seconds. You want it to smell nice. Then, stir in the honey, soy sauce, apple cider vinegar, and grated ginger. Bring this mix to a gentle simmer. It should thicken slightly in about 2-3 minutes. Now, return the chicken to the skillet. Add the broccoli florets and sliced carrots. Stir everything well to coat it in the sauce. Cover the skillet and cook for 5-7 minutes. The veggies should be tender-crisp and bright. Once done, take the skillet off the heat. Let it sit for a minute. Serve the dish hot. Sprinkle sesame seeds on top. Add fresh cilantro or green onions for a nice touch. Enjoy this one pan meal! To make a great honey garlic sauce, balance is key. The sweet honey pairs with savory soy sauce. Add a splash of apple cider vinegar for zing. Try using fresh ginger for a bright touch. If you want a thicker sauce, simmer it longer. Just be careful not to burn it. Taste as you go, and adjust to your liking. Chicken thighs cook best when they start at room temperature. Take them out of the fridge 15 minutes before cooking. This helps them cook evenly. Sear them in hot olive oil to get that lovely golden color. Don’t overcrowd the pan; this can lower the heat. Cook in batches if needed for the best results. Feel free to swap out broccoli and carrots. Bell peppers add sweetness and color. Snap peas give a nice crunch. Zucchini cooks fast and absorbs flavor well. Just be sure to cut vegetables into similar sizes. This ensures they cook evenly. Mix and match based on what you have in your fridge. Pro Tips Marinate for Extra Flavor: For deeper flavor, consider marinating the chicken thighs in the honey, soy sauce, and garlic mixture for at least 30 minutes before cooking. Vegetable Variations: Feel free to substitute the broccoli and carrots with other vegetables like bell peppers, snap peas, or zucchini for a different twist. Thicken the Sauce: If you prefer a thicker sauce, you can mix 1 teaspoon of cornstarch with 2 teaspoons of water and stir it into the sauce until it reaches your desired consistency. Serving Suggestions: Serve the dish over steamed rice or quinoa for a complete meal that absorbs the delicious honey garlic sauce. {{image_2}} You can easily add rice to this dish. Start by cooking one cup of rice before you make the chicken. Use a pot or rice cooker. After you finish cooking the chicken and veggies, serve them over the rice. This makes a complete meal. The rice will soak up the sweet sauce. It adds a nice touch. Want some heat? You can spice things up! Add red pepper flakes to the sauce. Start with half a teaspoon and taste. You can add more if you like it hotter. You can also use sriracha or chili paste. Mix it in with the honey and soy sauce. This version is for those who love spicy food. Feel free to swap the veggies! You can use bell peppers, snap peas, or zucchini. Just chop them into small pieces. Add them to the pan when you add the broccoli and carrots. Each veggie gives a new flavor and crunch. This way, you can enjoy the dish and keep it fresh. After enjoying your One Pan Honey Garlic Chicken, let the leftovers cool. Place them in an airtight container. Store it in the fridge for up to three days. Make sure to separate the chicken from the veggies if you want them to stay crisp. This helps keep the flavors fresh. To reheat, you can use a microwave or a skillet. For the microwave, place the chicken and veggies on a plate. Cover it with a damp paper towel. Heat in 30-second intervals until warm. If using a skillet, add a splash of water to keep it moist. Heat over low until warm. This will help keep the sauce tasty. You can freeze this dish for longer storage. First, let it cool completely. Then, place it in a freezer-safe container or a zip-top bag. Remove air to prevent freezer burn. It will stay good for up to three months. To enjoy, thaw overnight in the fridge, then reheat. This method keeps the chicken flavorful and juicy. Yes, you can use chicken breasts. They will cook faster, so check them often. Chicken breasts are leaner than thighs. This may change the dish's flavor and texture slightly. If you want juicy meat, use thighs. You can serve Honey Garlic Chicken with rice or quinoa. Steamed rice absorbs the sauce well. You can also add a fresh salad for crunch. Noodles or mashed potatoes are great options too. Pair with your favorite side for a complete meal. To make Honey Garlic Chicken gluten-free, use gluten-free soy sauce. Look for tamari as a good substitute. Ensure all other ingredients are gluten-free as well. This way, you keep the same great flavors without gluten. Honey Garlic Chicken lasts about 3 to 4 days in the fridge. Store it in an airtight container. This keeps it fresh and safe to eat. Reheat it well before serving to enjoy the flavors again. We covered the key parts of making Honey Garlic Chicken. We started with the ingredients, focusing on chicken, veggies, and garnishes. Then, we went through the steps to cook this dish, from prep to serving. I shared tips for perfecting the sauce and cooking chicken evenly. You can also explore tasty variations and learn how to store leftovers. Now, you can create a delicious meal that fits your taste and needs. Enjoy experimenting with this recipe and making it your own!
    One Pan Honey Garlic Chicken Easy and Flavorful Meal
  • - 1 lb boneless, skinless chicken breasts - 1 cup brown rice - 1 (15 oz) can black beans, drained and rinsed - 1 (15 oz) can corn, drained - 1 medium red bell pepper, diced - 1 medium onion, diced - 2 cloves garlic, minced - 1 (14.5 oz) can diced tomatoes with green chilies - 1 tablespoon olive oil These main ingredients form the heart of your burrito bowls. The chicken provides a tasty base, while the rice adds substance. The beans and corn offer fiber and texture. Fresh veggies like bell pepper and onion add crunch and zing. - 1 tablespoon chili powder - 1 teaspoon cumin - 1 teaspoon paprika - 1 teaspoon onion powder - Salt and pepper to taste The spices bring warmth and depth. Chili powder adds heat, while cumin gives an earthy note. Paprika lends a hint of sweetness. Onion powder boosts the overall flavor, and salt and pepper tie it all together. - 1 cup shredded cheddar cheese - Fresh cilantro, for garnish - Lime wedges, for serving Garnishes bring your dish to life. The cheese melts over the hot chicken, adding creaminess. Cilantro adds freshness and color. A squeeze of lime brightens every bite, making each bowl pop with flavor. {{ingredient_image_1}} To start, place the chicken breasts at the bottom of the slow cooker. This helps keep the meat moist. Next, rinse the brown rice under cold water. Once the water runs clear, layer the rice over the chicken. This will absorb the flavors. Now, add the black beans and corn on top of the rice. Then, toss in the diced red bell pepper, onion, and minced garlic. These veggies add great taste and color. Finally, pour the can of diced tomatoes over all the ingredients. The juices will make everything delicious. In a small bowl, mix the chili powder, cumin, paprika, onion powder, salt, and pepper. This blend gives the dish a nice kick. Sprinkle this spice mix evenly over the ingredients in the slow cooker. Next, drizzle the olive oil over the top. This adds richness and flavor to the meal. Cover the slow cooker with its lid. Set it to low for 6-7 hours or high for 3-4 hours. Make sure the chicken reaches 165°F (74°C) inside. Once cooked, carefully take out the chicken. Use two forks to shred it into bite-sized pieces. Return the shredded chicken to the slow cooker and mix everything well. This ensures every bite is full of flavor. After that, serve the burrito bowls in deep bowls. Top with shredded cheddar cheese and garnish with fresh cilantro. Add a lime wedge on the side for a zesty finish. Enjoy your tasty creation! - Ensure chicken reaches 165°F for safe eating. Use a food thermometer for accuracy. - Different slow cookers heat at different rates. Adjust cooking time as needed. - If using a newer model, it might cook faster than older ones. - Layer your burrito bowls for a vibrant look. Use deep bowls to show off colors. - Serve in bowls that showcase the layers. Clear glass bowls work well. - Top with fresh cilantro for a pop of green and a squeeze of lime. - Try different cheese options like Monterey Jack or pepper jack for a kick. - Add toppings like avocado, sour cream, or diced jalapeños for more flavor. - Fresh herbs like cilantro or parsley brighten up the dish. Pro Tips Use Frozen Chicken: Frozen chicken breasts can be used directly in the slow cooker without thawing, making prep even easier. Customize the Veggies: Feel free to add or substitute with your favorite vegetables such as zucchini or spinach for extra nutrition. Spice It Up: Adjust the spice levels by adding jalapeños or chipotle peppers for a smoky heat that enhances the flavors. Make It Ahead: This dish can be made a day in advance; simply store in the fridge and reheat for a quick meal. {{image_2}} You can easily swap chicken for tofu or tempeh. Both are great sources of protein. Tofu absorbs flavors well, making it a tasty choice. Tempeh has a nutty taste and adds texture. You can also add more veggies to the mix. Try zucchini, carrots, or spinach for extra color and nutrients. This makes your bowl even more filling and healthy. For a gluten-free meal, use gluten-free grains. Quinoa or cauliflower rice works well. They provide a nice base without any gluten. Always check labels on canned goods to avoid hidden gluten. This ensures your meal stays safe and delicious for everyone. Do you like it hot? You can adjust the spice in your burrito bowls. Add more chili powder or sprinkle in some cayenne pepper. This gives the dish a nice kick. If you want more heat, mix in hot sauce or chopped jalapeños. Just be careful; start with a little and taste as you go. You can always add more heat later! To keep your Slow Cooker Chicken Burrito Bowls fresh, follow these steps: - Let the dish cool down to room temperature. - Use airtight containers to store the leftovers. - Refrigerate within two hours of cooking to prevent bacteria growth. - Enjoy the leftovers within 3 to 4 days for the best taste. To reheat your burrito bowls without losing flavor, I suggest these methods: - Microwave: Place servings in a bowl. Cover with a damp paper towel. Heat for 1-2 minutes, stirring halfway. - Stovetop: Heat in a pan over medium heat, stirring often until warmed through. This keeps the texture nice. Freezing your burrito bowls makes for a quick meal later. Here’s how to do it right: - Divide the dish into portions. Use freezer-safe containers or bags. - Label each container with the date for easy tracking. - Freeze for up to three months for the best quality. - To defrost, place the container in the fridge overnight. Reheat as mentioned above for the best results. You can store these burrito bowls in the fridge for up to four days. Keep them in an airtight container. This helps keep the flavors fresh. Make sure to reheat them well before eating. Yes, you can cook this on the stovetop. Use a large pot and add all the ingredients. Bring it to a boil, then lower the heat. Let it simmer for about 30-40 minutes. Make sure the chicken reaches 165°F (74°C) before serving. Burrito bowls taste great with: - Tortilla chips with salsa - A simple green salad - Mexican corn salad - Guacamole These sides enhance the meal and add more flavors. Absolutely! Brown rice works well in many slow cooker recipes. It adds a nutty flavor and is healthy. Just remember to adjust cooking times. Brown rice takes longer to cook than white rice. To lower the calories, try these tips: - Use skinless chicken thighs instead of breasts. - Reduce the amount of cheese or skip it. - Add more vegetables and less rice. These changes make the dish lighter without losing taste. This blog post covers a delicious slow cooker chicken burrito bowl. We discussed the key ingredients, including chicken, rice, beans, and spices. Each step, from preparation to cooking, sets you up for success. Tips enhance flavor and presentation, while variations cater to different diets. Lastly, we shared storage and reheating guidelines for leftovers. In conclusion, this recipe offers convenience and taste. You can easily customize it to suit your needs. Enjoy the process and the meal with family and friends. Happy cooking!
    Slow Cooker Chicken Burrito Bowls Flavorful Delight
  • To make this creamy tomato basil soup, you will need: - 2 tablespoons olive oil - 1 medium onion, chopped - 2 cloves garlic, minced - 2 cans (15 oz each) crushed tomatoes - 2 cups vegetable broth - 1 teaspoon sugar (optional) - 1 teaspoon dried oregano - 1 teaspoon dried basil - ½ teaspoon salt - ¼ teaspoon black pepper - 1 cup heavy cream (or coconut cream for a dairy-free option) - ½ cup fresh basil leaves, chopped You can add a few items to make the soup your own. Consider: - Grated Parmesan cheese for serving - A pinch of red pepper flakes for heat - A splash of balsamic vinegar for tang - Chopped vegetables like carrots or celery for added nutrition I love how flexible this recipe is! Here are some swaps you can make: - Use a different oil like avocado oil instead of olive oil. - Replace heavy cream with coconut cream for a dairy-free choice. - If you don’t have crushed tomatoes, diced tomatoes work too. Just blend them longer. - For a low-sodium option, choose low-sodium vegetable broth. These simple swaps help you create a soup that fits your taste and needs. Enjoy experimenting! {{ingredient_image_1}} Start by turning your Instant Pot to the sauté mode. Once it gets hot, add 2 tablespoons of olive oil. Next, chop one medium onion and add it to the pot. Sauté the onion for about 3 to 4 minutes. You want it to turn translucent. Then, mince 2 cloves of garlic and add them. Sauté the garlic for one more minute until it smells great. Now it’s time to add the fun ingredients! Pour in 2 cans of crushed tomatoes and 2 cups of vegetable broth. If you like a touch of sweetness, add 1 teaspoon of sugar. Next, sprinkle in 1 teaspoon of dried oregano and 1 teaspoon of dried basil. Don’t forget to add ½ teaspoon of salt and ¼ teaspoon of black pepper to taste. Secure the lid on the Instant Pot. Set it to cook on high pressure for 10 minutes. Make sure the steam release valve is in the sealing position to keep the steam inside. When the cooking time is up, it’s time for a quick release of steam. Carefully open the lid, keeping it away from your face. Now, grab an immersion blender. Blend the soup until it’s nice and smooth. If you don’t have an immersion blender, you can carefully transfer it to a regular blender in batches. After blending, stir in 1 cup of heavy cream or coconut cream for a dairy-free option. Add ½ cup of chopped fresh basil leaves and mix well. Taste your soup and adjust the seasoning if needed. Now you’re ready to serve! Ladle the soup into bowls and consider garnishing with extra chopped basil and grated Parmesan cheese if you like. Enjoy your creamy tomato basil soup! For a smooth soup, use an immersion blender. It works great right in the pot. If you don’t have one, blend in batches in a regular blender. Be careful with hot soup! You can also add more cream for a richer texture. If you prefer a chunkier soup, blend only half. Taste is key! Add a pinch of sugar if your tomatoes taste too tart. Fresh herbs can boost flavor. Try adding a bit of thyme or rosemary. Lemon juice adds a nice zing too. Adjust salt and pepper to your liking. You can also add a splash of balsamic vinegar for depth. An Instant Pot makes this recipe easy and quick. An immersion blender saves time and mess. A good cutting board and sharp knife help with chopping. Measure cups and spoons are essential for accuracy. A ladle and serving bowls make serving simple and fun. Consider using a garlic press for mincing garlic quickly. Pro Tips Use Fresh Basil: Fresh basil adds vibrant flavor and aroma, enhancing the soup's overall taste. Add it at the end of cooking to preserve its freshness. Adjust Consistency: If you prefer a thicker soup, blend less or add a bit more heavy cream. For a thinner soup, add extra vegetable broth until desired consistency is reached. Flavor Boosting Sugar: A teaspoon of sugar can balance the acidity of the tomatoes, enhancing the soup's sweetness. Adjust to taste based on the tomatoes used. Garnish Wisely: Garnishing with Parmesan cheese and extra basil not only makes the soup visually appealing but also adds depth of flavor. Consider a drizzle of olive oil for an extra touch. {{image_2}} You can make this soup dairy-free by using coconut cream. Just replace the heavy cream with 1 cup of coconut cream. This swap gives the soup a rich, creamy texture. It also adds a light sweetness that pairs well with the tomatoes and basil. Coconut cream makes the dish smooth, while keeping it plant-based. You can boost the nutrition of this soup by adding vegetables or protein. Consider adding chopped carrots, celery, or bell peppers for extra flavor. You can also toss in cooked lentils or shredded chicken for protein. Just add them to the Instant Pot before blending. This helps create a heartier meal. If you like heat, try making a spicy version of this soup. Add red pepper flakes or diced jalapeños to the mix. You can add these spices when you sauté the onion and garlic. Adjust the amount to fit your taste. This fiery twist will give your creamy tomato basil soup a whole new kick! After you make this soup, let it cool. Pour any extras into an airtight container. Store it in the fridge for up to five days. Keep it away from strong-smelling foods. This helps to keep the flavors fresh. To reheat, pour the soup into a pot. Warm it over medium heat, stirring often. You can also use the microwave. Heat it in a bowl for about two minutes. Check that it is hot all the way through. You can freeze this soup for later. Use freezer-safe containers or bags. It will last for up to three months in the freezer. When you’re ready to eat, thaw it in the fridge overnight. Then reheat it on the stove or in the microwave. Enjoy your creamy tomato basil soup even when you are short on time! Yes, you can use fresh tomatoes! Start with about 10-12 ripe tomatoes. First, roast them to bring out their flavor. After roasting, peel and chop them. Use them in place of canned crushed tomatoes. This adds freshness and a unique taste to your soup. The soup will last about 3 to 5 days in the fridge. Store it in an airtight container. Make sure it cools down before sealing. This keeps it fresh and safe to eat later. Absolutely! To make this soup vegan, swap heavy cream for coconut cream. Ensure the vegetable broth is free from animal products. This way, you enjoy a creamy soup without any dairy. In this blog post, we covered how to make a delicious soup. We discussed the key ingredients, including options for customization. You learned step-by-step instructions for preparing and cooking your soup in the Instant Pot. We shared tips to improve texture and flavor and explored variations for different tastes. I also gave storage info and answers to common questions. Now, you have everything you need to enjoy tasty, homemade soup. Get cooking and have fun!
    Instant Pot Creamy Tomato Basil Soup Delight
  • To make a savory salmon coconut curry, you need a few key items. - 4 salmon fillets (skinless) - 1 can (400ml) coconut milk - 2 tablespoons red curry paste - 1 tablespoon fish sauce - 1 tablespoon lime juice - 1 teaspoon ginger, grated - 3 garlic cloves, minced - 1 red bell pepper, sliced - 1 cup snap peas - 1 tablespoon olive oil - Fresh cilantro for garnish - Salt and pepper to taste - Cooked jasmine rice for serving These ingredients blend well, giving you a rich flavor. The coconut milk adds creaminess, while the red curry paste gives it a kick. Fresh herbs like cilantro add brightness, and lime juice balances the dish. You can serve this curry with jasmine rice, making it a complete meal. {{ingredient_image_1}} Start by heating olive oil in a large skillet over medium heat. Add minced garlic and grated ginger. Sauté them for about one minute until they smell great. Next, stir in two tablespoons of red curry paste. Cook it for another minute until the spice blends well and fills your kitchen with a warm aroma. Now, it’s time to add the rich coconut milk. Pour in one can of coconut milk and stir to mix. Let it come to a gentle simmer. After that, add the sliced red bell pepper and one cup of snap peas. Cook these for about three to four minutes until they soften a bit. To bring out the flavor even more, season the sauce with one tablespoon of fish sauce and one tablespoon of lime juice. Stir well to combine everything. Gently place four salmon fillets in the skillet. If your fillets have skin, put them skin-side down. Spoon some of the curry sauce over the top of the salmon. Cover the skillet and let it simmer for about eight to ten minutes. The salmon is ready when it flakes easily with a fork. Taste the curry and adjust with salt and pepper if needed. Enjoy your meal! To make your Salmon Coconut Curry pop, spice adjustments can really help. If you like heat, add more red curry paste. For milder flavors, use less. You can also try adding a dash of chili flakes for extra kick. Fresh herbs play a big role in flavor and look. Cilantro is my go-to for garnish. It adds a fresh taste and bright color to your dish. You can also use fresh basil or mint if you want to mix things up. Cooking salmon right is key to a great dish. Use medium heat to cook the salmon gently. This helps it stay moist and tender. Always check if the salmon flakes easily with a fork. This shows it’s done. For the curry, aim for a creamy, smooth texture. If it’s too thick, add a splash of water or more coconut milk. This will help balance the flavors and keep it light. Pro Tips Use Fresh Ingredients: Fresh salmon and vegetables will enhance the flavor and texture of your curry, making it more vibrant and delicious. Adjust Spice Level: If you prefer a milder curry, reduce the amount of red curry paste or add a bit of coconut milk to temper the heat. Add More Veggies: Feel free to include other vegetables like broccoli, zucchini, or carrots for added nutrition and color. Let It Rest: Allow the curry to sit for a few minutes after cooking; this helps the flavors meld together beautifully before serving. {{image_2}} If you want to switch things up, there are great options! Instead of salmon, try using tofu for a plant-based meal. Tofu soaks up the curry flavors well. If you're a seafood fan, shrimp is another tasty choice. It cooks quickly and adds a nice touch. You can also play with the veggies. Snap peas and red peppers are great, but don't stop there! You can add zucchini, carrots, or broccoli. Each vegetable brings its own flavor and texture. This makes your curry fun and fresh. Curry varies widely across cultures. Thai curry uses coconut milk and fresh herbs, while Indian curry often relies on spices like turmeric and cumin. You can mix and match these styles to create your own version. Adjusting spices can help you find your perfect blend. If you like heat, add more red curry paste or some chili flakes. For a milder taste, reduce the curry paste. This way, you can make a curry that suits your taste buds. To keep your salmon coconut curry fresh, cool it first. Let it sit at room temperature for about 30 minutes before refrigerating. This step helps prevent bacteria growth. Use airtight containers for storage. Glass or plastic containers with tight lids work well. Make sure to label the containers with the date. This way, you’ll know how long they’ve been in the fridge. Store leftovers in the fridge for up to three days. When reheating your curry, do it gently. The best method is to use a stovetop. Pour the curry into a skillet over low heat. Stir occasionally to heat it evenly. If you use a microwave, heat it in short bursts. This way, you avoid overcooking the salmon. Salmon cooks quickly, so keep an eye on it. You want it warm, not dry. Enjoy your meal! Salmon cooks quickly in curry. It takes about 8 to 10 minutes. The salmon should be skin-side down if there is skin. You want the salmon to be opaque and flake easily with a fork. This timing helps keep the salmon moist and tender. Yes, you can prepare this dish ahead of time. Cook the curry base and store it in the fridge. Cook the salmon fresh when you are ready to eat. This method keeps the salmon from getting dry. You can also store leftovers in an airtight container for up to three days. I suggest serving this curry with jasmine rice. The rice soaks up the rich curry sauce. You can also add a side of steamed vegetables or a fresh salad. For extra flavor, try garnishing with fresh cilantro or lime wedges. These add brightness and freshness to your meal. This Salmon Coconut Curry recipe combines simple ingredients like salmon, coconut milk, and red curry paste. You can enhance flavors with fresh herbs and adjust spices to your taste. With the right techniques, you get delicious salmon cooked perfectly in a creamy, fragrant sauce. Don't forget to store any leftovers properly for future meals. This dish is easy to customize, making it perfect for everyone. Enjoy creating your curry and exploring new flavors in your kitchen.
    Savory Salmon Coconut Curry Easy and Flavorful Meal
  • - 4 boneless, skinless chicken breasts - 1 cup sun-dried tomatoes (packed in oil, drained and chopped) - 1 cup heavy cream - 1 cup chicken broth When making Crockpot Marry Me Chicken, you need good quality chicken. Boneless, skinless chicken breasts work best. They cook evenly and stay tender. Sun-dried tomatoes add a sweet and tangy flavor. Drain and chop them to mix well with the chicken. For a rich sauce, you’ll use heavy cream. It makes the dish creamy and delicious. Chicken broth adds depth and moisture. Together, these main ingredients create a meal that’s hard to resist. - 1 teaspoon garlic powder - 1 teaspoon onion powder - 1 teaspoon Italian seasoning - 1/2 teaspoon red pepper flakes (optional) Seasoning is key to flavor. Garlic powder gives a savory touch. Onion powder adds sweetness without the crunch. Italian seasoning brings a mix of herbs that complement the chicken. If you like a little heat, add red pepper flakes. They enhance the flavor without overpowering the dish. These simple seasonings make a big difference in taste. - Fresh basil leaves - Salt and pepper to taste After cooking, fresh basil leaves add a pop of color. They also bring a fresh taste that brightens the dish. Use salt and pepper to adjust the flavor to your liking. Taste as you go, and make it perfect for you. Garnishing makes your meal look as good as it tastes. {{ingredient_image_1}} To start, you need to season the chicken breasts. Take four boneless, skinless chicken breasts. Sprinkle salt, pepper, garlic powder, onion powder, and Italian seasoning on both sides. Make sure to coat them well. This adds great taste. Next, place the seasoned chicken in the bottom of your crockpot. Lay them flat. This helps them cook evenly and soak up all the flavors. Now it's time to add the sun-dried tomatoes. Grab one cup of sun-dried tomatoes, packed in oil. Drain and chop them. Spread the chopped tomatoes over the chicken in the crockpot. This adds a nice tangy flavor. For the sauce, mix one cup of heavy cream and one cup of chicken broth in a bowl. Whisk them together until blended. Pour this creamy mixture over the chicken and tomatoes. This sauce keeps the chicken moist and adds richness. Cover your crockpot with a lid. Set it to cook on low for 6 to 8 hours. If you're in a hurry, you can choose high for 4 to 6 hours. The chicken should be tender and fully cooked when done. Cooking on low lets the flavors blend well and makes the chicken super tender. Check it at the end of the cooking time. If it easily shreds with a fork, it's ready to serve. To keep your chicken juicy, start with fresh, high-quality chicken breasts. Dry chicken often comes from overcooking. Use a meat thermometer to check the temperature. The chicken should reach 165°F. This ensures it stays tender and safe to eat. Season your chicken well. The right seasonings help enhance the natural flavors. Salt, pepper, garlic powder, and onion powder are key in this recipe. Want to boost the flavor? Consider adding more herbs. Fresh thyme or rosemary can give your dish a nice touch. You could also use some oregano for an Italian twist. When choosing sun-dried tomatoes, go for those packed in oil. They add richness and depth to your dish. You can also try using sun-dried tomatoes with herbs for extra taste. For sides, I recommend serving your chicken with creamy mashed potatoes or garlic bread. Both will soak up the delicious sauce. Steamed green beans or a fresh salad can add a nice crunch. Pair this dish with a crisp white wine, like Chardonnay, for a perfect match. Enjoying it with a light salad will balance the richness of the chicken. Pro Tips Use Fresh Ingredients: Whenever possible, use fresh basil and high-quality sun-dried tomatoes for a more vibrant flavor. Adjust the Spice Level: If you prefer a milder dish, omit the red pepper flakes or reduce the amount to suit your taste. Thicken the Sauce: For a thicker sauce, remove the chicken once cooked, and let the sauce simmer on high for 10-15 minutes before serving. Meal Prep Friendly: This dish is perfect for meal prep! Store leftovers in airtight containers in the fridge for up to 4 days. {{image_2}} You can make this dish dairy-free by using coconut cream instead of heavy cream. Coconut cream adds a nice richness and flavor. Simply swap it one-for-one in the recipe. If you prefer, you can also use other broth options. Vegetable broth or a low-sodium chicken broth works well. This change will keep the dish tasty while being dairy-free. If you want to switch things up, try using turkey or tofu in place of chicken. Turkey breast works great and offers a similar taste. For tofu, use firm or extra-firm tofu for the best texture. Keep in mind that cooking times will vary. Turkey may take about the same time as chicken, while tofu may only need 3-4 hours on low. You can boost the flavor by adding vegetables. Spinach, bell peppers, or zucchini all work well. Simply chop and add them to the crockpot. You can also infuse your dish with herbs and spices. Consider adding fresh thyme or rosemary for a new twist. A splash of balsamic vinegar can also brighten the flavors. Get creative and make this dish your own! To keep your Crockpot Marry Me Chicken fresh, follow these steps: - Refrigeration tips: Let the chicken cool to room temperature. Place it in an airtight container. Store it in the fridge for up to four days. - Freezing instructions: If you want to freeze leftovers, use a freezer-safe bag or container. Remove as much air as possible. It can last up to three months in the freezer. When you’re ready to enjoy your leftovers, here’s how to reheat them: - Best methods for reheating: The microwave works well for quick reheating. Use a microwave-safe dish and cover it. You can also reheat in a pan on low heat, stirring often. - Tips for maintaining flavor and texture: Add a splash of chicken broth when reheating. This keeps the chicken moist and enhances the flavor. Knowing how long your dish lasts is key: - How long it lasts in the fridge: In the fridge, your cooked chicken will stay fresh for about four days. - Freezer storage duration: In the freezer, it can be safe for up to three months. Just remember to label the container with the date! Can I use frozen chicken? Yes, you can use frozen chicken. Just keep in mind that it will take longer to cook. If cooking on high, it may need 6-8 hours. For the low setting, expect it to take 8-10 hours. Can I make it ahead of time? Absolutely! You can prepare the dish a day ahead. Just store it in the fridge after cooking. When ready to serve, reheat it on low in the crockpot. This makes it easy for busy days. Calories per serving Each serving has about 500 calories. This includes the chicken, cream, and tomatoes. Overview of macro nutrients - Protein: 40g - Fat: 35g - Carbohydrates: 10g This dish offers a nice balance of protein and healthy fats. Best garnishes I love using fresh basil leaves on top. They add color and a fresh taste. You can also sprinkle some grated cheese for extra flavor. Presentation tips for serving guests Serve the chicken over a bed of rice or pasta. This adds a nice touch and makes the plate look fuller. Use a large platter for family-style serving, or individual plates for a more formal meal. In this blog post, we explored how to make delicious crockpot Marry Me Chicken. We covered the main ingredients, like chicken breasts and sun-dried tomatoes. We shared step-by-step instructions for a perfect cook every time. I also offered tips for keeping your dish flavorful and tender. As you try this recipe, remember you can adapt it to fit your taste. Enjoy experimenting with flavors and variations. With the right techniques, you’ll create a meal that truly impresses. Keep cooking and have fun in the kitchen!
    Crockpot Marry Me Chicken Flavorful and Easy Recipe
  • - Fresh asparagus - Olive oil - Garlic - Lemon (zest and juice) - Salt and black pepper - Parmesan cheese (optional) - Fresh parsley for garnish When I create Lemon Garlic Roasted Asparagus, I choose fresh asparagus. Look for bright green stalks with firm tips. This gives the best flavor and texture. Next, I use three tablespoons of olive oil. It helps the asparagus roast evenly. I also add four cloves of minced garlic. Garlic adds a rich, savory taste that pairs well with lemon. To bring in the zing, I use the zest and juice of one lemon. The zest adds a vibrant aroma. The juice gives a fresh burst of flavor. I sprinkle in one teaspoon of salt and half a teaspoon of black pepper. These seasonings enhance the taste of the asparagus. If you want a creamy touch, you can add two tablespoons of grated Parmesan cheese. It melts beautifully over the asparagus. Finally, I like to garnish with fresh parsley. It adds color and a hint of earthiness. This dish is fresh and full of flavor. {{ingredient_image_1}} 1. Preheat the oven: Start by setting your oven to 425°F (220°C). This helps the asparagus roast perfectly. 2. Prepare the asparagus: Take 1 pound of fresh asparagus. Trim the tough ends so they cook evenly. 3. Combine ingredients: In a big bowl, mix the asparagus with 3 tablespoons of olive oil. Add 4 cloves of minced garlic, the zest of 1 lemon, the juice of 1 lemon, 1 teaspoon of salt, and ½ teaspoon of black pepper. Toss everything well to coat the asparagus. 1. Spread on baking sheet: Line a baking sheet with parchment paper. Spread the asparagus in a single layer on the sheet. This helps them roast nicely without sticking. 2. Roasting time and temperature: Place the baking sheet in the oven. Roast the asparagus for 12-15 minutes. They should be tender and have a nice caramelized look when done. 3. Adding Parmesan cheese: If you want extra flavor, sprinkle 2 tablespoons of grated Parmesan cheese on top during the last 2 minutes of roasting. This will melt and add a rich taste. 1. Garnishing options: Once out of the oven, sprinkle fresh chopped parsley on the asparagus. This adds a nice color and a fresh touch. 2. Pairing ideas: Lemon garlic roasted asparagus pairs well with grilled chicken, fish, or a hearty grain salad. You can also serve it alongside pasta dishes for a complete meal. To pick fresh asparagus, look for bright green color. The tips should be closed and firm. Avoid stalks that are limp or have dry tips. You can choose thick or thin stalks based on your taste. Thick stalks give a nice crunch, while thin ones are tender. Both work well in this dish, so pick what you like best. Roasting time is key for tender asparagus. For a crisp bite, aim for 12 minutes. If you want softer asparagus, roast for up to 15 minutes. To cook evenly, spread the asparagus in a single layer. Avoid crowding the pan. This helps each piece get that nice caramel color. You can mix up the flavors by adding different seasonings. Try red pepper flakes for heat or lemon pepper for more zest. Using oils can change the taste too. While olive oil is great, try avocado oil for a mild flavor. Experiment with what you enjoy! Pro Tips Choose Fresh Asparagus: Look for firm, bright green stalks with closed tips for the best flavor and texture. Adjust Roasting Time: Thinner asparagus may cook faster, so keep an eye on them to ensure they don't overcook. Experiment with Seasonings: Try adding red pepper flakes or lemon thyme for an extra kick of flavor. Serve Immediately: For the best taste and texture, enjoy the asparagus right after roasting while they are still warm. {{image_2}} To brighten up your Lemon Garlic Roasted Asparagus, try some fun twists. You can add fresh herbs like thyme or rosemary for a lemon herb flavor. Just chop them finely and mix them in with the garlic. If you want some heat, sprinkle in chili flakes. This gives your dish a spicy kick. Start with a little and taste. You can always add more! This recipe can fit many diets! To make it vegan, simply skip the Parmesan cheese. The dish will still taste great with lemon and garlic. For gluten-free eaters, you’re in luck! The ingredients are naturally gluten-free. You can enjoy this dish without worry. Roasting is a classic way to prepare asparagus, but there are more options! Grilling adds a smoky flavor. To grill, preheat your grill, toss the asparagus with oil, and cook for 5-7 minutes. Turn them often for even cooking. If you prefer sautéing, heat olive oil in a pan over medium heat. Add the asparagus and cook for about 7-10 minutes. Stir frequently until they are tender. This method gives a nice crisp texture! To keep your Lemon Garlic Roasted Asparagus fresh, store it in an airtight container. This helps to lock in the flavors and moisture. Place the leftovers in the fridge within two hours after cooking. Asparagus stays good for about 3 to 5 days when stored properly. If you want to enjoy it later, try not to overcrowd the container. This allows air to circulate and keeps the asparagus crisp. When reheating your asparagus, avoid the microwave if you can. Microwaving can make it soggy. Instead, use an oven or skillet for the best results. Preheat your oven to 350°F (175°C) and place the asparagus on a baking sheet. Heat for about 5 to 10 minutes, or until warmed through. If using a skillet, heat over medium heat for about 3 to 5 minutes. This will help keep its texture and flavor intact. You can check the texture of the asparagus. It should feel tender when you poke it with a fork. Cooked asparagus should not be mushy. Next, watch for color changes. The asparagus will turn a bright green when cooked. If it starts to look dull, it may be overcooked. Yes, you can use frozen asparagus. It works well, but there are a few tips. First, thaw the asparagus completely. This helps it cook evenly. Next, pat it dry with a paper towel. Too much moisture can make it soggy. Finally, adjust the cooking time. Frozen asparagus may need a few extra minutes to roast. This dish goes great with many meals. You can serve it alongside grilled chicken or fish. It also pairs well with pasta dishes or quinoa. For salads, try mixing it with arugula and cherry tomatoes. You can also add feta cheese for a tasty twist. If you want protein, consider adding roasted chickpeas or nuts. This blog post explored how to make delicious Lemon Garlic Roasted Asparagus. We discussed the key ingredients needed, like fresh asparagus and garlic. The step-by-step instructions ensured you could follow along with ease. Plus, I shared tips for choosing the best asparagus and enhancing flavors. In final thoughts, roasting asparagus lets its natural taste shine. Don't hesitate to try different seasonings and cooking methods. Enjoy this dish as a healthy side for any meal!
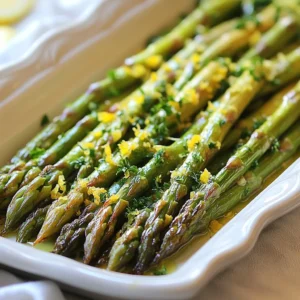
    Lemon Garlic Roasted Asparagus Fresh and Flavorful Dish
  • To make delicious cranberry orange scones, you need a few key ingredients: - 2 cups all-purpose flour - 1/4 cup granulated sugar - 1 tablespoon baking powder - 1/2 teaspoon salt - 1/2 cup cold unsalted butter, cut into cubes - 1/2 cup dried cranberries - Zest of 1 orange - 1/2 cup heavy cream - 1 large egg - 1 teaspoon vanilla extract - 1/2 cup powdered sugar (for glaze) - 1-2 tablespoons orange juice (for glaze) These ingredients work together to create a sweet and tangy flavor. The butter adds richness, while the orange zest gives a bright, fresh taste. Measuring your ingredients correctly is key to great scones. Use these tips: - Use a dry measuring cup for flour and sugar. - Spoon flour into the cup, then level it off. Don’t pack it down. - For butter, cut it cold, then measure. - Use a kitchen scale for precision. This helps avoid mistakes. Accurate measuring ensures your scones rise well and taste perfect. You can make some swaps if you don’t have certain items: - Replace heavy cream with milk or buttermilk for a lighter scone. - Use fresh cranberries instead of dried for a tart kick. - If you need a dairy-free option, use coconut oil instead of butter. - You can swap granulated sugar for brown sugar for a deeper flavor. These substitutions can change the taste and texture slightly, but they still work well. {{ingredient_image_1}} Start by gathering all your ingredients. You will need: - 2 cups all-purpose flour - 1/4 cup granulated sugar - 1 tablespoon baking powder - 1/2 teaspoon salt - 1/2 cup cold unsalted butter, cut into cubes - 1/2 cup dried cranberries - Zest of 1 orange - 1/2 cup heavy cream - 1 large egg - 1 teaspoon vanilla extract - 1/2 cup powdered sugar (for glaze) - 1-2 tablespoons orange juice (for glaze) Preheat the oven to 400°F (200°C) and line a baking sheet with parchment paper. This makes cleanup easy and helps the scones bake evenly. In a large bowl, whisk the flour, sugar, baking powder, and salt. Make sure it is well mixed. Next, add the cold butter. Use your fingers or a pastry cutter to work it into the flour. Stop when the mix looks like coarse crumbs. Then stir in the dried cranberries and orange zest. This adds great flavor! In another bowl, whisk together the heavy cream, egg, and vanilla. Once blended, pour this into the dry mix. Stir gently until just combined. Be careful! Overmixing can make the scones tough. Turn the dough onto a lightly floured surface. Gently knead it a few times to bring it together. Pat it into a circle, about 1-inch thick. Cut the circle into 8 wedges. Place the wedges on the prepared baking sheet, leaving space between them. Bake the scones for 15-20 minutes. Watch for a golden brown color. This signals they are done and ready to come out. While the scones bake, make the glaze. In a small bowl, whisk the powdered sugar and orange juice until smooth. If it’s too thick, add a little more juice. If it’s too thin, add more powdered sugar. This glaze adds a sweet touch to your scones. Once the scones cool slightly, drizzle the orange glaze on top. Enjoy the fresh, zesty flavor! For the best scone texture, keep your butter cold. This helps create a light and flaky scone. When mixing, use your fingers or a pastry cutter. Do not overwork the dough. Mix just until it comes together. A little bit of crumbly dough is okay! One mistake is overmixing the dough. This will make your scones tough. Another mistake is not using cold butter. Warm butter will change the texture. Make sure your oven is preheated. Baking in a cold oven can ruin your scones. To boost flavor, use fresh orange zest. It adds a bright taste. You can also add a pinch of cinnamon for warmth. If you want a tangy twist, try adding lemon zest. Lastly, drizzle the orange glaze generously. It adds sweetness and a lovely shine. Pro Tips Use Cold Ingredients: Make sure your butter and cream are cold. This helps create a flakier texture in your scones. Don't Overmix: When combining wet and dry ingredients, mix just until combined. Overmixing can lead to tough scones. Shape Uniformly: For even baking, ensure your scones are shaped uniformly. This helps them cook evenly and rise properly. Experiment with Flavors: Feel free to substitute dried cranberries with other fruits like blueberries or add nuts for extra texture. {{image_2}} You can change up your cranberry orange scones easily. Try adding chocolate chips for a sweet twist. Almonds or pecans add a nice crunch. You can also use fresh blueberries instead of cranberries. Mix and match flavors to find your favorite. The key is to keep the balance of wet and dry ingredients. If you want a gluten-free version, use a gluten-free flour blend. Make sure the blend has a good mix of starches and proteins. Add a bit of xanthan gum to help with texture. This will keep your scones light and fluffy. You can still use the same dried cranberries and orange zest for flavor. You can change the sweetness of the scones based on your preference. If you like it sweeter, add more sugar to the dough. You can also drizzle extra glaze on top after baking. For less sweetness, cut back on the granulated sugar. Tasting the dough as you go helps you find the right balance. To keep your scones fresh, store them in an airtight container. Place parchment paper between layers to avoid sticking. Keep them at room temperature for up to two days. If you need to store them longer, the fridge is fine for about a week. Avoid moisture; it makes scones soggy. Reheating is simple. Preheat your oven to 350°F (175°C). Place the scones on a baking sheet. Heat them for about 5-10 minutes. This will warm them up and bring back some crispiness. You can also use a microwave, but it may make them soft. Freezing scones is a great way to save them. Wrap each scone tightly in plastic wrap. Then, place them in a freezer bag. They can last for up to three months. To enjoy them, thaw in the fridge overnight and reheat in the oven. This keeps the texture nice. Yes, you can make these scones ahead of time. Prepare the dough and shape it. Wrap it tightly in plastic wrap. Then, store it in the fridge for up to 24 hours. When you are ready to bake, just cut the scones and bake them right away. This keeps them fresh and tasty. Look for a golden brown color on top. The edges should be firm yet soft to the touch. You can also insert a toothpick in the center. If it comes out clean, your scones are done. They should smell amazing too! Serve your scones warm for the best taste. Drizzle the orange glaze on top right before serving. Pair them with fresh cranberries and orange slices for a beautiful look. You can also add a little butter for extra flavor. Yes! Tea is a classic choice. Try a nice Earl Grey or chamomile. Coffee also pairs well, especially with a splash of cream. For a twist, enjoy these scones with fresh orange juice. Each drink brings out the bright flavors of the scones. In this guide, we covered all you need to make delicious cranberry orange scones. We explored key ingredients, measuring tips, and easy substitutions. You learned step-by-step instructions for mixing, shaping, baking, and glazing. I shared tips for the perfect texture and how to avoid common mistakes. You also found variations for different taste preferences, along with storage tips for freshness. Remember, practice makes perfect. Enjoy baking your scones and impressing friends or family with your skills!
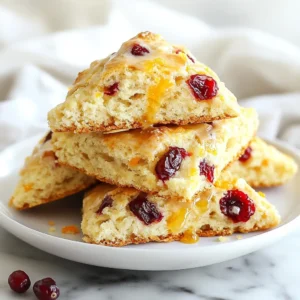
    Cranberry Orange Scones Flavorful and Easy Recipe
  • - 1 lb ground turkey or beef - 1 can (15 oz) black beans, rinsed and drained - 1 can (15 oz) corn, drained - 1 can (10 oz) diced tomatoes with green chilies - 1 packet taco seasoning The main ingredients will form the heart of your taco casserole. You can choose ground turkey or beef based on your taste. The black beans add protein and fiber. Corn brings a bit of sweetness, while the diced tomatoes with green chilies add spice and flavor. Taco seasoning ties it all together, giving the dish its classic taste. - 1 cup cooked rice (brown or white) - 2 cups shredded cheddar cheese - 1 small onion, diced - 1 bell pepper, diced - Salt and pepper to taste - Fresh cilantro, for garnish - Sour cream, for serving (optional) These additional ingredients bring depth and creaminess to the casserole. Rice adds bulk, making it hearty. The diced onion and bell pepper give a fresh crunch. Cheddar cheese melts beautifully on top, adding richness. Don’t forget salt and pepper to enhance all the flavors. Garnish with cilantro for a fresh finish and add sour cream if you want extra creaminess. {{ingredient_image_1}} 1. Browning the ground meat Start by heating a skillet over medium heat. Add 1 lb of ground turkey or beef. Cook until the meat is no longer pink. This step adds flavor and texture. Drain any fat before moving on. 2. Layering ingredients in the crockpot Now, grab your crockpot. In the bottom, layer the following ingredients: - 1 can (15 oz) black beans, rinsed and drained - 1 can (15 oz) corn, drained - 1 can (10 oz) diced tomatoes with green chilies - 1 cup cooked rice (brown or white) - 1 small onion, diced - 1 bell pepper, diced 3. Mixing and seasoning Sprinkle the cooked ground meat over your layered ingredients. Then, add 1 packet of taco seasoning. Don't forget to season with salt and pepper to taste. Gently mix everything to combine all the flavors well. - Cooking times for low and high settings Cover your crockpot and set it to cook. For low heat, plan for 4-6 hours. If you are in a hurry, use high heat for 2-3 hours. The longer you cook, the better the flavors blend. - Best practices for cheese melting About 30 minutes before serving, add 2 cups of shredded cheddar cheese on top. Cover the crockpot to help the cheese melt perfectly. This step adds a creamy texture and rich flavor to your dish. To avoid a watery casserole, drain all canned ingredients well. Rinse the black beans and drain the corn. This helps keep the flavors strong. You can also add less liquid if you like. To ensure even cooking in the crockpot, layer ingredients properly. Start with the beans and corn. Then add the rice, veggies, and meat. This way, heat spreads evenly. Stir gently but do not overmix. Cover the pot tightly while cooking. For ideal side dishes, consider tortilla chips or a fresh salad. They add a nice crunch and balance the meal. You can also serve with guacamole or salsa for added flavor. You can customize servings with toppings. Sour cream adds creaminess. Fresh cilantro gives a pop of flavor. You can also try sliced jalapeños or diced avocado. Each topping can change the dish's taste. Pro Tips Use Lean Meat: Opt for lean ground turkey to reduce the fat content while still providing great flavor. Customize Your Veggies: Feel free to add other vegetables like zucchini or spinach for extra nutrition and flavor. Make Ahead: Prepare the ingredients the night before and store them in the fridge for a quick assembly in the morning. Leftovers Storage: Store any leftovers in an airtight container and refrigerate for up to 3 days for an easy meal later. {{image_2}} You can easily change this recipe by using different proteins. Ground turkey or beef works great, but try chicken or a vegetarian substitute like lentils. Each option adds a unique twist to the flavor. You can also switch up the beans. Instead of black beans, use pinto or kidney beans. For vegetables, mix in chopped zucchini or spinach. These small changes can freshen the dish and make it your own. Want more heat? Add some diced jalapeños or a sprinkle of chili powder. You can even add a dash of cayenne pepper for an extra kick. These spices can take your casserole from mild to wild. Cheese is another area to play with. While cheddar is classic, try Monterey Jack or pepper jack for a different taste. You can mix cheeses too for extra creaminess. This way, your casserole stays exciting with every bite. To keep leftovers fresh, let the casserole cool down first. Store it in an airtight container. You can keep it in the fridge for up to three days. When you’re ready to eat, just reheat it on the stove or in the microwave. This will help keep the flavors intact. If you want to save some for later, freezing is a great option. Divide the casserole into smaller portions. Place them in freezer-safe bags or containers. Make sure to remove as much air as possible to avoid freezer burn. It can last in the freezer for up to three months. When you’re ready to enjoy it again, thaw it overnight in the fridge. Then, reheat it in the oven or microwave until hot. Enjoy that fresh taste from your Crockpot Taco Casserole! Yes, you can make Crockpot Taco Casserole ahead of time. To do this, you can prepare all the ingredients in the crockpot. Layer the black beans, corn, diced tomatoes, rice, onion, and bell pepper. Add the cooked meat, seasoning, salt, and pepper. Cover and refrigerate the crockpot overnight. When ready, just cook it on low for 4 to 6 hours or high for 2 to 3 hours. This method saves time and keeps the flavors fresh. To make this dish dairy-free, simply skip the cheddar cheese. You can also use dairy-free cheese alternatives that melt well. Coconut yogurt or cashew cream can replace sour cream for serving. These swaps let you enjoy the dish without dairy while keeping it creamy and tasty. Crockpot Taco Casserole pairs well with many sides. Consider serving it with: - Tortilla chips for crunch - A fresh green salad for a light touch - Guacamole for added flavor - Homemade salsa for a spicy kick These sides can enhance your meal and make it even more enjoyable. To sum up, we explored making a delicious Crockpot Taco Casserole. We covered main and extra ingredients, step-by-step instructions, and helpful tips for the best results. You learned how to store and freeze leftovers for later enjoyment. You can also customize it based on your tastes. Cooking should be fun and easy. Enjoy your meal, and happy cooking!
    Crockpot Taco Casserole Simple and Tasty Dish
  • - 2 cups cooked chicken, shredded - 1/2 cup honey - 1/2 cup BBQ sauce (preferably a smoky variant) - 1 tablespoon olive oil - 1 teaspoon garlic powder - 1 teaspoon smoked paprika - 1/2 teaspoon cumin - 1/2 teaspoon chili powder - Salt and pepper, to taste - 8 small corn or flour tortillas - 1 cup shredded lettuce - 1 cup diced tomatoes - 1/2 cup shredded cheese (cheddar or Mexican blend) - Fresh cilantro, for garnish - Lime wedges, for serving These ingredients make the honey BBQ chicken tacos both tasty and easy to prepare. The shredded chicken is the star, bringing in a savory flavor. Honey and BBQ sauce add a sweet and tangy kick. The spices like garlic powder and smoked paprika give depth. You can choose corn or flour tortillas based on your taste. They hold all the goodness inside. The toppings like lettuce, tomatoes, and cheese make each bite fresh and crunchy. Don’t forget the cilantro for that burst of flavor! Lime wedges on the side add a nice zesty touch. With these ingredients, you're on your way to a delicious meal. Just gather everything and let’s start cooking! {{ingredient_image_1}} To start, gather your ingredients. You need cooked chicken, honey, BBQ sauce, and spices. In a mixing bowl, combine 2 cups of shredded chicken with 1/2 cup of honey and 1/2 cup of BBQ sauce. Then, add 1 teaspoon of garlic powder, 1 teaspoon of smoked paprika, 1/2 teaspoon of cumin, and 1/2 teaspoon of chili powder. Add salt and pepper to taste. Mix everything well. Use a fork or spoon to ensure the chicken gets evenly coated. This helps the flavors blend nicely. You want every piece of chicken to have a bit of that sweet and smoky sauce. Next, heat 1 tablespoon of olive oil in a large skillet over medium heat. Make sure the oil is hot before adding the chicken mixture. This helps to lock in the flavors. Once the oil is hot, add your chicken mixture to the skillet. Stir occasionally with a spatula. Cook for about 5 to 7 minutes. You want the chicken to be heated through and slightly caramelized. This gives it a nice texture and flavor. While the chicken cooks, you can prepare your tortillas. You can warm 8 small corn or flour tortillas in a separate pan or microwave. The tortillas should be soft and pliable for easy folding. To assemble, place a generous portion of the BBQ chicken mixture in the center of each tortilla. Then, top it with 1 cup of shredded lettuce, 1 cup of diced tomatoes, and 1/2 cup of shredded cheese. For a fresh touch, garnish each taco with cilantro. Serve them with lime wedges on the side. Squeezing lime over the tacos adds a bright flavor that pairs well with the sweet BBQ chicken. Enjoy your meal! To make your Honey BBQ Chicken Tacos even better, try different BBQ sauce types. You can use a sweet sauce, a spicy one, or even a tangy variant. Each choice adds a new twist. You can also adjust the spices. If you like heat, add more chili powder or some hot sauce. For milder flavors, skip the chili powder or use less. When cooking the chicken, sauté it in a hot skillet. This method helps the flavors blend well. Keep stirring the chicken mixture often. It helps to cook evenly and prevents burning. To achieve caramelization, let the chicken sit for a moment before stirring. This technique gives the chicken a nice brown color and enhances the taste. For serving, think outside the box! You can arrange the tacos on a large platter. Add lime wedges and extra toppings on the side. This way, everyone can customize their tacos. For garnishing, use fresh cilantro to add color and flavor. You might also sprinkle some cheese on top for a nice finish. Remember, a fun presentation makes the meal even more enjoyable! Pro Tips Use Leftover Chicken: Shredded rotisserie chicken works perfectly for this recipe, saving you time and adding great flavor. Adjust Sweetness: If you prefer your tacos less sweet, reduce the honey in the sauce or use a barbecue sauce that is less sweet. Add Heat: For a spicy kick, consider adding diced jalapeños or a splash of hot sauce to the chicken mixture. Make Ahead: You can prepare the BBQ chicken mixture ahead of time and store it in the fridge for up to 3 days, making assembly quick and easy. {{image_2}} You can easily swap chicken for other proteins. Beef works well in these tacos. Use shredded beef for a rich flavor. You can also try using tofu. Tofu absorbs flavors well and offers a nice texture. For seafood lovers, shrimp is a great choice. Toss shrimp in the same honey BBQ mix. Cook them until they're pink and firm. Each option gives you a new twist on the classic taco. Toppings can take your tacos to the next level. Try adding avocado slices for creaminess. Pickled onions add a tangy crunch. You could also use jalapeños for some heat. Don’t forget about salsa! Fresh salsa brings a burst of flavor. For side dishes, consider serving corn on the cob. A fresh garden salad pairs nicely too. You can also serve tortilla chips with salsa for a fun crunch. Mixing in unique sauces can change the flavor profile. Try adding a bit of ranch dressing for a creamy touch. A drizzle of hot sauce can spice things up. If you love a tangy kick, mix in some lime juice. For a homemade dressing, combine Greek yogurt with lime and cilantro. This adds a fresh taste that complements the tacos well. Experiment with different sauces to find your perfect flavor! To keep your Honey BBQ Chicken Tacos fresh, store them properly. First, let them cool down. Place any leftover tacos in an airtight container. This helps keep moisture in and air out. You can store them in the fridge for up to three days. If you want to keep them longer, freezing is a good option. Wrap each taco tightly in plastic wrap. Then, place them in a freezer-safe bag. They will stay good in the freezer for up to three months. When you're ready to eat, just thaw them in the fridge overnight. Reheating your tacos can bring back their delicious flavor. You have a few good methods to choose from. The oven works well. Preheat it to 350°F (175°C). Place the tacos on a baking sheet for about 10-15 minutes. You can also use a skillet. Heat it on medium-low and add the tacos. Cook for about 3-5 minutes on each side. This method helps keep them crispy. If you're in a hurry, the microwave is easy too. Just place them on a microwave-safe plate. Heat in 30-second bursts until warm. After reheating, check the quality. Ensure the chicken is hot and the cheese is melted. Enjoy your tasty tacos just like the first time! Honey BBQ Chicken Tacos can last about 3 to 4 days in the fridge. To keep them fresh, store them in an airtight container. Always check for signs of spoilage. If the chicken looks off or smells strange, it's best to throw it away. Yes, you can make these tacos ahead. Prepare the chicken mixture and store it in the fridge. Warm it up when you're ready to eat. You can also pre-chop the veggies and keep them separate. This helps the tacos taste fresh when you assemble them. If you want a gluten-free option, use corn tortillas. For a low-carb choice, try using lettuce wraps. They add a nice crunch and keep the meal light. You can also use whole grain tortillas for a healthier twist. In this article, we explored the tasty world of Honey BBQ Chicken Tacos. We covered key ingredients like cooked chicken, honey, spices, and tortillas. We discussed step-by-step methods to prepare and cook the chicken, assemble the tacos, and serve them up. We also shared tips to enhance flavors and suggest fun variations. Remember, you can customize every part, from proteins to toppings. Enjoy these delicious tacos with your family and friends. Happy cooking!
    Honey BBQ Chicken Tacos Flavorful and Easy Dinner
  • - 8 oz (225g) whole wheat spaghetti - 2 tablespoons olive oil - 3 cloves garlic, minced - 1 small onion, diced - 4 cups fresh spinach, roughly chopped - 1 can (14 oz) diced tomatoes, drained - 1 teaspoon dried basil - 1 teaspoon dried oregano - Salt and pepper to taste - 1/4 teaspoon red pepper flakes (optional for heat) - 1/2 cup grated Parmesan cheese (or a plant-based alternative) - Fresh basil leaves for garnish - 1/2 teaspoon lemon zest for brightness - 1/4 cup sliced black olives for a salty kick - A handful of pine nuts for crunch - A splash of balsamic vinegar for depth This dish is packed with nutrients. Whole wheat spaghetti provides fiber and energy. Spinach is rich in iron and vitamins A and C. Tomatoes offer antioxidants, beneficial for heart health. Olive oil adds healthy fats. Here’s a quick look at the nutrition per serving (about 1 cup): - Calories: 350 - Protein: 12g - Carbohydrates: 50g - Fat: 12g - Fiber: 7g - Sugars: 5g This meal is not just tasty; it also supports a balanced diet. Enjoy the health benefits while relishing the rich flavors! {{ingredient_image_1}} First, boil a large pot of salted water. Add 8 oz of whole wheat spaghetti. Cook it until al dente, following the package instructions. This usually takes about 8 to 10 minutes. After cooking, reserve 1/2 cup of the pasta water. Drain the spaghetti and set it aside for later. Next, heat 2 tablespoons of olive oil in a large skillet over medium heat. Once the oil is hot, add 1 small diced onion. Sauté it until soft and see-through, which takes about 4 to 5 minutes. After that, mix in 3 cloves of minced garlic. Cook for another 1 to 2 minutes. Watch closely so it doesn’t burn. Now, add 4 cups of roughly chopped fresh spinach. Stir it until wilted, which should take about 2 to 3 minutes. Once the spinach is wilted, it's time to add more flavor. Stir in 1 can of drained diced tomatoes, 1 teaspoon each of dried basil and dried oregano, and some salt and pepper to taste. If you like heat, add 1/4 teaspoon of red pepper flakes. Let this mixture simmer for about 5 to 7 minutes. This helps the flavors blend. Next, add the drained spaghetti to the skillet. Toss everything together well. If it feels too dry, slowly add some of the reserved pasta water until it reaches the right consistency. Finally, mix in 1/2 cup of grated Parmesan cheese. Stir until it melts throughout the dish. Taste and adjust seasoning if needed. Serve hot, garnished with fresh basil leaves and extra cheese if you like. Enjoy your healthy and flavorful spinach tomato pasta! To enhance the taste of your spinach tomato pasta, use fresh ingredients. Fresh spinach brings a vibrant taste. Fresh tomatoes can add sweetness and depth. Use good quality olive oil for a rich flavor. Don’t skip the garlic; it adds a lovely aroma. Dried herbs like basil and oregano boost the taste. For more depth, try adding a splash of balsamic vinegar. If you like heat, add more red pepper flakes. Start with a small amount and taste as you go. You can also use fresh chili for a different flavor. For milder flavors, skip the red pepper flakes. Balance spicy with a sprinkle of sugar if needed. Always taste your dish before serving to get it just right. Whole wheat spaghetti is my go-to for this dish. It adds fiber and a nutty flavor. You can also use gluten-free pasta if you prefer. Cook the pasta until al dente for the best texture. Reserve some pasta water to adjust the sauce later. This water helps bind the sauce to the pasta. Remember, the right pasta can make a big difference! Pro Tips Choose Fresh Ingredients: Using fresh spinach and high-quality tomatoes will elevate the flavor of this dish significantly. Adjust the Spice Level: If you enjoy a bit of heat, feel free to increase the amount of red pepper flakes or even add a pinch of cayenne pepper. Don’t Skip the Pasta Water: The reserved pasta water is starchy and helps to create a silky sauce that clings to the spaghetti. Experiment with Herbs: Fresh herbs like basil or parsley can be added at the end for an extra burst of flavor and freshness. {{image_2}} You can boost the nutrition of your Spinach Tomato Pasta by adding proteins. Chicken breast, shrimp, or ground turkey all work well. Cook the protein in the skillet before adding the vegetables. For a plant-based option, try chickpeas or lentils. They add protein and fiber to the dish. While the base recipe is delicious, you can switch up the sauce. A creamy white sauce can create a rich flavor. Alternatively, a pesto sauce gives a fresh twist. You can even blend the tomatoes with basil for a smooth sauce. Explore different flavors to keep your meals exciting! Making this dish vegetarian or vegan is easy. For the cheese, try a plant-based alternative. Nutritional yeast can also give a cheesy flavor without dairy. If you want more veggies, add bell peppers or zucchini. They add color and nutrients while keeping the dish light and tasty. After making your spinach tomato pasta, let it cool. Place leftovers in an airtight container. This keeps it fresh for up to three days. Always label the container with the date to track freshness. When you're ready to eat, just grab it from the fridge. To reheat, use a skillet over medium heat. Add a splash of water or olive oil to keep it moist. Stir frequently until it's hot all the way through. You can also use a microwave. Heat it in short bursts of 30 seconds, stirring in between. Check if it’s hot enough before serving. If you want to save some for later, freezing works great. Place the cooled pasta in a freezer-safe bag or container. Remove as much air as possible before sealing. This helps prevent freezer burn. You can freeze it for up to three months. When you're ready to eat, thaw it in the fridge overnight before reheating. Yes, you can use fresh tomatoes. Choose ripe tomatoes for great flavor. Chop about 2-3 medium tomatoes. Cook them down for 8-10 minutes. This will help them break down and blend well with the pasta. Fresh tomatoes give a nice, bright taste to the dish. You may need a bit more salt since fresh tomatoes can be less salty than canned ones. Spinach tomato pasta pairs well with many sides. Here are some great options: - Garlic bread for a crunchy treat. - A simple green salad with a light dressing. - Roasted vegetables for extra color and flavor. - Grilled chicken or shrimp for added protein. These sides enhance your meal and make it more filling. To make this dish gluten-free, swap the whole wheat spaghetti for gluten-free pasta. There are many options like brown rice or quinoa pasta. Cook them according to package instructions. Check the labels to ensure they fit your dietary needs. You can enjoy the same great taste without the gluten! This blog post covered all key areas for making delicious spinach tomato pasta. You learned about ingredients, prep steps, and tips to boost flavor. We also explored variations and storage methods to keep your dish fresh. Remember, cooking is about being creative. Don’t hesitate to try new ingredients and adjustments to suit your taste. Enjoy your pasta journey!
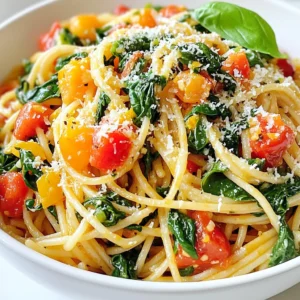
    Spinach Tomato Pasta Healthy and Flavorful Dish
  • When making Chicken Broccoli Casserole, you need simple and fresh ingredients. Each one plays a key role in the dish's flavor and texture. Here’s what you will need: - 2 cups cooked chicken, shredded - 2 cups broccoli florets (fresh or frozen) - 1 cup cooked quinoa (or rice) - 1 cup shredded cheddar cheese - 1 cup cream of mushroom soup (or homemade equivalent) - ½ cup Greek yogurt - 1 teaspoon garlic powder - 1 teaspoon onion powder - ½ teaspoon black pepper - ½ teaspoon salt - ½ teaspoon paprika - ½ cup breadcrumbs (optional for topping) - 2 tablespoons olive oil These ingredients come together to create a warm, cheesy, and satisfying meal. The chicken adds protein, while the broccoli gives vitamins and color. Quinoa or rice makes it filling, and the cheese binds it all in a creamy mix. You can use frozen broccoli for ease, or fresh for a crunchier bite. The cream of mushroom soup adds depth, and Greek yogurt keeps it moist. Garlic and onion powders boost the flavor without extra work. Seasoning with salt, pepper, and paprika gives it a nice kick. If you want a crunchy topping, add breadcrumbs mixed with olive oil. This combination makes for a cozy meal that everyone will love. {{ingredient_image_1}} First, set your oven to 350°F (175°C). This heat makes the casserole cook just right. If you have fresh broccoli, steam the florets in boiling water. Do this for 2-3 minutes. You want them a bit tender but not mushy. Drain the broccoli. If you use frozen broccoli, just microwave it until it thaws. In a big bowl, add the cooked chicken, steamed broccoli, and cooked quinoa. Next, toss in the shredded cheddar cheese, cream of mushroom soup, and Greek yogurt. Sprinkle in the garlic powder, onion powder, black pepper, salt, and paprika. Mix everything well. You want each bite to have all the flavors. Take a 9x13 inch casserole dish and lightly grease it with olive oil. Pour your mixed ingredients into this dish. Spread it out evenly so it cooks well. For a crunchy top, you can add breadcrumbs. Mix them with a bit of olive oil, then sprinkle them over the casserole. This makes a nice texture contrast. Now, put the casserole in your preheated oven. Bake it for 25-30 minutes. You want the cheese to be bubbly and golden brown. When the casserole is done, let it cool for about 5 minutes. This helps prevent burns. Then, serve it warm and enjoy every bite! To get the best texture in your casserole, cook the chicken well. Shredded chicken should be moist, not dry. Use fresh broccoli for crunch. If you choose frozen, don’t overcook it. Steaming fresh broccoli lightly keeps it tender. Bake until the cheese is bubbly and golden. This creates a nice crust on top. You can swap ingredients based on what you have. Use cooked rice instead of quinoa if needed. Cream of mushroom soup can be replaced with cream of chicken soup. Greek yogurt can be changed to sour cream for a different taste. If you want more flavor, try adding some fresh herbs like thyme or parsley. You can prepare this casserole in advance. Mix all the ingredients and put them in the dish. Cover it well and store it in the fridge for up to 24 hours. When you’re ready, just pop it in the oven. This saves time on busy days and makes dinner easy. Pro Tips Use Rotisserie Chicken: For a quicker prep, consider using store-bought rotisserie chicken. It saves time and adds flavor! Experiment with Cheese: While cheddar is delicious, feel free to mix in other cheeses like mozzarella or gouda for a unique flavor profile. Add More Veggies: Enhance the nutritional value by adding other vegetables like bell peppers, carrots, or spinach to the mix. Make it Ahead: Prepare the casserole in advance and store it in the fridge. Just bake it when you're ready to serve! {{image_2}} You can make this dish meat-free. Replace the chicken with more veggies. Try using mushrooms, bell peppers, or zucchini. You can also add chickpeas for protein. This mix will keep the dish filling and tasty. Use vegetable broth instead of chicken broth for added flavor. If you need a gluten-free meal, swap the breadcrumbs. Use gluten-free breadcrumbs or skip them entirely. Make sure the cream of mushroom soup is gluten-free too. You can find many brands that offer this option. Quinoa is naturally gluten-free, so you’re already on the right path. Cheddar cheese is a favorite, but you can change that. Try mozzarella for a stretchier texture. For a bolder taste, use pepper jack or gouda. You can even mix different cheeses to get a unique flavor. Just make sure to keep the cheese amount the same for the right creaminess. After you enjoy your Chicken Broccoli Casserole, store any leftovers. Place them in an airtight container. This helps keep the dish fresh. You can store it in the fridge for up to three days. If you want to keep it longer, freezing is a good idea. To freeze the casserole, let it cool first. Then, cut it into portions. Wrap each portion in plastic wrap. Place the wrapped portions into a freezer bag. Remove as much air as you can. Label the bag with the date. You can freeze it for up to three months. When you’re ready to eat, thaw it in the fridge overnight. To reheat, you have a couple of options. You can use the microwave or the oven. For the microwave, place a portion on a safe plate. Heat it for one to two minutes or until hot. Stir halfway through for even heating. If using the oven, preheat it to 350°F (175°C). Place the casserole in a baking dish, cover with foil, and heat for about 15-20 minutes. This keeps it moist while warming. Enjoy your meal again! You should not use raw chicken. Raw chicken needs to cook fully for safety. Using cooked chicken makes this dish quick and easy. You can use leftover chicken or rotisserie chicken. You can store the casserole in the fridge for up to three days. Make sure to cover it well. If you want to keep it longer, freeze it. It can stay frozen for up to three months. This casserole pairs well with a simple salad or garlic bread. You might also enjoy it with steamed rice or quinoa. These sides complement the rich flavors of the dish. Yes, you can make this casserole in advance. Prepare the dish and cover it. Store it in the fridge for up to 24 hours before baking. When you're ready, just pop it in the oven! This blog covered a simple yet tasty chicken broccoli casserole. You learned about the necessary ingredients, step-by-step instructions, and tips for the best results. I shared ways to customize the dish and how to store it properly. With these insights, you can whip up a delicious meal that suits your taste. I hope you feel ready to create this casserole, impressing friends and family with your skills. Enjoy every bite!
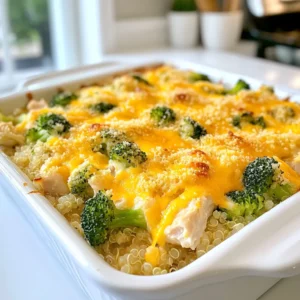
    Chicken Broccoli Casserole Simple and Comforting Meal
  • - 2 lbs chicken wings To start, you need fresh chicken wings. Look for wings that are plump and juicy. They should be cleaned and dry. Patting them dry helps make them crispy. - 1 tablespoon olive oil - 1 teaspoon garlic powder - 1 teaspoon onion powder - ½ teaspoon black pepper - ½ teaspoon salt - ½ teaspoon paprika Next, gather your seasonings. Olive oil helps the spices stick. Garlic and onion powders add rich flavor. Black pepper, salt, and paprika bring warmth and balance. Mix these together to coat the wings evenly. - 1 cup grated Parmesan cheese - ¼ cup fresh parsley, chopped - Zest of 1 lemon - Optional: red pepper flakes for heat Finally, for the garlic Parmesan coating, you need Parmesan cheese. It adds a cheesy crunch. Fresh parsley gives a pop of color and flavor. Lemon zest brightens the dish. If you like heat, add red pepper flakes. This mix makes the wings truly special. {{ingredient_image_1}} To start, you need to dry the chicken wings well. Use paper towels to pat them dry. This step helps them get crispy in the air fryer. Make sure they are as dry as possible. If they have moisture, they won't crisp up as you want. Next, you will marinate the wings. In a big bowl, combine the wings with olive oil, garlic powder, onion powder, black pepper, salt, and paprika. Mix everything well so that all the wings are coated. Let them sit for at least 30 minutes. For a stronger taste, you can refrigerate them for up to 2 hours. Now, it’s time to air fry. Preheat your air fryer to 380°F (193°C) for about five minutes. Place the marinated wings in the basket in a single layer. If you have many wings, cook them in batches. Cook for 25-30 minutes, shaking the basket halfway through. The wings should turn golden brown and crispy. While the wings cook, prepare the garlic Parmesan coating. In a bowl, mix together grated Parmesan cheese, chopped parsley, and lemon zest. This mix adds a fresh and cheesy flavor to your wings. When the wings are done, carefully transfer them to a large bowl. Toss them in the Parmesan mixture until they are well coated. Serve the wings right away for the best crispiness. You can add extra parsley and red pepper flakes if you want a bit of heat. Enjoy! To get the best crispiness for your wings, start by drying them well. Use paper towels to pat the wings dry. This helps reduce moisture. Less moisture means more crunch. Preheating your air fryer is also key. Set it to 380°F (193°C) for five minutes. Cook the wings in a single layer. If you stack them, they won’t crisp as well. Shake the basket halfway through cooking. This helps them cook evenly. Marinating is important for flavor. I suggest marinating the wings for at least 30 minutes. You can also let them sit in the fridge for up to 2 hours. The longer you marinate, the richer the taste. Just don’t go over two hours. The salt can make the meat tough if left too long. Using fresh ingredients can really boost flavor. Fresh parsley adds a bright touch. It makes your wings look great too. If you use dried herbs, they still work well. Just use less, as dried herbs are stronger. Fresh garlic is also a great choice if you have it. It gives a strong, fresh flavor. Consider your taste and what you have on hand when choosing. Pro Tips Dry Wings for Extra Crispiness: Make sure to pat the chicken wings dry with paper towels before marinating. Removing excess moisture helps achieve that perfect crispy texture. Let Them Marinate: For the best flavor, let the wings marinate for at least 30 minutes. If you have time, refrigerating them for up to 2 hours intensifies the flavors even more. Shake for Even Cooking: When air frying, shake the basket halfway through the cooking time. This ensures that all sides of the wings get evenly cooked and crispy. Serve Immediately: For maximum crispiness, serve the wings right after tossing them with the Parmesan mixture. This way, they retain their crunch and flavor. {{image_2}} If you like heat, add red pepper flakes to the marinade. Start with 1 teaspoon and adjust to your taste. This spice kicks up the flavor. The crispy wings will have a nice kick that pairs well with the garlic and cheese. You can also use hot sauce in the marinade for more heat. For a different touch, toss the wings in a spicy sauce after air frying. For a fresh twist, mix in herbs. Use 1 tablespoon of dried herbs like oregano or thyme. You can also use fresh herbs like rosemary or basil. Add them to the marinade with the other seasonings. This adds a bright flavor that balances the richness of the Parmesan. The aroma will fill your kitchen as they cook, making your meal feel special. While Parmesan is classic, you can try other cheeses. Grated Pecorino Romano adds a nice salty touch. For a creamier taste, try using Asiago cheese. Mix different cheeses for a unique flavor profile. Just remember to keep the cheese finely grated for better coating. Each cheese brings a new taste, so feel free to experiment and find your favorite. You can store leftover wings in the fridge. Place them in an airtight container. They stay fresh for up to 3 days. Make sure they cool down before storing. This keeps them crispy for your next meal. Want to save wings for later? You can freeze them too! Let the wings cool completely. Then, place them in a freezer bag. Squeeze out as much air as you can. Label the bag with the date. They can last up to 3 months in the freezer. Reheat wings for the best taste. Use your air fryer to keep them crispy. Preheat the air fryer to 375°F (190°C). Cook the wings for about 8-10 minutes. Check them halfway to shake the basket. This method works great and keeps the wings delicious! Cook chicken wings in the air fryer for 25 to 30 minutes. This time allows the wings to become golden brown and crispy. Remember to shake the basket halfway through cooking. This step helps them fry evenly. Yes, you can use frozen chicken wings. However, you need to cook them longer. Add about 5 to 10 extra minutes to the cooking time. Ensure they reach an internal temperature of 165°F (74°C). This ensures they are safe to eat. Garlic parmesan wings pair well with many sides. Consider serving them with: - Celery sticks - Carrot sticks - Ranch dressing - Blue cheese dressing - Fresh salad These sides add crunch and coolness to balance the rich flavors of the wings. In this post, we explored the tasty world of garlic Parmesan chicken wings. We broke down ingredients, from the wings to the perfect coating. I shared step-by-step instructions to help you create crisp wings every time. You learned tips for added flavor and great texture, plus fun variations to try. Don't forget about storage options to keep leftovers fresh. Enjoy making these wings, and have fun experimenting with your own twists! Your kitchen will be the place to be for delicious meals.
    Air Fryer Garlic Parmesan Wings Crispy and Flavorful
  • To make these Candy Cane Chocolate Chip Cookies, you need some key items: - 1 cup unsalted butter, softened - 1 cup brown sugar, packed - 1/2 cup granulated sugar - 2 large eggs - 2 teaspoons vanilla extract - 3 cups all-purpose flour - 1 teaspoon baking soda - 1/2 teaspoon salt - 1 cup semi-sweet chocolate chips - 1/2 cup crushed candy canes (about 3-4 candy canes) These ingredients create a perfect balance of flavor and texture. If you want to add more taste, consider these options: - Additional crushed candy canes for topping - A pinch of cinnamon for warmth - A splash of peppermint extract for extra minty flavor These additions can give your cookies a festive twist. You might not have every ingredient on hand. Here are some swaps: - Use coconut oil instead of butter for a dairy-free option. - Swap brown sugar with coconut sugar for a less processed choice. - Try using almond flour for a gluten-free version, but adjust the amount since it absorbs more liquid. These substitutions help you make these cookies fit your dietary needs or preferences. {{ingredient_image_1}} Start by preheating your oven to 350°F (175°C). This ensures even baking. Next, line two baking sheets with parchment paper. This helps cookies not stick to the sheets. You can also use silicone mats if you have them. Both options make clean-up easy. In a large mixing bowl, add 1 cup of softened unsalted butter. Add 1 cup of brown sugar and 1/2 cup of granulated sugar. Use a mixer to cream these ingredients together. Mix until it becomes light and fluffy. This takes about 2-3 minutes. Now, beat in 2 large eggs one at a time. Make sure to mix well after each egg. Finally, add 2 teaspoons of vanilla extract. This gives the cookies a nice flavor. In a separate bowl, whisk together 3 cups of all-purpose flour, 1 teaspoon of baking soda, and 1/2 teaspoon of salt. This step ensures that the baking soda and salt are evenly mixed. It helps the cookies rise and taste good. It's important to measure your flour correctly. Too much can make the cookies dry. Now, gradually add the dry mixture to the wet ingredients. Mix until just combined. Do not over-mix; this keeps the cookies soft. Next, fold in 1 cup of semi-sweet chocolate chips and 1/2 cup of crushed candy canes. Make sure they are evenly distributed in the dough. Using a cookie scoop or a tablespoon, drop rounded balls of dough onto the prepared baking sheets. Space them about 2 inches apart. If you want, sprinkle more crushed candy canes on top for a fun touch. Place the sheets in the preheated oven. Bake for 10-12 minutes. Look for edges that are lightly golden and centers that are set. When they are done, remove the cookies from the oven. Let them cool on the baking sheets for about 5 minutes. Then, transfer them to wire racks to cool completely. This helps them stay soft and chewy. Enjoy your delicious Candy Cane Chocolate Chip Cookies! To get soft and chewy cookies, use room-temperature butter. Softened butter blends well with sugars, creating a fluffy base. Mix until light and airy. This step is key. Don’t overmix when adding flour. Stop as soon as you see no dry flour. This helps keep the cookies soft. Bake just until the edges turn golden. Let them cool on the sheets for a few minutes. This helps them finish baking gently. Using the right tools makes a big difference. Here are some I recommend: - Mixing bowls: A large bowl for wet and a smaller one for dry ingredients. - Electric mixer: This speeds up mixing and makes it easier to cream butter and sugars. - Cookie scoop: It helps you make uniform cookie sizes. This ensures even baking. - Parchment paper: Line your baking sheets with this to prevent sticking. - Cooling racks: These allow air to circulate around cookies, helping them cool evenly. You can boost flavor with fun toppings. Here are some ideas: - Extra crushed candy canes: Sprinkle these on top before baking for a crunchy finish. - Sea salt: A pinch of sea salt adds a nice contrast to the sweetness. - Chocolate drizzle: Melt some chocolate and drizzle it over cooled cookies for a treat. - Nuts: Chopped nuts like walnuts or pecans can add a nice crunch and flavor. These tips will help you create the best Candy Cane Chocolate Chip Cookies. Enjoy the process and the delicious results! Pro Tips Chill the Dough: For thicker cookies, chill the dough in the refrigerator for at least 30 minutes before baking. This helps prevent spreading and results in a chewier texture. Use High-Quality Chocolate: Using premium semi-sweet chocolate chips will enhance the flavor of your cookies. Look for brands with high cocoa content for the best results. Fresh Candy Canes: Crush fresh candy canes for a more vibrant flavor and color. Stale candy canes may lose their crunch and taste. Don't Overbake: Keep an eye on your cookies while they bake. Remove them from the oven when the edges are golden but the centers are still slightly soft for a perfect chewy texture. {{image_2}} You can switch up the flavors in these cookies. Try adding peppermint extract for more minty taste. You might also use white chocolate chips instead of semi-sweet. If you want a fruity twist, add dried cranberries or cherries. These simple changes can make your cookies fun and new! For gluten-free cookies, substitute all-purpose flour with a gluten-free blend. Make sure it has a good binding agent. If you want vegan cookies, use plant-based butter and flax eggs instead of regular eggs. Mix one tablespoon of flaxseed meal with three tablespoons of water to make one egg. These swaps let everyone enjoy the cookies! Presentation adds joy to any treat. Stack the cookies in a clear jar for a pretty display. You can also place them on a festive platter, topped with extra crushed candy canes. Tie a ribbon around the jar or platter for a lovely touch. This makes your cookies a perfect gift or party treat! To keep your candy cane chocolate chip cookies fresh, use an airtight container. Layer parchment paper between cookies to prevent sticking. Store them at room temperature. They will stay soft and tasty for several days this way. Freezing cookie dough is easy and smart. First, scoop the dough into balls. Place them on a baking sheet lined with parchment paper. Freeze the balls until solid, then transfer them to a freezer bag. Label the bag with the date. This way, you can bake fresh cookies anytime. Baked cookies can last up to a week when stored properly. If you keep them in an airtight container, they stay soft and chewy. For longer storage, you can freeze baked cookies for up to three months. Just thaw them at room temperature before enjoying. To cut the sweetness, you can reduce the sugar. Use 3/4 cup brown sugar and 1/4 cup granulated sugar. You might also try dark chocolate chips. They have less sugar than semi-sweet. Another option is to add a pinch of salt. This helps balance the flavors. Yes, you can use white chocolate chips! They will make the cookies taste sweeter. The candy canes already add a lot of sweetness. So, you may want to reduce the sugar. This change can create a fun twist on the classic recipe. Chilling the dough is not required, but it helps. If you chill it for 30 minutes, the cookies can spread less. The flavors will also deepen. If you're in a hurry, you can skip this step. Just remember to keep an eye on baking time. Leftover crushed candy canes are great for many things! You can sprinkle them on hot chocolate or ice cream. They also make a nice topping for cupcakes and cakes. If you have extra, store them in an airtight container. They will last for weeks! To sum up, we explored essential and optional ingredients for your cookies. You learned detailed steps to mix and bake them. I shared tips for perfect texture and fun variations. You now know how to store cookies properly and answered common questions. Making cookies is simple and fun. Enjoy your baking and impress others with tasty results!
    Delicious Candy Cane Chocolate Chip Cookies Recipe
  • - 12 ounces cheese tortellini - 1 cup cherry tomatoes, halved - 1 cup cucumber, diced - 1 bell pepper (red or yellow), diced - 1/2 red onion, finely chopped - 1/2 cup black olives, sliced - 1/2 cup mozzarella balls, halved - 1/4 cup fresh basil, chopped You need the right ingredients for a great Italian tortellini pasta salad. Start with cheese tortellini. It adds a rich, creamy taste. Then, gather fresh, colorful veggies. Cherry tomatoes give a sweet burst. Cucumbers add crunch. Bell peppers bring color and flavor. Don’t forget the red onion for a sharp bite. Black olives add a salty touch. Finally, mozzarella balls provide a soft, chewy texture. Fresh basil adds a nice herbal note. - 1/4 cup olive oil - 2 tablespoons balsamic vinegar The dressing is simple but full of flavor. Use high-quality olive oil for richness. Balsamic vinegar adds acidity and sweetness. This mix elevates the salad and ties it all together. - 1 teaspoon dried oregano - Salt and pepper to taste Seasoning is key to making the flavors pop. Dried oregano gives a classic Italian taste. Salt and pepper are essential for overall flavor balance. Adjust these to your liking to make every bite delicious. {{ingredient_image_1}} Start by bringing a large pot of salted water to a boil. The salt helps flavor the pasta. Once the water is boiling, add 12 ounces of cheese tortellini. Cook them for about 4 to 5 minutes. You want them to be al dente, which means they should be firm but cooked. After they are done, drain the tortellini and rinse them under cold water. This stops the cooking and cools them down. In a large mixing bowl, combine the cooked tortellini with other fresh ingredients. Add 1 cup of halved cherry tomatoes, 1 cup of diced cucumber, and 1 diced bell pepper. You can use red or yellow for a pop of color. Next, add 1/2 cup of finely chopped red onion, 1/2 cup of sliced black olives, and 1/2 cup of halved mozzarella balls. Finally, toss in 1/4 cup of chopped fresh basil for a burst of flavor. Mix everything gently so it combines well. In a small bowl, whisk together the dressing ingredients. Start with 1/4 cup of olive oil and 2 tablespoons of balsamic vinegar. Then, add 1 teaspoon of dried oregano, along with salt and pepper to taste. Whisk until the mixture is well combined. This dressing will bring all the flavors together. Pour the dressing over the salad mixture. Toss everything gently until all the ingredients are coated with the dressing. This helps each bite burst with flavor. Cover the salad and place it in the refrigerator for at least 30 minutes. This waiting time allows the flavors to meld. You can serve it chilled or at room temperature. Enjoy your fresh and flavorful Italian tortellini pasta salad! To make great tortellini, cook it just right. For an al dente texture, boil it for 4 to 5 minutes. Check the package for the exact time. If you cook it too long, it may become mushy. After cooking, drain and rinse it with cold water. This stops the cooking and keeps it firm. You can add more flavor to your salad. Try adding grated parmesan cheese for a rich taste. Garlic can also boost the flavor. Just a little minced garlic goes a long way. Feel free to add your favorite herbs too. Fresh parsley or basil will brighten the dish. A beautiful salad is always more inviting. Serve your tortellini salad in a large bowl. Garnish it with extra basil leaves on top. You can drizzle a bit of balsamic vinegar for a nice look. Use colorful plates to make the dish pop. A sprinkle of black olives adds contrast and charm. Pro Tips Fresh Ingredients: Use the freshest vegetables you can find for the best flavor and texture in your salad. Make Ahead: Prepare the salad a few hours in advance or the night before to allow the flavors to develop. Customizable: Feel free to swap out the vegetables or add proteins like grilled chicken or salami for a heartier dish. Serving Size: This salad serves well as a side dish or main course, adjust the serving sizes accordingly based on your meal. {{image_2}} You can make your Italian Tortellini Pasta Salad even more colorful and healthy by adding more vegetables. Try mixing in some spinach or arugula for a fresh bite. You can also choose zucchini or bell peppers for a crunchy texture. If you want protein, consider adding chickpeas or black beans. They add fiber and help make the dish more filling. If you want to add more protein, think about using chicken, shrimp, or even tofu. Grilled chicken adds great flavor. Shrimp can offer a nice twist, bringing a seafood element to your salad. For a plant-based option, try cubed tofu. Marinate it in soy sauce for extra taste before adding it to your salad. The dressing can change the whole vibe of your salad. A simple vinaigrette made with olive oil, lemon juice, and herbs is light and zesty. For a creamier texture, try a ranch or Caesar dressing. You can even mix yogurt with herbs for a tangy twist. Experimenting with different dressings can lead to exciting new flavors. To keep your Italian Tortellini Pasta Salad fresh, store it in an airtight container. This helps prevent the salad from drying out. Place the container in the fridge as soon as you finish serving. Make sure to keep the dressing separate if you plan to store leftovers. This way, the salad stays crunchy. This salad is best served cold, so you don't need to reheat it. If you have leftovers, just take them out of the fridge. Toss the salad lightly to mix everything again. You can add a splash of olive oil or vinegar for extra flavor if needed. The salad lasts about 3 to 5 days in the fridge. After that, the ingredients may start to lose their taste and texture. If you see any signs of spoilage, like a strange smell or slimy veggies, it’s best to throw it away. Enjoy your delicious salad while it is fresh! Tortellini is a small pasta, often stuffed with cheese. The dough is made from flour and eggs. You can find different types, like cheese, meat, or even spinach. Each type adds a unique taste and texture to your dish. Yes, you can make this salad ahead of time. It tastes better after resting in the fridge. To prep in advance, cook the tortellini and chop the veggies. Mix them, but wait to add the dressing. This keeps everything fresh. Cover the salad and store it in the fridge. Just add the dressing just before serving. No, regular tortellini is not gluten-free. However, you can find gluten-free tortellini made from rice or corn. This way, you can enjoy the salad without gluten. Just check the package for gluten-free labels when you shop. This pasta salad combines cheese tortellini and fresh vegetables for a tasty dish. We covered the key ingredients, dressing components, and seasoning to boost flavor. I shared steps to cook and mix everything perfectly. You have useful tips for cooking and serving. You can also make variations that fit your taste. Remember, store it right to keep it fresh! Whether you serve it right away or save some for later, enjoy this quick and easy salad. It’s a fun way to eat well!
    Italian Tortellini Pasta Salad Fresh and Flavorful Dish
  • - 1 cup unsalted butter, melted - 1 cup brown sugar, packed - 1/2 cup granulated sugar - 2 large eggs - 2 teaspoons vanilla extract - 2 cups all-purpose flour - 1 teaspoon baking powder - 1/2 teaspoon baking soda - 1/2 teaspoon salt - 2 teaspoons cinnamon - 1/4 cup granulated sugar (for topping) - 1 tablespoon ground cinnamon (for topping) When you gather the ingredients for cinnamon sugar blondies, each one plays a key role. The melted butter adds richness and moisture. Brown sugar gives that deep, caramel flavor. Granulated sugar balances sweetness and helps the blondies rise. The eggs bind the mix and add structure. Vanilla extract gives a warm aroma that pairs well with cinnamon. All-purpose flour creates the base, while baking powder and baking soda help them rise just right. Salt is essential. It enhances the flavors and balances sweetness. Finally, cinnamon is the star. It adds warmth and a cozy touch. The topping of cinnamon sugar adds a sweet crunch that you will love. Each ingredient matters. Together, they create a treat that is easy and delicious. Enjoy the simple joy of baking these blondies at home! {{ingredient_image_1}} 1. First, preheat your oven to 350°F (175°C). This step is key for even baking. 2. Next, grease a 9x13-inch baking pan. You can also line it with parchment paper. 3. In a large bowl, combine 1 cup of melted butter, 1 cup of brown sugar, and 1/2 cup of granulated sugar. Stir until it's smooth and well-mixed. 4. Now, add 2 large eggs, one at a time. Mix well after each egg. Then, stir in 2 teaspoons of vanilla extract. 1. In another bowl, whisk together 2 cups of all-purpose flour, 1 teaspoon of baking powder, 1/2 teaspoon of baking soda, 1/2 teaspoon of salt, and 2 teaspoons of cinnamon. This blend gives great flavor. 1. Gradually add the dry ingredients to the wet mixture. Stir gently until just combined. Be careful not to over-mix; it can make the blondies dense. 2. Pour the batter into the prepared pan. Use a spatula to spread it evenly. 3. In a small bowl, mix 1/4 cup of granulated sugar with 1 tablespoon of ground cinnamon. Sprinkle this topping evenly over the batter. 1. Bake in the preheated oven for 20-25 minutes. To check if they are done, insert a toothpick into the center. It should come out clean. 2. Let the blondies cool in the pan for about 10 minutes. Then, move them to a wire rack to cool completely. To achieve the right texture, you want your blondies soft and chewy. Start by melting the butter. This gives them a rich flavor. Mix the butter with both sugars until smooth. This step is key for good blending. When you add eggs, do it one at a time. Mix well after each addition. This helps create a nice, fluffy batter. Be gentle when mixing in the dry ingredients. Stir until just combined. Over-mixing can make them tough. To slice and present your blondies, let them cool a bit first. Cut them into squares. Use a sharp knife for clean edges. Place them on a pretty plate for a nice touch. For extra flair, sprinkle some powdered sugar or cinnamon on top. You can also add toppings like nuts or chocolate chips. They bring extra texture and flavor. Serve warm with ice cream for a yummy treat. To keep blondies fresh, store them in an airtight container. This helps keep them soft. You can also place parchment paper between layers to avoid sticking. Blondies stay good for about a week at room temperature. For longer storage, you can freeze them. Wrap each blondie tightly in plastic wrap. Then place them in a freezer bag. They can last up to three months this way. Just thaw them at room temperature when you’re ready to enjoy! Pro Tips Butter Temperature: Make sure the melted butter has cooled slightly before mixing it with the sugars to prevent the eggs from scrambling. Mixing Technique: When combining the wet and dry ingredients, mix gently to maintain the blondies' soft and chewy texture. Baking Time: Check your blondies a few minutes before the suggested baking time, as ovens can vary, and you want them just set in the middle. Storage Tips: Store the blondies in an airtight container at room temperature to keep them fresh for up to a week. {{image_2}} You can make your cinnamon sugar blondies unique by adding chocolate chips or nuts. Chocolate chips bring a rich taste. I love using semi-sweet or dark chocolate for a nice contrast. Chopped nuts like pecans or walnuts add crunch. Simply fold them into the batter before pouring it into the pan. You can also switch up the spices. Instead of just cinnamon, try nutmeg or allspice for a warm flavor. Cardamom adds a floral note that pairs well with sweet treats. Mix and match to find what you love best. If you need a gluten-free option, use a gluten-free flour blend. Many brands work well in baking. Just make sure to follow the package instructions for best results. For those watching sugar intake, consider using sugar substitutes like stevia or monk fruit. These sweeteners can keep the blondies tasty without the extra calories. You may need to adjust the amount, so check the conversion ratio. For fall-inspired blondies, add pumpkin puree along with the spices. This gives a moist texture and a lovely autumn flavor. You could even stir in some chopped apples for added sweetness. During the holidays, think about using ginger or cloves. These spices can create a festive vibe. You could also top the blondies with a drizzle of icing made from powdered sugar and milk for a special treat. How do I know when blondies are done baking? Blondies are done when a toothpick comes out clean. Check them around 20 minutes. If it has wet batter, bake a bit longer. The edges will look set, but the center might still be soft. That’s perfect! Can I freeze blondies for later? Yes, you can freeze blondies. Once they cool, cut them into squares. Wrap each piece in plastic wrap and place them in a freezer bag. They can last up to three months. Just thaw them at room temperature when you’re ready to enjoy! What are the differences between blondies and brownies? Blondies are lighter and sweeter than brownies. They use brown sugar, which gives them a rich flavor. Brownies usually have cocoa powder or melted chocolate. This makes them darker and more fudgy. Both are delicious, but they offer different taste experiences. Can I use margarine instead of butter? You can use margarine, but it can change the taste. Butter adds a rich flavor that margarine may not match. If you’re out of butter, margarine works in a pinch. Just ensure it’s unsalted to keep the flavor balanced. What if I don’t have brown sugar? If you don’t have brown sugar, you can make your own. Mix one cup of granulated sugar with one tablespoon of molasses. This will mimic brown sugar’s taste and moisture. You can also use regular sugar, but the blondies will be less rich. How many servings does this recipe make? This recipe makes about 12 servings. You can cut the blondies into squares, making them easy to share. Each piece is a perfect treat for gatherings or a sweet snack at home. What is the estimated calorie count per serving? Each blondie has around 200 calories. This can vary based on the exact sizes you cut. They are a sweet indulgence, so enjoy them in moderation! - Prep Time: 15 minutes - Cook Time: 20-25 minutes - Total Time: 40 minutes - Servings: 12 Each blondie has about 200 calories. You get some carbs, fat, and protein. These blondies also have fiber from the flour. Cinnamon adds antioxidants, too! This treat is sweet and satisfying. I suggest taking mouthwatering photos of the blondies fresh from the oven. Show them cut into squares, arranged on a colorful plate. A video could show the mixing process or the final product being enjoyed. These visuals will make the recipe more appealing to readers! This blog post covered how to make tasty cinnamon sugar blondies. I shared the key ingredients, preparation steps, and tips to achieve the best texture. You learned about variations, serving suggestions, and how to store the blondies. Keep these points in mind for your baking journey. The process is simple, fun, and flexible. Enjoy making these delicious treats! Happy baking!
    Cinnamon Sugar Blondies Easy and Delicious Recipe
  • To make this Chicken Spinach Casserole with Cream Cheese, gather these items: - 2 cups cooked chicken, shredded - 3 cups fresh spinach, chopped - 8 oz cream cheese, softened - 1 cup sour cream - 1 cup shredded mozzarella cheese - 1 cup chicken broth - 1 teaspoon garlic powder - 1 teaspoon onion powder - 1/2 teaspoon red pepper flakes (optional) - Salt and pepper to taste - 1 cup breadcrumbs (for topping) - 2 tablespoons olive oil You can switch some ingredients based on your taste or what you have. Here are some ideas: - Instead of cooked chicken, use rotisserie chicken for ease. - Swap cream cheese for Greek yogurt for a lighter option. - Use any cheese you like, such as cheddar or gouda. - For a dairy-free option, try cashew cream instead of cream cheese and sour cream. - If you don't have fresh spinach, use frozen spinach, but drain it well. Choosing fresh ingredients makes a big difference. Here’s how to pick the best: - For chicken, look for a nice pink color with no odor. - Choose spinach with bright green leaves and no wilting. - Check cream cheese for a smooth texture and freshness date. - When buying cheese, select blocks or freshly shredded for better flavor. - For breadcrumbs, look for whole grain or homemade for added taste. By following these tips, you will enhance the flavors in your casserole! {{ingredient_image_1}} First, preheat your oven to 375°F (190°C). This step is key for even cooking. In a large bowl, combine the shredded chicken, chopped spinach, softened cream cheese, and sour cream. Mix these ingredients well until they blend smoothly. Now, add half of the mozzarella cheese to the mixture. It helps add richness to the dish. Next, pour in the chicken broth, then sprinkle in the garlic powder, onion powder, and optional red pepper flakes. Don’t forget to add salt and pepper to taste. Stir everything until it's mixed evenly. Once mixed, transfer the chicken-spinach mixture into a greased 9x13 inch baking dish. Spread it out evenly for even cooking. In a small bowl, mix the breadcrumbs with olive oil. This gives the topping a nice crunch. Sprinkle this breadcrumb mixture over the top of the casserole. Finally, add the remaining mozzarella cheese on top. Now it's time to bake! Place the casserole in your preheated oven. Bake it for about 30 minutes. You want the casserole to bubble and the breadcrumbs to turn golden brown. Keep an eye on it, as oven times can vary. When the casserole is done baking, take it out of the oven. Let it cool for 5-10 minutes before serving. This cooling time helps the layers set. Serve it warm, and enjoy the creamy delight with your family and friends. Pair it with a fresh salad or crusty bread for a complete meal. To make the best chicken spinach casserole, follow these key steps. First, use freshly cooked chicken. It adds great flavor and texture. Shredding the chicken allows it to mix well with the other ingredients. Next, soften the cream cheese before mixing it in. This helps create a creamy and smooth base. Make sure to chop your spinach finely. This ensures it blends well throughout the dish. When mixing, don’t rush. Stir until everything is well combined. This makes sure each bite is full of flavor. For the topping, mix your breadcrumbs with olive oil. This keeps them crispy while baking. Sprinkle them evenly over the casserole for a nice crunch. One common mistake is adding too much salt. Start with a little and taste as you go. Another mistake is overcooking the casserole. Bake it just until it bubbles and the top is golden brown. Letting it sit before serving helps the flavors meld. Don’t skip the red pepper flakes unless you dislike spice. They add a nice kick. Also, avoid using low-fat cream cheese. It can change the texture and flavor of your casserole. This casserole pairs well with a simple salad. A fresh green salad with lemon dressing complements it nicely. You can also serve it with garlic bread for a cozy meal. For drinks, try a chilled white wine or sparkling water with lime. If you want to make it a full meal, serve it with roasted vegetables. Carrots or broccoli add color and nutrients. Enjoy this dish warm for the best taste experience. Pro Tips Use Leftover Chicken: This recipe is perfect for using up leftover rotisserie or grilled chicken, adding flavor and saving time. Mix Up the Greens: Feel free to substitute or add other greens like kale or Swiss chard for different flavors and textures. Breadcrumb Alternatives: For a gluten-free option, use crushed gluten-free crackers or panko instead of regular breadcrumbs. Let it Rest: Allowing the casserole to sit for a few minutes after baking helps it set and makes serving easier. {{image_2}} To make a vegetarian version, swap the chicken for more veggies. You can use 2 cups of chopped mushrooms and 1 cup of diced bell peppers. This mix brings great flavor and texture. Use vegetable broth instead of chicken broth for a full veggie base. The cream cheese and sour cream will still give you that creamy delight. If you want to change the protein, try turkey or shredded beef. Both will add a nice twist. You can also use canned tuna for a quick option. Just make sure to drain it well before mixing. Each choice will give the casserole a different taste, so have fun experimenting. You can change the flavors with spices and herbs. Try adding Italian seasoning for a herb boost. Fresh basil or parsley will add a nice touch, too. For a kick, add more red pepper flakes or some diced jalapeños. Cheese lovers can mix in parmesan or cheddar for an extra cheesy experience. Feel free to get creative! After enjoying your delicious chicken spinach casserole, let it cool down. Place any leftovers in an airtight container. Store it in the fridge for up to three days. Make sure to cover the container well. This keeps the casserole fresh and tasty. To reheat your casserole, preheat your oven to 350°F (175°C). Take the casserole out of the fridge. Cover it with foil to keep it moist. Bake for about 20 minutes, or until hot. You can also use a microwave for quick reheating. Just heat it in short bursts, stirring in between, until warm. If you want to freeze the casserole, do it before baking. Wrap it well with plastic wrap or foil. You can freeze it for up to three months. To thaw, place it in the fridge overnight. Bake it at 375°F (190°C) for 30-40 minutes, until it bubbles. This way, you can enjoy this tasty dish later! Yes, you can prepare this casserole ahead of time. Just mix all the filling ingredients and place them in your baking dish. Cover it and store it in the fridge for up to one day. When ready to bake, just add the breadcrumb topping and bake it directly. This saves time on busy nights. If you need a substitute for cream cheese, try using Greek yogurt or ricotta cheese. Both options will give a creamy texture. You can also blend cottage cheese until smooth for a similar effect. These swaps will keep your casserole tasty and creamy. Leftover casserole lasts about three to four days in the fridge. Store it in an airtight container to keep it fresh. Make sure to let it cool before putting it away. This way, it stays safe and delicious for your next meal. Yes, this recipe is great for meal prep. You can make a big batch and divide it into smaller portions. Store them in individual containers. This makes it easy to grab a meal on the go. Just reheat when you’re ready to eat, and enjoy! This post covered the key parts of making a great casserole. We discussed ingredients, easy steps, and tips to get it just right. You now know how to select fresh items and avoid common mistakes. The variations let you mix things up, while storage tips help keep leftovers tasty. Always remember, with good ingredients and careful prep, you can create a dish everyone will love. Enjoy your cooking!
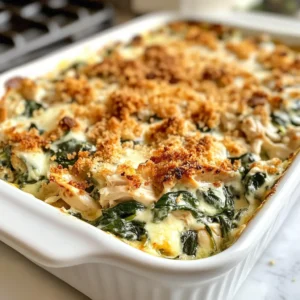
    Chicken Spinach Casserole with Cream Cheese Delight
  • - 2 cups cooked chicken, shredded - 1 (8 oz) package cream cheese, softened - 1 cup buffalo sauce (adjust to taste) - 1 cup shredded cheddar cheese - 1/2 cup ranch dressing - 1/2 cup blue cheese crumbles (optional) - 1/4 cup green onions, chopped (for garnish) - Tortilla chips, celery sticks, or carrot sticks for serving These ingredients create a rich and creamy dip. The chicken provides protein. Cream cheese gives it a smooth texture. Buffalo sauce adds heat and flavor. Cheddar cheese melts perfectly into the dip. Ranch dressing balances the spice. Blue cheese crumbles add a tangy twist. Green onions make it look fresh and bright. - Blue cheese crumbles - Extra hot sauce for more spice - Other cheese like mozzarella or pepper jack You can skip the blue cheese if you don’t like it. For more spice, add extra hot sauce. Mixing in different cheeses can change the flavor too. - Tortilla chips for crunch - Celery sticks for a fresh bite - Carrot sticks for a sweet touch Serve this dip warm. It’s great for parties or game days. Use tortilla chips for scooping. Celery sticks add a nice crunch. Carrot sticks bring a sweet flavor. Enjoy this dip with friends and family! {{ingredient_image_1}} Start by gathering your ingredients. You will need: - 2 cups cooked chicken, shredded - 1 (8 oz) package cream cheese, softened - 1 cup buffalo sauce (adjust to taste) - 1 cup shredded cheddar cheese - 1/2 cup ranch dressing - 1/2 cup blue cheese crumbles (optional) - 1/4 cup green onions, chopped (for garnish) - Tortilla chips, celery sticks, or carrot sticks for serving Make sure your chicken is cooked and shredded. You can use leftover chicken or rotisserie chicken. Soften your cream cheese by leaving it out for a bit. This helps it mix well. Now that your ingredients are ready, it’s time to cook. Place the shredded chicken, softened cream cheese, and buffalo sauce in your slow cooker. Stir these until they blend well. Next, add the shredded cheddar cheese and ranch dressing. If you like blue cheese, toss that in too. Stir everything together until it’s mixed well. Cover the slow cooker. Cook on low for 2 hours or on high for 1 hour. Stir it occasionally. You want it hot and creamy. After cooking, give the dip a good stir. Make sure all the ingredients are mixed well. Taste the dip and, if you like more heat, add extra buffalo sauce. When it’s ready, serve it warm. Garnish with chopped green onions for a fresh look. Pair it with tortilla chips, celery sticks, or carrot sticks for dipping. Enjoy your tasty dip! For this dip, use cooked chicken. You can use rotisserie chicken for ease. It saves time and adds great flavor. Just shred it into small pieces. You can also boil chicken breasts. Simply cook them until done, then shred. Both options work well. The key is to ensure your chicken is tender and easy to mix. Buffalo sauce can be spicy. If you like it mild, start with less sauce. You can always add more later. Mix in a little first, taste, and adjust. If you want it hot, pour in more sauce. You can also blend in ranch dressing to cool it down. This balance lets you control the heat and enjoy the dip. You can prep this dip early. Mix all the ingredients in your slow cooker. Then, store it in the fridge until you’re ready to cook. Just heat it in the crockpot when you need it. It’s a great time-saver for parties or busy nights. This way, you enjoy more time with friends and family. Pro Tips Adjust the Heat: Start with 1 cup of buffalo sauce and taste as you go. You can always add more if you prefer a spicier dip! Use Rotisserie Chicken: For an even quicker prep time, use shredded rotisserie chicken instead of cooking your own. Make It Creamier: For a creamier texture, mix in an extra 4 oz of cream cheese or a splash of heavy cream. Prep Ahead: You can prepare the dip in advance and store it in the refrigerator. Just heat it up in the slow cooker or on the stove when you're ready to serve. {{image_2}} You can make a tasty vegetarian version of this dip. Swap the chicken for shredded jackfruit or chickpeas. Use the same creamy base with cream cheese and buffalo sauce. Add some chopped spinach for extra flavor and nutrients. This twist keeps the dip rich and satisfying without meat. Want to kick up the flavor? Add minced garlic for a bold taste. You can also mix in herbs like thyme or parsley. These add freshness and a nice aroma. If you enjoy a little zest, try a dash of lemon juice. It brightens the dip and balances the heat from the buffalo sauce. Looking for a lighter option? Use low-fat cream cheese instead of the regular kind. You can also replace ranch dressing with a low-fat version. For a healthier cheese choice, opt for part-skim cheddar. These swaps cut calories but keep the dip creamy and delicious. Enjoy this tasty treat while feeling good about your choices! To store your leftover dip, let it cool to room temperature. Then, scoop it into an airtight container. Make sure to seal it well to keep it fresh. You can store it in the fridge for up to three days. Just remember to label your container with the date! When you're ready to enjoy the dip again, take it out of the fridge. You can reheat it in the microwave. Use a microwave-safe bowl and heat it in short bursts. Stir every 30 seconds until it warms up. You can also reheat it in the crockpot on low. Stir often to ensure even heating. If you want to save it for later, you can freeze the dip. Place it in a freezer-safe container. Leave some space at the top because it will expand. You can freeze it for up to three months. When you’re ready to use it, thaw it in the fridge overnight. Reheat as needed for the best taste! Yes, you can make this dip on the stove. Start by mixing all the ingredients in a pot. Heat it over medium heat. Stir often until it is hot and creamy. This method takes about 10-15 minutes. If you have no crockpot, this is a great option. You can keep leftovers in the fridge for up to 3 days. Store them in an airtight container. Make sure it cools down before you put it in the fridge. If you want to keep it longer, freeze it for up to 2 months. Buffalo chicken dip pairs well with many snacks. Here are some great options: - Tortilla chips - Celery sticks - Carrot sticks - Crackers - Pita bread Feel free to mix and match based on what you like! This article walks you through every step of making buffalo chicken dip. You learned about key ingredients, cooking methods, and tips for the best flavor. We explored fun variations and how to store leftovers properly. In conclusion, with these steps and ideas, you can create your perfect dish. Enjoy some tasty buffalo chicken dip with friends or family. Your next party will be a hit!
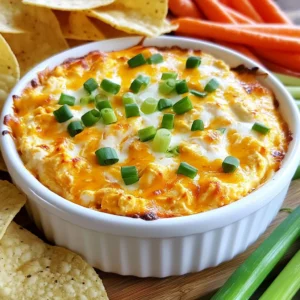
    Crockpot Buffalo Chicken Dip Easy and Flavorful Recipe
  • - 2 cups cooked chicken, shredded - 1/2 cup Greek yogurt - 1/4 cup mayonnaise The main ingredients for these sliders are simple yet key. I use cooked chicken as the base. Shredded chicken is easy to mix and very tasty. Greek yogurt gives a creamy texture and a healthy twist. Mayonnaise adds richness and flavor, making the salad delicious. - 1 tablespoon Dijon mustard - 1 tablespoon fresh dill, chopped - Salt and pepper to taste For flavor enhancements, I add Dijon mustard. It brings a nice tang to the mix. Fresh dill offers a bright taste that pairs well with chicken. Don’t forget to add salt and pepper! They help balance all the flavors. - 1 celery stalk, finely diced - 1/4 cup red grapes, halved - 1/4 cup almonds, chopped - Mini slider buns (8-10) - Leafy greens (such as spinach or lettuce) for garnish For add-ins, I love using diced celery. It adds a nice crunch. Halved red grapes bring a sweet touch to the salad. Chopped almonds give extra texture and nutty flavor. Mini slider buns hold everything together. Finally, I garnish with leafy greens. They add freshness and make the sliders look pretty. Mixing the chicken salad ingredients Start by taking a large mixing bowl. Add 2 cups of shredded chicken, 1/2 cup of Greek yogurt, 1/4 cup of mayonnaise, and 1 tablespoon of Dijon mustard. Mix everything well until the chicken is fully coated. Incorporating add-ins Now, it’s time to add more flavor! Dice 1 celery stalk finely and halve 1/4 cup of red grapes. Chop 1/4 cup of almonds and 1 tablespoon of fresh dill. Gently fold these into the chicken salad mix. Make sure all the ingredients blend well together. Finally, season with salt and pepper to taste. Toasting slider buns Take your mini slider buns and cut them in half. Toast them lightly in a skillet or toaster. This step adds a nice crunch to your sliders. Layering chicken salad on buns On each bun bottom, place a generous spoonful of your tasty chicken salad mixture. Make sure to cover the bun well with the salad. Garnishing with leafy greens Add a few leafy greens, like spinach or lettuce, on top of the chicken salad. This adds freshness and color to your sliders. Securing sliders with toothpicks To make it easy for guests, secure each slider with a toothpick. This way, they can grab and enjoy without any mess. You can easily change the protein in the sliders. Try shredded turkey or canned tuna. These options work well and keep the dish light. For a vegetarian twist, use chickpeas or tofu. This way, everyone can enjoy the sliders. If you want a dairy-free option, swap Greek yogurt for a plant-based yogurt. You can also skip the mayonnaise or use a vegan version. These small changes keep the flavor but fit dietary needs. To keep your sliders fresh, cover them with a damp cloth. This will prevent the buns from drying out. You can also serve them on a platter. Arrange the sliders neatly for a nice look. For presentation, add colorful garnishes like herbs or sliced veggies. This makes the dish pop on the table. You can even use cute toothpicks to hold the sliders together. It adds a fun touch for guests. To store leftover sliders, place them in an airtight container. They stay fresh in the fridge for about three days. Just reheat the chicken salad gently when you want to eat it. For long-term storage, freeze the sliders. Wrap each slider tightly in plastic wrap, then place them in a freezer bag. They will keep well for up to a month. When you're ready to eat, thaw them overnight in the fridge. {{image_2}} You can change the taste of your chicken salad sliders easily. Adding spices or herbs can make a big difference. Consider using paprika or garlic powder for a kick. Fresh herbs like basil or parsley can add a nice touch. You can also swap out almonds for walnuts or pecans. Adding different fruits like apples or cranberries can give a sweet twist. Each choice adds its own unique flavor. If you need gluten-free options, use gluten-free mini buns. You can also serve the chicken salad in lettuce wraps. For vegan variations, replace chicken with chickpeas or tofu. Use vegan yogurt and mayo to keep it plant-based. These changes make the dish suitable for everyone at your party. How you serve your sliders matters. For a slider platter, arrange them on a large board. You can add colorful veggies around the sliders for flair. If you want something smaller, use tiny buns. Miniature sliders look cute and are easy to grab. You can also serve them with toothpicks for easy handling. These fun ideas will wow your guests and make your party memorable. To keep your chicken salad sliders fresh, store them in an airtight container. Place a piece of parchment paper between layers to prevent sogginess. They stay fresh for up to three days in the fridge. After that, the flavors may fade. If you want to save sliders for later, freeze them. Wrap each slider in plastic wrap, then place them in a freezer bag. This way, they won’t get freezer burn. They can stay in the freezer for up to three months. To thaw, move them to the fridge overnight. This keeps the texture nice. If you need them fast, use the microwave on low power for a few minutes. When you're ready to enjoy, reheat the sliders gently. Use the oven for best results. Preheat it to 350°F (175°C). Place sliders on a baking sheet and cover with foil. Heat for about 10-15 minutes. This keeps them warm without drying them out. If using the microwave, heat for 30 seconds at a time. Check often to avoid heating too much. Enjoy your sliders fresh, with all the flavors intact! You can make chicken salad sliders ahead of time. Prepare the chicken salad a day before your event. Store it in a sealed container in the fridge. This keeps the flavors fresh. Toast the slider buns right before serving. Assemble the sliders quickly to maintain crispness. Yes, rotisserie chicken works great for this recipe! It saves time and adds flavor. Just shred the chicken and mix it with the other ingredients. This makes your chicken salad even easier to prepare. Plus, it adds a nice depth to the dish. You can serve many tasty sides with chicken salad sliders. Consider fresh fruit, veggie platters, or chips. A light salad pairs nicely too. For drinks, try iced tea or lemonade. These options complement the sliders well and keep your guests happy! This blog post covered a tasty chicken salad slider recipe. You learned about the main ingredients, flavor boosts, and add-ins. The step-by-step guide helps you mix and assemble these sliders easily. We also shared tips for customizing, serving, and storing them. Finally, the variations let you explore new flavors and styles. Enjoy making these sliders your way. They are fun to share and eat!
    Party-Perfect Chicken Salad Sliders for Easy Entertaining

Posts pagination

← Newer 1 … 5 6 7 8 9 Older →

Footer

↑ back to top

More information

  • Drinks
  • Appetizer
  • Dinner
  • Desserts
  • About
  • Contact
  • Privacy Policy

Our Policies

  • Privacy Policy
  • GDPR Policy
  • Terms Of Use
  • Copyright Policy
  • Cookie Policy
  • Disclaimer

Copyright © 2025 cheftaling