• Home
  • Recipe Index
    • Desserts
    • Dinner
    • Appetizer
    • Drinks
  • About
  • Contact
  • Privacy Policy
menu icon
go to homepage
  • Home
  • Recipe Index
    • Desserts
    • Dinner
    • Appetizer
    • Drinks
  • About
  • Contact
  • Privacy Policy

search icon
Homepage link
  • Home
  • Recipe Index
    • Desserts
    • Dinner
    • Appetizer
    • Drinks
  • About
  • Contact
  • Privacy Policy

×
Natalie

Natalie

Natalie is a passionate food storyteller and recipe developer at Taling’s Recipes, where she brings her love of seasonal ingredients and approachable cooking to life.

Her culinary path started in farmers’ markets, where she discovered the beauty of cooking with what’s fresh and local. Over time, she honed her skills in home kitchens and community gatherings, creating comforting meals that balance flavor with simplicity. Today, Natalie shares her recipes with a global audience, inspiring home cooks to embrace creativity, confidence, and joy in everyday meals.

  • - 1 cup canned pumpkin puree - 1/2 cup vegetable oil - 1/2 cup brown sugar - 1/2 cup granulated sugar - 2 large eggs - 1 teaspoon vanilla extract - 1 1/2 cups all-purpose flour - 1 teaspoon baking soda - 1 teaspoon baking powder - 1 teaspoon ground cinnamon - 1/2 teaspoon ground nutmeg - 1/2 teaspoon ground ginger - 1/4 teaspoon salt - 1 cup semi-sweet chocolate chips - 1/2 cup chopped walnuts (optional) - Muffin tin - Mixing bowls - Whisk and spatula - Toothpick The ingredients for these muffins create a warm, sweet treat. Canned pumpkin puree gives moisture and pumpkin flavor. Vegetable oil keeps the muffins soft. Brown and granulated sugars add sweetness and depth. You need two large eggs for binding. Vanilla extract adds a lovely aroma. The dry mix includes all-purpose flour, baking soda, and baking powder for rise. Spices like cinnamon, nutmeg, and ginger bring warmth and flavor. Salt balances the sweetness. Chocolate chips are a must for that sweet touch. If you like a nutty crunch, add walnuts. Each ingredient plays a role in making these muffins rich and delicious. - Preheat oven to 350°F (175°C). - Line muffin tin with paper liners or grease it with cooking spray. - In a large bowl, whisk together: - 1 cup canned pumpkin puree - 1/2 cup vegetable oil - 1/2 cup brown sugar - 1/2 cup granulated sugar - 2 large eggs - 1 teaspoon vanilla extract Mix until smooth and well combined. - In another bowl, sift together: - 1 1/2 cups all-purpose flour - 1 teaspoon baking soda - 1 teaspoon baking powder - 1 teaspoon ground cinnamon - 1/2 teaspoon ground nutmeg - 1/2 teaspoon ground ginger - 1/4 teaspoon salt - Gradually mix dry ingredients into the wet mixture. - Stir gently until just combined. - Fold in: - 1 cup semi-sweet chocolate chips - 1/2 cup chopped walnuts (optional) - Fill each muffin cup about 2/3 full with the batter. - Bake in the preheated oven for 18-22 minutes. - Check doneness with a toothpick; it should come out clean. - Remove muffins from oven and cool in the pan for 5 minutes. - Transfer muffins to a wire rack to cool completely. - Do not over-mix the batter: Mixing too much makes muffins tough. Stir gently until just combined. This keeps them light and fluffy. - Use room temperature ingredients: Bring your eggs and pumpkin to room temp. This helps the batter mix better and rise nicely. - Add powdered sugar on top for presentation: Dusting the tops makes them look fancy. It adds sweetness too. - Serve with cream cheese spread: A rich cream cheese spread takes these muffins to the next level. It’s a perfect pairing. - Different types of chocolate: You can use dark, milk, or white chocolate. Each type adds its own flavor twist. - Substitute spices or add extras: Try adding dried fruit or swap in your favorite spices. This keeps the recipe fresh and exciting. {{image_2}} You can make these muffins healthier with simple swaps. - Substitute half of the oil with applesauce. This keeps moisture while cutting fat. - Use whole wheat flour instead of all-purpose flour. This adds fiber and nutrients. Want to add a twist to your muffins? Here are some ideas: - Add a pinch of cayenne for a spicy kick. This will surprise your taste buds! - Include lemon zest for added freshness. The bright flavor pairs well with pumpkin. If you have dietary needs, these adjustments work well: - For a gluten-free option, use almond flour. It creates a rich, nutty flavor. - Make vegan muffins by substituting eggs with flaxseed meal. Mix 1 tablespoon of flaxseed with 2.5 tablespoons of water for each egg. To keep your muffins fresh, store them in an airtight container at room temperature. This helps them stay soft and tasty. If you plan to keep them longer than two days, refrigerate them. This keeps their flavor and texture intact. You can freeze these muffins easily. Start by freezing them in a single layer on a baking sheet. After they freeze solid, transfer them to a zip-top bag. This prevents them from sticking together. When you want to enjoy a muffin, thaw it at room temperature or warm it in the microwave for a cozy treat. These soft muffins are best eaten within three days for the best taste. If you freeze them, they can last up to three months. Enjoy them warm, and you'll love the rich pumpkin and chocolate flavor every time! Yes, but make sure it’s pureed and cooked properly. Fresh pumpkin gives a nice flavor. To prepare, cut the pumpkin, steam or bake it, and then blend until smooth. This adds a homemade touch to your muffins. Use a toothpick; it should come out clean when inserted. If there’s wet batter, bake them a bit longer. Trust your toothpick, as it is the best tool for checking! Absolutely! They are optional and can be left out if desired. If you prefer a nut-free muffin, just skip them. The muffins will still be delicious and moist. Ensure not to over-mix the batter to avoid density. Mix just until the flour disappears. Over-mixing can make your muffins tough. Gentle hands lead to fluffier muffins. Yes, adjust the baking time to about 10-15 minutes for mini muffins. They will bake faster, so keep an eye on them. Mini muffins are perfect for snacks or lunchboxes! This recipe combines simple ingredients and clear steps to make the best muffins. You learned to mix wet and dry items, ensuring great texture. We discussed tips to elevate your muffins, plus variations based on taste and diet. Remember, baking should be fun—experiment with flavors and enjoy! Store your muffins well, and they'll stay tasty longer. With these steps, you're set to bake delicious treats every time.
    Pumpkin Chocolate Chip Muffins Bakery Style Delight
  • To make the best Spicy Sriracha Honey Wings, you need these simple ingredients: - 2 pounds chicken wings - 1/4 cup Sriracha sauce - 1/4 cup honey - 2 tablespoons soy sauce - 1 tablespoon apple cider vinegar - 1 teaspoon garlic powder - 1 teaspoon onion powder - 1/2 teaspoon freshly ground black pepper - 1 tablespoon sesame oil - Optional: sliced green onions and sesame seeds for garnish These ingredients come together to create a sweet and spicy flavor that will make you crave more. The chicken wings form the base of this dish, providing a juicy and tender bite. Sriracha sauce adds heat, while honey gives a perfect sweetness. The soy sauce and apple cider vinegar balance the flavors, making every bite exciting. Garlic powder and onion powder enhance the taste without overwhelming the palate. Black pepper adds a bit of warmth, and sesame oil rounds out the mix with a nutty aroma. For a fun touch, you can garnish your wings with sliced green onions and sesame seeds. This not only adds color but also a fresh crunch. Each ingredient plays a role, making these wings a hit for any gathering or a cozy night in. - Preheat your oven to 400°F (200°C). This helps the wings cook well. - Line a baking sheet with parchment paper. This keeps the wings from sticking. - In a large bowl, mix Sriracha sauce, honey, soy sauce, apple cider vinegar, garlic powder, onion powder, black pepper, and sesame oil. Whisk until smooth. - Add the chicken wings to the bowl. Toss them in the sauce until they are all coated. - Make sure all wings have an even coating. This helps with flavor and crispiness. - Arrange the wings in a single layer on the baking sheet. They should not touch each other. - Bake in the oven for 40 to 45 minutes. Turn the wings halfway through for even cooking. - For extra glaze, brush on more sauce in the last 5 minutes of baking. This adds a nice finish. To get crispy wings, start with a hot oven. Set it to 400°F (200°C). This high heat helps the wings get that nice golden color. When cooking, turn the wings halfway through. This ensures all sides crisp up nicely. Use tongs to flip them gently. Want it milder? Use less Sriracha and add more honey. This keeps the sweetness but cuts the heat. For more spice, add extra Sriracha or a pinch of cayenne. This way, you can customize the heat to your taste. Achieving balance is key; mix sweet and spicy well. You can also air fry these wings. Set your air fryer to 375°F (190°C) for about 25 minutes. Shake the basket halfway for even cooking. If you prefer grilling, preheat the grill to medium-high heat. Cook the wings for about 20 minutes, turning often. This gives them a smoky flavor that is simply delicious. {{image_2}} You can switch up the soy sauce to make it gluten-free. Look for brands that offer gluten-free options. These sauces taste great and still pack a punch. If you need a different sweetener, try maple syrup or agave nectar. Both add a nice sweetness without the honey. Want to make your wings pop even more? Add minced garlic or freshly grated ginger to the sauce. These ingredients bring a zesty kick. You can also try different spice blends. A dash of smoked paprika or cayenne can turn up the heat! Pair these spicy wings with classic sides. Think celery sticks and carrot sticks with ranch dressing. You can also make a fun wing platter. Include dips like blue cheese or ranch for a crowd-pleaser. Add some fresh veggies for a colorful touch! To keep your spicy wings fresh, let them cool first. Place them in an airtight container. This helps lock in flavor and moisture. You can store them in the fridge for up to three days. If you want to keep them longer, consider freezing them. Oven reheating method: 1. Preheat the oven to 350°F (175°C). 2. Place the wings on a baking sheet. 3. Bake for about 10 to 15 minutes until heated through. This method keeps them crispy. Microwave reheating method: 1. Place wings on a microwave-safe plate. 2. Cover with a damp paper towel. 3. Heat on high for 1 to 2 minutes. Check if they are hot enough. Be careful, as microwaving can make them soggy. To freeze wings properly, cool them completely first. Place them in a freezer bag, and squeeze out as much air as you can. Label the bag with the date. They stay good for about three months. For thawing, move the wings from the freezer to the fridge overnight. This keeps them safe and tasty. If you're in a hurry, you can thaw them in cold water for about an hour. Always cook them right after thawing to keep them fresh. To make Spicy Sriracha Honey Wings in an air fryer, preheat your air fryer to 400°F (200°C). Toss the wings in the sauce as you would for the oven. Place them in a single layer in the air fryer basket. Cook for 25 to 30 minutes. Shake the basket halfway through to ensure even cooking. For a crispier finish, spray a little oil on the wings before cooking. Enjoy the same great taste with less oil! Yes, you can use frozen chicken wings. However, you need to thaw them first. Thaw the wings in the fridge overnight or use the microwave's defrost setting. Once thawed, follow the same steps in the recipe. This ensures the wings cook evenly and soak up the flavor of the sauce. Some great dips to enjoy with these wings are ranch and blue cheese. Ranch offers a cool contrast to the spicy wings. Blue cheese adds a bold flavor that pairs well with the sweetness of the honey. Both dips enhance the overall taste and make your meal even more enjoyable. Yes, Spicy Sriracha Honey Wings are great for meal prep. You can make a big batch and store them in the fridge. They stay good for about 3 to 4 days. To serve later, simply reheat them in the oven or air fryer. This makes them a tasty option for quick lunches or dinners! This blog covered how to make spicy Sriracha honey wings. You learned about the ingredients needed, step-by-step instructions, and tips to achieve crispy wings. Remember, adjusting spice levels can fit any taste. Storing leftovers and reheating properly ensures enjoyment later. Feel free to explore variations and alternative methods like grilling or air frying. With the right approach, these wings will impress at any gathering. Enjoy your cooking adventure!
    Spicy Sriracha Honey Wings Irresistible Flavor Punch
  • - 12 oz fettuccine pasta - 1 lb large shrimp, peeled and deveined - 4 tablespoons unsalted butter - 5 cloves garlic, minced - 1 cup grated Parmesan cheese - 1 teaspoon Italian seasoning - Salt and pepper to taste - Fresh parsley, chopped - Lemon wedges for serving This dish is all about simple yet tasty ingredients. First, the fettuccine pasta. It has a lovely shape that holds sauce well. I choose large shrimp because they cook quickly and add great flavor. Butter is key for richness and a smooth sauce. Now, let’s talk about flavor. Garlic brings a strong, savory taste. I always use fresh garlic for the best flavor. Parmesan cheese makes the sauce creamy and adds a salty bite. Italian seasoning adds herbs that tie everything together. Don’t forget salt and pepper. They balance the flavors and make every bite pop. For garnish, I love using fresh parsley. It adds color and freshness. Lemon wedges are a must for serving. They add a bright touch that lifts the dish. Squeeze some juice over your plate for extra zing. 1. Start by melting 2 tablespoons of butter in a large pot over medium heat. 2. Add 5 cloves of minced garlic and sauté for about 1 minute. The garlic should smell good but not brown. 3. Now, add 1 pound of peeled and deveined shrimp to the pot. 4. Season the shrimp with salt, pepper, and 1 teaspoon of Italian seasoning. 5. Cook the shrimp for 2 to 3 minutes on each side. They should turn pink and opaque. 6. Once cooked, remove the shrimp from the pot and set them aside. 1. In the same pot, pour in 2 cups of heavy cream. Bring it to a gentle simmer. 2. Stir in the remaining 2 tablespoons of butter. Let it melt completely. 3. Gradually whisk in 1 cup of grated Parmesan cheese. Keep whisking until the sauce is smooth and creamy. 4. Make sure there are no lumps in your sauce. This will make it nice and velvety. 1. Add 12 ounces of fettuccine pasta to the creamy sauce. Stir it well to coat the pasta. 2. Ensure that the pasta is submerged in the sauce. This helps it cook evenly. 3. Cover the pot and let it simmer for about 10 to 12 minutes. Stir occasionally. 4. Cook until the pasta is al dente and has soaked up some sauce. 5. Finally, return the shrimp to the pot. Toss everything together until well mixed. 6. Adjust the seasoning with more salt and pepper if needed. This dish is not only quick to make, but it also delivers creamy goodness in every bite. Enjoy! - Alternatives to Parmesan cheese: If you do not have Parmesan, use Pecorino Romano. It adds a similar salty flavor. For a dairy-free option, try nutritional yeast. It gives a cheesy taste without dairy. - Shrimp substitutes: If shrimp is not available, you can use chicken breast or scallops. Both cook quickly and soak up flavors well. For a vegetarian option, use mushrooms or zucchini for a nice texture. - Tips for perfect shrimp: Cook shrimp until they turn pink and opaque. Avoid overcooking, as they can become tough. It usually takes about 2-3 minutes on each side. - Achieving creamy sauce consistency: Gradually whisk in the Parmesan cheese. This helps prevent lumps. Stir the sauce continuously until it is smooth. If the sauce is too thick, add a splash of pasta water to loosen it up. - Presentation ideas: Serve the shrimp Alfredo in deep bowls. Top with freshly chopped parsley for color. Add a squeeze of lemon juice on top. This brightens the flavors and makes the dish look elegant. - What to pair with the dish: Pair this dish with a simple green salad. A side of garlic bread also works well. For a drink, a glass of white wine complements the creamy sauce nicely. {{image_2}} You can boost the nutrition of your One-Pot Creamy Garlic Shrimp Alfredo by adding vegetables. Spinach or peas add color and nutrients. Just toss them in during the last few minutes of cooking. They will wilt fast, keeping their bright taste. Bell peppers can also bring a nice crunch. Slice them thin and add them when you cook the garlic. This adds a sweet flavor and a fun texture. If you want to change the protein, you have options. Chicken works great in this dish; just cut it into pieces. Cook it in the same way you do the shrimp. Scallops are another tasty choice. They cook quickly and add a different taste. For a vegetarian option, mushrooms can be a wonderful swap. They soak up the sauce well, giving a meaty feel without meat. To make your dish stand out, try some flavor twists. Adding lemon zest brightens the dish with a fresh taste. A little spice, like red pepper flakes, can add heat. Fresh herbs, such as basil or thyme, can also elevate the meal. Just sprinkle them in before serving. These small changes can take your creamy Alfredo to the next level. To store leftovers, let the dish cool to room temperature. Place it in an airtight container. This helps keep the flavors fresh. I recommend using glass containers. They prevent spills and are easy to clean. You can store the dish in the fridge for up to three days. The best way to reheat is on the stove over low heat. This keeps the creaminess intact. Stir often to avoid sticking. If the sauce gets too thick, add a splash of milk or cream. This helps refresh the texture and taste. For freezing, let the dish cool completely first. Then, place it in a freezer-safe container. Make sure to leave some space for expansion. It will stay good for up to three months. When ready to eat, thaw it in the fridge overnight. Reheat on low heat, adding milk as needed for a creamy finish. One-Pot Creamy Garlic Shrimp Alfredo can last for three to four days in the fridge. Store it in an airtight container to keep it fresh. Make sure to let it cool before sealing to avoid condensation. If you want to extend its life, consider freezing it. Yes! You can use various pasta shapes like penne, farfalle, or even spaghetti. The key is to adjust the cooking time based on the pasta type. Follow the package instructions for cooking times to ensure your pasta is just right. Absolutely! This recipe works well for meal prep. Cook it ahead and store it in individual containers. Just reheat on low heat to maintain its creamy texture. You can also double the recipe to have more servings ready for the week. You can serve this dish with a simple side salad, garlic bread, or steamed vegetables. A fresh green salad adds a nice crunch and balances the meal. Garlic bread complements the creamy sauce perfectly, making it a satisfying dinner. In this post, we explored a tasty One-Pot Creamy Garlic Shrimp Alfredo. We covered key ingredients like shrimp, butter, and Parmesan cheese. I shared step-by-step instructions for cooking, along with tips for perfecting the dish. We also looked at variations, storage, and answers to common questions. Cooking is fun and creative. Try different ingredients to make this dish your own. Enjoy inviting family and friends to share your delicious creation!
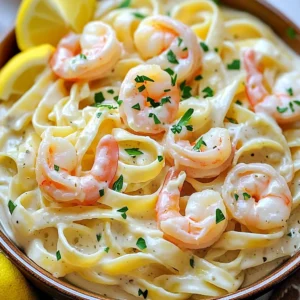
    One-Pot Creamy Garlic Shrimp Alfredo Delightful Meal
  • - 2 cups dried white beans (cannellini or navy), rinsed and soaked overnight - 1 medium onion, diced - 3 cloves garlic, minced - 2 carrots, diced - 2 celery stalks, diced - 1 can (14 oz) diced tomatoes (with juice) - 4 cups vegetable broth - 2 cups kale, chopped - 1 teaspoon dried oregano - 1 teaspoon dried basil - 1/2 teaspoon red pepper flakes (adjust to taste) - 1 bay leaf - Salt and pepper to taste I love using dried white beans in this soup. They soak up flavors well. Soaking them overnight makes them soft and ready to cook. The diced onion, garlic, carrots, and celery bring a fresh taste. Together, they create a rich base. The canned tomatoes add a touch of sweetness and acidity. The vegetable broth is the backbone of the soup. It gives depth and flavor. Kale adds a nice green color and nutrition. I like to add herbs like oregano and basil to give it a true Tuscan feel. The red pepper flakes give just a hint of spice. - Fresh parsley for garnish - Grated Parmesan cheese Fresh parsley brightens the dish and adds flavor. It makes the soup look nice, too. A sprinkle of grated Parmesan cheese adds a creamy finish. It melds well with the soup’s heartiness. - Alternative beans for desired taste: You can use any beans you like. Pinto or black beans work well too. - Vegetable broth vs. chicken broth: For a richer flavor, chicken broth is a good choice. - Fresh vs. dried herbs: Fresh herbs are great if you have them. Use three times more fresh herbs than dried. Feel free to mix and match ingredients. Cooking is all about what you love. Enjoy the process and make it your own! First, soak your dried beans. Place them in a bowl and cover them with water. Leave them to soak overnight. This step helps soften the beans. It also cuts down on cooking time. After soaking, drain and rinse the beans well. Properly prepared beans cook more evenly. This makes your soup creamy and delicious. When you layer ingredients, start with the soaked beans. Next, add the diced onion, minced garlic, diced carrots, and diced celery. These vegetables add flavor and texture. Pour in the diced tomatoes along with their juice. Then, add the vegetable broth. Stir in the dried oregano, basil, red pepper flakes, and the bay leaf. Layering in this order helps all flavors blend well. Set your slow cooker to low for 6 to 8 hours. This slow cooking makes the beans tender and tasty. You can check for doneness by tasting the beans and vegetables. They should be soft but not mushy. About 30 minutes before serving, stir in the chopped kale. This keeps the kale bright and fresh. Enjoy the warm aroma filling your kitchen as it cooks! When making bean soups, watch for common problems. First, don’t skip soaking the beans. This makes them cook evenly and helps digestion. If you forget to soak, you may end up with hard beans. Next, adjust spices to suit your taste. Start with the basic amounts in the recipe, then add more later. This way, you can control the heat from the red pepper flakes. A little goes a long way! To boost umami, try adding a splash of soy sauce or miso paste. These ingredients add depth without changing the soup's base. You can also toss in some fresh herbs like thyme or rosemary for freshness. For a richer texture, blend a cup of soup and return it to the pot. This makes the soup creamier without using dairy. You can also add a splash of olive oil right before serving for extra richness. This soup pairs well with crusty bread or a light salad. A simple arugula salad with lemon dressing offers a nice contrast. For wine, a crisp white like Pinot Grigio complements the soup's flavors. If you prefer red, a light Chianti works great too. Enjoying these sides enhances the overall meal experience! {{image_2}} To keep this soup plant-based, you must choose the right ingredients. Use vegetable broth instead of chicken broth. The dried white beans are naturally vegan. For added flavor, use fresh herbs. You can also swap in seasonal veggies like zucchini or spinach. These changes keep the soup delicious and healthy. If you want to add meat, consider ham or sausage. You can also use cooked chicken. Just chop it into bite-sized pieces. Add it during the last hour of cooking. This way, the flavors blend well. If using raw meat, add it earlier. Adjust cooking time to ensure everything cooks through. Experiment with spices to enhance flavor. Cumin adds warmth, while smoked paprika gives a nice kick. You can also try adding different veggies. Sweet potatoes or bell peppers work well for a seasonal twist. Each addition brings new taste and texture to the soup. Enjoy discovering your favorite combinations! To store your soup, cool it first. Let it sit at room temperature for about 30 minutes. This helps avoid steam buildup in containers. Use airtight containers to keep it fresh. Glass jars or plastic containers both work well. Label each container with the date. This way, you won’t forget how long it’s been. To freeze your soup, let it cool completely. Pour it into freezer-safe bags or containers. Leave some space at the top for expansion. Seal tightly and label with the date. When you want to enjoy it, thaw the soup overnight in the fridge. Reheat it in a pot on the stove or in the microwave. Stir often to heat evenly. Your Tuscan white bean soup lasts about 3-4 days in the fridge. If frozen, it can last for up to six months. Check for signs of spoilage like off smells or discoloration. If it looks or smells strange, toss it out. Keeping track of dates helps you enjoy your soup at its best. Cooking this soup on low takes about 6 to 8 hours. The beans need time to soften. If you are in a hurry, you can cook it on high for about 3 to 4 hours. Just check the beans for tenderness before serving. Yes, you can make this soup on the stovetop. To do this, soak the beans overnight as you usually would. Then, in a large pot, sauté the onions, garlic, carrots, and celery until they soften. Add the soaked beans, diced tomatoes, and broth. Bring it to a boil, then lower the heat and simmer. Cook for about 1.5 to 2 hours, or until the beans are tender. You can add the kale in the last 10 minutes, just like in the slow cooker version. This soup pairs well with crusty bread. A side salad adds freshness. You could also serve it with a simple cheese platter. For a heartier meal, consider a grilled cheese sandwich. If you want to elevate the meal, a glass of white wine complements the flavors nicely. Tuscan White Bean Soup is both delicious and easy to make. We covered essential ingredients, including dried beans and fresh veggies. I shared step-by-step instructions to help you prepare and cook in a slow cooker. You can see how to tweak the recipe with variations and storage tips. In conclusion, this hearty soup warms you inside and out. Adjust flavors to your liking and enjoy it with loved ones. Get creative with ingredients and pairings. Your slow cooker will make mealtime simple and satisfying.
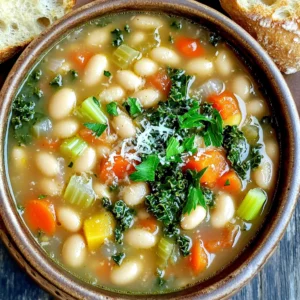
    Slow Cooker Tuscan White Bean Soup Comforting Delight
  • To make Air Fryer Honey Mustard Carrots, you need fresh and simple ingredients. Here’s what you will need: - 1 lb baby carrots (or regular carrots cut into sticks) - 2 tablespoons honey - 1 tablespoon Dijon mustard - 1 tablespoon olive oil - 1 teaspoon garlic powder - Salt and pepper to taste - Fresh parsley, chopped (for garnish) These items come together to create a sweet and tangy treat. The honey adds a nice sweetness, while the Dijon mustard gives it a delicious kick. Garlic powder enhances the flavor. When you add salt and pepper, they balance everything out. Fresh parsley on top makes the dish look nice and adds a little freshness. Using baby carrots is great because they are tender and cook quickly. If you use regular carrots, just cut them into sticks. This way, they will cook evenly and still taste sweet. To start, you need to mix the marinade. In a bowl, combine 2 tablespoons of honey and 1 tablespoon of Dijon mustard. Whisk them together until they blend well. Next, add in 1 tablespoon of olive oil, 1 teaspoon of garlic powder, and a pinch of salt and pepper. Mix it all again until smooth. This marinade brings a sweet and tangy flavor to the carrots. Now, it’s time to coat the carrots. Take 1 pound of baby carrots and add them to the bowl with your marinade. Toss the carrots gently. Make sure each carrot gets covered in the mixture. This step is key for great taste. Before you cook, preheat your air fryer to 375°F (190°C). This helps the carrots cook evenly. Once it’s hot, add the coated carrots to the basket. Spread them out in a single layer. Cook for about 15 to 18 minutes. Halfway through, shake the basket to ensure even cooking. When done, check if the carrots are tender and caramelized. They should look golden and delicious. Remove them from the fryer and place them on a serving dish. Enjoy your tasty, honey mustard carrots! For the best texture, coat each carrot well. Mix honey, mustard, and oil evenly. Toss the carrots until they are fully covered. This step is key to great flavor and texture. If you use larger carrots, cut them into sticks. Adjust the cooking time by a few minutes if needed. Thicker pieces take longer to cook. You can add more flavor to your honey mustard carrots. Consider adding fresh herbs like thyme or rosemary. A pinch of paprika can also give a nice kick. You might try a splash of lemon juice for extra zest. These small changes can make a big difference. These carrots pair well with many main dishes. Try them with grilled chicken or fish. They also go great with roasted pork. For garnish, sprinkle fresh parsley on top. A dash of sesame seeds can add a nice touch too. These ideas will make your dish shine on the table. {{image_2}} You can make this dish even more fun by adding other veggies. Bell peppers and zucchini work well. They add color and taste. Just cut them into similar sizes as the carrots. This way, they cook evenly. You can toss these veggies in the same honey mustard mix. The air fryer will give them a nice crisp, too! If you want to change the sweet taste, try other sweeteners. Maple syrup is a great option. It gives a different flavor while still being sweet. Agave is another choice. It has a mild taste and works well in this recipe. Both options can replace honey in equal amounts. You’ll still get that sticky, sweet finish. Switching up the mustard can make a big difference. Spicy brown mustard adds heat. Yellow mustard gives a milder flavor. You can also experiment with spices. Try adding a pinch of cayenne for heat or smoked paprika for depth. Each change will give your carrots a new twist. Feel free to get creative! To keep your honey mustard carrots fresh, use an airtight container. Glass containers work best, but plastic ones are fine too. Store them in the fridge for up to three days. Make sure they cool down first. This prevents steam from building up. For the best results, reheat your carrots in the air fryer. Set the temperature to 350°F (175°C) and heat for about 5-7 minutes. This will keep them crispy. You can also use a microwave. Heat them in short bursts to avoid sogginess. You can freeze honey mustard carrots, but they may lose some texture. First, let them cool completely. Place them in a freezer-safe bag. Remove as much air as possible. They will last for about three months. To thaw, place them in the fridge overnight before reheating. Yes, you can use regular carrots. Just cut them into sticks. Aim for similar sizes as baby carrots. This helps them cook evenly in the air fryer. It’s a great way to use what you have at home. To add spice, mix in some red pepper flakes. You can also use a spicy mustard. Just a little will go a long way. Taste as you go to find your perfect heat level. Air fryers cook food with less oil. This means fewer calories and less fat. They also keep the food crisp and tender. Using an air fryer can help you enjoy your meals guilt-free while keeping flavors intact. Plus, they cook food faster than traditional methods. This blog post provided a clear guide to making delicious honey mustard carrots. We covered the ingredients, step-by-step instructions, and tips for great results. You can customize the flavors and even add other veggies. Storing and reheating leftovers is easy too. Enjoy this tasty dish as a side for any meal. Don’t be afraid to try new ingredients or adjust the recipe to fit your taste. Happy cooking!
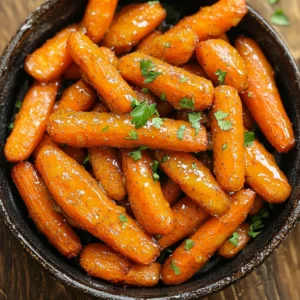
    Air Fryer Honey Mustard Carrots Flavorful Side Dish
  • - 1 lb ground chicken - 1 medium onion, diced - 2 cloves garlic, minced - 1 medium carrot, diced - 1 medium celery stalk, diced - 1 can (14 oz) diced tomatoes, with juice - 4 cups chicken broth The main ingredients in this soup create a flavorful base. Ground chicken adds protein and a light texture. The diced onion and minced garlic bring depth and aroma. Carrots and celery add sweetness and crunch. The diced tomatoes provide acidity, while chicken broth makes it hearty. - 1 cup heavy cream - ½ cup grated Parmesan cheese Heavy cream makes the soup rich and smooth. It gives that creamy texture we love. Grated Parmesan cheese adds a salty kick. Together, they balance the flavors in the soup. - 1 teaspoon Italian seasoning - Salt and pepper to taste - 1 cup fresh spinach, chopped - Fresh basil leaves for garnish Italian seasoning brings warmth and herb flavors. Salt and pepper enhance all the tastes. Fresh spinach adds color and nutrients. Finally, basil leaves make the soup look pretty and fresh. {{ingredient_image_1}} 1. Start by heating a splash of olive oil in a large pot over medium heat. 2. Add the diced onion. Sauté for about 3-5 minutes. The onion should become soft and fragrant. 3. Next, add minced garlic, diced carrot, and diced celery. Cook these for another 5 minutes. The vegetables should soften nicely. 1. Increase the heat to medium-high. Now, add the ground chicken to the pot. 2. Season the chicken with salt, pepper, and Italian seasoning. Cook until it turns brown, about 5-7 minutes. 3. Stir in the canned diced tomatoes, including their juice. Then pour in the chicken broth. 4. Bring the mixture to a simmer. Let it cook for about 10-15 minutes. This helps the flavors blend well. 1. Lower the heat and stir in the heavy cream and chopped spinach. 2. Cook for another 5 minutes. The spinach should wilt and the soup should heat up. 3. Taste the soup. Adjust the seasoning if needed. Just before serving, stir in the grated Parmesan cheese. Serve the soup in shallow bowls with fresh basil leaves on top and a sprinkle of extra cheese. Enjoy every bite! To make your soup great, start with the vegetables. Sauté the onion in olive oil first. Cook it over medium heat until it is soft and clear. This helps to build a strong base of flavor. Next, add garlic, carrot, and celery. Cook these for about five minutes. You want them to soften but not lose their shape. When you add ground chicken, make sure it is cooked well. Use medium-high heat to brown the chicken evenly. Break it up with a spoon while it cooks. It should take about five to seven minutes. This step keeps the meat juicy and flavorful. To boost the taste, try adding more seasonings. You can use fresh herbs like thyme or oregano. A splash of lemon juice can add brightness. This helps balance the creaminess from the heavy cream. Taste your soup often and adjust the seasoning. This makes sure every bowl is full of flavor. When serving, think about how to make it look nice. Use shallow bowls for a lovely display. Top each bowl with fresh basil and a bit of grated Parmesan. This adds color and makes the soup pop. Pair the soup with crusty bread. This adds a great texture and makes it a complete meal. Enjoy your creation! Pro Tips Use Fresh Ingredients: The flavor of your soup will greatly benefit from using fresh vegetables and herbs. Fresh spinach and basil will add a vibrant taste compared to dried alternatives. Adjust the Creaminess: For a lighter version, you can substitute half of the heavy cream with low-fat milk or Greek yogurt. This will still give you a creamy texture without the extra calories. Customize the Seasoning: Feel free to modify the Italian seasoning based on your taste preferences. Adding a pinch of red pepper flakes can provide a nice kick! Store Leftovers Properly: If you have leftovers, store them in an airtight container in the refrigerator for up to 3 days. Reheat gently on the stove to maintain the creamy texture. {{image_2}} You can switch ground chicken with other meats. Ground turkey works well and is leaner. If you prefer beef, use a ground beef option. Each choice brings a unique flavor and texture. If you want a dairy-free soup, replace heavy cream with coconut milk. It adds creaminess without dairy. You can also try almond milk or cashew cream for a lighter touch. For cheese, nutritional yeast offers a cheesy flavor without dairy. Adding herbs and spices can change the soup's taste. Try fresh thyme or oregano for a different twist. A pinch of red pepper flakes can add heat if you like spice. Fresh parsley or dill also brightens the flavor. Don’t hesitate to add more vegetables! Zucchini, bell peppers, or green beans work great. They add color and nutrients. Just chop them small so they cook evenly. Want a chunkier soup? Cut your vegetables larger. This gives a heartier feel. You can also add more chicken for extra protein. For a smoother texture, blend the soup. Use an immersion blender for a few seconds. This creates a creamy base while keeping some bits for texture. Adjust the blending until it reaches your desired smoothness. To store leftover soup, let it cool first. Transfer it to an airtight container. This keeps the soup fresh and safe. Place the container in the fridge. The shelf life in the fridge is about 3 to 4 days. If you want to eat it later, freezing is a great option. For the best freezing results, cool the soup completely. Use freezer-safe containers or bags. Leave a little space at the top for expansion. When you’re ready to eat, thaw the soup in the fridge overnight. This keeps it safe and tasty. For quick thawing, you can use the microwave. For quick reheating, use the stove or microwave. If using the stove, heat on low. Stir often to avoid hot spots. To avoid overcooking, only heat until warm. If the soup gets too thick, add a splash of broth or cream. Enjoy your delicious soup! Creamy Italian Ground Chicken Soup lasts about 3-4 days in the fridge. Store it in an airtight container to keep it fresh. When it comes to freezing, this soup can last up to 3 months. Just make sure to let it cool completely before you put it in the freezer. This way, it won't get freezer burn. When you're ready to eat it, thaw it overnight in the fridge before reheating. Yes, you can use frozen ground chicken in this recipe. It's best to thaw it in the fridge overnight. If you're in a hurry, you can cook it straight from frozen, but it may take longer to brown. Just break it up in the pan as it cooks. Always ensure it reaches a safe temperature of 165°F for safety. This soup pairs well with crusty bread or a simple green salad. You could also serve it over cooked pasta for a heartier meal. A sprinkle of extra Parmesan cheese on top adds flavor and a nice touch. For a refreshing side, consider a side of garlic bread. It’s perfect for dipping! This blog covered all you need to know about making a tasty Creamy Italian Ground Chicken Soup. We discussed main ingredients like chicken, veggies, and herbs. I shared easy steps for cooking and tips for perfect flavor. You can even try fun variations or learn how to store leftovers. In the end, this soup is simple and adaptable. You can make it your own and enjoy it anytime. Happy cooking!
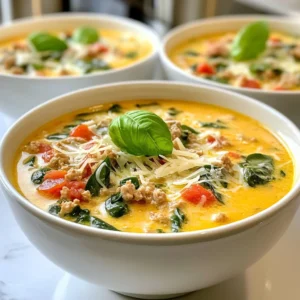
    Creamy Italian Ground Chicken Soup Hearty and Flavorful
  • - 4 boneless chicken thighs (or breasts), cut into pieces - 2 cups basmati rice, rinsed - 1 large onion, finely chopped - 3 cloves garlic, minced - 4 cups chicken broth - 1/4 cup plain yogurt - 2 tablespoons olive oil - 1 tablespoon ground cumin - 1 tablespoon ground coriander - 1 teaspoon ground turmeric - 1 teaspoon smoked paprika - 1/2 teaspoon cayenne pepper (adjust to taste) - Salt and pepper to taste - Fresh cilantro or parsley for garnish - Lemon wedges for serving In this dish, the chicken and rice shine together. The chicken provides a rich flavor. The basmati rice absorbs all the spices and broth, making it fragrant. You can try different chicken cuts if you want. Just keep in mind that cooking times may change. The spices make the meal pop with flavor. Cumin and coriander give warmth. Turmeric adds a nice color, while smoked paprika brings depth. Adjust the cayenne to fit your taste. Garnishing is simple but adds a fresh touch. Chopped cilantro or parsley brightens the dish. A squeeze of lemon gives it a zesty finish that pairs well with the spices. Enjoy this meal with your family or friends! {{ingredient_image_1}} First, gather your chicken and veggies. Cut four boneless chicken thighs into bite-sized pieces. Chop one large onion finely. Mince three cloves of garlic. This step sets the base for rich flavors in your dish. In a large pot, heat two tablespoons of olive oil over medium heat. Add the chopped onion and sauté until it turns soft, about five minutes. Next, add the minced garlic and cook for one more minute. This makes the kitchen smell amazing! Now, it’s time to add your spices. Sprinkle one tablespoon of ground cumin, one tablespoon of ground coriander, one teaspoon of ground turmeric, one teaspoon of smoked paprika, and half a teaspoon of cayenne pepper. Stir everything well and let it cook for one to two minutes. This helps the spices bloom. Add the chicken pieces to the pot. Cook them for about five to seven minutes until they are browned on all sides. This step adds great color and flavor to your chicken. Now, stir in two cups of rinsed basmati rice. Make sure the rice is coated with the spice mixture and chicken. This gives the rice a nice flavor. Pour in four cups of chicken broth. Bring it to a boil. Once boiling, lower the heat to low, cover the pot, and let it simmer for 18 to 20 minutes. This cooks the rice and helps it absorb all the tasty broth. After 20 minutes, turn off the heat and let it sit for five more minutes without lifting the lid. This resting time lets the rice fluff up. Finally, fluff the rice with a fork and mix in a quarter cup of plain yogurt. It adds a creamy touch to your dish. Adjust the seasoning if needed, and enjoy your flavorful meal! To get fluffy rice, rinsing is key. Rinse the basmati rice under cold water. This removes excess starch. Less starch means fluffier grains. Soak the rice for 20-30 minutes before cooking. This helps the grains expand. When you add the rice to the pot, stir gently. Avoid stirring too much while it cooks. This keeps the grains separate. Let the rice rest after cooking for 5 minutes. Fluff it with a fork for the best texture. You can tailor the spices to your liking. Start with the basic spice mix. This includes cumin, coriander, turmeric, paprika, and cayenne. If you like it spicy, add more cayenne pepper. If you prefer milder flavors, reduce it. Taste the dish while cooking. This helps you adjust the seasoning. Also, consider adding a pinch of salt. This enhances all the flavors in the dish. Don't hesitate to experiment with other spices. Cardamom or cinnamon can add a unique twist. For a creamier texture, mix in plain yogurt at the end. Stir it in after cooking the rice. This adds richness and a tangy flavor. You can also use sour cream or cream cheese. If you want a sauce, add more chicken broth. This makes a lovely gravy. A drizzle of olive oil before serving adds smoothness too. For a fresh touch, lemon juice brightens up the dish. Enjoy the creaminess with a squeeze of lemon on top. Pro Tips Marinate the Chicken: For deeper flavor, marinate the chicken in yogurt and spices for a few hours or overnight before cooking. Use Fresh Spices: Ensure your spices are fresh for the best flavor. Consider buying whole spices and grinding them just before use. Adjust Spice Levels: Feel free to adjust the cayenne pepper based on your heat preference. Start with less and add more if desired. Let It Rest: Allow the dish to sit for a few minutes after cooking before fluffing. This helps the flavors meld together. {{image_2}} You can use different cuts of chicken in this dish. Chicken thighs are my favorite. They stay juicy and tender. You can also use chicken breasts if you prefer. Breasts cook faster, so check them often. Adjust cooking time as needed. For a vegetarian or vegan twist, swap chicken for chickpeas or tofu. Both options work well. Use the same spices to keep the flavor strong. Add extra veggies like bell peppers or zucchini. They will give more texture and taste. Basmati rice is great, but you can try other types. Brown rice adds more fiber. It needs more liquid and time to cook, so adjust your broth amount. Quinoa is another option. It cooks faster and adds protein. Just rinse it before cooking to remove bitterness. Store your Shawarma Chicken and Rice in an airtight container. Let it cool first. You can keep it in the fridge for up to three days. Make sure to seal it well to keep flavors fresh. To reheat, you can use the microwave or the stove. If using a microwave, add a splash of water to keep it moist. Heat it in short bursts. Stir after each burst until warm. On the stove, use low heat and a bit of broth. Stir often until it’s hot all the way through. You can freeze this dish for later. Allow the chicken and rice to cool completely first. Then, place it in a freezer-safe container. It can last up to three months in the freezer. When ready to eat, thaw it in the fridge overnight. Reheat as mentioned above. This makes for a quick meal on busy days! Yes, you can use brown rice. However, cooking time changes. Brown rice takes longer to cook. You will need about 45-50 minutes. Also, add more broth to keep it moist. Start with 5 cups of broth for best results. If you lack chicken broth, try vegetable broth. Water works too, but add more spices. You can also use a mix of water and a bit of soy sauce for flavor. Adjust salt in the recipe, as soy sauce is salty. To add heat, increase cayenne pepper. You can also add fresh chili peppers when cooking. Another option is to serve with hot sauce on the side. Just remember to taste as you go, so it fits your spice level. This blog post covered a simple recipe for One Pot Shawarma Chicken and Rice. We explored main ingredients, spices, and optional garnishes. I shared step-by-step instructions for preparing everything perfectly. We also discussed tips for fluffy rice and variations to suit your needs. Finally, I included storage info and answers to common questions. Now you have the tools to make a tasty meal your way! Enjoy the cooking process and get creative with your dish.
    One Pot Shawarma Chicken and Rice Delightful Meal
  • Here’s what you need to make air fryer coconut shrimp: - 1 pound large shrimp, peeled and deveined - 1 cup all-purpose flour - 2 large eggs, beaten - 1 cup shredded coconut (sweetened or unsweetened) - 1 cup panko breadcrumbs - 1 teaspoon garlic powder - 1 teaspoon paprika - Salt and pepper to taste - Cooking spray Gathering fresh ingredients is key. I suggest using large shrimp. They give a nice bite and hold up well during cooking. You can choose sweetened or unsweetened coconut based on your taste. Panko breadcrumbs offer a light crunch, which is perfect for air frying. The garlic powder and paprika add a nice flavor kick. Adjust salt and pepper to your liking. Cooking spray is essential for that golden, crispy finish. Make sure to have everything ready before you start cooking. It makes the process smooth and fun! To start, you want to dry the shrimp. Use paper towels to pat them. This step is key because it removes excess moisture. A dry shrimp will hold the coating better. If you skip this, the coating might slide off. Now it’s time to get organized. You’ll need three separate bowls. In the first bowl, add flour mixed with garlic powder, paprika, salt, and pepper. In the second bowl, beat two large eggs. In the third bowl, mix shredded coconut and panko breadcrumbs. This setup makes the next steps easy and fun. This is where the magic happens. First, take a shrimp and dredge it in the flour mixture. Make sure it’s fully coated. Shake off any extra flour. Next, dip the flour-coated shrimp in the beaten eggs. Ensure it gets well covered. Finally, move it to the coconut and breadcrumb mix. Press the mixture onto the shrimp to help it stick. Repeat this for all the shrimp. Now we are ready to cook. Preheat your air fryer to 400°F (200°C) for about 5 minutes. Once hot, place the breaded shrimp in a single layer in the basket. Make sure they don’t overlap. This helps them cook evenly. Lightly spray the tops with cooking spray. This will make them extra crispy. Cook the shrimp for 8 to 10 minutes. Flip them halfway through for even cooking. They should be golden brown when done. Enjoy your crispy coconut shrimp! To get the best crisp on your coconut shrimp, do not overlap them in the air fryer. When shrimp overlap, they steam instead of fry. This can make them soggy. Keep them in a single layer. Use cooking spray to help achieve a golden, crispy finish. A light spray on the shrimp before cooking enhances the crunch. It also helps the coating brown evenly. Dipping sauces can elevate your shrimp. I love sweet chili sauce for its balance of heat and sweetness. Lime aioli offers a tangy twist that brightens the dish. Both sauces pair well with the coconut flavor. Serve your coconut shrimp with a side of rice or a fresh salad. A light mango salsa adds a fruity touch that complements the shrimp. Try serving with crispy fries for a fun twist. Enjoy these shrimp as an appetizer or a main dish. {{image_2}} To spice things up, add chili powder to the coating. This gives your shrimp a nice kick. Use one teaspoon of chili powder for a mild heat. If you want more spice, feel free to add more. It balances well with the sweet coconut. You can also mix in some cayenne for an extra punch. This change makes the shrimp exciting and fun. If you want a different crunch, try using crushed cornflakes. They give a unique texture. You can also use different types of breadcrumbs. For a more savory flavor, consider using seasoned breadcrumbs. This can enhance the taste of your shrimp. Experimenting with coatings can create a new favorite. If you need gluten-free options, almond flour works great. You can also use gluten-free breadcrumbs. These swaps keep the dish tasty while meeting dietary needs. It’s easy to adapt this recipe for everyone. Just ensure your ingredients are certified gluten-free. This way, you can enjoy coconut shrimp without worry. To keep your coconut shrimp fresh, place leftovers in an airtight container. Make sure the shrimp are cool before sealing. Refrigerate them within two hours of cooking. This helps prevent bacteria growth. Leftover coconut shrimp can last in the fridge for up to three days. If you want to keep them longer, freezing is a better option. When you reheat coconut shrimp, you want to keep them crisp. The best way to do this is to use the air fryer again. Preheat your air fryer to 350°F (175°C). Place the shrimp in a single layer. Heat them for about 5 minutes. This way, they regain their crunch without becoming soggy. You can also use an oven, but the air fryer works best. To freeze coconut shrimp, first cool them completely. Lay them on a baking sheet in a single layer. Freeze them for about an hour, until firm. Then, transfer the shrimp to a freezer-safe bag. Remove as much air as possible before sealing. They can stay in the freezer for up to three months. To thaw, place them in the fridge overnight before reheating. To make coconut shrimp, you start by patting the shrimp dry. This helps the coating stick. Next, set up a breading station with three bowls. One bowl holds flour mixed with garlic powder, paprika, salt, and pepper. The second bowl has beaten eggs. The third bowl combines shredded coconut and panko breadcrumbs. Dredge each shrimp in the flour mixture, dip it in the egg, and then coat it in the coconut mix. Preheat your air fryer to 400°F (200°C) for about five minutes. Arrange the shrimp in a single layer in the basket and spray them lightly with cooking spray. Cook them for 8 to 10 minutes, flipping halfway through. They should turn golden brown and be cooked through. Cook shrimp in an air fryer for 8 to 10 minutes at 400°F (200°C). Flip the shrimp halfway through cooking. This helps them crisp up evenly. When done, they should have a nice golden color. Yes, you can use frozen shrimp for this recipe. Just make sure to thaw them first. Place the frozen shrimp in the fridge overnight or run them under cold water. After thawing, pat them dry to remove any moisture. Then follow the same breading and cooking steps as with fresh shrimp. In this blog post, we explored how to make tasty coconut shrimp in an air fryer. We covered the ingredients, step-by-step instructions, and tips for the perfect bite. I shared variations and storage tips to help you enjoy this dish longer. Remember, air frying keeps it crispy and healthy. Get creative with dips and sides to enhance your meal. Enjoy every crunchy bite and have fun in the kitchen!
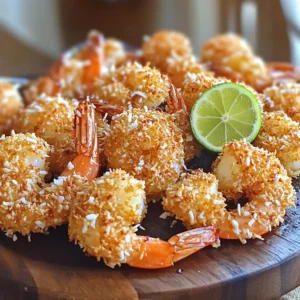
    Air Fryer Coconut Shrimp Crispy and Delicious Treat
  • To create delicious caramel apple cinnamon rolls, you will need the following key ingredients: - 2 cups all-purpose flour - 1 cup warm milk (110°F) - 2 tablespoons sugar - 1 packet (2 1/4 teaspoons) active dry yeast - 1/2 teaspoon salt - 1/4 cup unsalted butter, melted - 1 large egg - 1 teaspoon vanilla extract - 1 tablespoon cinnamon - 1 large apple, peeled and diced (preferably a tart variety like Granny Smith) - 1/3 cup brown sugar - 1/3 cup granulated sugar - 1/2 cup caramel sauce Each ingredient serves a purpose in this recipe. The flour forms the base of the dough. The warm milk activates the yeast. Sugar feeds the yeast and adds sweetness. Active dry yeast helps the dough rise. Salt boosts flavor and strengthens the dough. Melted butter adds richness. The egg binds the ingredients. Vanilla extract enhances taste. Cinnamon gives the rolls their signature flavor. The diced apple adds freshness and texture. The brown and granulated sugars create the sweet filling. Finally, caramel sauce drizzled on top adds a sweet finish. You can enhance your rolls with some optional ingredients: - Chopped nuts (like walnuts or pecans) for crunch - Extra spices (like nutmeg or ginger) for warmth - Cream cheese for a rich frosting - Dried fruits (like raisins or cranberries) for added sweetness These options allow you to customize your rolls, making them even more delightful. Start by getting a small bowl. Add warm milk, sugar, and yeast. Stir gently and let it sit for 5-10 minutes. You want it to become frothy. This shows the yeast is alive and ready to work. If it doesn’t froth, the yeast may be bad. Use fresh yeast for the best results. In a large bowl, combine the frothy yeast mixture with melted butter, egg, vanilla, flour, and salt. Mix until a dough forms. Pour some flour on your counter. Knead the dough for about 5 minutes. It should be smooth and elastic. Now, place it in a greased bowl. Cover it with a kitchen towel. Let it rise in a warm spot for about 1 hour. The dough should double in size. While the dough rises, prepare the filling. In a small bowl, mix brown sugar, granulated sugar, and cinnamon. Once the dough has risen, punch it down. Roll it out into a rectangle, about 12x18 inches. Spread the filling evenly over the dough. Then, sprinkle diced apples on top. Starting from one edge, roll the dough tightly into a log. Cut the log into 12 equal pieces. Arrange the rolls in a greased 9x13 inch baking dish. Drizzle caramel sauce over the top. Cover the dish with a towel and let the rolls rise for another 30 minutes. Preheat your oven to 350°F (175°C). Bake the rolls for 25-30 minutes, or until golden brown. Once baked, let them cool slightly. Drizzle more caramel sauce on top before serving. Enjoy your tasty treat! To make soft and fluffy rolls, knead the dough well. Knead it for about five minutes. This helps develop gluten, giving the dough strength. It should feel smooth and elastic. If it’s too sticky, add a bit of flour. If it’s too dry, add a splash of warm milk. You want it just right! For tender apples, use a tart variety like Granny Smith. Dice the apples small so they cook well. Mix them with sugar and cinnamon for flavor. This also helps keep them moist. If you want even softer apples, you can sauté them in a bit of butter before putting them in the rolls. Homemade caramel sauce is easy and tasty. Start with brown sugar and butter. Melt them in a pan over medium heat. Stir until it bubbles. Add a splash of cream for smoothness. Keep stirring to avoid burning. If you want a fun twist, try adding a pinch of sea salt! This gives it a nice balance with the sweet rolls. {{image_2}} You can use different fruits in these rolls. Try pears, peaches, or berries. Each fruit adds its own flavor. If you use pears, make sure they are ripe. For berries, fresh or frozen work well. Just remember to adjust the sugar based on the fruit's sweetness. If you need gluten-free rolls, use a gluten-free flour blend. Look for one that works for baking. You may need to add a bit more liquid. Keep an eye on the dough's texture. It should feel soft but not sticky. Follow the rest of the steps as usual, and enjoy gluten-free goodness! To make these rolls vegan, swap the milk for plant-based milk. Use flax eggs instead of a regular egg. Just mix one tablespoon of flaxseed meal with three tablespoons of water and let it sit. Replace butter with coconut oil or vegan butter. These simple swaps keep the rolls delicious and cruelty-free. To keep your leftover caramel apple cinnamon rolls fresh, place them in an airtight container. This helps maintain their soft texture. You can store them at room temperature for up to two days. If you want them to last longer, refrigerate them for up to a week. Just remember, they might dry out a bit in the fridge. Freezing cinnamon rolls is easy. First, let the rolls cool completely. Next, wrap each roll tightly in plastic wrap. Then, place them in a freezer-safe bag or container. You can freeze them for up to three months. When you’re ready to enjoy, just thaw them in the fridge overnight. Reheating your cinnamon rolls is simple. Preheat your oven to 350°F (175°C). Place the rolls on a baking sheet and cover them with foil. Heat for about 10-15 minutes. This keeps them warm and soft. If you prefer the microwave, heat each roll for 15-20 seconds. Add a drizzle of caramel sauce to make them extra special. Enjoy your tasty treat! Yes, you can make the dough ahead of time. After kneading, place it in a bowl. Cover it with plastic wrap. Chill it in the fridge for up to 24 hours. When you are ready, let it come to room temperature before rolling it out. I like to use tart apples like Granny Smith. They give a nice contrast to the sweet caramel. Other good choices include Honeycrisp or Braeburn. Avoid soft apples as they can turn mushy during baking. Yes, you can use premade dough. Choose a good quality dough for best results. Look for options that are fresh and easy to roll. This saves time and still allows for tasty rolls. Check the rolls after 25 minutes. They should be golden brown and puffed up. You can insert a toothpick into the center. If it comes out clean, the rolls are done. Enjoy the warm smell as they bake! This blog post covered everything you need for caramel apple cinnamon rolls. We talked about ingredients, from essential to optional, for adding flavor. We focused on step-by-step instructions for preparing the dough and filling. Tips helped ensure perfect texture and tender apples. We explored variations, storage, and answered common questions. Embrace this recipe to create warm, delicious rolls. Enjoy the sweet taste of success!
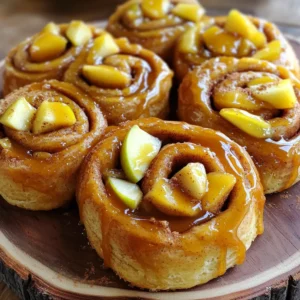
    Caramel Apple Cinnamon Rolls Irresistible Bakery Treat
  • To make the best apple cinnamon monkey bread, gather these simple ingredients: - 3 cups all-purpose flour - 1/4 cup granulated sugar - 1/4 teaspoon salt - 1 packet (2 1/4 teaspoons) active dry yeast - 1/2 cup warm milk (110°F) - 1/4 cup unsalted butter, melted - 1 large egg - 3 medium apples (like Granny Smith or Honeycrisp), peeled and diced - 1 tablespoon cinnamon - 1/2 cup brown sugar - 1/4 cup chopped walnuts (optional) - 1/4 cup powdered sugar (for glaze) - 1 tablespoon milk (for glaze) Each ingredient plays a role in making your monkey bread soft and tasty. The apples add a fresh burst of flavor. The cinnamon and brown sugar create a warm, sweet aroma. You can use walnuts for extra crunch, but they are optional. To start, you need warm milk. Heat it until it reaches 110°F. In a small bowl, mix the warm milk, yeast, and sugar. Let it sit for about 5-10 minutes. You will see bubbles forming. This means your yeast is alive and ready to work. In a large bowl, add 3 cups of flour and 1/4 teaspoon of salt. Make a well in the center. Pour in the yeast mixture, 1/4 cup of melted butter, and 1 large egg. Mix it all together until it forms a dough. Now, take the dough and knead it on a floured surface. Do this for about 5-7 minutes. Your dough should be smooth and elastic. This step is very important for the bread's texture. Place the kneaded dough in a greased bowl. Cover it with a kitchen towel and let it rise in a warm place. This should take about 1 hour. The dough will double in size. While it rises, prepare your apple mixture. In another bowl, mix 3 diced apples, 1/2 cup of brown sugar, and 1 tablespoon of cinnamon. If you like, add 1/4 cup of chopped walnuts for crunch. Set this aside. Once the dough has risen, punch it down gently. Tear off small pieces, about the size of a golf ball. Roll each piece into a ball. Dip each dough ball into melted butter and then roll it in cinnamon-sugar. Arrange half of these coated balls in a greased bundt pan. Layer half of the apple mixture over the dough. Then, add the rest of the dough balls. Finally, top with the remaining apple mixture. Cover the bundt pan with a towel. Let it rise again for 20-30 minutes. Preheat your oven to 350°F (175°C). Once the second rise is done, bake the monkey bread for 30-35 minutes. It should be golden brown, and a toothpick should come out clean. After baking, cool the monkey bread for about 10 minutes. Then, invert it onto a serving platter. For a sweet finish, make the glaze. Whisk together 1/4 cup of powdered sugar and 1 tablespoon of milk. Drizzle it over the warm monkey bread. Enjoy the warm, gooey goodness! To get the right texture for your monkey bread, kneading is key. Knead the dough for about 5-7 minutes. This helps the dough become smooth and elastic. If the dough is sticky, add a little more flour. It should feel soft but not wet. Managing rise times is also important. Let the dough rise in a warm spot, covered with a towel. This helps it double in size. Aim for about 1 hour for the first rise. For the second rise, let it sit for 20-30 minutes. This gives it a light, fluffy texture. To boost flavor, consider adding other spices. Nutmeg or allspice can add a nice touch. If you want a different twist, try adding vanilla extract to the dough. It will make your monkey bread even more fragrant. Apples are the star of this recipe. Granny Smith apples give a tartness, while Honeycrisp offers sweetness. You can mix different types for a balance of flavors. Don’t be afraid to experiment with your favorite apples! For a beautiful presentation, serve the monkey bread warm on a nice platter. Dust it with extra powdered sugar for a sweet touch. You can also drizzle the glaze on top for added flavor. Pairing your monkey bread with ice cream is a treat. Vanilla ice cream works well and adds creaminess. The warm bread and cold ice cream create a perfect contrast. You can also serve it with whipped cream or a cup of coffee for a cozy dessert. {{image_2}} For a gluten-free version, you can use a gluten-free flour blend. Look for a blend that includes xanthan gum, as this helps with texture. You can also mix almond flour and coconut flour. This combination gives a nice taste and a soft texture. To make this monkey bread vegan, replace the egg with a flax egg. Mix one tablespoon of ground flaxseed with three tablespoons of water. Let it sit for a few minutes until it thickens. For the butter, use a vegan butter substitute or coconut oil. This keeps the bread moist and rich. You can change the taste by using other fruits. Try pears, peaches, or even berries. You can also add chocolate chips or caramel for a sweet twist. Experimenting with spices like nutmeg or ginger can add depth too. These variations can make your monkey bread unique and fun! To keep your apple cinnamon monkey bread fresh, wrap it tightly in plastic wrap. You can also store it in an airtight container. This helps to keep the moisture in and prevents it from drying out. If you want to freeze it, slice the bread first. Then, wrap each piece in plastic wrap, followed by aluminum foil. This method protects it from freezer burn and keeps it tasty. When you want to enjoy your leftovers, preheat your oven to 350°F. Place the monkey bread on a baking sheet. Cover it with foil to keep it moist while it warms. Heat for about 10-15 minutes or until it's warm all the way through. You can also use a microwave. Just heat it for 15-20 seconds at a time, checking to avoid overheating. If stored properly in the fridge, your monkey bread can last up to four days. For frozen bread, it can stay good for about three months. Just remember, the sooner you eat it, the better the flavor will be! Yes, you can make this recipe ahead of time. Prepare the dough and let it rise. Then, cover it and place it in the fridge overnight. When you are ready to bake, let it warm up for about 30 minutes before baking. I recommend using tart apples like Granny Smith or sweet apples like Honeycrisp. These apples hold their shape and add great flavor. Their mix gives you a nice balance of sweet and tart in each bite. Absolutely! Store-bought dough can save time and effort. You can use biscuit dough or even pizza dough for a quick option. Just remember that the flavor and texture may vary a bit from the homemade version. The monkey bread is done when it's golden brown on top. You can also insert a toothpick into the center. If it comes out clean, your monkey bread is ready. It should feel firm to the touch as well. Yes, feel free to be creative! Chocolate chips or dried fruit like raisins or cranberries can add great flavor. Just keep the balance in mind. Too many mix-ins can make the dough heavy, so adjust accordingly. This blog post covered all you need to know to make delicious monkey bread. We explored the key ingredients, step-by-step instructions, and helpful tips. I shared variations for gluten-free and vegan options, plus storage and reheating advice. With all these details, you can impress anyone with your baking. Enjoy the process and have fun with flavors! I can’t wait to hear how your monkey bread turns out.
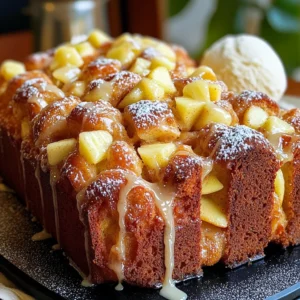
    Apple Cinnamon Monkey Bread Irresistible and Easy Recipe
  • - 2 cans (14 ounces each) of diced tomatoes (with juice) - 1 medium onion, chopped - 3 cloves garlic, minced These main ingredients form the heart of your soup. The diced tomatoes bring a rich, tangy flavor and a bright color. The chopped onion adds sweetness and depth. Minced garlic gives a wonderful aroma and spice that makes the soup so inviting. - 1 cup vegetable broth - 1 teaspoon dried oregano - 1 teaspoon sugar - 1/4 teaspoon red pepper flakes (optional) The vegetable broth serves as the base for your soup, adding moisture and a savory taste. Dried oregano gives a nice herbal note. The sugar balances the acidity of the tomatoes, making the flavor smoother. If you like a kick, the red pepper flakes add just the right amount of heat without overpowering the dish. - 1 cup fresh basil leaves, chopped - 1/2 cup heavy cream or coconut milk - Salt and pepper to taste Fresh basil is the star here. It brings a fresh, vibrant taste that brightens the soup. Heavy cream adds richness, while coconut milk offers a dairy-free alternative. Salt and pepper are essential for rounding out the flavors. Adjust them to your liking for the best taste experience. First, gather all your ingredients. You need two cans of diced tomatoes, a medium onion, and three cloves of garlic. Start by chopping the onion into small pieces. Next, mince the garlic until it’s fine. This helps to release its flavor. Measure out one cup of vegetable broth. Then, get one teaspoon of dried oregano, one teaspoon of sugar, and a quarter teaspoon of red pepper flakes if you want some heat. Lastly, chop one cup of fresh basil leaves for later. Now, it’s time to cook! In your slow cooker, combine the diced tomatoes (with juice), chopped onion, and minced garlic. Pour in the vegetable broth. Add the dried oregano, sugar, and red pepper flakes. Stir the mixture well to blend the flavors. Cover the slow cooker. You can set it to low for about six to eight hours or high for three to four hours. The soup is done when the vegetables are tender. When the cooking time is up, it's blending time! Use an immersion blender to puree the soup until it’s smooth. If you don’t have one, carefully transfer the soup to a blender in small batches. After blending, stir in the chopped basil and half a cup of heavy cream or coconut milk. This adds a creamy texture. Season with salt and pepper to taste. Let the soup warm for another thirty minutes in the slow cooker. Serve hot, and don’t forget to garnish with extra fresh basil leaves! To make your soup taste just right, I suggest adjusting the seasonings. Start with salt and pepper. Add a little, then taste. If you want more flavor, add more spices. Balancing acidity is key. If your soup tastes too sour, add sugar. Start with one teaspoon. This small touch can make a big difference. Blending is important for a smooth soup. You can use an immersion blender. If you don’t have one, a regular blender works. Just blend in small batches to avoid spills. If you want a thicker soup, you have options. You can add a bit of cornstarch mixed with water. Or, try adding some cooked potatoes for a creamy texture. Garnishing makes your soup look special. Use fresh basil leaves on top. This adds color and a fresh taste. For serving, bread is a great choice. A slice of crusty bread pairs well. It makes your meal feel cozy and complete. {{image_2}} You can make this soup dairy-free by using coconut milk instead of heavy cream. Coconut milk adds a rich, creamy texture without dairy. It also gives a subtle sweetness that balances the tomato's acidity. When you add coconut milk, stir well to blend it into the soup. This option is perfect for those who avoid dairy but still want comfort in every bite. You can boost the nutrition and flavor by adding more vegetables. Carrots and zucchini work well in this soup. Chop them into small pieces and add them to the slow cooker with the other ingredients. They will cook down nicely and add a lovely texture. You can also try bell peppers or spinach for extra color and taste. The more veggies you add, the heartier the soup will be. While basil is the star in this recipe, you can switch it up. Try using thyme or parsley if you want a different flavor. You can also add spices like smoked paprika or cumin for warmth. These spices can give a unique twist to the soup. Experiment with what you like best to create your own version of this comforting dish. To keep your soup fresh, let it cool first. Pour it into airtight containers. Glass jars or plastic containers work well. Label the containers with the date. Store them in the fridge for up to five days. This way, you can enjoy your soup later. To freeze the soup, let it cool completely. Use freezer-safe bags or containers. Pour the soup in, leaving some room for expansion. Seal tightly and label with the date. To reheat, thaw it overnight in the fridge. Heat it on the stove or in the microwave. Stir well to ensure even heating. In the fridge, your soup lasts about five days. In the freezer, it can last up to three months. This makes it easy to enjoy a warm bowl of soup anytime! Yes, you can use fresh tomatoes! Start with about 2 pounds of ripe tomatoes. - Blanch them in boiling water for 1 minute. - Then, cool them in ice water and peel off the skin. - Chop the tomatoes before adding them to the slow cooker. Using fresh tomatoes gives the soup a bright flavor. To add some heat, try these options: - Add more red pepper flakes, about 1/2 teaspoon. - Toss in a chopped jalapeño or serrano pepper. - Use a dash of hot sauce when blending the soup. These tweaks will wake up your taste buds. This soup pairs well with many sides. Here are some great options: - Grilled cheese sandwiches for a classic combo. - Crusty bread for dipping and soaking up the soup. - A fresh garden salad to balance the meal. Each option makes for a delightful dining experience. This blog post guides you through making a simple tomato basil soup. We covered the main ingredients needed to create a tasty base, plus how to enhance flavors and textures. You learned step-by-step instructions for cooking and finishing your soup, and discovered helpful tips for storing leftovers. In closing, keep experimenting with flavors and variations. Enjoy this comforting meal with family or friends. Your tomato basil soup journey starts today, so get cooking and savor every bite!
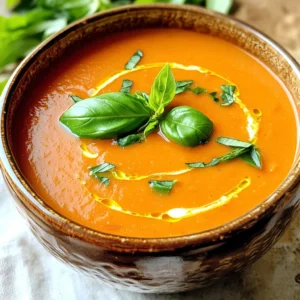
    Slow Cooker Tomato Basil Soup Comfort in Every Bite
  • - 1 cup pumpkin puree - ½ cup brown sugar - ½ cup granulated sugar - ½ cup vegetable oil - 2 eggs These main ingredients bring the rich flavor of pumpkin to the loaf. Pumpkin puree gives moisture and a slight sweetness. The sugars balance this with a touch of caramel notes. Vegetable oil keeps the loaf tender and soft. Eggs help bind everything together, making it fluffy. - 1 ½ cups all-purpose flour - 1 teaspoon baking soda - ½ teaspoon baking powder - 1 teaspoon ground cinnamon - ½ teaspoon ground nutmeg - ¼ teaspoon ground ginger - ½ teaspoon salt The dry ingredients create structure. All-purpose flour forms the base. Baking soda and powder help the loaf rise. The spices add warmth and flavor, while salt enhances the taste. Each ingredient plays a key role in creating a delicious loaf. - 1 cup semi-sweet chocolate chips - ½ cup all-purpose flour (for streusel) - ¼ cup brown sugar (for streusel) - ¼ cup rolled oats (for streusel) - ¼ teaspoon ground cinnamon (for streusel) - 4 tablespoons cold butter, cubed (for streusel) The chocolate chips provide sweet bursts in every slice. The streusel topping adds a crunchy, sweet layer. Mixing the flour, sugar, oats, and cinnamon with cold butter creates a crumbly topping. This adds texture and makes the loaf even more inviting. 1. Preheat your oven to 350°F (175°C). Grease a 9x5-inch loaf pan with butter or non-stick spray. This step helps the loaf come out easily. 2. In a large bowl, whisk together 1 cup pumpkin puree, ½ cup brown sugar, ½ cup granulated sugar, ½ cup vegetable oil, 2 eggs, and 1 teaspoon vanilla extract. Mix until smooth. This blend gives the loaf its rich flavor. 3. In a separate bowl, combine 1 ½ cups all-purpose flour, 1 teaspoon baking soda, ½ teaspoon baking powder, 1 teaspoon ground cinnamon, ½ teaspoon ground nutmeg, ¼ teaspoon ground ginger, and ½ teaspoon salt. Mixing dry ingredients first ensures even rising and flavor. 4. Gradually add the dry mixture to the wet mixture. Stir until just combined. Be careful not to over-mix, as this can make the loaf tough. 5. Fold in 1 cup semi-sweet chocolate chips until they are evenly spread throughout the batter. These chocolate bits add a sweet surprise in every slice. 6. In a small bowl, mix together ½ cup all-purpose flour, ¼ cup brown sugar, ¼ cup rolled oats, and ¼ teaspoon ground cinnamon. This mix creates a sweet and crunchy topping. 7. Add 4 tablespoons cold butter, cubed. Use your fingers or a pastry cutter to mix until the mixture looks like coarse crumbs. This step is key for a great texture. 8. Pour the batter into the prepared loaf pan. Spread it evenly. Then, sprinkle the streusel topping over the loaf batter. This gives it a lovely look and taste. 9. Bake in your preheated oven for 55-65 minutes. Check doneness by inserting a toothpick into the center. It should come out clean when the loaf is done. 10. Allow the loaf to cool in the pan for 10 minutes. Then, transfer it to a wire rack to cool completely. This cooling step helps the loaf set up nicely for slicing. To ensure even baking, I suggest rotating your loaf pan halfway through cooking. This simple step helps bake every side evenly. If you bake at high altitude, reduce the sugar by 1-2 tablespoons. This keeps your loaf from rising too fast and then collapsing. If you don’t have pumpkin puree, try using applesauce or mashed bananas. These add moisture and sweetness too. For a healthier option, swap granulated sugar with coconut sugar or honey. Both options give a different yet delightful flavor. Slice your loaf into thick, even pieces for a pretty display. Serve it on a decorative platter to impress guests. To enhance the look, drizzle caramel sauce over the slices or sprinkle them with powdered sugar. These little touches make a big difference! {{image_2}} You can easily change the flavor of your Pumpkin Chocolate Chip Streusel Loaf. Here are some great ideas: - Adding nuts: Toss in chopped walnuts or pecans to add crunch. Nuts also bring a nice rich flavor. - Spice adjustments: Want more warmth? Add extra cinnamon or a pinch of allspice. You can also reduce the ginger if you find it too strong. These simple swaps can make your loaf unique and fun to enjoy! If you have dietary needs, you can still enjoy this loaf. Here are two options: - Gluten-free options: Use a gluten-free flour blend in place of all-purpose flour. This keeps the loaf light and tasty. - Vegan adaptations: Replace the eggs with flax eggs or applesauce. Use a plant-based oil and dairy-free chocolate chips, too. This way, everyone can enjoy a slice! These variations help you cater to different diets while keeping the flavor intact. To keep your Pumpkin Chocolate Chip Streusel Loaf fresh, wrap it well. Use plastic wrap or foil for best results. Store it at room temperature for up to three days. You can also keep it in the fridge for about a week. If you store it in the fridge, the loaf may dry out. So, enjoy it quickly! To freeze the loaf, first, let it cool completely. Once cool, wrap it tightly in plastic wrap or aluminum foil. Then, place it in a freezer-safe bag. This helps avoid freezer burn. You can freeze it for up to three months. When you’re ready to eat, take it out and thaw it in the fridge overnight. For reheating, slice the loaf and heat it in the oven at 350°F (175°C) for about 10 minutes. You can also use the microwave for about 20-30 seconds. Enjoy your delicious loaf warm! Can I use fresh pumpkin instead of canned? Yes, you can use fresh pumpkin. First, cook the pumpkin until soft. Then, puree it until smooth. This fresh taste can add a nice twist to your loaf. How do I know when the loaf is fully baked? Check the loaf with a toothpick. Insert it into the center. If it comes out clean, your loaf is done. The top should also look golden brown. What beverages pair well with the loaf? This loaf goes great with coffee or tea. You can also try it with warm cider. The flavors blend well, making every bite better. How should I serve leftovers? Store leftovers in an airtight container. You can leave them at room temperature for a few days. For longer storage, keep them in the fridge. Reheat slices in the microwave for a cozy treat. Why did my loaf collapse? Your loaf may collapse if it had too much moisture. This can happen from overmixing or adding too many wet ingredients. Be sure to follow the recipe closely for the best results. Adjusting sweetness – what to do? If you find your loaf too sweet, reduce the sugar next time. You can also add a pinch of salt to balance it out. Tasting the batter is a good way to check sweetness levels before baking. This post covered how to make a delicious pumpkin loaf. We discussed the key ingredients, like pumpkin puree and chocolate chips. You learned step-by-step instructions to create the batter and bake it perfectly. I also shared tips for storing and freezing, as well as different variations for your tastes. Overall, this loaf is a great fall treat. With simple steps and options for everyone, you'll enjoy making it. Happy baking!
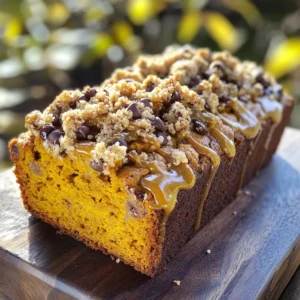
    Pumpkin Chocolate Chip Streusel Loaf Deliciously Simple
  • - 1 lb boneless, skinless chicken breasts, cubed - 8 oz fettuccine pasta - 2 cups chicken broth - 1 cup heavy cream - 1 cup grated Parmesan cheese - 3 cloves garlic, minced - 1 tablespoon olive oil - 1 teaspoon Italian seasoning - Salt and pepper to taste - Fresh parsley, chopped (for garnish) In this recipe, the key elements come together to create a rich and creamy dish. The chicken breasts provide a tender protein base that cooks quickly in the Instant Pot. Fettuccine pasta absorbs the flavors from the sauce while cooking in the broth. I use heavy cream to give the sauce that desired richness. Grated Parmesan cheese adds a salty depth that makes the dish truly special. To elevate the flavor, I add minced garlic, which brings in a lovely aroma. Olive oil helps to sauté the chicken, enhancing its taste. Italian seasoning adds a hint of herbs, while salt and pepper balance the flavors. Lastly, fresh parsley not only garnishes the dish but also gives it a pop of color. These ingredients come together in a quick and easy way. You’ll find that each step builds on the last, making the cooking process fun and rewarding. {{ingredient_image_1}} - Set your Instant Pot to sauté. Add 1 tablespoon of olive oil. - Once hot, add 1 pound of cubed chicken breasts. - Season the chicken with salt, pepper, and 1 teaspoon of Italian seasoning. - Sauté the chicken until browned, which takes about 5 minutes. - Next, add 3 minced garlic cloves. Sauté for another minute to bring out the flavor. - After the chicken is cooked, pour in 2 cups of chicken broth. - Scrape the bottom of the pot to remove any browned bits. This adds flavor. - Now, take 8 ounces of fettuccine and break it in half. Add it to the pot. - Make sure the pasta is fully submerged in the broth. - Close the Instant Pot lid and set the valve to sealing. - Cook on high pressure for 6 minutes. - Once the cooking time is done, do a quick release of the pressure. - Carefully open the lid and stir in 1 cup of heavy cream. - Add 1 cup of grated Parmesan cheese and mix until smooth. - If the sauce is too thick, add a bit more chicken broth to reach your desired consistency. - Taste the sauce and adjust the seasoning with salt and pepper if needed. To avoid overcooked pasta, follow these steps: - Break the fettuccine in half before adding it to the pot. - Make sure the pasta is fully submerged in chicken broth. - Cook on high pressure for just 6 minutes. For a creamy sauce, keep these tips in mind: - Use heavy cream for rich texture and flavor. - Stir in the grated Parmesan cheese after cooking. - If the sauce is too thick, add more broth gradually. Here are common mistakes to avoid when using the Instant Pot: - Do not skip the deglazing step; it adds flavor. - Ensure the sealing valve is in the correct position. - Avoid overfilling the pot; it can affect pressure. Troubleshooting pressure cooking can be simple: - If the pot doesn’t reach pressure, check the sealing ring. - Make sure your lid is locked properly. - If food is stuck, try adding more liquid for steam. For great pairings, consider these side dishes and beverages: - A light salad with lemon vinaigrette complements the dish. - Garlic bread is always a favorite with pasta. - A crisp white wine, like Pinot Grigio, pairs well too. To make your meal look special, try these plating ideas: - Use a large plate and twirl the pasta for height. - Sprinkle parsley on top for color. - Add a drizzle of olive oil for shine and flavor. Pro Tips Chicken Searing: Make sure to sear the chicken well to enhance flavor. Browning it creates a delicious depth in your dish. Pasta Cooking: Breaking the fettuccine ensures it fits easily in the pot and cooks evenly without sticking together. Sauce Consistency: If your alfredo sauce is too thick, gradually add more chicken broth until you achieve the desired creaminess. Garnishing: Fresh parsley not only adds color but also a bright flavor that complements the richness of the dish. {{image_2}} If you need gluten-free pasta, choose brown rice or quinoa pasta. Both cook well in the Instant Pot. For a dairy-free Alfredo, use coconut cream or cashew cream. These options can still give you a creamy texture. You can also try nutritional yeast for a cheesy flavor without dairy. Adding veggies boosts flavor and nutrition. Broccoli and spinach are great choices. You can stir them in just before the final sauce mix. Try different cheeses, like mozzarella or Gouda, for a unique taste. These will change the dish’s character and keep it exciting. To add heat, use red pepper flakes or hot sauce. Start with a pinch and taste as you go. You can also add fresh jalapeños for a kick. These spices can make your Chicken Alfredo pop with flavor. To keep your chicken Alfredo fresh, store it in an airtight container. This helps to lock in flavor and moisture. If you plan to eat it within a few days, place it in the fridge. For longer storage, freezing is a great option. Divide the dish into meal-sized portions before freezing. This way, you can reheat just what you need. To reheat, I recommend using the stovetop or microwave. If using the stovetop, warm it in a pan over low heat. Stir often to avoid burning. If you choose the microwave, heat in short bursts. Stop and stir every minute. If the sauce is thick, add a splash of chicken broth or cream. This will help refresh the sauce and keep it creamy. In the fridge, chicken Alfredo lasts about 3 to 4 days. If you freeze it, it can stay good for up to 2 months. Always check for signs of spoilage before eating. Look for changes in color or odor. If something seems off, it's best to toss it. To make Chicken Alfredo without cream, use unsweetened almond milk or coconut milk. You can also use a mix of chicken broth and nutritional yeast for a creamy feel. Adjust the seasoning to enhance flavor. This keeps the dish lighter while still tasty. Yes, you can use frozen chicken breasts. Just add a few extra minutes to the cooking time. Make sure the chicken is fully cooked to at least 165°F (75°C). Always check the internal temperature with a meat thermometer for safety. If your sauce is too thick, add more chicken broth. Start with a small amount, about a quarter cup. Stir well and check the consistency. You can adjust until it meets your liking. This will keep the sauce creamy and smooth. To double the recipe, simply increase the ingredients. Ensure you do not exceed the maximum fill line of the pot. Cooking time may remain the same, but check if the chicken is cooked through. Always ensure safety with thicker meals. Yes, it is safe to use quick release for this dish. Quick release helps prevent the pasta from overcooking. Just be careful of the steam. Use a kitchen towel or pot holder to protect your hands when releasing the pressure. In this article, we explored creating a savory Chicken Alfredo in the Instant Pot. We covered essential ingredients like chicken, fettuccine, and heavy cream. You learned step-by-step instructions, plus tips for perfecting the dish. Variations gave you options for dietary needs or flavor twists. Finally, we shared storage tips to keep leftovers fresh. Now, you can confidently make a delicious Chicken Alfredo, tailor it to your taste, and enjoy every bite. Cooking should be fun and rewarding!
    Instant Pot Chicken Alfredo Quick and Creamy Meal
  • To make this tasty dish, you will need the following ingredients: - 2 tablespoons olive oil - 1 pound chicken breast, diced - 3 cloves garlic, minced - 2 cups chicken broth - 1 cup heavy cream - 12 ounces penne pasta (or pasta of choice) - 1/2 cup basil pesto (store-bought or homemade) - 1 cup cherry tomatoes, halved - 1/2 cup grated Parmesan cheese - Salt and pepper to taste - Fresh basil leaves for garnish These ingredients come together to create creamy, flavorful pasta. The chicken adds protein, while the pesto brings a burst of fresh taste. You will need some basic kitchen tools to prepare this meal: - Large pot - Cutting board - Knife - Wooden spoon or spatula - Measuring cups and spoons Having the right tools makes cooking easier and more fun. If you want to switch things up, here are some great alternatives: - Use turkey or shrimp instead of chicken for a different protein. - Swap heavy cream for coconut cream for a dairy-free option. - Try whole wheat or gluten-free pasta for a healthier choice. - Use different vegetables like spinach or bell peppers for added flavor and nutrition. These substitutions allow you to customize the dish to your taste and dietary needs. Start by gathering your ingredients. Use 2 tablespoons of olive oil in a large pot. Heat the oil over medium heat. Next, take 1 pound of diced chicken breast. Season it with salt and pepper. Cook the chicken for about 5-7 minutes. You want it to turn golden and no longer look pink. As the chicken cooks, chop 3 cloves of garlic. Once the chicken is ready, add the minced garlic to the pot. Sauté for about 30 seconds. The garlic should smell fragrant at this point. Now, pour in 2 cups of chicken broth. Bring it to a gentle simmer. Take 12 ounces of penne pasta or your choice. Stir the pasta into the pot, ensuring it’s fully submerged. Cover the pot and let it cook for about 10 minutes. Stir occasionally to prevent sticking. Check the pasta after 10 minutes. It should be al dente, meaning it still has a slight bite. Once the pasta is cooked, lower the heat. Add 1 cup of heavy cream and 1/2 cup of basil pesto. Toss in 1 cup of halved cherry tomatoes. Mix everything well so it combines. Gradually add 1/2 cup of grated Parmesan cheese. Stir until it melts and the dish gets creamy. Taste the dish and add salt and pepper as needed. Let it cook for another 2-3 minutes while stirring. Finally, take the pot off the heat. Garnish with fresh basil leaves before serving. Enjoy your one-pot creamy pesto chicken pasta! To get a creamy texture, use heavy cream. It makes the sauce rich and smooth. Add the cream slowly to the pot after cooking the pasta. Stir well to mix. The heat will help blend the cream with other ingredients. You can also add a little pasta water to help it combine better. This water is starchy and helps the sauce stick. Timing is key for great pasta. Start cooking the pasta when the chicken is almost done. This way, the pasta and chicken finish at the same time. Cook the pasta for about 10 minutes. Stir it often to keep it from sticking. You want it al dente, meaning it should have a slight bite. This texture will hold up well when you mix in the cream and pesto. Want to kick up the flavor? Try adding more garlic or some crushed red pepper flakes. They bring a nice zing to the dish. You can also add fresh veggies, like spinach or bell peppers, for extra color and nutrients. If you love cheese, sprinkle more Parmesan on top before serving. Fresh basil leaves make a lovely garnish and add aroma too. {{image_2}} To make a vegetarian version, swap the chicken for mushrooms. Choose 8 ounces of sliced mushrooms and 2 cups of fresh spinach. Sauté the mushrooms in olive oil until they are soft and golden. Then add the garlic and follow the same steps for cooking. The mushrooms add a meaty texture, while the spinach brings a fresh taste. If you need a gluten-free meal, use gluten-free pasta. Many brands offer penne shapes that cook well. You can also try rice pasta or chickpea pasta. These options keep the dish tasty and satisfying. Just follow the package instructions for cooking times, as they may differ from regular pasta. Boost the nutrition by adding more veggies. Try bell peppers, zucchini, or broccoli. Dice the veggies and add them when you sauté the garlic. They will cook quickly and blend well with the sauce. This not only makes the dish colorful but also adds vitamins and fiber. After you enjoy your One-Pot Creamy Pesto Chicken Pasta, store any leftovers properly. Use an airtight container to keep the pasta fresh. Let the dish cool down before sealing it. This step helps prevent moisture buildup. You can keep it in the fridge for up to three days. If you want to enjoy it later, consider freezing some. When it’s time to eat your leftovers, you can reheat them easily. Place the pasta in a pot over low heat. Add a splash of chicken broth or cream to keep it creamy. Stir often to heat evenly. You can also use the microwave. Put the pasta in a microwave-safe bowl and cover it. Heat on medium power in short bursts to avoid overcooking. If you have extra pasta, freezing is a great option. First, let it cool completely. Then, divide it into portions. Use freezer bags or airtight containers to store them. Don’t forget to squeeze out as much air as you can. This way, it stays fresh for up to three months. When you're ready to eat, thaw it in the fridge overnight. Reheat as mentioned, and enjoy your meal again! Yes, you can use any pasta you like. I often use penne, but you can try fusilli, rotini, or even spaghetti. Just keep an eye on the cooking time. Different shapes may cook at different rates. To make homemade pesto, blend fresh basil, garlic, pine nuts, olive oil, and Parmesan cheese. Start with the basil and garlic, then add nuts. Blend while adding oil. This gives a fresh taste, unlike store-bought pesto. To make this dish dairy-free, swap heavy cream for coconut milk or almond milk. Use nutritional yeast instead of Parmesan cheese. These swaps keep the creaminess without dairy. This creamy pesto chicken pasta lasts about 3 to 4 days in the fridge. Store it in an airtight container. Reheat gently to avoid drying it out. Enjoy it again without hassle! This blog post covered how to make One-Pot Creamy Pesto Chicken Pasta. We discussed the key ingredients, cooking tools, and possible swaps. I provided clear steps to prepare the dish, tips for the creamiest texture, and ways to mix it up with variations. I also addressed storage and common questions. Enjoy your creamy pasta with confidence. Experiment with flavors and ingredients that suit your taste. Happy cooking!
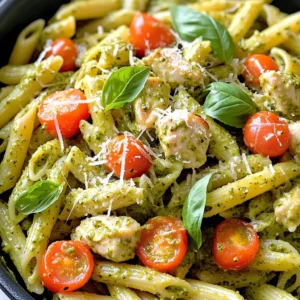
    One-Pot Creamy Pesto Chicken Pasta Delightful Meal
  • To make pumpkin spice energy balls, you need these main ingredients: - 1 cup rolled oats - 1/2 cup canned pumpkin puree - 1/2 cup almond butter (or any nut butter of choice) - 1/4 cup honey or maple syrup - 1/4 cup ground flaxseed - 1 teaspoon pumpkin pie spice (or a mix of cinnamon, nutmeg, ginger, and cloves) - 1/2 teaspoon vanilla extract - Pinch of salt These ingredients blend to create a tasty and nutritious snack. The oats provide fiber, while pumpkin adds moisture and flavor. Nut butter gives healthy fats, and honey or maple syrup sweetens the mix. You can enhance the flavor with mini dark chocolate chips. Adding 1/4 cup gives a sweet touch and fun texture. You can also try adding a scoop of protein powder for extra nutrition. This can make your energy balls even more filling. You can switch up ingredients if you like. If you have no almond butter, try peanut butter or sunflower seed butter. For a vegan option, use maple syrup instead of honey. If you want a nut-free version, use sunbutter. You can also replace flaxseed with chia seeds for a different twist. Start by gathering all your ingredients. You will need: - 1 cup rolled oats - 1/2 cup canned pumpkin puree - 1/2 cup almond butter (or any nut butter of choice) - 1/4 cup honey or maple syrup - 1/4 cup ground flaxseed - 1 teaspoon pumpkin pie spice - 1/2 teaspoon vanilla extract - 1/4 cup mini dark chocolate chips (optional) - Pinch of salt In a large mixing bowl, combine the rolled oats, pumpkin puree, almond butter, and honey. Mix these well until they form a thick, sticky mixture. This step is key to making sure the balls hold together later. Next, add the ground flaxseed, pumpkin pie spice, vanilla extract, and a pinch of salt. Stir until everything is well blended. If you want a sweeter treat, now is the time to fold in the mini dark chocolate chips. They add a nice touch! Once mixed, take small amounts of the mixture and roll them into balls about 1 inch in size. Place these energy balls on a parchment-lined baking sheet. This keeps them from sticking and makes cleanup easier. After rolling all the mixture into balls, pop the tray into the fridge. Chill them for at least 30 minutes. This step helps the energy balls firm up nicely. Once cooled, store them in an airtight container in the fridge. They will stay fresh for up to a week. If you want them to last longer, freeze them! To get the best texture for your energy balls, focus on the mix. You want a thick and sticky blend. If it feels too dry, add a splash of pumpkin puree or a bit more nut butter. If it's too wet, add a little more oats or flaxseed. This mix should hold together well when you form the balls. I love almond butter, but you can choose other nut butters too. Peanut butter gives a strong flavor. Cashew butter is creamy and sweet. Sunflower seed butter works well if you need a nut-free option. Each nut butter adds its own taste and texture, so try different ones to find your favorite! Honey and maple syrup are great natural sweeteners. Honey adds a rich taste, while maple syrup brings a unique flavor. If you want less sugar, use mashed bananas or dates. These options will keep your energy balls sweet and tasty without adding too much sugar. Adjust the amount based on your taste. {{image_2}} You can make pumpkin spice energy balls even tastier by adding fun mix-ins. Try adding: - Chopped nuts, like walnuts or pecans - Dried fruit, such as cranberries or raisins - Seeds, like chia or sunflower seeds - Coconut flakes for a tropical twist Each of these add-ins adds a new layer of flavor and texture. You can customize your energy balls. Just remember to keep the balance between wet and dry ingredients. This keeps your energy balls from becoming too sticky or too dry. While pumpkin pie spice is great, you can change it up. Try different spice blends to create unique flavors. Here are some ideas: - Use just cinnamon for a warm, sweet touch - Add cardamom for a floral note - Mix in cayenne for a spicy kick Experimenting with spices opens up new taste experiences. You can focus on what you like best. Adjust the spice amounts to fit your taste. This fun twist keeps the recipe fresh and exciting. To make these energy balls gluten-free, use certified gluten-free oats. Most nut butters are already gluten-free, but check labels. If you want dairy-free options, simply skip the chocolate chips or choose dairy-free ones. You can also swap the sweetener. Use agave syrup or coconut sugar as alternatives. These small changes allow everyone to enjoy the energy balls. You can share them with friends and family, no matter their dietary needs. To keep your pumpkin spice energy balls fresh, store them in an airtight container. Place them in the fridge after they firm up. This helps maintain their taste and texture. Always use a clean spoon to scoop them out. This prevents any moisture from spoiling the batch. If you want to save some for later, freezing works well. First, place the energy balls on a baking sheet. Make sure they are not touching each other. Freeze them for about 1 hour until firm. Then, transfer the balls to a freezer-safe bag or container. Label it with the date for easy reference. They can last up to three months in the freezer. In the fridge, these energy balls stay good for up to a week. When frozen, they can last for about three months. Just let them thaw in the fridge before eating. Keeping track of the dates will help you enjoy them at their best! Yes, you can use fresh pumpkin. Just cook it until soft. Then, mash it well. Canned pumpkin is more convenient, but fresh gives a nice taste. To make these energy balls vegan, use maple syrup instead of honey. Almond butter is already vegan. Just ensure any add-ins are vegan too. These energy balls are packed with nutrients. Each ball has: - Good fiber from oats and flaxseed. - Healthy fats from almond butter. - Vitamins from pumpkin. - Antioxidants from dark chocolate chips (if added). These energy balls last up to one week in the fridge. You can also freeze them for longer storage. Just make sure to keep them in an airtight container. Enjoy them as a quick snack! In this post, we covered the key ingredients for pumpkin spice energy balls, including their main and optional components. I walked you through each step, from mixing to final touches. Additionally, I shared helpful tips for texture and flavor variations. Remember to store these treats properly to keep them fresh. With easy swaps and options, you can tailor this recipe to fit your needs. Enjoy making these energy balls, and let your creativity shine in the kitchen!
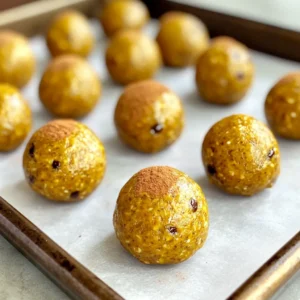
    Pumpkin Spice Energy Balls Tasty and Nutritious Snack
  • - 1 lb flank steak, thinly sliced - 2 cups broccoli florets - 1 red bell pepper, sliced - 1 yellow bell pepper, sliced - 1 cup snap peas - 3 cloves garlic, minced - 1 inch ginger, grated - 1/4 cup low-sodium soy sauce - 2 tablespoons honey - 1 tablespoon sesame oil - 1 tablespoon rice vinegar - 1 tablespoon cornstarch - 2 tablespoons sesame seeds - Cooked jasmine rice or quinoa for serving - Salt and pepper to taste Flank steak is the star of this dish. It cooks quickly and has great flavor. I love how it soaks up the marinade. Fresh vegetables add color and texture. Broccoli, bell peppers, and snap peas work well together. They stay crisp and bright when roasted. The marinade is simple yet powerful. Soy sauce brings saltiness, while honey adds sweetness. Sesame oil gives a nutty taste, and rice vinegar adds a bit of tang. These flavors blend beautifully. - Additional vegetables, herbs, or spices - Alternative sweeteners or sauces You can change things up with optional ingredients. Try adding carrots, green beans, or even mushrooms for more variety. Fresh herbs like cilantro or basil can brighten the dish. If you want a different sweetener, maple syrup or agave can work too. Feel free to experiment with sauces like teriyaki or hoisin for a twist. Cooking should be fun! To start, preheat your oven to 425°F (220°C). This high heat helps the steak cook fast and keeps the veggies crisp. Next, take a large baking sheet and line it with parchment paper. This makes clean-up easy and ensures nothing sticks. For the marinade, grab a large mixing bowl. Combine 1/4 cup of low-sodium soy sauce, 2 tablespoons of honey, 1 tablespoon of sesame oil, and 1 tablespoon of rice vinegar. Add 3 minced garlic cloves and 1 grated inch of ginger. Season with salt and pepper. Toss in the 1 lb of thinly sliced flank steak. Make sure every piece is coated well. Let it marinate for about 20 minutes. This adds great flavor to your steak. While the steak is marinating, it's time to prepare the veggies. Chop 2 cups of broccoli florets, slice 1 red bell pepper, and slice 1 yellow bell pepper. Add 1 cup of snap peas to the mix. Place all the chopped veggies in a bowl. Drizzle them with a little olive oil and season with salt and pepper. Toss the veggies to coat them evenly. Now, it’s time to bring it all together. Spread the marinated steak onto one half of the prepared sheet pan. Then, arrange the seasoned vegetables on the other half. This way, they cook together but stay separate. Roast in the preheated oven for about 15 to 20 minutes. Check that the steak is cooked to your liking and the veggies are tender-crisp. In the last five minutes of cooking, sprinkle 1 tablespoon of cornstarch over the steak and veggies. Give everything a gentle toss in the pan. This helps thicken the juices and creates a tasty glaze. Once done, remove the pan from the oven and sprinkle 2 tablespoons of sesame seeds on top. This adds a nice crunch and flavor. For the best flavor, marinate your steak for at least 20 minutes. Use a bowl to mix the soy sauce, honey, sesame oil, rice vinegar, garlic, and ginger. This blend adds depth and a sweet touch. Make sure the steak is fully coated. You can even marinate it overnight for a richer taste. To achieve perfect steak doneness, cook it for about 15-20 minutes at 425°F. Use a meat thermometer to check if it reaches 135°F for medium-rare. Don’t forget to let the steak rest for a few minutes after cooking. This helps keep it juicy. For tender-crisp veggies, roast them alongside the steak. They should be bright and slightly soft, not mushy. Keep an eye on them to avoid overcooking. Serve this dish over jasmine rice or quinoa for a wholesome meal. Add a sprinkle of sesame seeds on top for a nice finish. You can also pair it with a simple salad or steamed edamame on the side. This adds color and freshness to your plate. {{image_2}} You can make this dish gluten-free by using tamari instead of soy sauce. Tamari tastes similar but lacks gluten. For those on a low-carb diet, skip the rice or quinoa. You can also use cauliflower rice for a great swap. Add different marinades or spices for new tastes. Try adding sriracha for heat or orange juice for a fruity twist. You can toss in nuts like cashews or peanuts for a nice crunch. They give the dish a tasty texture. Feel free to switch up the veggies. If you don’t have broccoli, use green beans or asparagus. Carrots add color and sweetness. You can also toss in zucchini or mushrooms based on your likes or what you have in the fridge. This way, your stir-fry stays fresh and fun! To store leftover teriyaki steak stir-fry properly, place it in an airtight container. Make sure to let it cool to room temperature first. You can keep it in the fridge for up to three days. This keeps the flavors fresh and the steak tender. When you’re ready to eat, just open the container and enjoy! If you want to freeze your teriyaki steak stir-fry, it’s easy! Allow it to cool completely. Then, transfer it to a freezer-safe bag or container. Remove as much air as possible to prevent freezer burn. You can store it in the freezer for up to three months. When you’re ready to use it, just thaw it in the fridge overnight. To reheat your stir-fry, the best method is to use a skillet on low heat. Add a splash of water or broth to keep it moist. Stir it gently until heated through. This method helps to maintain the texture and flavor of the steak and veggies. You can also use a microwave, but be careful not to overcook it. Enjoy your tasty meal! You can make teriyaki sauce easily. Here’s a simple recipe: - 1/4 cup soy sauce - 2 tablespoons honey - 1 tablespoon sesame oil - 1 tablespoon rice vinegar - 1 clove garlic, minced - 1 inch ginger, grated 1. Mix all the ingredients in a bowl. 2. Stir until the honey dissolves. 3. Use it to marinate your steak. This homemade sauce is fresh and tasty. You can adjust the sweetness by adding more honey. I love using it in many dishes! Teriyaki steak stir-fry is great with many sides. Here are some ideas: - Steamed jasmine rice - Quinoa for a healthy twist - Sautéed green beans or bok choy - Cucumber salad for crunch These sides balance the rich flavors of the dish. They add texture and freshness. You can mix and match based on what you have at home. Yes, you can use other cuts of meat. Here are some good options: - Sirloin steak - Ribeye steak - Chicken breast for a lighter option Just remember to adjust cooking times. Thicker cuts may need more time, while thinner cuts cook fast. Always check for doneness to keep it juicy! This blog post covered how to make a tasty teriyaki steak stir-fry. You learned about the main and optional ingredients, plus the step-by-step instructions for prep and cooking. We shared tips for great flavor, variations for different diets, and how to store leftovers. Try this dish for a quick meal full of flavor. Cooking can be fun, so experiment and enjoy! With a few simple steps, you can impress anyone with your cooking skills. Happy cooking!
    Teriyaki Steak Stir-Fry Sheet Pan Flavorful and Easy
  • To make a tasty Apple Fritter Loaf, you will need the following key ingredients: - 2 medium apples, peeled, cored, and diced - 1 ½ cups all-purpose flour - 1 teaspoon baking powder - ½ teaspoon baking soda - ½ teaspoon salt - 1 teaspoon ground cinnamon - ½ teaspoon nutmeg - ¾ cup granulated sugar - ⅓ cup brown sugar, packed - 2 large eggs - ½ cup unsweetened applesauce - ⅓ cup vegetable oil - 1 teaspoon vanilla extract - ¼ cup chopped walnuts or pecans (optional) - 1 cup powdered sugar (for glaze) - 2 tablespoons milk (for glaze) For an extra burst of flavor, consider adding these optional ingredients: - ¼ cup raisins or dried cranberries for sweetness - 1 tablespoon lemon juice to brighten the taste - ½ teaspoon vanilla bean paste for a richer vanilla flavor If you have allergens, here are some substitutions you can use: - Gluten-free flour can replace all-purpose flour for a gluten-free loaf. - Applesauce can be replaced with mashed bananas for a different taste. - Vegetable oil can be swapped with melted coconut oil for a tropical twist. - Eggs can be replaced with ¼ cup of unsweetened applesauce or a flax egg (1 tablespoon ground flaxseed mixed with 2.5 tablespoons water). These tips help make this recipe fit many diets while keeping it delicious. Enjoy your baking! First, we need to get our oven ready. Preheat your oven to 350°F (175°C). Next, grease and flour a 9x5-inch loaf pan, or use parchment paper. This helps with easy removal later. In a medium bowl, combine the dry ingredients. Whisk together 1 ½ cups of all-purpose flour, 1 teaspoon of baking powder, ½ teaspoon of baking soda, ½ teaspoon of salt, 1 teaspoon of ground cinnamon, and ½ teaspoon of nutmeg. Set this bowl to the side. In a large bowl, mix together the granulated sugar and brown sugar. Add in 2 large eggs. Beat this mixture until it looks a bit frothy. Then, pour in ½ cup of unsweetened applesauce, ⅓ cup of vegetable oil, and 1 teaspoon of vanilla extract. Stir until smooth. Now, it's time to combine the mixtures. Gradually add your dry ingredients to the wet mix. Stir just until they come together. Finally, fold in 2 medium apples that are peeled, cored, and diced. If you like, add ¼ cup of chopped walnuts or pecans. Be gentle not to over-mix. Pour your batter into the prepared loaf pan. Use a spatula to smooth the top. Now, place the pan in your preheated oven. Bake for 50 to 60 minutes. To check if it's done, insert a toothpick into the center. If it comes out clean, your loaf is ready! Once baked, let the loaf cool in the pan for about 10 minutes. Then, carefully turn it out onto a wire rack to cool completely. This step is important for the best texture. While your loaf cools, let’s make the glaze. In a small bowl, whisk together 1 cup of powdered sugar and 2 tablespoons of milk. Mix until it’s smooth. If it seems too thick, add a little more milk until you reach the right consistency. Once the loaf is cool, drizzle the glaze over the top. Allow it to set before slicing. Enjoy your tasty Apple Fritter Loaf! When picking apples for baking, go for firm ones. I like using Granny Smith or Honeycrisp. These apples hold their shape and add a nice tartness. Avoid soft apples like McIntosh, as they break down too much. Freshness matters, so choose apples that feel heavy and have smooth skin. If you can, smell them. A sweet aroma often means good flavor. To get the right texture, mix your ingredients gently. Over-mixing can make your loaf tough. When adding apples, fold them in carefully. Don't worry if the batter looks a bit lumpy; that’s okay! Also, using room temperature eggs helps the batter blend better. Ensure your baking powder and baking soda are fresh. This ensures a good rise, making your loaf light and fluffy. One common mistake is not measuring ingredients accurately. Use measuring cups and spoons for best results. Also, don’t skip greasing the pan; it helps the loaf release easily. Keep an eye on the baking time. Ovens vary, so check your loaf a bit early. A toothpick should come out clean when it’s done. Lastly, resist the urge to slice it too soon; let it cool for better flavor and texture! {{image_2}} You can change up this loaf with various nuts. Try walnuts or pecans. They add a nice crunch and flavor. If you want a twist, use almonds or hazelnuts. You can also explore different spices. Try cardamom or allspice for a unique taste. Dried fruits like cranberries or raisins can be a great addition too. They bring extra sweetness and texture to your loaf. To make this loaf gluten-free, use a gluten-free flour blend. These blends often work well in recipes like this. For a vegan version, swap eggs with flax eggs. Mix one tablespoon of flaxseed meal with three tablespoons of water for each egg. Replace applesauce with a banana puree for added moisture. Use a plant-based oil, like coconut oil, to keep it vegan-friendly. This way, everyone can enjoy this delicious treat. You can change the fruits based on the season. In fall, use fresh pears or pumpkin puree for a cozy flavor. In winter, add spices like ginger or cloves for warmth. In spring, fresh berries can add a burst of brightness. In summer, using peaches or nectarines can give your loaf a juicy twist. Each season brings new flavors to explore in your Apple Fritter Loaf. To keep your Apple Fritter Loaf fresh, wrap it tightly in plastic wrap. This method keeps moisture in and prevents it from drying out. You can store it at room temperature for up to three days. If you want to keep it longer, consider refrigerating it. Just remember to let it cool completely before wrapping. To freeze your Apple Fritter Loaf, slice it first. This way, you can take out just what you need. Wrap each slice in plastic wrap, then place them in a freezer-safe bag. This method helps avoid freezer burn. You can freeze the loaf for up to three months. When you’re ready to enjoy it, simply thaw in the fridge overnight. For the best taste, reheat slices in the oven. Preheat the oven to 350°F (175°C). Place the slices on a baking sheet and warm them for about 10 minutes. This keeps the loaf soft and nice. If you are in a hurry, you can use the microwave. Heat each slice for about 15-20 seconds. Enjoy your warm Apple Fritter Loaf! Yes, you can use different apples. I suggest using tart apples like Granny Smith or sweet ones like Fuji. Mixing apples adds great flavor and texture. Just make sure the apples are firm. Soft apples can turn mushy in the loaf. The loaf stays fresh for about 3 to 4 days at room temperature. Just store it in an airtight container. For longer storage, keep it in the fridge for up to a week. You can also freeze the loaf for up to 3 months. Absolutely! You can make the glaze ahead of time. Just store it in the fridge in a sealed container. When ready to use, let it come to room temperature. You might need to add a bit of milk to get the right consistency again. Apple Fritter Loaf pairs well with coffee or tea. It’s also tasty with a scoop of vanilla ice cream. For a fun twist, try serving it with whipped cream or caramel sauce. Enjoy it warm or at room temperature for the best experience. Making an Apple Fritter Loaf is rewarding and fun. We covered key ingredients, from apples to possible swaps for allergens. I shared step-by-step instructions to create the best batter, bake it perfectly, and make a tasty glaze. Tips helped you choose the right apples and avoid common mistakes. Plus, we explored fun variations and storage tips for your loaf. Baking this treat can bring smiles and joy. So, roll up your sleeves and enjoy creating delicious memories!
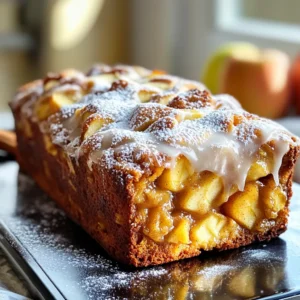
    Apple Fritter Loaf Tasty and Easy Baking Recipe
  • - 2 medium sweet potatoes, peeled and diced - 1 cup dried green or brown lentils, rinsed - 1 can (14 oz) coconut milk - 2 cups vegetable broth - 1 teaspoon cumin seeds - 1 teaspoon turmeric powder - 1 teaspoon curry powder - 1 teaspoon coriander powder - ½ teaspoon cayenne pepper (adjust to taste) - 1 large onion, finely chopped - 3 cloves garlic, minced - 1 inch ginger, grated - Juice of 1 lime - Fresh cilantro leaves for garnish The sweet potatoes bring a creamy texture. They also add natural sweetness. Lentils boost protein and fiber content. Coconut milk gives a rich, smooth base. Vegetable broth adds depth to the dish. Spices are key to great flavor. Cumin seeds add warmth. Turmeric gives a golden color and health benefits. Curry powder brings a blend of spices. Coriander enhances the dish with its citrusy notes. Cayenne pepper adds heat for those who love spice. Don’t skip the onion, garlic, and ginger. These aromatics build a solid flavor base. Lime juice brightens the curry. Fresh cilantro adds a pop of color and freshness. Each ingredient plays a vital role in creating a comforting and tasty meal. - Dicing Sweet Potatoes: Start by peeling and dicing two medium sweet potatoes. Aim for cubes about one inch in size. This helps them cook evenly and adds texture to your curry. - Rinsing Lentils: Measure one cup of dried green or brown lentils. Place them in a fine mesh strainer under cold water. Rinse them well to remove any dust or debris. This step ensures a cleaner taste in your dish. - Chopping Onion and Mince Garlic: Finely chop one large onion. This will add sweetness and depth of flavor. Next, mince three cloves of garlic. The garlic brings a lovely aroma to your curry. - Layering the Vegetables and Lentils: In your slow cooker, add the diced sweet potatoes, rinsed lentils, chopped onion, minced garlic, and grated ginger. Layer them evenly for the best flavor. - Adding Spices and Seasonings: Sprinkle one teaspoon each of cumin seeds, turmeric powder, curry powder, and coriander powder over the top. Adjust the cayenne pepper to your spice preference. Don't forget to add salt to taste. - Pouring in Liquids: Carefully pour in one can of coconut milk and two cups of vegetable broth. Stir everything gently to combine. This will create a creamy base for your curry. - Setting Slow Cooker on Low vs. High: You can cook this dish on low or high. Low gives a longer cooking time but richer flavors. High cooks faster, perfect for busy days. - Cooking Duration: If you set your slow cooker on low, let it cook for 6 to 8 hours. On high, it will take 4 to 5 hours. - Checking for Doneness: Once the time is up, check if the sweet potatoes are tender and the lentils are soft. They should blend easily with a fork. If not, give it a little more time. How can I adjust spice levels? You can easily change the heat by adding cayenne pepper. Start with half a teaspoon. Taste the curry and add more if you like it spicier. You can also try adding a pinch of chili powder for extra warmth. Why are fresh herbs important? Fresh herbs boost the taste of your dish. Cilantro adds a bright flavor and color. Add it just before serving to keep it fresh. You can also try adding fresh basil or mint for a new twist. What should I serve with naan or rice? Naan or rice balances the curry's flavors. Naan is great for dipping, while rice soaks up the sauce. Both options make the meal filling and satisfying. Try serving the curry in a deep bowl for a nice look. How can I present the dish for best aesthetics? For a beautiful dish, garnish with fresh cilantro. Use a sprinkle on top of the curry. Serve it in a bright bowl to make the colors pop. Pair it with warm naan on the side for added texture. How can I prep ahead for busy days? Chop your sweet potatoes and onion the night before. Store them in the fridge until you're ready to cook. Rinsing lentils can also be done ahead. Just remember to soak them in water if needed. How can I use a timer for convenience? Using a timer helps you keep track of cooking time. Set it for 6-8 hours on low or 4-5 hours on high. This way, you can enjoy your day without worrying about overcooking. It makes meal planning stress-free. {{image_2}} Different Types of Lentils You can use more than just green or brown lentils. Red lentils cook faster and become soft. Black lentils add a nice bite. Each type brings unique flavors to your curry. Experiment with what you have on hand. Seasonal Vegetable Options Feel free to mix in seasonal veggies. Carrots, spinach, and cauliflower work well. They add color and taste. Use whatever is fresh at the market. This helps keep your curry exciting and new. Adjusting Cayenne Pepper Want it spicy? Add more cayenne pepper. Start with half a teaspoon if you're unsure. Taste as you go and adjust to your liking. Remember, you can always add more, but you can't take it out! Other Spice Additions If you want more depth, try adding paprika or garam masala. These spices can give your curry a warm kick. Each option adds a different note to the dish. Play around and find your perfect blend. Alternative Protein Sources If you want extra protein, try adding chickpeas or tofu. Both will soak up the curry flavors well. They make the meal heartier without losing its vegan touch. Dairy-Free Suggestions The recipe uses coconut milk, so it's already dairy-free. But you can also add nut milk for creaminess. Almond or cashew milk can work great. Just be sure to balance the flavors well. - Storing Leftovers: Once you finish your meal, let the curry cool down. Store it in an airtight container. Make sure to keep it in the fridge to maintain freshness. I recommend using glass containers. They do not retain odors and are easier to clean. - Shelf Life in Refrigerator: The sweet potato lentil curry can stay fresh in the fridge for up to 5 days. Always check for any signs of spoilage before eating. If it smells off or looks strange, it’s best to toss it. - How to Freeze Curry: To freeze the curry, let it cool completely. Portion it into freezer-safe bags or containers. Remove as much air as possible to prevent freezer burn. Label each bag with the date for easy reference. - Reheating Tips: When you’re ready to eat, thaw the curry overnight in the fridge. You can reheat it on the stove over medium heat, stirring often. Alternatively, you can use a microwave. Heat in short intervals, stirring in between, until hot. - Portioning Out Servings: I like to divide the curry into single-serving sizes. This makes it easy to grab a meal on busy days. Portioning also helps control serving sizes, which is great if you watch your intake. - Containers for Storage: Use clear containers for easy visibility. Look for BPA-free plastic or glass with tight seals. They help keep your food fresh longer and are perfect for meal prep. You can tell lentils are done by looking for a few signs. First, they should be soft but not mushy. When you take a spoonful, they will hold their shape. You will also notice the sweet potatoes are tender. This usually takes about 6-8 hours on low or 4-5 hours on high in the slow cooker. If you want to be sure, taste a few lentils. If they feel soft and creamy inside, they are ready. Yes, you can add meat to this curry! Chicken or shrimp works great. If you use chicken, cut it into small pieces and add it at the start. For shrimp, add it in the last 30 minutes of cooking to keep it tender. Just remember, adding meat will change the cooking time slightly. Always check to ensure your meat is fully cooked before serving. This curry pairs well with many sides. You can serve it with warm naan for dipping. Rice is another great option, especially basmati or jasmine. For a fresh touch, a simple salad with cucumbers and tomatoes works well too. You can even add a dollop of yogurt on top for creaminess. This blog covered the key ingredients, steps, and tips for making a delicious slow cooker sweet potato lentil curry. We explored essential ingredients like sweet potatoes and lentils, the right spices, and cooking methods. In my experience, following these steps leads to a tasty meal. Remember to try different spices and variations to fit your taste. Enjoy your cooking and share this dish with friends!
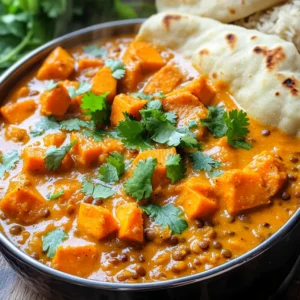
    Slow Cooker Sweet Potato Lentil Curry Flavor Booster
  • To make Garlic Parmesan Pull-Apart Bread, you need the following items: - 1 loaf of fresh Italian bread or sourdough - 4 tablespoons unsalted butter, melted - 6 cloves garlic, minced - 1 cup grated Parmesan cheese - 2 tablespoons fresh parsley, finely chopped - 1 teaspoon dried oregano - 1 teaspoon salt - 1/2 teaspoon black pepper Each ingredient plays a key role. The bread is the base. It holds all the flavors. The butter adds richness. Garlic gives a strong, tasty kick. Parmesan cheese brings a nice, salty bite. Fresh parsley adds color and brightness. Oregano gives a warm, earthy taste. Salt and pepper enhance all these flavors. Using fresh ingredients is best. Fresh bread is soft and warm. Fresh garlic is more flavorful. Fresh parsley adds color and flavor. Choose high-quality cheese for a richer taste. Make sure to measure all your items ahead of time. This way, you will have everything ready when you cook. - Preheat oven and slice the bread: Start by preheating your oven to 375°F (190°C). This heat makes the bread golden and crisp. Take your loaf of Italian bread or sourdough and slice it into sections. Cut about 1 inch apart. Be careful not to cut all the way through. You want the bottom of the loaf to stay intact. - Make the garlic butter mixture: In a bowl, melt 4 tablespoons of unsalted butter. Add 6 minced garlic cloves, 1 teaspoon of dried oregano, 1 teaspoon of salt, and 1/2 teaspoon of black pepper. Mix this all together well. The aroma will be amazing! - Coat the bread with garlic butter: Use a pastry brush or a spoon to coat the inside cuts of the bread with the garlic butter mixture. Make sure to get into all the little crevices. This step gives the bread a rich flavor. - Sprinkle Parmesan cheese: Now it’s time to add the good stuff! Take 1 cup of grated Parmesan cheese and sprinkle it evenly over the buttered sections of bread. Let some cheese fall into the cuts for extra flavor. - Bake covered and then uncovered: Place your bread on a baking sheet lined with parchment paper. Cover it loosely with aluminum foil. Bake it for about 15 minutes. After that, remove the foil and bake for another 10 minutes. You want the top to be golden brown and crispy. - Add fresh parsley for garnish: Once the bread is done, take it out of the oven. Sprinkle 2 tablespoons of finely chopped fresh parsley on top. This adds a nice touch of color and freshness. Serve the warm pull-apart bread right away. Encourage everyone to tear apart the loaf and enjoy! Choosing the right type of bread Use fresh Italian bread or sourdough. These breads have the right texture. They hold the garlic butter well. This helps keep the bread soft inside. The crust gets crispy when baked. Modifying baking time for crispiness Baking time matters for the perfect crunch. Bake the bread covered for 15 minutes. This keeps the inside soft. Then remove the foil and bake for 10 more minutes. This step makes the top golden brown and crispy. Adding herbs and spices Feel free to play with flavors! You can add herbs like basil or thyme. They bring more taste to the bread. A dash of red pepper flakes adds heat if you like spice. Mix these into the garlic butter for a fun twist. Serving suggestions Serve this bread warm for the best taste. Pair it with soup or salad for a meal. It also makes a great snack at parties. You can even add a side of marinara sauce for dipping. {{image_2}} You can switch up the cheese in your Garlic Parmesan Pull-Apart Bread. Mozzarella brings a nice stretch. It melts beautifully and adds a mild flavor that pairs well with garlic. Cheddar gives a sharp taste that many love. It adds a rich, savory bite to the bread. If you follow a vegan diet, try vegan cheese substitutes. Many brands offer great options today. Look for one that melts well. It will still give you that cheesy experience without dairy. Get creative with your garlic butter! You can infuse it with herbs or spices. Try adding rosemary or thyme for a fresh twist. These herbs add depth and flavor to each bite. If you like some heat, consider making spicy garlic butter. Add a pinch of red pepper flakes or a dash of hot sauce. This will give your bread a fantastic kick. It’s a fun way to surprise your guests! To keep your Garlic Parmesan Pull-Apart Bread fresh, follow these tips: - Refrigerating leftovers: Wrap the bread tightly in plastic wrap or foil. This helps keep the moisture in. Store it in the fridge for up to three days. - Freezing pull-apart bread: If you have more bread than you can eat, freezing is great. Wrap it in plastic wrap and then in foil. It can last for up to three months in the freezer. Be sure to label the wrap with the date. To enjoy your bread as if it were fresh, reheating is key: - How to reheat for freshness: Preheat your oven to 350°F (175°C). Remove the bread from its wrap. Place it on a baking sheet. Heat for about 10 to 15 minutes. This will warm it through and help restore some of that crispiness. - Tips to maintain texture: You can cover the bread loosely with foil while reheating. This keeps it from getting too dry. If you want a crispier crust, remove the foil for the last few minutes of reheating. Can I use pre-made dough? Yes, you can use pre-made dough. It saves time and effort. Choose a dough that fits your taste, like pizza dough or biscuit dough. Just follow the same steps for cutting and filling. How long will the bread stay fresh? The bread stays fresh for about 2 days at room temperature. Keep it in a sealed bag to keep it soft. If you want it to last longer, refrigerate it for up to a week. Can I prepare this bread ahead of time? Yes, you can prepare it ahead. Slice and coat the bread, then wrap it tightly. Store it in the fridge for up to 24 hours. Just bake it when you are ready to serve. What to do if bread is too soggy? If the bread is too soggy, it may have too much butter or garlic mixture. Make sure you don't overdo it. You can bake it longer to help it crisp up. Keep an eye on it to avoid burning. How to prevent burning? To prevent burning, cover the bread with foil for the first part of baking. This shields it from direct heat. After 15 minutes, remove the foil. This way, the top can brown nicely without burning. This blog post covered how to make delicious garlic pull-apart bread. We discussed the key ingredients, step-by-step instructions, and tips for the best texture and flavor. You can explore variations with different cheeses or flavored butters. Storing and reheating tips keep your bread fresh and tasty. Remember, making this bread is simple and fun. Enjoy sharing this dish with others. You’ll impress them with your tasty creation!
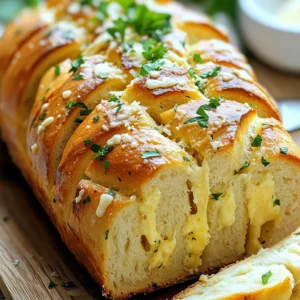
    Garlic Parmesan Pull-Apart Bread Tasty and Simple Treat
  • - 2 cups frozen edamame in pods - 2 tablespoons olive oil - 4 cloves garlic, minced - 1 teaspoon red pepper flakes (adjust to taste) - 1 tablespoon soy sauce - 1 teaspoon sesame oil - Salt to taste - Fresh cilantro for garnish To make Air Fryer Spicy Garlic Edamame, I start with frozen edamame in pods. You can find these at most stores in the frozen section. They provide a great texture and flavor. Next, I use olive oil to help the seasoning stick. It gives a rich taste. Garlic adds a strong and savory flavor. I always use fresh garlic and mince it well. Red pepper flakes give the snack its heat. You can adjust the amount based on your spice level. If you like it spicy, add more! Lastly, soy sauce brings umami flavor. It enhances the taste of the edamame. For an extra touch, I add sesame oil. This ingredient is optional but gives a nice nutty flavor. Don’t forget the salt! You can add it to taste. Fresh cilantro makes a lovely garnish. It adds a pop of color and freshness to your dish. - Rinse and thaw frozen edamame - Drain excess ice and water Start by rinsing the frozen edamame pods under warm water. This helps to thaw them a bit and wash away excess ice. After rinsing, drain the water well. Make sure the pods are free from any ice or water to help them soak up the flavors later. - Combine garlic, red pepper flakes, and oils In a mixing bowl, combine the minced garlic, red pepper flakes, olive oil, soy sauce, and sesame oil. Stir everything together well. This mixture creates a tasty marinade. You can adjust the red pepper flakes for more or less heat based on your taste. - Add edamame to marinade - Toss to coat evenly Now, add the drained edamame to the bowl with the marinade. Toss them gently to ensure each pod is coated evenly. This step is key to getting all the flavors into the edamame. - Set air fryer temperature and preheat - Air fry edamame and shake basket halfway Set your air fryer to 375°F (190°C) and preheat it for about 3 minutes. Once preheated, place the seasoned edamame in the air fryer basket in a single layer. Cook them for 10-12 minutes. Remember to shake the basket halfway through to help them cook evenly. - Ensure golden brown color and desired crispiness After 10 minutes, check the edamame. They should have a nice golden brown color and be crispy. If you want them crispier, feel free to air fry for an extra 2-3 minutes. - Transfer to bowl and garnish Once cooked, carefully transfer the edamame to a serving bowl. Sprinkle with salt to taste. If you like, add fresh cilantro for a pop of color and flavor. Enjoy these spicy garlic edamame warm as a tasty snack or appetizer! To get that perfect crunch, timing is key. Air fry the edamame for 10 to 12 minutes at 375°F (190°C). At the halfway point, give the basket a good shake. This helps them cook evenly. If you want more crispiness, add 2 to 3 extra minutes. Keep an eye on them to avoid burning. Want more heat? Increase the red pepper flakes. Start with one teaspoon and add more as you like. If you prefer it milder, reduce the amount. For a burst of flavor, try adding lime juice or a splash of rice vinegar after cooking. This brings brightness to the dish. Serve the edamame warm in a bowl. You can sprinkle some extra salt on top for flavor. Pair it with a cold drink or a light beer. For a fun twist, serve with dipping sauces like soy sauce or sriracha. Garnish with fresh cilantro for a pop of color and flavor. {{image_2}} You can make Air Fryer Spicy Garlic Edamame even more fun. Try adding other veggies. Bell peppers or snap peas add color and crunch. You can also stir in some mushrooms for an earthy taste. If you want a different kick, add some jalapeños or diced chili peppers. These add-ins will enhance the flavor and bring variety to your snack. Switching up your sauces can change everything. Instead of soy sauce, try tamari for a gluten-free option. You might also like teriyaki sauce for a sweet twist. For a tangy kick, a splash of rice vinegar can work wonders. Mix in some sriracha or chili garlic sauce if you want more heat. These sauce swaps keep the dish exciting. This recipe is already plant-based. Just ensure all sauces are vegan. Check the soy sauce and any other sauces you use. The recipe stays simple and delicious. You can also add nutritional yeast for a cheesy flavor without dairy. This keeps your Air Fryer Spicy Garlic Edamame tasty and vegan-friendly. To keep your cooked edamame fresh, place it in an airtight container. Let it cool first. Store it in the fridge for up to three days. Avoid leaving it out for too long, as it can spoil quickly. For the best taste, I recommend reheating in the air fryer. Set it to 350°F (175°C). Air fry for about 5 minutes. Shake the basket halfway through. The edamame will crisp up nicely. If using a microwave, heat in short bursts of 30 seconds. Check often to avoid overcooking. You can freeze both uncooked and cooked edamame. For uncooked, place it in a freezer bag. Remove as much air as possible and seal it. For cooked edamame, let it cool first. Then, spread it on a baking sheet to freeze individually. Once frozen, transfer to a bag. This helps keep it from clumping together. Cooking edamame in the air fryer takes about 10 to 12 minutes. I recommend checking them at the 10-minute mark. If they are not golden brown yet, add 2 to 3 more minutes. This will give you crispy and tasty edamame. Yes, you can use fresh edamame. Just make sure to adjust the cooking time. Fresh edamame usually cooks a bit faster than frozen. Start at 8 to 10 minutes and check for doneness. Spicy garlic edamame pairs well with many dishes. Try serving it as a snack with drinks. It also works great as a side dish with rice or noodles. You can add it to salads or grain bowls for extra flavor. Yes, edamame is very healthy! It is high in protein and fiber. It also contains vitamins and minerals like folate and vitamin K. Eating edamame may help with heart health and weight management. Enjoying it as a snack is a smart choice! In this post, we explored how to make tasty spicy garlic edamame. We covered the main and optional ingredients, step-by-step instructions, and helpful tips. You learned how to achieve that perfect crunch and enhance flavors. We even discussed fun variations and storage tips. Now you can enjoy this easy snack anytime. Remember, cooking should be fun and simple. Try new flavors and share them with friends!
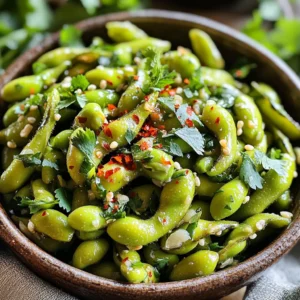
    Air Fryer Spicy Garlic Edamame Flavorful Snack Recipe
  • To make apple brownies, you will need these simple ingredients: - 2 cups grated apples (about 2 medium apples, peeled) - 1 cup all-purpose flour - 1/2 cup unsweetened cocoa powder - 1 teaspoon baking soda - 1/2 teaspoon salt - 1 teaspoon cinnamon - 1/2 cup granulated sugar - 1/2 cup brown sugar, packed - 2 large eggs - 1/2 cup vegetable oil - 1 teaspoon vanilla extract - 1/2 cup chopped walnuts (optional) - 1/2 cup chocolate chips (optional) Each ingredient plays a key role. The grated apples add moisture and flavor. Cocoa powder brings a rich taste. The sugars sweeten and help with texture. Eggs bind everything together, while oil keeps them soft and moist. You can swap some ingredients if you need to. For flour, you can use whole wheat flour. It adds a nutty flavor. If you want a gluten-free option, try almond flour or oat flour. For the sweeteners, coconut sugar works well too. Instead of vegetable oil, you can use melted coconut oil. It gives a nice hint of coconut flavor. If you don't have walnuts, pecans or even almonds can be great. No chocolate chips? Use dried fruit like raisins or cranberries instead. When picking apples, go for firm and fresh ones. Granny Smith apples are tart and work well in this recipe. Their taste balances the sweetness of the sugars. Honeycrisp apples add a nice crunch and sweetness too. Always check for bruises or soft spots, as these can affect your brownies. A mix of apple types can also create a more complex flavor in your brownies. {{ingredient_image_1}} Start by gathering all your ingredients. You need two medium apples. Peel and grate them to get about two cups. Next, measure out the flour, cocoa powder, baking soda, salt, cinnamon, sugars, eggs, oil, and vanilla. If you want to add walnuts or chocolate chips, grab those too. Having everything ready makes the process smooth and fun. First, preheat your oven to 350°F (175°C). Grab a medium bowl and mix the grated apples, granulated sugar, brown sugar, eggs, vegetable oil, and vanilla extract. Stir until everything blends well. In a separate bowl, whisk together the flour, cocoa powder, baking soda, salt, and cinnamon. Slowly add this dry mix to the wet mix. Stir gently until just combined. If you’re using walnuts or chocolate chips, fold them in now. Pour the batter into a greased 9x9 inch baking dish. Spread it out evenly. Bake for 25-30 minutes. To check if they’re done, insert a toothpick in the center. It should come out clean, but a few moist crumbs are fine. Once baked, let the brownies cool in the pan for 10 minutes. Use the parchment paper to lift them out. Place them on a wire rack to cool completely. After cooling, cut them into squares and enjoy! To get soft and chewy apple brownies, use fresh apples. Grate them finely. This helps them blend well with the batter. Avoid packing the grated apples too tightly in the measuring cup. This can add too much moisture and make brownies soggy. Remember, the key is to mix just until combined. Overmixing can lead to tough brownies. One common mistake is using too much flour. Always spoon flour into the measuring cup and level it off. Also, make sure your oven is at the right temperature. An oven that is too hot can burn the edges while leaving the center undercooked. Lastly, don’t skip the parchment paper. It helps you lift the brownies out easily. Cinnamon is a great spice for these brownies, but you can add more. Nutmeg or allspice adds warmth and depth. Try a pinch of ginger for a warm kick. If you love chocolate, a touch of espresso powder can boost the chocolate flavor. Just remember, a little goes a long way! Pro Tips Use Fresh Apples: For the best flavor and moisture, choose fresh, crisp apples. Varieties like Granny Smith or Honeycrisp work wonderfully. Grate Apples Finely: Finely grated apples will blend better into the batter, ensuring a more even texture and flavor throughout the brownies. Check for Doneness: Since ovens vary, check your brownies a few minutes early. They should be set in the middle with a few moist crumbs on the toothpick. Let Cool Before Slicing: Allow the brownies to cool completely in the pan before cutting. This helps them set and makes slicing easier without crumbling. {{image_2}} You can make your apple brownies gluten-free. Swap out the all-purpose flour for a gluten-free blend. Many blends work well in baking. Check the package for proper measurements. This way, everyone can enjoy these tasty treats. If you want a healthier option, try sugar-free substitutes. Use a sugar alternative like stevia or erythritol. These sweeteners offer great taste without added sugar. Adjust the amount to match your sweetness preference. Your apple brownies will still taste amazing. Get creative with your apple brownies by adding unique flavors. Try mixing in dried fruits like cranberries or cherries. You can also add spices like nutmeg or ginger for extra warmth. Topping your brownies with a drizzle of caramel or a sprinkle of sea salt adds a special touch. You can even serve them with a scoop of vanilla ice cream for a fun dessert. The possibilities are endless! To keep your apple brownies fresh, store them in an airtight container. This helps prevent them from drying out. You can leave them at room temperature for about three days. If you want to keep them longer, consider refrigerating them. Just make sure to wrap them well to avoid absorbing smells from the fridge. Freezing apple brownies is an easy way to save some for later. First, let them cool completely. Then, slice them into squares. Wrap each piece in plastic wrap. Place the wrapped brownies in a freezer bag or container. They can stay frozen for up to three months. When you want one, just take it out and let it thaw at room temperature. Reheating your apple brownies can bring back their warm, gooey goodness. For best results, use the oven. Preheat it to 350°F (175°C). Place the brownies on a baking sheet and cover them with foil. Heat for about 10-15 minutes. If you want a quick option, you can use the microwave. Just heat for 10-15 seconds, but be careful not to overdo it. Enjoy them warm with a scoop of ice cream! Yes, you can use many types of apples. Sweet apples like Fuji or Gala work well. Tart apples like Granny Smith add a nice zing. I suggest using a mix for more flavor. Just make sure to peel and grate them. This gives the brownies a rich apple taste. To check if the brownies are done, use a toothpick. Insert it in the center of the brownies. If it comes out clean or with a few moist crumbs, they are ready. Baking time is about 25-30 minutes. Keep an eye on them near the end. Every oven is a bit different. Apple brownies taste great on their own. You can serve them warm or cooled. For a special treat, add a scoop of vanilla ice cream on top. Whipped cream also makes a lovely addition. A drizzle of caramel sauce adds sweetness. Enjoy these options to enhance your dessert! You learned about the key ingredients for tasty apple brownies and various substitutes. I shared tips for choosing the best apples and how to prep everything. You now have step-by-step instructions for mixing, baking, and cooling. I also covered simple tricks to improve texture and flavor. Plus, you saw ways to make gluten-free and sugar-free versions. Storing and reheating methods ensure you enjoy them longer. With these insights, you can now bake delicious apple brownies and impress everyone!
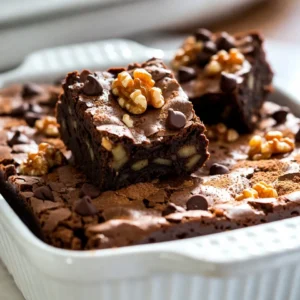
    Apple Brownies Delicious and Easy Recipe to Try
  • - 1 lb boneless, skinless chicken thighs, cut into bite-sized pieces - 1 bell pepper (red or yellow), diced - 1 cup pineapple chunks (fresh or canned) - 1 medium onion, cut into wedges - 2 carrots, sliced - 3 tablespoons cornstarch - 1/4 cup soy sauce (low sodium) - 1/4 cup ketchup - 2 tablespoons honey - 1 tablespoon apple cider vinegar - 1 teaspoon garlic powder - 1 teaspoon ginger powder - Salt and pepper to taste - 2 tablespoons sesame oil (or olive oil) - Chopped green onions - Sesame seeds - You can use chicken breast instead of thighs for a leaner option. - If you prefer plant-based meals, try tofu or tempeh. - Swap out the bell pepper for zucchini or broccoli. - Use any favorite veggies like snap peas or baby corn. These ingredients work together to create a bright and tasty dish. The chicken thighs stay juicy, while the veggies add crunch. The sweet and sour sauce gives it a zesty kick that kids love and adults enjoy. 1. Preheat your oven to 400°F (200°C). This helps cook the chicken evenly. 2. Line a large baking sheet with parchment paper. It makes cleanup easy. 3. In a large mixing bowl, add 1 lb of chicken thighs. 4. Sprinkle 3 tablespoons of cornstarch over the chicken. 5. Add salt and pepper to taste. 6. Toss the chicken until it is fully coated in cornstarch. 1. In a separate bowl, combine the diced bell pepper, onion wedges, sliced carrots, and pineapple chunks. 2. Pour the sweet and sour sauce over the vegetables. This sauce includes 1/4 cup soy sauce, 1/4 cup ketchup, 2 tablespoons honey, 1 tablespoon apple cider vinegar, 1 teaspoon garlic powder, and 1 teaspoon ginger powder. 3. Mix well to coat all the vegetables in the sauce. 1. Spread the chicken and vegetable mixture evenly on the prepared baking sheet. 2. Make sure everything is in a single layer for even cooking. 3. Bake in the preheated oven for 25-30 minutes. Stir halfway through for even cooking. 4. Check if the chicken is cooked through and the vegetables are tender before serving. 5. Allow it to cool slightly before you enjoy your meal with family or friends. To make sure your chicken cooks evenly, spread it out on the pan. Use a large baking sheet and keep everything in one layer. Stir halfway through cooking to allow heat to reach all pieces. If you want a sweeter or tangier sauce, adjust the honey or vinegar levels. Taste the sauce before pouring it over the chicken and veggies. This way, you can tweak it to fit your family's liking. Serve your sweet and sour chicken over jasmine rice or quinoa for a tasty meal. You can also pair it with a fresh green salad. To present it nicely, use a large platter and arrange the chicken and veggies in colorful sections. Sprinkle chopped green onions and sesame seeds on top for a pop of color and crunch. For meal prep, you can chop the chicken and veggies a day ahead. Store them in the fridge until you are ready to cook. Cleanup can be a breeze if you line your baking sheet with parchment paper. This will keep the pan clean and help with easy serving. After dinner, soak your mixing bowls in warm, soapy water right away to make washing them easier. {{image_2}} You can easily change the protein in this dish. - Using chicken breast: Swap the thighs for boneless, skinless chicken breasts. Cut them into small pieces for even cooking. This makes a leaner meal. - Vegetarian or vegan options: Use tofu or tempeh instead of chicken. Press the tofu to remove excess water. Cut it into bite-sized pieces and coat it like chicken. This gives a great texture and absorbs the sauce well. Want to shake things up? Here are some ideas: - Adding spices or heat: Add a pinch of red pepper flakes for some spice. You could also use sriracha in the sauce for a kick. - Tropical twists with different fruits: Instead of pineapple, try mango or kiwi. These fruits add a fun twist and a sweet taste. Make this meal even better: - Incorporating additional sides: Add broccoli or snap peas to the pan. They cook well and add color. You can also serve the meal with rice or quinoa for a complete dinner. - Modifying for different cuisines: Change the sauce to fit other flavors. Use teriyaki sauce for a Japanese touch. Or try a peanut sauce for a Thai twist. This keeps dinner fresh and exciting! Store any leftover sweet and sour chicken in an airtight container. Glass containers work well for this. You can also use plastic containers. The dish stays fresh for about 3 to 4 days in the fridge. To reheat, use the oven or the microwave. For the oven, set it to 350°F (175°C). Place the chicken in a baking dish and cover it with foil. Heat for about 15 minutes. In the microwave, heat on medium for 2-3 minutes. Stir halfway through to ensure even heating. This keeps the chicken juicy and the veggies firm. You can freeze the sweet and sour chicken. Let it cool completely first. Place it in freezer-safe bags or containers. It lasts for up to 3 months in the freezer. When ready to eat, move it to the fridge to thaw overnight. You can also reheat it straight from frozen. Just add a few extra minutes to the cooking time. Can I use frozen chicken? Yes, you can use frozen chicken. Just thaw it first. This helps it cook evenly. If you use frozen chicken, increase the baking time by 5 to 10 minutes. Always check the internal temperature. It should reach 165°F (74°C). What can I substitute for soy sauce? You can use coconut aminos or tamari for a soy sauce substitute. Both options offer a similar flavor. You can also try a mix of broth and vinegar for a different taste. Adjust the amount to match your flavor preference. How to make it gluten-free? To make this dish gluten-free, swap soy sauce for tamari or coconut aminos. These options keep the flavor without the gluten. Always check labels to ensure no hidden gluten is present. Can I use fresh vegetables? Yes, you can use fresh vegetables. Fresh bell peppers, carrots, and onions add great flavor. You can also add broccoli or snap peas for a crunchy twist. Just cut them into similar sizes for even cooking. What to do if the chicken is undercooked? If the chicken is undercooked, return it to the oven. Bake for another 5 to 10 minutes. Check the temperature again to ensure it reaches 165°F (74°C). Why did my sauce not thicken? If your sauce did not thicken, it might need more cornstarch. Mix a little cornstarch with water. Stir it into the sauce while cooking. Heat it until it thickens to your liking. This blog post covered key ingredients like chicken thighs, veggies, and sweet and sour sauce. I shared tips on preparation, cooking, and serving your dish. You learned about protein alternatives and flavor changes to make it your own. I also gave you advice on storage and reheating for leftovers. Cooking should bring joy and creativity to your meals. Now you have the tools to explore new flavors and make fun dishes any day. Enjoy your cooking journey!
    Sheet Pan Sweet & Sour Chicken Flavorful Family Meal
  • - Chicken: 2 pounds chicken wings - Oils and Seasonings: 1 tablespoon olive oil, 1/2 teaspoon salt, 1/2 teaspoon black pepper, 1 teaspoon garlic powder - Honey Garlic Sauce: 1/4 cup honey, 3 cloves garlic (minced), 2 tablespoons low sodium soy sauce, 1 tablespoon apple cider vinegar - Optional Heat: 1/2 teaspoon crushed red pepper flakes - Garnish: Fresh parsley (chopped) For this dish, I love using fresh chicken wings. They are juicy and tender. Make sure to choose wings that are plump and not frozen. This ensures the best flavor and texture. You will also need some simple seasonings. Olive oil gives the wings a nice crisp. Salt and black pepper add flavor, while garlic powder gives the wings a rich taste. The honey garlic sauce is the star. Honey adds sweetness while garlic brings a warm flavor. Low sodium soy sauce gives umami, and apple cider vinegar adds a touch of acidity. If you like heat, add crushed red pepper flakes to spice things up. Finally, fresh parsley makes a great garnish. It adds color and freshness to the dish. I always keep some on hand for a pop of green! - Patting Dry: First, I pat the chicken wings dry with paper towels. This step is key. Removing excess moisture helps the wings become crispy in the air fryer. - Seasoning Process: Next, I toss the wings in a large bowl with olive oil, salt, black pepper, and garlic powder. Make sure every piece gets coated well. This adds flavor and helps with crisping. - Preheating: I set the air fryer to 380°F (190°C). Preheating for about 5 minutes is essential for getting those crispy wings. - Cooking Time: I place the wings in a single layer in the basket. I cook them for 25-30 minutes. Halfway through, I shake the basket to cook evenly. By the end, the wings should look golden brown and crispy. - Cooking Instructions: While the wings cook, I make the sauce. In a small saucepan, I combine honey, minced garlic, soy sauce, apple cider vinegar, and crushed red pepper flakes. I stir it continuously. - Thicken Sauce: I keep an eye on the sauce as it simmers. It takes about 3-5 minutes to thicken slightly. Once it does, I remove it from the heat. - Tossing Wings in Sauce: After the wings are cooked, I move them to a big bowl. I pour the honey garlic sauce over the wings. I toss them until they are well coated. - Serving Suggestions: I plate the wings on a nice platter. I garnish them with chopped parsley for color. A drizzle of extra sauce makes them look even better. To get crispy wings, start by drying the chicken. Use paper towels to pat the wings dry. Moisture makes them soggy. Dry wings will crisp up nicely in the air fryer. After drying, it's important to set the right temperature. Preheat your air fryer to 380°F (190°C). This helps cook the wings evenly. Cook them for 25 to 30 minutes. Shake the basket halfway through cooking for even crispiness. For the best flavor, adjust the sweetness and heat levels in your sauce. If you like it sweeter, add more honey. For extra heat, toss in more crushed red pepper flakes. To get the right texture, watch your sauce while it simmers. Stir it continuously until it thickens. This usually takes about 3 to 5 minutes. A thicker sauce clings better to the wings. Pair these wings with tasty side dishes. Some good options are celery sticks, carrot sticks, or a fresh salad. Dip them in ranch or blue cheese dressing for extra flavor. Garnish your wings with fresh parsley. It adds a nice touch. You can also drizzle extra sauce on top for a burst of flavor. {{image_2}} You can change the flavor of your wings easily. For Spicy Honey Garlic Wings, add more crushed red pepper. This gives the wings a nice kick. If you like sweeter wings, try Sweet Apricot Garlic Wings. Just swap honey with apricot jam. It adds a fruity twist that many love. You can also cook these wings in other ways. If you choose to oven-bake, set your oven to 400°F (200°C). Spread the wings on a baking sheet and bake for 40-45 minutes. Flip them halfway for even cooking. Grilling is another great option. Preheat your grill, then cook the wings for about 20-25 minutes. Flip them often to get that nice char. If you want to switch things up, there are great swaps. Instead of soy sauce, try coconut aminos or tamari for a gluten-free option. If you don't have honey, maple syrup or agave works well as a sweetener. These changes can give your wings a new flavor that fits your taste! - Cooling and Storing: Let the wings cool down to room temperature. This helps keep them tasty. Once cool, put them in the fridge. Store them within two hours to keep them safe. - Recommended Containers: Use airtight containers for best results. These prevent moisture loss and keep the wings fresh longer. - Best Methods: You can reheat wings in the air fryer or oven. For the air fryer, set it to 350°F (175°C) and heat for about 5-7 minutes. If you choose the oven, preheat to 375°F (190°C) and bake for 10-15 minutes. - Maintaining Crispiness: To keep wings crispy, avoid covering them while reheating. This lets steam escape and keeps the skin crunchy. You can enjoy these wings with many tasty sides. Here are my favorites: - Crispy French fries: They pair well with the sweet sauce. - Coleslaw: The crunch adds a nice contrast. - Vegetable sticks: Carrots and celery are refreshing. - Rice: A bowl of steamed rice soaks up the sauce. - Dips: Ranch or blue cheese dressing are great choices. Yes, you can use frozen chicken wings. But you need to adjust cooking time. - Cooking Time: Add an extra 5 to 10 minutes. - Temperature: Keep the air fryer at 380°F (190°C). - Thawing: If you have time, thaw the wings overnight in the fridge. Check for a few signs to know if the wings are ready. - Color: They should be golden brown on the outside. - Crispiness: The skin should feel crispy to the touch. - Meat Thermometer: Use one to check the internal temp. It should read 165°F (75°C). Yes, preheating is key for the best results. - Crispy Texture: It helps the wings become crispy. - Cooking Time: Preheating reduces overall cooking time. - Even Cooking: It ensures the wings cook evenly throughout. In this post, we covered how to make tasty air fryer honey garlic wings. We outlined the ingredients, step-by-step instructions, and tips for achieving crispy wings. I shared ideas for flavor variations and cooking methods, plus how to store any leftovers. These wings are easy to make and sure to impress. Try these tips to enhance your wing-making skills. Enjoy every bite!
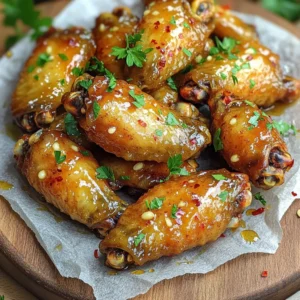
    Air Fryer Honey Garlic Wings Flavorful and Easy Recipe
  • - 1 cup graham cracker crumbs - 2 tablespoons sugar - 1/2 teaspoon ground cinnamon - 1/4 cup unsalted butter, melted - 1 cup cream cheese, softened - 1 cup pumpkin puree - 1/2 cup powdered sugar - 1 teaspoon vanilla extract - 1 teaspoon ground ginger - 1/2 teaspoon nutmeg - 1 cup whipped cream To create these delightful pumpkin cheesecake cups, you need a few key ingredients. First, graham cracker crumbs form the tasty crust. The cream cheese gives the filling a rich and creamy texture. Adding pumpkin puree offers a lovely fall flavor. Finally, whipped cream adds lightness and makes it dreamy. - Chopped pecans - Caramel sauce Optional garnishes take this treat to the next level. Chopped pecans give a nice crunch. A drizzle of caramel sauce adds sweetness and flair. - Alternative sweeteners - Dairy-free options You can easily swap ingredients if you need to. Use alternative sweeteners like honey or maple syrup instead of sugar. For a dairy-free option, try using coconut cream instead of cream cheese. These swaps keep the recipe delicious and accessible for everyone. - First, mix the graham cracker crumbs, sugar, and ground cinnamon in a bowl. - Then pour in the melted butter. Stir until the mixture looks like wet sand. - Next, take about 2 tablespoons of this mix and spoon it into each cup. - Press down firmly to form a solid base for your cheesecake. - In another bowl, beat the softened cream cheese until it's smooth and creamy. - Now add the pumpkin puree, powdered sugar, vanilla extract, ground ginger, and nutmeg. - Mix everything together until it's fully combined and smooth. - Gently fold in the whipped cream. This makes the filling light and fluffy. - Spoon the pumpkin cheesecake filling on top of the graham cracker crust in each cup. - Fill each cup all the way to the rim. - Finally, refrigerate the cups for at least 3 hours. This helps them set well. Enjoy the process and watch your delicious no bake pumpkin cheesecake cups come together! To get the best texture in your No Bake Pumpkin Cheesecake Cups, folding in the whipped cream is key. This step helps keep your filling light and airy. When you fold, use a spatula and gently mix. Start from the bottom and lift the mixture over itself. This method avoids deflating the whipped cream. Refrigeration time also plays a big role. Aim for at least three hours in the fridge. This time allows the filling to set properly. If you can, let them chill overnight. This extra time enhances the flavors and gives a firmer texture. Using clear cups is a great way to show off your dessert. You can see the beautiful layers of crust and filling. This makes your cheesecake cups look fancy. For final garnishes, add a dollop of whipped cream on top right before serving. Sprinkle with chopped pecans for extra crunch. If you want, you can drizzle some caramel sauce over the top. This adds a sweet touch and makes it even prettier. Pair your pumpkin cheesecake cups with warm drinks like coffee or tea. The flavors blend well and make a cozy treat. These cups are perfect for fall gatherings or holiday parties. They impress guests and are easy to serve. You can also enjoy them on a quiet night at home. They bring a slice of autumn joy with every bite. {{image_2}} You can easily change the flavor of your No Bake Pumpkin Cheesecake Cups. Here are a couple of fun ideas: - Adding chocolate: Mix in some melted chocolate with the pumpkin filling. You can use dark or milk chocolate. This gives a rich twist to your dessert. - Spice adjustments: If you like a spicier taste, add more ginger or even a pinch of cayenne. This adds warmth and depth to your cups. Want to serve more people? You can adjust the serving size with ease: - Scaling up for gatherings: Simply double or triple the recipe. Make sure you have enough cups ready. This way, everyone can enjoy your tasty treat. - Miniature versions for parties: Use smaller cups or shot glasses. This creates bite-sized delights that are perfect for parties. You can also make these cheesecake cups fit different diets: - Gluten-free options: Replace regular graham crackers with gluten-free ones. This way, everyone can join in on the fun. - Vegan substitutes: Use vegan cream cheese and coconut whipped cream. This keeps the flavors while being plant-based. Feel free to get creative with these variations! Each change can make the dessert feel fresh and exciting. To keep your No Bake Pumpkin Cheesecake Cups fresh, use the right containers. I recommend glass jars or plastic cups. They are easy to seal and show off your dessert. Make sure to cover them with a tight lid or plastic wrap. This keeps air out and prevents drying. These cheesecake cups can last in the fridge for about 4 days. After that, they may lose their texture and taste. If you want to freeze them, that's an option too. Just make sure you use freezer-safe containers. They can last up to 2 months in the freezer. When you take them out of the fridge or freezer, check the texture. If they seem a bit firm, let them sit at room temperature for about 10 minutes. This softens them up. For a nice touch, add a dollop of fresh whipped cream on top. A sprinkle of chopped pecans adds a crunchy bite and looks great! Yes, you can make these cups a day before. This makes them great for parties. Just cover them tightly with plastic wrap. Place them in the fridge until you are ready to serve. The flavors will blend well overnight. This also helps the cheesecake set properly. You will know the cheesecake is set when it feels firm to the touch. Gently press the top with your finger. If it springs back and holds its shape, it's ready. The edges should also look firm while the center can be slightly soft. Chill them for at least 3 hours to ensure the best texture. Yes, you can use Greek yogurt instead of cream cheese. It gives a nice tangy flavor. Silken tofu is another good option for a dairy-free choice. Just blend it until smooth. You can also try using mascarpone cheese for a rich taste. Each of these options will change the flavor a bit, but they work well. In this blog post, I covered how to make No Bake Pumpkin Cheesecake Cups. We discussed the must-have ingredients like graham cracker crumbs, cream cheese, and whipped cream. I shared steps for making the crust and filling, along with tips for the best texture. You can also explore variations and storage methods. Remember, these cups are not just tasty; they are easy to customize. Enjoy making them for any gathering or just a treat at home. Happy baking!
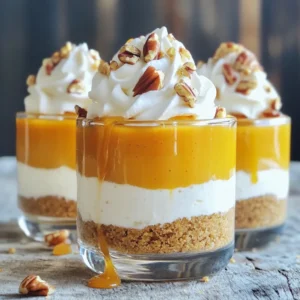
    No Bake Pumpkin Cheesecake Cups Easy and Delicious Treat
  • To make Apple Snickerdoodle Bars, you need simple and fresh ingredients. These will help create soft and sweet bars with a hint of spice. Here’s what you will need: - 1 cup unsalted butter, softened - 1 cup granulated sugar - 1 cup brown sugar, packed - 2 large eggs - 2 teaspoons vanilla extract - 3 cups all-purpose flour - 2 teaspoons cream of tartar - 1 teaspoon baking soda - 1 teaspoon ground cinnamon - 1/2 teaspoon salt - 2 cups peeled and diced apples (preferably Granny Smith) - Cinnamon-sugar mixture (1 tablespoon sugar + 1 teaspoon cinnamon for sprinkling on top) Each ingredient plays a role in making the bars delicious. The butter gives them richness. The sugars add sweetness and help with texture. The eggs bind everything together. The flour forms the base, while cream of tartar adds that classic snickerdoodle flavor. Using Granny Smith apples is key. Their tartness balances the sweetness well. The cinnamon-sugar topping adds a delightful crunch. This mix of flavors and textures makes these bars a must-try! {{ingredient_image_1}} - Preheat your oven to 350°F (175°C). - Prepare a 9x13 inch baking pan by greasing it or lining it with parchment paper. This makes it easier to remove the bars later. - In a large bowl, cream together 1 cup of softened butter, 1 cup of granulated sugar, and 1 cup of brown sugar. Mix until the mixture is light and fluffy. This step adds air and gives the bars a nice texture. - Next, add 2 large eggs, one at a time. Beat well after each addition. Then, mix in 2 teaspoons of vanilla extract for that warm flavor. - In another bowl, whisk together 3 cups of all-purpose flour, 2 teaspoons of cream of tartar, 1 teaspoon of baking soda, 1 teaspoon of ground cinnamon, and 1/2 teaspoon of salt. This mix gives the bars structure and flavor. - Gradually add the dry mix to the wet mix. Stir gently until just combined. Don’t over-mix, as this keeps the bars soft. - Fold in 2 cups of peeled and diced Granny Smith apples. This adds moisture and a nice tartness. - Spread the batter evenly into your prepared pan. - In a small bowl, combine 1 tablespoon of sugar and 1 teaspoon of cinnamon. Sprinkle this mix over the top of the batter for a sweet crust. - Bake in the preheated oven for 25-30 minutes. Check for doneness by inserting a toothpick in the center. It should come out clean. - Once baked, remove the pan from the oven. Let the bars cool for at least 15 minutes before cutting into squares. Enjoy the warm, sweet smell as they cool! - Ensuring even baking: Make sure your oven is preheated to 350°F (175°C). This helps the bars rise evenly. Rotate your baking pan halfway through to avoid hot spots. - Storing baked bars properly: Let the bars cool completely. Then, store them in an airtight container. They stay fresh at room temp for up to three days. You can also refrigerate them for a week. - Options for gluten-free and dairy-free versions: You can swap all-purpose flour for a gluten-free blend. Use coconut oil or vegan butter to replace the unsalted butter for a dairy-free option. - Types of apples for best flavor: Granny Smith apples work best here. Their tartness balances the sweet sugars. You can also use Honeycrisp for a sweeter taste. - Ways to get chewy versus cakey bars: For chewy bars, under-bake them slightly. Check them at 25 minutes. For cakey bars, follow the full bake time and let them cool longer. - Additional flavor enhancements: Add a pinch of nutmeg for warmth. Chopped nuts like walnuts or pecans can add crunch. You can also try a splash of maple syrup for a richer flavor. Pro Tips Choose the Right Apples: Use tart apples like Granny Smith for the best flavor contrast with the sweetness of the bars. Don’t Overmix: When combining the dry ingredients with the wet, mix just until combined to keep the bars tender. Check for Doneness: Since ovens vary, start checking the bars a few minutes before the recommended baking time for the best results. Storage Tips: Store any leftovers in an airtight container to keep them fresh, and enjoy within a week for the best taste. {{image_2}} You can add nuts for a nice crunch. Chopped walnuts or pecans work great. They give a tasty bite to the soft bars. You can also swap apples for other fruits. Pears or peaches can add a sweet twist. Each fruit brings its own flavor and charm. Instead of cinnamon-sugar, try using frosting. A cream cheese frosting makes these bars even richer. You can also drizzle with caramel or chocolate. This adds a fun, sweet layer on top. It makes each bite even more delightful. For a seasonal twist, add spices like nutmeg or cloves. These spices give a warm, cozy feel. You can also mix in pumpkin for autumn flair. The pumpkin makes the bars moist and adds great flavor. Each variation allows for creativity and fun in the kitchen! - Store Apple Snickerdoodle Bars at room temperature. Use an airtight container to keep them fresh. - If you live in a warm area, put the bars in the fridge. This will help them last longer. - To freeze Apple Snickerdoodle Bars, cut them into squares. Wrap each square in plastic wrap, then in foil. - Place the wrapped bars in a freezer bag. They can last for up to three months in the freezer. - To thaw, take the bars out and let them sit at room temperature for a few hours. - If you want a warm treat, reheat them in the oven at 350°F for about 10 minutes. - Pair these bars with a scoop of vanilla ice cream. The warm bars and cold ice cream taste great together. - You can also serve them with whipped cream for a light touch. - Enjoy them warm or chilled. Each way offers a nice taste experience. To check if your bars are done, use a toothpick. Insert it into the center of the bars. If it comes out clean, the bars are ready. You want a golden brown top and a soft look. Be careful not to overbake them, or they will be dry. Yes, you can make these bars ahead of time. They store well and taste great later. Let the bars cool completely before wrapping them. Use plastic wrap or foil to keep them fresh. You can keep them at room temperature for a few days. For longer storage, place them in the fridge. If you have leftover bars, you can share them with friends or family. They make a great treat for gatherings. You can also cut them into smaller pieces and pack them in lunchboxes. Another fun idea is to warm them up and serve with ice cream. They taste amazing when warm! These Apple Snickerdoodle Bars are simple and fun to make. Start with basic ingredients and follow easy steps. You can tweak flavors or toppings to suit your taste. Remember to store them well for later use. Baking should bring joy and deliciousness. Enjoy your sweet treat, and share it with friends and family. Each bite holds warmth and happiness. Happy baking!
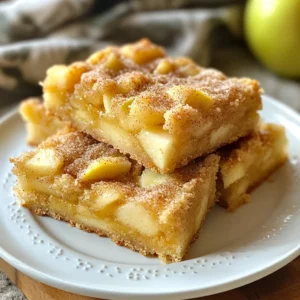
    Apple Snickerdoodle Bars Irresistibly Delicious Treat
  • - 4 boneless, skinless chicken thighs - 1 cup teriyaki sauce - 1 fresh pineapple, cut into 1-inch cubes - 2 red bell peppers, sliced - 1 zucchini, sliced - 1 red onion, sliced - 2 tablespoons olive oil - 2 cloves garlic, minced - 1 teaspoon fresh ginger, grated - Sesame seeds - Chopped green onions - Cooked rice or quinoa The main ingredients for this dish include chicken thighs, teriyaki sauce, and fresh pineapple. Chicken thighs work well because they stay juicy during cooking. Teriyaki sauce adds a sweet and savory flavor. Pineapple gives a fresh and bright taste that pairs well with the chicken. For the veggies, I like using red bell peppers, zucchini, and red onion. These add color and crunch. The marinade components are crucial. Olive oil helps the flavors meld together. Minced garlic and fresh ginger add depth and warmth. Lastly, garnishing ingredients bring the dish to life. Sesame seeds give a nice crunch. Chopped green onions add a fresh pop. Serve it all on rice or quinoa for a filling meal. Using these ingredients makes my Sheet Pan Teriyaki Chicken Pineapple Bowls a hit every time. The balance of flavors and textures is what makes this dish truly special. First, set your oven to 400°F (200°C). This high heat cooks the chicken well. Line a large sheet pan with parchment paper. This makes cleanup easier and prevents sticking. In a mixing bowl, combine 1 cup of teriyaki sauce, 2 minced garlic cloves, and 1 teaspoon of grated ginger. Whisk them together until smooth. Take your 4 chicken thighs and place them in a resealable bag. Pour half of the marinade over the chicken. Seal the bag tightly. Let the chicken marinate for at least 30 minutes. For deeper flavor, marinate up to 4 hours in the fridge. Grab a large mixing bowl. Cut a fresh pineapple into 1-inch cubes, slice 2 red bell peppers, 1 zucchini, and 1 red onion. Toss these in the bowl with 2 tablespoons of olive oil. Add the remaining teriyaki marinade and mix well. Make sure all pieces get coated evenly. Take the marinated chicken thighs out of the bag and place them in the center of the sheet pan. Spread the vegetable and pineapple mix around the chicken. Keep everything in an even layer. This helps them cook evenly. Roast in the oven for 25-30 minutes. Check the chicken's doneness by using a meat thermometer. The internal temperature should reach 165°F (75°C). The veggies should be tender and slightly browned. Once baked, take the sheet pan out of the oven. Let it cool for a few minutes. While it's cooling, spoon some cooked rice or quinoa into bowls. Top these with the roasted chicken, veggies, and pineapple. Finally, sprinkle sesame seeds and chopped green onions on top. This adds flavor and makes it look great. Marinating the chicken is key. I suggest at least 30 minutes. For even better flavor, marinate it for up to 4 hours. This allows the flavors to soak in deeply. You can use store-bought teriyaki sauce, but homemade is best. Making your own lets you control the taste and quality. Combine soy sauce, honey, and a dash of sesame oil for a simple mix. Feel free to switch up the veggies! Snow peas, broccoli, and carrots work great too. Cut your vegetables into uniform sizes. This helps them cook evenly. Think about using bite-sized pieces for easy eating. Use a large sheet pan with edges. This prevents spills and makes cleanup easy. I recommend using a sturdy, non-stick pan for the best results. Parchment paper is a must-have. It keeps food from sticking and makes cleanup a breeze. Just line your pan before adding the chicken and veggies. {{image_2}} You can easily swap chicken for other proteins. Try using boneless pork chops or shrimp. Both work well with teriyaki sauce. If you prefer a vegetarian option, use tofu. Tofu absorbs flavors well. Press it to remove excess water, then marinate just like chicken. This dish is great on rice or quinoa. Both options add texture and nutrition. For a fun twist, try a salad base like mixed greens or cabbage. You can also make a wrap using large lettuce leaves. This adds freshness and crunch. To boost flavor, add your favorite spices or herbs. Fresh cilantro or basil can add brightness. You can also incorporate different sauces. Try adding sriracha for heat or a sprinkle of lime juice for zest. These choices allow you to customize your dish to fit your taste! To keep your leftovers fresh, use airtight containers. Glass containers work best. They help maintain flavor and texture. Store the chicken and veggies together for easy meals. In the fridge, your leftovers last up to four days. Make sure to let them cool before sealing. For reheating, the oven is the best choice. Set it to 350°F (175°C). Place your chicken and veggies on a baking sheet. Heat for about 10-15 minutes, or until hot. If you’re in a hurry, use the microwave. Heat in short bursts to avoid overcooking. Don’t reheat more than once. This keeps your food safe and tasty. If you want to save some for later, freezing is a great option. Lay the chicken and veggies flat in freezer bags. Remove as much air as possible. This helps prevent freezer burn. You can freeze them for up to three months. When ready to eat, thaw overnight in the fridge. Reheat as mentioned above for best results. For the best flavor, marinate the chicken thighs for at least 30 minutes. If you have more time, marinate for up to 4 hours in the fridge. This longer time helps the chicken soak up all the tasty teriyaki sauce. Yes, you can make this dish gluten-free. Use a gluten-free teriyaki sauce. Many brands offer great options. Just check the label to be sure. You can also serve it with rice instead of quinoa if you prefer. I like to serve this dish with cooked rice or quinoa. You can also add a simple salad or steamed vegetables on the side. This adds extra color and crunch to your meal. Check the internal temperature with a meat thermometer. The chicken should reach 165°F (75°C). You can also look for clear juices when you cut into it. If the juices run clear, the chicken is done. This blog post covers a delicious teriyaki chicken pineapple bowl recipe. We went over the key ingredients, step-by-step instructions, and helpful tips. You learned how to marinate chicken, choose vegetables, and make flavorful variations. Remember to store leftovers properly for later enjoyment. With these easy instructions, you can create a tasty dish at home. Trust me, your family will love it! Enjoy cooking and experimenting with different flavors. Your kitchen will become a fun place for great meals.
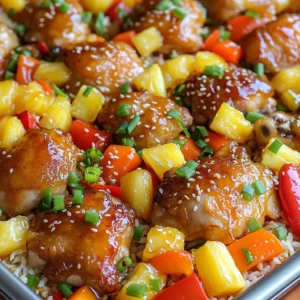
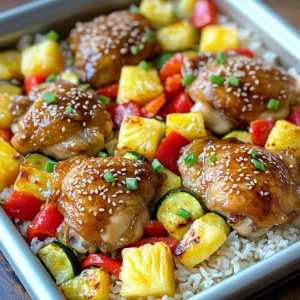
    Sheet Pan Teriyaki Chicken Pineapple Bowls Delight
  • To make No Bake Maple Pecan Energy Bites, you need a few simple items. Here’s what to gather: - 1 cup rolled oats - 1/2 cup chopped pecans - 1/3 cup almond butter (or nut butter of choice) - 1/4 cup pure maple syrup - 1/4 cup ground flaxseed - 1/2 teaspoon vanilla extract - 1/4 teaspoon salt - 1/2 teaspoon cinnamon - Optional: 1/4 cup mini chocolate chips or dried cranberries Each ingredient adds flavor and nutrition. The oats give you energy and fiber. Pecans add crunch and healthy fats. Almond butter brings creaminess and protein. Maple syrup sweetens the bites naturally. Flaxseed offers omega-3s, while vanilla and cinnamon enhance the taste. You can add mini chocolate chips or dried cranberries for extra fun. These ingredients combine to create a tasty, no-bake snack that you can enjoy any time. Start with a large mixing bowl. Add 1 cup of rolled oats, 1/2 cup of chopped pecans, and 1/4 cup of ground flaxseed. Sprinkle in 1/4 teaspoon of salt and 1/2 teaspoon of cinnamon. Mix everything well until all the dry ingredients blend evenly. In a separate bowl, whisk together 1/3 cup of almond butter, 1/4 cup of pure maple syrup, and 1/2 teaspoon of vanilla extract. Keep whisking until the mixture is smooth and creamy. Now, pour the wet mixture over the dry ingredients. Stir until fully combined. If you want extra flavor, fold in 1/4 cup of mini chocolate chips or dried cranberries. Use your hands to shape the mixture into small balls, about 1-inch wide. If the mix feels too sticky, chill it in the fridge for about 10 minutes. Place the energy bites on a parchment-lined plate. Refrigerate for at least 30 minutes to firm them up. Enjoy right away or store them in an airtight container in the fridge for up to a week. To get the right texture, adjust the moisture. If your mixture feels dry, add more almond butter. If it’s too sticky, chill it in the fridge for about 10 minutes before rolling. This step helps the bites hold their shape better. Feel free to experiment! You can add spices like nutmeg or cardamom for a different taste. Try mixing in extras like dried fruit or seeds to keep things exciting. Each tweak makes the bites unique and fun. When rolling your energy bites, wet your hands first. This simple trick helps prevent sticking. It makes shaping them easier and keeps your hands clean. Roll them into small balls, about one inch wide, for the perfect bite-sized treat. {{image_2}} You can easily tweak this recipe to fit your taste. If you want a different nut butter, try peanut butter or cashew butter. If you prefer a sweeter bite, swap maple syrup for honey or agave nectar. You can also add mix-ins like sunflower seeds or shredded coconut. These changes keep the bites tasty and fun. This recipe is flexible for different diets. For gluten-free options, make sure your oats are certified gluten-free. If you need a vegan version, use a plant-based butter and a vegan sweetener. For nut-free bites, try sunbutter or soy nut butter. These choices ensure everyone can enjoy these energy bites. You can change the flavors with the seasons. In fall, add pumpkin spice for a warm touch. In winter, mix in cocoa powder for a chocolatey kick. These seasonal swaps keep your energy bites fresh and exciting all year long. Store your No Bake Maple Pecan Energy Bites in an airtight container. They stay fresh in the fridge for up to one week. Keeping them sealed helps maintain their texture and flavor. I recommend labeling the container with the date you made them. This way, you’ll know when to enjoy them best. If you want to keep your energy bites for longer, freezing is a great option. Place the bites in a single layer on a baking tray. Freeze them for about two hours, or until firm. Then, transfer them into a freezer-safe bag or container. They can last for up to three months in the freezer. Just make sure to remove as much air as possible from the bag. To thaw your frozen energy bites, take them out of the freezer and let them sit at room temperature. This usually takes about 30 minutes. If you need them faster, you can use the microwave. Set it to low power and heat the bites in short bursts of ten seconds. This keeps them from getting too warm. Enjoy your delicious bites as a quick snack or energy boost! Yes, you can use other nuts. Almonds and walnuts work well. They add a nice crunch and flavor. You can even try sunflower seeds for a nut-free option. Just chop them up like the pecans. These bites last about a week in the fridge. For longer storage, freeze them. They can stay good for up to three months in the freezer. Just remember to put them in an airtight container. Absolutely! Use a plant-based nut butter. Almond, cashew, or peanut butter are great choices. For sweeteners, maple syrup is already vegan. Just check that your mix-ins, like chocolate chips, are dairy-free. These No Bake Maple Pecan Energy Bites are simple and fun to make. You mix dry and wet ingredients, form balls, and refrigerate. Feel free to customize with your favorite nuts or spices. These snacks are great for busy days and can fit many diets. Store them in the fridge or freeze for later. Try different flavors to keep it exciting. With this guide, making healthy snacks is easy and enjoyable. Enjoy your energy bites and the benefits they bring to your day!
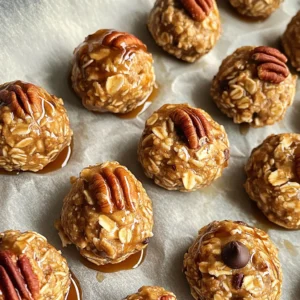
    No Bake Maple Pecan Energy Bites Simple and Nutritious
  • - 2 medium apples, peeled, cored, and diced - 1 teaspoon lemon juice - 2 cups all-purpose flour - 1 ½ cups granulated sugar, divided - 1 tablespoon baking powder - ½ teaspoon baking soda - ½ teaspoon salt - 1 teaspoon ground cinnamon - ½ cup unsalted butter, softened - 2 large eggs - 1 teaspoon vanilla extract - 1 cup buttermilk The main ingredients for the apple streusel coffee cake create a soft and moist texture. Apples add natural sweetness and flavor. Lemon juice keeps the apples fresh and bright. Flour, sugar, and baking powder help the cake rise and hold its shape. Eggs and butter give richness. - ½ cup all-purpose flour - ½ cup brown sugar - 1 teaspoon ground cinnamon - ¼ cup unsalted butter, melted The streusel topping adds a sweet, crunchy layer. Flour and brown sugar form the base. Cinnamon gives warmth and spice. Melted butter binds everything together, creating a delicious crumb. - 1 cup chopped pecans or walnuts Adding nuts to your coffee cake gives it extra texture and flavor. Pecans and walnuts work well with apples. They add a lovely crunch and richness. Feel free to skip them if you prefer a nut-free cake. First, set your oven to 350°F (175°C). This is the perfect temperature for our coffee cake. Next, grease and flour a 9x13-inch baking pan. You can also use parchment paper for easy removal later. Now, take two medium apples. Peel, core, and dice them into small pieces. Toss the apples with one teaspoon of lemon juice in a bowl. This keeps them fresh and bright. In another large bowl, whisk together two cups of flour, one cup of granulated sugar, baking powder, baking soda, salt, and one teaspoon of cinnamon. Mixing these dry ingredients ensures they blend well in the batter. In a separate bowl, mix half a cup of softened unsalted butter with the remaining half cup of granulated sugar. Beat until it looks light and fluffy. This step adds air to your batter. Next, add two large eggs, one at a time. Mix well after each egg. Finally, stir in one teaspoon of vanilla extract for that sweet flavor. Now, it's time to bring it all together. Alternately add the dry mixture and one cup of buttermilk to the butter mixture. Start and end with the dry ingredients. Mix until just combined. Be careful not to overmix; this keeps your cake tender. Gently fold in the diced apples and chopped nuts if you want some crunch. For the streusel topping, combine half a cup of flour, half a cup of brown sugar, and one teaspoon of cinnamon in a small bowl. Add a quarter cup of melted butter and mix until crumbly. This topping adds a sweet crunch. Pour the batter into the prepared pan and smooth the top with a spatula. Sprinkle the streusel evenly over the batter. Now, place the pan in your preheated oven. Bake for 35 to 40 minutes. To check if it’s done, insert a toothpick into the center. If it comes out clean, your cake is ready! Let it cool in the pan for 10 minutes. Then, transfer it to a wire rack. This helps it cool evenly. Enjoy this warm or at room temperature! To get a soft and fluffy cake, use room-temperature ingredients. This includes butter, eggs, and buttermilk. Mixing the butter and sugar until light and fluffy helps add air. Be gentle when combining wet and dry ingredients. Overmixing can make the cake dense. Spice up the flavor with a pinch of nutmeg or ginger. You can also use different apples, like Granny Smith or Honeycrisp, for a unique taste. If you want a nutty crunch, add chopped pecans or walnuts. You can even try a swirl of caramel for extra sweetness. Store leftover cake in an airtight container. This keeps it fresh for up to three days on the counter. If you want to keep it longer, wrap it in plastic wrap and freeze it. It will stay good for about three months. When ready to eat, just thaw it at room temperature. {{image_2}} You can switch up the apples for other fruits. Peaches add a sweet, juicy twist. Berries like blueberries or raspberries give a nice tart flavor. If you use berries, reduce sugar slightly. This way, you keep the balance of sweetness and tartness. Each fruit brings its unique taste to the cake. It's fun to experiment! To make this cake gluten-free, use a gluten-free flour blend. Many brands work well for baking. Just ensure it has a good mix of starches and proteins. Also, check that your baking powder is gluten-free. The rest of the ingredients usually fit into a gluten-free diet. This way, everyone can enjoy a slice! If you're looking for a vegan option, swap eggs for flax eggs. Mix one tablespoon of flaxseed meal with two and a half tablespoons of water. Let it sit until thick. For buttermilk, combine plant milk with vinegar or lemon juice. Use coconut oil instead of butter for the fat. These swaps keep the cake moist and delicious! Store your apple streusel coffee cake at room temperature for up to three days. Keep it in an airtight container to maintain moisture. If your home is warm, it’s best to refrigerate the cake. It can last up to a week in the fridge. However, the cake may dry out a bit. Always wrap it tightly in plastic wrap or foil. You can freeze this coffee cake for up to three months. Cool the cake completely before wrapping it. Use plastic wrap and then aluminum foil to protect it from freezer burn. Label the package with the date. When you’re ready to enjoy it, thaw in the fridge overnight or at room temperature for a few hours. To reheat, preheat your oven to 350°F (175°C). Place the cake in the oven for about 10-15 minutes. This warms it through and revives the flavors. You can also use the microwave for quick reheating. Heat a slice for about 20-30 seconds, but the oven method is best for taste. Enjoy it warm for the best experience! Yes, you can use different apples. I suggest tart apples like Granny Smith or Honeycrisp. They add a nice balance to the sweet cake. If you want a sweeter taste, try Fuji or Gala apples. Just remember, different apples will change the flavor a bit. To check if the cake is done, insert a toothpick into the center. If it comes out clean, the cake is ready. If there is wet batter, it needs more time. Keep an eye on it after about 30 minutes. Baking times may vary based on your oven. If you don't have buttermilk, you can make your own. Mix 1 cup of milk with 1 tablespoon of vinegar or lemon juice. Let it sit for about 5 minutes. You can also use yogurt or milk mixed with sour cream for a similar effect. This coffee cake stays fresh for about 3 days at room temperature. If you store it in an airtight container, it can last up to a week in the fridge. For longer storage, freeze it for up to 3 months. Just thaw it in the fridge before serving. In this blog post, we explored the key ingredients for apple streusel coffee cake and detailed the steps to make it. We included tips for texture and flavor, plus different variations and storage methods. Remember, this cake is not just for breakfast; it’s great for any time. Enjoy crafting your cake and don’t be afraid to experiment. Happy baking!
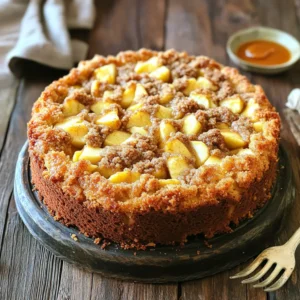
    Bakery-Style Apple Streusel Coffee Cake Delight
  • - 1 cup pumpkin puree - 1/2 cup Greek yogurt - 2 large eggs - 1/2 cup honey or maple syrup - 1 teaspoon vanilla extract - 1 cup whole wheat flour - 1/2 cup rolled oats - 1/4 cup vanilla protein powder - 1 teaspoon baking powder - 1 teaspoon baking soda - 1 teaspoon pumpkin pie spice - 1/2 teaspoon salt - 1/2 cup dark chocolate chips Each ingredient plays a key role. Pumpkin puree gives moisture and flavor. It adds vitamins like A and C. Greek yogurt brings protein and creaminess. It helps the muffins stay soft. Eggs bind the mixture and add protein. Honey or maple syrup sweetens. They also add moisture and flavor. Whole wheat flour boosts fiber and nutrients. Rolled oats add heartiness and texture. Vanilla protein powder increases protein, making these muffins filling. Baking powder and baking soda help them rise. Pumpkin pie spice gives warmth and that cozy fall taste. Lastly, dark chocolate chips add sweetness and a delicious contrast to the pumpkin. If you want to change the sweetener, you can use agave syrup or brown sugar. These options work well and taste great. For the protein powder, you can switch to chocolate or plant-based protein. Both will still give you that protein boost while adding a different flavor twist. Start by preheating your oven to 350°F (175°C). Line your muffin tin with paper liners or grease it lightly. In a large bowl, mix these wet ingredients: - 1 cup pumpkin puree - 1/2 cup Greek yogurt - 2 large eggs - 1/2 cup honey or maple syrup - 1 teaspoon vanilla extract Stir these until smooth and creamy. Make sure there are no lumps. In a separate bowl, combine the dry ingredients: - 1 cup whole wheat flour - 1/2 cup rolled oats - 1/4 cup vanilla protein powder - 1 teaspoon baking powder - 1 teaspoon baking soda - 1 teaspoon pumpkin pie spice - 1/2 teaspoon salt Whisk these dry ingredients together until well mixed. This helps to distribute the baking powder evenly. Now, slowly add the dry mix to the wet mixture. Stir gently until just combined. Be careful not to overmix; a few lumps are okay. Fold in 1/2 cup dark chocolate chips. They add great flavor! Next, fill each muffin cup about 3/4 full with batter. This allows room for the muffins to rise. Bake in your preheated oven for 18-20 minutes. Check if they are done by inserting a toothpick into the center. If it comes out clean, they are ready! Once baked, let the muffins cool in the tin for about 5 minutes. This helps them firm up. Then, transfer them to a wire rack to cool completely. For serving, I like to present them on a wooden board. Drizzle a little honey over the top and sprinkle some extra chocolate chips. Serve warm or at room temperature for the best taste. Enjoy your delicious creation! To make great muffins, avoid overmixing. Mix just until the dry and wet ingredients meet. A few lumps are okay. Overmixing makes muffins tough. For even chocolate chip distribution, fold them in gently. This keeps them from sinking. You want every bite to have a bit of chocolate. Spices can boost the flavor of your muffins. Consider adding cinnamon or nutmeg. These spices complement pumpkin well. You can also mix in some chopped nuts for extra crunch. To ripen bananas, place them in a paper bag. The bag traps ethylene gas, speeding up ripening. Use ripe bananas for sweeter muffins. They also add moisture. {{image_2}} You can make these muffins even more fun! Try adding nuts or fruits to the batter. Walnuts or pecans give a nice crunch. Chopped apples or bananas add more sweetness and moisture. Just remember to keep the total amount balanced with the pumpkin. Switching up the protein powder flavor is another great idea. You can use chocolate protein powder for a richer taste. Vanilla or even a spice-flavored powder can add a twist, too. Just think about what flavors you enjoy most! If you need gluten-free muffins, it's easy to adapt this recipe. Simply substitute whole wheat flour with a gluten-free blend. Make sure it has xanthan gum to help bind the ingredients. You can also use almond flour for a nutty taste. For vegan muffins, swap eggs for flax eggs. Mix one tablespoon of flaxseed meal with three tablespoons of water. Let it sit for five minutes to thicken. Use plant-based yogurt instead of Greek yogurt, and maple syrup works great for sweetening. With these changes, you can enjoy delicious muffins that fit your diet! To keep your Pumpkin Chocolate Chip Protein Muffins fresh, store them in the fridge. Place them in an airtight container. This way, they stay moist and tasty for up to five days. If you want to store them longer, freezing is a great choice. Wrap each muffin tightly in plastic wrap. Then, place them in a freezer bag. They can last for up to three months. When you want one, just take it out to thaw. Reheating your muffins helps bring back their warm, soft texture. For the best results, use the oven. Preheat it to 350°F (175°C). Place the muffin on a baking sheet for about 10 minutes. This method keeps them fluffy. If you are short on time, the microwave works too. Heat each muffin for about 15-20 seconds. Just be careful not to overheat; you want them warm, not hot! Can I use regular flour instead of whole wheat? Yes, you can use regular all-purpose flour. Whole wheat flour adds more fiber and nutrients. It also gives a hearty texture. If you swap, the muffins may be lighter. How long can I store these muffins? You can store these muffins for about 4 to 5 days. Keep them in an airtight container at room temperature. For longer storage, freeze them. They stay good for up to 3 months in the freezer. How many calories per muffin? Each muffin has about 150 calories. This varies based on the exact ingredients you use. They offer protein, fiber, and healthy carbs. Are these muffins suitable for meal prep? Yes, these muffins are great for meal prep. They are easy to make in bulk. You can grab one for breakfast or a snack. They stay fresh for days, making them perfect for busy weeks. What can I do if my muffins don’t rise? If your muffins don’t rise, check the baking powder and baking soda. These are key to making muffins fluffy. Make sure they are fresh. Overmixing the batter can also cause them to not rise. How can I make muffins more moist? To make your muffins more moist, use Greek yogurt or add extra pumpkin puree. Both help keep them soft. Avoid overbaking, as this can dry them out. Keep an eye on them in the oven! Now you have all the tools to make delicious muffins. You learned the key ingredients and their benefits. We discussed simple substitutions and alternatives to fit your needs. I guided you through each step, from preparation to baking and cooling. You now know tricks to perfect your muffins and explore fun variations. Remember to store them correctly and reheat for the best taste. Enjoy baking and sharing these muffins with friends and family! They’re sure to be a hit!
    Pumpkin Chocolate Chip Protein Muffins Simple Delight
  • - 4 salmon fillets (about 6 ounces each) - 1/4 cup honey - 3 tablespoons soy sauce (low-sodium preferred) To make this dish shine, you need fresh salmon fillets. The honey adds sweetness. It balances well with the salty soy sauce. Together, they create a tasty glaze for the salmon. - 1 cup broccoli florets - 1 cup bell pepper, sliced (colorful mix of red, yellow, and green) - 1 cup snap peas - Sesame seeds and chopped green onions for garnish The vegetables add color and crunch. Broccoli florets bring a nice bite. Sliced bell peppers add sweetness. Snap peas offer a fresh snap with each bite. You can sprinkle sesame seeds and green onions for a beautiful finish. - 2 cloves garlic, minced - 1 tablespoon fresh ginger, grated - 1 tablespoon rice vinegar - 1 tablespoon sesame oil - 1 teaspoon cornstarch - Salt and pepper to taste Garlic and ginger give a bold flavor. Rice vinegar adds a tangy note. Sesame oil brings a rich, nutty taste. Cornstarch helps thicken the glaze. Don’t forget to season with salt and pepper. This mix of flavors makes the dish truly special. 1. Preheating the oven: Start by setting your oven to 400°F (200°C). This high heat helps cook the salmon and veggies perfectly. It also makes the honey garlic glaze nice and sticky. 2. Whisking the sauce: In a small bowl, mix together 1/4 cup honey, 3 tablespoons low-sodium soy sauce, 2 minced garlic cloves, 1 tablespoon of grated ginger, 1 tablespoon rice vinegar, 1 tablespoon sesame oil, and 1 teaspoon cornstarch. Keep whisking until it is smooth. This sauce is key to the sweet and savory flavor. 1. Placing salmon and vegetables on the sheet pan: Take a large sheet pan and line it with parchment paper. This makes cleanup a breeze. Place 4 salmon fillets in the center and sprinkle them with salt and pepper. Next, arrange 1 cup of broccoli florets, 1 cup of sliced bell pepper, and 1 cup of snap peas around the salmon. 2. Drizzling the honey garlic sauce: Pour the honey garlic sauce evenly over the salmon and veggies. Make sure everything gets coated for the best flavor. This glaze will caramelize in the oven, making it even more delicious. 1. Baking time and temperature: Slide the pan into the preheated oven. Bake for 15-20 minutes. Keep an eye on it. The salmon will be done when it flakes easily with a fork, and the veggies will be tender-crisp. 2. Resting the dish before serving: Once baked, take the pan out of the oven and let it rest for a couple of minutes. This helps the salmon stay moist. Before serving, sprinkle sesame seeds and chopped green onions on top for a lovely finish. Enjoy your meal! How do I check for doneness? To check if your salmon is done, use a fork. Gently press the thickest part. If it flakes easily, it's ready. The salmon should look opaque and slightly shiny. How do I ensure the right texture? A perfect salmon has a tender, moist texture. Avoid overcooking it. Keep an eye on the time, especially if your fillets are thick. Salmon cooks fast in the oven. What are tips for marinating? For great flavor, marinate the salmon for 15 to 30 minutes before cooking. This lets the honey and garlic soak in. Just don’t let it sit too long, or the fish can get mushy. How do I adjust ingredients for taste? Feel free to tweak the sauce. Add more honey for sweetness or more soy sauce for saltiness. You can also play with garlic and ginger amounts. Make it your own! How can I make cleanup easy? Line your sheet pan with parchment paper. This keeps the fish and veggies from sticking. It makes cleanup a breeze. Just peel off the paper when you’re done! What is the best way to manage leftovers? Store any leftovers in an airtight container. Keep them in the fridge for up to three days. Reheat gently in the microwave or oven. This keeps the salmon tasty and fresh. {{image_2}} You can swap the broccoli and snap peas for other veggies. Try carrots, zucchini, or asparagus. Each adds a unique taste and texture. Seasonal veggies work well, too. In spring, use fresh peas or asparagus. In fall, try Brussels sprouts or sweet potatoes. These swaps keep the dish fresh and exciting. If you want to change the protein, chicken or tofu are great choices. For chicken, use boneless breasts or thighs. They cook in about 20-25 minutes. If you pick tofu, use firm or extra-firm. Cut it into cubes and bake for about 15-20 minutes. Both options soak up the honey garlic sauce nicely. You can change the flavor by adding spices or herbs. Try red pepper flakes for heat, or fresh herbs like cilantro or parsley for brightness. Mixing in other sauces can also change the taste. Teriyaki, hoisin, or even a spicy sriracha adds a fun twist. Don't be afraid to experiment and find what you love! To keep your salmon fresh, use airtight containers. Glass containers work well. They do not stain and are easy to clean. Store your leftovers in the fridge. They will stay fresh for up to three days. Be sure to let the dish cool before sealing. You can reheat your salmon in two ways: the microwave or the oven. If you use the microwave, cover the dish and heat for 1-2 minutes. Check to see if it is warm. For the oven, set it to 350°F (175°C) and heat for about 10 minutes. This keeps the salmon nice and moist. To avoid dryness, add a splash of water or broth before reheating. You can freeze your salmon and veggies. Place them in freezer-safe bags or containers. Make sure to remove as much air as possible. They can last up to three months in the freezer. When you are ready to eat, thaw them in the fridge overnight. To reheat, follow the oven instructions above. This way, you keep the taste and texture. Bake salmon at 400°F (200°C) for about 15-20 minutes. Check the salmon after 15 minutes. It should flake easily with a fork when done. Yes, you can use frozen salmon. Just add 5-10 minutes to the baking time. Make sure it’s thawed if you want even cooking. You can use maple syrup or agave syrup as a sweetener. Both will add a nice flavor, though they are less thick than honey. Yes, this recipe is healthy. Salmon is rich in omega-3 fatty acids. The vegetables add fiber and vitamins. The dish is low in added sugar and packed with nutrients. This blog post covered making a tasty salmon dish that’s easy to prepare. We explored the simple ingredients like salmon, honey, and vegetables. The step-by-step guide ensures even beginners can follow along. With tips for cooking and storage, you can enjoy this meal more than once. Experiment with flavors to make it your own. Healthy and fun, this recipe brings joy to your table. Try it out and enjoy the benefits of cooking at home!
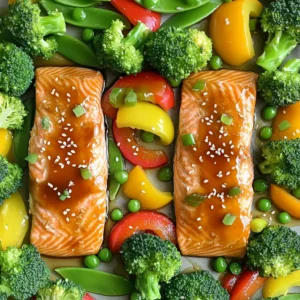
    Sheet-Pan Honey Garlic Glazed Salmon Easy Delight
  • - 1 cup graham cracker crumbs - 4 tablespoons unsalted butter, melted - 8 oz cream cheese, softened - 1/2 cup powdered sugar - 1 teaspoon vanilla extract The base of our No-Bake S’mores Cheesecake Cups starts with graham cracker crumbs. These give a sweet and crunchy texture. Next, we add melted unsalted butter. This helps bind the crumbs and creates a rich flavor. Cream cheese is key for the cheesecake filling. It provides a creamy and smooth texture. Powdered sugar adds sweetness without grittiness. Don't forget the vanilla extract; it brightens the flavor and adds depth. - 1 cup whipped cream (or whipped topping) - 1/2 cup mini marshmallows - 1/2 cup chocolate chips (semi-sweet or milk chocolate) - Extra mini marshmallows and chocolate for garnish Toppings make this dessert fun and appealing. Whipped cream adds fluffiness and lightness. Mini marshmallows give that classic s'mores touch. Chocolate chips provide rich, melted chocolate goodness. For garnish, you can add extra mini marshmallows and chocolate pieces on top. - Mixing bowls - Serving cups or glasses - Kitchen torch (optional) You will need mixing bowls to combine your ingredients. Serving cups or glasses are perfect for layering your cheesecake. A kitchen torch is optional but fun for toasting the marshmallows on top. This adds a nice, smoky flavor that takes it to the next level. - Combine graham cracker crumbs and melted butter in a medium bowl. - Mix until the crumbs are evenly coated. This forms a tasty base for your cups. - Add the graham cracker mixture to your serving cups. - Press down gently to form a solid crust. This step is key for holding the layers above. - In a mixing bowl, beat together softened cream cheese and powdered sugar until smooth. - Mix in the vanilla extract for a fragrant touch. This adds great flavor to your cheesecake. - Gently fold in the whipped cream to the cream cheese mixture. - This makes the filling light and fluffy. Be careful not to deflate the mixture. - Spoon a layer of the cheesecake filling onto the graham cracker crust in each cup. - Top with mini marshmallows and some chocolate chips for sweetness. - Repeat layers until the cups are filled. This creates a delightful mix of flavors. - Refrigerate the cups for at least 3 hours or until set. - Before serving, you can torch the mini marshmallows for a toasted effect. - Garnish with extra chocolate pieces for a final touch. This will impress your guests! To make your cheesecake smooth, ensure the cream cheese is softened. It should feel like a cloud. If it is cold, your filling will be lumpy. This step is key for a creamy bite. Next, when you fold in the whipped cream, do it gently. This keeps the air in, making it light and fluffy. Over-mixing can make it dense, which we want to avoid. Using clear cups for your s'mores cheesecake cups adds a nice touch. Guests can see the layers, and it looks inviting. I also suggest serving with extra chocolate drizzle. A quick drizzle makes each bite feel special. You can use a squeeze bottle for precision. One common mistake is over-mixing the filling. This can lead to a heavy texture. Mix just until smooth. Another mistake is not chilling long enough. The cups need at least three hours to set. If you rush this step, the layers may run together. Trust the chill! {{image_2}} You can switch things up with fun flavors. A pumpkin spice version is perfect for fall. Just add pumpkin puree and some cinnamon to the cheesecake mix. It gives a warm, cozy taste. Another great choice is a peanut butter s'mores variation. Mix creamy peanut butter into the cheesecake filling. This adds a rich and nutty twist. You can even top it with chopped peanuts for extra crunch. If you need gluten-free options, use gluten-free graham crackers. They make a great base for the cheesecake. Just make sure to check the label for gluten-free labeling. For those who prefer vegan options, substitute cream cheese with vegan cream cheese. Many brands taste just as good. You can also use coconut whipped cream for a light and fluffy texture. You can enhance your cups with seasonal flavors. In summer, add fresh fruit layers like strawberries or blueberries. They bring a refreshing touch and vibrant color. During fall, consider adding dried fruits or nuts. Chopped pecans or cranberries make each bite even more delightful. The mix of flavors and textures will impress everyone. To keep your No-Bake S’mores Cheesecake Cups fresh, store them in the fridge. Use an airtight container to seal them tight. This helps to prevent any odors from your fridge affecting the taste. These cheesecake cups last for about 3 to 5 days in the fridge. Enjoy them within this time for the best taste and texture. After 5 days, they may not taste as fresh or creamy. You can freeze cheesecake cups, but it’s not the best choice. Freezing can change their creamy texture. If you still want to freeze, wrap each cup well in plastic wrap. Place them in a freezer-safe container. Thaw in the fridge before serving. To help your cheesecake set right, chill it well. I recommend at least 3 hours in the fridge. The longer it chills, the firmer it gets. Make sure to cover the cups with plastic wrap. This keeps moisture in and prevents the top from drying out. Yes, you can make these cups a day in advance. Just prepare and assemble them, then chill overnight. This gives the flavors time to meld. If you want, you can add the toppings just before serving. This keeps them fresh and tasty. You can use cookies, like digestive biscuits or vanilla wafers, for the crust. Crushed pretzels add a salty crunch. For a gluten-free option, try gluten-free graham crackers. Just crush them the same way and mix with melted butter. It's best to torch the marshmallows just before serving. This keeps them soft and fluffy. If you torch them too early, they may get hard and lose that nice toasted taste. You can just add extra marshmallows on top for a fun look. This recipe makes 6 to 8 cups, depending on cup size. For a good portion, fill each cup about three-quarters full. This way, everyone gets a nice treat without feeling too full. Perfect for sharing at a party! These cheesecake cups are easy to make and full of flavor. You learned about the key ingredients like graham crackers and cream cheese. The step-by-step guide helped you layer delicious flavors, while tips ensured a perfect texture. You can even try different variations to match your taste. Remember, these cups store well and can last a few days. With a little creativity, you can impress anyone with this treat. Enjoy making these delightful desserts, and let your kitchen be filled with joy!
    No-Bake S’mores Cheesecake Cups Delightful Treat
  • To make Cottage Cheese Chocolate Mousse, you need simple ingredients that pack a punch. Here’s what you’ll need: - 1 cup cottage cheese (low-fat or fat-free) - 1/4 cup unsweetened cocoa powder - 1/4 cup honey or maple syrup - 1/4 cup Greek yogurt - 1 teaspoon vanilla extract - 1/4 cup dark chocolate chips (dairy-free if needed) - Pinch of salt - Fresh berries for garnish (optional) Each ingredient plays a role in making this mousse rich and flavorful. The cottage cheese adds protein and creaminess, while cocoa powder brings that deep chocolate flavor. Honey or maple syrup sweetens the mix, balancing the cocoa's bitterness. Greek yogurt contributes a smooth texture, and vanilla extract enhances the overall taste. Dark chocolate chips add a delightful melt-in-your-mouth experience. Finally, a pinch of salt rounds out the flavors. Fresh berries can add a pop of color and freshness when serving. Gather these ingredients, and you’re ready to whip up a high-protein dessert that satisfies your chocolate cravings! - Combining Ingredients in Blender Start by adding the cottage cheese, cocoa powder, honey (or maple syrup), Greek yogurt, vanilla extract, and a pinch of salt into your blender. Blend these ingredients until they are smooth and creamy. Make sure to scrape down the sides of the blender. This helps mix everything well. - Melting Dark Chocolate Chips Next, take your dark chocolate chips and place them in a microwave-safe bowl. Heat them in the microwave in 30-second bursts. Stir the chocolate in between. Keep going until it is fully melted and smooth. Let it cool for a moment before using it. - Folding Chocolate into Mousse Gently fold the melted chocolate into the cottage cheese mixture. Use a spatula to mix carefully. You want to keep it light and airy, so don’t stir too hard. Make sure the chocolate is mixed in well. - Spoon into Serving Glasses Once your mixture is ready, take it and spoon it into serving glasses or bowls. You can use any glass you like. Make sure to leave some space at the top for garnishing later. - Refrigeration Time Now, place the glasses in the fridge. Let the mousse chill for at least 30 minutes. This helps it set and become firmer. The longer it sits, the better the flavors meld together, so feel free to wait longer if you can! To get the best mousse, blending is key. Use a blender or food processor. This helps mix everything well. Start with the cottage cheese, cocoa, honey, Greek yogurt, and vanilla. Blend until smooth. Scrape down the sides to get all the lumps out. Next, melt the dark chocolate chips. Do this in the microwave at 30-second intervals. Stir in between each interval. This keeps the chocolate from burning. Once smooth, let it cool a bit before adding it to the mixture. For garnishing, fresh fruits work great. Berries like strawberries, raspberries, or blueberries add color and taste. They make your mousse look pretty and taste fresh. You can also add nuts or coconut flakes for crunch. Nuts like almonds or walnuts add a nice texture. Coconut flakes give a tropical flair. Just sprinkle them on top before serving. {{image_2}} You can swap honey or maple syrup for agave or stevia. These options lower the sugar. Agave has a mild taste and mixes well. Stevia is very sweet, so use less. Both sweeteners work great in this mousse. For a sugar-free option, try using erythritol. It adds sweetness without the calories. Make sure to adjust the amount based on your taste. Your mousse will still be rich and creamy! Want to make your mousse unique? Adding espresso powder gives it a coffee kick. Just a teaspoon can enhance the chocolate flavor. It’s perfect for coffee lovers. You can also infuse the mousse with mint or orange zest. Add a few drops of mint extract or the zest of an orange. Both choices add a fresh twist. They brighten up the rich chocolate flavor. Try these variations to find your favorite! To keep your mousse fresh, use an airtight container. Glass or plastic containers work well. Make sure the lid seals tightly. This helps prevent air from getting in. You want to keep the mousse creamy and smooth. Store it in the fridge for up to three days. If you don’t eat it all, it will still taste great! Can you freeze cottage cheese mousse? Yes, you can freeze it! However, the texture might change a bit. It may become a little grainy after thawing. If you want to freeze it, spoon it into small containers. Leave some space at the top because it expands. For thawing instructions, place the container in the fridge overnight. This helps it thaw slowly. If you're in a hurry, you can set it at room temperature for about 30 minutes. Stir before serving to help bring back the creaminess. Enjoy your mousse even days later! Yes, cottage cheese is very healthy. It is rich in protein, which helps build and repair muscles. One cup of low-fat cottage cheese has about 28 grams of protein. That’s more than many other dairy options. It also has calcium, which supports strong bones. You can use other cheeses, but the taste and texture will change. Cream cheese can give a rich flavor. Ricotta can also work, but it will be less smooth. Always choose cheeses that blend well to keep your mousse creamy. The mousse lasts about three to five days in the fridge. Store it in an airtight container to keep it fresh. If you want to enjoy it later, make sure to eat it within this time. In this blog post, I shared how to make a delicious cottage cheese mousse. We covered the ingredients, step-by-step instructions, and key tips for perfecting the recipe. Remember, blending well and melting chocolate smoothly are important. You can also vary the flavors with sweeteners or fruits. This mousse is not just tasty; it's also healthy. With the right storage, it lasts for days. Enjoy your treat and get creative with the toppings!
    Cottage Cheese Chocolate Mousse High Protein Delight
  • To make pumpkin chocolate chip blondies, you’ll need these key ingredients: - 1 cup pumpkin puree - 1/2 cup unsalted butter, melted - 1 cup brown sugar - 1/2 cup granulated sugar - 2 large eggs - 1 teaspoon vanilla extract - 2 cups all-purpose flour - 1 teaspoon baking powder - 1 teaspoon baking soda - 1 teaspoon ground cinnamon - 1/2 teaspoon nutmeg - 1/4 teaspoon salt - 1 cup chocolate chips (semi-sweet or dark) - 1/2 cup chopped nuts (optional) You can make these blondies even better with a few add-ins. Consider using: - White chocolate chips for a creamy twist. - Dried cranberries for a tart flavor. - Shredded coconut for a chewy texture. - Pumpkin seeds for a crunchy bite. These add-ins can change the taste and look of your blondies. If you need to substitute some ingredients, here are a few options: - Instead of pumpkin puree, use mashed sweet potato. - Replace unsalted butter with coconut oil for a dairy-free option. - If you don’t have brown sugar, use an equal amount of granulated sugar. - For a gluten-free option, try almond flour or a gluten-free blend. These swaps can help you tailor the recipe to fit your needs while keeping it tasty. Start by preheating your oven to 350°F (175°C). This step is key for even baking. Next, grab an 8x8-inch baking pan. Grease it lightly to help the blondies release easily. Line the bottom and sides with parchment paper. Leave some paper hanging over the edges. This makes it easy to lift your blondies out later. In a large bowl, combine your melted butter, brown sugar, and granulated sugar. Whisk them together until smooth. Then, add the pumpkin puree, eggs, and vanilla extract. Mix well until everything is blended. In a separate bowl, whisk together the flour, baking powder, baking soda, ground cinnamon, nutmeg, and salt. This mix of dry ingredients helps the blondies rise. Gradually fold the dry mix into the pumpkin blend. Be gentle here! Overmixing can make the blondies tough. Finally, fold in the chocolate chips and any nuts if you want. Now, pour your batter into the greased and lined baking pan. Use a spatula to smooth the top. Place it in your preheated oven. Bake for 25-30 minutes. Check for doneness by inserting a toothpick in the center. It should come out clean or with a few moist crumbs. Once baked, let the blondies cool in the pan for about 10 minutes. Use the parchment paper to lift them out. Set them on a wire rack to cool completely. After that, cut them into squares and enjoy your tasty treat! To bake perfect pumpkin chocolate chip blondies, follow these tips. Use room temperature ingredients. This helps the batter mix well. Measure flour correctly. Too much flour can make blondies dry. Use a light hand when mixing. This keeps your blondies soft and chewy. Overmixing can make your blondies tough. Mix until the dry ingredients just blend in. You want to see some streaks of flour. Then, gently fold in the chocolate chips. This keeps the texture light and fluffy. Remember, less is more when it comes to mixing! To keep your blondies fresh, store them in an airtight container. They stay soft for up to five days. If you want to keep them longer, freeze them. Wrap each blondie in plastic wrap, then place them in a freezer bag. They can last up to three months in the freezer. Enjoy them straight from the freezer for a cold treat! {{image_2}} You can make these blondies your own by adding fun mix-ins. Try swapping in white chocolate chips for a sweet twist. You can also use butterscotch chips for a buttery flavor. Dried cranberries or raisins add a nice chewiness. If you want a crunch, add some chopped pecans or walnuts. These options keep the taste fresh and exciting. To make gluten-free blondies, swap the all-purpose flour for a gluten-free blend. Many brands work well and keep the texture nice. For a vegan version, replace the eggs with flax eggs. Mix one tablespoon of ground flaxseed with three tablespoons of water. Let it sit for a few minutes to thicken. You can also use coconut oil instead of butter for a dairy-free treat. These swaps make the recipe fit more diets. Seasonal spices can really enhance the flavor. In fall, add more cinnamon or some allspice. A pinch of cloves gives a warm touch. In winter, consider using peppermint extract for a festive flavor. For nuts, try adding pumpkin seeds for a seasonal crunch. You can even sprinkle some sea salt on top before baking for a sweet and salty mix. These variations keep your blondies unique and delicious! To keep your pumpkin chocolate chip blondies fresh, store them in an airtight container. This helps lock in moisture and flavor. Place parchment paper between layers to avoid sticking. Keep them at room temperature for up to three days. If you want to store them for longer, use the freezer. Freezing blondies is easy. First, let them cool completely. Cut them into squares and wrap each piece in plastic wrap. Then, place the wrapped squares in a freezer bag. Remove as much air as possible before sealing. These can last for up to three months in the freezer. When you want to enjoy them, thaw them in the fridge or at room temperature. These blondies stay tasty for about a week at room temperature. If you refrigerate them, they may last a bit longer, about ten days. However, expect some changes in texture. Freezing helps maintain their taste and softness over time. Enjoy these sweet treats whenever you crave something delicious! Yes, you can use fresh pumpkin. First, cook the pumpkin until soft. Then, blend it into a smooth puree. Make sure to drain any excess water. This will prevent your batter from becoming too wet. Fresh pumpkin adds a nice flavor. If you lack brown sugar, use granulated sugar. To mimic brown sugar, add a bit of molasses. For each cup of white sugar, add one tablespoon of molasses. This change will keep your blondies sweet and moist. You can also use coconut sugar as a substitute. To check if your blondies are ready, insert a toothpick into the center. If it comes out clean or with a few moist crumbs, they are done. The edges should look set and slightly golden. Don’t overbake them; they will continue to cook as they cool. This article covered everything you need to make tasty pumpkin chocolate chip blondies. We explored the key ingredients, helpful tips, and alternative options. You can mix in new flavors or substitute for health needs. Storing leftovers and understanding baking times are easy with the advice we shared. Trust these insights to bake with confidence. Enjoy your delicious blondies and have fun experimenting!
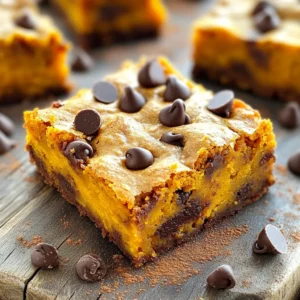
    Pumpkin Chocolate Chip Blondies Tasty Fall Treat
  • For this hearty chicken noodle soup, you'll need: - 1 pound boneless, skinless chicken breasts - 4 cups low-sodium chicken broth - 2 cups water - 2 cups carrots, sliced - 2 cups celery, diced - 1 medium onion, chopped - 3 cloves garlic, minced - 1 teaspoon dried thyme - 1 teaspoon dried parsley - 1 teaspoon black pepper - 1 bay leaf - 8 ounces egg noodles - 2 tablespoons olive oil - Salt to taste These ingredients work together to create a warm and filling dish. You can add your own twist to the soup with these options: - Fresh parsley for garnish - Lemon juice for a bright flavor - A dash of hot sauce for heat - Kale or spinach for extra greens - Different herbs like rosemary or oregano Feel free to mix and match these ingredients to suit your taste. If you're missing an item, here are some easy swaps: - Chicken breasts can be replaced with thighs for more flavor. - Use vegetable broth instead of chicken broth for a vegetarian option. - If you have frozen carrots or celery, they work well too. - Wide noodles or even rice can replace egg noodles. - Olive oil can be swapped with butter for a richer taste. These substitutions can help you make the soup even if you run low on ingredients. Enjoy crafting your perfect bowl! First, get your slow cooker ready. Add 2 tablespoons of olive oil to the pot. Next, chop 1 medium onion and mince 3 cloves of garlic. Toss them in the slow cooker. Now, slice 2 cups of carrots and dice 2 cups of celery. Add these to the pot, too. Stir the veggies well to mix them. This step builds a great base for your soup. Now, we need the star of the show: chicken. Take 1 pound of boneless, skinless chicken breasts. Place them on top of the veggies. Then, pour in 4 cups of low-sodium chicken broth. Add 2 cups of water next, covering everything completely. This makes sure the chicken stays moist and tender. Now, it's time to spice things up. Add 1 teaspoon each of dried thyme, dried parsley, and black pepper. Toss in 1 bay leaf for extra flavor. Stir gently to mix in the spices. Cover your slow cooker. You can cook on low for 6 to 8 hours or on high for 3 to 4 hours. I recommend low heat for deeper flavors. You’ll know it’s done when the chicken is tender. After cooking, take out the chicken. Shred it with two forks and return it to the pot. Next, add 8 ounces of egg noodles to the soup. Cover the slow cooker again. Cook on high for an additional 20 to 30 minutes until the noodles are al dente. Taste your soup and adjust the salt as needed. Don’t forget to remove the bay leaf! To boost the flavor of your hearty chicken noodle soup, use low-sodium broth. This gives you control over the salt level. Adding fresh herbs like thyme and parsley really brightens the dish. Sautéing the onion and garlic in olive oil before adding them to the slow cooker adds depth. The bay leaf brings a lovely aroma. Let the soup cook low and slow for rich, deep flavors. Shredding chicken can be simple. After cooking, let the chicken rest for a few minutes. This keeps it juicy. Use two forks to pull apart the chicken. You can also use your hands for a more personal touch. Shred it into bite-sized pieces so it mixes well with the soup. This step makes the soup feel hearty and filling. To get the best texture from your noodles, add them at the right time. Wait until the chicken is shredded and returned to the pot. Cook the noodles on high for 20 to 30 minutes. This timing keeps them al dente, not mushy. If you want extra bite, try adding a few more noodles. They soak up flavor and add heartiness to each bowl. {{image_2}} To make a creamy version, add one cup of heavy cream at the end. Stir it in after you add the noodles. This gives the soup a rich and smooth taste. You can also use half-and-half for a lighter option. The creaminess pairs well with the chicken and veggies. It turns the soup into a cozy treat. You can add many vegetables for more nutrition. Try adding peas, corn, or spinach. These veggies cook quickly and add color. Chop them small so they blend well. You can toss them in during the last 30 minutes of cooking. They will keep their crunch and flavor. This is a great way to sneak in healthy greens. For a gluten-free version, swap egg noodles for rice or gluten-free pasta. Brown rice takes longer to cook, so add it early. If using gluten-free pasta, check the package for cooking time. You might need to add them later to avoid mushiness. Always check labels to ensure all ingredients are gluten-free. This way, everyone can enjoy the soup without worries. After you enjoy your hearty chicken noodle soup, let it cool first. Use an airtight container for storage. This helps keep the soup fresh. Store it in the fridge for up to three days. If you want to save it longer, consider freezing it. To reheat, pour the soup into a pot. Heat it over medium heat. Stir often until it warms through. You can also use a microwave. Pour the soup into a safe bowl, cover it, and heat for about two minutes. Stir and check if it’s hot enough. To freeze, first cool the soup completely. Then, pour it into freezer-safe bags or containers. Leave some space at the top, as the soup may expand. Label each bag with the date. You can freeze it for up to three months. When ready to eat, thaw it overnight in the fridge before reheating. Yes, you can use frozen chicken. Just add it directly to the slow cooker. You may need to increase the cooking time by one hour. Always make sure the chicken reaches 165°F to ensure it is safe to eat. Using frozen chicken works well because it simmers in the broth, keeping it moist and tender. To thicken your soup, you have a few options. One way is to add a cornstarch slurry. Mix one tablespoon of cornstarch with one tablespoon of cold water. Stir this mix into the soup and let it cook for a few more minutes. You can also add more egg noodles or mash some of the vegetables in the soup. This adds body and richness to the dish without changing the flavor too much. Pairing side dishes with chicken noodle soup is easy! Here are some great options: - Crusty bread or rolls for dipping - A fresh green salad for a light touch - Grilled cheese sandwiches for a classic combo - Crackers for a crunchy texture These sides enhance the soup and make the meal feel complete. Enjoy experimenting with these combinations! This blog post covered all you need to know for making chicken noodle soup. We looked at ingredients, how to cook, and added helpful tips. I shared ways to personalize your soup and even offered storage advice. Now you have the skills to create a warm bowl of goodness any time! Enjoy the process and share it with others. Soup brings comfort and joy, so let's get cooking!
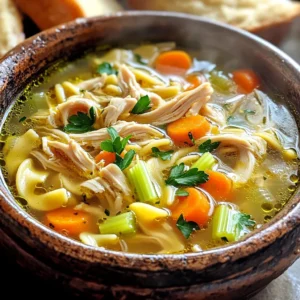
    Hearty Chicken Noodle Soup Slow Cooker Delight
  • To make your Salted Caramel Pumpkin Bites, gather these ingredients: - 1 cup pumpkin puree - 1/2 cup almond butter (or any nut butter of your choice) - 1/3 cup maple syrup - 1 teaspoon vanilla extract - 1 teaspoon pumpkin pie spice - 1 cup rolled oats - 1/4 cup coconut flour - 1/4 teaspoon sea salt - 1/2 cup chocolate chips (for drizzling) - Additional sea salt for sprinkling These ingredients blend together to create a sweet and creamy treat. The pumpkin gives it a lovely flavor, while the almond butter adds a nice creaminess. You might not have all the ingredients at home. Here are some easy swaps: - Nut Butter: You can use peanut butter or sunflower seed butter if you prefer. - Maple Syrup: Honey or agave syrup works well too. - Coconut Flour: Try using almond flour if you have it. These substitutions will still keep your bites delicious! Want to make these bites even healthier? Here are some tips: - Use natural nut butter with no added sugar or oil. - Swap maple syrup for a sugar-free sweetener like monk fruit or stevia. - Add chia seeds or flax seeds for extra fiber and nutrients. These changes can boost the nutrition of your tasty bites while keeping them enjoyable! Start with a large bowl. Add 1 cup of pumpkin puree. Next, include 1/2 cup of almond butter. Pour in 1/3 cup of maple syrup. Add 1 teaspoon of vanilla extract and 1 teaspoon of pumpkin pie spice. Mix these ingredients until smooth and creamy. This base will be the heart of your bites. Now, it’s time for the dry ingredients. Add 1 cup of rolled oats and 1/4 cup of coconut flour. Mix everything well. You want a thick dough that holds its shape. If it feels too sticky, add a bit more coconut flour. It should be easy to handle. Once your mixture is ready, use your hands to form small balls. Aim for about 1 inch in diameter. This size is perfect for popping in your mouth. Place each ball on a lined baking sheet. Make sure they are spaced out. This allows for easy handling later. After shaping all the bites, pop the baking sheet into the fridge. Chill them for about 30 minutes. This step helps them firm up. A good chill makes them easier to drizzle with chocolate later on. While the bites chill, it’s time to melt the chocolate. Use 1/2 cup of chocolate chips. Place them in a microwave-safe bowl. Heat them in 20-second bursts. Stir after each round until melted. Be careful not to overheat the chocolate. Once the pumpkin bites are firm, take them out of the fridge. Use a fork or spoon to drizzle the melted chocolate over each bite. Get creative with your drizzling pattern. It adds a nice touch! Before the chocolate sets, sprinkle a small pinch of sea salt on top. This salt enhances the flavor and gives a salted caramel vibe. After drizzling and salting, place the bites back in the fridge. Let them chill for another 15-20 minutes. This step ensures the chocolate hardens nicely. Now you have delightful no-bake salted caramel pumpkin bites ready to enjoy! To make your pumpkin bites shine, use fresh pumpkin puree. It adds great flavor. Make sure your almond butter is creamy. This helps bind the mixture. If it feels too dry, add a touch more maple syrup. Chill the bites well after shaping. This step helps them hold their shape when drizzling chocolate. When melting chocolate, patience is key. Use a microwave-safe bowl. Heat the chocolate in 20-second bursts. Stir well between each burst. This helps avoid burning. If the chocolate is thick, add a teaspoon of coconut oil. This will make it smoother and easier to drizzle. Serve your pumpkin bites on a colorful plate. Drizzle more melted chocolate around the edges. For a fun touch, sprinkle pumpkin seeds on top. You can also add a dash of cinnamon for extra flavor. These bites are perfect for parties or a cozy night in. Enjoy them with a warm drink for a tasty treat! {{image_2}} You can change the taste of your pumpkin bites easily. Try adding a bit of cinnamon for warmth. A splash of coconut extract can bring a tropical flair. You can also mix in mini chocolate chips for extra sweetness. If you like nuts, chopped pecans or walnuts add a nice crunch. While almond butter is great, you have options. Cashew butter gives a creamier texture. Peanut butter adds a rich flavor and pairs well with chocolate. For a fun twist, try sunflower seed butter for a nut-free alternative. Each nut butter brings its own unique taste to the bites. If you need to avoid nuts, don’t worry! Use sunflower seed butter instead of nut butters. You can also swap in coconut yogurt for creaminess. This keeps the texture smooth while keeping it nut-free. Just make sure to check for allergens in your other ingredients. Enjoy these bites with peace of mind! To keep your salted caramel pumpkin bites fresh, place them in an airtight container. Use parchment paper between layers to prevent sticking. Store them in the fridge for the best taste. This helps maintain their chewy texture and rich flavor. You can freeze these bites for later enjoyment. Place them in a single layer on a baking sheet. Once frozen, transfer them to an airtight freezer bag. They can stay fresh in the freezer for up to three months. Thaw them in the fridge before serving. When stored properly, these pumpkin bites last about one week in the fridge. If you freeze them, they can last up to three months. Enjoy them fresh for the best flavor, but they are still tasty after a week! Yes, you can make these bites ahead of time. I often prepare them a day in advance. Just store them in an airtight container in the fridge. They stay fresh and tasty for about a week. This makes them perfect for parties or snacks. You can pop them out whenever you want a sweet treat. If you can’t find pumpkin puree, try using sweet potato puree. It gives a similar flavor and texture. You could also use butternut squash puree as a great option. Both substitutes work well in this recipe. Just make sure they are smooth and creamy for the best results. To get the chocolate drizzle to harden, melt the chocolate slowly. Use a microwave in short bursts, stirring in between. After drizzling it over the bites, refrigerate them for 15-20 minutes. This helps the chocolate set nicely. If it still feels soft, let it chill a bit longer. In this article, we explored various aspects of making delicious pumpkin bites. We looked at ingredients, step-by-step instructions, and helpful tips. You learned about substitutions and even storage options. Remember, creating these bites can be fun and easy. Don’t hesitate to try new flavors or nut butters. With the right techniques, you’ll impress everyone with your tasty treats! Enjoy experimenting with your pumpkin bites recipe!
    Salted Caramel Pumpkin Bites No-Bake Delightful Treat
  • - 12 ounces pasta (penne or fusilli) - 2 cups fresh spinach, roughly chopped - 1 cup ricotta cheese - 1 cup vegetable broth - 1 cup milk (dairy or non-dairy) - 1 cup grated Parmesan cheese - 2 cloves garlic, minced - 1 tablespoon olive oil - 1 teaspoon dried oregano - 1/2 teaspoon red pepper flakes (optional) - Salt and pepper to taste The main ingredients for this dish are simple yet full of flavor. I love using penne or fusilli pasta because they hold sauce well. Fresh spinach adds a bright green color and a healthy touch. Ricotta cheese gives the dish a creamy texture and rich taste. Next, we have the additional ingredients. Vegetable broth adds depth. Milk adds creaminess, whether you choose dairy or a non-dairy option. Don't forget the grated Parmesan cheese. It melts beautifully and adds a savory note. Seasonings bring everything together. Minced garlic offers a great aroma. Olive oil helps sauté the garlic, building flavor right from the start. Dried oregano adds a warm, earthy taste. Red pepper flakes bring a hint of heat, but it’s optional. Finish with salt and pepper to make the flavors pop. With these ingredients, you are on your way to a delicious creamy spinach ricotta pasta dish, all made in one pot! 1. First, heat 1 tablespoon of olive oil in a large pot over medium heat. 2. Add 2 cloves of minced garlic and sauté for 1 minute. You want it fragrant but not browned. 3. Next, add 12 ounces of pasta, your choice of penne or fusilli, to the pot. 4. Pour in 1 cup of vegetable broth and 1 cup of milk. Stir well to mix. 1. Bring the mixture to a gentle boil. Once boiling, reduce the heat and let it simmer. 2. Cook the pasta according to package instructions until it is al dente. This usually takes about 8 to 10 minutes. Stir occasionally to prevent sticking. 3. When the pasta is nearly done, stir in 2 cups of roughly chopped spinach, 1 cup of ricotta cheese, and 1 teaspoon of dried oregano. 4. Mix well so all the ingredients combine. Cook for an extra 2 to 3 minutes until the spinach wilts and the ricotta warms up. 1. Now, stir in 1 cup of grated Parmesan cheese. If you like heat, add 1/2 teaspoon of red pepper flakes. 2. Season with salt and pepper to taste. Mix until everything is combined. 3. Remove the pot from heat and let it sit for a couple of minutes. This helps thicken the dish before you serve it. To prevent pasta from sticking, stir it often while it cooks. Make sure to use enough water in the pot. A little olive oil can also help. To achieve the right creaminess, add the ricotta cheese after the pasta is almost done. If the pasta seems thick, pour in a splash of milk. This will make it smooth and rich. For presentation, serve the pasta in deep bowls. This adds a nice touch. Top with extra grated Parmesan and a sprinkle of black pepper. For color, add a few fresh spinach leaves on top. You can add herbs and spices to boost flavor. Consider fresh basil or parsley for a fresh kick. A pinch of nutmeg also pairs well with ricotta. Adjust the richness by using different cheeses. Try mixing in mozzarella for a stretchier texture or feta for a tangy twist. This can change the dish's taste and texture nicely. {{image_2}} You can change the pasta shape to fit your taste. Penne and fusilli work well, but you can try shells, rotini, or even gluten-free pasta. Each shape holds the sauce differently, giving you a new experience. If you want a lighter option, swap ricotta for cottage cheese or cream cheese. Both will give your dish a creamy texture. Cottage cheese has a milder flavor. Cream cheese adds a rich taste. Try them and see what you like best! Want to make your meal heartier? Add some protein! Cooked chicken or shrimp blends well. Just toss them in with the pasta as it cooks. If you prefer plant-based options, try adding beans like chickpeas or white beans. They add fiber and taste great with spinach. You can make this dish even more exciting with extra ingredients. Sun-dried tomatoes add a sweet and tangy kick. Artichokes bring a unique flavor that pairs well with the cheese. Mushrooms add a nice earthy taste. Don’t forget about spice! If you like heat, add red pepper flakes or a dash of hot sauce. You can adjust the spice to fit your taste buds, making each meal special. To keep your creamy spinach ricotta pasta fresh, follow these tips: - Let the pasta cool down to room temperature. - Store leftovers in an airtight container. - Refrigerate within two hours of cooking. - Consume within 3-4 days for best quality. When reheating, you want to avoid dry pasta. Here’s how: - Use a microwave-safe dish with a lid. Add a splash of milk. - Heat in short bursts, stirring often. This keeps it moist. - Alternatively, reheat on the stove over low heat. Stir in a little milk to restore creaminess. Freezing is a great option for meal prep. Here’s what to do: - Let the pasta cool completely before freezing. - Portion it into freezer-safe containers. Leave space for expansion. - It can last for up to 3 months in the freezer. - To thaw, move it to the fridge overnight. Reheat as mentioned above. To make this dish vegan, you can swap the cheese and milk. Use cashew cheese or almond cream instead of ricotta. For milk, try almond, soy, or oat milk. These options still keep it creamy and flavorful. You can also add nutritional yeast for a cheesy taste. It gives a nice flavor and adds vitamins. Make sure to check the labels for any hidden animal products. Yes, frozen spinach works well! It is easy to use and saves time. Just thaw and squeeze out excess water. This helps avoid a watery pasta dish. To incorporate frozen spinach, add it to the pot along with the pasta. Use it in the last few minutes of cooking. This way, it heats through without overcooking. This pasta pairs nicely with a side salad or garlic bread. A fresh green salad adds a nice crunch and balances the creaminess. You can also serve it with grilled vegetables for added flavor. Try zucchini, bell peppers, or asparagus. These options add color and taste to your meal. Enjoy your pasta with a glass of white wine for a special touch! In this post, I shared a delicious recipe for creamy spinach ricotta pasta. We explored key ingredients, cooking steps, and tips to enhance flavors. Remember, you can personalize this dish with different proteins or cheeses. Whether you enjoy it fresh or save leftovers, this meal is sure to please. Use this guide to create a quick, tasty dinner that everyone will love. Happy cooking!
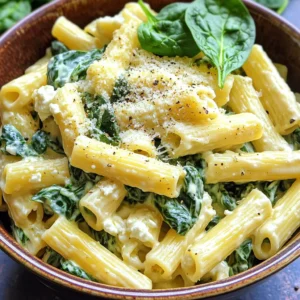
    Creamy Spinach Ricotta Pasta One Pot Delight
  • To make your chipotle chicken quesadillas, gather these key ingredients: - 2 cups cooked chicken, shredded - 1 tablespoon chipotle sauce (or more for extra heat) - 1 cup shredded cheddar cheese - 1 cup shredded mozzarella cheese - 4 large flour tortillas - 1 bell pepper, sliced (any color) - 1 small red onion, thinly sliced - 1 tablespoon olive oil - Salt and pepper to taste - Sour cream and guacamole for serving - Cooked chicken: You can use rotisserie chicken for quick prep. - Chipotle sauce: Adjust the amount based on your spice level. - Cheeses: Feel free to mix different cheeses for unique flavors. - Tortillas: Corn tortillas work well for a gluten-free option. - Bell pepper: Use any color you like; each has its own taste. - Onion: Red onion adds sweetness, but yellow or white works too. - Olive oil: You can swap this with vegetable oil if needed. For this recipe, you'll need: - A large skillet for cooking - A mixing bowl for combining ingredients - A spatula for flipping the quesadillas - A cutting board and knife for slicing veggies - A serving platter for presentation First, grab a mixing bowl. Add 2 cups of shredded chicken. Pour in 1 tablespoon of chipotle sauce. Mix until the chicken is fully coated. If you like heat, add more sauce. This mixture packs a punch of flavor. Next, heat a large skillet over medium heat. Add 1 tablespoon of olive oil. Once hot, toss in the sliced bell pepper and red onion. Sauté them for about 3-4 minutes. They should soften slightly. Season with salt and pepper to taste. The colors and smells will fill your kitchen. Now, take a large flour tortilla. On one half, layer a quarter of the chicken mixture. Top it with a mix of cheddar and mozzarella cheese. Add some of the sautéed vegetables on top. Fold the tortilla in half. Place it in the heated skillet. Cook for 2-3 minutes on each side. The tortilla should turn golden and crispy, and the cheese should melt. Repeat this with the remaining tortillas. Once done, let them cool for a minute. Cut them into wedges and serve. Enjoy your tasty quesadillas! To get crispy quesadillas, heat your skillet well. Use medium heat, not high. This helps the tortilla cook evenly. Add just enough oil to coat the pan. When you cook, press down lightly on the quesadilla with a spatula. This helps it crisp up. Flip the quesadilla carefully. Watch for a golden color before you take it out. If you love heat, add more chipotle sauce. Mix it well with the chicken. For milder quesadillas, use less sauce. You can also add sweet peppers to balance the spice. If someone finds it too spicy, serve them with sour cream. This cools down the heat and adds flavor. When serving, cut your quesadillas into wedges. Arrange them in a fan shape on a plate. This looks nice and invites people to grab a piece. Add small bowls of sour cream and guacamole in the center. Sprinkle fresh cilantro on top for color. This makes your dish pop and looks appetizing! {{image_2}} You can switch up the chicken for other proteins. Try cooked shrimp or beef. You can also use pulled pork for a tasty twist. Just make sure to mix in chipotle sauce as you do with chicken. This keeps that smoky flavor. Each protein will add its own unique taste to the quesadilla. For a vegetarian option, skip the chicken. Load the quesadilla with black beans, corn, and sautéed veggies. You can use bell peppers, zucchini, or mushrooms. If you want a vegan version, use plant-based cheese and omit sour cream. You can also try avocado for creaminess. This way, you keep the richness without dairy. Cheddar and mozzarella are great, but feel free to mix it up. Try pepper jack for some heat, or even feta for a tangy touch. If you want to keep it dairy-free, look for vegan cheese options. They melt well and add flavor. Mixing different cheeses adds depth and makes each bite more exciting. To store leftover quesadillas, let them cool first. Place them in an airtight container. Make sure to separate layers with parchment paper. This helps keep them from sticking together. Store in the fridge for up to 3 days. To reheat quesadillas, use a skillet. Heat it over medium heat. Place the quesadilla in the skillet and cover with a lid. This helps the cheese melt without burning the tortilla. Heat for about 2-3 minutes on each side. You can also use a microwave. Just place it on a plate and heat for 30-45 seconds. But know that the tortilla might get soft. To freeze quesadillas, wrap each one in plastic wrap. Then, place them in a freezer bag. Squeeze out as much air as possible. This keeps them fresh. You can freeze them for up to 2 months. To reheat, let them thaw overnight in the fridge. Then, cook as described above for best taste. No, you cannot use raw chicken directly. Raw chicken needs cooking first. Using cooked chicken makes these quesadillas quick and safe. If you have raw chicken, cook it fully before shredding. Then, mix it with the chipotle sauce. You can serve several tasty sides. Here are a few ideas: - Sour cream - Guacamole - Salsa - Fresh cilantro - A simple salad These add flavor and balance to your meal. If you don’t have a skillet, you can use an oven or microwave. For the oven: 1. Preheat to 400°F (200°C). 2. Assemble your quesadilla on a baking sheet. 3. Bake for 10 minutes, flipping halfway. In the microwave, heat on a plate for 1-2 minutes. The cheese should melt. Enjoy! This article covered how to make tasty chipotle chicken quesadillas. We discussed the needed ingredients, cooking steps, and helpful tips for success. You learned easy ways to add your favorites and store leftovers. Whether you want crispy quesadillas or spicy variations, these ideas help. With practice, you'll impress everyone at your table. Enjoy cooking and try new flavors. Your next meal can be fun and delicious!
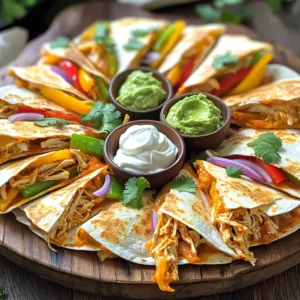
    Chipotle Chicken Quesadillas in 15 Minutes Recipe
  • - 1 lb Brussels sprouts - 3 tablespoons olive oil - 4 cloves garlic - 1/2 cup grated Parmesan cheese - 1 teaspoon garlic powder - 1/2 teaspoon red pepper flakes (optional) - Salt and pepper to taste - Fresh parsley for garnish Gathering the right ingredients is key to making Air Fryer Garlic Parmesan Brussels sprouts. Start with fresh Brussels sprouts, about 1 pound. Trim the ends and slice them in half. This helps them cook evenly. Next, you’ll need 3 tablespoons of olive oil. This oil gives the sprouts a nice crisp and flavor. You will also want 4 cloves of garlic, minced finely. Garlic adds a rich, savory taste. For that cheesy goodness, grab 1/2 cup of grated Parmesan cheese. This cheese melts beautifully and creates a delicious crust. For seasoning, you’ll need 1 teaspoon of garlic powder. This extra boost of garlic flavor is a must! If you like some heat, add 1/2 teaspoon of red pepper flakes. Adjust salt and pepper to your taste. Finally, don’t forget fresh parsley. Chop some up to sprinkle on top. It adds a nice pop of color and freshness to your dish. With these ingredients, you’ll create a tasty and healthy side dish that everyone will love! - First, preheat your air fryer to 375°F (190°C). This step is key for crispy sprouts. - Next, take 1 lb of Brussels sprouts. Trim the ends and halve them. This helps them cook evenly. - In a large bowl, add the halved Brussels sprouts. - Pour in 3 tablespoons of olive oil. - Then, add 4 minced garlic cloves, 1 teaspoon of garlic powder, and 1/2 teaspoon of red pepper flakes if you like some heat. - Season with salt and pepper to taste. - Toss everything together until the sprouts are well coated. - Place Brussels sprouts in the air fryer basket in a single layer. This ensures they cook well. - Air fry for about 12-15 minutes at 375°F. - Shake the basket halfway through to ensure even cooking. They should turn golden and crispy. - Once done, remove the sprouts and sprinkle 1/2 cup of grated Parmesan cheese on top. - Toss gently to let the cheese melt and stick to the sprouts. To get the best results, place your Brussels sprouts in a single layer. This helps them cook evenly and get crispy. If you pile them up, some may not cook right. If you want extra crunch, adjust the cooking time. Start with 12 minutes, then check. If you like them crispier, add a few more minutes. Just keep an eye on them to avoid burning. You can boost the flavor by adding extra seasonings. Try smoked paprika or lemon zest for a fresh twist. For the cheese, use a good quality Parmesan. Grated Parmesan melts well and adds a rich taste. If you want something sharper, try aged Parmesan. It adds a nice depth to the dish. You can also mix in some pecorino for a different flavor. {{image_2}} You can switch up the flavor of your Brussels sprouts. Try adding spices like paprika or cumin. Fresh herbs like thyme or rosemary also work well. If you want a smoky taste, add some smoked paprika. You can even mix in crispy bacon bits. Bacon adds a nice salty crunch. Feel free to toss in other veggies too. Carrots or bell peppers can add color and sweetness. Just remember to cut them to a similar size for even cooking. If you're looking for a vegan option, there are great cheese substitutes. Nutritional yeast gives a cheesy flavor without dairy. You can also use vegan Parmesan cheese. Check the label to ensure it fits your diet. For a creamy touch, you can drizzle a vegan dressing after cooking. This keeps your dish rich and flavorful without dairy. Enjoy these tasty options that fit your needs! To keep your Brussels sprouts fresh, use airtight containers. Glass or plastic containers work well. Store the leftovers in the fridge. They stay good for up to three days. After that, the taste and texture may change. To reheat your Brussels sprouts, use the air fryer again. Set it to 350°F (175°C). Heat for about 5 minutes. This keeps them crispy. You can also use the oven. Just spread them out on a baking sheet and heat for 10 minutes. Avoid the microwave. It can make them soggy. To make your Brussels sprouts crispy, follow these steps: - Use fresh Brussels sprouts and trim them well. - Halve them to expose more surface area. - Toss them with enough olive oil. - Keep them in a single layer in the air fryer. - Shake the basket halfway through cooking. This method helps them cook evenly, leading to a nice, crispy texture. Yes, you can prepare Brussels sprouts ahead of time. Follow these tips: - Toss them with olive oil and seasonings. - Store them in an airtight container in the fridge. - Cook them in the air fryer right before serving. Cooking them fresh keeps them crispy and tasty. Pair these Brussels sprouts with a variety of dishes: - Serve them with grilled chicken or fish for protein. - Add them to a salad for extra crunch. - They complement pasta dishes nicely. - Use them as a side for any holiday meal. These sprouts add flavor and texture to many plates. In this post, I covered how to make Air Fryer Garlic Parmesan Brussels sprouts. We explored the main ingredients, steps for preparation, and cooking tips for achieving a crispy finish. Remember, customizing with different flavors can take this dish to new heights. Whether you choose to add bacon or make it vegan, the options are endless. Store leftovers properly and follow reheating tips for the best taste. Enjoy this healthy side dish that is easy to prepare and always delicious.
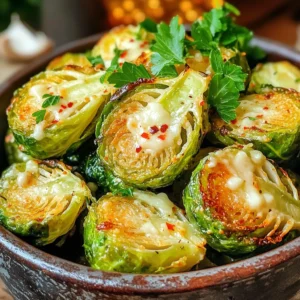
    Air Fryer Garlic Parmesan Brussels Sprouts Delight
  • - 1 cup cottage cheese - 2 large eggs - 1 cup rolled oats - 1 medium apple, grated Cottage cheese is the star here. It adds creaminess and protein. Eggs help bind the mix and give it a nice lift. Rolled oats serve as the base, giving the pancakes a hearty texture. Grated apple brings natural sweetness and a fruity flavor. - 1 teaspoon ground cinnamon - 1 teaspoon baking powder - 1 tablespoon honey or maple syrup (optional) Ground cinnamon is key for a warm, cozy flavor. Baking powder helps the pancakes rise and stay fluffy. If you like a sweeter taste, honey or maple syrup is a great choice. You can add it based on your taste. - Pinch of salt - Cooking spray or coconut oil for the skillet A pinch of salt balances the flavors. It enhances the sweet notes from the apple and honey. Using cooking spray or coconut oil is important to prevent sticking. This way, your pancakes cook evenly and come out perfectly golden. 1. Start by mixing the cottage cheese and eggs in a bowl. Whisk them together until the mixture is smooth. 2. Next, add the rolled oats and grated apple. Sprinkle in the ground cinnamon, baking powder, and a pinch of salt. Stir until well combined. 3. If you like a sweeter taste, you can mix in honey or maple syrup for extra flavor. 1. Preheat a non-stick skillet over medium heat. Lightly grease it using cooking spray or coconut oil. 2. Pour about 1/4 cup of the batter onto the skillet for each pancake. Cook them until bubbles appear on the surface, which takes about 2-3 minutes. 3. Flip the pancakes and cook for another 2-3 minutes until they turn golden brown. 1. Serve the pancakes warm for the best taste. 2. Top them with more grated apple, a sprinkle of cinnamon, and a drizzle of honey or maple syrup if you want. These toppings enhance the flavor and make your pancakes even more delicious. To get the best pancakes, focus on the skillet's heat. I find that medium heat works best. Too hot, and the pancakes burn quickly. Too low, and they take too long to cook. Aim for a nice golden brown color. This means your skillet is just right. Next, adjust the batter thickness. If the batter is too runny, the pancakes will spread too much. You want them fluffy and thick. If needed, add a bit more rolled oats to thicken it up. A thicker batter will hold its shape better while cooking. These pancakes pack a nutritious punch. Cottage cheese is rich in protein, helping you feel full longer. Each serving has about 14 grams of protein. The eggs add more protein and healthy fats. Rolled oats provide fiber, which is great for digestion. Apples give you vitamins and a hint of sweetness. Cinnamon can help regulate blood sugar levels, making this a healthy choice. Want to save time? Make these pancakes in batches. You can cook several at once by using a larger skillet or griddle. This is perfect for busy mornings. Just keep the cooked pancakes warm in the oven set to low heat. You can enjoy them fresh even if you make a big batch. {{image_2}} You can change the fruits in this recipe. Bananas or berries work well too. Just mash or chop them before adding. If you want a dairy-free option, use plant-based yogurt. This keeps the pancakes creamy without dairy. To add some crunch, mix in nuts or seeds. Chopped walnuts or flaxseeds are great choices. You can also try adding spices like nutmeg or ginger for a warm taste. These will enhance the flavor and make each bite special. You can serve these pancakes in different ways. Stack several pancakes for a tall, impressive dish. Or, keep it simple with single pancakes on a plate. Either way, they look great and taste delicious! To keep your cottage cheese apple cinnamon pancakes fresh, store them in the fridge. Place the pancakes in an airtight container. This helps them stay moist and tasty. You can keep them in the fridge for up to three days. If you want to enjoy them later, just remember to let them cool completely before sealing them up. When you’re ready to eat your pancakes again, reheating is key. The best way to warm them up is on the stovetop. Heat a skillet over low heat. Place the pancakes in the skillet and cover them with a lid. This method keeps them soft and warm. You can also use the microwave. Just place them on a plate and heat for about 20-30 seconds. If they seem dry, add a small splash of water on the plate to create steam. Freezing pancakes is a great way to save time. First, let the pancakes cool completely. Then, stack them with a piece of parchment paper between each one. This prevents them from sticking together. Place the stack in a freezer bag or container. They can last for up to two months in the freezer. When you want to eat them, take out how many you need. Thaw them in the fridge overnight or pop them straight in the toaster or microwave for a quick meal. To make cottage cheese pancakes fluffy, use these key techniques: - Whisk well: Blend the cottage cheese and eggs until smooth. This adds air to the batter. - Use fresh baking powder: Check the date on your baking powder. Fresh powder helps pancakes rise better. - Don’t overmix: Mix the dry and wet ingredients just until combined. Too much mixing can make pancakes tough. These steps help create a light, airy texture that makes every bite delightful. If you need a gluten-free option, consider these alternatives: - Almond flour: It adds a nutty flavor and keeps the pancakes light. - Rice flour: This works well for a softer texture. - Ground flaxseed: Use it for fiber and healthy fats, but adjust the liquid in the recipe. These substitutes can keep the pancakes delicious while fitting different diets. Yes, you can make these pancakes ahead of time. Here’s how to store and reheat them: - Storing: Place cooled pancakes in an airtight container. Fridge storage lasts up to 3 days. - Reheating: To reheat, use a microwave for about 20-30 seconds or warm them in a skillet for a few minutes. You can also freeze pancakes. Lay them flat on a baking sheet, freeze, then transfer to a bag. They last up to 2 months in the freezer. This article covered how to make delicious cottage cheese pancakes. We discussed key ingredients like cottage cheese, eggs, and rolled oats. You learned step-by-step instructions, from mixing the batter to serving. Tips helped you perfect texture and cooking efficiency while exploring fun variations. Enjoy making these pancakes and sharing them with friends and family. They are not just tasty; they are also nutritious and versatile. With the right techniques, you'll create fluffy pancakes every time.
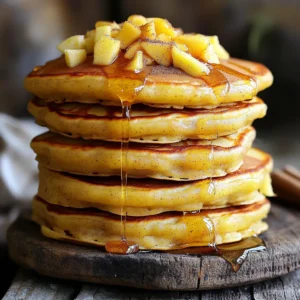
    Cottage Cheese Apple Cinnamon Pancakes Protein Boost
  • - 1 ½ cups all-purpose flour - 1 teaspoon baking powder - ½ teaspoon baking soda - ½ teaspoon salt - 1 teaspoon ground cinnamon - ½ teaspoon ground nutmeg - ½ cup unsalted butter, softened - 1 cup granulated sugar - 2 large eggs - ½ cup apple cider - 1 tablespoon vanilla extract - 1 cup finely diced apples (like Granny Smith or Honeycrisp) - For the glaze: - 1 cup powdered sugar - 2 tablespoons apple cider - 1 tablespoon milk - ¼ teaspoon cinnamon This recipe blends sweet apples and warm spices. The dry ingredients create a strong base for the cake. I use all-purpose flour for the best texture. Baking powder and baking soda help the cake rise well. A pinch of salt brings out the flavors. Ground cinnamon and nutmeg add that cozy fall taste. In the wet ingredients, I combine softened butter and sugar. This mix makes the cake light and sweet. Eggs bring richness and help bind the cake. Apple cider adds moisture and flavor. A touch of vanilla gives a warm aroma. The additional ingredients are where the magic happens. Finely diced apples add texture and sweetness. For the glaze, I mix powdered sugar, apple cider, and milk. A hint of cinnamon ties it all together. This glaze adds a nice finish to the cake. First, preheat your oven to 350°F (175°C). This step warms the oven for the best bake. While the oven heats, grease and flour your bundt pan or loaf pan. Greasing helps the cake come out easily. Flouring adds another layer of protection against sticking. In a medium bowl, mix the dry ingredients. Combine 1 ½ cups of flour, 1 teaspoon of baking powder, ½ teaspoon of baking soda, ½ teaspoon of salt, 1 teaspoon of cinnamon, and ½ teaspoon of nutmeg. Set this mix aside. In a large bowl, beat ½ cup of softened butter and 1 cup of sugar together. Use an electric mixer for about 3-4 minutes until the mix is light and fluffy. Next, add 2 large eggs one at a time. Mix well after each egg. Stir in ½ cup of apple cider and 1 tablespoon of vanilla extract. Now, slowly fold in your dry mix until just combined. Be careful not to overmix. This keeps the cake light and fluffy. Gently add 1 cup of finely diced apples. This gives the cake a nice texture and flavor. Pour the batter into your prepared pan. Smooth the top with a spatula. Bake in your preheated oven for about 50-60 minutes. Check for doneness by inserting a toothpick into the center. If it comes out clean, your cake is ready. Let the cake cool in the pan for about 15 minutes. This helps it firm up. After that, transfer it to a wire rack to cool completely. While the cake cools, prepare your glaze. In a bowl, whisk together 1 cup of powdered sugar, 2 tablespoons of apple cider, 1 tablespoon of milk, and ¼ teaspoon of cinnamon. Mix until smooth. You can adjust the thickness by adding more sugar or cider. Once the cake is cool, drizzle the glaze over the top evenly. Let it set for a few minutes before slicing. Enjoy this tasty treat! - Ensuring the cake rises properly: Use fresh baking powder and soda. They help the cake rise. Make sure your butter is soft, but not melted. This adds air to the batter. - Avoiding overmixing: Mix the batter until just combined. Overmixing makes the cake dense. Gently fold in the diced apples at the end. - Testing for doneness: Insert a toothpick into the center of the cake. If it comes out clean, your cake is done. If it has batter on it, bake for a few more minutes. - Adjusting glaze consistency: If your glaze is too thick, add a little more apple cider. If it’s too thin, add more powdered sugar. Aim for a pourable yet thick glaze. - Tips for an even glaze application: Drizzle the glaze in a back-and-forth motion over the cooled cake. This helps cover every slice. - Garnishing suggestions: Top the cake with thin apple slices for a fresh look. A sprinkle of cinnamon adds warmth and color. - Serving recommendations: Serve slices on a decorative plate. Pair it with a scoop of vanilla ice cream for a delightful treat. {{image_2}} You can make this cake even better! Try adding nuts like walnuts or pecans. They give a nice crunch and extra flavor. You can also mix in raisins or dried cranberries. Both add sweetness and chewiness. These little changes make each bite fun and tasty. Want a gluten-free cake? No problem! Just swap the all-purpose flour for a gluten-free blend. Many stores offer these blends. They work well in most recipes. Be sure to check the package for the right amount. This way, everyone can enjoy a slice! If you need a dairy-free cake, it's easy to adjust. Use dairy-free butter and choose a milk alternative, like almond or oat milk. This keeps the cake moist and delicious without dairy. You won’t miss the butter or milk in this treat. It still tastes amazing! You can keep your Apple Cider Pound Cake at room temperature. Wrap it in plastic wrap. Place it in an airtight container. This keeps it fresh for up to three days. Avoid direct sunlight. If your kitchen is warm, consider refrigerating it. Refrigeration helps the cake last longer. Keep the cake in an airtight container. It can stay fresh for about a week. Just remember, the fridge can dry it out. So, eat it within a week for the best taste. Freezing is a great option if you want to save some cake. First, let the cake cool completely. Wrap it tightly in plastic wrap. Then, place it in a freezer-safe bag. You can freeze it for up to three months. When you’re ready to enjoy it, take it out of the freezer. Place it in the fridge overnight to thaw. If you need it fast, leave it at room temperature for a few hours. Your Apple Cider Pound Cake lasts about three days at room temp. In the fridge, it can last about a week. If you freeze it, it lasts for three months. Look for signs of spoilage. If the cake smells bad or has mold, throw it away. A dry texture can also mean it's time to toss it. Always check before enjoying your tasty treat! To check if the cake is done, use these signs: - The cake is golden brown on top. - A toothpick inserted in the center comes out clean. - The cake pulls away from the sides of the pan. You can test for doneness by inserting a toothpick in the center. If it comes out clean, your cake is ready. If there is batter on the toothpick, bake it a little longer. Yes, you can use different types of apples in this recipe. I recommend these apple varieties: - Granny Smith: They add a nice tartness. - Honeycrisp: They are sweet and juicy. - Fuji: They bring a firm texture and sweetness. Feel free to mix different apples for added flavor. Each type will give a unique taste to your cake. You can make this cake ahead of time with these tips: - Bake the cake and let it cool completely. - Wrap it tightly in plastic wrap or foil. - Store it at room temperature for up to three days. If you want to keep it longer, you can freeze it. Just thaw it overnight in the fridge before serving. This cake pairs well with many sides and drinks: - A scoop of vanilla ice cream. - Whipped cream on top. - A hot cup of spiced cider. - A drizzle of caramel sauce. These options will enhance the flavors of the cake and create a warm, cozy experience. This blog post shared a simple and fun way to make Apple Cider Pound Cake. We covered the key ingredients, step-by-step instructions, and helpful tips. You learned about flavor variations and storage options to keep your cake fresh. Finally, I answered common questions you might have. With these steps, you can enjoy a delicious cake for any occasion. Now, grab your ingredients and start baking! You will love the results.
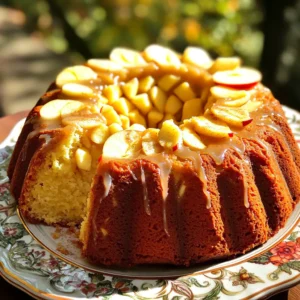
    Apple Cider Pound Cake with Glaze Irresistible Treat
  • To make No-Bake Caramel Pretzel Bites, you need a few simple ingredients. Each one adds to the sweet and salty flavor. Here’s what you will need: - 2 cups mini pretzel twists - 1 cup soft caramel candies, unwrapped - 2 tablespoons heavy cream (or milk) - 1 cup semisweet chocolate chips - Sea salt, for sprinkling - Optional: 1/2 cup chopped nuts (e.g., pecans or almonds) These ingredients work together to create a delicious treat. The mini pretzel twists give the bites a nice crunch. The soft caramel and chocolate add sweetness. Sea salt brings a perfect balance. If you like nuts, add those for extra flavor and texture. Enjoy your time preparing these bites! Start by lining a baking sheet with parchment paper. This makes it easy to remove your bites later. The parchment also helps keep them from sticking, so you can enjoy every last bit. Next, take a microwave-safe bowl. Combine the unwrapped caramel candies and heavy cream. Microwave this mixture in 30-second bursts. Stir in between each burst until smooth. This should take about 1 to 2 minutes. You want a creamy, gooey caramel that coats well. Now, grab a mini pretzel twist. Dip one side into your warm caramel mixture. Let any extra caramel drip off. Place the dipped pretzel on the lined baking sheet. Repeat this step with all the pretzels. Make sure they are well-coated for the best flavor. Once all pretzels are dipped in caramel, it’s time to melt the chocolate. Use a microwave-safe bowl again. Microwave the semisweet chocolate chips in 30-second increments. Stir often until the chocolate is fully melted and smooth. This should take about 1 to 2 minutes as well. After the caramel has set, dip each pretzel into the melted chocolate. Make sure the caramel side is well-coated. Place the chocolate-covered pretzel back on the baking sheet. While the chocolate is still soft, sprinkle a pinch of sea salt on top. This adds a perfect sweet and salty taste. If you like, you can also add chopped nuts for extra crunch. Put the tray back in the fridge. Let the bites chill for another 15 to 20 minutes. This helps the chocolate harden and gives your bites a nice texture. Once set, they are ready to enjoy! To get smooth caramel, use your microwave wisely. Start by placing the unwrapped caramel candies in a microwave-safe bowl. Add the heavy cream next. Heat it in 30-second bursts. Stir the mixture in between each burst. This helps the heat spread evenly. After 1-2 minutes, you should have a smooth caramel. If it feels too thick, add a little more cream. Choose semisweet chocolate chips for dipping. They have a rich taste that pairs well with the sweet caramel. You can also use milk chocolate for a sweeter bite. Dark chocolate offers a nice contrast if you like less sweetness. Avoid baking chocolate, as it can taste bitter. To stop pretzels from sticking, line your baking sheet with parchment paper. This step is key for easy removal. Make sure the pretzels do not touch each other on the sheet. If you don’t have parchment paper, try using wax paper. However, parchment works best for this recipe. {{image_2}} You can make your No-Bake Caramel Pretzel Bites even better by adding flavorings. Adding a splash of vanilla extract brings out the sweetness. A bit of coffee flavor can add a nice twist too. Just mix these flavors into the caramel before you dip the pretzels. This small change can make your bites taste unique and special. For a nutty crunch, try adding different types of chopped nuts. You can use pecans, almonds, or even walnuts. Just sprinkle the chopped nuts on top of the chocolate. This adds extra texture and flavor. You can also mix nuts into the caramel for a delightful surprise. This variation makes each bite a little different and even more fun to eat. Drizzling chocolate or caramel on top is an easy way to make these treats look fancy. After dipping the pretzels in chocolate, melt some extra chocolate in a bowl. Use a spoon to drizzle it over the pretzels. You can also drizzle more caramel for a sweet touch. This not only looks great but enhances the flavors too. Your friends and family will love the extra effort! To keep your No-Bake Caramel Pretzel Bites fresh, store them in an airtight container. This will help keep them from getting stale. Place parchment paper between layers if stacking them. This method prevents sticking and ensures easy access. You should refrigerate these bites if you want to keep them firm. The cold helps the chocolate and caramel stay set. If you plan to eat them within a day or two, you can store them at room temperature. Keep them in a cool, dry place, away from sunlight. You can freeze your caramel pretzel bites for longer storage. Place them in a single layer on a baking sheet first. Once frozen, move them to a freezer bag. To thaw, leave the bites in the fridge overnight. They will taste just as good as fresh! To help the caramel stick well, use soft caramel candies. Microwave them with heavy cream. This makes a smooth mix. Dip the pretzel into the caramel. Let any extra caramel drip off. Place the dipped pretzel on parchment paper. If you have trouble, make sure the caramel is warm but not too hot. A warm caramel helps it stick better. Yes, you can use different pretzels! Mini pretzel twists are great, but you can try pretzel sticks or rods. They will still taste amazing. Just remember that the size and shape may change how you dip them. Bigger pretzels may need more caramel. If your chocolate is too thick, add a little vegetable oil. This helps make it smooth. Heat the chocolate in short bursts, stirring in between. If it stays thick, you can also add a tiny bit of milk or cream. Just be careful not to add too much or it will become too runny. These treats last about one week in the fridge. Store them in an airtight container. If you keep them at room temperature, they might last a bit less. Always check for freshness before enjoying them. If you freeze them, they can last for a month. Just thaw them in the fridge when you want to eat them. In this post, we explored making delicious no-bake caramel pretzel bites. We covered the key ingredients, step-by-step instructions, and helpful tips. You learned how to avoid common kitchen issues and discovered tasty variations. These bites are fun to make and great for sharing. Enjoy your time in the kitchen and impress friends with your sweet treats. Happy cooking!
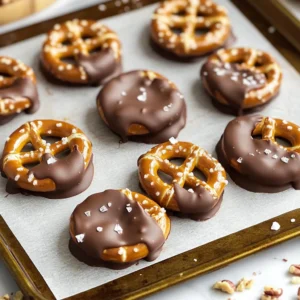
    No-Bake Caramel Pretzel Bites Simple and Sweet Treat
  • - 1 pound chicken or turkey sausage, sliced into rounds - 2 large apples (such as Honeycrisp or Granny Smith), cored and sliced - 1 red onion, cut into wedges - 2 tablespoons olive oil - 1/4 cup pure maple syrup - 1 teaspoon Dijon mustard - 1 teaspoon ground cinnamon - Salt and pepper to taste - Fresh thyme leaves for garnish (optional) For this sheet-pan recipe, I love using chicken or turkey sausage. It gives the dish a nice flavor. You can slice the sausage into rounds, making it easy to cook evenly. When it comes to apples, I recommend using Honeycrisp or Granny Smith. These apples add a sweet and tart flavor that balances well with the sausage. Core and slice them for the best texture. The red onion adds a bit of bite and sweetness. Cut it into wedges so it can caramelize nicely while baking. For the glaze, olive oil helps everything stick together. Pure maple syrup is the star here, adding a rich sweetness. I also like to add Dijon mustard. It gives the glaze a bit of tang that brings all the flavors together. In terms of seasonings, ground cinnamon adds warmth and a hint of spice. Don’t forget to season with salt and pepper to taste. Finally, if you want to elevate your dish, fresh thyme leaves make a lovely garnish. They add a pop of color and fresh flavor. Gather these ingredients, and you’re ready to make a delicious meal! - Preheat your oven to 400°F (200°C). - Slice the chicken or turkey sausage into rounds. - Core and slice the apples. I love Honeycrisp apples for their crunch. - Cut the red onion into wedges. - In a small bowl, combine 2 tablespoons of olive oil, 1/4 cup of pure maple syrup, and 1 teaspoon of Dijon mustard. - Add 1 teaspoon of ground cinnamon, salt, and pepper to taste. - Whisk the mixture until it is smooth. - Drizzle the glaze over the sausage, apple slices, and onion wedges. - Toss everything together using a spoon. Make sure each piece gets coated. - Spread the mixture in an even layer on the sheet pan. - Bake for 25-30 minutes. Stir halfway through to ensure even cooking. - You want the sausages to brown and the apples to tenderize. - Once done, let it cool for a few minutes. If you like, garnish with fresh thyme leaves. For this recipe, I recommend using Honeycrisp or Granny Smith apples. Honeycrisp apples are sweet and crisp, perfect for balancing the savory sausage. Granny Smith apples add a nice tartness that complements the dish. When slicing apples, make sure to cut them into even pieces. This ensures they cook at the same rate. Aim for slices about 1/4 inch thick. This size allows the apples to soften yet hold their shape during baking. To get the right glaze, you may want to adjust the syrup consistency. If it seems too thick, add a splash of water or extra olive oil. This helps it coat the sausage and apples evenly. Balancing flavors is key. You can add a pinch of nutmeg or ginger to the glaze for an extra kick. This will enhance the overall taste. Remember, the goal is a sweet and savory blend that complements the dish. For sides, roasted Brussels sprouts or a fresh green salad work well. They add a nice crunch and freshness to the meal. Pair this dish with a light white wine or sparkling cider for a refreshing drink. When serving, arrange the sausage and apples neatly on a platter. Drizzle some extra glaze on top for a beautiful finish. Garnish with fresh thyme leaves to add a pop of color and flavor. This makes it look fancy, even though it’s easy to prepare. {{image_2}} You can switch up the sausage for a different type. Try using pork sausage or even plant-based options like tofu or tempeh. If you want to keep it vegetarian, consider using veggie sausage. They provide great taste and texture too. You can also add other protein sources. Chickpeas or lentils can work well here. Both options add fiber and flavor. Feel free to mix in other fruits. Pears or peaches can add a nice twist. They give a different flavor while keeping it sweet. You can also boost your veggies. Carrots, bell peppers, or even sweet potatoes would fit in nicely. Each adds a new layer of taste and color. Want to spice things up? Add herbs like rosemary or sage to the dish. They can elevate the flavor. You can also try adding nuts or seeds. Chopped walnuts or pumpkin seeds add a great crunch. This extra texture makes the dish even more enjoyable. To store leftovers, let the dish cool first. Place the sausage and apples in an airtight container. This keeps flavors fresh and prevents spills. Use glass or plastic containers with tight lids. You can also use plastic wrap or aluminum foil. Store in the fridge for up to four days. For the best flavor and texture, reheat in the oven. Preheat the oven to 350°F (175°C). Spread the mixture on a baking tray. Heat for about 15 minutes, stirring halfway through. This helps keep the sausages juicy. If you use a microwave, place the food in a microwave-safe bowl. Heat for 1 to 2 minutes, stirring once. This method may make the apples softer, but it is quick. You can freeze this dish for later use. Cool it completely before freezing. Place it in a freezer-safe container or bag. Remove as much air as possible. You can store it in the freezer for up to three months. To thaw, place it in the fridge overnight before reheating. You can also use the microwave to thaw it on a low setting. This makes it easy to enjoy again! Yes, you can use other types of sausage. I suggest trying pork, beef, or even vegetarian sausage. Each type brings a unique flavor. Just make sure to slice them into rounds. This helps them cook evenly. If you want to keep it lighter, chicken or turkey sausage works great. To reduce the sweetness, you can cut back on the maple syrup. Use only two tablespoons instead of a quarter cup. You can also add a splash of vinegar or lemon juice. This will balance the sweetness with some acidity. Another option is to use less sweet apples, like Granny Smith. Absolutely! You can prep this dish ahead of time. Slice the sausage, apples, and onion the night before. Place them in the fridge until you’re ready to cook. You can also mix the glaze and store it separately. When you’re ready, just toss everything together and bake. This makes dinner quick and easy! This recipe offers a delightful mix of chicken or turkey sausage, apples, and red onion, topped with a tasty maple glaze. You learned how to prepare the dish, bake it, and even make adjustments to suit your taste. Don’t forget to explore variations with different fruits and vegetables. Proper storage is key for enjoying leftovers, and reheating tips ensure the best flavor. Experiment with this dish to make it your own. This easy recipe can become a cherished part of your meals. Enjoy cooking and sharing it!
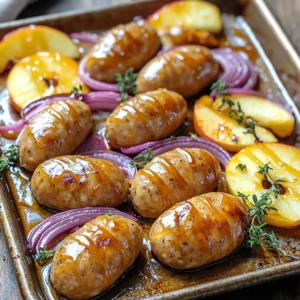
    Sheet-Pan Maple Glazed Sausage and Apples Delight

Posts pagination

← Newer 1 2 3 4 … 9 Older →

Footer

↑ back to top

More information

  • Drinks
  • Appetizer
  • Dinner
  • Desserts
  • About
  • Contact
  • Privacy Policy

Our Policies

  • Privacy Policy
  • GDPR Policy
  • Terms Of Use
  • Copyright Policy
  • Cookie Policy
  • Disclaimer

Copyright © 2025 cheftaling