

Introduction
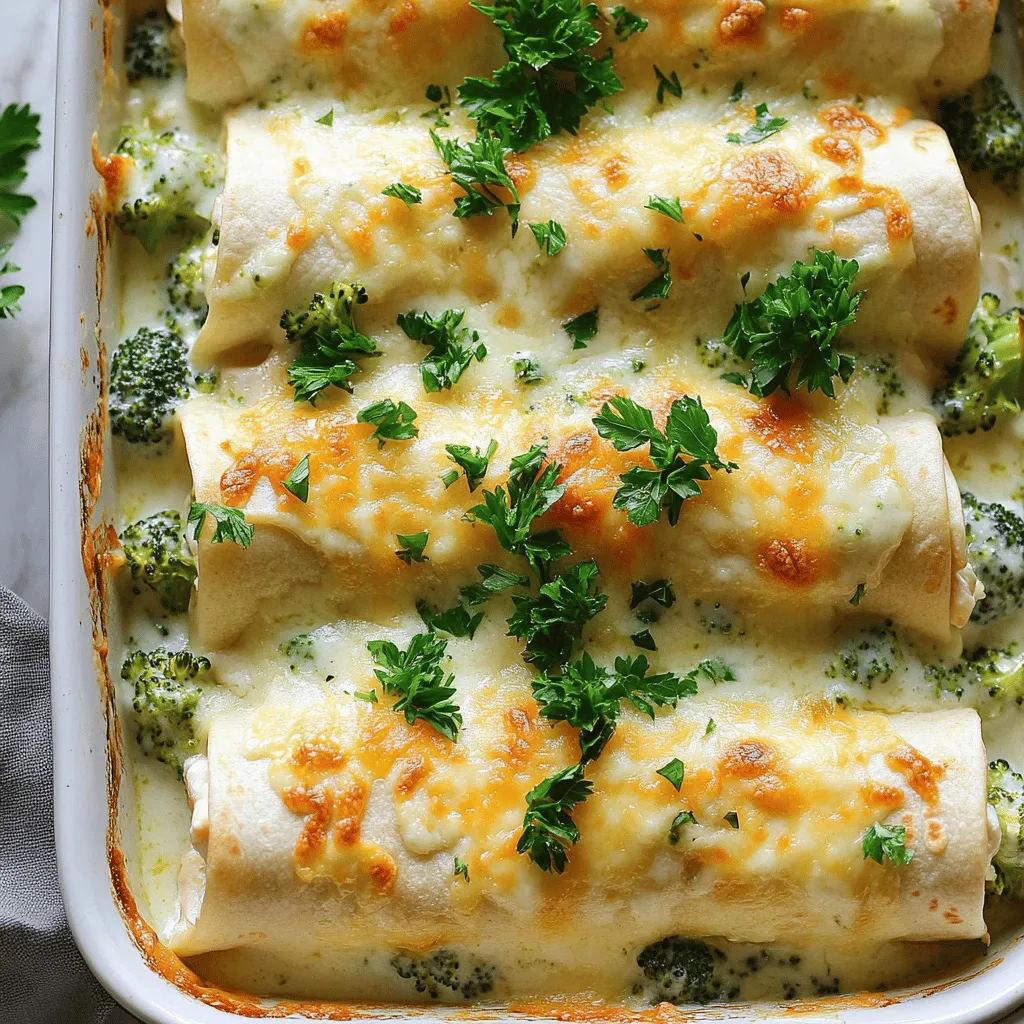
Chicken and Broccoli Alfredo Roll-Ups are a delightful twist on traditional comfort food that combines the rich, creamy flavors of Alfredo sauce with wholesome ingredients. This dish not only tantalizes your taste buds but also offers a satisfying blend of textures, making it a family favorite. With tender chicken, fresh broccoli, and gooey cheese, these roll-ups are perfect for weeknight dinners or meal prep for busy days. The convenience of a roll-up recipe allows for easy serving and portion control, making it an ideal choice for feeding a crowd or enjoying leftovers throughout the week.
In the world of comfort food, the combination of flavors and textures plays a crucial role in elevating the dining experience. The creamy Alfredo sauce perfectly complements the shredded chicken and tender broccoli, creating a harmonious blend that is both hearty and comforting. The addition of fettuccine pasta and a flourish of cheese not only adds depth but also enriches the overall flavor profile. This recipe is a wonderful way to bring together familiar ingredients into a fun and appealing presentation that will have everyone coming back for seconds.
Understanding the Ingredients
To create the perfect Chicken and Broccoli Alfredo Roll-Ups, it’s essential to understand the role of each ingredient in the recipe. The following ingredients contribute to the dish’s delicious flavor and nutritional value:
Shredded Cooked Chicken
As the primary protein source, shredded cooked chicken provides a robust flavor base for the roll-ups. It is a versatile ingredient that can easily take on the flavors of the surrounding ingredients. Using pre-cooked or rotisserie chicken saves time without compromising taste, making this dish a go-to for busy home cooks. The chicken not only adds protein but also enhances the overall heartiness of the meal.
Broccoli Florets
Broccoli is not just a colorful addition to the dish; it also brings numerous nutritional benefits. Packed with vitamins C and K, as well as fiber, broccoli contributes to a well-rounded meal. Its crunchy texture contrasts beautifully with the creamy Alfredo sauce, providing a delightful bite in each roll-up. By incorporating broccoli, you also add a pop of color, making the dish visually appealing.
Fettuccine Pasta
Fettuccine pasta is a classic Italian staple that adds heartiness to the roll-ups. The long, flat noodles are perfect for wrapping around the filling, providing a traditional touch to this modern take on Italian cuisine. The pasta absorbs the delicious Alfredo sauce, ensuring that every bite is packed with flavor. If you’re looking for a gluten-free option, feel free to substitute with gluten-free pasta.
Alfredo Sauce
The creamy Alfredo sauce is the star of the show in these roll-ups. This rich sauce, typically made with butter, cream, and Parmesan cheese, binds all the ingredients together and adds a luscious mouthfeel. For convenience, you can use store-bought Alfredo sauce or make your own from scratch using simple ingredients. The key is to achieve a smooth and creamy consistency that will coat the chicken and broccoli perfectly.
Cheese Varieties
For added flavor and texture, a combination of mozzarella and Parmesan cheese is used in the roll-ups. Mozzarella offers a delightful stretchiness and mild flavor, while Parmesan adds a sharp, nutty taste that enhances the overall profile of the dish. These cheeses melt beautifully, creating a gooey and irresistible layer within each roll-up.
Flour Tortillas
In a creative twist on traditional pasta dishes, flour tortillas serve as the wrapping for the roll-ups. This unique choice not only makes the dish easier to handle and serve but also adds a slightly chewy texture that complements the creamy filling. Flour tortillas are versatile and can be found in various sizes, allowing you to choose the perfect size for your roll-ups. For a healthier option, you can use whole wheat or spinach tortillas to boost the nutritional value even further.
Preparation Steps
Now that you understand the essential ingredients, let’s dive into the preparation steps that will guide you through creating these Chicken and Broccoli Alfredo Roll-Ups.
Preheat the Oven
Before you begin assembling your roll-ups, preheating your oven is crucial. Set your oven to 350°F (175°C) to ensure an even cooking environment. Preheating allows the roll-ups to bake uniformly, ensuring that the tortillas become golden and crispy while the filling heats through. This step is essential for achieving that perfect texture in your final dish.
Preparing the Filling
The next step involves mixing the filling ingredients to create a flavorful and cohesive mixture. Start by placing the shredded cooked chicken in a large mixing bowl. If you’re using rotisserie chicken, ensure that it’s been shredded into bite-sized pieces for easy incorporation. Add the steamed broccoli florets to the bowl, breaking them into smaller pieces if necessary. This will help distribute the broccoli evenly throughout the filling.
Next, pour in the Alfredo sauce and mix well until all the ingredients are evenly coated. For an extra burst of flavor, consider adding a sprinkle of garlic powder, onion powder, or even a pinch of red pepper flakes for a bit of heat. The goal is to ensure that every bite of the roll-up is packed with flavor, so make sure to taste the mixture and adjust the seasonings as needed.
Tips for Even Seasoning and Flavor Distribution
To achieve even seasoning and flavor distribution, consider the following tips:
- Mix Gently: When combining the ingredients, use a spatula or wooden spoon to fold the mixture gently. This will help maintain the integrity of the chicken and broccoli while ensuring that the sauce is evenly distributed.
- Taste Test: Don’t hesitate to taste the filling before assembling the roll-ups. Adjust the seasoning according to your preference; you can always add more spices, salt, or pepper to suit your taste.
- Use Fresh Ingredients: Fresh broccoli not only tastes better but also retains more nutrients. If possible, opt for fresh over frozen for the best flavor and texture.
Assembling the Roll-Ups
Once your filling is ready, it’s time to assemble the roll-ups. Begin by laying a flour tortilla flat on a clean surface. Spoon a generous amount of the chicken and broccoli mixture onto the center of the tortilla, leaving enough space on the sides for rolling. A good rule of thumb is to use about ⅓ cup of filling per tortilla, but this can vary depending on the size of your tortillas.
Step-by-Step Guide on Rolling Techniques
1. Fold the Sides In: Start by folding the sides of the tortilla in towards the center. This helps keep the filling secure as you roll.
2. Roll Tightly: Begin rolling the tortilla from the bottom (the side closest to you) up towards the top. Roll it tightly but not so tight that the filling squeezes out. The goal is to create a snug roll that holds together when baked.
3. Repeat the Process: Continue this process with the remaining tortillas and filling until all roll-ups are assembled.
Suggestions for Ingredient Placement for Best Results
For the best results, consider these suggestions when placing your filling:
- Even Distribution: Spread the filling evenly across the tortilla to ensure that each roll-up has a balanced amount of chicken and broccoli.
- Don’t Overfill: While it may be tempting to add more filling, overstuffing can lead to messy roll-ups that are hard to manage. Stick to the recommended amount for the best results.
- Seal the Edges: If desired, you can lightly brush the edges of the tortilla with water or a beaten egg before rolling to help seal them. This can prevent the roll-ups from unraveling during baking.
Baking the Roll-Ups
Once your roll-ups are assembled, it’s time to prepare them for baking. Start by greasing a baking dish with non-stick cooking spray or a drizzle of olive oil. This will help prevent the roll-ups from sticking to the dish during baking.
Preparing the Baking Dish
Before placing the roll-ups in the dish, it’s important to create a bed of sauce. Pour a small amount of Alfredo sauce into the bottom of the baking dish, spreading it evenly. This not only adds flavor but also helps prevent the roll-ups from sticking to the bottom, ensuring they come out easily once baked.
After adding the sauce, carefully place the roll-ups seam side down into the baking dish. This placement will help keep them intact during baking. If desired, drizzle additional Alfredo sauce over the top of the roll-ups before placing them in the oven for an extra layer of creaminess.
By following these initial steps, you’ll be well on your way to creating a delicious and satisfying Chicken and Broccoli Alfredo Roll-Ups dish that your family will love. With its delightful combination of flavors, textures, and ease of preparation, this recipe is sure to become a staple in your meal rotation. Stay tuned for the next part of this article, where we’ll delve into the baking process and tips for achieving the perfect golden, bubbly finish!

Layering and Topping
To create the perfect Chicken and Broccoli Alfredo Roll-Ups, layering is key. Start by spreading a generous amount of the creamy Alfredo sauce evenly over each tortilla. This not only enhances the flavor but also helps to keep the chicken and broccoli filling moist during baking. Next, add a layer of shredded cooked chicken and a handful of steamed broccoli florets, ensuring that the ingredients are evenly distributed. For an extra burst of flavor and texture, sprinkle a layer of mozzarella cheese over the filling before rolling the tortilla tightly.
Once rolled, place each roll-up seam side down in a greased baking dish. Pour any remaining Alfredo sauce over the top of the roll-ups, ensuring they are well-coated. Finish with a generous sprinkle of mozzarella and Parmesan cheese for that irresistible cheesy crust. This layering technique not only maximizes flavor but also helps to create a beautiful presentation.
How to Achieve a Perfect Cheese Melt and Golden Finish
Achieving that perfect cheese melt and golden crust on your Chicken and Broccoli Alfredo Roll-Ups requires a few essential tips. First, use freshly shredded cheese rather than pre-packaged shredded cheese, which often contains anti-caking agents that can prevent a smooth melt. For an ideal melt, consider mixing different cheese varieties, such as mozzarella for stretch and a bit of sharp cheddar for flavor.
A crucial step in the baking process is to ensure your oven is preheated to the right temperature, typically around 375°F (190°C). To achieve a golden finish, bake the roll-ups uncovered for the last 10-15 minutes of cooking. This allows the cheese to bubble and brown beautifully, creating that appealing golden crust.
Discussing the Role of Olive Oil in Enhancing Flavor
Olive oil plays a significant role in enhancing the flavor of your Chicken and Broccoli Alfredo Roll-Ups. When preparing your filling, drizzling a bit of extra virgin olive oil over the steamed broccoli and chicken before assembling the roll-ups adds richness and depth to the flavor profile. Olive oil not only complements the creamy Alfredo sauce but also contributes healthy fats that can help your body absorb fat-soluble vitamins found in the dish.
In addition to flavor enhancement, olive oil helps to keep the roll-ups moist during baking. If you prefer, you can also brush a light coating of olive oil over the tops of the roll-ups before baking to promote browning and add a touch of richness.
Cooking Time and Temperature
Baking Instructions
To bake your Chicken and Broccoli Alfredo Roll-Ups, preheat your oven to 375°F (190°C). Once preheated, cover your baking dish with aluminum foil to retain moisture during the initial baking period. Bake the roll-ups for approximately 20-25 minutes. This allows the flavors to meld together and the cheese to begin melting without drying out the tortillas.
Importance of Covering with Foil to Retain Moisture
Covering your roll-ups with foil during the first half of the baking process is vital. It traps steam within the dish, ensuring that the tortillas do not dry out and that the filling remains moist and tender. After the first 20-25 minutes, remove the foil to allow the cheese to brown and develop that appealing golden crust.
Timing Tips for Achieving the Ideal Bake
Every oven is different, so keep an eye on your roll-ups as they bake. After the initial 25 minutes, check for doneness around the 30-minute mark. The roll-ups are ready when the cheese is bubbly and golden, and the edges of the tortillas are slightly crispy. Allowing them to rest for about 5 minutes after baking will make them easier to slice and serve.
Serving Suggestions
Ideal Garnishes and Accompaniments
When it comes to serving your Chicken and Broccoli Alfredo Roll-Ups, garnishing can elevate the dish’s presentation and flavor. Freshly chopped parsley adds a vibrant green color and a hint of freshness that contrasts beautifully with the creamy filling. For an extra touch, consider drizzling a bit of extra Alfredo sauce over the top before serving.
Fresh Parsley: Adding Color and Freshness
Fresh parsley not only enhances the visual appeal of your dish but also provides a burst of flavor that complements the richness of the Alfredo sauce. Simply chop a handful of parsley and sprinkle it over the roll-ups just before serving for an inviting finish.
Suggestions for Side Dishes that Pair Well with the Roll-Ups
To round out your meal, consider serving your Chicken and Broccoli Alfredo Roll-Ups with a light side salad or steamed vegetables. A simple mixed greens salad dressed with a lemon vinaigrette can provide a refreshing contrast to the richness of the roll-ups. Alternatively, roasted asparagus or sautéed green beans make excellent companions, adding crunch and nutrition to your meal.
Presenting the Dish for Maximum Appeal
When presenting your Chicken and Broccoli Alfredo Roll-Ups, consider serving them on a large platter. Arrange the roll-ups in a circular pattern, drizzling with extra Alfredo sauce and sprinkling with fresh parsley for a visually striking presentation. Add some lemon wedges on the side for a pop of color and a hint of acidity that can elevate the flavors of the dish.
Nutritional Information
Breakdown of Nutrition per Serving
Understanding the nutritional profile of your Chicken and Broccoli Alfredo Roll-Ups can help you enjoy them as part of a balanced diet. Each serving provides a hearty combination of protein, fiber, and essential nutrients. A standard serving (one roll-up) contains approximately:
- Calories: 350
- Protein: 25g
- Fat: 18g
- Carbohydrates: 30g
- Fiber: 3g
Discussion of Health Benefits of Key Ingredients
The key ingredients in this recipe offer various health benefits. Chicken is an excellent source of lean protein, which is essential for muscle repair and growth. Broccoli is packed with vitamins C and K, fiber, and antioxidants, promoting overall health. The use of whole grain tortillas adds fiber and nutrients, making the meal more filling and satisfying.
How This Meal Fits into a Balanced Diet
Incorporating Chicken and Broccoli Alfredo Roll-Ups into your meal plan can be a delicious way to enjoy a balanced diet. Pairing the roll-ups with a side salad or steamed vegetables increases your vegetable intake while providing a variety of nutrients. Additionally, the protein from chicken and the fiber from broccoli and whole grain tortillas contribute to a well-rounded meal.
Variations and Customization
Alternative Ingredients for Dietary Restrictions
Customizing your Chicken and Broccoli Alfredo Roll-Ups to meet dietary restrictions is straightforward. For those who are lactose intolerant, consider using lactose-free cheese and Alfredo sauce. Additionally, you can swap the chicken for a plant-based protein, such as tofu or tempeh, to create a delicious vegan alternative.
Gluten-Free Tortilla Options
For gluten-free diners, many brands offer gluten-free tortillas made from rice flour, corn, or other gluten-free grains. These options work well in this recipe, allowing everyone to enjoy this comforting dish without concern.
Vegetarian Alternatives Using Different Vegetables or Proteins
If you’re looking to create a vegetarian version, feel free to replace the chicken with a variety of vegetables such as spinach, bell peppers, or mushrooms. You can also incorporate chickpeas or black beans for added protein and flavor.
Flavor Enhancements: Spices and Herbs to Consider
To enhance the flavor of your Chicken and Broccoli Alfredo Roll-Ups, consider adding spices and herbs. A sprinkle of garlic powder or Italian seasoning in the filling can elevate the dish. Fresh herbs like basil or oregano can also add aromatic notes that complement the creamy Alfredo sauce beautifully.
Conclusion
The Chicken and Broccoli Alfredo Roll-Ups are not just a meal; they are a delightful way to bring comfort and joy to the dinner table. With their creamy filling, tender chicken, and vibrant broccoli, these roll-ups are sure to please the entire family. Their versatility allows for various adaptations, making them suitable for different dietary needs and occasions.
We encourage you to try making these roll-ups, whether for a cozy family dinner or a gathering with friends. The simple pleasure of cooking and sharing delightful meals with loved ones is a rewarding experience that transcends the dining table. Enjoy the process, savor the flavors, and relish the moments spent with those you care about. Happy cooking!


Leave a Reply