
Introduction
In recent years, artisan bread has surged in popularity among home cooks, appealing to those seeking both the joy of baking and the satisfaction of crafting something from scratch. Unlike mass-produced bread, artisan varieties are characterized by their unique flavors, textures, and the care that goes into their creation. One standout recipe that embodies this artisan spirit is the Olive Delight Artisan Bread. This delectable loaf introduces a harmonious blend of savory ingredients, making it a flavorful twist on traditional bread.
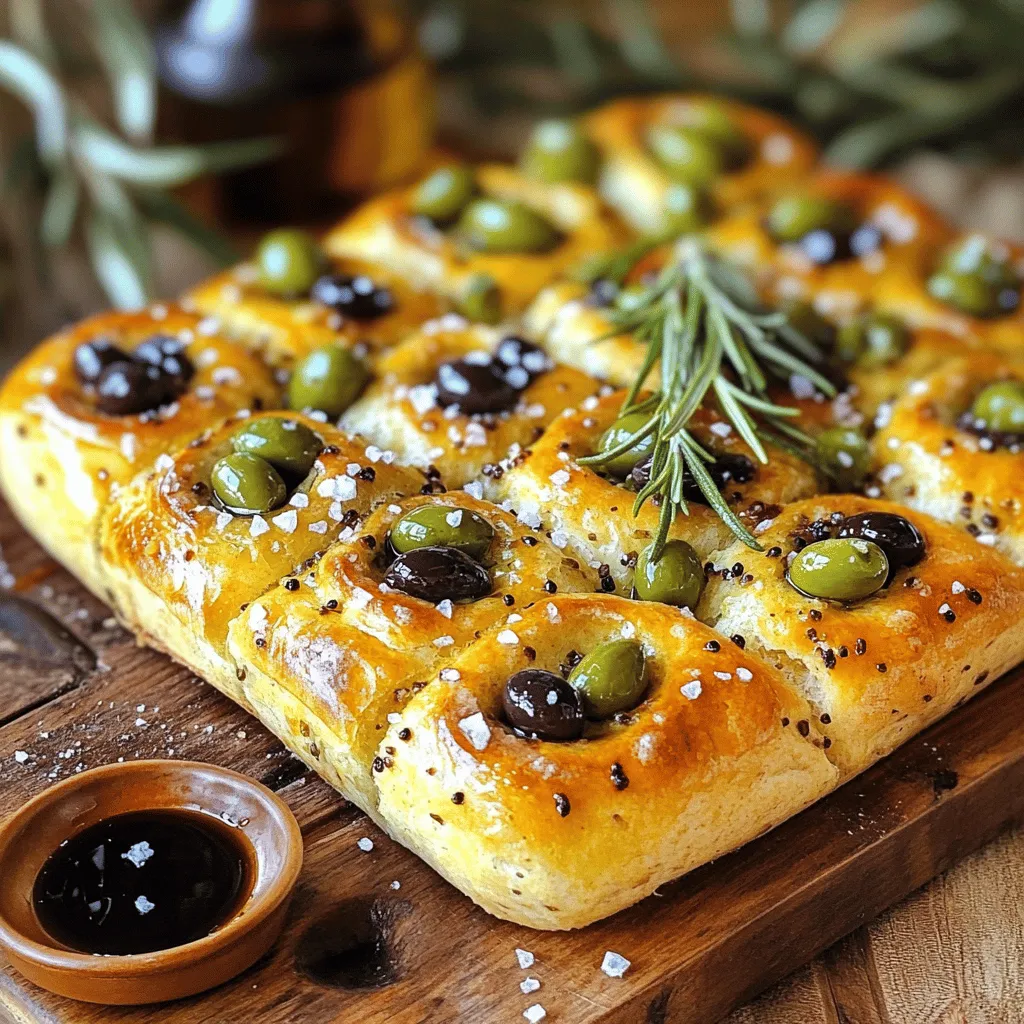
The Olive Delight Artisan Bread is not just a simple loaf; it is a sensory experience. The main ingredients—high-quality all-purpose flour, yeast, sugar, salt, olive oil, mixed olives, fresh rosemary, garlic powder, and flaky sea salt—each contribute significantly to the overall flavor and texture of the bread. The olives lend a briny richness, while the rosemary adds a fragrant herbal note that elevates the bread to new heights. When baked, this bread develops a crusty exterior and a soft, flavorful interior, making it perfect for sandwiches, as a side to soups, or enjoyed on its own.
Beyond its delightful taste, the act of baking bread at home creates a warm and inviting atmosphere. The enticing aroma of freshly baked bread fills the kitchen, drawing family and friends together. There is something inherently comforting about homemade bread, and the Olive Delight Artisan Bread is sure to become a cherished recipe in your culinary repertoire.
Understanding Artisan Bread
Artisan bread is defined by its traditional methods of production and the quality of its ingredients. Unlike commercial bread, which often relies on additives and preservatives to enhance shelf life and texture, artisan bread is typically made using simple, wholesome ingredients. The hallmark of artisan bread lies in its hand-crafted nature, often involving long fermentation processes that allow the dough to develop complex flavors.
The key characteristics of artisan bread include a crusty exterior, a chewy texture, and a distinctive flavor profile that varies with each recipe. Artisan bakers take pride in their craft, often experimenting with different flours, grains, and additional ingredients to create unique loaves. This approach fosters an appreciation for the nuances of flavor and texture that only come from time and skill.
Making artisan bread at home offers numerous benefits. First and foremost, it allows you to control the ingredients that go into your bread, ensuring that you’re using high-quality components without unnecessary additives. Additionally, the process of kneading, shaping, and baking can be incredibly therapeutic, providing a sense of accomplishment when you pull a freshly baked loaf from the oven. Finally, there’s the undeniable joy of sharing your homemade bread with loved ones, creating lasting memories around the dinner table.
The Ingredients Breakdown
Creating the Olive Delight Artisan Bread requires a selection of carefully chosen ingredients, each playing a vital role in the final product. Let’s take a closer look at what goes into this delightful recipe and how each component contributes to its unique flavor and texture.
All-Purpose Flour
All-purpose flour serves as the foundation of the Olive Delight Artisan Bread. It provides the necessary structure and texture, allowing the bread to rise beautifully while maintaining a soft, chewy interior. The protein content in all-purpose flour is ideal for developing gluten, which gives the bread its characteristic elasticity and chewiness. For the best results, choose a high-quality brand that is unbleached and has a higher protein content.
Yeast
Yeast is the magic ingredient that transforms the dough into a light and airy loaf. In this recipe, active dry yeast is commonly used, which needs to be activated before incorporation into the dough. This process involves dissolving the yeast in warm water along with a bit of sugar to feed it, allowing it to bloom and become frothy. This activation is crucial for the yeast to begin producing carbon dioxide, which causes the dough to rise.
Sugar
Sugar plays a dual role in this recipe. First, it acts as food for the yeast, promoting fermentation and a better rise. Second, sugar contributes to the browning of the crust during baking, leading to a beautifully golden exterior. While the amount of sugar in this recipe is modest, its effects are significant in the overall development of flavor and texture.
Salt
Salt is an essential ingredient in any bread recipe, and it serves multiple purposes. In the Olive Delight Artisan Bread, salt enhances the flavor of the loaf, making it more complex and enjoyable. Additionally, salt helps to control the fermentation process by regulating yeast activity, ensuring that the dough rises at a steady pace. This promotes a balanced flavor profile and contributes to the overall structure of the bread.
Olive Oil
Olive oil is a key player in this recipe, adding richness and moisture to the bread. The oil not only enhances the flavor but also contributes to a softer crumb, making each slice tender and delightful. Additionally, the healthy fats in olive oil help to improve the shelf life of the bread, keeping it fresh for longer.
Mixed Olives
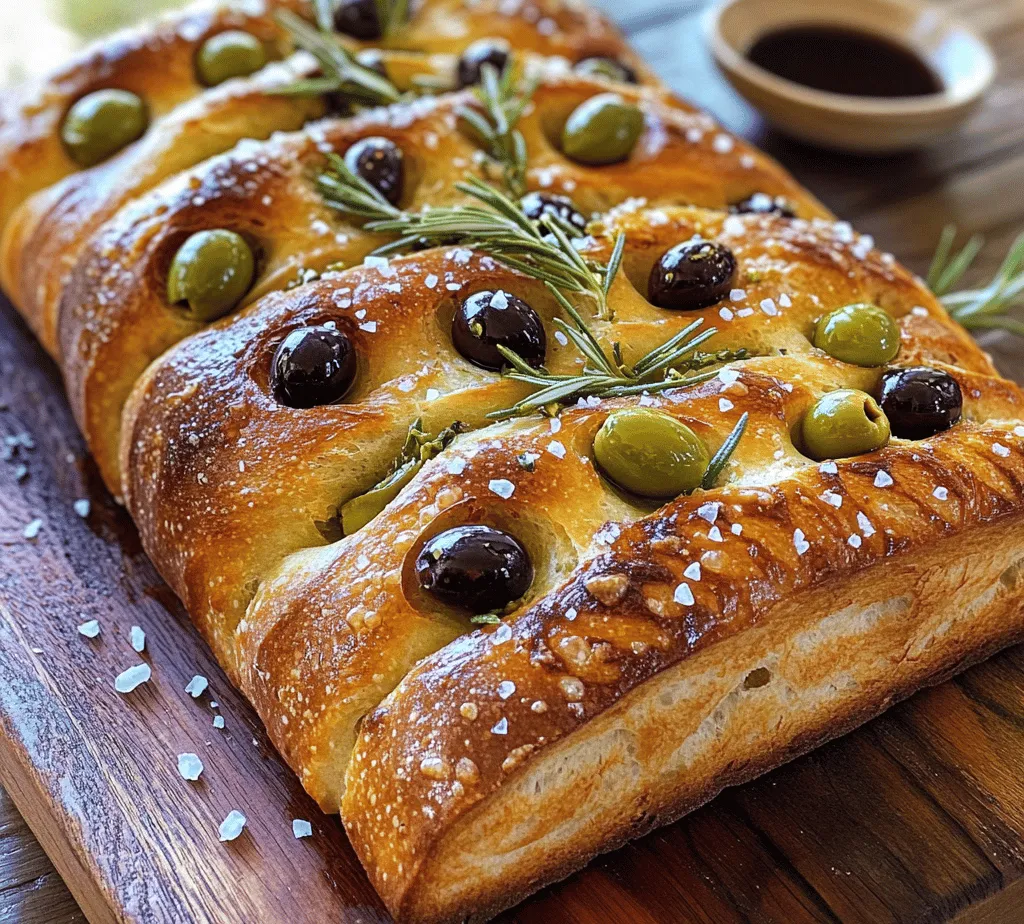
One of the star ingredients in Olive Delight Artisan Bread is the mixed olives. Their briny, savory flavor infuses the bread, providing bursts of taste with every bite. You can use a variety of olives, such as Kalamata, green olives, or even sun-dried tomatoes, depending on your preference. The olives also add texture, creating a delightful contrast to the soft bread.
Fresh Rosemary
Fresh rosemary brings an aromatic quality to the Olive Delight Artisan Bread, elevating its flavor profile. The fragrant herb complements the olives beautifully, creating a savory combination that is hard to resist. You can adjust the amount of rosemary according to your taste, but a generous handful will ensure that its flavor shines through.
Garlic Powder
Garlic powder adds another layer of depth to the flavor of the bread. It imparts a subtle, savory note that pairs perfectly with the olives and rosemary. The powder is a convenient way to incorporate garlic flavor without the need for fresh cloves, making it easy to mix into the dough.
Flaky Sea Salt
While optional, flaky sea salt makes for an excellent finishing touch on the Olive Delight Artisan Bread. Sprinkling a bit of flaky sea salt on top of the loaf before baking enhances the overall taste and presentation, providing a burst of salty flavor that contrasts beautifully with the richness of the olives and the softness of the bread.
Preparing the Dough
Now that we have a solid understanding of the ingredients, let’s dive into the process of preparing the dough for Olive Delight Artisan Bread. This part of the recipe is crucial, as it sets the stage for developing the bread’s texture and flavor.
1. Activate the Yeast: Begin by measuring out your warm water (typically between 100°F and 110°F). Sprinkle the active dry yeast and a teaspoon of sugar into the water. Stir gently and let it sit for about 5-10 minutes until it becomes foamy. This indicates that the yeast is active and ready to be added to the dough.
2. Mix the Dry Ingredients: In a large mixing bowl, combine the all-purpose flour and salt. Mix thoroughly to ensure the salt is evenly distributed throughout the flour. This step is essential, as it helps to prevent any direct contact between the yeast and salt, which can inhibit yeast activity.
3. Combine Ingredients: Once the yeast mixture is frothy, add it to the bowl of flour along with the olive oil. Use a wooden spoon or a spatula to mix until a shaggy dough forms. At this point, you can also fold in the mixed olives, fresh rosemary, and garlic powder, ensuring that they are evenly distributed throughout the dough.
4. Knead the Dough: Transfer the shaggy dough onto a lightly floured surface. Begin kneading the dough for about 8-10 minutes, until it becomes smooth and elastic. If the dough is too sticky, sprinkle a little more flour as needed. Kneading is crucial as it develops the gluten structure, which contributes to the bread’s texture.
5. First Rise: Shape the kneaded dough into a ball and place it in a lightly greased bowl. Cover the bowl with a clean kitchen towel or plastic wrap, and allow it to rise in a warm, draft-free area for about 1-2 hours, or until it has doubled in size. This first rise is essential for developing flavor and texture in the bread.
By following these initial steps, you’ll be well on your way to creating a delicious loaf of Olive Delight Artisan Bread. The combination of savory olives, aromatic rosemary, and subtle garlic flavor will make every bite a delightful experience. As the dough rises, the anticipation of pulling a fresh, warm loaf from the oven will surely fill your kitchen with excitement. Stay tuned for the next part, where we’ll cover shaping the dough, the second rise, and the baking process that will bring this artisan bread to life.
Activating Yeast: The Foundation of Your Olive Delight Artisan Bread
Before diving into the preparation of your Olive Delight Artisan Bread, it’s essential to properly activate the yeast, as this is crucial for achieving the perfect rise and texture. Start by measuring out your yeast, typically around 2 teaspoons for a standard loaf. The ideal temperature for activating yeast is between 100°F to 110°F (37°C to 43°C). Use a kitchen thermometer to ensure accuracy; if the temperature is too high, it could kill the yeast, while too low of a temperature won’t activate it effectively.
To activate the yeast, mix it with warm water and a pinch of sugar in a small bowl. Allow it to sit for about 5-10 minutes until it becomes frothy. This bubbly texture indicates that the yeast is alive and ready to work its magic in your dough. Now, let’s move on to the next essential step: mixing the dry ingredients.
Mixing the Dry Ingredients and Creating the Perfect Dough Consistency
In a large mixing bowl, combine 3 cups of all-purpose flour, 1 teaspoon of salt, and your activated yeast mixture. Mixing your dry ingredients evenly is vital for a well-integrated dough. As you combine the ingredients, you can add a tablespoon of olive oil for added richness and flavor.
Stir the mixture with a wooden spoon or spatula until it begins to form a shaggy dough. At this stage, it’s important to assess the dough’s consistency. If it feels too sticky, gradually add more flour, one tablespoon at a time, until you reach a smooth yet slightly tacky texture. Conversely, if the dough is too dry, you can add water, a teaspoon at a time. The goal is to achieve a dough that is pliable and elastic, which will contribute to the final bread’s texture.
The Significance of Kneading and How It Affects the Dough’s Elasticity
Kneading is a critical step in bread-making, as it develops the gluten structure in your dough. Once your dough is formed, turn it onto a lightly floured surface and begin kneading. Using the heel of your hand, push the dough away from you, fold it over, and then rotate it. Repeat this process for about 8-10 minutes, until the dough becomes smooth and elastic.
The importance of kneading cannot be overstated—it enables the gluten strands to stretch and connect, which creates a chewy and airy texture in the final product. The dough should spring back when gently pressed, indicating that it is ready for the first rise.
Adding Olives: Tips on Evenly Distributing Them Without Compromising the Dough
Now it’s time to incorporate the star ingredient: olives. Depending on your preference, you can choose kalamata, green, or a mix of both. About 1 cup of pitted and chopped olives will add a flavorful punch to your bread. After kneading your dough, gently flatten it into a rectangle. Sprinkle the olives evenly over the surface, then fold the dough over itself like a letter to encase the olives.
Knead the dough for another minute or two, just enough to distribute the olives without overworking the dough. You want to see speckles of olives throughout the bread rather than having them completely mixed in. This technique ensures that every bite of your Olive Delight Artisan Bread is infused with that savory flavor.
The Rising Process
Explanation of the First Rise: What Happens During This Stage
The first rise, also known as bulk fermentation, is when the dough begins to expand and develop flavor. As the yeast consumes the sugars, it releases carbon dioxide, which causes the dough to puff up. This process usually takes about 1 to 1.5 hours, depending on the room temperature. To maximize flavor, it’s ideal to allow the dough to rise until it has doubled in size.
Ideal Conditions for Dough Rising and How to Create Them at Home
To create the perfect environment for your dough to rise, find a warm spot in your kitchen, away from drafts. You can preheat your oven to 200°F (93°C) for a few minutes, then turn it off and place the covered bowl of dough inside. Alternatively, placing the dough near a sunny window or covering it with a damp cloth can also help retain warmth and moisture.
Importance of Punching Down the Dough and the Science Behind It
Once your dough has risen, it’s time to punch it down. This step may seem counterintuitive, but it’s crucial for redistributing the yeast and gases that have built up during the rising process. Gently deflate the dough with your fist, allowing it to collapse slightly, then let it rest for about 10 minutes before shaping. This resting period relaxes the gluten, making it easier to form your loaf.
Shaping and Baking the Bread
Techniques for Shaping the Dough into a Round Loaf
After the dough has rested, turn it out onto a lightly floured surface and shape it into a round loaf. Start by gently stretching the dough into a circle and folding the edges toward the center. Flip it over and use your hands to create tension on the surface by rotating the dough in a circular motion. This technique helps create a smooth outer layer, essential for a good rise in the oven.
Preparing the Oven and the Baking Sheet for Optimal Results
While shaping the dough, preheat your oven to 450°F (232°C). Prepare your baking sheet by lining it with parchment paper or lightly dusting it with flour. If you have a baking stone, you can place it in the oven to preheat as well for an even better crust. When the oven is ready, carefully transfer your shaped loaf onto the baking sheet.
Tips for Achieving a Golden Crust and Hollow Sound When Tapped
To achieve that coveted golden crust, consider placing a small oven-safe dish filled with water at the bottom of the oven during baking. This creates steam, which helps develop a crustier exterior. Bake the bread for 25-30 minutes, or until it turns golden brown. To check for doneness, gently tap the bottom of the loaf; it should sound hollow. If it does, your Olive Delight Artisan Bread is ready to be taken out.
Cooling and Serving Suggestions
Importance of Cooling Bread on a Wire Rack
Once your bread is baked, it’s essential to cool it on a wire rack. This allows air to circulate around the loaf, preventing the bottom from becoming soggy. Let it cool for at least 30 minutes before slicing to ensure a proper crumb structure. This cooling period also enhances the flavors, making each bite more enjoyable.
Recommended Serving Methods: Pairing with Olive Oil and Balsamic Vinegar
For an exquisite serving suggestion, slice your Olive Delight Artisan Bread and serve it with high-quality extra virgin olive oil and balsamic vinegar. This pairing accentuates the flavors of the olives and adds a delightful richness. You can also complement the bread with a selection of cheeses, cured meats, or roasted vegetables for an impressive appetizer or side dish.
Presentation Ideas: Rustic Serving Suggestions to Enhance the Dining Experience
To elevate your dining experience, consider serving the bread on a rustic wooden board with small bowls of olive oil and vinegar. Garnish with fresh herbs like rosemary or thyme, or sprinkle some sea salt on the oil for an added flavor boost. This visual appeal will surely impress your guests and make your homemade bread the centerpiece of any meal.
Nutritional Information
Overview of Nutritional Benefits of Ingredients Used in Olive Delight Artisan Bread
Olive Delight Artisan Bread is not only a delicious treat but also boasts several nutritional benefits. Whole olives are rich in healthy fats, antioxidants, and vitamins such as Vitamin E. Olive oil is known for its heart-healthy monounsaturated fats, while whole-grain flour can offer more fiber and nutrients compared to refined flour.
Considerations for Those with Dietary Restrictions (e.g., Gluten-Free Alternatives)
For those with dietary restrictions, such as gluten intolerance, you can experiment with gluten-free flour blends available in stores. While the texture may vary, the resulting bread can still be delightful with the addition of olives. Additionally, consider using almond flour or oat flour as alternatives, adjusting the liquid content accordingly to achieve the right consistency.
Conclusion
Creating Olive Delight Artisan Bread at home is a rewarding experience that combines skill, patience, and a touch of culinary art. From activating the yeast to shaping and baking the loaf, each step is integral to achieving that beautiful, flavorful bread. The joy of pulling a fresh loaf out of the oven, with its enticing aroma and golden crust, is something truly special.
Baking bread is not just about nourishment; it’s about sharing love and warmth with family and friends. So invite your loved ones to join you in the kitchen, or surprise them with a fresh loaf as a thoughtful gift. Don’t hesitate to experiment with variations of this recipe, perhaps by adding herbs or different types of cheese, to keep your bread-making adventures exciting. Enjoy the process, and remember that every loaf is an opportunity to create something delicious and memorable.
