
Introduction
Italian Nut Roll Cookies, or “Noci di Cattolica,” are a delightful treat that embodies the essence of Italian baking traditions. These beautifully rolled cookies, filled with a rich nut mixture, are not only a testament to the culinary skills passed down through generations but also a symbol of celebration during festive seasons and family gatherings. The allure of homemade cookies, especially those steeped in cultural significance, draws many home bakers to recreate these classic delights in their own kitchens.
In this article, we will embark on a journey to explore the rich history and cultural significance of Italian Nut Roll Cookies. We will provide a comprehensive guide to making these cookies from scratch, including essential tips to master the recipe. Whether you’re making them for the holidays, special occasions, or simply to satisfy your sweet tooth, this guide will equip you with everything you need to know.
Understanding Italian Nut Roll Cookies
Historical Background and Origins of the Recipe
The origins of Italian Nut Roll Cookies can be traced back to the rich culinary heritage of Italy, where various recipes have been crafted over centuries. Traditionally, these cookies were made to celebrate special occasions, such as weddings, holidays, and family gatherings. The practice of baking with nuts has deep roots in Italian cuisine, where nuts symbolize prosperity and abundance.
Italian immigrants brought their cherished recipes to America during the great migration, leading to the evolution of many traditional dishes, including Nut Roll Cookies. In Italian-American households, these cookies became a staple during festive seasons, often prepared alongside other beloved confections like biscotti and pizzelle. The combination of buttery dough and a sweet nut filling creates a symphony of flavors that resonates with nostalgia and warmth.
Significance in Italian-American Cuisine and Family Traditions
In Italian-American culture, food plays a central role in family traditions and celebrations. Preparing and sharing food with loved ones fosters a sense of community and belonging. Nut Roll Cookies often serve as a bridge between generations—passed down from grandparents to grandchildren, each family adding its unique twist to the recipe.
During the holiday season, these cookies find their way onto dessert tables, delighting guests with their rustic charm and comforting flavors. The act of baking Nut Roll Cookies is often a cherished family activity, where laughter and stories are shared, and memories are created.
Variations of Nut Roll Cookies Across Different Regions in Italy
While the Nut Roll Cookie is a beloved treat enjoyed across Italy and the Italian-American diaspora, variations exist depending on the region. For instance, in the northern provinces, you may find versions that incorporate different types of nuts, such as almonds or chestnuts, while southern regions might favor hazelnuts or pistachios.
Additionally, some recipes may include spices like cinnamon or chocolate, adding a unique flavor profile to the cookies. The adaptability of the recipe allows home bakers to experiment with ingredients based on personal preferences or regional ingredients, ensuring that each batch is a reflection of the baker’s taste.
Essential Ingredients for Italian Nut Roll Cookies
To create the perfect Italian Nut Roll Cookies, using high-quality ingredients is crucial. Here’s a closer look at the essential components you’ll need:
Primary Ingredients Overview
1. All-Purpose Flour: The backbone of the cookie dough, providing structure and stability.
2. Unsalted Butter: Adds richness and flavor; using unsalted allows for better control of the cookie’s salt content.
3. Granulated Sugar: Sweetens the dough and contributes to the cookie’s texture.
4. Eggs: Binds the ingredients together and adds moisture, contributing to a tender crumb.
5. Vanilla Extract: Enhances the overall flavor profile, providing a warm, aromatic quality.
6. Baking Powder: Acts as a leavening agent, ensuring the cookies rise and have a soft texture.
7. Salt: Balances the sweetness and enhances the flavors of the other ingredients.
8. Walnuts (or Hazelnuts): The star filling, providing crunch and a rich, nutty flavor.
9. Powdered Sugar: Used for dusting the finished cookies, adding a touch of sweetness and visual appeal.
10. Milk: Aids in achieving the right dough consistency and moisture level.
11. Optional Cinnamon: Adds a warm spice note that complements the nuts beautifully.
Importance of Ingredient Quality
The quality of ingredients significantly impacts the final flavor and texture of your Italian Nut Roll Cookies. Using fresh nuts ensures that the filling is flavorful and aromatic. Similarly, high-quality butter and pure vanilla extract contribute to a rich, decadent cookie. When possible, shop for ingredients that are organic or locally sourced, as these often possess superior flavor profiles.
Substitutes for Dietary Restrictions
If you or your guests have dietary restrictions, there are several substitutes you can use without compromising the essence of the cookies:
- Gluten-Free Options: Substitute all-purpose flour with a 1:1 gluten-free flour blend. Make sure it contains xanthan gum for optimal texture.
- Dairy Alternatives: Replace unsalted butter with vegan butter or coconut oil. For milk, almond milk or oat milk can work well.
Step-by-Step Guide to Making Italian Nut Roll Cookies
Preparing the Dough
Creating the perfect Italian Nut Roll Cookies starts with preparing the dough. Follow these steps for an excellent base.
Importance of Creaming Butter and Sugar for Texture
1. Begin by preheating your oven to 350°F (175°C) and lining a baking sheet with parchment paper.
2. In a large mixing bowl, combine the unsalted butter and granulated sugar. Using a hand mixer or a stand mixer, cream the butter and sugar together on medium speed until the mixture is light and fluffy. This process typically takes about 3-5 minutes. Properly creaming the butter and sugar incorporates air into the mixture, which is essential for achieving a tender texture in your cookies.
Tips for Incorporating Eggs and Maintaining a Smooth Batter
3. Add the eggs, one at a time, mixing well after each addition. This helps the eggs to emulsify into the butter mixture, contributing to a smooth batter.
4. Stir in the vanilla extract and mix until fully incorporated.
Combining the Dry Ingredients
Next, it’s time to prepare the dry ingredients.
How to Properly Mix Dry Ingredients to Avoid Lumps
5. In a separate bowl, whisk together the all-purpose flour, baking powder, and salt. Whisking aerates the flour, ensuring even distribution of the leavening agent and salt, which helps prevent lumps in the dough.
Significance of the Right Flour Measurement in Cookie Dough Consistency
6. Gradually add the dry mixture to the wet ingredients, mixing gently until just combined. Avoid over-mixing at this stage, as it can lead to tough cookies. The goal is to have a soft, slightly sticky dough.
Chilling the Dough
Chilling the dough is a crucial step that cannot be overlooked.
Explanation of How Chilling Affects Dough Handling and Final Cookie Structure
7. Wrap the dough in plastic wrap and refrigerate for at least 1 hour. Chilling the dough firms it up, making it easier to roll out and shape. Additionally, it helps the flavors to meld and enhances the overall texture of the cookies.
Recommended Chilling Time and Tips for Best Results
8. For best results, you can chill the dough overnight. If you’re pressed for time, aim for a minimum of 30 minutes to an hour.
Preparing the Nut Filling
While the dough chills, prepare the nut filling.
Techniques for Chopping Nuts Finely for Even Distribution
9. Take your walnuts or hazelnuts and finely chop them using a food processor or a sharp knife. Ensure that the nuts are evenly chopped to promote even distribution throughout the cookies. You may also lightly toast the nuts in a dry skillet over medium heat for a few minutes to enhance their flavor, but be careful not to burn them.
By following this guide, you are well on your way to making exquisite Italian Nut Roll Cookies that will surely impress family and friends. Stay tuned for the next part, where we will continue with the shaping, baking, and finishing touches that will take your cookies from good to extraordinary.
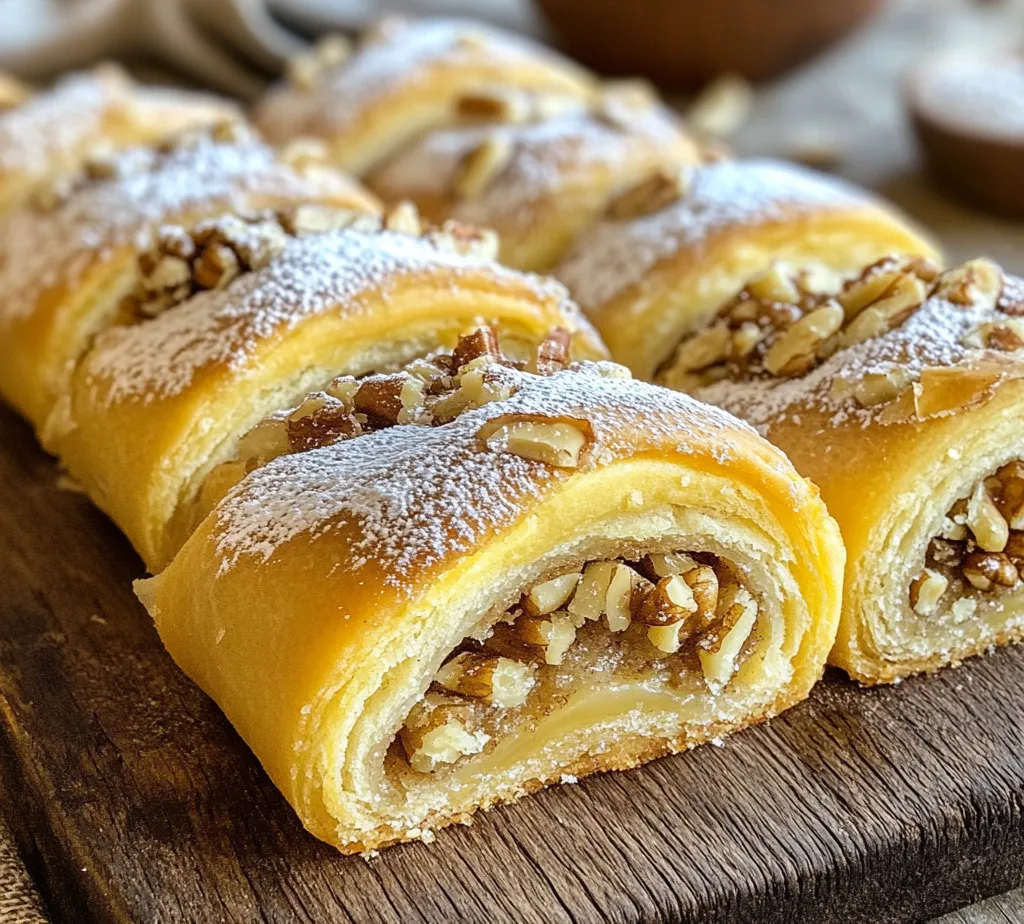
Achieving the Perfect Nut Mixture Consistency
Creating the perfect filling for your Italian Nut Roll Cookies begins with achieving the right consistency for your nut mixture. Start by finely chopping your choice of nuts—traditionally, walnuts or hazelnuts work beautifully. You can also experiment with pecans or almonds if you prefer a different flavor profile.
Once your nuts are chopped, combine them with granulated sugar and a splash of milk. The milk not only binds the mixture but also helps soften the nuts, enhancing their flavor. For an added layer of warmth and spice, consider mixing in a teaspoon of ground cinnamon. This optional addition can elevate the overall taste, making your cookies even more delightful.
Rolling Out the Dough
After preparing your nut filling, it’s time to roll out the dough. Start by dividing your dough into manageable portions, roughly the size of a tennis ball. This will make it easier to handle and ensure uniformity across all cookies.
Tips for Achieving the Right Thickness
When rolling out the dough, aim for a thickness of about 1/8 inch. This thickness allows for a crispy exterior while maintaining a soft, chewy center. If the dough is too thick, it may not bake evenly, leading to a doughy texture; if too thin, it can easily break during the rolling and shaping process.
Tools and Equipment for Rolling and Shaping
To achieve the perfect rolled dough, consider using a rolling pin. A marble or wooden rolling pin provides even pressure and can help maintain the dough’s temperature. Additionally, a silicone baking mat can be invaluable, preventing sticking and providing a non-slip surface. If you find that the dough is too sticky, sprinkling a light dusting of flour can help you roll it out without tearing.
Filling and Shaping the Cookies
With your dough rolled out, it’s time to fill and shape your cookies.
Step-by-Step Instructions on Spreading the Filling
1. Spread the Filling: Begin by spooning your nut mixture onto one edge of the rolled-out