
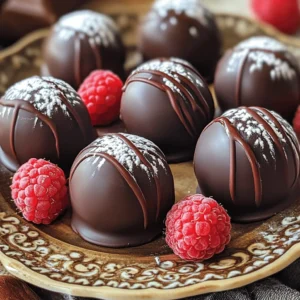
Indulging in rich, dark chocolate raspberry truffles can elevate any treat time. If you want a simple and satisfying dessert, I’ve got the perfect recipe for you. With a few basic ingredients, you can create melt-in-your-mouth truffles that impress everyone. Join me as we dive into the rich flavors and creamy textures of these decadent delights. Get ready to impress your friends and satisfy your sweet tooth!

Ingredients
List of Key Ingredients
- 8 oz dark chocolate (70% cocoa or higher), chopped
- ½ cup heavy cream
- 1 teaspoon vanilla extract
- 1 cup fresh raspberries (plus a few for garnish)
- 1 cup cocoa powder (for rolling)
- ¼ cup powdered sugar (for rolling)
- Pinch of sea salt
Ingredient Substitutions
- Alternative chocolate options: If you prefer a sweeter chocolate, use semi-sweet chocolate. You can also try milk chocolate, but it will change the flavor.
- Vegan cream substitutes: Use coconut cream or almond milk for a vegan option. These will give a rich texture, too.
- Fresh vs. frozen raspberries: Fresh raspberries work best for flavor and texture. Frozen can be used, but they may be mushy after thawing. If using frozen, drain excess water before mixing.
Step-by-Step Instructions
Preparation Steps
Heating the heavy cream
Start by putting the heavy cream in a medium saucepan. Heat it on low. Watch it closely. You want it hot but not boiling. This step helps the chocolate melt well.
Melting and mixing chocolate
Once the cream is hot, take it off the heat. Add the chopped dark chocolate right away. Stir until the chocolate melts into the cream. The mixture should be smooth and shiny. This is where the magic begins!
Incorporating flavors
Now, mix in the vanilla extract and a pinch of sea salt. These flavors add depth to the truffles. Then, gently fold in the fresh raspberries. Be careful not to crush them too much. You want small pieces for bursts of flavor.
Forming the Truffles
Chilling the mixture
Let the chocolate mixture cool at room temperature. After about 30 minutes, cover it. Place it in the fridge for about 2 hours. The mixture needs to be firm enough to handle.
Rolling into balls
When the chocolate is ready, scoop out small portions. Use a teaspoon or a melon baller. Roll each portion into a ball with your hands. Keep them small and round for a lovely shape.
Coating techniques
In a shallow bowl, mix cocoa powder and powdered sugar. Roll each truffle in this mix until well coated. This adds a nice texture and look to your truffles.
Setting the Truffles
Refrigeration process
Place the rolled truffles on a parchment-lined tray. Put them back in the fridge for about 30 minutes. This helps them set well and hold their shape.
Presentation recommendations
Serve the truffles on a nice plate. Add a few fresh raspberries on top. A light dusting of cocoa powder makes them look fancy. For extra flair, drizzle some melted chocolate over them before serving. Enjoy your creation!
Tips & Tricks
Common Mistakes to Avoid
- Overheating the chocolate: Heat the cream until it’s just about to simmer. If you boil it, the chocolate can seize up and become grainy.
- Incorrect chilling time: Allow the mixture to chill for at least two hours. If it’s too soft, rolling the truffles will be messy.
Expert Advice for Perfect Truffles
- Folding in raspberries without breaking them: Use a gentle hand when folding in the raspberries. This keeps them intact and adds lovely bursts of flavor.
- Achieving the right size for truffles: Aim for a bite-sized ball, about one inch in diameter. This size ensures a good chocolate-to-raspberry ratio.
Enhancing Flavor and Texture
- Adding extracts or spices: Try adding a touch of almond extract or a sprinkle of cinnamon for extra flavor depth. Just a little goes a long way!
- Using different rolling ingredients: Besides cocoa powder and powdered sugar, consider rolling in crushed nuts or coconut for added texture and taste.
Feel free to explore these tips to make your truffles even more delightful!

Variations
Flavor Variations
You can tweak the flavor of your truffles. One option is to add orange zest. This gives a fresh, citrusy kick. Mix the zest into the melted chocolate before adding the raspberries. Another great choice is mint-infused truffles. Add a few drops of mint extract to the chocolate. It adds a cool taste that pairs well with dark chocolate.
Dietary Variations
If you need gluten-free options, you are in luck! All the ingredients in this recipe are naturally gluten-free. Just make sure to check for any cross-contamination. For vegan versions, swap the heavy cream for coconut cream. Use dairy-free chocolate for a fully vegan treat. This way, everyone can enjoy these truffles.
Presentation Variations
How you present your truffles can be fun! Serve them on a decorative plate. Add some fresh raspberries for color. A light dusting of cocoa powder on top makes them look fancy. You can also drizzle melted chocolate over them for extra flair. For special occasions, think about themed garnishes. Use sprinkles or edible flowers to match your event. These ideas make your truffles not just tasty, but beautiful too!
Storage Info
Proper Storage Methods
To keep your dark chocolate raspberry truffles fresh, store them properly.
- Refrigerating truffles: Place them in an airtight container. This keeps them cool and prevents them from absorbing odors. They are best stored in the fridge for short-term use.
- Freezing instructions for long-term storage: For longer storage, freeze the truffles. Arrange them in a single layer on a tray. Once frozen, transfer them to a freezer-safe bag. They can last up to three months in the freezer. When you're ready to enjoy them, let them thaw in the fridge overnight.
Shelf Life of Dark Chocolate Raspberry Truffles
How long do these truffles last? In the fridge, dark chocolate raspberry truffles stay fresh for about one week.
What are the signs of truffle spoilage? Look for changes in texture or smell. If they develop an off odor or appear dry, it's best to toss them. Enjoy your truffles while they're fresh for the best taste!
FAQs
How do you make dark chocolate raspberry truffles from scratch?
To make dark chocolate raspberry truffles, follow these basic steps:
1. Heat heavy cream in a saucepan over low heat until it's almost simmering.
2. Remove from heat and stir in chopped dark chocolate. Mix until smooth.
3. Add vanilla extract and a pinch of sea salt for flavor.
4. Fold in fresh raspberries gently so they don’t break.
5. Cool the mixture at room temperature. Then refrigerate for about 2 hours.
6. Once firm, scoop out small portions and roll them into balls.
7. Roll each ball in a mix of cocoa powder and powdered sugar.
8. Place on a tray and refrigerate for another 30 minutes to set.
Can I use different fruits in these truffles?
Yes! You can use various fruits in your truffles. Here are some options:
- Strawberries: They add a sweet and tangy flavor.
- Cherries: These give a rich, fruity taste and pair well with chocolate.
- Blueberries: They add a burst of flavor and are easy to fold in.
- Peaches: These can add a soft, juicy texture for a unique twist.
Feel free to experiment with fruits you love!
What’s the best way to melt dark chocolate without burning it?
To melt dark chocolate perfectly, follow these tips:
- Use a double boiler. Place a heatproof bowl over simmering water. This keeps the chocolate from direct heat.
- Stir often. This helps the chocolate melt evenly and prevents burning.
- If using a microwave, heat in short intervals. Start with 15 seconds, then stir, and repeat until melted.
- Always remove the chocolate from heat before it’s fully melted. It will continue to melt from residual heat.
Using these methods ensures smooth, melted chocolate for your truffles.
You now know how to make dark chocolate raspberry truffles. We covered key ingredients like dark chocolate and fresh raspberries. I shared step-by-step instructions to guide your process. We explored tips to avoid common mistakes and enhance flavor. Finally, I highlighted variations to suit different tastes and dietary needs. With this knowledge, you can create delightful truffles that impress everyone. Enjoy the fun of making your own sweet treats!
Leave a Reply