
Welcome to your new favorite dish: Summer Berry Salad! This fresh and colorful delight bursts with flavor and is super easy to make. With juicy berries, crisp greens, creamy cheese, and crunchy nuts, it’s a perfect match for warm weather. In this post, I’ll guide you through every step, share tips and tricks, and reveal tasty variations to keep your summer salads exciting. Get ready to impress your friends and family!
![To start this salad, choose your favorite berries. I love using: - 1 cup strawberries, hulled and quartered - 1 cup blueberries, whole - 1 cup raspberries, whole These berries add bright colors and sweet flavors. They are rich in vitamins and antioxidants too. Next, we need some greens for a crisp base. I recommend: - 1 cup baby spinach, washed and dried - ½ cup arugula, washed and dried These greens give the salad a fresh taste and a nice crunch. Now, let's add some creamy and crunchy elements. Use: - ½ cup feta cheese, crumbled - ¼ cup walnuts, toasted and chopped The cheese adds creaminess, and the nuts bring texture and a nutty flavor. Finally, we need a dressing to tie everything together. For this, gather: - 2 tablespoons honey - 2 tablespoons balsamic glaze - 1 tablespoon olive oil - Salt and pepper to taste This dressing gives a sweet and tangy kick to the salad. It makes every bite delightful. For the full recipe, check out Berry Bliss Summer Salad. Start with the mixed berries. If you use strawberries, hull and quarter them. Keep blueberries and raspberries whole. Rinse the berries gently. This keeps them fresh and clean. Next, wash and dry the baby spinach and arugula. Make sure they are dry to avoid soggy greens. Get a large salad bowl. First, place the baby spinach and arugula at the bottom. This forms a nice base for your salad. Then, add the mixed berries on top. Spread them evenly across the greens. Next, sprinkle crumbled feta cheese over the salad. Finally, add toasted walnuts for texture and crunch. In a small bowl, take honey, balsamic glaze, and olive oil. Add a pinch of salt and pepper for flavor. Whisk them together until they mix well. This dressing adds a sweet and tangy taste to the salad. Drizzle the dressing over the salad. Gently toss the salad to coat the greens and berries. Make sure everything gets a bit of dressing. For the final touch, add fresh mint leaves on top. This adds bright color and extra freshness. Serve the salad in a large, shallow bowl. This makes the colorful ingredients stand out beautifully. For the full recipe, check out the Berry Bliss Summer Salad section above. To make your salad shine, pick ripe berries. Look for vibrant colors and no bruises. Strawberries should smell sweet and feel firm. Blueberries should be plump and smooth. Raspberries need to be deep red, not mushy. When you find the best berries, your salad will taste amazing! To boost flavors, try adding a pinch of salt to the berries. This small tip makes them taste sweeter. You can also mix in some lemon juice. A splash of citrus brightens the whole dish. Experiment with fresh herbs like basil or cilantro for a unique twist. These flavors will make your salad stand out. Serve your salad in a large, shallow bowl. This lets the colors pop. Arrange whole berries and mint leaves on top for a pretty look. Drizzle the dressing artfully over the salad before serving. Use a light hand with the dressing to avoid sogginess. A well-presented salad is sure to impress your guests. For the full recipe, check out the Berry Bliss Summer Salad! {{image_2}} You can make this salad heartier by adding proteins. Grilled chicken is a great choice. It adds flavor and makes the dish filling. You can also use shrimp or tofu for a tasty twist. Just cook them well and slice before adding to the salad. Feel free to swap ingredients based on your taste. If you don’t like feta, try goat cheese. It gives a nice tang. You can also change the nuts. Almonds or pecans work well. If you want less sweetness, use lemon juice instead of honey. As the seasons change, so can your salad. In fall, add slices of apples or pears. In winter, try pomegranate seeds for a pop of color. Each season brings different fruits, so get creative! Use whatever is fresh for the best flavor. Check the [Full Recipe] for more ideas! To keep your Summer Berry Salad fresh, store it in an airtight container. Make sure the container is clean and dry. Keep the salad in the fridge to maintain its crispness. Avoid adding dressing until you serve. This helps keep the greens and berries from wilting. If you have leftovers, gently separate the salad components. Put the greens in one container and the berries in another. Store the dressing in a small jar or bowl. This keeps each part fresh and tasty. When you’re ready to eat, mix everything again. Most ingredients last a few days in the fridge. Fresh berries can last about three to five days. Spinach and arugula stay fresh for about three days. Feta cheese can last up to a week if stored well. Walnuts keep for a month when sealed. Remember, always check for any signs of spoilage before eating. Yes, you can use frozen berries. Just thaw them first. Frozen berries may be softer than fresh ones. They can still add great taste and color to your salad. You can use pecans or almonds instead of walnuts. Both nuts add a nice crunch. They also bring their own unique flavors to the salad. To make this salad vegan, skip the feta cheese. You can use avocado for creaminess instead. A bit of nutritional yeast can add a cheesy flavor too. A light grilled chicken or fish works well. You could also serve a crusty bread or a soup. These options complement the freshness of the salad nicely. It takes about 15 minutes to prepare. This quick time makes it easy for a last-minute meal. Just gather your ingredients, and you’re ready to go! For the full recipe, check out the Berry Bliss Summer Salad. This blog post covered how to create a delicious Summer Berry Salad. You learned about selecting fresh berries, greens, and protein options. I shared step-by-step instructions for prepping ingredients, assembling the salad, and making the dressing. Tips on enhancing flavors and presenting the salad helped you elevate your dish. Finally, proper storage methods ensure freshness and quality. Enjoy creating your unique versions and satisfying your taste buds! Your salad journey starts now.](https://cheftaling.com/wp-content/uploads/2025/06/ba549531-3911-4758-b151-4f51cb7bcd08.webp)
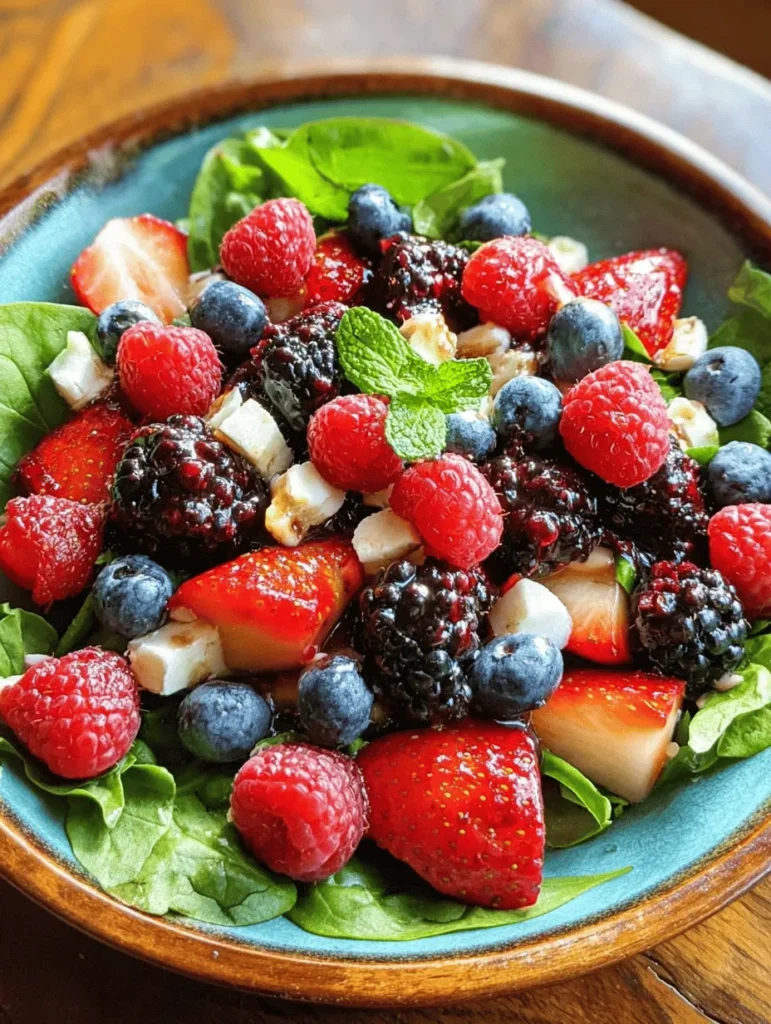
Ingredients
Fresh Berries
To start this salad, choose your favorite berries. I love using:
- 1 cup strawberries, hulled and quartered
- 1 cup blueberries, whole
- 1 cup raspberries, whole
These berries add bright colors and sweet flavors. They are rich in vitamins and antioxidants too.
Greens
Next, we need some greens for a crisp base. I recommend:
- 1 cup baby spinach, washed and dried
- ½ cup arugula, washed and dried
These greens give the salad a fresh taste and a nice crunch.
Cheese and Nuts
Now, let's add some creamy and crunchy elements. Use:
- ½ cup feta cheese, crumbled
- ¼ cup walnuts, toasted and chopped
The cheese adds creaminess, and the nuts bring texture and a nutty flavor.
Dressing Components
Finally, we need a dressing to tie everything together. For this, gather:
- 2 tablespoons honey
- 2 tablespoons balsamic glaze
- 1 tablespoon olive oil
- Salt and pepper to taste
This dressing gives a sweet and tangy kick to the salad. It makes every bite delightful.
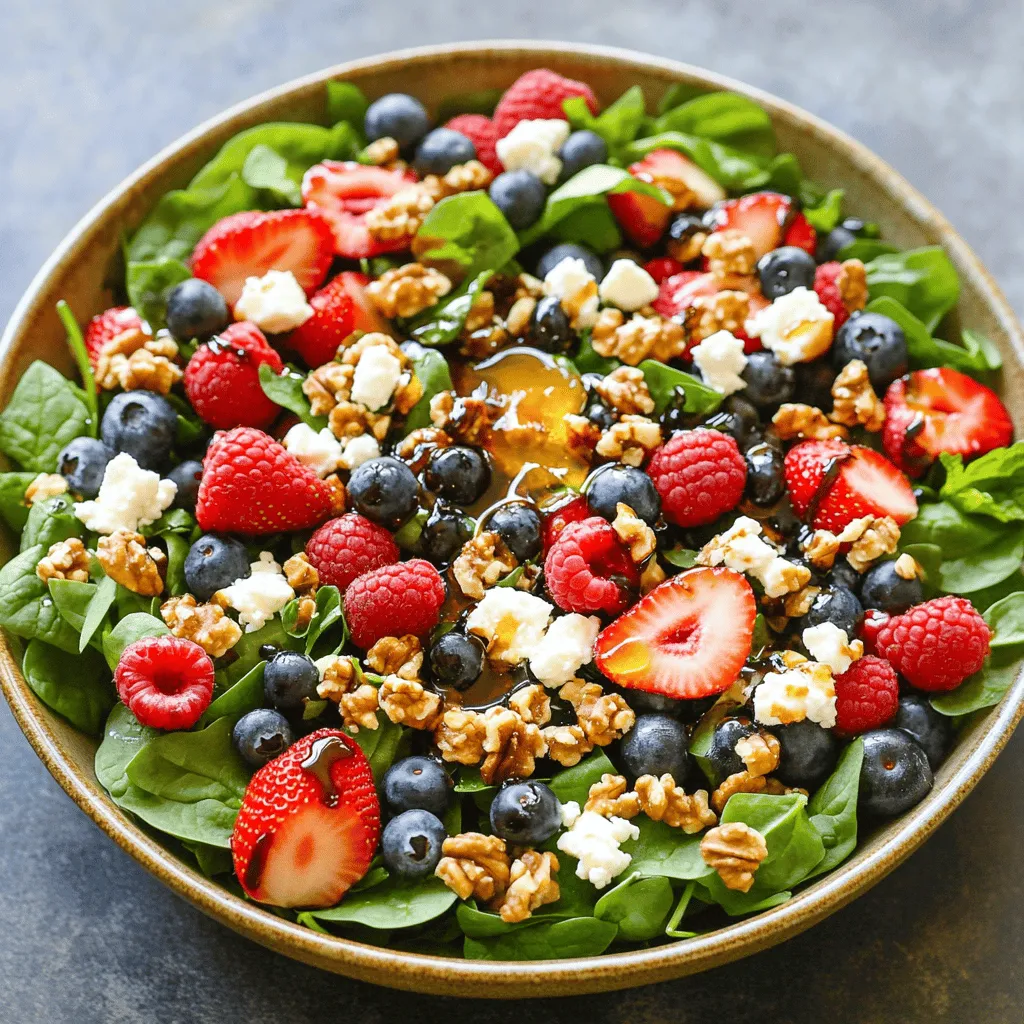
Step-by-Step Instructions
Preparation of Ingredients
Start with the mixed berries. If you use strawberries, hull and quarter them. Keep blueberries and raspberries whole. Rinse the berries gently. This keeps them fresh and clean. Next, wash and dry the baby spinach and arugula. Make sure they are dry to avoid soggy greens.
Assembling the Salad
Get a large salad bowl. First, place the baby spinach and arugula at the bottom. This forms a nice base for your salad. Then, add the mixed berries on top. Spread them evenly across the greens. Next, sprinkle crumbled feta cheese over the salad. Finally, add toasted walnuts for texture and crunch.
Making the Dressing
In a small bowl, take honey, balsamic glaze, and olive oil. Add a pinch of salt and pepper for flavor. Whisk them together until they mix well. This dressing adds a sweet and tangy taste to the salad.
Tossing and Serving
Drizzle the dressing over the salad. Gently toss the salad to coat the greens and berries. Make sure everything gets a bit of dressing. For the final touch, add fresh mint leaves on top. This adds bright color and extra freshness. Serve the salad in a large, shallow bowl. This makes the colorful ingredients stand out beautifully.
Tips & Tricks
Selecting the Best Berries
To make your salad shine, pick ripe berries. Look for vibrant colors and no bruises. Strawberries should smell sweet and feel firm. Blueberries should be plump and smooth. Raspberries need to be deep red, not mushy. When you find the best berries, your salad will taste amazing!
Enhancing Flavor Profiles
To boost flavors, try adding a pinch of salt to the berries. This small tip makes them taste sweeter. You can also mix in some lemon juice. A splash of citrus brightens the whole dish. Experiment with fresh herbs like basil or cilantro for a unique twist. These flavors will make your salad stand out.
Presentation Techniques
Serve your salad in a large, shallow bowl. This lets the colors pop. Arrange whole berries and mint leaves on top for a pretty look. Drizzle the dressing artfully over the salad before serving. Use a light hand with the dressing to avoid sogginess. A well-presented salad is sure to impress your guests.
Variations
Adding Proteins
You can make this salad heartier by adding proteins. Grilled chicken is a great choice. It adds flavor and makes the dish filling. You can also use shrimp or tofu for a tasty twist. Just cook them well and slice before adding to the salad.
Substituting Ingredients
Feel free to swap ingredients based on your taste. If you don’t like feta, try goat cheese. It gives a nice tang. You can also change the nuts. Almonds or pecans work well. If you want less sweetness, use lemon juice instead of honey.
Seasonal Variations
As the seasons change, so can your salad. In fall, add slices of apples or pears. In winter, try pomegranate seeds for a pop of color. Each season brings different fruits, so get creative! Use whatever is fresh for the best flavor.
Storage Info
Best Practices for Keeping Fresh
To keep your Summer Berry Salad fresh, store it in an airtight container. Make sure the container is clean and dry. Keep the salad in the fridge to maintain its crispness. Avoid adding dressing until you serve. This helps keep the greens and berries from wilting.
How to Store Leftovers
If you have leftovers, gently separate the salad components. Put the greens in one container and the berries in another. Store the dressing in a small jar or bowl. This keeps each part fresh and tasty. When you’re ready to eat, mix everything again.
Shelf Life of Ingredients
Most ingredients last a few days in the fridge. Fresh berries can last about three to five days. Spinach and arugula stay fresh for about three days. Feta cheese can last up to a week if stored well. Walnuts keep for a month when sealed. Remember, always check for any signs of spoilage before eating.
FAQs
Can I use frozen berries in this salad?
Yes, you can use frozen berries. Just thaw them first. Frozen berries may be softer than fresh ones. They can still add great taste and color to your salad.
What nuts can I substitute for walnuts?
You can use pecans or almonds instead of walnuts. Both nuts add a nice crunch. They also bring their own unique flavors to the salad.
How can I make the salad vegan?
To make this salad vegan, skip the feta cheese. You can use avocado for creaminess instead. A bit of nutritional yeast can add a cheesy flavor too.
What is a good side dish to serve with Summer Berry Salad?
A light grilled chicken or fish works well. You could also serve a crusty bread or a soup. These options complement the freshness of the salad nicely.
How long does it take to prepare the Berry Bliss Summer Salad?
It takes about 15 minutes to prepare. This quick time makes it easy for a last-minute meal. Just gather your ingredients, and you’re ready to go!
This blog post covered how to create a delicious Summer Berry Salad. You learned about selecting fresh berries, greens, and protein options. I shared step-by-step instructions for prepping ingredients, assembling the salad, and making the dressing. Tips on enhancing flavors and presenting the salad helped you elevate your dish. Finally, proper storage methods ensure freshness and quality. Enjoy creating your unique versions and satisfying your taste buds! Your salad journey starts now.


Leave a Reply