
Are you ready to spice up your dinner routine? This easy and flavorful Taco Pasta recipe combines the best of both worlds: the comfort of pasta and the bold flavors of taco night. With just a few simple ingredients, you can create a dish that not only satisfies your taste buds but also brings the family together. Let’s dive into this quick and delicious recipe that’s sure to become a weeknight favorite!
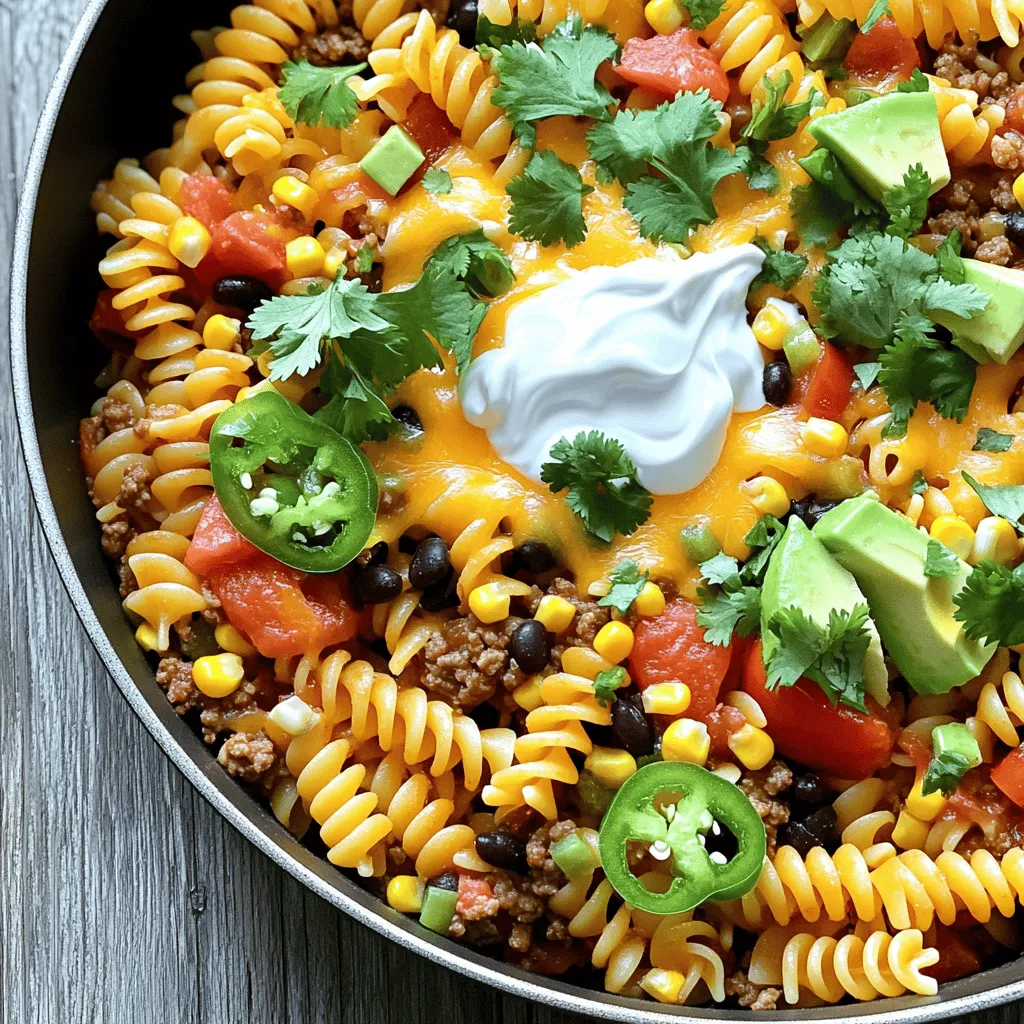
![- 8 oz. rotini pasta - 1 lb. ground beef or turkey - 1 small onion, diced - 2 cloves garlic, minced - 1 packet taco seasoning - 1 can (14 oz.) diced tomatoes with green chilies - 1 cup corn kernels (fresh or frozen) - 1 cup black beans, rinsed and drained - 1 cup shredded cheddar cheese - ½ cup sour cream - Fresh cilantro, chopped (for garnish) - Optional toppings: sliced jalapeños, avocado, sliced green onions Gathering these ingredients makes this dish quick and fun. You can use ground beef or turkey based on your taste. Diced tomatoes with green chilies give it a zesty kick. Corn and black beans add texture and color. For toppings, I love using cheese and sour cream. They add creaminess. Fresh cilantro makes it pop. You can also add jalapeños for heat or avocado for creaminess. This taco pasta recipe is all about flavor, so feel free to mix and match! You can find the complete recipe in the Full Recipe section. - Bring salted water to a boil. - Cook rotini according to package instructions. - Drain and set aside. - Heat olive oil in a large skillet over medium heat. - Sauté onion and garlic until soft. - Add and brown the ground beef or turkey. - Season with taco seasoning. - Stir in diced tomatoes, corn, and black beans. - Simmer to meld flavors. - Add cooked rotini to the skillet. - Mix until well coated. - Stir in cheddar cheese and sour cream. - Adjust seasoning with salt and pepper. - Garnish with fresh cilantro. - Add optional toppings before serving. This recipe is all about ease and flavor. You can find the full recipe above. Enjoy your cooking! How to cook pasta al dente? To cook pasta al dente, boil water and add salt. Once boiling, add the rotini. Check the pasta a couple of minutes before the time on the package. It should be firm but not hard. Drain it and set it aside. Tips for browning meat evenly? To brown meat evenly, use a large skillet. Heat the olive oil first. Add the ground beef or turkey in a single layer. Avoid crowding the pan. Let it cook without stirring for a few minutes, then break it apart. Best practices for seasoning? Season your meat while it cooks. Use the taco seasoning packet for the best flavor. Add salt and pepper gradually. Taste as you cook to avoid over-seasoning. Alternatives to sour cream? If you want an alternative to sour cream, try Greek yogurt. It gives a nice tang and creaminess without the fat. You can also use plain cottage cheese, blended until smooth. Adding cream cheese for richness? For an extra rich flavor, add cream cheese. Mix it in with the cheese and sour cream. It will give your taco pasta a creamy texture that everyone will love. Suggested spices for extra kick? To add some heat, try cayenne pepper or crushed red pepper flakes. A hint of smoked paprika can also boost the flavor. Start with a small amount and add more as needed. Using fresh herbs to elevate taste? Fresh herbs like cilantro or parsley can really elevate your dish. Chop them finely and mix them in just before serving. They add freshness and a pop of color. {{image_2}} For a tasty vegetarian taco pasta, swap the meat for lentils or mushrooms. Lentils add protein and fiber. Mushrooms bring a savory, earthy flavor. When using these ingredients, adjust the seasonings to fit plant-based options. You might want to add more spices for depth. A little extra cumin or chili powder can make a big difference. You can easily turn this recipe into a baked dish. After mixing in the pasta, transfer it to a baking dish. To add a crunchy topping, sprinkle breadcrumbs over the top. Bake at 350°F for about 20 minutes. This gives you a crispy layer that contrasts nicely with the creamy inside. If you prefer other proteins, try chicken or ground turkey instead of beef. Both will work well and still taste great. You can even use seafood like shrimp or fish for a fun twist. Just cook the seafood until it's done, then mix it in with the other ingredients. This adds new flavors and textures to your taco pasta. After you enjoy your taco pasta, store any leftovers right away. Place them in an airtight container. This keeps the flavors fresh and helps avoid spills. Make sure the pasta cools down first. Refrigerate it within two hours of cooking. Proper storage can keep it good for about three to four days. You can reheat your taco pasta in two ways: the microwave or the stove. For the microwave, place it in a bowl. Cover it with a damp paper towel to keep moisture. Heat it in short bursts, stirring in between. On the stove, add a splash of water in a pan. Heat gently over low heat, stirring often. This way, you avoid mushy pasta. If you want to keep your taco pasta longer, freezing is a great option. First, let it cool completely. Then, store it in a freezer-safe container or bag. Remove as much air as possible before sealing. For the best results, eat it within three months. When you're ready to eat, thaw it in the fridge overnight. Reheat it as you would with leftovers for the best taste. For the full recipe, check out [Full Recipe]. Yes, you can use other pasta shapes. You might try penne or fusilli. For gluten-free options, use brown rice pasta or chickpea pasta. These choices taste great and keep the dish healthy. Taco pasta lasts about 3 to 5 days in the fridge. Make sure to store it in a tight container. This keeps the flavors fresh and tasty. You can prepare taco pasta ahead of time. Cook the pasta and meat, then store them separately. This way, you can mix them right before serving. It helps keep everything fresh. Taco pasta is very kid-friendly. Kids love the cheesy, meaty flavor. To make it more appealing, let them add their own toppings like cheese or avocado. This makes it fun for them. Serve taco pasta with a fresh salad or garlic bread. A side of corn or nachos also works well. These sides add a nice crunch and balance to the meal. This recipe combines pasta and taco flavors for a fun dish. We covered key ingredients, cooking steps, and tips for the best results. You can also adjust it for dietary needs or storage. Enjoy making it your own with favorite toppings and variations. Now, it's time to bring friends or family together for a tasty meal they’ll love. Happy cooking!](https://cheftaling.com/wp-content/uploads/2025/05/99136476-dbbe-4ea8-b4bf-7b80400c09bc.webp)
Ingredients
Required Ingredients
- 8 oz. rotini pasta
- 1 lb. ground beef or turkey
- 1 small onion, diced
- 2 cloves garlic, minced
Additional Ingredients
- 1 packet taco seasoning
- 1 can (14 oz.) diced tomatoes with green chilies
- 1 cup corn kernels (fresh or frozen)
- 1 cup black beans, rinsed and drained
Toppings
- 1 cup shredded cheddar cheese
- ½ cup sour cream
- Fresh cilantro, chopped (for garnish)
- Optional toppings: sliced jalapeños, avocado, sliced green onions
Gathering these ingredients makes this dish quick and fun. You can use ground beef or turkey based on your taste. Diced tomatoes with green chilies give it a zesty kick. Corn and black beans add texture and color.
For toppings, I love using cheese and sour cream. They add creaminess. Fresh cilantro makes it pop. You can also add jalapeños for heat or avocado for creaminess. This taco pasta recipe is all about flavor, so feel free to mix and match!
Step-by-Step Instructions
Cooking the Pasta
- Bring salted water to a boil.
- Cook rotini according to package instructions.
- Drain and set aside.
Preparing the Meat
- Heat olive oil in a large skillet over medium heat.
- Sauté onion and garlic until soft.
- Add and brown the ground beef or turkey.
Combining Ingredients
- Season with taco seasoning.
- Stir in diced tomatoes, corn, and black beans.
- Simmer to meld flavors.
Mixing with Pasta
- Add cooked rotini to the skillet.
- Mix until well coated.
Final Touches
- Stir in cheddar cheese and sour cream.
- Adjust seasoning with salt and pepper.
Serving the Dish
- Garnish with fresh cilantro.
- Add optional toppings before serving.
This recipe is all about ease and flavor.Enjoy your cooking!
Tips & Tricks
Cooking Tips
How to cook pasta al dente?
To cook pasta al dente, boil water and add salt. Once boiling, add the rotini. Check the pasta a couple of minutes before the time on the package. It should be firm but not hard. Drain it and set it aside.
Tips for browning meat evenly?
To brown meat evenly, use a large skillet. Heat the olive oil first. Add the ground beef or turkey in a single layer. Avoid crowding the pan. Let it cook without stirring for a few minutes, then break it apart.
Best practices for seasoning?
Season your meat while it cooks. Use the taco seasoning packet for the best flavor. Add salt and pepper gradually. Taste as you cook to avoid over-seasoning.
Making it Creamy
Alternatives to sour cream?
If you want an alternative to sour cream, try Greek yogurt. It gives a nice tang and creaminess without the fat. You can also use plain cottage cheese, blended until smooth.
Adding cream cheese for richness?
For an extra rich flavor, add cream cheese. Mix it in with the cheese and sour cream. It will give your taco pasta a creamy texture that everyone will love.
Enhancing Flavor
Suggested spices for extra kick?
To add some heat, try cayenne pepper or crushed red pepper flakes. A hint of smoked paprika can also boost the flavor. Start with a small amount and add more as needed.
Using fresh herbs to elevate taste?
Fresh herbs like cilantro or parsley can really elevate your dish. Chop them finely and mix them in just before serving. They add freshness and a pop of color.
Variations
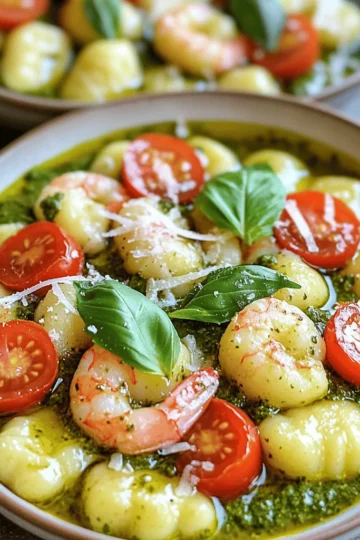
Vegetarian Version
For a tasty vegetarian taco pasta, swap the meat for lentils or mushrooms. Lentils add protein and fiber. Mushrooms bring a savory, earthy flavor. When using these ingredients, adjust the seasonings to fit plant-based options. You might want to add more spices for depth. A little extra cumin or chili powder can make a big difference.
Taco Pasta Bake
You can easily turn this recipe into a baked dish. After mixing in the pasta, transfer it to a baking dish. To add a crunchy topping, sprinkle breadcrumbs over the top. Bake at 350°F for about 20 minutes. This gives you a crispy layer that contrasts nicely with the creamy inside.
Different Protein Options
If you prefer other proteins, try chicken or ground turkey instead of beef. Both will work well and still taste great. You can even use seafood like shrimp or fish for a fun twist. Just cook the seafood until it’s done, then mix it in with the other ingredients. This adds new flavors and textures to your taco pasta.
Storage Info
Storing Leftovers
After you enjoy your taco pasta, store any leftovers right away. Place them in an airtight container. This keeps the flavors fresh and helps avoid spills. Make sure the pasta cools down first. Refrigerate it within two hours of cooking. Proper storage can keep it good for about three to four days.
Reheating Instructions
You can reheat your taco pasta in two ways: the microwave or the stove. For the microwave, place it in a bowl. Cover it with a damp paper towel to keep moisture. Heat it in short bursts, stirring in between. On the stove, add a splash of water in a pan. Heat gently over low heat, stirring often. This way, you avoid mushy pasta.
Freezing Taco Pasta
If you want to keep your taco pasta longer, freezing is a great option. First, let it cool completely. Then, store it in a freezer-safe container or bag. Remove as much air as possible before sealing. For the best results, eat it within three months. When you’re ready to eat, thaw it in the fridge overnight. Reheat it as you would with leftovers for the best taste.
FAQs
Can I use other types of pasta?
Yes, you can use other pasta shapes. You might try penne or fusilli. For gluten-free options, use brown rice pasta or chickpea pasta. These choices taste great and keep the dish healthy.
How long does taco pasta last in the fridge?
Taco pasta lasts about 3 to 5 days in the fridge. Make sure to store it in a tight container. This keeps the flavors fresh and tasty.
Can I make taco pasta ahead of time?
You can prepare taco pasta ahead of time. Cook the pasta and meat, then store them separately. This way, you can mix them right before serving. It helps keep everything fresh.
Is this dish kid-friendly?
Taco pasta is very kid-friendly. Kids love the cheesy, meaty flavor. To make it more appealing, let them add their own toppings like cheese or avocado. This makes it fun for them.
What to serve with taco pasta?
Serve taco pasta with a fresh salad or garlic bread. A side of corn or nachos also works well. These sides add a nice crunch and balance to the meal.
This recipe combines pasta and taco flavors for a fun dish. We covered key ingredients, cooking steps, and tips for the best results. You can also adjust it for dietary needs or storage. Enjoy making it your own with favorite toppings and variations. Now, it’s time to bring friends or family together for a tasty meal they’ll love. Happy cooking!
![- 8 oz. rotini pasta - 1 lb. ground beef or turkey - 1 small onion, diced - 2 cloves garlic, minced - 1 packet taco seasoning - 1 can (14 oz.) diced tomatoes with green chilies - 1 cup corn kernels (fresh or frozen) - 1 cup black beans, rinsed and drained - 1 cup shredded cheddar cheese - ½ cup sour cream - Fresh cilantro, chopped (for garnish) - Optional toppings: sliced jalapeños, avocado, sliced green onions Gathering these ingredients makes this dish quick and fun. You can use ground beef or turkey based on your taste. Diced tomatoes with green chilies give it a zesty kick. Corn and black beans add texture and color. For toppings, I love using cheese and sour cream. They add creaminess. Fresh cilantro makes it pop. You can also add jalapeños for heat or avocado for creaminess. This taco pasta recipe is all about flavor, so feel free to mix and match! You can find the complete recipe in the Full Recipe section. - Bring salted water to a boil. - Cook rotini according to package instructions. - Drain and set aside. - Heat olive oil in a large skillet over medium heat. - Sauté onion and garlic until soft. - Add and brown the ground beef or turkey. - Season with taco seasoning. - Stir in diced tomatoes, corn, and black beans. - Simmer to meld flavors. - Add cooked rotini to the skillet. - Mix until well coated. - Stir in cheddar cheese and sour cream. - Adjust seasoning with salt and pepper. - Garnish with fresh cilantro. - Add optional toppings before serving. This recipe is all about ease and flavor. You can find the full recipe above. Enjoy your cooking! How to cook pasta al dente? To cook pasta al dente, boil water and add salt. Once boiling, add the rotini. Check the pasta a couple of minutes before the time on the package. It should be firm but not hard. Drain it and set it aside. Tips for browning meat evenly? To brown meat evenly, use a large skillet. Heat the olive oil first. Add the ground beef or turkey in a single layer. Avoid crowding the pan. Let it cook without stirring for a few minutes, then break it apart. Best practices for seasoning? Season your meat while it cooks. Use the taco seasoning packet for the best flavor. Add salt and pepper gradually. Taste as you cook to avoid over-seasoning. Alternatives to sour cream? If you want an alternative to sour cream, try Greek yogurt. It gives a nice tang and creaminess without the fat. You can also use plain cottage cheese, blended until smooth. Adding cream cheese for richness? For an extra rich flavor, add cream cheese. Mix it in with the cheese and sour cream. It will give your taco pasta a creamy texture that everyone will love. Suggested spices for extra kick? To add some heat, try cayenne pepper or crushed red pepper flakes. A hint of smoked paprika can also boost the flavor. Start with a small amount and add more as needed. Using fresh herbs to elevate taste? Fresh herbs like cilantro or parsley can really elevate your dish. Chop them finely and mix them in just before serving. They add freshness and a pop of color. {{image_2}} For a tasty vegetarian taco pasta, swap the meat for lentils or mushrooms. Lentils add protein and fiber. Mushrooms bring a savory, earthy flavor. When using these ingredients, adjust the seasonings to fit plant-based options. You might want to add more spices for depth. A little extra cumin or chili powder can make a big difference. You can easily turn this recipe into a baked dish. After mixing in the pasta, transfer it to a baking dish. To add a crunchy topping, sprinkle breadcrumbs over the top. Bake at 350°F for about 20 minutes. This gives you a crispy layer that contrasts nicely with the creamy inside. If you prefer other proteins, try chicken or ground turkey instead of beef. Both will work well and still taste great. You can even use seafood like shrimp or fish for a fun twist. Just cook the seafood until it's done, then mix it in with the other ingredients. This adds new flavors and textures to your taco pasta. After you enjoy your taco pasta, store any leftovers right away. Place them in an airtight container. This keeps the flavors fresh and helps avoid spills. Make sure the pasta cools down first. Refrigerate it within two hours of cooking. Proper storage can keep it good for about three to four days. You can reheat your taco pasta in two ways: the microwave or the stove. For the microwave, place it in a bowl. Cover it with a damp paper towel to keep moisture. Heat it in short bursts, stirring in between. On the stove, add a splash of water in a pan. Heat gently over low heat, stirring often. This way, you avoid mushy pasta. If you want to keep your taco pasta longer, freezing is a great option. First, let it cool completely. Then, store it in a freezer-safe container or bag. Remove as much air as possible before sealing. For the best results, eat it within three months. When you're ready to eat, thaw it in the fridge overnight. Reheat it as you would with leftovers for the best taste. For the full recipe, check out [Full Recipe]. Yes, you can use other pasta shapes. You might try penne or fusilli. For gluten-free options, use brown rice pasta or chickpea pasta. These choices taste great and keep the dish healthy. Taco pasta lasts about 3 to 5 days in the fridge. Make sure to store it in a tight container. This keeps the flavors fresh and tasty. You can prepare taco pasta ahead of time. Cook the pasta and meat, then store them separately. This way, you can mix them right before serving. It helps keep everything fresh. Taco pasta is very kid-friendly. Kids love the cheesy, meaty flavor. To make it more appealing, let them add their own toppings like cheese or avocado. This makes it fun for them. Serve taco pasta with a fresh salad or garlic bread. A side of corn or nachos also works well. These sides add a nice crunch and balance to the meal. This recipe combines pasta and taco flavors for a fun dish. We covered key ingredients, cooking steps, and tips for the best results. You can also adjust it for dietary needs or storage. Enjoy making it your own with favorite toppings and variations. Now, it's time to bring friends or family together for a tasty meal they’ll love. Happy cooking!](https://cheftaling.com/wp-content/uploads/2025/05/99136476-dbbe-4ea8-b4bf-7b80400c09bc-250x250.webp)


Leave a Reply