
Craving a tasty and healthy snack? You’re in the right place! This easy recipe for Chickpea Fritters with Veggies will satisfy your hunger and taste buds. Packed with nutrients and flavor, these fritters blend chickpeas and colorful veggies into a delightful dish. Whether you’re cooking for family or hosting friends, this recipe is a winner. Let’s dive into the ingredients and get cooking!
![To make delicious chickpea fritters with veggies, gather these ingredients: - 1 can (15 oz) chickpeas, rinsed and drained - ½ cup grated zucchini (squeezed to remove excess moisture) - ½ cup grated carrots - ¼ cup finely chopped red bell pepper - ¼ cup finely chopped green onions - 2 cloves garlic, minced - ½ cup fresh cilantro, chopped - ½ teaspoon ground cumin - ½ teaspoon paprika - ¼ teaspoon black pepper - ¼ teaspoon salt - ½ cup all-purpose flour (or chickpea flour for gluten-free) - 1 large egg (or flax egg for vegan) - Oil for frying (such as olive oil or vegetable oil) These fresh ingredients bring flavor and texture. The chickpeas serve as a great base. Zucchini and carrots add moisture and crunch. The spices give a warm kick. You can adjust the spices to fit your taste. For a gluten-free option, use chickpea flour instead of all-purpose flour. You can also swap the egg for a flax egg if you prefer a vegan recipe. This recipe is flexible. You can customize it with your favorite veggies or spices. Check out the Full Recipe for more details on preparing these tasty fritters! Mixing the Chickpeas and Veggies Start by mashing the chickpeas in a large bowl. Use a fork or potato masher. Aim for a chunky texture; avoid making it too smooth. Next, add the grated zucchini, carrots, red bell pepper, and green onions. Don’t forget the minced garlic and chopped cilantro. Sprinkle in the ground cumin, paprika, black pepper, and salt. Mix everything well until combined. Making the Batter In a small bowl, whisk the egg until it's frothy. If you want a vegan option, use a flax egg. Add this egg to the chickpea mix along with the flour. Stir until a thick batter forms. If the batter seems too wet, you can add more flour. It should hold together well, so check the consistency. Cooking the Fritters Heat 2-3 tablespoons of oil in a large skillet over medium heat. Once the oil is hot, scoop about 2 tablespoons of the mixture for each fritter. Flatten them slightly in the pan. Fry each fritter for about 3-4 minutes on each side. You want them golden brown and crispy. If needed, work in batches, adding more oil as necessary. Frying Techniques To get the best results, keep an eye on the oil temperature. Too hot, and the fritters will burn. Too cool, and they will soak up oil. Aim for a steady medium heat to achieve that crispy goodness. Achieving the Perfect Color and Texture When frying, look for a golden brown color. This is key for a great texture. Once done, remove the fritters from the pan. Place them on a paper towel-lined plate to absorb any excess oil. This keeps them crisp and tasty. For serving, arrange the fritters on a platter with fresh cilantro for a pop of color. Enjoy them warm with your favorite dip or sauce. For the full recipe, check out the instructions above. Oil Temperature Management Keep your oil at the right heat. If it’s too cool, the fritters will soak up oil and turn soggy. If it’s too hot, they will burn quickly. Aim for medium heat. You can test the oil by dropping a small amount of batter in. If it sizzles and rises, you’re ready to fry! Batch Cooking Suggestions Make more fritters than you need. They freeze well! Just fry them and let them cool. Place them in a single layer on a baking sheet. Once frozen, transfer them to a bag. When you want some, just reheat them in the oven for a quick snack. Recommended Dips and Sauces Pair your fritters with tasty dips. A yogurt sauce or tahini works great. You can mix yogurt with herbs and lemon for a fresh flavor. Hummus is also a favorite. These add creaminess and balance the crispiness of the fritters. Presentation Tips Make your dish look tempting! Arrange the fritters on a large platter. Garnish with fresh cilantro or parsley. Add a colorful mix of dips around the fritters. This not only looks good but invites everyone to dig in. For the full recipe, refer to the recipe section above. {{image_2}} Gluten-Free Options You can easily make these fritters gluten-free. Simply swap regular flour for chickpea flour. This flour keeps the fritters light and adds extra chickpea flavor. You can also use almond flour or oat flour if you prefer. Both options work well and keep the texture nice. Vegan Alternatives To make the fritters vegan, replace the egg with a flax egg. Mix one tablespoon of flaxseed meal with three tablespoons of water. Let it sit for a few minutes until it thickens. This simple change keeps your fritters together without any eggs. Additional Veggies to Include Feel free to add extra veggies for more flavor. Chopped spinach, shredded cabbage, or even corn can work great. These ingredients add color and nutrition. You can also try adding some diced jalapeños for a spicy kick. Different Spices to Experiment With Spices can change the whole dish. Try adding curry powder for warmth or chili powder for heat. You can also use fresh herbs like dill or parsley for a fresh taste. Mixing in some lemon zest brightens up the fritters too. The options are endless, so have fun experimenting. For the full recipe, check out [Full Recipe]. Refrigeration Tips After cooking, let the fritters cool. Place them in an airtight container. They will stay fresh for up to four days. If you want to keep them longer, consider freezing. Freezing Guidance For freezing, cool the fritters first. Arrange them in a single layer on a baking sheet. Once frozen solid, move them to a freezer bag. This method prevents them from sticking together. They can last up to three months in the freezer. Best Methods for Maintaining Crispiness To keep the fritters crispy when reheating, use the oven. Preheat it to 375°F (190°C). Place the fritters on a baking sheet for about 10 minutes. This method keeps them golden and crunchy. Microwave vs. Oven Reheating While you can use the microwave, it may make the fritters soggy. If you choose this method, heat them for 30 seconds at a time. Check until they are warm but be careful not to overheat. For the best result, the oven is always the winner! For the full recipe, check out the [Full Recipe]. How do you make chickpea fritters crispy? To make chickpea fritters crispy, use enough oil in the pan. Heat the oil until it's hot before adding the fritters. This helps them get a nice golden color. You can also squeeze out excess moisture from the veggies. This keeps the batter from being too wet. Can I bake the fritters instead of frying? Yes, you can bake the fritters. Preheat your oven to 400°F (200°C). Place the fritters on a lined baking sheet. Brush or spray them with a little oil. Bake for about 20-25 minutes, flipping halfway through. They will be less crispy than fried, but still tasty! What can I serve with chickpea fritters? Chickpea fritters go well with many dips. Try yogurt sauce, hummus, or a spicy salsa. A fresh salad also makes a great side. You can serve them on a platter with colorful sauces for a fun touch. Caloric Content Each fritter has about 100 calories. This can change based on how much oil you use. If you bake, the calorie count may be lower. Nutritional Benefits of Ingredients Chickpeas are high in protein and fiber. They help keep you full longer. Zucchini and carrots add vitamins and minerals. Fresh herbs like cilantro provide antioxidants. These fritters are a healthy choice for a snack or meal. Enjoy the Full Recipe for a delicious dish! This blog post outlined how to make delicious chickpea fritters. We covered the key ingredients, blending chickpeas with fresh veggies, and creating the perfect batter. You learned cooking tips for frying and serving ideas with dips. We also explored variations for dietary needs, storage methods, and answers to common questions. Chickpea fritters can be a fun, tasty dish. You can customize them to suit your taste or dietary preferences. So, grab your ingredients and start cooking! Enjoy your homemade fritters!](https://cheftaling.com/wp-content/uploads/2025/05/3632a5a1-64d7-4421-9e80-54061ca83127.webp)
Ingredients
To make delicious chickpea fritters with veggies, gather these ingredients:
- 1 can (15 oz) chickpeas, rinsed and drained
- ½ cup grated zucchini (squeezed to remove excess moisture)
- ½ cup grated carrots
- ¼ cup finely chopped red bell pepper
- ¼ cup finely chopped green onions
- 2 cloves garlic, minced
- ½ cup fresh cilantro, chopped
- ½ teaspoon ground cumin
- ½ teaspoon paprika
- ¼ teaspoon black pepper
- ¼ teaspoon salt
- ½ cup all-purpose flour (or chickpea flour for gluten-free)
- 1 large egg (or flax egg for vegan)
- Oil for frying (such as olive oil or vegetable oil)
These fresh ingredients bring flavor and texture. The chickpeas serve as a great base. Zucchini and carrots add moisture and crunch. The spices give a warm kick. You can adjust the spices to fit your taste.
For a gluten-free option, use chickpea flour instead of all-purpose flour. You can also swap the egg for a flax egg if you prefer a vegan recipe. This recipe is flexible. You can customize it with your favorite veggies or spices.
Step-by-Step Instructions
Preparation Steps
Mixing the Chickpeas and Veggies
Start by mashing the chickpeas in a large bowl. Use a fork or potato masher. Aim for a chunky texture; avoid making it too smooth. Next, add the grated zucchini, carrots, red bell pepper, and green onions. Don’t forget the minced garlic and chopped cilantro. Sprinkle in the ground cumin, paprika, black pepper, and salt. Mix everything well until combined.
Making the Batter
In a small bowl, whisk the egg until it’s frothy. If you want a vegan option, use a flax egg. Add this egg to the chickpea mix along with the flour. Stir until a thick batter forms. If the batter seems too wet, you can add more flour. It should hold together well, so check the consistency.
Cooking the Fritters
Heat 2-3 tablespoons of oil in a large skillet over medium heat. Once the oil is hot, scoop about 2 tablespoons of the mixture for each fritter. Flatten them slightly in the pan. Fry each fritter for about 3-4 minutes on each side. You want them golden brown and crispy. If needed, work in batches, adding more oil as necessary.
Finalizing the Dish
Frying Techniques
To get the best results, keep an eye on the oil temperature. Too hot, and the fritters will burn. Too cool, and they will soak up oil. Aim for a steady medium heat to achieve that crispy goodness.
Achieving the Perfect Color and Texture
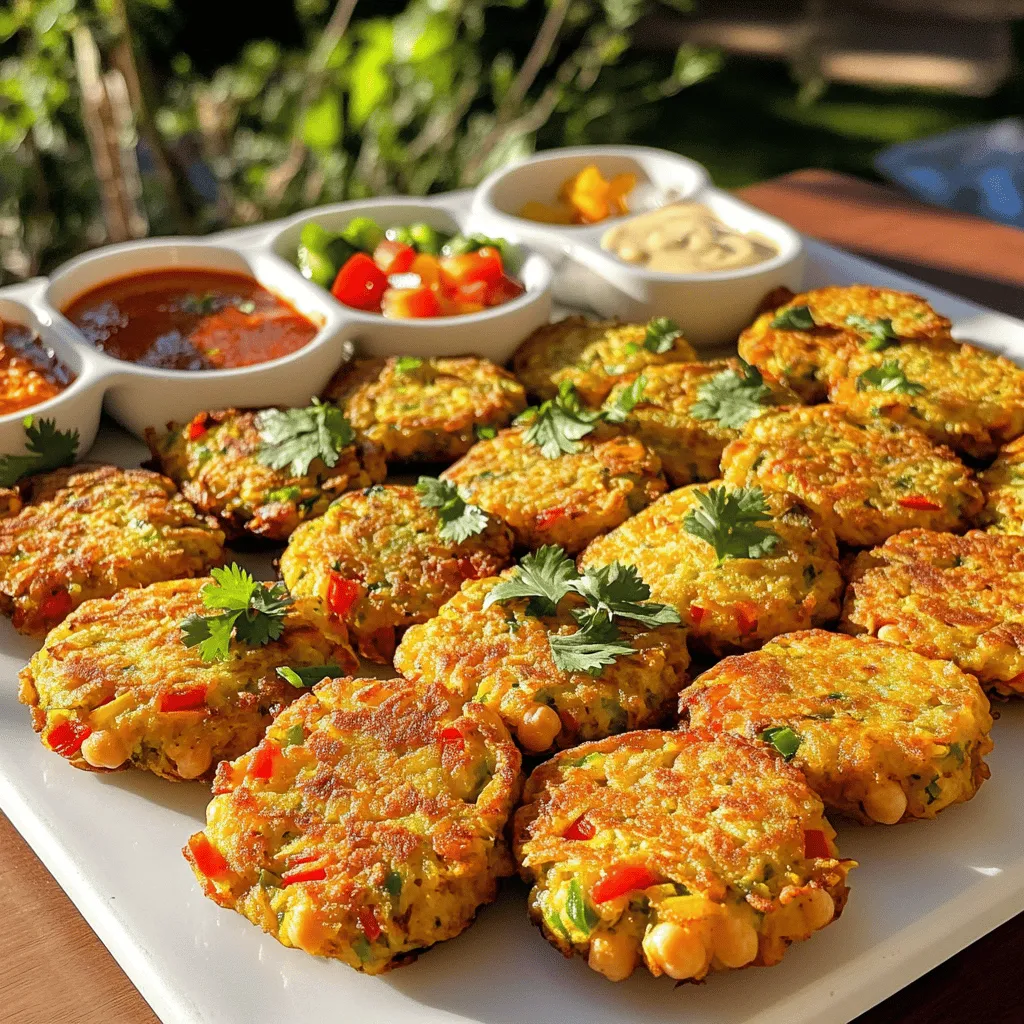
When frying, look for a golden brown color. This is key for a great texture. Once done, remove the fritters from the pan. Place them on a paper towel-lined plate to absorb any excess oil. This keeps them crisp and tasty. For serving, arrange the fritters on a platter with fresh cilantro for a pop of color. Enjoy them warm with your favorite dip or sauce.
Tips & Tricks
Cooking Tips
Oil Temperature Management
Keep your oil at the right heat. If it’s too cool, the fritters will soak up oil and turn soggy. If it’s too hot, they will burn quickly. Aim for medium heat. You can test the oil by dropping a small amount of batter in. If it sizzles and rises, you’re ready to fry!
Batch Cooking Suggestions
Make more fritters than you need. They freeze well! Just fry them and let them cool. Place them in a single layer on a baking sheet. Once frozen, transfer them to a bag. When you want some, just reheat them in the oven for a quick snack.
Serving Suggestions
Recommended Dips and Sauces
Pair your fritters with tasty dips. A yogurt sauce or tahini works great. You can mix yogurt with herbs and lemon for a fresh flavor. Hummus is also a favorite. These add creaminess and balance the crispiness of the fritters.
Presentation Tips
Make your dish look tempting! Arrange the fritters on a large platter. Garnish with fresh cilantro or parsley. Add a colorful mix of dips around the fritters. This not only looks good but invites everyone to dig in.
Variations
Ingredient Substitutions
Gluten-Free Options
You can easily make these fritters gluten-free. Simply swap regular flour for chickpea flour. This flour keeps the fritters light and adds extra chickpea flavor. You can also use almond flour or oat flour if you prefer. Both options work well and keep the texture nice.
Vegan Alternatives
To make the fritters vegan, replace the egg with a flax egg. Mix one tablespoon of flaxseed meal with three tablespoons of water. Let it sit for a few minutes until it thickens. This simple change keeps your fritters together without any eggs.
Flavor Enhancements
Additional Veggies to Include
Feel free to add extra veggies for more flavor. Chopped spinach, shredded cabbage, or even corn can work great. These ingredients add color and nutrition. You can also try adding some diced jalapeños for a spicy kick.
Different Spices to Experiment With
Spices can change the whole dish. Try adding curry powder for warmth or chili powder for heat. You can also use fresh herbs like dill or parsley for a fresh taste. Mixing in some lemon zest brightens up the fritters too. The options are endless, so have fun experimenting.
Storage Info
How to Store Fritters
Refrigeration Tips
After cooking, let the fritters cool. Place them in an airtight container. They will stay fresh for up to four days. If you want to keep them longer, consider freezing.
Freezing Guidance
For freezing, cool the fritters first. Arrange them in a single layer on a baking sheet. Once frozen solid, move them to a freezer bag. This method prevents them from sticking together. They can last up to three months in the freezer.
Reheating Instructions
Best Methods for Maintaining Crispiness
To keep the fritters crispy when reheating, use the oven. Preheat it to 375°F (190°C). Place the fritters on a baking sheet for about 10 minutes. This method keeps them golden and crunchy.
Microwave vs. Oven Reheating
While you can use the microwave, it may make the fritters soggy. If you choose this method, heat them for 30 seconds at a time. Check until they are warm but be careful not to overheat. For the best result, the oven is always the winner!
FAQs
Common Questions
How do you make chickpea fritters crispy?
To make chickpea fritters crispy, use enough oil in the pan. Heat the oil until it’s hot before adding the fritters. This helps them get a nice golden color. You can also squeeze out excess moisture from the veggies. This keeps the batter from being too wet.
Can I bake the fritters instead of frying?
Yes, you can bake the fritters. Preheat your oven to 400°F (200°C). Place the fritters on a lined baking sheet. Brush or spray them with a little oil. Bake for about 20-25 minutes, flipping halfway through. They will be less crispy than fried, but still tasty!
What can I serve with chickpea fritters?
Chickpea fritters go well with many dips. Try yogurt sauce, hummus, or a spicy salsa. A fresh salad also makes a great side. You can serve them on a platter with colorful sauces for a fun touch.
Nutritional Information
Caloric Content
Each fritter has about 100 calories. This can change based on how much oil you use. If you bake, the calorie count may be lower.
Nutritional Benefits of Ingredients
Chickpeas are high in protein and fiber. They help keep you full longer. Zucchini and carrots add vitamins and minerals. Fresh herbs like cilantro provide antioxidants. These fritters are a healthy choice for a snack or meal.
This blog post outlined how to make delicious chickpea fritters. We covered the key ingredients, blending chickpeas with fresh veggies, and creating the perfect batter. You learned cooking tips for frying and serving ideas with dips. We also explored variations for dietary needs, storage methods, and answers to common questions.
Chickpea fritters can be a fun, tasty dish. You can customize them to suit your taste or dietary preferences. So, grab your ingredients and start cooking! Enjoy your homemade fritters!
![To make delicious chickpea fritters with veggies, gather these ingredients: - 1 can (15 oz) chickpeas, rinsed and drained - ½ cup grated zucchini (squeezed to remove excess moisture) - ½ cup grated carrots - ¼ cup finely chopped red bell pepper - ¼ cup finely chopped green onions - 2 cloves garlic, minced - ½ cup fresh cilantro, chopped - ½ teaspoon ground cumin - ½ teaspoon paprika - ¼ teaspoon black pepper - ¼ teaspoon salt - ½ cup all-purpose flour (or chickpea flour for gluten-free) - 1 large egg (or flax egg for vegan) - Oil for frying (such as olive oil or vegetable oil) These fresh ingredients bring flavor and texture. The chickpeas serve as a great base. Zucchini and carrots add moisture and crunch. The spices give a warm kick. You can adjust the spices to fit your taste. For a gluten-free option, use chickpea flour instead of all-purpose flour. You can also swap the egg for a flax egg if you prefer a vegan recipe. This recipe is flexible. You can customize it with your favorite veggies or spices. Check out the Full Recipe for more details on preparing these tasty fritters! Mixing the Chickpeas and Veggies Start by mashing the chickpeas in a large bowl. Use a fork or potato masher. Aim for a chunky texture; avoid making it too smooth. Next, add the grated zucchini, carrots, red bell pepper, and green onions. Don’t forget the minced garlic and chopped cilantro. Sprinkle in the ground cumin, paprika, black pepper, and salt. Mix everything well until combined. Making the Batter In a small bowl, whisk the egg until it's frothy. If you want a vegan option, use a flax egg. Add this egg to the chickpea mix along with the flour. Stir until a thick batter forms. If the batter seems too wet, you can add more flour. It should hold together well, so check the consistency. Cooking the Fritters Heat 2-3 tablespoons of oil in a large skillet over medium heat. Once the oil is hot, scoop about 2 tablespoons of the mixture for each fritter. Flatten them slightly in the pan. Fry each fritter for about 3-4 minutes on each side. You want them golden brown and crispy. If needed, work in batches, adding more oil as necessary. Frying Techniques To get the best results, keep an eye on the oil temperature. Too hot, and the fritters will burn. Too cool, and they will soak up oil. Aim for a steady medium heat to achieve that crispy goodness. Achieving the Perfect Color and Texture When frying, look for a golden brown color. This is key for a great texture. Once done, remove the fritters from the pan. Place them on a paper towel-lined plate to absorb any excess oil. This keeps them crisp and tasty. For serving, arrange the fritters on a platter with fresh cilantro for a pop of color. Enjoy them warm with your favorite dip or sauce. For the full recipe, check out the instructions above. Oil Temperature Management Keep your oil at the right heat. If it’s too cool, the fritters will soak up oil and turn soggy. If it’s too hot, they will burn quickly. Aim for medium heat. You can test the oil by dropping a small amount of batter in. If it sizzles and rises, you’re ready to fry! Batch Cooking Suggestions Make more fritters than you need. They freeze well! Just fry them and let them cool. Place them in a single layer on a baking sheet. Once frozen, transfer them to a bag. When you want some, just reheat them in the oven for a quick snack. Recommended Dips and Sauces Pair your fritters with tasty dips. A yogurt sauce or tahini works great. You can mix yogurt with herbs and lemon for a fresh flavor. Hummus is also a favorite. These add creaminess and balance the crispiness of the fritters. Presentation Tips Make your dish look tempting! Arrange the fritters on a large platter. Garnish with fresh cilantro or parsley. Add a colorful mix of dips around the fritters. This not only looks good but invites everyone to dig in. For the full recipe, refer to the recipe section above. {{image_2}} Gluten-Free Options You can easily make these fritters gluten-free. Simply swap regular flour for chickpea flour. This flour keeps the fritters light and adds extra chickpea flavor. You can also use almond flour or oat flour if you prefer. Both options work well and keep the texture nice. Vegan Alternatives To make the fritters vegan, replace the egg with a flax egg. Mix one tablespoon of flaxseed meal with three tablespoons of water. Let it sit for a few minutes until it thickens. This simple change keeps your fritters together without any eggs. Additional Veggies to Include Feel free to add extra veggies for more flavor. Chopped spinach, shredded cabbage, or even corn can work great. These ingredients add color and nutrition. You can also try adding some diced jalapeños for a spicy kick. Different Spices to Experiment With Spices can change the whole dish. Try adding curry powder for warmth or chili powder for heat. You can also use fresh herbs like dill or parsley for a fresh taste. Mixing in some lemon zest brightens up the fritters too. The options are endless, so have fun experimenting. For the full recipe, check out [Full Recipe]. Refrigeration Tips After cooking, let the fritters cool. Place them in an airtight container. They will stay fresh for up to four days. If you want to keep them longer, consider freezing. Freezing Guidance For freezing, cool the fritters first. Arrange them in a single layer on a baking sheet. Once frozen solid, move them to a freezer bag. This method prevents them from sticking together. They can last up to three months in the freezer. Best Methods for Maintaining Crispiness To keep the fritters crispy when reheating, use the oven. Preheat it to 375°F (190°C). Place the fritters on a baking sheet for about 10 minutes. This method keeps them golden and crunchy. Microwave vs. Oven Reheating While you can use the microwave, it may make the fritters soggy. If you choose this method, heat them for 30 seconds at a time. Check until they are warm but be careful not to overheat. For the best result, the oven is always the winner! For the full recipe, check out the [Full Recipe]. How do you make chickpea fritters crispy? To make chickpea fritters crispy, use enough oil in the pan. Heat the oil until it's hot before adding the fritters. This helps them get a nice golden color. You can also squeeze out excess moisture from the veggies. This keeps the batter from being too wet. Can I bake the fritters instead of frying? Yes, you can bake the fritters. Preheat your oven to 400°F (200°C). Place the fritters on a lined baking sheet. Brush or spray them with a little oil. Bake for about 20-25 minutes, flipping halfway through. They will be less crispy than fried, but still tasty! What can I serve with chickpea fritters? Chickpea fritters go well with many dips. Try yogurt sauce, hummus, or a spicy salsa. A fresh salad also makes a great side. You can serve them on a platter with colorful sauces for a fun touch. Caloric Content Each fritter has about 100 calories. This can change based on how much oil you use. If you bake, the calorie count may be lower. Nutritional Benefits of Ingredients Chickpeas are high in protein and fiber. They help keep you full longer. Zucchini and carrots add vitamins and minerals. Fresh herbs like cilantro provide antioxidants. These fritters are a healthy choice for a snack or meal. Enjoy the Full Recipe for a delicious dish! This blog post outlined how to make delicious chickpea fritters. We covered the key ingredients, blending chickpeas with fresh veggies, and creating the perfect batter. You learned cooking tips for frying and serving ideas with dips. We also explored variations for dietary needs, storage methods, and answers to common questions. Chickpea fritters can be a fun, tasty dish. You can customize them to suit your taste or dietary preferences. So, grab your ingredients and start cooking! Enjoy your homemade fritters!](https://cheftaling.com/wp-content/uploads/2025/05/3632a5a1-64d7-4421-9e80-54061ca83127-250x250.webp)


Leave a Reply