
Are you ready to indulge in a dessert that’s not only rich but also fun to make? The Oreo Dirt Cake is the ultimate treat for both kids and adults alike. With layers of creamy goodness and crunchy Oreos, it’s the perfect addition to any gathering. Let’s dig into this irresistible dessert recipe and turn your kitchen into a sweet paradise! You won’t want to miss it!
Ingredients
List of Ingredients for Oreo Dirt Cake
- 1 package (15.25 oz) Oreo cookies
- 1/2 cup unsalted butter, softened
- 8 oz cream cheese, softened
- 1 cup powdered sugar
- 1 teaspoon vanilla extract
- 2 cups cold milk
- 1 package (3.9 oz) instant chocolate pudding mix
- 2 cups whipped topping (like Cool Whip)
- 1 cup gummy worms (for decoration)
- Fresh mint leaves (optional, for garnish)
To make the Oreo dirt cake, you need simple ingredients that create rich flavors. Start with a package of Oreo cookies. These will give our dessert its classic taste. You also need unsalted butter and cream cheese to make the filling creamy. The powdered sugar adds sweetness, while the vanilla extract gives a nice touch of flavor.
You will need cold milk and instant chocolate pudding mix to make the chocolate layer. The whipped topping, like Cool Whip, adds a light texture. Finally, gummy worms make great decorations, adding fun to the dish. Fresh mint leaves can brighten the look if you like.
Gather these ingredients, and you are ready to create a dessert that is both rich and irresistible.
Step-by-Step Instructions
Detailed Preparation Steps
- Crushing the Oreos
Start by taking the entire package of Oreo cookies. Place them in a food processor. Pulse the Oreos until they become fine crumbs. Set aside half a cup of these crumbs for later. This will be your topping.
- Mixing the Cream Cheese Mixture
In a large mixing bowl, combine softened butter, cream cheese, powdered sugar, and vanilla extract. Beat these together until the mixture is smooth and creamy. This step is key for a rich flavor.
- Preparing the Instant Pudding
Take another bowl and add the cold milk. Sprinkle in the instant chocolate pudding mix. Whisk it together for about two minutes. You want it thick and creamy, so give it a good mix.
Assembling the Oreo Dirt Cake
- Layering the Ingredients
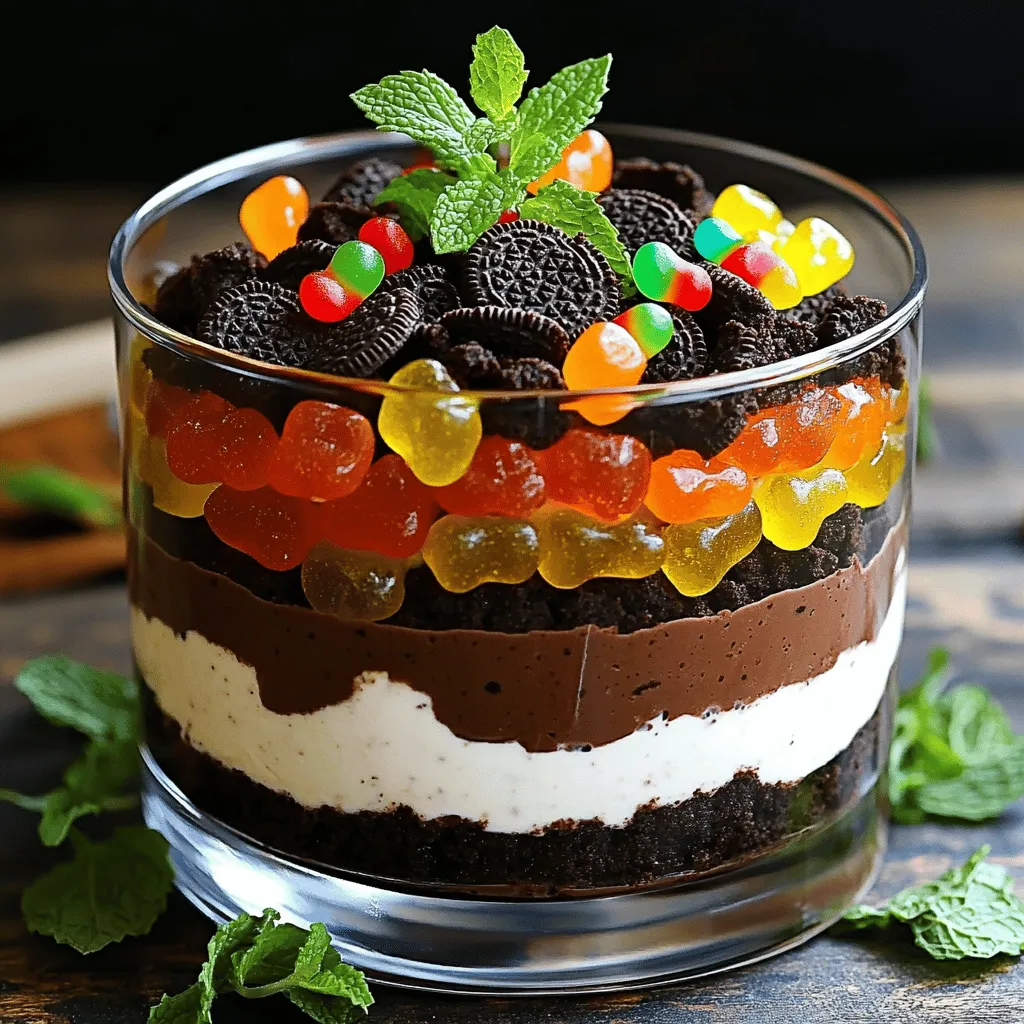
Grab a large serving dish or a trifle bowl. Start with a layer of the cream cheese mixture at the bottom. Then, sprinkle a layer of the crushed Oreos. Repeat this layering until you use all the ingredients. End with the cream cheese mixture on top.
- Chilling Process
Cover the dish with plastic wrap. Place it in the fridge for at least four hours or overnight. This chilling time helps the flavors mix and sets the layers nicely.
- Final Touches before Serving
When you’re ready to serve, take the cake out of the fridge. Sprinkle the reserved crushed Oreos on top. Decorate with gummy worms for a fun look. If you like, add fresh mint leaves for a touch of color.
This detailed process will help you create a delicious Oreo Dirt Cake.
Tips & Tricks
Perfecting the Oreo Dirt Cake
How to Achieve the Best Texture
For the best texture, crush the Oreos finely. Use a food processor for even crumbs. This creates a nice crunch and helps layers stick together.
Serving Suggestions for Presentation
I love to use a clear glass dish. It shows off those beautiful layers. For a fun twist, serve with mini plastic shovels. Kids and adults both enjoy this playful touch!
Recommended Tools for Efficiency
Use a food processor to crush Oreos quickly. Mixing bowls and a whisk make combining the cream cheese and pudding easy. A spatula is great for folding in the whipped topping smoothly.
Common Mistakes to Avoid
Tips for Avoiding Runny Layers
Always let the pudding set for a full two minutes. Mixing too quickly can lead to runny layers. Be gentle when folding the whipped topping into the cream cheese mixture.
Ensuring Cream Cheese is Softened Properly
Make sure your cream cheese is at room temperature. This helps it blend smoothly. If it’s too cold, you might have lumps in your mix.
Properly Storing Leftovers
Store any leftover dirt cake in the fridge. Use plastic wrap to cover it well. This keeps it fresh and tasty for up to three days.

Variations
Flavor Variations
You can play with flavors to make your Oreo Dirt Cake even more fun. Try a Peanut Butter Oreo Dirt Cake. Just mix in some creamy peanut butter with the cream cheese. This adds a nutty taste that pairs well with Oreos. You can also make a Mint Chocolate Variation. Add a few drops of peppermint extract to the cream cheese mix. This gives your dessert a fresh, minty kick that many love.
Dietary Adjustments
If you need a gluten-free Oreo Dirt Cake, there are great options. Look for gluten-free Oreo cookies at the store. They taste just as good and keep the cake delicious. If you’re looking for dairy-free alternatives, use plant-based cream cheese and whipped topping. You can also choose almond or oat milk instead of regular milk. This way, everyone can enjoy the dessert.
Decoration Ideas
Decorating your Oreo Dirt Cake can be as fun as making it. For seasonal themes, add gummy worms for Halloween. You can also use colorful sprinkles for birthdays. This adds a festive touch. For alternative toppings, consider using crushed nuts or even fresh berries. They add texture and flavor, making your cake stand out.
Storage Info
Storing Leftover Oreo Dirt Cake
To keep your Oreo Dirt Cake fresh, always refrigerate leftovers. Use an airtight container or cover the dish with plastic wrap. This way, it won’t absorb other smells from the fridge. If you want to freeze it, slice it into portions. Wrap each piece in plastic wrap and then place them in a freezer bag. This helps keep the cake from freezer burn.
Shelf Life of Oreo Dirt Cake
How long does it last in the fridge? Oreo Dirt Cake can last about 3 to 5 days in the fridge. Always check for any changes in smell or texture.
Signs to look for when it’s no longer good include:
- A sour smell
- A watery layer on top
- Changes in color or texture
If you spot these signs, it’s best to throw it away. Enjoy your treat while it’s fresh!
FAQs
Common User Questions
How do I make Oreo Dirt Cake more chocolatey?
To add more chocolate flavor, use chocolate Oreos instead of regular ones. You can also mix in a little cocoa powder into the cream cheese layer. This will boost the chocolate taste without changing the texture.
Can I make Oreo Dirt Cake ahead of time?
Yes! You can make this cake a day in advance. Just cover it tightly and store it in the fridge. This allows the flavors to blend nicely, and it will taste even better the next day.
What can I use instead of Cool Whip?
If you want an alternative to Cool Whip, you can use homemade whipped cream. Just whip 2 cups of heavy cream with a bit of sugar until it forms soft peaks. It works great and has a fresh taste.
Troubleshooting
What do I do if my pudding mixture doesn’t thicken?
If your pudding mixture doesn’t thicken, make sure you whisk it well. Let it sit for a few more minutes. If it still doesn’t thicken, you can try adding a bit more pudding mix.
How can I make my Oreo Dirt Cake less sweet?
To reduce the sweetness, cut back on the powdered sugar in the cream cheese mixture. You can also use unsweetened whipped cream instead of Cool Whip to balance the flavors.
Serving Sizes and Portions
How many servings does this recipe provide?
This recipe serves about 10 to 12 people. It’s perfect for parties or gatherings. If you want a smaller portion, you can cut it into smaller servings.
How can I adjust the recipe for a larger crowd?
To serve more people, simply double the recipe. Use a bigger dish or two separate ones. Make sure to adjust the chilling time if you use two dishes. This way, everyone can enjoy this delicious treat!
Oreo Dirt Cake is a fun and tasty dessert you can make easily. We covered the needed ingredients, equipment, and step-by-step instructions to guide you. Tips helped you avoid common mistakes and even explore variations for different tastes. Remember, it’s all about having fun while making and sharing this dessert. Get creative with decorations and flavors to make it your own. Enjoy every bite of this delightful treat!