Chef Taling

  • Dinner
  • Desserts
  • Appetizer
  • Drinks
  • Privacy Policy
  • Contact
  • About
menu icon
go to homepage
  • Dinner
  • Desserts
  • Appetizer
  • Drinks
  • Privacy Policy
  • Contact
  • About
Beat the heat this summer with a delightful Whipped Pink Lemonade that will impress your friends and family! This refreshing drink combines fresh lemon juice, strawberries, and a creamy whipped topping for a fun twist on a classic favorite. Perfect for gatherings, picnics, or just a sunny day, this easy recipe invites you to add your creative spin. Ready to make a splash? Click through to explore the full recipe and serve up this summer delight today!

search icon
Homepage link
  • Dinner
  • Desserts
  • Appetizer
  • Drinks
  • Privacy Policy
  • Contact
  • About
Beat the heat this summer with a delightful Whipped Pink Lemonade that will impress your friends and family! This refreshing drink combines fresh lemon juice, strawberries, and a creamy whipped topping for a fun twist on a classic favorite. Perfect for gatherings, picnics, or just a sunny day, this easy recipe invites you to add your creative spin. Ready to make a splash? Click through to explore the full recipe and serve up this summer delight today!

×

Whipped Pink Lemonade Refreshing Summer Delight Recipe

Published: Mar 22, 2025 · by Taling · Leave a Comment

WANT TO SAVE THIS RECIPE?

15 shares
Beat the heat this summer with a delightful Whipped Pink Lemonade that will impress your friends and family! This refreshing drink combines fresh lemon juice, strawberries, and a creamy whipped topping for a fun twist on a classic favorite. Perfect for gatherings, picnics, or just a sunny day, this easy recipe invites you to add your creative spin. Ready to make a splash? Click through to explore the full recipe and serve up this summer delight today!

Looking for a refreshing drink to cool off this summer? Try my Whipped Pink Lemonade! Perfect for hot days, this fun twist on a classic lemonade is not just tasty but super easy to make. With essential ingredients and playful variations, you can impress your friends and family at any gathering. Ready to dive into this summer delight? Let’s whip up something special!

To make whipped pink lemonade, you need fresh and simple ingredients. The main star is fresh lemon juice. You will need about 1 cup, which usually comes from 4-6 lemons. Fresh juice gives a bright and zesty taste. Next, grab 1 cup of granulated sugar. This sweetens the drink and balances the tartness of the lemons.

What Are the Essential Ingredients for Whipped Pink Lemonade?

To make whipped pink lemonade, you need fresh and simple ingredients. The main star is fresh lemon juice. You will need about 1 cup, which usually comes from 4-6 lemons. Fresh juice gives a bright and zesty taste. Next, grab 1 cup of granulated sugar. This sweetens the drink and balances the tartness of the lemons.

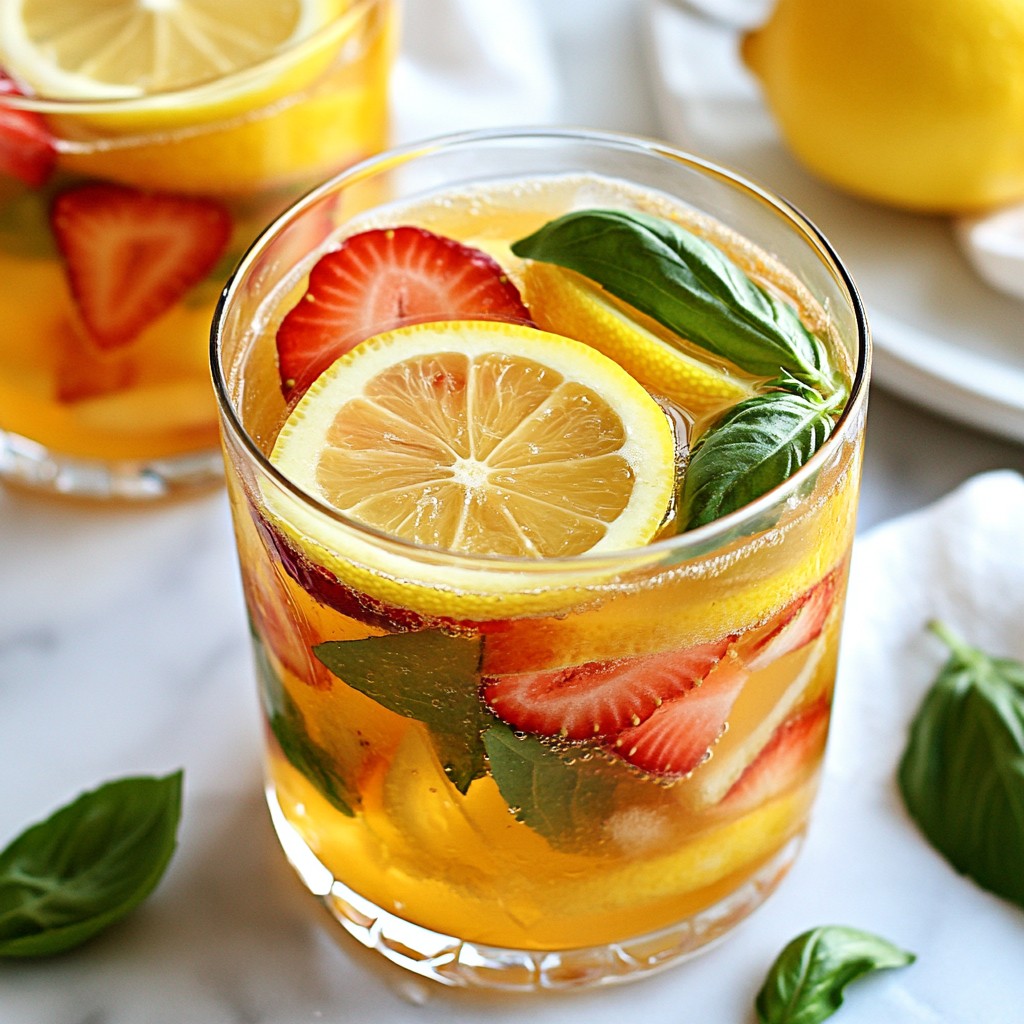
You also need 4 cups of cold water to dilute the lemonade. This brings a refreshing chill to each sip. 1 cup of strawberries adds a lovely pink color and fruity flavor. Make sure to hull and chop them first.

For the whipped topping, use 1 cup of heavy cream. This makes the drink creamy and indulgent. Add 1 teaspoon of vanilla extract for extra flavor. Finally, ¼ cup of powdered sugar sweetens the cream.

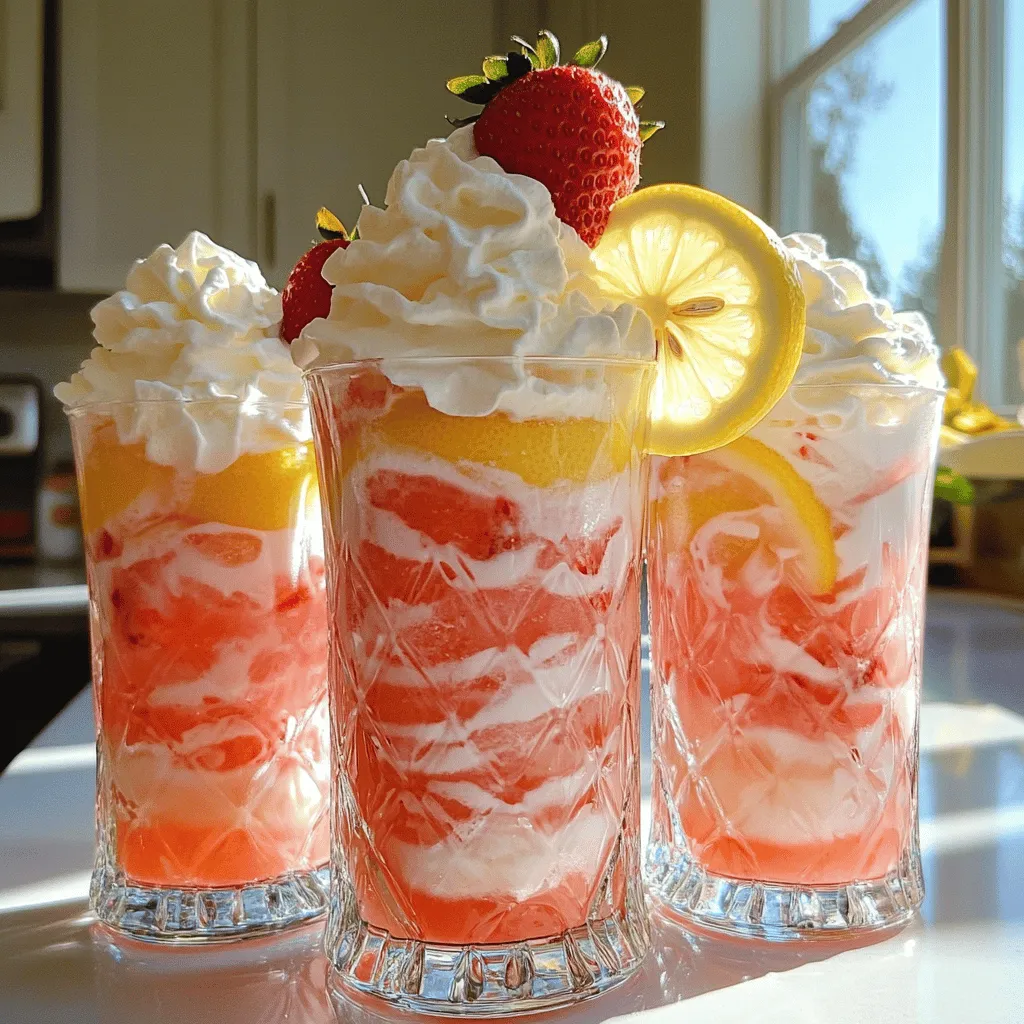
Using ice cubes for serving will keep your drink cool. Garnish with lemon slices and fresh strawberries for a beautiful touch. All these ingredients blend together to create a drink that is both eye-catching and delicious.

How Do You Make Whipped Pink Lemonade Step-by-Step?

What Are the Initial Steps for Preparing the Lemonade Base?

To make whipped pink lemonade, start by blending your base. First, take 1 cup of fresh lemon juice. This is about 4 to 6 lemons. Next, add 1 cup of granulated sugar. Then, toss in 1 cup of chopped strawberries. Blend this mix until smooth. After blending, strain it through a fine mesh sieve into a large pitcher. This helps remove seeds and pulp. Now, add 4 cups of cold water to the pitcher. Stir well until the sugar dissolves. Taste it and adjust the sweetness if needed. Chill it in the fridge for about 30 minutes. This step makes it nice and cool.

How Do You Achieve the Perfect Whipped Texture?

Now, let’s make the whipped topping. In a mixing bowl, pour in 1 cup of heavy cream. Add 1 teaspoon of vanilla extract and ¼ cup of powdered sugar. Using an electric mixer, whip the cream on medium speed. Keep mixing until you see soft peaks. Be careful not to overwhip. The cream must stay fluffy and light. This fluffy topping adds richness to your drink.

What Serving Techniques Should You Follow for an Attractive Presentation?

For serving, grab your favorite glasses. Fill each one with ice cubes first. Then, pour the chilled pink lemonade over the ice. Make sure it fills the glass nicely. Next, take the whipped cream mixture and dollop it on top. You can use a spoon or a piping bag for a fancy look. To make it pretty, garnish each glass with a lemon slice and a whole strawberry. This adds color and makes your drink look great. Enjoy your refreshing summer drink!

To make whipped pink lemonade, you need fresh and simple ingredients. The main star is <strong>fresh lemon juice</strong>. You will need about <strong>1 cup</strong>, which usually comes from <strong>4-6 lemons</strong>. Fresh juice gives a bright and zesty taste. Next, grab <strong>1 cup of granulated sugar</strong>. This sweetens the drink and balances the tartness of the lemons.” /></p>
</p>
<h2>What Variations Can You Create with Whipped Pink Lemonade?</h2>
</p>
<p>You can have fun with whipped pink lemonade by adding your own twist. This drink is easy to customize.</p>
</p>
<h3>How Can You Customize the Flavors of Whipped Pink Lemonade?</h3>
</p>
<p>Start with the base recipe. You can change the fruit to suit your taste. Try using raspberries or blackberries instead of strawberries. This will change the flavor and color. You can also mix in some fresh mint for a refreshing kick. Just blend the mint with the lemon juice. It adds a nice herbal note.</p>
</p>
<h3>What Add-Ins Work Well with This Drink?</h3>
</p>
<p>You can enhance whipped pink lemonade with fun add-ins. For a tropical vibe, add coconut milk. This will make it creamy and smooth. You can also mix in some flavored syrups, like peach or mango. Just remember to adjust the sugar to keep it balanced. If you like a little fizz, top it with soda water. This creates a sparkling version that’s very refreshing.</p>
</p>
<h3>Are There Any Seasonal Variants You Can Try?</h3>
</p>
<p>Seasonal variants are a great way to keep things interesting. In fall, you can add pumpkin spice for a cozy flavor. In winter, try adding cinnamon and a splash of cranberry juice. This gives it a holiday twist. For spring, fresh herbs like basil or lavender can add a lovely aroma. Each season brings new flavors to explore with whipped pink lemonade.Enjoy making your own variations!</p>
</p>
<h2>What Are the Best Occasions to Serve Whipped Pink Lemonade?</h2>
</p>
<p>Whipped pink lemonade shines at summer gatherings. It cools you down and adds flair. Serve it at picnics, barbecues, or pool parties. The bright color and creamy texture make it fun for all ages.</p>
</p>
<h3>Is Whipped Pink Lemonade Ideal for Summer Events?</h3>
</p>
<p>Yes, whipped pink lemonade is perfect for summer fun. It quenches thirst and lifts spirits. The sweet and tart flavor delights everyone. Kids love the pink color, while adults enjoy its creamy touch. You can prepare it in advance, making it easy for busy hosts.</p>
</p>
<h3>What Other Celebrations Can It Complement?</h3>
</p>
<p>This drink suits many celebrations. Birthdays, bridal showers, and baby showers all benefit from its charm. It pairs well with light snacks and desserts. The vibrant look makes your table pop. It even works for casual get-togethers with friends.</p>
</p>
<h3>How to Serve This Drink for Maximum Impact at Gatherings?</h3>
</p>
<p>To make a splash, serve it in clear glasses. Layer ice cubes and chilled lemonade, then top with whipped cream. Use a piping bag for a fancy touch. Garnish with lemon slices and strawberries for color. This makes your drink stand out. Everyone will want to try it.Whipped pink lemonade brings joy to any occasion. Enjoy the smiles it brings!</p>
</p>
<p><img decoding=

To make whipped pink lemonade, you need fresh and simple ingredients. The main star is fresh lemon juice. You will need about 1 cup, which usually comes from 4-6 lemons. Fresh juice gives a bright and zesty taste. Next, grab 1 cup of granulated sugar. This sweetens the drink and balances the tartness of the lemons.

Whipped Pink Lemonade

Beat the heat this summer with a delightful Whipped Pink Lemonade that will impress your friends and family! This refreshing drink combines fresh lemon juice, strawberries, and a creamy whipped topping for a fun twist on a classic favorite. Perfect for gatherings, picnics, or just a sunny day, this easy recipe invites you to add your creative spin. Ready to make a splash?
Print Recipe Pin Recipe

Ingredients
  

1 cup fresh lemon juice (about 4-6 lemons)

1 cup granulated sugar

4 cups cold water

1 cup strawberries, hulled and chopped

1 cup heavy cream

1 teaspoon vanilla extract

¼ cup powdered sugar

Ice cubes for serving

Lemon slices and fresh strawberries for garnish

Instructions
 

In a blender, combine the fresh lemon juice, granulated sugar, and chopped strawberries. Blend until smooth.

    Strain the mixture through a fine mesh sieve into a large pitcher to remove any seeds and pulp.

      Add the cold water to the pitcher and stir well until the sugar is fully dissolved. Taste and adjust sweetness if desired. Chill in the refrigerator for about 30 minutes.

        In a separate mixing bowl, whip the heavy cream, vanilla extract, and powdered sugar using an electric mixer until soft peaks form. Be careful not to overwhip; the cream should remain fluffy.

          To serve, fill each glass with ice cubes and pour the chilled pink lemonade over the ice.

            Top each glass with a generous dollop of the whipped cream mixture, using a spoon or piping bag for an attractive finish.

              Garnish with a slice of lemon and a whole strawberry to enhance the visual appeal.

                Prep Time: 15 minutes | Total Time: 45 minutes | Servings: 4-6

                  Related Recipes

                  • - 1 ripe banana - 2 tablespoons natural peanut butter - 1 cup unsweetened almond milk (or any milk of choice) - 1 scoop vanilla protein powder (plant-based or whey) - 1 tablespoon chia seeds - 1 teaspoon honey (optional for sweetness) - A pinch of cinnamon - Ice cubes (optional, for a thicker texture) Gather these simple items before you start. A ripe banana gives natural sweetness and creaminess. Use two tablespoons of natural peanut butter for a rich flavor. Almond milk is my go-to, but any milk you love works great. The protein powder adds a boost of nutrition. Choose vanilla to match the banana. Chia seeds are tiny but mighty. They add fiber and help keep you full. If you like it sweeter, add honey, but it’s not a must. A pinch of cinnamon brings warmth and depth to this drink. For a thicker texture, toss in some ice cubes. This smoothie is flexible, so feel free to mix and match based on your taste. Now, let's blend it all together! 1. Start by peeling the ripe banana. Break it into small chunks. 2. In a blender, combine the banana chunks, natural peanut butter, almond milk, protein powder, chia seeds, and a pinch of cinnamon. 3. If you like a colder and thicker smoothie, add some ice cubes. 1. Blend all the ingredients on high speed. Keep blending until you have a smooth and creamy mix. 2. Stop the blender and taste your smoothie. If you want it sweeter, add honey. Blend again for a few seconds to mix. 1. Pour the smoothie into a tall glass. Enjoy it right away for the best taste and creaminess. 2. For a fun twist, you can top it with extra chia seeds or banana slices. This makes it look pretty too! To get the perfect texture, use a ripe banana. A ripe banana makes the smoothie creamy. Add ice cubes if you want it thicker. If you prefer a smoother drink, blend longer. Scrape the sides of the blender to mix all the ingredients well. This ensures a silky-smooth result. If your smoothie tastes too bland, add honey or more banana. Start with a teaspoon of honey. Blend and taste again. You can always add more honey if needed. This way, you control the sweetness to match your taste. Remember, ripe bananas also add natural sweetness. Use a high-speed blender for the best results. A strong blender breaks down the ingredients quickly. If you have a less powerful blender, blend in stages. Start with the liquids first, then add the solids. This helps everything mix better. Make sure your blender is clean for the best flavor. {{image_2}} You can switch the peanut butter for other nut butters. Almond butter offers a nutty taste. Cashew butter is creamy and sweet. Sunflower seed butter is a great choice for allergies. Each nut butter brings its own flavor and health benefits. Experiment to find your favorite. You can add many fruits to the smoothie. Frozen berries add sweetness and color. Spinach or kale boosts nutrition without changing the taste. Try mango for a tropical twist. Each fruit adds vitamins and makes the smoothie fun. Mix and match to discover new flavors. Choosing the right protein powder is key. Plant-based powders are great for vegan diets. Whey protein is popular for muscle recovery. Look for flavors that match your taste, like chocolate or vanilla. The right powder can enhance the smoothie’s flavor and nutrition. Test different types to see what you prefer. Store any leftover smoothie in an airtight container. You want to keep it fresh. Place it in the fridge right after making it. It will stay good for about one day. When you are ready to drink it again, shake or stir well. This helps mix any settled ingredients. You can freeze your smoothie for later. Pour it into ice cube trays or freezer-safe bags. This way, you can grab a portion whenever you want. To use, thaw the smoothie overnight in the fridge. You can also blend it again for a fresh taste. In the fridge, your smoothie lasts about 24 hours. In the freezer, it can last up to three months. Just remember, the sooner you drink it, the better the taste and texture will be! Yes, this smoothie is gluten-free. All the ingredients listed are naturally free from gluten. The peanut butter, banana, almond milk, protein powder, chia seeds, and honey do not contain gluten. Always check labels if you use store-bought items to confirm they are gluten-free. Absolutely! To make this smoothie vegan, simply use plant-based protein powder. Ensure your peanut butter is also free from animal products. Replace honey with maple syrup or agave nectar for sweetness. All other ingredients are already vegan-friendly. This smoothie offers many health benefits. It provides protein from the peanut butter and protein powder, which helps build muscle. Bananas add potassium, good for heart health. Chia seeds are packed with fiber, aiding digestion. Almond milk is low in calories and rich in vitamins. Yes, you can use various milk types. Cow’s milk will add creaminess and protein. Soy milk is a great option for extra protein. Coconut milk gives a tropical flavor. Each milk option changes the taste and texture slightly, so choose what you enjoy best. This smoothie recipe combines simple ingredients for great taste and nutrition. You learned step-by-step how to prepare it and tips for perfect texture. Variations let you customize your drink to fit your taste. Remember to store leftovers properly for later enjoyment. Smoothies can be healthy and fun. Try new mixtures to find what you love best. Keep experimenting and enjoy your delicious creations!
                    Peanut Butter Banana Protein Smoothie Easy Recipe
                  • To make a delicious Turmeric Golden Milk Latte, gather these simple ingredients: - 2 cups almond milk (or your preferred milk) - 1 teaspoon ground turmeric - 1/2 teaspoon ground ginger - 1/4 teaspoon cinnamon - 1 tablespoon honey or maple syrup (adjust to taste) - Pinch of black pepper - 1/2 teaspoon vanilla extract - Optional: a sprinkle of nutmeg for garnish - Almond Milk: This milk is low in calories and rich in vitamins. It helps with heart health. - Turmeric: This spice has curcumin, known for its anti-inflammatory properties. It may help improve brain function. - Ginger: Ginger can help with digestion and nausea. It adds a nice warmth to the drink. - Cinnamon: This spice is rich in antioxidants. It may help lower blood sugar and improve heart health. - Honey or Maple Syrup: Both sweeteners can boost energy. They also provide antioxidants. - Black Pepper: This spice enhances turmeric absorption. It makes the drink more effective. - Vanilla Extract: It adds flavor and can help reduce stress. - Nutmeg: This spice is optional, but it adds warmth and a nice aroma. - Milk Options: You can use oat milk, soy milk, or coconut milk for different flavors. - Sweeteners: If you prefer, try agave syrup or stevia as sugar-free options. - Spices: Experiment with cardamom or cloves for added flavor. - Nutmeg: You can skip it if you don't like nutmeg, or use a touch of cocoa powder instead. 1. Start by taking a small saucepan. 2. Add 2 cups of almond milk to the pan. 3. Measure and add 1 teaspoon of ground turmeric. 4. Next, add 1/2 teaspoon of ground ginger. 5. Sprinkle in 1/4 teaspoon of cinnamon. 6. Sweeten your drink with 1 tablespoon of honey or maple syrup. 7. Don't forget a pinch of black pepper for better absorption of turmeric. 8. Lastly, add 1/2 teaspoon of vanilla extract. 9. Whisk all the ingredients well in the pan. 10. Place the saucepan on medium heat. 11. Gently warm the mixture while stirring often. 12. Keep an eye on it; do not let it boil. 13. After about 5-7 minutes, it should be hot enough. 14. Remove the pan from heat and let it cool slightly. 15. If you want a frothy drink, use a milk frother or whisk it quickly. 16. Pour the golden milk into your favorite mugs. 17. Optionally, sprinkle a bit of nutmeg on top for a nice touch. 18. Serve warm and enjoy this comforting drink! - Always use a whisk to blend the spices into the milk. - Whisking helps mix the turmeric and other spices evenly. - When heating, keep the heat low to avoid scalding the milk. - Stir often to prevent sticking at the bottom of the pan. - If you see steam but no bubbles, you are at the right temperature. - A milk frother works wonders for a smooth, frothy finish. - If you don’t have a frother, whisk vigorously by hand. - Frothing adds air, giving the latte a creamy feel. - The more you froth, the lighter and fluffier your drink will become. - For an extra touch, froth some almond milk separately and top your latte with it. You can mix spices to make your turmeric latte tastier. Try adding a pinch of nutmeg or a dash of cardamom. These spices add warmth to the drink. You can also use fresh ginger instead of ground ginger. This will give your latte a bright, zesty kick. Just remember, fresh ginger may need more time to steep. Many people rush the heating process. Always warm your milk slowly over medium heat. If you boil it, the spices can lose flavor. Another mistake is not blending the spices well. Make sure to whisk the mixture thoroughly. This helps avoid clumps of turmeric or ginger. Lastly, avoid skipping the black pepper. It helps your body absorb turmeric better. Sweetness is personal. Start with one tablespoon of honey or maple syrup. Taste your latte and add more if you like it sweeter. For creaminess, use full-fat coconut milk for a richer feel. Almond milk is lighter but still delicious. You can also mix almond and coconut milk for the best of both worlds. {{image_2}} You can easily make this latte vegan. Just use almond milk, coconut milk, or oat milk. These milks work great in this recipe. They keep the drink creamy and delicious. If you want a nut-free option, oat milk is the best choice. It blends well with turmeric and spices. To make an iced version, start with brewed turmeric milk. Follow the same steps but let it cool. Pour over ice instead of serving warm. This drink is refreshing on hot days. You can also add some ice cream for a treat! You can mix and match flavors for fun. Try adding matcha for a green twist. This adds a fresh taste and boosts energy. You can also use cocoa for a chocolatey version. The cocoa pairs well with turmeric and spices. For a special touch, add a dash of vanilla extract. This enhances the overall flavor and aroma. To store leftover turmeric golden milk, let it cool first. Then, pour it into an airtight container. Keep it in the fridge for up to three days. This way, you can enjoy the drink again without losing its flavor. When reheating your golden milk, do it gently. Pour it into a small saucepan. Heat it over low to medium heat. Stir it often to avoid burning. Never let it boil, as this can change the taste and texture. You can also use a microwave. Heat in short bursts, stirring in between. Turmeric golden milk lasts about three days in the fridge. Check for signs of spoilage. If it smells sour or has any mold, discard it. Always trust your senses. If it looks or smells off, it’s best to throw it away. Turmeric has many health benefits. It is known for its bright yellow color and active compound called curcumin. Curcumin may help reduce inflammation. It can also support joint health. Some studies suggest it may boost your mood. Turmeric might even help with digestion. Drinking turmeric may also support your immune system. Yes, you can use any milk you like. Almond milk is great, but coconut milk adds creaminess. Oat milk is a good choice for a thicker texture. If you prefer dairy, whole or skim milk works too. Just remember, different types of milk will change the flavor a bit. To make this recipe sugar-free, skip the honey or maple syrup. You can use a sugar substitute like stevia or monk fruit instead. These options will give you sweetness without the calories. Just adjust the amount to your taste. Yes, it is safe for most people to have turmeric daily. Using it in cooking or drinks is a great way to enjoy its benefits. However, if you have health issues or take certain medications, check with a doctor first. Moderation is key, as with any food. In this blog post, we explored the ingredients and health benefits of Turmeric Golden Milk. I shared step-by-step instructions for making it frothy and delicious. We also discovered tips, tricks, and variations to enhance your drink. Proper storage and reheating advice can help you enjoy leftovers. Remember, turmeric offers many health benefits, so enjoy this drink often. Use alternative ingredients if you prefer. With these ideas, you can create the perfect golden milk to suit your taste and health needs. Enjoy your journey to wellness!
                    Turmeric Golden Milk Latte Simple and Creamy Recipe
                  • - 1 ripe mango, peeled and diced - 1 cup fresh pineapple chunks - 1 banana, sliced - 1 cup coconut water (or regular water) - 1/2 cup plain Greek yogurt (or dairy-free alternative) - 1 tablespoon honey or agave syrup (optional) - A handful of fresh mint leaves (for garnish) - Ice cubes (optional) The key to a delicious mango pineapple smoothie lies in its fresh ingredients. You want ripe fruits for the best flavor. The mango should feel soft when you squeeze it gently. Pineapples should smell sweet and fruity. This smoothie combines sweet mango, tangy pineapple, and creamy banana. Coconut water adds hydration, while Greek yogurt gives it a nice creaminess. You can add honey for extra sweetness if you like. Mint leaves add a refreshing touch when you serve it. Each ingredient plays a role in making this smoothie flavorful and refreshing. Trust me, using fresh ingredients will make a big difference in taste! To make this smoothie, start by gathering your main ingredients. You need a ripe mango, fresh pineapple, and a banana. 1. In a blender, combine the diced mango, pineapple chunks, and banana slices. This mix brings a burst of tropical flavor. 2. Next, add one cup of coconut water to the blender. This not only hydrates but also adds a refreshing twist. 3. For creaminess, pour in half a cup of plain Greek yogurt. If you want it sweeter, drizzle in one tablespoon of honey or agave syrup. 4. Blend on high until the mixture is smooth and creamy. If you like your smoothie chilled, toss in a few ice cubes and blend again until they are fully mixed in. 5. After blending, taste your smoothie. If it needs to be sweeter or thicker, add more honey or coconut water as needed. Once your smoothie is ready, it’s time to serve it. I recommend using tall glasses to show off the vibrant color. For a fun touch, garnish each glass with a few fresh mint leaves on top. This not only looks nice but also adds a fresh aroma. Enjoy your delicious Mango Pineapple Smoothie! For the Full Recipe, please refer back to the ingredient list and instructions. To get your smoothie just right, focus on creaminess. Use ripe fruits like mango and banana. The Greek yogurt adds a nice, smooth texture. If you want a richer taste, try full-fat yogurt. For a lighter feel, use low-fat or dairy-free yogurt. Adjust the thickness by adding more liquid. Coconut water is great for this. If your smoothie is too thick, just pour in a bit more. Blend again until it’s just how you like it. If you want a thicker smoothie, add more banana or ice cubes. Boosting flavor can take your smoothie to the next level. Try adding spices like cinnamon or ginger. These spices not only add warmth but also great health benefits. A dash of cinnamon can make the smoothie taste cozy. A pinch of ginger gives it a nice kick. You can also use flavored yogurts for extra taste. Vanilla or coconut yogurt work well. If you want sweetness, think about honey or agave syrup. These can make your smoothie more enjoyable. For a fun twist, try adding a splash of vanilla extract. It will add a lovely aroma to your drink. For a full taste experience, explore the [Full Recipe]. {{image_2}} You can change the fruit in your smoothie to keep it fresh. Adding strawberries or blueberries gives a sweet twist. These berries add a nice color and taste. You can also try using other tropical fruits like papaya or kiwi. These fruits bring new flavors and nutrients to your drink. Each fruit will change the smoothie’s taste and make it unique. If you want a dairy-free smoothie, swap the Greek yogurt for a plant-based option. Almond, coconut, or soy yogurt works well. These alternatives keep your smoothie creamy without dairy. For sweeteners, you can use maple syrup or agave syrup for a vegan choice. These options add sweetness while keeping your drink plant-based. Enjoy the fruity goodness in many ways! Don't forget to check the Full Recipe for more ideas. You may have some smoothie left after making your Mango Pineapple Smoothie. To keep it fresh, use a glass jar or a BPA-free plastic container. Seal it tightly to prevent air from spoiling the flavor. Store it in the fridge for up to 24 hours. After that, it may lose some taste and texture. If you want to enjoy the smoothie later, freezing is a great option. Pour the smoothie into ice cube trays or freezer-safe bags. Leave some space in the bags for expansion. You can freeze it for up to three months. When you’re ready to drink it, take out what you need. Thaw it in the fridge overnight or blend it straight from the freezer for a slushy treat. Enjoy your refreshing Mango Pineapple Smoothie anytime! Yes, you can make this smoothie ahead of time. If you want to save it, store it in an airtight container. Keep it in the fridge for up to one day. The smoothie may separate, so stir it well before you drink it. If you don’t have coconut water, use regular water or fruit juice instead. Fruit juice can add a nice flavor. You can also try almond milk for a creamier touch. Just remember, the taste will change a bit based on what you use. To make the smoothie thicker, add more Greek yogurt or a banana. You can also use frozen fruit instead of fresh. Frozen fruit gives you a nice, thick texture. Just blend it well, and you’ll get a creamy drink. Yes, this smoothie is great for kids! It is packed with fruits and tastes sweet. You can adjust the sweetness by adding less honey. The bright colors and fresh flavors will appeal to children, making it a fun treat. You can find the Full Recipe for the Tropical Bliss Mango Pineapple Smoothie above in this article. This will guide you through every step to create your own refreshing drink. This blog post covers a simple and tasty smoothie recipe. You learned about the key ingredients and their nutritional benefits. I provided steps to prepare and serve the smoothie perfectly. Tips for texture and flavor help you make it your own. You can explore variations to suit your tastes or dietary needs. Don’t forget storage tips to keep leftovers fresh. Enjoy your smoothie making journey. It’s all about trying new things and having fun!
                    Mango Pineapple Smoothie Refreshing and Flavorful Blend
                  • - 2 packets of frozen açaí puree - 1 ripe banana - 1 cup of fresh pineapple chunks - 1 cup of coconut milk (or any non-dairy milk) - 1 tablespoon of honey or agave syrup (optional) For a vibrant tropical taste, the main ingredients are key. Açaí puree brings rich color and flavor. It is full of antioxidants. Bananas add creaminess and natural sweetness. Fresh pineapple gives a bright, juicy touch. Coconut milk offers a smooth base. You can use any non-dairy milk you prefer. Honey or agave syrup adds sweetness if needed. - Sliced kiwi - Coconut flakes - Granola - Chia seeds - Fresh berries (e.g., strawberries, blueberries) Toppings make your smoothie bowl pop! Sliced kiwi adds a zesty kick. Coconut flakes give it a tropical crunch. Granola provides texture and flavor. Chia seeds offer extra nutrients. Fresh berries, like strawberries and blueberries, add color and taste. You can mix and match these toppings for a fun look. For the full recipe, please refer to the section above. 1. Blend the ingredients Start by adding the frozen açaí puree, ripe banana, fresh pineapple chunks, and coconut milk into a blender. If you want it sweeter, you can add honey or agave syrup. Blend this mixture on high speed until it becomes creamy and smooth. 2. Adjust consistency with coconut milk If your smoothie is too thick, just add a bit more coconut milk. Blend again until you reach the texture you want. This step is key to making your smoothie bowl enjoyable. 3. Pour into a bowl Once blended, carefully pour the smoothie mixture into a bowl. Make sure to use a large enough bowl to hold all the goodness. 4. Add toppings creatively Now comes the fun part! Arrange your toppings, such as sliced kiwi, coconut flakes, granola, chia seeds, and fresh berries, over the smoothie. Try to create a colorful pattern. I love making a circular design to highlight all the vibrant colors. - Tips for presentation Use a shallow bowl to show off your beautiful toppings. You can also sprinkle some extra coconut flakes around the edge for a nice touch. A colorful presentation makes your smoothie bowl more fun to eat. - Recommended serving utensils Serve your smoothie bowl with a regular spoon. If you want to make it more special, use a wooden spoon or a cute, colorful one. Enjoy your tropical treat right away to keep it fresh and tasty. For the full recipe, refer to the earlier sections. To make a great smoothie bowl, start with ripe fruits. Ripe fruits taste better and add natural sweetness. Look for bananas that are yellow with some brown spots. When it comes to pineapples, choose ones that smell sweet. It ensures they are juicy and fresh. Blending is key to your smoothie bowl. You want a smooth and creamy texture. If your mix is too thick, add more coconut milk. Blend again until you reach the right consistency. A good blend makes your bowl enjoyable and easy to eat. A colorful topping arrangement makes your smoothie bowl pop. Use fresh berries, sliced kiwi, and coconut flakes. Lay them out in a pattern. A circular design looks appealing and fun. To elevate your smoothie bowl's look, use bowls with interesting shapes. Tall bowls or wide, shallow ones can change the game. Garnish with a sprinkle of chia seeds for a fancy touch. This not only looks great but adds a bit of crunch too. {{image_2}} You can change the non-dairy milk for this smoothie. Almond, soy, or oat milk work well. Each milk adds a different taste. Try using seasonal fruits too. Mango, papaya, or berries add a fresh twist. You can mix and match to find your favorite blend. Want more nutrients? Add spinach or kale to your smoothie. They blend well and boost health. You won’t even taste them! For extra energy, stir in nut butter or protein powder. Both will make your smoothie more filling. They add great flavor too! You can also experiment with different combinations to find the best taste for you. To store leftovers, place your smoothie bowl in the fridge. Use a tight container to keep it fresh. Glass or BPA-free plastic works well for storage. I prefer glass because it keeps flavors better. You can freeze smoothie bowls for later. Just pour the mixture into an airtight container. Leave some space at the top, as it will expand when frozen. To defrost, place it in the fridge overnight. If you’re in a rush, you can use the microwave. Just heat it in short bursts to avoid cooking. Enjoy your tropical treat later with ease! For the recipe, check out the Full Recipe. What is açaí and what are its benefits? Açaí is a small, dark purple berry from Brazil. It is full of antioxidants, which help fight free radicals in the body. Açaí is also rich in fiber, promoting good digestion. Plus, it has healthy fats that support heart health. You can enjoy its fruity taste in many dishes. Can I make this smoothie bowl ahead of time? Yes! You can prepare the smoothie mix and store it in the fridge for up to 24 hours. Just remember to keep the toppings separate. This way, your bowl stays fresh and tasty. How can I make this recipe vegan or gluten-free? To make it vegan, use agave syrup instead of honey. For gluten-free, ensure your granola and any other toppings are gluten-free. Most fruits and coconut milk are naturally gluten-free, so you’re all set! Can I substitute açaí with other fruits? Yes, you can! If you can’t find açaí, try using frozen berries like blueberries or strawberries. These fruits will add sweetness and a burst of color to your bowl. What to do if the smoothie is too thick? If your smoothie is too thick, just add a little more coconut milk. Blend again until you reach your desired creaminess. This will make it easier to pour and enjoy. How to fix a smoothie bowl that tastes too bland? If your smoothie bowl lacks flavor, try adding a splash of vanilla extract or a pinch of salt. You can also mix in a bit of honey or agave syrup for sweetness. Adjust the toppings to add more taste and texture. This article covers how to make a delicious açaí smoothie bowl. You learned about the key ingredients, easy steps for preparation, and creative topping ideas. I shared tips to improve taste and presentation, plus fun variations to try. Don’t forget storage techniques to keep your bowl fresh. With all this information, you can enjoy a tasty and nutritious treat anytime. Get creative with your favorites and make this recipe truly yours. Enjoy every bite!
                    Tropical Acai Smoothie Bowl Energizing Healthy Treat

                  WANT TO SAVE THIS RECIPE?

                  15 shares

                  Leave a Reply Cancel reply

                  Your email address will not be published. Required fields are marked *

                  Recipe Rating


                  Beat the heat this summer with a delightful Whipped Pink Lemonade that will impress your friends and family! This refreshing drink combines fresh lemon juice, strawberries, and a creamy whipped topping for a fun twist on a classic favorite. Perfect for gatherings, picnics, or just a sunny day, this easy recipe invites you to add your creative spin. Ready to make a splash? Click through to explore the full recipe and serve up this summer delight today!

                  Hi I’m Taling

                  I love sharing perfected dishes from my kitchen. I’m sure they’ll earn a spot in your heart. Let’s savor this journey together!.

                  More about me

                  Recent Desserts

                  • To make Chocolate Mocha Overnight Oats, you need the following ingredients: - 1 cup rolled oats - 2 cups almond milk (or any milk of choice) - 2 tablespoons cocoa powder - 1 tablespoon instant coffee granules - 2 tablespoons maple syrup (or honey) - ½ teaspoon vanilla extract - A pinch of salt - ¼ cup Greek yogurt (optional for creaminess) - 2 tablespoons chocolate chips (optional for topping) - Sliced banana or berries for topping These ingredients come together to create a rich, chocolatey breakfast. The oats soak up the almond milk and cocoa, making each bite creamy and satisfying. Using almond milk keeps it light, while maple syrup adds natural sweetness. The instant coffee gives it a nice mocha flavor. If you want extra creaminess, add Greek yogurt. Don’t forget the toppings! Sliced bananas or fresh berries add color and taste. You can even sprinkle some chocolate chips on top for a sweet finish. This mix of ingredients makes the perfect breakfast for any day. Enjoy the ease and deliciousness of Chocolate Mocha Overnight Oats! - In a large bowl, combine: - 1 cup rolled oats - 2 cups almond milk (or any milk of choice) - 2 tablespoons cocoa powder - 1 tablespoon instant coffee granules - 2 tablespoons maple syrup (or honey) - ½ teaspoon vanilla extract - A pinch of salt - If you want creaminess, mix in ¼ cup Greek yogurt. This makes your oats extra smooth. - Now, divide the mixture into two jars. - Seal the jars tightly to lock in flavor. - Place them in the refrigerator. Let them chill overnight or for at least 4-6 hours. - When it’s time to eat, stir the oats well. - If they look too thick, add a splash of milk. - Top with chocolate chips, banana slices, or berries. This adds fun flavors and textures. To get the right thickness, adjust the milk amount. Start with two cups of almond milk. If your oats seem too thick, add a splash of milk. This will help create a creamy texture. Always stir your oats before serving. This mixes the flavors well and ensures every bite is tasty. You can experiment with different types of milk. Oat milk is a great choice for creaminess. Coconut milk adds a tropical twist. For extra flavor, use flavored Greek yogurt. This adds a delicious taste and makes your oats even creamier. Make a big batch of oats for quick breakfasts all week. Divide the mixture into jars. This makes it easy to grab one in the morning. Store the jars in the fridge for a fresh start to your day. {{image_2}} You can change up the flavors easily. - Add nut butter for creaminess and taste. - Try different toppings like nuts or seeds for crunch. Want a lower-calorie option? - Substitute maple syrup with a sugar-free sweetener. - Use dairy-free yogurt for a vegan choice. Make your oats special with seasonal flavors. - Add pumpkin spice in fall or peppermint extract in winter. - For freshness, include fruits like apples in fall or strawberries in summer. Store your overnight oats in the refrigerator. This keeps them fresh and tasty. Use airtight containers to stop any spoilage from happening. Your chocolate mocha overnight oats can last up to 5 days in the fridge. They are best eaten fresh but can stay good this long. Do not freeze them, as the texture will change when thawed. You can enjoy your oats cold right from the fridge. If you prefer them warm, heat in the microwave for a quick breakfast. Stir them well and add a splash of milk if they seem too thick when reheating. Yes, if you prefer a non-caffeinated version, simply omit the coffee. The oats will still taste great with chocolate and other flavors. You can add more cocoa powder or a dash of vanilla to keep it yummy. For best results, soak the oats overnight or for at least 4-6 hours. This helps the oats absorb the milk and flavors. If you rush it, the oats might be too chewy. Letting them soak overnight gives you the best texture. Absolutely! Use plant-based yogurt and a suitable sweetener to keep it vegan-friendly. Almond milk is great, but you can also try oat or coconut milk. This way, everyone can enjoy this tasty breakfast delight! You learned how to make easy overnight oats packed with flavor and nutrition. This recipe uses simple ingredients like oats, cocoa powder, and your choice of milk. I shared tips for personalizing flavors and storage. Remember, meal prep helps you save time during busy mornings. With endless variations, you can enjoy this healthy dish all week long. Now, get started on your tasty and nutritious breakfast!
                    Chocolate Mocha Overnight Oats Easy Breakfast Delight
                  • To make No-Bake Nutella Cheesecake Squares, you need simple ingredients that pack a lot of flavor. Here’s what you will need: - 1 cup graham cracker crumbs - ¼ cup melted butter - ¼ cup granulated sugar - 16 oz cream cheese, softened - 1 cup Nutella - ½ cup powdered sugar - 1 teaspoon vanilla extract - 1 cup heavy whipping cream - Chocolate shavings or cocoa powder for garnish Each ingredient plays a key role in creating a smooth and rich dessert. The graham cracker crumbs form the tasty crust, while the Nutella brings a delightful chocolate hazelnut flavor. Cream cheese adds creaminess, and whipped cream gives it a light texture. When you mix all these ingredients, you create layers of flavor. The sweetness from the sugar balances the rich Nutella. You can also choose your garnish based on your mood. Chocolate shavings add elegance, while cocoa powder gives a nice finish. Make sure to use fresh ingredients, especially the cream cheese and heavy cream, for the best taste. You can find these ingredients at your local grocery store. Enjoy the fun of putting this recipe together! To start, you need to make the crust. In a medium bowl, combine graham cracker crumbs, melted butter, and granulated sugar. Mix until it feels like wet sand. This helps hold the crust together. Next, press the mixture firmly into the bottom of an 8x8 inch square pan. Make sure it's even and packed well. Refrigerate this for about 10 minutes to let it set. Now, let’s make the cheesecake filling. In a large bowl, beat the softened cream cheese until it is smooth. This step is key for a creamy texture. Add the Nutella, powdered sugar, and vanilla extract to the cream cheese. Mix until everything is combined and there are no lumps left. The Nutella gives it a rich, chocolate flavor. Next, whip the heavy cream in a separate bowl. Beat it until stiff peaks form. This means it should hold shape when you lift the whisk. Once that's done, gently fold the whipped cream into the Nutella mixture. Be careful not to deflate the whipped cream. This helps keep the filling light and fluffy. Finally, pour the Nutella cheesecake filling over the chilled crust. Spread it out evenly with a spatula. Cover the pan with plastic wrap and refrigerate for at least four hours or until it sets. Once it’s firm, you can cut it into squares and serve. Enjoy your delicious, no-bake Nutella cheesecake squares! To make a great crust, start with good graham cracker crumbs. You want them fine, like sand. Mix the crumbs with melted butter and sugar. This helps the crust stick together. Press the crust into the pan firmly. Use the bottom of a measuring cup or your hands. You want it to be even. A well-pressed crust gives a nice base for the cheesecake. Refrigerate it for 10 minutes to set. Room temperature cream cheese is key. Cold cream cheese makes it hard to mix. Soft cream cheese blends easily and makes a smooth filling. When mixing in the whipped cream, fold gently. Use a spatula to lift and turn the mixture. This keeps air bubbles in the cream. Air bubbles make the cheesecake light and fluffy. For a stunning look, add chocolate shavings on top. You can also sprinkle cocoa powder for a rich touch. Both options make your cheesecake squares pop. Serve the squares on a pretty plate. This makes them look fancy for parties. You can cut them into different shapes too, like triangles or rectangles. Get creative and impress your guests! {{image_2}} You can easily change the flavor of these cheesecake squares. One fun option is to add espresso for a coffee kick. Just mix in one tablespoon of espresso powder to the Nutella mix. If you love mint, consider adding a few drops of mint extract. This gives your dessert a fresh taste. If you want to swap the Nutella, try different nut spreads. Almond butter or cashew butter can work well. Each choice gives a unique twist to the classic recipe. For a gluten-free version, use gluten-free graham crackers. Many stores sell these now. This simple swap keeps the taste but makes it safe for those with gluten issues. Want a vegan option? Replace cream cheese with a vegan cream cheese alternative. You can also swap the heavy cream with coconut cream. This keeps it rich and creamy while being plant-based. Pair these Nutella cheesecake squares with fresh fruit. Strawberries or raspberries add a nice tartness. You can also serve them with whipped cream for extra indulgence. These squares are perfect for parties or family gatherings. They are easy to transport and look great on a platter. Serve them at birthdays or any celebration for a sweet treat everyone will enjoy. To keep your Nutella cheesecake squares fresh, place them in an airtight container. This helps lock in moisture and flavor. I recommend using a glass or BPA-free plastic container. Always store the cheesecake squares in the fridge. This will keep them cool and tasty. You can freeze leftover squares for later. First, cut them into squares and wrap each piece in plastic wrap. Then, place the wrapped squares in a freezer-safe bag. Press out any air before sealing. To enjoy them later, just thaw them in the fridge overnight. This keeps the taste rich and creamy. These cheesecake squares last about five days in the fridge. Keep an eye out for any off smells or changes in texture. If you see any liquid pooling or the squares look dry, it’s best to toss them. Enjoy these delights while they are fresh for the best taste! The cheesecake needs at least 4 hours to set. For best results, let it chill overnight. This helps the flavors blend well and makes slicing easier. Yes, you can use light cream cheese. It will still work well in this recipe. Just remember, it may change the texture slightly. The cheesecake might not be as rich, but it will still taste great! You can use other chocolate spreads, like chocolate hazelnut spread or peanut butter. For a different flavor, try almond butter or a fruit spread. Each will give a unique taste while keeping the recipe fun. Absolutely! You can make these squares a day or two before serving. Just keep them covered in the fridge. This is great for parties or events when you want to save time. Yes, an 8x8 pan is perfect for this recipe. It helps create nice, thick squares. If you prefer thinner squares, you can use a larger pan. Just adjust the chilling time as needed. This blog post covered how to make delicious Nutella cheesecake squares. We went over the key ingredients and the easy steps to prepare both the crust and the filling. You learned tips for perfecting your dessert's texture and ways to present it beautifully. Feel free to experiment with flavors and adjust for dietary needs. Remember, make it ahead of time, and store it properly to keep it fresh. Enjoy making this treat for any occasion!
                    No-Bake Nutella Cheesecake Squares Delightful Treat
                  • To make delicious apple pie cheesecake bars, gather the following ingredients: - 2 cups graham cracker crumbs - ½ cup unsalted butter, melted - 2 tablespoons granulated sugar - 16 oz cream cheese, softened - 1 cup granulated sugar - 3 large eggs - 1 teaspoon vanilla extract - 1 teaspoon ground cinnamon - 2 cups sautéed apples (from about 2-3 medium apples, peeled and diced) - 1 tablespoon lemon juice - ½ teaspoon nutmeg - ¼ cup caramel sauce (for drizzling) You can make some changes if you need to. Here are a few ideas: - Use coconut oil instead of unsalted butter for a dairy-free option. - Swap granulated sugar with brown sugar for a richer flavor. - If you don’t have cream cheese, try mascarpone cheese. - You can use any apples you like, such as Granny Smith or Honeycrisp. - For a nut-free version, leave out the nutmeg or use allspice. Understanding the nutrition can help you enjoy these bars mindfully. Each bar contains roughly: - Calories: 250 - Total Fat: 15g - Saturated Fat: 8g - Cholesterol: 75mg - Sodium: 180mg - Total Carbohydrates: 28g - Dietary Fiber: 1g - Sugars: 16g - Protein: 3g This information can vary based on ingredient choices. Enjoy these tasty bars as an occasional treat! Start by gathering all your ingredients. You need graham cracker crumbs, butter, sugar, cream cheese, eggs, vanilla, cinnamon, sautéed apples, lemon juice, nutmeg, and caramel sauce. Preheat your oven to 325°F (163°C). Line a 9x13 inch baking pan with parchment paper. Leave some paper hanging over the edges. This makes it easier to lift out your bars later. In a medium bowl, mix 2 cups of graham cracker crumbs, ½ cup of melted butter, and 2 tablespoons of sugar. Stir it until the crumbs are well coated. Press this mixture firmly into the bottom of the prepared pan. Make sure it is even all over. Bake this crust for about 10 minutes. After baking, take it out of the oven and let it cool completely. In a large bowl, beat 16 oz of softened cream cheese until smooth. This step is key for a creamy texture. Slowly add 1 cup of sugar while beating the cream cheese. Next, add 3 eggs, one at a time. Mix well after each egg. Then, stir in 1 teaspoon of vanilla extract, 1 teaspoon of ground cinnamon, and ½ teaspoon of nutmeg. Now, gently fold in the sautéed apples, which you made with 2-3 medium apples and 1 tablespoon of lemon juice. Pour the apple cheesecake filling over the cooled crust. Spread it evenly. Bake in the oven for 35-40 minutes. Check if the center is set but still jiggles slightly. Once done, remove it from the oven and let the bars cool at room temperature for about an hour. After cooling, refrigerate them for at least 4 hours. This helps the bars set completely. When you are ready to serve, drizzle caramel sauce on top. Now your apple pie cheesecake bars are ready to enjoy! To get a smooth and creamy texture, start with softened cream cheese. Cold cheese makes lumps. Beat the cream cheese until it's silky. Add sugar slowly while mixing. This helps blend the sugar evenly. Mix in eggs one at a time. This keeps the filling light and airy. Avoid overmixing after adding eggs. Too much mixing can add air, causing cracks. Sautéing apples gives them a soft and sweet flavor. Use medium heat to cook the apples evenly. Add lemon juice to help them keep their color. This also brightens their taste. Cook the apples until they're just tender, about 5-7 minutes. If you want a spicier taste, sprinkle in some cinnamon while they cook. This adds warmth to your bars. Serve the cheesecake bars chilled for the best flavor. Drizzle caramel sauce on top right before serving. This adds a sweet touch. You can also sprinkle some crushed nuts for crunch. A dollop of whipped cream can make it fancy. For extra fun, pair with vanilla ice cream. It's a treat everyone will love! {{image_2}} You can change the flavor of your Apple Pie Cheesecake Bars. For a spiced apple twist, add more cinnamon and a pinch of ginger. You can also use a mix of apples for a richer taste. If you want to go seasonal, try pumpkin. Replace some cream cheese with pumpkin puree. Add pumpkin spice for a cozy fall vibe. This gives your bars a fun twist while keeping them creamy. You can make these bars gluten-free easily. Swap the graham cracker crumbs with gluten-free crumbs. You can find these in many stores. Make sure your butter and sugar are gluten-free as well. This way, everyone can enjoy these delicious treats without worry. If you want a vegan version, there are simple swaps. Use vegan cream cheese instead of regular cream cheese. Try flax eggs or chia eggs in place of the eggs. Mix one tablespoon of flaxseed meal with three tablespoons of water. Let it sit until it thickens. For the crust, look for vegan butter or use coconut oil. This way, you keep the creamy texture while making it plant-based. To store leftover apple pie cheesecake bars, place them in an airtight container. This keeps them fresh and prevents drying out. If you cut the bars, wrap them individually in plastic wrap. Make sure to refrigerate them right away. You can freeze these cheesecake bars for later. First, let them cool completely. Then, wrap each bar in plastic wrap. Place the wrapped bars in a freezer-safe bag or container. This method helps to keep the flavor and texture intact when you are ready to enjoy them again. When stored in the fridge, these cheesecake bars last about 5-7 days. If frozen, they can last for up to 3 months. Always check for any signs of freezer burn before eating. For the best taste, enjoy them within the recommended time frame. Yes, using a store-bought graham cracker crust is a great option. It saves time and still tastes good. If you choose this, skip the step for making your crust. Just place the crust in your baking pan and fill it with the cheesecake mixture. To check if your cheesecake bars are done, look for a slight jiggle in the center when you shake the pan. The edges should be set, but the middle can still wiggle a bit. This means they will firm up as they cool. Yes! You can use other fruits like peaches or pears. Just make sure to sauté them like you do with apples. This step helps to soften the fruit and bring out its flavor. To cut the bars neatly, use a sharp knife. Dip the knife in warm water and wipe it dry before each cut. This helps prevent sticking and keeps the edges clean. You can also chill the bars before slicing for easier cutting. We explored the key ingredients needed for the perfect cheesecake bars. You learned about substitutes and nutritional facts. Next, we walked through the steps to prepare, bake, and cool your cheesecake. I shared tips for great texture and serving ideas. You can even try variations to make it your own. Remember to store leftovers properly for best taste later. With these insights, you can create delicious cheesecake bars that impress everyone. Happy baking!
                    Apple Pie Cheesecake Bars Tempting Dessert Recipe
                  • - 8 oz dark chocolate (70% cocoa or higher), chopped - ½ cup heavy cream - 1 teaspoon vanilla extract - 1 cup fresh raspberries (plus a few for garnish) - 1 cup cocoa powder (for rolling) - ¼ cup powdered sugar (for rolling) - Pinch of sea salt - Alternative chocolate options: If you prefer a sweeter chocolate, use semi-sweet chocolate. You can also try milk chocolate, but it will change the flavor. - Vegan cream substitutes: Use coconut cream or almond milk for a vegan option. These will give a rich texture, too. - Fresh vs. frozen raspberries: Fresh raspberries work best for flavor and texture. Frozen can be used, but they may be mushy after thawing. If using frozen, drain excess water before mixing. Heating the heavy cream Start by putting the heavy cream in a medium saucepan. Heat it on low. Watch it closely. You want it hot but not boiling. This step helps the chocolate melt well. Melting and mixing chocolate Once the cream is hot, take it off the heat. Add the chopped dark chocolate right away. Stir until the chocolate melts into the cream. The mixture should be smooth and shiny. This is where the magic begins! Incorporating flavors Now, mix in the vanilla extract and a pinch of sea salt. These flavors add depth to the truffles. Then, gently fold in the fresh raspberries. Be careful not to crush them too much. You want small pieces for bursts of flavor. Chilling the mixture Let the chocolate mixture cool at room temperature. After about 30 minutes, cover it. Place it in the fridge for about 2 hours. The mixture needs to be firm enough to handle. Rolling into balls When the chocolate is ready, scoop out small portions. Use a teaspoon or a melon baller. Roll each portion into a ball with your hands. Keep them small and round for a lovely shape. Coating techniques In a shallow bowl, mix cocoa powder and powdered sugar. Roll each truffle in this mix until well coated. This adds a nice texture and look to your truffles. Refrigeration process Place the rolled truffles on a parchment-lined tray. Put them back in the fridge for about 30 minutes. This helps them set well and hold their shape. Presentation recommendations Serve the truffles on a nice plate. Add a few fresh raspberries on top. A light dusting of cocoa powder makes them look fancy. For extra flair, drizzle some melted chocolate over them before serving. Enjoy your creation! - Overheating the chocolate: Heat the cream until it’s just about to simmer. If you boil it, the chocolate can seize up and become grainy. - Incorrect chilling time: Allow the mixture to chill for at least two hours. If it’s too soft, rolling the truffles will be messy. - Folding in raspberries without breaking them: Use a gentle hand when folding in the raspberries. This keeps them intact and adds lovely bursts of flavor. - Achieving the right size for truffles: Aim for a bite-sized ball, about one inch in diameter. This size ensures a good chocolate-to-raspberry ratio. - Adding extracts or spices: Try adding a touch of almond extract or a sprinkle of cinnamon for extra flavor depth. Just a little goes a long way! - Using different rolling ingredients: Besides cocoa powder and powdered sugar, consider rolling in crushed nuts or coconut for added texture and taste. Feel free to explore these tips to make your truffles even more delightful! {{image_2}} You can tweak the flavor of your truffles. One option is to add orange zest. This gives a fresh, citrusy kick. Mix the zest into the melted chocolate before adding the raspberries. Another great choice is mint-infused truffles. Add a few drops of mint extract to the chocolate. It adds a cool taste that pairs well with dark chocolate. If you need gluten-free options, you are in luck! All the ingredients in this recipe are naturally gluten-free. Just make sure to check for any cross-contamination. For vegan versions, swap the heavy cream for coconut cream. Use dairy-free chocolate for a fully vegan treat. This way, everyone can enjoy these truffles. How you present your truffles can be fun! Serve them on a decorative plate. Add some fresh raspberries for color. A light dusting of cocoa powder on top makes them look fancy. You can also drizzle melted chocolate over them for extra flair. For special occasions, think about themed garnishes. Use sprinkles or edible flowers to match your event. These ideas make your truffles not just tasty, but beautiful too! To keep your dark chocolate raspberry truffles fresh, store them properly. - Refrigerating truffles: Place them in an airtight container. This keeps them cool and prevents them from absorbing odors. They are best stored in the fridge for short-term use. - Freezing instructions for long-term storage: For longer storage, freeze the truffles. Arrange them in a single layer on a tray. Once frozen, transfer them to a freezer-safe bag. They can last up to three months in the freezer. When you're ready to enjoy them, let them thaw in the fridge overnight. How long do these truffles last? In the fridge, dark chocolate raspberry truffles stay fresh for about one week. What are the signs of truffle spoilage? Look for changes in texture or smell. If they develop an off odor or appear dry, it's best to toss them. Enjoy your truffles while they're fresh for the best taste! To make dark chocolate raspberry truffles, follow these basic steps: 1. Heat heavy cream in a saucepan over low heat until it's almost simmering. 2. Remove from heat and stir in chopped dark chocolate. Mix until smooth. 3. Add vanilla extract and a pinch of sea salt for flavor. 4. Fold in fresh raspberries gently so they don’t break. 5. Cool the mixture at room temperature. Then refrigerate for about 2 hours. 6. Once firm, scoop out small portions and roll them into balls. 7. Roll each ball in a mix of cocoa powder and powdered sugar. 8. Place on a tray and refrigerate for another 30 minutes to set. Yes! You can use various fruits in your truffles. Here are some options: - Strawberries: They add a sweet and tangy flavor. - Cherries: These give a rich, fruity taste and pair well with chocolate. - Blueberries: They add a burst of flavor and are easy to fold in. - Peaches: These can add a soft, juicy texture for a unique twist. Feel free to experiment with fruits you love! To melt dark chocolate perfectly, follow these tips: - Use a double boiler. Place a heatproof bowl over simmering water. This keeps the chocolate from direct heat. - Stir often. This helps the chocolate melt evenly and prevents burning. - If using a microwave, heat in short intervals. Start with 15 seconds, then stir, and repeat until melted. - Always remove the chocolate from heat before it’s fully melted. It will continue to melt from residual heat. Using these methods ensures smooth, melted chocolate for your truffles. You now know how to make dark chocolate raspberry truffles. We covered key ingredients like dark chocolate and fresh raspberries. I shared step-by-step instructions to guide your process. We explored tips to avoid common mistakes and enhance flavor. Finally, I highlighted variations to suit different tastes and dietary needs. With this knowledge, you can create delightful truffles that impress everyone. Enjoy the fun of making your own sweet treats!
                    Decadent Dark Chocolate Raspberry Truffles Recipe

                  Recent Drinks

                  • - 1 cup plain yogurt - ½ cup coconut milk - 1 cup fresh blueberries (plus extra for garnish) - 2 tablespoons honey or agave syrup (adjust to taste) - ½ teaspoon vanilla extract - A pinch of cardamom powder - Ice cubes (optional) Using fresh ingredients makes a big difference in taste. Fresh blueberries burst with flavor and nutrients. They give the lassi a bright color and a sweet taste. If you can’t find fresh blueberries, frozen ones work too. They are picked at their peak and frozen quickly. This helps keep their taste and nutrients. However, fresh blueberries always add a better texture. Each ingredient in this lassi has great health benefits. - Plain yogurt: Full of protein and good for your gut health. - Coconut milk: Contains healthy fats that can boost energy. - Blueberries: Packed with antioxidants, they help fight disease. - Honey or agave syrup: Adds sweetness and has some vitamins. - Vanilla extract: Adds flavor and may reduce stress. - Cardamom powder: Can aid digestion and add a warm spice note. This Blueberry Coconut Lassi is not just tasty; it’s also good for you! Start by gathering all your ingredients. This makes the process easier and faster. You will need: - 1 cup plain yogurt - ½ cup coconut milk - 1 cup fresh blueberries (plus extra for garnish) - 2 tablespoons honey or agave syrup (adjust to taste) - ½ teaspoon vanilla extract - A pinch of cardamom powder - Ice cubes (optional) Make sure your blueberries are fresh and ripe. They add great flavor and color. If you want a sweeter lassi, adjust the honey or agave syrup to your taste. Now it’s time to blend! In a blender, combine the yogurt, coconut milk, blueberries, honey, vanilla extract, and cardamom powder. Blend on high speed until the mix is smooth and creamy. If you like a thinner drink, add more coconut milk. After blending, taste the lassi. You can add more honey if you want it sweeter. For a chilled treat, add ice cubes and blend again until frothy. Pour your lassi into tall, clear glasses. This shows off the pretty purple color. For a special touch, garnish with a few whole blueberries on top. You can also sprinkle a little cardamom powder for added flair. If you want to impress, add a slice of lime on the glass rim. This not only looks good but adds a nice contrast to the drink. Enjoy your refreshing Blueberry Coconut Lassi! For the full recipe, check the earlier section. For a thick and creamy lassi, use full-fat yogurt. This gives your drink a rich texture. If you want it thinner, add a bit more coconut milk. Blend it well until it's smooth. You can also try adding ice cubes. This makes it frothy and cold. Both honey and agave syrup are great for sweetness. Honey gives a floral taste, while agave is mild. Start with two tablespoons and taste it. If you want it sweeter, add more. Remember, you can always add more, but you can't take it out! You can make your lassi even better! Try adding a pinch of cinnamon or nutmeg for warmth. Fresh mint leaves can add a nice touch too. You might even add a splash of lime juice for a zesty kick. All these extras can make your blueberry coconut lassi unique and delicious. For the full recipe, check out the complete instructions. {{image_2}} You can easily make a vegan version of blueberry coconut lassi. Just swap the yogurt with a plant-based option. Use coconut yogurt or almond yogurt for a creamy base. These alternatives keep that rich flavor. They also add a nice texture. You still get the fresh taste from blueberries and coconut milk. This change makes the drink creamy without any dairy. Spices can enhance the flavor of your lassi. Cardamom adds a warm note. You can also try cinnamon for a sweet twist. If you want more fruit, think about adding bananas or mangoes. These fruits blend well with blueberries. They also boost the health benefits. Each adds its own flavor and richness to the drink. If you prefer different dairy options, there are many choices. Greek yogurt gives a thicker texture. It also adds a tangy taste. You can use regular yogurt instead of plain yogurt. It is a great way to change the flavor. Try using buttermilk for a unique twist. Each choice will change the texture and taste of your lassi. Each option keeps the drink creamy and delicious. For the full recipe, check out the link above. To keep your blueberry coconut lassi fresh, store it in a clean glass jar. Make sure the jar is airtight. This helps keep out air and bacteria. If you have leftovers, don’t let them sit out for long. Refrigerate the lassi within two hours of making it. Always use a spoon to scoop the lassi. Avoid using your fingers, as this can introduce germs. When stored properly, blueberry coconut lassi lasts about 2 to 3 days in the fridge. After that, the taste and texture may change. You will notice it may separate a bit. If this happens, just give it a good shake or blend it again. Always check for any off smells or changes in color before consuming. You can freeze blueberry coconut lassi for later enjoyment. Pour the lassi into ice cube trays or freezer-safe containers. Leave some space at the top, as liquids expand when frozen. To use, thaw the lassi in the fridge overnight or blend the frozen cubes into smoothies. This method keeps the flavor and nutrients intact. For the best taste, use frozen lassi within three months. For the full recipe, check out the earlier section! Yes, you can use Greek yogurt. It makes the lassi thicker and creamier. If you prefer a lighter drink, stick with plain yogurt. Greek yogurt has more protein, which is great for keeping you full. Just remember to adjust the coconut milk to balance the thickness. Absolutely! Blueberry Coconut Lassi is a fun and tasty drink for kids. It has natural sweetness from honey and blueberries. The yogurt provides healthy probiotics, good for digestion. Kids love the vibrant color and fruity flavor. You can make it as sweet as they like! You can find Blueberry Coconut Lassi at many health food stores or cafes. Some grocery stores may also carry it in the yogurt section. If you want a fresh one, try making it at home. You can easily whip up this drink with the Full Recipe I provided. Blueberry coconut lassi is a nutritious and tasty drink. You learned about key ingredients, like fresh blueberries and coconut. The blending process ensures a smooth drink. Adjust sweetness with honey or agave for your taste. You can try different fruits and spices to mix it up. Storing tips help you keep leftovers fresh. Remember, lassi is fun to make and enjoy. Experiment with variations to find your favorite way to drink it. Enjoy your delicious and healthy blueberry coconut lassi!
                    Blueberry Coconut Lassi Creamy and Refreshing Drink
                  • For this recipe, you need ripe peaches and mangoes. Ripe peaches should feel soft when you gently press them. They should smell sweet and juicy. Ripe mangoes should have a slight give when pressed. Their skin should show a bit of color, often yellow or red. Using fresh fruit is best. Fresh fruit tastes better and has more nutrients. Frozen fruit can work, but it may change the drink's texture. Fresh peaches and mangoes bring bright flavor. They also add a beautiful color to your drink. You can use different types of tea in this recipe. Black tea gives a strong flavor, while green tea adds a lighter taste. Choose what you like best. For milk, you have many options. You can use dairy milk or non-dairy milk like almond or oat milk. Each choice adds a unique twist to the drink. Non-dairy milk can be creamier, while dairy milk gives a classic taste. When sweetening your drink, you can choose honey or agave syrup. Honey has a rich flavor and can be a bit thicker. Agave syrup is sweeter and lighter. Both work well, so pick what you prefer. You might also want to add spices like cinnamon. Cinnamon gives a warm flavor that pairs well with peach and mango. It also has health benefits, like helping with digestion. A little can go a long way in enhancing your drink's taste. For the full recipe, refer to the section above. To make the fruit puree, start with fresh peaches and mangoes. Wash the fruit well. For the peach, slice it in half and remove the pit. Make thin slices from one half and then dice the other half into small pieces. For the mango, peel it. Cut the sides off the pit and dice the flesh. You want small, even pieces. This helps the puree blend smoothly. Now, grab your blender. Add the sliced peach and diced mango. Blend them until they are smooth. This is your fruit puree. Next, in a large pitcher, pour in the cooled brewed black tea. Add the milk and sweeteners. You can use honey or agave syrup, depending on your taste. Mix these well. If you want, add in the vanilla extract and ground cinnamon for more flavor. Stir until everything is combined. Choose your favorite glasses. Fill each glass with ice cubes. Pour the tea mixture into the glasses, filling them about three-quarters full. Now, scoop a generous spoonful of the peach-mango puree on top. Let it swirl into the milk tea for a lovely look. Finally, add fresh mint leaves on top for a nice touch. Enjoy your Peach Mango Milk Tea! You can find the full recipe [here](Full Recipe). To make a smooth puree, start with ripe fruit. Use one peach and one mango. Slice the peach and dice the mango. Place them in a blender. Blend until there are no lumps. If your puree seems thick, add a tiny splash of water. This will help it blend better. A smooth puree makes your drink look great and taste even better. Sweetness can change the whole drink. Start with two tablespoons of honey or agave syrup. Taste it after mixing. If you like it sweeter, add more. Some might want less sweetness, so adjust to your taste. Remember, the fruit adds natural sugar too. Always taste as you go to find the right balance. You can make your drink even more special with extra flavors. Try adding a teaspoon of vanilla extract for a nice touch. Ground cinnamon gives warmth and depth. If you want something fresh, add mint leaves for garnish. They look pretty and add a nice flavor. You can also explore other fruits like strawberries for a twist. {{image_2}} You can change the fruits in your peach mango milk tea. Try using strawberries for a sweet twist. You can also add passion fruit for a tangy kick. Mix and match based on what you love. The goal is to keep it fruity and fun. Each fruit brings its own flavor. This keeps your drink fresh and exciting. Using different teas can change the taste of your milk tea. Black tea gives a rich flavor, while green tea offers a lighter taste. Herbal teas, like chamomile, can add a calming touch. Experiment with what you have at home. Each tea base will give your drink a new vibe. So don’t be afraid to switch it up! If you want a vegan version, use plant-based milk. Almond milk or oat milk works well. You can also use maple syrup instead of honey for sweetness. For a keto option, use unsweetened almond milk and a low-carb sweetener. This way, you can enjoy peach mango milk tea without the carbs. These changes make it fit your diet while keeping it delicious. To keep your peaches and mangoes fresh, follow these tips: - Peaches: Store ripe peaches in the fridge. They stay fresh for about three to five days. If they are not ripe, keep them at room temperature until they soften. - Mangoes: Like peaches, keep ripe mangoes in the fridge. They can last about five days. If they are firm, leave them out to ripen first. Fresh fruit is best for your peach mango milk tea. Avoid frozen fruit if you want a bright, fresh flavor. After making your peach mango milk tea, you may want to store it. Here is how to do it right: - Refrigeration: Pour the milk tea into an airtight container. This helps keep it fresh and tasty. - Serving Later: When you serve it later, stir it well. The fruit puree may settle at the bottom, so mix it again. Your peach mango milk tea can last in the fridge for about two to three days. However, for the best flavor, enjoy it fresh. If you notice any change in taste or smell, it’s best to toss it out. Peach mango milk tea is a fruity drink made from fresh peaches and mangoes. You blend the fruits into a smooth puree. Then, you mix it with brewed black tea and milk for a creamy texture. This drink is sweet, refreshing, and perfect for hot days. You can find peach mango milk tea at many cafes and tea shops. Popular brands include Chatime and Gong Cha. They offer different versions of this drink. Local bubble tea cafes may also serve it. Check menus for special flavors and toppings. Peach mango milk tea has many health benefits. Peaches are high in vitamins A and C. They can help your skin and immune system. Mangoes are rich in antioxidants and fiber, which support digestion. Using milk adds calcium for strong bones. If you use honey or agave, you get a natural sweetener with fewer chemicals. Enjoy this drink as a tasty treat that is also good for you. In this article, we explored how to make delicious peach mango milk tea. We covered fresh ingredients, sweeteners, and the importance of using the right tea and milk. I shared tips for creating the perfect puree and adjusting sweetness to your taste. You can also experiment with different fruits and teas. Remember, storing your tea properly helps maintain its freshness. By following these steps, you can enjoy a tasty, healthy drink anytime. Enjoy your peach mango milk tea adventure!
                    Peach Mango Milk Tea Refreshing and Simple Recipe
                  • To make a delicious pistachio cardamom iced coffee, gather these key ingredients: - 2 cups strong brewed coffee, cooled - 1 cup milk (or non-dairy alternative) - 1 tablespoon pistachio paste - ½ teaspoon ground cardamom - 2 tablespoons maple syrup (or to taste) - Crushed ice - Chopped pistachios and cardamom pods for garnish These ingredients work together to create a rich and refreshing drink. The strong brewed coffee gives you a great base, while the pistachio paste adds a creamy texture. The cardamom provides a warm spice, and maple syrup sweetens the mix. If you want a non-dairy option, try these milk alternatives: - Almond milk - Oat milk - Coconut milk - Cashew milk Each of these options brings its own flavor to the drink. Almond milk adds a nutty taste. Oat milk provides creaminess. Coconut milk gives a tropical twist. Cashew milk is rich and smooth. Choose the milk that fits your taste best! Garnishes make your drink look and taste even better. Here are some great options: - Chopped pistachios - Whole cardamom pods - A sprinkle of cinnamon - A drizzle of honey Chopped pistachios add crunch and a pop of color. Whole cardamom pods enhance the spice aroma. A sprinkle of cinnamon can add warmth. A drizzle of honey gives extra sweetness. These garnishes not only beautify your iced coffee but also boost the flavor! For the full recipe, check the detailed instructions to create this delightful drink. Start by brewing two cups of strong coffee. Let it cool down completely. You want it chilled for this drink. Using cooled coffee helps keep your iced drink refreshing. This step is key for the perfect iced coffee. In a large bowl or pitcher, mix the cooled coffee with one cup of milk. You can use any milk you like, even non-dairy options. Add one tablespoon of pistachio paste to the mix. This gives the drink its nutty flavor. Next, sprinkle in half a teaspoon of ground cardamom. This spice adds warmth and depth. Then, pour in two tablespoons of maple syrup. Taste the mix and adjust it to your liking. Some may want it sweeter. Whisk everything together until the pistachio paste blends well. This step is important to get a smooth drink. Take a glass and fill it halfway with crushed ice. Pour your coffee mixture over the ice, leaving some room at the top. For a nice finish, sprinkle chopped pistachios and a few cardamom pods on top. This makes the drink look beautiful and adds extra flavor. Before sipping, stir gently. This helps mix the flavors again. Enjoy your pistachio cardamom iced coffee! You can find the full recipe at the beginning of this article. To get the best taste, you should focus on the coffee and spices. Use strong brewed coffee; it makes a big difference. I like to brew it a little stronger than usual. The pistachio paste gives a creamy texture. Make sure it is mixed well. Cardamom has a strong flavor. Just half a teaspoon adds warmth without overpowering. Taste it as you mix. If you want it sweeter, add more maple syrup. Adjust it to what you love! If you have extra iced coffee, store it right! Use a sealed container to keep it fresh. It can last in the fridge for up to three days. But remember, the flavors may change over time. If you want to enjoy it again, shake it before serving. If it tastes a bit off, try adding more milk or syrup. This helps revive the flavors. When making your iced coffee, avoid these common mistakes. First, don’t skip cooling the coffee. Hot coffee will melt the ice too fast. Next, be careful with the spices. Too much cardamom can make it taste bitter. Always start with less; you can add more later. Lastly, don’t forget the garnish! Chopped pistachios and cardamom pods make your drink look pretty and add flavor. For the full recipe, check the section above! {{image_2}} You can easily make this drink dairy-free or vegan. Instead of regular milk, use almond, oat, or coconut milk. These options add their own unique tastes. I love using almond milk for a nutty twist. Just ensure the milk is unsweetened to keep the flavor balanced. Feel free to get creative with flavors! You can mix in vanilla extract for warmth. A dash of cinnamon gives a nice spice kick. If you want something unique, try adding a splash of rose water. This will give it a floral note that pairs well with cardamom. Maple syrup is a great choice for sweetening this drink. However, you can try honey or agave syrup as well. For a low-calorie option, consider stevia or monk fruit sweetener. Each sweetener brings its own taste, so taste as you go. Adjust until it's just how you like it. For the full recipe, check out the detailed instructions above. Enjoy experimenting with your own variations! If you have leftover pistachio cardamom iced coffee, store it in an airtight container. This keeps the flavors fresh. You can use a glass jar or a plastic pitcher. Make sure to put it in the fridge right away. Do not let it sit out at room temperature. Store your ingredients properly for the best taste. Keep pistachio paste in the fridge after opening. It lasts longer that way. Ground cardamom should stay in a cool, dark place. Use it within six months for the best flavor. If you use milk, check the expiration date often. Homemade pistachio cardamom iced coffee stays fresh for about 3 days in the fridge. After that, the taste may change. If it starts to smell funny or looks off, toss it out. Always give it a good stir before drinking. For the full recipe, check the top of this article. Pistachio Cardamom Iced Coffee is a unique drink that mixes rich coffee with nutty flavors. You blend brewed coffee, milk, pistachio paste, and cardamom for a refreshing treat. The pistachios add creaminess, while cardamom gives a warm spice. This drink is perfect for hot days or any time you crave something special. Yes, you can prepare the coffee mixture ahead of time. Just mix the coffee, milk, pistachio paste, and cardamom. Store it in your fridge for up to two days. When you are ready to enjoy, pour it over ice and add your garnishes. This makes it easy to serve to guests or enjoy a quick treat. Pistachios are packed with protein, fiber, and healthy fats. They help keep you full and support heart health. Cardamom has antioxidant properties and can aid digestion. Together, these ingredients make your iced coffee not just tasty but also good for you. Enjoying this drink can be a delightful way to add nutrients to your day. Pistachio cardamom iced coffee combines unique flavors for a refreshing drink. You learned about essential ingredients, milk options, and flavor enhancers to make it great. Following the step-by-step guide helps ensure your coffee tastes its best. I shared helpful tips to avoid mistakes and achieve balance. Plus, I offered ideas for variations and proper storage. Enjoy experimenting with this drink for a delightful taste experience. Make it your own, and don’t hesitate to share it with friends!
                    Pistachio Cardamom Iced Coffee Rich and Refreshing Drink
                  • - 1 cup strawberries, hulled and sliced - 1 medium dragon fruit, peeled and diced - 4 cups water - 2 tablespoons agave syrup - 1 tablespoon lime juice These main ingredients make the base for your Strawberry Dragon Fruit Agua Fresca. Fresh strawberries give a sweet and tangy taste. Dragon fruit adds a unique texture and a bright color. - Ice cubes - Fresh mint leaves for garnish Adding ice cubes keeps your drink cool and refreshing. A sprig of mint on top adds a nice touch. It also enhances the aroma, making each sip more delightful. - Alternative sweeteners - Additional fruits for blending You can use other sweeteners if you prefer. Honey or maple syrup works well. Want to experiment? Try adding other fruits like mango or pineapple for a twist. They will blend beautifully with the dragon fruit and strawberries. For the full recipe, check the section above. - Step 1: Blend strawberries and dragon fruit Start by adding 1 cup of sliced strawberries and 1 medium diced dragon fruit into a blender. Pour in 2 cups of water. Blend this mix on high until it's smooth and creamy. The colors should be bright and inviting. - Step 2: Strain the mixture Next, set up a fine mesh sieve over a large pitcher. Pour the blended mix into the sieve. Use a spatula to push the liquid through while leaving the pulp behind. This step makes your agua fresca silky and refreshing. - Step 3: Combine with remaining ingredients Once strained, add 2 more cups of water to the pitcher. Then mix in 2 tablespoons of agave syrup and 1 tablespoon of lime juice. Stir everything together until well combined. - Serve over ice Fill tall glasses with ice cubes. Pour the chilled agua fresca over the ice. This drink is best enjoyed cold on a warm day. - Garnish with mint leaves To add a touch of beauty, garnish each glass with fresh mint leaves. This not only looks great but also adds a fresh aroma. - Taste testing and modifications Before serving, give your agua fresca a taste. If you want it sweeter, add more agave syrup. Stir well and taste again. Adjust until it’s just right for you. Enjoy making it your own! Use fresh strawberries and dragon fruit for the best taste. Look for bright red strawberries. They should be firm and free from soft spots. For dragon fruit, select one with vibrant skin. It should feel slightly soft when you press it gently. To get a smooth drink, blend the fruit well. Start by adding strawberries and dragon fruit to the blender. Use two cups of water for easy blending. Blend on high until it looks creamy. If your mixture is too thick, add more water before blending again. Taste your agua fresca after mixing in the lime juice and agave syrup. If it needs more lime, add a little more juice. If it’s not sweet enough, stir in more agave syrup. Adjust these flavors to fit your taste. Enjoy experimenting until it’s just right! {{image_2}} You can change up the fruits in this recipe for new flavors. Try using mango, pineapple, or kiwi. Each fruit brings its own taste and color. For a berry twist, add blueberries or raspberries. These fruits all blend well with strawberries and dragon fruit. Feel free to mix and match. You might find a combo you love even more! If you want to make this drink vegan, switch the sweeteners. Instead of agave syrup, use maple syrup or coconut sugar. Both choices work well and keep the drink plant-based. Just remember to adjust the amount based on how sweet you like it. Taste as you go, and find your perfect balance! If you enjoy a bit of heat, consider adding jalapeño or ginger. A few slices of jalapeño can bring a fun, spicy kick. If you prefer ginger, grate a small piece and mix it in. Both options add a unique twist to the refreshing taste. This can make your agua fresca exciting and different. Give it a try if you’re feeling adventurous! To keep your strawberry dragon fruit agua fresca fresh, store it in the fridge. Use a clean glass pitcher or jar with a tight lid. This helps keep out air and light, which can affect taste. If you have leftovers, it’s best to drink them within a couple of days. In the fridge, your agua fresca stays fresh for up to three days. After that, the flavors may fade. If you notice any change in smell or color, it’s best to throw it away. Always give it a taste before serving to ensure it's still good. You can freeze agua fresca if you want to save it for later. Pour the mixture into ice cube trays or freezer-safe bags. This way, you can enjoy it for up to three months. When you’re ready to drink, just thaw it in the fridge. You can also blend the frozen cubes into smoothies for a quick treat. Agua fresca is a light, refreshing drink from Mexico. It combines fruit, water, and sometimes sugar. People enjoy it on hot days. The name means "fresh water" in Spanish. Each region has its own version, using local fruits. You can find flavors like hibiscus, tamarind, and cucumber. This drink is perfect for gatherings. It’s easy to make and very tasty! Yes, you can make this drink ahead of time. Prepare it in the morning for later. Store it in the fridge for up to three days. Keep it in a sealed container. The flavors will blend well over time. Just remember to stir it before serving. If it separates, that's normal. Strawberry Dragon Fruit Agua Fresca is healthy and refreshing. Strawberries are high in vitamin C and fiber. Dragon fruit is low in calories and packed with antioxidants. This drink is hydrating, especially in hot weather. Using agave syrup keeps it natural. You can adjust sweetness to fit your taste. Overall, this drink is a nutritious choice for everyone! You’ve learned how to make a refreshing Strawberry Dragon Fruit Agua Fresca. We covered the simplest ingredients and steps. This drink is tasty and easy to customize. Don’t forget to try different fruits or adjust the sweetness to your liking. Store any leftovers properly to enjoy later. Experiment with flavors to find your favorite twist. This drink can be a fun addition to your menu. Enjoy making this drink for yourself and friends.
                    Strawberry Dragon Fruit Agua Fresca Refreshing Drink

                  Footer

                  Beat the heat this summer with a delightful Whipped Pink Lemonade that will impress your friends and family! This refreshing drink combines fresh lemon juice, strawberries, and a creamy whipped topping for a fun twist on a classic favorite. Perfect for gatherings, picnics, or just a sunny day, this easy recipe invites you to add your creative spin. Ready to make a splash? Click through to explore the full recipe and serve up this summer delight today!
                  ↑ back to top

                  More information

                  • Home
                  • Drinks
                  • Appetizer
                  • Dinner
                  • Desserts
                  • About
                  • Contact
                  • Privacy Policy

                  Our Policies

                  • Privacy Policy
                  • GDPR Policy
                  • Terms Of Use
                  • Copyright Policy
                  • Cookie Policy
                  • Disclaimer

                  Copyright © 2025 cheftaling