Chef Taling

  • Recipes
    • Dinner
    • Desserts
    • Appetizer
    • Drinks
  • Privacy Policy
  • Contact
  • About
menu icon
go to homepage
  • Recipes
    • Dinner
    • Desserts
    • Appetizer
    • Drinks
  • Privacy Policy
  • Contact
  • About

search icon
Homepage link
  • Recipes
    • Dinner
    • Desserts
    • Appetizer
    • Drinks
  • Privacy Policy
  • Contact
  • About

×

Tropical Acai Smoothie Bowl Energizing Healthy Treat

Published: Jul 3, 2025 · Modified: Jul 31, 2025 by Taling · Leave a Comment

↓ Jump to Recipe

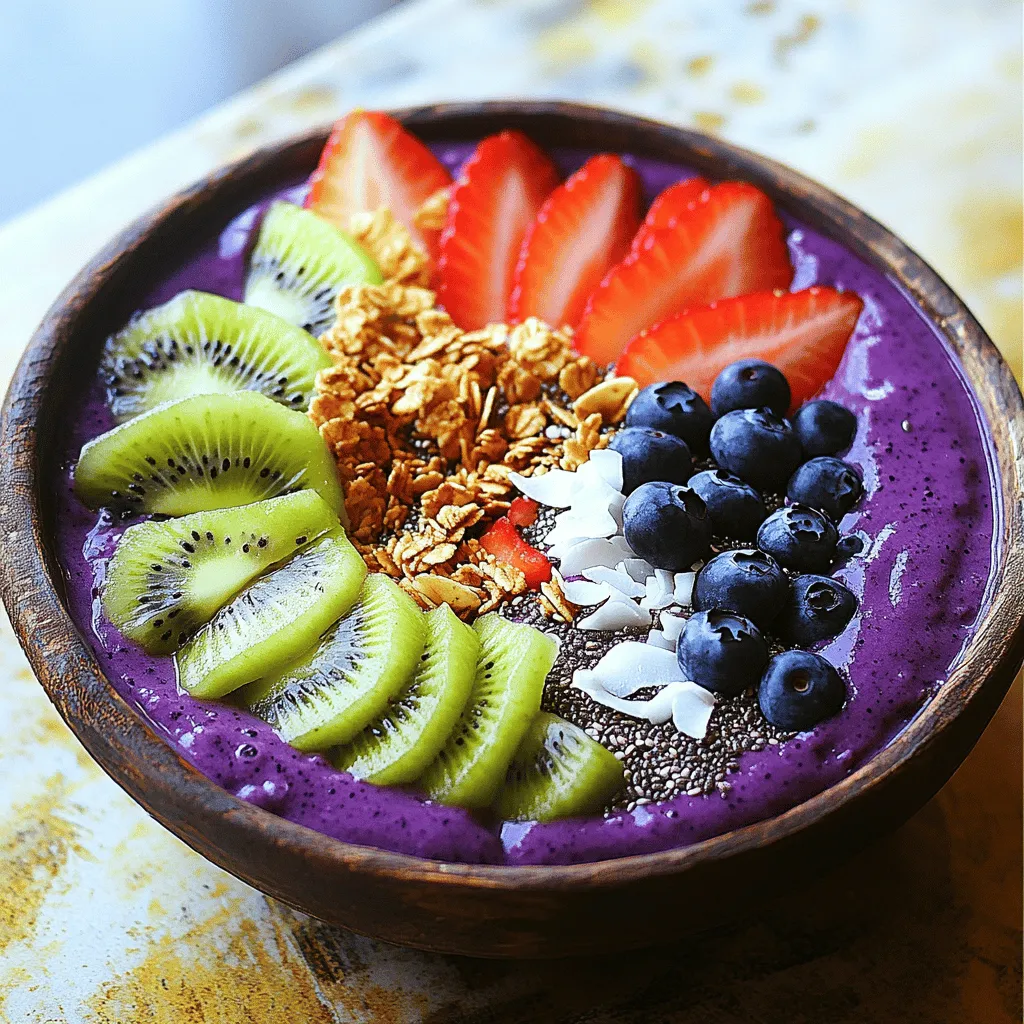
Are you ready to whip up a delicious and energizing Tropical Acai Smoothie Bowl? Packed with vibrant flavors and wholesome ingredients, this treat is a perfect way to boost your day. In this guide, I’ll share easy steps to create a creamy bowl filled with açaí, ripe bananas, and fresh pineapple. Plus, you’ll discover fun topping ideas and tips for perfect presentation. Let’s dive into this healthy delight that will leave you refreshed!

- 2 packets of frozen açaí puree - 1 ripe banana - 1 cup of fresh pineapple chunks - 1 cup of coconut milk (or any non-dairy milk) - 1 tablespoon of honey or agave syrup (optional) For a vibrant tropical taste, the main ingredients are key. Açaí puree brings rich color and flavor. It is full of antioxidants. Bananas add creaminess and natural sweetness. Fresh pineapple gives a bright, juicy touch. Coconut milk offers a smooth base. You can use any non-dairy milk you prefer. Honey or agave syrup adds sweetness if needed. - Sliced kiwi - Coconut flakes - Granola - Chia seeds - Fresh berries (e.g., strawberries, blueberries) Toppings make your smoothie bowl pop! Sliced kiwi adds a zesty kick. Coconut flakes give it a tropical crunch. Granola provides texture and flavor. Chia seeds offer extra nutrients. Fresh berries, like strawberries and blueberries, add color and taste. You can mix and match these toppings for a fun look. For the full recipe, please refer to the section above. 1. Blend the ingredients Start by adding the frozen açaí puree, ripe banana, fresh pineapple chunks, and coconut milk into a blender. If you want it sweeter, you can add honey or agave syrup. Blend this mixture on high speed until it becomes creamy and smooth. 2. Adjust consistency with coconut milk If your smoothie is too thick, just add a bit more coconut milk. Blend again until you reach the texture you want. This step is key to making your smoothie bowl enjoyable. 3. Pour into a bowl Once blended, carefully pour the smoothie mixture into a bowl. Make sure to use a large enough bowl to hold all the goodness. 4. Add toppings creatively Now comes the fun part! Arrange your toppings, such as sliced kiwi, coconut flakes, granola, chia seeds, and fresh berries, over the smoothie. Try to create a colorful pattern. I love making a circular design to highlight all the vibrant colors. - Tips for presentation Use a shallow bowl to show off your beautiful toppings. You can also sprinkle some extra coconut flakes around the edge for a nice touch. A colorful presentation makes your smoothie bowl more fun to eat. - Recommended serving utensils Serve your smoothie bowl with a regular spoon. If you want to make it more special, use a wooden spoon or a cute, colorful one. Enjoy your tropical treat right away to keep it fresh and tasty. For the full recipe, refer to the earlier sections. To make a great smoothie bowl, start with ripe fruits. Ripe fruits taste better and add natural sweetness. Look for bananas that are yellow with some brown spots. When it comes to pineapples, choose ones that smell sweet. It ensures they are juicy and fresh. Blending is key to your smoothie bowl. You want a smooth and creamy texture. If your mix is too thick, add more coconut milk. Blend again until you reach the right consistency. A good blend makes your bowl enjoyable and easy to eat. A colorful topping arrangement makes your smoothie bowl pop. Use fresh berries, sliced kiwi, and coconut flakes. Lay them out in a pattern. A circular design looks appealing and fun. To elevate your smoothie bowl's look, use bowls with interesting shapes. Tall bowls or wide, shallow ones can change the game. Garnish with a sprinkle of chia seeds for a fancy touch. This not only looks great but adds a bit of crunch too. {{image_2}} You can change the non-dairy milk for this smoothie. Almond, soy, or oat milk work well. Each milk adds a different taste. Try using seasonal fruits too. Mango, papaya, or berries add a fresh twist. You can mix and match to find your favorite blend. Want more nutrients? Add spinach or kale to your smoothie. They blend well and boost health. You won’t even taste them! For extra energy, stir in nut butter or protein powder. Both will make your smoothie more filling. They add great flavor too! You can also experiment with different combinations to find the best taste for you. To store leftovers, place your smoothie bowl in the fridge. Use a tight container to keep it fresh. Glass or BPA-free plastic works well for storage. I prefer glass because it keeps flavors better. You can freeze smoothie bowls for later. Just pour the mixture into an airtight container. Leave some space at the top, as it will expand when frozen. To defrost, place it in the fridge overnight. If you’re in a rush, you can use the microwave. Just heat it in short bursts to avoid cooking. Enjoy your tropical treat later with ease! For the recipe, check out the Full Recipe. What is açaí and what are its benefits? Açaí is a small, dark purple berry from Brazil. It is full of antioxidants, which help fight free radicals in the body. Açaí is also rich in fiber, promoting good digestion. Plus, it has healthy fats that support heart health. You can enjoy its fruity taste in many dishes. Can I make this smoothie bowl ahead of time? Yes! You can prepare the smoothie mix and store it in the fridge for up to 24 hours. Just remember to keep the toppings separate. This way, your bowl stays fresh and tasty. How can I make this recipe vegan or gluten-free? To make it vegan, use agave syrup instead of honey. For gluten-free, ensure your granola and any other toppings are gluten-free. Most fruits and coconut milk are naturally gluten-free, so you’re all set! Can I substitute açaí with other fruits? Yes, you can! If you can’t find açaí, try using frozen berries like blueberries or strawberries. These fruits will add sweetness and a burst of color to your bowl. What to do if the smoothie is too thick? If your smoothie is too thick, just add a little more coconut milk. Blend again until you reach your desired creaminess. This will make it easier to pour and enjoy. How to fix a smoothie bowl that tastes too bland? If your smoothie bowl lacks flavor, try adding a splash of vanilla extract or a pinch of salt. You can also mix in a bit of honey or agave syrup for sweetness. Adjust the toppings to add more taste and texture. This article covers how to make a delicious açaí smoothie bowl. You learned about the key ingredients, easy steps for preparation, and creative topping ideas. I shared tips to improve taste and presentation, plus fun variations to try. Don’t forget storage techniques to keep your bowl fresh. With all this information, you can enjoy a tasty and nutritious treat anytime. Get creative with your favorites and make this recipe truly yours. Enjoy every bite!

Ingredients

Main Ingredients

  1. 2 packets of frozen açaí puree
  2. 1 ripe banana
  3. 1 cup of fresh pineapple chunks
  4. 1 cup of coconut milk (or any non-dairy milk)
  5. 1 tablespoon of honey or agave syrup (optional)

For a vibrant tropical taste, the main ingredients are key. Açaí puree brings rich color and flavor. It is full of antioxidants. Bananas add creaminess and natural sweetness. Fresh pineapple gives a bright, juicy touch. Coconut milk offers a smooth base. You can use any non-dairy milk you prefer. Honey or agave syrup adds sweetness if needed.

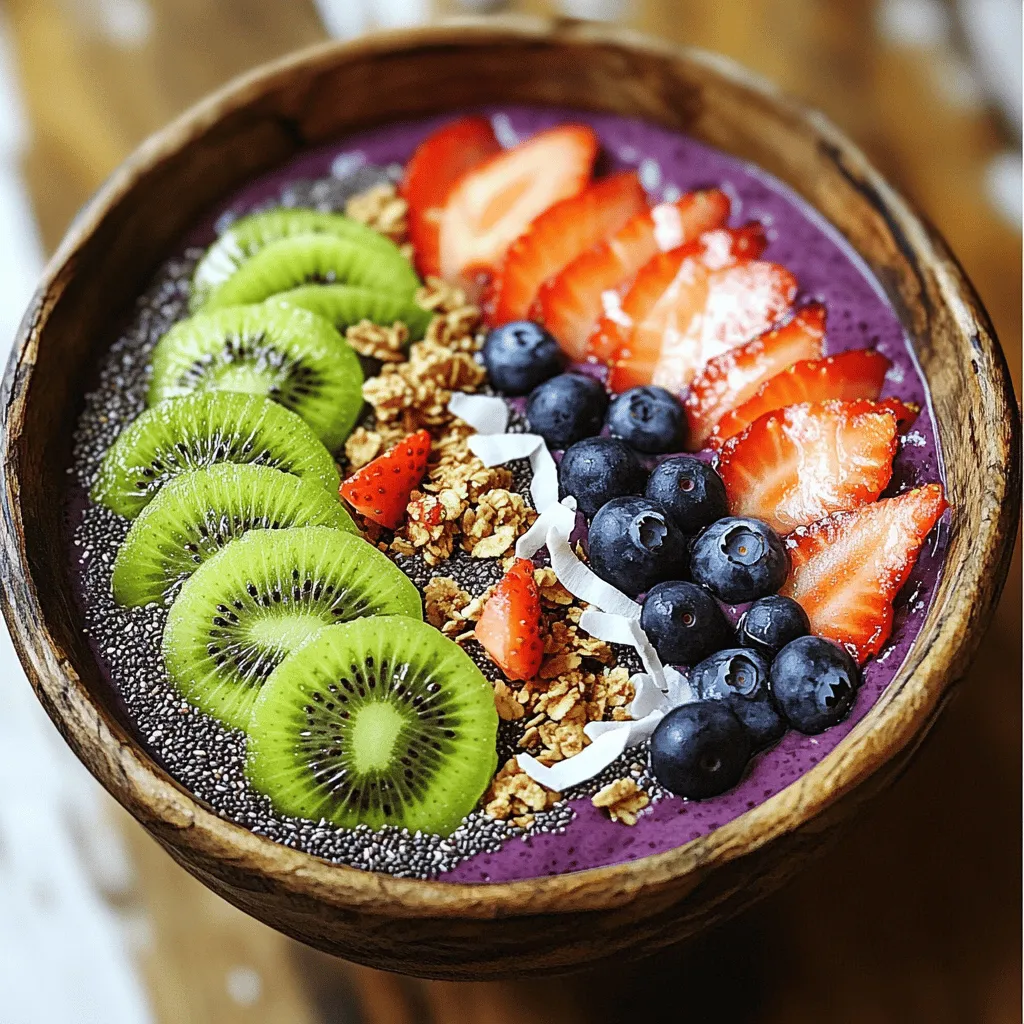
Toppings Suggestions

  1. Sliced kiwi
  2. Coconut flakes
  3. Granola
  4. Chia seeds
  5. Fresh berries (e.g., strawberries, blueberries)

Toppings make your smoothie bowl pop! Sliced kiwi adds a zesty kick. Coconut flakes give it a tropical crunch. Granola provides texture and flavor. Chia seeds offer extra nutrients. Fresh berries, like strawberries and blueberries, add color and taste. You can mix and match these toppings for a fun look.

Step-by-Step Instructions

Preparation Steps

1. Blend the ingredients

Start by adding the frozen açaí puree, ripe banana, fresh pineapple chunks, and coconut milk into a blender. If you want it sweeter, you can add honey or agave syrup. Blend this mixture on high speed until it becomes creamy and smooth.

2. Adjust consistency with coconut milk

If your smoothie is too thick, just add a bit more coconut milk. Blend again until you reach the texture you want. This step is key to making your smoothie bowl enjoyable.

3. Pour into a bowl

Once blended, carefully pour the smoothie mixture into a bowl. Make sure to use a large enough bowl to hold all the goodness.

4. Add toppings creatively

Now comes the fun part! Arrange your toppings, such as sliced kiwi, coconut flakes, granola, chia seeds, and fresh berries, over the smoothie. Try to create a colorful pattern. I love making a circular design to highlight all the vibrant colors.

Visual and Serving Suggestions

  1. Tips for presentation

Use a shallow bowl to show off your beautiful toppings. You can also sprinkle some extra coconut flakes around the edge for a nice touch. A colorful presentation makes your smoothie bowl more fun to eat.

  1. Recommended serving utensils

Serve your smoothie bowl with a regular spoon. If you want to make it more special, use a wooden spoon or a cute, colorful one. Enjoy your tropical treat right away to keep it fresh and tasty.

Tips & Tricks

Perfecting Your Smoothie Bowl

To make a great smoothie bowl, start with ripe fruits. Ripe fruits taste better and add natural sweetness. Look for bananas that are yellow with some brown spots. When it comes to pineapples, choose ones that smell sweet. It ensures they are juicy and fresh.

Blending is key to your smoothie bowl. You want a smooth and creamy texture. If your mix is too thick, add more coconut milk. Blend again until you reach the right consistency. A good blend makes your bowl enjoyable and easy to eat.

Presentation Ideas

A colorful topping arrangement makes your smoothie bowl pop. Use fresh berries, sliced kiwi, and coconut flakes. Lay them out in a pattern. A circular design looks appealing and fun.

To elevate your smoothie bowl’s look, use bowls with interesting shapes. Tall bowls or wide, shallow ones can change the game. Garnish with a sprinkle of chia seeds for a fancy touch. This not only looks great but adds a bit of crunch too.

Variations

Alternative Ingredients

You can change the non-dairy milk for this smoothie. Almond, soy, or oat milk work well. Each milk adds a different taste. Try using seasonal fruits too. Mango, papaya, or berries add a fresh twist. You can mix and match to find your favorite blend.

Flavor Add-Ins

Want more nutrients? Add spinach or kale to your smoothie. They blend well and boost health. You won’t even taste them! For extra energy, stir in nut butter or protein powder. Both will make your smoothie more filling. They add great flavor too! You can also experiment with different combinations to find the best taste for you.

Storage Info

Short-Term Storage

To store leftovers, place your smoothie bowl in the fridge. Use a tight container to keep it fresh. Glass or BPA-free plastic works well for storage. I prefer glass because it keeps flavors better.

Long-Term Storage

You can freeze smoothie bowls for later. Just pour the mixture into an airtight container. Leave some space at the top, as it will expand when frozen. To defrost, place it in the fridge overnight. If you’re in a rush, you can use the microwave. Just heat it in short bursts to avoid cooking. Enjoy your tropical treat later with ease!

FAQs

Common Questions

What is açaí and what are its benefits?

Açaí is a small, dark purple berry from Brazil. It is full of antioxidants, which help fight free radicals in the body. Açaí is also rich in fiber, promoting good digestion. Plus, it has healthy fats that support heart health. You can enjoy its fruity taste in many dishes.

Can I make this smoothie bowl ahead of time?

Yes! You can prepare the smoothie mix and store it in the fridge for up to 24 hours. Just remember to keep the toppings separate. This way, your bowl stays fresh and tasty.

How can I make this recipe vegan or gluten-free?

To make it vegan, use agave syrup instead of honey. For gluten-free, ensure your granola and any other toppings are gluten-free. Most fruits and coconut milk are naturally gluten-free, so you’re all set!

Can I substitute açaí with other fruits?

Yes, you can! If you can’t find açaí, try using frozen berries like blueberries or strawberries. These fruits will add sweetness and a burst of color to your bowl.

Troubleshooting Tips

What to do if the smoothie is too thick?

If your smoothie is too thick, just add a little more coconut milk. Blend again until you reach your desired creaminess. This will make it easier to pour and enjoy.

How to fix a smoothie bowl that tastes too bland?

If your smoothie bowl lacks flavor, try adding a splash of vanilla extract or a pinch of salt. You can also mix in a bit of honey or agave syrup for sweetness. Adjust the toppings to add more taste and texture.

This article covers how to make a delicious açaí smoothie bowl. You learned about the key ingredients, easy steps for preparation, and creative topping ideas. I shared tips to improve taste and presentation, plus fun variations to try. Don’t forget storage techniques to keep your bowl fresh. With all this information, you can enjoy a tasty and nutritious treat anytime. Get creative with your favorites and make this recipe truly yours. Enjoy every bite!

- 2 packets of frozen açaí puree - 1 ripe banana - 1 cup of fresh pineapple chunks - 1 cup of coconut milk (or any non-dairy milk) - 1 tablespoon of honey or agave syrup (optional) For a vibrant tropical taste, the main ingredients are key. Açaí puree brings rich color and flavor. It is full of antioxidants. Bananas add creaminess and natural sweetness. Fresh pineapple gives a bright, juicy touch. Coconut milk offers a smooth base. You can use any non-dairy milk you prefer. Honey or agave syrup adds sweetness if needed. - Sliced kiwi - Coconut flakes - Granola - Chia seeds - Fresh berries (e.g., strawberries, blueberries) Toppings make your smoothie bowl pop! Sliced kiwi adds a zesty kick. Coconut flakes give it a tropical crunch. Granola provides texture and flavor. Chia seeds offer extra nutrients. Fresh berries, like strawberries and blueberries, add color and taste. You can mix and match these toppings for a fun look. For the full recipe, please refer to the section above. 1. Blend the ingredients Start by adding the frozen açaí puree, ripe banana, fresh pineapple chunks, and coconut milk into a blender. If you want it sweeter, you can add honey or agave syrup. Blend this mixture on high speed until it becomes creamy and smooth. 2. Adjust consistency with coconut milk If your smoothie is too thick, just add a bit more coconut milk. Blend again until you reach the texture you want. This step is key to making your smoothie bowl enjoyable. 3. Pour into a bowl Once blended, carefully pour the smoothie mixture into a bowl. Make sure to use a large enough bowl to hold all the goodness. 4. Add toppings creatively Now comes the fun part! Arrange your toppings, such as sliced kiwi, coconut flakes, granola, chia seeds, and fresh berries, over the smoothie. Try to create a colorful pattern. I love making a circular design to highlight all the vibrant colors. - Tips for presentation Use a shallow bowl to show off your beautiful toppings. You can also sprinkle some extra coconut flakes around the edge for a nice touch. A colorful presentation makes your smoothie bowl more fun to eat. - Recommended serving utensils Serve your smoothie bowl with a regular spoon. If you want to make it more special, use a wooden spoon or a cute, colorful one. Enjoy your tropical treat right away to keep it fresh and tasty. For the full recipe, refer to the earlier sections. To make a great smoothie bowl, start with ripe fruits. Ripe fruits taste better and add natural sweetness. Look for bananas that are yellow with some brown spots. When it comes to pineapples, choose ones that smell sweet. It ensures they are juicy and fresh. Blending is key to your smoothie bowl. You want a smooth and creamy texture. If your mix is too thick, add more coconut milk. Blend again until you reach the right consistency. A good blend makes your bowl enjoyable and easy to eat. A colorful topping arrangement makes your smoothie bowl pop. Use fresh berries, sliced kiwi, and coconut flakes. Lay them out in a pattern. A circular design looks appealing and fun. To elevate your smoothie bowl's look, use bowls with interesting shapes. Tall bowls or wide, shallow ones can change the game. Garnish with a sprinkle of chia seeds for a fancy touch. This not only looks great but adds a bit of crunch too. {{image_2}} You can change the non-dairy milk for this smoothie. Almond, soy, or oat milk work well. Each milk adds a different taste. Try using seasonal fruits too. Mango, papaya, or berries add a fresh twist. You can mix and match to find your favorite blend. Want more nutrients? Add spinach or kale to your smoothie. They blend well and boost health. You won’t even taste them! For extra energy, stir in nut butter or protein powder. Both will make your smoothie more filling. They add great flavor too! You can also experiment with different combinations to find the best taste for you. To store leftovers, place your smoothie bowl in the fridge. Use a tight container to keep it fresh. Glass or BPA-free plastic works well for storage. I prefer glass because it keeps flavors better. You can freeze smoothie bowls for later. Just pour the mixture into an airtight container. Leave some space at the top, as it will expand when frozen. To defrost, place it in the fridge overnight. If you’re in a rush, you can use the microwave. Just heat it in short bursts to avoid cooking. Enjoy your tropical treat later with ease! For the recipe, check out the Full Recipe. What is açaí and what are its benefits? Açaí is a small, dark purple berry from Brazil. It is full of antioxidants, which help fight free radicals in the body. Açaí is also rich in fiber, promoting good digestion. Plus, it has healthy fats that support heart health. You can enjoy its fruity taste in many dishes. Can I make this smoothie bowl ahead of time? Yes! You can prepare the smoothie mix and store it in the fridge for up to 24 hours. Just remember to keep the toppings separate. This way, your bowl stays fresh and tasty. How can I make this recipe vegan or gluten-free? To make it vegan, use agave syrup instead of honey. For gluten-free, ensure your granola and any other toppings are gluten-free. Most fruits and coconut milk are naturally gluten-free, so you’re all set! Can I substitute açaí with other fruits? Yes, you can! If you can’t find açaí, try using frozen berries like blueberries or strawberries. These fruits will add sweetness and a burst of color to your bowl. What to do if the smoothie is too thick? If your smoothie is too thick, just add a little more coconut milk. Blend again until you reach your desired creaminess. This will make it easier to pour and enjoy. How to fix a smoothie bowl that tastes too bland? If your smoothie bowl lacks flavor, try adding a splash of vanilla extract or a pinch of salt. You can also mix in a bit of honey or agave syrup for sweetness. Adjust the toppings to add more taste and texture. This article covers how to make a delicious açaí smoothie bowl. You learned about the key ingredients, easy steps for preparation, and creative topping ideas. I shared tips to improve taste and presentation, plus fun variations to try. Don’t forget storage techniques to keep your bowl fresh. With all this information, you can enjoy a tasty and nutritious treat anytime. Get creative with your favorites and make this recipe truly yours. Enjoy every bite!

Tropical Acai Smoothie Bowl

Indulge in a refreshing Tropical Açaí Smoothie Bowl that's perfect for breakfast or a snack! This delicious recipe features frozen açaí puree, ripe banana, fresh pineapple, and creamy coconut milk, all blended to perfection. Top it off with kiwi, coconut flakes, granola, and berries for a vibrant and healthy treat. Ready to make your own smoothie bowl paradise?
Print Recipe Pin Recipe

Ingredients
  

2 packets of frozen açaí puree

1 ripe banana

1 cup of fresh pineapple chunks

1 cup of coconut milk (or any non-dairy milk)

1 tablespoon of honey or agave syrup (optional)

Toppings: sliced kiwi, coconut flakes, granola, chia seeds, and fresh berries (e.g., strawberries, blueberries)

Instructions
 

In a blender, combine the frozen açaí puree, banana, pineapple chunks, and coconut milk. If you prefer a sweeter taste, add honey or agave syrup.

    Blend on high speed until the mixture is creamy and smooth. If it's too thick, add a little more coconut milk to reach your desired consistency.

      Pour the smoothie mixture into a bowl.

        Arrange your selected toppings artistically over the smoothie. Consider using a circular pattern for a beautiful presentation and vibrant colors.

          Serve immediately with a spoon and enjoy your tropical delight!

            Prep Time: 10 minutes | Total Time: 10 minutes | Servings: 2

              Related Recipes

              • To make a delicious Turmeric Golden Milk Latte, gather these simple ingredients: - 2 cups almond milk (or your preferred milk) - 1 teaspoon ground turmeric - 1/2 teaspoon ground ginger - 1/4 teaspoon cinnamon - 1 tablespoon honey or maple syrup (adjust to taste) - Pinch of black pepper - 1/2 teaspoon vanilla extract - Optional: a sprinkle of nutmeg for garnish - Almond Milk: This milk is low in calories and rich in vitamins. It helps with heart health. - Turmeric: This spice has curcumin, known for its anti-inflammatory properties. It may help improve brain function. - Ginger: Ginger can help with digestion and nausea. It adds a nice warmth to the drink. - Cinnamon: This spice is rich in antioxidants. It may help lower blood sugar and improve heart health. - Honey or Maple Syrup: Both sweeteners can boost energy. They also provide antioxidants. - Black Pepper: This spice enhances turmeric absorption. It makes the drink more effective. - Vanilla Extract: It adds flavor and can help reduce stress. - Nutmeg: This spice is optional, but it adds warmth and a nice aroma. - Milk Options: You can use oat milk, soy milk, or coconut milk for different flavors. - Sweeteners: If you prefer, try agave syrup or stevia as sugar-free options. - Spices: Experiment with cardamom or cloves for added flavor. - Nutmeg: You can skip it if you don't like nutmeg, or use a touch of cocoa powder instead. 1. Start by taking a small saucepan. 2. Add 2 cups of almond milk to the pan. 3. Measure and add 1 teaspoon of ground turmeric. 4. Next, add 1/2 teaspoon of ground ginger. 5. Sprinkle in 1/4 teaspoon of cinnamon. 6. Sweeten your drink with 1 tablespoon of honey or maple syrup. 7. Don't forget a pinch of black pepper for better absorption of turmeric. 8. Lastly, add 1/2 teaspoon of vanilla extract. 9. Whisk all the ingredients well in the pan. 10. Place the saucepan on medium heat. 11. Gently warm the mixture while stirring often. 12. Keep an eye on it; do not let it boil. 13. After about 5-7 minutes, it should be hot enough. 14. Remove the pan from heat and let it cool slightly. 15. If you want a frothy drink, use a milk frother or whisk it quickly. 16. Pour the golden milk into your favorite mugs. 17. Optionally, sprinkle a bit of nutmeg on top for a nice touch. 18. Serve warm and enjoy this comforting drink! - Always use a whisk to blend the spices into the milk. - Whisking helps mix the turmeric and other spices evenly. - When heating, keep the heat low to avoid scalding the milk. - Stir often to prevent sticking at the bottom of the pan. - If you see steam but no bubbles, you are at the right temperature. - A milk frother works wonders for a smooth, frothy finish. - If you don’t have a frother, whisk vigorously by hand. - Frothing adds air, giving the latte a creamy feel. - The more you froth, the lighter and fluffier your drink will become. - For an extra touch, froth some almond milk separately and top your latte with it. You can mix spices to make your turmeric latte tastier. Try adding a pinch of nutmeg or a dash of cardamom. These spices add warmth to the drink. You can also use fresh ginger instead of ground ginger. This will give your latte a bright, zesty kick. Just remember, fresh ginger may need more time to steep. Many people rush the heating process. Always warm your milk slowly over medium heat. If you boil it, the spices can lose flavor. Another mistake is not blending the spices well. Make sure to whisk the mixture thoroughly. This helps avoid clumps of turmeric or ginger. Lastly, avoid skipping the black pepper. It helps your body absorb turmeric better. Sweetness is personal. Start with one tablespoon of honey or maple syrup. Taste your latte and add more if you like it sweeter. For creaminess, use full-fat coconut milk for a richer feel. Almond milk is lighter but still delicious. You can also mix almond and coconut milk for the best of both worlds. {{image_2}} You can easily make this latte vegan. Just use almond milk, coconut milk, or oat milk. These milks work great in this recipe. They keep the drink creamy and delicious. If you want a nut-free option, oat milk is the best choice. It blends well with turmeric and spices. To make an iced version, start with brewed turmeric milk. Follow the same steps but let it cool. Pour over ice instead of serving warm. This drink is refreshing on hot days. You can also add some ice cream for a treat! You can mix and match flavors for fun. Try adding matcha for a green twist. This adds a fresh taste and boosts energy. You can also use cocoa for a chocolatey version. The cocoa pairs well with turmeric and spices. For a special touch, add a dash of vanilla extract. This enhances the overall flavor and aroma. To store leftover turmeric golden milk, let it cool first. Then, pour it into an airtight container. Keep it in the fridge for up to three days. This way, you can enjoy the drink again without losing its flavor. When reheating your golden milk, do it gently. Pour it into a small saucepan. Heat it over low to medium heat. Stir it often to avoid burning. Never let it boil, as this can change the taste and texture. You can also use a microwave. Heat in short bursts, stirring in between. Turmeric golden milk lasts about three days in the fridge. Check for signs of spoilage. If it smells sour or has any mold, discard it. Always trust your senses. If it looks or smells off, it’s best to throw it away. Turmeric has many health benefits. It is known for its bright yellow color and active compound called curcumin. Curcumin may help reduce inflammation. It can also support joint health. Some studies suggest it may boost your mood. Turmeric might even help with digestion. Drinking turmeric may also support your immune system. Yes, you can use any milk you like. Almond milk is great, but coconut milk adds creaminess. Oat milk is a good choice for a thicker texture. If you prefer dairy, whole or skim milk works too. Just remember, different types of milk will change the flavor a bit. To make this recipe sugar-free, skip the honey or maple syrup. You can use a sugar substitute like stevia or monk fruit instead. These options will give you sweetness without the calories. Just adjust the amount to your taste. Yes, it is safe for most people to have turmeric daily. Using it in cooking or drinks is a great way to enjoy its benefits. However, if you have health issues or take certain medications, check with a doctor first. Moderation is key, as with any food. In this blog post, we explored the ingredients and health benefits of Turmeric Golden Milk. I shared step-by-step instructions for making it frothy and delicious. We also discovered tips, tricks, and variations to enhance your drink. Proper storage and reheating advice can help you enjoy leftovers. Remember, turmeric offers many health benefits, so enjoy this drink often. Use alternative ingredients if you prefer. With these ideas, you can create the perfect golden milk to suit your taste and health needs. Enjoy your journey to wellness!
                Turmeric Golden Milk Latte Simple and Creamy Recipe
              • - 1 ripe mango, peeled and diced - 1 cup fresh pineapple chunks - 1 banana, sliced - 1 cup coconut water (or regular water) - 1/2 cup plain Greek yogurt (or dairy-free alternative) - 1 tablespoon honey or agave syrup (optional) - A handful of fresh mint leaves (for garnish) - Ice cubes (optional) The key to a delicious mango pineapple smoothie lies in its fresh ingredients. You want ripe fruits for the best flavor. The mango should feel soft when you squeeze it gently. Pineapples should smell sweet and fruity. This smoothie combines sweet mango, tangy pineapple, and creamy banana. Coconut water adds hydration, while Greek yogurt gives it a nice creaminess. You can add honey for extra sweetness if you like. Mint leaves add a refreshing touch when you serve it. Each ingredient plays a role in making this smoothie flavorful and refreshing. Trust me, using fresh ingredients will make a big difference in taste! To make this smoothie, start by gathering your main ingredients. You need a ripe mango, fresh pineapple, and a banana. 1. In a blender, combine the diced mango, pineapple chunks, and banana slices. This mix brings a burst of tropical flavor. 2. Next, add one cup of coconut water to the blender. This not only hydrates but also adds a refreshing twist. 3. For creaminess, pour in half a cup of plain Greek yogurt. If you want it sweeter, drizzle in one tablespoon of honey or agave syrup. 4. Blend on high until the mixture is smooth and creamy. If you like your smoothie chilled, toss in a few ice cubes and blend again until they are fully mixed in. 5. After blending, taste your smoothie. If it needs to be sweeter or thicker, add more honey or coconut water as needed. Once your smoothie is ready, it’s time to serve it. I recommend using tall glasses to show off the vibrant color. For a fun touch, garnish each glass with a few fresh mint leaves on top. This not only looks nice but also adds a fresh aroma. Enjoy your delicious Mango Pineapple Smoothie! For the Full Recipe, please refer back to the ingredient list and instructions. To get your smoothie just right, focus on creaminess. Use ripe fruits like mango and banana. The Greek yogurt adds a nice, smooth texture. If you want a richer taste, try full-fat yogurt. For a lighter feel, use low-fat or dairy-free yogurt. Adjust the thickness by adding more liquid. Coconut water is great for this. If your smoothie is too thick, just pour in a bit more. Blend again until it’s just how you like it. If you want a thicker smoothie, add more banana or ice cubes. Boosting flavor can take your smoothie to the next level. Try adding spices like cinnamon or ginger. These spices not only add warmth but also great health benefits. A dash of cinnamon can make the smoothie taste cozy. A pinch of ginger gives it a nice kick. You can also use flavored yogurts for extra taste. Vanilla or coconut yogurt work well. If you want sweetness, think about honey or agave syrup. These can make your smoothie more enjoyable. For a fun twist, try adding a splash of vanilla extract. It will add a lovely aroma to your drink. For a full taste experience, explore the [Full Recipe]. {{image_2}} You can change the fruit in your smoothie to keep it fresh. Adding strawberries or blueberries gives a sweet twist. These berries add a nice color and taste. You can also try using other tropical fruits like papaya or kiwi. These fruits bring new flavors and nutrients to your drink. Each fruit will change the smoothie’s taste and make it unique. If you want a dairy-free smoothie, swap the Greek yogurt for a plant-based option. Almond, coconut, or soy yogurt works well. These alternatives keep your smoothie creamy without dairy. For sweeteners, you can use maple syrup or agave syrup for a vegan choice. These options add sweetness while keeping your drink plant-based. Enjoy the fruity goodness in many ways! Don't forget to check the Full Recipe for more ideas. You may have some smoothie left after making your Mango Pineapple Smoothie. To keep it fresh, use a glass jar or a BPA-free plastic container. Seal it tightly to prevent air from spoiling the flavor. Store it in the fridge for up to 24 hours. After that, it may lose some taste and texture. If you want to enjoy the smoothie later, freezing is a great option. Pour the smoothie into ice cube trays or freezer-safe bags. Leave some space in the bags for expansion. You can freeze it for up to three months. When you’re ready to drink it, take out what you need. Thaw it in the fridge overnight or blend it straight from the freezer for a slushy treat. Enjoy your refreshing Mango Pineapple Smoothie anytime! Yes, you can make this smoothie ahead of time. If you want to save it, store it in an airtight container. Keep it in the fridge for up to one day. The smoothie may separate, so stir it well before you drink it. If you don’t have coconut water, use regular water or fruit juice instead. Fruit juice can add a nice flavor. You can also try almond milk for a creamier touch. Just remember, the taste will change a bit based on what you use. To make the smoothie thicker, add more Greek yogurt or a banana. You can also use frozen fruit instead of fresh. Frozen fruit gives you a nice, thick texture. Just blend it well, and you’ll get a creamy drink. Yes, this smoothie is great for kids! It is packed with fruits and tastes sweet. You can adjust the sweetness by adding less honey. The bright colors and fresh flavors will appeal to children, making it a fun treat. You can find the Full Recipe for the Tropical Bliss Mango Pineapple Smoothie above in this article. This will guide you through every step to create your own refreshing drink. This blog post covers a simple and tasty smoothie recipe. You learned about the key ingredients and their nutritional benefits. I provided steps to prepare and serve the smoothie perfectly. Tips for texture and flavor help you make it your own. You can explore variations to suit your tastes or dietary needs. Don’t forget storage tips to keep leftovers fresh. Enjoy your smoothie making journey. It’s all about trying new things and having fun!
                Mango Pineapple Smoothie Refreshing and Flavorful Blend
              • - 1 cup plain yogurt - 1/2 cup coconut milk - 1 cup fresh blueberries (plus extra for garnish) - 2 tablespoons honey or agave syrup (adjust to taste) - 1/2 teaspoon vanilla extract - A pinch of cardamom powder - Ice cubes (optional) Using fresh ingredients makes a big difference in taste. Fresh blueberries burst with flavor and nutrients. They give the lassi a bright color and a sweet taste. If you can’t find fresh blueberries, frozen ones work too. They are picked at their peak and frozen quickly. This helps keep their taste and nutrients. However, fresh blueberries always add a better texture. Each ingredient in this lassi has great health benefits. - Plain yogurt: Full of protein and good for your gut health. - Coconut milk: Contains healthy fats that can boost energy. - Blueberries: Packed with antioxidants, they help fight disease. - Honey or agave syrup: Adds sweetness and has some vitamins. - Vanilla extract: Adds flavor and may reduce stress. - Cardamom powder: Can aid digestion and add a warm spice note. This Blueberry Coconut Lassi is not just tasty; it’s also good for you! Start by gathering all your ingredients. This makes the process easier and faster. You will need: - 1 cup plain yogurt - 1/2 cup coconut milk - 1 cup fresh blueberries (plus extra for garnish) - 2 tablespoons honey or agave syrup (adjust to taste) - 1/2 teaspoon vanilla extract - A pinch of cardamom powder - Ice cubes (optional) Make sure your blueberries are fresh and ripe. They add great flavor and color. If you want a sweeter lassi, adjust the honey or agave syrup to your taste. Now it’s time to blend! In a blender, combine the yogurt, coconut milk, blueberries, honey, vanilla extract, and cardamom powder. Blend on high speed until the mix is smooth and creamy. If you like a thinner drink, add more coconut milk. After blending, taste the lassi. You can add more honey if you want it sweeter. For a chilled treat, add ice cubes and blend again until frothy. Pour your lassi into tall, clear glasses. This shows off the pretty purple color. For a special touch, garnish with a few whole blueberries on top. You can also sprinkle a little cardamom powder for added flair. If you want to impress, add a slice of lime on the glass rim. This not only looks good but adds a nice contrast to the drink. Enjoy your refreshing Blueberry Coconut Lassi! For the full recipe, check the earlier section. For a thick and creamy lassi, use full-fat yogurt. This gives your drink a rich texture. If you want it thinner, add a bit more coconut milk. Blend it well until it's smooth. You can also try adding ice cubes. This makes it frothy and cold. Both honey and agave syrup are great for sweetness. Honey gives a floral taste, while agave is mild. Start with two tablespoons and taste it. If you want it sweeter, add more. Remember, you can always add more, but you can't take it out! You can make your lassi even better! Try adding a pinch of cinnamon or nutmeg for warmth. Fresh mint leaves can add a nice touch too. You might even add a splash of lime juice for a zesty kick. All these extras can make your blueberry coconut lassi unique and delicious. For the full recipe, check out the complete instructions. {{image_2}} You can easily make a vegan version of blueberry coconut lassi. Just swap the yogurt with a plant-based option. Use coconut yogurt or almond yogurt for a creamy base. These alternatives keep that rich flavor. They also add a nice texture. You still get the fresh taste from blueberries and coconut milk. This change makes the drink creamy without any dairy. Spices can enhance the flavor of your lassi. Cardamom adds a warm note. You can also try cinnamon for a sweet twist. If you want more fruit, think about adding bananas or mangoes. These fruits blend well with blueberries. They also boost the health benefits. Each adds its own flavor and richness to the drink. If you prefer different dairy options, there are many choices. Greek yogurt gives a thicker texture. It also adds a tangy taste. You can use regular yogurt instead of plain yogurt. It is a great way to change the flavor. Try using buttermilk for a unique twist. Each choice will change the texture and taste of your lassi. Each option keeps the drink creamy and delicious. For the full recipe, check out the link above. To keep your blueberry coconut lassi fresh, store it in a clean glass jar. Make sure the jar is airtight. This helps keep out air and bacteria. If you have leftovers, don’t let them sit out for long. Refrigerate the lassi within two hours of making it. Always use a spoon to scoop the lassi. Avoid using your fingers, as this can introduce germs. When stored properly, blueberry coconut lassi lasts about 2 to 3 days in the fridge. After that, the taste and texture may change. You will notice it may separate a bit. If this happens, just give it a good shake or blend it again. Always check for any off smells or changes in color before consuming. You can freeze blueberry coconut lassi for later enjoyment. Pour the lassi into ice cube trays or freezer-safe containers. Leave some space at the top, as liquids expand when frozen. To use, thaw the lassi in the fridge overnight or blend the frozen cubes into smoothies. This method keeps the flavor and nutrients intact. For the best taste, use frozen lassi within three months. For the full recipe, check out the earlier section! Yes, you can use Greek yogurt. It makes the lassi thicker and creamier. If you prefer a lighter drink, stick with plain yogurt. Greek yogurt has more protein, which is great for keeping you full. Just remember to adjust the coconut milk to balance the thickness. Absolutely! Blueberry Coconut Lassi is a fun and tasty drink for kids. It has natural sweetness from honey and blueberries. The yogurt provides healthy probiotics, good for digestion. Kids love the vibrant color and fruity flavor. You can make it as sweet as they like! You can find Blueberry Coconut Lassi at many health food stores or cafes. Some grocery stores may also carry it in the yogurt section. If you want a fresh one, try making it at home. You can easily whip up this drink with the Full Recipe I provided. Blueberry coconut lassi is a nutritious and tasty drink. You learned about key ingredients, like fresh blueberries and coconut. The blending process ensures a smooth drink. Adjust sweetness with honey or agave for your taste. You can try different fruits and spices to mix it up. Storing tips help you keep leftovers fresh. Remember, lassi is fun to make and enjoy. Experiment with variations to find your favorite way to drink it. Enjoy your delicious and healthy blueberry coconut lassi!
                Blueberry Coconut Lassi Creamy and Refreshing Drink
              • For this recipe, you need ripe peaches and mangoes. Ripe peaches should feel soft when you gently press them. They should smell sweet and juicy. Ripe mangoes should have a slight give when pressed. Their skin should show a bit of color, often yellow or red. Using fresh fruit is best. Fresh fruit tastes better and has more nutrients. Frozen fruit can work, but it may change the drink's texture. Fresh peaches and mangoes bring bright flavor. They also add a beautiful color to your drink. You can use different types of tea in this recipe. Black tea gives a strong flavor, while green tea adds a lighter taste. Choose what you like best. For milk, you have many options. You can use dairy milk or non-dairy milk like almond or oat milk. Each choice adds a unique twist to the drink. Non-dairy milk can be creamier, while dairy milk gives a classic taste. When sweetening your drink, you can choose honey or agave syrup. Honey has a rich flavor and can be a bit thicker. Agave syrup is sweeter and lighter. Both work well, so pick what you prefer. You might also want to add spices like cinnamon. Cinnamon gives a warm flavor that pairs well with peach and mango. It also has health benefits, like helping with digestion. A little can go a long way in enhancing your drink's taste. For the full recipe, refer to the section above. To make the fruit puree, start with fresh peaches and mangoes. Wash the fruit well. For the peach, slice it in half and remove the pit. Make thin slices from one half and then dice the other half into small pieces. For the mango, peel it. Cut the sides off the pit and dice the flesh. You want small, even pieces. This helps the puree blend smoothly. Now, grab your blender. Add the sliced peach and diced mango. Blend them until they are smooth. This is your fruit puree. Next, in a large pitcher, pour in the cooled brewed black tea. Add the milk and sweeteners. You can use honey or agave syrup, depending on your taste. Mix these well. If you want, add in the vanilla extract and ground cinnamon for more flavor. Stir until everything is combined. Choose your favorite glasses. Fill each glass with ice cubes. Pour the tea mixture into the glasses, filling them about three-quarters full. Now, scoop a generous spoonful of the peach-mango puree on top. Let it swirl into the milk tea for a lovely look. Finally, add fresh mint leaves on top for a nice touch. Enjoy your Peach Mango Milk Tea! You can find the full recipe [here](Full Recipe). To make a smooth puree, start with ripe fruit. Use one peach and one mango. Slice the peach and dice the mango. Place them in a blender. Blend until there are no lumps. If your puree seems thick, add a tiny splash of water. This will help it blend better. A smooth puree makes your drink look great and taste even better. Sweetness can change the whole drink. Start with two tablespoons of honey or agave syrup. Taste it after mixing. If you like it sweeter, add more. Some might want less sweetness, so adjust to your taste. Remember, the fruit adds natural sugar too. Always taste as you go to find the right balance. You can make your drink even more special with extra flavors. Try adding a teaspoon of vanilla extract for a nice touch. Ground cinnamon gives warmth and depth. If you want something fresh, add mint leaves for garnish. They look pretty and add a nice flavor. You can also explore other fruits like strawberries for a twist. {{image_2}} You can change the fruits in your peach mango milk tea. Try using strawberries for a sweet twist. You can also add passion fruit for a tangy kick. Mix and match based on what you love. The goal is to keep it fruity and fun. Each fruit brings its own flavor. This keeps your drink fresh and exciting. Using different teas can change the taste of your milk tea. Black tea gives a rich flavor, while green tea offers a lighter taste. Herbal teas, like chamomile, can add a calming touch. Experiment with what you have at home. Each tea base will give your drink a new vibe. So don’t be afraid to switch it up! If you want a vegan version, use plant-based milk. Almond milk or oat milk works well. You can also use maple syrup instead of honey for sweetness. For a keto option, use unsweetened almond milk and a low-carb sweetener. This way, you can enjoy peach mango milk tea without the carbs. These changes make it fit your diet while keeping it delicious. To keep your peaches and mangoes fresh, follow these tips: - Peaches: Store ripe peaches in the fridge. They stay fresh for about three to five days. If they are not ripe, keep them at room temperature until they soften. - Mangoes: Like peaches, keep ripe mangoes in the fridge. They can last about five days. If they are firm, leave them out to ripen first. Fresh fruit is best for your peach mango milk tea. Avoid frozen fruit if you want a bright, fresh flavor. After making your peach mango milk tea, you may want to store it. Here is how to do it right: - Refrigeration: Pour the milk tea into an airtight container. This helps keep it fresh and tasty. - Serving Later: When you serve it later, stir it well. The fruit puree may settle at the bottom, so mix it again. Your peach mango milk tea can last in the fridge for about two to three days. However, for the best flavor, enjoy it fresh. If you notice any change in taste or smell, it’s best to toss it out. Peach mango milk tea is a fruity drink made from fresh peaches and mangoes. You blend the fruits into a smooth puree. Then, you mix it with brewed black tea and milk for a creamy texture. This drink is sweet, refreshing, and perfect for hot days. You can find peach mango milk tea at many cafes and tea shops. Popular brands include Chatime and Gong Cha. They offer different versions of this drink. Local bubble tea cafes may also serve it. Check menus for special flavors and toppings. Peach mango milk tea has many health benefits. Peaches are high in vitamins A and C. They can help your skin and immune system. Mangoes are rich in antioxidants and fiber, which support digestion. Using milk adds calcium for strong bones. If you use honey or agave, you get a natural sweetener with fewer chemicals. Enjoy this drink as a tasty treat that is also good for you. In this article, we explored how to make delicious peach mango milk tea. We covered fresh ingredients, sweeteners, and the importance of using the right tea and milk. I shared tips for creating the perfect puree and adjusting sweetness to your taste. You can also experiment with different fruits and teas. Remember, storing your tea properly helps maintain its freshness. By following these steps, you can enjoy a tasty, healthy drink anytime. Enjoy your peach mango milk tea adventure!
                Peach Mango Milk Tea Refreshing and Simple Recipe

              Leave a Reply Cancel reply

              Your email address will not be published. Required fields are marked *

              Recipe Rating


              Hi I’m Taling

              I love sharing perfected dishes from my kitchen. I’m sure they’ll earn a spot in your heart. Let’s savor this journey together!.

              More about me

              Recent Desserts

              • - 2 cups old-fashioned rolled oats - 1 cup sliced almonds - ½ cup honey or maple syrup - ¼ cup coconut oil, melted - 1 teaspoon pure vanilla extract - ½ teaspoon cinnamon - ¼ teaspoon sea salt The main ingredients create a great base for your granola clusters. Old-fashioned rolled oats give you texture and fiber. Sliced almonds add crunch and protein. Honey or maple syrup provides natural sweetness. Coconut oil helps bind the granola and gives it a nice flavor. Vanilla extract adds a warm aroma. Cinnamon and sea salt enhance the taste, making it irresistible. - ½ cup dried fruit (e.g., cranberries or cherries) Adding dried fruit is optional but can enhance your granola. Dried cranberries or cherries bring a chewy texture. They also add a burst of flavor that contrasts nicely with the crunchy clusters. Feel free to mix in your favorite dried fruit to make it your own! - Benefits of oats and almonds - Natural sweeteners vs. processed sugars Oats are a fantastic source of fiber. They help keep you full and support heart health. Almonds provide healthy fats and protein. They are great for your skin and heart. Using honey or maple syrup makes the granola healthier than using processed sugars. Natural sweeteners offer flavor without the crash. This granola is a smart choice for breakfast or snacks! First, preheat your oven to 325°F (165°C). This helps your granola cook evenly. Next, line your baking sheet with parchment paper. This will make cleanup easy and prevent sticking. In a large mixing bowl, combine the rolled oats, sliced almonds, cinnamon, and sea salt. I like to stir these ingredients well to mix the flavors. This step is key for a tasty granola. In a separate bowl, whisk together the melted coconut oil, honey or maple syrup, and vanilla extract. This mixture brings sweetness and flavor. Make sure it is fully combined to coat the oats well. Now, pour the wet mixture over the dry ingredients. Stir gently but thoroughly to ensure even coating. Every oat should feel the love of the sweet mixture! Transfer the mixture to your prepared baking sheet. Press it down firmly with a spatula. This step is crucial for making clusters. Bake in the preheated oven for 20-25 minutes. Stir halfway through to ensure even baking. Look for a golden brown color. Once baked, allow the granola to cool completely on the baking sheet. This cooling time helps the granola harden and form clusters. After it cools, break the granola into clusters. If you like, mix in any dried fruit at this stage for extra flavor. Enjoy your crunchy and delicious snack! To get those perfect granola clusters, you must press the mixture down firmly. This step helps the granola stick together as it bakes. Use a spatula to compact the mix into an even layer on the baking sheet. This creates a solid base for your clusters. Also, bake at the right temperature, which is 325°F (165°C). This temperature ensures that the granola cooks evenly and gets that lovely golden color. You can easily change the flavor of your granola. Try adding spices like nutmeg or cardamom for a warm touch. You can also use different nuts or seeds. Swap sliced almonds for walnuts or pecans. This switch adds a unique crunch and flavor. You could even add seeds like pumpkin or sunflower for more texture. Presentation can make your granola even more appealing. Serve the clusters in mason jars or cute bowls. This adds a fun touch to your breakfast or snack. Drizzle with honey or almond butter for extra sweetness. A sprinkle of sliced almonds on top makes it look even better. Enjoy your beautiful and tasty creation! {{image_2}} If you need a nut-free option, try using seeds. Sunflower seeds or pumpkin seeds work great. They keep the crunch and add good flavor. Use them in the same amount as the sliced almonds. This way, you still get tasty granola clusters without nuts. You can mix things up! For a sweet twist, add chocolate chips to your granola. Chocolate chip vanilla almond granola clusters taste amazing. You can also try a maple pecan version. Just swap the almonds for pecans and add a splash of maple syrup. Both variations are sure to please. Get creative with seasonal flavors! In the fall, add dried cranberries or a sprinkle of pumpkin spice. This gives a warm, cozy taste. For summer, toss in some tropical fruits like dried mango or pineapple. It adds a fun, fruity vibe. Enjoy these variations to keep your granola exciting! Store your Vanilla Almond Granola Clusters in airtight containers. This keeps them fresh. Place the containers in a cool, dry spot. Avoid warm places to prevent moisture. When stored at room temperature, your granola lasts about two weeks. For longer storage, consider freezing it. Granola freezes well, and you can keep it for up to three months. Check the texture and smell of your granola. If it feels soft or chewy, it may be stale. A lack of aroma also means it’s time to toss it. Fresh granola should smell sweet and nutty. Homemade Vanilla Almond Granola Clusters last about two weeks when stored properly. Use an airtight container to keep them fresh. After two weeks, the granola may still be safe to eat but could lose its crunch. Yes, you can! Use certified gluten-free oats to make this recipe gluten-free. Many brands offer gluten-free oats, which are safe for those with gluten sensitivities. Granola clusters are great with yogurt or smoothie bowls. You can also sprinkle them on oatmeal or mix them into your favorite cereal. They add a nice crunch and flavor. To lower sugar, use less honey or maple syrup. You can also try unsweetened applesauce or mashed bananas. These options keep the flavor and texture while cutting back on sugar. Making Vanilla Almond Granola Clusters is easy and fun. You learned the main ingredients needed, like oats and almonds, and how to combine them. I shared tips for perfect clusters and fun variations to try. Storage methods keep your granola fresh longer. Homemade granola is tasty and healthier than store-bought. It’s a great snack or breakfast option. Enjoy making this recipe and customizing it to your taste!
                Vanilla Almond Granola Clusters Crunchy and Delicious
              • - 3 ripe peaches, peeled and pitted - 1 cup fresh raspberries Fresh fruits are the stars of this sorbet. Ripe peaches give it a sweet, juicy base. They should feel soft when you gently press them. Fresh raspberries add a tangy burst of flavor. Their bright color makes the sorbet look beautiful. - ½ cup granulated sugar - 1 cup water - 2 tablespoons lemon juice We use granulated sugar to sweeten the sorbet. It mixes well with the fruit and makes a simple syrup. Water helps the sugar dissolve easily. Lemon juice adds a bit of zing. It balances the sweetness and brings out the fruit's natural flavors. - A pinch of salt Salt is a secret ingredient here. It enhances the flavors and makes the sorbet taste better. Just a small pinch will do. It helps all the sweet and tart notes shine through. First, we make a simple syrup. In a medium saucepan, combine 1 cup of water with ½ cup of granulated sugar. Heat this over medium heat. Stir until the sugar dissolves completely. This usually takes just a few minutes. Once the sugar dissolves, remove the saucepan from the heat. Let the syrup cool to room temperature. This syrup will add sweetness to our sorbet. Now, we will prepare the fruit. Take 3 ripe peaches, peel them, and remove the pits. Then, rinse 1 cup of fresh raspberries. Place the peaches and raspberries in a blender or food processor. Blend them until the mixture is smooth. You want a creamy texture without any chunks. This will create the rich base for our sorbet. Next, we combine everything. Pour the cooled simple syrup into the blender with the fruit. Add 2 tablespoons of lemon juice and a pinch of salt. Blend again until all the ingredients mix well. Taste the mixture. If it needs more sweetness, add a little sugar or extra raspberries and blend again. Now, transfer this mixture into a shallow container. Place it in the freezer. Every 30 minutes, stir the mixture to break up any ice crystals. This will take about 4 hours. When it is fully frozen and smooth, it’s ready to serve. Use a scoop to dish it up into bowls. Enjoy your peach raspberry sorbet! To make your sorbet shine, you can adjust the sweetness. Taste the mix before freezing. If it's not sweet enough, add a bit more sugar. You can also use extra raspberries for a bolder flavor. Try mixing in other fruits for fun. You can use strawberries, blackberries, or even mango. Each fruit brings its own taste to the sorbet. This way, you can create many yummy flavors! To avoid ice crystals, stir the sorbet every 30 minutes while it freezes. This helps keep it smooth and creamy. If you skip this step, the sorbet may turn icy. Use a shallow container for freezing. A wider surface area helps the sorbet freeze faster and stay smooth. Glass or metal containers work best. They help cool the mixture evenly. For a lovely presentation, serve the sorbet in chilled bowls. This keeps it cold for longer. You might want to garnish it with fresh raspberries or mint leaves. This adds color and extra flavor to your dish. Another idea is to create a layered dessert. You can serve sorbet with yogurt or fresh fruit. This not only makes it pretty but also adds more taste and texture to enjoy! {{image_2}} You can switch out fruits for fun flavors. Try using seasonal fruits like strawberries or mangoes. They add a new twist to your sorbet. You can mix peaches with blackberries, too. Each fruit brings its own sweetness and taste. Adding herbs or spices can also change the flavor. A little mint can make your sorbet refreshing. You might like a hint of ginger for a spicy kick. Experimenting with different combinations keeps things exciting. If you want to cut down on sugar, try sugar substitutes. Agave syrup or honey can work well in this recipe. Just remember to adjust the amount since they are sweeter. This way, you can enjoy a tasty treat without all the sugar. For a dairy-free option, you can leave out any cream. This sorbet is already dairy-free, making it perfect for those with allergies. You can enjoy this cool treat without any worries. To keep your peach raspberry sorbet fresh, choose the right container. I recommend using a shallow, airtight container. This helps the sorbet freeze evenly. You can also use a glass or plastic container with a tight lid. Avoid metal containers, as they can cause freezer burns. When storing your sorbet, freeze it quickly. After you finish freezing it, press a piece of plastic wrap directly onto the surface. This helps keep out air and moisture. Always ensure the lid is on tight before placing it back in the freezer. Your peach raspberry sorbet can last up to two weeks in the freezer. After that, it may lose its flavor and texture. To enjoy it at its best, try to eat it within this time frame. Watch for signs of spoilage. If you see ice crystals forming on the surface, that means it is starting to lose quality. If the sorbet has an off smell or odd color, it's best to toss it. Always trust your senses when enjoying this tasty treat! You can make sorbet by freezing the mixture manually. First, blend your fruits, sugar, and water. Once mixed, pour it into a shallow dish. Place it in the freezer. Every 30 minutes, stir it with a fork. This breaks up ice and keeps it smooth. Repeat until it’s fully frozen, usually about 4 hours. Yes, you can use frozen fruit. Just make sure to thaw it a bit before blending. This helps with blending. You might need less sugar since frozen fruit can be sweeter. Taste the mixture and adjust as needed. To soften sorbet, take it out of the freezer a few minutes before serving. Let it sit at room temperature for 5 to 10 minutes. You can also scoop it and place it in the fridge for a short time. This helps it reach the right texture. Sorbet is often seen as a healthier option than ice cream. It usually has less fat since it doesn’t contain cream. Sorbet is made mainly from fruit and sugar. However, it can still have a lot of sugar. Always check labels if you buy it. Fresh fruit sorbet is a great way to enjoy sweet flavors with fewer calories. In summary, we covered how to make delightful sorbet using fresh fruits like peaches and raspberries. You learned about necessary ingredients like sugar and lemon juice, and how to blend them into a smooth mix. We also explored tips for enhancing flavor and achieving the perfect texture. Don’t forget to try different fruits or adjustments for your diet. With proper storage, your sorbet will last. Enjoy refreshing treats with this simple method! Create your unique flavors and share them with others.
                Peach Raspberry Sorbet Refreshing Summer Treat
              • To make these delightful bars, you need the following key ingredients: - 1 cup all-purpose flour - ¼ cup powdered sugar - ½ cup unsalted butter, softened - ¼ teaspoon salt - 2 large eggs - 1 cup granulated sugar - ¼ cup freshly squeezed lemon juice - Zest of 1 lemon - 1 cup fresh raspberries These ingredients create a tasty treat that is both sweet and tangy. The flour and butter make a nice crust, while the eggs and sugar give the filling a smooth texture. Fresh lemon juice and zest add a bright flavor, and raspberries give a burst of color and taste. You can add some optional ingredients to make your bars even better: - Extra powdered sugar for dusting This optional dusting gives a lovely finish to the bars. It adds a touch of sweetness and makes the bars look even more appealing. Having the right tools makes cooking easier. For this recipe, you will need: - 8x8 inch baking dish - Parchment paper - Mixing bowls - Whisk - Spatula Using parchment paper helps lift the bars out easily. A whisk is great for mixing the filling smoothly. These tools will help you create perfect Raspberry Lemonade Bars every time. First, you need to preheat your oven to 350°F (175°C). This step is key to getting the bars baked just right. Next, grab an 8x8 inch baking dish. Line it with parchment paper. Leave some paper hanging over the sides. This will help you lift the bars out later. In a medium bowl, mix together these four ingredients: - 1 cup all-purpose flour - ¼ cup powdered sugar - ½ cup unsalted butter, softened - ¼ teaspoon salt Stir them well until the mix forms a crumbly dough. Then, press this dough into the bottom of your lined baking dish. Make sure to spread it evenly. Bake this crust for about 15 minutes, or until it turns a light golden color. While the crust bakes, you can prepare the filling. In another bowl, whisk together: - 2 large eggs - 1 cup granulated sugar - ¼ cup freshly squeezed lemon juice - Zest of 1 lemon Mix these until they are smooth and combined. Next, gently fold in 1 cup of fresh raspberries. Be careful not to crush them too much. You want to keep some whole for a nice texture. Once the crust is ready, pour the raspberry-lemon filling over it. Return the dish to the oven and bake for an extra 20-25 minutes. The filling should be set and slightly golden on top when done. After baking, let the bars cool completely in the dish on a wire rack. When cool, use the parchment paper to lift the bars out and cut them into squares. If you like, you can dust the tops with extra powdered sugar before serving. To make a great crust, use cold butter. It keeps the crust flaky. Mix the flour, powdered sugar, and salt well. This helps the flavors blend. Press the dough firmly into the baking dish. Make sure it’s even. Bake until it’s lightly golden. This gives a perfect base for your filling. For a smooth filling, whisk the eggs well. Mix in the granulated sugar until it’s blended. Add the lemon juice and zest next. This gives a bright flavor. Gently fold in the raspberries. Be careful not to mash them. You want some berries whole for texture. This makes every bite exciting. When serving, cut the bars into neat squares. Dust them with powdered sugar for a sweet touch. Use a sharp knife for clean edges. Arrange them on a colorful plate. This makes for a pretty display. You can also add fresh raspberries on top. This adds a nice pop of color. Enjoy with a glass of lemonade for a refreshing treat! {{image_2}} You can switch up the fruit in these bars. Try using blueberries or strawberries. Each fruit gives a unique taste. I love the sweet and tart mix of peach and lemon. You can blend fruits too. For instance, mix raspberries with blackberries for a berry blast! To make these bars gluten-free, swap all-purpose flour with almond or coconut flour. These flours add flavor and texture. You may need to adjust the amounts. Almond flour is heavier, so use less. Coconut flour absorbs more moisture, so add extra liquid. Want to spice things up? Add fresh mint or basil for a herbal twist. You can also mix in a pinch of cinnamon for warmth. If you like spicy, try a dash of cayenne pepper. These small changes can make a big impact on taste! To keep your Raspberry Lemonade Bars fresh, store them in an airtight container. They will stay good at room temperature for up to two days. If you want to keep them longer, place them in the fridge. They can last about a week when chilled. Always make sure to cover them well to prevent them from drying out. You can freeze these bars for longer storage. First, cut them into squares. Wrap each piece tightly in plastic wrap. Then, place them in a freezer-safe bag or container. They will stay fresh in the freezer for up to three months. When you’re ready to enjoy them, just thaw them in the fridge overnight. If you want to warm your Raspberry Lemonade Bars, use the oven. Preheat your oven to 300°F (150°C). Place the bars on a baking sheet and heat for about 10 minutes. This will make them warm and soft without losing their flavor. Avoid using the microwave, as it can make the bars soggy. Enjoy your delicious treat! Yes, you can use frozen raspberries. They work well in this recipe. Just remember to thaw them first. Drain any extra water to keep the filling from being too runny. This way, your bars stay firm and tasty. To add more tartness, increase the lemon juice. Try adding an extra tablespoon. You can also add a bit more lemon zest. This will boost the lemon flavor and balance the sweetness of the raspberries. The best way to cut the bars is using a sharp knife. First, let the bars cool completely. Use the parchment paper to lift them out. Then, run the knife under hot water for clean cuts. Wipe the knife dry between cuts for neat squares. Raspberry Lemonade Bars last up to five days in the fridge. Store them in an airtight container. If you want to keep them longer, you can freeze them for up to three months. Just make sure to wrap them tightly before freezing. Raspberry Lemonade Bars are easy to make and delicious. We covered key ingredients, step-by-step baking, and helpful tips. You can also try different fruit or gluten-free options. Remember to store them right for the best taste. These bars are great for sharing or enjoying at home. I hope you feel inspired to create your own tasty treats. Enjoy the sweet and tangy flavors!
                Raspberry Lemonade Bars Refreshing Summer Treat
              • - 2 cups fresh strawberries, hulled and halved - 1 cup coconut milk (or any milk of your choice) - 2 tablespoons honey or maple syrup (adjust to taste) - 1 teaspoon vanilla extract - 100g dark chocolate, chopped - 1 tablespoon coconut oil - ¼ cup crushed nuts (almonds, pistachios, or hazelnuts for topping, optional) Fresh strawberries make the base for these popsicles. You want ripe, sweet berries. They should shine and smell sweet. Coconut milk adds creaminess and pairs well with strawberries. If you prefer, use almond or oat milk instead. For sweetness, I like honey or maple syrup. You can adjust the amount based on your taste. The vanilla extract brings warmth and depth. Next, we have dark chocolate. Choose one that you love. It coats the popsicles and gives a nice contrast to the fruit. The coconut oil helps the chocolate melt smoothly. Lastly, the crushed nuts are optional but add great crunch and flavor. Almonds, pistachios, or hazelnuts work well. You can skip them if you want a simpler treat. Now that you have your ingredients, you’re ready to create a delicious dessert! Start with fresh strawberries. Remove the green tops and cut them in half. This makes them easier to blend. Place the hulled strawberries in a blender. Add one cup of coconut milk, two tablespoons of honey or maple syrup, and one teaspoon of vanilla extract. Blend these ingredients until smooth. You want a nice, creamy mixture. Next, grab your popsicle molds. Pour the strawberry mixture into the molds. Fill each one about three-quarters full. This space helps the popsicles expand as they freeze. Be careful not to overfill them, or it will be messy. Now, insert the popsicle sticks into each mold. Make sure they stand straight. Place the molds in the freezer. Let them freeze for about four to six hours. They need to be solid to remove them easily. To release them, run warm water over the outside of the molds. This trick helps loosen the popsicles. For the chocolate coating, gather 100 grams of chopped dark chocolate and one tablespoon of coconut oil. Place these in a heatproof bowl. Melt the mixture in the microwave. Do this in 20-second intervals. Stir after each interval until smooth. You want it fully melted and ready to dip. Now comes the fun part—dipping! Take each popsicle and dip it halfway into the melted chocolate. Let any excess chocolate drip off. If you like, roll the dipped part in crushed nuts for extra crunch. Then, lay the popsicles on a baking sheet lined with parchment paper. Return them to the freezer for about 10 to 15 minutes. This sets the chocolate nicely. Fresh strawberries are key for these popsicles. Look for berries that are bright red, firm, and free from blemishes. The best strawberries taste sweet and juicy. Ripe strawberries have more flavor, making your popsicles better. Choose organic strawberries if you can, as they often have a richer taste. Adjust the sweetness to fit your taste. Use honey or maple syrup to sweeten your popsicles. Start with the 2 tablespoons suggested in the recipe. If you prefer a sweeter treat, add more. Just mix well and taste. Remember, the sweetness can change the final flavor. To get a smooth, even coat of chocolate, melt dark chocolate with coconut oil. This mix helps the chocolate flow better. Heat it in short bursts in the microwave. Stir often to avoid burning. When dipping your popsicles, let the excess chocolate drip off. This keeps your popsicles neat and tasty. {{image_2}} You can switch up the chocolate for your popsicles. Instead of dark chocolate, try milk chocolate for a sweeter taste. White chocolate adds a creamy flavor, while ruby chocolate brings a unique berry-like taste. Each type can change how your popsicles taste. Experiment with them to find your favorite. Mixing fruits can make your popsicles even more fun. Try adding bananas or mango to the strawberry mix. You can also add a few drops of flavor extracts, like almond or coconut. These small changes create new tastes. Each combination can surprise your taste buds. If you're looking for healthier popsicles, there are easy swaps. Use a low-sugar sweetener like stevia instead of honey or maple syrup. For a dairy-free option, stick with coconut milk or almond milk. You can even add Greek yogurt for creaminess without much sugar. These options keep your popsicles tasty while making them better for you. To keep your chocolate dipped strawberry popsicles fresh, store them in an airtight container. This helps prevent freezer burn. If you do not have one, wrap each popsicle in plastic wrap. This adds an extra layer of protection. Make sure to label the container with the date to track freshness. You can store these popsicles in the freezer for up to two months. After that, they may lose taste and texture. To enjoy them at their best, try to eat them within this time frame. When you are ready to enjoy your popsicles, remove them from the freezer. Let them sit for about 5 minutes to soften slightly. This makes them easier to bite into. If you want them cold and firm, enjoy them right away! Yes, you can use frozen strawberries! Just remember to thaw them first. This helps in blending. Frozen strawberries may make your popsicles a bit softer. But they still taste great. You can easily make these popsicles vegan. Just swap honey for maple syrup. Use coconut milk or any plant-based milk. This keeps the popsicles creamy and delicious. To remove popsicles, run warm water over the outside of the molds. This warms the sides and helps loosen the popsicles. They should slide out easily after a few seconds. To prevent cracking, add coconut oil to the chocolate. This keeps it smooth and flexible. Make sure the popsicles are cold when you dip them in chocolate. This helps the chocolate set nicely without cracking. You now have a simple guide to make tasty strawberry popsicles. Using fresh strawberries and creamy coconut milk, you can create a fun treat. Remember to customize the sweetness and experiment with toppings like nuts. Storing them right will keep them fresh, and you can enjoy different variations too. With these steps, you'll impress family and friends with your skills. Get ready to enjoy your homemade popsicles!
                Chocolate Dipped Strawberry Popsicles Simple Delight

              Recent Drinks

              • - 2 packets of frozen açaí puree - 1 ripe banana - 1 cup of fresh pineapple chunks - 1 cup of coconut milk (or any non-dairy milk) - 1 tablespoon of honey or agave syrup (optional) For a vibrant tropical taste, the main ingredients are key. Açaí puree brings rich color and flavor. It is full of antioxidants. Bananas add creaminess and natural sweetness. Fresh pineapple gives a bright, juicy touch. Coconut milk offers a smooth base. You can use any non-dairy milk you prefer. Honey or agave syrup adds sweetness if needed. - Sliced kiwi - Coconut flakes - Granola - Chia seeds - Fresh berries (e.g., strawberries, blueberries) Toppings make your smoothie bowl pop! Sliced kiwi adds a zesty kick. Coconut flakes give it a tropical crunch. Granola provides texture and flavor. Chia seeds offer extra nutrients. Fresh berries, like strawberries and blueberries, add color and taste. You can mix and match these toppings for a fun look. For the full recipe, please refer to the section above. 1. Blend the ingredients Start by adding the frozen açaí puree, ripe banana, fresh pineapple chunks, and coconut milk into a blender. If you want it sweeter, you can add honey or agave syrup. Blend this mixture on high speed until it becomes creamy and smooth. 2. Adjust consistency with coconut milk If your smoothie is too thick, just add a bit more coconut milk. Blend again until you reach the texture you want. This step is key to making your smoothie bowl enjoyable. 3. Pour into a bowl Once blended, carefully pour the smoothie mixture into a bowl. Make sure to use a large enough bowl to hold all the goodness. 4. Add toppings creatively Now comes the fun part! Arrange your toppings, such as sliced kiwi, coconut flakes, granola, chia seeds, and fresh berries, over the smoothie. Try to create a colorful pattern. I love making a circular design to highlight all the vibrant colors. - Tips for presentation Use a shallow bowl to show off your beautiful toppings. You can also sprinkle some extra coconut flakes around the edge for a nice touch. A colorful presentation makes your smoothie bowl more fun to eat. - Recommended serving utensils Serve your smoothie bowl with a regular spoon. If you want to make it more special, use a wooden spoon or a cute, colorful one. Enjoy your tropical treat right away to keep it fresh and tasty. For the full recipe, refer to the earlier sections. To make a great smoothie bowl, start with ripe fruits. Ripe fruits taste better and add natural sweetness. Look for bananas that are yellow with some brown spots. When it comes to pineapples, choose ones that smell sweet. It ensures they are juicy and fresh. Blending is key to your smoothie bowl. You want a smooth and creamy texture. If your mix is too thick, add more coconut milk. Blend again until you reach the right consistency. A good blend makes your bowl enjoyable and easy to eat. A colorful topping arrangement makes your smoothie bowl pop. Use fresh berries, sliced kiwi, and coconut flakes. Lay them out in a pattern. A circular design looks appealing and fun. To elevate your smoothie bowl's look, use bowls with interesting shapes. Tall bowls or wide, shallow ones can change the game. Garnish with a sprinkle of chia seeds for a fancy touch. This not only looks great but adds a bit of crunch too. {{image_2}} You can change the non-dairy milk for this smoothie. Almond, soy, or oat milk work well. Each milk adds a different taste. Try using seasonal fruits too. Mango, papaya, or berries add a fresh twist. You can mix and match to find your favorite blend. Want more nutrients? Add spinach or kale to your smoothie. They blend well and boost health. You won’t even taste them! For extra energy, stir in nut butter or protein powder. Both will make your smoothie more filling. They add great flavor too! You can also experiment with different combinations to find the best taste for you. To store leftovers, place your smoothie bowl in the fridge. Use a tight container to keep it fresh. Glass or BPA-free plastic works well for storage. I prefer glass because it keeps flavors better. You can freeze smoothie bowls for later. Just pour the mixture into an airtight container. Leave some space at the top, as it will expand when frozen. To defrost, place it in the fridge overnight. If you’re in a rush, you can use the microwave. Just heat it in short bursts to avoid cooking. Enjoy your tropical treat later with ease! For the recipe, check out the Full Recipe. What is açaí and what are its benefits? Açaí is a small, dark purple berry from Brazil. It is full of antioxidants, which help fight free radicals in the body. Açaí is also rich in fiber, promoting good digestion. Plus, it has healthy fats that support heart health. You can enjoy its fruity taste in many dishes. Can I make this smoothie bowl ahead of time? Yes! You can prepare the smoothie mix and store it in the fridge for up to 24 hours. Just remember to keep the toppings separate. This way, your bowl stays fresh and tasty. How can I make this recipe vegan or gluten-free? To make it vegan, use agave syrup instead of honey. For gluten-free, ensure your granola and any other toppings are gluten-free. Most fruits and coconut milk are naturally gluten-free, so you’re all set! Can I substitute açaí with other fruits? Yes, you can! If you can’t find açaí, try using frozen berries like blueberries or strawberries. These fruits will add sweetness and a burst of color to your bowl. What to do if the smoothie is too thick? If your smoothie is too thick, just add a little more coconut milk. Blend again until you reach your desired creaminess. This will make it easier to pour and enjoy. How to fix a smoothie bowl that tastes too bland? If your smoothie bowl lacks flavor, try adding a splash of vanilla extract or a pinch of salt. You can also mix in a bit of honey or agave syrup for sweetness. Adjust the toppings to add more taste and texture. This article covers how to make a delicious açaí smoothie bowl. You learned about the key ingredients, easy steps for preparation, and creative topping ideas. I shared tips to improve taste and presentation, plus fun variations to try. Don’t forget storage techniques to keep your bowl fresh. With all this information, you can enjoy a tasty and nutritious treat anytime. Get creative with your favorites and make this recipe truly yours. Enjoy every bite!
                Tropical Acai Smoothie Bowl Energizing Healthy Treat
              • To make a delicious pistachio cardamom iced coffee, gather these key ingredients: - 2 cups strong brewed coffee, cooled - 1 cup milk (or non-dairy alternative) - 1 tablespoon pistachio paste - ½ teaspoon ground cardamom - 2 tablespoons maple syrup (or to taste) - Crushed ice - Chopped pistachios and cardamom pods for garnish These ingredients work together to create a rich and refreshing drink. The strong brewed coffee gives you a great base, while the pistachio paste adds a creamy texture. The cardamom provides a warm spice, and maple syrup sweetens the mix. If you want a non-dairy option, try these milk alternatives: - Almond milk - Oat milk - Coconut milk - Cashew milk Each of these options brings its own flavor to the drink. Almond milk adds a nutty taste. Oat milk provides creaminess. Coconut milk gives a tropical twist. Cashew milk is rich and smooth. Choose the milk that fits your taste best! Garnishes make your drink look and taste even better. Here are some great options: - Chopped pistachios - Whole cardamom pods - A sprinkle of cinnamon - A drizzle of honey Chopped pistachios add crunch and a pop of color. Whole cardamom pods enhance the spice aroma. A sprinkle of cinnamon can add warmth. A drizzle of honey gives extra sweetness. These garnishes not only beautify your iced coffee but also boost the flavor! For the full recipe, check the detailed instructions to create this delightful drink. Start by brewing two cups of strong coffee. Let it cool down completely. You want it chilled for this drink. Using cooled coffee helps keep your iced drink refreshing. This step is key for the perfect iced coffee. In a large bowl or pitcher, mix the cooled coffee with one cup of milk. You can use any milk you like, even non-dairy options. Add one tablespoon of pistachio paste to the mix. This gives the drink its nutty flavor. Next, sprinkle in half a teaspoon of ground cardamom. This spice adds warmth and depth. Then, pour in two tablespoons of maple syrup. Taste the mix and adjust it to your liking. Some may want it sweeter. Whisk everything together until the pistachio paste blends well. This step is important to get a smooth drink. Take a glass and fill it halfway with crushed ice. Pour your coffee mixture over the ice, leaving some room at the top. For a nice finish, sprinkle chopped pistachios and a few cardamom pods on top. This makes the drink look beautiful and adds extra flavor. Before sipping, stir gently. This helps mix the flavors again. Enjoy your pistachio cardamom iced coffee! You can find the full recipe at the beginning of this article. To get the best taste, you should focus on the coffee and spices. Use strong brewed coffee; it makes a big difference. I like to brew it a little stronger than usual. The pistachio paste gives a creamy texture. Make sure it is mixed well. Cardamom has a strong flavor. Just half a teaspoon adds warmth without overpowering. Taste it as you mix. If you want it sweeter, add more maple syrup. Adjust it to what you love! If you have extra iced coffee, store it right! Use a sealed container to keep it fresh. It can last in the fridge for up to three days. But remember, the flavors may change over time. If you want to enjoy it again, shake it before serving. If it tastes a bit off, try adding more milk or syrup. This helps revive the flavors. When making your iced coffee, avoid these common mistakes. First, don’t skip cooling the coffee. Hot coffee will melt the ice too fast. Next, be careful with the spices. Too much cardamom can make it taste bitter. Always start with less; you can add more later. Lastly, don’t forget the garnish! Chopped pistachios and cardamom pods make your drink look pretty and add flavor. For the full recipe, check the section above! {{image_2}} You can easily make this drink dairy-free or vegan. Instead of regular milk, use almond, oat, or coconut milk. These options add their own unique tastes. I love using almond milk for a nutty twist. Just ensure the milk is unsweetened to keep the flavor balanced. Feel free to get creative with flavors! You can mix in vanilla extract for warmth. A dash of cinnamon gives a nice spice kick. If you want something unique, try adding a splash of rose water. This will give it a floral note that pairs well with cardamom. Maple syrup is a great choice for sweetening this drink. However, you can try honey or agave syrup as well. For a low-calorie option, consider stevia or monk fruit sweetener. Each sweetener brings its own taste, so taste as you go. Adjust until it's just how you like it. For the full recipe, check out the detailed instructions above. Enjoy experimenting with your own variations! If you have leftover pistachio cardamom iced coffee, store it in an airtight container. This keeps the flavors fresh. You can use a glass jar or a plastic pitcher. Make sure to put it in the fridge right away. Do not let it sit out at room temperature. Store your ingredients properly for the best taste. Keep pistachio paste in the fridge after opening. It lasts longer that way. Ground cardamom should stay in a cool, dark place. Use it within six months for the best flavor. If you use milk, check the expiration date often. Homemade pistachio cardamom iced coffee stays fresh for about 3 days in the fridge. After that, the taste may change. If it starts to smell funny or looks off, toss it out. Always give it a good stir before drinking. For the full recipe, check the top of this article. Pistachio Cardamom Iced Coffee is a unique drink that mixes rich coffee with nutty flavors. You blend brewed coffee, milk, pistachio paste, and cardamom for a refreshing treat. The pistachios add creaminess, while cardamom gives a warm spice. This drink is perfect for hot days or any time you crave something special. Yes, you can prepare the coffee mixture ahead of time. Just mix the coffee, milk, pistachio paste, and cardamom. Store it in your fridge for up to two days. When you are ready to enjoy, pour it over ice and add your garnishes. This makes it easy to serve to guests or enjoy a quick treat. Pistachios are packed with protein, fiber, and healthy fats. They help keep you full and support heart health. Cardamom has antioxidant properties and can aid digestion. Together, these ingredients make your iced coffee not just tasty but also good for you. Enjoying this drink can be a delightful way to add nutrients to your day. Pistachio cardamom iced coffee combines unique flavors for a refreshing drink. You learned about essential ingredients, milk options, and flavor enhancers to make it great. Following the step-by-step guide helps ensure your coffee tastes its best. I shared helpful tips to avoid mistakes and achieve balance. Plus, I offered ideas for variations and proper storage. Enjoy experimenting with this drink for a delightful taste experience. Make it your own, and don’t hesitate to share it with friends!
                Pistachio Cardamom Iced Coffee Rich and Refreshing Drink
              • - 1 cup strawberries, hulled and sliced - 1 medium dragon fruit, peeled and diced - 4 cups water - 2 tablespoons agave syrup - 1 tablespoon lime juice These main ingredients make the base for your Strawberry Dragon Fruit Agua Fresca. Fresh strawberries give a sweet and tangy taste. Dragon fruit adds a unique texture and a bright color. - Ice cubes - Fresh mint leaves for garnish Adding ice cubes keeps your drink cool and refreshing. A sprig of mint on top adds a nice touch. It also enhances the aroma, making each sip more delightful. - Alternative sweeteners - Additional fruits for blending You can use other sweeteners if you prefer. Honey or maple syrup works well. Want to experiment? Try adding other fruits like mango or pineapple for a twist. They will blend beautifully with the dragon fruit and strawberries. For the full recipe, check the section above. - Step 1: Blend strawberries and dragon fruit Start by adding 1 cup of sliced strawberries and 1 medium diced dragon fruit into a blender. Pour in 2 cups of water. Blend this mix on high until it's smooth and creamy. The colors should be bright and inviting. - Step 2: Strain the mixture Next, set up a fine mesh sieve over a large pitcher. Pour the blended mix into the sieve. Use a spatula to push the liquid through while leaving the pulp behind. This step makes your agua fresca silky and refreshing. - Step 3: Combine with remaining ingredients Once strained, add 2 more cups of water to the pitcher. Then mix in 2 tablespoons of agave syrup and 1 tablespoon of lime juice. Stir everything together until well combined. - Serve over ice Fill tall glasses with ice cubes. Pour the chilled agua fresca over the ice. This drink is best enjoyed cold on a warm day. - Garnish with mint leaves To add a touch of beauty, garnish each glass with fresh mint leaves. This not only looks great but also adds a fresh aroma. - Taste testing and modifications Before serving, give your agua fresca a taste. If you want it sweeter, add more agave syrup. Stir well and taste again. Adjust until it’s just right for you. Enjoy making it your own! Use fresh strawberries and dragon fruit for the best taste. Look for bright red strawberries. They should be firm and free from soft spots. For dragon fruit, select one with vibrant skin. It should feel slightly soft when you press it gently. To get a smooth drink, blend the fruit well. Start by adding strawberries and dragon fruit to the blender. Use two cups of water for easy blending. Blend on high until it looks creamy. If your mixture is too thick, add more water before blending again. Taste your agua fresca after mixing in the lime juice and agave syrup. If it needs more lime, add a little more juice. If it’s not sweet enough, stir in more agave syrup. Adjust these flavors to fit your taste. Enjoy experimenting until it’s just right! {{image_2}} You can change up the fruits in this recipe for new flavors. Try using mango, pineapple, or kiwi. Each fruit brings its own taste and color. For a berry twist, add blueberries or raspberries. These fruits all blend well with strawberries and dragon fruit. Feel free to mix and match. You might find a combo you love even more! If you want to make this drink vegan, switch the sweeteners. Instead of agave syrup, use maple syrup or coconut sugar. Both choices work well and keep the drink plant-based. Just remember to adjust the amount based on how sweet you like it. Taste as you go, and find your perfect balance! If you enjoy a bit of heat, consider adding jalapeño or ginger. A few slices of jalapeño can bring a fun, spicy kick. If you prefer ginger, grate a small piece and mix it in. Both options add a unique twist to the refreshing taste. This can make your agua fresca exciting and different. Give it a try if you’re feeling adventurous! To keep your strawberry dragon fruit agua fresca fresh, store it in the fridge. Use a clean glass pitcher or jar with a tight lid. This helps keep out air and light, which can affect taste. If you have leftovers, it’s best to drink them within a couple of days. In the fridge, your agua fresca stays fresh for up to three days. After that, the flavors may fade. If you notice any change in smell or color, it’s best to throw it away. Always give it a taste before serving to ensure it's still good. You can freeze agua fresca if you want to save it for later. Pour the mixture into ice cube trays or freezer-safe bags. This way, you can enjoy it for up to three months. When you’re ready to drink, just thaw it in the fridge. You can also blend the frozen cubes into smoothies for a quick treat. Agua fresca is a light, refreshing drink from Mexico. It combines fruit, water, and sometimes sugar. People enjoy it on hot days. The name means "fresh water" in Spanish. Each region has its own version, using local fruits. You can find flavors like hibiscus, tamarind, and cucumber. This drink is perfect for gatherings. It’s easy to make and very tasty! Yes, you can make this drink ahead of time. Prepare it in the morning for later. Store it in the fridge for up to three days. Keep it in a sealed container. The flavors will blend well over time. Just remember to stir it before serving. If it separates, that's normal. Strawberry Dragon Fruit Agua Fresca is healthy and refreshing. Strawberries are high in vitamin C and fiber. Dragon fruit is low in calories and packed with antioxidants. This drink is hydrating, especially in hot weather. Using agave syrup keeps it natural. You can adjust sweetness to fit your taste. Overall, this drink is a nutritious choice for everyone! You’ve learned how to make a refreshing Strawberry Dragon Fruit Agua Fresca. We covered the simplest ingredients and steps. This drink is tasty and easy to customize. Don’t forget to try different fruits or adjust the sweetness to your liking. Store any leftovers properly to enjoy later. Experiment with flavors to find your favorite twist. This drink can be a fun addition to your menu. Enjoy making this drink for yourself and friends.
                Strawberry Dragon Fruit Agua Fresca Refreshing Drink
              • To make Sweet Peach Iced Tea, you need simple, fresh ingredients. Here’s what you'll need: - 4 black tea bags - 4 cups water - 2 ripe peaches, sliced - ½ cup sugar (or to taste) - 1 tablespoon fresh lemon juice - Fresh mint leaves for garnish - Ice cubes These ingredients come together to create a refreshing drink perfect for summer. You can twist this recipe to fit your tastes. Here are some fun ideas: - Tea Base: Use green tea or herbal tea instead of black tea for a lighter taste. - Fruits: Swap peaches for nectarines or apricots. You can mix different fruits too. - Sweeteners: Try honey or agave syrup instead of sugar for a different sweetness. - Herbs: Add basil instead of mint for a unique flavor. Feel free to play with these options to find what you love! Peaches and tea are more than just tasty. They also offer health perks: - Peaches: These fruits are full of vitamins A and C. They help keep your skin healthy and boost your immune system. - Tea: Black tea contains antioxidants. These can help fight free radicals in your body. - Hydration: This iced tea is hydrating, making it a great choice on hot days. Enjoying Sweet Peach Iced Tea means treating yourself to a drink that tastes good and is good for you! For the full recipe, check out the details above. First, we need to make the tea. Grab a medium saucepan. Pour in 4 cups of water and bring it to a boil. When the water is bubbling, take it off the heat. Add 4 black tea bags to the hot water. Let them steep for 5-7 minutes. This makes the tea strong and flavorful. If you like it lighter, steep for less time. After steeping, remove the tea bags. Next, let’s prepare the peach syrup. Take a small saucepan and place it on medium heat. Add 2 sliced peaches and ½ cup of sugar. Stir the mix. You want the peaches to release their juices. This will take about 5-10 minutes. Once it looks syrupy, remove it from the heat. Use a strainer to separate the syrup from the peach slices. Now, you have a sweet syrup ready to use! Now it's time to combine everything. In a large pitcher, pour in the brewed tea. Add the peach syrup and 1 tablespoon of fresh lemon juice. Stir well to mix all the flavors. Taste it to see if you want more sugar. If it’s good, let it cool at room temperature for about 20 minutes. Then, place it in the fridge for at least 1 hour. This chilling step makes it super refreshing. Once chilled, it’s time to serve! Fill glasses with ice cubes. Pour the Sweet Peach Iced Tea over the ice. You can garnish with fresh mint leaves and a slice of peach if you wish. Enjoy your drink! For the best flavor, use fresh, high-quality black tea bags. Heat your water to a boil, then steep the tea bags for 5-7 minutes. Be careful not to steep too long. Over-steeping makes the tea bitter. If you prefer a stronger flavor, try using more tea bags. Taste your tea after mixing in the peach syrup. If it is not sweet enough, add more sugar. You can also use honey or agave syrup for a different flavor. Mix well until the sweetener dissolves. Remember, you can always add more, but you can't take it out. Serve Sweet Peach Iced Tea over ice for a refreshing drink. Add fresh mint leaves for a pop of color and flavor. You can also slice extra peaches to float on top. This makes the drink look fancy and fun. For a twist, try a splash of sparkling water. It adds fizz and makes the drink even more special. Enjoy! {{image_2}} You can mix other fruits with peach for fun. Try adding raspberries or strawberries. Their tartness pairs well with the sweet peach. You can also add a splash of pineapple juice for a tropical twist. Lime juice can add a zesty kick, making your drink more exciting. You can enjoy sweet peach tea hot or cold. For hot tea, steep the black tea bags in boiling water. Add the peach syrup right after steeping. This method creates a cozy drink perfect for chilly days. However, iced peach tea is a summer favorite. Chill it in the fridge and serve over ice. This keeps it refreshing and cool. Sugar is a common choice, but you can try other sweeteners too. Honey adds a floral note that enhances the peach flavor. If you want a low-calorie option, try stevia or agave syrup. Each sweetener gives a unique taste, so feel free to experiment. Adjust the amount based on your preference for sweetness. For the full recipe, check the Sweet Peach Iced Tea section. To store leftover Sweet Peach Iced Tea, pour it into a clean pitcher. Make sure to cover the pitcher with a lid or plastic wrap. This keeps the tea fresh and prevents it from absorbing other smells in the fridge. Keep your iced tea in the coldest part of the fridge. The back of the shelf is usually the best spot. Avoid placing it in the door. The door often gets warmer when you open it. Your Sweet Peach Iced Tea stays fresh for about 3 to 5 days. After that, the flavor fades. If you see any signs of mold or changes in smell, throw it away. Enjoy your refreshing drink while it’s at its best! You can skip the sugar by using natural sweeteners. Try honey or agave syrup. You can also use ripe peaches, as they add sweetness. Just blend them into a puree and mix with the tea. This keeps the drink refreshing and tasty without added sugar. Yes, frozen peaches work well in this recipe. They can add a nice chill to your drink. Just thaw the peaches before use. You can mash them for more flavor in the syrup. This is a great option when fresh peaches are out of season. You can find Sweet Peach Iced Tea at many grocery stores. Look in the beverage aisle or tea section. Some cafes and restaurants also serve this flavor. For the best taste, consider making it at home with the full recipe. We covered how to make Sweet Peach Iced Tea from scratch. You learned about key ingredients, how to prepare the peach syrup, and the best ways to chill your drink. We explored helpful tips for brewing and adjusting sweetness. I also shared fun variations to try and how to store any leftovers. Enjoy making this refreshing drink that not only tastes great but also offers health benefits. Experiment with flavors, and find what delights your taste buds. Your perfect summer drink awaits!
                Sweet Peach Iced Tea Refreshing Summer Delight

              Footer

              ↑ back to top

              About

              • Home
              • Drinks
              • Appetizer
              • Dinner
              • Desserts
              • About
              • Contact
              • Privacy Policy

              Contact

              • Privacy Policy
              • GDPR Policy
              • Terms Of Use
              • Copyright Policy
              • Cookie Policy
              • Disclaimer

              Copyright © 2025 cheftaling