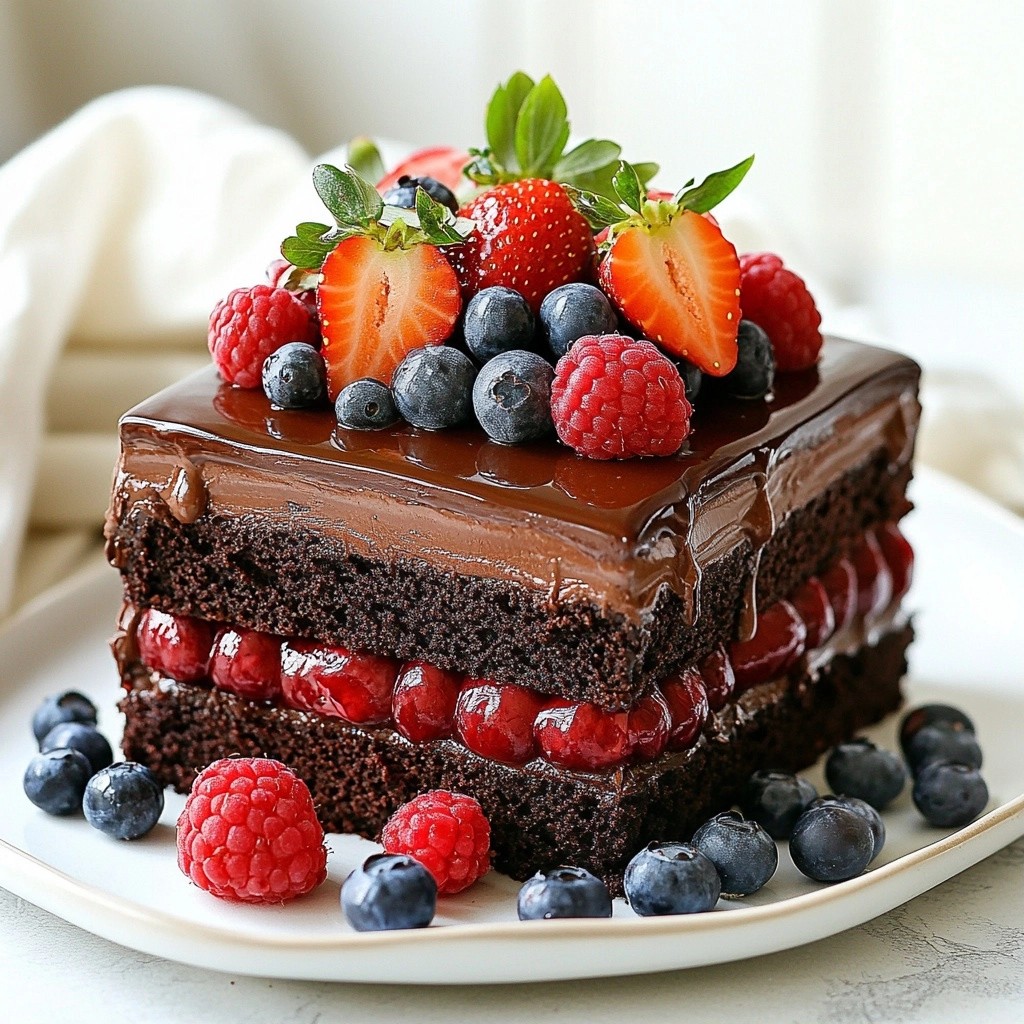
Indulge your sweet tooth with my Triple Layer Chocolate Mousse Cake with Berry Glaze Delight! This cake is the perfect mix of rich chocolate and fresh berries. You’ll impress friends and family with its gorgeous layers and luscious glaze. In this post, I'll guide you through each step, sharing tips for a flawless bake. Get ready to create a dessert that will make every occasion special! Let’s dive in!
Why I Love This Recipe
- Decadent Layers: This cake features three rich layers of chocolate mousse, making every bite an indulgent experience.
- Beautiful Presentation: The berry glaze adds a vibrant pop of color, making it visually stunning for any occasion.
- Perfect for Celebrations: Whether it's a birthday or an anniversary, this cake is sure to impress your guests.
- Make Ahead Option: You can prepare the cake layers and mousse in advance, saving you time on the day of serving.
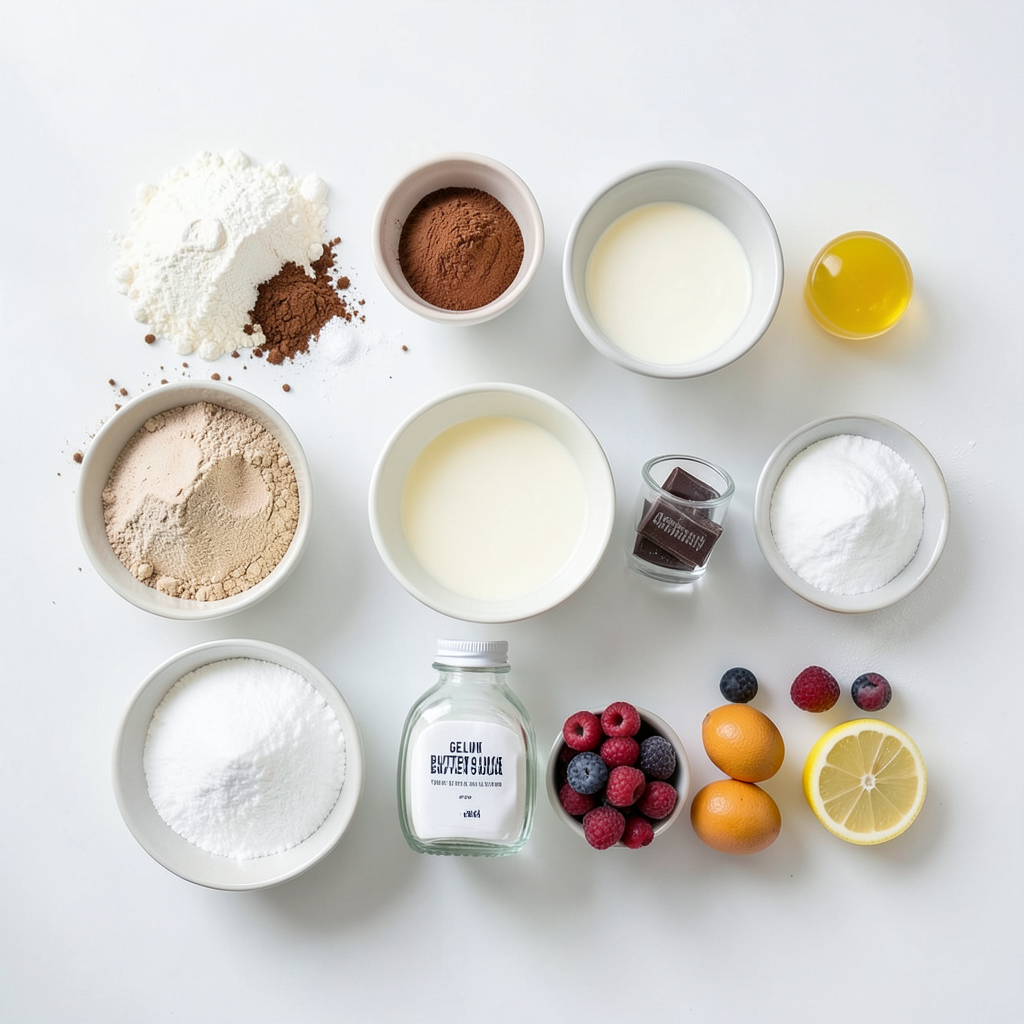
Ingredients
Cake Layer Ingredients
- 1 cup all-purpose flour
- 1/2 cup unsweetened cocoa powder
- 1 teaspoon baking powder
- 1/2 teaspoon baking soda
- 1/4 teaspoon salt
- 1/2 cup unsalted butter, softened
- 1 cup granulated sugar
- 2 large eggs
- 1 teaspoon vanilla extract
- 1/2 cup buttermilk
- 1/2 cup boiling water
Chocolate Mousse Ingredients
- 8 ounces dark chocolate, chopped
- 2 tablespoons unsalted butter
- 2 cups heavy whipping cream, divided
- 2 tablespoons powdered sugar, divided
- 1 teaspoon vanilla extract
- 1 tablespoon gelatin powder
- 3 tablespoons cold water
Berry Glaze Ingredients
- 1 cup mixed berries (strawberries, raspberries, blueberries)
- 1/4 cup granulated sugar
- 1 tablespoon lemon juice
- 1 tablespoon cornstarch
- 1/4 cup water
These ingredients are key to creating your Triple Layer Chocolate Mousse Cake with Berry Glaze. Each layer brings its own unique taste and texture.
For the cake, I use flour, cocoa, and baking powder. The butter and sugar give it a rich flavor. Eggs add moisture, while buttermilk helps it rise. Boiling water makes the batter smooth.
The chocolate mousse is a treat. Dark chocolate brings depth, while heavy cream adds lightness. Gelatin helps it set, giving it a fluffy feel.
Finally, the berry glaze adds a fresh burst. Mixed berries give sweetness and tartness. Sugar and lemon juice balance the flavors. Cornstarch thickens the glaze, making it shiny.
Gather these ingredients for a fun baking adventure. You will love how they come together!
Step-by-Step Instructions
Preparing the Cake Layers
1. Preheat your oven to 350°F (175°C). Grease three 8-inch round cake pans.
2. In a medium bowl, whisk together these dry ingredients: flour, cocoa powder, baking powder, baking soda, and salt.
3. In a large bowl, cream together 1/2 cup of softened butter and 1 cup of sugar until fluffy. Add 2 eggs, one at a time, mixing well after each. Stir in 1 teaspoon of vanilla extract.
4. Gradually add the dry mix to the wet mix. Alternate this with 1/2 cup of buttermilk. Mix until smooth. Carefully fold in 1/2 cup of boiling water until just combined.
5. Divide the batter evenly among the prepared pans. Bake for 25-30 minutes. Check by inserting a toothpick. If it comes out clean, they are done. Let them cool in the pans for 10 minutes, then transfer to wire racks to cool completely.
Making the Chocolate Mousse
1. Melt 8 ounces of chopped dark chocolate and 2 tablespoons of butter in a heatproof bowl over simmering water. Stir until smooth. Remove from heat and let it cool slightly.
2. In a small bowl, sprinkle 1 tablespoon of gelatin powder over 3 tablespoons of cold water. Let it bloom for about 5 minutes. Warm it slightly until dissolved, then mix it with the melted chocolate.
3. In a mixing bowl, whip 1 cup of heavy cream with 1 tablespoon of powdered sugar and 1 teaspoon of vanilla extract until stiff peaks form. Gently fold this whipped cream into the chocolate mixture. Repeat this with the remaining 1 cup of whipping cream for the second mousse layer.
Assembling the Cake
1. Place the first cooled cake layer on a serving plate. Spread a layer of chocolate mousse on top. Add the second cake layer, followed by another layer of mousse. Finally, place the third cake layer on top.
2. Chill the entire cake in the refrigerator for at least 2 hours. This helps the layers set properly.
Making the Berry Glaze
1. In a medium saucepan, mix together 1 cup of mixed berries, 1/4 cup of sugar, and 1 tablespoon of lemon juice over medium heat.
2. Simmer the berry mixture for about 5 minutes. The berries should soften during this time.
3. In a small bowl, mix 1 tablespoon of cornstarch with 1/4 cup of water until smooth. Add this to the berry mixture. Stir continuously until it thickens. Remove from heat and let it cool.
Finishing Touches
1. Once the mousse has set, pour the cooled berry glaze over the top of the cake. Let it drip down the sides for a beautiful finish.
2. Chill the cake for an additional 30 minutes to set the glaze.
3. Slice the cake to reveal those stunning layers of mousse and cake. Enjoy every bite!
Tips & Tricks
Perfecting the Cake Layers
To bake the cake layers evenly, always check your oven temperature. An oven thermometer can help. Use three 8-inch round pans to ensure even cooking. Spread the batter evenly across each pan. This helps them bake at the same rate.
After baking, let the layers cool for 10 minutes in the pans. Then, transfer them to wire racks. This step keeps the cake from getting soggy. Make sure they cool completely before adding mousse. This prevents the layers from sliding apart.
Enhancing the Chocolate Mousse
Choosing the right chocolate is key. I suggest using a high-quality dark chocolate with at least 60% cocoa. The better the chocolate, the richer your mousse will taste. Melt the chocolate gently to avoid burning it. Use a double boiler to keep the heat low.
For the whipped cream, start with cold heavy cream. This helps it whip up faster. Beat until you see stiff peaks. Be gentle when folding the whipped cream into the chocolate. This keeps the mousse light and airy.
Presentation Ideas
Decorating the cake can be fun. Try using fresh berries on top for a pop of color. You can also sprinkle cocoa powder around the edges. Another idea is to drizzle some chocolate sauce over the top.
When serving, slice the cake to show the beautiful layers. A sharp knife helps make clean cuts. I suggest serving with a dollop of whipped cream on the side. This adds an extra touch to your dessert.
Pro Tips
- Use Quality Chocolate: The flavor of your mousse greatly depends on the chocolate you use. Opt for high-quality dark chocolate for the best results.
- Chill Your Mixing Bowls: For better whipping results, chill your mixing bowls and beaters in the refrigerator before whipping the cream. This helps achieve stiff peaks more easily.
- Let the Cake Layers Cool Completely: Ensure that your cake layers are completely cool before adding the mousse to prevent melting and mixing.
- Adjust the Sweetness: If you prefer a less sweet glaze, adjust the sugar in the berry glaze recipe to suit your taste while still maintaining the balance with the tartness of the berries.
Variations
Flavor Variations
You can change the flavor of the cake easily. Try using different types of chocolate. White chocolate gives a creamy taste. Milk chocolate adds sweetness. You can even use flavored chocolates, like orange or mint. Each choice will change the cake's taste and style.
For the berry glaze, you can mix different berries. Strawberries, raspberries, or blueberries all work well. Each berry adds its unique flavor. You might even try a mix of berries for a fun twist.
Gluten-Free Adaptations
If you want a gluten-free cake, it is simple to adapt. Just switch the all-purpose flour with a gluten-free flour mix. Make sure it is a blend meant for baking. This will help keep the cake light and fluffy.
You may also need to adjust your baking method. Keep an eye on the baking time. Gluten-free cakes can bake quicker. Always check with a toothpick to see if it is done.
Vegan Options
To make this cake vegan, you can replace the dairy ingredients. Use plant-based butter instead of regular butter. For the heavy cream, try coconut cream or a vegan whipping cream. These work well and still taste great.
Instead of regular eggs, use flax eggs. To make a flax egg, mix one tablespoon of ground flaxseed with two and a half tablespoons of water. Let it sit for a few minutes until it thickens. This will help bind the cake together nicely.
Storage Info
Refrigeration Guidelines
To keep your Triple Layer Chocolate Mousse Cake fresh, store any leftovers in the fridge. Place the cake in a cake box or cover it with plastic wrap. This helps keep the cake moist and prevents it from absorbing other fridge odors.
- Best containers for storage:
- Cake box with a lid
- Airtight plastic container
- Wrapped in plastic wrap
Freezing Instructions
You can freeze the assembled cake for longer storage. First, chill it in the fridge until firm. Then, wrap the cake tightly in plastic wrap. Place it in a freezer-safe container for extra protection. This helps prevent freezer burn.
- To thaw and serve:
- Move the cake to the fridge for about 6-8 hours.
- Once thawed, let it sit at room temperature for 30 minutes before serving. This brings back its creamy texture.
Shelf Life Details
In the fridge, your cake will last about 3-5 days. Keep an eye on it to enjoy its best flavor and texture.
- Signs of spoilage:
- Any off smells
- Mold or discoloration
- Change in texture, becoming dry or hard
FAQs
How Long Does the Cake Take to Make?
The cake takes about 35 minutes to prepare. After that, you need to bake it for 25-30 minutes. You should cool the cake layers for 10 minutes in the pans. Then, let them cool completely on wire racks. Overall, the total time is about 4 hours. This includes chilling the mousse layers and glaze.
Can I Make This Cake Ahead of Time?
Yes, you can make this cake ahead of time! You can bake the cake layers a day in advance. Just wrap them tightly in plastic wrap and store them in the fridge. You can also prepare the mousse a day early. Assemble the cake the day you plan to serve it for the best texture.
What Should I Serve with Chocolate Mousse Cake?
I love pairing this cake with fresh whipped cream or vanilla ice cream. A hot cup of coffee or a chilled glass of milk works great too. For a fruity twist, serve it with fresh berries on the side. This adds a nice touch to the rich chocolate flavor.
Can I Use Other Fruits for the Glaze?
Absolutely! You can use any berries you like. Strawberries, raspberries, and blueberries are perfect. You can also try blackberries or cherries for a change. Just make sure to adjust the sugar based on the fruit's sweetness.
This chocolate mousse cake features rich layers, smooth mousse, and a sweet berry glaze. You’ve learned how to prepare the cake, make the mousse, and create a delicious glaze. Remember, you can mix flavors, adapt recipes, and try different storage methods. Whether for a celebration or a treat, this cake impresses everyone. Enjoy the process, share your creation, and make memories. Your baking adventure can bring joy to many!