Introduction
Chocolate desserts have a special place in the hearts of many. From rich brownies to fluffy mousse, the allure of chocolate is undeniable. Among these delightful treats, the triple chocolate cheesecake stands out as a decadent masterpiece, marrying the creaminess of classic cheesecake with the intense richness of chocolate. This recipe elevates traditional cheesecake by incorporating three distinct forms of chocolate: cocoa powder, milk chocolate, and dark chocolate. Each layer contributes its unique flavor and texture, creating an indulgent experience that is sure to satisfy any chocolate lover’s cravings.
What sets this triple chocolate cheesecake apart is not only its luxurious taste but also its visually appealing layers that make it a showstopper for any occasion. Whether you’re celebrating a birthday, hosting a dinner party, or simply treating yourself, this cheesecake is a perfect choice. The combination of velvety cream cheese, smooth melted chocolate, and a crunchy cookie crust creates a symphony of flavors and textures that will leave you wanting more. Let’s dive into the details of this delightful dessert, starting with an understanding of the ingredients that make it so special.
Understanding the Ingredients
To create a truly remarkable triple chocolate cheesecake, it’s essential to use high-quality ingredients. Each element plays a crucial role in achieving the perfect flavor and texture that defines this dessert.
1. Cream Cheese: The base of any cheesecake, cream cheese provides the rich and creamy texture that is characteristic of this dessert. Opt for full-fat cream cheese for a smooth, luscious filling. Make sure to let it soften at room temperature before mixing to avoid lumps.
2. Granulated Sugar: Sugar adds sweetness to balance the richness of the cream cheese and chocolate. It also contributes to the overall structure of the cheesecake.
3. Sour Cream: This ingredient adds a slight tanginess that enhances the overall flavor profile. It also helps to create a creamy texture. If you prefer a lighter version, you can use Greek yogurt as a substitute.
4. Eggs: Eggs are essential for binding the ingredients together and ensuring the cheesecake sets properly. They also contribute to the creamy texture. It’s best to use large eggs at room temperature for optimal mixing.
5. High-Quality Chocolate: The star of the show! For this recipe, you will need three types of chocolate: unsweetened cocoa powder, milk chocolate, and dark chocolate. The cocoa powder adds a deep chocolate flavor, while the milk and dark chocolates contribute sweetness and richness. Always choose high-quality chocolate for the best results—look for brands with a high cocoa content for a more intense flavor.
6. Chocolate Cookies (for the crust): A chocolate cookie crust is a delicious foundation for this cheesecake. Classic options include Oreos or other chocolate sandwich cookies. If you have dietary restrictions, consider gluten-free chocolate cookies or making your own from scratch.
By selecting the finest ingredients, you ensure that your triple chocolate cheesecake will not only taste incredible but also impress anyone lucky enough to share in your creation.
Preparing the Crust
The crust is a vital component of the cheesecake, providing a contrasting texture to the creamy filling. Here’s how to prepare a chocolate cookie crust that will perfectly complement your cheesecake.
Step-by-Step Guide to Making the Chocolate Cookie Crust
1. Gather Your Ingredients: For the crust, you will need:
– 2 cups of chocolate cookie crumbs (about 20-24 cookies)
– ½ cup of unsalted butter, melted
– ¼ cup of granulated sugar (optional, depending on the sweetness of your cookies)
2. Crush the Cookies: Start by placing the chocolate cookies in a food processor. Pulse until they are finely crushed and resemble sand. If you don’t have a food processor, you can place the cookies in a resealable plastic bag and use a rolling pin to crush them.
3. Mix the Ingredients: In a medium-sized bowl, combine the chocolate cookie crumbs with the melted butter and granulated sugar (if using). Mix until the crumbs are evenly coated and the mixture holds together when pressed.
4. Press Into the Pan: Transfer the crumb mixture to a 9-inch springform pan. Use the back of a measuring cup or your fingers to firmly press the mixture into the bottom and slightly up the sides of the pan. Ensure that the crust is evenly distributed and compact for stability.
5. Bake the Crust: Preheat your oven to 350°F (175°C). Place the crust in the oven and bake for 8-10 minutes until set. Baking the crust helps to firm it up and enhances the flavor. Once done, remove it from the oven and let it cool completely before adding the filling.
Tips for Achieving the Perfect Crust Texture and Firmness
– Don’t Overmix: When combining the cookie crumbs and butter, mix just until it holds together. Overmixing can lead to a dense crust that doesn’t have the right texture.
– Chill the Crust: For an extra firm crust, consider chilling it in the refrigerator for 30 minutes after pressing it into the pan. This allows the butter to solidify and helps the crust hold its shape during baking.
– Alternative Crust Options: If you have dietary restrictions, you can easily modify the crust. For a gluten-free option, use gluten-free chocolate cookies or almond flour mixed with cocoa powder and butter. For a healthier version, try using crushed nuts combined with dates and cocoa powder for a no-bake crust.
With your chocolate cookie crust prepared, it’s time to move on to the star of the show—the cheesecake filling.
Making the Cheesecake Filling
The filling is where the magic happens. It is essential to create a smooth, creamy texture that melds beautifully with the cookie crust.
Explanation of the Cheesecake Filling Process
1. Melt the Chocolate: Start by melting the milk chocolate and dark chocolate separately. Chop the chocolate into small pieces for even melting, then use a microwave or a double boiler. If using the microwave, heat in 30-second intervals, stirring in between to prevent seizing.
2. Mix the Cream Cheese: In a large mixing bowl, beat the softened cream cheese with an electric mixer until smooth and creamy. This step is crucial; any lumps in the cream cheese will affect the final texture of the cheesecake.
3. Add Sugar and Sour Cream: Gradually add the granulated sugar and sour cream to the cream cheese, mixing until fully incorporated. Be sure to scrape down the sides of the bowl to ensure everything is well combined.
4. Incorporate the Eggs: Add the eggs one at a time, mixing on low speed after each addition just until combined. Overmixing can introduce too much air, leading to cracks in the cheesecake.
5. Add Melted Chocolate: Allow the melted chocolate to cool slightly before adding it to the cream cheese mixture. Pour in the melted milk chocolate and dark chocolate, mixing until the filling is smooth and uniformly colored.
Tips for Melting Chocolate and Incorporating It Into the Batter
– Watch the Temperature: If chocolate is overheated, it can seize up and become grainy. Always melt chocolate on low heat and allow it to cool slightly before mixing it into the batter.
– Mixing Techniques: Use a rubber spatula to gently fold the melted chocolate into the cream cheese mixture if you prefer a more controlled incorporation. This method helps to avoid overmixing.
– Flavor Additions: For an extra flavor boost, consider adding a splash of vanilla extract or espresso powder to enhance the chocolate flavor.
With the cheesecake filling prepared, you’re well on your way to creating a stunning triple chocolate cheesecake. Next, we’ll explore the art of layering the cheesecake for that perfect presentation and taste. Stay tuned for the final steps to assemble and bake your cheesecake!
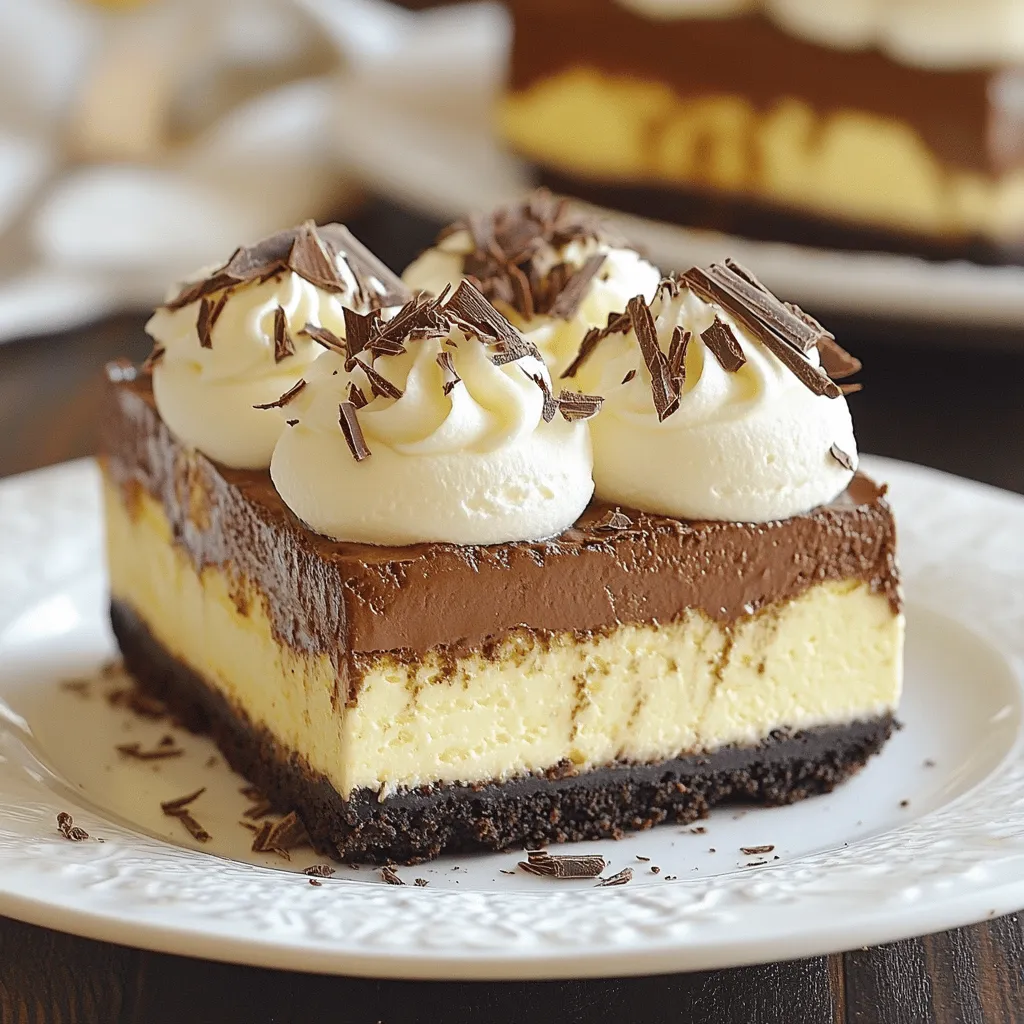
Layering the Three Types of Chocolate Filling
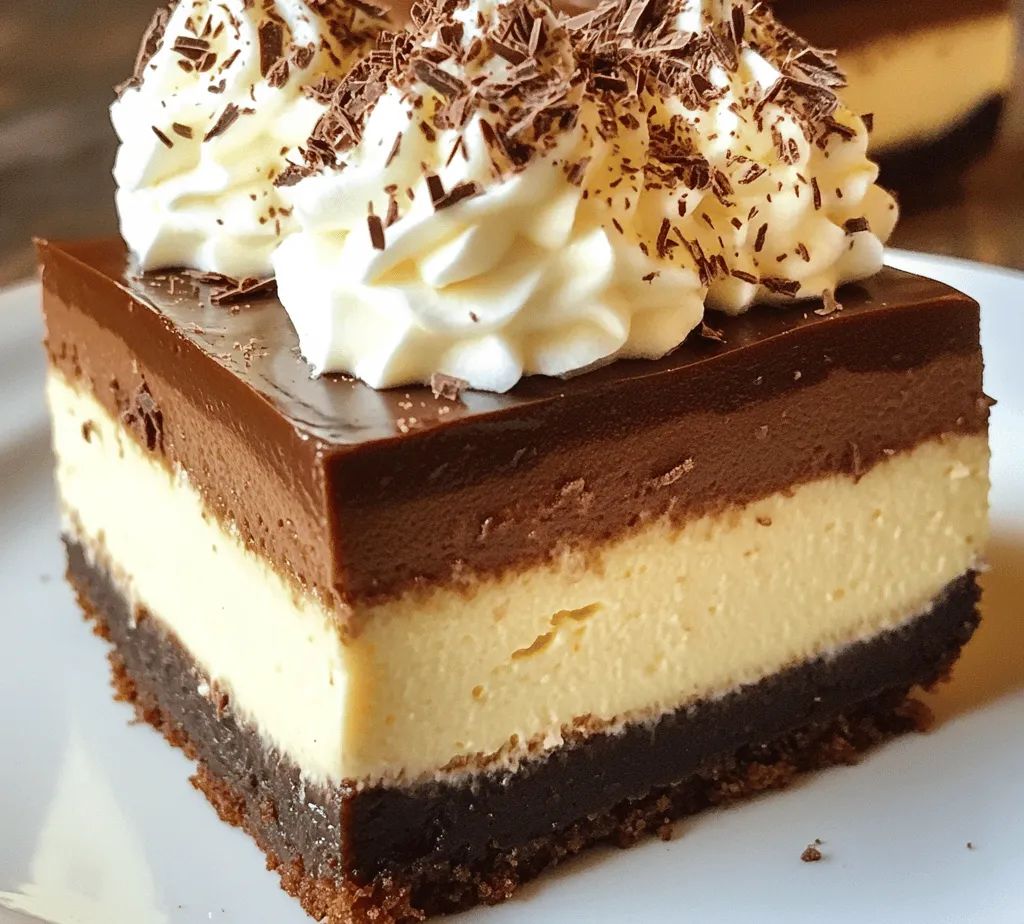
Creating the perfect triple chocolate cheesecake begins with expertly layering the three types of chocolate fillings: dark chocolate, milk chocolate, and white chocolate. Each layer not only adds a unique flavor but also contributes to the visual appeal of the cheesecake. Here’s how to achieve those seamless layers:
1. Prepare the Layers: Once your cream cheese mixture is smooth and your chocolate types are melted and slightly cooled, it’s time to start layering. Begin with the dark chocolate filling. Pour about one-third of the filling into the prepared crust. Use a spatula to gently spread it evenly across the base.
2. Minimizing Air Bubbles: To ensure a smooth surface and prevent air bubbles from forming, gently tap the pan on the counter a few times. This will help any trapped air escape and lead to a more polished finish.
3. Visual Cues: Look for the filling to settle evenly before adding the next layer. The top should appear glossy and free of bubbles. If you see any bubbles, use a toothpick or skewer to pop them before proceeding.
4. Building Up Layers: After the dark chocolate layer has set slightly (about 10-15 minutes in the refrigerator should suffice), repeat the process with the milk chocolate filling. Pour it over the dark chocolate layer, spreading it evenly again while tapping the pan to release any air.
5. Final Layering: Once the milk chocolate layer is set, pour the white chocolate filling on top. This last layer should be the thickest, as it will crown your cheesecake with a beautiful finish. Ensure that the spatula is clean to avoid mixing the layers and creating a marbled effect unless that is your desired outcome.
Baking the Cheesecake
Baking is a pivotal stage in the cheesecake-making process, and it requires careful attention to detail:
1. Temperature and Time: Preheat your oven to 325°F (163°C). The ideal baking time for your triple chocolate cheesecake is between 55 to 70 minutes. Keep an eye on it as it bakes. The edges should appear set, while the center will still have a slight jiggle.
2. Monitoring the Cheesecake: One of the biggest challenges in baking cheesecake is preventing it from overbaking, which can lead to cracks. A reliable method to check for doneness is to gently shake the pan. If the center jiggles slightly but the outer edges are firm, it’s time to take it out.
3. Cooling Process: Once you remove the cheesecake from the oven, allow it to cool in the pan for about an hour. This gradual cooling helps prevent cracking. Afterward, run a knife around the edges of the cheesecake to loosen it from the pan. This step is crucial as it allows the cheesecake to contract slightly without causing cracks.
Chilling the Cheesecake
Chilling your cheesecake is essential for achieving that rich, creamy texture:
1. Why Chilling is Important: Chilling allows the flavors to meld and the cheesecake to firm up. This is when the filling sets to its final creamy consistency, making it easier to slice and serve.
2. Recommended Chilling Time: Aim to chill your cheesecake in the refrigerator for at least 4 hours, but overnight is preferred. This extended chilling not only enhances the flavor but also improves the texture significantly.
3. Benefits of Making Ahead: Making your cheesecake a day in advance is a great strategy. The extra time in the fridge allows the flavors to develop fully, resulting in a richer taste. It also eases the stress of last-minute preparation for gatherings or special occasions.
Garnishing and Serving the Cheesecake
Presentation can elevate your dessert from good to great. Here are some creative ideas for garnishing and serving your triple chocolate cheesecake:
1. Garnishing Ideas: Top your cheesecake with a glossy chocolate ganache made from heavy cream and chocolate, drizzling it over the top. A swirl of fresh whipped cream can add a light, airy touch. For an added texture, sprinkle chocolate shavings or curls over the top.
2. Serving Occasions: This luxurious cheesecake is perfect for special occasions like birthdays, anniversaries, or holiday gatherings. Serve it on a beautiful cake stand to showcase its layers and garnishes.
3. Pairing Suggestions: Enhance the dessert experience by pairing your cheesecake with beverages like coffee, espresso, or a rich dessert wine. A glass of milk or a scoop of vanilla ice cream can also beautifully complement the chocolate flavors.
Conclusion
Creating a magnificent triple chocolate cheesecake is an endeavor that brings immense satisfaction and joy. By layering dark, milk, and white chocolate fillings, you craft a visually stunning and delicious dessert that’s bound to impress. Each step, from baking to chilling, is crucial in achieving that perfect balance of flavors and textures.
Don’t hesitate to experiment with different toppings, such as fresh berries or a raspberry coulis, to add a fruity contrast to the richness of the chocolate. The beauty of this recipe lies in its versatility; you can adapt it to suit your taste preferences or seasonal ingredients.
Indulging in this luxurious dessert is not just about satisfying your sweet tooth; it’s also about enjoying the process of baking and sharing something special with friends and family. So gather your ingredients, follow these steps, and prepare to delight in the rich, creamy goodness of your homemade triple chocolate cheesecake. Whether it’s a celebration or a simple treat for yourself, this cheesecake will surely be a showstopper.