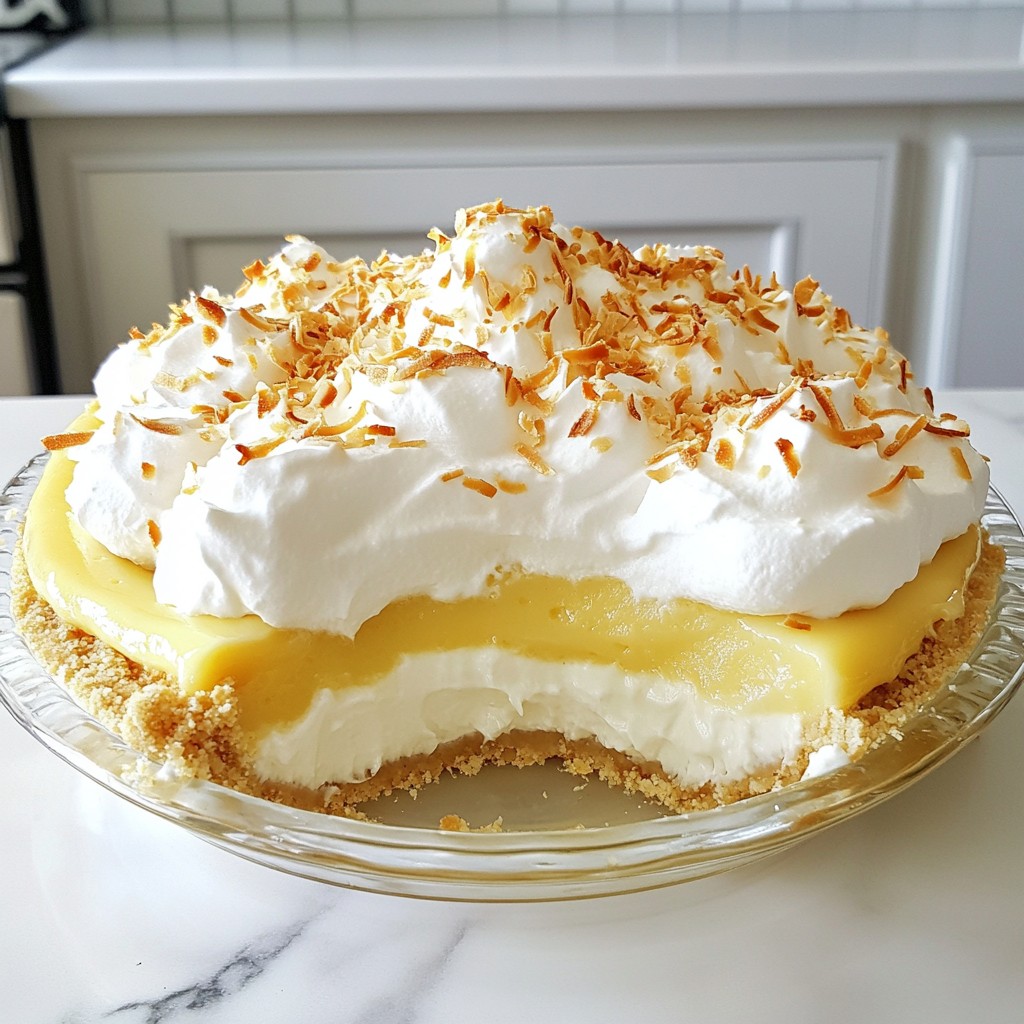
Are you craving a sweet treat that won't derail your keto diet? Look no further! This Sugar-free Keto Coconut Cream Pie is rich, creamy, and packed with flavor, all while keeping your carbs in check. With simple ingredients like almond flour and full-fat coconut milk, you can whip up a delicious dessert that everyone will love. Join me as I guide you through this easy and satisfying recipe!
Why I Love This Recipe
- Deliciously Creamy: This pie is incredibly rich and creamy, making it a perfect dessert for coconut lovers.
- Healthy Ingredients: With almond flour and coconut milk, this recipe is both keto-friendly and sugar-free.
- Easy to Make: The steps are simple and straightforward, allowing even novice bakers to create a stunning pie.
- Perfect for Any Occasion: This coconut cream pie is a delightful treat for gatherings, parties, or just a special night in.
Ingredients
Key Ingredients List
- 1 ½ cups almond flour
- 1/4 cup coconut oil, melted
- 2 tablespoons erythritol (or preferred sugar substitute)
- 1/4 teaspoon sea salt
- 1 cup full-fat coconut milk
These ingredients form the base of our pie. Almond flour gives a nutty flavor and a nice texture. Coconut oil provides healthy fats and a rich taste. Erythritol, or your choice of sweetener, ensures the pie is sugar-free. Sea salt enhances the flavors, while full-fat coconut milk creates a creamy filling.
Optional Ingredients
- 1/2 cup unsweetened shredded coconut
- 1 cup heavy whipping cream
- Extra shredded coconut for garnish
You can add shredded coconut to boost flavor and texture. Whipping cream makes a great topping that adds fluffiness. Use extra shredded coconut to garnish for a nice look and extra flavor.
Nutritional Benefits
- Low-carb advantages
- Keto-friendly components
This pie is low in carbs and fits well in a keto diet. Almond flour and coconut milk offer good fats and fiber. Erythritol keeps sugar content low while providing sweetness. Enjoying this pie can fit into your healthy eating plan while satisfying your sweet tooth.

Step-by-Step Instructions
Preparing the Crust
First, I preheat my oven to 350°F (175°C). In a mixing bowl, I combine 1 ½ cups almond flour, 1/4 cup melted coconut oil, 2 tablespoons erythritol, and 1/4 teaspoon sea salt. I mix until a dough forms. Then, I press this dough evenly into a 9-inch pie pan, covering the bottom and sides well.
Baking and Cooling the Crust
I bake the crust for 10-12 minutes until it turns lightly golden. It's important not to overbake it, as this can dry it out. After baking, I let the crust cool completely. This step is key. A warm crust can make the filling runny.
Preparing the Coconut Filling
Next, I prepare the coconut filling. In a saucepan, I combine 1 cup full-fat coconut milk, 1/2 cup unsweetened shredded coconut, 1/4 cup powdered erythritol, and 1 teaspoon vanilla extract. I heat this mixture over medium heat and whisk until it is warm, but I avoid boiling it.
To thicken the filling, I dissolve 2 tablespoons of unsweetened gelatin powder in 1/4 cup of warm water. Then, I add this to my coconut mixture, along with 3 large egg yolks. I stir continuously on low heat for about 2-3 minutes until it thickens slightly. After that, I remove it from the heat and let it cool a bit before pouring it into the cooled pie crust.
Tips & Tricks
Perfecting the Crust
To make a great crust, avoid these common mistakes:
- Overmixing: Mixing too much can make the crust tough. Just blend until it forms.
- Ignoring the chill: Let the crust cool fully before adding filling. This helps it hold up.
For a flakier crust, try these tips:
- Chill the coconut oil before mixing. Cold fat helps create layers.
- Use a light hand when pressing the dough. Don’t pack it too tight.
Enhancing the Filling Flavors
To make your filling even better, consider these flavor variations:
- Add a splash of almond extract for a nutty twist.
- Mix in lime zest for a citrus kick.
Adjust sweetness levels by:
- Tasting the filling before setting. If it needs more sweetness, add a bit of powdered erythritol.
- Keeping in mind that flavors can deepen as the pie chills.
Serving Suggestions
Pair your pie with these ideas:
- Serve with a dollop of whipped cream for extra creaminess.
- Add fresh berries like raspberries for a pop of color and taste.
For presentation, remember these tips:
- Slice the pie while chilled for clean cuts.
- Garnish with shredded coconut and a mint sprig for a fresh look.
Pro Tips
- Chill Your Ingredients: For an even creamier filling, chill the coconut milk and heavy cream before using them. This helps in achieving better whipping and a smoother texture.
- Use Fresh Coconut: If possible, use fresh coconut instead of dried for a more vibrant flavor and texture. Fresh coconut adds a delightful chewiness to the pie.
- Experiment with Sweeteners: Different sugar substitutes can vary in sweetness. Start with less erythritol and adjust to taste, ensuring your filling isn't overly sweet.
- Let It Set: Allow the pie to set in the refrigerator for at least 2 hours. This ensures the filling solidifies properly, giving you clean slices when serving.
Variations
Flavor Variations
You can switch things up with this pie. Try making a chocolate coconut cream pie. Add unsweetened cocoa powder to the filling. Start with 1/4 cup and mix well. This twist adds rich flavor without the added sugar.
You can also add different extracts for a fun taste. Almond extract pairs well with coconut. Use just a teaspoon for a nice touch. Vanilla is great, but almond gives a new vibe.
Dietary Modifications
If you need dairy-free options, I have you covered. Use coconut cream instead of heavy cream. This makes a creamy topping that fits well. You can also skip the gelatin. Use agar-agar instead for a vegan version.
For nut-free alternatives, consider sunflower seed flour. It works in place of almond flour. You can also use gluten-free flour blends. This keeps the crust tasty without the nuts.
Serving Size Adjustments
To make mini pies, use a muffin tin. Press the dough into each cup. Bake for about 8-10 minutes. This way, everyone gets their own pie!
If you decide to make smaller pies, adjust the baking time. Check them often. They will bake faster than a full pie, so keep an eye on them.
Storage Info
How to Store the Pie
Store your pie in the fridge. It helps keep it fresh and tasty. Use a pie dish with a lid or cover it with plastic wrap. This way, it won’t dry out. If you don’t have a lid, a cake box works too.
Freezing Instructions
To freeze the pie, first, let it cool completely. Wrap it tightly in plastic wrap. Then, place it in a freezer-safe container. This keeps out air and prevents freezer burn. To thaw, move it to the fridge overnight. This way, the texture stays nice and smooth.
Shelf Life
The pie lasts about 4-5 days in the fridge. Keep an eye out for signs it has gone bad. If you see mold or an off smell, toss it out. It's better to be safe than sorry!
FAQs
Can I use a different sweetener instead of erythritol?
Yes, you can use other sweeteners. Stevia or monk fruit work well. You can adjust the amount based on your taste. Each sweetener has a different sweetness level. Taste as you go to find what you like best. Remember to choose a sugar-free option for keto.
How can I make this pie dairy-free?
To make the pie dairy-free, replace heavy cream with coconut cream. You can also use almond milk instead of coconut milk. Ensure your cream is full-fat for a rich texture. Use a dairy-free whipped topping if you like. These swaps will still keep the pie creamy and tasty.
What’s the best way to ensure my pie sets properly?
To help your pie set, let the filling cool before adding it to the crust. Use gelatin as directed; it helps firm the filling. Make sure to refrigerate the pie for at least two hours. This time allows the filling to thicken and hold its shape. Avoid skipping the chilling step for the best results.
This blog post covered how to make a delicious coconut cream pie. We explored key ingredients and optional ones that enhance flavor. I detailed step-by-step instructions for preparing the crust and filling. Tips helped avoid common mistakes and improve taste. You can even try fun variations, like chocolate or mini pies.
Enjoy your keto-friendly dessert, and impress your friends! Remember, with a bit of care, you can create a tasty pie that stays fresh. Keep these tips handy for your next baking session.