• Home
  • Recipe Index
    • Desserts
    • Dinner
    • Appetizer
    • Drinks
  • About
  • Contact
  • Privacy Policy
menu icon
go to homepage
  • Home
  • Recipe Index
    • Desserts
    • Dinner
    • Appetizer
    • Drinks
  • About
  • Contact
  • Privacy Policy

search icon
Homepage link
  • Home
  • Recipe Index
    • Desserts
    • Dinner
    • Appetizer
    • Drinks
  • About
  • Contact
  • Privacy Policy

×

S'mores Cookie Cups Recipe: A Delightful Twist on a Classic Treat

Published: Jan 25, 2025 · by Taling · Leave a Comment

WANT TO SAVE THIS RECIPE?

Indulge in the delightful world of S'mores Cookie Cups with this easy-to-follow recipe that puts a twist on the classic campfire treat! These sweet, gooey cups combine rich chocolate, toasted marshmallows, and a crunchy graham cracker base, making them perfect for any occasion. Ready to impress your friends and family? Click through to explore the step-by-step guide and discover how to create these irresistible dessert delights that will have everyone craving more!

Introduction

There’s something irresistibly nostalgic about s’mores. The mere mention of the classic treat conjures up images of summer campfires, laughter among friends, and the sweet aroma of toasted marshmallows mingling with chocolate and graham crackers. The simplicity of roasting marshmallows over an open flame and sandwiching them between two graham crackers brings a sense of comfort and joy that transcends generations. However, as much as we cherish the traditional s’mores experience, there is an exciting twist that elevates this beloved dessert: S’mores Cookie Cups.

There’s something irresistibly nostalgic about s'mores. The mere mention of the classic treat conjures up images of summer campfires, laughter among friends, and the sweet aroma of toasted marshmallows mingling with chocolate and graham crackers. The simplicity of roasting marshmallows over an open flame and sandwiching them between two graham crackers brings a sense of comfort and joy that transcends generations. However, as much as we cherish the traditional s'mores experience, there is an exciting twist that elevates this beloved dessert: S'mores Cookie Cups.

Imagine combining the rich, gooey goodness of s’mores with the delightful texture of cookie dough, all baked into a convenient cup shape. S’mores Cookie Cups capture the essence of the classic treat while providing a fun, portable dessert that’s perfect for any occasion. Whether it’s a summer barbecue, a cozy family movie night, or a festive gathering with friends, these cookie cups are sure to impress and satisfy sweet cravings.

In this article, we’ll explore the delightful world of S’mores Cookie Cups, outlining their irresistible appeal and providing you with a step-by-step guide to create this delectable dessert. With their gooey marshmallows, melted chocolate, and crisp cookie shells, these cups are not only easy to make but also offer a unique twist that will have everyone reaching for seconds.

Understanding the Ingredients

To craft the perfect S’mores Cookie Cups, it’s essential to understand the role of each ingredient in the recipe. Each component contributes to the overall flavor, texture, and structure of the cookie cups, making it crucial to use the right ingredients and techniques for the best results.

Unsalted Butter

Butter is a cornerstone of any cookie recipe, and for S’mores Cookie Cups, unsalted butter is preferred. Using unsalted butter allows for better control over the salt content in the final product, ensuring that the sweetness of the cookie isn’t overshadowed. Additionally, using butter at room temperature is vital; it allows for easier creaming with the sugars, resulting in a light and fluffy cookie dough. Properly softened butter contributes to a tender texture and enhances the overall flavor of the cookie cups.

Brown Sugar vs. Granulated Sugar

When it comes to sweetening your S’mores Cookie Cups, both brown sugar and granulated sugar play distinct roles. Brown sugar contains molasses, which not only adds sweetness but also imparts a rich, caramel-like flavor and moisture to the cookie dough. This results in a chewier texture, which is desirable in a cookie cup. Granulated sugar, on the other hand, promotes a crispier texture and helps with the dough’s structure. The combination of both sugars creates a perfect balance of sweetness and texture, enhancing the overall flavor profile.

The Role of the Egg

Eggs are a vital ingredient in many baking recipes, and their role in S’mores Cookie Cups cannot be understated. The egg acts as a binder, helping to hold the cookie dough together while providing moisture. It also contributes to the overall structure and richness of the cookie. For optimal results, make sure the egg is at room temperature, as this allows it to incorporate more easily into the dry ingredients, resulting in a smoother dough.

Importance of Vanilla Extract

Vanilla extract is often referred to as the “secret ingredient” in baking, and for good reason. It enhances the flavors of the other ingredients, adding depth and complexity to the cookie cups. The warm, aromatic notes of vanilla complement the sweetness of the sugars and the richness of the chocolate, creating a harmonious flavor profile that elevates the entire dessert.

Flour, Baking Soda, and Salt

These three ingredients work in tandem to provide the structure and leavening needed for S’mores Cookie Cups. All-purpose flour serves as the main building block of the dough, while baking soda acts as a leavening agent, helping the cookie cups rise and achieve a soft, yet slightly chewy texture. Salt, though often overlooked, plays a crucial role in enhancing the flavors and balancing the sweetness of the sugars. A small amount of salt can make a noticeable difference in the overall taste of the cookies.

Chocolate Chips

No s’mores dessert would be complete without chocolate! For S’mores Cookie Cups, chocolate chips are essential for that rich, melty goodness. You can choose from different types of chocolate chips depending on your preference—semi-sweet, milk chocolate, or even dark chocolate for a more intense flavor. The choice of chocolate can significantly influence the overall taste of the cookie cups, so select a type that you enjoy the most.

Mini Marshmallows

Perhaps the most iconic element of s’mores, mini marshmallows add that beloved gooeyness to S’mores Cookie Cups. When baked, these little puffs of sugar melt into a soft, marshmallowy center that pairs perfectly with the chocolate and cookie crust. They provide a delightful texture contrast, and their sweetness complements the other flavors in the cookie cup. For an extra touch, consider toasting the marshmallows briefly with a kitchen torch before serving for that authentic s’mores experience.

Graham Cracker Crumbs

Last but not least, graham cracker crumbs are the foundation of the s’mores flavor. They not only contribute to the distinct taste of s’mores but also help create the cookie cup base. The crumbs lend a subtle crunch, which contrasts beautifully with the gooey chocolate and marshmallows. For the best results, use finely crushed graham cracker crumbs to ensure even distribution and texture throughout the cookie cups.

Preparing for Success

Before diving into the preparation of S’mores Cookie Cups, it’s important to set up your kitchen for success. A well-organized workspace and the right tools can make the process smoother and more enjoyable.

Recommended Equipment

To make S’mores Cookie Cups, you will need a few essential kitchen tools:

  1. Muffin Tin: A standard 12-cup muffin tin is necessary for shaping the cookie cups. Make sure to grease or line the tin for easy removal.
  2. Mixing Bowls: Use medium and large mixing bowls for combining the dry and wet ingredients separately before mixing them together.
  3. Spatula: A sturdy spatula is crucial for mixing the ingredients, especially when creaming the butter and sugars.
  4. Whisk: A whisk is helpful for combining the dry ingredients thoroughly and ensuring an even distribution of baking soda and salt in the flour.

Tips for Ingredient Preparation

Accurate ingredient preparation is key to achieving the desired results in your S’mores Cookie Cups. Here are some tips to ensure success:

  1. Measuring Accurately: Use dry measuring cups for flour and graham cracker crumbs, and liquid measuring cups for wet ingredients like melted butter and egg. Level off dry ingredients with a knife for precision.
  2. Softening Butter: If your butter isn’t at room temperature, you can soften it quickly by cutting it into small cubes and letting it sit at room temperature for about 15 minutes. Alternatively, you can microwave it on low power in short bursts of 5-10 seconds, but be careful not to melt it.

Step-by-Step Instructions

With all your ingredients prepared and kitchen tools at the ready, it’s time to begin crafting these delightful S’mores Cookie Cups. Follow these step-by-step instructions for a successful baking experience.

Preheating the Oven

The first step in baking is to preheat your oven to 350°F (175°C). Preheating is crucial for achieving the right texture and doneness of your cookie cups. An adequately heated oven ensures that your cookie dough begins baking immediately, preventing it from spreading too much and maintaining the desired shape.

Mixing the Cookie Dough

Once the oven is preheated, it’s time to mix your cookie dough. Start by creaming the softened unsalted butter and both brown and granulated sugars in a large mixing bowl. Use a spatula or an electric mixer on medium speed to combine the ingredients until the mixture is light and fluffy, about 2-3 minutes. This texture is key for incorporating air into the dough, resulting in a tender cookie cup.

Creaming Butter and Sugars

As you cream the butter and sugars together, watch for the transformation in texture. The mixture should become pale in color and increase in volume. This process is essential, as it affects the final consistency of the cookie cups. Once you achieve the right texture, add the egg and vanilla extract, mixing until well combined.

Now that you have a solid foundation for your S’mores Cookie Cups, you’re well on your way to creating a delicious dessert that’s bound to delight anyone who tries it. The next steps involve incorporating the dry ingredients and shaping the cookie cups, which will be covered in the following sections of this comprehensive recipe guide. Stay tuned for more details on how to create these scrumptious treats!

There’s something irresistibly nostalgic about s'mores. The mere mention of the classic treat conjures up images of summer campfires, laughter among friends, and the sweet aroma of toasted marshmallows mingling with chocolate and graham crackers. The simplicity of roasting marshmallows over an open flame and sandwiching them between two graham crackers brings a sense of comfort and joy that transcends generations. However, as much as we cherish the traditional s'mores experience, there is an exciting twist that elevates this beloved dessert: S'mores Cookie Cups.

Incorporating Wet Ingredients: Ensuring Even Distribution

To create the perfect S’mores Cookie Cups, start by incorporating the wet ingredients into your cookie dough. The key to a successful dough is to ensure a smooth and even mixture, which helps in achieving the right texture and flavor. Begin by adding your melted butter, egg, and vanilla extract into a mixing bowl. Using a whisk or an electric mixer, blend these ingredients until they are fully combined and have a creamy texture. This process should take about 1-2 minutes. Make sure to scrape down the sides of the bowl to incorporate all the ingredients evenly.

Adding the wet ingredients gradually to the dry ingredients helps to prevent clumps and ensures a uniform dough. Once combined, you’ll notice the mixture becomes much easier to work with, setting the stage for the next steps in forming your cookie cups.

Combining Dry Ingredients: Importance of Whisking for Uniformity

When working with dry ingredients, it’s crucial to whisk them thoroughly before combining with the wet mixture. In a separate bowl, mix your all-purpose flour, baking soda, baking powder, and salt. Whisking the dry ingredients not only aerates the flour but also ensures that the leavening agents are evenly distributed throughout your mixture. This uniformity is essential for achieving a consistent rise and texture in your cookie cups, preventing any dense or gummy spots.

Once your dry ingredients are well combined, gradually fold them into the wet mixture. Use a spatula or wooden spoon to gently mix until just combined. Be careful not to overmix, as this can lead to tougher cookies. The dough should be soft and slightly sticky, perfect for forming into cups.

Forming the Cookie Cups: Techniques for Proper Shaping and Filling

To form your cookie cups, preheat your oven to 350°F (175°C) and prepare a muffin tin by greasing it lightly or using non-stick spray. Take a generous scoop of your cookie dough (about 1.5 tablespoons) and roll it into a ball. Place the dough ball into the center of each muffin cup.

Using your fingers or the bottom of a small glass, press the dough down and up the sides of the muffin tin to create a cup shape. It’s important to ensure that the sides are not too thin, as this could lead to breaking when filled and baked. Aim for an even thickness of about ¼ inch around the edges. If you find the dough sticking to your fingers, lightly dust them with flour to help with shaping.

Visual Cues for Ideal Cup Shape

An ideal cookie cup will have a well-defined shape, with a slight indentation in the center to hold the filling. As you shape the cookie cups, look for visual cues such as a smooth surface without cracks and an even height around the edges. The cups should rise slightly as they bake, creating a nice, rounded top.

If you notice any uneven areas, simply reshape them gently before placing them in the oven. This attention to detail will ensure that every cup is perfect and ready to hold the delicious layers of s’mores ingredients.

Layering Ingredients: How to Achieve the Perfect S’mores Experience

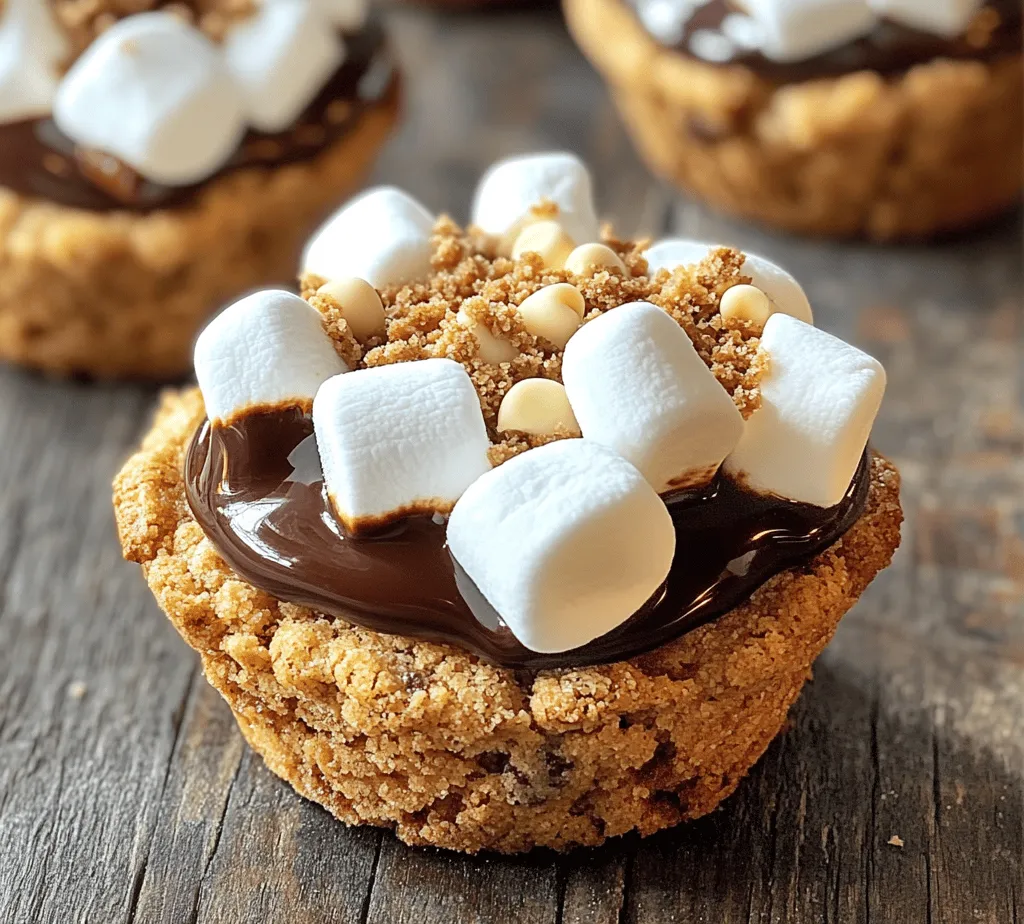
Now comes the fun part—layering the ingredients to create the quintessential s’mores experience. After the cookie cups have been formed, it’s time to add the filling. Start by adding a layer of chocolate chips at the bottom of each cup. This layer not only adds rich chocolate flavor but also acts as a barrier to prevent the marshmallows from sinking into the cookie dough.

Next, add a generous amount of mini marshmallows on top of the chocolate layer. Feel free to use more than the suggested amount; the marshmallows will melt during baking and create that gooey, classic s’mores effect. If desired, you can also add a few more chocolate chips on top of the marshmallows for an extra chocolatey touch.

Graham Cracker Crumbs and Marshmallows: Application Methods

For the final touch, sprinkle some graham cracker crumbs over the marshmallows. This will add a delightful crunch and mimic the traditional s’mores flavor profile. To make the crumbs, simply crush graham crackers in a zip-top bag or food processor until they resemble coarse sand.

For those who prefer a more pronounced graham flavor, consider mixing a little bit of melted butter into the crumbs before sprinkling them on top. This will help them adhere better and provide an even richer flavor.

Baking Process: What to Monitor During Baking

Place the muffin tin in the preheated oven and bake for 10-12 minutes. Keep an eye on the cookie cups during this time. You want to monitor the edges for a slight golden brown color, which indicates they are baking properly. The marshmallows will puff up and turn slightly golden as well, a sure sign that they are reaching the perfect gooey consistency.

Signs of Doneness: Color, Puffiness, and Aroma

The S’mores Cookie Cups are done when the edges are golden brown, the centers look slightly puffed, and the marshmallows have turned a beautiful golden color. The aroma wafting from the oven will be intoxicating, with hints of melted chocolate and toasted marshmallows. Once you notice these signs, remove the muffin tin from the oven and let the cookie cups cool in the pan for about 5 minutes before transferring them to a wire rack.

Cooling and Serving Your S’mores Cookie Cups

Cooling is a crucial step in ensuring that your S’mores Cookie Cups maintain their structure. Allowing them to cool for at least 10-15 minutes on a wire rack helps them to set properly. If you try to remove them too soon, they may fall apart or lose their shape.

Importance of Cooling Time: How It Affects Texture

As the cookie cups cool, they will firm up, making it easier to remove them from the muffin tin without breaking. This cooling period is also essential for achieving the right texture; the cookies will be soft and chewy on the inside while maintaining a slightly crisp exterior.

Suggestions for Serving: Warm vs. Cooled Options

S’mores Cookie Cups can be enjoyed warm or cooled, depending on your preference. Serving them warm allows for that gooey, melty chocolate and marshmallow experience, while cooled cookie cups offer a firmer texture that holds up well for stacking or transporting. Consider serving them with a scoop of vanilla ice cream for an indulgent dessert option.

Presentation Ideas: Garnishing with Extra Graham Cracker Pieces

For an eye-catching presentation, consider garnishing your cookie cups with additional graham cracker pieces or a drizzle of chocolate sauce. You can also sprinkle a pinch of sea salt on top to enhance the flavors. These small touches add a professional flair and make your dessert more appealing.

Flavor Variations and Customizations

One of the best aspects of S’mores Cookie Cups is their versatility. Feel free to experiment with different flavors and ingredients to customize your cookie cups to your liking.

Exploring Alternative Chocolate Options: Dark, White, or Flavored Chocolates

While classic milk chocolate is a favorite, consider using dark chocolate, white chocolate, or even flavored chocolates like mint or caramel for a unique twist. Each type of chocolate brings its own flavor profile, allowing you to create a personalized version of the cookie cups.

Customizing with Add-ins: Nuts, Peanut Butter, or Flavored Marshmallows

Adding nuts like chopped pecans or walnuts can introduce a delightful crunch and nutty flavor. If you’re a fan of peanut butter, consider swirling in some creamy peanut butter or using peanut butter chips in place of chocolate chips. You can even explore flavored marshmallows, such as chocolate or strawberry, to add an extra layer of flavor.

Suggestions for Dietary Modifications: Gluten-Free or Vegan Adaptations

If you have dietary restrictions, you can easily modify the recipe for gluten-free or vegan diets. For gluten-free options, substitute regular flour with a gluten-free flour blend. To make the recipe vegan, use plant-based butter, flax eggs, and dairy-free chocolate chips. These adaptations ensure that everyone can enjoy the deliciousness of S’mores Cookie Cups.

Storage and Shelf Life

To keep your S’mores Cookie Cups fresh, proper storage is essential.

Best Practices for Storing S’mores Cookie Cups

Once your cookie cups have cooled completely, store them in an airtight container. This will help prevent them from drying out and maintain their chewy texture.

Airtight Containers and Refrigeration Tips

If you live in a humid climate, it’s best to store the cookie cups in the refrigerator to prolong freshness. However, if you choose to refrigerate them, allow them to come to room temperature before serving to enjoy the best texture.

Expected Shelf Life: How Long They Last and Signs of Spoilage

When stored properly, S’mores Cookie Cups can last for up to one week. If you notice any changes in smell, texture, or appearance, such as a dry or hard cookie, it’s best to discard them.

Conclusion

S’mores Cookie Cups are not only a delightful treat but also a simple and fun recipe that anyone can master. With the perfect combination of flavors and textures—rich chocolate, gooey marshmallows, and crunchy graham crackers—these cookie cups encapsulate the essence of the classic s’mores experience in a new and exciting way.

As you embark on your baking journey, don’t hesitate to experiment with flavors and customizations to make this recipe your own. Whether served warm or cooled, these cookie cups are sure to bring joy to any gathering. So gather your ingredients, and enjoy the process of creating these irresistible treats!

There’s something irresistibly nostalgic about s'mores. The mere mention of the classic treat conjures up images of summer campfires, laughter among friends, and the sweet aroma of toasted marshmallows mingling with chocolate and graham crackers. The simplicity of roasting marshmallows over an open flame and sandwiching them between two graham crackers brings a sense of comfort and joy that transcends generations. However, as much as we cherish the traditional s'mores experience, there is an exciting twist that elevates this beloved dessert: S'mores Cookie Cups.

S'mores Cookie Cups

Indulge in the delightful world of S'mores Cookie Cups with this easy-to-follow recipe that puts a twist on the classic campfire treat! These sweet, gooey cups combine rich chocolate, toasted marshmallows, and a crunchy graham cracker base, making them perfect for any occasion. Ready to impress your friends and family? Click through to explore the step-by-step guide and discover how to create these irresistible dessert delights that will have everyone craving more!
Print Recipe Pin Recipe

Ingredients
  

1 cup unsalted butter, softened

1 cup brown sugar, packed

½ cup granulated sugar

1 large egg

2 teaspoons vanilla extract

2 ½ cups all-purpose flour

1 teaspoon baking soda

½ teaspoon salt

1 cup chocolate chips (milk or semi-sweet)

1 cup mini marshmallows

1 cup graham cracker crumbs

Additional graham cracker pieces for topping

Instructions
 

Preheat the Oven: Preheat your oven to 350°F (175°C). Grease or line a 12-cup muffin tin with paper liners or cooking spray.

    Make the Cookie Dough: In a large mixing bowl, cream together the softened butter, brown sugar, and granulated sugar until light and fluffy. This should take about 2-3 minutes.

      Add Wet Ingredients: Beat in the egg and vanilla extract until well combined.

        Combine Dry Ingredients: In a separate bowl, whisk together the flour, baking soda, and salt. Gradually add the dry ingredients to the wet mixture, mixing until just combined.

          Stir in Chocolate Chips: Fold in the chocolate chips to the cookie dough. The mixture will be thick.

            Form Cookie Cups: Using a tablespoon or a cookie scoop, fill each muffin cup about halfway with the cookie dough, pressing it into the bottom and up the sides to create a cup shape.

              Add Graham Cracker Crumbs: Sprinkle a layer of graham cracker crumbs into each cookie cup.

                Add Marshmallows: Place 2-3 mini marshmallows on top of the graham cracker layer, gently pressing them down.

                  Bake: Bake in the preheated oven for 12-15 minutes or until the edges are golden and the marshmallows are puffed.

                    Cool and Finish: Let the cookie cups cool in the pan for about 10 minutes before transferring them to a wire rack. Once cooled, you can sprinkle additional graham cracker pieces on top for garnish.

                      Serve: Enjoy your delicious S'mores Cookie Cups warm, or let them cool completely and store in an airtight container.

                        Prep Time: 20 minutes | Total Time: 40 minutes | Servings: 12

                          Related Recipes

                          • - 1 package yellow cake mix - 1 cup canned pumpkin puree - 3 large eggs - 1/2 cup vegetable oil - 1 cup water - 1 tablespoon pumpkin pie spice - 1 can (14 oz) sweetened condensed milk - 1/2 cup caramel sauce, plus extra for drizzling - 1 cup whipped topping (or whipped cream) - 1/4 cup chopped pecans (optional) - Ground cinnamon for dusting (optional) To make this pumpkin caramel poke cake, you need simple ingredients. Each one plays a role in creating the rich flavors and textures. The yellow cake mix gives the base its lightness. Canned pumpkin puree adds moisture and a warm, earthy taste. Eggs bind everything together while the vegetable oil keeps it soft. Water helps to mix the batter smoothly. Pumpkin pie spice brings in a blend of cinnamon, nutmeg, and clove, which gives that classic fall flavor. The sweetened condensed milk is key for soaking the cake, making it creamy and decadent. Caramel sauce adds a sweet touch, while whipped topping or cream contributes to the cake's richness. You can add chopped pecans for crunch and ground cinnamon for a lovely finish. These ingredients come together to make an irresistible dessert treat that everyone will love. - Mixing bowls - Electric mixer - Baking dish (9x13 inch) - Wooden spoon or skewer When preparing this cake, you will need some basic tools. Mixing bowls are essential for combining the ingredients. An electric mixer helps to beat the batter quickly and evenly. A 9x13 inch baking dish is perfect for baking this cake, giving it a nice, flat surface. Lastly, you will want a wooden spoon or skewer. This will help you poke holes in the cake for soaking it with caramel. With these tools, you are ready to create a delicious pumpkin caramel poke cake that will impress your friends and family! 1. Preheat the oven and prepare the baking dish. Start by setting your oven to 350°F (175°C). While it heats, take a 9x13 inch baking dish and grease it with oil or butter. Then, sprinkle some flour to coat the bottom and sides. This helps the cake come out easily. 2. Combining the ingredients in a mixing bowl. In a large mixing bowl, add one package of yellow cake mix, one cup of canned pumpkin puree, three large eggs, half a cup of vegetable oil, one cup of water, and one tablespoon of pumpkin pie spice. Use an electric mixer to beat these on medium speed for about two minutes. The mix should look smooth and well blended. 3. Pouring and spreading the batter. Next, pour the cake batter into your prepared baking dish. Use a spatula to spread it evenly across the dish. This ensures every bite is just as good as the last. 1. Baking time and temperature settings. Place the baking dish in your preheated oven. Bake for 25 to 30 minutes. The cake should rise and get a nice golden color. 2. Checking for doneness with a toothpick. To check if the cake is done, insert a toothpick into the center. If it comes out clean, your cake is ready. If it has batter on it, bake for a few more minutes. 1. Cooling the cake and poking holes. After baking, remove the cake from the oven and let it cool in the pan for about 10 minutes. Once it cools a bit, take the handle of a wooden spoon or a skewer and poke holes all over the cake. Space them about one inch apart. This is what makes it a poke cake! 2. Mixing the caramel and sweetened condensed milk. In a medium bowl, mix together one can of sweetened condensed milk and half a cup of caramel sauce until it’s well combined. 3. Pouring the mixture over the cake. Pour this caramel mixture evenly over the warm cake, letting it soak into all those holes. This gives the cake its sweet, gooey goodness. - To keep your cake moist, do not overbake it. Check for doneness at 25 minutes. - You can use a different cake mix if you want. Spice cake works great too. - For a lovely look, cut the cake into squares. Serve on nice plates. - Drizzle extra caramel on top. Add a sprinkle of pecans for crunch. - This cake pairs well with vanilla ice cream or a cup of coffee. - Overmixing the batter can make the cake tough. Mix just until combined. - Make sure to cool the cake before adding the caramel. This helps it soak in better. {{image_2}} You can take your Pumpkin Caramel Poke Cake to the next level. Add chocolate chips for a sweet touch. They melt into the cake, giving it a rich flavor. You can also toss in some nuts like pecans or walnuts for a nice crunch. This adds texture and makes each bite exciting. Another fun idea is to switch the cake mix. Instead of yellow cake mix, try spice cake mix. This adds more warmth and depth to the flavors. The spice mix pairs perfectly with pumpkin. You can even use a chocolate cake mix for a sweeter twist. The chocolate and caramel create a delightful contrast. For a twist on the topping, try cream cheese frosting instead of whipped topping. Cream cheese adds a tangy taste that balances the sweetness. It’s also smooth and rich, making your cake extra special. Just whip together some cream cheese, butter, and powdered sugar for a quick mix. If you want a more elegant touch, use a chocolate ganache. Melt chocolate with cream for a shiny topping. Pour it over the cake instead of caramel. This makes the dessert look fancy and taste divine. You can adapt this cake for different holidays. For Halloween, add spooky decorations like candy corn or chocolate spiders. This makes it fun for kids and adults alike. During Thanksgiving, top the cake with pecans and a sprinkle of cinnamon. This gives it a festive look and flavor. You can even serve it with a scoop of vanilla ice cream on the side. It’s a perfect treat for the holiday season. To keep your Pumpkin Caramel Poke Cake fresh, store it in the fridge. Use an airtight container to prevent the cake from drying out. You can also wrap it tightly with plastic wrap. If you want to save some for later, you can freeze it. Cut the cake into slices, wrap each slice in plastic wrap, and place them in a freezer bag. This way, you can enjoy a piece whenever you like. In the fridge, this delightful cake lasts about four to five days. After that, the taste and texture may start to fade. Look for signs of spoilage like a sour smell or mold. If you see any of these signs, it’s best to toss the cake. Enjoy your Pumpkin Caramel Poke Cake while it's fresh for the best flavor! A poke cake is a simple dessert where you poke holes in a baked cake and fill them. This allows toppings or sauces to soak into the cake, adding extra flavor and moisture. The idea became popular in the 1970s. It is fun to make and even more fun to eat! You can use any cake mix you like. For our Pumpkin Caramel Poke Cake, we use yellow cake mix and pumpkin puree. This gives it a rich, fall flavor. Yes, you can make this cake ahead of time! I suggest baking and soaking it the day before you plan to serve it. This way, the flavors meld nicely. After you poke the holes and pour the caramel mixture, let it cool. Then, cover it and place it in the fridge for at least two hours or overnight. This makes the cake even tastier when you serve it. Just remember to add the whipped topping and any garnishes right before serving. Absolutely! You can make this cake gluten-free by using a gluten-free cake mix. Many brands offer great options that taste just as good. Just check the packaging to ensure it’s safe for your needs. Also, be careful with the toppings. Ensure that the whipped topping and any other ingredients you use are gluten-free. This way, everyone can enjoy the deliciousness of the Pumpkin Caramel Poke Cake! This article covered how to make a delicious poke cake using simple ingredients and easy steps. You learned about the tools needed, baking tips, and common mistakes to avoid. I shared ways to enhance flavors and suggested storage tips. Get creative with toppings and variations to make this cake your own. Enjoy making and sharing this treat with friends and family. You will surely impress everyone with this tasty dessert!
                            Pumpkin Caramel Poke Cake Irresistible Dessert Treat
                          • To make these tasty bites, you need just a few key ingredients: - 1 cup almond flour - 1 cup canned pumpkin puree - 1/4 cup maple syrup - 1/4 cup nut butter (almond or peanut) - 1 teaspoon vanilla extract - 1 teaspoon pumpkin pie spice - 1/4 teaspoon salt These ingredients come together to create a rich, creamy dough. The almond flour gives a nice texture, while pumpkin puree adds moisture and flavor. Maple syrup sweetens the mix without being too heavy. The nut butter binds it all together, and the spices bring out that cozy fall taste. You can easily take these bites to the next level. Consider adding: - 1/2 cup chocolate chips - 1/2 cup chopped nuts Chocolate chips add a sweet surprise, while nuts give a nice crunch. You can mix and match. If you want a fun twist, try adding dried fruit or coconut flakes. If you need to swap an ingredient, it's quite simple. Here are a few ideas: - Almond flour: You can use oat flour or any nut flour. - Maple syrup: Honey or agave syrup works too. - Nut butter: Sunflower seed butter is a great choice for nut-free options. These changes keep the taste good while catering to your needs. Don't be afraid to experiment! To start, grab a large mixing bowl. Add 1 cup of almond flour. Next, scoop in 1 cup of canned pumpkin puree. Pour in 1/4 cup of maple syrup. Then, add 1/4 cup of nut butter. You can use almond or peanut butter here. Don't forget to include 1 teaspoon of vanilla extract. Sprinkle in 1 teaspoon of pumpkin pie spice and 1/4 teaspoon of salt. Mix all these ingredients well. A nice dough should form. If you want, fold in 1/2 cup of chocolate chips or chopped nuts. This adds a tasty twist. Now for the fun part! Use your hands to scoop out small portions of the dough. Aim for about 1 inch in diameter. This size is perfect for bites. Roll the dough into balls. Make sure they are smooth and round. Place the cookie dough bites on a parchment-lined baking sheet. Space them out evenly. This helps them keep their shape. Chilling is key for these bites. After rolling, place the baking sheet in the fridge. Let them chill for at least 30 minutes. This step helps the bites firm up. They will be easier to eat and hold their shape. After chilling, they are ready to enjoy. If you have leftovers, store them in an airtight container in the fridge. To get the right dough, mix your ingredients well. You want a thick and smooth texture. If it feels too sticky, add a bit more almond flour. If it seems too dry, a splash of maple syrup helps. Always trust your hands; they give the best feel for dough. Spices can make your bites pop! Try adding a bit of cinnamon for warmth. Nutmeg is a great choice for extra depth. A pinch of cloves can also add a festive twist. Just remember, start small. You can always add more spice, but you can't take it out! To impress guests, use mini cupcake liners for serving. They make your bites look fancy. Sprinkle some pumpkin pie spice on top for flair. You can also drizzle a little melted chocolate over them. This adds sweetness and makes them extra special. Enjoy these bites chilled for the best flavor! {{image_2}} To make these bites vegan, swap the maple syrup for agave nectar. You can also use sunflower seed butter instead of nut butter. This keeps the bites creamy and delicious while being nut-free. The other ingredients stay the same. You still get that yummy pumpkin flavor without any animal products. If you need a gluten-free version, almond flour works great. You can also try coconut flour. Just remember, coconut flour absorbs more liquid. Start with less, then add more if needed. Always check the labels on your ingredients to ensure they are gluten-free. You can change up the flavor by adding extracts. Try almond or maple extract for a twist. Just a few drops can make a big difference. If you love spice, add more pumpkin pie spice or a pinch of cinnamon. This adds warmth and depth to the bites. Feel free to get creative and mix flavors to find your favorite combo! To keep your pumpkin cookie dough bites fresh, store them in an airtight container. This will help keep moisture out and preserve flavor. You can place parchment paper between layers to avoid sticking. Make sure to keep the bites in the fridge. They stay best at a cool temperature. If you want to save some bites for later, freezing is a great option. Start by placing the bites in a single layer on a baking sheet. Freeze them for about an hour until they are firm. Once frozen, transfer them to a freezer-safe bag or container. Label the bag with the date. You can freeze them for up to three months. When stored properly, these bites last about one week in the fridge. If you freeze them, they can last up to three months. Just remember, the longer they sit, the more their taste may change. Always check for any signs of spoilage before eating. Yes, you can use fresh pumpkin. First, cook and puree it until smooth. Make sure to drain any excess water. Canned pumpkin is easier and saves time. Both options work well in this recipe. To make these bites healthier, try these tips: - Use less maple syrup or substitute with a low-calorie sweetener. - Add chia seeds or flaxseeds for added fiber. - Swap almond flour for oat flour to increase whole grains. These changes keep the taste while boosting nutrition. You can use sun butter or soy nut butter if you need a nut-free option. Both provide a similar creamy texture. You can also try tahini for a different flavor. Just keep the consistency in mind. Yes, these bites are perfect for kids. They are easy to make and fun to eat. Plus, they contain healthy ingredients. Just watch out for any nut allergies when serving. Each bite has a good mix of nutrients. They are rich in protein from the nut butter and healthy fats from the almond flour. A rough estimate gives you around: - Calories: 100 - Protein: 3g - Carbs: 10g - Fat: 5g This varies based on your specific ingredients. You learned how to make tasty No Bake Pumpkin Cookie Dough Bites. We discussed essential ingredients and fun ways to customize your recipe. You now know how to mix, shape, and chill your bites for the best results. With tips on dough consistency and flavor boosts, you can impress your friends. Remember, these bites are easy to store and freeze for later. Enjoy your creation, and have fun making it your own!
                            No Bake Pumpkin Cookie Dough Bites Delightfully Easy
                          • To make the Apple Cinnamon Chia Pudding, you will need the following main ingredients: - 1 cup almond milk (or any milk of your choice) - 1/4 cup chia seeds - 1 medium apple, grated (preferably a sweeter variety like Fuji or Gala) - 1 tablespoon maple syrup (or to taste) - 1 teaspoon cinnamon - 1/2 teaspoon vanilla extract - Pinch of salt These ingredients work together to create a creamy and tasty pudding. Almond milk adds a light flavor and creaminess. Chia seeds are small but packed with nutrients. They help create the thick pudding texture. Grated apple brings sweetness and freshness. Maple syrup adds a natural sweetness that complements the cinnamon. Vanilla extract gives a warm note, while salt boosts all the flavors. You can make this pudding even better with some fun toppings. Here are some great options: - Diced apples - Cinnamon sprinkle - Crushed walnuts - Granola Using these toppings adds crunch and extra flavor. Diced apples keep the apple taste alive. A sprinkle of cinnamon enhances the warm spice flavor. Crushed walnuts add a nutty crunch. Granola brings a delightful texture and sweetness. You can mix and match these toppings to make it your own. Enjoy experimenting! 1. In a mixing bowl, whisk together these ingredients: - 1 cup almond milk (or any milk of choice) - 1 tablespoon maple syrup (or to taste) - 1 teaspoon cinnamon - 1/2 teaspoon vanilla extract - pinch of salt This mix should be smooth and well combined. 2. Gradually stir in 1/4 cup chia seeds. This step helps avoid clumps. Stir until they spread throughout the mix. 3. Fold in the grated apple. Use one medium apple, like Fuji or Gala for sweetness. Mix well to combine all flavors. 4. Cover the bowl with plastic wrap or a lid. Refrigerate for at least 4 hours or overnight. This chilling time lets the chia seeds swell, giving your pudding a creamy texture. 5. When ready to serve, stir the pudding well. If it's too thick, add a splash of almond milk. This helps adjust the consistency to your liking. 6. Serve the pudding in bowls or jars. For a pretty twist, layer the pudding with diced apples and toppings like crushed walnuts or granola. This adds crunch and flavor in every bite. For a great apple cinnamon chia pudding, pick sweet apples. Fuji and Gala are my favorites. They add a nice flavor and natural sweetness. You can also use Honeycrisp or Ambrosia for a twist. When it comes to milk, almond milk works well. But you can use any milk you like. Oat milk or coconut milk can give a creamier texture. Try different types to find your favorite! To avoid clumping, mix the chia seeds slowly. Stir them in gradually. This helps them spread out evenly in the mixture. After chilling, check the pudding's thickness. If it feels too thick, add a splash of milk. Stir well to get the right creamy feel. Make your pudding look fun and tasty! Layer it in clear jars. Start with chia pudding, then add diced apples. Top with a sprinkle of cinnamon and nuts for crunch. This not only looks good but also tastes great in each layer! {{image_2}} You can add a twist to your apple cinnamon chia pudding. Try mixing in a pinch of nutmeg or ginger. These spices bring warmth and depth to the flavor. If you want more sweetness, use honey or agave instead of maple syrup. Each option creates a unique taste that excites your palate. If you prefer dairy-free, use coconut milk or oat milk. Coconut milk adds a creamy texture and a hint of tropical flavor. Oat milk keeps it light and smooth. Both options work well with the other ingredients and keep the pudding rich without dairy. For some crunch, you can add nuts or seeds. Chopped walnuts or pecans provide a nice texture. You can also sprinkle in some sunflower seeds or pumpkin seeds. These extras not only enhance the taste but also boost the nutrition. Enjoy mixing and matching to find your favorite version! You can store your apple cinnamon chia pudding in the fridge for up to five days. This allows you to enjoy it as a quick breakfast or snack. Just make sure it stays covered to prevent it from absorbing other smells from the fridge. If you see any liquid separation, just stir it back together. Yes, you can freeze chia pudding! It lasts for up to three months in the freezer. To freeze, use an airtight container. When you're ready to eat it, thaw it in the fridge overnight. You may need to stir in a little milk to restore its creamy texture. Use glass or plastic containers with tight lids for the best storage. Mason jars work great, as they are easy to seal and look nice too. Make sure the pudding is cool before sealing the lid. This keeps it fresh and prevents condensation. Chia seeds are tiny black seeds from the Salvia hispanica plant. They are packed with nutrition. Chia seeds provide a great source of fiber, protein, and healthy fats. They also contain calcium, magnesium, and antioxidants. When mixed with liquid, chia seeds absorb water and swell. This creates a thick, pudding-like texture that is both fun and filling. You can use either fresh or cooked apples for this recipe. Fresh apples add a crisp bite and bright flavor. Grated apples are best for mixing well into the pudding. Cooked apples can add warmth and a softer texture. If you choose cooked apples, try sautéing them with a bit of cinnamon for extra flavor. This pudding can last up to five days in the fridge. To keep it fresh, store it in an airtight container. If you notice any liquid separation, just stir it before serving. For the best taste and texture, enjoy it within the first three days. Yes! This recipe is already vegan-friendly. Use almond milk or any plant-based milk. The other ingredients, like chia seeds and maple syrup, are also vegan. You can enjoy this tasty treat without any animal products. You learned how to make a tasty chia pudding, perfect for any meal. We discussed key ingredients like almond milk, chia seeds, and sweet apples. You now have steps to prepare and chill the pudding, plus tips for serving and storage. Remember, you can make this recipe your own by adding flavors or toppings. Enjoy getting creative with your ingredients while making this healthy treat. This pudding is easy to prepare and fun to personalize, so dig in and enjoy!
                            Apple Cinnamon Chia Pudding Tasty and Nutritious Treat
                          • - 24 Oreo cookies, crushed - 1/2 cup unsalted butter, melted - 16 oz cream cheese, softened - 1 cup powdered sugar - 1 teaspoon vanilla extract - 1 teaspoon peppermint extract - 1 cup heavy cream - 1 cup crushed peppermint candies (or candy canes) - Whipped cream for topping (optional) - Extra Oreo cookies for garnish (optional) The star of this cheesecake is the Oreo crust. It gives a sweet and crunchy base. The cream cheese filling is rich and creamy. The peppermint flavor brings a fresh twist. You mix the cream cheese with sugar and extracts. Heavy cream makes it light and fluffy. - 9-inch springform pan - Medium mixing bowl - Large mixing bowl - Electric mixer - Spatula - Plastic wrap These tools make your baking easy. The springform pan lets you remove the cheesecake easily. Mixing bowls help you combine your ingredients well. An electric mixer beats the cream cheese smoothly. A spatula ensures you mix well without mess. - Whipped cream - Crushed peppermint candies - Extra Oreo cookies Garnishes add fun and flair to your cheesecake. Whipped cream makes it look fancy. Crushed peppermint candies offer extra flavor. Extra Oreo cookies are perfect for a crunchy topping. You can also use a sprig of mint for color. To start, grab a medium bowl. Combine the crushed Oreo cookies and melted butter. Mix until it looks like wet sand. This will be your base. Next, press the mixture into the bottom of a 9-inch springform pan. Make sure to press down firmly for a sturdy crust. Once done, place the pan in the fridge. Let it chill while you prepare the filling. Now, take a large mixing bowl. Beat the softened cream cheese with an electric mixer. Keep mixing until it is smooth and creamy. Add the powdered sugar, vanilla extract, and peppermint extract. Mix these until they blend well. In another bowl, whip the heavy cream until stiff peaks form. Gently fold this whipped cream into the cream cheese mixture. Be careful not to deflate the whipped cream. Finally, add the crushed peppermint candies and fold them in evenly. Pour the cream cheese filling over the chilled Oreo crust. Use a spatula to spread it out evenly. Cover the cheesecake with plastic wrap. Put it back in the fridge for at least 4 hours, or overnight if you can wait. Once set, remove the cheesecake from the pan. If you like, top it with whipped cream and garnish with extra crushed Oreos or peppermint bits. Enjoy your delicious creation! To get a smooth cream cheese mixture, start with softened cream cheese. Take it out of the fridge 30 minutes before using. This way, it blends easier. Use an electric mixer on medium speed. Beat it until it is creamy and free of lumps. Add the powdered sugar slowly to avoid clumping. Mix until all the ingredients are smooth. To whip cream perfectly, use cold heavy cream. Chill your mixing bowl and beaters in the fridge for 10 minutes. Pour the heavy cream into the cold bowl. Start mixing on low speed, then increase to high. Stop mixing when stiff peaks form. This means the cream holds its shape. Be gentle when folding it into the cream cheese mixture. This keeps the whipped cream fluffy. Refrigerate your cheesecake for at least 4 hours, or overnight if you can wait. This time helps the cheesecake set properly. Cover it with plastic wrap to keep it fresh. Avoid opening the fridge often. Each time you open it, the temperature changes. Once set, remove it from the springform pan carefully. Enjoy your delicious cheesecake! {{image_2}} You can switch up the crust for fun. Use graham crackers for a classic flavor. Or try chocolate cookies for a richer taste. You can also use crushed nuts mixed with butter for a gluten-free option. This adds a nice crunch to every bite. Want to spice things up? Add chopped chocolate or different candies. You can mix in some crushed Oreos for extra texture. Try other extracts like almond or orange for a new twist. Each change can give your cheesecake a fresh taste. Make this cheesecake fit any holiday! For Christmas, add red and green sprinkles on top. For Valentine’s Day, use heart-shaped candies and pink whipped cream. In the summer, mix in fresh strawberries or blueberries. These ideas keep the dessert fun and festive all year long! To store your no bake peppermint Oreo cheesecake, cover it tightly. Use plastic wrap or aluminum foil. A sealed container also works well. Make sure to keep it in the fridge. This keeps it fresh and tasty. You can freeze leftovers for later. First, let the cheesecake chill fully. Then, slice it into pieces. Wrap each piece in plastic wrap and foil. Place the wrapped slices in a freezer-safe bag. They can stay frozen for up to three months. When you're ready to eat, thaw it in the fridge overnight. This cheesecake stays fresh in the fridge for about five days. After that, the taste may change. Always check for any off smells or changes in texture. If it smells funny or looks odd, it's best to toss it. Enjoy your cheesecake while it's fresh! To make this recipe gluten-free, use gluten-free Oreo cookies. Many brands offer gluten-free cookies that taste great. Check the label to ensure they fit your needs. You can still enjoy this delicious cheesecake without gluten. Yes, you can use different types of cream cheese. Neufchâtel cheese is a lighter option. It has less fat but still tastes creamy. You can also use vegan cream cheese for a dairy-free version. Each choice will change the flavor and texture slightly. If you don’t have peppermint extract, use mint extract instead. It has a similar flavor, though it is less sweet. You can also use fresh mint leaves for a natural taste. Just chop them finely and mix them in. You now know how to make a tasty No Bake Peppermint Oreo Cheesecake. We covered the key ingredients, tools, and optional garnishes to make it special. You learned step-by-step instructions for the crust and filling. I shared tips for a smooth mixture and perfect whipped cream. We explored variations to keep things exciting. Lastly, I gave storage tips to keep your cheesecake fresh. Enjoy making this easy dessert that brings a festive touch to any gathering!
                            No Bake Peppermint Oreo Cheesecake Delight Recipe

                          WANT TO SAVE THIS RECIPE?

                          Leave a Reply Cancel reply

                          Your email address will not be published. Required fields are marked *

                          Recipe Rating


                          Hi I’m Taling

                          I love sharing perfected dishes from my kitchen. I’m sure they’ll earn a spot in your heart. Let’s savor this journey together!.

                          More about me

                          Recent Desserts

                          • - 3 ripe bananas, mashed - 1/2 cup unsalted butter, melted - 3/4 cup brown sugar - 1 large egg, beaten - 1 teaspoon vanilla extract - 1 teaspoon baking soda - 1/4 teaspoon salt - 1 1/2 cups all-purpose flour - 1/2 cup chocolate chips - 1/4 cup chopped walnuts (optional) - 1/2 teaspoon cinnamon Gather these ingredients before you start baking. Ripe bananas are key for a sweet and moist bread. Their flavor shines through, making it a treat. Melted butter gives a rich taste, while brown sugar adds depth. The egg helps bind everything together. Vanilla extract lifts the flavors, making them bright. Baking soda acts as a leavening agent, giving the bread a nice rise. Salt enhances all the sweetness in the mix. All-purpose flour forms the base of your batter. Chocolate chips add a delightful touch. Choose semi-sweet or dark based on your taste. If you love nuts, walnuts bring a nice crunch and extra flavor. Lastly, a hint of cinnamon can elevate the whole dish. This simple list packs a punch. Each ingredient plays a vital role in creating your bakery-style delight. Happy baking! - Preheat oven to 350°F (175°C). - Grease a 9x5 inch loaf pan. - In a large bowl, combine mashed bananas and melted butter. Mix until smooth. - Add brown sugar, egg, and vanilla extract. Stir well to blend. - Sprinkle in baking soda and salt. Mix gently to combine. - Gradually add flour and cinnamon. Stir just until no dry flour remains. - Carefully fold in chocolate chips and walnuts, if you choose to use them. - Pour the batter into the prepared loaf pan. Smooth the top with a spatula. - Bake for 60-65 minutes. A toothpick should come out clean when done. - Cool the banana bread in the pan for about 10 minutes. Then, transfer it to a wire rack to cool completely. To get that perfect bakery-style texture, start with your ingredients. Use room temperature butter and eggs. This helps your banana bread rise better. Cold ingredients can make the bread dense. Mix your batter gently. Over-mixing can lead to tough bread. Once you add flour, stir just until combined. A few lumps are fine. For a richer taste, try different types of chocolate. Semi-sweet chocolate chips give a classic touch. Dark chocolate adds a deep flavor. You can even mix both! Cinnamon is another great addition. Just half a teaspoon can boost the flavor. It pairs well with bananas and chocolate. When slicing, use a serrated knife for clean cuts. Cut thick pieces for a more rustic look. Serve your banana bread on a nice platter. Dust it with powdered sugar for charm. A dollop of whipped cream or a scoop of vanilla ice cream makes it even better! {{image_2}} If you want a nut-free banana bread, simply skip the walnuts. This keeps your loaf soft and delicious. The texture will still be great without them. You can enjoy the rich chocolate and banana flavor without any crunch. This option is perfect for kids or those with nut allergies. For those needing gluten-free options, use a gluten-free flour blend. Many blends work well in this recipe. Just replace the all-purpose flour with the same amount of gluten-free flour. This allows you to enjoy banana bread without gluten. If you want a vegan version, substitute the egg with a flaxseed egg. To make a flaxseed egg, mix 1 tablespoon of flaxseed meal with 2.5 tablespoons of water. Let it sit for a few minutes until it thickens. You can also use plant-based butter instead of regular butter. This keeps your banana bread tasty and friendly for all diets. You can jazz up your banana bread with dried fruits like raisins or cranberries. These add sweetness and chewiness. Another idea is to mix in spices like nutmeg or allspice for warmth. Just a pinch can change the whole flavor. Get creative and let your taste guide you! To keep your banana bread fresh, wrap it tightly with plastic wrap. This helps prevent it from drying out. You can also place it in an airtight container. Store it at room temperature for up to three days. If you want it to last longer, consider refrigerating it. Just remember that chilling can change the texture a bit. To freeze banana bread, let it cool completely. Then, wrap it in plastic wrap and foil. This extra layer helps keep the bread moist. Place the wrapped bread in a freezer bag. You can freeze it for up to three months. When you’re ready to eat it, take it out and let it thaw at room temperature. For a warm slice, you can pop it in the oven at a low temp for a few minutes. Banana bread can stay fresh at room temperature for about three days. If you keep it in the fridge, it can last up to a week. However, the best taste comes from enjoying it fresh. Always check for signs of spoilage, like a sour smell or mold, before eating. Yes, you can use frozen bananas. They work well in banana bread. When using frozen bananas, let them thaw first. This helps to remove excess water. You can mash them easily once thawed. The flavor stays rich and sweet, just like fresh bananas. To check if your banana bread is done, use a toothpick. Insert the toothpick into the center of the loaf. If it comes out clean, your bread is ready. If there are wet crumbs, bake for a few more minutes. Keep checking until the toothpick is clean. This method works great for all banana breads. Yes, you can replace brown sugar with white sugar. This change will alter the flavor and texture slightly. Brown sugar adds a deeper flavor and moisture. White sugar will make your bread a bit lighter. If you want a more caramel taste, stick with brown sugar. This blog post covered all you need to make perfect banana bread. We looked at essential ingredients, step-by-step instructions, and helpful tips. From mixing to baking, these steps guide you easily. You also learned variations to fit your taste and how to store your creation. Remember, with simple tweaks, you can make it your own. Enjoy every slice of your warm, homemade banana bread. It’s a treat worth sharing! Happy baking!
                            Chocolate Chip Banana Bread Bakery Style Delight
                          • To create the pumpkin cream cheese roll, you'll need these key ingredients: - 3/4 cup all-purpose flour - 1/2 teaspoon baking powder - 1 teaspoon baking soda - 1 teaspoon ground cinnamon - 1/2 teaspoon ground nutmeg - 1/4 teaspoon ground ginger - 1/4 teaspoon salt - 1 cup granulated sugar - 3 large eggs - 1 cup canned pumpkin puree - 1 teaspoon vanilla extract - 8 oz cream cheese, softened - 1/4 cup unsalted butter, softened - 2 cups powdered sugar - 1 teaspoon vanilla extract (for the frosting) You can add your twist to this recipe with these optional ingredients: - Chopped nuts like walnuts or pecans for crunch - Chocolate chips for a sweet surprise - A splash of maple syrup for added flavor - Cream cheese with herbs for a savory twist If you run out of an ingredient, here are some swaps: - Use whole wheat flour instead of all-purpose flour for a healthier option. - Replace granulated sugar with coconut sugar for a lower glycemic index. - If you have no cream cheese, Greek yogurt can work in a pinch. - Swap eggs with flaxseed meal mixed with water for a vegan option. These ingredients help you make a great pumpkin cream cheese roll. Each option brings its taste and flair to this delightful dessert. First, set your oven to 375°F (190°C). Grab a 15x10-inch jelly roll pan. Line it with parchment paper. Lightly grease the paper with non-stick spray. This helps the cake release easily. In a medium bowl, whisk together flour, baking powder, baking soda, cinnamon, nutmeg, ginger, and salt. Mix well and set the bowl aside. This mix gives the cake its warm fall flavor. In a large bowl, beat the sugar and eggs until light and fluffy. This takes about 3-4 minutes. Next, add the pumpkin puree and 1 teaspoon of vanilla. Mix until everything combines well. Gradually fold in the dry ingredients. Be gentle; don't overmix. Pour the batter into your prepared pan. Spread it evenly with a spatula. Bake for 15 minutes. Check if it's done by lightly pressing the cake. It should spring back. While the cake bakes, prepare the filling. In a medium bowl, beat the softened cream cheese and butter until smooth. Slowly add powdered sugar and 1 teaspoon of vanilla. Mix until creamy and well combined. Once the cake is done, carefully flip it onto a clean kitchen towel dusted with powdered sugar. Remove the parchment paper. Start at one end and gently roll the cake with the towel. Let it cool completely in this rolled shape. After cooling, unroll the cake carefully. Spread the cream cheese filling evenly over the cake. Roll the cake back up without the towel. Keep the seam side down. Wrap it in plastic wrap and chill for at least one hour. When ready, slice the roll into pieces. Dust with more powdered sugar if you like. Serve it on a pretty platter with a sprinkle of cinnamon or fresh mint leaves for a nice touch. Enjoy this delightful fall treat! To keep your pumpkin cream cheese roll from cracking, follow these steps: - Use Parchment Paper: Line your pan with parchment paper. This helps the cake slide out easily. - Cool on a Towel: After baking, flip the cake onto a clean, powdered sugar-dusted towel. This helps keep it moist. - Roll While Warm: Roll the cake while it’s still warm. This makes it flexible and less likely to crack. If cracks do happen, don’t worry! You can hide them with frosting later. The texture of your roll is key for a great dessert. Here’s how to get it right: - Mix Gently: When adding dry ingredients, fold them in slowly. Overmixing makes the cake tough. - Check for Doneness: Bake until the cake springs back. If it’s too soft, it won’t hold its shape. - Cool Completely: Allow the cake to cool fully before adding the cream cheese filling. This prevents melting and sogginess in the filling. These steps ensure your roll is soft and fluffy, just like it should be. Getting your ingredients ready helps your baking go smoothly: - Room Temperature Ingredients: Use eggs and cream cheese at room temperature. This helps them blend better. - Measure Accurately: Use a kitchen scale or measuring cups for precise amounts. Baking is a science. - Sift Dry Ingredients: Sifting the flour and spices removes lumps. It also adds air, which helps the cake rise. Following these tips will help you create a delightful pumpkin cream cheese roll that impresses everyone. {{image_2}} You can make a gluten-free version of this dessert. Replace all-purpose flour with a gluten-free blend. Make sure the blend has a good mix of starches and flours. Use 3/4 cup of this mix in place of regular flour. The texture may differ slightly, but it will still taste amazing. To create a vegan pumpkin cream cheese roll, substitute eggs with flaxseed meal. Mix 1 tablespoon of flaxseed meal with 3 tablespoons of water for each egg. Let it sit until it thickens. For the cream cheese filling, use a vegan cream cheese alternative mixed with coconut butter. This gives a rich flavor without dairy. You can add fun flavors to your pumpkin cream cheese roll. For a chocolate twist, stir in 1/4 cup of cocoa powder into the batter. This makes a chocolate-pumpkin delight. If you prefer spices, try adding allspice or cardamom. Just a pinch can change the whole vibe of the roll. These variations keep your dessert exciting and unique! Store leftover pumpkin cream cheese roll in the fridge. Wrap it tightly in plastic wrap. This keeps it fresh and moist. You can also place it in an airtight container. It will last for about 3 to 5 days in the fridge. Make sure to slice it before serving. This way, it’s easy to grab a piece whenever you want a tasty treat. You can freeze the pumpkin cream cheese roll for longer storage. To do this, wrap it tightly in plastic wrap. Then, place it in a freezer bag or container. This helps to prevent freezer burn. The roll will stay fresh in the freezer for up to 2 months. When you're ready to enjoy it, just take it out and let it thaw in the fridge overnight. To reheat the pumpkin cream cheese roll, you have a couple of options. For a quick method, slice it and place it in the microwave for about 10-15 seconds. This warms it up nicely without drying it out. If you prefer, you can reheat slices in an oven. Preheat the oven to 350°F (175°C) and place the slices on a baking sheet. Heat for about 5-10 minutes. Enjoy it warm for a cozy fall dessert! Yes, you can use fresh pumpkin. You need to cook and puree it first. Start with about 1 1/4 pounds of fresh pumpkin. Cut it in half, remove the seeds, and roast it until soft. Once cooked, scoop out the flesh and blend until smooth. This gives a fresh taste to your roll. To prevent the roll from breaking, be gentle when rolling it. Use a clean kitchen towel dusted with powdered sugar. After baking, flip the cake onto the towel, remove the parchment, and roll it up while it’s still warm. Allow it to cool in this shape. This helps keep the cake soft and flexible. You can serve it with whipped cream or a scoop of vanilla ice cream. A sprinkle of cinnamon adds warmth and flavor. Some like to pair it with coffee or chai tea. Fresh mint leaves can also add a nice touch and color. The pumpkin cream cheese roll lasts about 3 to 5 days in the fridge. Make sure to wrap it well in plastic wrap. This keeps it fresh and moist. If you want it to last longer, consider freezing it. You learned how to make a great pumpkin cream cheese roll. We covered essential ingredients and tips for the best texture. You can explore variations, like gluten-free or vegan options. Storing leftovers and reheating are easy with the right steps. Remember, practice makes perfect in baking. Embrace your creativity, and enjoy your tasty results. Now, gather your ingredients and start baking!
                            Pumpkin Cream Cheese Roll Delightful Fall Dessert Recipe
                          • - 4 cups Rice Krispies cereal - 3 tablespoons unsalted butter - 1 package (10 oz) mini marshmallows - 1 teaspoon vanilla extract - 1 teaspoon pumpkin pie spice - 1 cup pumpkin puree - Pinch of salt These ingredients create a tasty treat. The Rice Krispies give crunch, while the marshmallows add chewiness. Butter helps everything stick together, and pumpkin puree provides a rich flavor. Vanilla and pumpkin pie spice bring warmth to each bite. - Orange and yellow sprinkles Adding sprinkles makes the treats festive. It is a fun way to enjoy these treats, especially for holidays. You can choose any color you like. Sprinkles add color and a bit of extra sweetness. These treats are not gluten-free due to Rice Krispies, which may contain gluten. To make them gluten-free, look for gluten-free Rice Krispies. They also contain dairy from the butter. For a dairy-free option, try using a plant-based butter. First, grab a large saucepan. Place it on low heat. Add 3 tablespoons of unsalted butter. Watch it melt slowly. Once it melts, toss in the whole package of mini marshmallows. Stir them with a spatula. Keep stirring until they melt and become smooth. This part takes just a few minutes. After melting, take the saucepan off the heat. Now, add 1 teaspoon of vanilla extract. Next, add 1 teaspoon of pumpkin pie spice. Mix these in well until combined. Then, add 1 cup of pumpkin puree. Make sure to stir until there are no lumps. This step makes your treats taste like fall! Gradually, add 4 cups of Rice Krispies cereal. Gently fold it into the mixture. You want every piece coated well. It helps to use a spatula or your hands, lightly greased. Once mixed, line a 9x9 inch baking pan with parchment paper. Pour the mixture into the pan. Press it down firmly with the back of the spatula. You want an even layer. Then, if you like, sprinkle some orange and yellow sprinkles on top. Let the treats cool for at least 30 minutes. After cooling, cut them into squares or rectangles. Enjoy! To make the best Pumpkin Rice Krispie Treats, focus on texture. Start by melting the butter and marshmallows slowly. This keeps them smooth. If you rush, the mix may clump. After melting, mix in the pumpkin puree well. This adds moisture and flavor. If the mixture feels too sticky, add a bit more Rice Krispies. This helps balance the texture. When mixing the Rice Krispies, take your time. Gently fold the cereal into the melted marshmallow mix. Use a rubber spatula to reach all corners. If you use your hands, lightly grease them. This will stop the mix from sticking. Make sure every piece of cereal is coated. This creates a better flavor in each bite. Cutting the treats right takes a little care. Let them cool for at least 30 minutes. This helps them hold their shape. Use a sharp knife for clean edges. Lightly grease the knife to prevent sticking. Cut them into squares or rectangles based on your preference. For a fun touch, top with colorful sprinkles before cutting. Enjoy the fun shapes! {{image_2}} You can add chocolate or peanut butter for a fun twist. Just melt 1 cup of chocolate chips or 1/2 cup of peanut butter with the marshmallows. Stir them in until smooth. These flavors mix well with pumpkin. The result is a richer treat that kids will love. You can also drizzle melted chocolate on top for extra flair. Adding nuts or seeds boosts texture and flavor. Try 1/2 cup of chopped pecans or walnuts. You can also use pumpkin seeds for a seasonal touch. Stir them in with the Rice Krispies. This adds crunch and nutrition to your treats. Just be careful if serving to little ones or guests with allergies. You can mix in other flavors to change things up. Consider using 1 teaspoon of cinnamon or maple syrup for a sweet twist. A splash of almond extract can add a nice touch. Experimenting with different flavors keeps it exciting. You might find a new favorite combo that everyone enjoys! You can store your Pumpkin Rice Krispie Treats in an airtight container. Keep them at room temperature for up to three days. If you live in a warm area, consider placing them in the fridge. This keeps them fresh and chewy for longer. To freeze these treats, cut them into squares first. Wrap each square in plastic wrap. Place the wrapped treats in a freezer-safe bag or container. They can last in the freezer for up to two months. When you want to enjoy them, let them thaw at room temperature for about 30 minutes. Always keep your treats sealed tightly to avoid air exposure. This helps prevent them from getting hard or stale. If they start to lose their softness, you can microwave them for a few seconds to regain some chewiness. Enjoy your treats while they are fresh for the best taste! Yes, you can use homemade marshmallows. They add a unique touch. Just make sure they are soft and fluffy. Melt them the same way as the store-bought ones. This will create a nice, gooey base for your treats. To make these treats vegan, swap out the butter for coconut oil or vegan butter. Use vegan marshmallows instead of regular ones. These changes keep the flavor and texture while being plant-based. Enjoy your vegan Pumpkin Rice Krispie Treats just as much! If you need a substitute for Rice Krispies, try using puffed rice or cornflakes. You can even use crispy rice cereal made from brown rice for a healthier option. The key is to keep the texture light and crunchy. This way, your treats will still turn out delicious! In this article, you learned how to make delicious Pumpkin Rice Krispie Treats. We covered key ingredients, step-by-step instructions, and tips for perfect treats. You can mix in flavors like chocolate or nuts and store your treats fresh. Keep these ideas in mind when you create your own treats. Enjoy your fun, tasty snacks!
                            Pumpkin Rice Krispie Treats Simple and Tasty Recipe
                          • - 2 cans (16 oz each) refrigerated biscuit dough - 1 cup apple butter - 1/2 cup brown sugar, packed - 3 teaspoons ground cinnamon - 1/4 cup granulated sugar - 1/2 cup unsalted butter, melted - 1 cup chopped apples (preferably Granny Smith) - 1/2 cup chopped walnuts or pecans (optional) - 1 pinch of salt When I create Apple Butter Monkey Bread, I love using fresh ingredients. The first key ingredient is the biscuit dough. I use two cans of refrigerated dough to save time. This dough provides the base for the sweet and sticky goodness. Next, I grab a cup of apple butter. The apple butter adds depth and a rich flavor. It turns the dough into an irresistible treat. Brown sugar adds sweetness. I use half a cup packed to give that caramel-like flavor. Cinnamon plays a big role in this recipe. I add three teaspoons for warmth and spice. Granulated sugar, about a quarter cup, mixes with the brown sugar and cinnamon for a sweet coating. Melted unsalted butter is essential. I use half a cup to help the sugar and cinnamon stick to the dough. Then, I chop one cup of Granny Smith apples for a tart contrast. If you like nuts, I recommend adding half a cup of walnuts or pecans. They add crunch and extra flavor. Finally, I include a pinch of salt to balance everything. These ingredients come together to create a delightful dish. Each bite is full of flavor and texture. You will find that this monkey bread is not only tasty but also fun to share. - Preheat your oven to 350°F (175°C). - Grease a bundt pan with non-stick spray or butter. Start by getting your oven ready. Preheating it ensures even baking. A hot oven helps the dough rise nicely. Greasing the bundt pan prevents sticking. You want your monkey bread to come out whole and beautiful. - Mix brown sugar, granulated sugar, and cinnamon in a bowl. - Cut the biscuit dough into quarters. In a small bowl, mix the brown sugar, granulated sugar, and cinnamon. Set this aside. This mix brings sweetness and warmth to your bread. Next, take the biscuit dough. Cut each biscuit into quarters. This makes it easier to coat and layer. - Mix apple butter with melted butter. - Toss the biscuit pieces with the apple butter mixture. - Add chopped apples and nuts, if using. Now, in another bowl, mix the melted butter with the apple butter. This blend is the magic sauce. Drizzle this mixture over your biscuit pieces. Toss them gently until they are well-coated. If you like, add in your chopped apples and nuts. This adds texture and flavor. - Sprinkle half of the sugar-cinnamon mixture. - Layer the biscuit mix in the bundt pan. - Bake for 30-35 minutes, or until golden. Take half of your sugar-cinnamon mix and sprinkle it over the coated biscuit pieces. Toss again to coat. Now it’s time to layer. Place the biscuit mix in the greased bundt pan. Sprinkle any remaining sugar mixture between layers. Bake for 30-35 minutes. Check for doneness by looking for a golden brown top. To make your Apple Butter Monkey Bread shine, start with the right apples. I recommend using Granny Smith apples. They add a lovely tartness that balances the sweetness of the apple butter. If you want it sweeter, you can adjust the sugar levels. Add a bit more brown sugar or granulated sugar to your mix. Just remember, too much sugar can make it overly sweet. To check if your monkey bread is done, use a toothpick. Insert it in the center. If it comes out clean, your bread is ready. For a golden top, keep an eye on your oven. You want it to be a nice brown color, not too dark. If it starts to brown too quickly, cover it with foil. This will help it bake evenly. This treat is best served warm. The gooey apple butter pulls apart easily when it's hot. You can also serve it cold, but the flavors shine when warm. For drinks, try pairing it with hot cider or coffee. You can also add toppings like whipped cream or a drizzle of caramel for extra fun! {{image_2}} You can easily customize your Apple Butter Monkey Bread. Adding spices like nutmeg or cloves brings warmth and depth. These spices enhance the apple flavor and make it cozy. You can also switch up your butters. Try using maple butter for a sweet twist. It adds a rich, earthy taste that pairs well with apple butter. Think about drizzling your monkey bread with caramel or icing. These toppings add a sticky sweetness that makes each bite special. You can also add seasonal fruits like pears or cranberries. These fruits can bring a fresh burst of flavor and color to your dish. Their tartness balances the sweetness of the bread. If you need gluten-free options, substitute the biscuit dough with gluten-free dough. There are many brands available that taste great. For those wanting a vegan version, use plant-based butter and almond milk instead of regular butter. You can still enjoy the same gooey goodness while keeping it plant-based. To keep your Apple Butter Monkey Bread fresh, store it in the fridge. Place the cooled bread in an airtight container. You can also wrap it tightly in plastic wrap. This method helps lock in moisture and flavor. Aim to eat it within three days for the best taste. To reheat, place the bread in the oven at 350°F (175°C). Cover it with foil to keep it moist. Heat for about 10-15 minutes. You can also use the microwave. Heat it in short bursts, about 20 seconds at a time. Check often to avoid drying it out. You can freeze Apple Butter Monkey Bread if you want to save some for later. First, let it cool completely. Then, wrap it well in plastic wrap and foil. This helps prevent freezer burn. It can last for about three months in the freezer. To thaw, move it to the fridge overnight. If you’re in a hurry, let it sit at room temperature for a couple of hours. Once thawed, reheat it as mentioned before. Enjoy this sweet treat any time! Monkey bread is a fun and tasty pull-apart bread. It uses biscuit dough, coated in sweet layers. You bake it in a bundt pan, which gives it a lovely shape. Each piece is soft, gooey, and filled with flavor. You can also add spices and fruits for extra taste. Yes, you can prep this monkey bread ahead. Cut the biscuit dough into pieces. Mix with apple butter and spices, then place in the bundt pan. Cover it and put it in the fridge. Bake it fresh when you're ready to serve. This way, you save time on busy days. Using homemade apple butter is great! It tastes fresh and rich. You can control the sweetness and spices. Store-bought apple butter is fine, but homemade often has more flavor. If you have the time, making your own is worth it. No, adding nuts is not a must. You can skip them if you have nut allergies. You can also use seeds, like sunflower or pumpkin. They add a nice crunch without nuts. Enjoy this sweet treat just the way you like it! In this article, I shared a delicious recipe for apple butter monkey bread. We explored the key ingredients and detailed steps to prepare it perfectly. I also offered tips for flavor and baking, along with suggestions for variations and storage. This dish is a fun treat for all ages. Whether you share it warm or cold, its flavors will delight everyone. Enjoy making this recipe and feel free to get creative with it!
                            Apple Butter Monkey Bread Irresistible Sweet Treat

                          Recent Drinks

                          • - Fresh raspberries - Raspberry syrup - Club soda - Coconut cream - Lime juice - Fresh mint leaves - Ice cubes Gathering the right ingredients is key. Start with fresh raspberries. They should be bright and firm. Next, get raspberry syrup. This adds sweetness and flavor. Use club soda for a fizzy lift. You will also need coconut cream. This makes your drink creamy and rich. Don't forget lime juice. It adds a nice zing that balances the sweetness. Fresh mint leaves give your drink a fresh touch. Finally, grab some ice cubes. They cool everything down. With these ingredients, you're ready to create a refreshing Raspberry Dream Dirty Soda. Each part plays a role in making this drink a summer favorite! Start by blending 1 cup of fresh raspberries with 1/2 cup of raspberry syrup. Blend until smooth. If you prefer no seeds, strain the mixture through a fine mesh sieve. This step gives you a smooth, bright raspberry puree. Next, take the raspberry puree and pour it into a large pitcher. Add 2 cups of club soda to the puree. Stir gently to mix. Then, squeeze in 1 tablespoon of lime juice. The lime adds a zesty kick to the drink. In a separate bowl, whip 1/2 cup of coconut cream. Use a hand mixer or whisk until it reaches a smooth and fluffy texture. This cream will top your drink and provide a nice contrast to the tart raspberry. Now, grab your glasses and fill them with ice cubes. Pour the raspberry soda mixture over the ice. Make sure each glass gets a nice amount. Finally, top each drink with a generous dollop of whipped coconut cream. For a final touch, garnish with fresh mint leaves. Enjoy your refreshing Raspberry Dream Dirty Soda! To make a great raspberry puree, choose ripe raspberries. Look for berries that are deep red and firm. Avoid any that are mushy or have dark spots. Ripe berries will give you the best flavor. To avoid seed chunks, blend the raspberries with raspberry syrup until smooth. Then, strain the mixture through a fine mesh sieve. This step helps you get a silky texture. Push the puree through with a spatula for best results. You can add more flavor to your drink easily. Consider mixing in a splash of vanilla or a hint of ginger. Both will give your drink a nice twist. Adjust the sweetness based on your taste. If you like it sweeter, add more raspberry syrup. If you prefer less sugar, use fresh lime juice to balance the sweetness. Serving your drink can be fun and creative. Use clear glasses to show off the vibrant colors. You can also layer the coconut cream on top for a beautiful look. For garnishing, add fresh mint leaves on top. They add a pop of color and a fresh scent. You might also consider adding a slice of lime on the rim of the glass for an extra touch. {{image_2}} You can switch up the fruits in your Raspberry Dream Dirty Soda. Try using other berries like strawberries or blueberries. These fruits add a fun twist and color to your drink. If you want a tropical vibe, use pineapple or mango. They give a refreshing taste that pairs well with the soda. If you want a non-dairy option, almond milk or oat cream works well. These alternatives keep your drink creamy without coconut. For a coconut-free choice, you can use soy or cashew cream. These will still add richness and flavor to your soda. You can make a fun cocktail version of this soda. Try adding light or dark rum for a kick. The rum blends nicely with the raspberry and lime flavors. Mix it well in a shaker for a smooth drink. A Raspberry Dream Dirty Soda with rum can be a great choice for summer parties. After making the raspberry puree, store it in the fridge. Use an airtight container for best results. The puree stays fresh for up to three days. If you want to keep it longer, freeze it. Pour the puree into ice cube trays. Once frozen, transfer the cubes to a bag. This method makes it easy to use later. Do not store the assembled drink in the fridge. The club soda will lose its fizz. Instead, prepare the drink just before serving. You can mix the raspberry soda and coconut cream separately. Keep them cool until you are ready to serve. This way, your drink will stay refreshing and bubbly. Fresh raspberries last about one week in the fridge. Watch for soft spots or mold as signs of spoilage. Raspberry syrup can last up to a month when stored in a cool, dark place. For club soda, check the expiration date on the can. Proper storage helps keep your ingredients fresh and tasty. Raspberry Dream Dirty Soda is a fun and fizzy drink. It blends fresh raspberries, raspberry syrup, and club soda. This drink also has a creamy touch from coconut cream. It is refreshing and perfect for hot days. Many people love it for its bright flavor. The drink became popular in recent years, often seen at summer parties and events. It has roots in the "dirty soda" trend that started in Utah. Yes, you can prepare parts of this drink ahead. You can make the raspberry puree and store it in the fridge for up to three days. Keep it in an airtight container. Mix the raspberry puree with the club soda right before serving for the best fizz. Do not whip the coconut cream until you are ready to serve. Whipped cream does not store well. If you want alternatives to raspberry syrup, consider these options: - Strawberry syrup for a different berry flavor. - Agave syrup for a natural sweetness. - Honey can also work, but it has a strong taste. You can also use fruit juice, like pomegranate or cherry, for a fruity twist. Adjust the sweetness to your liking. Raspberry Dream Dirty Soda has some healthy parts. Fresh raspberries are full of vitamins and fiber. The drink does contain added sugar from the syrup. If you want a healthier option, try these tips: - Use less raspberry syrup or a sugar-free version. - Replace coconut cream with lighter options like almond milk. - Add more fresh fruits for extra nutrients. In this blog post, we covered how to make a refreshing Raspberry Dream Dirty Soda. We explored the key ingredients and went step-by-step through blending raspberry puree, mixing, and adding the coconut cream. Tips on flavor and presentation help you enhance your drink. We also looked at fun variations and storage tips. Try these methods to impress your guests or enjoy a treat at home. This drink is simple, enjoyable, and perfect for any occasion.
                            Raspberry Dream Dirty Soda Refreshing Summer Treat
                          • To make a rich and creamy pumpkin hot chocolate, gather these key ingredients: - 2 cups milk (dairy or plant-based) - 1/2 cup of pumpkin puree (canned or fresh) - 1/4 cup semi-sweet chocolate chips - 2 tablespoons cocoa powder - 2 tablespoons sugar (or to taste) - 1 teaspoon vanilla extract - 1/2 teaspoon pumpkin pie spice (plus extra for garnish) These ingredients create a warm and cozy drink that makes the fall season special. You can enhance your pumpkin hot chocolate with some fun toppings: - Whipped cream (for topping) - Dark chocolate shavings or chocolate curls (for garnish) - A sprinkle of extra pumpkin pie spice These garnishes add flavor and make your drink look lovely. When picking your ingredients, focus on quality: - Choose fresh pumpkin puree for a brighter taste. - Select high-quality chocolate chips for a rich chocolate flavor. - Use whole milk for creaminess or a good plant-based milk for a lighter option. Quality ingredients make a noticeable difference in flavor. Always check labels for additives or preservatives. This helps ensure your drink is as healthy as it is tasty. Start by gathering your ingredients. You need milk, pumpkin puree, and a whisk. In a medium saucepan, combine 2 cups of milk and 1/2 cup of pumpkin puree. Whisk these together over medium heat. Keep mixing for about 3 to 5 minutes. You want the mixture warm and well blended. Be careful not to let it boil. Now, it’s time for the chocolate! Add 1/4 cup of semi-sweet chocolate chips, 2 tablespoons of cocoa powder, and 2 tablespoons of sugar to the pumpkin mix. Stir continuously for 2 to 3 minutes. The chocolate should melt nicely, making the drink smooth and rich. Next, stir in 1 teaspoon of vanilla extract and 1/2 teaspoon of pumpkin pie spice. Whisk until everything is combined and warm. Remove the saucepan from heat. Taste your hot chocolate and adjust the sweetness if you like. Pour the mixture into mugs. Top each mug with whipped cream. For a special touch, sprinkle some pumpkin pie spice on top. You can also add dark chocolate shavings or chocolate curls for extra flair. Enjoy your creamy fall delight! To make your pumpkin hot chocolate shine, think about adding flavors. A pinch of sea salt boosts sweetness. It balances the rich chocolate and creamy pumpkin. You can also try a dash of cinnamon or nutmeg. These spices add warmth and depth. If you want more chocolate, add extra chocolate chips. For a fun twist, stir in some caramel sauce for a sweet kick. Sweetness is key to a great hot chocolate. After mixing, taste your drink. If it’s not sweet enough, add sugar slowly. Try one tablespoon at a time. Stir well and taste again. You can also use honey or maple syrup for a natural option. Just remember to mix it in fully for even sweetness. Avoid cooking your mixture too fast. Medium heat is best to keep it smooth. Don’t let it boil; that can change the texture. If you add too much cocoa powder, it may taste bitter. Always whisk well to blend everything smoothly. Lastly, don’t skip the whipped cream! It adds a nice touch and makes it look fancy. {{image_2}} To make a vegan version of pumpkin hot chocolate, swap dairy milk for a plant-based milk. Almond, oat, or coconut milk works well. Use dairy-free chocolate chips for a rich taste. Follow the same steps in the recipe, and enjoy this creamy treat! If you want a dairy-free hot chocolate, simply choose non-dairy milk. Almond milk adds a nutty flavor. Coconut milk gives a rich, creamy texture. Soy milk is also a good choice. Each option keeps the drink smooth and delicious. Adjust the sweetness as you mix in the cocoa and chocolate. You can add fun flavors to your pumpkin hot chocolate! Try adding a splash of peppermint extract for a fresh twist. This pairs well with the pumpkin spice. For a sweeter touch, drizzle caramel syrup over the whipped cream. These add-ins make your drink feel special and festive. To store leftover pumpkin hot chocolate, let it cool first. Then, pour it into an airtight container. Make sure to seal it well to keep the flavors fresh. Store it in the fridge for up to three days. If you want to enjoy it later, you can freeze it. Just use a freezer-safe container. Leave some space at the top, as liquids expand when frozen. When you're ready to enjoy your hot chocolate, take it out of the fridge or freezer. If frozen, let it thaw in the fridge overnight. To reheat, pour it into a saucepan. Heat it over medium-low heat, stirring often. This helps it warm evenly without burning. If you prefer, you can use a microwave. Heat it in short bursts of 30 seconds, stirring in between. This way, it stays creamy and smooth. The shelf life of your ingredients varies. Milk lasts about a week after opening, while pumpkin puree is good for about a week once opened. Semi-sweet chocolate chips can last several months if stored well. Sugar and cocoa powder have a long shelf life. They stay fresh for years if kept dry and cool. Always check labels for specific dates, as freshness matters in your drink. To make one serving, simply halve the original recipe. Use 1 cup of milk and 1/4 cup of pumpkin puree. Add 2 tablespoons of chocolate chips, 1 tablespoon of cocoa powder, and 1 tablespoon of sugar. Mix these in a small saucepan over medium heat. Whisk until everything melts and blends well. This takes about 3-5 minutes. Pour into a mug, top with whipped cream, and sprinkle some pumpkin pie spice. Yes, you can use pumpkin pie filling. This filling has spices and sugar mixed in. It can add a nice flavor. Just remember to reduce the sugar in the recipe. Taste your drink first. Adjust the sweetness if needed. Pumpkin pie filling makes the drink sweeter and spicier. Pumpkin is rich in vitamins and minerals. It has a lot of vitamin A, which helps your eyes. It also contains fiber, which aids digestion. Pumpkin is low in calories, making it a healthy choice. You get antioxidants too, which help fight free radicals in your body. Enjoying this drink can add some health benefits to your cozy fall treat! This blog post covered how to make delicious pumpkin hot chocolate. We discussed essential ingredients and tips to choose the best ones. I shared easy steps to prepare, mix, and serve your drink. You learned how to enhance flavors and avoid common mistakes. We explored variations, like vegan options and seasonal add-ins. Finally, I provided storage tips and answered frequent questions. Enjoy creating this warm drink. It’s an easy way to savor fall flavors!
                            Pumpkin Hot Chocolate Rich and Creamy Fall Delight
                          • To make Pumpkin Spice White Hot Chocolate, you need simple and tasty ingredients. Each one adds a special touch to this cozy drink. Here’s what you’ll need: - 2 cups whole milk - 1 cup heavy cream - 1 cup white chocolate chips - 1/2 cup pumpkin puree - 1 teaspoon vanilla extract - 1 teaspoon pumpkin spice mix - A pinch of salt - Whipped cream, for topping - Ground cinnamon or extra pumpkin spice, for garnish Whole milk and heavy cream make the drink rich and creamy. White chocolate chips melt into a sweet base. Pumpkin puree gives it a warm flavor. Vanilla extract adds a lovely aroma. Pumpkin spice mix brings in classic fall flavors. Just a pinch of salt enhances all the tastes. Lastly, whipped cream and a sprinkle of cinnamon or pumpkin spice make it pretty. Once you gather these ingredients, you’re ready to create a delicious drink that warms your heart. You can enjoy it alone or share it with friends and family. Each sip will remind you of cozy fall days. Making Pumpkin Spice White Hot Chocolate is easy and fun. Gather all your ingredients first. You will need whole milk, heavy cream, white chocolate chips, pumpkin puree, vanilla extract, pumpkin spice mix, a pinch of salt, whipped cream, and ground cinnamon or extra pumpkin spice for garnish. This recipe takes about 10 minutes to prep and 15 minutes in total. You can serve four people, so share it with friends or family! Start by pouring 2 cups of whole milk and 1 cup of heavy cream into a medium saucepan. Set your stove to medium heat. Stir the mixture gently. Heat it until it feels warm but do not let it boil. This step is important because boiling can change the texture. Once your milk and cream are warm, add 1 cup of white chocolate chips. Use a whisk and stir continuously. This will help the chocolate melt evenly into the milk. Keep whisking until the mixture is smooth and creamy. Next, stir in 1/2 cup of pumpkin puree, 1 teaspoon of vanilla extract, 1 teaspoon of pumpkin spice mix, and a pinch of salt. Make sure everything blends well. Once it's creamy and heated, remove the saucepan from the heat. Now, pour your hot chocolate into mugs. Top each serving with whipped cream. Finish by sprinkling ground cinnamon or extra pumpkin spice on top. Enjoy your delicious drink! To make your Pumpkin Spice White Hot Chocolate super creamy, use whole milk and heavy cream. These two ingredients work great together. They add richness that makes each sip feel like a warm hug. Heat them gently in a saucepan, but don’t let them boil. Boiling can change the texture and make it less smooth. Stir often to keep the mixture even and creamy. Everyone has different tastes. If you like your drink sweeter, add more white chocolate chips. Start with an extra tablespoon, then taste it. If it needs more, keep adding a little at a time. For those who prefer less sweetness, cut back on the white chocolate. You can also use less pumpkin puree. This will keep the flavor strong but make it less sweet. Whipped cream makes this drink even better! To get the best whipped cream, use heavy cream. Beat it until it forms stiff peaks. This means it should hold its shape well. You can add a bit of sugar or vanilla for extra flavor. Once your hot chocolate is in the mug, top it with a big scoop of whipped cream. Don’t forget to sprinkle a bit of ground cinnamon or pumpkin spice on top. This adds a nice touch and enhances the fall flavors. {{image_2}} If you want a dairy-free option, try using almond milk or oat milk. These milks create a creamy base without dairy. You can also swap out the heavy cream for coconut cream. It adds richness and a light coconut flavor. For the white chocolate, look for dairy-free chips. They melt well and keep the sweet taste. You can mix in some maple syrup for extra sweetness. It adds a nice fall flavor. Want a little heat? Add a pinch of cayenne pepper or a dash of chili powder. It gives a fun kick to your drink. You can also stir in some caramel sauce for a sweet twist. A splash of flavored extracts, like hazelnut or almond, can also elevate the taste. This drink is perfect for fall gatherings. Serve it at Halloween parties in cute mugs. You can even top it with marshmallows for a fun touch. For Thanksgiving, offer it as a warm drink option. Add a sprinkle of nutmeg on top for a festive look. You can create a hot chocolate bar with toppings like crushed cookies or chocolate shavings. This way, everyone can customize their own cup. You can store leftover Pumpkin Spice White Hot Chocolate in an airtight container. Let it cool first. Then, place it in the fridge. This keeps it fresh for later. To reheat, pour the hot chocolate into a saucepan. Heat over low heat. Stir it gently to avoid burning. You can also use the microwave. Heat it in short bursts. Stir in between to ensure even warming. Stored correctly, this treat lasts about three days in the fridge. For best taste, consume it within this time. If you see any changes in texture or smell, toss it out. Always trust your senses! Yes, you can make this drink vegan. Use almond milk or oat milk instead of whole milk and heavy cream. Replace white chocolate chips with dairy-free options. Pumpkin puree fits well in vegan recipes. If you can't find pumpkin puree, use butternut squash puree or sweet potato puree. Both options give a similar flavor and texture. You may also blend cooked pumpkin for a fresh taste. To add more spice, increase the pumpkin spice mix to two teaspoons. You can also add a pinch of cayenne pepper or more cinnamon for an extra kick. Adjust to your taste! Absolutely! Almond milk, soy milk, or coconut milk all work well. Choose a creamy milk alternative to maintain a rich texture. Just ensure it is unsweetened for better flavor balance. For garnishes, whipped cream is a must. You can sprinkle ground cinnamon or extra pumpkin spice on top. Chocolate shavings or caramel drizzle can add a fun twist. Enjoy your tasty drink! This blog post detailed how to make a delicious Pumpkin Spice White Hot Chocolate. We covered essential ingredients, simple steps, and helpful tips. You learned how to achieve creamy texture and customize sweetness. We shared dairy-free ideas and perfect serving suggestions for seasonal gatherings. In closing, enjoy crafting this cozy drink at home. It’s perfect for chilly days and gatherings. Your taste buds will thank you!
                            Pumpkin Spice White Hot Chocolate Creamy Delight
                          • To make Pumpkin Spice Whipped Coffee, gather these ingredients: - 2 tablespoons instant coffee - 2 tablespoons sugar - 2 tablespoons hot water - 1/4 cup milk (dairy or non-dairy) - 1/4 teaspoon pumpkin spice (plus extra for garnish) - 1 tablespoon pumpkin puree - Whipped cream (optional, for topping) Having the right ingredients makes your coffee special. I love how these simple items blend to create a delightful drink. You can add fun toppings to your whipped coffee. Some great options include: - Whipped cream - Extra pumpkin spice - Chocolate shavings - Caramel drizzle Toppings add flavor and make your drink look fancy. I recommend using whipped cream and a sprinkle of pumpkin spice for a festive touch. If you want to switch things up, here are some easy swaps: - Use brown sugar instead of white sugar for a richer flavor. - Coconut milk or almond milk work well if you’re avoiding dairy. - Try cinnamon instead of pumpkin spice for a different taste. These substitutions let you customize the drink to your taste. Enjoy experimenting with flavors! To make pumpkin spice whipped coffee, gather your ingredients first. This simple recipe takes just ten minutes. You'll enjoy a delightful coffee treat with warm pumpkin flavors. 1. In a medium bowl, combine: - 2 tablespoons instant coffee - 2 tablespoons sugar - 2 tablespoons hot water Mix these together well. 2. Use an electric mixer or a whisk. Beat the mixture on high speed. This should take about 2-4 minutes. You want it light and fluffy, like whipped cream. 3. In a separate container, heat: - 1/4 cup milk (dairy or non-dairy) Heat until steaming but not boiling. If using non-dairy milk, ensure it’s frothy. 4. Stir in: - 1/4 teaspoon pumpkin spice - 1 tablespoon pumpkin puree Mix these into the heated milk until fully combined. 5. In a glass, pour in the pumpkin mixture first. Next, add the whipped coffee on top. 6. You can gently fold the whipped coffee into the pumpkin milk for a marbled look. Or, leave it layered for a pretty presentation. 7. If you'd like, top with whipped cream. Sprinkle a pinch of pumpkin spice for an extra festive touch. Enjoy your pumpkin spice whipped coffee warm. It makes a perfect fall treat. Pair it with a slice of pumpkin bread or a cozy blanket. Share it with friends for a delightful coffee break! To make your whipped coffee fluffy, use instant coffee. Mix it with sugar and hot water. Beat the mix on high speed for about 2-4 minutes. You want it to look light and airy. If you don’t have an electric mixer, a whisk works too, but it takes longer. Aim for stiff peaks, like whipped cream. To boost the taste, use fresh pumpkin spice. Add a touch more if you like spice. Pumpkin puree also helps bring out the pumpkin flavor. If you want it sweeter, add extra sugar to taste. Heating the milk until it's steaming helps mix the spices well, making each sip flavorful. Don’t skip the instant coffee. Regular coffee won’t whip up like instant. Avoid using cold milk, as it won’t blend well. If you overbeat the coffee mix, it can become grainy. Also, don’t forget to garnish. A sprinkle of pumpkin spice on top makes it look pretty and adds flavor. {{image_2}} You can change the flavor of your Pumpkin Spice Whipped Coffee by adding new ingredients. Here are some fun ideas: - Vanilla Extract: A splash of vanilla adds warmth. - Cocoa Powder: Mix in cocoa for a chocolate twist. - Caramel Sauce: Drizzle caramel for extra sweetness and richness. - Nutmeg or Cinnamon: These spices can deepen the fall flavor. Each add-in creates a unique drink. Feel free to experiment! You can adjust the sweetness to fit your taste. The basic recipe calls for two tablespoons of sugar. Here are some tips: - Less Sweet: Start with one tablespoon of sugar. - More Sweet: Add up to three tablespoons if you like it sweeter. - Natural Sweeteners: Try honey, maple syrup, or agave for a different flavor. Taste as you mix. Make it just right for you! You can make this drink dairy-free and vegan easily. Here are some options: - Milk Choices: Use almond milk, oat milk, or coconut milk instead of dairy milk. - Whipped Topping: Look for dairy-free whipped cream at the store. - Sugar Substitutes: Use coconut sugar or maple syrup if preferred. These swaps will keep the drink delicious and suitable for all diets. Enjoy your tasty Pumpkin Spice Whipped Coffee! To store any leftovers, place them in a sealed container. You can keep it in the fridge for up to two days. If you want to enjoy it later, make sure to store the whipped coffee and pumpkin milk separately. This helps keep each part fresh. When you're ready to enjoy your coffee again, heat the pumpkin milk gently. Use a microwave or a small pot on low heat. Stir it well to mix any settled pumpkin spice. Avoid boiling the milk, as it can change the taste. For the best taste, drink your Pumpkin Spice Whipped Coffee fresh. If you have leftovers, consume them within two days. Make sure to seal the container tightly. This keeps out air and other smells, helping preserve its yummy flavor. Yes, you can use brewed coffee instead. Just make a strong cup. Use about 1/2 cup of brewed coffee in place of the instant coffee. It may not whip up as fluffy, but it will still taste great. You can prepare the whipped coffee and pumpkin milk separately. Store them in airtight containers in the fridge. When you're ready to enjoy, combine them and serve cold or heat the milk. This way, you save time on busy mornings. The best milk depends on your taste. Dairy milk gives a rich flavor. Almond milk or oat milk works well too for a lighter taste. Choose what fits your diet and enjoy it! This blog post outlined the key ingredients and steps for making Pumpkin Spice Whipped Coffee. You learned about optional toppings, ingredient swaps, and how to perfect the whipped texture. There are tips to enhance flavor and avoid common mistakes. You can customize flavors and ensure the drink fits your diet. Lastly, I shared how to store leftovers and answer common questions. With this knowledge, you can enjoy a sweet, creamy treat. Get creative and make it your own!
                            Pumpkin Spice Whipped Coffee Delightful Fall Treat

                          Footer

                          ↑ back to top

                          More information

                          • Drinks
                          • Appetizer
                          • Dinner
                          • Desserts
                          • About
                          • Contact
                          • Privacy Policy

                          Our Policies

                          • Privacy Policy
                          • GDPR Policy
                          • Terms Of Use
                          • Copyright Policy
                          • Cookie Policy
                          • Disclaimer

                          Copyright © 2025 cheftaling