Chef Taling

  • Home
  • Recipe Index
    • Desserts
    • Dinner
    • Appetizer
    • Drinks
  • About
  • Contact
  • Privacy Policy
menu icon
go to homepage
  • Home
  • Recipe Index
    • Desserts
    • Dinner
    • Appetizer
    • Drinks
  • About
  • Contact
  • Privacy Policy
Indulge in this delicious Sizzling Sausage & Colorful Veggie Sheet Pan Dinner that’s perfect for a quick weeknight meal! Packed with juicy Italian chicken sausages and vibrant veggies like zucchini, bell peppers, and baby potatoes, this one-pan dish is a feast for the eyes and the taste buds. Discover the easy steps to create a mouthwatering dinner that family and friends will love. Click to explore the full recipe now! #SheetPanDinner #HealthyRecipes #OnePanMeals #EasyDinners

search icon
Homepage link
  • Home
  • Recipe Index
    • Desserts
    • Dinner
    • Appetizer
    • Drinks
  • About
  • Contact
  • Privacy Policy
Indulge in this delicious Sizzling Sausage & Colorful Veggie Sheet Pan Dinner that’s perfect for a quick weeknight meal! Packed with juicy Italian chicken sausages and vibrant veggies like zucchini, bell peppers, and baby potatoes, this one-pan dish is a feast for the eyes and the taste buds. Discover the easy steps to create a mouthwatering dinner that family and friends will love. Click to explore the full recipe now! #SheetPanDinner #HealthyRecipes #OnePanMeals #EasyDinners

×

Sausage & Veggie Sheet Pan Dinner Simple and Tasty

Published: Oct 1, 2025 · by Natalie · Leave a Comment

WANT TO SAVE THIS RECIPE?

Indulge in this delicious Sizzling Sausage & Colorful Veggie Sheet Pan Dinner that’s perfect for a quick weeknight meal! Packed with juicy Italian chicken sausages and vibrant veggies like zucchini, bell peppers, and baby potatoes, this one-pan dish is a feast for the eyes and the taste buds. Discover the easy steps to create a mouthwatering dinner that family and friends will love. Click to explore the full recipe now! #SheetPanDinner #HealthyRecipes #OnePanMeals #EasyDinners

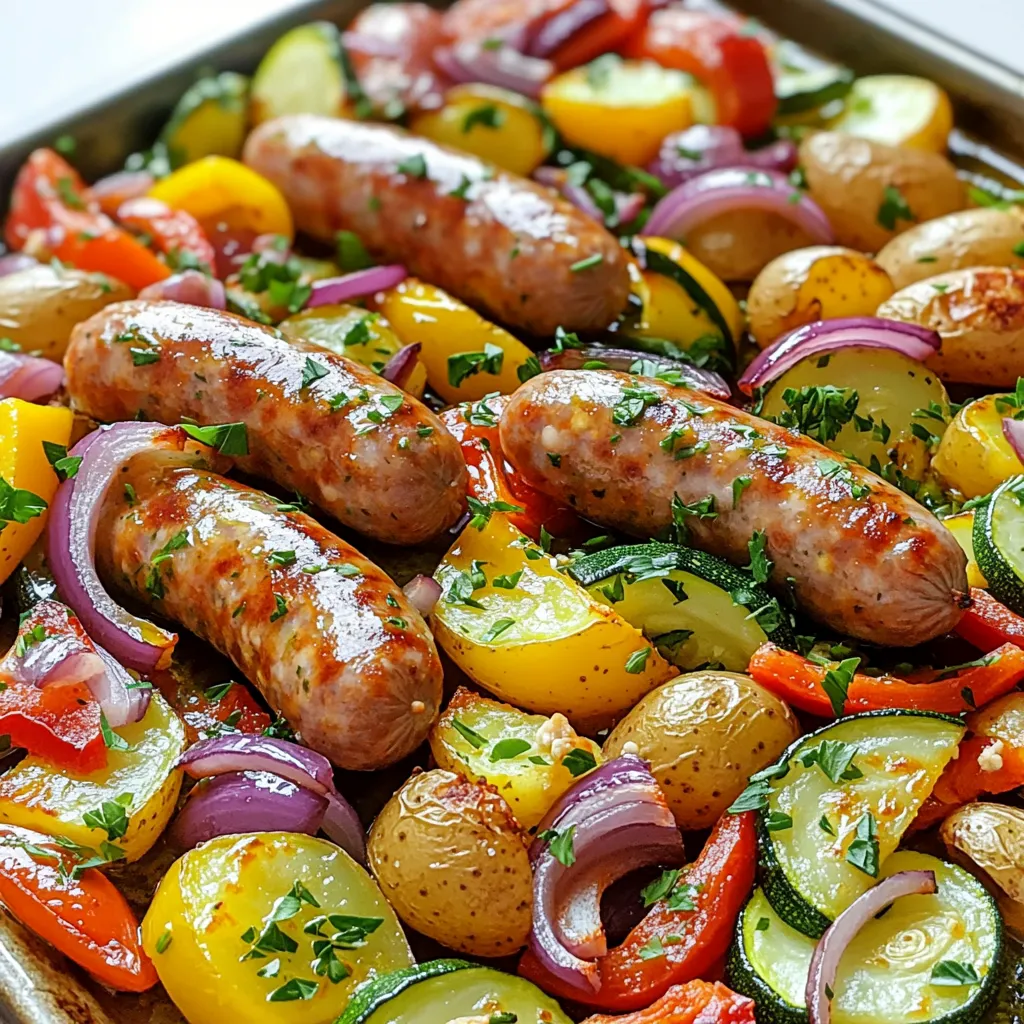
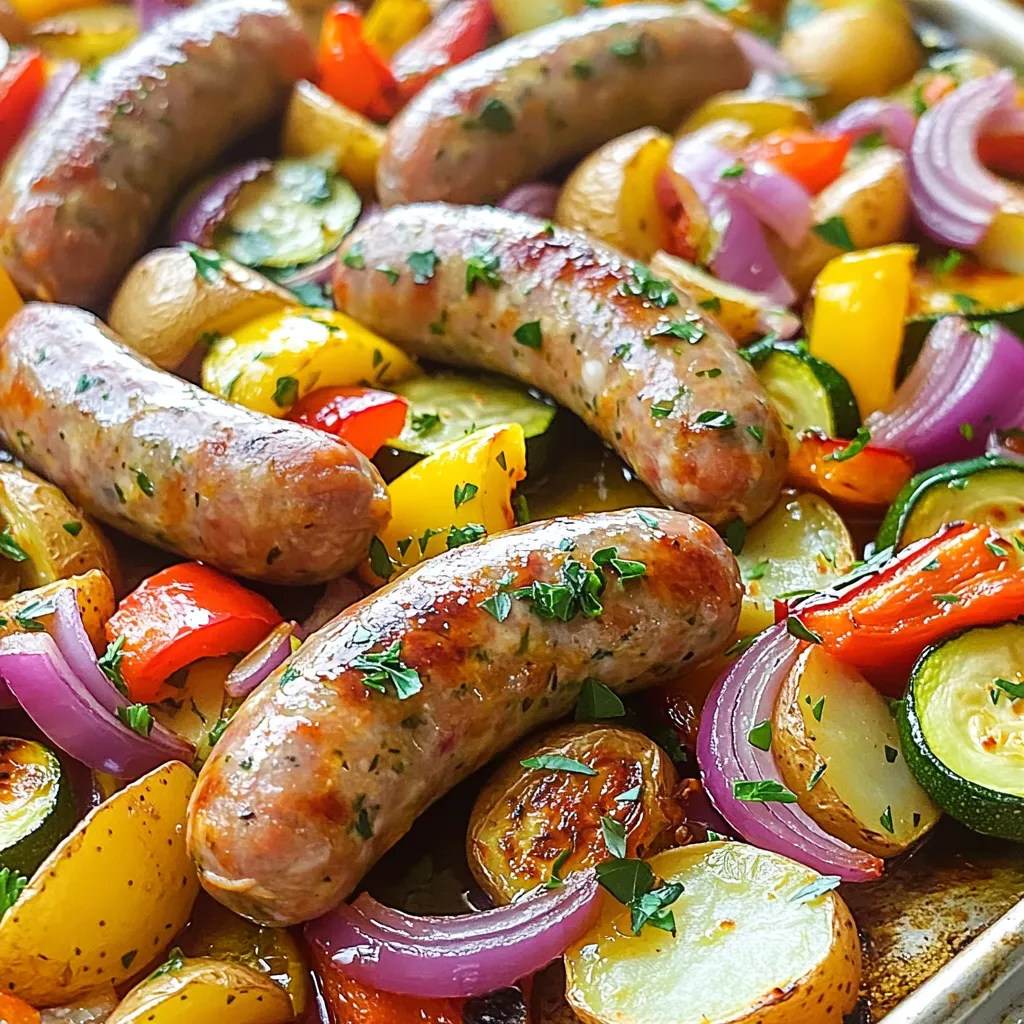
If you're short on time but still want a delicious meal, I have the perfect solution: a Sausage & Veggie Sheet Pan Dinner! This simple and tasty recipe is all about bringing bold flavors together with minimal effort. You’ll find just what you need to create a hearty, one-pan feast, complete with tips, variations, and easy storage options. Let’s dive into how to make your next dinner a hit!

The main ingredients for this dish create a colorful and tasty meal. You need: - 4 Italian chicken sausages (or your choice of sausage) - 2 cups baby potatoes, halved - 1 red bell pepper, diced - 1 yellow bell pepper, diced - 1 zucchini, sliced - 1 red onion, cut into wedges - 3 cloves garlic, minced These ingredients blend well and cook evenly, giving you great flavors and textures. You can customize this dish to fit your taste. Consider adding: - Broccoli florets - Carrots, sliced - Asparagus, cut into pieces - Cherry tomatoes These veggies add color and make your meal even more nutritious. You can mix and match based on what you have at home. Seasoning enhances the flavors of the dish. Use: - 2 tablespoons olive oil - 1 teaspoon dried oregano - 1 teaspoon smoked paprika - Salt and pepper to taste For a fresh finish, sprinkle chopped parsley on top after cooking. This adds a pop of color and a hint of flavor. Enjoy your meal straight from the sheet pan for a fun, rustic dining experience! First, you need to preheat your oven to 400°F (200°C). This step is key for getting your meal crispy and golden. While the oven heats, grab a large sheet pan. Make sure it is clean and ready to use. This will help your veggies and sausage cook evenly. In a big bowl, add the halved baby potatoes, diced red and yellow bell peppers, sliced zucchini, and red onion wedges. Next, toss in the minced garlic. Drizzle 2 tablespoons of olive oil over the veggies. This adds rich flavor and helps them roast well. Now, sprinkle in 1 teaspoon of dried oregano, 1 teaspoon of smoked paprika, and some salt and pepper. Mix everything together until the veggies are well coated. This blend of spices brings out the best flavors in each ingredient. Spread the seasoned veggies evenly on your sheet pan. Make sure they are not crowded. Nestle the Italian chicken sausages among the veggies. This allows the flavors to mix while cooking. Put the sheet pan in your preheated oven. Roast for about 25-30 minutes. Check to see if the sausages are browned and cooked through. The veggies should be tender and caramelized. Flip the veggies halfway through to ensure they cook evenly. Once done, take the sheet pan out of the oven. Sprinkle fresh parsley on top for a pop of color and taste. Serve hot from the pan for a fun touch or move everything to a serving dish for a nicer look. Enjoy your meal! When picking sausages, look for fresh ones. Check the expiry date. I prefer chicken sausages for this recipe. They are lean and flavorful. You can also use pork or turkey sausages. Always choose high-quality meat. Look for natural casings. This makes them juicy and gives a nice snap when you bite in. If you can, ask the butcher for advice. They can help you find the best options. To get great roasted veggies, cut them into even pieces. This helps them cook evenly. I like to add a mix of colors. Red and yellow bell peppers, zucchini, and red onion make a lovely dish. Toss them well with olive oil and seasoning. This ensures each piece is coated. Don’t crowd the pan; give them space. This helps them caramelize. Flip the veggies halfway through cooking for the best results. Ovens can vary, so check your food as it cooks. If your oven runs hot, start checking the dish early. At 400°F, it should take about 25-30 minutes. Look for browned sausages and tender veggies. If your oven is cooler, it might take longer. You can use a meat thermometer to check the sausages. They should reach 165°F. This way, you ensure your meal is safe and tasty! {{image_2}} You can mix and match veggies for this dish. Try using broccoli or carrots for a different taste. Cauliflower adds a nice crunch. Sweet potatoes can bring a hint of sweetness. Asparagus or green beans can also work well. The key is to choose what you love. While Italian chicken sausages are great, feel free to experiment. Try spicy sausage for extra heat. Pork sausage adds rich flavor. Turkey sausage is a leaner option. You can even use plant-based sausage for a veggie twist. Each type changes the dish's flavor. To make this dish gluten-free, ensure your sausage is certified gluten-free. You can swap potatoes for cauliflower or turnips for a low-carb option. Zucchini noodles can also replace traditional pasta. These swaps keep the meal light and healthy without losing taste. To store your sausage and veggie sheet pan dinner, let it cool first. Then, place the leftovers in an airtight container. Make sure to divide it into smaller portions for easy access. You can keep it in the fridge for up to three days. This way, you can enjoy it again without fuss. When you’re ready to eat the leftovers, reheating is simple. Preheat your oven to 350°F (175°C). Spread the leftovers on a baking sheet. Heat them for about 15-20 minutes. This method helps keep the sausages juicy and the veggies crisp. You can also use the microwave, but the oven gives better results. If you want to save the dish for later, freezing works well. After cooling, place the meal in a freezer-safe container. Make sure to label it with the date. You can freeze it for up to three months. To enjoy, thaw it overnight in the fridge, then reheat as mentioned above. This makes meal prep easy and fun! Yes, you can use frozen vegetables for this dish. Frozen veggies save time and are still tasty. Just remember to adjust the cooking time. They may need a few extra minutes to cook through. Check them often to avoid mushiness. The internal temperature for sausages should reach 165°F (74°C). Use a meat thermometer to check. This ensures they are safe to eat. Cook them until they are no longer pink inside. This keeps the meal both safe and delicious. To make it a one-pan meal, add a few more items. You can include chickpeas or quinoa for protein. Leafy greens like spinach or kale can add nutrients. Just make sure to chop them small for even cooking. Mix these extras in with the other veggies before roasting. This way, you get a complete meal in one pan. In this article, I shared how to craft a tasty roasted sausage and veggie dish. I covered key ingredients, step-by-step cooking methods, and helpful tips for perfect results. I also explored variations to keep meals exciting and storage tips for leftovers. Remember, the best meals come from simple steps and fresh choices. Stay creative. Enjoy your cooking journey!

Ingredients

Main ingredients overview

The main ingredients for this dish create a colorful and tasty meal. You need:

  1. 4 Italian chicken sausages (or your choice of sausage)
  2. 2 cups baby potatoes, halved
  3. 1 red bell pepper, diced
  4. 1 yellow bell pepper, diced
  5. 1 zucchini, sliced
  6. 1 red onion, cut into wedges
  7. 3 cloves garlic, minced

These ingredients blend well and cook evenly, giving you great flavors and textures.

Optional ingredients for customization

You can customize this dish to fit your taste. Consider adding:

  1. Broccoli florets
  2. Carrots, sliced
  3. Asparagus, cut into pieces
  4. Cherry tomatoes

These veggies add color and make your meal even more nutritious. You can mix and match based on what you have at home.

Recommended seasoning and garnishes

Seasoning enhances the flavors of the dish. Use:

  1. 2 tablespoons olive oil
  2. 1 teaspoon dried oregano
  3. 1 teaspoon smoked paprika
  4. Salt and pepper to taste

For a fresh finish, sprinkle chopped parsley on top after cooking. This adds a pop of color and a hint of flavor. Enjoy your meal straight from the sheet pan for a fun, rustic dining experience!

Step-by-Step Instructions

Preheating and preparing your oven

First, you need to preheat your oven to 400°F (200°C). This step is key for getting your meal crispy and golden. While the oven heats, grab a large sheet pan. Make sure it is clean and ready to use. This will help your veggies and sausage cook evenly.

Combining the ingredients for optimal flavor

In a big bowl, add the halved baby potatoes, diced red and yellow bell peppers, sliced zucchini, and red onion wedges. Next, toss in the minced garlic. Drizzle 2 tablespoons of olive oil over the veggies. This adds rich flavor and helps them roast well.

Now, sprinkle in 1 teaspoon of dried oregano, 1 teaspoon of smoked paprika, and some salt and pepper. Mix everything together until the veggies are well coated. This blend of spices brings out the best flavors in each ingredient.

Roasting and finishing touches

Spread the seasoned veggies evenly on your sheet pan. Make sure they are not crowded. Nestle the Italian chicken sausages among the veggies. This allows the flavors to mix while cooking.

Put the sheet pan in your preheated oven. Roast for about 25-30 minutes. Check to see if the sausages are browned and cooked through. The veggies should be tender and caramelized. Flip the veggies halfway through to ensure they cook evenly.

Once done, take the sheet pan out of the oven. Sprinkle fresh parsley on top for a pop of color and taste. Serve hot from the pan for a fun touch or move everything to a serving dish for a nicer look. Enjoy your meal!

Tips & Tricks

How to select the best sausages

When picking sausages, look for fresh ones. Check the expiry date. I prefer chicken sausages for this recipe. They are lean and flavorful. You can also use pork or turkey sausages. Always choose high-quality meat. Look for natural casings. This makes them juicy and gives a nice snap when you bite in. If you can, ask the butcher for advice. They can help you find the best options.

Tips for perfectly roasted vegetables

To get great roasted veggies, cut them into even pieces. This helps them cook evenly. I like to add a mix of colors. Red and yellow bell peppers, zucchini, and red onion make a lovely dish. Toss them well with olive oil and seasoning. This ensures each piece is coated. Don’t crowd the pan; give them space. This helps them caramelize. Flip the veggies halfway through cooking for the best results.

Adjusting cooking times for different ovens

Ovens can vary, so check your food as it cooks. If your oven runs hot, start checking the dish early. At 400°F, it should take about 25-30 minutes. Look for browned sausages and tender veggies. If your oven is cooler, it might take longer. You can use a meat thermometer to check the sausages. They should reach 165°F. This way, you ensure your meal is safe and tasty!

Variations

Alternative vegetables to consider

You can mix and match veggies for this dish. Try using broccoli or carrots for a different taste. Cauliflower adds a nice crunch. Sweet potatoes can bring a hint of sweetness. Asparagus or green beans can also work well. The key is to choose what you love.

Different types of sausages to try

While Italian chicken sausages are great, feel free to experiment. Try spicy sausage for extra heat. Pork sausage adds rich flavor. Turkey sausage is a leaner option. You can even use plant-based sausage for a veggie twist. Each type changes the dish's flavor.

Gluten-free and low-carb modifications

To make this dish gluten-free, ensure your sausage is certified gluten-free. You can swap potatoes for cauliflower or turnips for a low-carb option. Zucchini noodles can also replace traditional pasta. These swaps keep the meal light and healthy without losing taste.

Storage Info

How to store leftovers

To store your sausage and veggie sheet pan dinner, let it cool first. Then, place the leftovers in an airtight container. Make sure to divide it into smaller portions for easy access. You can keep it in the fridge for up to three days. This way, you can enjoy it again without fuss.

Reheating suggestions for best results

When you’re ready to eat the leftovers, reheating is simple. Preheat your oven to 350°F (175°C). Spread the leftovers on a baking sheet. Heat them for about 15-20 minutes. This method helps keep the sausages juicy and the veggies crisp. You can also use the microwave, but the oven gives better results.

Freezing the dish for later meals

If you want to save the dish for later, freezing works well. After cooling, place the meal in a freezer-safe container. Make sure to label it with the date. You can freeze it for up to three months. To enjoy, thaw it overnight in the fridge, then reheat as mentioned above. This makes meal prep easy and fun!

FAQs

Can I use frozen vegetables?

Yes, you can use frozen vegetables for this dish. Frozen veggies save time and are still tasty. Just remember to adjust the cooking time. They may need a few extra minutes to cook through. Check them often to avoid mushiness.

What temperature should the internal sausages reach?

The internal temperature for sausages should reach 165°F (74°C). Use a meat thermometer to check. This ensures they are safe to eat. Cook them until they are no longer pink inside. This keeps the meal both safe and delicious.

How to make it a one-pan meal with additional ingredients?

To make it a one-pan meal, add a few more items. You can include chickpeas or quinoa for protein. Leafy greens like spinach or kale can add nutrients. Just make sure to chop them small for even cooking. Mix these extras in with the other veggies before roasting. This way, you get a complete meal in one pan.

In this article, I shared how to craft a tasty roasted sausage and veggie dish. I covered key ingredients, step-by-step cooking methods, and helpful tips for perfect results. I also explored variations to keep meals exciting and storage tips for leftovers. Remember, the best meals come from simple steps and fresh choices. Stay creative. Enjoy your cooking journey!

The main ingredients for this dish create a colorful and tasty meal. You need: - 4 Italian chicken sausages (or your choice of sausage) - 2 cups baby potatoes, halved - 1 red bell pepper, diced - 1 yellow bell pepper, diced - 1 zucchini, sliced - 1 red onion, cut into wedges - 3 cloves garlic, minced These ingredients blend well and cook evenly, giving you great flavors and textures. You can customize this dish to fit your taste. Consider adding: - Broccoli florets - Carrots, sliced - Asparagus, cut into pieces - Cherry tomatoes These veggies add color and make your meal even more nutritious. You can mix and match based on what you have at home. Seasoning enhances the flavors of the dish. Use: - 2 tablespoons olive oil - 1 teaspoon dried oregano - 1 teaspoon smoked paprika - Salt and pepper to taste For a fresh finish, sprinkle chopped parsley on top after cooking. This adds a pop of color and a hint of flavor. Enjoy your meal straight from the sheet pan for a fun, rustic dining experience! First, you need to preheat your oven to 400°F (200°C). This step is key for getting your meal crispy and golden. While the oven heats, grab a large sheet pan. Make sure it is clean and ready to use. This will help your veggies and sausage cook evenly. In a big bowl, add the halved baby potatoes, diced red and yellow bell peppers, sliced zucchini, and red onion wedges. Next, toss in the minced garlic. Drizzle 2 tablespoons of olive oil over the veggies. This adds rich flavor and helps them roast well. Now, sprinkle in 1 teaspoon of dried oregano, 1 teaspoon of smoked paprika, and some salt and pepper. Mix everything together until the veggies are well coated. This blend of spices brings out the best flavors in each ingredient. Spread the seasoned veggies evenly on your sheet pan. Make sure they are not crowded. Nestle the Italian chicken sausages among the veggies. This allows the flavors to mix while cooking. Put the sheet pan in your preheated oven. Roast for about 25-30 minutes. Check to see if the sausages are browned and cooked through. The veggies should be tender and caramelized. Flip the veggies halfway through to ensure they cook evenly. Once done, take the sheet pan out of the oven. Sprinkle fresh parsley on top for a pop of color and taste. Serve hot from the pan for a fun touch or move everything to a serving dish for a nicer look. Enjoy your meal! When picking sausages, look for fresh ones. Check the expiry date. I prefer chicken sausages for this recipe. They are lean and flavorful. You can also use pork or turkey sausages. Always choose high-quality meat. Look for natural casings. This makes them juicy and gives a nice snap when you bite in. If you can, ask the butcher for advice. They can help you find the best options. To get great roasted veggies, cut them into even pieces. This helps them cook evenly. I like to add a mix of colors. Red and yellow bell peppers, zucchini, and red onion make a lovely dish. Toss them well with olive oil and seasoning. This ensures each piece is coated. Don’t crowd the pan; give them space. This helps them caramelize. Flip the veggies halfway through cooking for the best results. Ovens can vary, so check your food as it cooks. If your oven runs hot, start checking the dish early. At 400°F, it should take about 25-30 minutes. Look for browned sausages and tender veggies. If your oven is cooler, it might take longer. You can use a meat thermometer to check the sausages. They should reach 165°F. This way, you ensure your meal is safe and tasty! {{image_2}} You can mix and match veggies for this dish. Try using broccoli or carrots for a different taste. Cauliflower adds a nice crunch. Sweet potatoes can bring a hint of sweetness. Asparagus or green beans can also work well. The key is to choose what you love. While Italian chicken sausages are great, feel free to experiment. Try spicy sausage for extra heat. Pork sausage adds rich flavor. Turkey sausage is a leaner option. You can even use plant-based sausage for a veggie twist. Each type changes the dish's flavor. To make this dish gluten-free, ensure your sausage is certified gluten-free. You can swap potatoes for cauliflower or turnips for a low-carb option. Zucchini noodles can also replace traditional pasta. These swaps keep the meal light and healthy without losing taste. To store your sausage and veggie sheet pan dinner, let it cool first. Then, place the leftovers in an airtight container. Make sure to divide it into smaller portions for easy access. You can keep it in the fridge for up to three days. This way, you can enjoy it again without fuss. When you’re ready to eat the leftovers, reheating is simple. Preheat your oven to 350°F (175°C). Spread the leftovers on a baking sheet. Heat them for about 15-20 minutes. This method helps keep the sausages juicy and the veggies crisp. You can also use the microwave, but the oven gives better results. If you want to save the dish for later, freezing works well. After cooling, place the meal in a freezer-safe container. Make sure to label it with the date. You can freeze it for up to three months. To enjoy, thaw it overnight in the fridge, then reheat as mentioned above. This makes meal prep easy and fun! Yes, you can use frozen vegetables for this dish. Frozen veggies save time and are still tasty. Just remember to adjust the cooking time. They may need a few extra minutes to cook through. Check them often to avoid mushiness. The internal temperature for sausages should reach 165°F (74°C). Use a meat thermometer to check. This ensures they are safe to eat. Cook them until they are no longer pink inside. This keeps the meal both safe and delicious. To make it a one-pan meal, add a few more items. You can include chickpeas or quinoa for protein. Leafy greens like spinach or kale can add nutrients. Just make sure to chop them small for even cooking. Mix these extras in with the other veggies before roasting. This way, you get a complete meal in one pan. In this article, I shared how to craft a tasty roasted sausage and veggie dish. I covered key ingredients, step-by-step cooking methods, and helpful tips for perfect results. I also explored variations to keep meals exciting and storage tips for leftovers. Remember, the best meals come from simple steps and fresh choices. Stay creative. Enjoy your cooking journey!

Sausage & Veggie Sheet Pan Dinner

Indulge in this delicious Sizzling Sausage & Colorful Veggie Sheet Pan Dinner that’s perfect for a quick weeknight meal! Packed with juicy Italian chicken sausages and vibrant veggies like zucchini, bell peppers, and baby potatoes, this one-pan dish is a feast for the eyes and the taste buds. Discover the easy steps to create a mouthwatering dinner that family and friends will love. Click to explore the full recipe now! #SheetPanDinner #HealthyRecipes #OnePanMeals #EasyDinners
Print Recipe Pin Recipe

Ingredients
  

4 Italian chicken sausages (or your choice of sausage)

2 cups baby potatoes, halved

1 red bell pepper, diced

1 yellow bell pepper, diced

1 zucchini, sliced

1 red onion, cut into wedges

3 cloves garlic, minced

2 tablespoons olive oil

1 teaspoon dried oregano

1 teaspoon smoked paprika

Salt and pepper to taste

Fresh parsley, chopped (for garnish)

Instructions
 

Preheat your oven to 400°F (200°C).

    In a large bowl, combine the halved baby potatoes, diced bell peppers, sliced zucchini, red onion wedges, and minced garlic.

      Drizzle olive oil over the veggies, then add the dried oregano, smoked paprika, salt, and pepper. Toss everything until the veggies are nicely coated.

        Spread the seasoned vegetables evenly on a large sheet pan.

          Nestle the chicken sausages among the veggies on the sheet pan.

            Place the sheet pan in the preheated oven and roast for 25-30 minutes, or until the sausages are browned and cooked through, and the vegetables are tender and slightly caramelized. Flip the veggies halfway through for even cooking.

              Once cooked, remove the sheet pan from the oven and sprinkle fresh parsley on top for a burst of color and flavor.

                Serve hot, directly from the sheet pan for a rustic look or transfer to a serving dish.

                  Prep Time: 15 mins | Total Time: 45 mins | Servings: 4

                    Related Recipes

                    • - 2 medium sweet potatoes, peeled and diced - 1 can (15 oz) black beans, drained and rinsed - 1 can (14 oz) diced tomatoes (with juices) - 1 medium onion, diced - 3 cloves garlic, minced - 1 bell pepper (red or green), diced - 2 cups vegetable broth - 2 teaspoons ground cumin - 1 teaspoon smoked paprika - 1 teaspoon chili powder - ½ teaspoon cayenne pepper (adjust to taste) - Salt and pepper to taste - 1 tablespoon olive oil - Fresh cilantro, chopped (for garnish) - Avocado slices (for serving) - Lime wedges (for serving) Sweet potatoes bring a sweet taste and nice texture to this chili. Black beans add protein and fiber. Diced tomatoes add moisture and flavor. The onion, garlic, and bell pepper give a great base. Vegetable broth makes it all come together. Spices make this dish pop. Cumin adds warmth. Smoked paprika adds a slight smokiness. Chili powder gives heat, while cayenne pepper adds a kick. You can adjust the cayenne to your taste. Olive oil helps to sauté the vegetables. Fresh cilantro gives a burst of color and flavor. Avocado slices add creaminess, and lime wedges add brightness. This combination makes a hearty meal. 1. Start by heating olive oil in a large pot over medium heat. 2. Add the diced onion and bell pepper. Sauté until soft, about 5 minutes. 3. Next, stir in the minced garlic. Cook for another 1-2 minutes, but don’t let it burn. 1. Now, add the diced sweet potatoes, black beans, and diced tomatoes with their juices. 2. Pour in the vegetable broth, then sprinkle the ground cumin, smoked paprika, chili powder, cayenne pepper, salt, and pepper. 3. Bring everything to a boil. After it boils, lower the heat and cover the pot. 4. Let the chili simmer for 25-30 minutes. Stir occasionally until the sweet potatoes are tender. 1. Taste your chili. Adjust the seasoning if needed, adding salt, pepper, or spices. 2. Serve the chili hot. Garnish with fresh cilantro and avocado slices. Add lime wedges for a zesty kick. - Best practices for softening sweet potatoes: Cut sweet potatoes into small, even pieces. This helps them cook faster and become tender. Cook them in the chili from the start. The simmering chili will soften them well. You can also boil them for 10 minutes before adding them to the pot. - How to prevent burning the garlic: Add garlic after the onion and bell pepper start to soften. Cook the garlic for just 1-2 minutes. Stir it often and watch it closely. If it starts to brown too much, lower the heat. Burnt garlic tastes bitter, so keep it fresh and fragrant. - Serving suggestions with garnishes: Serve the chili in bright bowls. Top each bowl with fresh cilantro and avocado slices. Squeeze fresh lime juice on top for a zesty kick. This adds color and flavor. - Bowl and plate ideas for aesthetic appeal: Choose colorful bowls to make the dish pop. A deep bowl highlights the chili's texture. Use small plates for lime wedges and extra toppings. You can also add a sprinkle of chili powder for a nice touch on the rim of the bowl. {{image_2}} You can mix up the beans in this chili. Try kidney beans or pinto beans instead of black beans. You can also add more veggies. Zucchini, corn, or spinach work great in this dish. For extra protein, ground turkey or tofu makes a nice addition. Just brown the turkey first or press the tofu to remove extra water before adding it to the pot. Do you want more heat? Add more cayenne pepper or some diced jalapeños. If you prefer it milder, skip the cayenne and reduce the chili powder. You can also use sweet paprika instead of smoked paprika for a softer flavor. This chili is easy to make gluten-free. Just use gluten-free vegetable broth, and you're set. If you want vegan options, skip the ground turkey or tofu. You can also add more beans or veggies to keep it hearty and satisfying. Store leftover chili in an airtight container. Make sure it cools down first. This keeps flavors fresh. Use glass or plastic containers that seal well. Label with the date for easy tracking. To reheat, the stovetop works best. Heat on low, stirring often. This way, it warms evenly. If you choose the microwave, use a microwave-safe bowl. Stir halfway through to avoid hot spots. You can freeze this chili for later meals. Let it cool completely before freezing. Use freezer-safe bags or containers. Remove as much air as possible to prevent freezer burn. To thaw, place it in the fridge overnight. Reheat on the stovetop or microwave until hot. Yes, you can make this chili in a slow cooker. Start by sautéing the onion and bell pepper in a pan. After that, add all the ingredients to the slow cooker. Cook on low for 6-8 hours or on high for 3-4 hours. This method makes the flavors blend well and keeps your kitchen cool. You can store leftovers in the refrigerator for up to 5 days. Make sure to put the chili in an airtight container. This keeps it fresh and safe to eat. This chili pairs well with many sides. You can serve it with rice or cornbread. Toppings like avocado, lime, or cilantro add flavor. A fresh salad can also balance the meal. Yes, you can use fresh tomatoes instead of canned. Just chop about 2-3 medium tomatoes. Add them to the pot with some extra broth, as fresh tomatoes have more water. Absolutely! This chili is great for meal prep. It stores well and tastes even better the next day. You can pack it in single servings for easy lunches or dinners throughout the week. This blog post covered the key elements of making Sweet Potato Black Bean Chili. You learned about the best ingredients, step-by-step cooking, and tips for perfect taste. I shared ideas for variations and how to store leftovers. Remember, your chili can change based on your taste and needs. Enjoy experimenting with spices or adding protein! This dish is not just tasty; it’s also healthy and easy to make. Dive in, get creative, and serve up a bowlful of comfort!
                      Sweet Potato Black Bean Chili Hearty and Flavorful Dish
                    • To make Slow Cooker Chicken Alfredo Pasta, you need some simple ingredients. Here’s the full list: - 1 pound boneless, skinless chicken breasts - 8 ounces fettuccine pasta - 2 cups heavy cream - 1 cup grated Parmesan cheese - 1 cup chicken broth - 4 cloves garlic, minced - 1 teaspoon Italian seasoning - Salt and pepper to taste - 2 tablespoons butter - Fresh parsley, chopped (for garnish) These ingredients come together to create a rich and creamy dish. The chicken breasts are the main star, while the fettuccine adds great texture. Heavy cream and Parmesan cheese give it that comforting, creamy flavor we all love. Garlic adds a nice kick, and Italian seasoning brings in warmth. Salt and pepper help to balance all the tastes. Don't forget the butter for richness and the parsley for a fresh touch! First, I season the chicken. I use salt, pepper, and Italian seasoning to add flavor. I place the boneless, skinless chicken breasts in the slow cooker. Next, I add the liquid ingredients. I pour in the chicken broth and heavy cream. Then, I add minced garlic and butter. I gently stir everything to mix well. Now, it's time to cook. I cover the slow cooker tightly. If I set it on low, it cooks for 6-7 hours. On high, it cooks for 3-4 hours. Covering the slow cooker is key. It keeps the heat in and helps the chicken cook evenly. About 30 minutes before serving, I make the pasta. I bring a large pot of salted water to a boil and add the fettuccine. I cook it according to the package instructions until it is al dente, then drain and set aside. Once the chicken is done, I remove it from the slow cooker. Using two forks, I shred the chicken into bite-sized pieces. I return the shredded chicken back to the slow cooker. Finally, I stir in the cooked fettuccine and grated Parmesan cheese. I mix everything well and let it cook for an additional 10-15 minutes. This warms everything through and blends the flavors perfectly. To make your Slow Cooker Chicken Alfredo Pasta extra tasty, use seasonings like: - Italian seasoning - Salt and pepper - Garlic powder You can also add ingredients to boost flavor. Consider: - Fresh spinach for a nutrient boost - Sun-dried tomatoes for a tangy kick - Mushrooms for earthy notes For this recipe, a good slow cooker is key. I recommend using: - 6-quart slow cooker for larger meals - Programmable slow cooker for ease of use You will need some basic utensils, such as: - Measuring cups for accuracy - A sharp knife for prepping - A large spoon for stirring Plating your dish well makes it more appealing. Here are some ideas: - Serve in shallow bowls for a cozy look - Sprinkle extra Parmesan on top for richness - Add a pinch of chopped parsley for color A drizzle of olive oil can enhance the dish's visual appeal. Small touches can make your meal look gourmet! {{image_2}} You can switch up the chicken for shrimp or sausage. Shrimp cooks quickly and adds a nice touch. Just toss it in the slow cooker for the last hour of cooking. For sausage, use Italian sausage. Slice it up and add it at the start. Both options bring great flavors to your meal. If you want a vegetarian twist, try using mushrooms or tofu in place of chicken. For mushrooms, use a mix of cremini and shiitake. They add a hearty texture and umami flavor. If you choose tofu, use firm tofu. Press it to remove excess moisture, then cube it. Add it to the slow cooker with the other ingredients for a creamy dish. While fettuccine is classic, you can use other pasta shapes too. Penne works well and holds sauce nicely. Bowtie pasta is fun and adds a playful look. Even whole wheat or gluten-free pasta can be used. Just adjust the cooking time based on the type of pasta you choose. This way, you can keep it interesting every time you make it! To keep your leftovers fresh, let them cool first. Place the chicken Alfredo pasta in an airtight container. This will help prevent moisture loss and keep flavors intact. Store it in the fridge for up to three days. Make sure to label the container with the date. This way, you know when to finish it. You can freeze this dish for later. First, let it cool completely. Then, transfer the pasta to a freezer-safe container. Seal it tightly to avoid freezer burn. This dish can last up to three months in the freezer. When you're ready to eat, thaw it in the fridge overnight. Reheat it on the stove over low heat. Add a splash of cream or broth to revive the sauce. In the fridge, your chicken Alfredo pasta lasts about three days. If you freeze it, you can keep it for three months. Always check for any signs of spoilage before eating. If it smells off or looks strange, it’s best to throw it away. Enjoy your tasty meal without worry! Cooking this dish takes about 6 to 7 hours on low. If you set it to high, it will take 3 to 4 hours. The chicken needs to reach a safe temperature to be tender. Always check that your chicken is fully cooked before serving. Yes, you can prep this meal ahead of time. You can season the chicken and add the liquids into the slow cooker the night before. Just cover it and store it in the fridge. In the morning, you can plug it in and let it cook while you go about your day. This dish pairs well with simple side salads or garlic bread. A fresh green salad with vinaigrette will balance the creaminess. You can also enjoy a glass of white wine or sparkling water with lemon. These drinks will enhance the flavors of the pasta. This blog post covered how to make Slow Cooker Chicken Alfredo Pasta. We looked at the key ingredients, step-by-step instructions, and tips to boost flavor. I shared storage methods and variations for your tastes. Now you can create a delicious meal with ease. Enjoy experimenting with different proteins and pasta shapes. Follow these steps for great results every time. You’re now ready to impress friends and family with your cooking skills!
                      Slow Cooker Chicken Alfredo Pasta Easy and Tasty Meal
                    • - 8 oz linguine pasta - 1 lb large shrimp, peeled and deveined - 4 tablespoons unsalted butter - 4 cloves garlic, minced The base of this dish is simple yet packed with flavor. Linguine pasta gives a nice texture. Shrimp adds a sweet seafood taste. Butter and garlic create a rich, savory sauce. - 1/4 teaspoon red pepper flakes (adjust to taste) - 1 lemon (juice and zest) - 1/4 cup fresh parsley, chopped - Grated Parmesan cheese (for serving, optional) The optional ingredients can elevate your dish. Red pepper flakes add heat. Lemon brightens the flavors. Fresh parsley brings a pop of color and freshness. Parmesan cheese gives a creamy touch when served. - Salt and pepper - Reserved pasta water Salt and pepper enhance the dish's overall taste. Reserved pasta water helps adjust the sauce's thickness. It also adds flavor, making every bite enjoyable. To start, you need to cook the linguine pasta. Boil water in a large pot. Add 8 ounces of linguine and cook as directed on the package. This usually takes about 8 to 10 minutes. You want it to be al dente, which means firm to the bite. After cooking, save 1/2 cup of the pasta water before draining the rest. This water is rich in starch and helps bind the sauce later. Don’t skip this step; it makes a big difference in the dish! While your pasta cooks, it’s time to prepare the shrimp. In a large skillet, heat 2 tablespoons of butter over medium heat. Once melted, add 4 cloves of minced garlic. Cook this for about 30 seconds until it smells great. Next, add 1 pound of peeled and deveined shrimp. Sprinkle some salt, pepper, and 1/4 teaspoon of red pepper flakes for a little kick. Cook the shrimp for 2 to 3 minutes on each side. They will turn pink and opaque when ready. Once done, take the shrimp out and set them aside. Now, let's make the garlic butter sauce. In the same skillet, add the remaining 2 tablespoons of butter. Squeeze in the juice of 1 lemon and add the zest. Stir together and let it simmer for about a minute. Return the shrimp to the skillet and add the drained linguine. Toss everything well, adding the reserved pasta water bit by bit. This helps create the perfect sauce. Finally, stir in 1/4 cup of chopped fresh parsley for color and taste. Adjust seasoning if needed. Serve right away in shallow bowls. Top with extra parsley and grated Parmesan cheese if you like! Achieving Perfectly Cooked Shrimp To cook shrimp well, heat oil in a skillet. Add shrimp in a single layer. Cook until pink for about 2-3 minutes on each side. Don’t crowd the pan. This helps them cook evenly. If they curl too tightly, they may be overcooked. How to Enhance the Garlic Flavor For a stronger garlic taste, use fresh garlic. Mince it finely for better flavor release. Add garlic at the start of cooking for a rich base. If you like more heat, add red pepper flakes when cooking the garlic. This brings out a nice kick. Best Ways to Plate Garlic Butter Shrimp Linguine Serve your dish in shallow bowls. Twirl the linguine for a nice presentation. Top with cooked shrimp and a sprinkle of parsley. Finish with grated Parmesan for a creamy touch. This adds color and taste. Recommended Wine Pairing Pair this dish with a crisp white wine. A Sauvignon Blanc or Pinot Grigio works best. The wine cuts through the butter and enhances the shrimp flavor. How to Prepare in Under 30 Minutes To keep it quick, prep all your ingredients first. Cook the linguine while you prepare the sauce. This makes the dish come together fast. If you multitask, you can easily finish in 20 minutes. Multitasking While Cooking While the pasta cooks, focus on the shrimp. Heat the skillet and start with the garlic. This way, you save time and keep everything fresh. Always keep an eye on the stove to avoid burning. {{image_2}} Alternative Pastas You can use other pastas if you want a change. Try fettuccine, spaghetti, or whole wheat pasta. Each type gives a different texture. Remember to cook them the same way as linguine. Different Protein Options If shrimp isn’t your thing, try chicken or scallops. Both cook quickly and soak up flavor well. Just adjust cooking times to keep them tender. Adding Vegetables Want more color and nutrients? Add fresh spinach or cherry tomatoes. They cook fast and add a nice pop. Toss them in just before serving for a fresh crunch. Spices and Herbs Variations For more spice, add more red pepper flakes or some paprika. Fresh herbs like basil or thyme can also make a big difference. Experiment and find your favorite mix. Gluten-Free Options If you need a gluten-free dish, use gluten-free pasta. Many great options are available. Just check the package for cooking instructions. Vegan Alternatives To make this dish vegan, swap shrimp for chickpeas or tofu. Use vegan butter in place of regular butter. You can also skip the Parmesan or use a vegan cheese. To keep your Garlic Butter Shrimp Linguine fresh, store it right. First, let it cool completely. Then, place it in an airtight container. This helps keep moisture in and air out. For best taste, eat leftovers within three days. Use glass or BPA-free plastic containers. Glass containers work well when reheating. They do not absorb flavors. Choose a size that fits your serving needs. Smaller containers are great for lunch portions. To reheat, add a small splash of water or broth to the pan. This helps keep the dish moist. Heat it over medium heat for about five minutes. Stir often to ensure even heating. Be careful not to overheat the shrimp. They can become tough if cooked too long. Heat just until warm. If using a microwave, heat in short bursts. Stir in between bursts for even heating. Freezing Garlic Butter Shrimp Linguine is not the best idea. The shrimp may lose texture and flavor. However, if you must freeze, do so without the shrimp. To thaw, place the container in the fridge overnight. This keeps the dish safe. Reheat in a pan with a bit of water or broth. Stir gently until heated through. Enjoy your meal just like fresh! It takes about 20 minutes to make Garlic Butter Shrimp Linguine. This includes 10 minutes of prep time and 10 minutes of cooking time. You can enjoy a tasty meal fast! Yes, you can use frozen shrimp. Make sure to thaw them first. To thaw, place the shrimp in a bowl of cold water for about 15-20 minutes. Once thawed, pat them dry before cooking. This helps the shrimp cook evenly and stay juicy. If you don’t have linguine, you can use other types of pasta. Good choices include spaghetti, fettuccine, or even penne. Each type will change the dish's look and feel, but all will taste great with the garlic butter sauce! This blog post shared the essentials for making Garlic Butter Shrimp Linguine. You learned about key ingredients like shrimp, butter, and pasta. I provided step-by-step cooking instructions and handy tips to make this dish shine. Remember, variations and smart storage keep your meal fresh and fun. Whether you're an expert cook or a beginner, this dish is easy to master. Enjoy your delicious meal and impress others with your skills!
                      Garlic Butter Shrimp Linguine Flavorful Yet Simple Dish
                    • For this tasty soup, you need: - 2 cups vegetable broth - 1 can (14 oz) diced tomatoes, with juices - 1 medium onion, diced - 2 cloves garlic, minced - 2 medium carrots, chopped - 2 celery stalks, chopped - 1 zucchini, diced - 1 cup green beans, chopped - 1 cup kidney beans, drained and rinsed - 1 teaspoon dried oregano - 1 teaspoon dried basil - Salt and pepper to taste - 1 cup small pasta (like ditalini or elbow macaroni) - 1 cup fresh spinach, roughly chopped - 2 tablespoons olive oil - Grated Parmesan cheese (optional, for serving) When making minestrone, fresh ingredients often taste better. Fresh veggies add crunch and bright flavors. However, canned items can save time. Use canned tomatoes for easy prep. Just be sure to pick those packed in juice, not syrup. It gives the soup a richer taste. You can add fun toppings to your soup. Grated Parmesan cheese brings a salty kick. A drizzle of olive oil adds richness. For a bit of spice, try red pepper flakes. Fresh herbs, like basil or parsley, also brighten the dish. If you want to make it heartier, add cooked sausage or chicken. Enjoy mixing and matching toppings to suit your taste! To start, gather all your ingredients. This makes cooking easier. First, pour 2 cups of vegetable broth into the slow cooker. Next, add the can of diced tomatoes with the juices. Then, toss in the diced onion, minced garlic, chopped carrots, and celery. These veggies give the soup great flavor. After that, add the diced zucchini, chopped green beans, and kidney beans. Don’t forget to sprinkle in dried oregano, dried basil, salt, and pepper. Drizzle 2 tablespoons of olive oil on top, and mix everything well. You can cook this soup on low or high heat. If you choose low heat, cook it for 6 to 8 hours. This slow method brings out more flavor. If you are short on time, use high heat. This will take about 3 to 4 hours. Both ways will taste delicious! About 30 minutes before you serve the soup, it’s time to add the pasta. Stir in 1 cup of small pasta like ditalini or elbow macaroni. If the soup seems too thick, add more broth. This helps the pasta cook well without sticking. When the pasta is tender, stir in the fresh spinach. Let it wilt for about 5 minutes. This adds color and nutrition to your soup. To make your minestrone extra tasty, use fresh herbs. Add basil and oregano right before serving. This keeps their bright taste. You can also try using homemade vegetable broth. It adds depth and flavor. A splash of lemon juice can brighten the soup, too. One mistake is not seasoning well. Always taste and adjust salt and pepper. Another issue is overcooking the vegetables. Add softer veggies like spinach at the end. This keeps them vibrant and fresh. Lastly, don’t forget to monitor the pasta. It can get mushy if cooked too long. You can change the vegetables based on what you have. Use squash, peas, or corn for variety. If you want more protein, add some lentils or chickpeas. To make it heartier, toss in cooked sausage or chicken. Lastly, try different pasta shapes for a fun twist. {{image_2}} You can change the veggies based on the season. In spring, try adding peas or asparagus. In summer, use bell peppers or corn for a fresh twist. Fall is perfect for squash or pumpkin. In winter, root vegetables like parsnips or turnips add great flavor. This soup is flexible, making it fun to explore new tastes. If you want to make your minestrone more filling, try adding lentils or chickpeas. These options are rich in protein and keep it vegetarian. You can also use vegetable stock instead of chicken broth for a more robust taste. Fresh herbs like basil or parsley can brighten the dish. Just sprinkle them in right before serving. To make this recipe gluten-free, swap out the pasta for gluten-free pasta or zucchini noodles. This keeps the meal light and tasty. If you are going low-carb, you can skip the pasta altogether. Adding more veggies, like cauliflower or mushrooms, gives you that hearty feel without the carbs. This way, you can enjoy a warm bowl of soup that suits your diet. To store leftover minestrone soup, let it cool first. Then, pour the soup into airtight containers. Make sure to leave some space at the top. This lets the soup expand as it freezes. Label the containers with the date. Place them in the fridge for up to four days. When you are ready to eat, reheat the soup on the stove. Pour the soup into a pot. Heat over medium heat, stirring often. If the soup seems thick, add a splash of broth or water. You can also use the microwave. Place the soup in a microwave-safe bowl. Heat it in short bursts, stirring in between. This helps it heat evenly. You can freeze minestrone soup for longer storage. Place it in freezer-safe containers. Make sure to leave space at the top for expansion. The soup can last up to three months in the freezer. When you want to eat it, thaw the soup in the fridge overnight. Then, reheat it as mentioned before. This keeps the flavors fresh and tasty! Yes, you can skip the pasta if you want. The soup still tastes great. You might want to add more beans or veggies for texture. Try using quinoa or rice for a different twist. These options still fit well in the soup. To thicken your minestrone, you have a few choices. First, you can mash some of the beans in the soup. This adds body and creaminess. Another way is to add a little more vegetable broth and let it cook longer. You could also stir in a cornstarch slurry. Mix one tablespoon of cornstarch with two tablespoons of water. Pour it in, and let it cook until thickened. Serve the soup in deep bowls for a cozy feel. I love adding grated Parmesan cheese on top. This adds a rich, salty flavor. Drizzle a bit of olive oil for extra taste. Pair the soup with crusty bread for dipping. It's a warm, filling meal that everyone enjoys. Yes, you can add meat if you like. Cooked chicken, sausage, or ground beef work well. Just add the meat when you add the vegetables. This will give the soup a heartier taste. If you add meat, make sure to adjust the seasoning to keep the flavor balanced. You can make a tasty minestrone in your slow cooker with ease. Remember to choose fresh or canned ingredients wisely for great flavor. Cooking times can change based on low or high heat, so keep an eye on it. Don't forget to customize and store your soup for later. By following these steps and tips, you’ll have a warm, hearty dish ready to enjoy at any time. Enjoy your cooking journey!
                      Slow Cooker Vegetable Minestrone Hearty and Simple Recipe

                    WANT TO SAVE THIS RECIPE?

                    Leave a Reply Cancel reply

                    Your email address will not be published. Required fields are marked *

                    Recipe Rating


                    Indulge in this delicious Sizzling Sausage & Colorful Veggie Sheet Pan Dinner that’s perfect for a quick weeknight meal! Packed with juicy Italian chicken sausages and vibrant veggies like zucchini, bell peppers, and baby potatoes, this one-pan dish is a feast for the eyes and the taste buds. Discover the easy steps to create a mouthwatering dinner that family and friends will love. Click to explore the full recipe now! #SheetPanDinner #HealthyRecipes #OnePanMeals #EasyDinners

                    Hi I’m Taling

                    I love sharing perfected dishes from my kitchen. I’m sure they’ll earn a spot in your heart. Let’s savor this journey together!.

                    More about me

                    Recent Desserts

                    • - 24 Oreo cookies, crushed - ½ cup unsalted butter, melted - 16 oz cream cheese, softened - 1 cup powdered sugar - 1 teaspoon vanilla extract - 1 teaspoon peppermint extract - 1 cup heavy cream - 1 cup crushed peppermint candies (or candy canes) - Whipped cream for topping (optional) - Extra Oreo cookies for garnish (optional) The star of this cheesecake is the Oreo crust. It gives a sweet and crunchy base. The cream cheese filling is rich and creamy. The peppermint flavor brings a fresh twist. You mix the cream cheese with sugar and extracts. Heavy cream makes it light and fluffy. - 9-inch springform pan - Medium mixing bowl - Large mixing bowl - Electric mixer - Spatula - Plastic wrap These tools make your baking easy. The springform pan lets you remove the cheesecake easily. Mixing bowls help you combine your ingredients well. An electric mixer beats the cream cheese smoothly. A spatula ensures you mix well without mess. - Whipped cream - Crushed peppermint candies - Extra Oreo cookies Garnishes add fun and flair to your cheesecake. Whipped cream makes it look fancy. Crushed peppermint candies offer extra flavor. Extra Oreo cookies are perfect for a crunchy topping. You can also use a sprig of mint for color. To start, grab a medium bowl. Combine the crushed Oreo cookies and melted butter. Mix until it looks like wet sand. This will be your base. Next, press the mixture into the bottom of a 9-inch springform pan. Make sure to press down firmly for a sturdy crust. Once done, place the pan in the fridge. Let it chill while you prepare the filling. Now, take a large mixing bowl. Beat the softened cream cheese with an electric mixer. Keep mixing until it is smooth and creamy. Add the powdered sugar, vanilla extract, and peppermint extract. Mix these until they blend well. In another bowl, whip the heavy cream until stiff peaks form. Gently fold this whipped cream into the cream cheese mixture. Be careful not to deflate the whipped cream. Finally, add the crushed peppermint candies and fold them in evenly. Pour the cream cheese filling over the chilled Oreo crust. Use a spatula to spread it out evenly. Cover the cheesecake with plastic wrap. Put it back in the fridge for at least 4 hours, or overnight if you can wait. Once set, remove the cheesecake from the pan. If you like, top it with whipped cream and garnish with extra crushed Oreos or peppermint bits. Enjoy your delicious creation! To get a smooth cream cheese mixture, start with softened cream cheese. Take it out of the fridge 30 minutes before using. This way, it blends easier. Use an electric mixer on medium speed. Beat it until it is creamy and free of lumps. Add the powdered sugar slowly to avoid clumping. Mix until all the ingredients are smooth. To whip cream perfectly, use cold heavy cream. Chill your mixing bowl and beaters in the fridge for 10 minutes. Pour the heavy cream into the cold bowl. Start mixing on low speed, then increase to high. Stop mixing when stiff peaks form. This means the cream holds its shape. Be gentle when folding it into the cream cheese mixture. This keeps the whipped cream fluffy. Refrigerate your cheesecake for at least 4 hours, or overnight if you can wait. This time helps the cheesecake set properly. Cover it with plastic wrap to keep it fresh. Avoid opening the fridge often. Each time you open it, the temperature changes. Once set, remove it from the springform pan carefully. Enjoy your delicious cheesecake! {{image_2}} You can switch up the crust for fun. Use graham crackers for a classic flavor. Or try chocolate cookies for a richer taste. You can also use crushed nuts mixed with butter for a gluten-free option. This adds a nice crunch to every bite. Want to spice things up? Add chopped chocolate or different candies. You can mix in some crushed Oreos for extra texture. Try other extracts like almond or orange for a new twist. Each change can give your cheesecake a fresh taste. Make this cheesecake fit any holiday! For Christmas, add red and green sprinkles on top. For Valentine’s Day, use heart-shaped candies and pink whipped cream. In the summer, mix in fresh strawberries or blueberries. These ideas keep the dessert fun and festive all year long! To store your no bake peppermint Oreo cheesecake, cover it tightly. Use plastic wrap or aluminum foil. A sealed container also works well. Make sure to keep it in the fridge. This keeps it fresh and tasty. You can freeze leftovers for later. First, let the cheesecake chill fully. Then, slice it into pieces. Wrap each piece in plastic wrap and foil. Place the wrapped slices in a freezer-safe bag. They can stay frozen for up to three months. When you're ready to eat, thaw it in the fridge overnight. This cheesecake stays fresh in the fridge for about five days. After that, the taste may change. Always check for any off smells or changes in texture. If it smells funny or looks odd, it's best to toss it. Enjoy your cheesecake while it's fresh! To make this recipe gluten-free, use gluten-free Oreo cookies. Many brands offer gluten-free cookies that taste great. Check the label to ensure they fit your needs. You can still enjoy this delicious cheesecake without gluten. Yes, you can use different types of cream cheese. Neufchâtel cheese is a lighter option. It has less fat but still tastes creamy. You can also use vegan cream cheese for a dairy-free version. Each choice will change the flavor and texture slightly. If you don’t have peppermint extract, use mint extract instead. It has a similar flavor, though it is less sweet. You can also use fresh mint leaves for a natural taste. Just chop them finely and mix them in. You now know how to make a tasty No Bake Peppermint Oreo Cheesecake. We covered the key ingredients, tools, and optional garnishes to make it special. You learned step-by-step instructions for the crust and filling. I shared tips for a smooth mixture and perfect whipped cream. We explored variations to keep things exciting. Lastly, I gave storage tips to keep your cheesecake fresh. Enjoy making this easy dessert that brings a festive touch to any gathering!
                      No Bake Peppermint Oreo Cheesecake Delight Recipe
                    • - 3 ripe bananas, mashed - ½ cup unsalted butter, melted - ¾ cup brown sugar - 1 large egg, beaten - 1 teaspoon vanilla extract - 1 teaspoon baking soda - ¼ teaspoon salt - 1 ½ cups all-purpose flour - ½ cup chocolate chips - ¼ cup chopped walnuts (optional) - ½ teaspoon cinnamon Gather these ingredients before you start baking. Ripe bananas are key for a sweet and moist bread. Their flavor shines through, making it a treat. Melted butter gives a rich taste, while brown sugar adds depth. The egg helps bind everything together. Vanilla extract lifts the flavors, making them bright. Baking soda acts as a leavening agent, giving the bread a nice rise. Salt enhances all the sweetness in the mix. All-purpose flour forms the base of your batter. Chocolate chips add a delightful touch. Choose semi-sweet or dark based on your taste. If you love nuts, walnuts bring a nice crunch and extra flavor. Lastly, a hint of cinnamon can elevate the whole dish. This simple list packs a punch. Each ingredient plays a vital role in creating your bakery-style delight. Happy baking! - Preheat oven to 350°F (175°C). - Grease a 9x5 inch loaf pan. - In a large bowl, combine mashed bananas and melted butter. Mix until smooth. - Add brown sugar, egg, and vanilla extract. Stir well to blend. - Sprinkle in baking soda and salt. Mix gently to combine. - Gradually add flour and cinnamon. Stir just until no dry flour remains. - Carefully fold in chocolate chips and walnuts, if you choose to use them. - Pour the batter into the prepared loaf pan. Smooth the top with a spatula. - Bake for 60-65 minutes. A toothpick should come out clean when done. - Cool the banana bread in the pan for about 10 minutes. Then, transfer it to a wire rack to cool completely. To get that perfect bakery-style texture, start with your ingredients. Use room temperature butter and eggs. This helps your banana bread rise better. Cold ingredients can make the bread dense. Mix your batter gently. Over-mixing can lead to tough bread. Once you add flour, stir just until combined. A few lumps are fine. For a richer taste, try different types of chocolate. Semi-sweet chocolate chips give a classic touch. Dark chocolate adds a deep flavor. You can even mix both! Cinnamon is another great addition. Just half a teaspoon can boost the flavor. It pairs well with bananas and chocolate. When slicing, use a serrated knife for clean cuts. Cut thick pieces for a more rustic look. Serve your banana bread on a nice platter. Dust it with powdered sugar for charm. A dollop of whipped cream or a scoop of vanilla ice cream makes it even better! {{image_2}} If you want a nut-free banana bread, simply skip the walnuts. This keeps your loaf soft and delicious. The texture will still be great without them. You can enjoy the rich chocolate and banana flavor without any crunch. This option is perfect for kids or those with nut allergies. For those needing gluten-free options, use a gluten-free flour blend. Many blends work well in this recipe. Just replace the all-purpose flour with the same amount of gluten-free flour. This allows you to enjoy banana bread without gluten. If you want a vegan version, substitute the egg with a flaxseed egg. To make a flaxseed egg, mix 1 tablespoon of flaxseed meal with 2.5 tablespoons of water. Let it sit for a few minutes until it thickens. You can also use plant-based butter instead of regular butter. This keeps your banana bread tasty and friendly for all diets. You can jazz up your banana bread with dried fruits like raisins or cranberries. These add sweetness and chewiness. Another idea is to mix in spices like nutmeg or allspice for warmth. Just a pinch can change the whole flavor. Get creative and let your taste guide you! To keep your banana bread fresh, wrap it tightly with plastic wrap. This helps prevent it from drying out. You can also place it in an airtight container. Store it at room temperature for up to three days. If you want it to last longer, consider refrigerating it. Just remember that chilling can change the texture a bit. To freeze banana bread, let it cool completely. Then, wrap it in plastic wrap and foil. This extra layer helps keep the bread moist. Place the wrapped bread in a freezer bag. You can freeze it for up to three months. When you’re ready to eat it, take it out and let it thaw at room temperature. For a warm slice, you can pop it in the oven at a low temp for a few minutes. Banana bread can stay fresh at room temperature for about three days. If you keep it in the fridge, it can last up to a week. However, the best taste comes from enjoying it fresh. Always check for signs of spoilage, like a sour smell or mold, before eating. Yes, you can use frozen bananas. They work well in banana bread. When using frozen bananas, let them thaw first. This helps to remove excess water. You can mash them easily once thawed. The flavor stays rich and sweet, just like fresh bananas. To check if your banana bread is done, use a toothpick. Insert the toothpick into the center of the loaf. If it comes out clean, your bread is ready. If there are wet crumbs, bake for a few more minutes. Keep checking until the toothpick is clean. This method works great for all banana breads. Yes, you can replace brown sugar with white sugar. This change will alter the flavor and texture slightly. Brown sugar adds a deeper flavor and moisture. White sugar will make your bread a bit lighter. If you want a more caramel taste, stick with brown sugar. This blog post covered all you need to make perfect banana bread. We looked at essential ingredients, step-by-step instructions, and helpful tips. From mixing to baking, these steps guide you easily. You also learned variations to fit your taste and how to store your creation. Remember, with simple tweaks, you can make it your own. Enjoy every slice of your warm, homemade banana bread. It’s a treat worth sharing! Happy baking!
                      Chocolate Chip Banana Bread Bakery Style Delight
                    • To create the pumpkin cream cheese roll, you'll need these key ingredients: - ¾ cup all-purpose flour - ½ teaspoon baking powder - 1 teaspoon baking soda - 1 teaspoon ground cinnamon - ½ teaspoon ground nutmeg - ¼ teaspoon ground ginger - ¼ teaspoon salt - 1 cup granulated sugar - 3 large eggs - 1 cup canned pumpkin puree - 1 teaspoon vanilla extract - 8 oz cream cheese, softened - ¼ cup unsalted butter, softened - 2 cups powdered sugar - 1 teaspoon vanilla extract (for the frosting) You can add your twist to this recipe with these optional ingredients: - Chopped nuts like walnuts or pecans for crunch - Chocolate chips for a sweet surprise - A splash of maple syrup for added flavor - Cream cheese with herbs for a savory twist If you run out of an ingredient, here are some swaps: - Use whole wheat flour instead of all-purpose flour for a healthier option. - Replace granulated sugar with coconut sugar for a lower glycemic index. - If you have no cream cheese, Greek yogurt can work in a pinch. - Swap eggs with flaxseed meal mixed with water for a vegan option. These ingredients help you make a great pumpkin cream cheese roll. Each option brings its taste and flair to this delightful dessert. First, set your oven to 375°F (190°C). Grab a 15x10-inch jelly roll pan. Line it with parchment paper. Lightly grease the paper with non-stick spray. This helps the cake release easily. In a medium bowl, whisk together flour, baking powder, baking soda, cinnamon, nutmeg, ginger, and salt. Mix well and set the bowl aside. This mix gives the cake its warm fall flavor. In a large bowl, beat the sugar and eggs until light and fluffy. This takes about 3-4 minutes. Next, add the pumpkin puree and 1 teaspoon of vanilla. Mix until everything combines well. Gradually fold in the dry ingredients. Be gentle; don't overmix. Pour the batter into your prepared pan. Spread it evenly with a spatula. Bake for 15 minutes. Check if it's done by lightly pressing the cake. It should spring back. While the cake bakes, prepare the filling. In a medium bowl, beat the softened cream cheese and butter until smooth. Slowly add powdered sugar and 1 teaspoon of vanilla. Mix until creamy and well combined. Once the cake is done, carefully flip it onto a clean kitchen towel dusted with powdered sugar. Remove the parchment paper. Start at one end and gently roll the cake with the towel. Let it cool completely in this rolled shape. After cooling, unroll the cake carefully. Spread the cream cheese filling evenly over the cake. Roll the cake back up without the towel. Keep the seam side down. Wrap it in plastic wrap and chill for at least one hour. When ready, slice the roll into pieces. Dust with more powdered sugar if you like. Serve it on a pretty platter with a sprinkle of cinnamon or fresh mint leaves for a nice touch. Enjoy this delightful fall treat! To keep your pumpkin cream cheese roll from cracking, follow these steps: - Use Parchment Paper: Line your pan with parchment paper. This helps the cake slide out easily. - Cool on a Towel: After baking, flip the cake onto a clean, powdered sugar-dusted towel. This helps keep it moist. - Roll While Warm: Roll the cake while it’s still warm. This makes it flexible and less likely to crack. If cracks do happen, don’t worry! You can hide them with frosting later. The texture of your roll is key for a great dessert. Here’s how to get it right: - Mix Gently: When adding dry ingredients, fold them in slowly. Overmixing makes the cake tough. - Check for Doneness: Bake until the cake springs back. If it’s too soft, it won’t hold its shape. - Cool Completely: Allow the cake to cool fully before adding the cream cheese filling. This prevents melting and sogginess in the filling. These steps ensure your roll is soft and fluffy, just like it should be. Getting your ingredients ready helps your baking go smoothly: - Room Temperature Ingredients: Use eggs and cream cheese at room temperature. This helps them blend better. - Measure Accurately: Use a kitchen scale or measuring cups for precise amounts. Baking is a science. - Sift Dry Ingredients: Sifting the flour and spices removes lumps. It also adds air, which helps the cake rise. Following these tips will help you create a delightful pumpkin cream cheese roll that impresses everyone. {{image_2}} You can make a gluten-free version of this dessert. Replace all-purpose flour with a gluten-free blend. Make sure the blend has a good mix of starches and flours. Use ¾ cup of this mix in place of regular flour. The texture may differ slightly, but it will still taste amazing. To create a vegan pumpkin cream cheese roll, substitute eggs with flaxseed meal. Mix 1 tablespoon of flaxseed meal with 3 tablespoons of water for each egg. Let it sit until it thickens. For the cream cheese filling, use a vegan cream cheese alternative mixed with coconut butter. This gives a rich flavor without dairy. You can add fun flavors to your pumpkin cream cheese roll. For a chocolate twist, stir in ¼ cup of cocoa powder into the batter. This makes a chocolate-pumpkin delight. If you prefer spices, try adding allspice or cardamom. Just a pinch can change the whole vibe of the roll. These variations keep your dessert exciting and unique! Store leftover pumpkin cream cheese roll in the fridge. Wrap it tightly in plastic wrap. This keeps it fresh and moist. You can also place it in an airtight container. It will last for about 3 to 5 days in the fridge. Make sure to slice it before serving. This way, it’s easy to grab a piece whenever you want a tasty treat. You can freeze the pumpkin cream cheese roll for longer storage. To do this, wrap it tightly in plastic wrap. Then, place it in a freezer bag or container. This helps to prevent freezer burn. The roll will stay fresh in the freezer for up to 2 months. When you're ready to enjoy it, just take it out and let it thaw in the fridge overnight. To reheat the pumpkin cream cheese roll, you have a couple of options. For a quick method, slice it and place it in the microwave for about 10-15 seconds. This warms it up nicely without drying it out. If you prefer, you can reheat slices in an oven. Preheat the oven to 350°F (175°C) and place the slices on a baking sheet. Heat for about 5-10 minutes. Enjoy it warm for a cozy fall dessert! Yes, you can use fresh pumpkin. You need to cook and puree it first. Start with about 1 ¼ pounds of fresh pumpkin. Cut it in half, remove the seeds, and roast it until soft. Once cooked, scoop out the flesh and blend until smooth. This gives a fresh taste to your roll. To prevent the roll from breaking, be gentle when rolling it. Use a clean kitchen towel dusted with powdered sugar. After baking, flip the cake onto the towel, remove the parchment, and roll it up while it’s still warm. Allow it to cool in this shape. This helps keep the cake soft and flexible. You can serve it with whipped cream or a scoop of vanilla ice cream. A sprinkle of cinnamon adds warmth and flavor. Some like to pair it with coffee or chai tea. Fresh mint leaves can also add a nice touch and color. The pumpkin cream cheese roll lasts about 3 to 5 days in the fridge. Make sure to wrap it well in plastic wrap. This keeps it fresh and moist. If you want it to last longer, consider freezing it. You learned how to make a great pumpkin cream cheese roll. We covered essential ingredients and tips for the best texture. You can explore variations, like gluten-free or vegan options. Storing leftovers and reheating are easy with the right steps. Remember, practice makes perfect in baking. Embrace your creativity, and enjoy your tasty results. Now, gather your ingredients and start baking!
                      Pumpkin Cream Cheese Roll Delightful Fall Dessert Recipe
                    • - 4 cups Rice Krispies cereal - 3 tablespoons unsalted butter - 1 package (10 oz) mini marshmallows - 1 teaspoon vanilla extract - 1 teaspoon pumpkin pie spice - 1 cup pumpkin puree - Pinch of salt These ingredients create a tasty treat. The Rice Krispies give crunch, while the marshmallows add chewiness. Butter helps everything stick together, and pumpkin puree provides a rich flavor. Vanilla and pumpkin pie spice bring warmth to each bite. - Orange and yellow sprinkles Adding sprinkles makes the treats festive. It is a fun way to enjoy these treats, especially for holidays. You can choose any color you like. Sprinkles add color and a bit of extra sweetness. These treats are not gluten-free due to Rice Krispies, which may contain gluten. To make them gluten-free, look for gluten-free Rice Krispies. They also contain dairy from the butter. For a dairy-free option, try using a plant-based butter. First, grab a large saucepan. Place it on low heat. Add 3 tablespoons of unsalted butter. Watch it melt slowly. Once it melts, toss in the whole package of mini marshmallows. Stir them with a spatula. Keep stirring until they melt and become smooth. This part takes just a few minutes. After melting, take the saucepan off the heat. Now, add 1 teaspoon of vanilla extract. Next, add 1 teaspoon of pumpkin pie spice. Mix these in well until combined. Then, add 1 cup of pumpkin puree. Make sure to stir until there are no lumps. This step makes your treats taste like fall! Gradually, add 4 cups of Rice Krispies cereal. Gently fold it into the mixture. You want every piece coated well. It helps to use a spatula or your hands, lightly greased. Once mixed, line a 9x9 inch baking pan with parchment paper. Pour the mixture into the pan. Press it down firmly with the back of the spatula. You want an even layer. Then, if you like, sprinkle some orange and yellow sprinkles on top. Let the treats cool for at least 30 minutes. After cooling, cut them into squares or rectangles. Enjoy! To make the best Pumpkin Rice Krispie Treats, focus on texture. Start by melting the butter and marshmallows slowly. This keeps them smooth. If you rush, the mix may clump. After melting, mix in the pumpkin puree well. This adds moisture and flavor. If the mixture feels too sticky, add a bit more Rice Krispies. This helps balance the texture. When mixing the Rice Krispies, take your time. Gently fold the cereal into the melted marshmallow mix. Use a rubber spatula to reach all corners. If you use your hands, lightly grease them. This will stop the mix from sticking. Make sure every piece of cereal is coated. This creates a better flavor in each bite. Cutting the treats right takes a little care. Let them cool for at least 30 minutes. This helps them hold their shape. Use a sharp knife for clean edges. Lightly grease the knife to prevent sticking. Cut them into squares or rectangles based on your preference. For a fun touch, top with colorful sprinkles before cutting. Enjoy the fun shapes! {{image_2}} You can add chocolate or peanut butter for a fun twist. Just melt 1 cup of chocolate chips or ½ cup of peanut butter with the marshmallows. Stir them in until smooth. These flavors mix well with pumpkin. The result is a richer treat that kids will love. You can also drizzle melted chocolate on top for extra flair. Adding nuts or seeds boosts texture and flavor. Try ½ cup of chopped pecans or walnuts. You can also use pumpkin seeds for a seasonal touch. Stir them in with the Rice Krispies. This adds crunch and nutrition to your treats. Just be careful if serving to little ones or guests with allergies. You can mix in other flavors to change things up. Consider using 1 teaspoon of cinnamon or maple syrup for a sweet twist. A splash of almond extract can add a nice touch. Experimenting with different flavors keeps it exciting. You might find a new favorite combo that everyone enjoys! You can store your Pumpkin Rice Krispie Treats in an airtight container. Keep them at room temperature for up to three days. If you live in a warm area, consider placing them in the fridge. This keeps them fresh and chewy for longer. To freeze these treats, cut them into squares first. Wrap each square in plastic wrap. Place the wrapped treats in a freezer-safe bag or container. They can last in the freezer for up to two months. When you want to enjoy them, let them thaw at room temperature for about 30 minutes. Always keep your treats sealed tightly to avoid air exposure. This helps prevent them from getting hard or stale. If they start to lose their softness, you can microwave them for a few seconds to regain some chewiness. Enjoy your treats while they are fresh for the best taste! Yes, you can use homemade marshmallows. They add a unique touch. Just make sure they are soft and fluffy. Melt them the same way as the store-bought ones. This will create a nice, gooey base for your treats. To make these treats vegan, swap out the butter for coconut oil or vegan butter. Use vegan marshmallows instead of regular ones. These changes keep the flavor and texture while being plant-based. Enjoy your vegan Pumpkin Rice Krispie Treats just as much! If you need a substitute for Rice Krispies, try using puffed rice or cornflakes. You can even use crispy rice cereal made from brown rice for a healthier option. The key is to keep the texture light and crunchy. This way, your treats will still turn out delicious! In this article, you learned how to make delicious Pumpkin Rice Krispie Treats. We covered key ingredients, step-by-step instructions, and tips for perfect treats. You can mix in flavors like chocolate or nuts and store your treats fresh. Keep these ideas in mind when you create your own treats. Enjoy your fun, tasty snacks!
                      Pumpkin Rice Krispie Treats Simple and Tasty Recipe

                    Recent Drinks

                    • To make Pumpkin Spice White Hot Chocolate, you need simple and tasty ingredients. Each one adds a special touch to this cozy drink. Here’s what you’ll need: - 2 cups whole milk - 1 cup heavy cream - 1 cup white chocolate chips - ½ cup pumpkin puree - 1 teaspoon vanilla extract - 1 teaspoon pumpkin spice mix - A pinch of salt - Whipped cream, for topping - Ground cinnamon or extra pumpkin spice, for garnish Whole milk and heavy cream make the drink rich and creamy. White chocolate chips melt into a sweet base. Pumpkin puree gives it a warm flavor. Vanilla extract adds a lovely aroma. Pumpkin spice mix brings in classic fall flavors. Just a pinch of salt enhances all the tastes. Lastly, whipped cream and a sprinkle of cinnamon or pumpkin spice make it pretty. Once you gather these ingredients, you’re ready to create a delicious drink that warms your heart. You can enjoy it alone or share it with friends and family. Each sip will remind you of cozy fall days. Making Pumpkin Spice White Hot Chocolate is easy and fun. Gather all your ingredients first. You will need whole milk, heavy cream, white chocolate chips, pumpkin puree, vanilla extract, pumpkin spice mix, a pinch of salt, whipped cream, and ground cinnamon or extra pumpkin spice for garnish. This recipe takes about 10 minutes to prep and 15 minutes in total. You can serve four people, so share it with friends or family! Start by pouring 2 cups of whole milk and 1 cup of heavy cream into a medium saucepan. Set your stove to medium heat. Stir the mixture gently. Heat it until it feels warm but do not let it boil. This step is important because boiling can change the texture. Once your milk and cream are warm, add 1 cup of white chocolate chips. Use a whisk and stir continuously. This will help the chocolate melt evenly into the milk. Keep whisking until the mixture is smooth and creamy. Next, stir in ½ cup of pumpkin puree, 1 teaspoon of vanilla extract, 1 teaspoon of pumpkin spice mix, and a pinch of salt. Make sure everything blends well. Once it's creamy and heated, remove the saucepan from the heat. Now, pour your hot chocolate into mugs. Top each serving with whipped cream. Finish by sprinkling ground cinnamon or extra pumpkin spice on top. Enjoy your delicious drink! To make your Pumpkin Spice White Hot Chocolate super creamy, use whole milk and heavy cream. These two ingredients work great together. They add richness that makes each sip feel like a warm hug. Heat them gently in a saucepan, but don’t let them boil. Boiling can change the texture and make it less smooth. Stir often to keep the mixture even and creamy. Everyone has different tastes. If you like your drink sweeter, add more white chocolate chips. Start with an extra tablespoon, then taste it. If it needs more, keep adding a little at a time. For those who prefer less sweetness, cut back on the white chocolate. You can also use less pumpkin puree. This will keep the flavor strong but make it less sweet. Whipped cream makes this drink even better! To get the best whipped cream, use heavy cream. Beat it until it forms stiff peaks. This means it should hold its shape well. You can add a bit of sugar or vanilla for extra flavor. Once your hot chocolate is in the mug, top it with a big scoop of whipped cream. Don’t forget to sprinkle a bit of ground cinnamon or pumpkin spice on top. This adds a nice touch and enhances the fall flavors. {{image_2}} If you want a dairy-free option, try using almond milk or oat milk. These milks create a creamy base without dairy. You can also swap out the heavy cream for coconut cream. It adds richness and a light coconut flavor. For the white chocolate, look for dairy-free chips. They melt well and keep the sweet taste. You can mix in some maple syrup for extra sweetness. It adds a nice fall flavor. Want a little heat? Add a pinch of cayenne pepper or a dash of chili powder. It gives a fun kick to your drink. You can also stir in some caramel sauce for a sweet twist. A splash of flavored extracts, like hazelnut or almond, can also elevate the taste. This drink is perfect for fall gatherings. Serve it at Halloween parties in cute mugs. You can even top it with marshmallows for a fun touch. For Thanksgiving, offer it as a warm drink option. Add a sprinkle of nutmeg on top for a festive look. You can create a hot chocolate bar with toppings like crushed cookies or chocolate shavings. This way, everyone can customize their own cup. You can store leftover Pumpkin Spice White Hot Chocolate in an airtight container. Let it cool first. Then, place it in the fridge. This keeps it fresh for later. To reheat, pour the hot chocolate into a saucepan. Heat over low heat. Stir it gently to avoid burning. You can also use the microwave. Heat it in short bursts. Stir in between to ensure even warming. Stored correctly, this treat lasts about three days in the fridge. For best taste, consume it within this time. If you see any changes in texture or smell, toss it out. Always trust your senses! Yes, you can make this drink vegan. Use almond milk or oat milk instead of whole milk and heavy cream. Replace white chocolate chips with dairy-free options. Pumpkin puree fits well in vegan recipes. If you can't find pumpkin puree, use butternut squash puree or sweet potato puree. Both options give a similar flavor and texture. You may also blend cooked pumpkin for a fresh taste. To add more spice, increase the pumpkin spice mix to two teaspoons. You can also add a pinch of cayenne pepper or more cinnamon for an extra kick. Adjust to your taste! Absolutely! Almond milk, soy milk, or coconut milk all work well. Choose a creamy milk alternative to maintain a rich texture. Just ensure it is unsweetened for better flavor balance. For garnishes, whipped cream is a must. You can sprinkle ground cinnamon or extra pumpkin spice on top. Chocolate shavings or caramel drizzle can add a fun twist. Enjoy your tasty drink! This blog post detailed how to make a delicious Pumpkin Spice White Hot Chocolate. We covered essential ingredients, simple steps, and helpful tips. You learned how to achieve creamy texture and customize sweetness. We shared dairy-free ideas and perfect serving suggestions for seasonal gatherings. In closing, enjoy crafting this cozy drink at home. It’s perfect for chilly days and gatherings. Your taste buds will thank you!
                      Pumpkin Spice White Hot Chocolate Creamy Delight
                    • To make Pumpkin Spice Whipped Coffee, gather these ingredients: - 2 tablespoons instant coffee - 2 tablespoons sugar - 2 tablespoons hot water - ¼ cup milk (dairy or non-dairy) - ¼ teaspoon pumpkin spice (plus extra for garnish) - 1 tablespoon pumpkin puree - Whipped cream (optional, for topping) Having the right ingredients makes your coffee special. I love how these simple items blend to create a delightful drink. You can add fun toppings to your whipped coffee. Some great options include: - Whipped cream - Extra pumpkin spice - Chocolate shavings - Caramel drizzle Toppings add flavor and make your drink look fancy. I recommend using whipped cream and a sprinkle of pumpkin spice for a festive touch. If you want to switch things up, here are some easy swaps: - Use brown sugar instead of white sugar for a richer flavor. - Coconut milk or almond milk work well if you’re avoiding dairy. - Try cinnamon instead of pumpkin spice for a different taste. These substitutions let you customize the drink to your taste. Enjoy experimenting with flavors! To make pumpkin spice whipped coffee, gather your ingredients first. This simple recipe takes just ten minutes. You'll enjoy a delightful coffee treat with warm pumpkin flavors. 1. In a medium bowl, combine: - 2 tablespoons instant coffee - 2 tablespoons sugar - 2 tablespoons hot water Mix these together well. 2. Use an electric mixer or a whisk. Beat the mixture on high speed. This should take about 2-4 minutes. You want it light and fluffy, like whipped cream. 3. In a separate container, heat: - ¼ cup milk (dairy or non-dairy) Heat until steaming but not boiling. If using non-dairy milk, ensure it’s frothy. 4. Stir in: - ¼ teaspoon pumpkin spice - 1 tablespoon pumpkin puree Mix these into the heated milk until fully combined. 5. In a glass, pour in the pumpkin mixture first. Next, add the whipped coffee on top. 6. You can gently fold the whipped coffee into the pumpkin milk for a marbled look. Or, leave it layered for a pretty presentation. 7. If you'd like, top with whipped cream. Sprinkle a pinch of pumpkin spice for an extra festive touch. Enjoy your pumpkin spice whipped coffee warm. It makes a perfect fall treat. Pair it with a slice of pumpkin bread or a cozy blanket. Share it with friends for a delightful coffee break! To make your whipped coffee fluffy, use instant coffee. Mix it with sugar and hot water. Beat the mix on high speed for about 2-4 minutes. You want it to look light and airy. If you don’t have an electric mixer, a whisk works too, but it takes longer. Aim for stiff peaks, like whipped cream. To boost the taste, use fresh pumpkin spice. Add a touch more if you like spice. Pumpkin puree also helps bring out the pumpkin flavor. If you want it sweeter, add extra sugar to taste. Heating the milk until it's steaming helps mix the spices well, making each sip flavorful. Don’t skip the instant coffee. Regular coffee won’t whip up like instant. Avoid using cold milk, as it won’t blend well. If you overbeat the coffee mix, it can become grainy. Also, don’t forget to garnish. A sprinkle of pumpkin spice on top makes it look pretty and adds flavor. {{image_2}} You can change the flavor of your Pumpkin Spice Whipped Coffee by adding new ingredients. Here are some fun ideas: - Vanilla Extract: A splash of vanilla adds warmth. - Cocoa Powder: Mix in cocoa for a chocolate twist. - Caramel Sauce: Drizzle caramel for extra sweetness and richness. - Nutmeg or Cinnamon: These spices can deepen the fall flavor. Each add-in creates a unique drink. Feel free to experiment! You can adjust the sweetness to fit your taste. The basic recipe calls for two tablespoons of sugar. Here are some tips: - Less Sweet: Start with one tablespoon of sugar. - More Sweet: Add up to three tablespoons if you like it sweeter. - Natural Sweeteners: Try honey, maple syrup, or agave for a different flavor. Taste as you mix. Make it just right for you! You can make this drink dairy-free and vegan easily. Here are some options: - Milk Choices: Use almond milk, oat milk, or coconut milk instead of dairy milk. - Whipped Topping: Look for dairy-free whipped cream at the store. - Sugar Substitutes: Use coconut sugar or maple syrup if preferred. These swaps will keep the drink delicious and suitable for all diets. Enjoy your tasty Pumpkin Spice Whipped Coffee! To store any leftovers, place them in a sealed container. You can keep it in the fridge for up to two days. If you want to enjoy it later, make sure to store the whipped coffee and pumpkin milk separately. This helps keep each part fresh. When you're ready to enjoy your coffee again, heat the pumpkin milk gently. Use a microwave or a small pot on low heat. Stir it well to mix any settled pumpkin spice. Avoid boiling the milk, as it can change the taste. For the best taste, drink your Pumpkin Spice Whipped Coffee fresh. If you have leftovers, consume them within two days. Make sure to seal the container tightly. This keeps out air and other smells, helping preserve its yummy flavor. Yes, you can use brewed coffee instead. Just make a strong cup. Use about ½ cup of brewed coffee in place of the instant coffee. It may not whip up as fluffy, but it will still taste great. You can prepare the whipped coffee and pumpkin milk separately. Store them in airtight containers in the fridge. When you're ready to enjoy, combine them and serve cold or heat the milk. This way, you save time on busy mornings. The best milk depends on your taste. Dairy milk gives a rich flavor. Almond milk or oat milk works well too for a lighter taste. Choose what fits your diet and enjoy it! This blog post outlined the key ingredients and steps for making Pumpkin Spice Whipped Coffee. You learned about optional toppings, ingredient swaps, and how to perfect the whipped texture. There are tips to enhance flavor and avoid common mistakes. You can customize flavors and ensure the drink fits your diet. Lastly, I shared how to store leftovers and answer common questions. With this knowledge, you can enjoy a sweet, creamy treat. Get creative and make it your own!
                      Pumpkin Spice Whipped Coffee Delightful Fall Treat
                    • - 1 ripe banana - 2 tablespoons natural peanut butter - 1 cup unsweetened almond milk (or any milk of choice) - 1 scoop vanilla protein powder (plant-based or whey) - 1 tablespoon chia seeds - 1 teaspoon honey (optional for sweetness) - A pinch of cinnamon - Ice cubes (optional, for a thicker texture) Gather these simple items before you start. A ripe banana gives natural sweetness and creaminess. Use two tablespoons of natural peanut butter for a rich flavor. Almond milk is my go-to, but any milk you love works great. The protein powder adds a boost of nutrition. Choose vanilla to match the banana. Chia seeds are tiny but mighty. They add fiber and help keep you full. If you like it sweeter, add honey, but it’s not a must. A pinch of cinnamon brings warmth and depth to this drink. For a thicker texture, toss in some ice cubes. This smoothie is flexible, so feel free to mix and match based on your taste. Now, let's blend it all together! 1. Start by peeling the ripe banana. Break it into small chunks. 2. In a blender, combine the banana chunks, natural peanut butter, almond milk, protein powder, chia seeds, and a pinch of cinnamon. 3. If you like a colder and thicker smoothie, add some ice cubes. 1. Blend all the ingredients on high speed. Keep blending until you have a smooth and creamy mix. 2. Stop the blender and taste your smoothie. If you want it sweeter, add honey. Blend again for a few seconds to mix. 1. Pour the smoothie into a tall glass. Enjoy it right away for the best taste and creaminess. 2. For a fun twist, you can top it with extra chia seeds or banana slices. This makes it look pretty too! To get the perfect texture, use a ripe banana. A ripe banana makes the smoothie creamy. Add ice cubes if you want it thicker. If you prefer a smoother drink, blend longer. Scrape the sides of the blender to mix all the ingredients well. This ensures a silky-smooth result. If your smoothie tastes too bland, add honey or more banana. Start with a teaspoon of honey. Blend and taste again. You can always add more honey if needed. This way, you control the sweetness to match your taste. Remember, ripe bananas also add natural sweetness. Use a high-speed blender for the best results. A strong blender breaks down the ingredients quickly. If you have a less powerful blender, blend in stages. Start with the liquids first, then add the solids. This helps everything mix better. Make sure your blender is clean for the best flavor. {{image_2}} You can switch the peanut butter for other nut butters. Almond butter offers a nutty taste. Cashew butter is creamy and sweet. Sunflower seed butter is a great choice for allergies. Each nut butter brings its own flavor and health benefits. Experiment to find your favorite. You can add many fruits to the smoothie. Frozen berries add sweetness and color. Spinach or kale boosts nutrition without changing the taste. Try mango for a tropical twist. Each fruit adds vitamins and makes the smoothie fun. Mix and match to discover new flavors. Choosing the right protein powder is key. Plant-based powders are great for vegan diets. Whey protein is popular for muscle recovery. Look for flavors that match your taste, like chocolate or vanilla. The right powder can enhance the smoothie’s flavor and nutrition. Test different types to see what you prefer. Store any leftover smoothie in an airtight container. You want to keep it fresh. Place it in the fridge right after making it. It will stay good for about one day. When you are ready to drink it again, shake or stir well. This helps mix any settled ingredients. You can freeze your smoothie for later. Pour it into ice cube trays or freezer-safe bags. This way, you can grab a portion whenever you want. To use, thaw the smoothie overnight in the fridge. You can also blend it again for a fresh taste. In the fridge, your smoothie lasts about 24 hours. In the freezer, it can last up to three months. Just remember, the sooner you drink it, the better the taste and texture will be! Yes, this smoothie is gluten-free. All the ingredients listed are naturally free from gluten. The peanut butter, banana, almond milk, protein powder, chia seeds, and honey do not contain gluten. Always check labels if you use store-bought items to confirm they are gluten-free. Absolutely! To make this smoothie vegan, simply use plant-based protein powder. Ensure your peanut butter is also free from animal products. Replace honey with maple syrup or agave nectar for sweetness. All other ingredients are already vegan-friendly. This smoothie offers many health benefits. It provides protein from the peanut butter and protein powder, which helps build muscle. Bananas add potassium, good for heart health. Chia seeds are packed with fiber, aiding digestion. Almond milk is low in calories and rich in vitamins. Yes, you can use various milk types. Cow’s milk will add creaminess and protein. Soy milk is a great option for extra protein. Coconut milk gives a tropical flavor. Each milk option changes the taste and texture slightly, so choose what you enjoy best. This smoothie recipe combines simple ingredients for great taste and nutrition. You learned step-by-step how to prepare it and tips for perfect texture. Variations let you customize your drink to fit your taste. Remember to store leftovers properly for later enjoyment. Smoothies can be healthy and fun. Try new mixtures to find what you love best. Keep experimenting and enjoy your delicious creations!
                      Peanut Butter Banana Protein Smoothie Easy Recipe
                    • To make a delicious Turmeric Golden Milk Latte, gather these simple ingredients: - 2 cups almond milk (or your preferred milk) - 1 teaspoon ground turmeric - ½ teaspoon ground ginger - ¼ teaspoon cinnamon - 1 tablespoon honey or maple syrup (adjust to taste) - Pinch of black pepper - ½ teaspoon vanilla extract - Optional: a sprinkle of nutmeg for garnish - Almond Milk: This milk is low in calories and rich in vitamins. It helps with heart health. - Turmeric: This spice has curcumin, known for its anti-inflammatory properties. It may help improve brain function. - Ginger: Ginger can help with digestion and nausea. It adds a nice warmth to the drink. - Cinnamon: This spice is rich in antioxidants. It may help lower blood sugar and improve heart health. - Honey or Maple Syrup: Both sweeteners can boost energy. They also provide antioxidants. - Black Pepper: This spice enhances turmeric absorption. It makes the drink more effective. - Vanilla Extract: It adds flavor and can help reduce stress. - Nutmeg: This spice is optional, but it adds warmth and a nice aroma. - Milk Options: You can use oat milk, soy milk, or coconut milk for different flavors. - Sweeteners: If you prefer, try agave syrup or stevia as sugar-free options. - Spices: Experiment with cardamom or cloves for added flavor. - Nutmeg: You can skip it if you don't like nutmeg, or use a touch of cocoa powder instead. 1. Start by taking a small saucepan. 2. Add 2 cups of almond milk to the pan. 3. Measure and add 1 teaspoon of ground turmeric. 4. Next, add ½ teaspoon of ground ginger. 5. Sprinkle in ¼ teaspoon of cinnamon. 6. Sweeten your drink with 1 tablespoon of honey or maple syrup. 7. Don't forget a pinch of black pepper for better absorption of turmeric. 8. Lastly, add ½ teaspoon of vanilla extract. 9. Whisk all the ingredients well in the pan. 10. Place the saucepan on medium heat. 11. Gently warm the mixture while stirring often. 12. Keep an eye on it; do not let it boil. 13. After about 5-7 minutes, it should be hot enough. 14. Remove the pan from heat and let it cool slightly. 15. If you want a frothy drink, use a milk frother or whisk it quickly. 16. Pour the golden milk into your favorite mugs. 17. Optionally, sprinkle a bit of nutmeg on top for a nice touch. 18. Serve warm and enjoy this comforting drink! - Always use a whisk to blend the spices into the milk. - Whisking helps mix the turmeric and other spices evenly. - When heating, keep the heat low to avoid scalding the milk. - Stir often to prevent sticking at the bottom of the pan. - If you see steam but no bubbles, you are at the right temperature. - A milk frother works wonders for a smooth, frothy finish. - If you don’t have a frother, whisk vigorously by hand. - Frothing adds air, giving the latte a creamy feel. - The more you froth, the lighter and fluffier your drink will become. - For an extra touch, froth some almond milk separately and top your latte with it. You can mix spices to make your turmeric latte tastier. Try adding a pinch of nutmeg or a dash of cardamom. These spices add warmth to the drink. You can also use fresh ginger instead of ground ginger. This will give your latte a bright, zesty kick. Just remember, fresh ginger may need more time to steep. Many people rush the heating process. Always warm your milk slowly over medium heat. If you boil it, the spices can lose flavor. Another mistake is not blending the spices well. Make sure to whisk the mixture thoroughly. This helps avoid clumps of turmeric or ginger. Lastly, avoid skipping the black pepper. It helps your body absorb turmeric better. Sweetness is personal. Start with one tablespoon of honey or maple syrup. Taste your latte and add more if you like it sweeter. For creaminess, use full-fat coconut milk for a richer feel. Almond milk is lighter but still delicious. You can also mix almond and coconut milk for the best of both worlds. {{image_2}} You can easily make this latte vegan. Just use almond milk, coconut milk, or oat milk. These milks work great in this recipe. They keep the drink creamy and delicious. If you want a nut-free option, oat milk is the best choice. It blends well with turmeric and spices. To make an iced version, start with brewed turmeric milk. Follow the same steps but let it cool. Pour over ice instead of serving warm. This drink is refreshing on hot days. You can also add some ice cream for a treat! You can mix and match flavors for fun. Try adding matcha for a green twist. This adds a fresh taste and boosts energy. You can also use cocoa for a chocolatey version. The cocoa pairs well with turmeric and spices. For a special touch, add a dash of vanilla extract. This enhances the overall flavor and aroma. To store leftover turmeric golden milk, let it cool first. Then, pour it into an airtight container. Keep it in the fridge for up to three days. This way, you can enjoy the drink again without losing its flavor. When reheating your golden milk, do it gently. Pour it into a small saucepan. Heat it over low to medium heat. Stir it often to avoid burning. Never let it boil, as this can change the taste and texture. You can also use a microwave. Heat in short bursts, stirring in between. Turmeric golden milk lasts about three days in the fridge. Check for signs of spoilage. If it smells sour or has any mold, discard it. Always trust your senses. If it looks or smells off, it’s best to throw it away. Turmeric has many health benefits. It is known for its bright yellow color and active compound called curcumin. Curcumin may help reduce inflammation. It can also support joint health. Some studies suggest it may boost your mood. Turmeric might even help with digestion. Drinking turmeric may also support your immune system. Yes, you can use any milk you like. Almond milk is great, but coconut milk adds creaminess. Oat milk is a good choice for a thicker texture. If you prefer dairy, whole or skim milk works too. Just remember, different types of milk will change the flavor a bit. To make this recipe sugar-free, skip the honey or maple syrup. You can use a sugar substitute like stevia or monk fruit instead. These options will give you sweetness without the calories. Just adjust the amount to your taste. Yes, it is safe for most people to have turmeric daily. Using it in cooking or drinks is a great way to enjoy its benefits. However, if you have health issues or take certain medications, check with a doctor first. Moderation is key, as with any food. In this blog post, we explored the ingredients and health benefits of Turmeric Golden Milk. I shared step-by-step instructions for making it frothy and delicious. We also discovered tips, tricks, and variations to enhance your drink. Proper storage and reheating advice can help you enjoy leftovers. Remember, turmeric offers many health benefits, so enjoy this drink often. Use alternative ingredients if you prefer. With these ideas, you can create the perfect golden milk to suit your taste and health needs. Enjoy your journey to wellness!
                      Turmeric Golden Milk Latte Simple and Creamy Recipe

                    Footer

                    Indulge in this delicious Sizzling Sausage & Colorful Veggie Sheet Pan Dinner that’s perfect for a quick weeknight meal! Packed with juicy Italian chicken sausages and vibrant veggies like zucchini, bell peppers, and baby potatoes, this one-pan dish is a feast for the eyes and the taste buds. Discover the easy steps to create a mouthwatering dinner that family and friends will love. Click to explore the full recipe now! #SheetPanDinner #HealthyRecipes #OnePanMeals #EasyDinners
                    ↑ back to top

                    More information

                    • Drinks
                    • Appetizer
                    • Dinner
                    • Desserts
                    • About
                    • Contact
                    • Privacy Policy

                    Our Policies

                    • Privacy Policy
                    • GDPR Policy
                    • Terms Of Use
                    • Copyright Policy
                    • Cookie Policy
                    • Disclaimer

                    Copyright © 2025 cheftaling