Looking for a simple yet flavor-packed meal? This Satisfying Slow Cooker Lamb Curry is here to save your dinner time. Using tender lamb shoulder, aromatic spices, and fresh veggies, this dish is a hug in a bowl. I’ll guide you through easy steps to create a meal that your whole family will enjoy. Ready to get started? Let’s dive into the ingredients and make magic happen in your slow cooker!
Why I Love This Recipe
- Flavorful Depth: This slow cooker lamb curry is packed with rich spices and creamy coconut milk, creating a dish that bursts with flavor.
- Hands-Free Cooking: Simply sear the lamb and toss everything into the slow cooker—it does all the work for you while you enjoy your day.
- Perfect for Meal Prep: Make a big batch and enjoy leftovers throughout the week, making lunch and dinner planning a breeze.
- Customizable Ingredients: This recipe allows for flexibility with vegetables and spices, so you can tailor it to your taste preferences easily.
Ingredients
Main Ingredients for Slow Cooker Lamb Curry
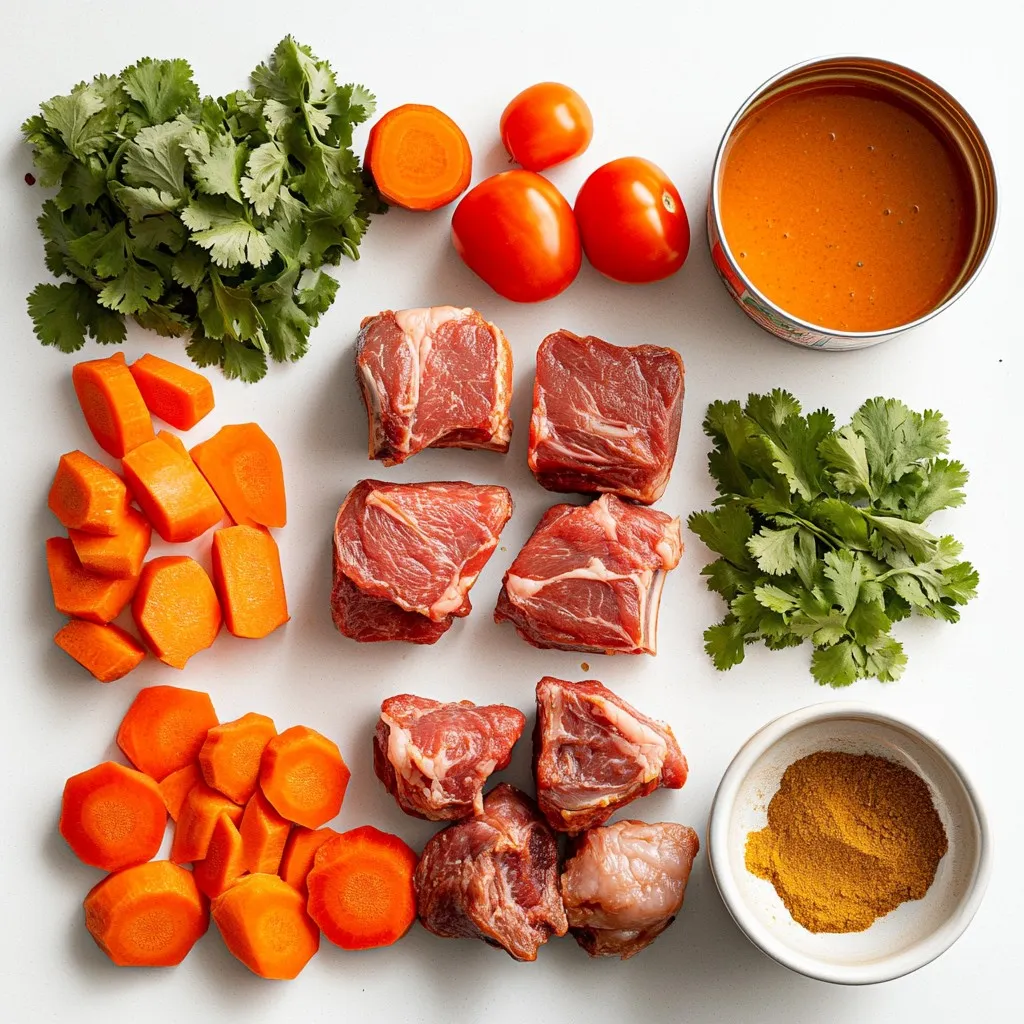
- 2 lbs lamb shoulder, cut into bite-sized pieces
- 2 tablespoons vegetable oil
- 1 large onion, finely chopped
- 4 garlic cloves, minced
- 1 tablespoon fresh ginger, grated
Lamb shoulder is the star of this dish. It becomes tender and full of flavor as it cooks. I use vegetable oil to sear the lamb. This step gives it a nice brown color. Onions, garlic, and ginger add a great depth of taste. They create a base that makes your curry rich and aromatic.
Spices and Seasoning
- 2 tablespoons curry powder
- 1 tablespoon ground cumin
- 1 teaspoon ground coriander
- 1 teaspoon turmeric
- Salt and pepper
Spices are key to a great curry. I love using curry powder, cumin, coriander, and turmeric. They blend well together and give the dish its warm color and taste. Salt and pepper enhance all these flavors.
Additional Ingredients
- 1 can (14 oz) coconut milk
- 1 cup vegetable broth
- 1 can (14 oz) diced tomatoes
- 2 medium carrots, sliced
- 1 red bell pepper, diced
- 1 cup frozen peas
- Fresh cilantro, chopped for garnish
Coconut milk makes the curry creamy and dreamy. Vegetable broth adds more flavor. Diced tomatoes give a nice tang. Carrots and red bell peppers add crunch and color. Frozen peas are added for sweetness. Finally, fresh cilantro is perfect for garnish, adding brightness to your dish.
Step-by-Step Instructions
Preparing the Lamb
To start, I heat 2 tablespoons of vegetable oil in a large skillet. I use medium-high heat for this. Then, I add 2 pounds of lamb shoulder, cut into bite-sized pieces. I sear the lamb until it is browned on all sides. This step adds great flavor. Once browned, I remove the lamb from the skillet and set it aside.
Sautéing Aromatics and Spices
Next, I keep the same skillet for the next step. I add 1 large finely chopped onion, 4 minced garlic cloves, and 1 tablespoon of grated fresh ginger. I sauté these until the onion is soft and translucent, which takes about 5 minutes. After that, I stir in 2 tablespoons of curry powder, 1 tablespoon of ground cumin, 1 teaspoon of ground coriander, and 1 teaspoon of turmeric. I let the spices cook for another 1-2 minutes until they smell great.
Combining Ingredients in the Slow Cooker
Now, I transfer the sautéed onion and spice mix to the slow cooker. I add the seared lamb back in. Next, I pour in 1 can of coconut milk, 1 cup of vegetable broth, and 1 can of diced tomatoes. I stir everything together well. Then, I add 2 medium sliced carrots and 1 diced red bell pepper. I season the mix with salt and pepper to taste.
Cooking Process
I cover the slow cooker and set it to cook. I can choose to cook on low for 8 hours or high for 4 hours. I prefer low heat for tender lamb. In the last 30 minutes of cooking, I stir in 1 cup of frozen peas. This adds color and sweetness. Before serving, I garnish the curry with fresh chopped cilantro.
Tips & Tricks
Selecting the Right Cut of Lamb
For the best slow cooker lamb curry, I recommend using lamb shoulder. This cut has great flavor and tenderness when cooked slowly. It breaks down well, making it perfect for a curry. Lamb leg is another option, but it can be a bit leaner.
When considering price, lamb shoulder is often more affordable than leg. Check local markets and sales for the best deals. Sometimes, buying in bulk can save money too.
Enhancing Flavor
To make your curry even tastier, adjust the seasoning based on your taste. You can add more salt or pepper if needed. I love using fresh herbs, like cilantro, to brighten the dish.
For spices, try mixing curry powder with garam masala for an extra kick. You can also add a pinch of cinnamon for warmth. Don’t forget to taste as you go. This helps you find the perfect balance.
Serving Suggestions
Serve your slow cooker lamb curry over fluffy basmati rice. The rice soaks up the sauce and adds a nice texture. You can also use naan bread to scoop up the curry.
For a beautiful presentation, garnish with fresh cilantro and a sprinkle of chili flakes. This adds color and a hint of heat. It makes your dish look as good as it tastes!
Pro Tips
- Marinate the Lamb: For deeper flavor, marinate the lamb in yogurt and spices for a few hours or overnight before cooking.
- Layer the Flavors: Searing the meat and sautéing the aromatics first helps build a richer, more complex flavor in the curry.
- Customize the Vegetables: Feel free to add or substitute vegetables like potatoes or green beans based on your preference or what you have on hand.
- Serve with Accompaniments: Pair the curry with naan bread or a side of yogurt to balance the spices and enhance the meal.
Variations
Different Protein Options
You can switch up the protein in this curry. If you want to use beef or chicken, they work well with the same spices. Beef adds a rich flavor, while chicken offers a lighter taste. For a vegetarian twist, you can try chickpeas or lentils. They will soak up the curry flavors nicely.
Spice Level Adjustments
Do you like your curry mild or spicy? If you want a mild lamb curry, use less curry powder and skip hot peppers. For a spicy kick, add chili flakes or fresh chilies. You can also add a bit of cayenne pepper for extra heat. Adjust to your taste for the perfect balance.
Culinary Inspirations
Curry has many regional styles. Indian curries often use yogurt and fresh herbs, while Thai curries may include lime leaves and basil. You can even make fusion dishes by adding ingredients like peanut butter for a Thai twist. Explore different spices to create your own unique flavor profile.
Storage Info
Storing Leftovers
After enjoying your meal, let the leftovers cool. Place them in airtight containers. This keeps them fresh and safe. Glass or plastic containers work well. Label them with the date so you remember when you stored them.
Freezing Slow Cooker Lamb Curry
To freeze your curry, let it cool completely. Transfer it to freezer-safe containers. Leave some space at the top, as it will expand. You can also use freezer bags. When ready to eat, thaw it in the fridge overnight. Reheat it on the stove until hot. For best taste, add a splash of coconut milk while reheating.
Shelf Life
In the fridge, your lamb curry lasts about 3 to 4 days. If frozen, it can last up to 3 months. Always check for signs of spoilage before eating. If you see any strange colors or smell anything off, toss it away. Safe food means tasty food!
FAQs
Can I skip searing the lamb?
You can skip searing the lamb, but it has pros and cons. Searing gives the meat a rich, deep flavor and nice color. It also adds texture. If you skip it, your curry may be less rich but still tasty. For busy days, just add the raw lamb straight to the slow cooker.
What can I serve with lamb curry?
You can serve lamb curry with rice or bread. Basmati rice is a classic choice. Naan or roti adds a nice touch too. For a fresh side, try a simple salad. You can also serve yogurt or chutney for added flavor. These pairings balance the curry's richness and spice.
How long should I cook the lamb in the slow cooker?
Cook the lamb on low for 8 hours or on high for 4 hours. The lamb should be tender and fall apart easily. If you're short on time, use the high setting. Just be sure to check the lamb's doneness.
Can I use frozen vegetables instead of fresh?
Yes, you can use frozen vegetables in your curry. They save time and add nutrition. Just add them in the last 30 minutes of cooking. This keeps them bright and slightly crisp. Make sure to adjust the seasoning, as frozen veggies can be less flavorful.
This blog post covers the essentials for making slow cooker lamb curry. You learned about the key ingredients, spices, and step-by-step instructions to create a flavorful dish. I shared tips for selecting the right lamb and adjusting flavors. You also found different variations to suit your taste and storage tips for leftovers.
Slow cooker lamb curry is a delicious, versatile meal. It’s easy to make and perfect for sharing. With a few simple steps, you can enjoy this hearty dish anytim