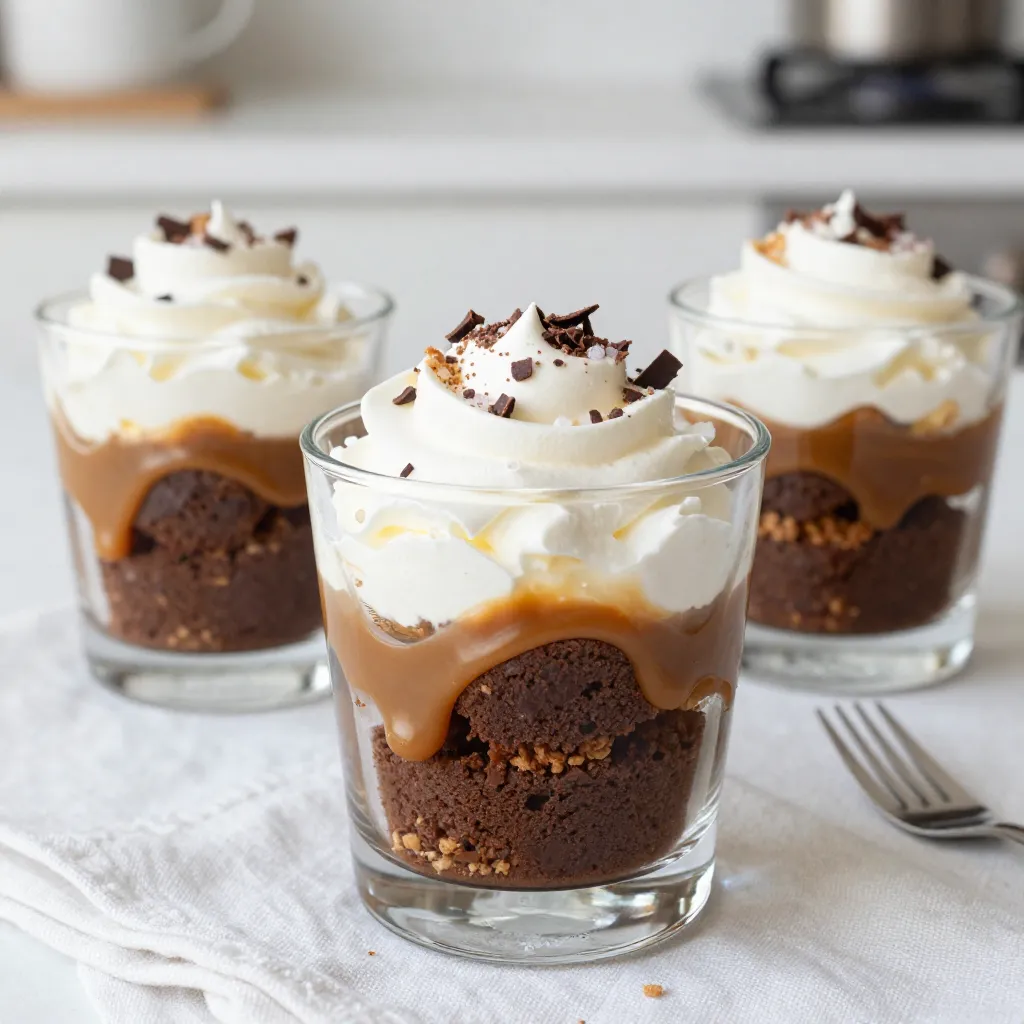
Are you ready to indulge in a dessert that’s sure to impress? This Salted Caramel Brownie Trifle combines rich chocolate brownies, fluffy whipped cream, and luscious salted caramel. Each layer creates a delightful treat that’s both simple and stunning. Whether you're hosting a party or just satisfying your sweet tooth, this trifle is the perfect choice. Let’s dive into the ingredients and steps to make this decadent dessert!
Why I Love This Recipe
- Decadent Layers: This trifle combines rich brownie squares, luscious caramel, and fluffy whipped cream for a truly indulgent dessert experience.
- Easy to Assemble: With just a few simple steps, you can create a stunning dessert that looks as good as it tastes, perfect for entertaining.
- Customizable: Feel free to mix in your favorite toppings or layer with different flavors to make this trifle your own.
- Make Ahead: This dessert can be made in advance, allowing you to enjoy your time with guests without the last-minute rush.
Ingredients
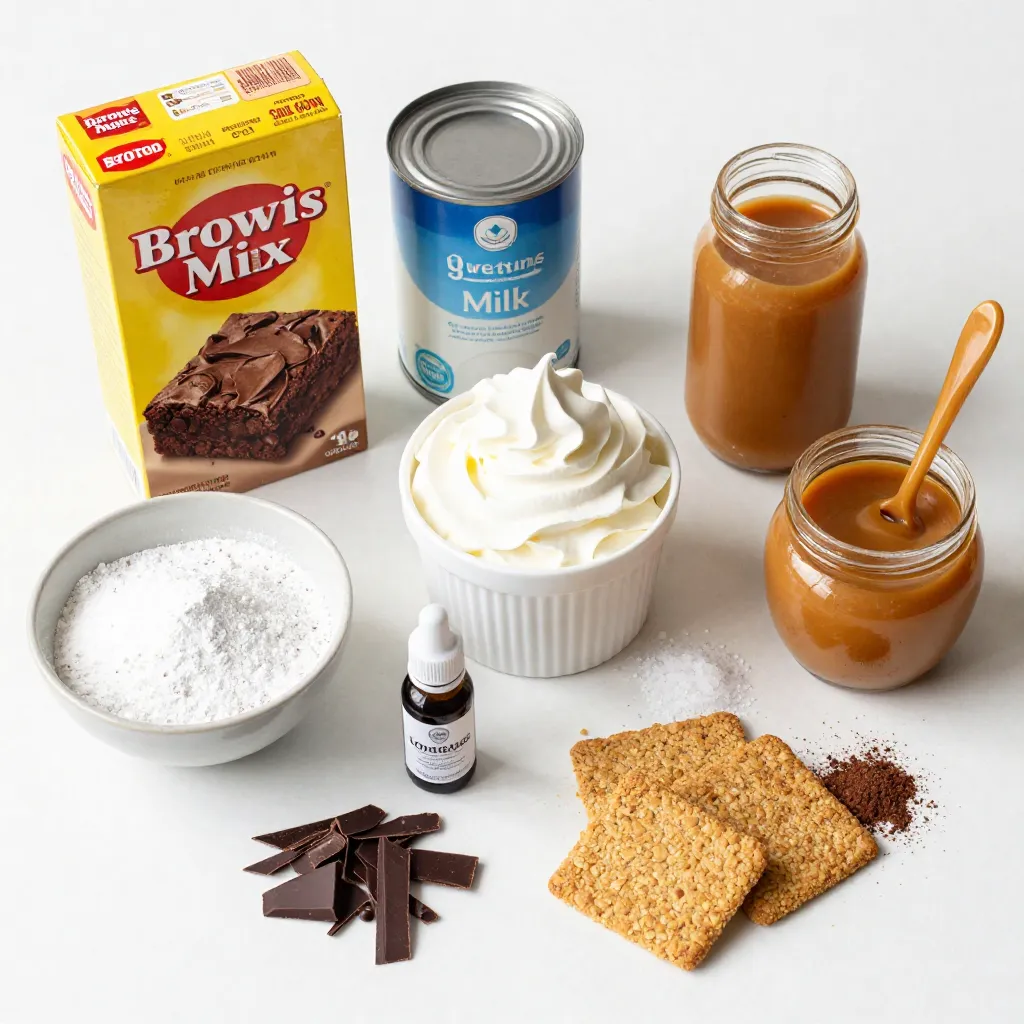
List of Ingredients
- 1 box of brownie mix (plus ingredients required on the box)
- 1 can (14 oz) sweetened condensed milk
- 1 cup heavy whipping cream
- ½ cup powdered sugar
- 1 teaspoon vanilla extract
- ½ cup caramel sauce (store-bought or homemade)
- ½ teaspoon sea salt
- 1 cup crushed graham crackers (for layering)
- Optional: Chocolate shavings or cocoa powder for garnish
Key Ingredient Notes
The brownie mix is the base of this dessert. Choose your favorite brand. The sweetened condensed milk adds a creamy texture and sweetness. Heavy whipping cream is essential for a light and fluffy whipped cream. The vanilla extract gives a warm flavor. Caramel sauce is the star of this dish. Use a good quality sauce for the best taste. Sea salt balances the sweet flavors perfectly. Crushed graham crackers add crunch and flavor to the layers.
Substitutions and Alternatives
If you don't have brownie mix, you can make brownies from scratch. Use equal parts of sugar, flour, cocoa powder, and eggs. For a dairy-free option, try coconut cream instead of heavy cream. You can use maple syrup or agave syrup in place of caramel sauce. If you want a nutty flavor, add crushed nuts instead of graham crackers.
Step-by-Step Instructions
Baking the Brownies
To start, grab a box of brownie mix. Follow the instructions on the box. This usually means mixing the dry mix with eggs, oil, and water. Pour the batter into a greased pan. Bake until a toothpick comes out clean. Once baked, let them cool completely. After cooling, cut the brownies into bite-sized squares. This step is key for easy layering later.
Making the Whipped Cream
Next, take a mixing bowl. Add one cup of heavy whipping cream. Add half a cup of powdered sugar and one teaspoon of vanilla extract. Beat the mixture on medium-high speed. Keep mixing until soft peaks form. This means the cream holds its shape but is still smooth. Set the whipped cream aside for later use.
Preparing the Caramel
For the caramel, use a saucepan. Add a 14 oz can of sweetened condensed milk. Mix in half a cup of caramel sauce. Heat this over medium heat. Stir continuously for about 5 to 7 minutes. The mixture should become smooth and slightly thick. After that, take it off the heat and let it cool a bit. This caramel will add richness to your trifle.
Layering the Trifle
How to Layer Effectively
Start with a clean trifle dish or individual cups. Lay down a base of brownie squares. Use bite-sized pieces for even layers. Drizzle a generous amount of caramel sauce over the brownies. The sauce adds richness and flavor. Next, add a layer of whipped cream. Make sure it covers the caramel completely. Sprinkle a layer of crushed graham crackers on top. This adds crunch and a nice texture. Repeat these layers until you reach the top. Finish with whipped cream to create a lovely peak.
Tips for Presentation
Presentation is key for a stunning trifle. Use clear glass cups for individual servings. This lets the colorful layers shine through. Top the whipped cream with chocolate shavings or cocoa powder. These add a beautiful touch. A sprinkle of sea salt on the top layer enhances the flavor. For added flair, drizzle more caramel sauce on top. Make sure to serve it chilled. This keeps it fresh and tasty.
Serving Suggestions
Serve your trifle at gatherings or special events. It’s perfect for parties or family dinners. Offer small spoons for easy serving. This makes it fun for everyone to dig in. Pair it with coffee or dessert wine for a lovely treat. You can also serve it with fresh fruit on the side. Berries or sliced bananas add a fresh touch. Enjoy this delightful dessert with friends and family.
Pro Tips
- Use Fresh Ingredients: Always use fresh whipping cream and high-quality caramel sauce for the best flavor in your trifle.
- Let Brownies Cool Completely: Allow the brownies to cool completely before cutting them into squares; this prevents them from crumbling during layering.
- Customize Your Layers: Feel free to add layers of your favorite toppings, such as crushed nuts or chocolate chips, to enhance the texture and flavor.
- Chill for Maximum Flavor: For the best taste, let your trifle chill in the refrigerator for at least 2 hours, allowing the flavors to meld beautifully.
Tips & Tricks
Troubleshooting Common Issues
If your brownies turn out too dry, try reducing the baking time. Overbaking can lead to a crumbly texture. Keep an eye on them. If your whipped cream does not form peaks, you may need to beat it longer. Make sure your bowl and beaters are cold for best results. If your caramel sauce thickens too much, add a splash of milk to loosen it. Stir it well before using.
Best Practices for Whipped Cream
Use cold heavy whipping cream for the best results. Chill your mixing bowl for a few minutes. This helps the cream whip better. Beat on medium-high speed until soft peaks form. Be careful not to overbeat, or your cream will turn into butter. Store any leftover whipped cream in the fridge, covered tightly. It will last for a day or two, but it’s best fresh.
Flavor Enhancements
To make your trifle even tastier, add a bit of espresso powder to the whipped cream. This gives a nice coffee flavor. You can also mix in some crushed nuts or chocolate chips between the layers for extra crunch. For a fruity twist, add slices of banana or berries. They pair well with the sweetness of the caramel and brownies.
Variations
Chocolate Brownie Swap
You can change up the flavor with a different brownie. Try a blondie mix for a lighter taste. You could also use dark chocolate brownies for a richer treat. This swap adds depth to your trifle.
Adding Fruits or Nuts
Fruits and nuts can bring freshness and crunch. Try adding sliced strawberries or bananas between the layers. Chopped nuts like pecans or walnuts add a nice texture. These additions can balance the sweetness of the caramel.
Alternative Sauces
Switching out the caramel sauce can give your trifle a new twist. Use chocolate sauce for a double chocolate delight. Raspberry or berry sauce can add tartness. These sauces can change the whole vibe of your dessert.
FAQs
Can I make this trifle in advance?
Yes, you can make this trifle ahead of time. Assemble it and chill for up to 24 hours. This helps the flavors blend and makes it easy for serving later.
How long can a Salted Caramel Brownie Trifle be stored?
You can store the trifle in the fridge for up to three days. Make sure to cover it tightly with plastic wrap. After that, the brownies may become soggy.
Can I use homemade caramel sauce?
Absolutely! Homemade caramel sauce adds a special touch. Just ensure it cools slightly before layering. This will keep the trifle from becoming too warm.
What can I substitute for heavy cream?
If you don’t have heavy cream, use coconut cream or a non-dairy cream. You can also whip together milk and butter in a pinch. This gives you a similar texture for your whipped layer.
You now know how to make a Salted Caramel Brownie Trifle, step by step. We covered the ingredients, preparations, and how to layer it for a great look. With tips and variations, you can make it your own. Remember to try out different flavors or add fruits and nuts. This dessert is fun to make and share with friends or family. Enjoy your trifle creation and let it impress everyon