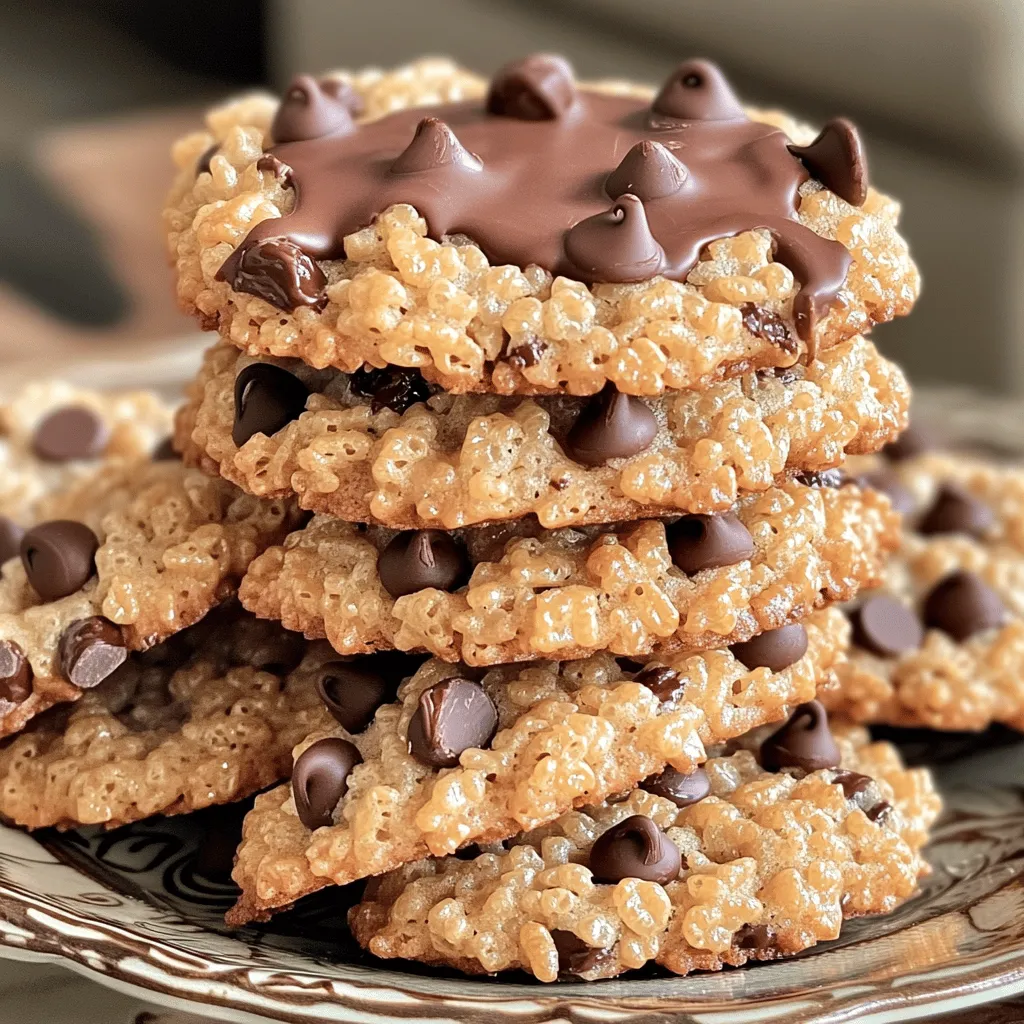
Are you ready to take your cookie game to the next level? Rice Krispie Chocolate Chip Cookies combine the classic taste of chocolate chip cookies with the exciting crunch of Rice Krispies. In this blog, I’ll walk you through each step, from gathering simple ingredients to baking perfection. These treats are fun to make and will delight your family and friends. Let’s dive in and create something special together!
Ingredients
Detailed Ingredient List
– 1 cup unsalted butter, softened
– ¾ cup brown sugar, packed
– ¾ cup granulated sugar
– 1 teaspoon vanilla extract
– 2 large eggs
– 2 cups all-purpose flour
– 1 teaspoon baking soda
– ½ teaspoon salt
– 1 ½ cups Rice Krispies cereal
– 1 cup chocolate chips (semi-sweet or milk chocolate)
– ½ cup chopped nuts (optional, like walnuts or pecans)
Ingredient Substitutions
You can swap unsalted butter for coconut oil or margarine. These alternatives work well and keep the cookies moist. If you prefer a sweeter touch, you can use brown rice syrup instead of sugar. This makes the cookies chewy and delicious. For gluten-free needs, almond flour or a gluten-free mix can replace all-purpose flour. Both options yield tasty results!
Each ingredient plays a role. Butter adds richness. Brown sugar gives a soft texture, while granulated sugar helps cookies spread. Vanilla enhances flavor, and eggs bind everything together. Flour gives structure, while baking soda helps them rise. Rice Krispies add crunch. Chocolate chips bring sweetness, and nuts add texture and taste.
Step-by-Step Instructions
Pre-Baking Preparations
First, we need to preheat the oven to 350°F (175°C). This heat is key for cookies that bake just right. Next, grab a baking sheet and line it with parchment paper. This helps the cookies not stick and makes cleanup easy.
Mixing the Dough
Now, let’s mix the dough. Start with a large bowl. Cream together 1 cup of softened unsalted butter, ¾ cup of brown sugar, and ¾ cup of granulated sugar. Mix until it’s light and fluffy. This step is important because it adds air to the dough, which helps the cookies rise.
Next, beat in 1 teaspoon of vanilla extract. Then, add 2 large eggs, one at a time. Mix well after each egg to ensure they are fully combined.
Combining Dry and Wet Ingredients
In another bowl, whisk together 2 cups of all-purpose flour, 1 teaspoon of baking soda, and ½ teaspoon of salt. This is the dry mix. Gradually add this dry mix to the wet ingredients. Mix until just combined. Over-mixing can make the cookies tough, so stop as soon as there are no dry spots.
Now, fold in 1 ½ cups of Rice Krispies and 1 cup of chocolate chips. If you like nuts, add ½ cup of chopped nuts now. Gently mix until everything is evenly spread in the dough.
Baking the Cookies
For portioning the dough, use a cookie scoop or a tablespoon. Drop rounded balls of dough onto your prepared baking sheet. Leave space between each ball so they can spread while baking.
Bake the cookies in your preheated oven for 10-12 minutes. Look for lightly golden edges. The centers may seem underbaked, but that’s okay. They will set as they cool.
After baking, let the cookies rest on the sheet for about 5 minutes. Then, transfer them to a wire rack to cool completely. Enjoy these delightful treats!
Tips & Tricks
Perfecting Cookie Texture
To get the right dough, you want it to be soft but not sticky. Mix the butter and sugars until fluffy. Then, add eggs and vanilla. For chewy cookies, use less flour and bake a bit less. If you like crunch, add a bit more flour. Bake until edges turn golden, but keep the center soft.
Cooling and Storing
Let your cookies cool on the baking sheet for five minutes. This helps them firm up. After that, move them to a wire rack. For storage, place cookies in an airtight container. They stay fresh for about a week. You can also freeze them for longer. Just make sure they are cool before freezing.
Baking Equipment Recommendations
You need a few key tools for baking cookies. A sturdy mixing bowl, a whisk, and a baking sheet are must-haves. A cookie scoop makes it easy to get even sizes. You can also use a tablespoon if you don’t have one. Both work well, but a scoop gives you more uniform cookies.
These tips will help you create perfect Rice Krispie chocolate chip cookies every time.

Variations
Flavor Additions
You can change your Rice Krispie chocolate chip cookies with fun flavors. Try different types of chocolate. Semi-sweet, dark, or white chocolate adds new taste. Mixing chocolates gives a unique twist. You can also add dried fruits. Raisins or cranberries complement the sweet chocolate. This will give your cookies a chewy texture and fruity flavor.
Dietary-Friendly Options
If you want to make these cookies vegan, swap the butter for coconut oil. Use flax eggs instead of regular eggs. This keeps the texture soft and tasty. For gluten-free options, use almond flour or a gluten-free blend. These substitutions still keep your cookies delicious and enjoyable.
Themed Cookie Ideas
Get creative with holiday-themed variations! For Halloween, use orange and black sprinkles. During Christmas, add red and green candies. You can also shape the cookies for special occasions. Use cookie cutters to create fun shapes. Decorate with icing or melted chocolate for extra flair. These ideas make each batch a fun surprise!
Storage Info
Short-Term Storage
To keep your Rice Krispie chocolate chip cookies fresh for up to a week, store them in a cool, dry place. Use an airtight container to keep them soft. If you have extra cookies, separate layers with parchment paper. This prevents them from sticking together.
Long-Term Storage
For long-term storage, freezing is a great option. Place cooled cookies in a single layer on a baking sheet. Freeze for about an hour until solid. Then, transfer them to a freezer-safe bag or container. They can last for up to three months. To thaw, leave them at room temperature for a few hours. For a quick warm-up, pop them in the microwave for a few seconds.
Best Containers for Storage
Airtight containers work best for cookies. They keep air out and moisture in, which helps maintain freshness. Cookie jars look nice but may not seal as well. If you want to keep cookies longer, consider vacuum sealing. This method removes air and can extend the shelf life significantly.
FAQs
How do I ensure my cookies don’t come out flat?
To keep your cookies from being flat, use cold butter instead of soft butter. Make sure to chill the dough for at least 30 minutes before baking. This helps the cookies hold their shape. Avoid overmixing the dough, as this can also cause flattening. Finally, make sure your baking soda is fresh.
Can I use other cereal types instead of Rice Krispies?
Yes, you can swap Rice Krispies for other cereals. Try using cornflakes for a different crunch. Chex cereal can add a unique texture as well. You can also use granola for a chewy twist. The flavor will change a bit, but it’s fun to experiment!
How can I adjust the recipe for less sweetness?
To make your cookies less sweet, reduce the sugar by ¼ cup. You can also try using dark chocolate chips, which are less sweet than milk chocolate. If you use unsweetened cereal, that helps too. Balance is key, so taste as you go!
What can I do with leftover cookie dough?
You can freeze leftover cookie dough for later use. Just scoop the dough into balls, place them on a baking sheet, and freeze until firm. Then, transfer them to a zip-top bag. You can bake them straight from the freezer; just add a minute or two to the baking time. You can also make cookie dough bars or bites for a quick treat.
In this blog post, we explored the perfect cookie recipe, from key ingredients to storage tips. We covered how to mix the dough, bake the cookies, and customize flavors for your taste. I shared essential tips for texture, cooling, and storage to keep cookies fresh. Remember, baking is an adventure, so don’t hesitate to experiment with variations. Enjoy creating your own delicious cookies that everyone will love. Happy baking!