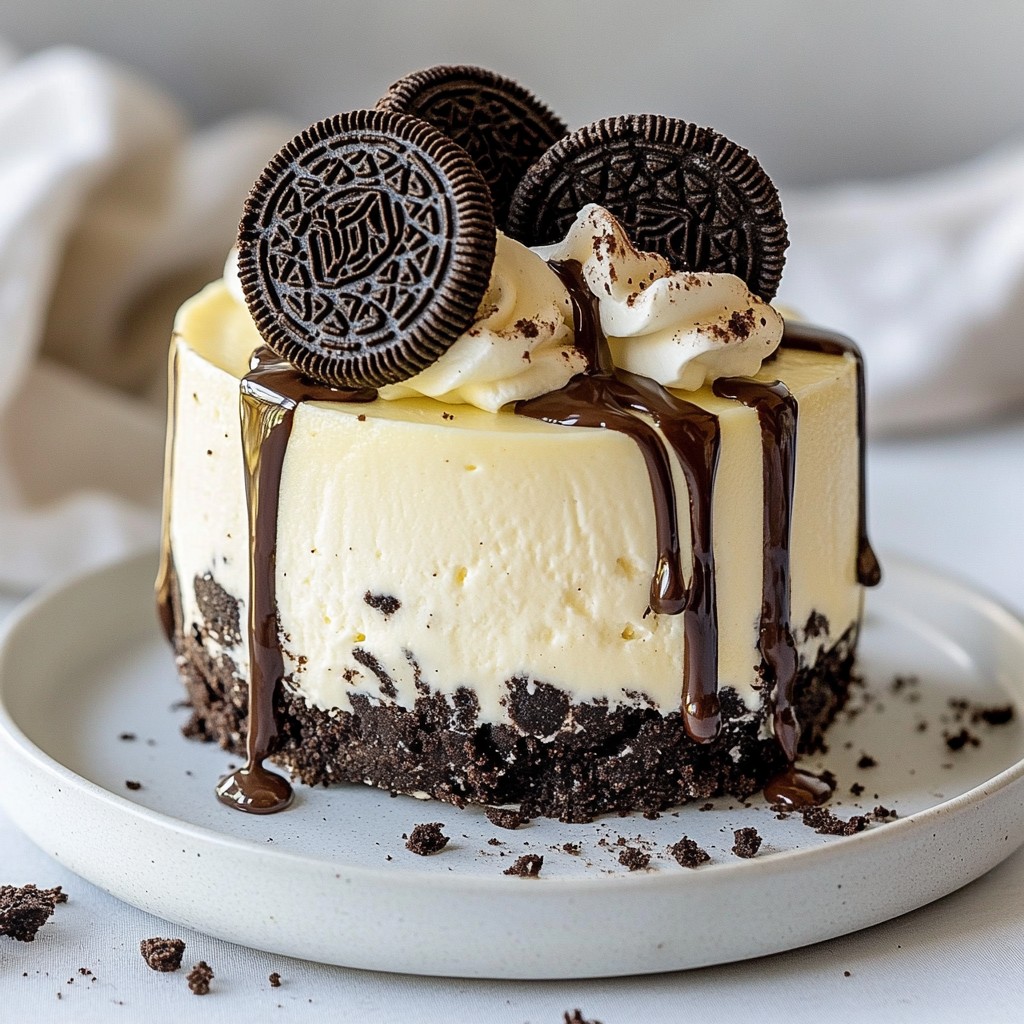
If you love cookies and cream, this No Bake Oreo Cheesecake is for you! This easy dessert requires no baking, making it perfect for a quick treat. With just a few simple ingredients, you can create a rich and creamy cheesecake that will impress everyone. Get ready to dive into this fun recipe that elevates a classic favorite! Let’s get started!
Why I Love This Recipe
- Decadent Flavor: This no-bake cheesecake combines the rich taste of cream cheese with the beloved flavor of Oreo cookies, creating a delightful dessert that everyone loves.
- Easy Preparation: No baking required! With just a few simple steps, you can prepare a delicious cheesecake that sets in the refrigerator, making it a stress-free dessert option.
- Perfect for Any Occasion: This Oreo Delight Cheesecake is ideal for parties, family gatherings, or a sweet treat to enjoy at home. It’s a crowd-pleaser!
- Customizable Toppings: You can easily enhance this cheesecake with various toppings, from extra Oreo crumbles to a drizzle of chocolate sauce, allowing for creativity in presentation.
Ingredients
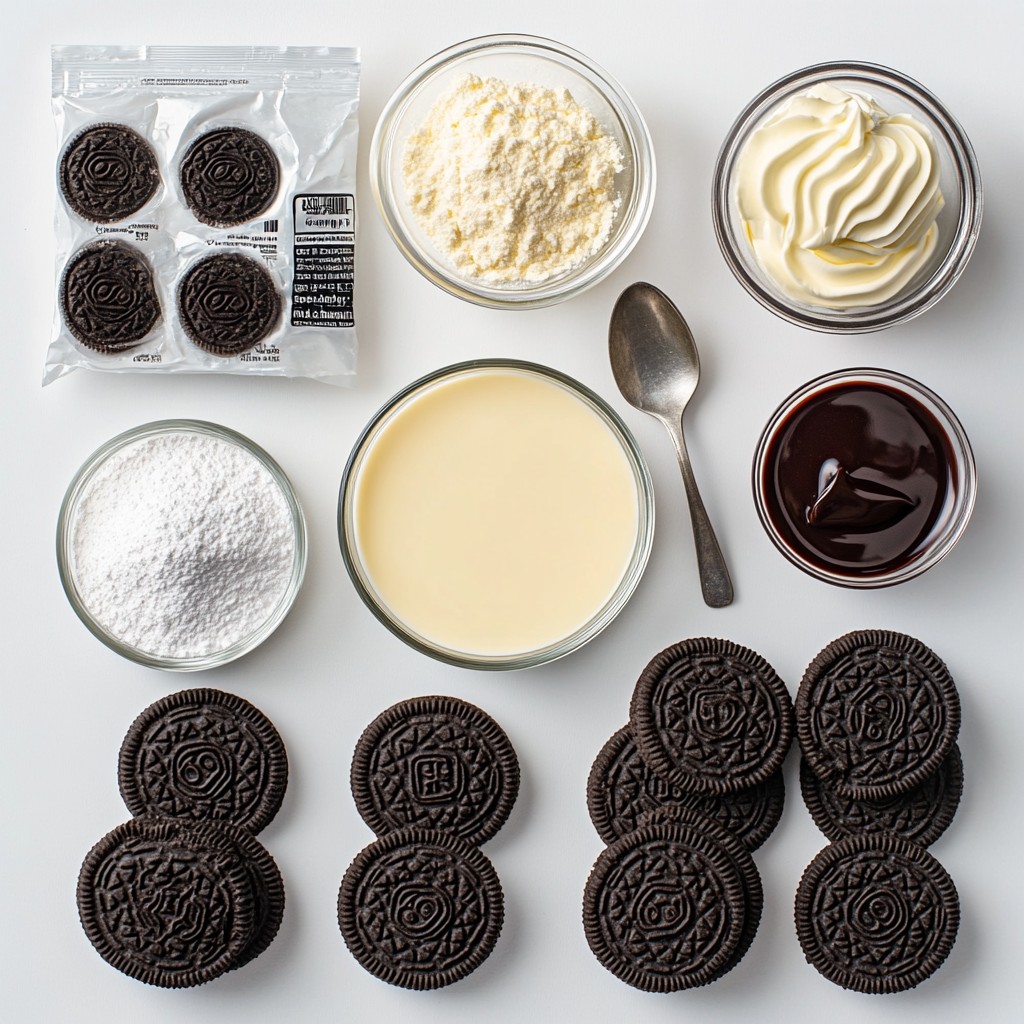
List of Ingredients
- 24 Oreo cookies (plus extra for garnish)
- 4 tablespoons unsalted butter, melted
- 16 oz cream cheese, softened
- 1 cup powdered sugar
- 1 teaspoon vanilla extract
- 1 cup heavy whipping cream
- 1/2 cup Oreo crumbs (from crushed cookies)
- Optional: Chocolate sauce for drizzling
To start, gather all your ingredients. You’ll need 24 Oreo cookies to make the crust and some extra for garnish. The crust is simple. You mix these cookies with melted butter. Next, you need 16 ounces of softened cream cheese. This gives your cheesecake a smooth, rich base.
For sweetness, we add 1 cup of powdered sugar. Vanilla extract adds flavor, so grab 1 teaspoon of that. Heavy whipping cream is key for the filling. You’ll need 1 cup of this cream. Finally, save 1/2 cup of Oreo crumbs to fold into your filling. If you want a special touch, you can drizzle chocolate sauce on top when serving.
With these ingredients, you are set to make a tasty no bake Oreo cheesecake!
Step-by-Step Instructions
Preparing the Crust
- Crushing the Oreo cookies: Start with 24 Oreo cookies. Place them in a food processor. Pulse until they turn into fine crumbs. This will make the base for your cheesecake.
- Mixing with melted butter: In a bowl, combine the Oreo crumbs with 4 tablespoons of melted butter. Stir until the crumbs are fully coated. This mix will hold the crust together.
- Pressing into the springform pan: Take a 9-inch springform pan. Firmly press the crumb mixture into the bottom. Make sure it is even all around. Refrigerate the crust while you work on the filling.
Making the Cheesecake Filling
- Beating cream cheese until smooth: In a large bowl, take 16 oz of softened cream cheese. Use an electric mixer to beat it until it is creamy and smooth. This step is key for a rich texture.
- Incorporating powdered sugar and vanilla: Gradually add 1 cup of powdered sugar and 1 teaspoon of vanilla extract to the cream cheese. Mix well until everything is combined. This adds sweetness and flavor.
Whipping the Cream
- Whipping heavy cream to stiff peaks: In a separate bowl, pour in 1 cup of heavy whipping cream. Use a mixer to whip until stiff peaks form. This means the cream holds its shape.
- Folding whipped cream into the cheese mixture: Gently fold the whipped cream into the cream cheese mix. Be careful not to deflate the whipped cream. This makes the filling light and fluffy.
Final Assembly and Chilling
- Adding crushed Oreos to the filling: Fold in 1/2 cup of crushed Oreo cookies into the filling. This adds texture and extra Oreo flavor.
- Pouring and smoothing the filling over the crust: Carefully pour the cream cheese mixture over the crust in the springform pan. Use a spatula to smooth the top. Make it look nice!
- Covering and refrigerating: Cover the cheesecake with plastic wrap. Place it in the fridge for at least 4 hours. For best results, chill it overnight. This helps it set perfectly.
Tips & Tricks
Achieving the Perfect Texture
For a smooth cheesecake, use room temperature cream cheese. Cold cream cheese can cause lumps. Let it sit out for about 30 minutes before mixing. This makes blending easier.
When you whip the cream, beat it until it forms stiff peaks. This adds air and lightness to your cheesecake. Gently fold the whipped cream into the cheese mixture. Use a spatula and a gentle motion. This keeps the air in the whipped cream, making the cheesecake fluffy.
Enhancing Flavor
You can add flavor with extracts. For a twist, try almond or peppermint extract. Just a little goes a long way, so start with half a teaspoon.
To make your cheesecake look even better, consider toppings. Crushed Oreos create a nice crunch. You can drizzle chocolate sauce on top for added sweetness. Fresh berries also make a lovely garnish, adding color and freshness.
Pro Tips
- Use Cold Ingredients: Ensure that your cream cheese is at room temperature before mixing, while the heavy cream should be chilled. This helps achieve a smooth and fluffy filling.
- Crush Oreos Evenly: For a more uniform crust, crush the Oreo cookies into fine crumbs using a food processor rather than a rolling pin, ensuring no large pieces remain.
- Chill Longer for Best Results: While 4 hours is the minimum chilling time, letting the cheesecake set overnight will improve the flavor and texture significantly.
- Garnish Creatively: Aside from crushed Oreos, consider adding fresh berries or a drizzle of caramel to elevate the presentation and flavor of your cheesecake.
Variations
Flavor Variations
You can change the taste of your No Bake Oreo Cheesecake in fun ways. One idea is to add fruit purées. Pureed strawberries or raspberries can give a fruity twist. Simply mix in about half a cup of purée into your filling. This adds bright flavor and color. You can also try adding nut butters. Peanut butter or almond butter can make the cheesecake richer. Fold in about a quarter cup of your favorite nut butter. This adds depth and a creamy texture that pairs well with Oreos.
Dietary Adjustments
If you or your guests have dietary needs, don't worry! You can make this cheesecake gluten-free. Use gluten-free Oreos instead of regular ones. They taste just as good and keep the recipe simple. For a vegan version, swap the cream cheese with a dairy-free alternative. You can find coconut-based cream cheese that works well. Use coconut whipped cream instead of heavy cream. This keeps the light and fluffy texture. These swaps make the cheesecake suitable for more diets while still being delicious!
Storage Info
Best Storage Practices
To store leftover cheesecake, place it in the fridge. Use an airtight container to keep it fresh. If you don't have a container, cover it tightly with plastic wrap. This helps avoid any weird smells or flavors from other foods. Cheesecake stays best in the fridge for about 3 to 5 days.
Freezing Instructions
You can freeze the cheesecake if you want to save some for later. To freeze, first, make sure it is fully set. Then, wrap it tightly in plastic wrap. After that, put it in a freezer-safe bag or container. This way, it will stay fresh for up to 2 months.
When you’re ready to eat it, thaw the cheesecake in the fridge overnight. This keeps the texture nice and smooth. Avoid thawing it at room temperature, as it can get too soft. Once thawed, enjoy your cheesecake just like fresh!
FAQs
Can I use different cookies for the crust?
Yes, you can use other cookies for the crust. Some great options include:
- Graham crackers
- Chocolate wafer cookies
- Digestive biscuits
Using different cookies will change the flavor. Graham crackers add a sweet, buttery taste. Chocolate wafers give a rich, deep chocolate flavor. Each cookie will also change the texture slightly.
How long does the cheesecake last in the fridge?
The cheesecake lasts about 3 to 5 days in the fridge. Store it in an airtight container. Look for these signs of spoilage:
- Off smell
- Change in texture
- Visible mold
If you notice any of these, it’s best to toss it.
What to do if the cheesecake doesn’t set?
If your cheesecake doesn’t set, it may be due to several reasons:
- Ingredients were too warm
- Whipped cream wasn't stiff enough
- Not enough chilling time
To fix it before serving, try these tips:
- Place it back in the fridge for a few more hours.
- If it’s still soft, you can add gelatin. Dissolve it in water first. Add it to the mix and chill again.
This blog post covered a delicious no-bake Oreo cheesecake, with easy steps and tips. You learned how to prepare the crust, make the filling, and assemble the dessert. I also shared flavor variations and storage tips to keep your cheesecake fresh. Experimenting with different cookies and toppings can make it unique. Enjoying this dessert is simple and fun. Follow these steps, and you will impress friends and family with your cheesecake. Your baking skills will shine!