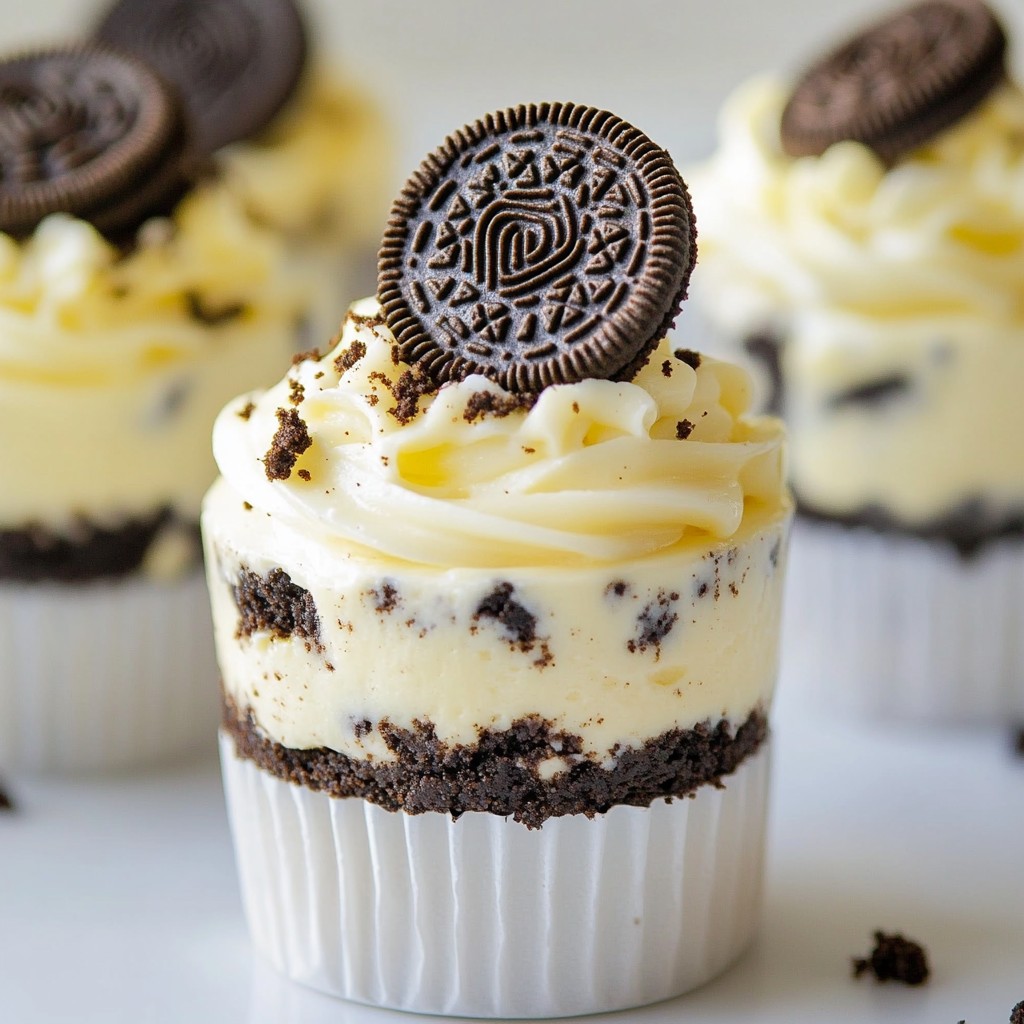
Are you ready to indulge in a yummy treat? These No Bake Oreo Cheesecake Cups are easy and delicious! With just a handful of simple ingredients, you can whip up a tasty dessert that everyone will love. From making the Oreo crust to the creamy filling, I'll guide you through each step. Plus, I’ll share tips for perfecting your whipped cream and ideas for tasty variations. Let’s get started!
Why I Love This Recipe
- Easy to Make: This no-bake recipe requires minimal effort, making it perfect for quick desserts.
- Decadent Flavor: The combination of cream cheese and Oreo creates a rich and indulgent taste.
- Perfect for Any Occasion: These cheesecake cups are great for parties, gatherings, or just a sweet treat at home.
- Customizable: You can easily adjust the toppings or add different flavors to suit your preferences.
Ingredients
List of Required Ingredients
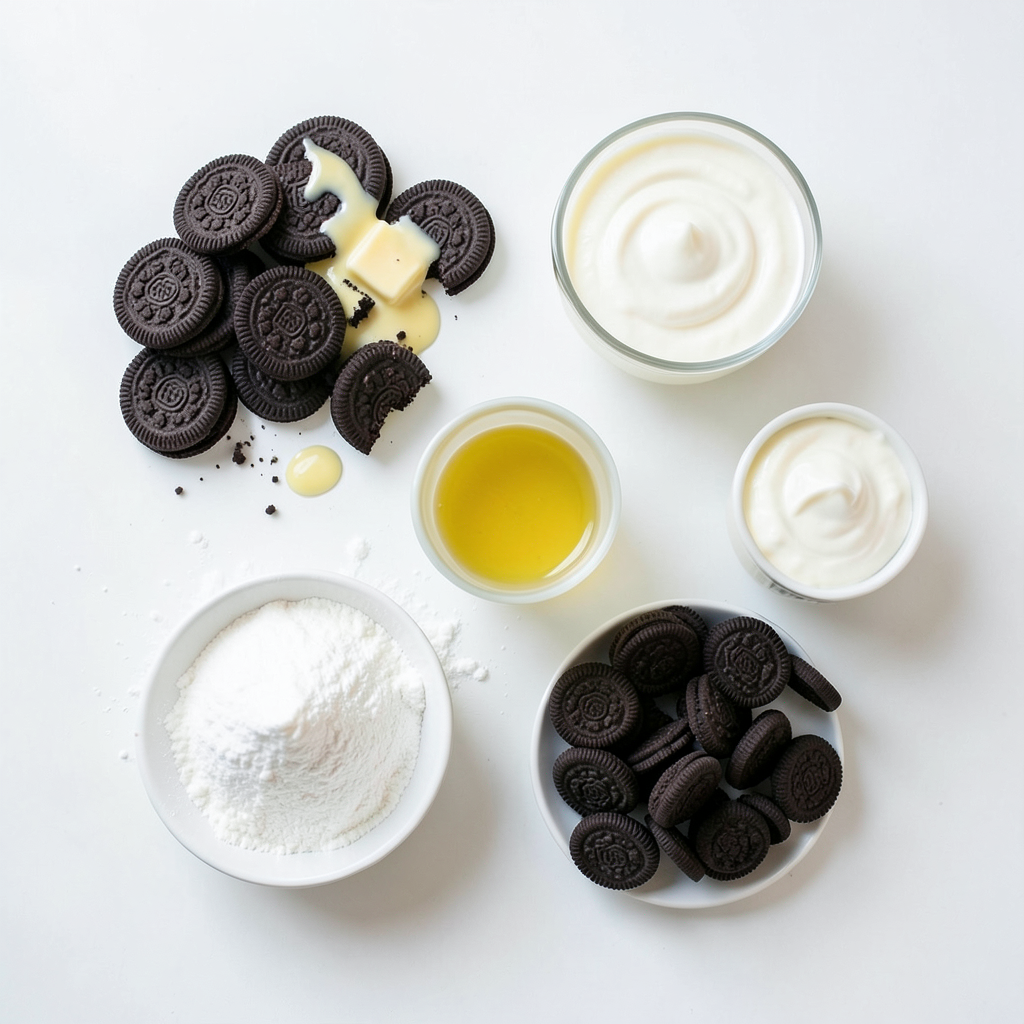
To create your No Bake Oreo Cheesecake Cups, gather these items:
- 24 Oreo cookies, crushed
- 4 tablespoons unsalted butter, melted
- 16 oz cream cheese, softened
- ½ cup powdered sugar
- 1 teaspoon vanilla extract
- 1 cup heavy whipping cream
- 8 Oreos, coarsely chopped (for mixing in)
These ingredients come together to make a rich and creamy treat. The crushed Oreos create a tasty crust, while the cream cheese and whipped cream give that lovely cheesecake texture.
Optional Garnishes
You can add these fun garnishes to make your cups even better:
- Extra Oreos for garnish
- A sprinkle of Oreo crumbs
These garnishes make your dessert look nice and add extra crunch and flavor.
Ingredient Substitutions
If you need to swap some ingredients, here are good options:
- Use gluten-free Oreos for a gluten-free version.
- Swap cream cheese with mascarpone for a lighter taste.
- Use coconut cream instead of heavy cream for dairy-free cups.
These substitutions keep the recipe flexible while still tasting great. Enjoy making your No Bake Oreo Cheesecake Cups!
Step-by-Step Instructions
Preparing the Oreo Crust
First, crush 24 Oreo cookies into small pieces. You want them to be fine. Then, melt 4 tablespoons of unsalted butter in a bowl. Mix the crushed Oreos and melted butter together. Make sure all the crumbs are coated. Next, take about 2 tablespoons of this mixture and put it in each cup. Press it down gently to form a nice crust.
Making the Cheesecake Filling
Now, get a large mixing bowl. Beat 16 ounces of softened cream cheese with an electric mixer. You want it to be smooth and creamy. Gradually add in ½ cup of powdered sugar and 1 teaspoon of vanilla extract. Mix until everything is well combined. In another bowl, whip 1 cup of heavy cream until it forms stiff peaks. Be careful not to over-whip. Gently fold the whipped cream into the cream cheese mixture. Add in 8 coarsely chopped Oreos and fold them in too.
Assembling the Cheesecake Cups
Once your filling is ready, it's time to assemble. Spoon or pipe the cheesecake filling over the Oreo crust in each cup. Fill them almost to the top. Put the cups in the fridge for at least 4 hours, or overnight if you can wait. This chilling time helps the cheesecake set. Before serving, you can add an extra Oreo on top or sprinkle some Oreo crumbs for a nice touch. Enjoy your delicious creation!
Tips & Tricks
How to Achieve the Perfect Whipped Cream
To make the best whipped cream, start with cold heavy cream. Cold cream whips better. Use a chilled bowl and beaters for best results too. Whip the cream until you see stiff peaks. This means it holds its shape well. Gently fold it into the cream cheese mixture. This keeps it light and airy. Avoid over-mixing, as that can make it grainy.
Storing the Cheesecake Cups for Freshness
Store your cheesecake cups in the fridge. Use an airtight container to keep them fresh. They will last for about 3 to 5 days. If you want to store them longer, consider freezing. To freeze, wrap each cup tightly with plastic wrap. Then place them in a freezer-safe bag. When ready to eat, thaw them in the fridge overnight.
Common Mistakes to Avoid
One common mistake is not letting the cream cheese soften. If it’s too cold, it won’t mix well. Always soften it to room temperature. Another mistake is not folding gently. If you stir too hard, you lose the air in the whipped cream. Lastly, don’t skip the chilling time. Your cheesecake cups need to set properly for the best taste.
Pro Tips
- Use Room Temperature Cream Cheese: This ensures a smooth and creamy cheesecake filling, preventing lumps.
- Chill Longer for Better Texture: Allowing the cheesecake cups to set overnight will enhance the flavors and improve the texture.
- Experiment with Garnishes: Try adding whipped cream, chocolate drizzle, or fruit for a unique twist on presentation.
- Adjust Sweetness to Taste: Feel free to modify the amount of powdered sugar based on your sweetness preference.
Variations
Flavor Enhancements
You can mix things up with flavor additions. Mint adds a refreshing twist. Just add 1 teaspoon of mint extract to the cream cheese mix. For a rich taste, try peanut butter. Blend in ½ cup of creamy peanut butter. Both options keep the Oreo flavor strong while adding a fun twist.
Serving Suggestions
These cheesecake cups pair well with fresh fruit. Berries like strawberries or raspberries add a nice touch. You can also drizzle chocolate or caramel sauce on top. For extra crunch, sprinkle chopped nuts or cookie crumbs. These toppings make your dessert even more special.
Dietary Modifications
If you need gluten-free options, use gluten-free Oreo cookies. They work just as well and taste great. For a dairy-free version, swap cream cheese with dairy-free cream cheese. Use coconut cream instead of heavy cream. Both options keep your dessert tasty while meeting your needs.
Storage Info
How to Properly Store Leftover Cheesecake Cups
To keep your No Bake Oreo Cheesecake Cups fresh, cover them with plastic wrap or a lid. Store them in the fridge. They stay good for up to three days. The longer they sit, the softer the crust may become. So, it’s best to eat them sooner for that perfect crunch.
Freezing Instructions
You can freeze these cheesecake cups if you have leftovers. First, let them chill in the fridge for about four hours. Then, cover each cup tightly with plastic wrap. Place them in a freezer-safe container. They will last up to one month in the freezer. Just remember, the texture may change a bit after freezing.
Best Practices for Thawing
When you are ready to eat your frozen cheesecake cups, take them out of the freezer. Move them to the fridge and let them thaw overnight. This slow thaw keeps the texture nice. If you need them fast, you can let them sit at room temperature for about an hour. Avoid using the microwave, as it can ruin the creamy texture.
FAQs
How long do No Bake Oreo Cheesecake Cups last?
No Bake Oreo Cheesecake Cups last about 3 to 5 days in the fridge. They should stay fresh if you store them in an airtight container. The flavors will blend and get even better over time. Just check for any signs of spoilage before you enjoy them.
Can I make this recipe ahead of time?
Yes, you can make this recipe a day ahead. In fact, it helps the cups set better. Make sure to cover them well and keep them in the fridge. This way, you save time when you want to serve them.
What can I use instead of heavy cream?
If you don’t have heavy cream, use whipped topping or coconut cream. Both options can work well in this recipe. They will keep the dessert light and fluffy, just like the original. Always remember to taste as you go to ensure the flavor stays great!
You now have everything you need to make delicious No Bake Oreo Cheesecake Cups. We covered the must-have ingredients and options for substitutions. You learned the simple steps for making the crust, filling, and assembling it all.
Plus, we shared tips for perfect whipped cream and storage. You can even explore fun flavor variations and diet options. With these details, you’re set up to create a tasty treat. Enjoy every bite!