• Home
  • Recipe Index
    • Desserts
    • Dinner
    • Appetizer
    • Drinks
  • About
  • Contact
  • Privacy Policy
menu icon
go to homepage
  • Home
  • Recipe Index
    • Desserts
    • Dinner
    • Appetizer
    • Drinks
  • About
  • Contact
  • Privacy Policy

search icon
Homepage link
  • Home
  • Recipe Index
    • Desserts
    • Dinner
    • Appetizer
    • Drinks
  • About
  • Contact
  • Privacy Policy

×

Mocha Swirl Pound Cake Deliciously Indulgent Treat

Published: Nov 10, 2025 · by Natalie · Leave a Comment

WANT TO SAVE THIS RECIPE?

  • Facebook
Indulge in this delicious mocha pound cake recipe that combines rich chocolate and coffee in every bite. This homemade mocha cake is perfect for coffee lovers, featuring an espresso swirl pound cake that will impress guests. Drizzle with an easy glaze for the perfect finish. Try this chocolate coffee cake recipe today and elevate your dessert game! Save this pin for later! #MochaPoundCake #CoffeeCake #EspressoSwirl #DessertRecipes

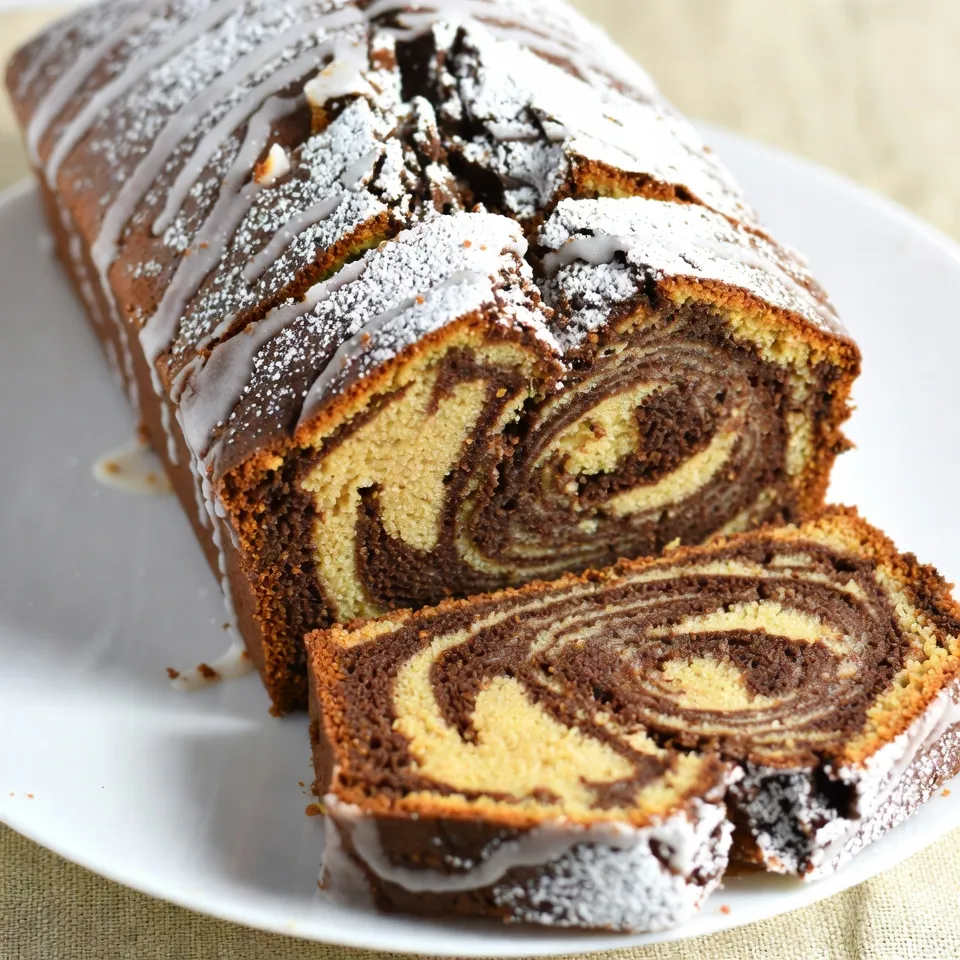
Craving something sweet and delicious? Let me show you how to make a Mocha Swirl Pound Cake that delights every bite. This cake blends rich chocolate, strong coffee, and a soft texture for a perfect treat. Whether for a cozy gathering or a quiet evening, this indulgent recipe will impress. Let’s dive into the tasty world of mocha and create something you’ll love!

- 1 cup unsalted butter, softened - 1 ½ cups granulated sugar - 4 large eggs - 2 cups all-purpose flour - 1 teaspoon baking powder - ½ teaspoon salt - ½ cup brewed coffee, cooled - ½ cup unsweetened cocoa powder - 1 teaspoon vanilla extract - 1 teaspoon espresso powder - 1 cup powdered sugar (for glaze) - 2 tablespoons milk (for glaze) For this cake, precise measurements matter. Use a kitchen scale for best results. If you need to swap some ingredients, here are ideas: - Unsalted butter can be replaced with a plant-based butter. - Granulated sugar can switch to coconut sugar for a hint of caramel. - All-purpose flour can be substituted with a gluten-free blend. - Brewed coffee can be replaced with strong brewed tea for a different taste. Certain ingredients add depth to this cake. Espresso powder intensifies the coffee flavor. Use high-quality cocoa powder for a rich chocolate taste. Freshly brewed coffee makes a notable difference, too. These ingredients create a unique blend of mocha and chocolate. They keep the cake moist and flavorful, making each bite a delight. {{ingredient_image_1}} Start by preheating your oven to 350°F (175°C). Grease a 9x5-inch loaf pan to keep the cake from sticking. In a large bowl, cream together 1 cup of softened unsalted butter and 1 ½ cups of granulated sugar. Mix until it looks light and fluffy. Next, add 4 large eggs one by one. Make sure to mix well after each egg. In another bowl, whisk together 2 cups of all-purpose flour, 1 teaspoon of baking powder, and ½ teaspoon of salt. Gradually mix this dry blend into the butter mixture. Alternate adding the ½ cup of cooled brewed coffee. Keep mixing until everything is just combined. Now it’s time to divide the batter. Split it into two equal parts. In one half, stir in ½ cup of unsweetened cocoa powder, 1 teaspoon of espresso powder, and 1 teaspoon of vanilla extract. This chocolate mix will add rich flavor. To create the swirl, begin layering the batters in the loaf pan. Start with a spoonful of the vanilla batter, followed by a spoonful of the chocolate batter. Keep alternating until both batters are used up. Use a knife to gently swirl them together. This will give your cake a beautiful marbled look. Place the loaf pan in your preheated oven. Bake for 50 to 60 minutes. Check if it's done by inserting a toothpick into the center. It should come out clean. Once baked, let the cake cool in the pan for 10 minutes. After that, transfer it to a wire rack to cool completely. While the cake cools, prepare the glaze. In a bowl, whisk together 1 cup of powdered sugar and 2 tablespoons of milk until smooth. Drizzle this over your cooled pound cake before serving. Enjoy your delicious mocha swirl pound cake! When making mocha swirl pound cake, avoid these mistakes for the best results: - Not softening the butter: Use softened butter for a fluffy mix. Cold butter won't blend well. - Overmixing the batter: Mix just until combined. Overmixing can make the cake dense. - Skipping the cooling step: Let the cake cool in the pan. This helps it firm up and makes it easier to remove. - Not checking your oven temperature: Use an oven thermometer to ensure accurate baking. An oven that is too hot or too cool can change your cake's texture. Creating beautiful swirls is fun and easy. Here’s how to do it: - Spoon batter alternately: Place a spoonful of vanilla batter, then a spoonful of chocolate batter. Repeat until the pan is full. - Use a knife gently: Take a butter knife and run it through the batter in a figure-eight motion. This creates a lovely marbled look. - Don’t over-swirl: Swirl just enough to mix the batters without losing the distinct layers. Too much swirling will blend the flavors completely. A glaze adds a sweet finish to your cake. Here are tips for a perfect glaze: - Use room temperature milk: This helps the glaze mix smoothly. Cold milk can make it lumpy. - Whisk well: Combine the powdered sugar and milk until there are no lumps. A smooth glaze looks better. - Drizzle over cooled cake: Let the cake cool completely before adding the glaze. Hot cake will melt the glaze, making it runny. - Add extra flavor: For a twist, mix in a bit of coffee or cocoa powder into the glaze. This enhances the mocha flavor and makes it even more special. Pro Tips Use Room Temperature Ingredients: Make sure your butter and eggs are at room temperature for a smoother batter and better texture. Don’t Overmix: When combining the batter, mix just until the ingredients are incorporated to avoid a dense cake. Check for Doneness: Insert a toothpick into the center of the cake; it should come out clean or with a few crumbs for perfect doneness. Let It Cool Completely: Allow the cake to cool completely before glazing to ensure the glaze sets properly. {{image_2}} You can change the flavor of your mocha swirl pound cake easily. Try using different extracts. Almond or hazelnut extracts add a unique twist. You can also swap out the brewed coffee for flavored coffee. This adds depth to the cake's taste. For a sweeter note, add a bit more sugar. Want a richer flavor? Use dark cocoa powder instead of regular cocoa. Each adjustment gives the cake a new life. Making a gluten-free mocha swirl pound cake is simple. Replace all-purpose flour with gluten-free all-purpose flour. This swap works well in most recipes. Just check that your baking powder is gluten-free. You may need to adjust the liquid slightly. Some gluten-free flours absorb more moisture. The cake will still taste amazing and be a hit! Adding nuts or chips can enhance the texture of your cake. Chopped walnuts or pecans add a nice crunch. Fold these in gently before baking. Chocolate chips work great too. They melt and create pockets of gooey chocolate. Use semi-sweet or dark chocolate chips for a richer flavor. These additions make each slice even more delightful. Store your mocha swirl pound cake in an airtight container. This keeps it fresh and moist. You can place it at room temperature for up to three days. If you want to keep it longer, the fridge is a good option. Just remember, cold air can dry it out. Wrap it well in plastic wrap or foil before putting it in the fridge. This way, it stays soft and tasty. To freeze the cake, first let it cool completely. Wrap it tightly in plastic wrap. Then, place the wrapped cake in a freezer bag. This prevents freezer burn and keeps the flavor. You can freeze it for up to three months. When you are ready to enjoy, thaw it in the fridge overnight. This helps it regain moisture and taste great. To reheat the mocha swirl pound cake, slice it first. You can use a microwave or an oven. For the microwave, warm it for about 15-20 seconds. Check it often to avoid overheating. For the oven, preheat it to 350°F (175°C). Place slices on a baking sheet and heat for 5-10 minutes. This warms the cake and brings back its soft texture. Enjoy with a drizzle of glaze or a cup of coffee! Yes, you can use any brewed coffee you like. Dark roast coffee adds a strong flavor. Light roast coffee gives a milder taste. You can also try flavored coffee. Vanilla or hazelnut coffee can make it unique and fun. Just make sure it’s brewed and cooled before adding to the batter. Mocha swirl pound cake lasts about four to five days at room temperature. Store it in an airtight container to keep it fresh. If you want it to last longer, you can freeze it. It stays good in the freezer for up to three months. Just wrap it tightly in plastic wrap. Mocha pairs well with many flavors. Here are some tasty options: - Peppermint for a minty twist. - Orange zest adds a bright citrus note. - Almond extract gives a nutty flavor. - Sea salt can enhance the sweet and rich coffee taste. Mix and match to find your favorite combo! This blog post covered all you need for a great mocha cake. We explored the key ingredients, including special ones for better flavor. I shared step-by-step instructions for batter, swirling, and baking. You learned tips to avoid common mistakes and make the best glaze. Variations let you change flavors or go gluten-free. Lastly, I shared storage tips to keep your cake fresh. Enjoy your baking, and make every slice delicious!

Why I Love This Recipe

  1. Delicious Flavor Combination: This mocha swirl pound cake combines the rich flavors of chocolate and coffee, creating a delightful treat that is sure to please any dessert lover.
  2. Perfect Texture: The pound cake is incredibly moist and tender, with a lovely crumb that makes each slice melt in your mouth.
  3. Easy to Make: With simple ingredients and straightforward steps, this recipe is perfect for both novice bakers and seasoned pros.
  4. Beautiful Presentation: The marbled effect of the chocolate and vanilla batter makes this cake visually stunning, perfect for serving at gatherings or special occasions.
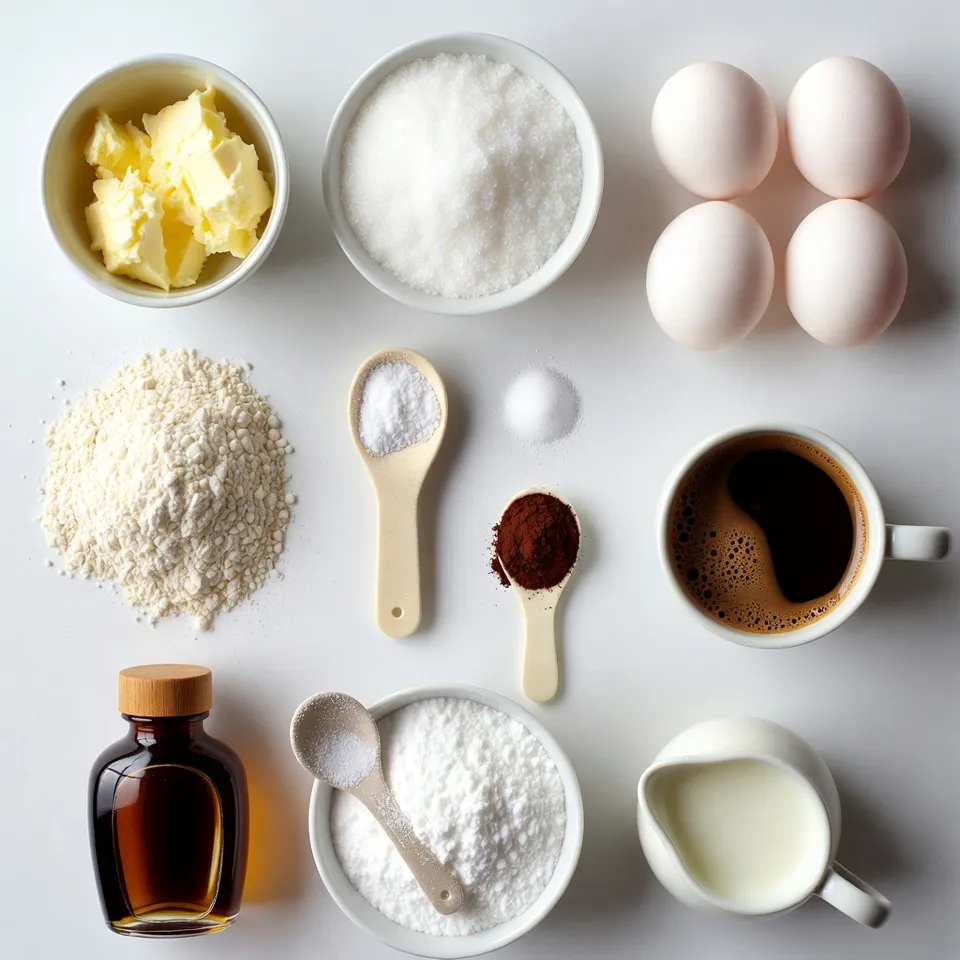
Ingredients

List of Ingredients

  1. 1 cup unsalted butter, softened
  2. 1 ½ cups granulated sugar
  3. 4 large eggs
  4. 2 cups all-purpose flour
  5. 1 teaspoon baking powder
  6. ½ teaspoon salt
  7. ½ cup brewed coffee, cooled
  8. ½ cup unsweetened cocoa powder
  9. 1 teaspoon vanilla extract
  10. 1 teaspoon espresso powder
  11. 1 cup powdered sugar (for glaze)
  12. 2 tablespoons milk (for glaze)

Measurements and Substitutions

For this cake, precise measurements matter. Use a kitchen scale for best results. If you need to swap some ingredients, here are ideas:

  1. Unsalted butter can be replaced with a plant-based butter.
  2. Granulated sugar can switch to coconut sugar for a hint of caramel.
  3. All-purpose flour can be substituted with a gluten-free blend.
  4. Brewed coffee can be replaced with strong brewed tea for a different taste.

Specialty Ingredients for Enhanced Flavor

Certain ingredients add depth to this cake. Espresso powder intensifies the coffee flavor. Use high-quality cocoa powder for a rich chocolate taste. Freshly brewed coffee makes a notable difference, too. These ingredients create a unique blend of mocha and chocolate. They keep the cake moist and flavorful, making each bite a delight.

Step-by-Step Instructions

Preparing the Batter

Start by preheating your oven to 350°F (175°C). Grease a 9x5-inch loaf pan to keep the cake from sticking. In a large bowl, cream together 1 cup of softened unsalted butter and 1 ½ cups of granulated sugar. Mix until it looks light and fluffy.

Next, add 4 large eggs one by one. Make sure to mix well after each egg. In another bowl, whisk together 2 cups of all-purpose flour, 1 teaspoon of baking powder, and ½ teaspoon of salt. Gradually mix this dry blend into the butter mixture. Alternate adding the ½ cup of cooled brewed coffee. Keep mixing until everything is just combined.

Creating the Swirl Effect

Now it’s time to divide the batter. Split it into two equal parts. In one half, stir in ½ cup of unsweetened cocoa powder, 1 teaspoon of espresso powder, and 1 teaspoon of vanilla extract. This chocolate mix will add rich flavor.

To create the swirl, begin layering the batters in the loaf pan. Start with a spoonful of the vanilla batter, followed by a spoonful of the chocolate batter. Keep alternating until both batters are used up. Use a knife to gently swirl them together. This will give your cake a beautiful marbled look.

Baking and Cooling

Place the loaf pan in your preheated oven. Bake for 50 to 60 minutes. Check if it's done by inserting a toothpick into the center. It should come out clean. Once baked, let the cake cool in the pan for 10 minutes. After that, transfer it to a wire rack to cool completely.

While the cake cools, prepare the glaze. In a bowl, whisk together 1 cup of powdered sugar and 2 tablespoons of milk until smooth. Drizzle this over your cooled pound cake before serving. Enjoy your delicious mocha swirl pound cake!

Tips & Tricks

Common Mistakes to Avoid

When making mocha swirl pound cake, avoid these mistakes for the best results:

  1. Not softening the butter: Use softened butter for a fluffy mix. Cold butter won't blend well.
  2. Overmixing the batter: Mix just until combined. Overmixing can make the cake dense.
  3. Skipping the cooling step: Let the cake cool in the pan. This helps it firm up and makes it easier to remove.
  4. Not checking your oven temperature: Use an oven thermometer to ensure accurate baking. An oven that is too hot or too cool can change your cake's texture.

How to Achieve Perfect Swirls

Creating beautiful swirls is fun and easy. Here’s how to do it:

  1. Spoon batter alternately: Place a spoonful of vanilla batter, then a spoonful of chocolate batter. Repeat until the pan is full.
  2. Use a knife gently: Take a butter knife and run it through the batter in a figure-eight motion. This creates a lovely marbled look.
  3. Don’t over-swirl: Swirl just enough to mix the batters without losing the distinct layers. Too much swirling will blend the flavors completely.

Best Practices for Glazing

A glaze adds a sweet finish to your cake. Here are tips for a perfect glaze:

  1. Use room temperature milk: This helps the glaze mix smoothly. Cold milk can make it lumpy.
  2. Whisk well: Combine the powdered sugar and milk until there are no lumps. A smooth glaze looks better.
  3. Drizzle over cooled cake: Let the cake cool completely before adding the glaze. Hot cake will melt the glaze, making it runny.
  4. Add extra flavor: For a twist, mix in a bit of coffee or cocoa powder into the glaze. This enhances the mocha flavor and makes it even more special.

Pro Tips

  1. Use Room Temperature Ingredients: Make sure your butter and eggs are at room temperature for a smoother batter and better texture.
  2. Don’t Overmix: When combining the batter, mix just until the ingredients are incorporated to avoid a dense cake.
  3. Check for Doneness: Insert a toothpick into the center of the cake; it should come out clean or with a few crumbs for perfect doneness.
  4. Let It Cool Completely: Allow the cake to cool completely before glazing to ensure the glaze sets properly.

Variations

Flavor Adjustments

You can change the flavor of your mocha swirl pound cake easily. Try using different extracts. Almond or hazelnut extracts add a unique twist. You can also swap out the brewed coffee for flavored coffee. This adds depth to the cake's taste. For a sweeter note, add a bit more sugar. Want a richer flavor? Use dark cocoa powder instead of regular cocoa. Each adjustment gives the cake a new life.

Gluten-Free Option

Making a gluten-free mocha swirl pound cake is simple. Replace all-purpose flour with gluten-free all-purpose flour. This swap works well in most recipes. Just check that your baking powder is gluten-free. You may need to adjust the liquid slightly. Some gluten-free flours absorb more moisture. The cake will still taste amazing and be a hit!

Addition of Nuts or Chips

Adding nuts or chips can enhance the texture of your cake. Chopped walnuts or pecans add a nice crunch. Fold these in gently before baking. Chocolate chips work great too. They melt and create pockets of gooey chocolate. Use semi-sweet or dark chocolate chips for a richer flavor. These additions make each slice even more delightful.

Storage Info

Best Storage Practices

Store your mocha swirl pound cake in an airtight container. This keeps it fresh and moist. You can place it at room temperature for up to three days. If you want to keep it longer, the fridge is a good option. Just remember, cold air can dry it out. Wrap it well in plastic wrap or foil before putting it in the fridge. This way, it stays soft and tasty.

How to Freeze the Cake

To freeze the cake, first let it cool completely. Wrap it tightly in plastic wrap. Then, place the wrapped cake in a freezer bag. This prevents freezer burn and keeps the flavor. You can freeze it for up to three months. When you are ready to enjoy, thaw it in the fridge overnight. This helps it regain moisture and taste great.

Reheating Instructions

To reheat the mocha swirl pound cake, slice it first. You can use a microwave or an oven. For the microwave, warm it for about 15-20 seconds. Check it often to avoid overheating. For the oven, preheat it to 350°F (175°C). Place slices on a baking sheet and heat for 5-10 minutes. This warms the cake and brings back its soft texture. Enjoy with a drizzle of glaze or a cup of coffee!

FAQs

Can I use a different type of coffee?

Yes, you can use any brewed coffee you like. Dark roast coffee adds a strong flavor. Light roast coffee gives a milder taste. You can also try flavored coffee. Vanilla or hazelnut coffee can make it unique and fun. Just make sure it’s brewed and cooled before adding to the batter.

How long does the cake last?

Mocha swirl pound cake lasts about four to five days at room temperature. Store it in an airtight container to keep it fresh. If you want it to last longer, you can freeze it. It stays good in the freezer for up to three months. Just wrap it tightly in plastic wrap.

What other flavors pair well with mocha?

Mocha pairs well with many flavors. Here are some tasty options:

  1. Peppermint for a minty twist.
  2. Orange zest adds a bright citrus note.
  3. Almond extract gives a nutty flavor.
  4. Sea salt can enhance the sweet and rich coffee taste.

Mix and match to find your favorite combo!

This blog post covered all you need for a great mocha cake. We explored the key ingredients, including special ones for better flavor. I shared step-by-step instructions for batter, swirling, and baking. You learned tips to avoid common mistakes and make the best glaze. Variations let you change flavors or go gluten-free. Lastly, I shared storage tips to keep your cake fresh. Enjoy your baking, and make every slice deliciou

- 1 cup unsalted butter, softened - 1 ½ cups granulated sugar - 4 large eggs - 2 cups all-purpose flour - 1 teaspoon baking powder - ½ teaspoon salt - ½ cup brewed coffee, cooled - ½ cup unsweetened cocoa powder - 1 teaspoon vanilla extract - 1 teaspoon espresso powder - 1 cup powdered sugar (for glaze) - 2 tablespoons milk (for glaze) For this cake, precise measurements matter. Use a kitchen scale for best results. If you need to swap some ingredients, here are ideas: - Unsalted butter can be replaced with a plant-based butter. - Granulated sugar can switch to coconut sugar for a hint of caramel. - All-purpose flour can be substituted with a gluten-free blend. - Brewed coffee can be replaced with strong brewed tea for a different taste. Certain ingredients add depth to this cake. Espresso powder intensifies the coffee flavor. Use high-quality cocoa powder for a rich chocolate taste. Freshly brewed coffee makes a notable difference, too. These ingredients create a unique blend of mocha and chocolate. They keep the cake moist and flavorful, making each bite a delight. {{ingredient_image_1}} Start by preheating your oven to 350°F (175°C). Grease a 9x5-inch loaf pan to keep the cake from sticking. In a large bowl, cream together 1 cup of softened unsalted butter and 1 ½ cups of granulated sugar. Mix until it looks light and fluffy. Next, add 4 large eggs one by one. Make sure to mix well after each egg. In another bowl, whisk together 2 cups of all-purpose flour, 1 teaspoon of baking powder, and ½ teaspoon of salt. Gradually mix this dry blend into the butter mixture. Alternate adding the ½ cup of cooled brewed coffee. Keep mixing until everything is just combined. Now it’s time to divide the batter. Split it into two equal parts. In one half, stir in ½ cup of unsweetened cocoa powder, 1 teaspoon of espresso powder, and 1 teaspoon of vanilla extract. This chocolate mix will add rich flavor. To create the swirl, begin layering the batters in the loaf pan. Start with a spoonful of the vanilla batter, followed by a spoonful of the chocolate batter. Keep alternating until both batters are used up. Use a knife to gently swirl them together. This will give your cake a beautiful marbled look. Place the loaf pan in your preheated oven. Bake for 50 to 60 minutes. Check if it's done by inserting a toothpick into the center. It should come out clean. Once baked, let the cake cool in the pan for 10 minutes. After that, transfer it to a wire rack to cool completely. While the cake cools, prepare the glaze. In a bowl, whisk together 1 cup of powdered sugar and 2 tablespoons of milk until smooth. Drizzle this over your cooled pound cake before serving. Enjoy your delicious mocha swirl pound cake! When making mocha swirl pound cake, avoid these mistakes for the best results: - Not softening the butter: Use softened butter for a fluffy mix. Cold butter won't blend well. - Overmixing the batter: Mix just until combined. Overmixing can make the cake dense. - Skipping the cooling step: Let the cake cool in the pan. This helps it firm up and makes it easier to remove. - Not checking your oven temperature: Use an oven thermometer to ensure accurate baking. An oven that is too hot or too cool can change your cake's texture. Creating beautiful swirls is fun and easy. Here’s how to do it: - Spoon batter alternately: Place a spoonful of vanilla batter, then a spoonful of chocolate batter. Repeat until the pan is full. - Use a knife gently: Take a butter knife and run it through the batter in a figure-eight motion. This creates a lovely marbled look. - Don’t over-swirl: Swirl just enough to mix the batters without losing the distinct layers. Too much swirling will blend the flavors completely. A glaze adds a sweet finish to your cake. Here are tips for a perfect glaze: - Use room temperature milk: This helps the glaze mix smoothly. Cold milk can make it lumpy. - Whisk well: Combine the powdered sugar and milk until there are no lumps. A smooth glaze looks better. - Drizzle over cooled cake: Let the cake cool completely before adding the glaze. Hot cake will melt the glaze, making it runny. - Add extra flavor: For a twist, mix in a bit of coffee or cocoa powder into the glaze. This enhances the mocha flavor and makes it even more special. Pro Tips Use Room Temperature Ingredients: Make sure your butter and eggs are at room temperature for a smoother batter and better texture. Don’t Overmix: When combining the batter, mix just until the ingredients are incorporated to avoid a dense cake. Check for Doneness: Insert a toothpick into the center of the cake; it should come out clean or with a few crumbs for perfect doneness. Let It Cool Completely: Allow the cake to cool completely before glazing to ensure the glaze sets properly. {{image_2}} You can change the flavor of your mocha swirl pound cake easily. Try using different extracts. Almond or hazelnut extracts add a unique twist. You can also swap out the brewed coffee for flavored coffee. This adds depth to the cake's taste. For a sweeter note, add a bit more sugar. Want a richer flavor? Use dark cocoa powder instead of regular cocoa. Each adjustment gives the cake a new life. Making a gluten-free mocha swirl pound cake is simple. Replace all-purpose flour with gluten-free all-purpose flour. This swap works well in most recipes. Just check that your baking powder is gluten-free. You may need to adjust the liquid slightly. Some gluten-free flours absorb more moisture. The cake will still taste amazing and be a hit! Adding nuts or chips can enhance the texture of your cake. Chopped walnuts or pecans add a nice crunch. Fold these in gently before baking. Chocolate chips work great too. They melt and create pockets of gooey chocolate. Use semi-sweet or dark chocolate chips for a richer flavor. These additions make each slice even more delightful. Store your mocha swirl pound cake in an airtight container. This keeps it fresh and moist. You can place it at room temperature for up to three days. If you want to keep it longer, the fridge is a good option. Just remember, cold air can dry it out. Wrap it well in plastic wrap or foil before putting it in the fridge. This way, it stays soft and tasty. To freeze the cake, first let it cool completely. Wrap it tightly in plastic wrap. Then, place the wrapped cake in a freezer bag. This prevents freezer burn and keeps the flavor. You can freeze it for up to three months. When you are ready to enjoy, thaw it in the fridge overnight. This helps it regain moisture and taste great. To reheat the mocha swirl pound cake, slice it first. You can use a microwave or an oven. For the microwave, warm it for about 15-20 seconds. Check it often to avoid overheating. For the oven, preheat it to 350°F (175°C). Place slices on a baking sheet and heat for 5-10 minutes. This warms the cake and brings back its soft texture. Enjoy with a drizzle of glaze or a cup of coffee! Yes, you can use any brewed coffee you like. Dark roast coffee adds a strong flavor. Light roast coffee gives a milder taste. You can also try flavored coffee. Vanilla or hazelnut coffee can make it unique and fun. Just make sure it’s brewed and cooled before adding to the batter. Mocha swirl pound cake lasts about four to five days at room temperature. Store it in an airtight container to keep it fresh. If you want it to last longer, you can freeze it. It stays good in the freezer for up to three months. Just wrap it tightly in plastic wrap. Mocha pairs well with many flavors. Here are some tasty options: - Peppermint for a minty twist. - Orange zest adds a bright citrus note. - Almond extract gives a nutty flavor. - Sea salt can enhance the sweet and rich coffee taste. Mix and match to find your favorite combo! This blog post covered all you need for a great mocha cake. We explored the key ingredients, including special ones for better flavor. I shared step-by-step instructions for batter, swirling, and baking. You learned tips to avoid common mistakes and make the best glaze. Variations let you change flavors or go gluten-free. Lastly, I shared storage tips to keep your cake fresh. Enjoy your baking, and make every slice delicious!

Mocha Swirl Pound Cake

A deliciously rich pound cake with a delightful mocha swirl, perfect for coffee lovers.
Print Recipe Pin Recipe
Prep Time 20 minutes mins
Cook Time 1 hour hr
Total Time 1 hour hr 20 minutes mins
Course Dessert
Cuisine American
Servings 10
Calories 300 kcal

Ingredients
  

  • 1 cup unsalted butter, softened
  • 1.5 cups granulated sugar
  • 4 large eggs
  • 2 cups all-purpose flour
  • 1 teaspoon baking powder
  • 0.5 teaspoon salt
  • 0.5 cup brewed coffee, cooled
  • 0.5 cup unsweetened cocoa powder
  • 1 teaspoon vanilla extract
  • 1 teaspoon espresso powder
  • 1 cup powdered sugar (for glaze)
  • 2 tablespoons milk (for glaze)

Instructions
 

  • Preheat your oven to 350°F (175°C) and grease a 9x5-inch loaf pan.
  • In a large mixing bowl, cream the softened butter and granulated sugar together until light and fluffy.
  • Add the eggs one at a time, mixing well after each addition.
  • In another bowl, whisk together the flour, baking powder, and salt. Gradually add this mixture to the butter mixture, alternating with the brewed coffee. Mix until just combined.
  • Divide the batter into two equal portions. In one portion, stir in the cocoa powder, espresso powder, and vanilla extract.
  • To create the swirl, alternate spooning the two batters into the prepared loaf pan. Start with a layer of vanilla batter, then add a layer of chocolate batter, and repeat until both batters are used up. Use a knife to gently swirl the two batters together for a marbled effect.
  • Bake in the preheated oven for 50-60 minutes or until a toothpick inserted into the center comes out clean. Let the cake cool in the pan for 10 minutes before transferring it to a wire rack to cool completely.
  • For the glaze, whisk the powdered sugar and milk together until smooth. Drizzle over the cooled pound cake before serving.

Notes

Slice the cake and arrange on a serving platter. Drizzle with extra coffee glaze and serve with a cup of coffee on the side for a delightful pairing.
Keyword coffee, dessert, mocha, pound cake

Related Recipes

  • To make these tasty cookies, you need some key ingredients: - 1 cup rolled oats - 1 cup all-purpose flour - 1/2 teaspoon baking soda - 1/2 teaspoon cinnamon - 1/4 teaspoon salt - 1/2 cup unsalted butter, softened - 1/2 cup brown sugar, packed - 1/4 cup honey - 1 large egg - 1 teaspoon vanilla extract These ingredients create a chewy texture. The oats give a hearty feel, while honey adds natural sweetness. You can make your cookies even better with some add-ins: - 1/2 cup raisins or chocolate chips (optional) - 1/2 cup chopped nuts (e.g., walnuts or pecans, optional) Raisins bring a hint of chewiness, and nuts add a nice crunch. Chocolate chips make everything sweeter, and you can mix and match! If you need substitutions, there are many options: - Use gluten-free flour instead of all-purpose flour for a gluten-free version. - Replace the egg with 1/4 cup of applesauce for a vegan choice. - Swap honey with maple syrup if you want a different flavor. These changes allow you to make cookies fit your needs. Enjoy experimenting and find what works best for you! {{ingredient_image_1}} Start by gathering your ingredients. You need rolled oats, flour, baking soda, cinnamon, salt, butter, brown sugar, honey, an egg, and vanilla extract. If you want, add raisins, chocolate chips, or nuts. 1. Preheat your oven to 350°F (175°C). Line a baking sheet with parchment paper. 2. In a medium bowl, mix the oats, flour, baking soda, cinnamon, and salt. Stir these until they blend well. 3. In a large bowl, cream the softened butter and brown sugar. Beat until it looks smooth and fluffy. 4. Add honey, the egg, and vanilla extract. Mix these together till smooth. 5. Gradually add the dry mix. Stir just until combined. Do not overmix. 6. If you choose, fold in raisins, chocolate chips, or nuts. 1. Use a tablespoon to scoop portions of the dough. Place them on the baking sheet. Leave space between each scoop for spreading. 2. Bake for 10-12 minutes. Watch for the edges to turn golden brown. The centers can look soft but will firm up as they cool. 3. For best results, rotate your baking sheet halfway through. This helps cookies bake evenly. 1. When done, take the cookies out of the oven. Let them cool on the baking sheet for 5 minutes. 2. After that, transfer them to a wire rack. Allow them to cool completely. 3. Serve these cookies on a pretty plate. Drizzle honey on top for extra sweetness. A sprinkle of powdered sugar also looks nice. Enjoy your warm and chewy cookies! To make the best honey oatmeal cookies, focus on the butter. Use softened butter, not melted. Creaming the butter and brown sugar helps create a light texture. Don't overmix your dough. Mix until just combined for chewy cookies. Bake them until the edges are golden but the centers seem soft. They will firm up as they cool. One mistake is not preheating the oven. Always preheat to 350°F (175°C). This helps the cookies bake evenly. Another issue is using the wrong flour. All-purpose flour works best for this recipe. Lastly, avoid crowding the baking sheet. Leave space between cookies to allow for spreading. Store leftover cookies in an airtight container. They stay fresh for about a week. If you want to keep them longer, freeze them. Just place them in a freezer-safe bag. To thaw, leave them at room temperature for a few hours. Enjoy your cookies soft and chewy again! Pro Tips Chill the Dough: For even chewier cookies, refrigerate the dough for at least 30 minutes before baking. This helps to prevent spreading and enhances the flavor. Use Fresh Ingredients: Ensure your baking soda and spices are fresh for the best flavor and texture. Old ingredients can lead to flat or bland cookies. Customize Your Add-ins: Feel free to experiment with various mix-ins like dried fruits, seeds, or different types of chocolate to suit your taste preferences. Perfect Storage: Store cookies in an airtight container at room temperature for up to a week. For longer freshness, freeze them in a single layer and transfer to a container once solid. {{image_2}} You can make these cookies healthier with some simple swaps. Instead of all-purpose flour, try using whole wheat flour. This adds fiber and nutrients. You can also replace some butter with unsweetened applesauce. This change cuts fat and adds moisture. Using less brown sugar can also help. Try just a third of a cup to reduce sugar while still keeping sweetness. Add-ins can change the flavor of your cookies in fun ways. Instead of raisins, try dried cranberries or cherries for a tart touch. For a nutty flavor, use chopped almonds or pecans. You can also mix in dark chocolate chips for a rich taste. If you want a spice kick, add a pinch of nutmeg or ginger. These add-ins make each batch unique and fun to explore. Seasonal changes inspire great variations. In fall, add pumpkin spice and chopped apples for a cozy vibe. During winter, mix in peppermint chips for a festive flair. In the summer, fresh berries can give a bright burst of flavor. These seasonal twists let you enjoy honey oatmeal cookies all year round. Each season brings a new taste adventure! Each Honey Oatmeal Cookie has about 100 calories. This number can change based on the add-ins you choose. If you use chocolate chips or nuts, the calories may go up a bit. To keep track, you can divide the total calories by the number of cookies you bake. These cookies have oats, which are good for heart health. Oats can help lower bad cholesterol. Honey gives a natural sweetness and has antioxidants. It can also help soothe a sore throat. Brown sugar adds flavor but is less processed than white sugar. Using nuts can add healthy fats and protein, making the cookies more filling. You can cut sugar by using less brown sugar or honey. Replace some of the sugar with mashed bananas or applesauce. This change keeps cookies moist and sweet. You can also try using whole wheat flour for more fiber. If you skip the raisins or chocolate chips, you lower the calories too. To make these cookies vegan, swap the butter for a plant-based option. Use coconut oil or vegan butter. Replace the egg with a flax egg. To make a flax egg, mix one tablespoon of ground flaxseed with two and a half tablespoons of water. Let it sit for five minutes until it thickens. You can still use honey, but for a fully vegan cookie, substitute it with maple syrup or agave nectar. If you want to skip the eggs, use a flax egg or applesauce. A quarter cup of unsweetened applesauce works great in place of one egg. You can also use mashed banana or yogurt as alternatives. Each option adds moisture and keeps your cookies chewy. Yes, you can freeze these cookies! After baking, let them cool completely. Place the cookies in an airtight container or a freezer bag. They will last for about three months. To enjoy later, thaw them overnight in the fridge or microwave them for a few seconds. They will taste fresh and delightful! In this article, we explored how to make delicious honey oatmeal cookies. We covered key ingredients, step-by-step instructions, and tips for success. You can try different flavors and healthier swaps to suit your taste. Remember to avoid common mistakes for the best texture. Finally, enjoy these cookies fresh or store them well for later. Each bite offers great taste and health benefits that you can feel good about.
    Honey Oatmeal Cookies Comforting and Chewy Delight
  • To make your blondies, you need simple yet tasty items: - 1 cup unsalted butter - 1 cup packed brown sugar - 1/2 cup granulated sugar - 2 large eggs - 1 teaspoon vanilla extract - 2 cups all-purpose flour - 1 teaspoon baking powder - 1/2 teaspoon baking soda - 1/4 teaspoon salt - 1 cup chocolate chips (semisweet or milk) - 1/2 cup chopped nuts (optional, like walnuts or pecans) Each ingredient plays a key role. The butter gives rich flavor. The sugars add sweetness and texture. Eggs bind everything together. Flour gives structure. Baking powder and baking soda help them rise. You can take your blondies up a notch with some fun add-ins! Here are some ideas: - 1/2 cup of shredded coconut for a tropical flair - 1/2 cup of dried fruit like cranberries or apricots for a chewy bite - A sprinkle of sea salt on top to enhance sweet flavors These add-ins let you customize your blondies. You can make each batch unique and exciting. If you need to swap some items, here are great options: - Use coconut oil instead of butter for a dairy-free treat - Replace all-purpose flour with oat flour for a gluten-free option - Try maple syrup in place of granulated sugar for a deeper flavor These substitutions will still give you delicious blondies. You can enjoy them no matter your dietary needs. {{ingredient_image_1}} Start by preheating your oven to 350°F (175°C). Line a 9x13 inch baking pan with parchment paper. Leave some paper over the sides to help lift out the blondies later. In a medium saucepan, melt one cup of unsalted butter over medium heat. Stir it often. Cook until the butter turns a golden brown and smells nutty. This takes about 5 to 7 minutes. Be careful not to burn it. After that, pour the browned butter into a mixing bowl and let it cool for a few minutes. Once cooled, mix in one cup of packed brown sugar and half a cup of granulated sugar. Stir until the mix is smooth. Add two large eggs, one at a time, mixing well after each egg. Next, stir in one teaspoon of vanilla extract. In another bowl, whisk together two cups of all-purpose flour, one teaspoon of baking powder, half a teaspoon of baking soda, and a quarter teaspoon of salt. Gradually add this dry mix to the wet ingredients, stirring until just combined. Be careful not to overmix. Finally, gently fold in one cup of chocolate chips and half a cup of chopped nuts, if you like. Now, pour the batter into your prepared baking pan. Spread it out evenly. Place the pan in the oven and bake for 20 to 25 minutes. The edges should look lightly golden. To check if they are done, insert a toothpick in the center. If it comes out with a few moist crumbs, your blondies are ready! After baking, let the blondies cool in the pan for about 10 minutes. Use the parchment paper to lift them out. Move them to a wire rack to cool completely. Once cool, cut them into squares. Enjoy your chewy brown butter blondies! To get that chewy texture, don’t overmix your batter. Mix just until the flour disappears. Adding brown sugar helps keep your blondies moist and chewy. The brown butter also adds richness that boosts the chewiness. Finally, let them cool before cutting. This helps them set and hold their shape. Brown butter is key to making these blondies shine. Melt your butter slowly over medium heat. Keep stirring until it turns a beautiful golden brown. You’ll know it’s done when it smells nutty. This process adds a deep, rich flavor that makes your blondies special. Remember to let it cool before mixing it with sugar and eggs. One common mistake is not measuring ingredients correctly. Use a kitchen scale for accuracy if you can. Another mistake is opening the oven door too soon. This can cause the blondies to sink. Always check for doneness with a toothpick. It should come out with a few moist crumbs, not wet batter. Avoiding these mistakes will help you bake perfect blondies every time. Pro Tips Use Fresh Ingredients: Always use fresh eggs and quality chocolate chips for the best flavor and texture in your blondies. Don't Overmix: When combining the wet and dry ingredients, mix just until combined to maintain a chewy texture. Cool Before Cutting: Allow the blondies to cool completely before cutting to ensure clean edges and prevent them from falling apart. Experiment with Mix-ins: Feel free to add your favorite mix-ins like dried fruit or different types of nuts for a unique twist on the classic blondie. {{image_2}} If you want nut-free blondies, simply skip the nuts. You can still enjoy a chewy texture and rich flavor. The chocolate chips will add enough sweetness. If you like, add a bit more flour to keep the texture nice. This way, those with nut allergies can enjoy this treat too! You can change the flavor of your blondies easily. Adding spices like cinnamon or nutmeg gives a warm taste. A teaspoon of almond extract can add a nice twist. Want a tropical touch? Add some shredded coconut. These small changes can create a whole new dessert experience. Taste buds will thank you! Using different types of chocolate is simple. If you love dark chocolate, swap in dark chocolate chips. They will give a richer flavor. For a sweeter treat, use white chocolate chips. You can even mix them for a fun blend. Each type of chocolate brings its own magic to these blondies. Enjoy experimenting! To keep your chewy brown butter blondies fresh, store them in an airtight container. This helps keep them soft and chewy. Place parchment paper between layers to prevent sticking. Store them at room temperature for up to five days. If you want them to last longer, the fridge can work too. Just know that cold blondies may lose some chewiness. Freezing blondies is easy and a smart choice. Start by letting them cool completely. Once cool, cut them into squares. Wrap each square in plastic wrap. Then, place the wrapped blondies in a freezer bag. They can stay in the freezer for up to three months. When you’re ready to enjoy, simply take one out and let it thaw at room temperature. If you want to warm up your blondies, the oven is best. Preheat your oven to 350°F (175°C). Place the blondies on a baking sheet for about 5-10 minutes. This warms them and brings back their chewy texture. You can also use a microwave. Heat them for about 10-15 seconds. Be careful not to overheat; you want them warm, not hot. Enjoy every bite! Blondies and brownies look alike, but they taste very different. Blondies use brown sugar, while brownies use cocoa powder. That gives blondies a sweet, butterscotch flavor. Brownies have richer chocolate flavor. The texture is also different. Blondies are chewy and soft, while brownies can be fudgy or cake-like. To check if your blondies are done, look at the edges. They should be lightly golden. Insert a toothpick in the center. If it comes out with a few moist crumbs, they are ready. If it comes out wet with batter, bake them a bit longer. This usually takes about 20 to 25 minutes. You can use margarine, but it will change the flavor a bit. Butter gives blondies a rich taste. Margarine may not brown like butter, which adds a nutty flavor. If you need to use margarine, choose one that has a higher fat content for better results. In this post, I covered key ingredients for chewy brown butter blondies and helpful tips for baking. You learned how to prepare the batter, bake your blondies, and cool them properly. I shared storage tips and answered common questions about blondies. Brown butter adds a rich taste you will love. Baking is fun, so don’t be afraid to try new flavors. Enjoy your blondies and share with friends.
    Chewy Brown Butter Blondies Perfectly Delicious Treat
  • To make a flourless chocolate lava cake, you need: - 1 cup semi-sweet chocolate chips - 6 tablespoons unsalted butter - 3 large eggs - 1/2 cup granulated sugar - 1 teaspoon vanilla extract - 1/4 teaspoon salt - 1/4 cup unsweetened cocoa powder These simple ingredients create a rich and gooey dessert that everyone loves. You can enhance your cake with these extras: - Powdered sugar for dusting - Vanilla ice cream for serving These additions make your lava cake even more delightful. This dessert is naturally gluten-free since it uses no flour. If you want to make it dairy-free, you can swap the butter and chocolate for dairy-free options. Always check labels to ensure they meet your needs. {{ingredient_image_1}} Start by preheating your oven to 425°F (220°C). Grease four ramekins with unsalted butter. Make sure to cover the entire inside. Then, dust each ramekin with cocoa powder. This step helps the cakes pop out easily after baking. In a microwave-safe bowl, mix the semi-sweet chocolate chips with the unsalted butter. Heat them in the microwave for 30 seconds. Stir the mixture well after each interval. Keep doing this until it is smooth and shiny. This blend is the heart of your lava cake. In another bowl, crack three large eggs. Add the granulated sugar, vanilla extract, and salt. Whisk these together until the mix is pale and frothy. Next, pour the melted chocolate mixture into this egg mix. Fold the two together gently. Be careful not to overmix; we want a rich, smooth batter. Sift the unsweetened cocoa powder over your batter. Gently fold it in until combined. Now, divide the batter evenly among the prepared ramekins, filling each about 3/4 full. Place the ramekins on a baking sheet for easy handling. Bake in your preheated oven for 12-14 minutes. The edges should be firm, but the center will still jiggle slightly. After baking, let the cakes cool for 1-2 minutes. Carefully flip each ramekin onto a serving plate. The cakes should slide out easily. If you want, dust them with powdered sugar for a nice touch. Serve warm, and don't forget a scoop of vanilla ice cream for extra delight! To get that gooey center, watch your baking time closely. Bake the cakes for 12 to 14 minutes. The edges should feel firm, but the center must jiggle. If you bake too long, the center will cook through. Use a timer to help you avoid overbaking. Every oven is different, so check a minute early. Trust me, the perfect lava cake is all about timing. If you have any leftover lava cakes, store them in the fridge. Place them in an airtight container to keep them fresh. They will last for about three days. When you’re ready to eat them, reheat in the microwave. Heat for about 20 seconds. This warms them without losing the gooey center. Enjoy them warm for the best taste. The type of chocolate you use makes a big difference. I recommend semi-sweet chocolate chips for a rich flavor. Dark chocolate works too, if you want a more intense taste. Just remember, the better the chocolate, the better the cake. Look for high-quality brands with simple ingredients. Always choose chocolate you love to eat on its own. Pro Tips Perfect Chocolate Melting: To avoid scorching the chocolate, melt it in short 30-second intervals, stirring in between to ensure even melting without burning. Check for Doneness: The ideal lava cake should have firm edges and a soft, gooey center. If unsure, do a toothpick test; it should come out with moist crumbs, not wet batter. Cooling Time: Allow the cakes to cool for just 1-2 minutes before inverting. This helps set the edges while keeping the center molten. Serving Suggestions: For an extra touch of elegance, serve with a dollop of whipped cream or a fresh raspberry alongside the vanilla ice cream. {{image_2}} You can spice up your flourless chocolate lava cake with fun flavors. Want a minty twist? Just add a few drops of mint extract to the batter. This will give it a cool and fresh taste. If you love coffee, add one tablespoon of instant coffee granules. It brings out the chocolate flavor nicely. For a fruity touch, mix in some orange zest. Each flavor adds a new layer of fun to this dessert. If you want a healthier cake, switch the granulated sugar. You can use coconut sugar or maple syrup. Coconut sugar has a lower glycemic index, so it’s a bit better for your health. If you use maple syrup, reduce the amount of butter slightly. This keeps the cake moist while making it a bit lighter. These swaps keep the richness you love but make it a tad healthier. Want to make this cake gluten-free? You're already set! The recipe contains no flour. For a dairy-free option, use vegan chocolate chips and coconut oil instead of butter. The taste remains rich and delicious. If you have egg allergies, try using flax eggs. Mix one tablespoon of ground flaxseed with three tablespoons of water for each egg. Let it sit until it thickens. These swaps help you enjoy this tasty dessert no matter your dietary needs. To store leftover lava cakes, let them cool first. Place them in airtight containers. Keep them in the fridge for up to three days. If you want to enjoy them later, wait to dust with powdered sugar until you're ready to serve. This keeps them looking fresh. When you're ready to eat, reheat the lava cakes. Preheat your oven to 350°F (175°C). Place the cakes on a baking sheet. Heat for about 8-10 minutes. This warms them without overcooking. You can also use the microwave. Heat on low for about 20-30 seconds. Check to see if they are warm enough. If you want to save lava cakes for later, freezing is a great option. Wrap each cooled cake tightly in plastic wrap. Then, place them in a freezer-safe bag. They can last up to three months. When you want to eat one, take it out and thaw it in the fridge overnight. Then, reheat as needed. Enjoy that molten center again! Yes, you can use dark chocolate or milk chocolate. Dark chocolate gives a rich taste. Milk chocolate offers a sweeter flavor. Just keep the same amount of chocolate chips. Adjust the sugar if you use a sweeter chocolate. Watch the edges closely while baking. They should be firm and set. The center should jiggle slightly when you shake the ramekin. If it looks too firm, it may not have a molten center. You can serve it with a scoop of vanilla ice cream. The cold ice cream pairs well with the warm cake. Fresh berries also add a nice touch. A sprinkle of powdered sugar makes it look fancy too. Yes, you can make the batter ahead of time. Just cover it and keep it in the fridge. When ready to bake, pour it into the ramekins and bake as usual. It’s a great way to save time before a dinner party! In this article, we explored making delicious chocolate lava cakes. You learned about the key ingredients and optional items to serve. I shared step-by-step instructions for perfecting your cakes, along with useful tips to achieve that molten center. We also discussed fun variations to customize your cakes and smart storage practices. As you try this recipe, have fun experimenting! Enjoy the rich flavors and warm centers. Happy baking!
    Flourless Chocolate Lava Cake Rich and Decadent Dessert
  • To make Crème Brûlée French Toast, gather these ingredients: - 1 loaf of brioche bread, sliced thick (about 8 slices) - 4 large eggs - 1 cup whole milk - 1/2 cup heavy cream - 1/2 cup granulated sugar - 1 tablespoon vanilla extract - 1 teaspoon ground cinnamon - Pinch of salt - 1/4 cup brown sugar (for topping) - Fresh berries (for garnish) - Whipped cream (optional, for serving) Each ingredient plays a special role in this recipe. - Brioche Bread: This soft bread adds sweetness and richness. Its thick slices soak up the egg mixture well. - Eggs: They bind the mixture and give the toast a custardy texture. Always use large eggs for best results. - Whole Milk and Heavy Cream: These create a creamy base. Whole milk adds richness, while heavy cream boosts flavor. - Granulated Sugar: This sweetens the egg mixture. It helps to create a balanced flavor. - Vanilla Extract: This adds a warm, sweet aroma. It enhances the overall taste. - Ground Cinnamon: It gives a hint of spice. Cinnamon makes the dish cozy and inviting. - Brown Sugar: This forms a crunchy topping. It caramelizes beautifully, adding a nice contrast to the soft bread. If you can't find some ingredients, here are some substitutes: - Brioche Bread: You can use challah or any thick-sliced bread. They work well too. - Heavy Cream: Use half-and-half for a lighter option. It still adds creaminess. - Whole Milk: Almond milk or oat milk can work if you prefer dairy-free. - Granulated Sugar: You can swap it with coconut sugar or honey for a different sweetness. - Brown Sugar: If you don’t have brown sugar, use granulated sugar with a touch of molasses. {{ingredient_image_1}} To start, gather your ingredients. You will need 4 large eggs, 1 cup of whole milk, 1/2 cup of heavy cream, 1/2 cup of granulated sugar, 1 tablespoon of vanilla extract, 1 teaspoon of ground cinnamon, and a pinch of salt. 1. In a large mixing bowl, whisk together the eggs, milk, heavy cream, granulated sugar, vanilla, cinnamon, and salt. Mix until it is smooth and creamy. This mixture is the heart of your French toast. 2. Let the mixture sit for a few minutes. This gives the flavors time to blend well together. Now, it’s time to assemble your French toast. 1. Take a loaf of brioche bread and slice it thickly, about 8 slices. Arrange the slices in a greased baking dish. You can slightly overlap them if needed. 2. Pour your egg mixture over the brioche slices. Make sure each slice is well soaked. This step is key for that rich, custardy texture. 3. Cover the dish with plastic wrap and refrigerate. Let it sit for at least 2 hours or overnight. The longer it sits, the better it tastes. After the soaking time, you’re ready to bake. 1. Preheat your oven to 350°F (175°C). This ensures even cooking. 2. Remove the plastic wrap and sprinkle 1/4 cup of brown sugar evenly over the soaked bread. This will create that lovely caramel top. 3. Bake in the oven for 30-35 minutes. Look for a golden top and a set center. 4. For a special touch, use a kitchen torch to caramelize the brown sugar. Aim for a bubbly, golden finish for that perfect crème brûlée effect. 5. Let it cool for a few minutes before slicing. This helps the toast hold its shape. Enjoy your delicious Crème Brûlée French Toast warm, topped with fresh berries and whipped cream if you like! To get the best texture, use thick slices of brioche bread. This bread soaks up the egg mixture well. I recommend letting it sit in the fridge for at least two hours. Overnight soaking yields even better results. This allows the bread to absorb all the flavors. One common mistake is not soaking the bread long enough. If you skip this step, the toast may turn out dry. Also, avoid using too much heat while baking. Baking at 350°F ensures even cooking without burning the top. Remember, caramelizing the sugar with too much heat can lead to burnt sugar. Serve your Crème Brûlée French Toast warm. Top it with fresh berries for a burst of flavor. A dollop of whipped cream adds a nice touch, too. You can sprinkle some extra cinnamon on top for added warmth. Consider pairing it with maple syrup for sweetness or a drizzle of honey for a unique twist. Pro Tips Use Day-Old Brioche: For the best texture, use day-old brioche bread. It will absorb the custard mixture better without becoming too soggy. Customize Your Flavors: Feel free to experiment with different extracts like almond or orange for a unique twist on the classic flavor. Check for Doneness: To ensure your French toast is perfectly set, gently shake the baking dish. If the center jiggles too much, it needs more time in the oven. Serving Suggestions: Serve with a drizzle of maple syrup or a dusting of powdered sugar for an extra touch of sweetness. {{image_2}} You can add fun flavors to your Crème Brûlée French Toast. Chocolate is a great choice. You can use chocolate chips or a drizzle of chocolate sauce. Fresh fruit is another tasty addition. Strawberries, blueberries, and bananas work well. You can also mix fruit into the egg mix. It adds a fresh taste and color. Want to try something different? Add a splash of orange or almond extract for a unique twist. You can make this dish fit your needs. For a gluten-free option, use gluten-free bread. Many brands offer great gluten-free choices. If you want a dairy-free version, substitute almond milk or oat milk for whole milk. Use coconut cream instead of heavy cream. This keeps the creaminess while making it dairy-free. Just adjust the sugar if you use sweetened milk. Serving your Crème Brûlée French Toast can be fun! You can stack the slices high for a tall, impressive look. Add whipped cream on top for a treat. Fresh berries add color and flavor. For a fancy touch, sprinkle powdered sugar over the top. You could also serve it with maple syrup or a fruit compote on the side. This makes breakfast feel special. After you enjoy your Crème Brûlée French Toast, you might have some left. To store leftovers, let them cool completely first. Place the slices in an airtight container. Keep them in the fridge for up to three days. This way, they stay fresh and tasty. When you're ready to eat the leftovers, reheating is simple. Preheat your oven to 350°F (175°C). Place the French toast on a baking sheet. Cover it with foil to keep it moist. Heat for about 10-15 minutes. You can also use the microwave if you’re in a hurry. Just warm it for 30-60 seconds, but the oven gives better results. If you want to save some for later, freezing works well too. Wrap each slice in plastic wrap tightly. Then, place them in a freezer bag. They can last up to two months in the freezer. When you're ready to eat, thaw them in the fridge overnight. After that, reheat as mentioned earlier. Crème Brûlée French Toast is a sweet breakfast dish. It combines the creamy texture of crème brûlée with the classic French toast. You soak thick slices of brioche bread in a rich mixture of eggs, milk, and heavy cream. After soaking, you bake it until it is golden. Then, you top it with brown sugar and caramelize it for a crunchy finish. This dish is both decadent and comforting, perfect for special mornings. You can easily prepare this dish ahead of time. After you mix the egg mixture, pour it over the brioche slices. Cover the baking dish with plastic wrap and place it in the fridge. Let it soak for at least 2 hours or overnight for best results. This way, it’s ready to bake when you are. Just preheat your oven and bake it in the morning. You’ll enjoy a warm, tasty breakfast without stress. Yes, you can use different types of bread for this recipe. While brioche gives a rich flavor, you can try challah or French bread. These types also soak up the egg mixture well. Just make sure the bread is thickly sliced. Thin slices may not hold up during baking. Experiment with what you have on hand for a fun twist on this dish! We explored the key ingredients and step-by-step instructions for Crème Brûlée French Toast. I shared tips for perfect texture and common mistakes to avoid. You learned about different variations and storage options to keep your dish fresh. In conclusion, with a few simple steps and tweaks, you can make this dish shine. Experiment with flavors and enjoy every bite. Happy cooking!
    Crème Brûlée French Toast Delicious Morning Treat

WANT TO SAVE THIS RECIPE?

  • Facebook

Leave a Reply Cancel reply

Your email address will not be published. Required fields are marked *

Recipe Rating


Hi I’m Taling

I love sharing perfected dishes from my kitchen. I’m sure they’ll earn a spot in your heart. Let’s savor this journey together!.

More about me

Recent Desserts

  • - 1 cup unsalted butter, softened - 1 ½ cups granulated sugar - 4 large eggs - 2 cups all-purpose flour - 1 teaspoon baking powder - ½ teaspoon salt - 1/2 cup brewed coffee, cooled - 1/2 cup unsweetened cocoa powder - 1 teaspoon vanilla extract - 1 teaspoon espresso powder - 1 cup powdered sugar (for glaze) - 2 tablespoons milk (for glaze) For this cake, precise measurements matter. Use a kitchen scale for best results. If you need to swap some ingredients, here are ideas: - Unsalted butter can be replaced with a plant-based butter. - Granulated sugar can switch to coconut sugar for a hint of caramel. - All-purpose flour can be substituted with a gluten-free blend. - Brewed coffee can be replaced with strong brewed tea for a different taste. Certain ingredients add depth to this cake. Espresso powder intensifies the coffee flavor. Use high-quality cocoa powder for a rich chocolate taste. Freshly brewed coffee makes a notable difference, too. These ingredients create a unique blend of mocha and chocolate. They keep the cake moist and flavorful, making each bite a delight. {{ingredient_image_1}} Start by preheating your oven to 350°F (175°C). Grease a 9x5-inch loaf pan to keep the cake from sticking. In a large bowl, cream together 1 cup of softened unsalted butter and 1 ½ cups of granulated sugar. Mix until it looks light and fluffy. Next, add 4 large eggs one by one. Make sure to mix well after each egg. In another bowl, whisk together 2 cups of all-purpose flour, 1 teaspoon of baking powder, and ½ teaspoon of salt. Gradually mix this dry blend into the butter mixture. Alternate adding the ½ cup of cooled brewed coffee. Keep mixing until everything is just combined. Now it’s time to divide the batter. Split it into two equal parts. In one half, stir in ½ cup of unsweetened cocoa powder, 1 teaspoon of espresso powder, and 1 teaspoon of vanilla extract. This chocolate mix will add rich flavor. To create the swirl, begin layering the batters in the loaf pan. Start with a spoonful of the vanilla batter, followed by a spoonful of the chocolate batter. Keep alternating until both batters are used up. Use a knife to gently swirl them together. This will give your cake a beautiful marbled look. Place the loaf pan in your preheated oven. Bake for 50 to 60 minutes. Check if it's done by inserting a toothpick into the center. It should come out clean. Once baked, let the cake cool in the pan for 10 minutes. After that, transfer it to a wire rack to cool completely. While the cake cools, prepare the glaze. In a bowl, whisk together 1 cup of powdered sugar and 2 tablespoons of milk until smooth. Drizzle this over your cooled pound cake before serving. Enjoy your delicious mocha swirl pound cake! When making mocha swirl pound cake, avoid these mistakes for the best results: - Not softening the butter: Use softened butter for a fluffy mix. Cold butter won't blend well. - Overmixing the batter: Mix just until combined. Overmixing can make the cake dense. - Skipping the cooling step: Let the cake cool in the pan. This helps it firm up and makes it easier to remove. - Not checking your oven temperature: Use an oven thermometer to ensure accurate baking. An oven that is too hot or too cool can change your cake's texture. Creating beautiful swirls is fun and easy. Here’s how to do it: - Spoon batter alternately: Place a spoonful of vanilla batter, then a spoonful of chocolate batter. Repeat until the pan is full. - Use a knife gently: Take a butter knife and run it through the batter in a figure-eight motion. This creates a lovely marbled look. - Don’t over-swirl: Swirl just enough to mix the batters without losing the distinct layers. Too much swirling will blend the flavors completely. A glaze adds a sweet finish to your cake. Here are tips for a perfect glaze: - Use room temperature milk: This helps the glaze mix smoothly. Cold milk can make it lumpy. - Whisk well: Combine the powdered sugar and milk until there are no lumps. A smooth glaze looks better. - Drizzle over cooled cake: Let the cake cool completely before adding the glaze. Hot cake will melt the glaze, making it runny. - Add extra flavor: For a twist, mix in a bit of coffee or cocoa powder into the glaze. This enhances the mocha flavor and makes it even more special. Pro Tips Use Room Temperature Ingredients: Make sure your butter and eggs are at room temperature for a smoother batter and better texture. Don’t Overmix: When combining the batter, mix just until the ingredients are incorporated to avoid a dense cake. Check for Doneness: Insert a toothpick into the center of the cake; it should come out clean or with a few crumbs for perfect doneness. Let It Cool Completely: Allow the cake to cool completely before glazing to ensure the glaze sets properly. {{image_2}} You can change the flavor of your mocha swirl pound cake easily. Try using different extracts. Almond or hazelnut extracts add a unique twist. You can also swap out the brewed coffee for flavored coffee. This adds depth to the cake's taste. For a sweeter note, add a bit more sugar. Want a richer flavor? Use dark cocoa powder instead of regular cocoa. Each adjustment gives the cake a new life. Making a gluten-free mocha swirl pound cake is simple. Replace all-purpose flour with gluten-free all-purpose flour. This swap works well in most recipes. Just check that your baking powder is gluten-free. You may need to adjust the liquid slightly. Some gluten-free flours absorb more moisture. The cake will still taste amazing and be a hit! Adding nuts or chips can enhance the texture of your cake. Chopped walnuts or pecans add a nice crunch. Fold these in gently before baking. Chocolate chips work great too. They melt and create pockets of gooey chocolate. Use semi-sweet or dark chocolate chips for a richer flavor. These additions make each slice even more delightful. Store your mocha swirl pound cake in an airtight container. This keeps it fresh and moist. You can place it at room temperature for up to three days. If you want to keep it longer, the fridge is a good option. Just remember, cold air can dry it out. Wrap it well in plastic wrap or foil before putting it in the fridge. This way, it stays soft and tasty. To freeze the cake, first let it cool completely. Wrap it tightly in plastic wrap. Then, place the wrapped cake in a freezer bag. This prevents freezer burn and keeps the flavor. You can freeze it for up to three months. When you are ready to enjoy, thaw it in the fridge overnight. This helps it regain moisture and taste great. To reheat the mocha swirl pound cake, slice it first. You can use a microwave or an oven. For the microwave, warm it for about 15-20 seconds. Check it often to avoid overheating. For the oven, preheat it to 350°F (175°C). Place slices on a baking sheet and heat for 5-10 minutes. This warms the cake and brings back its soft texture. Enjoy with a drizzle of glaze or a cup of coffee! Yes, you can use any brewed coffee you like. Dark roast coffee adds a strong flavor. Light roast coffee gives a milder taste. You can also try flavored coffee. Vanilla or hazelnut coffee can make it unique and fun. Just make sure it’s brewed and cooled before adding to the batter. Mocha swirl pound cake lasts about four to five days at room temperature. Store it in an airtight container to keep it fresh. If you want it to last longer, you can freeze it. It stays good in the freezer for up to three months. Just wrap it tightly in plastic wrap. Mocha pairs well with many flavors. Here are some tasty options: - Peppermint for a minty twist. - Orange zest adds a bright citrus note. - Almond extract gives a nutty flavor. - Sea salt can enhance the sweet and rich coffee taste. Mix and match to find your favorite combo! This blog post covered all you need for a great mocha cake. We explored the key ingredients, including special ones for better flavor. I shared step-by-step instructions for batter, swirling, and baking. You learned tips to avoid common mistakes and make the best glaze. Variations let you change flavors or go gluten-free. Lastly, I shared storage tips to keep your cake fresh. Enjoy your baking, and make every slice delicious!
    Mocha Swirl Pound Cake Deliciously Indulgent Treat
  • To make delightful Key Lime Pie Bars, you need a few simple ingredients. Here’s the list: - 1 cup graham cracker crumbs - 1/4 cup granulated sugar - 1/2 cup unsalted butter, melted - 2 large eggs - 1 can (14 oz) sweetened condensed milk - 1/2 cup key lime juice - Zest of 2 limes - Pinch of salt - Optional toppings: Whipped cream, lime slices These ingredients create a perfect mix of flavors and textures. The graham cracker crumbs form a sweet and crunchy crust. The sweetened condensed milk gives a creamy base. Fresh key lime juice adds a tangy taste. Don't forget the zest! It enhances the lime flavor. If you like, add whipped cream and lime slices on top for a fun touch. {{ingredient_image_1}} First, set your oven to 350°F (175°C). This temperature helps the bars bake evenly. Next, line an 8x8 inch baking dish with parchment paper. This makes it easy to lift the bars out later. In a medium bowl, mix together 1 cup of graham cracker crumbs and 1/4 cup of granulated sugar. Then, add 1/2 cup of melted unsalted butter. Stir until the crumbs look wet. Press this mixture firmly into the bottom of your prepared dish to form a nice, even layer. Now, place the crust in your preheated oven. Bake it for about 8 to 10 minutes. Look for a light golden color on the crust. Once it’s ready, take it out and let it cool slightly. In a large bowl, whisk together 2 large eggs, 1 can (14 oz) of sweetened condensed milk, and 1/2 cup of key lime juice. Add the zest of 2 limes and a pinch of salt. Mix until it's smooth. This filling is what makes the bars so zesty and tasty. Pour the filling over your cooled crust. Make sure to spread it out evenly. Then, put the dish back in the oven. Bake for 15 to 18 minutes. The filling should be set but still have a slight jiggle in the center. After baking, remove the dish from the oven. Let it cool down at room temperature for a bit. Then, place it in the fridge for at least 2 hours. This chilling time helps the bars firm up. Once chilled, lift the pie bars out using the parchment paper. Cut them into squares. You can top them with whipped cream and lime slices for a fun touch. To get the best filling, focus on a few key points. First, use fresh key lime juice for a bright flavor. If you can’t find it, bottled juice works too, but fresh is best. Whisk the eggs and sweetened condensed milk together well. This helps mix air into the filling, giving it a light texture. The lime zest adds a nice touch, so don’t skip it. When you bake, check for a slight jiggle in the center. This means it’s perfect! If you want to mix it up, try different crusts. You can use almond flour for a nutty twist. A chocolate cookie crust is great too. Just crush your cookies and mix them with butter, like you do with graham crackers. You can even try a shortbread crust for a rich flavor. Each crust brings a new taste to your pie bars. Serving Key Lime Pie Bars can be fun and creative. You can top them with whipped cream to add sweetness. A slice of lime on each bar makes for a pretty touch. For extra flair, dust the bars with powdered sugar. Arrange them on a colorful platter for a great look. Try serving them with a scoop of vanilla ice cream for a treat! Pro Tips Chill for Best Results: Allow the key lime pie bars to chill completely in the refrigerator for at least 2 hours. This helps the flavors meld and ensures a firmer texture. Use Fresh Juice: Opt for freshly squeezed key lime juice instead of bottled for a brighter, more authentic flavor in your filling. Perfectly Set Filling: Keep an eye on the bars while baking; they should be set around the edges with a slight jiggle in the center when done. Garnish Wisely: Top with freshly whipped cream and a slice of lime for an appealing presentation and added flavor contrast. {{image_2}} You can change the flavor by using different citrus fruits. If you want a twist, try lemons. Lemon bars have a bright and tangy taste. Oranges can also work well. They add a sweet and zesty touch. Each option gives you a new experience. You can keep the same method from the key lime recipe but switch the juice. For those who need gluten-free treats, you have choices. You can use gluten-free graham cracker crumbs. There are many brands available now. Almond flour or ground oats can also serve as a crust. Just mix them with sugar and melted butter. Press firmly into the dish like you would with regular crumbs. Want to make your bars vegan? It is easy! Instead of eggs, use flaxseed meal. Mix one tablespoon of flaxseed meal with three tablespoons of water. Let it sit until it thickens. Swap the sweetened condensed milk with coconut cream or a dairy-free version. These changes keep the bars creamy and delicious without using animal products. To keep your leftover Key Lime Pie Bars fresh, place them in an airtight container. You can also cover them with plastic wrap. Store the bars in the refrigerator. This will help keep their tangy flavor and smooth texture. Make sure they are completely cool before storing. This prevents condensation from forming inside the container. If you want to freeze your Key Lime Pie Bars, follow these steps: - First, let the bars cool completely. - Next, cut them into squares. - Wrap each square tightly in plastic wrap. - Place the wrapped bars in a freezer bag. - Label the bag with the date and type. You can freeze the bars for up to three months. When you're ready to enjoy them, thaw in the fridge for a few hours before serving. Key Lime Pie Bars can last in the fridge for about five days. After that, they may lose their taste and texture. Always check for any signs of spoilage before eating. If they look or smell off, it's best to discard them. Keeping them stored properly will help you enjoy these treats longer. Key Lime Pie Bars need to chill for at least 2 hours. This time helps the filling set and improves the flavor. If you can wait longer, chilling them overnight works great too. The longer they chill, the better they taste. Yes, you can use bottled key lime juice. It saves time and is easy to find. However, fresh juice tastes better. Bottled juice may lack the bright flavor of fresh limes. If you want true taste, use freshly squeezed juice. To cut the bars cleanly, use a sharp knife. Dip the knife in hot water, then wipe it dry. This method helps you get neat squares. Make sure to cut them after they are fully chilled. This way, they will hold their shape well. You now have a simple guide to make delicious Key Lime Pie Bars. We covered ingredients, step-by-step instructions, and some fun variations. Remember, the key to great bars is in the filling's balance and the crust's crunch. Feel free to experiment with different flavors and diets. Storing them correctly helps keep them fresh. Enjoy sharing these tasty treats with friends and family! Your dessert skills are sure to impress everyone.
    Key Lime Pie Bars Delightful and Easy to Make
  • - 3 ripe bananas, mashed - 1 cup Greek yogurt (plain, unsweetened) - 2 large eggs - 1/2 cup honey or maple syrup - 1/4 cup melted coconut oil (or vegetable oil) - 1 teaspoon vanilla extract - 1 teaspoon baking soda - 1/2 teaspoon baking powder - 1/2 teaspoon salt - 1 teaspoon ground cinnamon - 1 1/2 cups all-purpose flour - 1/2 cup chopped walnuts or pecans - 1/2 cup dark chocolate chips The key to this Greek yogurt banana bread lies in the balance of flavors and textures. The ripe bananas give it sweetness and moisture. The Greek yogurt adds creaminess and a slight tang, making your bread rich and soft. This recipe uses two eggs for binding and structure. Honey or maple syrup serves as a natural sweetener, which you can adjust to fit your taste. Coconut oil brings a lovely richness, but you can swap it with vegetable oil if you prefer. For the dry mix, baking soda and baking powder make the bread rise. Salt enhances all the flavors, while cinnamon adds warmth. Finally, all-purpose flour gives the bread its structure. Feel free to customize your banana bread! Adding walnuts or dark chocolate chips can transform the flavor and texture. You can mix and match to create your perfect loaf. {{ingredient_image_1}} - Preheat your oven to 350°F (175°C). - Grease or line a 9x5-inch loaf pan. - In a large bowl, combine the mashed bananas, Greek yogurt, eggs, honey (or maple syrup), melted coconut oil, and vanilla extract. - Whisk everything until smooth and well-combined. - In another bowl, whisk together the baking soda, baking powder, salt, ground cinnamon, and all-purpose flour. - Gradually fold the dry ingredients into the wet mixture. Mix until just combined. - If you like, fold in walnuts or dark chocolate chips. - Pour the batter into the prepared loaf pan and smooth the top. - Bake for 50-60 minutes. Check doneness with a toothpick; it should come out clean. - Don't over-mix the batter. This keeps your bread light and fluffy. - Let the ingredients come to room temperature before mixing. Cold ingredients can make the bread dense. - Experiment with adding vanilla extract or spices to boost flavor. A little can go a long way! - Add a pinch of nutmeg for additional warmth. It gives a nice touch to the overall taste. - Cool in the pan for 10 minutes before transferring to a wire rack. This helps it set properly. - Serve warm or at room temperature. Enjoy it plain or with a dollop of Greek yogurt for extra creaminess. Pro Tips Use Overripe Bananas: The riper the bananas, the sweeter and more flavorful your banana bread will be. Look for bananas with brown spots for optimal sweetness. Don’t Overmix the Batter: Mix the wet and dry ingredients until just combined to ensure a tender loaf. Overmixing can lead to a dense texture. Add Flavor Variations: Consider adding nuts, chocolate chips, or spices like nutmeg for extra flavor. Make it your own by experimenting with different mix-ins! Cool Properly: Let the banana bread cool in the pan for a few minutes before transferring it to a wire rack. This helps maintain its structure and prevents sogginess. {{image_2}} You can make simple swaps to boost the health factor of your Greek yogurt banana bread. - Replace honey with agave syrup for a lower glycemic option. - Use whole wheat flour instead of all-purpose flour. Whole wheat flour adds fiber and nutrients. Get creative with flavors to make your banana bread unique. - Add dried fruit like raisins or cranberries for extra sweetness. - Incorporate zests like lemon or orange for a fresh twist. The zests bring brightness to the dish. You can modify the recipe to fit different diets. - Make it vegan by swapping eggs with flaxseed meal mixed with water. - Use maple syrup instead of honey for a plant-based sweetener. These changes keep the bread moist and tasty. Let the bread cool completely before storing. This helps keep the texture nice. Once cool, store it in an airtight container at room temperature. The bread stays fresh for up to 3 days. For long-term storage, freeze slices of banana bread. Wrap each slice in plastic wrap, then in foil. This helps keep the bread from getting freezer burn. You can freeze it for up to 3 months. When ready to eat, thaw it in the refrigerator or at room temperature. To enjoy your banana bread warm, you can microwave it for a few seconds. Alternatively, toast slices for a warm treat. Both methods bring back that fresh-baked taste. Enjoy! Yes, you can use frozen bananas. Just thaw them first. Drain any extra liquid after thawing. This way, your banana bread stays moist and tasty. If you don’t have Greek yogurt, plain yogurt works well. You can also use applesauce for a lighter option. Both will keep your bread moist and delicious. You can replace eggs easily. Mix flaxseed meal with water as a substitute. A commercial egg replacer also works. Both options keep your banana bread fluffy. To check if your banana bread is ready, insert a toothpick into the center. If it comes out clean or with a few moist crumbs, your bread is done. This simple test ensures perfect baking every time. In this post, I covered how to make delicious banana bread, detailing its main and dry ingredients, and offering step-by-step instructions. I also shared tips for baking and storing, plus variations and FAQs. With this guide, you can easily bake banana bread at home. Try different flavors and modifications to suit your taste. Enjoy the process, and share your tasty results with friends and family!
    Greek Yogurt Banana Bread Simple and Tasty Recipe
  • - 2 ripe avocados - 1/2 cup unsweetened cocoa powder - 1/3 cup maple syrup (or honey) - 1/4 cup almond milk (or any milk of choice) - 1 teaspoon vanilla extract - Pinch of sea salt - Fresh berries and mint leaves for garnish - Food processor - Measuring cups and spoons - Serving bowls or cups Gathering the right ingredients is key to making this creamy treat. Start with two ripe avocados. You want them soft but not brown. The cocoa powder gives the mousse its rich chocolate flavor. I use unsweetened cocoa to keep it healthy. Next, grab your sweetener. Maple syrup works well, but honey is great too. You can use either one, based on your taste. Almond milk helps blend it all together. You can swap it for any milk you prefer. Don't forget the vanilla extract! It adds a nice touch of flavor. A pinch of sea salt balances the sweetness. For garnishing, fresh berries and mint leaves make it look beautiful and fresh. Prepare your tools ahead of time. A food processor will make blending easy. Use measuring cups and spoons for accuracy. Finally, have serving bowls or cups ready for a fun presentation. With everything in place, you can dive into making this delicious avocado chocolate mousse! {{ingredient_image_1}} To start, take two ripe avocados. Ripe avocados are key to a smooth mousse. If they are hard, they won’t blend well. Slice each avocado in half, and remove the pit carefully. Use a spoon to scoop out the green flesh. Make sure you get every bit of the creamy avocado. Place the avocado in your food processor. This is the base of your mousse. Now, let’s add the other ingredients. Start with 1/2 cup of unsweetened cocoa powder. Then, pour in 1/3 cup of maple syrup or honey for sweetness. Next, add 1/4 cup of almond milk for creaminess. Don’t forget 1 teaspoon of vanilla extract and a pinch of sea salt. The order matters! Blend on high until it is smooth. Scrape the sides of the bowl to mix well. If it’s too thick, add a bit more milk. Taste your mousse, and if you want it sweeter, add more maple syrup. Blend again to combine everything. Once your mousse is smooth and creamy, it’s time to serve. Transfer the mousse into small bowls or cups. Cover them with plastic wrap. Refrigerate the mousse for at least 30 minutes. This chilling time helps the flavors mix and the texture firm up. When ready, serve the mousse chilled. Top it with fresh berries and a sprig of mint for a lovely finish. Enjoy your delicious treat! To get a velvety consistency, blend the mousse well. Use a food processor to mix everything until smooth. If it's too thick, add a splash of almond milk. If it's too thin, blend in a bit more cocoa powder. Sometimes, you may find little lumps. This can happen if the avocados are not ripe enough. Make sure to use ripe avocados for the best results. You can tell they are ripe if they feel soft when you press them gently. Tasting the mousse is key. After blending, take a small spoonful. If it needs more sweetness, add a bit more maple syrup. Blend again to mix it well. You can also try honey if you prefer. For a healthier option, consider using agave nectar or stevia. Both can give you sweetness without too many calories. Just remember to adjust the amount to your taste. Creative toppings can make your mousse look amazing. Fresh berries, like strawberries or raspberries, add color and taste. Mint leaves not only look good but also add a fresh flavor. Using berries has health benefits too. They are full of vitamins and antioxidants. Mint also helps with digestion. So, topping your mousse with these can make it both pretty and good for you. Pro Tips Use Ripe Avocados: Ensure your avocados are perfectly ripe for the best creamy texture and flavor. They should yield slightly to gentle pressure when squeezed. Adjust Sweetness: After blending, taste the mousse and adjust the sweetness to your preference. A little extra maple syrup or honey can enhance the flavor. Chill for Best Results: Allow the mousse to chill in the refrigerator for at least 30 minutes before serving. This helps the flavors to meld and improves the texture. Garnish Creatively: Top your mousse with a variety of fresh fruits, nuts, or a drizzle of chocolate sauce for an attractive presentation and added flavor. {{image_2}} You can boost the flavor of your avocado chocolate mousse in fun ways. Try adding a shot of espresso or a tablespoon of coffee. This gives the mousse a rich mocha taste. If you want to change the milk, use different nut milks. Almond milk adds a subtle flavor, but cashew or coconut milk offers a creamier touch. Want to make this mousse vegan? Just swap honey for maple syrup. Use plant-based milk to keep it dairy-free. If you're watching sugar intake, use less maple syrup or try a sugar substitute. You can enjoy this treat without guilt. For extra creaminess, add nut butters like almond or cashew. These add flavor and a smooth texture. Coconut is another great choice. You can also spice things up! A pinch of cinnamon gives warmth, while a hint of cayenne adds a kick. Experimenting with these options makes your mousse unique and tasty. To store leftover mousse, place it in an airtight container. This helps keep the mousse fresh. You can also cover the serving bowls with plastic wrap. Make sure the wrap touches the mousse to prevent air exposure. The mousse will stay fresh in the fridge for up to three days. Before serving, check the texture. If it seems too thick, stir in a little almond milk. This will restore its creamy goodness. Yes, you can freeze avocado chocolate mousse! To do this, scoop the mousse into a freezer-safe container. Make sure to leave some space at the top since it will expand when frozen. The mousse can last in the freezer for up to two months. When you want to enjoy it, remove it from the freezer. Let it thaw in the fridge for several hours or overnight. This keeps the texture smooth and creamy. If it feels a bit icy, blend it again to restore the velvety feel. Yes, you can make this mousse ahead of time. It stays fresh in the fridge for up to three days. Just store it in an airtight container to keep it from drying out. This makes it perfect for parties or special dinners. Making it ahead also lets the flavors blend nicely. The texture should be rich and creamy. It should feel smooth in your mouth. When you blend the ingredients well, it becomes velvety. If it’s too thick, add a bit more almond milk. If it’s too thin, blend it longer. You want a luscious mousse that feels indulgent. Yes, avocados offer many health benefits. They are high in healthy fats that are good for your heart. They also add fiber, which is great for digestion. Plus, avocados have vitamins like E and K. Using them in dessert gives you a treat that’s not only tasty but also nutritious. Absolutely! You can experiment with different chocolates. Dark chocolate gives a bold flavor. Milk chocolate makes it sweeter and creamier. You can even use white chocolate for a unique twist. Just keep in mind that the sweetness may vary, so adjust the maple syrup accordingly. This blog post walked you through making a creamy avocado chocolate mousse. We covered ingredients, tools needed, and step-by-step instructions. I shared tips for perfecting texture and sweetening to your taste. You learned fun variations and how to store your mousse for later enjoyment. Incorporating avocados into desserts gives a tasty twist and boosts nutrition. Now you can impress others with this healthy treat that everyone will love. Enjoy your delicious mousse!
    Avocado Chocolate Mousse Creamy and Decadent Treat

Recent Drinks

  • - 1 cup vanilla yogurt - 1 banana, frozen - 1 cup milk (dairy or non-dairy) - 2 tablespoons sugar cookie mix (dry) - 1 teaspoon vanilla extract - 1/2 teaspoon almond extract - 1 tablespoon sprinkles (plus extra for garnish) - Ice cubes (optional) The Frosted Sugar Cookie Smoothie is easy to make and delicious. Each ingredient plays a key role in the flavor and texture. Vanilla yogurt gives a creamy base and a sweet taste. Frozen banana adds a natural sweetness and thickens the smoothie. You can use any milk you like, whether it's cow's milk or a plant-based option. The sugar cookie mix brings that classic cookie flavor right into your drink. For a warm note, add vanilla extract and almond extract. These flavors enhance the sweetness and make the smoothie taste rich. The sprinkles are a fun touch, both in flavor and color. They make the drink feel festive. If you like a thicker smoothie, toss in some ice cubes. They make the drink colder and creamier. Having all these ingredients ready will make your smoothie-making quick and fun! {{ingredient_image_1}} - Step 1: Blend yogurt, banana, and milk First, take your blender and add the vanilla yogurt, frozen banana, and milk. Blend these together until smooth. This mix will be the base of your smoothie. - Step 2: Incorporate sugar cookie mix and extracts Next, add the sugar cookie mix, vanilla extract, and almond extract to the blender. Blend again until everything is mixed well. This step gives your smoothie that sweet cookie flavor. - Step 3: Adjust thickness with ice cubes if desired If you want your smoothie thicker, now is the time to add ice cubes. Blend again until the ice is crushed and fully mixed in. This will make your smoothie cold and refreshing. - Step 4: Add sprinkles for a swirled effect Once your smoothie is smooth, gently stir in the sprinkles. This adds a fun, colorful swirl to your drink, making it look as good as it tastes. - Step 5: Serve in glasses and garnish Pour the smoothie into tall glasses. For a fun finishing touch, sprinkle some extra sprinkles on top. You can even add a small, frosted sugar cookie to the rim of each glass for a special treat. - Use ripe bananas for sweetness: Ripe bananas bring natural sweetness. They make your smoothie taste great without extra sugar. - Selecting the right milk for texture: Choose milk based on your taste. Whole milk gives creaminess, while almond milk adds a light touch. - Tips on using fresh vs. frozen ingredients: Frozen bananas create a thick texture. Fresh bananas can work, but add ice for consistency. - Adding whipped cream as a topping: Whipped cream adds a rich layer. It makes your smoothie look fancy and fun. - Using different types of sprinkles: Choose colorful sprinkles for a pop of joy. You can also try themed sprinkles for special occasions. - Creative glassware suggestions: Serve in tall glasses for an elegant look. You can even use fun cups to make it playful. Pro Tips Use Frozen Bananas: Freezing the bananas not only gives a creamy texture to the smoothie but also keeps it cold and refreshing without needing too much ice. Customize Your Sprinkles: Choose your favorite themed sprinkles for a fun twist, especially for parties or special occasions! Experiment with Milk Alternatives: Try different milk options like almond, oat, or coconut milk for varying flavors and textures in your smoothie. Add a Protein Boost: For an extra nutritional punch, consider adding a scoop of protein powder or a tablespoon of nut butter to your smoothie. {{image_2}} You can change up the flavor of your Frosted Sugar Cookie Smoothie easily. Try using different extracts. For instance, swap the almond extract for coconut or hazelnut. This switch gives your smoothie a fun twist. You can also add new fruits. Strawberries or peaches work great. They add fresh flavors and a nice color. Blend them in with the other ingredients. This makes your smoothie even more unique. Want to make your smoothie vegan? You can do that! Just use plant-based yogurt and milk. Almond, soy, or coconut milk are great choices. These options keep the flavor rich while being dairy-free. If you want to lower the sugar, try using a sugar substitute. Stevia or monk fruit sweetener can work well. This way, you can enjoy your smoothie without too much sugar. Store any leftover Frosted Sugar Cookie Smoothie in the fridge. Use a sealed container to keep it fresh. It is best to drink the smoothie within one day. The yogurt and banana may change texture over time. If you want to freeze it, pour the smoothie into ice cube trays. This way, you can use it later in other smoothies. Just blend the frozen cubes with a little milk when you want a quick treat. If you have leftover smoothie, here's how to revive it. Pour it back into the blender. Blend it again to mix. If it is too thick, add a little milk. This helps keep the texture smooth. Taste it after blending. If it needs more flavor, add a drop of vanilla or a sprinkle of sugar cookie mix. Enjoy your smoothie just like it was fresh! Can I use regular cookies instead of cookie mix? Yes, you can use regular sugar cookies. Just crush them into small bits. This will give your smoothie a nice texture. Use about two cookies per smoothie. How long does the smoothie last in the fridge? The smoothie stays fresh for about one day in the fridge. After that, it may lose its taste and texture. Be sure to store it in a sealed container to keep it fresh. Is it possible to make this smoothie without a blender? You can make this smoothie without a blender, but it will be harder. Try using a whisk or a fork to mix the ingredients. This method works best for small batches. What can I add to enhance the nutritional value? You can add spinach or kale for extra vitamins. Greek yogurt adds protein, while chia seeds boost fiber. Nuts or seeds can also add healthy fats and crunch. This smoothie combines simple ingredients for a tasty treat. You blend yogurt, banana, and milk, then add sugar cookie mix and extracts. Adjust the thickness with ice cubes, and don’t forget the sprinkles. You can customize flavors and even make it vegan. Store leftovers in the fridge or freeze for later. Enjoy this fun, easy drink whenever you crave something sweet and refreshing!
    Frosted Sugar Cookie Smoothie Tasty and Simple Treat
  • To make Poisoned Apple Cider, you need these key items: - 4 cups apple cider - 1 small pumpkin, peeled and cubed - 2 cups dark red cranberries (fresh or frozen) - 1 teaspoon cinnamon - 1 teaspoon nutmeg - 1 teaspoon allspice These ingredients work together to create a warm, cozy drink. The apple cider forms the base. The pumpkin adds creaminess. Cranberries give a tart taste. Spices like cinnamon and nutmeg add warmth. Allspice adds depth, making this drink special. You can use these optional items to enhance the flavor: - 1 tablespoon brown sugar (optional) - 1 tablespoon vanilla extract Adding brown sugar can sweeten the cider a bit. Vanilla extract adds a nice aroma. These ingredients can make your cider taste even better. Feel free to adjust them based on your taste. Presentation is key for this spooky drink! For a fun touch, use: - 1/2 cup blackberries for garnish - Sprigs of rosemary for garnish Blackberries add a pop of color. Rosemary looks like little witchy sprigs. These garnishes make your cider look festive and inviting. Serve in spooky mugs for an extra thrill! {{ingredient_image_1}} To start, gather your ingredients. You need: - 4 cups apple cider - 1 small pumpkin, peeled and cubed - 2 cups dark red cranberries (fresh or frozen) - 1 teaspoon cinnamon - 1 teaspoon nutmeg - 1 teaspoon allspice - 1 tablespoon brown sugar (optional) - 1 tablespoon vanilla extract In a large pot, combine the apple cider, cubed pumpkin, and cranberries. The pumpkin adds a nice texture. The cranberries bring a tart balance. Next, add the cinnamon, nutmeg, allspice, and brown sugar if you choose. Stir well to mix everything together. Now, heat the pot over medium heat. Watch closely until it starts to simmer. This usually takes about 5 to 10 minutes. Once it simmers, reduce the heat to low and cover the pot. Let it simmer for about 30 minutes. This step is key. It lets the flavors meld together beautifully. You’ll notice a lovely aroma filling your kitchen. After 30 minutes, you need to blend the mixture. Use an immersion blender to puree it until smooth. If you don’t have one, transfer it to a regular blender. Do this in small batches to avoid spills. Once blended, return the smooth mixture to the pot. Stir in the vanilla extract for an extra layer of flavor. Heat it for another 10 minutes to warm it through. Now your poisoned apple cider is ready to serve! To make the best poisoned apple cider, balance is key. The tartness of cranberries goes well with sweet apple cider. Use fresh or frozen cranberries. The pumpkin adds creaminess and a rich taste. Spices like cinnamon, nutmeg, and allspice bring warmth. If you want more sweetness, add brown sugar. This helps round out the flavors. Don’t forget the vanilla extract! It enhances the overall taste and aroma. Using the right equipment helps achieve the best cider. A large pot is essential for cooking the mixture. An immersion blender makes it easy to puree the cider smoothly. If you don’t have one, a regular blender works too. Just be careful when transferring hot liquid. Prepare heat-resistant mugs for serving. They keep your drink warm and look great too. Make your cider look as good as it tastes! Serve it in spooky mugs. For extra flair, add blackberries on top. They look like little dark gems. A sprig of rosemary adds a creepy touch. For a foggy effect, place dry ice in a separate container. This gives the cider a bubbling potion look. Your guests will love the spooky vibe! Pro Tips Choose Fresh Ingredients: Opt for fresh cranberries and seasonal pumpkins to enhance the flavor and quality of your cider. Adjust Sweetness: Taste the mixture before serving and adjust the sweetness by adding more brown sugar if desired, depending on your taste preference. Garnish Creatively: Use additional spooky garnishes like gummy worms or spooky-shaped ice cubes to make your presentation even more festive. Make Ahead: This cider can be made a day in advance. Just reheat gently before serving, allowing the flavors to deepen even more. {{image_2}} You can change the flavor of your poisoned apple cider by swapping or adding ingredients. Try using pear cider instead of apple cider for a different taste. You can also add a splash of orange juice for a zesty twist. Want some spice? Toss in a few cloves or a slice of fresh ginger. These simple swaps can make your drink unique and fun. You can enjoy poisoned apple cider in two ways. For a non-alcoholic drink, just follow the recipe as is. It’s perfect for kids and anyone who wants a tasty treat. If you want a kick, try adding rum or bourbon. Just mix in about a cup when you heat the cider. This gives it a warm, cozy feel for adults. You can make your cider special for any holiday. For Halloween, keep the spooky theme with creepy garnishes like gummy worms or spooky mugs. During Thanksgiving, focus on flavors like maple syrup or caramel. For Christmas, add some peppermint extract or even some cranberries on top for a festive look. These variations keep your poisoned apple cider fun and fresh all year round! Store your poisoned apple cider in a clean glass jar or airtight container. Make sure it cools to room temperature first. Label the container with the date. This helps you remember when you made it. Keep it in the fridge to stay fresh. Avoid metal containers as they can change the flavor. When stored properly, your poisoned apple cider can last up to five days in the fridge. After that, it may spoil. Always check for any off smells or changes in color. If it looks or smells bad, throw it out. Safety first! When reheating, do it on low heat. This helps keep the flavors intact. Stir often to avoid hot spots. Heat until it is warm but not boiling. If you have leftovers, never reheat more than once. Enjoy your spooky drink safely! If apple cider is poisoned, you may feel sick. Common symptoms include nausea, vomiting, and stomach pain. You might also have headaches or dizziness. In serious cases, you could feel confused or have trouble breathing. If you notice any of these signs after drinking cider, seek help fast. To check if apple cider is safe, start with your senses. Look for strange colors or floating bits. Smell it; if it smells off, do not drink it. Taste a small amount. If it tastes sour or strange, it might be bad. Always buy cider from a trusted source to stay safe. If you think the cider is poisoned, stop drinking it right away. Call poison control or seek medical help. Tell them what you drank and when. Keep the cider container for testing if needed. Do not wait for symptoms to appear; act quickly! Yes, there have been news stories about poisoned apple cider. Some cases involved people getting sick after drinking unregulated cider from local farms. These cases remind us to be careful when enjoying seasonal drinks. Always check where your cider comes from to ensure it is safe. In this blog post, we covered the core ingredients for a tasty apple cider. You learned step-by-step how to prepare and simmer it to boost flavor. We also discussed tips for the best taste and fun ways to serve it. Variations let you create seasonal drinks too. Lastly, we tackled storage tips and answered common questions about cider safety. Enjoy your delicious apple cider, and remember, safety first!
    Poisoned Apple Cider Shocking Safety Tips Revealed
  • - 2 cups orange juice (freshly squeezed) - 1 cup sparkling water - 1 teaspoon ground cinnamon - 1 tablespoon honey or maple syrup - 1 orange (for garnish) - 2 cinnamon sticks (for garnish) - Ice cubes - Mint leaves (optional garnish) To make the Cinnamon Orange Cozy Mocktail, you need fresh orange juice. I suggest squeezing the oranges yourself for the best taste. You'll also need sparkling water to add some fizz. Ground cinnamon gives it that warm flavor we love. For sweetness, you can use honey or maple syrup. Taste it after mixing to see if you like it sweeter. Don't forget the garnishes! Slices of orange and cinnamon sticks make it look nice. Mint leaves add a fresh touch but are optional. Gather all these ingredients, and you’re ready to make a cozy drink that brightens your day! {{ingredient_image_1}} - First, grab a large pitcher. - Combine 2 cups of orange juice with 1 cup of sparkling water. - Add 1 teaspoon of ground cinnamon and 1 tablespoon of honey or maple syrup. - Stir the mix well until the honey or syrup dissolves completely. - This step helps the cinnamon blend in nicely. - Now, fill your serving glasses with ice cubes. - Carefully pour the orange mixture over the ice-filled glasses. - Make each drink special by garnishing with orange slices and a cinnamon stick. - If you want, add a few mint leaves for a fresh touch. - Serve your cozy mocktail right away and enjoy! To customize the sweetness of your Cinnamon Orange Cozy Mocktail, start with the honey or maple syrup. You can add one tablespoon, then taste it. If it needs more sweetness, add a little more. Remember, you can always add more sweetener, but you can't take it out. So, taste test before serving to get it just right. Garnishing makes your drink look nice. Use fresh orange slices to enhance the color. Adding a cinnamon stick brings warmth to the drink and makes it smell great. If you want a fresh touch, add mint leaves. They not only look good but also add a cool flavor. Arrange everything nicely in the glass to make your mocktail pop! Pro Tips Use Fresh Ingredients: Freshly squeezed orange juice enhances the flavor significantly compared to store-bought juice. Adjust Sweetness: Taste the mixture before serving and adjust the honey or maple syrup to your preferred sweetness level. Chill the Glasses: For an extra refreshing experience, chill your serving glasses in the freezer for 15 minutes before pouring the mocktail. Experiment with Garnishes: Feel free to add other garnishes like star anise or pomegranate seeds for a unique twist. {{image_2}} You can change the taste of your cozy mocktail by adding more spices. Try adding nutmeg for a warm, sweet note. Cloves can also add a unique flavor. Just a pinch of these spices can transform your drink. For sweetness, you have options. Use agave syrup, coconut sugar, or even stevia. Each sweetener adds its own twist. Adjust based on your taste. Always taste as you go to find the right balance. Seasonal fruits can make your mocktail even more special. In fall, add sliced apples or pears for a crisp touch. In summer, mix in fresh berries like strawberries or blueberries. They not only taste great but also look beautiful. You can also use seasonal spices. In winter, try ginger or allspice. They add warmth and depth to your drink. For spring, fresh herbs like basil can brighten the flavor. Experiment to find your favorite seasonal mix! To keep your Cinnamon Orange Cozy Mocktail fresh, store it in the fridge. Use an airtight container. A glass jar or a pitcher works great. If you have extra garnishes, store them separately. This prevents them from getting soggy. This mocktail is best served cold. If you want to refresh it, add ice. You can also mix in more sparkling water. For the best taste, drink it within two days. After that, the flavors may fade. Always check if it smells or tastes off before drinking. Can I make this mocktail ahead of time? Yes, you can. Make the drink mix ahead of time. Store it in the fridge. Just add ice and garnish when you serve. What are the health benefits of cinnamon and orange? Cinnamon helps with blood sugar control. It also has antioxidants. Oranges are high in vitamin C. They boost your immune system and keep your skin healthy. Is this recipe vegan-friendly? Yes, this recipe is vegan. Use maple syrup instead of honey for a vegan option. What snacks pair well with this mocktail? This mocktail goes great with light snacks. Try cheese and crackers, fruit platters, or veggie sticks. These snacks balance the sweetness of the drink. Can it be served at parties or gatherings? Absolutely! This mocktail is perfect for parties. It is easy to make and looks beautiful. Guests will love its fresh taste and cozy vibe. This blog post guides you through making a fresh cinnamon orange mocktail. We covered the simple ingredients and easy steps, plus tips for sweetness and garnish. You learned about flavor variations and how to store leftovers. Enjoy mixing this drink at home. It’s fun and healthy, perfect for any occasion. Try different spices and fruits to make it your own. You're ready to impress your friends with a tasty and eye-catching mocktail!
    Cinnamon Orange Cozy Mocktail Refreshing Drink Recipe
  • To make Sparkling Cranberry Mimosas, you need: - 2 cups cranberry juice (preferably 100% cranberry juice) - 1 cup sparkling water or club soda - 1 tablespoon fresh lime juice - Fresh cranberries, for garnish - Lime slices, for garnish - Mint leaves, for garnish Each ingredient adds a unique touch to the drink. The cranberry juice gives a sweet and tart flavor. The sparkling water adds fizz, making it festive. Fresh lime juice brightens the drink and adds a nice zing. Garnishes are fun and can make your drink look great. You can add: - Extra fresh cranberries - Lime wedges - More mint leaves These garnishes not only look pretty but also add fresh flavors. You can mix and match them based on your taste. If you don't have an ingredient, don't worry! Here are some swaps you can try: - Use any berry juice if you don’t have cranberry juice. - Swap sparkling water with lemon-lime soda for a sweeter taste. - Try lemon juice instead of lime for a different zing. These substitutions can help you customize your drink while keeping it festive. Enjoy experimenting with flavors! {{ingredient_image_1}} To start, grab a large pitcher. Pour in 2 cups of 100% cranberry juice. Next, add 1 tablespoon of fresh lime juice. This lime juice brightens the drink and balances the sweetness. Stir the mixture well to blend the flavors. You want a smooth and tasty base for your mimosas. Now, it’s time to add some fizz. Gently pour in 1 cup of sparkling water or club soda. Be careful! Stir slowly to keep the bubbles. Mixing too fast can make the drink lose its sparkle. You want a refreshing drink that bubbles nicely when served. Prepare your glasses with a few fresh cranberries in each one. This step adds a festive touch. Pour the sparkling cranberry mixture into each glass, filling it about three-quarters full. For an extra pop of color, garnish each drink with a lime slice on the rim. Add a sprig of fresh mint for aroma and charm. Serve right away to enjoy the vibrant flavors! To keep your mimosas bubbly, do not mix too hard. Gently pour the sparkling water into the juice mixture. Stir slowly to maintain those delightful bubbles. Use chilled sparkling water for added fizz. Serve the drinks right after making them for the best experience. Garnishes add flair and taste. Use fresh cranberries, lime slices, and mint leaves to make your drink pop. Place a few cranberries at the bottom of each glass. Add a lime slice on the rim for a nice touch. Top with a sprig of mint for a fresh aroma and vibrant color. This recipe makes 4 to 6 servings. To serve more, just double the ingredients. If you have a larger crowd, consider preparing a pitcher. Keep the ratio of juices and sparkling water the same for balanced flavors. Remember, the more, the merrier! Pro Tips Choose Quality Juice: Using 100% cranberry juice ensures a rich flavor without added sugars or preservatives. Chill Ingredients: For the best experience, chill your cranberry juice and sparkling water before mixing to keep your mimosas refreshingly cool. Garnish Creatively: Experiment with different garnishes like rosemary or edible flowers for a unique twist on presentation. Make It Ahead: Prepare the cranberry juice and lime mixture in advance and add sparkling water just before serving to maintain its fizz. {{image_2}} Sparkling cranberry mimosas shine at winter holiday gatherings. The bright red color brings cheer. For summer brunches, swap cranberry juice for lighter fruit juices. Think about using fresh orange juice or peach juice. These alternatives provide a refreshing twist that fits the season. You can even mix cranberry and orange juice together for a fun flavor blend. To add a kick, mix in champagne or prosecco. The bubbles elevate your drink's festive spirit. Use equal parts of sparkling wine and juice for balance. This adds complexity and makes it feel more special. For a fun touch, try flavored sparkling wines. Raspberry or peach-flavored options can change the drink's profile. Get creative with fruit additions! Fresh berries, like raspberries or blueberries, can enhance your drink. Simply drop a few berries in each glass for color and taste. You might also try citrus slices, like oranges or lemons. These fruits add a bright zing and make your drink pop. Don’t be afraid to mix flavors. Experimenting can lead to delightful surprises! If you have leftover sparkling cranberry mix, pour it into an airtight container. Make sure to seal it tightly to keep the bubbles in. Store it in the fridge. Try to use the mix within two days for the best taste and fizz. The mix stays fresh for about two days when stored properly. The cranberry juice lasts longer, but the bubbles will fade. For the best experience, drink it sooner rather than later. Always check for any off smells before using. You can easily reuse the leftover cranberry juice in different ways. Add it to smoothies for a tasty twist. Mix it into a salad dressing for a fruity touch. You can even use it to make popsicles by freezing it in molds. The fresh cranberries and mint can brighten up other drinks or dishes too! You can prepare the cranberry juice and lime juice mixture ahead of time. Mix these in a pitcher and store it in the fridge. This keeps the flavors fresh. However, add the sparkling water just before serving. This step keeps your drink fizzy and fun. If you mix it too early, the bubbles will go flat. You can switch up the cranberry juice for many other juices. Orange juice adds a classic twist. Pineapple juice brings a sweet and tropical flair. Pomegranate juice offers a rich, tart flavor. Mix and match to find your favorite. Just keep the same ratio for a tasty drink. To make a non-alcoholic Sparkling Cranberry Mimosa, simply skip any alcohol. Use sparkling water or club soda as the base. You can also add more juice for flavor. For a fun twist, consider adding sparkling grape juice. This option keeps the drink festive without the alcohol. You can now create delicious Sparkling Cranberry Mimosas by using simple steps. We covered the key ingredients, their substitutes, and garnishes. I shared tips to keep fizz and ideas for seasonal twists. You learned storage tips and how to repurpose extras. Now, get ready to impress friends and family with these drinks at your next gathering. Making these mimosas is easy and fun. Enjoy the fizz and flavor!
    Sparkling Cranberry Mimosas Festive Holiday Drink

Footer

↑ back to top

More information

  • Drinks
  • Appetizer
  • Dinner
  • Desserts
  • About
  • Contact
  • Privacy Policy

Our Policies

  • Privacy Policy
  • GDPR Policy
  • Terms Of Use
  • Copyright Policy
  • Cookie Policy
  • Disclaimer

Copyright © 2025 cheftaling