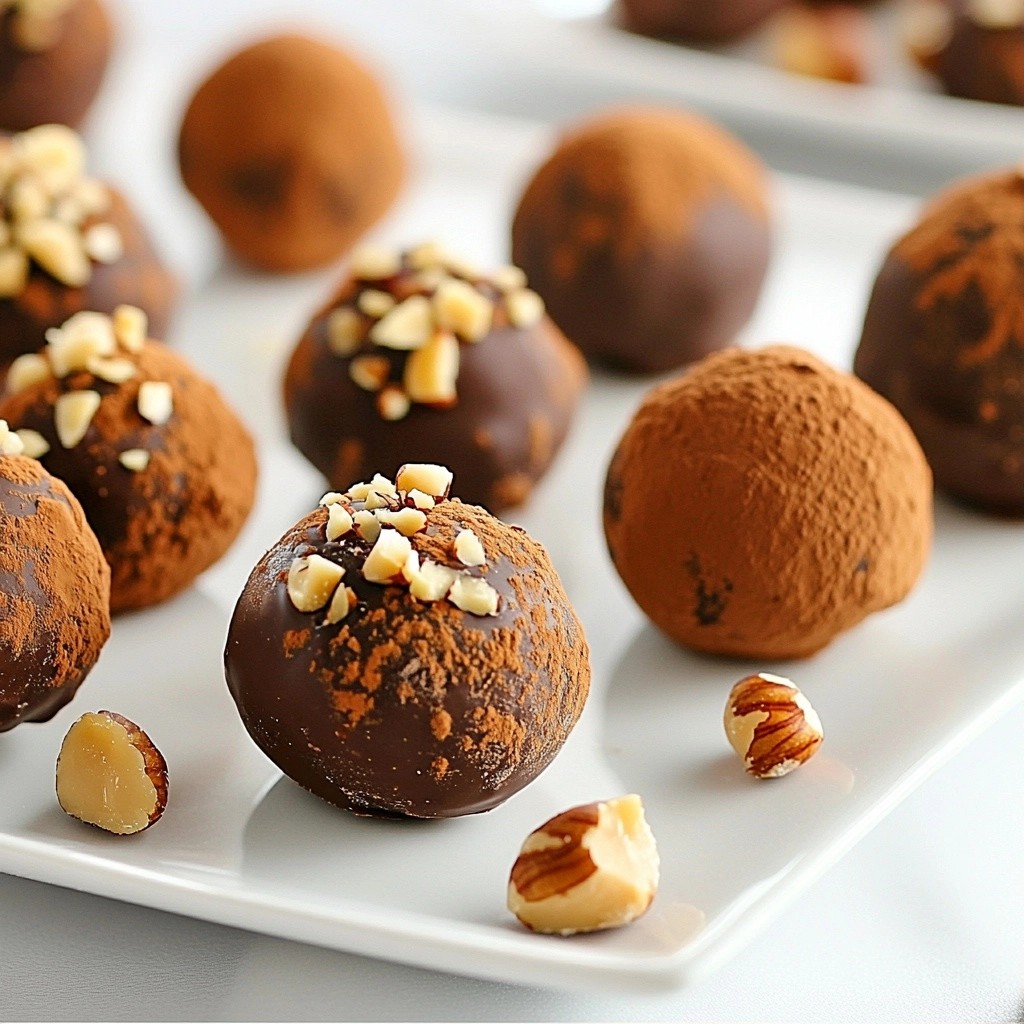
Indulge in the rich world of Luscious Hazelnut Chocolate Truffles with Creamy Centers! These delightful treats combine smooth chocolate and nutty flavors in each bite. I’ll guide you through easy steps, so you can impress your friends and family. Whether you want to explore flavor variations or learn perfect storage tips, this article has you covered. Get ready to create a mouthwatering dessert that everyone will love!
Why I Love This Recipe
- Rich and Decadent Flavor: These truffles combine the deep bitterness of dark chocolate with the creamy sweetness of hazelnut spread, creating an irresistible flavor profile.
- Easy to Make: With just a few simple steps and ingredients, you can whip up these luxurious treats without any complicated techniques.
- Perfect for Gifting: These truffles make an elegant homemade gift that is sure to impress friends and family during holidays or special occasions.
- Customizable Coatings: Feel free to experiment with different coatings, such as sprinkles, crushed cookies, or even a dusting of matcha for a unique twist!
Ingredients
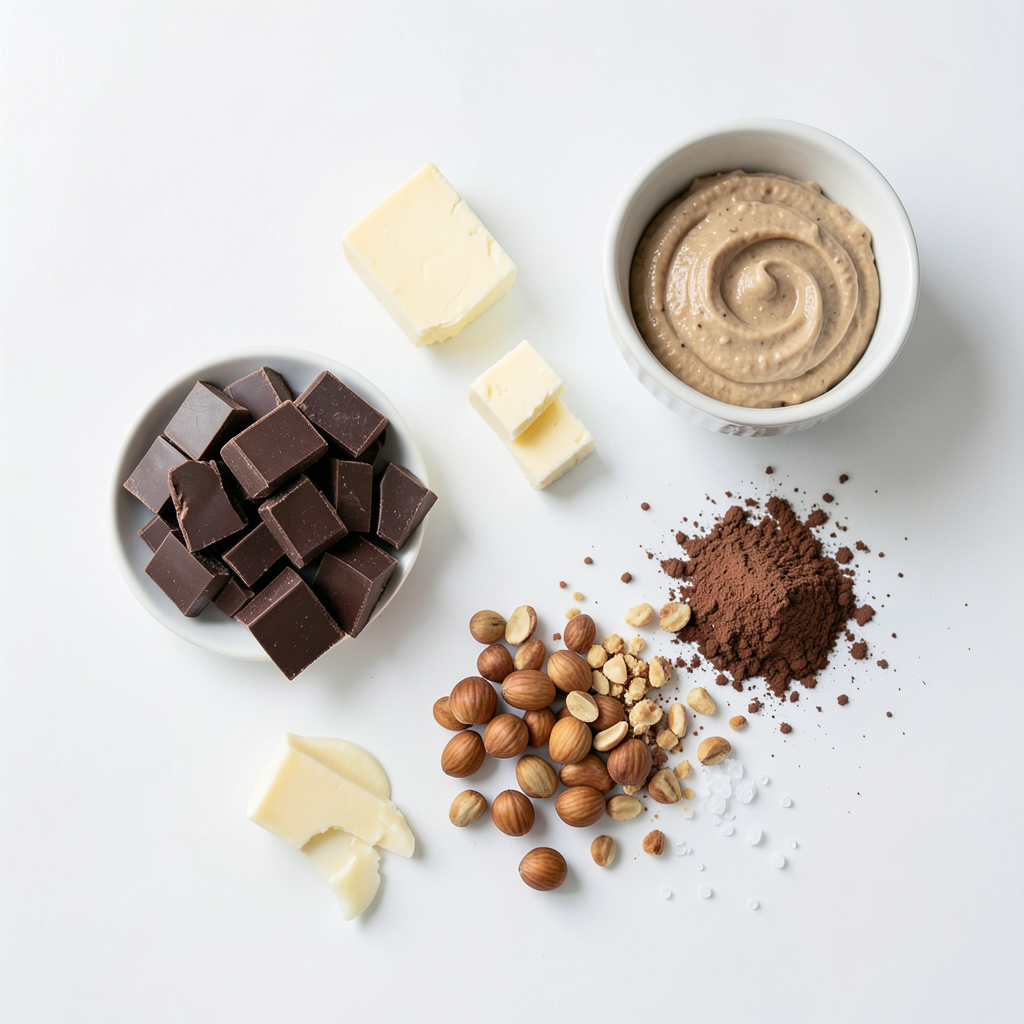
Detailed List of Ingredients
To create these luscious hazelnut chocolate truffles, gather these ingredients:
- 200g dark chocolate (70% cocoa), chopped
- 100ml heavy cream
- 2 tablespoons unsalted butter
- 1/2 cup hazelnut spread (such as Nutella)
- 1 cup crushed hazelnuts (for rolling)
- 1 tablespoon cocoa powder (for rolling)
- A pinch of sea salt
Each ingredient plays a key role in flavor and texture. Dark chocolate gives richness. Heavy cream adds smoothness. Butter helps create a creamy center. Hazelnut spread brings that nutty goodness. Crushed hazelnuts and cocoa powder add a nice crunch and extra flavor.
Measurement Conversions for Ingredient Substitutions
If you need to substitute, here are some conversions:
- Chocolate: Use semi-sweet chocolate if you want a sweeter taste.
- Heavy Cream: You can use half-and-half for a lighter version.
- Butter: Coconut oil works as a dairy-free option.
- Hazelnut Spread: Any nut butter can replace it, like almond or cashew.
These swaps can change the taste slightly but keep the truffle fun.
Recommended Brands for Best Results
For the best flavor and texture, I suggest these brands:
- Dark Chocolate: Look for Lindt or Ghirardelli for rich taste.
- Heavy Cream: Organic Valley provides good quality cream.
- Hazelnut Spread: Nutella is classic, but Justin's offers a natural choice.
- Unsalted Butter: Kerrygold has a creamy taste that enhances your truffles.
Using quality brands makes a big difference in your truffles’ final flavor.
Step-by-Step Instructions
Preparation of the Chocolate Mixture
To start, grab a small saucepan. Pour in the heavy cream and heat it over medium heat. Keep an eye on it until it's just simmering. This step is crucial for melting the chocolate. Once it simmers, take it off the heat. Now, add the chopped dark chocolate and unsalted butter. Stir it well until everything melts into a smooth mixture. This is where the magic begins! Next, mix in the hazelnut spread. Stir until it’s all combined, then add a pinch of sea salt for flavor.
Let the mixture cool at room temperature for about 30 minutes. After that, cover it with plastic wrap. Place it in the fridge for 1-2 hours until it firms up. This chilling time is key for forming the truffles later.
Rolling and Coating the Truffles
Once your chocolate mixture is firm, it’s time to roll the truffles. Use a small scoop or your hands to take out about one-inch pieces. Roll these pieces into balls; this can get a bit messy, but that’s part of the fun!
Now, prepare a shallow dish. Combine the crushed hazelnuts and cocoa powder in it. Roll each truffle in this mix until fully coated. This gives your truffles a nice crunch and extra flavor. After coating, place the truffles on a parchment-lined baking sheet. They need to chill again for about 30 minutes. This helps them set perfectly.
Tips for Perfecting the Truffle Shape and Coating
For a perfect truffle shape, make sure your hands are clean and dry. If the mixture sticks, lightly dust your hands with cocoa powder. This helps shape them smoothly. When rolling, keep the pressure even to avoid uneven shapes.
For the coating, make sure to roll the truffles well in the hazelnut and cocoa mix. This not only looks good but also adds a nice crunch. If you want an extra touch, consider using mini cupcake liners. They can make your truffles look even more festive on the plate.
Tips & Tricks
How to Achieve a Creamy Center
To get a creamy center in your truffles, follow these steps:
- Use heavy cream. This gives a rich texture.
- Melt the chocolate and butter together with the cream. This makes it smooth.
- Add hazelnut spread after melting. Mix well for a perfect blend.
Let the mixture cool at room temperature before chilling. This helps set the truffles without making them too hard.
Common Mistakes to Avoid
A few common mistakes can ruin your truffles:
- Don’t overheat the cream. If it boils, it may ruin the texture.
- Avoid using old chocolate. Fresh chocolate melts better.
- Don’t skip cooling time. Rushing leads to messy truffles.
Make sure to roll the truffles while they are cold. This helps keep their shape.
Best Practices for Melting Chocolate
Melting chocolate sounds easy, but it requires care:
- Use a double boiler. This prevents direct heat and burning.
- Stir often while melting. This keeps the chocolate smooth.
- If using a microwave, heat in short bursts. Check every 20 seconds to avoid burning.
These methods ensure your chocolate stays glossy and perfect for truffles.
Pro Tips
- Chill for Better Shape: Make sure the chocolate mixture is well-chilled before rolling into truffles. This will help maintain their shape and make them easier to handle.
- Quality Chocolate Matters: Use high-quality dark chocolate for a richer flavor. The better the chocolate, the better your truffles will taste!
- Experiment with Coatings: Try rolling the truffles in different coatings such as crushed cookies, sprinkles, or even coconut for a unique twist on the classic recipe.
- Perfect Storage: Store truffles in an airtight container in the refrigerator for up to two weeks to maintain their freshness and flavor.
Variations
Flavor Alternatives for Hazelnut Spread
If you want to mix things up, try different spreads. You can use almond butter, peanut butter, or even a chocolate spread with a hint of coffee. Each spread changes the truffle's taste. It keeps the creamy center while adding fun flavors. Experimenting can lead to exciting new treats.
Different Coatings for Truffles
Coatings can make your truffles shine. Instead of crushed hazelnuts and cocoa powder, try rolling them in shredded coconut, crushed cookies, or even colorful sprinkles. These options add texture and fun. Each coating can change the look and taste. Let your creativity flow!
Incorporating Other Ingredients for Unique Flavor Profiles
Want to add a twist? You can mix in spices or extracts. A dash of cinnamon or a few drops of vanilla can enhance the flavor. You can even fold in finely chopped dried fruits or nuts. These additions create unique flavor profiles. Each bite can surprise you with new tastes!
Storage Info
Best Ways to Store Truffles
To keep your truffles fresh, store them in an airtight container. Place parchment paper between layers to avoid sticking. Keep the container in a cool, dry place. Avoid direct sunlight, as heat can melt the chocolate. If it's warm in your kitchen, consider storing them in the fridge.
Shelf Life of Homemade Truffles
Homemade truffles last about one week at room temperature. In the fridge, they can last up to two weeks. If you keep them in an airtight container, they stay fresh longer. Always check for any changes in smell or texture before enjoying.
Freezing Truffles for Later Enjoyment
You can freeze truffles if you want to save some for later. First, place them in a single layer on a baking sheet. Freeze for about an hour until they are firm. Then, transfer them to a freezer-safe bag or container. They will stay good for about three months. When you are ready to eat, thaw them in the fridge for a few hours. Enjoy your homemade treats anytime!
FAQs
How can I make the truffles dairy-free?
To make these truffles dairy-free, you can substitute heavy cream with coconut cream. It gives a creamy texture. For butter, use a plant-based option like coconut oil or vegan butter. Ensure your hazelnut spread is dairy-free as well. Brands like Nutiva offer a good dairy-free option.
What is the best way to melt chocolate without burning?
The best way to melt chocolate is using a double boiler. Fill a pot with water and bring it to a simmer. Place a heat-safe bowl on top, making sure it doesn’t touch the water. Add your chopped chocolate to the bowl. Stir gently as it melts. This method helps keep the heat low and prevents burning. If you don’t have a double boiler, you can microwave in short bursts. Heat for 20 seconds, stir, and repeat until smooth.
Can I use milk chocolate instead of dark chocolate?
Yes, you can use milk chocolate instead of dark chocolate. However, be aware that milk chocolate is sweeter and creamier. You may want to reduce the amount of hazelnut spread slightly to balance the sweetness. The texture will also be different, but it can create a delicious treat.
To summarize, we explored the key ingredients, detailed steps, and helpful tips for making delicious chocolate truffles. We also discussed exciting flavor variations and proper storage methods. Remember, with a bit of care and creativity, you can craft truffles that impress everyone. Don’t forget the tips to avoid common mistakes and to achieve that creamy center. Enjoy the process, and indulge in your tasty creations!