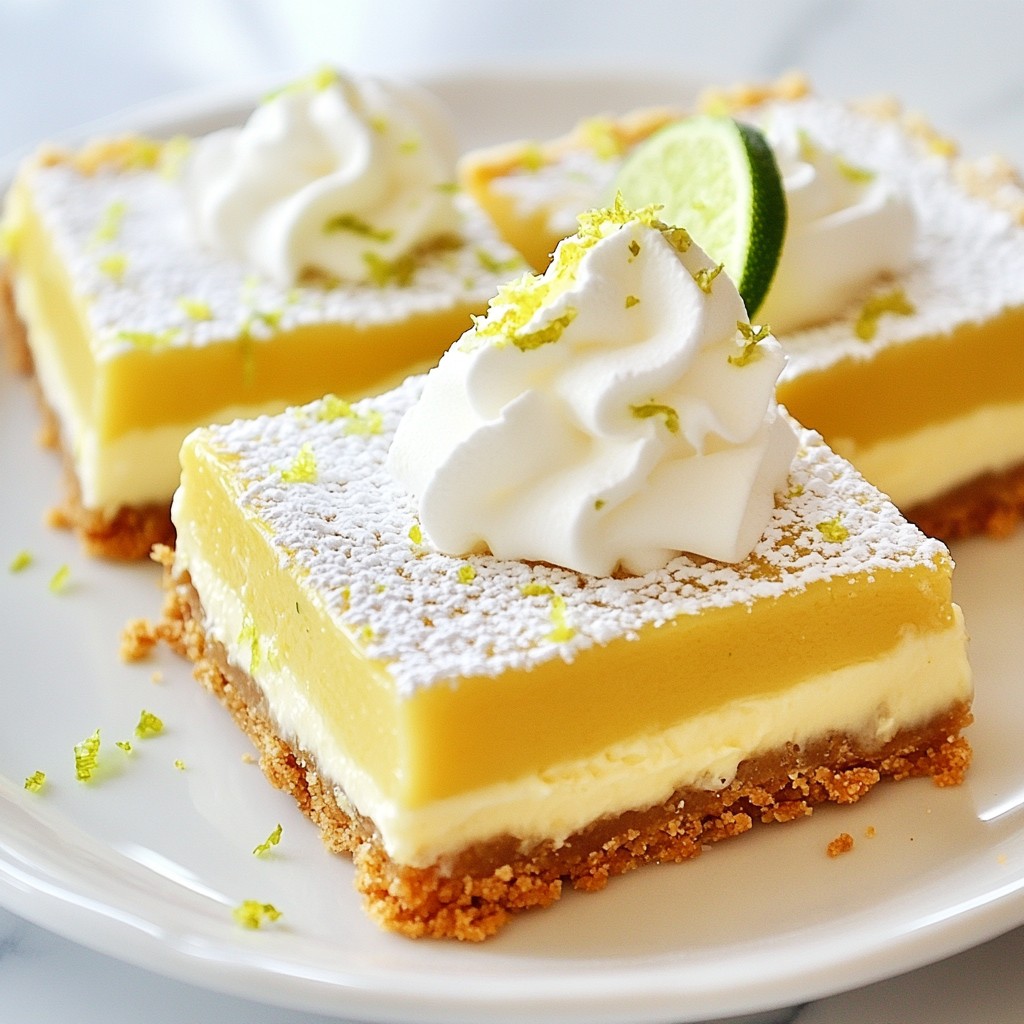
If you love tangy, sweet treats that are easy to make, you’ll adore these Key Lime Pie Bars! With a crust that’s buttery and crunchy and a filling that’s full of zesty lime flavor, this dessert is sure to impress. In this blog post, I’ll guide you through each simple step to create these delicious bars. Get ready to enjoy a slice of sunshine in every bite!
Why I Love This Recipe
- Unique Flavor Combination: The combination of tangy key lime and sweet coconut creates a delightful tropical taste that’s refreshing and irresistible.
- Easy to Make: This recipe requires minimal ingredients and straightforward steps, making it perfect for both novice and experienced bakers.
- Perfect for Any Occasion: These bars are great for summer gatherings, holiday parties, or just a sweet treat at home!
- Beautiful Presentation: With a sprinkle of lime zest and a dollop of whipped cream, these bars look as good as they taste, perfect for impressing guests.
Ingredients
List of Required Ingredients
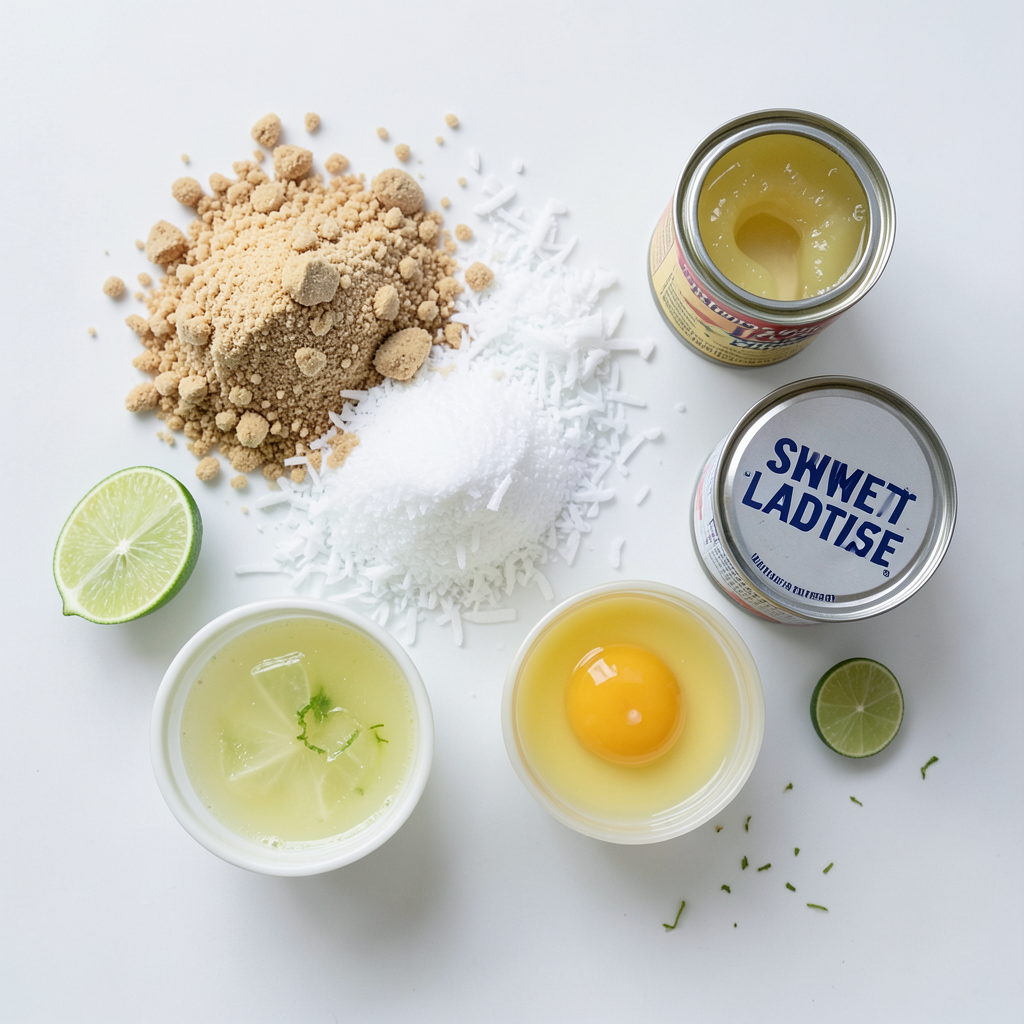
For this easy Key Lime Pie Bars recipe, you will need the following ingredients:
- Key ingredients for the crust
- 1 ½ cups graham cracker crumbs
- ½ cup unsweetened shredded coconut
- ⅓ cup sugar
- ½ cup unsalted butter, melted
- Key ingredients for the filling
- 1 cup fresh key lime juice (or regular lime juice)
- 1 (14-ounce) can sweetened condensed milk
- 3 large egg yolks
- 1 teaspoon lime zest (plus extra for garnish)
- Optional garnishes
- Whipped cream, for serving
- Extra lime zest for decoration
These ingredients come together to make a bright, zesty treat. The graham cracker crumbs and coconut create a rich crust. The filling blends tart lime juice with sweetened condensed milk for a creamy texture. You can top your bars with whipped cream and a sprinkle of zest to elevate their charm.
Step-by-Step Instructions
Preparation of the Crust
Start by mixing the graham cracker crumbs, shredded coconut, and sugar in a bowl. Then, pour in the melted butter and stir until everything is mixed well. This mixture will create a tasty crust.
Next, press the crumb mixture into the bottom of a greased 9x9 inch baking dish. Make sure it is even and packed tightly. This helps it hold together after baking.
Bake the crust in a preheated oven at 350°F (175°C) for about 8-10 minutes. Look for a light golden color. This shows the crust is ready.
Making the Filling
In a clean bowl, whisk together the fresh key lime juice and sweetened condensed milk. This mixture gives the bars their sweet and tangy flavor.
Add in the egg yolks and lime zest. Whisk until everything is smooth and combined. This step is crucial for a creamy filling.
Pour the filling over the baked crust. Spread it evenly with a spatula. This ensures every bite is full of flavor.
Baking and Cooling
Now, bake the assembled bars in the oven for 15-18 minutes. You want the filling to be set but still slightly jiggly in the center. This will give it a perfect texture.
After baking, take the bars out and let them cool completely at room temperature. Once cool, refrigerate them for at least 2 hours. Chilling helps them firm up nicely.
When ready, cut the bars into squares and serve them cold. A dollop of whipped cream and a sprinkle of lime zest make great toppings. Enjoy this refreshing treat!
Tips & Tricks
Ingredient Substitutions
You can switch up some ingredients to suit your taste. If you want less sugar, try using honey or maple syrup instead. For the crust, you can use crushed cookies like Digestive biscuits or even nuts for a gluten-free option. If you can’t find key limes, regular limes work just fine. The taste will be a bit different, but still tasty!
Techniques for Perfect Bars
To make sure your crust holds well, press it down firmly in the dish. Use the back of a measuring cup to get an even layer. For the filling, mix until smooth. No lumps should be present. If you like it creamier, whisk longer or use an electric mixer.
Presentation Suggestions
Serving your bars can be fun! Try arranging them on a colorful platter. Dust with powdered sugar for a sweet touch. For garnish, use thinly sliced lime or extra lime zest. A dollop of whipped cream adds flair. It makes the bars look special and inviting!
Pro Tips
- Chill for Best Texture: Ensure the bars are chilled for at least 2 hours after baking. This helps the filling set properly and enhances the creamy texture.
- Use Fresh Limes: For the best flavor, use fresh key limes if available. They provide a vibrant taste that enhances the overall dessert.
- Adjust Sweetness: Taste the filling before baking and adjust the sugar if needed. The sweetness can vary based on the tartness of the limes used.
- Garnish Creatively: Add a sprinkle of toasted coconut or lime zest on top of the whipped cream for an extra layer of flavor and a beautiful presentation.
Variations
Flavor Variations
You can add a twist to your key lime pie bars by using coconut. Mix in unsweetened shredded coconut into the crust. This gives you a tropical vibe that blends well with the tart lime. If you want something different, try lemon or orange juice instead of lime juice. Each citrus brings its own flavor, creating a unique treat each time.
Dietary Adjustments
If you need a gluten-free option, use gluten-free graham cracker crumbs. They work just as well, and you'll have a tasty dessert that everyone can enjoy. For a vegan version, substitute the eggs with flaxseed meal or a commercial egg replacer. Use coconut cream instead of sweetened condensed milk. These changes keep the flavor while making it suitable for a variety of diets.
Serving Suggestions
Pair your key lime pie bars with a refreshing drink. I suggest iced tea or a fruity soda. Both complement the tangy flavor of the bars. You can also serve them alongside fresh fruit, like berries or slices of lime, to enhance the presentation. The bright colors will make your dessert even more appealing.
Storage Info
How to Store Key Lime Pie Bars
To keep your key lime pie bars fresh, use an airtight container. This will prevent them from drying out. You can also wrap them in plastic wrap for extra protection. Store the bars in the fridge. They stay good for about 4-5 days. If you want them to last longer, freezing is a great option.
Freezing Instructions
To freeze your key lime pie bars, first cut them into squares. Place them in a single layer in a freezer-safe container. Make sure to leave some space between each bar. This helps them freeze evenly. Cover the container tightly. You can freeze them for up to 2 months.
When you want to enjoy them again, move the bars to the fridge. Let them thaw overnight. This keeps their texture nice. If you want, you can also thaw them at room temperature for about 30 minutes. Enjoy your tasty treat!
FAQs
How do I know when my key lime pie bars are done?
To check if your key lime pie bars are done, look for a few key signs. The edges should be set, while the center remains slightly jiggly. A good test is to gently shake the pan. If the filling wobbles but does not ripple, it’s ready. This means the filling will set as it cools.
Can I use regular limes instead of key limes?
Yes, you can use regular limes instead of key limes. However, they will change the flavor. Key limes are sweeter and have a unique tang. Regular limes taste more tart and less sweet. Adjust your sugar if you use regular limes to balance the flavor.
Where can I buy pre-made key lime pie bars?
You can find pre-made key lime pie bars at local bakeries and grocery stores. Check the dessert section or the bakery counter. If you prefer online shopping, many brands offer delivery. Websites like Amazon or specialty dessert shops provide options for purchase.
You’ve learned the key steps to make delicious key lime pie bars. We covered the ingredients, preparation, and baking process, along with helpful tips and variations. With a few simple tricks, you can create a tasty dessert that everyone will love. Remember, the right storage keeps them fresh longer. Now, go ahead and try making these treats. Enjoy the process and impress your friends and family with your baking skills!