Chef Taling

  • Dinner
  • Desserts
  • Appetizer
  • Drinks
  • Privacy Policy
  • Contact
  • About
menu icon
go to homepage
  • Dinner
  • Desserts
  • Appetizer
  • Drinks
  • Privacy Policy
  • Contact
  • About
Looking for a refreshing drink that’s also healthy? Discover how to make an Iced Butterfly Pea Flower Tea Latte at home! This vibrant beverage is not just visually stunning but packed with antioxidants. In our guide, you'll find key ingredients, health benefits, and creative variations to customize your latte. Dive into this delicious recipe and impress your friends with a colorful treat that brightens any day. Click to explore the full recipe!

search icon
Homepage link
  • Dinner
  • Desserts
  • Appetizer
  • Drinks
  • Privacy Policy
  • Contact
  • About
Looking for a refreshing drink that’s also healthy? Discover how to make an Iced Butterfly Pea Flower Tea Latte at home! This vibrant beverage is not just visually stunning but packed with antioxidants. In our guide, you'll find key ingredients, health benefits, and creative variations to customize your latte. Dive into this delicious recipe and impress your friends with a colorful treat that brightens any day. Click to explore the full recipe!

×

Iced Butterfly Pea Flower Tea Latte Refreshing Treat

Published: Mar 24, 2025 · by Taling · Leave a Comment

WANT TO SAVE THIS RECIPE?

1 shares
Looking for a refreshing drink that’s also healthy? Discover how to make an Iced Butterfly Pea Flower Tea Latte at home! This vibrant beverage is not just visually stunning but packed with antioxidants. In our guide, you'll find key ingredients, health benefits, and creative variations to customize your latte. Dive into this delicious recipe and impress your friends with a colorful treat that brightens any day. Click to explore the full recipe!

Looking for a cool drink that’s both refreshing and good for you? The Iced Butterfly Pea Flower Tea Latte is your answer! This vibrant drink is full of flavor, and it’s easy to make at home. In this post, I’ll guide you through the key ingredients, health benefits, and creative twists you can add. Let’s dive into this colorful treat that’s sure to brighten your day!

To make an Iced Butterfly Pea Flower Tea Latte, you need a few key ingredients. First, you need dried butterfly pea flowers. These flowers give the drink its stunning blue color. You will also need boiling water to steep the flowers. Next, choose your favorite milk. You can use dairy milk, almond milk, coconut milk, or oat milk. Finally, you need a sweetener. Honey works well, but you can pick any sweetener you like.

What are the Key Ingredients in an Iced Butterfly Pea Flower Tea Latte?

What Ingredients Are Essential for the Recipe?

To make an Iced Butterfly Pea Flower Tea Latte, you need a few key ingredients. First, you need dried butterfly pea flowers. These flowers give the drink its stunning blue color. You will also need boiling water to steep the flowers. Next, choose your favorite milk. You can use dairy milk, almond milk, coconut milk, or oat milk. Finally, you need a sweetener. Honey works well, but you can pick any sweetener you like.

How Do Different Types of Milk Affect the Flavor?

The type of milk you choose can change the flavor of your latte. Dairy milk gives a rich and creamy taste. Almond milk adds a nutty flavor. Coconut milk brings a tropical twist. Oat milk is smooth and slightly sweet. Each milk choice creates a unique taste experience. You can even mix different milks for a fun twist.

What Are the Options for Sweeteners in This Drink?

Sweeteners can also change your drink’s flavor. Honey is a natural choice and adds a floral note. You can use agave syrup for a mild sweetness. Maple syrup gives a rich flavor that pairs well with the tea. If you prefer no sugar, use a sugar substitute. Stevia or monk fruit are great options. The choice of sweetener is up to your taste.

How Do You Prepare an Iced Butterfly Pea Flower Tea Latte at Home?

Making an iced butterfly pea flower tea latte is simple and fun. You can enjoy this stunning drink right at home.

What Are the Step-by-Step Instructions for Making It?

1. Start by boiling 1 cup of water.

2. Add 2 tablespoons of dried butterfly pea flowers to the hot water.

3. Let it steep for 10 to 15 minutes. The water will turn a bright blue.

4. Strain the flowers out and let the tea cool down.

5. In a bowl, mix 1 cup of your favorite milk with 2 tablespoons of honey and ½ teaspoon of vanilla.

6. Whisk or froth this milk mixture until it’s slightly airy.

7. Grab a glass and fill it with ice cubes.

8. Pour the cooled butterfly pea tea over the ice halfway.

9. Gently add the milk mixture on top. This creates a cool layered look.

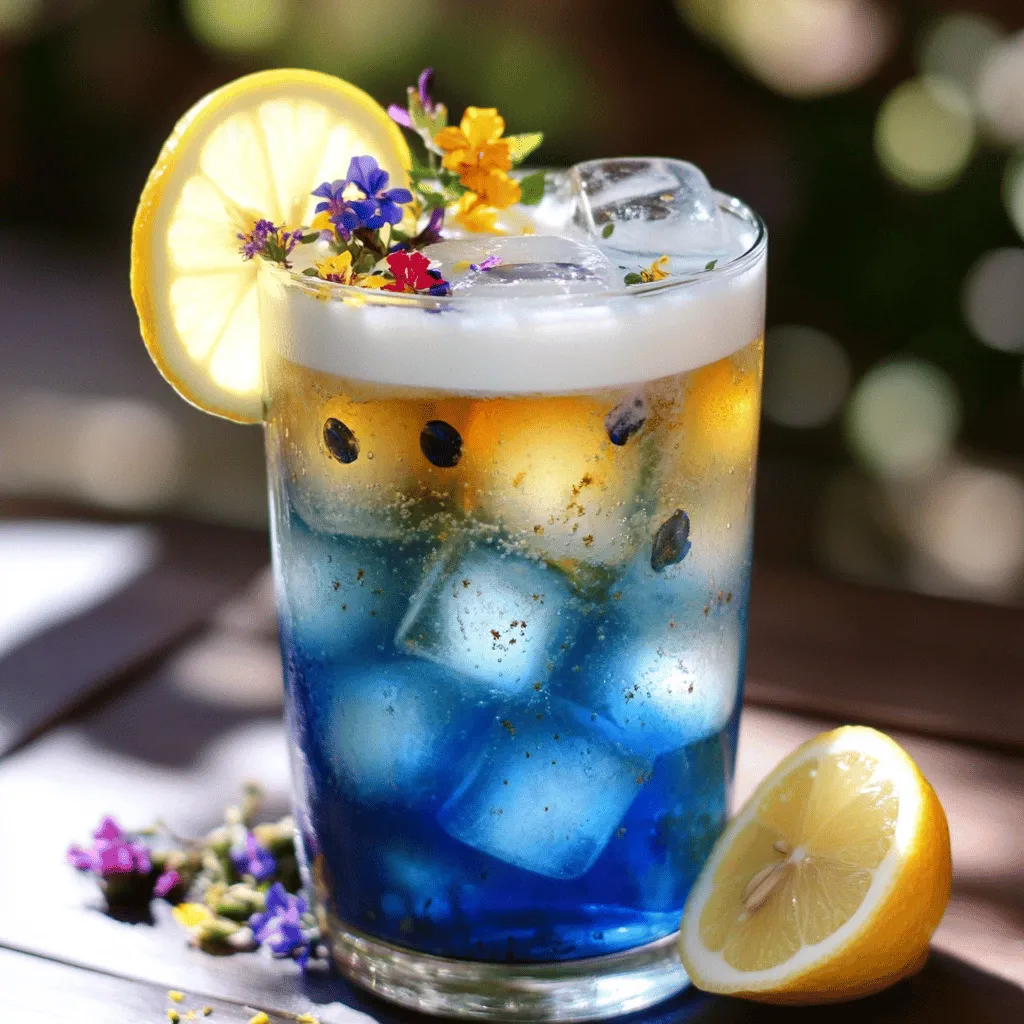
10. Optionally, add lemon slices or edible flowers for extra flair.

What Tips Can Enhance the Brewing Process?

  1. Use fresh, high-quality dried flowers for the best color and taste.
  2. Adjust steeping time for a stronger or lighter tea.
  3. Try adding a splash of lemon juice for a color change and a tangy flavor.
  4. Experiment with different types of milk like coconut or almond for unique tastes.

How Long Should You Steep the Butterfly Pea Flowers?

The butterfly pea flowers should steep for about 10 to 15 minutes. Steeping longer can deepen the blue color and flavor. Watch the color change; it’s beautiful! Enjoy your iced floral drink.

To make an Iced Butterfly Pea Flower Tea Latte, you need a few key ingredients. First, you need dried butterfly pea flowers. These flowers give the drink its stunning blue color. You will also need boiling water to steep the flowers. Next, choose your favorite milk. You can use dairy milk, almond milk, coconut milk, or oat milk. Finally, you need a sweetener. Honey works well, but you can pick any sweetener you like.

What Are the Health Benefits of Butterfly Pea Flower Tea?

Butterfly pea flower tea is not just pretty; it has many health benefits too. This tea is rich in antioxidants. Antioxidants help fight free radicals in your body. This can lead to better health and reduced aging.

What Vitamins and Nutrients Are Found in Butterfly Pea Flower Tea?

Butterfly pea flower tea contains vitamins A, C, and E. These vitamins are great for your skin and eyes. It also has flavonoids, which can support heart health. Drinking this tea may boost your immune system.

How Does It Support Skin and Digestive Health?

Butterfly pea flower tea can help your skin glow. The antioxidants fight skin damage from the sun and pollution. This tea may also help with digestion. It can ease bloating and improve gut health.

Can Butterfly Pea Flower Tea Contribute to Relaxation and Wellness?

Yes, this tea can help you relax. It is known for its calming effects. Drinking it may reduce stress and anxiety. This can lead to better sleep and overall wellness.

Enjoying an Iced Butterfly Pea Flower Tea Latte not only tastes great but also gives you these amazing health benefits.

What Are Some Creative Variations of the Iced Butterfly Pea Flower Tea Latte?

You can have fun with the iced butterfly pea flower tea latte. Here are some ideas to make it your own.

How Can You Use Different Flavors and Ingredients to Customize the Latte?

Start by adding different flavors to your latte. You might try using matcha for a green tea twist. A splash of coconut milk adds a tropical vibe. For a fruity touch, add some mango or passion fruit puree. Each change gives you a new taste experience.

What Seasonal Ingredients Can Be Added for a Unique Twist?

Seasonal ingredients can make your drink special. In spring, add fresh mint for a cool flavor. In summer, try using ripe berries for sweetness. In fall, a hint of cinnamon or pumpkin spice can warm your drink. Winter calls for a splash of peppermint extract for a festive feel.

How Can You Incorporate Other Floral Teas into the Recipe?

Don’t stop with butterfly pea flowers! You can mix in other floral teas too. Lavender adds a lovely aroma and flavor. Hibiscus gives a tangy twist and a bright hue. Rose tea brings a soft, sweet flavor that pairs well. Feel free to experiment and discover your favorites.

To make an Iced Butterfly Pea Flower Tea Latte, you need a few key ingredients. First, you need dried butterfly pea flowers. These flowers give the drink its stunning blue color. You will also need boiling water to steep the flowers. Next, choose your favorite milk. You can use dairy milk, almond milk, coconut milk, or oat milk. Finally, you need a sweetener. Honey works well, but you can pick any sweetener you like.

Where Can You Find Quality Ingredients for Your Iced Butterfly Pea Flower Tea Latte?

To make butterfly pea flower tea at home, you need good ingredients. First, you want to buy dried butterfly pea flowers. You can find these at health food stores or specialty shops. Look for flowers that are bright blue and smell fresh. This shows they are high quality.

Where Can You Purchase Dried Butterfly Pea Flowers?

You can purchase dried butterfly pea flowers at local markets. Many Asian grocery stores carry them. If you prefer shopping online, websites like Amazon and specialty tea shops have great options. Always read reviews to ensure you pick a trusted seller.

Are There Any Recommended Online Stores for Herbal Teas?

Yes, several online stores focus on herbal teas. Sites like Adagio Teas and Teavana offer a range of quality options. They often have butterfly pea flowers in bulk, which is great for making multiple batches of iced tea. Check their selection for unique blends too!

How Can You Ensure the Quality of Ingredients?

To ensure quality, look for organic labels where possible. This means no harmful chemicals were used. Check the packaging for a harvest date. Fresh ingredients taste better. If you’re unsure, ask the seller about their sourcing methods. Trust your instincts; quality matters for taste.Enjoy!

What Are Some Tips for Serving and Enjoying Your Iced Butterfly Pea Flower Tea Latte?

To serve your iced butterfly pea flower tea latte, choose a clear glass. A clear glass shows off the stunning blue and white layers. You can also use a tall glass for a fancy look.

For garnishes, lemon slices or edible flowers work well. They add color and a fresh taste. Place the lemon on the rim or sprinkle flowers on top. This small touch makes the drink look special.

Pair this drink with light snacks. It goes great with fruit salads, light pastries, or cookies. The sweet taste of the latte complements these treats well. You can also enjoy it with a light sandwich for a quick lunch.

This refreshing beverage is perfect for hot days. Serve it at summer parties, picnics, or brunch. It’s a great way to impress friends and family. You can also enjoy it as a cooling drink after a long day.It has all the steps to create this delightful drink.

Iced Butterfly Pea Flower Tea Lattes are both tasty and fun to make. You learned about essential ingredients, milk options, and sweeteners to boost flavor. We also covered how to prepare the drink and its health benefits. You can make creative variations to match your mood or season. Plus, you now know where to find quality ingredients. Enjoy crafting this drink and impressing others with your skills. Dive in and savor the unique taste and benefits of your homemade latte.

To make an Iced Butterfly Pea Flower Tea Latte, you need a few key ingredients. First, you need dried butterfly pea flowers. These flowers give the drink its stunning blue color. You will also need boiling water to steep the flowers. Next, choose your favorite milk. You can use dairy milk, almond milk, coconut milk, or oat milk. Finally, you need a sweetener. Honey works well, but you can pick any sweetener you like.

Iced Butterfly Pea Flower Tea Latte

Looking for a refreshing drink that’s also healthy? Discover how to make an Iced Butterfly Pea Flower Tea Latte at home! This vibrant beverage is not just visually stunning but packed with antioxidants. In our guide, you'll find key ingredients, health benefits, and creative variations to customize your latte. Dive into this delicious recipe and impress your friends with a colorful treat that brightens any day.
Print Recipe Pin Recipe

Ingredients
  

2 tablespoons dried butterfly pea flowers

1 cup boiling water

1 cup milk of choice (dairy, almond, coconut, oat, etc.)

2 tablespoons honey or sweetener of choice

½ teaspoon vanilla extract

Ice cubes

Lemon slices or edible flowers for garnish (optional)

Instructions
 

In a heatproof container, steep the dried butterfly pea flowers in 1 cup of boiling water for about 10-15 minutes, until the color is vibrant and the infusion is complete. Strain the flowers and set the tea aside to cool.

    While the tea is cooling, prepare your milk mixture by combining the milk, honey (or sweetener), and vanilla extract in a separate bowl or container. Whisk or froth until well combined and slightly frothy.

      Fill a glass with ice cubes to your desired level. Pour the cooled butterfly pea flower tea over the ice until the glass is halfway full.

        Gently pour the milk mixture over the tea, allowing the two layers to create a beautiful ombre effect.

          For added flavor and decoration, garnish with lemon slices on the rim of the glass or sprinkle some edible flowers on top.

            Prep Time: 10 min | Total Time: 25 min | Servings: 1

              Related Recipes

              • To make a delicious Turmeric Golden Milk Latte, gather these simple ingredients: - 2 cups almond milk (or your preferred milk) - 1 teaspoon ground turmeric - 1/2 teaspoon ground ginger - 1/4 teaspoon cinnamon - 1 tablespoon honey or maple syrup (adjust to taste) - Pinch of black pepper - 1/2 teaspoon vanilla extract - Optional: a sprinkle of nutmeg for garnish - Almond Milk: This milk is low in calories and rich in vitamins. It helps with heart health. - Turmeric: This spice has curcumin, known for its anti-inflammatory properties. It may help improve brain function. - Ginger: Ginger can help with digestion and nausea. It adds a nice warmth to the drink. - Cinnamon: This spice is rich in antioxidants. It may help lower blood sugar and improve heart health. - Honey or Maple Syrup: Both sweeteners can boost energy. They also provide antioxidants. - Black Pepper: This spice enhances turmeric absorption. It makes the drink more effective. - Vanilla Extract: It adds flavor and can help reduce stress. - Nutmeg: This spice is optional, but it adds warmth and a nice aroma. - Milk Options: You can use oat milk, soy milk, or coconut milk for different flavors. - Sweeteners: If you prefer, try agave syrup or stevia as sugar-free options. - Spices: Experiment with cardamom or cloves for added flavor. - Nutmeg: You can skip it if you don't like nutmeg, or use a touch of cocoa powder instead. 1. Start by taking a small saucepan. 2. Add 2 cups of almond milk to the pan. 3. Measure and add 1 teaspoon of ground turmeric. 4. Next, add 1/2 teaspoon of ground ginger. 5. Sprinkle in 1/4 teaspoon of cinnamon. 6. Sweeten your drink with 1 tablespoon of honey or maple syrup. 7. Don't forget a pinch of black pepper for better absorption of turmeric. 8. Lastly, add 1/2 teaspoon of vanilla extract. 9. Whisk all the ingredients well in the pan. 10. Place the saucepan on medium heat. 11. Gently warm the mixture while stirring often. 12. Keep an eye on it; do not let it boil. 13. After about 5-7 minutes, it should be hot enough. 14. Remove the pan from heat and let it cool slightly. 15. If you want a frothy drink, use a milk frother or whisk it quickly. 16. Pour the golden milk into your favorite mugs. 17. Optionally, sprinkle a bit of nutmeg on top for a nice touch. 18. Serve warm and enjoy this comforting drink! - Always use a whisk to blend the spices into the milk. - Whisking helps mix the turmeric and other spices evenly. - When heating, keep the heat low to avoid scalding the milk. - Stir often to prevent sticking at the bottom of the pan. - If you see steam but no bubbles, you are at the right temperature. - A milk frother works wonders for a smooth, frothy finish. - If you don’t have a frother, whisk vigorously by hand. - Frothing adds air, giving the latte a creamy feel. - The more you froth, the lighter and fluffier your drink will become. - For an extra touch, froth some almond milk separately and top your latte with it. You can mix spices to make your turmeric latte tastier. Try adding a pinch of nutmeg or a dash of cardamom. These spices add warmth to the drink. You can also use fresh ginger instead of ground ginger. This will give your latte a bright, zesty kick. Just remember, fresh ginger may need more time to steep. Many people rush the heating process. Always warm your milk slowly over medium heat. If you boil it, the spices can lose flavor. Another mistake is not blending the spices well. Make sure to whisk the mixture thoroughly. This helps avoid clumps of turmeric or ginger. Lastly, avoid skipping the black pepper. It helps your body absorb turmeric better. Sweetness is personal. Start with one tablespoon of honey or maple syrup. Taste your latte and add more if you like it sweeter. For creaminess, use full-fat coconut milk for a richer feel. Almond milk is lighter but still delicious. You can also mix almond and coconut milk for the best of both worlds. {{image_2}} You can easily make this latte vegan. Just use almond milk, coconut milk, or oat milk. These milks work great in this recipe. They keep the drink creamy and delicious. If you want a nut-free option, oat milk is the best choice. It blends well with turmeric and spices. To make an iced version, start with brewed turmeric milk. Follow the same steps but let it cool. Pour over ice instead of serving warm. This drink is refreshing on hot days. You can also add some ice cream for a treat! You can mix and match flavors for fun. Try adding matcha for a green twist. This adds a fresh taste and boosts energy. You can also use cocoa for a chocolatey version. The cocoa pairs well with turmeric and spices. For a special touch, add a dash of vanilla extract. This enhances the overall flavor and aroma. To store leftover turmeric golden milk, let it cool first. Then, pour it into an airtight container. Keep it in the fridge for up to three days. This way, you can enjoy the drink again without losing its flavor. When reheating your golden milk, do it gently. Pour it into a small saucepan. Heat it over low to medium heat. Stir it often to avoid burning. Never let it boil, as this can change the taste and texture. You can also use a microwave. Heat in short bursts, stirring in between. Turmeric golden milk lasts about three days in the fridge. Check for signs of spoilage. If it smells sour or has any mold, discard it. Always trust your senses. If it looks or smells off, it’s best to throw it away. Turmeric has many health benefits. It is known for its bright yellow color and active compound called curcumin. Curcumin may help reduce inflammation. It can also support joint health. Some studies suggest it may boost your mood. Turmeric might even help with digestion. Drinking turmeric may also support your immune system. Yes, you can use any milk you like. Almond milk is great, but coconut milk adds creaminess. Oat milk is a good choice for a thicker texture. If you prefer dairy, whole or skim milk works too. Just remember, different types of milk will change the flavor a bit. To make this recipe sugar-free, skip the honey or maple syrup. You can use a sugar substitute like stevia or monk fruit instead. These options will give you sweetness without the calories. Just adjust the amount to your taste. Yes, it is safe for most people to have turmeric daily. Using it in cooking or drinks is a great way to enjoy its benefits. However, if you have health issues or take certain medications, check with a doctor first. Moderation is key, as with any food. In this blog post, we explored the ingredients and health benefits of Turmeric Golden Milk. I shared step-by-step instructions for making it frothy and delicious. We also discovered tips, tricks, and variations to enhance your drink. Proper storage and reheating advice can help you enjoy leftovers. Remember, turmeric offers many health benefits, so enjoy this drink often. Use alternative ingredients if you prefer. With these ideas, you can create the perfect golden milk to suit your taste and health needs. Enjoy your journey to wellness!
                Turmeric Golden Milk Latte Simple and Creamy Recipe
              • - 1 ripe mango, peeled and diced - 1 cup fresh pineapple chunks - 1 banana, sliced - 1 cup coconut water (or regular water) - 1/2 cup plain Greek yogurt (or dairy-free alternative) - 1 tablespoon honey or agave syrup (optional) - A handful of fresh mint leaves (for garnish) - Ice cubes (optional) The key to a delicious mango pineapple smoothie lies in its fresh ingredients. You want ripe fruits for the best flavor. The mango should feel soft when you squeeze it gently. Pineapples should smell sweet and fruity. This smoothie combines sweet mango, tangy pineapple, and creamy banana. Coconut water adds hydration, while Greek yogurt gives it a nice creaminess. You can add honey for extra sweetness if you like. Mint leaves add a refreshing touch when you serve it. Each ingredient plays a role in making this smoothie flavorful and refreshing. Trust me, using fresh ingredients will make a big difference in taste! To make this smoothie, start by gathering your main ingredients. You need a ripe mango, fresh pineapple, and a banana. 1. In a blender, combine the diced mango, pineapple chunks, and banana slices. This mix brings a burst of tropical flavor. 2. Next, add one cup of coconut water to the blender. This not only hydrates but also adds a refreshing twist. 3. For creaminess, pour in half a cup of plain Greek yogurt. If you want it sweeter, drizzle in one tablespoon of honey or agave syrup. 4. Blend on high until the mixture is smooth and creamy. If you like your smoothie chilled, toss in a few ice cubes and blend again until they are fully mixed in. 5. After blending, taste your smoothie. If it needs to be sweeter or thicker, add more honey or coconut water as needed. Once your smoothie is ready, it’s time to serve it. I recommend using tall glasses to show off the vibrant color. For a fun touch, garnish each glass with a few fresh mint leaves on top. This not only looks nice but also adds a fresh aroma. Enjoy your delicious Mango Pineapple Smoothie! For the Full Recipe, please refer back to the ingredient list and instructions. To get your smoothie just right, focus on creaminess. Use ripe fruits like mango and banana. The Greek yogurt adds a nice, smooth texture. If you want a richer taste, try full-fat yogurt. For a lighter feel, use low-fat or dairy-free yogurt. Adjust the thickness by adding more liquid. Coconut water is great for this. If your smoothie is too thick, just pour in a bit more. Blend again until it’s just how you like it. If you want a thicker smoothie, add more banana or ice cubes. Boosting flavor can take your smoothie to the next level. Try adding spices like cinnamon or ginger. These spices not only add warmth but also great health benefits. A dash of cinnamon can make the smoothie taste cozy. A pinch of ginger gives it a nice kick. You can also use flavored yogurts for extra taste. Vanilla or coconut yogurt work well. If you want sweetness, think about honey or agave syrup. These can make your smoothie more enjoyable. For a fun twist, try adding a splash of vanilla extract. It will add a lovely aroma to your drink. For a full taste experience, explore the [Full Recipe]. {{image_2}} You can change the fruit in your smoothie to keep it fresh. Adding strawberries or blueberries gives a sweet twist. These berries add a nice color and taste. You can also try using other tropical fruits like papaya or kiwi. These fruits bring new flavors and nutrients to your drink. Each fruit will change the smoothie’s taste and make it unique. If you want a dairy-free smoothie, swap the Greek yogurt for a plant-based option. Almond, coconut, or soy yogurt works well. These alternatives keep your smoothie creamy without dairy. For sweeteners, you can use maple syrup or agave syrup for a vegan choice. These options add sweetness while keeping your drink plant-based. Enjoy the fruity goodness in many ways! Don't forget to check the Full Recipe for more ideas. You may have some smoothie left after making your Mango Pineapple Smoothie. To keep it fresh, use a glass jar or a BPA-free plastic container. Seal it tightly to prevent air from spoiling the flavor. Store it in the fridge for up to 24 hours. After that, it may lose some taste and texture. If you want to enjoy the smoothie later, freezing is a great option. Pour the smoothie into ice cube trays or freezer-safe bags. Leave some space in the bags for expansion. You can freeze it for up to three months. When you’re ready to drink it, take out what you need. Thaw it in the fridge overnight or blend it straight from the freezer for a slushy treat. Enjoy your refreshing Mango Pineapple Smoothie anytime! Yes, you can make this smoothie ahead of time. If you want to save it, store it in an airtight container. Keep it in the fridge for up to one day. The smoothie may separate, so stir it well before you drink it. If you don’t have coconut water, use regular water or fruit juice instead. Fruit juice can add a nice flavor. You can also try almond milk for a creamier touch. Just remember, the taste will change a bit based on what you use. To make the smoothie thicker, add more Greek yogurt or a banana. You can also use frozen fruit instead of fresh. Frozen fruit gives you a nice, thick texture. Just blend it well, and you’ll get a creamy drink. Yes, this smoothie is great for kids! It is packed with fruits and tastes sweet. You can adjust the sweetness by adding less honey. The bright colors and fresh flavors will appeal to children, making it a fun treat. You can find the Full Recipe for the Tropical Bliss Mango Pineapple Smoothie above in this article. This will guide you through every step to create your own refreshing drink. This blog post covers a simple and tasty smoothie recipe. You learned about the key ingredients and their nutritional benefits. I provided steps to prepare and serve the smoothie perfectly. Tips for texture and flavor help you make it your own. You can explore variations to suit your tastes or dietary needs. Don’t forget storage tips to keep leftovers fresh. Enjoy your smoothie making journey. It’s all about trying new things and having fun!
                Mango Pineapple Smoothie Refreshing and Flavorful Blend
              • - 2 packets of frozen açaí puree - 1 ripe banana - 1 cup of fresh pineapple chunks - 1 cup of coconut milk (or any non-dairy milk) - 1 tablespoon of honey or agave syrup (optional) For a vibrant tropical taste, the main ingredients are key. Açaí puree brings rich color and flavor. It is full of antioxidants. Bananas add creaminess and natural sweetness. Fresh pineapple gives a bright, juicy touch. Coconut milk offers a smooth base. You can use any non-dairy milk you prefer. Honey or agave syrup adds sweetness if needed. - Sliced kiwi - Coconut flakes - Granola - Chia seeds - Fresh berries (e.g., strawberries, blueberries) Toppings make your smoothie bowl pop! Sliced kiwi adds a zesty kick. Coconut flakes give it a tropical crunch. Granola provides texture and flavor. Chia seeds offer extra nutrients. Fresh berries, like strawberries and blueberries, add color and taste. You can mix and match these toppings for a fun look. For the full recipe, please refer to the section above. 1. Blend the ingredients Start by adding the frozen açaí puree, ripe banana, fresh pineapple chunks, and coconut milk into a blender. If you want it sweeter, you can add honey or agave syrup. Blend this mixture on high speed until it becomes creamy and smooth. 2. Adjust consistency with coconut milk If your smoothie is too thick, just add a bit more coconut milk. Blend again until you reach the texture you want. This step is key to making your smoothie bowl enjoyable. 3. Pour into a bowl Once blended, carefully pour the smoothie mixture into a bowl. Make sure to use a large enough bowl to hold all the goodness. 4. Add toppings creatively Now comes the fun part! Arrange your toppings, such as sliced kiwi, coconut flakes, granola, chia seeds, and fresh berries, over the smoothie. Try to create a colorful pattern. I love making a circular design to highlight all the vibrant colors. - Tips for presentation Use a shallow bowl to show off your beautiful toppings. You can also sprinkle some extra coconut flakes around the edge for a nice touch. A colorful presentation makes your smoothie bowl more fun to eat. - Recommended serving utensils Serve your smoothie bowl with a regular spoon. If you want to make it more special, use a wooden spoon or a cute, colorful one. Enjoy your tropical treat right away to keep it fresh and tasty. For the full recipe, refer to the earlier sections. To make a great smoothie bowl, start with ripe fruits. Ripe fruits taste better and add natural sweetness. Look for bananas that are yellow with some brown spots. When it comes to pineapples, choose ones that smell sweet. It ensures they are juicy and fresh. Blending is key to your smoothie bowl. You want a smooth and creamy texture. If your mix is too thick, add more coconut milk. Blend again until you reach the right consistency. A good blend makes your bowl enjoyable and easy to eat. A colorful topping arrangement makes your smoothie bowl pop. Use fresh berries, sliced kiwi, and coconut flakes. Lay them out in a pattern. A circular design looks appealing and fun. To elevate your smoothie bowl's look, use bowls with interesting shapes. Tall bowls or wide, shallow ones can change the game. Garnish with a sprinkle of chia seeds for a fancy touch. This not only looks great but adds a bit of crunch too. {{image_2}} You can change the non-dairy milk for this smoothie. Almond, soy, or oat milk work well. Each milk adds a different taste. Try using seasonal fruits too. Mango, papaya, or berries add a fresh twist. You can mix and match to find your favorite blend. Want more nutrients? Add spinach or kale to your smoothie. They blend well and boost health. You won’t even taste them! For extra energy, stir in nut butter or protein powder. Both will make your smoothie more filling. They add great flavor too! You can also experiment with different combinations to find the best taste for you. To store leftovers, place your smoothie bowl in the fridge. Use a tight container to keep it fresh. Glass or BPA-free plastic works well for storage. I prefer glass because it keeps flavors better. You can freeze smoothie bowls for later. Just pour the mixture into an airtight container. Leave some space at the top, as it will expand when frozen. To defrost, place it in the fridge overnight. If you’re in a rush, you can use the microwave. Just heat it in short bursts to avoid cooking. Enjoy your tropical treat later with ease! For the recipe, check out the Full Recipe. What is açaí and what are its benefits? Açaí is a small, dark purple berry from Brazil. It is full of antioxidants, which help fight free radicals in the body. Açaí is also rich in fiber, promoting good digestion. Plus, it has healthy fats that support heart health. You can enjoy its fruity taste in many dishes. Can I make this smoothie bowl ahead of time? Yes! You can prepare the smoothie mix and store it in the fridge for up to 24 hours. Just remember to keep the toppings separate. This way, your bowl stays fresh and tasty. How can I make this recipe vegan or gluten-free? To make it vegan, use agave syrup instead of honey. For gluten-free, ensure your granola and any other toppings are gluten-free. Most fruits and coconut milk are naturally gluten-free, so you’re all set! Can I substitute açaí with other fruits? Yes, you can! If you can’t find açaí, try using frozen berries like blueberries or strawberries. These fruits will add sweetness and a burst of color to your bowl. What to do if the smoothie is too thick? If your smoothie is too thick, just add a little more coconut milk. Blend again until you reach your desired creaminess. This will make it easier to pour and enjoy. How to fix a smoothie bowl that tastes too bland? If your smoothie bowl lacks flavor, try adding a splash of vanilla extract or a pinch of salt. You can also mix in a bit of honey or agave syrup for sweetness. Adjust the toppings to add more taste and texture. This article covers how to make a delicious açaí smoothie bowl. You learned about the key ingredients, easy steps for preparation, and creative topping ideas. I shared tips to improve taste and presentation, plus fun variations to try. Don’t forget storage techniques to keep your bowl fresh. With all this information, you can enjoy a tasty and nutritious treat anytime. Get creative with your favorites and make this recipe truly yours. Enjoy every bite!
                Tropical Acai Smoothie Bowl Energizing Healthy Treat
              • - 1 cup plain yogurt - 1/2 cup coconut milk - 1 cup fresh blueberries (plus extra for garnish) - 2 tablespoons honey or agave syrup (adjust to taste) - 1/2 teaspoon vanilla extract - A pinch of cardamom powder - Ice cubes (optional) Using fresh ingredients makes a big difference in taste. Fresh blueberries burst with flavor and nutrients. They give the lassi a bright color and a sweet taste. If you can’t find fresh blueberries, frozen ones work too. They are picked at their peak and frozen quickly. This helps keep their taste and nutrients. However, fresh blueberries always add a better texture. Each ingredient in this lassi has great health benefits. - Plain yogurt: Full of protein and good for your gut health. - Coconut milk: Contains healthy fats that can boost energy. - Blueberries: Packed with antioxidants, they help fight disease. - Honey or agave syrup: Adds sweetness and has some vitamins. - Vanilla extract: Adds flavor and may reduce stress. - Cardamom powder: Can aid digestion and add a warm spice note. This Blueberry Coconut Lassi is not just tasty; it’s also good for you! Start by gathering all your ingredients. This makes the process easier and faster. You will need: - 1 cup plain yogurt - 1/2 cup coconut milk - 1 cup fresh blueberries (plus extra for garnish) - 2 tablespoons honey or agave syrup (adjust to taste) - 1/2 teaspoon vanilla extract - A pinch of cardamom powder - Ice cubes (optional) Make sure your blueberries are fresh and ripe. They add great flavor and color. If you want a sweeter lassi, adjust the honey or agave syrup to your taste. Now it’s time to blend! In a blender, combine the yogurt, coconut milk, blueberries, honey, vanilla extract, and cardamom powder. Blend on high speed until the mix is smooth and creamy. If you like a thinner drink, add more coconut milk. After blending, taste the lassi. You can add more honey if you want it sweeter. For a chilled treat, add ice cubes and blend again until frothy. Pour your lassi into tall, clear glasses. This shows off the pretty purple color. For a special touch, garnish with a few whole blueberries on top. You can also sprinkle a little cardamom powder for added flair. If you want to impress, add a slice of lime on the glass rim. This not only looks good but adds a nice contrast to the drink. Enjoy your refreshing Blueberry Coconut Lassi! For the full recipe, check the earlier section. For a thick and creamy lassi, use full-fat yogurt. This gives your drink a rich texture. If you want it thinner, add a bit more coconut milk. Blend it well until it's smooth. You can also try adding ice cubes. This makes it frothy and cold. Both honey and agave syrup are great for sweetness. Honey gives a floral taste, while agave is mild. Start with two tablespoons and taste it. If you want it sweeter, add more. Remember, you can always add more, but you can't take it out! You can make your lassi even better! Try adding a pinch of cinnamon or nutmeg for warmth. Fresh mint leaves can add a nice touch too. You might even add a splash of lime juice for a zesty kick. All these extras can make your blueberry coconut lassi unique and delicious. For the full recipe, check out the complete instructions. {{image_2}} You can easily make a vegan version of blueberry coconut lassi. Just swap the yogurt with a plant-based option. Use coconut yogurt or almond yogurt for a creamy base. These alternatives keep that rich flavor. They also add a nice texture. You still get the fresh taste from blueberries and coconut milk. This change makes the drink creamy without any dairy. Spices can enhance the flavor of your lassi. Cardamom adds a warm note. You can also try cinnamon for a sweet twist. If you want more fruit, think about adding bananas or mangoes. These fruits blend well with blueberries. They also boost the health benefits. Each adds its own flavor and richness to the drink. If you prefer different dairy options, there are many choices. Greek yogurt gives a thicker texture. It also adds a tangy taste. You can use regular yogurt instead of plain yogurt. It is a great way to change the flavor. Try using buttermilk for a unique twist. Each choice will change the texture and taste of your lassi. Each option keeps the drink creamy and delicious. For the full recipe, check out the link above. To keep your blueberry coconut lassi fresh, store it in a clean glass jar. Make sure the jar is airtight. This helps keep out air and bacteria. If you have leftovers, don’t let them sit out for long. Refrigerate the lassi within two hours of making it. Always use a spoon to scoop the lassi. Avoid using your fingers, as this can introduce germs. When stored properly, blueberry coconut lassi lasts about 2 to 3 days in the fridge. After that, the taste and texture may change. You will notice it may separate a bit. If this happens, just give it a good shake or blend it again. Always check for any off smells or changes in color before consuming. You can freeze blueberry coconut lassi for later enjoyment. Pour the lassi into ice cube trays or freezer-safe containers. Leave some space at the top, as liquids expand when frozen. To use, thaw the lassi in the fridge overnight or blend the frozen cubes into smoothies. This method keeps the flavor and nutrients intact. For the best taste, use frozen lassi within three months. For the full recipe, check out the earlier section! Yes, you can use Greek yogurt. It makes the lassi thicker and creamier. If you prefer a lighter drink, stick with plain yogurt. Greek yogurt has more protein, which is great for keeping you full. Just remember to adjust the coconut milk to balance the thickness. Absolutely! Blueberry Coconut Lassi is a fun and tasty drink for kids. It has natural sweetness from honey and blueberries. The yogurt provides healthy probiotics, good for digestion. Kids love the vibrant color and fruity flavor. You can make it as sweet as they like! You can find Blueberry Coconut Lassi at many health food stores or cafes. Some grocery stores may also carry it in the yogurt section. If you want a fresh one, try making it at home. You can easily whip up this drink with the Full Recipe I provided. Blueberry coconut lassi is a nutritious and tasty drink. You learned about key ingredients, like fresh blueberries and coconut. The blending process ensures a smooth drink. Adjust sweetness with honey or agave for your taste. You can try different fruits and spices to mix it up. Storing tips help you keep leftovers fresh. Remember, lassi is fun to make and enjoy. Experiment with variations to find your favorite way to drink it. Enjoy your delicious and healthy blueberry coconut lassi!
                Blueberry Coconut Lassi Creamy and Refreshing Drink

              WANT TO SAVE THIS RECIPE?

              1 shares

              Leave a Reply Cancel reply

              Your email address will not be published. Required fields are marked *

              Recipe Rating


              Looking for a refreshing drink that’s also healthy? Discover how to make an Iced Butterfly Pea Flower Tea Latte at home! This vibrant beverage is not just visually stunning but packed with antioxidants. In our guide, you'll find key ingredients, health benefits, and creative variations to customize your latte. Dive into this delicious recipe and impress your friends with a colorful treat that brightens any day. Click to explore the full recipe!

              Hi I’m Taling

              I love sharing perfected dishes from my kitchen. I’m sure they’ll earn a spot in your heart. Let’s savor this journey together!.

              More about me

              Recent Desserts

              • - 1 cup rolled oats - 1 cup almond milk (or any milk of choice) - 1 medium apple, peeled and diced - 1 tablespoon maple syrup (or honey) In this recipe, rolled oats serve as the base. They give the dish texture and fiber. Almond milk or any milk you choose keeps it creamy. Diced apple adds sweetness and crunch. Maple syrup or honey brings a touch of natural sweetness. - ¼ cup Greek yogurt (optional for creaminess) - 2 tablespoons chopped walnuts (or pecans) - ½ teaspoon vanilla extract Adding Greek yogurt makes the oats rich and creamy. Chopped walnuts or pecans give a nice crunch and healthy fats. A bit of vanilla extract enhances the flavor, making it taste more like dessert. - 1 teaspoon cinnamon - A pinch of salt Cinnamon is key for that warm, apple pie flavor. It adds depth and aroma. A pinch of salt balances the sweetness and enhances the taste of all the ingredients. To start, take a medium bowl. Combine the rolled oats, almond milk, maple syrup, cinnamon, vanilla extract, and a pinch of salt. Stir well until everything mixes together. This step ensures the oats soak up the flavors. Next, fold in the diced apple. Make sure the apple pieces are spread evenly in the mix. If you want a creamier texture, add the Greek yogurt. Mix until it blends smoothly into the oats. Now, divide the mixture into two clean jars or containers. This helps with portion control. Next, top each jar with chopped walnuts for a nice crunch. Cover the jars tightly with lids or plastic wrap. Place them in the fridge overnight, or for at least four hours. This chilling time lets the oats soften and absorb flavors. In the morning, take the jars out of the fridge. Give the oats a good stir. If you want them creamier, add a splash more almond milk. You can enjoy them cold straight from the jar. If you prefer warm oats, microwave each jar for 30 to 60 seconds. For an extra touch, drizzle some maple syrup on top. A sprinkle of cinnamon and some extra apple slices can make your dish look appealing. Enjoy your tasty apple pie overnight oats! You can switch up the fruits in your Apple Pie Overnight Oats. Try using pears for a juicy twist. Bananas add creaminess and sweetness too. You can mix and match to find your favorite flavor. When it comes to milk, I recommend almond milk. But you can use any milk you like. Cow's milk, oat milk, or even coconut milk work well. Each one gives a different taste and texture. Chilling time is key for great overnight oats. Let them sit in the fridge for at least four hours. This helps the oats soak up the milk. You get a creamy, soft texture. If your oats are too thick, add more milk. Stir in a splash at a time until it feels just right. You want it to be creamy, not dry. Garnish your oats with extra toppings for a fun touch. Drizzle some maple syrup on top. A sprinkle of cinnamon adds flavor and looks nice too. For a creative serving suggestion, add apple slices on the side. A dollop of Greek yogurt can make it feel fancy. Use clear jars to show off those layers of flavor. {{image_2}} You can spice up your Apple Pie Overnight Oats in fun ways. Adding raisins or dried cranberries brings a sweet burst. These fruits add chewiness and extra flavor. You can also sprinkle in nutmeg for a warm, cozy taste. Nutmeg pairs well with cinnamon and gives a deeper spice note. Need to keep it gluten-free? Use certified gluten-free oats. They taste just as good and keep your dish safe. If you want a dairy-free option, swap Greek yogurt for a plant-based yogurt. Almond milk is already dairy-free, making this dish easy to adapt. Feel free to change your toppings with the seasons! In fall, add caramelized apples or pecans for a festive touch. In summer, fresh berries like strawberries or blueberries work great. These seasonal fruits add color and flavor, keeping your breakfast exciting all year long. Store your leftover overnight oats in airtight containers. Glass jars work great. They keep the oats fresh and make it easy to grab and go. If you have more than two servings, divide them into separate jars. This way, you can enjoy them throughout the week. These oats can stay fresh in the fridge for up to five days. To maintain their best taste, eat them within three days. Check for signs of spoilage like a sour smell or change in color. If the oats look dry or clumpy, it’s best to toss them. You can enjoy your oats cold or warm. For a quick heat-up, use the microwave. Heat for 30 to 60 seconds. Stir halfway to ensure even warming. If you prefer the stovetop, add a little almond milk and heat in a small pot. Stir until warm, and enjoy! To make this dish vegan, swap honey with maple syrup. Use almond milk or any plant-based milk. For yogurt, try coconut yogurt or omit it for a lighter version. This keeps the creamy texture without the dairy. Yes, you can prepare Apple Pie Overnight Oats up to three days ahead. Store them in airtight jars in the fridge. It’s best to top with nuts right before serving. This keeps them crunchy and fresh. Overnight oats are full of fiber, which helps digestion. They provide steady energy throughout the day. Oats lower cholesterol and support heart health. Apples add vitamins and antioxidants. Walnuts give healthy fats and protein. This dish is a balanced breakfast choice. Apple pie overnight oats are easy to make and tasty. You learned the main ingredients, like oats and apple, and how to prepare them. I shared tips on customizing the oats and offered storage tips for leftovers. Try different fruits or nuts to find what you love. Remember, the best part is making it your own. Enjoy this healthy, quick meal that fits any time of year. Happy cooking!
                Apple Pie Overnight Oats Healthy Breakfast Delight
              • To make this yummy coffee cake, gather these simple ingredients: - 2 cups all-purpose flour - 1 cup granulated sugar - ½ cup unsalted butter, softened - 1 cup milk - 2 large eggs - 2 teaspoons baking powder - 1 teaspoon vanilla extract - ½ teaspoon salt - 1 cup chopped walnuts - ½ cup maple syrup - 1 teaspoon cinnamon You can swap some ingredients if needed. Here are a few options: - Use coconut oil instead of butter for a dairy-free option. - Swap almond milk for regular milk to make it dairy-free. - Use brown sugar instead of granulated sugar for a richer flavor. - If you want a nut-free cake, leave out the walnuts entirely. Choosing the right ingredients makes a big difference. Here’s what I recommend: - Use fresh, high-quality eggs for better flavor and texture. - Choose real maple syrup, not imitation, for a true maple taste. - Opt for organic all-purpose flour for a cleaner bake. - Select fresh walnuts and chop them yourself for the best crunch. Using these quality ingredients will elevate your coffee cake and impress your guests! First, I preheat the oven to 350°F (175°C). This step is key for even baking. Next, I grease a 9x13 inch baking pan. I use butter for a nice, non-stick finish. Make sure to cover all corners well. This helps the cake come out easily after baking. In a large bowl, I cream together softened butter and granulated sugar. I mix until it looks light and fluffy. Then, I add the eggs, one at a time. Each egg needs a good mix before the next. After that, I stir in the vanilla extract for flavor. In a separate bowl, I whisk the flour, baking powder, salt, and cinnamon. Mixing these dry ingredients first helps them blend well. I then add this dry mix to my creamed mixture, alternating with the milk. I mix until just combined but avoid overmixing. Finally, I gently fold in the chopped walnuts and maple syrup. This adds a nice crunch and sweetness. Now, I pour the batter into the prepared baking pan. I smooth the top with a spatula to make it even. I place the pan in the oven and bake for 30-35 minutes. To check if it’s done, I insert a toothpick into the center. If it comes out clean, the cake is ready! After baking, I let the cake cool in the pan for about 10 minutes. Then, I carefully transfer it to a wire rack. This step helps it cool completely and avoids sogginess. For an extra treat, I sometimes drizzle maple syrup on top before serving. To get the best texture for your Maple Walnut Coffee Cake, follow these simple tips: - Use room temperature butter and eggs. This helps mix the batter smoothly. - Do not over-mix the batter. Mix until just combined to keep it fluffy. - Fold in walnuts gently. This keeps the cake light and airy. If you're new to baking, here are some helpful tips: - Preheat the oven. Always preheat your oven to ensure even baking. - Use the right pan size. A 9x13 inch pan works best for this recipe. - Test with a toothpick. Insert it into the center to check if it’s done. Serving your coffee cake is easy and fun. Here are some ideas: - Serve warm or at room temperature. This makes the flavors shine. - Pair with coffee or tea. The flavors of maple and walnuts go well with both. - Add a drizzle of maple syrup on top. This adds sweetness and looks nice. {{image_2}} You can make a gluten-free version of this cake. Use gluten-free flour instead of all-purpose flour. Look for a blend that works best for baking. Many brands offer this option. Follow the same steps in the recipe. You will get a moist and tasty cake. For a creamier twist, add a cream cheese swirl. Mix 8 ounces of softened cream cheese with ¼ cup of sugar and 1 egg. After mixing the batter, pour half into the pan. Then, dollop the cream cheese mix on top. Use a knife to swirl it into the batter. Pour the rest of the batter over this. Bake as usual for a rich flavor. You can also make this cake nut-free. Simply leave out the walnuts. For extra texture, add ½ cup of oats or chocolate chips. This change still keeps the cake delicious and fun. Follow the same recipe steps for baking. Enjoy a tasty treat without the nuts. After you finish your delicious cake, let it cool. Cut the cake into slices. Place the slices in an airtight container. If you do not have one, wrap the cake in plastic wrap. This keeps it fresh for up to four days at room temperature. For best taste, keep it in a cool, dry place. To keep your cake fresh, avoid direct sunlight. Heat and humidity can dry it out. If you want to keep it longer, refrigerate it. Wrap the cake tightly in foil before putting it in the fridge. This helps it last for about a week. Remember, cold storage can change the texture, so serve it at room temperature. You can freeze Maple Walnut Coffee Cake for later! First, let the cake cool completely. Wrap individual slices in plastic wrap. Then, place them in a freezer-safe bag. Mark the date on the bag. The cake will stay fresh for up to three months. When you want a slice, remove it from the freezer. Let it thaw in the fridge overnight or at room temperature for a few hours before serving. Enjoy the taste of your cake any time! To keep your maple walnut coffee cake moist, use fresh ingredients. Use room temperature butter and eggs. Adding milk helps too. Avoid overmixing the batter, as this can dry it out. Bake just until a toothpick comes out clean. You can also store it in an airtight container. This keeps moisture in. Yes, you can! If you dislike walnuts, try pecans or almonds. Both nuts add a nice crunch. You can even skip nuts for a nut-free cake. Just keep the flavor balance in mind. Using nuts can enhance the cake's texture and taste. When stored properly, your cake can last for about 3 to 5 days. Keep it in an airtight container. If you want it to last longer, freeze it. It can stay good for about 3 months in the freezer. Just remember to thaw it before serving. Absolutely! You can prepare the batter a day in advance. Just cover it and keep it in the fridge. For baked cake, you can also make it a day ahead. Just allow it to cool before storing. This makes serving easy for special occasions or brunch. This blog post covered how to make a Maple Walnut Coffee Cake. We discussed the best ingredients, step-by-step instructions, and tips for success. You learned about fun variations and how to store leftovers properly. In the end, making this cake is rewarding and simple. Enjoy your baking journey and share your delicious results!
                Maple Walnut Coffee Cake Bakery Delightful Recipe
              • - 2 cups gingersnap crumbs - ½ cup unsalted butter, melted - ¼ cup brown sugar - 16 oz cream cheese, softened - 1 cup pumpkin puree - 1 cup granulated sugar - 3 large eggs - 1 teaspoon vanilla extract - Spices: 1 teaspoon ground cinnamon, ½ teaspoon ground nutmeg, ½ teaspoon ground ginger - ¼ teaspoon salt - 1 cup caramel sauce (store-bought or homemade) This recipe starts with a crunchy gingersnap crust. The crust is simple yet full of flavor. You mix gingersnap crumbs with melted butter and brown sugar. Press this mixture into the bottom of your baking dish. Next, we create a smooth and creamy cheesecake filling. Start with softened cream cheese. This step is key. If the cream cheese is cold, it will be hard to mix. Add pumpkin puree and granulated sugar to the cream cheese. This combination gives the bars their delicious pumpkin flavor. Then, mix in the eggs, one at a time. This helps to keep the filling light. After that, add vanilla extract and spices. The warm spices will fill your kitchen with a lovely aroma. Lastly, we need caramel sauce. You can use store-bought sauce for ease, or make your own if you prefer. Drizzle this over the cheesecake filling. Swirl it in with a knife for a beautiful marbled look. Each layer adds to the rich taste of these pumpkin caramel cheesecake bars. 1. Preheat your oven to 350°F (175°C). This step is crucial for a perfect crust. 2. In a medium bowl, mix 2 cups of gingersnap crumbs, ½ cup of melted butter, and ¼ cup of brown sugar. Stir until the crumbs look like wet sand. 3. Press the mixture evenly into the bottom of your greased 9x13 inch baking dish. Bake for 10 minutes. Let it cool slightly. 1. In a large bowl, beat 16 ounces of softened cream cheese until smooth. This makes for a creamy texture. 2. Mix in 1 cup of pumpkin puree and 1 cup of granulated sugar. Blend well until smooth. 3. Add 3 large eggs, one at a time. Beat well after each egg. This helps to create a light filling. 4. Stir in 1 teaspoon of vanilla extract, 1 teaspoon of ground cinnamon, ½ teaspoon of ground nutmeg, ½ teaspoon of ground ginger, and ¼ teaspoon of salt. Mix until all ingredients are combined. 1. Pour the pumpkin cheesecake filling over the cooled gingersnap crust. Spread it evenly. 2. Drizzle 1 cup of caramel sauce on top. Use a knife or skewer to swirl the caramel into the cheesecake. This creates a beautiful marbled effect. 3. Bake for 35-40 minutes. The center should be set but slightly jiggly. 4. After baking, let it cool at room temperature for about an hour. Then refrigerate for at least 4 hours, or overnight, to set completely. To get a smooth texture, always start with softened cream cheese. This helps it mix well and prevents lumps. If you forget to soften it, you can microwave it for a few seconds. Also, mix the eggs gently. Overmixing can cause cracks in your cheesecake. Add them one at a time, and just mix until blended. This keeps the bars looking nice. A pinch of salt can make a big difference. It enhances the sweetness and adds depth to the flavor. Use a high-quality caramel sauce. The better the sauce, the more delicious your bars will be. You can make homemade caramel, or choose a good store brand. Either way, quality matters. For a beautiful finish, garnish your bars with whipped cream. Crushed gingersnap cookies on top add a nice crunch. Drizzle more caramel sauce over the bars right before serving. This extra touch makes them look special and inviting. Serve them chilled on a nice platter to impress your guests. {{image_2}} You can change the crust for a new taste. - Use 2 cups of graham cracker crumbs instead of gingersnap crumbs. - For a gluten-free crust, try a nut-based crust, like almonds or pecans. You do not have to stick to pumpkin. - Swap pumpkin puree with sweet potato puree for a different flavor. - You can play with spices too. Try using allspice or cloves instead of the usual cinnamon and nutmeg. Add fun touches to your bars for extra joy. - Mix in chocolate chips or toffee bits for a sweet surprise in the filling. - Top your bars with chopped pecans or walnuts for a crunchy finish. To keep your pumpkin caramel cheesecake bars fresh, store them in an airtight container in the refrigerator. This will protect them from drying out. Always use parchment paper when baking. This makes it easy to lift and cut the bars later. If you want to save some bars for later, freeze them in individual portions. This way, you can enjoy a slice whenever you want. To serve, thaw the bars in the refrigerator. This keeps the texture just right. These tasty bars are best eaten within a week when stored in the fridge. They pair wonderfully with coffee or tea. Enjoying them as a dessert with your favorite drink makes for a delightful experience. Yes, but ensure it is cooked and well-pureed. Fresh pumpkin can bring a bright flavor. To prepare, cut the pumpkin, roast it, and blend until smooth. This method gives you a rich taste. Make sure you drain any excess moisture. It will help your cheesecake bars set better. The center should be set but still slightly jiggly. When you take them out, the edges will be firm. The middle will have a soft wobble. This indicates it still has some creaminess. Keep in mind, they will firm up as they cool. Yes, these bars can be made and refrigerated for up to 2 days in advance. This makes them great for parties or family dinners. Just cover them well with plastic wrap. This keeps them fresh and tasty. Allow them to chill for at least four hours before serving. This helps the flavors meld together beautifully. This blog post covered how to create delicious pumpkin cheesecake bars with a gingersnap crust. We explored each ingredient and step, ensuring you have the tools to succeed. Remember to soften the cream cheese and avoid overmixing the eggs to get the perfect texture. With these tips, your cheesecake can shine. Don't forget to customize your bars with different toppings or crust options. Enjoy your baking, and savor each bite!
                Pumpkin Caramel Cheesecake Bars with Gingersnap Base
              • - 3 medium apples (Granny Smith or Honeycrisp) - 1 cup fresh or frozen cranberries - ½ cup granulated sugar - 1 teaspoon cinnamon - 1 tablespoon lemon juice - 1 cup rolled oats - ½ cup all-purpose flour - ⅓ cup packed brown sugar - ¼ teaspoon salt - ½ teaspoon vanilla extract - ½ cup cold unsalted butter When making Warm Cranberry Apple Crisp, I love to choose fresh ingredients. The type of apple matters. Granny Smith gives a tart flavor, while Honeycrisp is sweet and crisp. Either choice works great, so pick what you like best. For cranberries, you can use fresh or frozen. If you go with frozen, remember not to thaw them. They hold their shape better that way. The sugar balances the tartness of the cranberries. Cinnamon adds warmth and depth. Lemon juice brightens the dish and enhances the fruit flavors. Now onto the topping! Rolled oats give a wonderful texture. They soak up the juices from the fruit. The all-purpose flour helps bind the topping together. Brown sugar adds a rich flavor, while salt brings everything together. Don’t forget the vanilla extract! It adds a hint of sweetness. Finally, cold unsalted butter is key. It creates that crumbly texture we all love. Feel free to get creative! You can swap in other fruits like pears or berries. Enjoy using what’s in season or what you have on hand. Each variation makes this recipe special! First, preheat your oven to 350°F (175°C). This ensures it is hot and ready. While the oven warms, grab a large mixing bowl. In this bowl, combine three medium apples, sliced, with one cup of fresh or frozen cranberries. I prefer Granny Smith or Honeycrisp for their tart flavor. Add half a cup of granulated sugar, one teaspoon of cinnamon, and one tablespoon of lemon juice. Toss all of these ingredients well, so the fruit is evenly coated. Next, in another bowl, mix together one cup of rolled oats, half a cup of all-purpose flour, and one-third cup of packed brown sugar. Don’t forget to add a pinch of salt, about a quarter teaspoon, and half a teaspoon of vanilla extract for flavor. Now, take half a cup of cold unsalted butter, cut into small pieces, and add it to your oat mixture. Use your hands or a pastry cutter to mix until it looks like coarse crumbs. This crumble will add a nice texture on top. Now, it’s time to bake! Transfer your fruit mixture into a greased 9x9-inch baking dish, spreading it evenly. Then, sprinkle the oat crumble over the fruit layer, making sure it covers everything. Place the dish in your preheated oven. Bake for 30 to 35 minutes. You'll know it’s done when the topping is golden brown and the fruit is bubbling. Once baked, remove it from the oven and let it cool slightly before serving. Enjoy the warm, delicious smell filling your kitchen! To get that golden topping, use cold butter. Mix it into the oats and flour well. Aim for small crumbs. Bake it until it’s a nice brown color. This takes about 30 to 35 minutes at 350°F (175°C). For even cooking, make sure the fruit is spread out in the dish. This helps all parts cook at the same time. Check the fruit at the 25-minute mark. If it bubbles, it’s on the right track! This warm cranberry apple crisp shines when paired with vanilla ice cream. The cold ice cream melts into the warm crisp. It creates a creamy treat. You can also serve it with a dollop of whipped cream. Both options add a nice touch! Try to serve it in bowls. This makes it easy to enjoy. You might want to sprinkle some cinnamon on top for extra flavor. Let the crisp cool before storing. This helps keep it fresh. Place it in an airtight container. Store it in the fridge for up to three days. To reheat, place it in the oven at 350°F (175°C). Heat it for about 10 to 15 minutes. This keeps the topping crispy and the fruit warm. If you want it faster, use the microwave. Just heat in short bursts to avoid making it mushy. {{image_2}} You can give your warm cranberry apple crisp a fun twist. Try adding nuts like walnuts or pecans for a crunchy bite. Chopped nuts add texture and flavor. You can also mix in spices like nutmeg or ginger to warm up the taste. These spices blend well with apples and cranberries. Want to switch up the fruit? You can use pears or berries instead of apples. Pears add a soft, sweet touch. Mixed berries give a burst of color and flavor. Feel free to get creative with your fruit choices! If you need a gluten-free option, swap the all-purpose flour with almond flour or a gluten-free blend. Make sure your oats are labeled gluten-free, as some may contain traces of wheat. For a vegan version, replace the butter with coconut oil or a vegan butter substitute. You can also use maple syrup instead of granulated sugar for sweetness. Need more or less? You can easily adjust the recipe to fit your crowd. To make a larger batch, simply double the ingredients. Use a bigger baking dish to ensure even cooking. For fewer servings, cut the ingredients in half. This way, you can enjoy the crisp no matter the size of your gathering. To keep your warm cranberry apple crisp fresh, store it in the fridge. First, let it cool completely. Then, cover it tightly with plastic wrap or place it in an airtight container. This helps prevent it from drying out or absorbing other smells in the fridge. The crisp will stay fresh for up to four days. Freezing is a great way to enjoy your crisp later. Start by letting it cool completely. Next, cut it into individual portions. Wrap each piece in plastic wrap, then place them in a freezer-safe bag or container. Be sure to remove as much air as possible. Your crisp can last up to three months in the freezer. When you’re ready to eat it, thaw it in the fridge overnight before reheating. In the fridge, your warm cranberry apple crisp lasts up to four days. If you freeze it, it can stay good for up to three months. Always check for any signs of spoilage before eating. If it smells off or looks strange, it’s best to toss it. Enjoy your delicious dessert fresh for the best taste! Yes, you can! This recipe is very flexible. You can swap apples for pears or peaches. Mixed berries work well too. Just keep the tartness in mind. A mix of sweet and tart fruits gives the best flavor. You can reduce sugar by using less granulated sugar. Try honey or maple syrup instead. For a whole grain option, use whole wheat flour instead of all-purpose flour. You can also add nuts for healthy fats and protein. Bake your crisp at 350°F (175°C). This temperature allows the fruit to bubble and the topping to become golden. It ensures even cooking without burning the top. Yes! You can prepare the fruit mixture and topping ahead of time. Store them in the fridge until you’re ready to bake. When ready, just assemble and bake. This saves time and makes it easier for gatherings. You now have a complete guide to make a warm cranberry apple crisp. We covered ingredients, preparation steps, tips, and variations. You can customize this dish to fit your taste. Remember, the right balance between sweet and tart makes it special. Whether shared with a friend or enjoyed alone, this dessert promises warmth and comfort. Try it out, and I'm sure you’ll love it!
                Warm Cranberry Apple Crisp with Oat Crumble Delight

              Recent Drinks

              • For this recipe, you need ripe peaches and mangoes. Ripe peaches should feel soft when you gently press them. They should smell sweet and juicy. Ripe mangoes should have a slight give when pressed. Their skin should show a bit of color, often yellow or red. Using fresh fruit is best. Fresh fruit tastes better and has more nutrients. Frozen fruit can work, but it may change the drink's texture. Fresh peaches and mangoes bring bright flavor. They also add a beautiful color to your drink. You can use different types of tea in this recipe. Black tea gives a strong flavor, while green tea adds a lighter taste. Choose what you like best. For milk, you have many options. You can use dairy milk or non-dairy milk like almond or oat milk. Each choice adds a unique twist to the drink. Non-dairy milk can be creamier, while dairy milk gives a classic taste. When sweetening your drink, you can choose honey or agave syrup. Honey has a rich flavor and can be a bit thicker. Agave syrup is sweeter and lighter. Both work well, so pick what you prefer. You might also want to add spices like cinnamon. Cinnamon gives a warm flavor that pairs well with peach and mango. It also has health benefits, like helping with digestion. A little can go a long way in enhancing your drink's taste. For the full recipe, refer to the section above. To make the fruit puree, start with fresh peaches and mangoes. Wash the fruit well. For the peach, slice it in half and remove the pit. Make thin slices from one half and then dice the other half into small pieces. For the mango, peel it. Cut the sides off the pit and dice the flesh. You want small, even pieces. This helps the puree blend smoothly. Now, grab your blender. Add the sliced peach and diced mango. Blend them until they are smooth. This is your fruit puree. Next, in a large pitcher, pour in the cooled brewed black tea. Add the milk and sweeteners. You can use honey or agave syrup, depending on your taste. Mix these well. If you want, add in the vanilla extract and ground cinnamon for more flavor. Stir until everything is combined. Choose your favorite glasses. Fill each glass with ice cubes. Pour the tea mixture into the glasses, filling them about three-quarters full. Now, scoop a generous spoonful of the peach-mango puree on top. Let it swirl into the milk tea for a lovely look. Finally, add fresh mint leaves on top for a nice touch. Enjoy your Peach Mango Milk Tea! You can find the full recipe [here](Full Recipe). To make a smooth puree, start with ripe fruit. Use one peach and one mango. Slice the peach and dice the mango. Place them in a blender. Blend until there are no lumps. If your puree seems thick, add a tiny splash of water. This will help it blend better. A smooth puree makes your drink look great and taste even better. Sweetness can change the whole drink. Start with two tablespoons of honey or agave syrup. Taste it after mixing. If you like it sweeter, add more. Some might want less sweetness, so adjust to your taste. Remember, the fruit adds natural sugar too. Always taste as you go to find the right balance. You can make your drink even more special with extra flavors. Try adding a teaspoon of vanilla extract for a nice touch. Ground cinnamon gives warmth and depth. If you want something fresh, add mint leaves for garnish. They look pretty and add a nice flavor. You can also explore other fruits like strawberries for a twist. {{image_2}} You can change the fruits in your peach mango milk tea. Try using strawberries for a sweet twist. You can also add passion fruit for a tangy kick. Mix and match based on what you love. The goal is to keep it fruity and fun. Each fruit brings its own flavor. This keeps your drink fresh and exciting. Using different teas can change the taste of your milk tea. Black tea gives a rich flavor, while green tea offers a lighter taste. Herbal teas, like chamomile, can add a calming touch. Experiment with what you have at home. Each tea base will give your drink a new vibe. So don’t be afraid to switch it up! If you want a vegan version, use plant-based milk. Almond milk or oat milk works well. You can also use maple syrup instead of honey for sweetness. For a keto option, use unsweetened almond milk and a low-carb sweetener. This way, you can enjoy peach mango milk tea without the carbs. These changes make it fit your diet while keeping it delicious. To keep your peaches and mangoes fresh, follow these tips: - Peaches: Store ripe peaches in the fridge. They stay fresh for about three to five days. If they are not ripe, keep them at room temperature until they soften. - Mangoes: Like peaches, keep ripe mangoes in the fridge. They can last about five days. If they are firm, leave them out to ripen first. Fresh fruit is best for your peach mango milk tea. Avoid frozen fruit if you want a bright, fresh flavor. After making your peach mango milk tea, you may want to store it. Here is how to do it right: - Refrigeration: Pour the milk tea into an airtight container. This helps keep it fresh and tasty. - Serving Later: When you serve it later, stir it well. The fruit puree may settle at the bottom, so mix it again. Your peach mango milk tea can last in the fridge for about two to three days. However, for the best flavor, enjoy it fresh. If you notice any change in taste or smell, it’s best to toss it out. Peach mango milk tea is a fruity drink made from fresh peaches and mangoes. You blend the fruits into a smooth puree. Then, you mix it with brewed black tea and milk for a creamy texture. This drink is sweet, refreshing, and perfect for hot days. You can find peach mango milk tea at many cafes and tea shops. Popular brands include Chatime and Gong Cha. They offer different versions of this drink. Local bubble tea cafes may also serve it. Check menus for special flavors and toppings. Peach mango milk tea has many health benefits. Peaches are high in vitamins A and C. They can help your skin and immune system. Mangoes are rich in antioxidants and fiber, which support digestion. Using milk adds calcium for strong bones. If you use honey or agave, you get a natural sweetener with fewer chemicals. Enjoy this drink as a tasty treat that is also good for you. In this article, we explored how to make delicious peach mango milk tea. We covered fresh ingredients, sweeteners, and the importance of using the right tea and milk. I shared tips for creating the perfect puree and adjusting sweetness to your taste. You can also experiment with different fruits and teas. Remember, storing your tea properly helps maintain its freshness. By following these steps, you can enjoy a tasty, healthy drink anytime. Enjoy your peach mango milk tea adventure!
                Peach Mango Milk Tea Refreshing and Simple Recipe
              • To make a delicious pistachio cardamom iced coffee, gather these key ingredients: - 2 cups strong brewed coffee, cooled - 1 cup milk (or non-dairy alternative) - 1 tablespoon pistachio paste - ½ teaspoon ground cardamom - 2 tablespoons maple syrup (or to taste) - Crushed ice - Chopped pistachios and cardamom pods for garnish These ingredients work together to create a rich and refreshing drink. The strong brewed coffee gives you a great base, while the pistachio paste adds a creamy texture. The cardamom provides a warm spice, and maple syrup sweetens the mix. If you want a non-dairy option, try these milk alternatives: - Almond milk - Oat milk - Coconut milk - Cashew milk Each of these options brings its own flavor to the drink. Almond milk adds a nutty taste. Oat milk provides creaminess. Coconut milk gives a tropical twist. Cashew milk is rich and smooth. Choose the milk that fits your taste best! Garnishes make your drink look and taste even better. Here are some great options: - Chopped pistachios - Whole cardamom pods - A sprinkle of cinnamon - A drizzle of honey Chopped pistachios add crunch and a pop of color. Whole cardamom pods enhance the spice aroma. A sprinkle of cinnamon can add warmth. A drizzle of honey gives extra sweetness. These garnishes not only beautify your iced coffee but also boost the flavor! For the full recipe, check the detailed instructions to create this delightful drink. Start by brewing two cups of strong coffee. Let it cool down completely. You want it chilled for this drink. Using cooled coffee helps keep your iced drink refreshing. This step is key for the perfect iced coffee. In a large bowl or pitcher, mix the cooled coffee with one cup of milk. You can use any milk you like, even non-dairy options. Add one tablespoon of pistachio paste to the mix. This gives the drink its nutty flavor. Next, sprinkle in half a teaspoon of ground cardamom. This spice adds warmth and depth. Then, pour in two tablespoons of maple syrup. Taste the mix and adjust it to your liking. Some may want it sweeter. Whisk everything together until the pistachio paste blends well. This step is important to get a smooth drink. Take a glass and fill it halfway with crushed ice. Pour your coffee mixture over the ice, leaving some room at the top. For a nice finish, sprinkle chopped pistachios and a few cardamom pods on top. This makes the drink look beautiful and adds extra flavor. Before sipping, stir gently. This helps mix the flavors again. Enjoy your pistachio cardamom iced coffee! You can find the full recipe at the beginning of this article. To get the best taste, you should focus on the coffee and spices. Use strong brewed coffee; it makes a big difference. I like to brew it a little stronger than usual. The pistachio paste gives a creamy texture. Make sure it is mixed well. Cardamom has a strong flavor. Just half a teaspoon adds warmth without overpowering. Taste it as you mix. If you want it sweeter, add more maple syrup. Adjust it to what you love! If you have extra iced coffee, store it right! Use a sealed container to keep it fresh. It can last in the fridge for up to three days. But remember, the flavors may change over time. If you want to enjoy it again, shake it before serving. If it tastes a bit off, try adding more milk or syrup. This helps revive the flavors. When making your iced coffee, avoid these common mistakes. First, don’t skip cooling the coffee. Hot coffee will melt the ice too fast. Next, be careful with the spices. Too much cardamom can make it taste bitter. Always start with less; you can add more later. Lastly, don’t forget the garnish! Chopped pistachios and cardamom pods make your drink look pretty and add flavor. For the full recipe, check the section above! {{image_2}} You can easily make this drink dairy-free or vegan. Instead of regular milk, use almond, oat, or coconut milk. These options add their own unique tastes. I love using almond milk for a nutty twist. Just ensure the milk is unsweetened to keep the flavor balanced. Feel free to get creative with flavors! You can mix in vanilla extract for warmth. A dash of cinnamon gives a nice spice kick. If you want something unique, try adding a splash of rose water. This will give it a floral note that pairs well with cardamom. Maple syrup is a great choice for sweetening this drink. However, you can try honey or agave syrup as well. For a low-calorie option, consider stevia or monk fruit sweetener. Each sweetener brings its own taste, so taste as you go. Adjust until it's just how you like it. For the full recipe, check out the detailed instructions above. Enjoy experimenting with your own variations! If you have leftover pistachio cardamom iced coffee, store it in an airtight container. This keeps the flavors fresh. You can use a glass jar or a plastic pitcher. Make sure to put it in the fridge right away. Do not let it sit out at room temperature. Store your ingredients properly for the best taste. Keep pistachio paste in the fridge after opening. It lasts longer that way. Ground cardamom should stay in a cool, dark place. Use it within six months for the best flavor. If you use milk, check the expiration date often. Homemade pistachio cardamom iced coffee stays fresh for about 3 days in the fridge. After that, the taste may change. If it starts to smell funny or looks off, toss it out. Always give it a good stir before drinking. For the full recipe, check the top of this article. Pistachio Cardamom Iced Coffee is a unique drink that mixes rich coffee with nutty flavors. You blend brewed coffee, milk, pistachio paste, and cardamom for a refreshing treat. The pistachios add creaminess, while cardamom gives a warm spice. This drink is perfect for hot days or any time you crave something special. Yes, you can prepare the coffee mixture ahead of time. Just mix the coffee, milk, pistachio paste, and cardamom. Store it in your fridge for up to two days. When you are ready to enjoy, pour it over ice and add your garnishes. This makes it easy to serve to guests or enjoy a quick treat. Pistachios are packed with protein, fiber, and healthy fats. They help keep you full and support heart health. Cardamom has antioxidant properties and can aid digestion. Together, these ingredients make your iced coffee not just tasty but also good for you. Enjoying this drink can be a delightful way to add nutrients to your day. Pistachio cardamom iced coffee combines unique flavors for a refreshing drink. You learned about essential ingredients, milk options, and flavor enhancers to make it great. Following the step-by-step guide helps ensure your coffee tastes its best. I shared helpful tips to avoid mistakes and achieve balance. Plus, I offered ideas for variations and proper storage. Enjoy experimenting with this drink for a delightful taste experience. Make it your own, and don’t hesitate to share it with friends!
                Pistachio Cardamom Iced Coffee Rich and Refreshing Drink
              • - 1 cup strawberries, hulled and sliced - 1 medium dragon fruit, peeled and diced - 4 cups water - 2 tablespoons agave syrup - 1 tablespoon lime juice These main ingredients make the base for your Strawberry Dragon Fruit Agua Fresca. Fresh strawberries give a sweet and tangy taste. Dragon fruit adds a unique texture and a bright color. - Ice cubes - Fresh mint leaves for garnish Adding ice cubes keeps your drink cool and refreshing. A sprig of mint on top adds a nice touch. It also enhances the aroma, making each sip more delightful. - Alternative sweeteners - Additional fruits for blending You can use other sweeteners if you prefer. Honey or maple syrup works well. Want to experiment? Try adding other fruits like mango or pineapple for a twist. They will blend beautifully with the dragon fruit and strawberries. For the full recipe, check the section above. - Step 1: Blend strawberries and dragon fruit Start by adding 1 cup of sliced strawberries and 1 medium diced dragon fruit into a blender. Pour in 2 cups of water. Blend this mix on high until it's smooth and creamy. The colors should be bright and inviting. - Step 2: Strain the mixture Next, set up a fine mesh sieve over a large pitcher. Pour the blended mix into the sieve. Use a spatula to push the liquid through while leaving the pulp behind. This step makes your agua fresca silky and refreshing. - Step 3: Combine with remaining ingredients Once strained, add 2 more cups of water to the pitcher. Then mix in 2 tablespoons of agave syrup and 1 tablespoon of lime juice. Stir everything together until well combined. - Serve over ice Fill tall glasses with ice cubes. Pour the chilled agua fresca over the ice. This drink is best enjoyed cold on a warm day. - Garnish with mint leaves To add a touch of beauty, garnish each glass with fresh mint leaves. This not only looks great but also adds a fresh aroma. - Taste testing and modifications Before serving, give your agua fresca a taste. If you want it sweeter, add more agave syrup. Stir well and taste again. Adjust until it’s just right for you. Enjoy making it your own! Use fresh strawberries and dragon fruit for the best taste. Look for bright red strawberries. They should be firm and free from soft spots. For dragon fruit, select one with vibrant skin. It should feel slightly soft when you press it gently. To get a smooth drink, blend the fruit well. Start by adding strawberries and dragon fruit to the blender. Use two cups of water for easy blending. Blend on high until it looks creamy. If your mixture is too thick, add more water before blending again. Taste your agua fresca after mixing in the lime juice and agave syrup. If it needs more lime, add a little more juice. If it’s not sweet enough, stir in more agave syrup. Adjust these flavors to fit your taste. Enjoy experimenting until it’s just right! {{image_2}} You can change up the fruits in this recipe for new flavors. Try using mango, pineapple, or kiwi. Each fruit brings its own taste and color. For a berry twist, add blueberries or raspberries. These fruits all blend well with strawberries and dragon fruit. Feel free to mix and match. You might find a combo you love even more! If you want to make this drink vegan, switch the sweeteners. Instead of agave syrup, use maple syrup or coconut sugar. Both choices work well and keep the drink plant-based. Just remember to adjust the amount based on how sweet you like it. Taste as you go, and find your perfect balance! If you enjoy a bit of heat, consider adding jalapeño or ginger. A few slices of jalapeño can bring a fun, spicy kick. If you prefer ginger, grate a small piece and mix it in. Both options add a unique twist to the refreshing taste. This can make your agua fresca exciting and different. Give it a try if you’re feeling adventurous! To keep your strawberry dragon fruit agua fresca fresh, store it in the fridge. Use a clean glass pitcher or jar with a tight lid. This helps keep out air and light, which can affect taste. If you have leftovers, it’s best to drink them within a couple of days. In the fridge, your agua fresca stays fresh for up to three days. After that, the flavors may fade. If you notice any change in smell or color, it’s best to throw it away. Always give it a taste before serving to ensure it's still good. You can freeze agua fresca if you want to save it for later. Pour the mixture into ice cube trays or freezer-safe bags. This way, you can enjoy it for up to three months. When you’re ready to drink, just thaw it in the fridge. You can also blend the frozen cubes into smoothies for a quick treat. Agua fresca is a light, refreshing drink from Mexico. It combines fruit, water, and sometimes sugar. People enjoy it on hot days. The name means "fresh water" in Spanish. Each region has its own version, using local fruits. You can find flavors like hibiscus, tamarind, and cucumber. This drink is perfect for gatherings. It’s easy to make and very tasty! Yes, you can make this drink ahead of time. Prepare it in the morning for later. Store it in the fridge for up to three days. Keep it in a sealed container. The flavors will blend well over time. Just remember to stir it before serving. If it separates, that's normal. Strawberry Dragon Fruit Agua Fresca is healthy and refreshing. Strawberries are high in vitamin C and fiber. Dragon fruit is low in calories and packed with antioxidants. This drink is hydrating, especially in hot weather. Using agave syrup keeps it natural. You can adjust sweetness to fit your taste. Overall, this drink is a nutritious choice for everyone! You’ve learned how to make a refreshing Strawberry Dragon Fruit Agua Fresca. We covered the simplest ingredients and steps. This drink is tasty and easy to customize. Don’t forget to try different fruits or adjust the sweetness to your liking. Store any leftovers properly to enjoy later. Experiment with flavors to find your favorite twist. This drink can be a fun addition to your menu. Enjoy making this drink for yourself and friends.
                Strawberry Dragon Fruit Agua Fresca Refreshing Drink
              • To make Sweet Peach Iced Tea, you need simple, fresh ingredients. Here’s what you'll need: - 4 black tea bags - 4 cups water - 2 ripe peaches, sliced - ½ cup sugar (or to taste) - 1 tablespoon fresh lemon juice - Fresh mint leaves for garnish - Ice cubes These ingredients come together to create a refreshing drink perfect for summer. You can twist this recipe to fit your tastes. Here are some fun ideas: - Tea Base: Use green tea or herbal tea instead of black tea for a lighter taste. - Fruits: Swap peaches for nectarines or apricots. You can mix different fruits too. - Sweeteners: Try honey or agave syrup instead of sugar for a different sweetness. - Herbs: Add basil instead of mint for a unique flavor. Feel free to play with these options to find what you love! Peaches and tea are more than just tasty. They also offer health perks: - Peaches: These fruits are full of vitamins A and C. They help keep your skin healthy and boost your immune system. - Tea: Black tea contains antioxidants. These can help fight free radicals in your body. - Hydration: This iced tea is hydrating, making it a great choice on hot days. Enjoying Sweet Peach Iced Tea means treating yourself to a drink that tastes good and is good for you! For the full recipe, check out the details above. First, we need to make the tea. Grab a medium saucepan. Pour in 4 cups of water and bring it to a boil. When the water is bubbling, take it off the heat. Add 4 black tea bags to the hot water. Let them steep for 5-7 minutes. This makes the tea strong and flavorful. If you like it lighter, steep for less time. After steeping, remove the tea bags. Next, let’s prepare the peach syrup. Take a small saucepan and place it on medium heat. Add 2 sliced peaches and ½ cup of sugar. Stir the mix. You want the peaches to release their juices. This will take about 5-10 minutes. Once it looks syrupy, remove it from the heat. Use a strainer to separate the syrup from the peach slices. Now, you have a sweet syrup ready to use! Now it's time to combine everything. In a large pitcher, pour in the brewed tea. Add the peach syrup and 1 tablespoon of fresh lemon juice. Stir well to mix all the flavors. Taste it to see if you want more sugar. If it’s good, let it cool at room temperature for about 20 minutes. Then, place it in the fridge for at least 1 hour. This chilling step makes it super refreshing. Once chilled, it’s time to serve! Fill glasses with ice cubes. Pour the Sweet Peach Iced Tea over the ice. You can garnish with fresh mint leaves and a slice of peach if you wish. Enjoy your drink! For the best flavor, use fresh, high-quality black tea bags. Heat your water to a boil, then steep the tea bags for 5-7 minutes. Be careful not to steep too long. Over-steeping makes the tea bitter. If you prefer a stronger flavor, try using more tea bags. Taste your tea after mixing in the peach syrup. If it is not sweet enough, add more sugar. You can also use honey or agave syrup for a different flavor. Mix well until the sweetener dissolves. Remember, you can always add more, but you can't take it out. Serve Sweet Peach Iced Tea over ice for a refreshing drink. Add fresh mint leaves for a pop of color and flavor. You can also slice extra peaches to float on top. This makes the drink look fancy and fun. For a twist, try a splash of sparkling water. It adds fizz and makes the drink even more special. Enjoy! {{image_2}} You can mix other fruits with peach for fun. Try adding raspberries or strawberries. Their tartness pairs well with the sweet peach. You can also add a splash of pineapple juice for a tropical twist. Lime juice can add a zesty kick, making your drink more exciting. You can enjoy sweet peach tea hot or cold. For hot tea, steep the black tea bags in boiling water. Add the peach syrup right after steeping. This method creates a cozy drink perfect for chilly days. However, iced peach tea is a summer favorite. Chill it in the fridge and serve over ice. This keeps it refreshing and cool. Sugar is a common choice, but you can try other sweeteners too. Honey adds a floral note that enhances the peach flavor. If you want a low-calorie option, try stevia or agave syrup. Each sweetener gives a unique taste, so feel free to experiment. Adjust the amount based on your preference for sweetness. For the full recipe, check the Sweet Peach Iced Tea section. To store leftover Sweet Peach Iced Tea, pour it into a clean pitcher. Make sure to cover the pitcher with a lid or plastic wrap. This keeps the tea fresh and prevents it from absorbing other smells in the fridge. Keep your iced tea in the coldest part of the fridge. The back of the shelf is usually the best spot. Avoid placing it in the door. The door often gets warmer when you open it. Your Sweet Peach Iced Tea stays fresh for about 3 to 5 days. After that, the flavor fades. If you see any signs of mold or changes in smell, throw it away. Enjoy your refreshing drink while it’s at its best! You can skip the sugar by using natural sweeteners. Try honey or agave syrup. You can also use ripe peaches, as they add sweetness. Just blend them into a puree and mix with the tea. This keeps the drink refreshing and tasty without added sugar. Yes, frozen peaches work well in this recipe. They can add a nice chill to your drink. Just thaw the peaches before use. You can mash them for more flavor in the syrup. This is a great option when fresh peaches are out of season. You can find Sweet Peach Iced Tea at many grocery stores. Look in the beverage aisle or tea section. Some cafes and restaurants also serve this flavor. For the best taste, consider making it at home with the full recipe. We covered how to make Sweet Peach Iced Tea from scratch. You learned about key ingredients, how to prepare the peach syrup, and the best ways to chill your drink. We explored helpful tips for brewing and adjusting sweetness. I also shared fun variations to try and how to store any leftovers. Enjoy making this refreshing drink that not only tastes great but also offers health benefits. Experiment with flavors, and find what delights your taste buds. Your perfect summer drink awaits!
                Sweet Peach Iced Tea Refreshing Summer Delight

              Footer

              Looking for a refreshing drink that’s also healthy? Discover how to make an Iced Butterfly Pea Flower Tea Latte at home! This vibrant beverage is not just visually stunning but packed with antioxidants. In our guide, you'll find key ingredients, health benefits, and creative variations to customize your latte. Dive into this delicious recipe and impress your friends with a colorful treat that brightens any day. Click to explore the full recipe!
              ↑ back to top

              More information

              • Home
              • Drinks
              • Appetizer
              • Dinner
              • Desserts
              • About
              • Contact
              • Privacy Policy

              Our Policies

              • Privacy Policy
              • GDPR Policy
              • Terms Of Use
              • Copyright Policy
              • Cookie Policy
              • Disclaimer

              Copyright © 2025 cheftaling