Winter calls for warm drinks, and Hot Chocolate Bombs are a fun twist! These delightful treats combine rich chocolate with tasty flavors that burst open in your cup. Whether you're enjoying them alone or sharing with friends, Hot Chocolate Bombs will make your chilly days feel cozy. Ready to learn how to make these sweet bombs? Let’s dive into the simple steps, special tips, and fun variations to warm your winter!
Why I Love This Recipe
- Decadent Flavor: The combination of rich chocolate and fluffy marshmallows creates a luxurious taste experience that is perfect for cozy evenings.
- Interactive Fun: Watching the hot chocolate bomb dissolve in warm milk is a delightful experience for both kids and adults alike.
- Customizable: You can easily tweak the filling with your favorite flavors or mix-ins, making each bomb unique and tailored to your taste.
- Perfect Gift: These hot chocolate bombs make a charming homemade gift for friends and family, especially during the holiday season!
Ingredients
Complete ingredient list for Hot Chocolate Bombs
To make delicious hot chocolate bombs, you need the following ingredients:
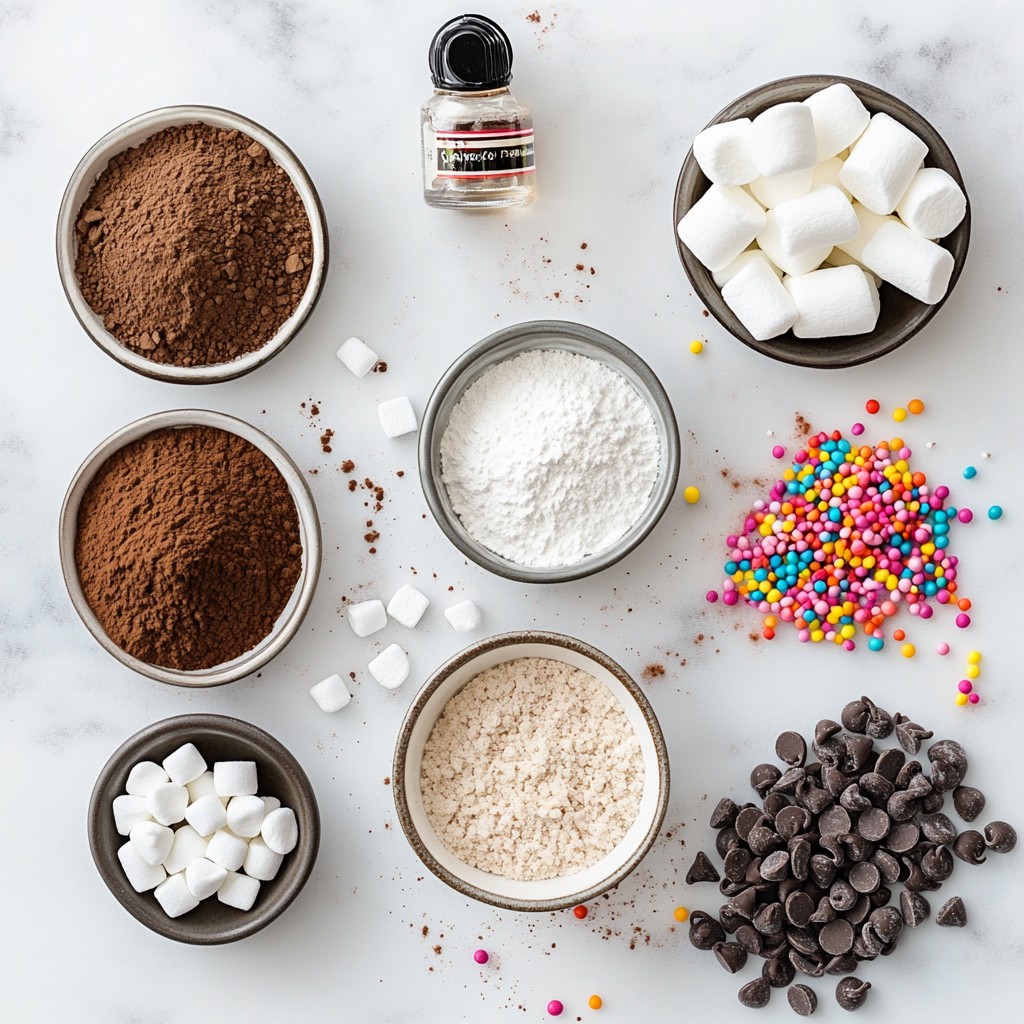
- 1 cup chocolate chips (milk or dark, based on your taste)
- 1/2 cup mini marshmallows
- 1/2 cup cocoa powder
- 1/4 cup powdered sugar
- 1/2 teaspoon vanilla extract
- Silicone mold (sphere-shaped)
Optional decorative elements
To make your hot chocolate bombs pop, consider these fun options:
- Colored sprinkles
- Edible glitter
- Drizzled chocolate
These decorations add joy and flair to your treats.
Ingredient substitutions
You can change a few ingredients to suit your needs. Here are some ideas:
- Use white chocolate chips instead of milk or dark chocolate for a sweeter taste.
- Swap mini marshmallows for flavored marshmallows to mix things up.
- Try using sugar substitutes if you want a lower-sugar option.
These swaps keep your recipe fun and flexible!
Step-by-Step Instructions
Detailed melting and coating process
Start by melting your chocolate chips. Use a microwave-safe bowl, and heat in 30-second bursts. Stir often until the chocolate is smooth. This helps prevent burning. Once melted, take a spoon or pastry brush. Coat the inside of each half of your silicone mold. Make the chocolate layer about 1/8 inch thick. This thickness helps the bombs hold their shape. Keep some melted chocolate for later.
Step-by-step filling and sealing guidance
After chilling the mold for about 10 minutes, take it out. In a bowl, mix the cocoa powder, powdered sugar, and a pinch of salt. This mix adds a rich flavor. Use a spoon to add about one tablespoon of the mix into each half. Then, add a generous pinch of mini marshmallows. Next, warm the edges of the remaining melted chocolate in the microwave for about 10 seconds. Press the two mold halves together firmly. If there are gaps, use more melted chocolate to seal them.
Chilling and serving instructions
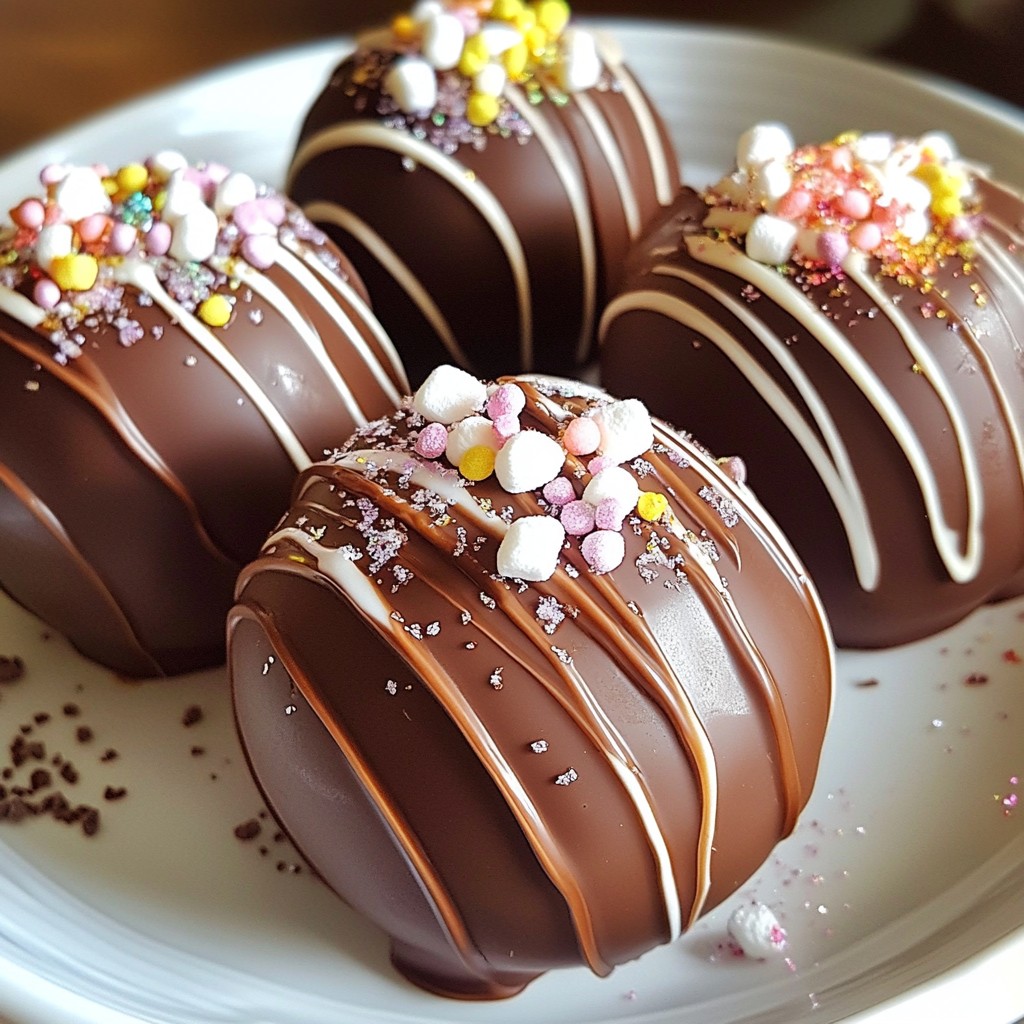
Chill the filled bombs for another 10-15 minutes. This ensures they set completely. When ready to serve, place a hot chocolate bomb in a mug. Pour hot milk over it and watch the magic happen! The chocolate will melt, and the marshmallows will pop up. For a pretty touch, serve the bombs on a decorative plate. Add extra marshmallows, whipped cream, and a sprinkle of cinnamon or nutmeg. Enjoy your cozy winter treat!
Tips & Tricks
Best practices for melting chocolate
When melting chocolate, use a microwave-safe bowl. Heat your chocolate chips in 30-second bursts. Stir after each interval. This keeps the chocolate smooth and prevents burning. If you have a double boiler, that works great too. Just be careful not to let water touch the chocolate.
Techniques for achieving perfect bomb shape
To create a perfect bomb shape, use a silicone mold. Coat the inside evenly with melted chocolate. Make it about 1/8 inch thick. After chilling, fill each half with your cocoa mix and marshmallows. Warm the edges before sealing them together. This helps them stick well.
Serving suggestions and pairing ideas
Serve your hot chocolate bombs on a nice plate. Add extra marshmallows and whipped cream. You can sprinkle cinnamon or nutmeg for flavor. For a fun touch, use colored sprinkles or edible glitter. Pair with cookies or biscotti for a cozy treat.
Pro Tips
- Use Quality Chocolate: The better the chocolate, the richer your hot chocolate bombs will taste. Opt for high-quality chocolate chips for the best results.
- Double Coat for Stability: For a sturdier bomb, consider double-coating the silicone mold with chocolate. This ensures the shells are thick and less likely to break.
- Customize Your Fillings: Experiment with different fillings like crushed peppermint, flavored syrups, or different types of marshmallows for a unique twist.
- Store Properly: Keep the finished hot chocolate bombs in an airtight container at room temperature to maintain freshness and prevent moisture absorption.
Variations
Different flavor combinations
You can mix flavors to make hot chocolate bombs even more fun. Try mint for a fresh taste. Just add a few drops of mint extract to your melted chocolate. Caramel is another great choice. Swirl in some caramel sauce before sealing the bombs. Try different flavors to see what you enjoy most.
Alternative fillings
You don't have to use just mini marshmallows. You can fill your bombs with dark chocolate for a richer taste. Flavored marshmallows, like strawberry or vanilla, also work well. You can even add crushed cookies or candy for extra texture and flavor. Be creative and make each bomb unique.
Seasonal variations
Seasonal themes make your hot chocolate bombs special. For winter, sprinkle some edible glitter on top. For the holidays, use festive colors like red and green. You can also shape your bombs into holiday-themed designs, like snowmen or ornaments. These small touches will make your treats stand out and bring joy to your gatherings.
Storage Info
How to store Hot Chocolate Bombs
Store your hot chocolate bombs in an airtight container. This keeps them fresh and tasty. You can use a glass jar or a plastic container. Make sure the bombs do not touch each other. This prevents them from sticking together.
Shelf life and best storing conditions
Hot chocolate bombs last about two weeks. Keep them in a cool, dry place. Avoid heat and moisture as they can ruin the chocolate. If you live in a warm area, store them in the fridge. Just remember to let them come to room temperature before serving.
Tips for gifts and packaging
Hot chocolate bombs make great gifts! Use clear cellophane bags to wrap them. Tie with a festive ribbon for a nice touch. You can also use a small box with colorful tissue paper. Add a note with instructions on how to use the bombs. This makes your gift extra special.
FAQs
What are Hot Chocolate Bombs?
Hot chocolate bombs are fun treats that melt into rich hot chocolate. They are chocolate spheres filled with cocoa powder, mini marshmallows, and sweet flavors. When you drop one into hot milk, it bursts open, creating a warm drink. These treats are perfect for cozy nights or special occasions.
How do I use Hot Chocolate Bombs?
Using hot chocolate bombs is very easy. Just place one bomb in your favorite mug. Then, heat some milk until it’s hot but not boiling. Pour the hot milk over the bomb. Watch as it melts and releases the cocoa and marshmallows. Stir well and enjoy your delicious drink!
Can I make Hot Chocolate Bombs in advance?
Yes, you can make hot chocolate bombs ahead of time. Once they are fully set, store them in an airtight container. Keep them in a cool, dry place, away from heat and light. They will stay fresh for about two weeks. This makes them great for gifts or festive gatherings!
Hot chocolate bombs are fun and easy to make. We covered all the key steps—from gathering ingredients to perfecting your technique. You learned about flavor variations and how to store them well. Creating these treats not only warms you up but also brings joy to others. I hope you feel inspired to whip up these tasty delights, experiment with flavors, and share with friends. Happy making!